Chuck
-
Posts
9,720 -
Joined
-
Last visited
Content Type
Profiles
Forums
Gallery
Events
Everything posted by Chuck
-
 Satin but wiped and buffed off with a lint free cloth. So no shine at all.
- 1,784 replies
-
- 7
-

-
- winchelsea
- Syren Ship Model Company
- (and 1 more)
-
I am using wipe on poly on all surfaces if you need something to compare it to.
- 1,784 replies
-
- 4
-
-
- winchelsea
- Syren Ship Model Company
- (and 1 more)
-
One solution to get rid of the shiny spots is to use weathering powder. But hopefully your rigging is somewhat crisp still without large lumps of CA. There isnt a thing you can do about lumps. but if you just have shiny spots they can easily be fixed. Especially the dark brown or black rope. For tan you will need to do your best to select a tan weathering powder that matches the rope color. Just be sure to cover the deck below because no matter how careful you think you are the powder will fall to the deck. If it does…blow it away quickly. Dont wipe it or you will be weathering your deck and fittings. i use a smallish paint brush to apply to the rope. I usually use it on served rope. But I have done so on tan as well. Sorry I have no photos but hopefully this makes sense.
-
That square tuck looks wonderful. A very tricky thing to model correctly. Outstanding!
- 112 replies
-
- 1
-
-
- Cheerful
- Syren Ship Model Company
- (and 1 more)
-
That is the cleanest set of molding I have seen on any Sphinx build to date. Well done.
-
Thanks Dan… Like you I just muddle through sharpening. I have a good sharpening stone but I am far from being an expert. I am mostly using a sharp #11 blade like you and go through a ton of them. But I have 2 or 3 favorite micro chisels for delicate work and do sharpen them a lot. The chisels dont look pretty when I sharpen them but they are sharp. I have an old leather strap that I finish them with after using the stone. I am far from being qualified to explain proper technique. For the cathead support knee…I have that all figured out I believe. Chuck
- 1,784 replies
-
- 5
-
-
- winchelsea
- Syren Ship Model Company
- (and 1 more)
-
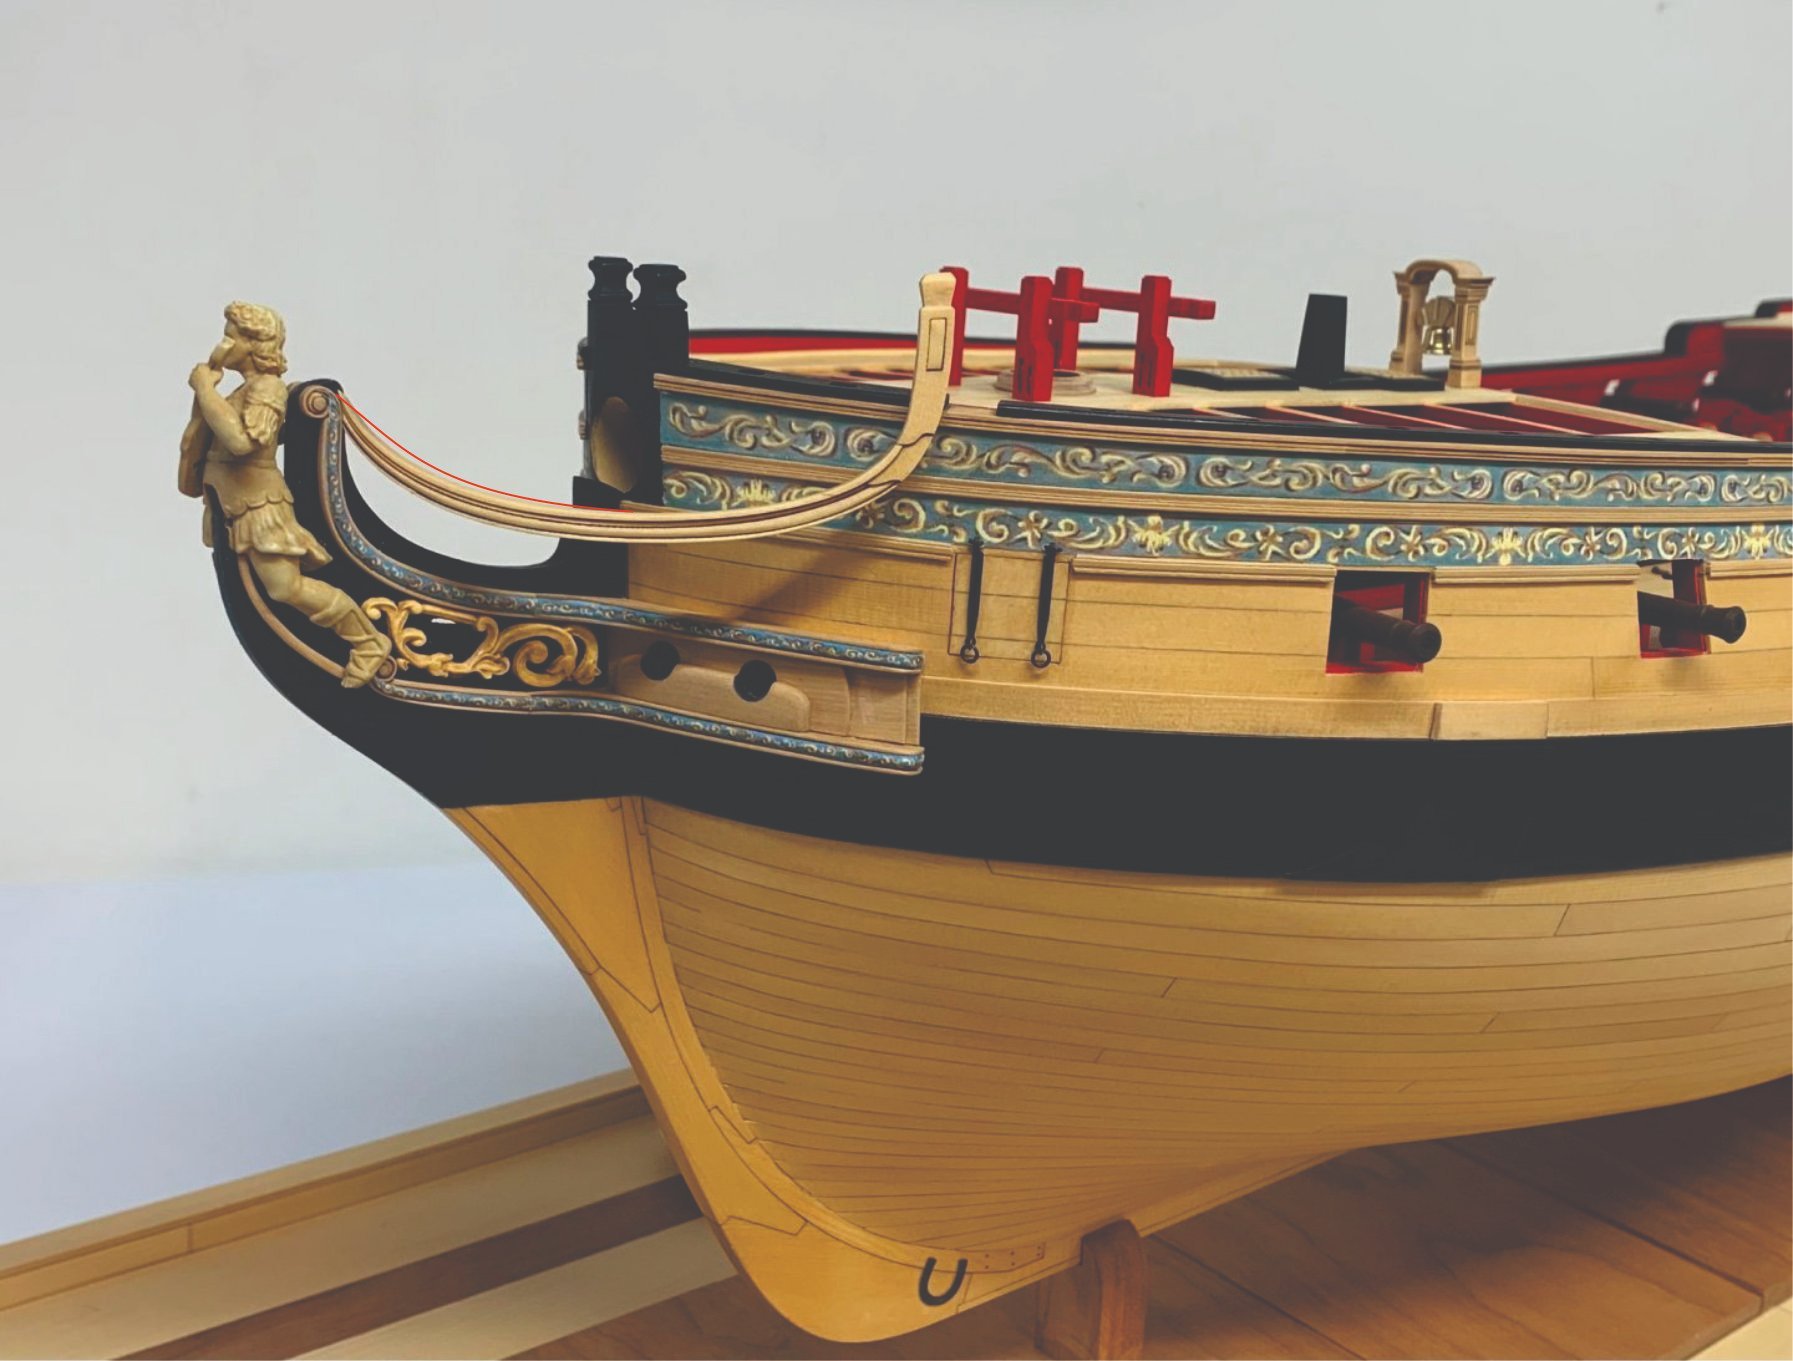
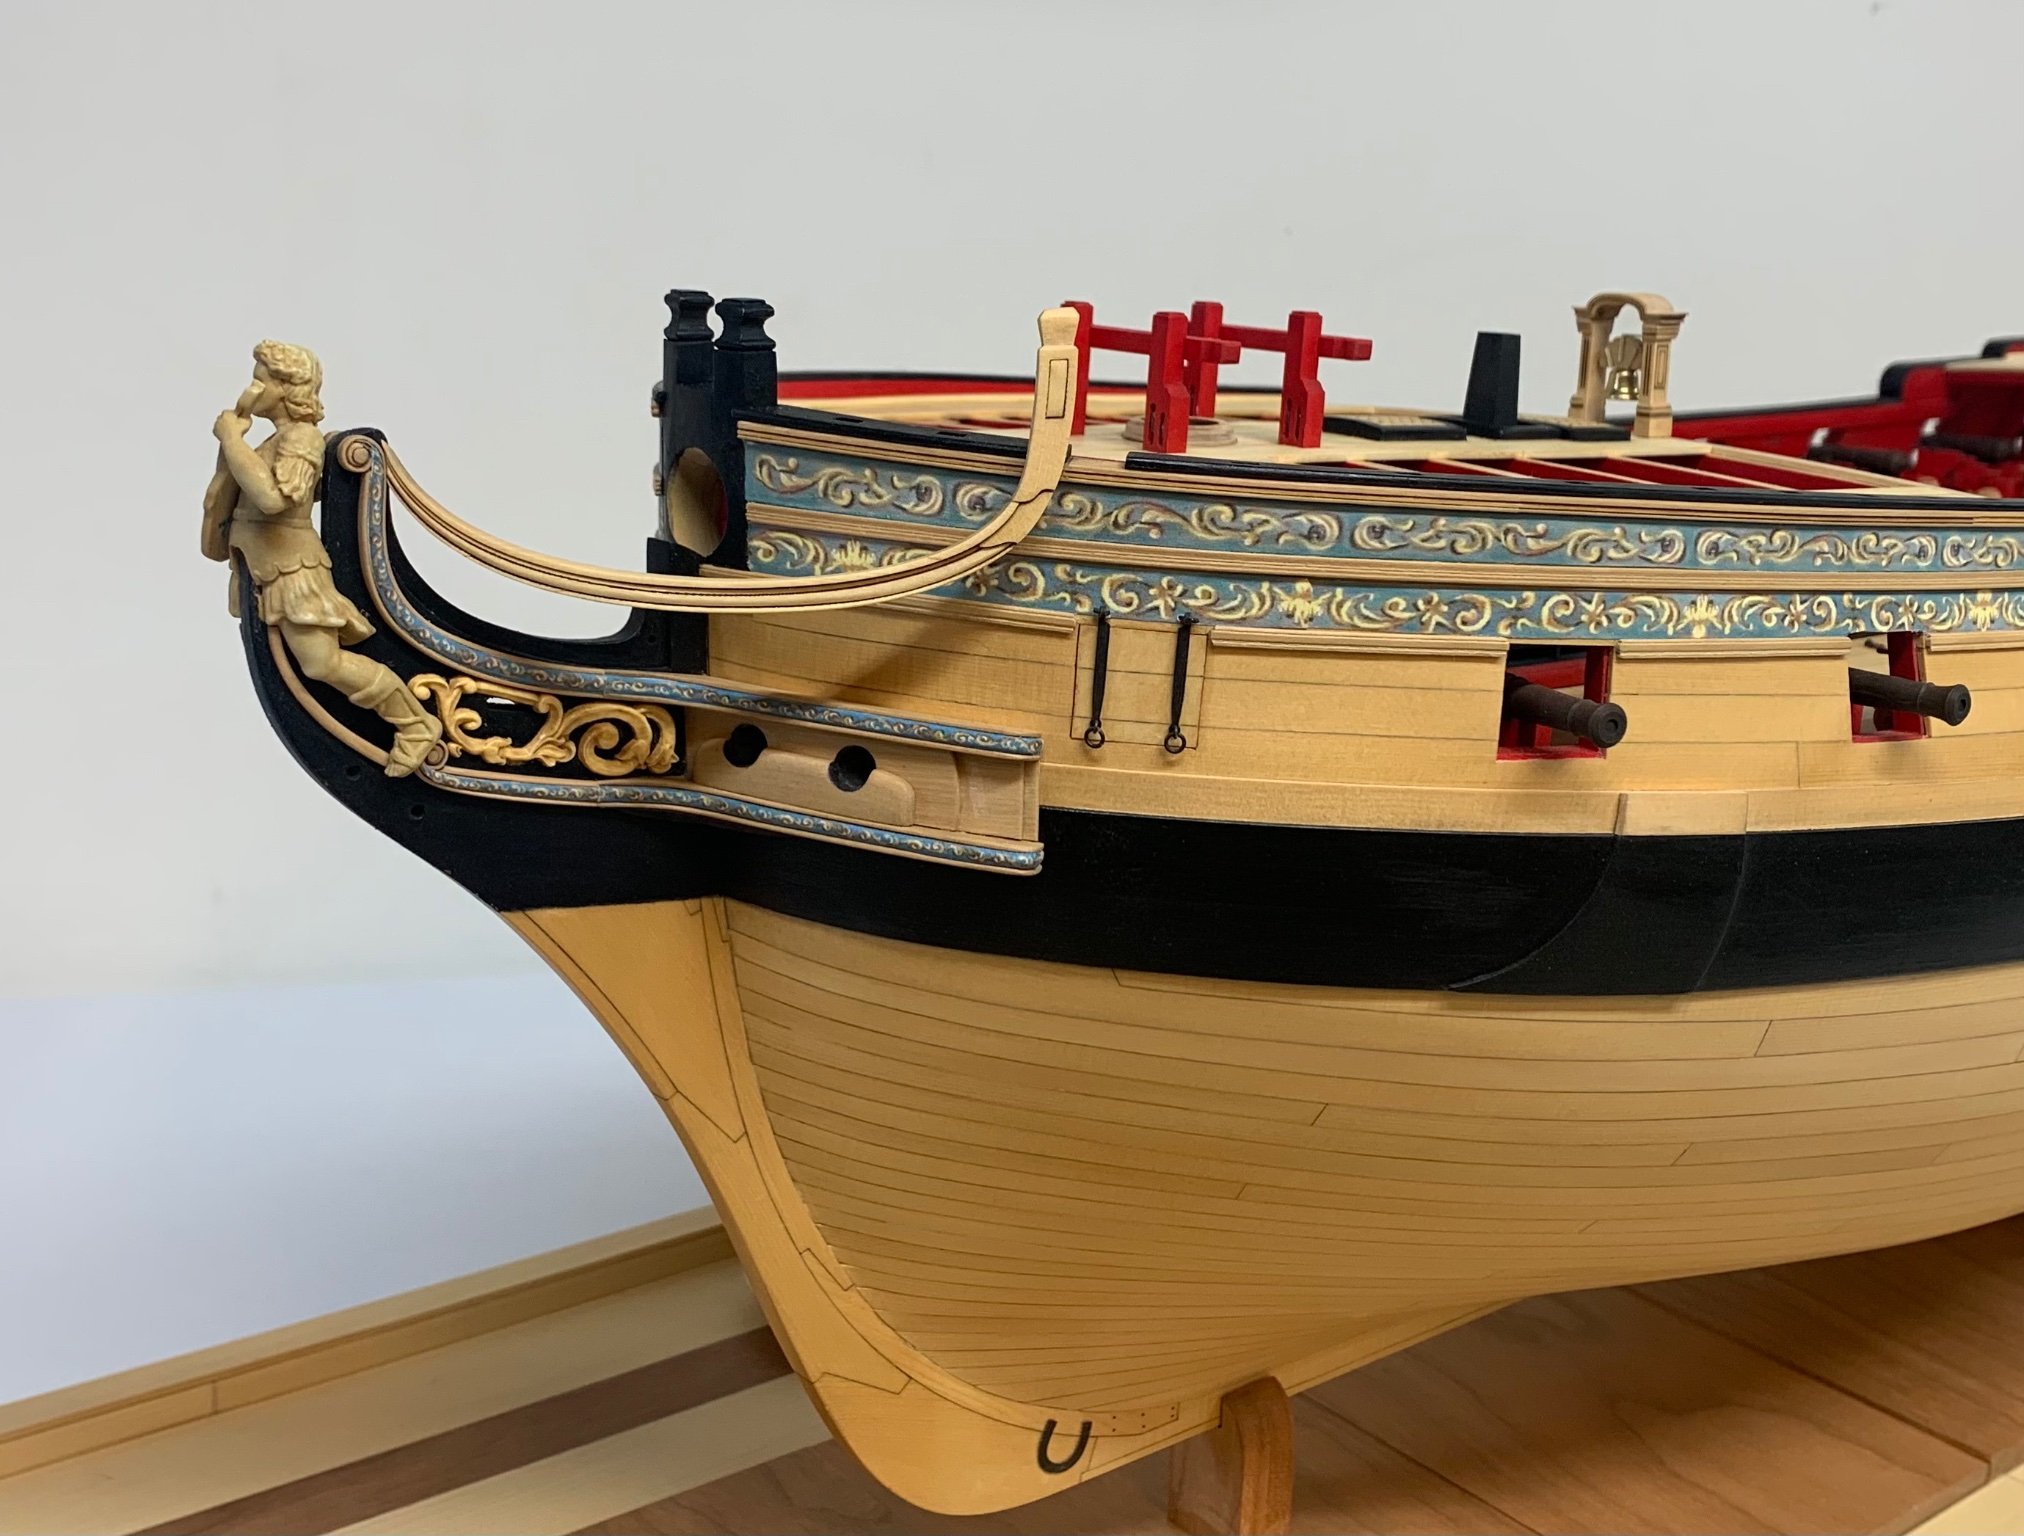
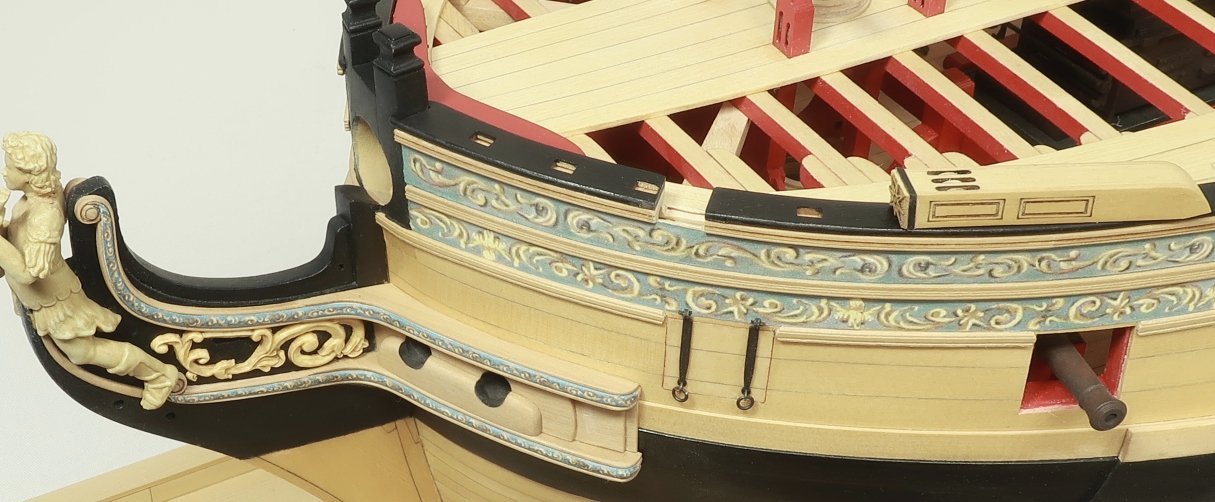
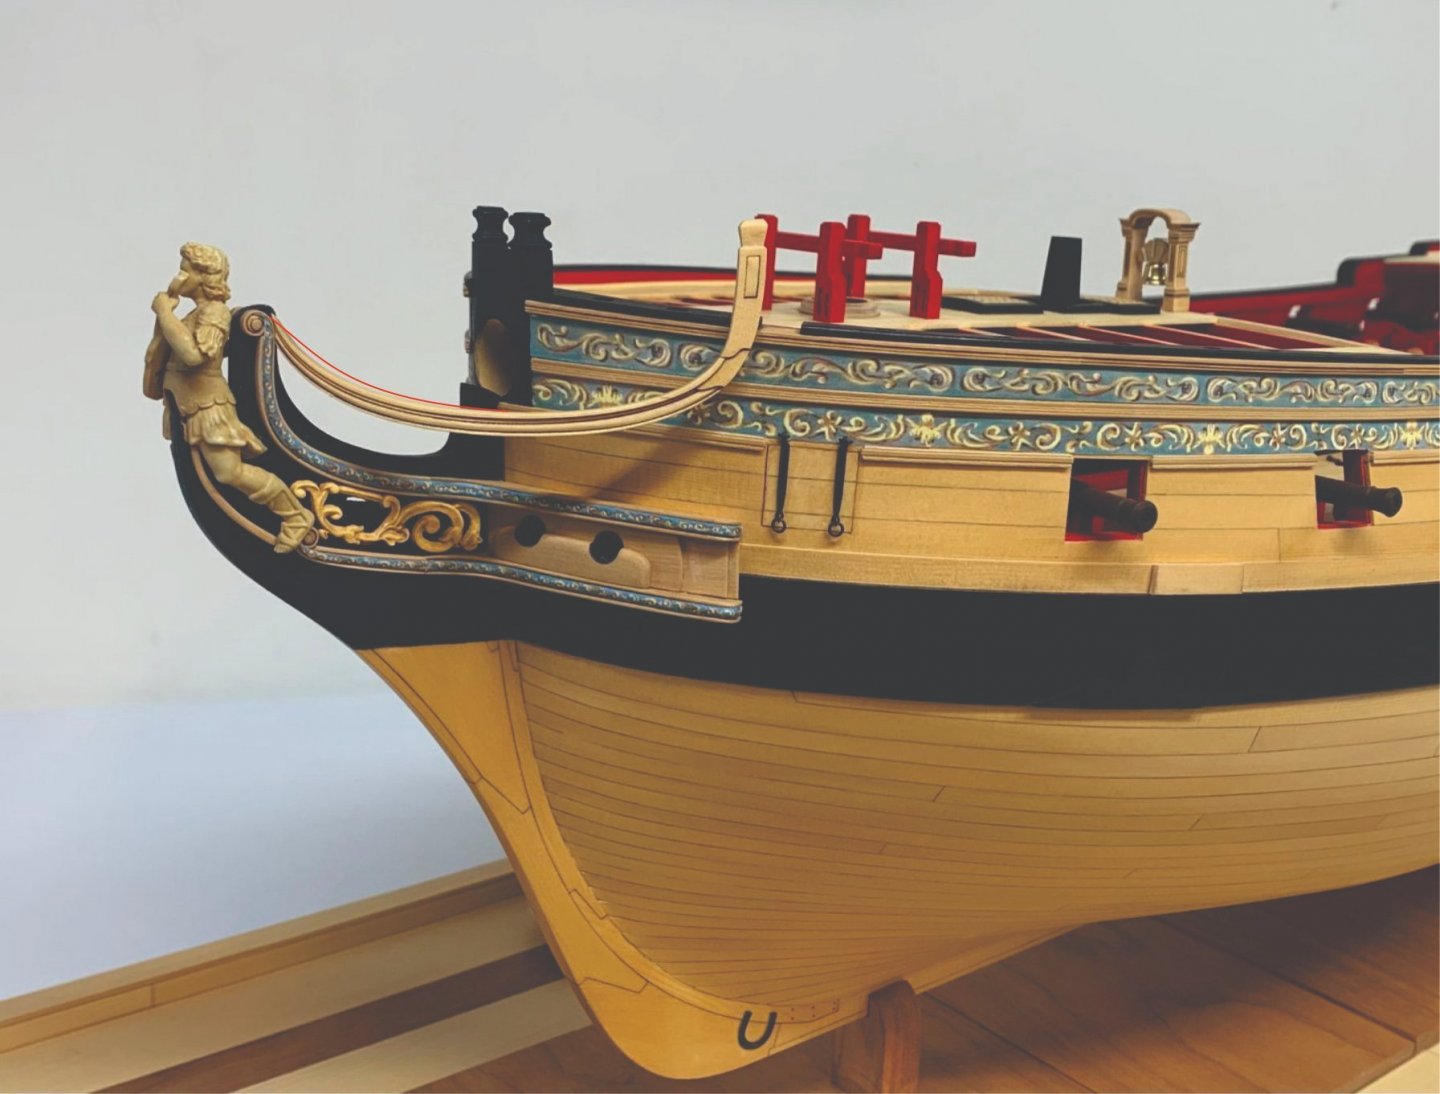
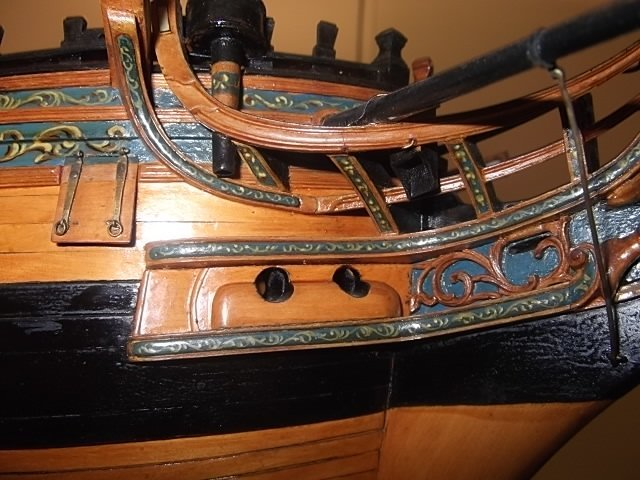
Thank You....I just added more images of the contemporary model to the gallery album. Also this is a good one that shows the cathead as you guys will soon be adding it to your model. Interesting white painted panels but I didnt care for that look. So I am going all natural. Again note how the bottom edge of the cathead lines up with the bottom edge of the molding on the hull. Keep this reference in mind when you cut those notched. Outboard side of notch to the molding like this. The inboard side is taken all the way down to the deck.

- 1,784 replies
-
- 28
-
-
- winchelsea
- Syren Ship Model Company
- (and 1 more)
-
This means however that you wont have such an "error-proof" reference for where to place the moldings on the hull. But I think you could start with the shear molding and then add the verticals. Then the second molding....repeat etc. Although I think Chris added references on the planked laser etched hull as well. But that presents another problem possibly....if you are too heavy sanding the sides of the molding and make them noticeable narrower then those etched reference lines on the hull will be visible. So use very fine sandpaper and a very light touch. But it is very much a necessity. Although those areas are likely to be painted blue and covered with the frieze so no worries. The other option depending on you comfort zone would be to discard the laser etched molding aside from the top piece with fancy volutes and scrape you own for the lower two....then there is no char at all to remove. But I realize many wont feel comfortable with that and want to use all of the kit supplied pieces. Its a choice that builders can make after weighing their options. There are quite a few options depending on the skill level of the builder.
-
For parts like that...no silver bullet I am afraid. Just need to be careful. But looking at the shape of those parts and the way they are cut, they lend themselves to breaking along the cross-grain. So if it were me cleaning those, I would preemptively break those moldings in the most delicate spots such as the areas that broke for you. I would have carefully cut those cross-grain vertical pieces away so I could more easily hold the molding and sand them a little at a time individually down their length with some 420 grit sandpaper. I would cut the vertical pieces free right up against the fancy molding. Indicated by the red lines. But thats just me. If you are really worried about placing the vertical elements back where they should be, you could also cut them free leaving a small nub against the fancy molding. But leave the break point as a clean break so the pieces will glue back without even ever seeing the seams. Then I would assemble the moldings separately on the model and add those vertical pieces after the fact....all cleaned and crisp. Any gaps would be filled before the second layers were added. I wouldnt have laser cut those moldings in one piece. The simple breaks (or absence) of the etched lines of the fancy molding are more than enough of a reference to see where the vertical pieces like fenders and such go. But if I felt I needed more reference I would have drawn them with a pencil before removing as indicated by the blue lines. But again thats just me. For me as a builder there would be no reason to make cleaning the char more difficult to try and attempt it in one huge piece like that, and as such I would remove all vertical element cross grain pieces before char removal. They are super easy to add and locate back later on. I would use a sharp blade to do so. Lightly score the back side and bend to snap them clean away. I would leave the area as a clean break with no sanding so the pieces removed will fit back perfectly without any issue when the time comes. Especially since they will be covered up with a second layer. Its just a different approach...one that would make me more comfortable.
-
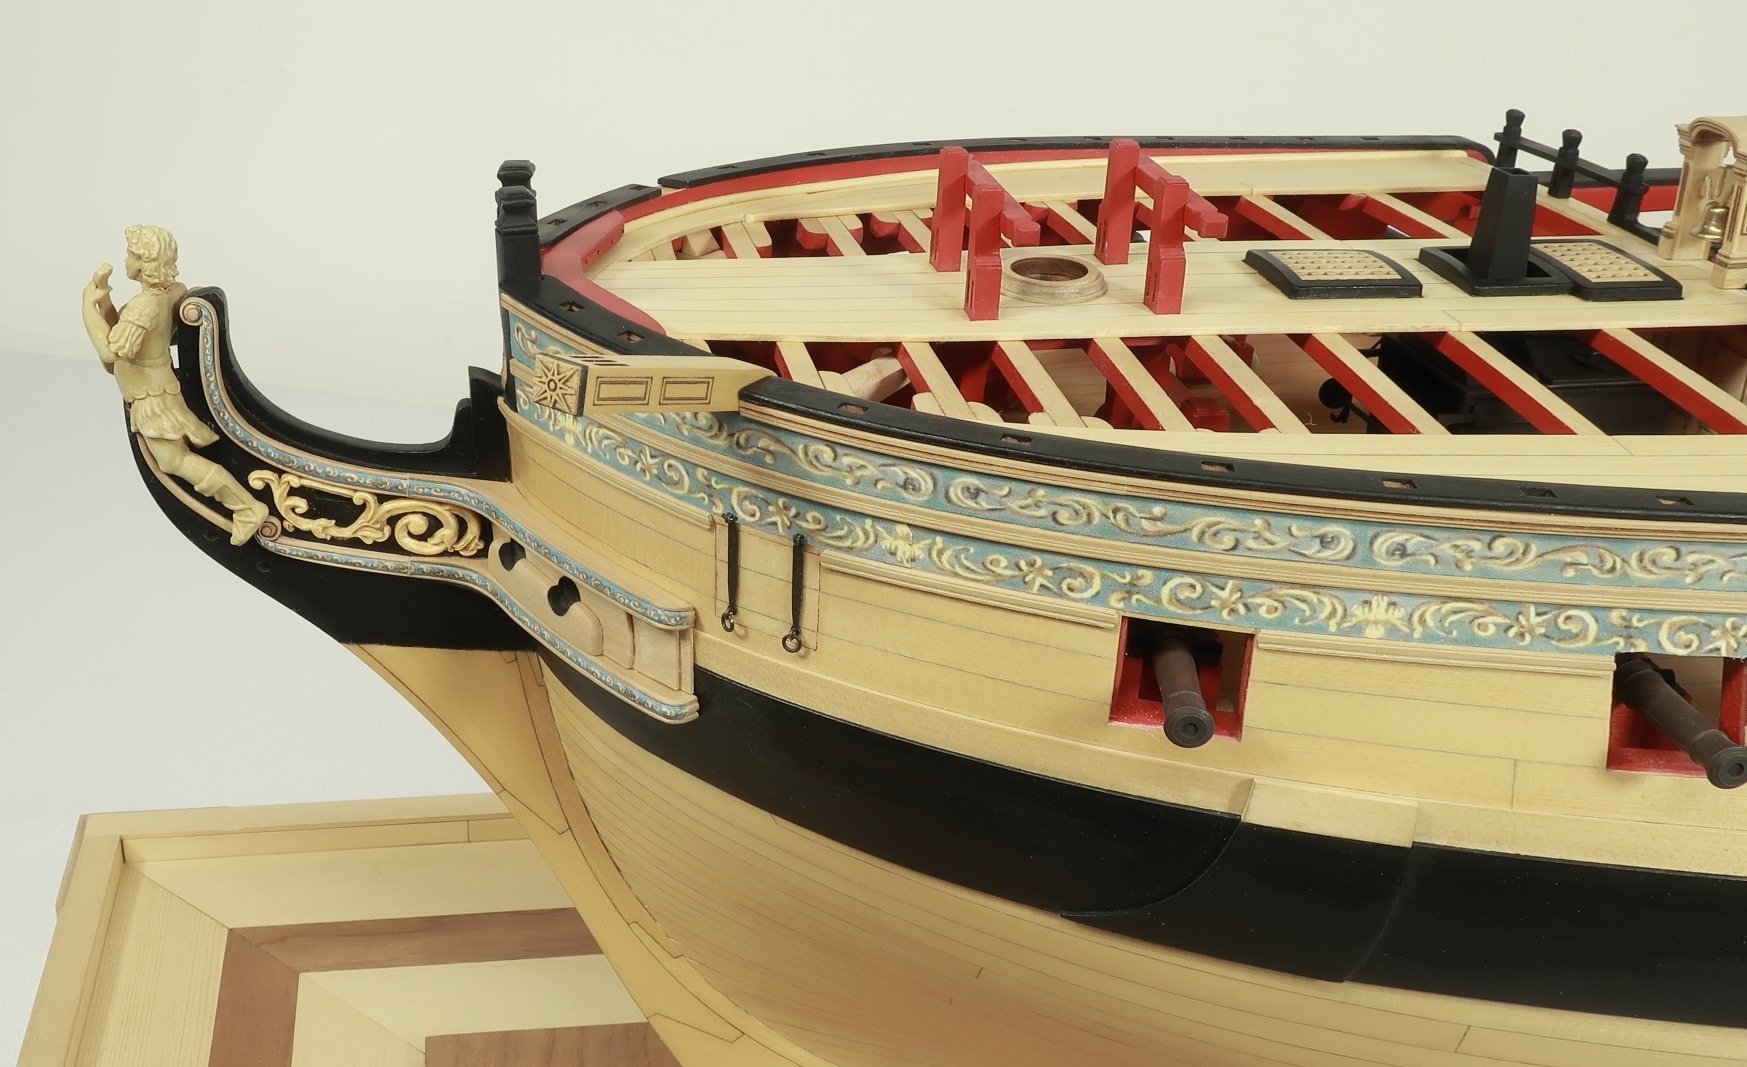
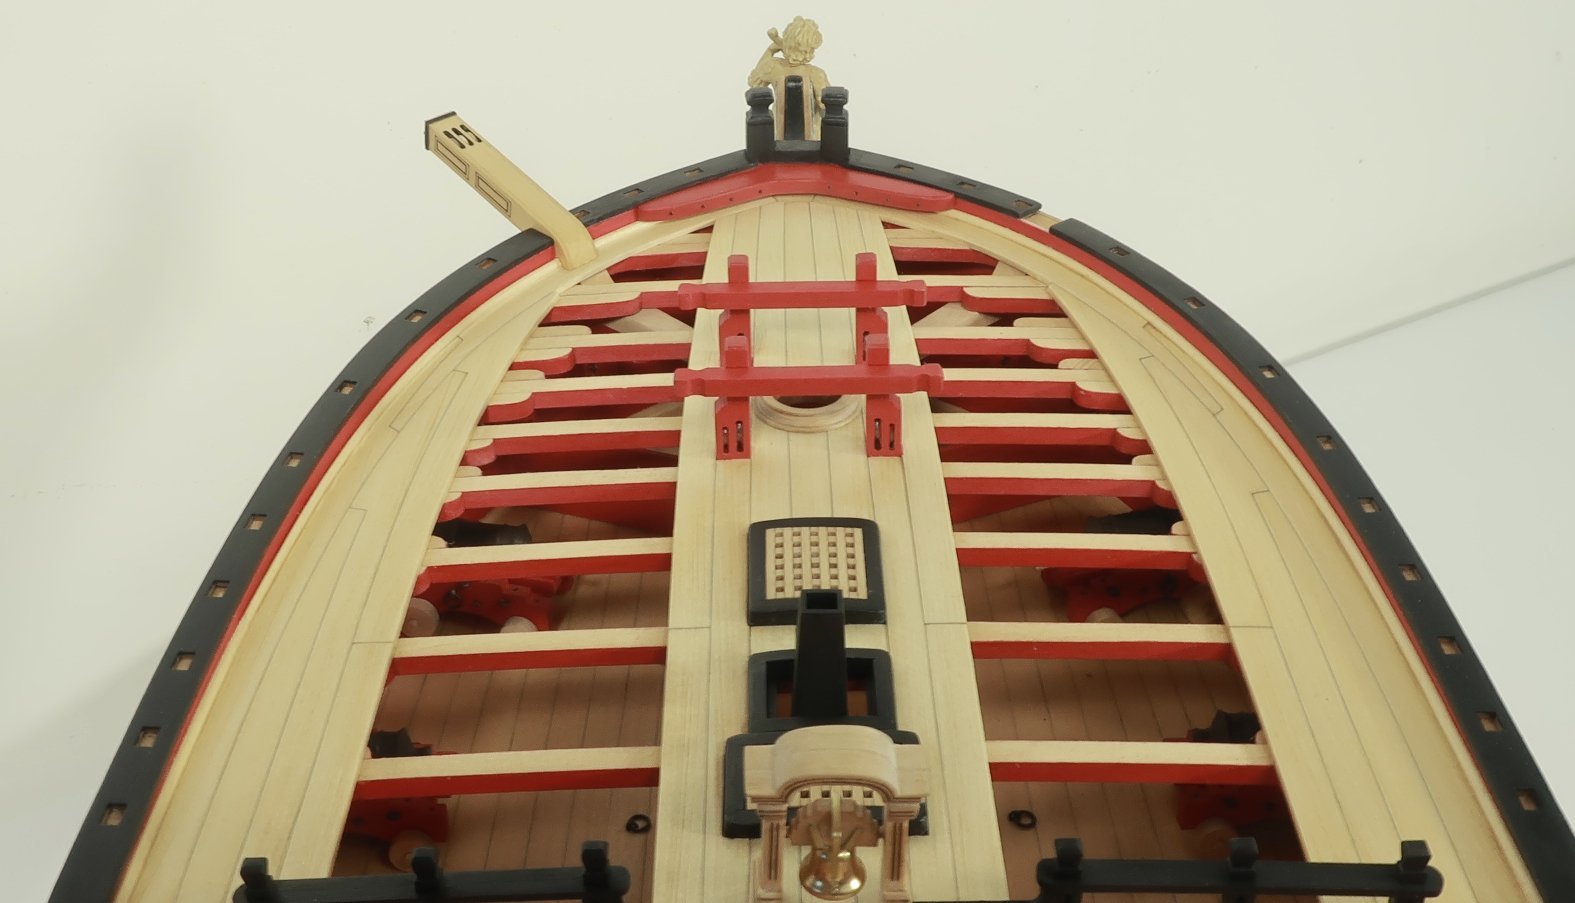
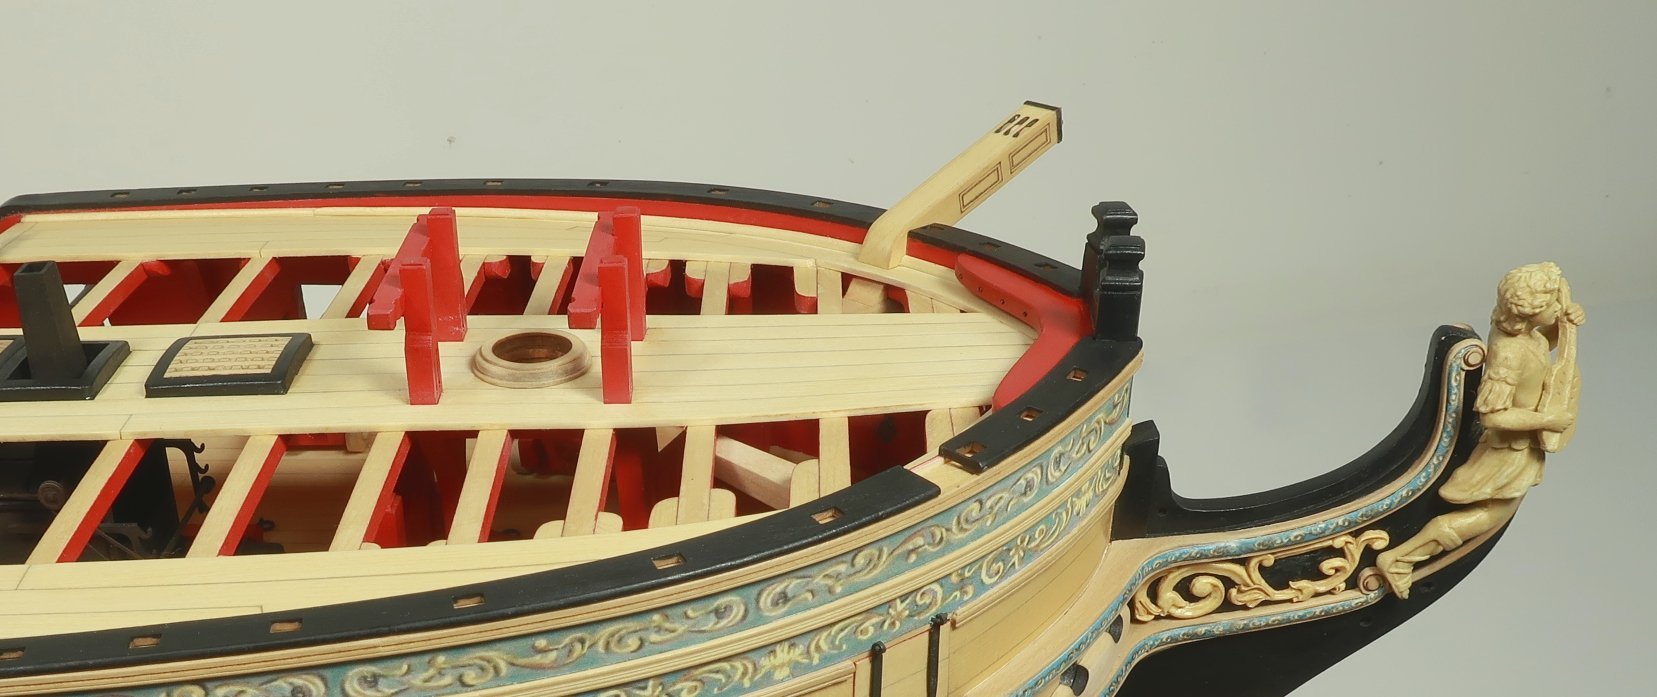
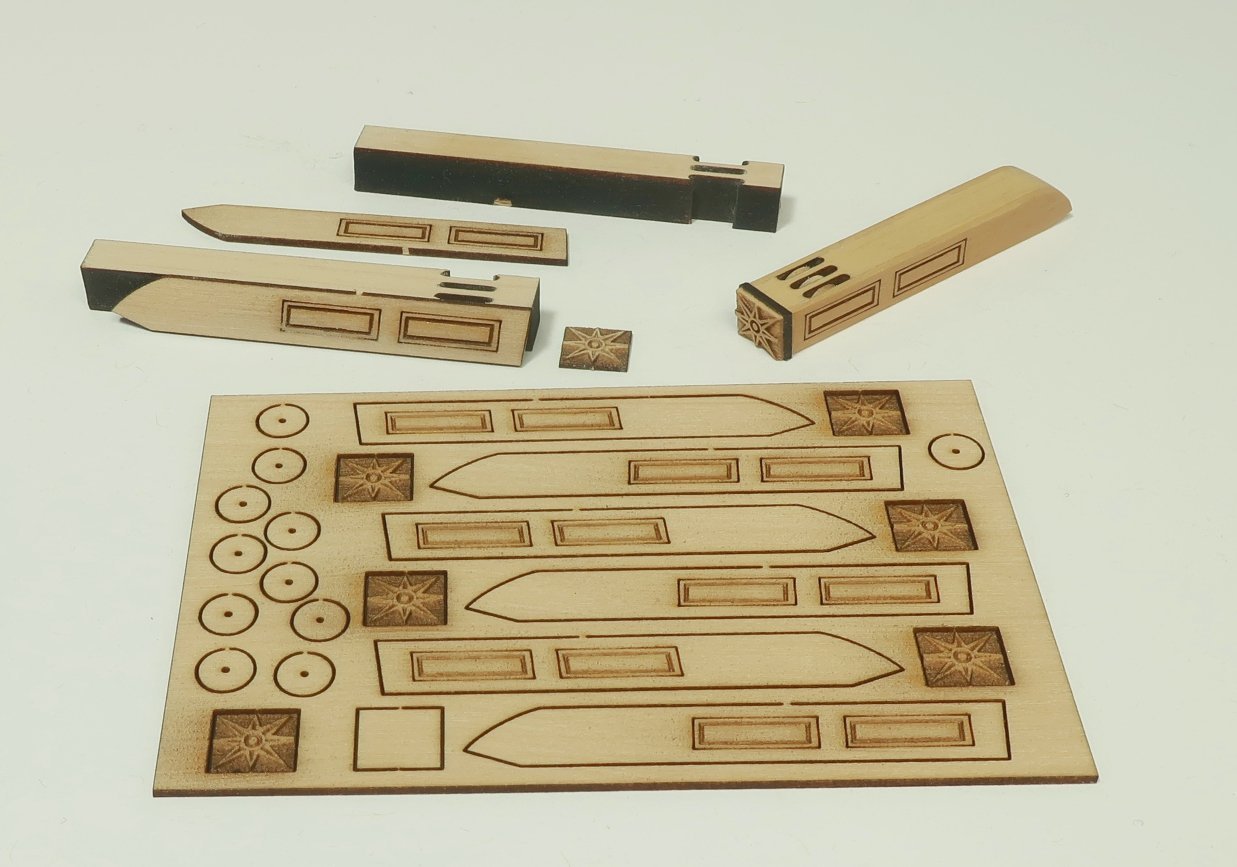
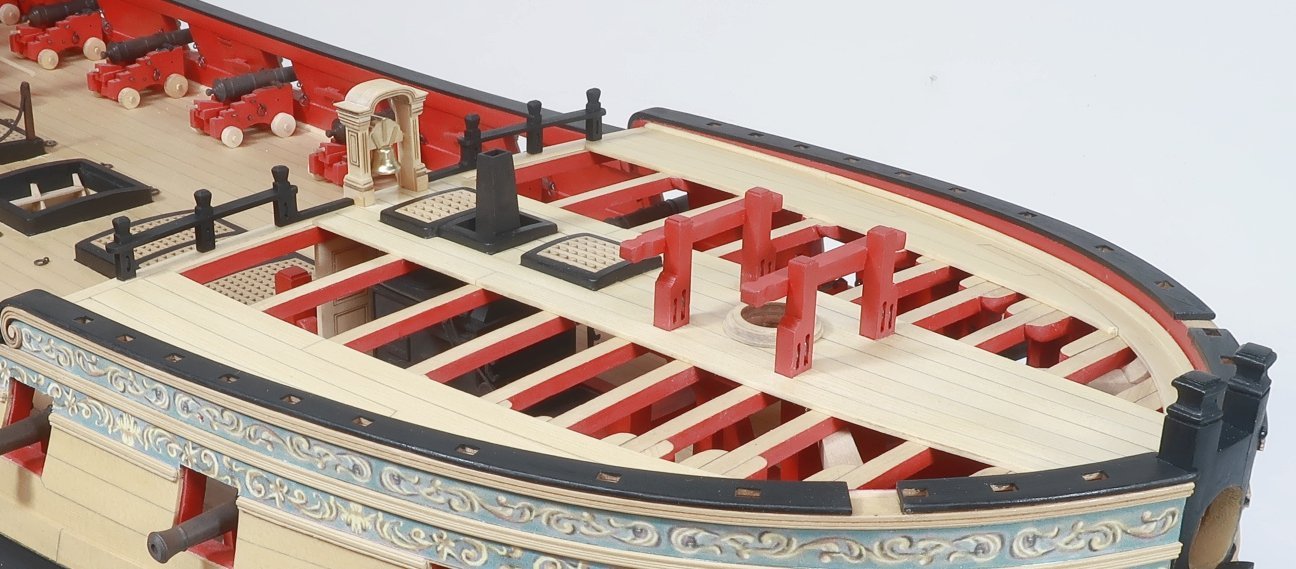
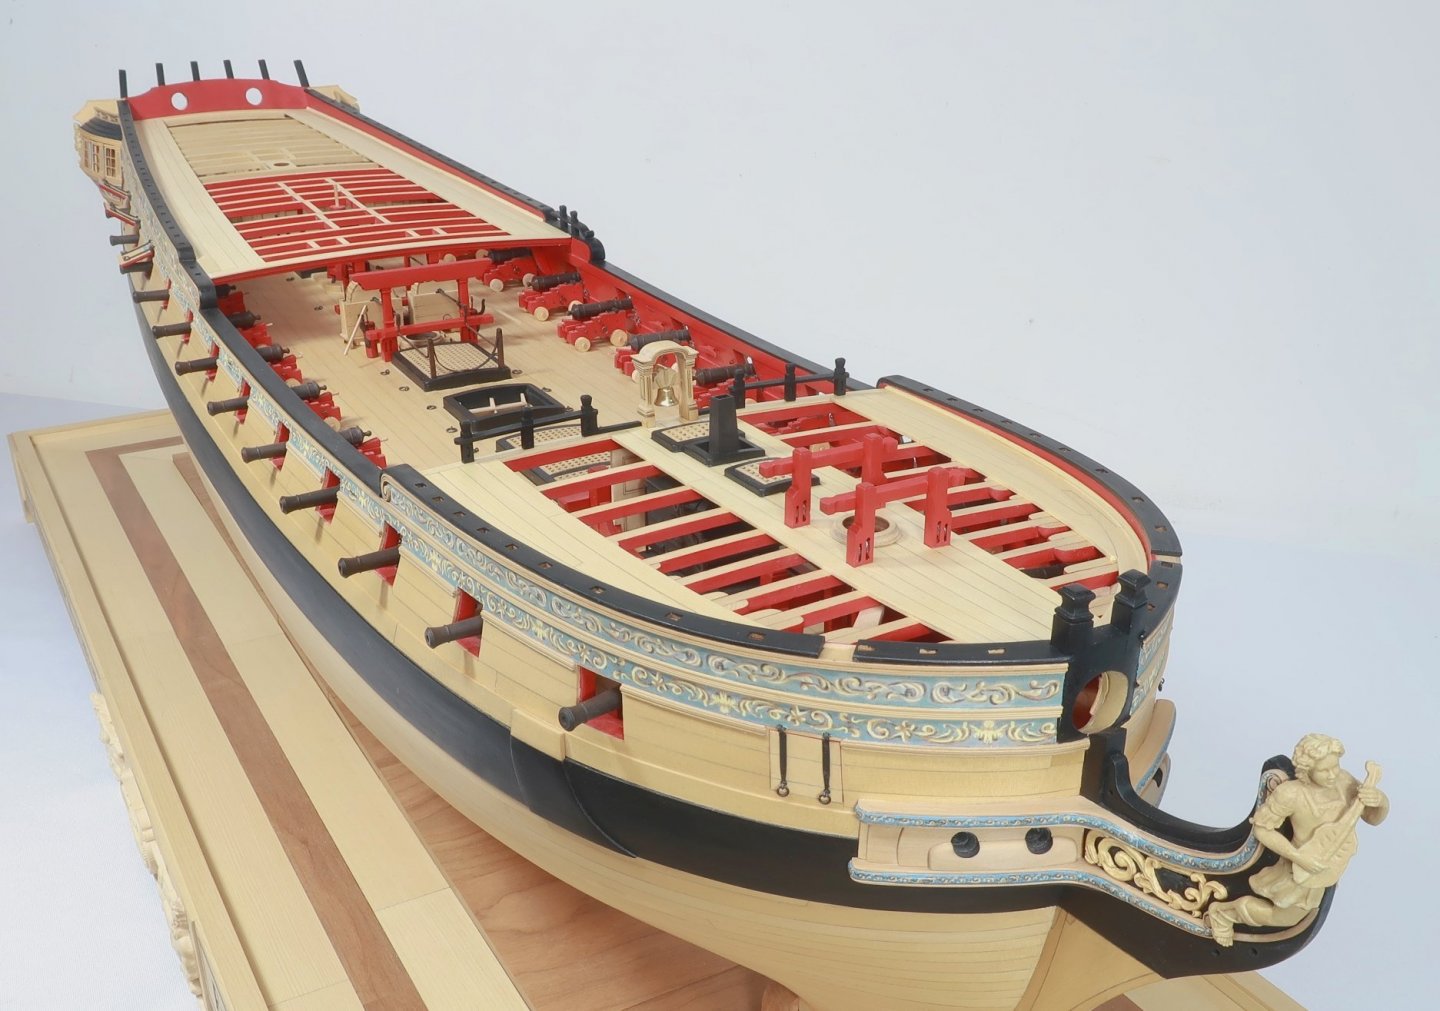
I added the breasthook at the bow. This was straight forward. It is laser cut. Unlike the one on the gun deck at the bow I cut this one in one piece. So you may have to adjust and tweak it to fit snug and tight against the bulwarks a the bow. Dont forget to chamfer the top and bottom edge on the aft side. That is customary. Unlike last time you see I also added some bolts. There are four on each arm or side of the breasthook. I used 30lb black fishing line for this. In the same photo above you can also see the cathead I made. But most important in that photo is the slot for the cathead. Note how it has been notched out with a sharp chisel and blade. I did so on the inboard side right down to the deck. Take the INBOARD side down to the margin plank. Remove the waterway as well. Do this carefully. You will need sharp chisels or blades. Careful not to mar the deck. On the outboard side it is a bit different. See below. I only notched the outboards side down to the top of the frieze.....OR better yet described, remove the fancy molding where the notch will be. Then deepen the notch down to the bottom edge of the molding that remains. Its not as deep as the inboard side. This is what will give the cathead its proper angle. I hope this makes sense so far... The catheads... These are pretty easy to make but dont rush it. The main cathead is in three layers. The two outboard layers define its shape. They line up with the front or OUTBOARD end of the cathead. But this is very important. The goal here is to not show the seams between the three layers if possible. To minimize this, you MUST thoroughly clean the char from the edges of the center piece. Its 1/4" thick boxwood so there is a lot of char. Dont be afraid to scrape it and sand it. I compensated for this and if you dont clean it well enough, the two outside sheaves of the cathead will be too wide. So do go ahead and sand away!!! Also test the sides periodically to check the width of the two outer sheave slots. Glue the layers up with tite-bond. Make sure you line everything up and center the side pieces up and down. Then sand them smooth top and bottom. But also sand the center to the shape of the outside layers. That shape is very important. Note the finished cathead in the photo above. Use a sharp chisel to get most of the heavy stuff off and when you get close to the shape switch over to a sanding stick. Sand it to match the shape....test it in the slot on the model. ONE MORE NOTE: the front side of each cathead is NOT at a 90 degree angle. It isnt supposed to be. It is a much steeper angle actually and that is a detail not usually shown n models. The angle of the front of the cathead is important and before you glue the star onto it you should make sure its flat and shaped appropriately. Look at the laser cut sheet and I think you can better see the actual shape of the cathead on the side panels. I made sure I gave you guys an extra cathead just in case. The front piece is similar. It has that wonderful star pattern etched onto it. Sand the four sides flush. But also try and scrape some of the char away from the perimeter of the star. I used the tip of a #11 blade to scrape away a good amount of the char around the outside of the star. It cleaned up really good. I found it easier to do after I glue it onto the cathead. Test it on the model... In this photo above you will also notice how I added an iron band around the outboard end. Its very thin. I just used some black tape for this. Dont make this too heavy and wide. Just a really thin band. Use the seam from the star piece as a guide. Cover up that seam or at least put the band right up against it. It really finishes it off wouldnt you say? When positioning it....the inboard side is also very very important. Remember you want it to look like one piece with the cat tail under the beams. Do your best to line them up assuming you positioned all that stuff carefully enough early on. See below. we are just trying to simulate the cathead and cat tail being in one piece. Do the best you can. Its a very difficult part to make otherwise. Especially with a cathead as detailed as this one. Oh and yes there are laser cut sheaves for the cathead as well. You can see them in the photos. Just glue them into the slots for them. I am not sure I pulled it off 100% but its real close. I am happy with the results. Especially after looking at how the catheads are usually portrayed on most kits. They seem like afterthoughts. But they are an important detail in my opinion. Now to do the other side....any comments or questions??


- 1,784 replies
-
- 38
-
-

-
- winchelsea
- Syren Ship Model Company
- (and 1 more)
-
Looking great…nice clean work.
-
Spilling (very long) planks
Chuck replied to vaddoc's topic in Building, Framing, Planking and plating a ships hull and deck
Wonderful step by step. And the mode is looking fantastic. -
Just test those before you cut anything. Depending on how accurate the work needs to be, probably 6 out of those ten will have the poi nt off-center. They will still cut beautifully but the cut line will be wider than your drawing by a lot. I regularly use those exact bits. So I take each of the ten bits and test them by turning the spindle on. Then as I see a bit wobble I will mark the shaft with a sharpie and set it aside for less accurate use. You can easily see the wobble once you get a perfect bit that spins true. This caused me much heartache until I realized what a difference it makes. If working with small parts this matters a great deal. I mainly use 10, 15 and 20 degree V engraving bits.
-
Which CNC Machine to get?
Chuck replied to KrisWood's topic in Modeling tools and Workshop Equipment
Let me know how it works out…i have a prover and thought about getting this one as well. -
Thanks…this is also how I will probably approach the rails along the shear. That should work and make life a bit easier. But you still have to shape the tops of each. That takes some careful slow work but its worth it.

- 1,784 replies
-
- 10
-
-
- winchelsea
- Syren Ship Model Company
- (and 1 more)
-
Beautiful stuff!!!
-
Very nice work....beautiful.😀
-
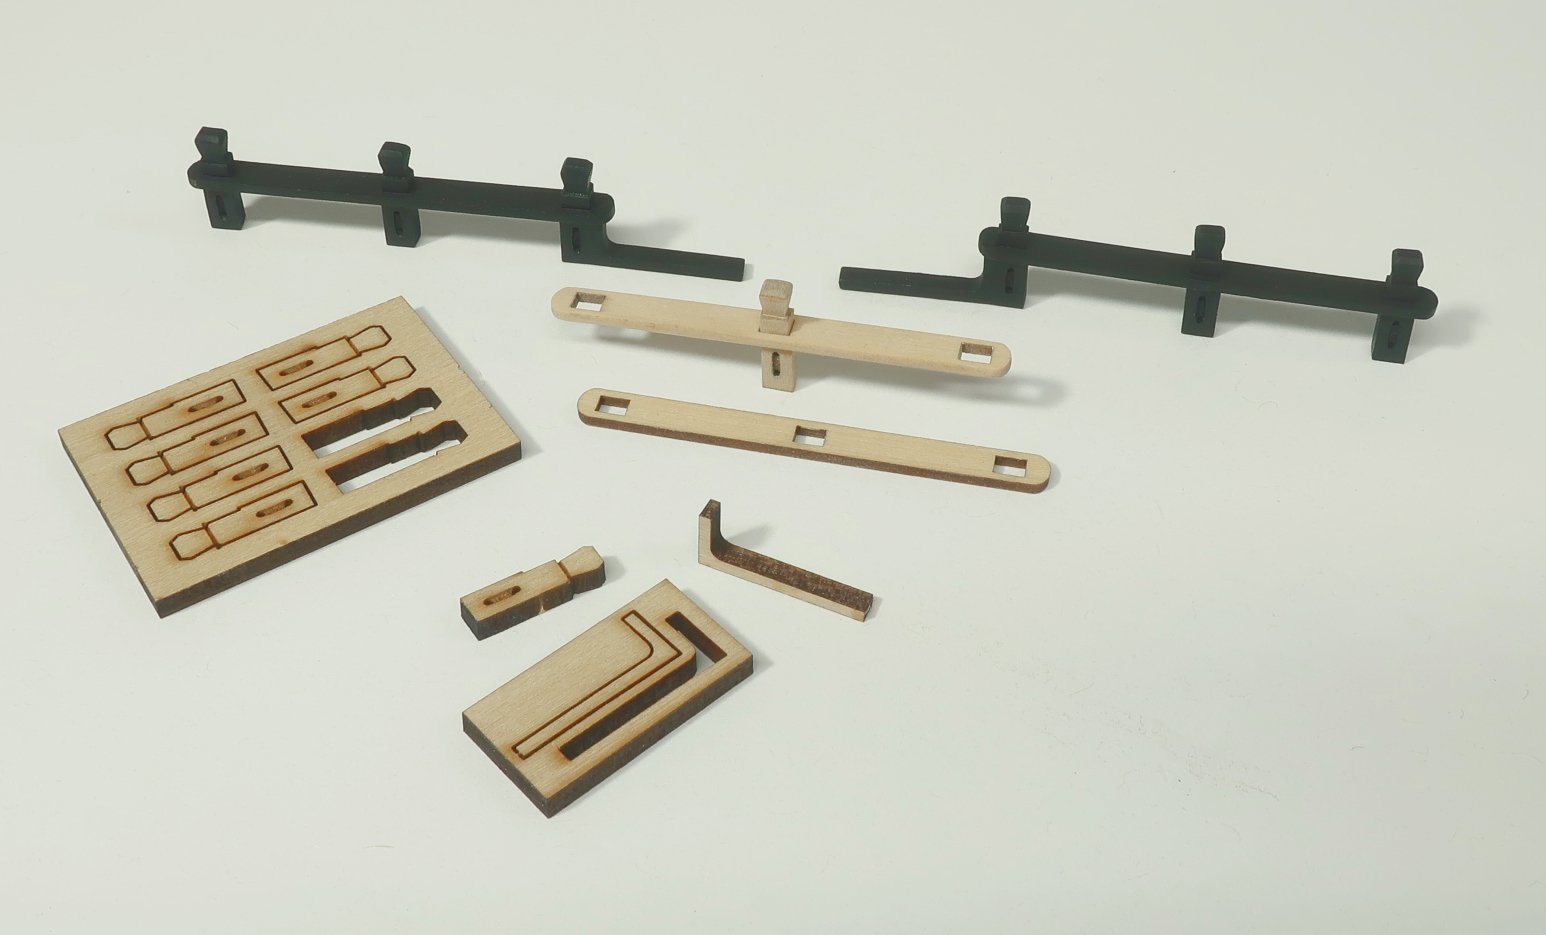
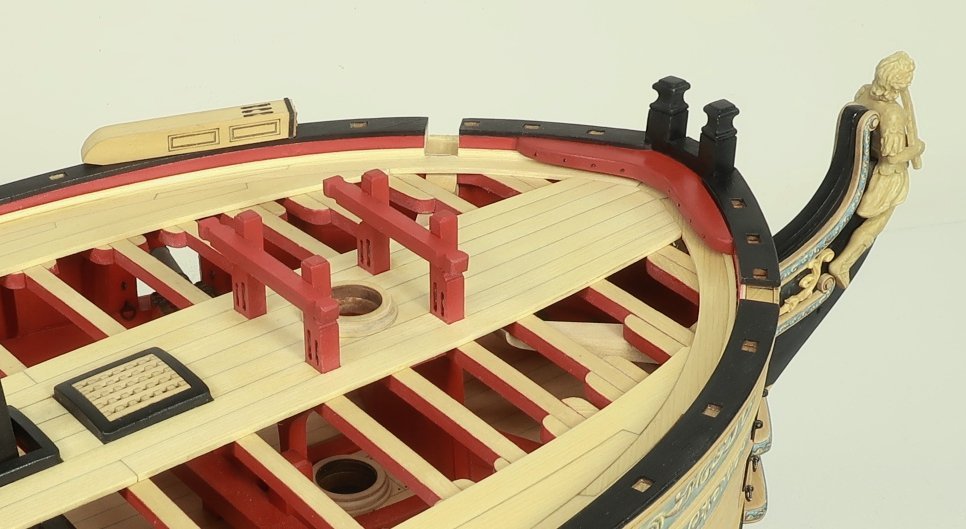
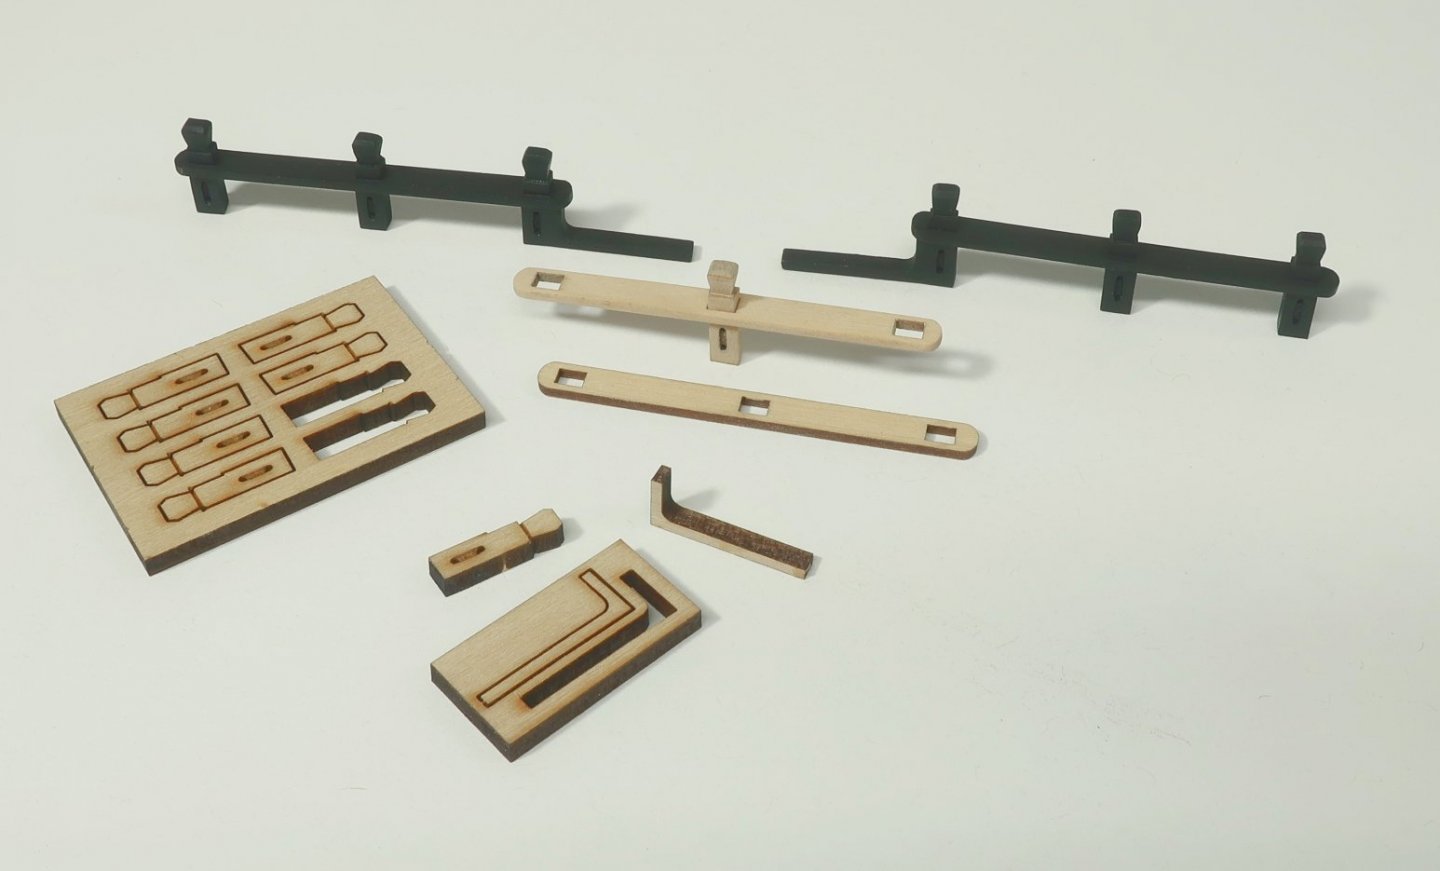
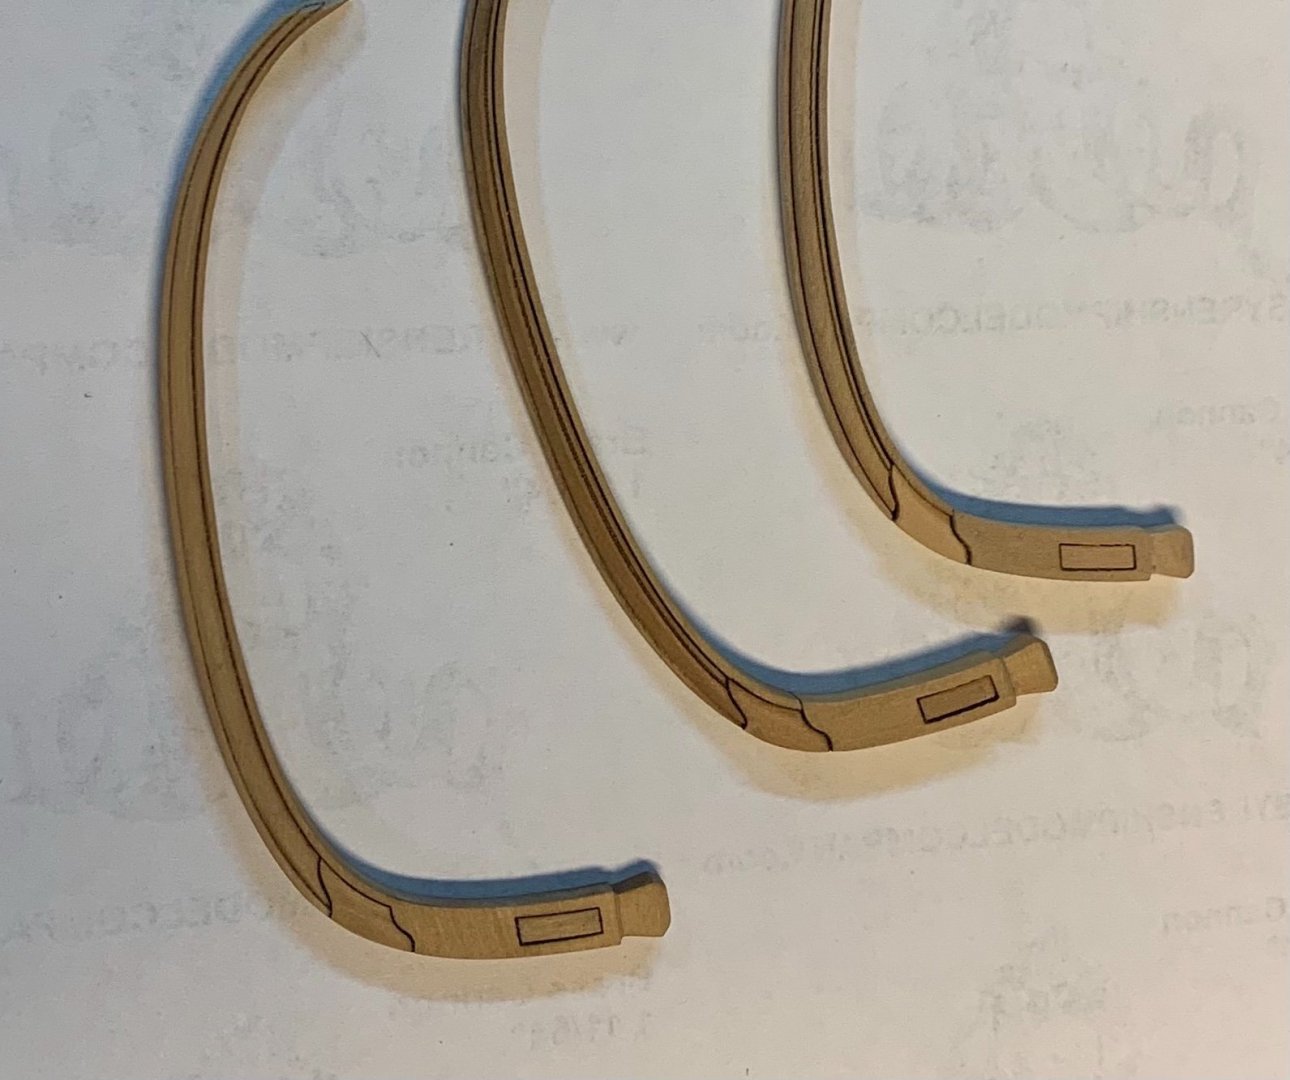
Thank You Moving on to the belfry rail. This is pretty straight forward. All of the parts are laser cut for you. I carefully removed the laser char from each piece and then glued each rail together. One thing worth noting is that the tops of the rail uprights are shaped like the typical timberheads you have all seen. But they can only have the shape laser cut on two sides. You will need to sand or file the shape on the front end of each. I just used a sharp #11 blade actually to cut in the angle for the top. There is a laser etched line already on the piece to act as a stop-cut. So I just sliced the angle back towards the etched line. You can see one that has been shaped before painting below. Another detail to mention is the fact that the fcastle deck has a roundup or camber to it. In order to ensure these uprights for the rail are actually vertical, the bottom of each of them is laser cut at the appropriate angle for you. Just make sure you face them all the correct way when you insert the uprights into the rail. Insert them top-end first as I also laser cut a small stop into the bottom half of the uprights so you can keep the height of the rail consistent along all three pieces. There is also a small "L" shaped piece that is glued to the inboard end of each rail port and starboard. Make sure you glue it to the correct side....otherwise the rail will not sit properly and will lean to one side because of the angled bottoms. These "L" shaped pieces once glued to each rail also help position it on the fcastle. It makes it impossible not to center them on the fcastle edge properly. The one side of the "L" actually sits against the belfry. It butts up against the belfry sides. Oh and I almost forgot...you can round off the sheaves on the rail just like on the other fittings you made from parts like this. Paint them black. Slowly but surely the fcastle is filling up with details. Next up will be the large knee at the bow followed by the catheads. Any questions or comments? Feedback...
- 1,784 replies
-
- 24
-
-
- winchelsea
- Syren Ship Model Company
- (and 1 more)
-
Thats just what happens when I try to draw a line on a photo in the software I am currently using. It really screws up the image. LOL Plus those were just taken with my phone. I do that a lot because its quick when I am doing testing of parts. Lighting isnt important I just need to check placement and shape etc. I take dozens with my phone and then I can sit and really examine them... Then I toss the part and tweak it and make another...rinse and repeat. Thats the process.
- 1,784 replies
-
- 4
-
-
- winchelsea
- Syren Ship Model Company
- (and 1 more)
-
Thats way too much...it wouldnt fit...it just needs a slight adjustment on the forward end so the curve isnt as severe. This has already been done, I am just waiting to get the shear rail completed around the fcastle along with the catheads. It will be easier to finalize the upper headrail once those are in place. More to follow. Chuck
- 1,784 replies
-
- 17
-
-
- winchelsea
- Syren Ship Model Company
- (and 1 more)
-
Yes they will be a bit long as I always do. But I dont think I can supply two of everything for these. That would cost a fortune and take too long to mfg. It would be an enormous amount of parts to make as well. I would never be able to make enough of them to keep them in stock in a timely manner. Thats why the headrails will be a stand alone chapter.....those that need to redo them might need to buy a second chapter at some point. Otherwise those that dont need the extras would be paying way more than they need because these will be made out of boxwood which is very expensive. It would literally double the cost of that chapter. And most of it would be wasted if not used. Maybe I can set it up so folks can buy extra parts for these. Just the headrail they need to do again... For example...."extra main rail port side" and then a separate store item for "extra main rail starboard side"..."head timbers port side".....Eking rail...etc.
- 1,784 replies
-
- 8
-
-
- winchelsea
- Syren Ship Model Company
- (and 1 more)
-
That is actually how they are they made....Its a good thing that you couldnt tell, unless you think the results are not satisfactory. All are different versions of that concept. In fact that one rail is made up of 4 or even 5 different thickness of wood... Chuck
- 1,784 replies
-
- 4
-
-
- winchelsea
- Syren Ship Model Company
- (and 1 more)
-
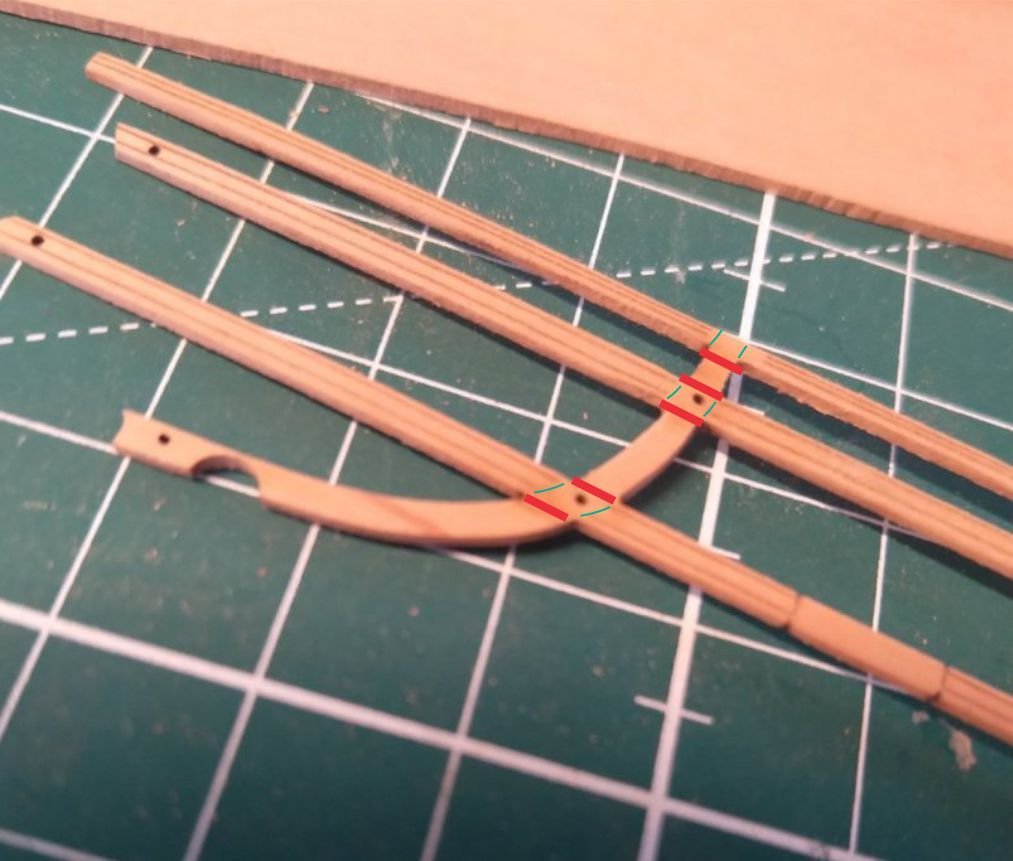
Still plugging away on experimenting guys…i have made probably a dozen of these already all with different shapes and approaches. These are all with the laser cutter but when time permits I may also give it a try on the cnc. Just trying to manage my time to get it all done. Each iteration takes a few hours. Adjusting for grain direction and number of parts etc These are just down and dirty experiments. I am leaning in the direction of the one on the right. But nothing will out do a scratch built rail but I am trying to get you guys close enough to be happy. One of the many tests made in just cedar. This one was discarded for obvious reasons. I started using cedar for the tests because I was going through too much of my boxwood stash. The shape isnt correct on this version and its a bit too heavy. Too much sweep and curve toward the forward end of the rail. These headrails will take a long while to get right. I have to take a step back and turn my attention to finishing the next two chapters but I think its good that you see how many iterations I work up and the thought process. It takes me forever to work on each element. I am never entirely satisfied. Feedback?? Any would be appreciated as it would let me know if I am on the right path or not.

- 1,784 replies
-
- 18
-
-
- winchelsea
- Syren Ship Model Company
- (and 1 more)