Chuck
-
Posts
9,704 -
Joined
-
Last visited
Content Type
Profiles
Forums
Gallery
Events
Everything posted by Chuck
-
 Yes very nicely executed. That will prove itself well worth the effort later.
 -
Keep in mind we did moderate that that topic. And what you cant see, is that we did speak to those who treated the OP badly. There is and will be no tolerance for belittling other members. We have hundreds of members who may not be experts or they may even be beginners. To call what they have posted as a tip or suggestion "trash" is not something we want to condone at MSW. We have many new builders who are proud of what they have done. They want to share their methods and work. It may not be perfect or masterful. But they dont deserve to be treated badly. And you wonder why new folks dont stick around. Its because of people like those members who bashed the guy. I counted six. And I must say if those six experts suddenly vanished from the site...it would be less impactful then the scores of new builders alienated and poorly treated by them. These so called experts who love to pontificate (you know who they are) will not be allowed to treat other members like dirt. They have been formally warned. If they continue...they will be banned. The OP of that topic was NOT banned. Nor was the topic removed. It was being cleaned up and pruned of the nasty remarks other members were making. Such as the one below. Who would actually have the balls to to post THIS!!! ...on another persons topic no less. They should be ashamed of themselves. As if they are so perfect. Pompous posters who love to pontificate on their wealth of knowledge be warned....do not treat folks this way. There is a way to teach and educate without being a bully. You guys are certainly NOT mentor material. You get three strikes.....if the behavior continues...you are out. The bully below says the member wasted his time. You know what wasted my time...cleaning up the hate you decided to post all over someone elses topic. That was a waste of my time. Sending you a private message and issuing warnings to the folks who think they are "genius" masters who everyone should kiss up to....that was a waste of my time. found the video a total waste of time. So what's to respect in the effort to make it and why do you care whether the poster "is getting pleasure in his task?" I know I may be criticized for being "insensitive," but I don't respect the efforts people put into posting useless, let alone erroneous, "how-to-do-it" videos on the internet and I could care less whether the people who post such drivel are getting pleasure from it. They waste everybody else's time. Who has the bandwidth to waste on junk content? And here is the kicker.....non of the so -called MASTER builders in their INFINITE WISDOM of all things...posted a better method...or the correct historical reference. They made ZERO attempt to politely state that there may be a better way or a more historically accurate way. No attempt to teach or mentor. They just bashed the guy and went on long Rants...like this one I am now forced to write about how so many people dont know as much as they do and yet post on You tube and the internet all this bad wrong information.....making society more stupid. 18 posts by expert bullies were pruned from that topic leaving just two replies. All 18 had no value other than to belittle. Shameful. Talk about a waste of time reading those. The replies of the bullies had no value what so ever. Except of course maybe to allow the bullies to hear themselves claim omnipotent dominance of all things in the Universe.
- 5 replies
-
- 39
-

-

-
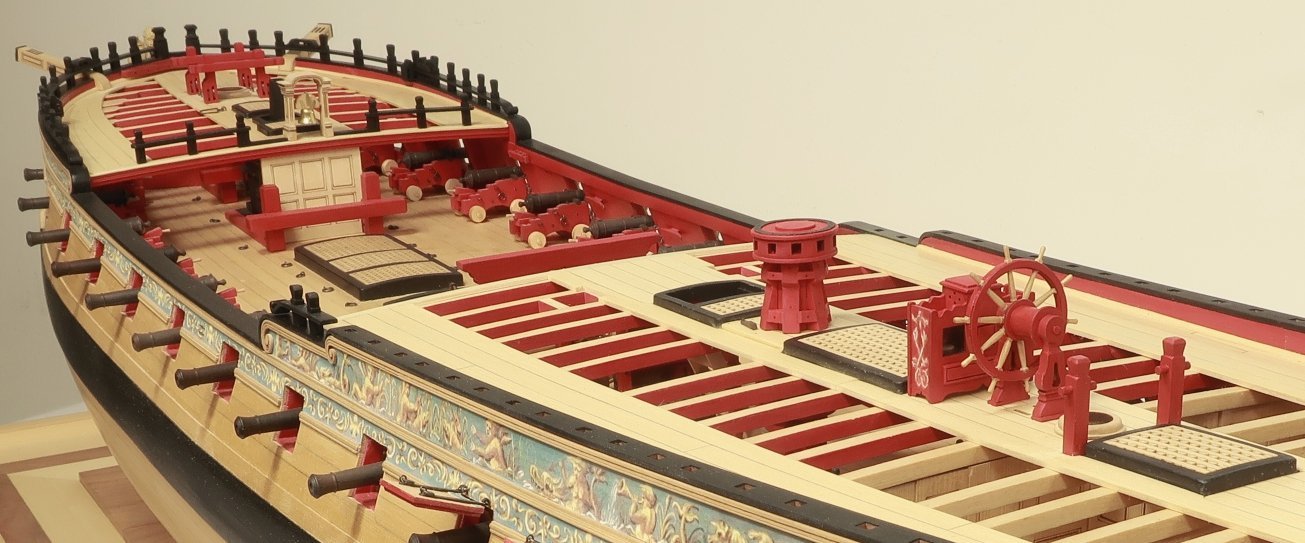
Looking great. That deck looks wonderful.
- 112 replies
-
- 1
-
-
- Cheerful
- Syren Ship Model Company
- (and 1 more)
-
Beautiful and a real milestone. I remember how that felt to get that done. You will feel the same way after getting the guns completed.
- 642 replies
-
- 4
-
-
- winchelsea
- Syren Ship Model Company
- (and 1 more)
-
Very nice progress…Its interesting to see a copper plated Winnie.
-
Yes indeed....so still lots of choices to be made. The Cheerful hull is 18" long at 1/4" scale. So those who are familiar with it.....it will be only a couple of inches longer. But the Cheerful is also much wider at mid ship. Speedwell is a long narrow hull which is quite beautiful.
- 1,784 replies
-
- 8
-
-
- winchelsea
- Syren Ship Model Company
- (and 1 more)
-
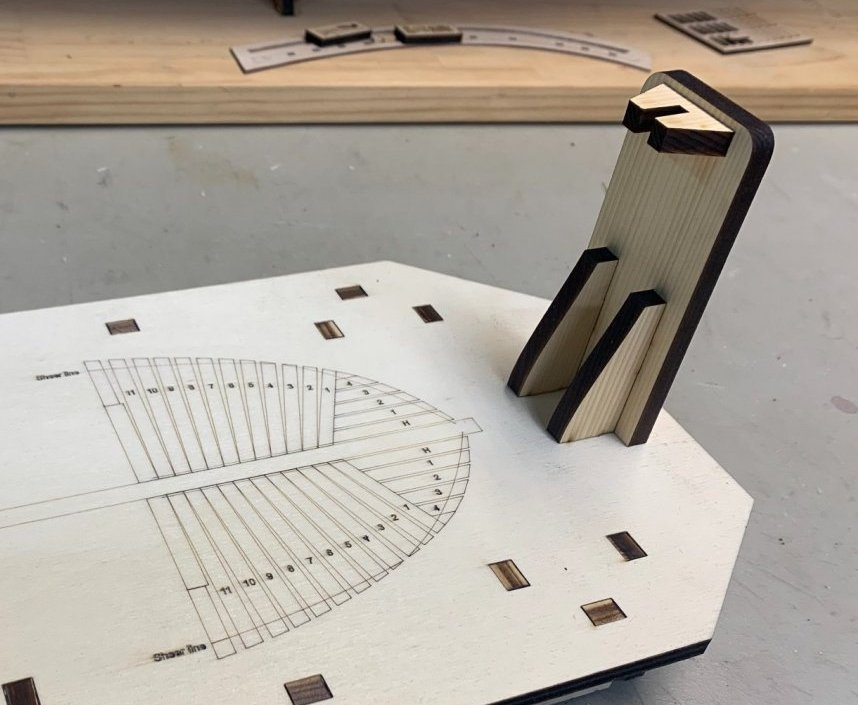
Yes I hear you....its tough for me as well. I have a lot of planning to do on it. Its just in the very very early stages. I havent even really decided on the scale yet to be honest. At 1/4" scale the Speedwell hull is about 20" long. Quite tiny by comparison to Winnie. I have even been considering enlarging it more to 3/8 scale...thats how early the planning stages are. When the time comes I will start another topic for it to get everyone thoughts. At 3/8" scale it would be just over 30" long and at 1/2" scale a bit over 41"..... After building large for the Winnie I am very aware that it may be the first POF for many, and larger would be easier. But how large....OR is it important to keep it at the traditional 1/4" scale although it may make building it a bit more difficult for some. Space considerations aside. Honestly I havent even measured it fully rigged yet. Maybe Greg can tell us what those measurements are. In the end I will probably be 1/4" scale. But my brain does seem to go where it wants to with this stuff. This is indeed the first attempt at the buildboard for Speedwell. I have some tweaks to it but it will be an upright build. Without all of that retched scaffolding you typically see on some POF kits. We will build it in a more traditional way using laser cut parts and learning the tried and true step by step methods. I believe its the easier way to go actually....than building those crazy boxes. We shall see...time will tell. If you start off POF building with all of those crutches and jigs and scaffolding, it will be that much harder to just pick up a set of plans which is not a kit and build it POF. You will become too reliant and conditioned to look for the "ugly-box". So learning the ropes so-to-speak is something this project will be all about. But its very much on my mind too. I also posted a picture below...from Greg of the Speedwell hawse timbers vs the Pegasus hawse timebrs. Keep in mind that the Pegasus is much smaller than the Winnie as well and would dwarf the Pegasus hawse timbers. So that should give you an idea of how large the Speedwell will be at 1/4" scale. At the dead flat mid ship the hull is 4.75" wide. Compared to the Winnie at almost 8". Chuck

- 1,784 replies
-
- 13
-
-
-
- winchelsea
- Syren Ship Model Company
- (and 1 more)
-
Scroll up….see the other tabs above. Click on the tab for “general project discussion….etc” Thats where they are in the topic with the monograph chapter downloads. Speedwell is a long way off. You will know when it gets close because I will start a build log of the prototype. Until you see that…I wouldnt even think about. Stay focused on the Winnie which is what I am trying to do.
- 1,784 replies
-
- 3
-
-
- winchelsea
- Syren Ship Model Company
- (and 1 more)
-
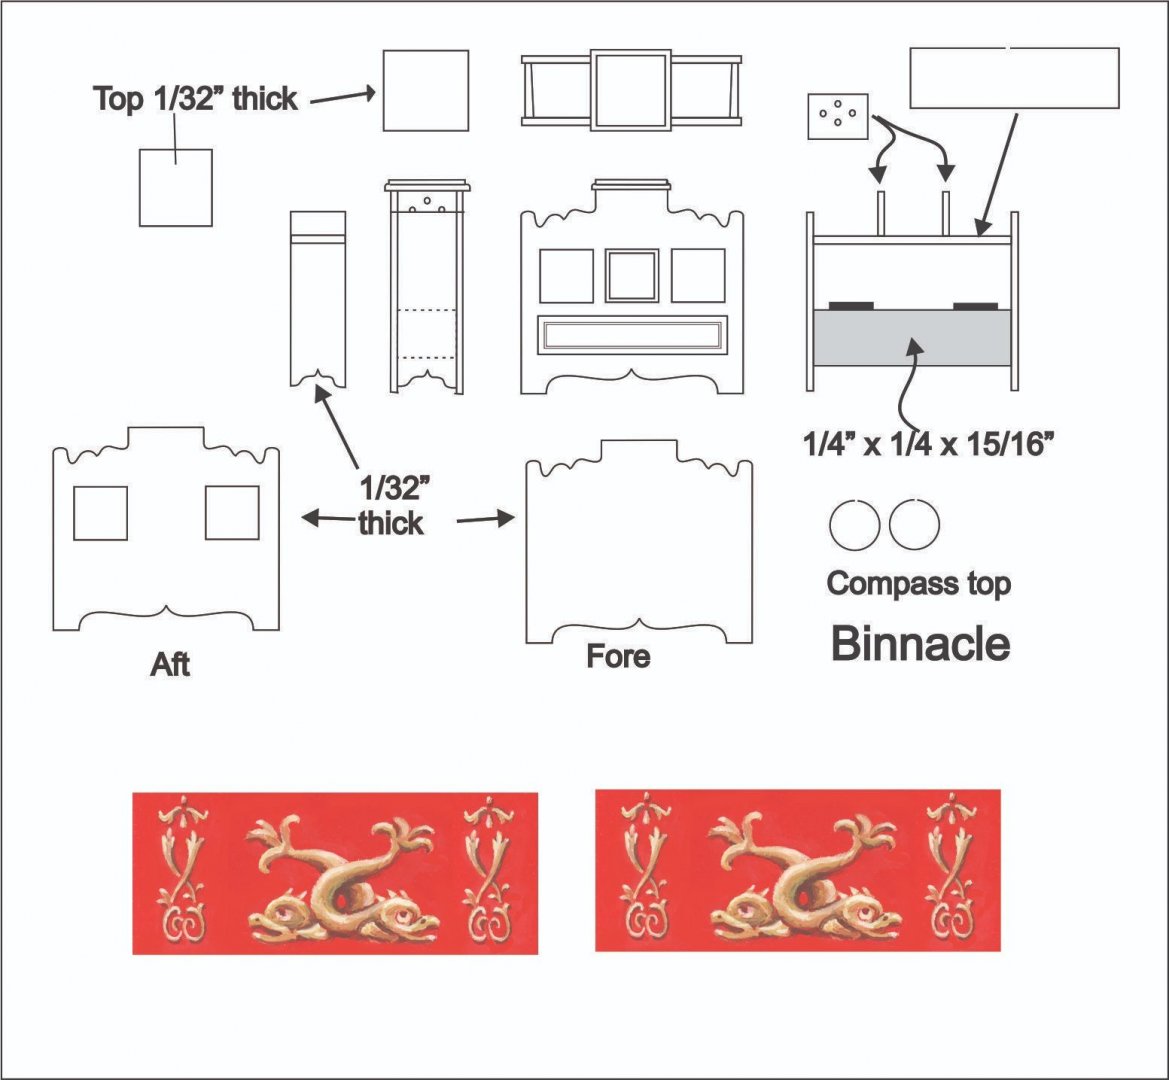
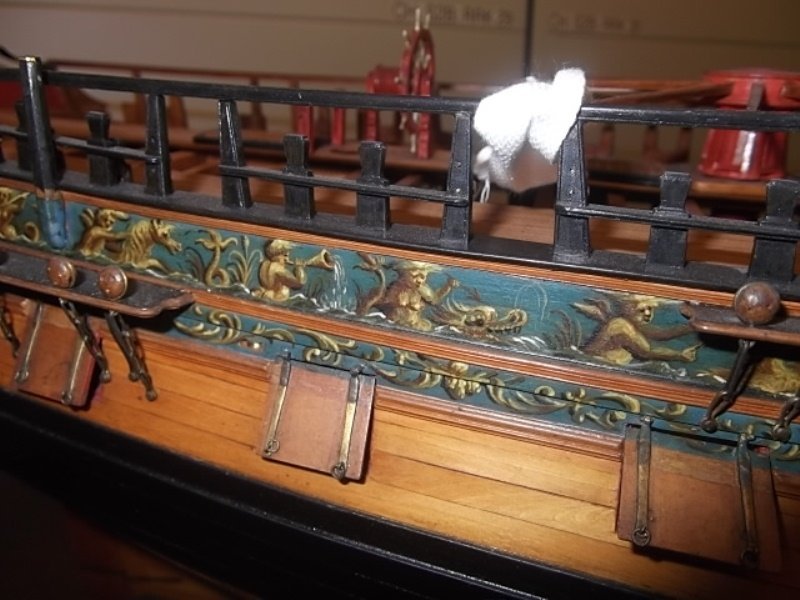
Binnacle friezes....and plan. binnacle.pdf
-
Nicely done. You are making some beautiful progress.
-
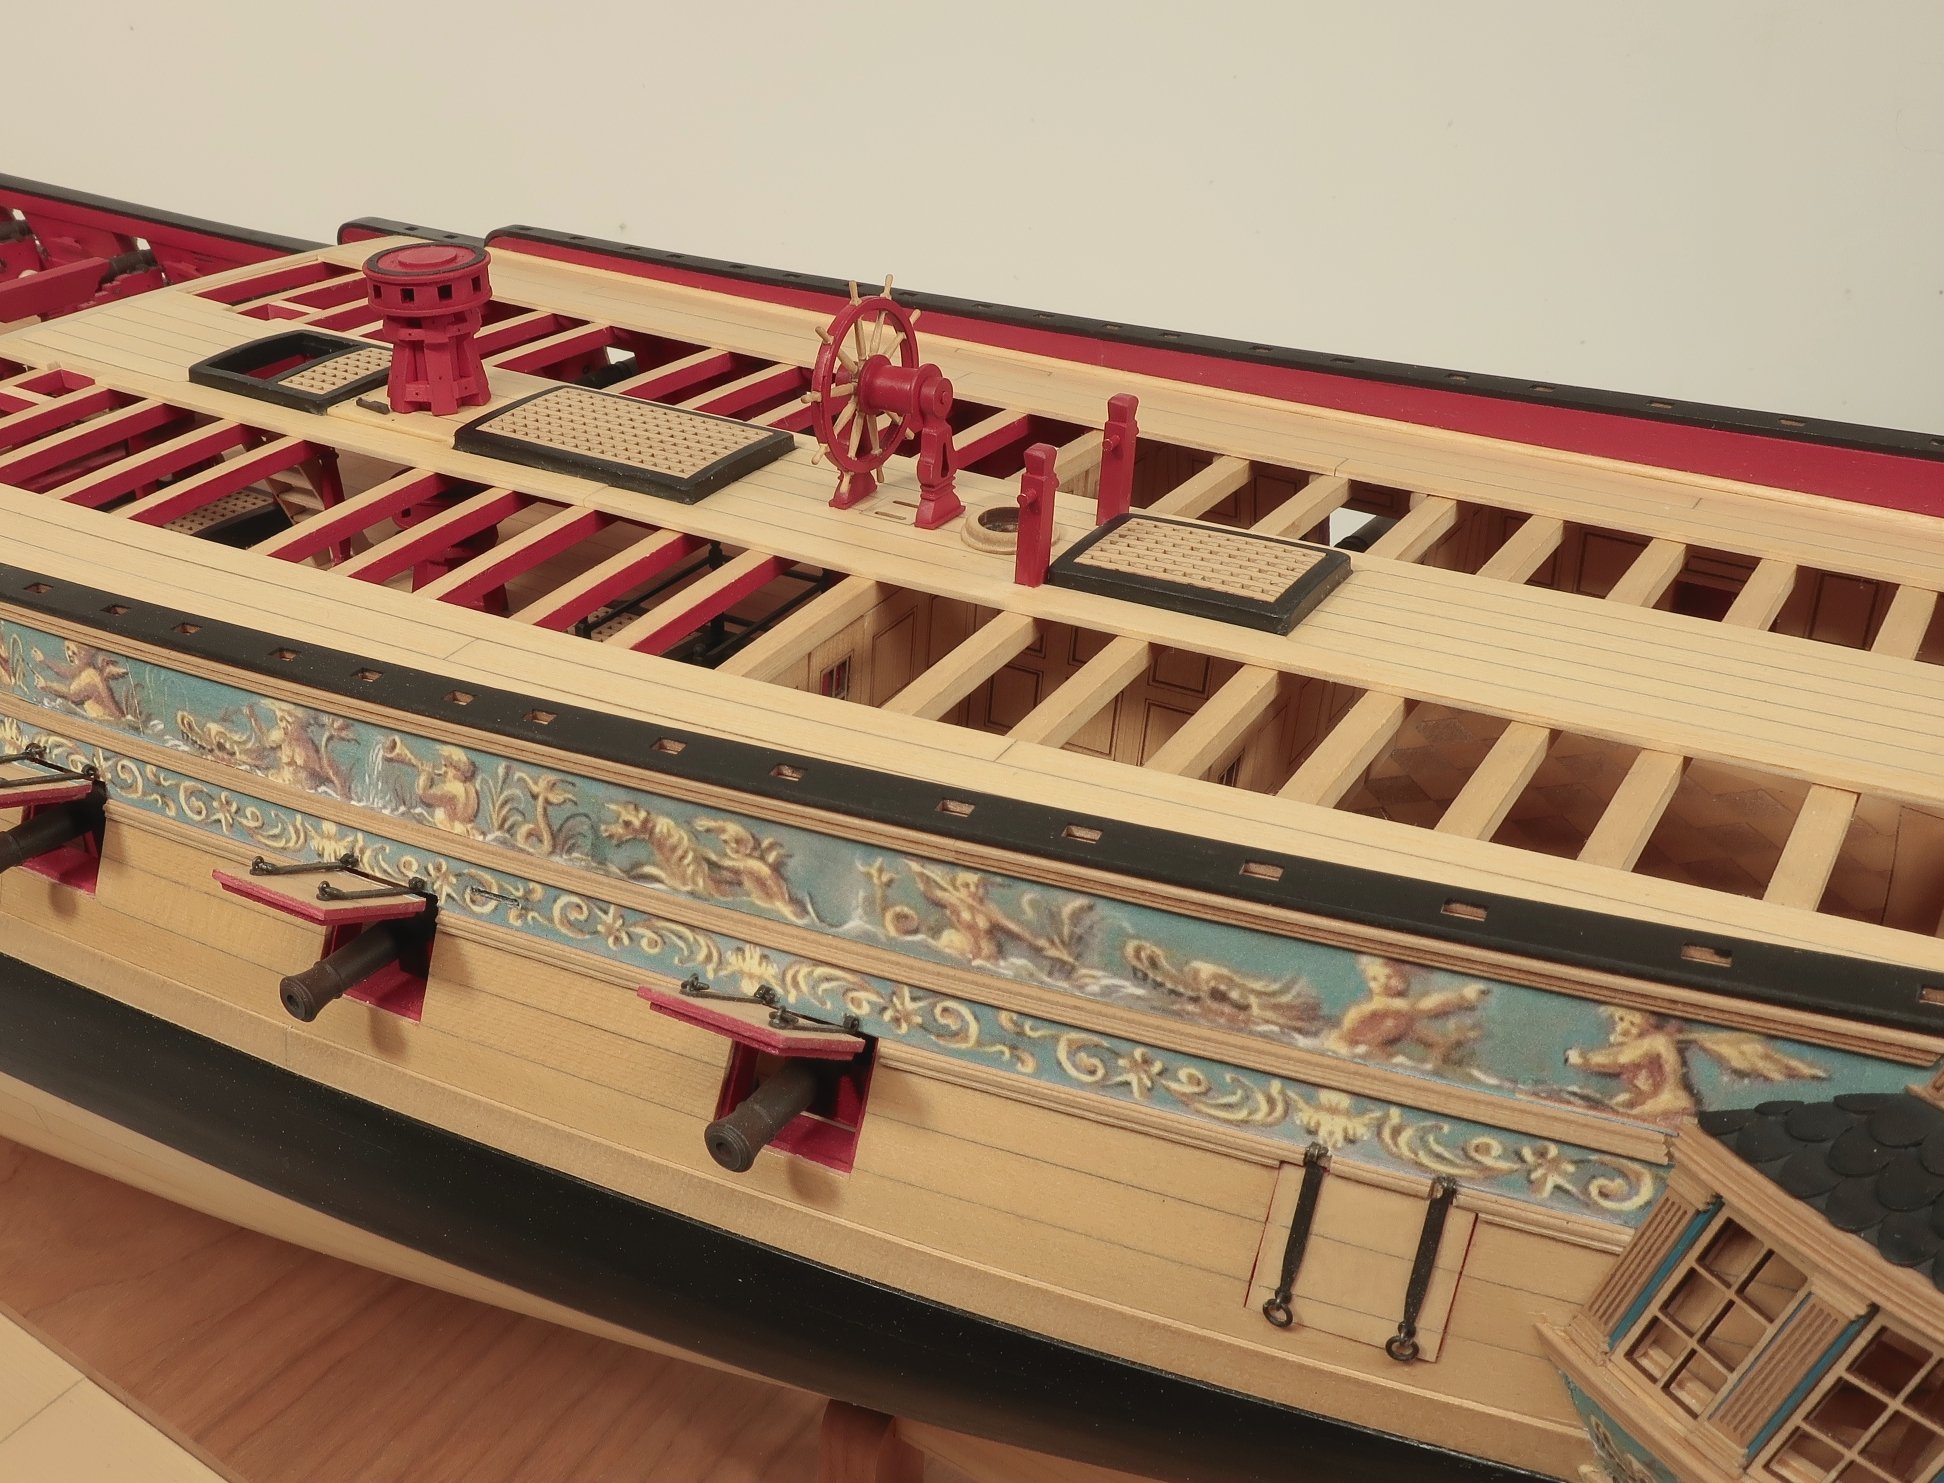
Binnacle test on the model. This was fun to build. I have plenty of construction photos which I will soon upload as well. A big Thank You to David Antscherl who was kind enough to paint the friezes for the binnacle. More to follow soon. But breaking for dinner now.


- 1,784 replies
-
- 34
-

-
-
- winchelsea
- Syren Ship Model Company
- (and 1 more)
-
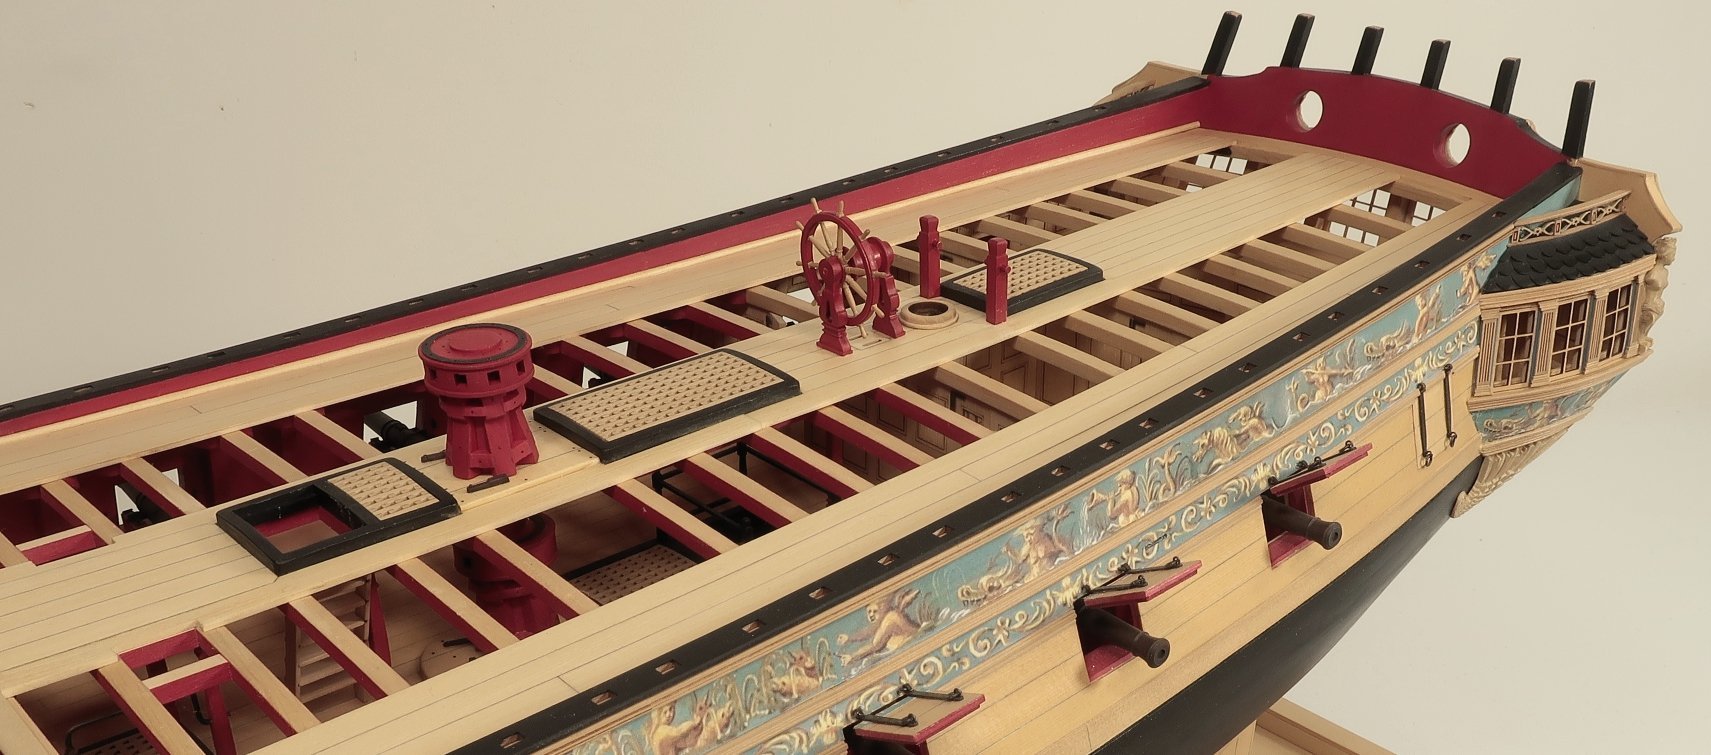
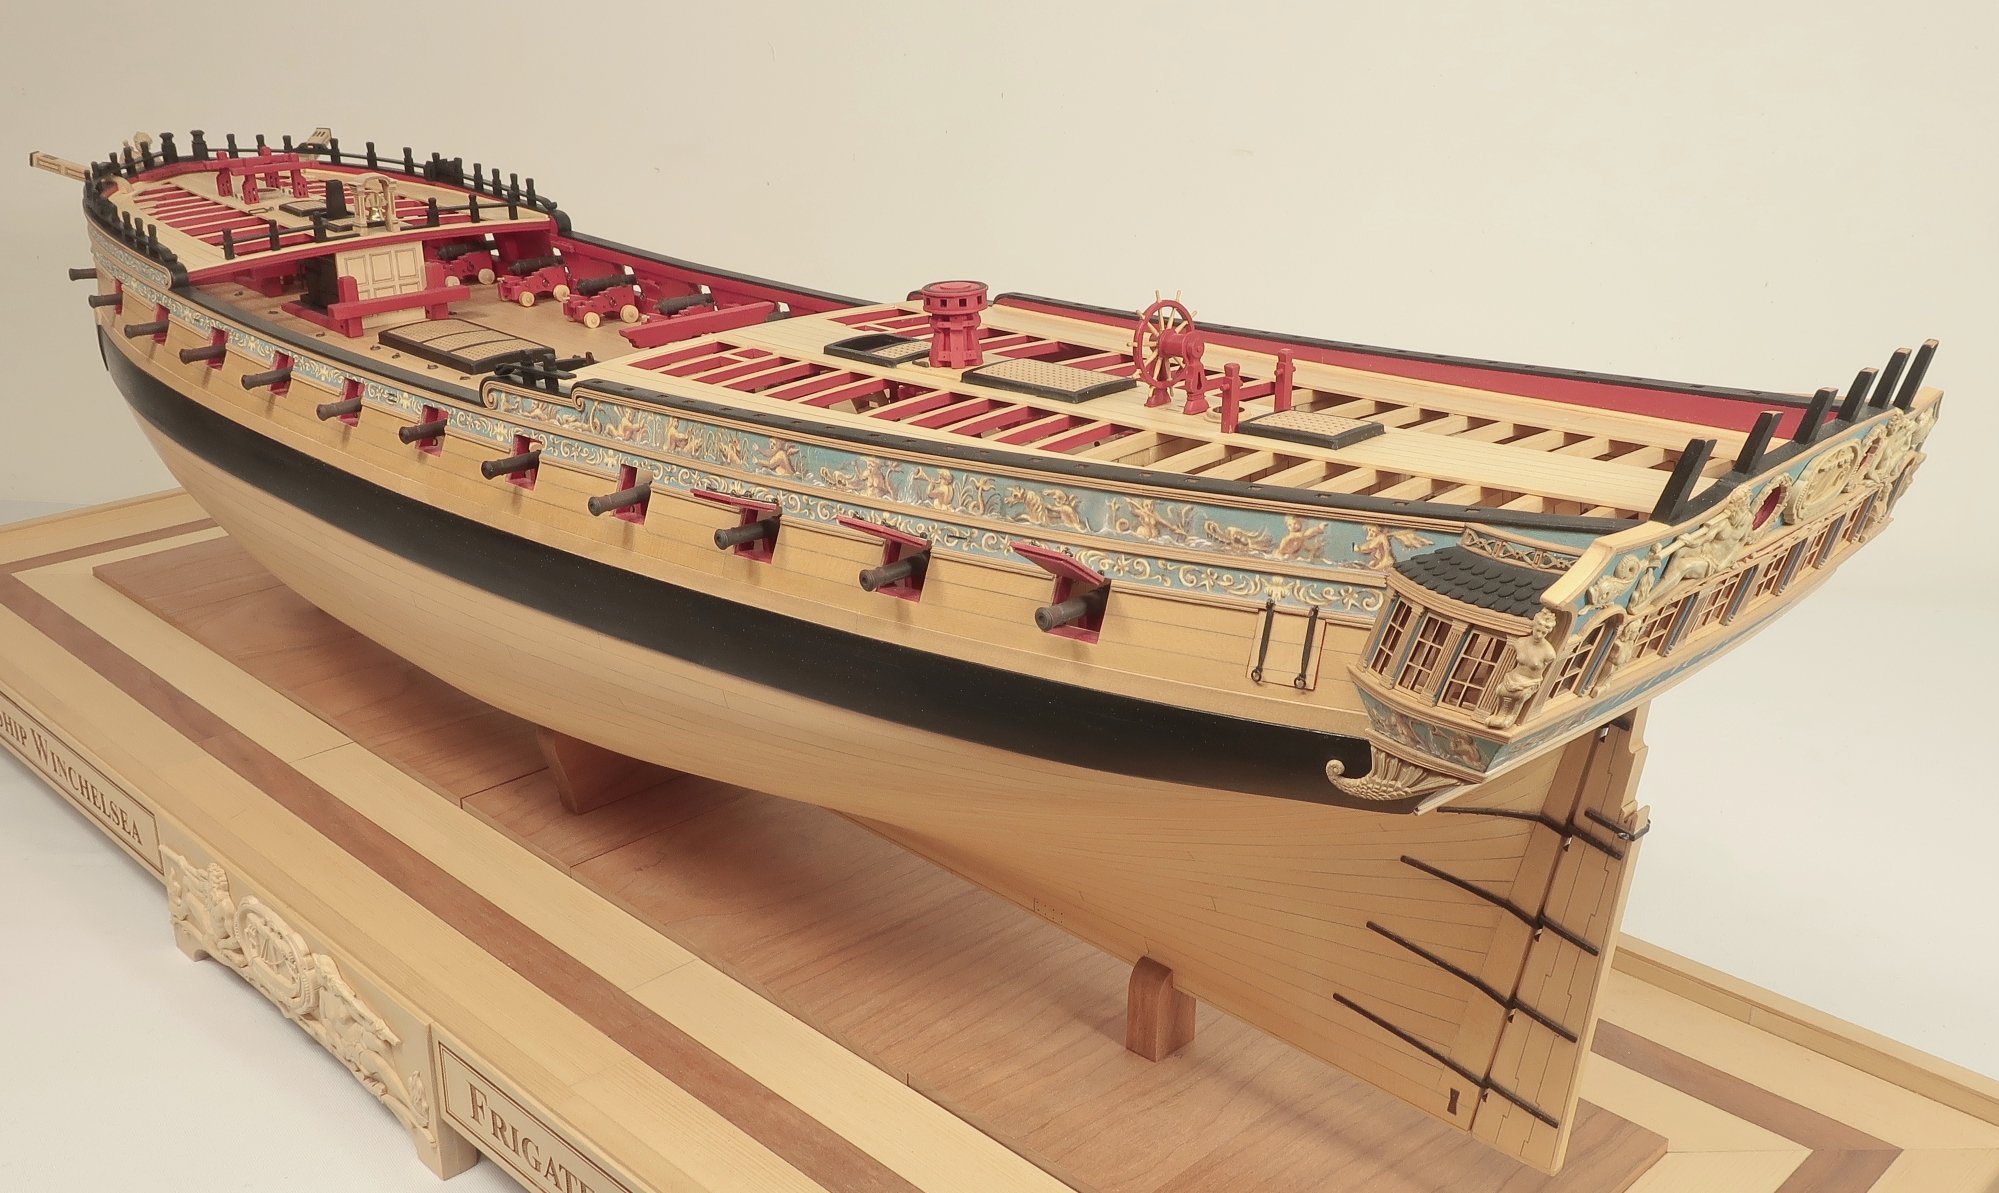
Back to the Winnie...prep for Binnacle
- 1,784 replies
-
- 16
-
-
- winchelsea
- Syren Ship Model Company
- (and 1 more)
-
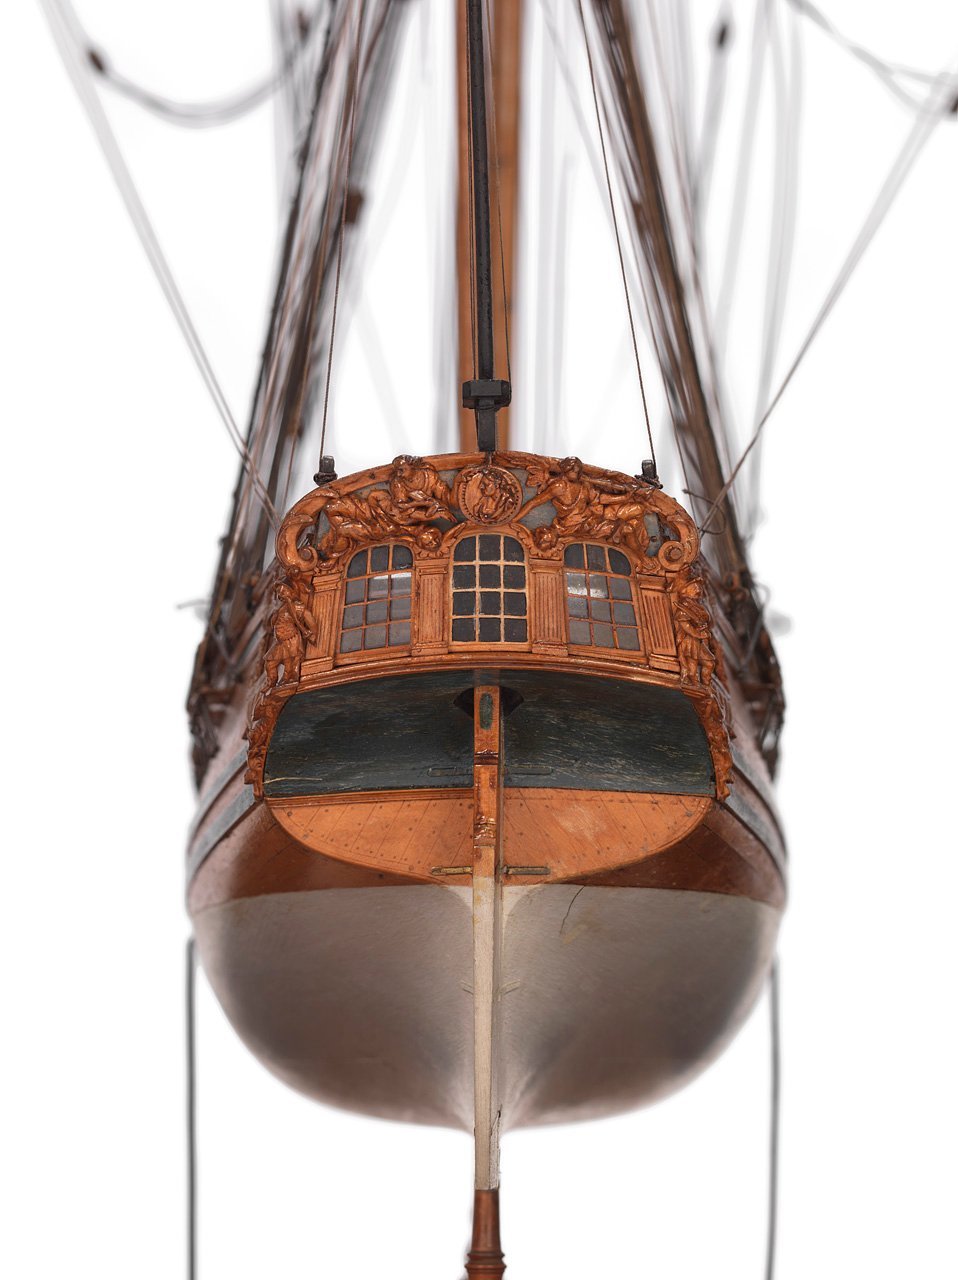
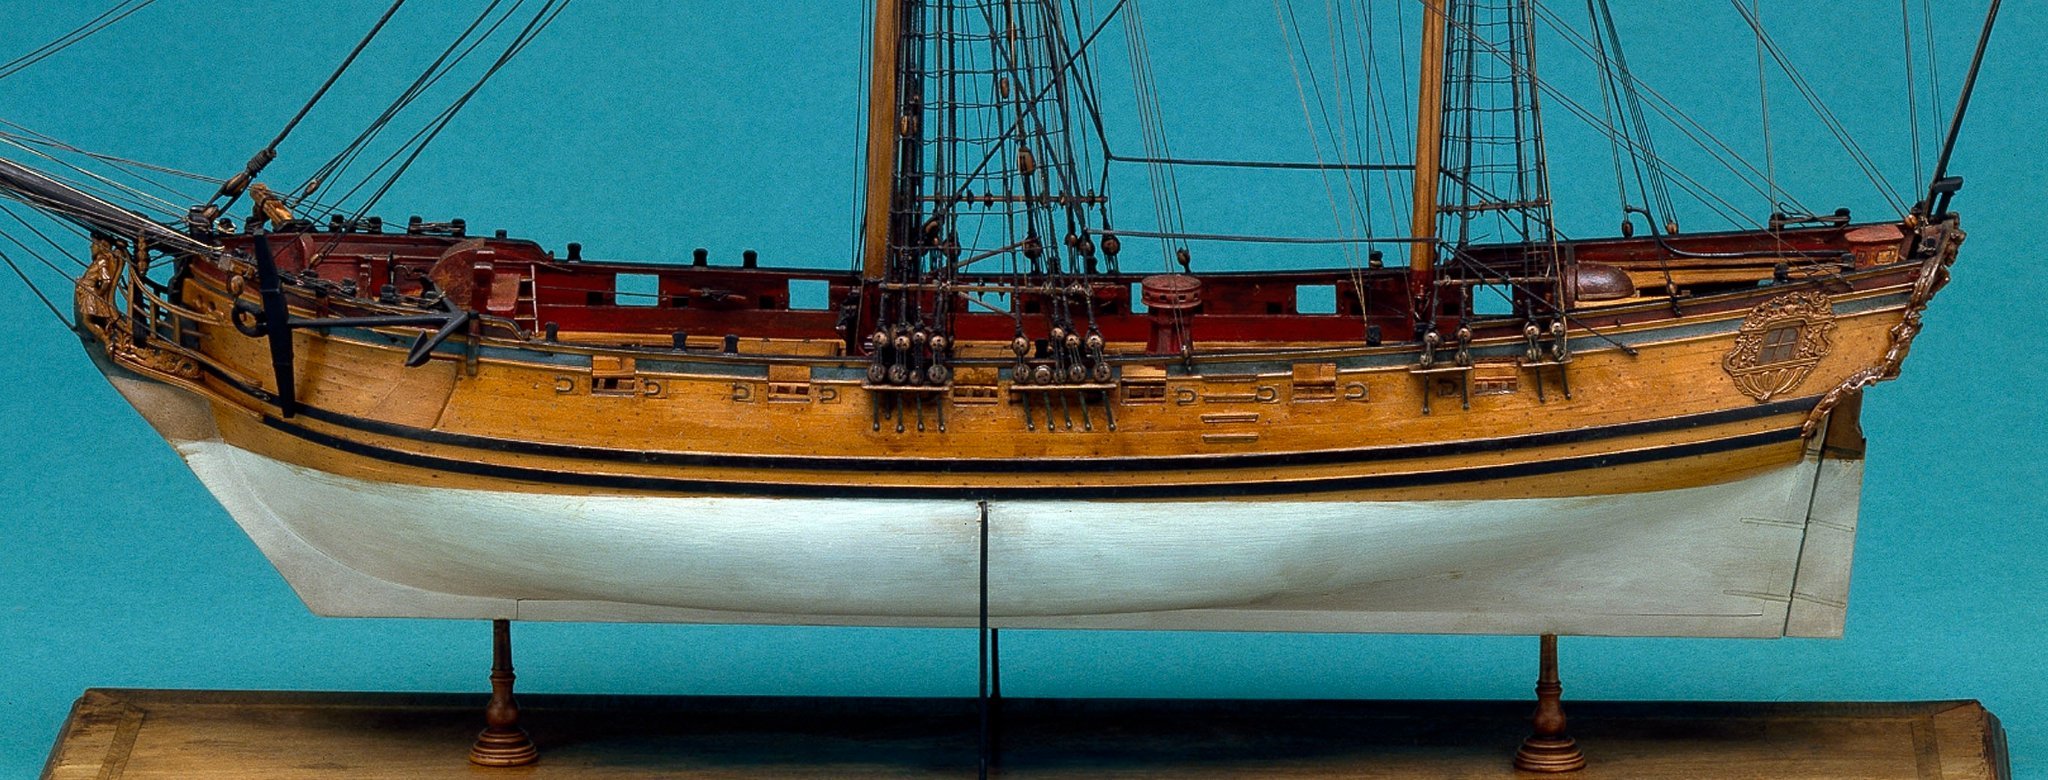
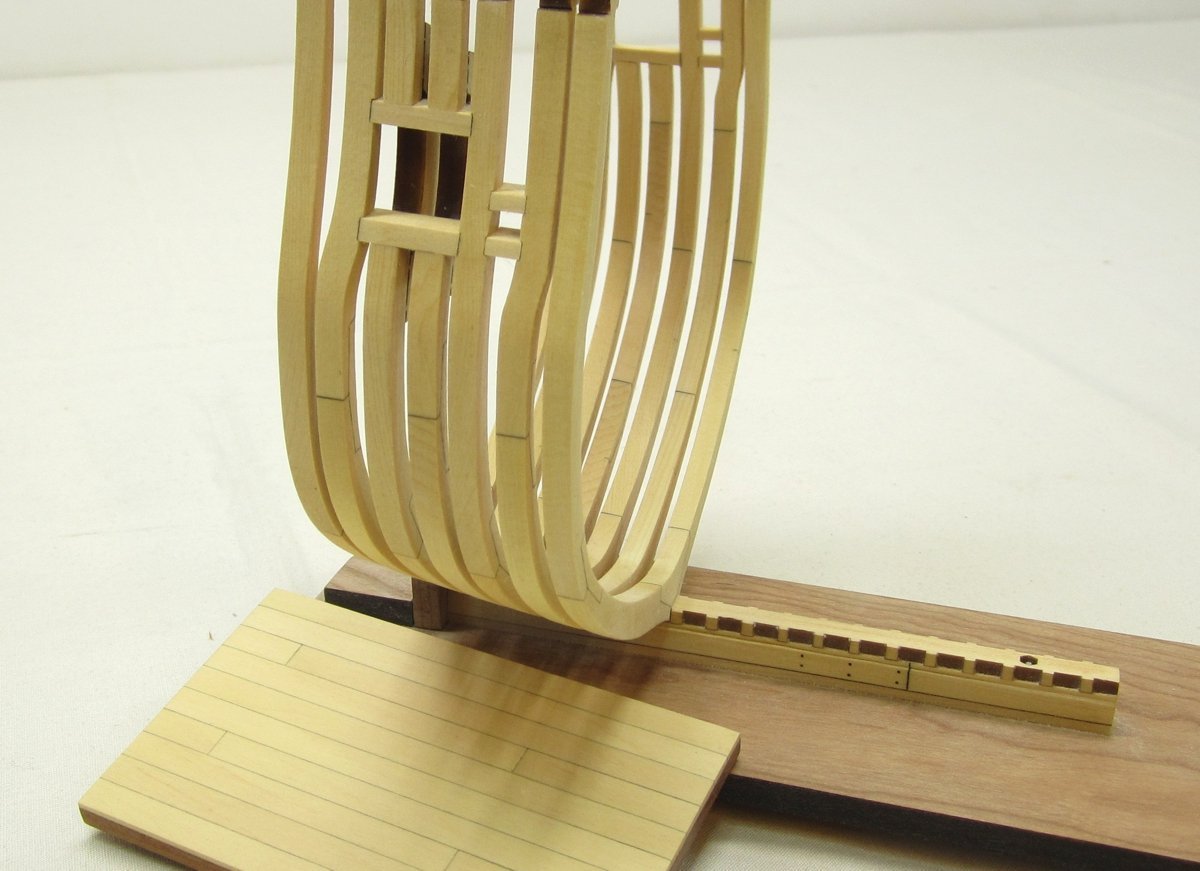
This is the Speedwell. The model on the bottom is Greg Herbert's model. There is a lot of info available mainly because David Antscherl and Greg have already documented it in their two book series. In addition there are plenty of original drafts and the Contemporary model. Making a kit with laser cut pieces and CNC carvings is a logical next step in my opinion. I cant think of a better suited "learning" subject for a POF model. Mainly because of its size and decorative appearance. Plus the not to burdensome number of guns and two masted rig. I figured why not do this one before it gets pirated so a legit version could be made available of it. See here for Greg's beautiful scratch -built version. and here I am hoping because of the support and available resources that there will be a great deal of interest in such a project. Especially if many have the books but not the tools or experience or confidence to build it entirely from scratch. Not to gunk up this build log too much but please feel free let me know if this is a subject that could be of interest.

- 1,784 replies
-
- 19
-
-
-
- winchelsea
- Syren Ship Model Company
- (and 1 more)
-
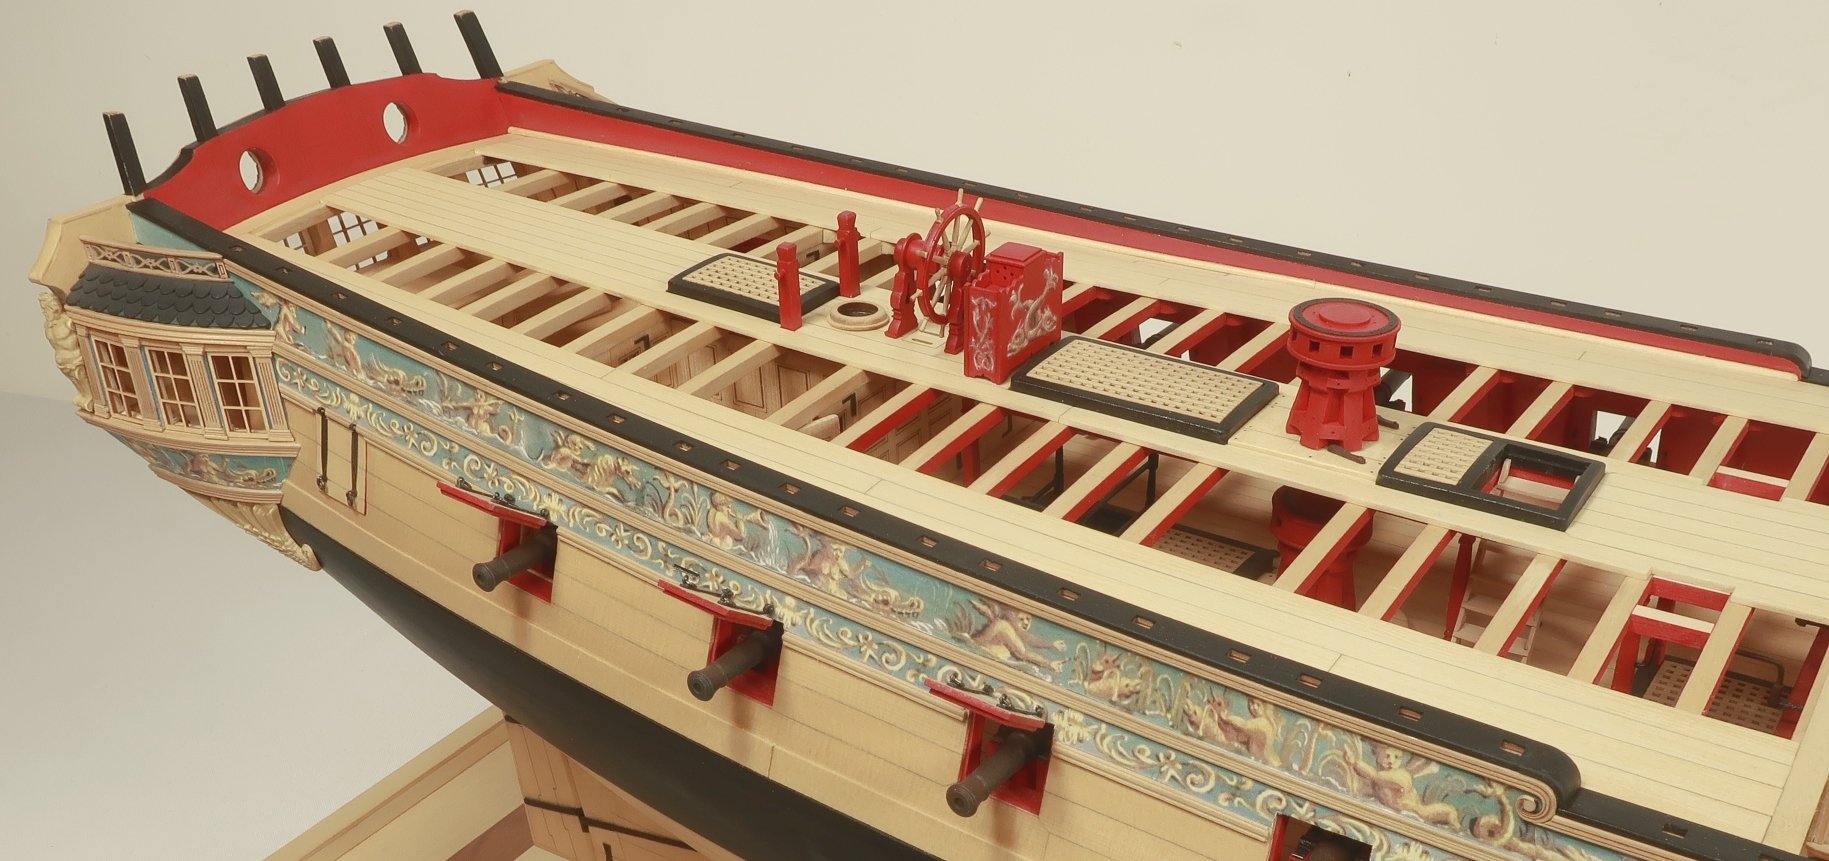
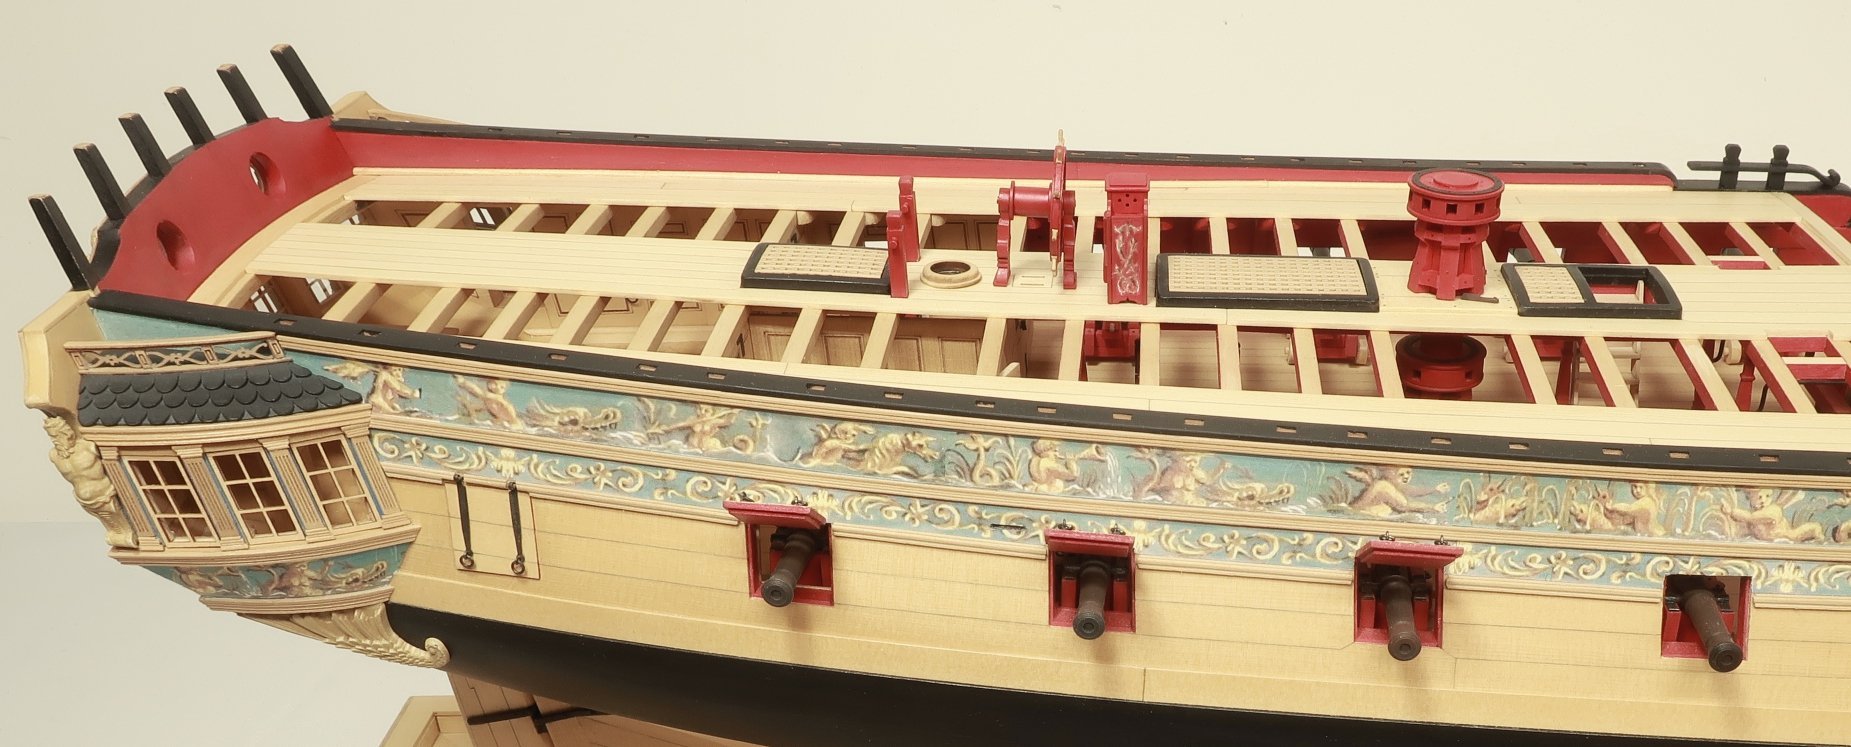
Currently under consideration....fully rigged. Planked above the wales with frames exposed below.

- 1,784 replies
-
- 28
-
-
-
-
- winchelsea
- Syren Ship Model Company
- (and 1 more)
-
Thats good news. But alas the Winnie must be completed first. But we are getting really close. it wont be a huge two or 3 decker. It will be a smaller model fully rigged. It will be a great first time exercise in framing. Nothing to terribly difficult. I am hoping Jack will be able to do all carvings as well. Chuck
- 1,784 replies
-
- 14
-
-
- winchelsea
- Syren Ship Model Company
- (and 1 more)
-
No rigging on the wheel for me. But you can do that if you like. I would guess a .025 or .030 rope size. No blocks needed because the rope goes through the gun deck. i did bot prime the brass tube. I did however run some steel wool over it. But you guys could also use styrene tube or even turn the drum from wood. A 1/4 dowel would work as well. Lots of options there for you guys. And yes I am getting excited about a pof kit. I hope there is some interest out there. I would hate to start making one and have no interest from the builders at large. Unless of course only having the option to buy pof kits from china is ok with most of you. Please share your level of interest!!!!
- 1,784 replies
-
- 11
-
-
- winchelsea
- Syren Ship Model Company
- (and 1 more)
-
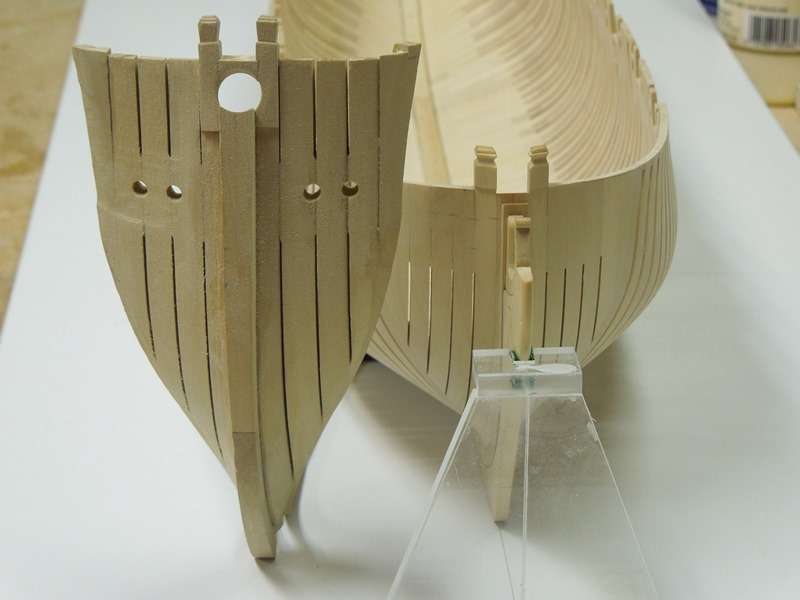
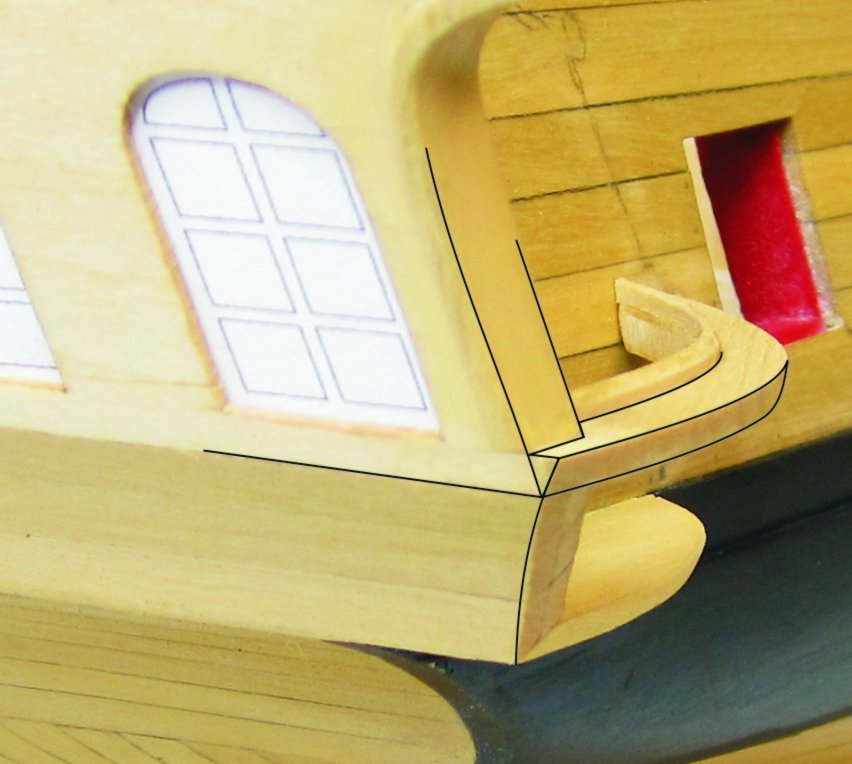
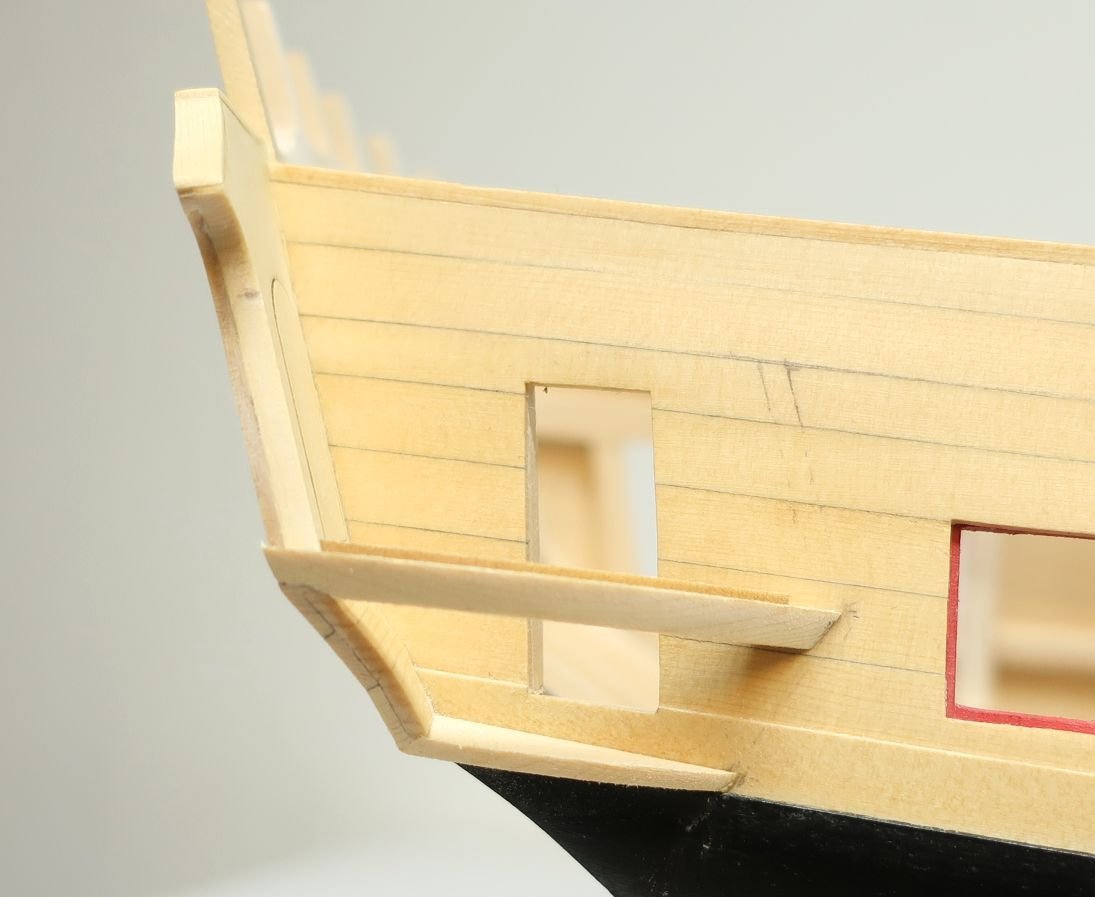
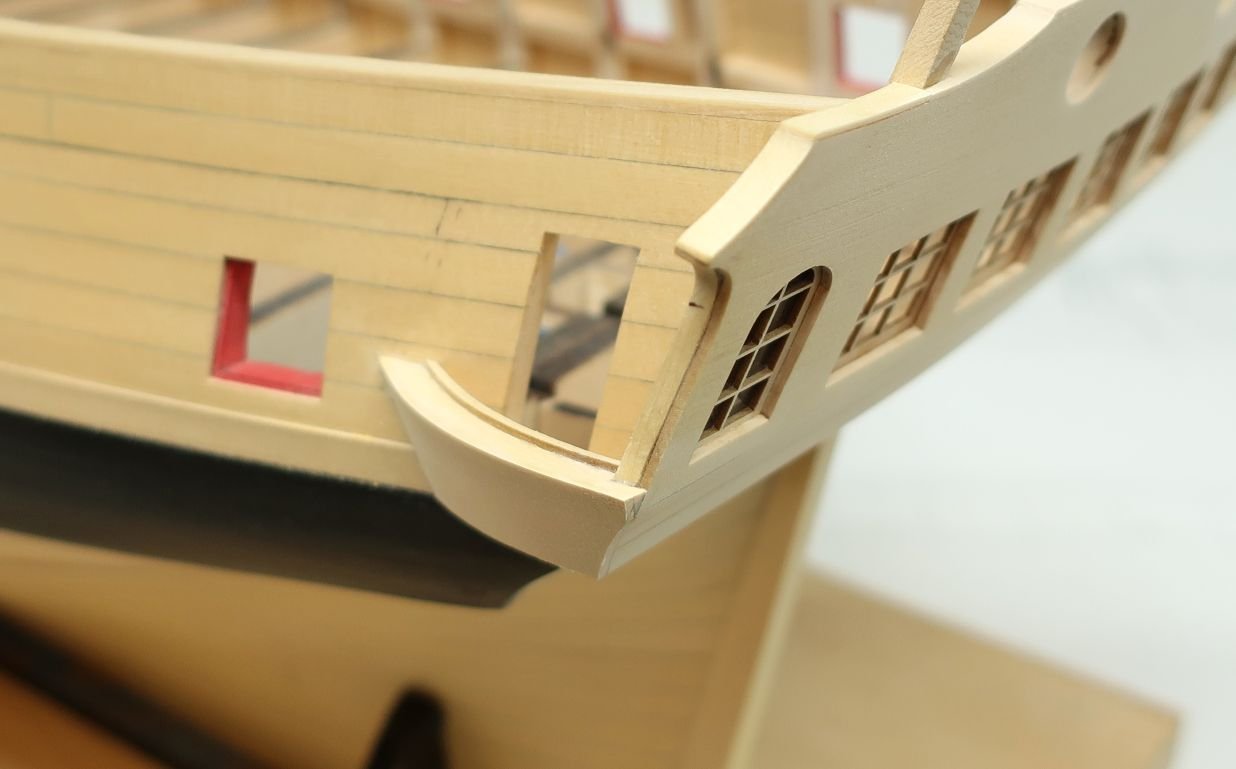
I would think about omitting the pieces of the qgallery frame that sit against the transom and the hull. Why would you need it? Just use the front outside curved timber. Once the planking is added to the counter it should make it very strong. It certainly makes cutting it out easier and gives you more room inside gallery. Just a thought. Similar to this.
- 857 replies
-
- 12
-
-
- Sphinx
- Vanguard Models
- (and 1 more)
-
Materials List for Chapter 8 and 9. I am cutting chapter 9 parts as I write this!! Before anyone asks. Materials List for Winnie Eight.pdf Materials List for Winnie Nine.pdf
-
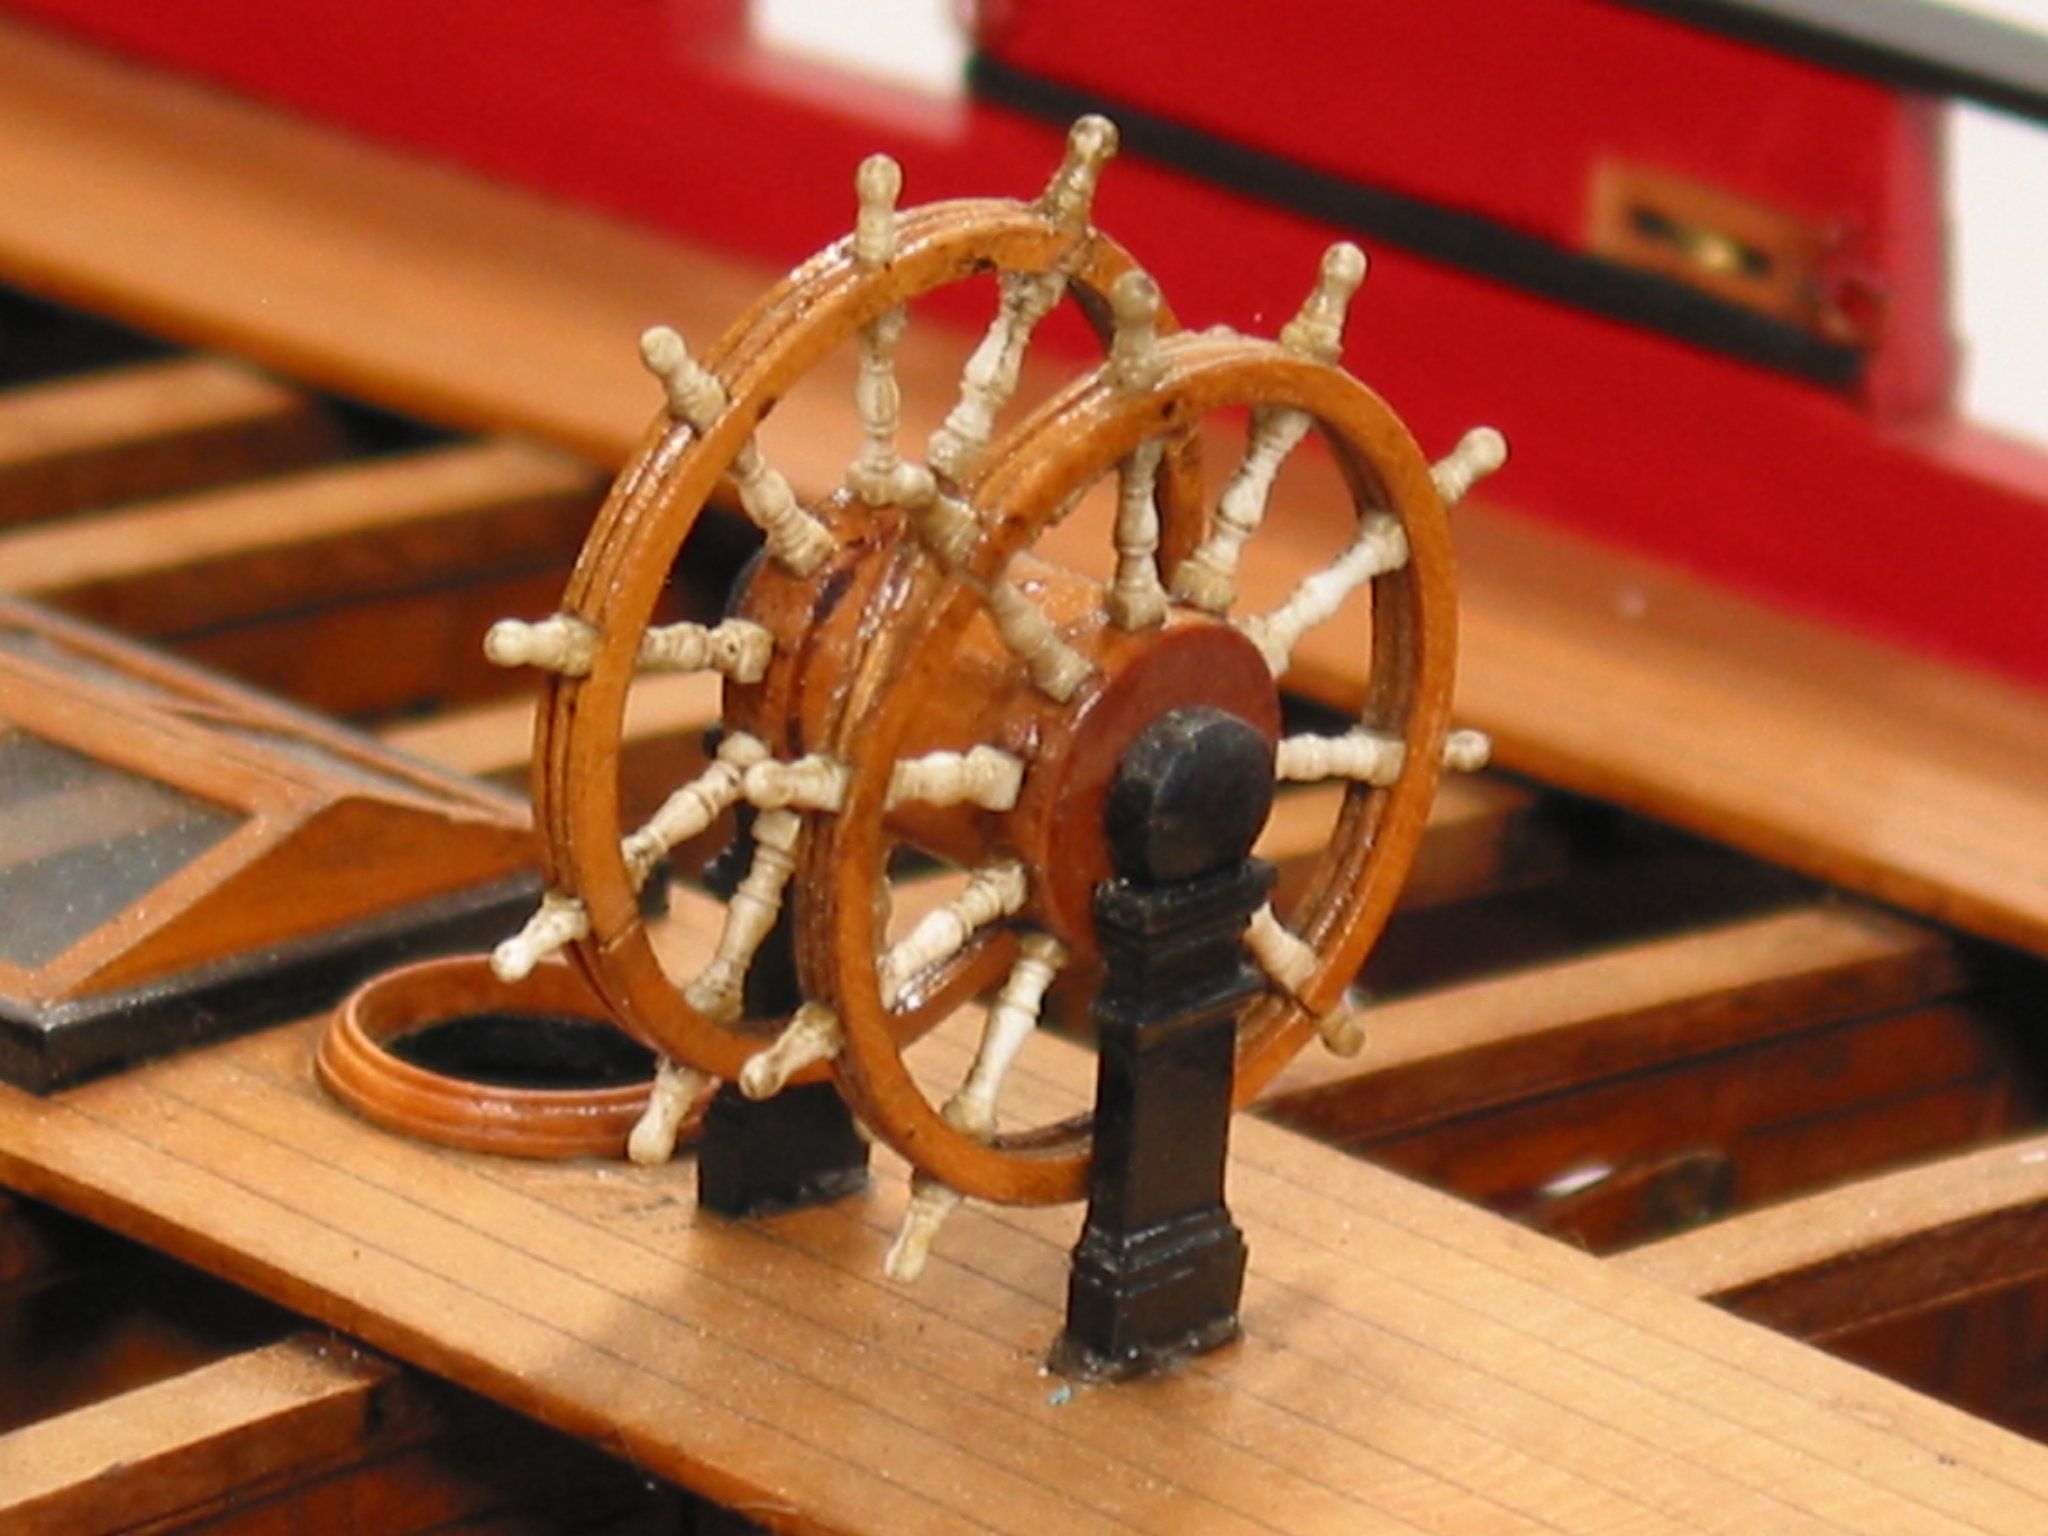
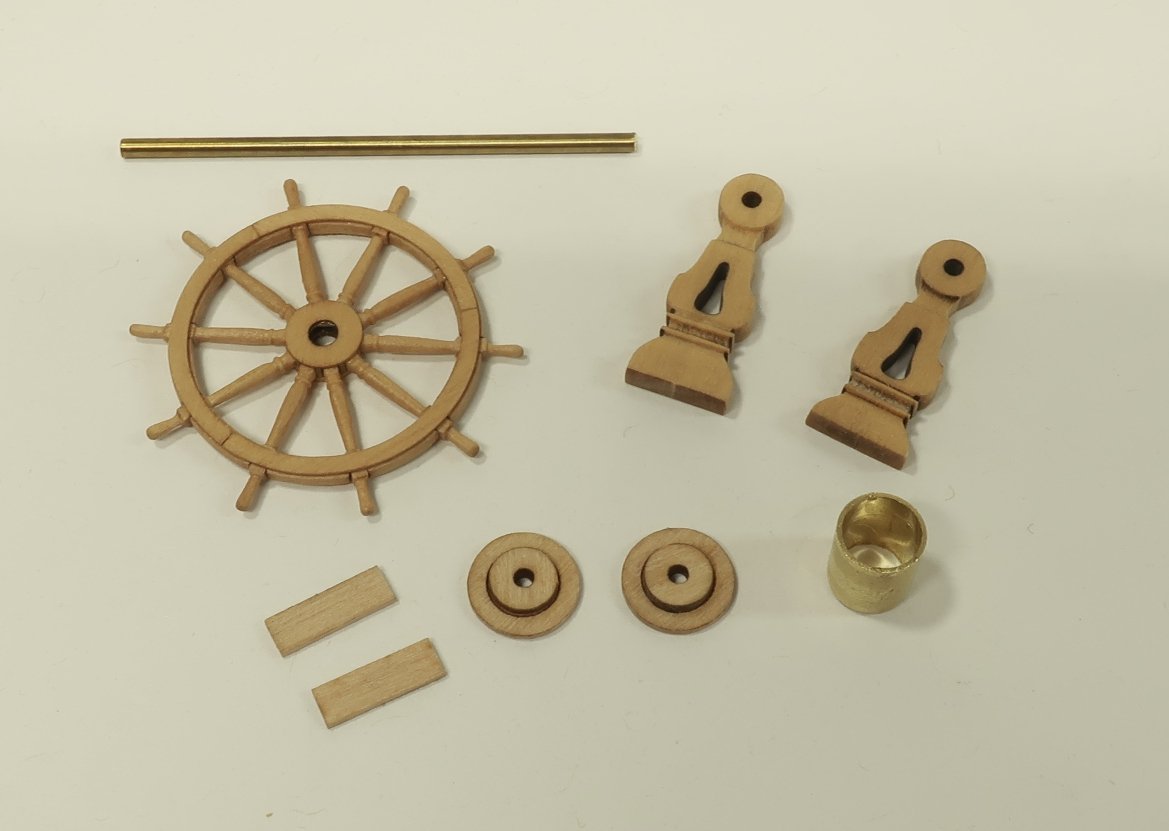
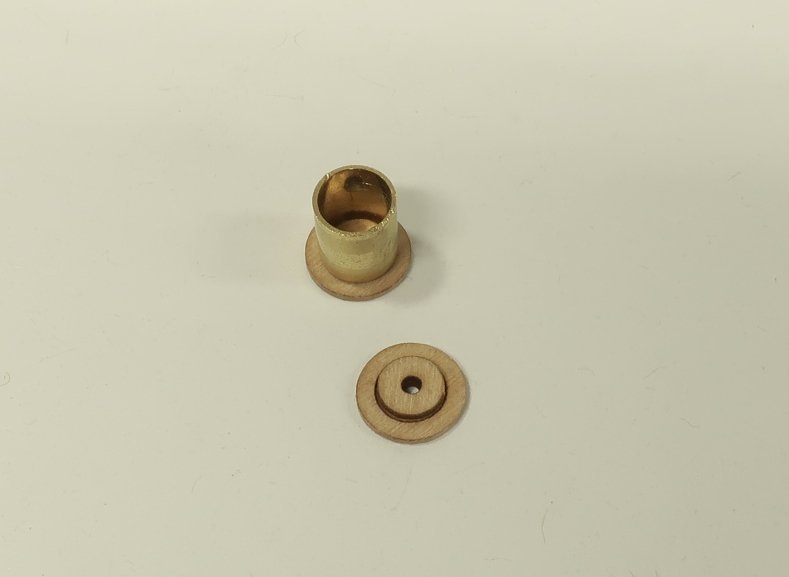
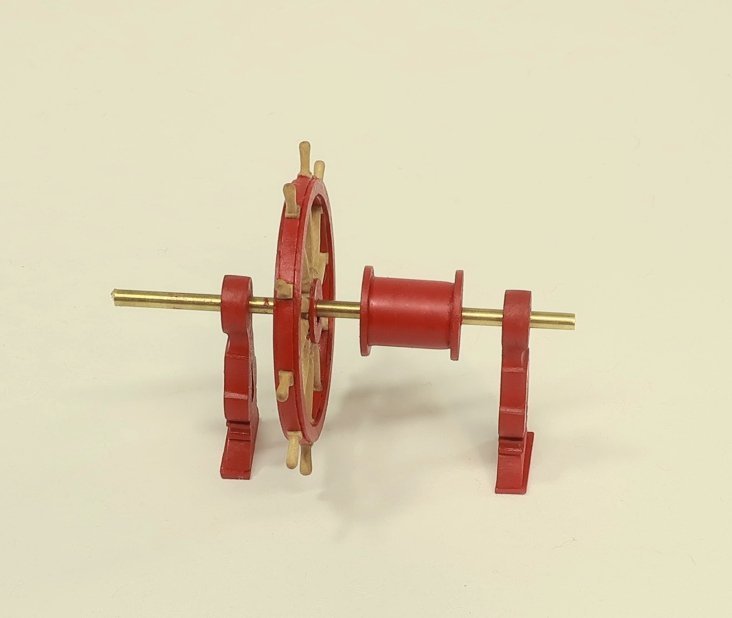
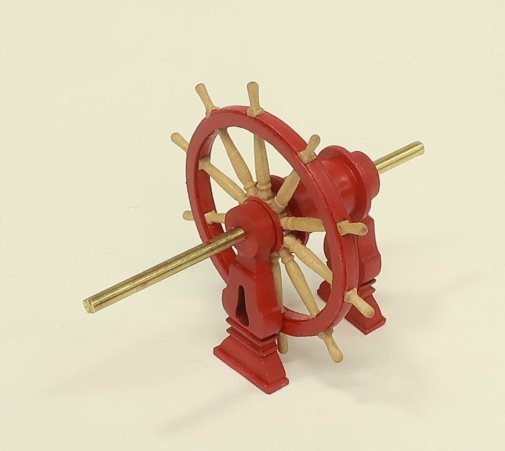
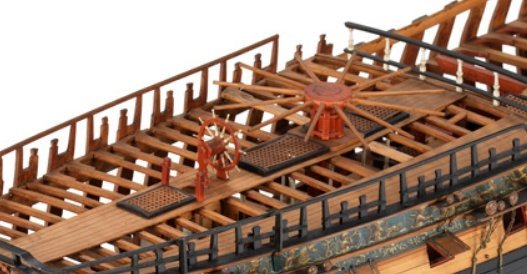
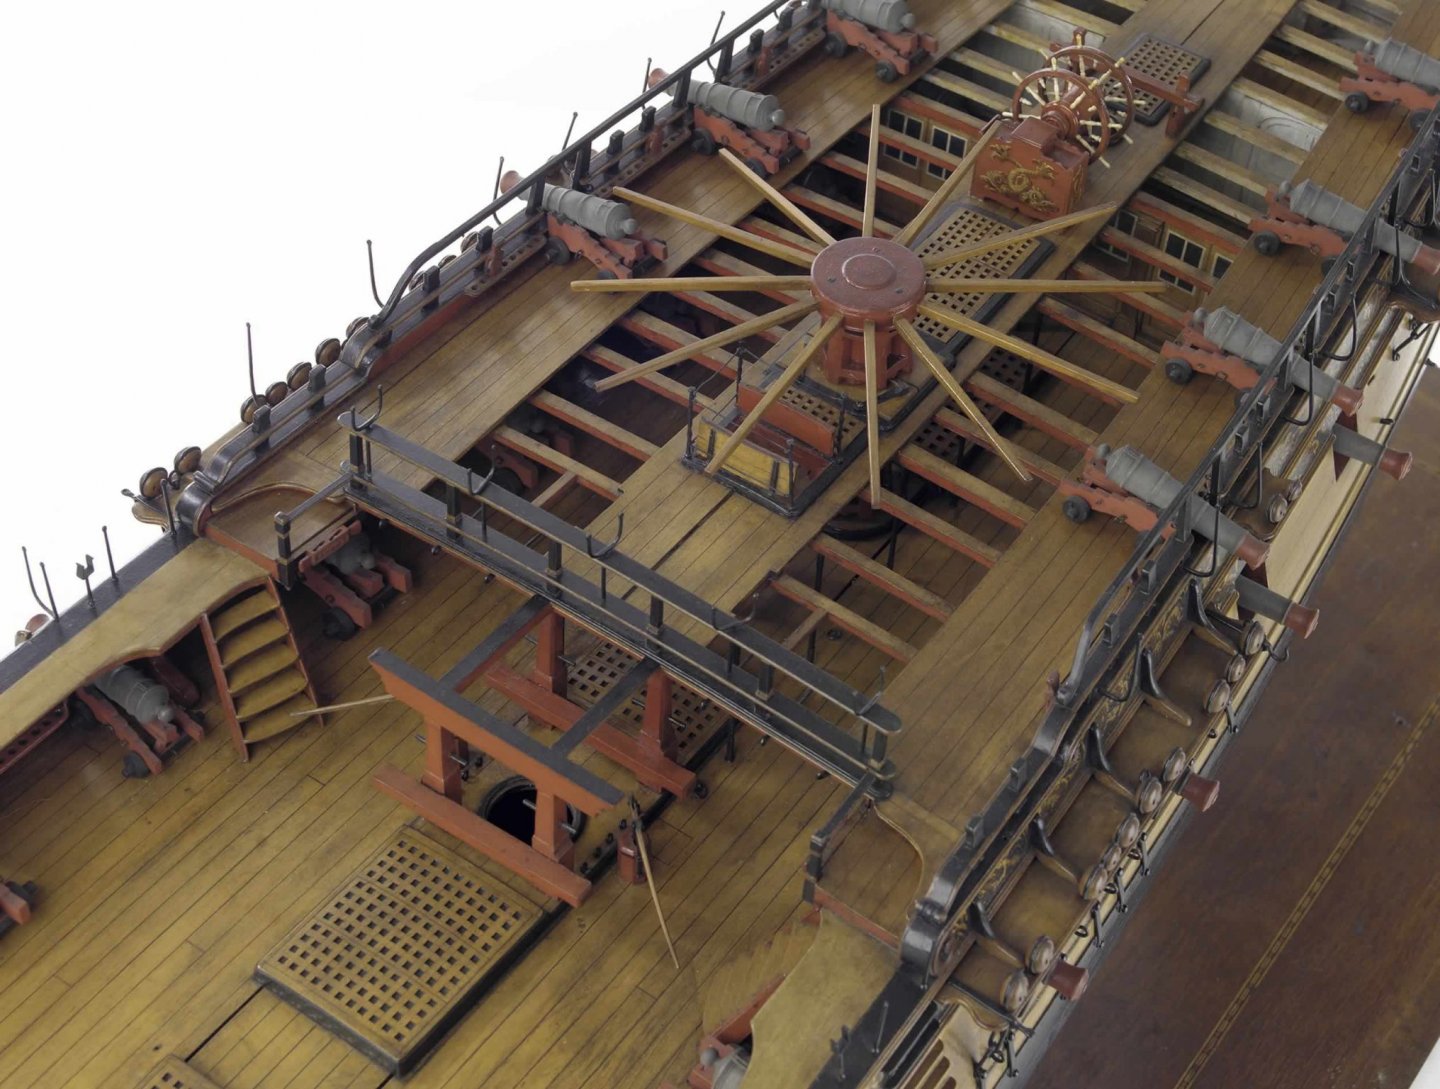
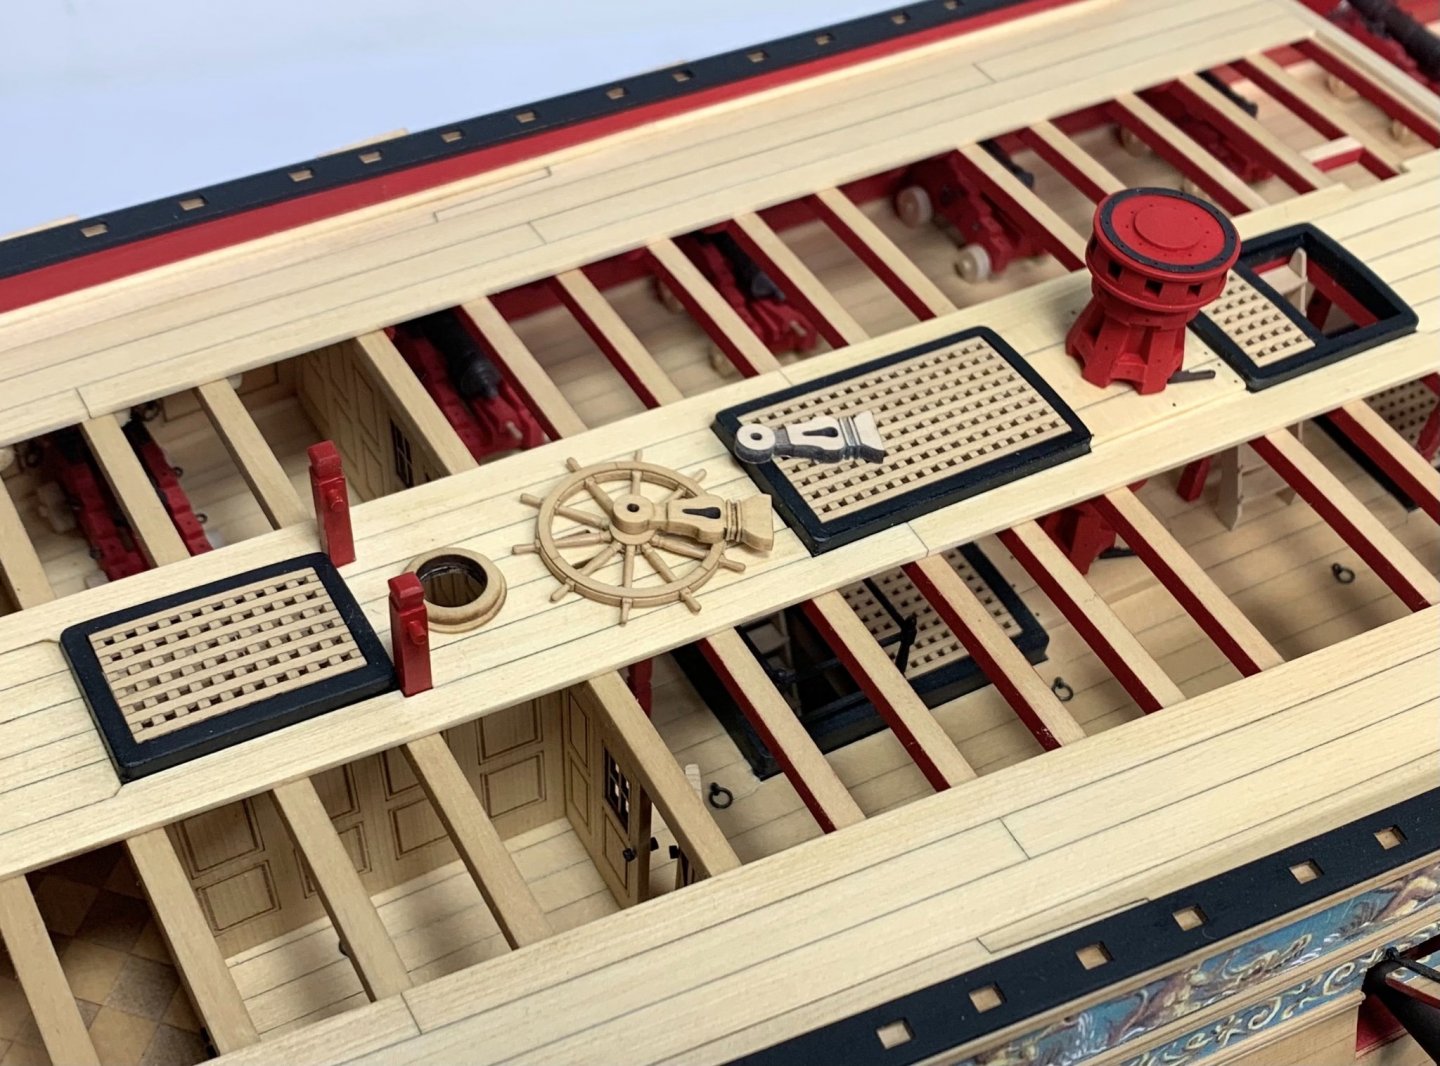
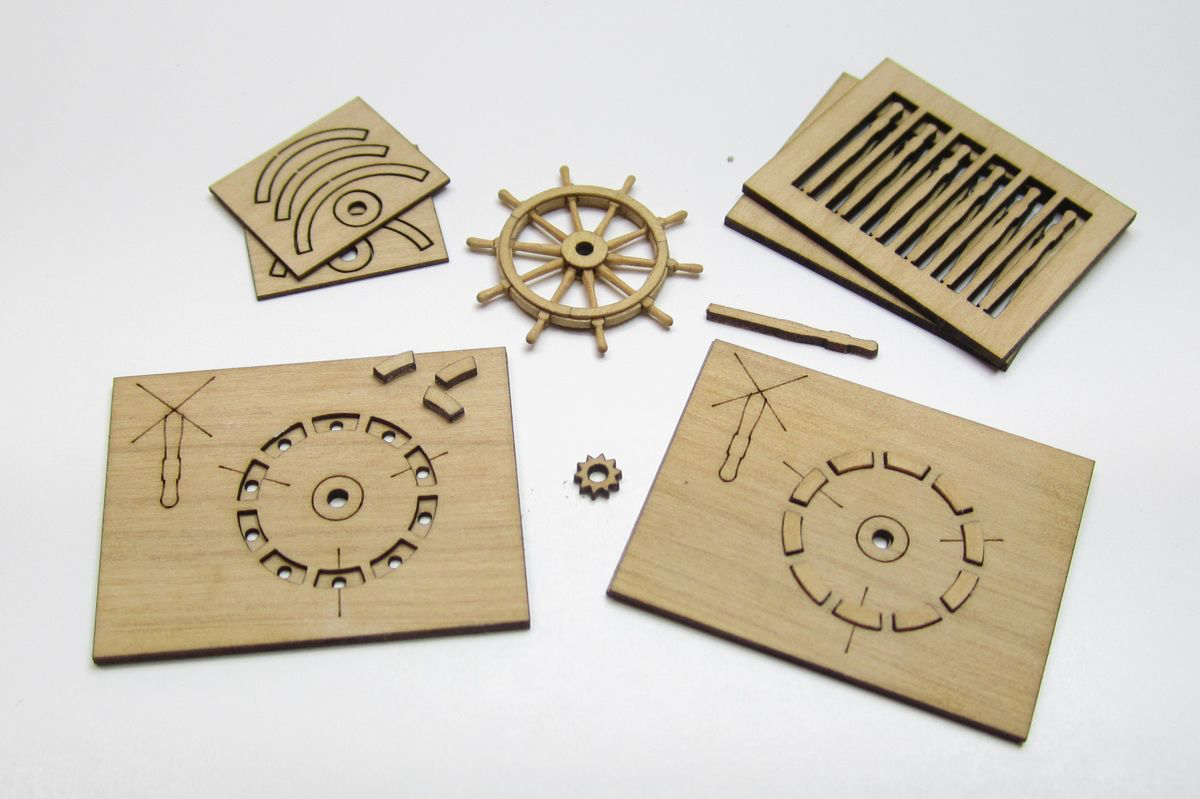
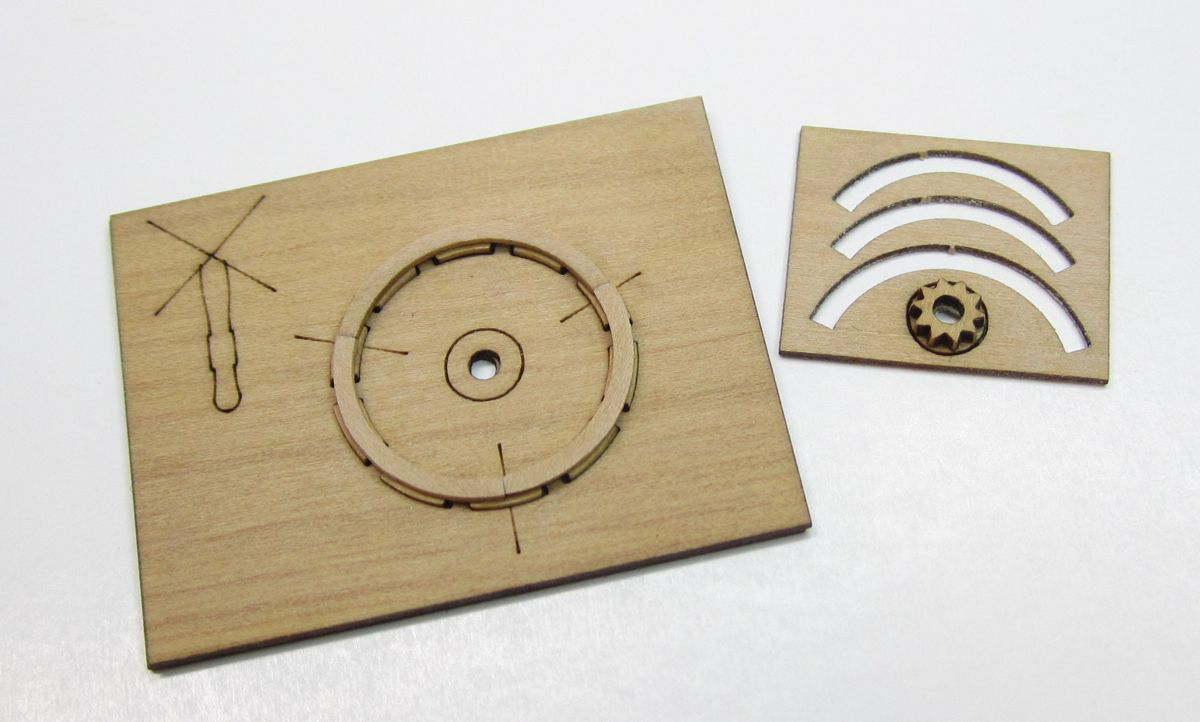
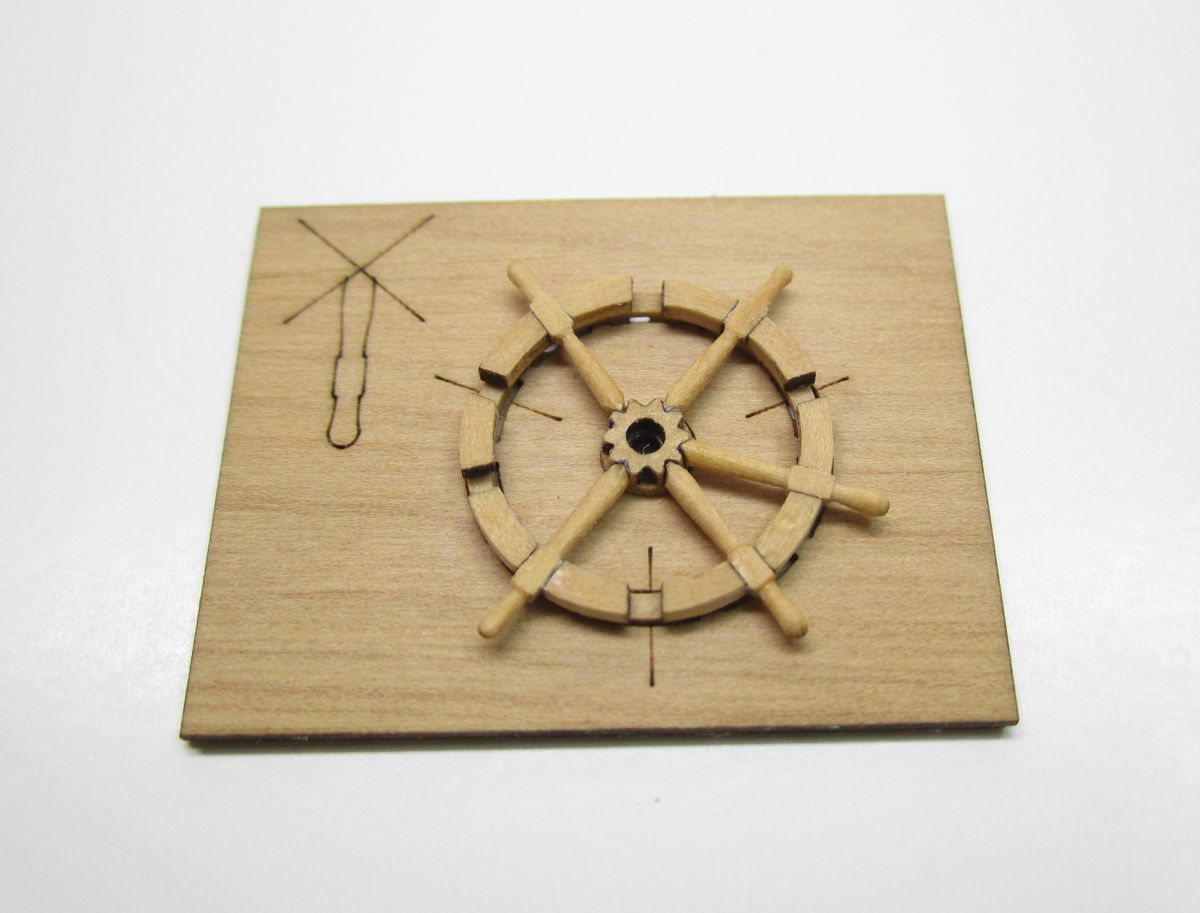
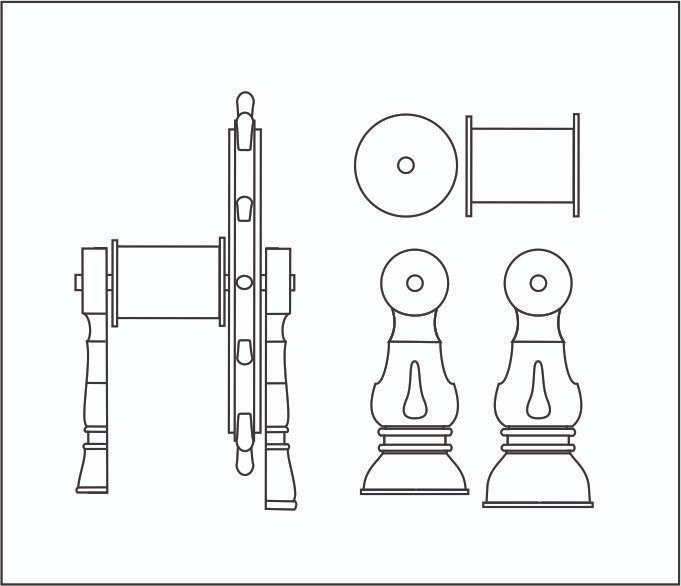
The 1 1/4" ship's wheel already exists as a mini kit as I mentioned. So I wont bother going through those instructions again. They are on my website as a download. But the other parts of the wheels assembly will be in the chapter parts. You can see the wheel and the other parts below. Note How the discs for the drum have two layers. You can glue the smaller disc to the larger ones as shown. The other parts had their char removed. The forward wheel support is longer than the aft support. This is done because of the camber of the deck forward to aft. So after cleaning the char dont glue the feet onto them yet. Those are the flat pieces or strips shown in the photo above. Once you test assemble all the parts on the 1/16" brass bar, you should position it on deck to see how it fits. Adjust the bottom of the two supports (probably the forward longer support) so the wheel is nice and vertical. You dont want it to lean forward because of the slope of the deck. Once you get those adjusted you can glue the feet into position. To complete the drum...take the 1/4" brass tube and it will fit onto the two layer disc. Then add the other side to finish it up. Paint it red. I also painted the supports red and the rim of the wheel. You can see in the photo below that the feet have been glued onto the bottom of the supports before painting them. Treat every fitting like it is a model all its own Treat every fitting as if it is the only project you have to work on….just smaller. As if it will be displayed on its own. Dont rush these. Cut the brass rod to length and glue the elements in position. Remember to face those supports in the right direction. The longer one on the forward end. Then you can glue it on the model. And the obligatory overall shot of the progress below. Next up will be the binnacle... Any questions? Or comments.


- 1,784 replies
-
- 33
-
-
-
- winchelsea
- Syren Ship Model Company
- (and 1 more)
-
Well er about that.....The prospect another huge undertaking is a worry of mine. BUT, I may be taking the plunge into a Fully-Framed design for my next subject, whatever it will be. I think there needs to be some more choices for model builders rather than just those POF kits from the east that are emerging. If anybody wants to build a POF kit they are forced to only buy the stuff that comes out of China. So I may be the first to develop a full kit done in a style that is different from those being made in China at the moment. I think I can do better. We shall see how it goes over the next few months. I can tell you that tests are already underway. But its still 50-50 which way I will end up going. Not just a cross section either...but a full hull. You have seen my other tests into this type of POF development by now. There are more on the drawing table at the moment. I think I should do this only because I am not getting any younger, LOL. So I may as well get this out of my system before I get too old to consider it.
- 1,784 replies
-
- 31
-
-
-
- winchelsea
- Syren Ship Model Company
- (and 1 more)
-
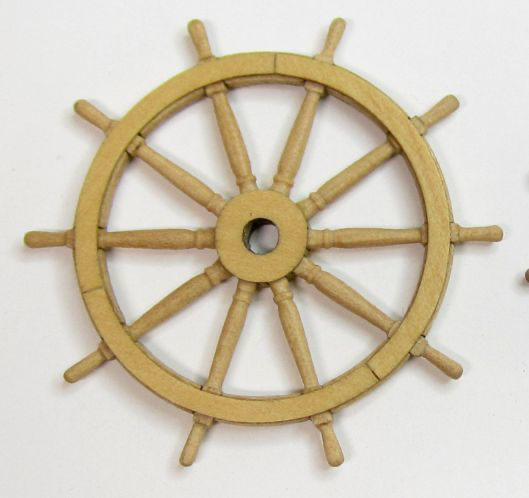
More paint color choices on the wheel as well. Here are some photos. For the contemp. model as you can see, the supports, drum and rim of the wheel are red. The spokes are ivory. I may be doing the same except leaving the spokes natural boxwood. and some winnie parts for the wheel being tested and contemplating color choices as well. This just taken with my Phone. For other cont. models its similar but there is some variation. Minerva...which has a double wheel. Winnie does not have a double wheel. But you can see how the supports are black in this case. And Amazon...all read with ivory spokes again. Again a double wheel. The ships wheel for the Winnie is sold separately and is already available. Sold one per package. For those guys waiting for the next chapter this is something that could be bought and made in advance. Its just the wheel as the other parts will be part of chapter 10. Buy the larger 1 1/4” wheel for Winnie. The wheel kit is built just like other master model builders build them. There are lots of small parts but it makes a beautiful boxwood wheel as you can see. You just need to go really slow and take your time. If you rush through the wheel mini kit …it will look a mess. So take your time and practice.

- 1,784 replies
-
- 30
-
-
-
- winchelsea
- Syren Ship Model Company
- (and 1 more)
-
Thank You.... Just a reference for next fitting.
- 1,784 replies
-
- 12
-
-
- winchelsea
- Syren Ship Model Company
- (and 1 more)