Chuck
-
Posts
9,724 -
Joined
-
Last visited
Content Type
Profiles
Forums
Gallery
Events
Everything posted by Chuck
-
 That planking looks pretty darned good to me. It looks excellent.
 -
Stove instructions. Winnie stove instructions.pdf
-
Black Pearl by LFNokia - 1/48 - open hull
Chuck replied to LFNokia's topic in - Build logs for subjects built 1501 - 1750
A very nice start to your project. Well done. Good to see someone developing a set of plans for themselves rather than buying the pirated kit from ZHL. Nicely done. Chuck -
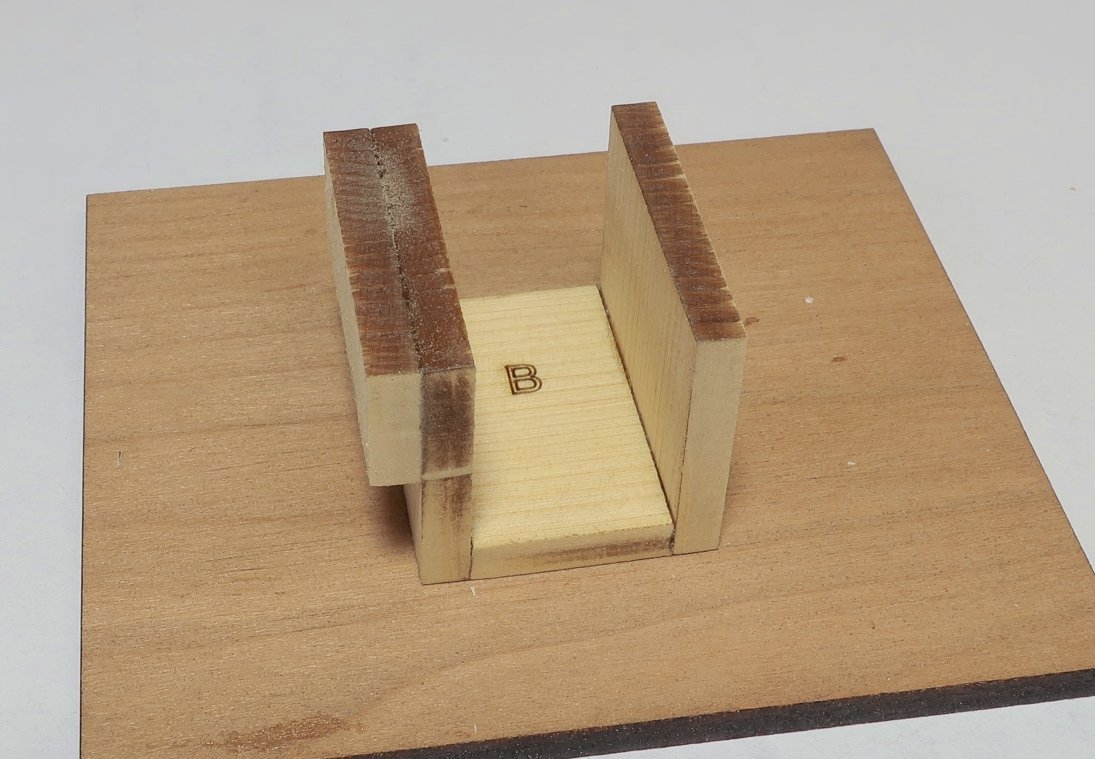
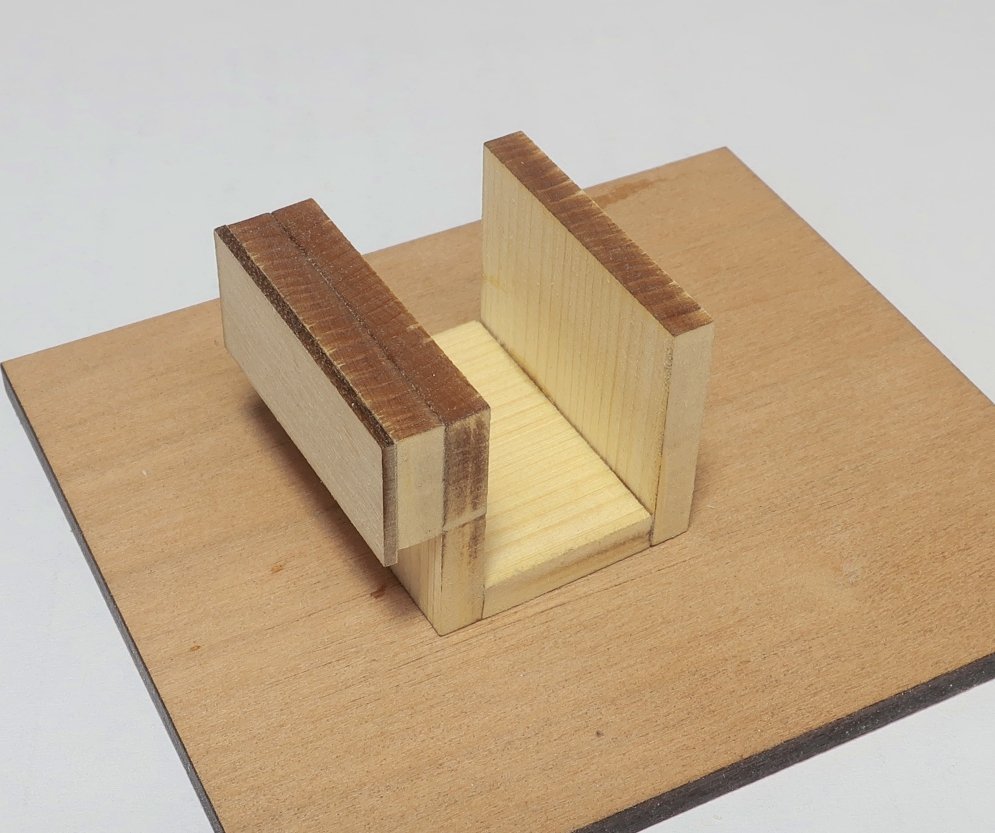
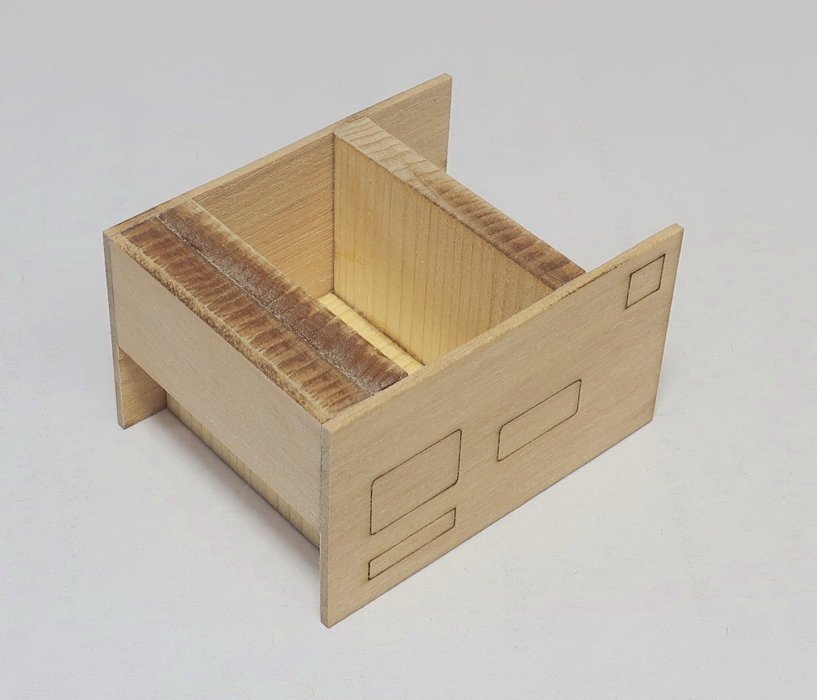
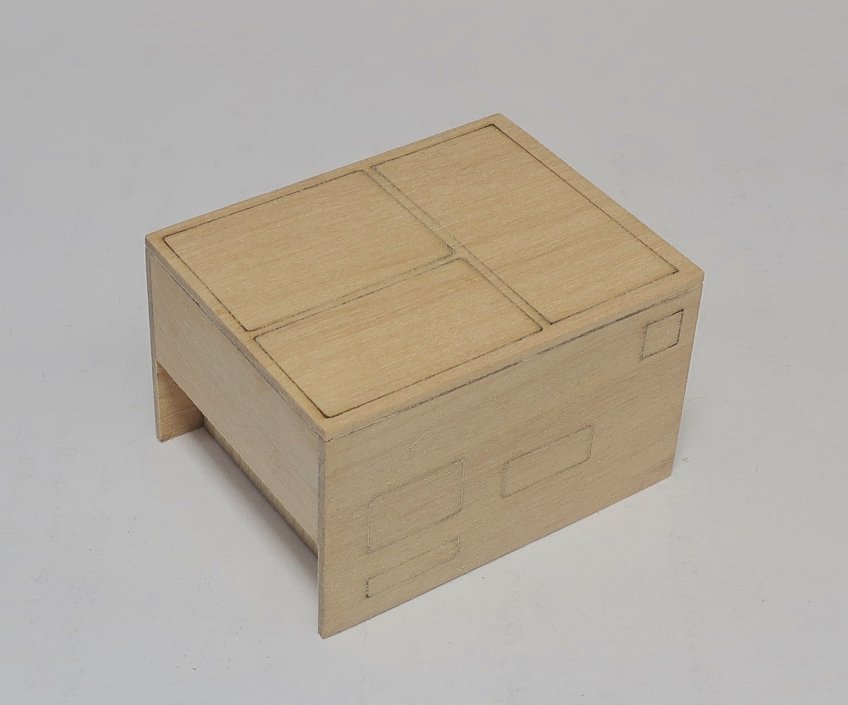
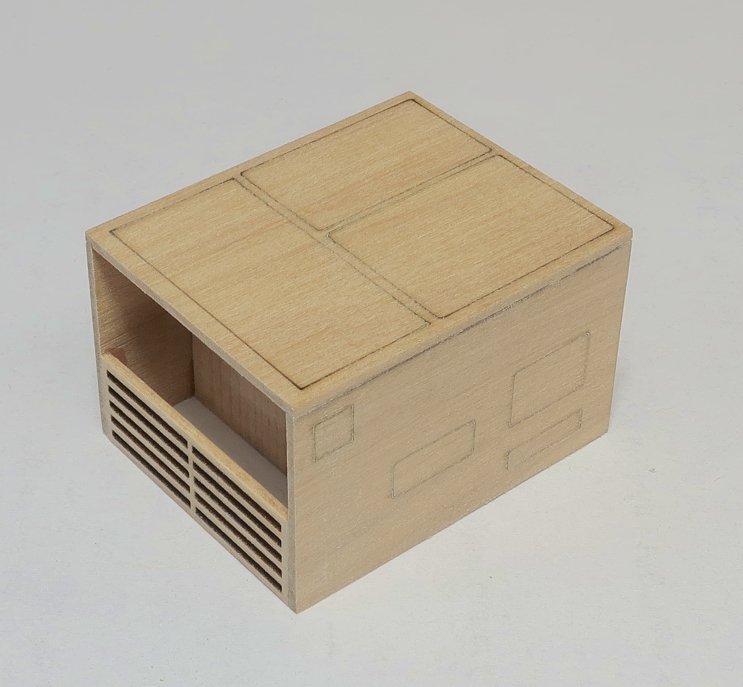
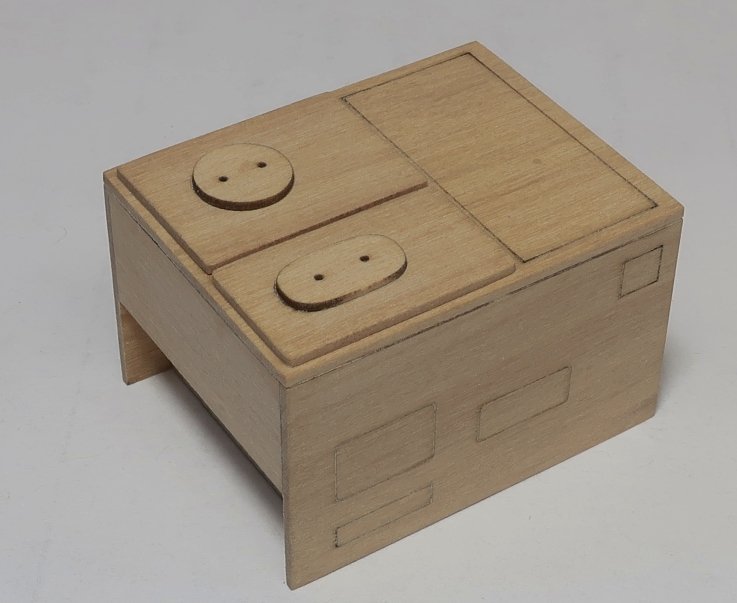
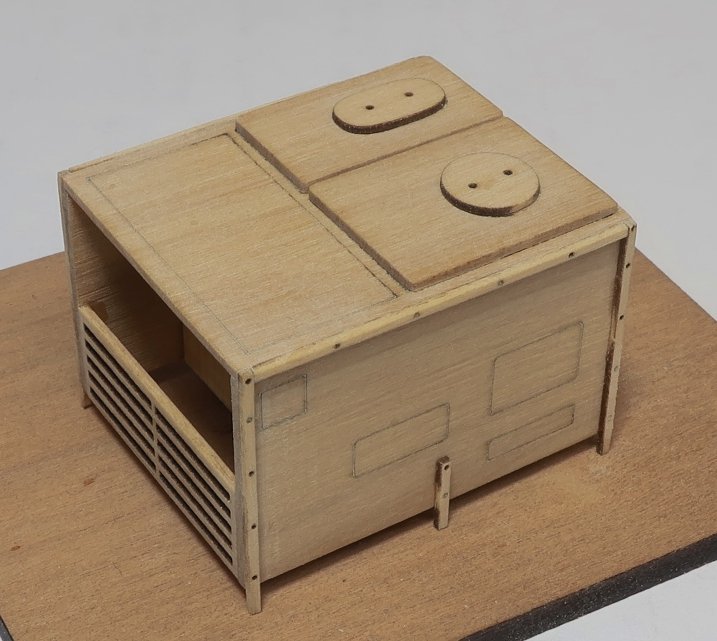
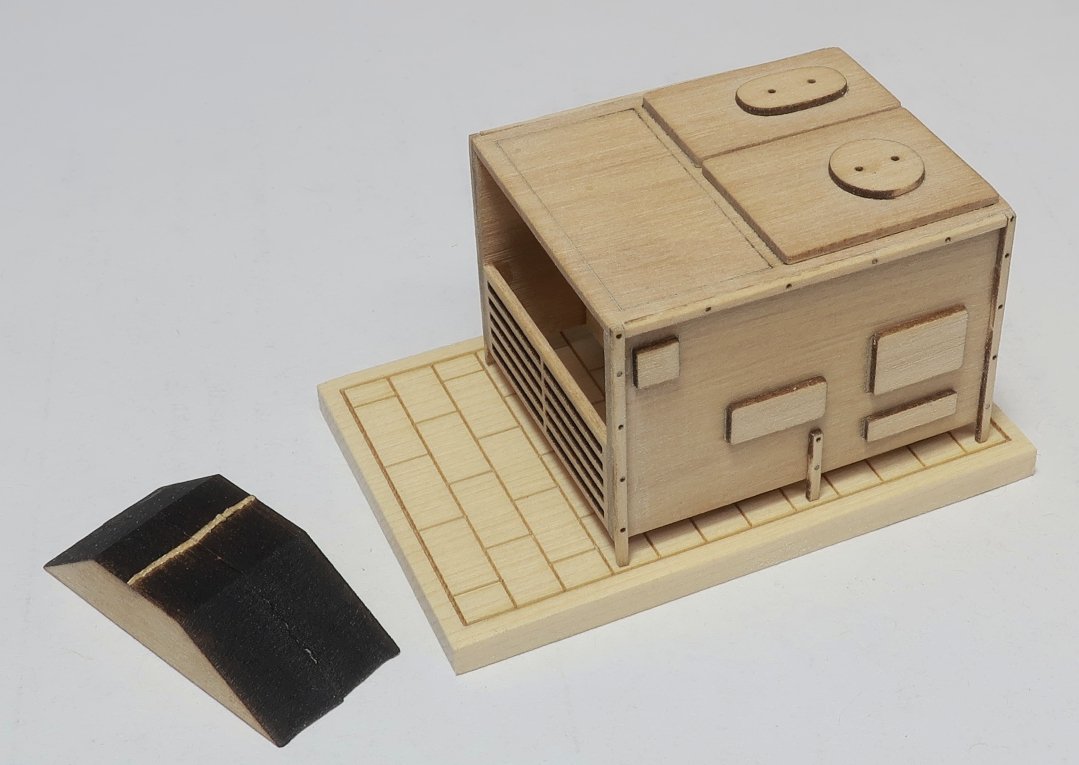
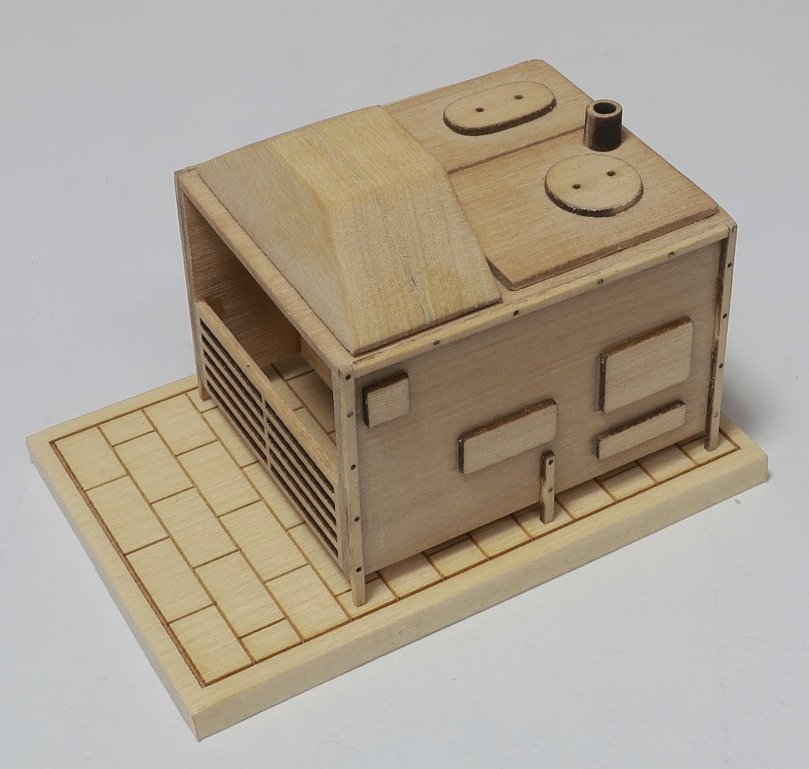
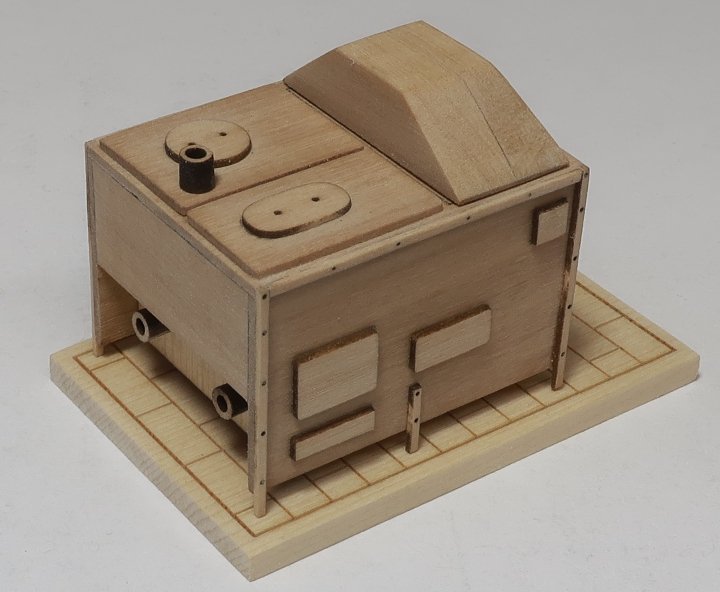
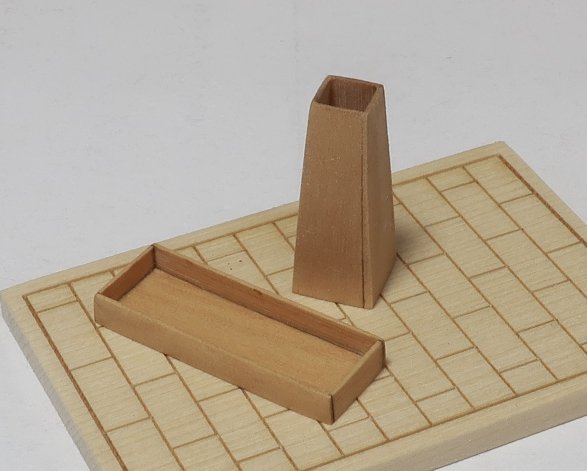
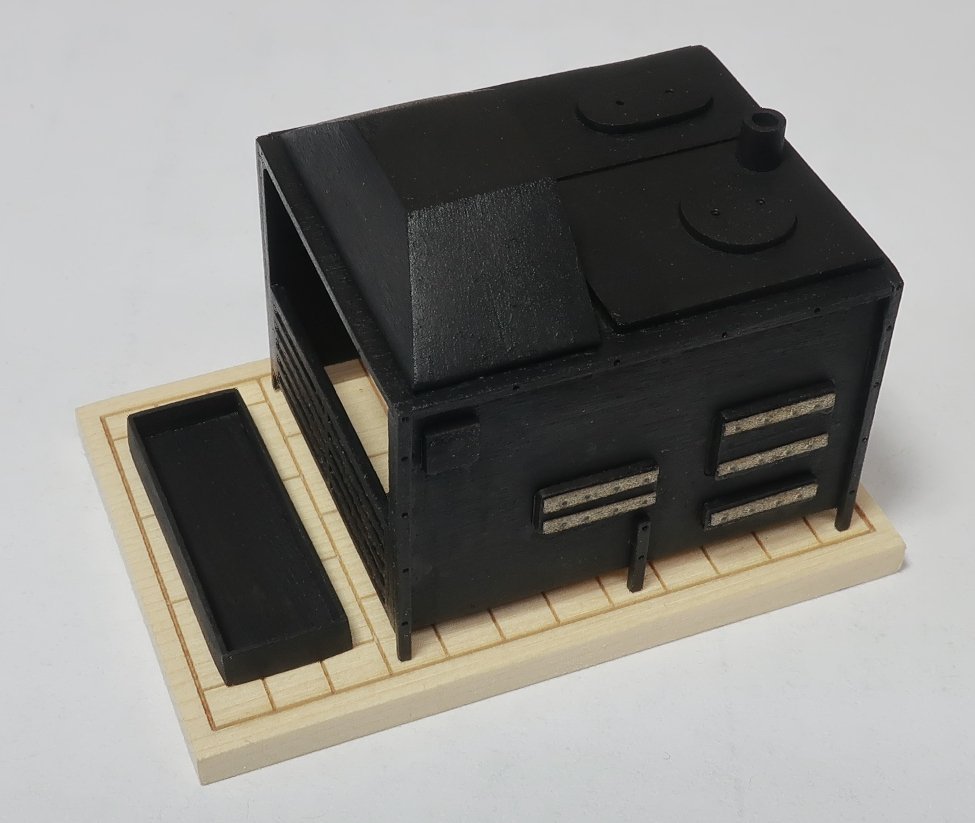
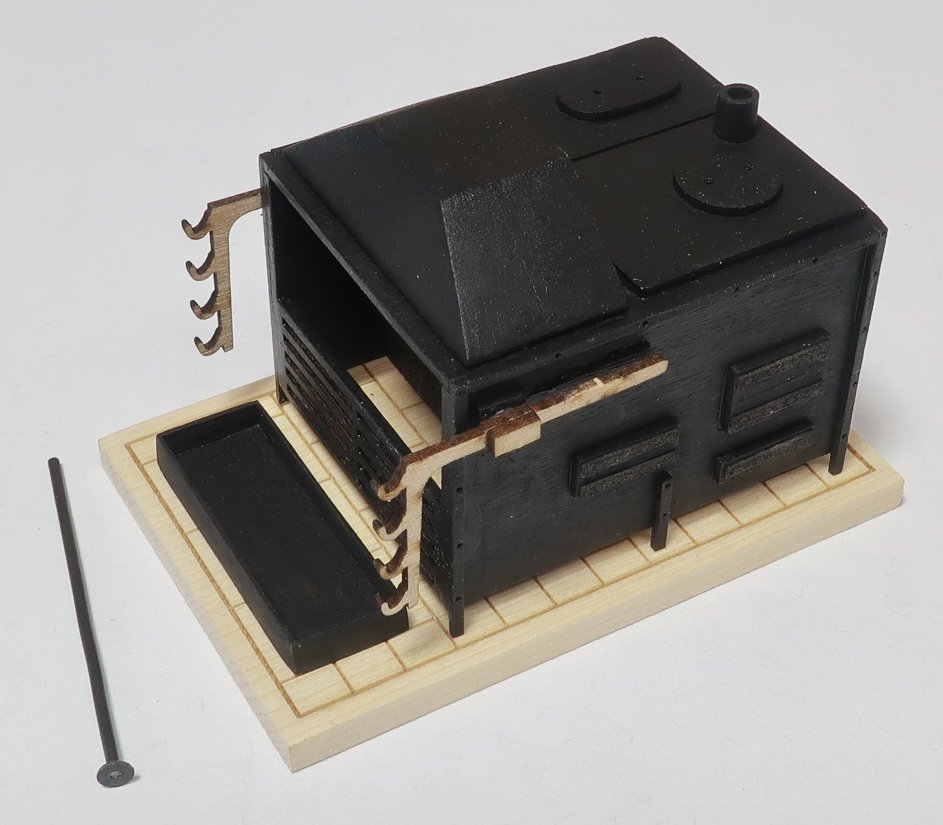
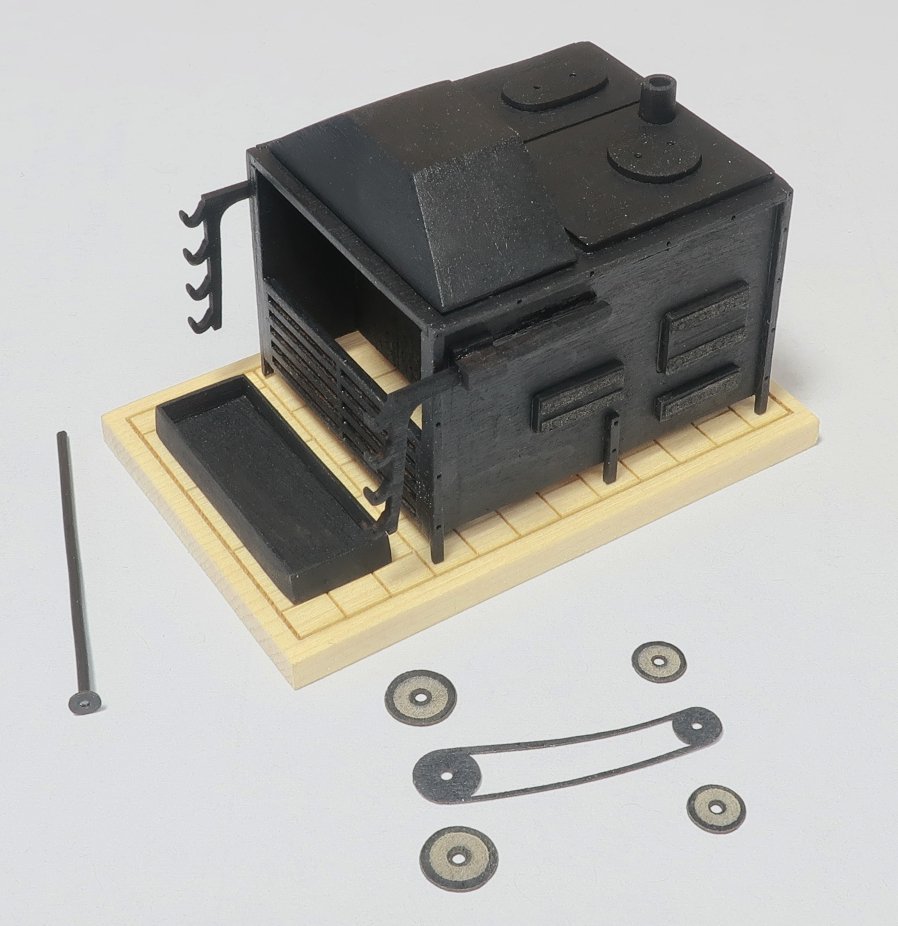
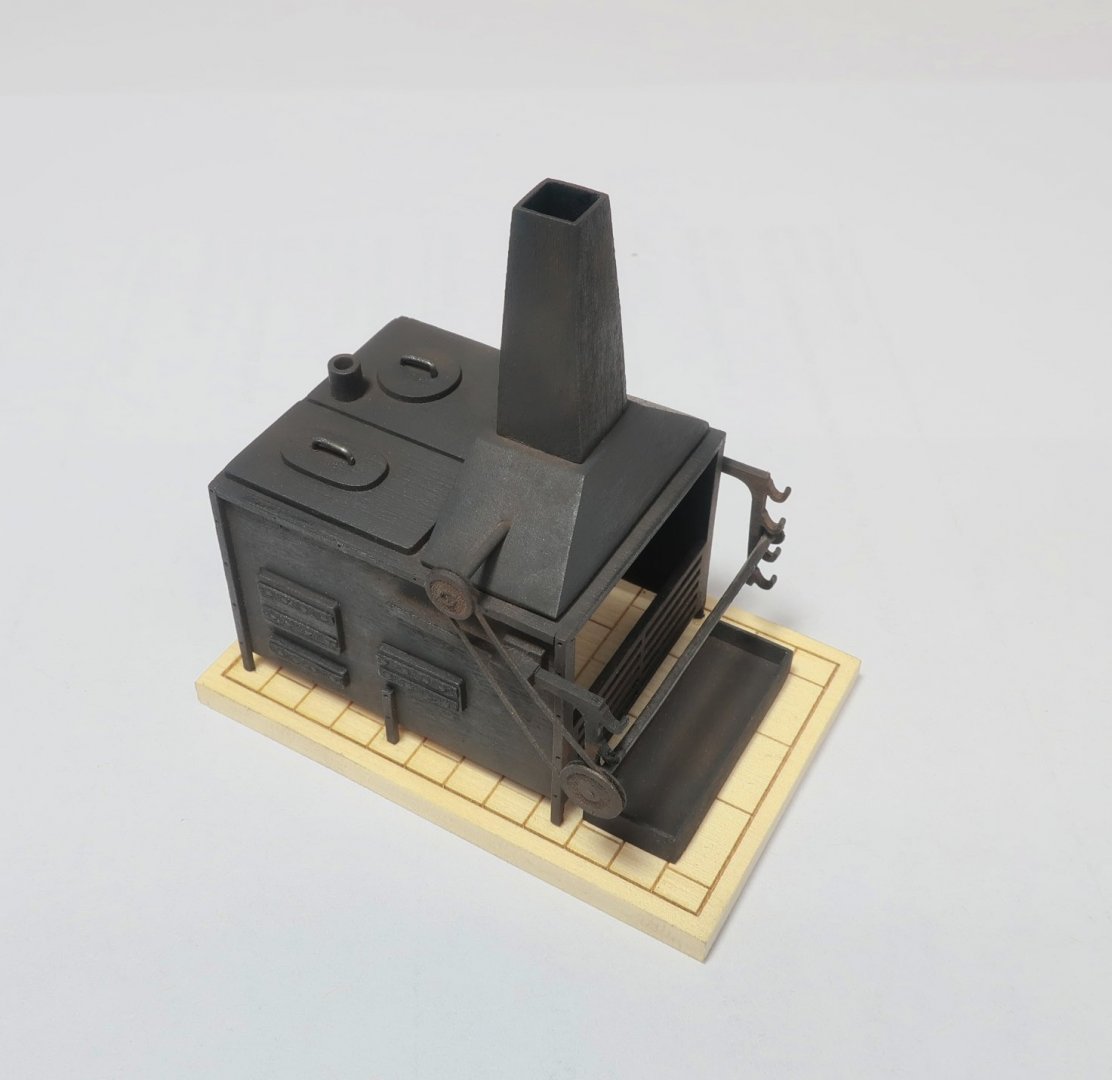
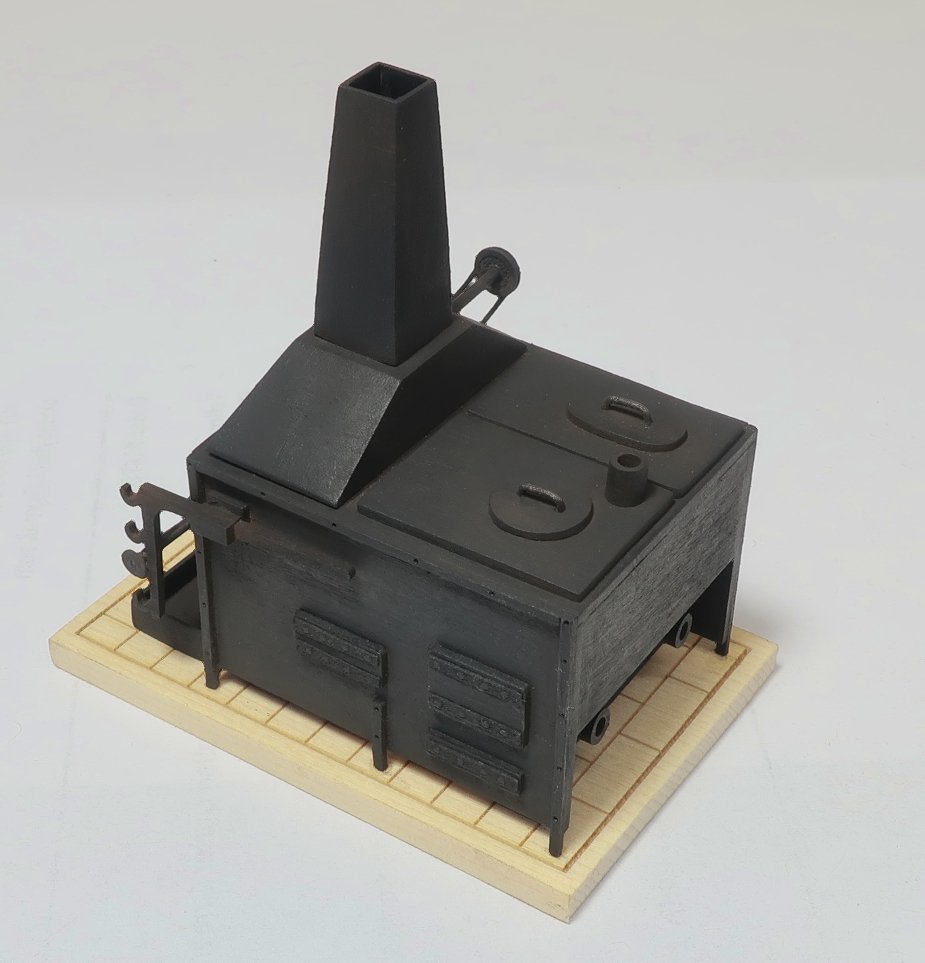
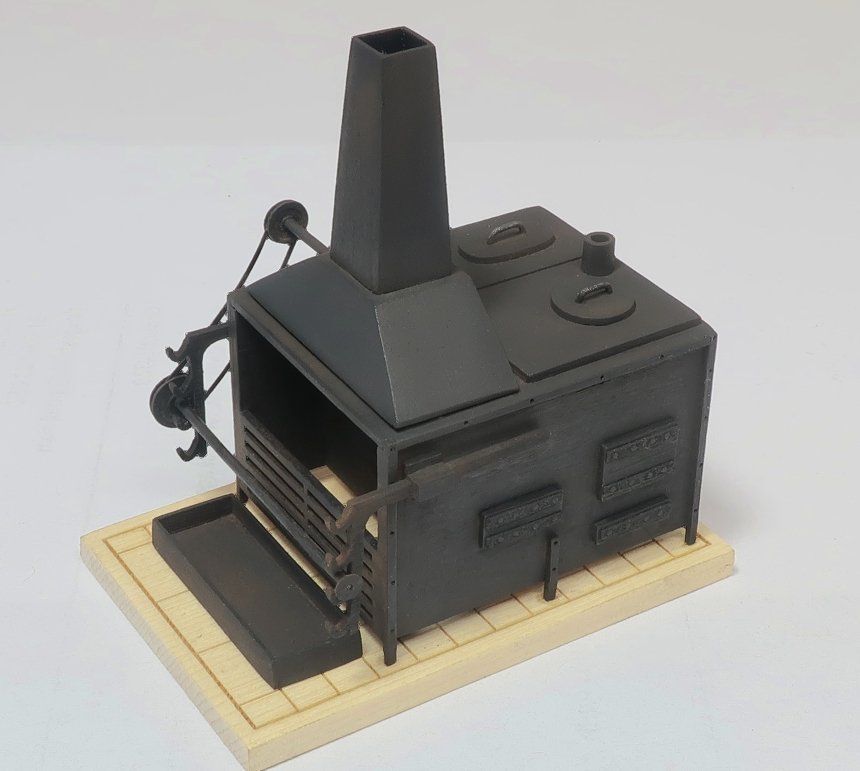
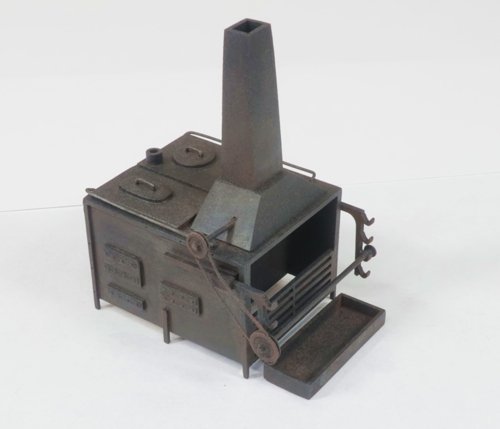
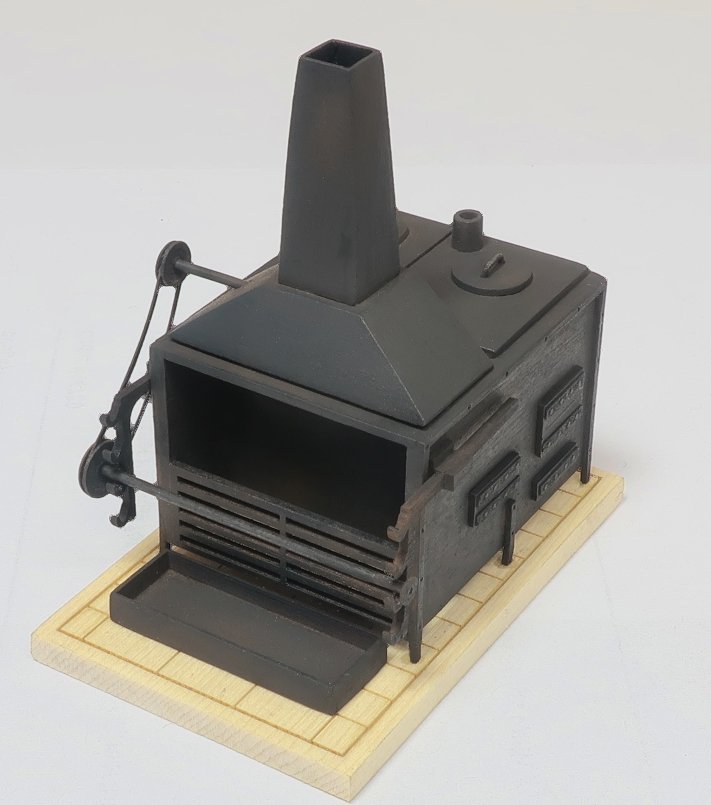
If you recall I didn't take any construction photos of the stove the first time around so I had to build another one. This will allow me to complete the 8th chapter. Step1....Assemble the four 1/8" cedar pieces that will become the foundation for the stove. Note the bottom "B" in the photo. The two larger pieces are glued to each side of "B" so the ends are flush. The final smaller piece is glued to what will be the aft end of the stove. The top edges are flush. Sand all edges flush and there is no need to remove all the laser char but the fore and aft surfaces should be sanded smooth for painting black later. Step 2 - Glue the aft face (1/32" thick) onto the aft end. The top is flush. Note how the bottom edge hangs lower a bit. That is by design. Step 3 - Glue the 1/32" thick sides into position. Make sure you orient them the correct way. Note how the aft edges and top and bottom are flush. Sand them smooth with fine 320 grit sandpaper. Step 4 - Glue the top into position. Sand all edges and corners flush. Once again be careful to glue it on in the correct orientation. Step 5 - Glue the grill into position. Outside surface is flush with the side edges. Step 6 - Although indicated as step six because I built it in this order...I know realize that the above step should be done after you complete steps 7 and 8. It will just be easier. So skip ahead and then return to step 6. In this step the two larger platforms are glued into position followed by the lids for the pots. This is pretty easy as you just have to follow the laser etched outlines. Sany them smooth for painting. Step 7 - Glue the strips around the perimeter as shown above. These are thin so be careful. Add the three lengths for the legs first keeping them even so it wont wobble. Then add the cross piece along the top edge. The edges are flush as you can see. Sand them flush after you glue them. Dont worry about the laser char as the whole thing will soon be painted black. Step 8 - Glue the doors into position. Dont worry about the laser char. You can also see above that I glued the two halves of the hood together so it can be shaped and sanded smooth. Step 9 - Glue the round vent you see on the top of the stove. You can also see the hood has been shaped. It was sanded free of char and smooth. The front edge of the hood has a slope aft. This needed to be sanded into the hood. It is not a very severe slope but you should check the plans for details. The hood was laser cut a bit wider than needed to leave you room to sand it for a nice fit and all squared up. Step 10 - Glue to more of the round pipes on the front face as shown to simulate the drains. No need to get fancy here as these will be nothing more than a shadow once installed on your model. Step 11 - assemble the stack and drain pan. Get them ready for painting. The short ends of the drip pan were glued on first followed by the long sides. The stack is laser cut with very thin sheets ....but they are really not thin enough to look in scale. So you should at least sand the walls along the top edge much thinner to make them look in scale and more fragile. Not the whole stack but just gradually sand the sides tapered so it has the appearance of being much thinner sheet metal. This would be a great time to paint all of these parts as well. Go ahead and paint the stove and these two other pieces black. Keep the surface smooth and free of brush strokes. Sand regularly between coats as you finish up the remaining details. Step 12 - The stove has its first coat of black paint. At this stage you can glue the laser board hinges onto the stove for all of the doors on each side. Then paint those black as well. Step 13 - Its going to look a bit messy now because its hard to not see all of the dust on the black painted surfaces. But ignore that for now and press on. Glue the two brackets onto to stove as shown. Line up the square area of the bracket with the other one you already glued on each side. Center it so there is equal distance on the top and bottom of the tiny squared area already on the stove. Keep these brackets lined up on both sides and level. They are very delicate so be careful. Then there is one last tiny square or should I say rectangle of laser cut wood that is also glued to the top of the squared section of each bracket. This finishes the simulation that the brackets are sliding through these small clamps on the side of the stove, Paint them black when done. Note that I also cut some 19 gauge black wire to length which will span across the brackets. I glued the tiny disc to one end of the wire as shown above. Then I also line up all the pieces for making the pulleys. The pullies are made in three layers. The center layer is very fragile so be careful. Step 14 - To assemble the pullies...glue one of the discs over the top of those in the center layer. Tey outside layers are slightly larger than the center layers. Then repeat this process on the other side. These discs on the outer layers will simulate a pully nicely. Just remember to keep the holes for those pulleys lined up. See the photo below whic shows the entire assembly completed. Step 15 - Glue the pulley assembly onto the other end of the long 19 gauge wire you made earlier. You will also need to cut a shorter length that will be inserted in the smaller pully of the assembly. See above. Also not that because you may build your stove slightly different than someone else, I have laser cut three sets of "center layer" pulleys. The top one on the sheet is the longest. I used this one. But you may have to use one of the other sizes depending on how you do in the next step. Step 16 - You must drill a hole into the side of the hood. The shorter wire on the pulley assembly will be inserted into it. Depending on where you drill this hole will determine if you need a shorter or longer pulley assembly. So place the pulley on one of the bracket arms to get a sense of where you need to drill that hole. I ended up drilling it dead center (left to right) on the hood but slightly lower than center (up and down). If that make sense. You can also use a shorter pulley assembly and place it on the next level above on the bracket arms as well. You have many possibilities. I have also started to take care in finishing the black painted surfaces properly. Sanding the rough spots with 420 grit and repainting. I have also used some weathering powder as well to make it look like metal. Step 17 - 24 gauge black wire was used to shape the handles for the pot lids. I drilled out the holes in the lid deeper and test fit the handles carefully so the black paint wouldt be damaged. I had to bend the wire a few times into the handle shape so it was the correct length so the holes lined up. The stack was also glued on top as you can see. This finishes your stove. There are many more details you can add but that is up to you. The stove will end up being only partially visible below deck. So take your time and make sure the painted surfaces are smooth and painted with care. On my stove for the model I added some wire to each side along the top edge. This was sometimes used on the stoves to hang pots and pans and utensils. But the stove is very fragile so this is an optional detail. I used 25 gauge black wire. There were also eye bolts with rings along the top edges in some cases which were used for the lifting the stove. Again ....you can get crazy with the level of details. But below deck you will be disappointed with how many of these details will ever be seen. So rather than risk breaking it or over doing it, I concentrated on "neatness" and making a well crafted and painted stove. These close ups are pretty brutal but this is a tiny fitting actually. Ample amounts of weathering powder were used on all surfaces once completed. The powder achieves two things. First when using a rust or brownish tint it makes the whole stove look more like metal. But most importantly, the entire stove was coated with an ash or grungy black powder first. Every surface. The powder really smooths the surfaces out and covers up the brush strokes etc. ....It makes the surface smoother to a degree but all care should be taken to have a smooth painted surface ahead of time. I used the grimy grungy black powder first. Then I followed that up with some rust powder. I tried not to over do it with the rust because you dont want it to look too "rusty". You just want to use it to define certain areas. You can see the difference in the surface quality as my stove assembly progressed. With each new photo I spent time working on the surface quality and applying more powder. I also sprayed the entire stove lightly with Dull coat before adding a final layer of weathering powder. As this was my second stove I wont go crazy. I just needed to have construction photos for you guys. Just take your time. It took me 14 hours to assemble the stove and finish it as you see it in the above photos. I also learned that it is very very hard to take pictures of a solid black object so you guys can see the details, LOL. Shown on the model. But remember the fcastle deck isnt done yet so you can see how much of the stove is actually seen.

- 1,784 replies
-
- 37
-

-

-
- winchelsea
- Syren Ship Model Company
- (and 1 more)
-
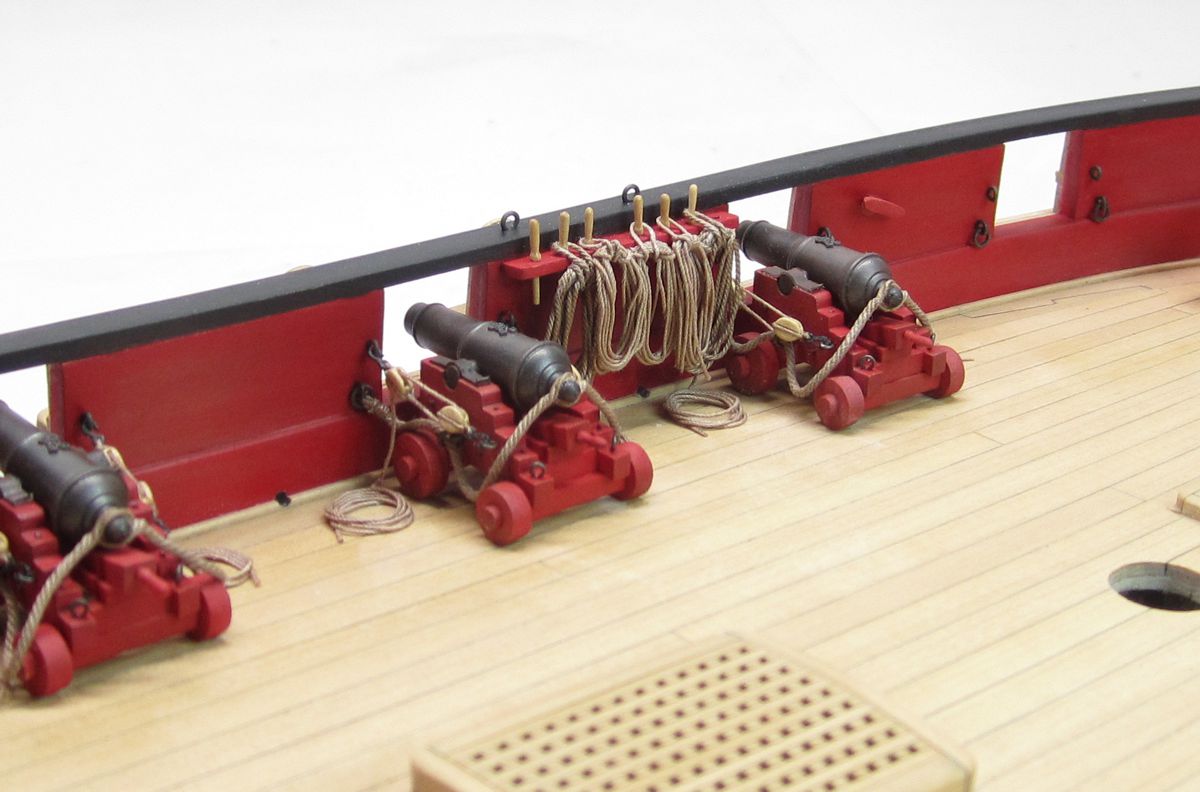
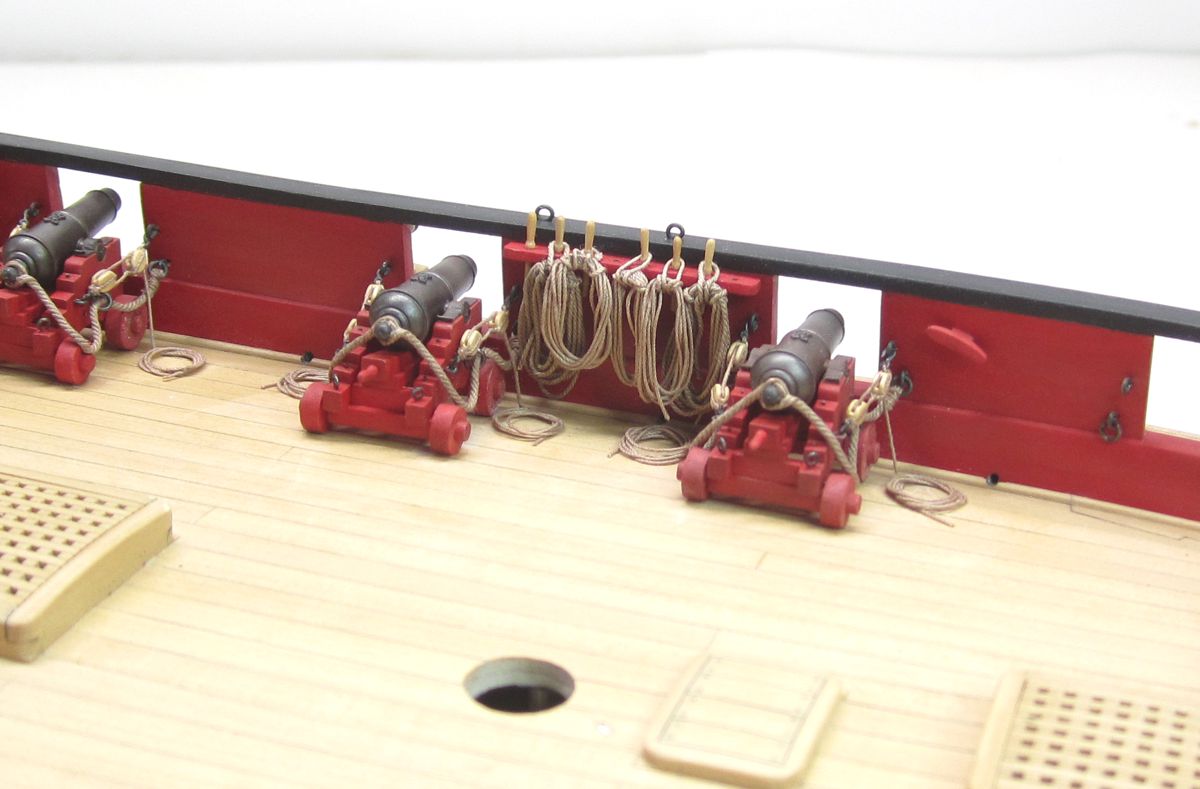
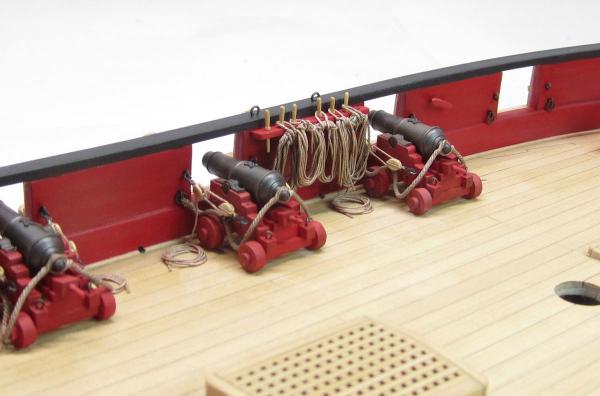
The rope coil size isnt bad (maybe a tad smaller) but the color is way too bright and light. They dont all have to be the exact same size either. It looks almost white. The rope looks a bit heavy for those as well. See below.

- 274 replies
-
- 7
-
-
- Cheerful
- Syren Ship Model Company
- (and 1 more)
-
I hope!!!! Not counting my chickens yet.
-
Looking great Bill. Cant wait to see it up close.
-
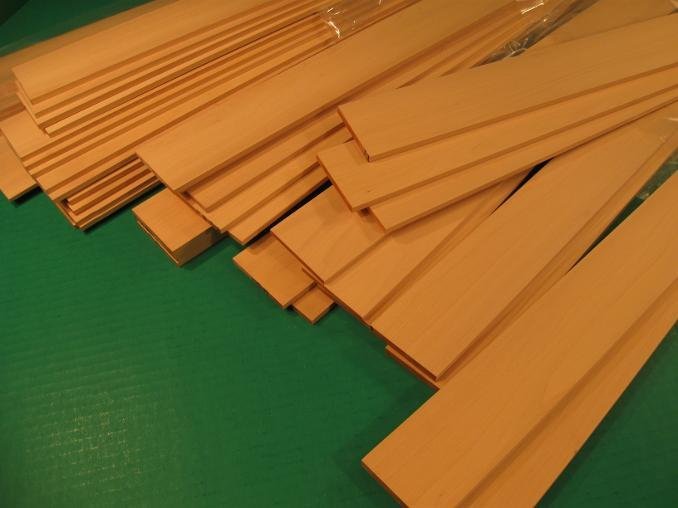
Please welcome Joe as our newest sponsor. He sells precision milled wood sheets and strips. Please visit his website and have a look. Modeler's Sawmill Boxwood...Swiss Pear....Walnut....Cherry...Alaskan Yellow Cedar etc. Welcome Joe!!!

- 17 replies
-
- 23
-
-

-
As you know I will not be rigging the prototype model. But there are some who have interest in rigging the model. If you are researching masting and rigging the model please post your findings and plans here for the benefit of the group. Chuck
- 1 reply
-
- 3
-
-
-
That looks great. Nicely done. Chuck
-
That looks OK but yes you need to fix those stern frames. The center two (when viewed from above need t be lined up. The next pair is slightly more forward but they line up with each other. The outboard-most pair is even slightly more forward....But these two also line up port to starboard. This is what creates the gentle curve to the transom when viewed from above. It shouldnt flatten out which is what happens when you use that strip across all the stern frames. That strip is not a good idea. You need to push the tops of the stern frames on the port side more aft to get each married pair in the correct spot. This will allow you to fair that nice curve of the transom when viewed from above them. A good way to do this is to take a strip of wood and butt it against the last bulkhead edge. It should be a long strip.....maybe 3/32x1/4. Then place it against the top edge of the offending frame and push the top of the frame aft a bit....then clamp it to the scrap strip. This will hold the stern frame still and in position until after you glue your window framing in position. Hope this makes sense as its tough to describe in writing. Basically brace the frame after pushing the top of it aft .
-
Probably in my Cheerful monograph. Check out the many Cheerful logs. Stuntflyer (Mike) has some excellent tutorials in his Cheerful log if I remember correctly. But its pretty simple. You just find where the template spans across your square stock. Then mark the square stock periodically down its length on all four sides. Draw lines connecting the two lines on on each side so you have two lines down the length of the stick separating it into a ratio of 7-10-7 . Then sand or shave the corners to make an equal octagon. Turn the octagon or sand it round. Now you have a round dowel made from square stock. Taper to suit. Some folks will taper the square stock before they mark it off to the 7-10-7 ratio....others taper the round dowel afterwards. Leave any square sections for masts alone....or octagon areas for spars. Only round of what is round. Drill any holes or simulate any sheaves before rounding off. Its easier to do while square. Chuck
- 3 replies
-
- 12
-
-
-

-
I know I have uploaded this in the past. But I have recently had several requests for this template and folks couldnt find it. So here it is again in its own easier to search topic. seventenseven.pdf
-
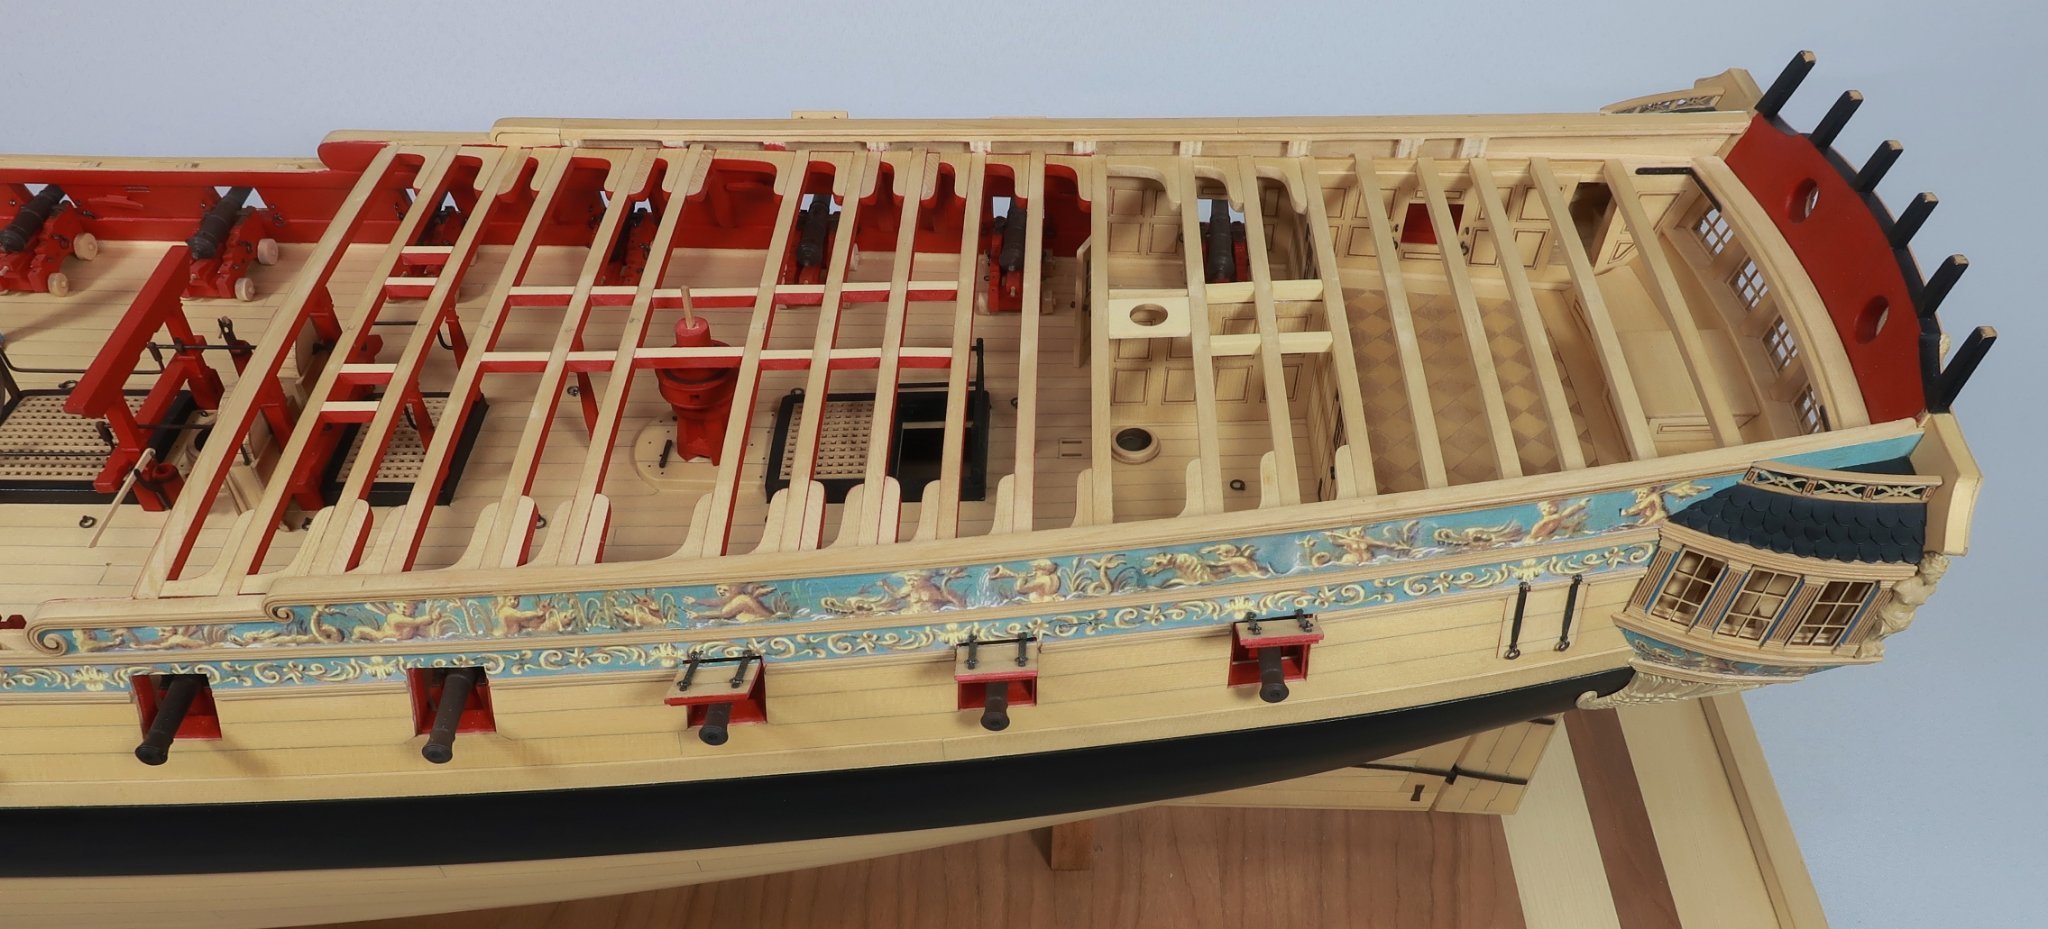
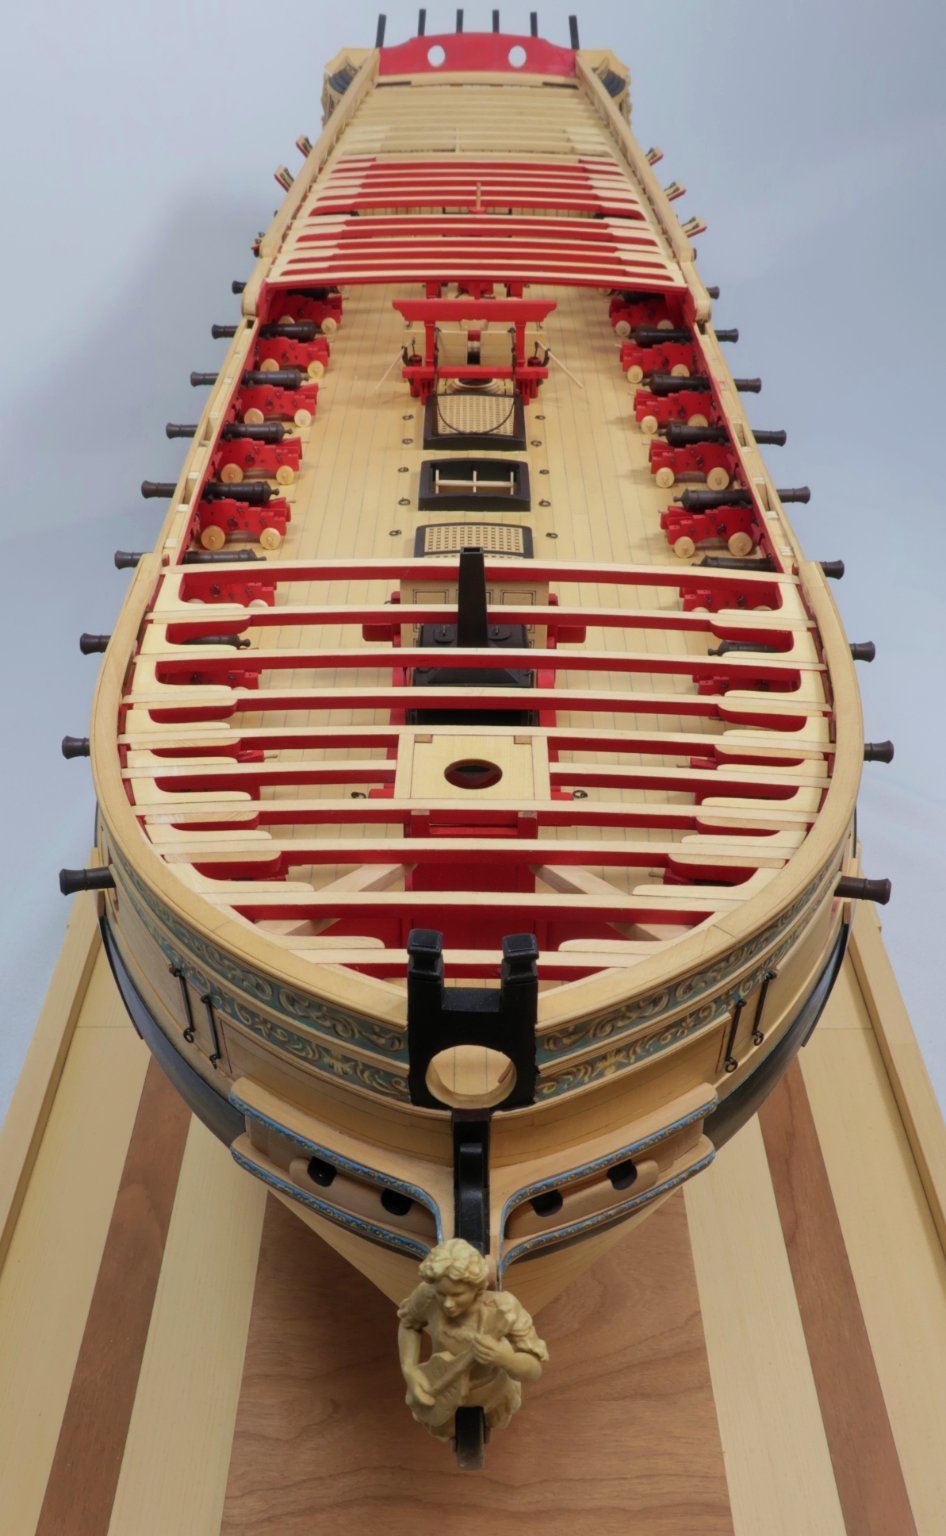
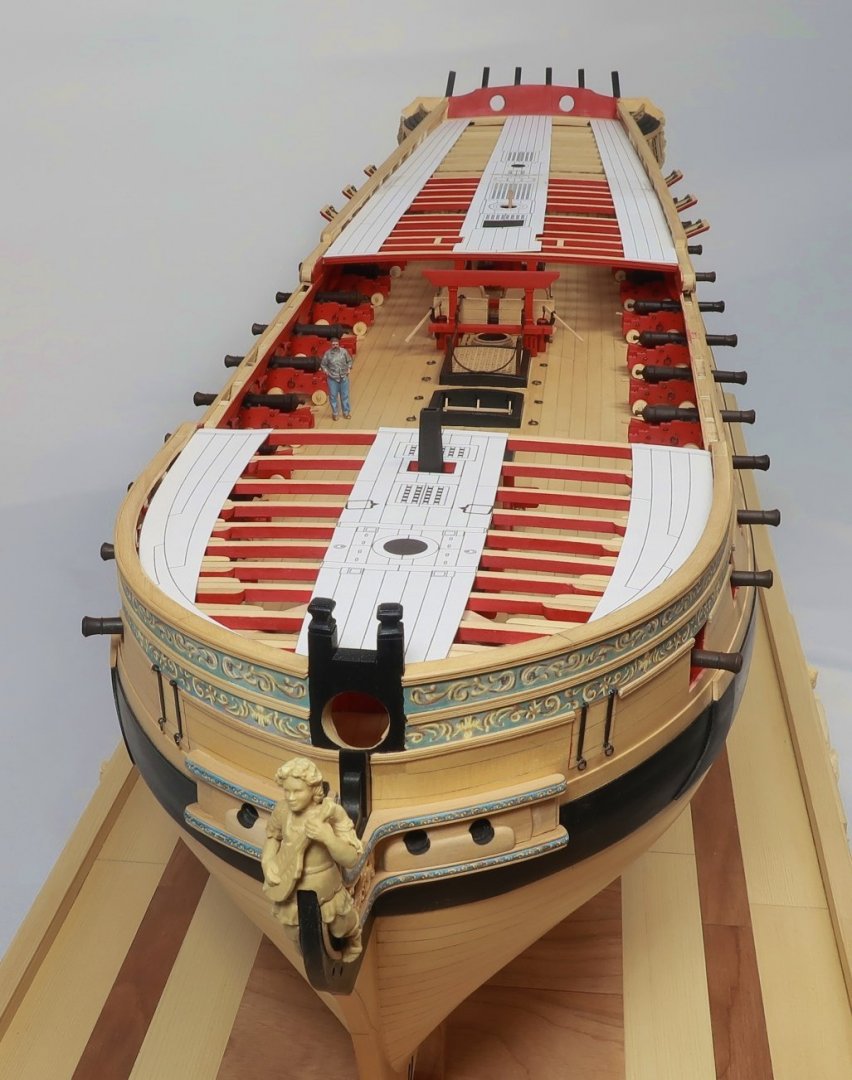
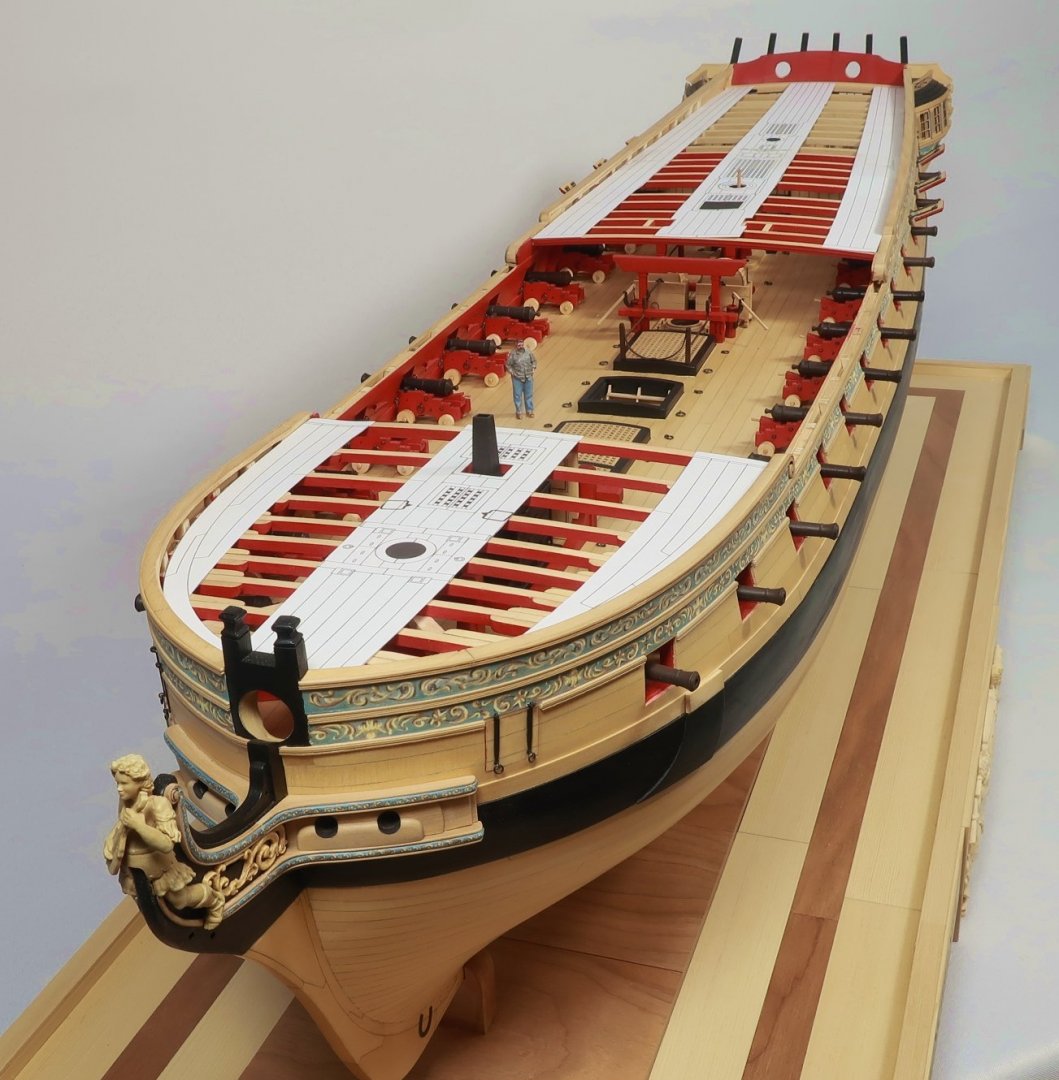
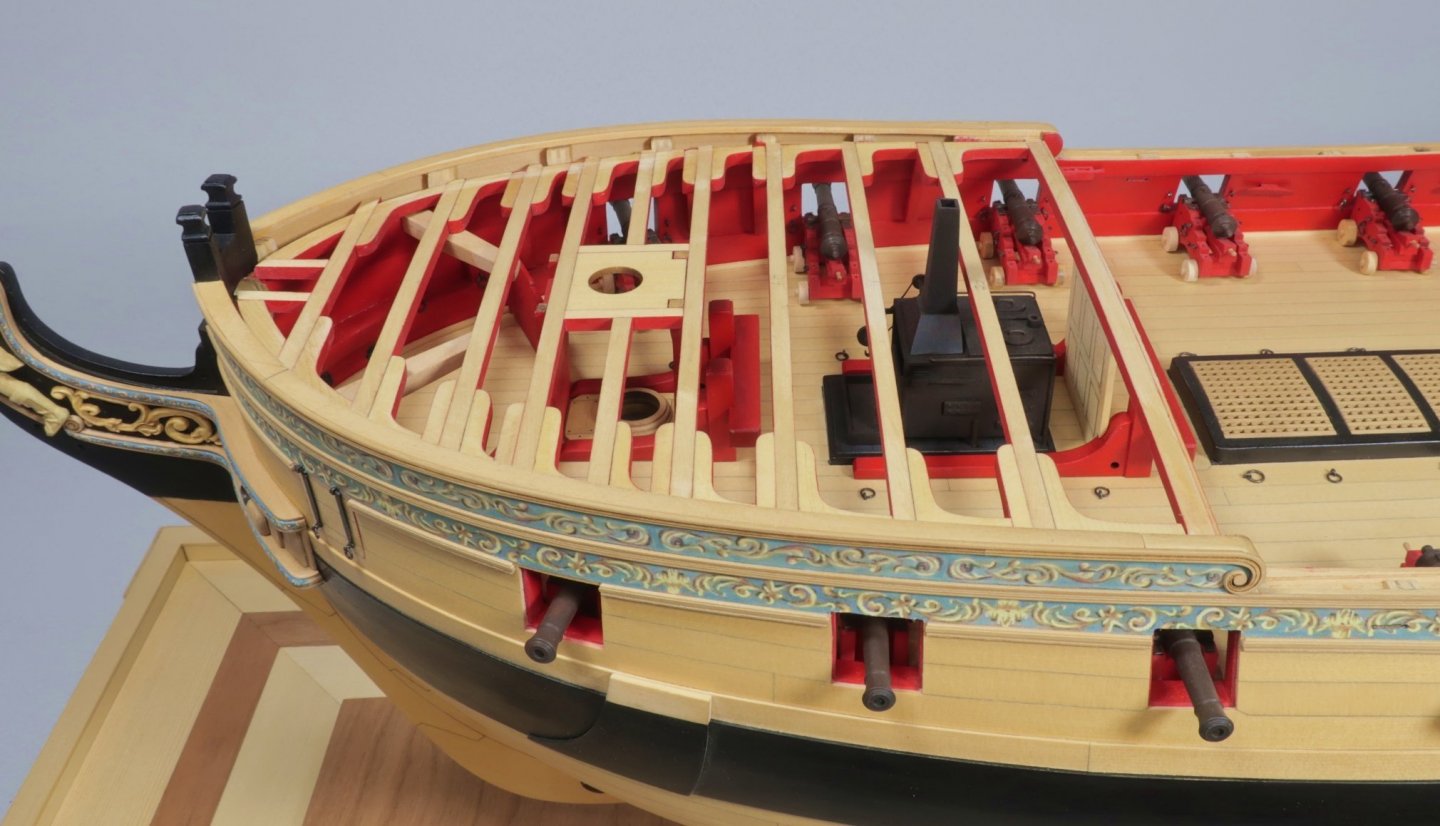
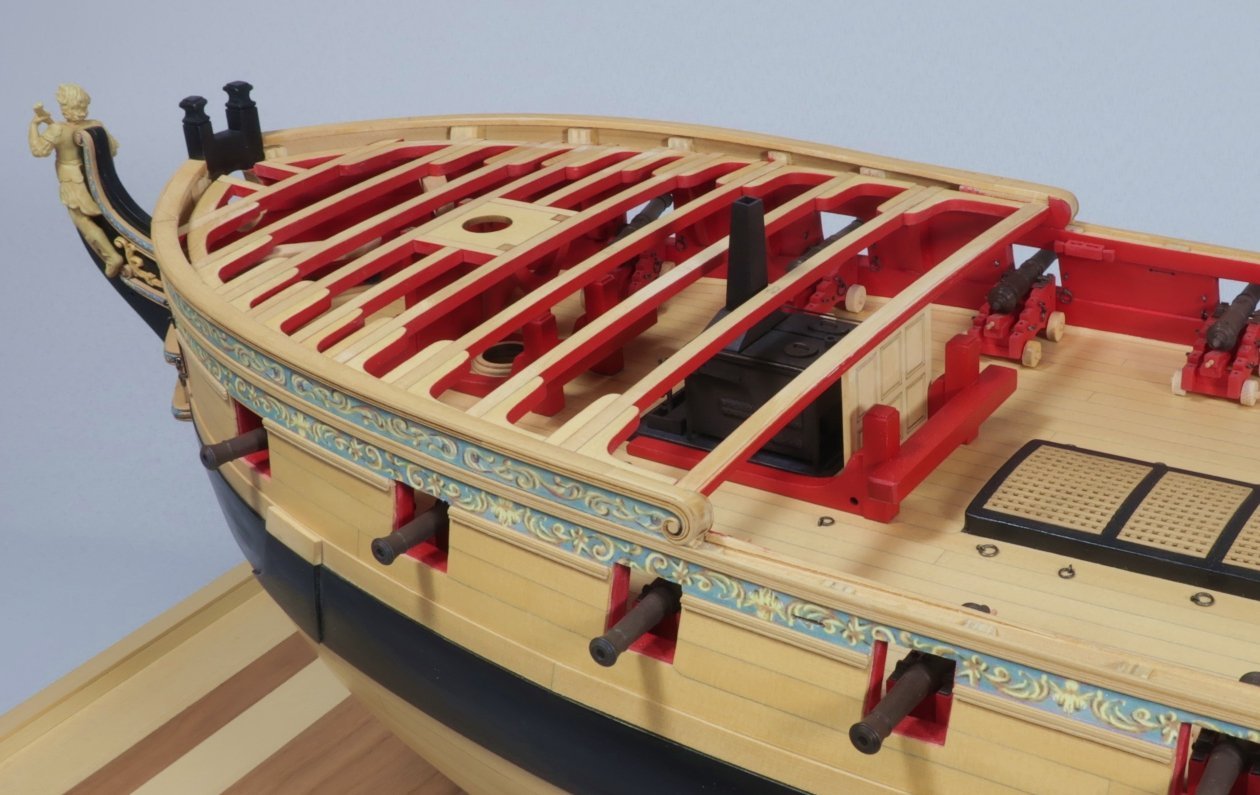
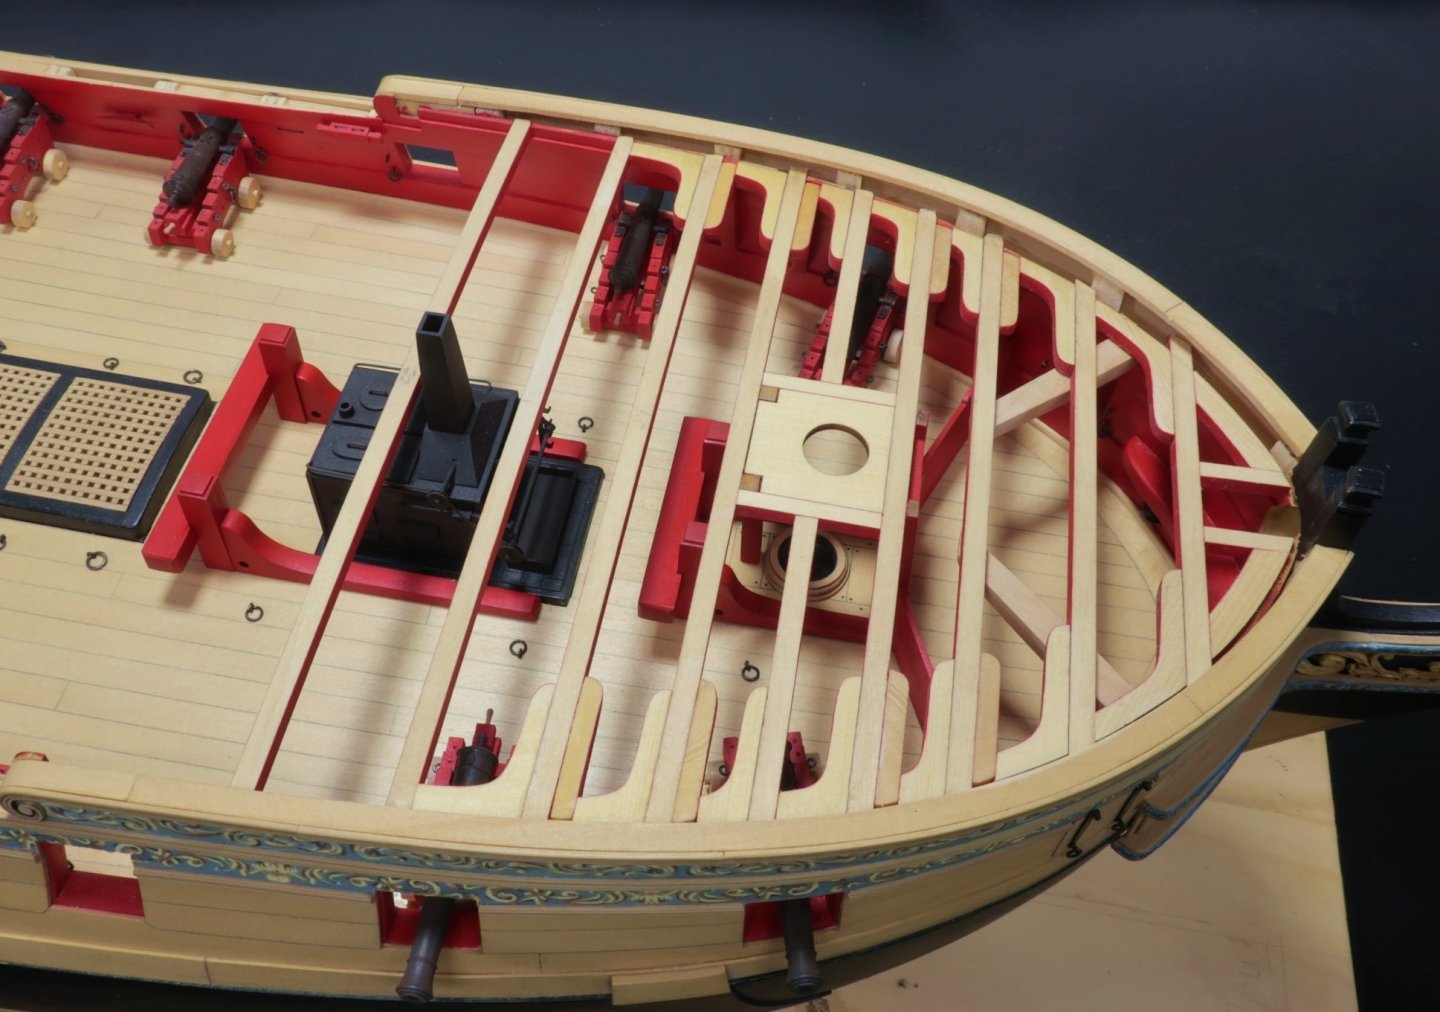
Just a quick update. This completes Chapter 8. The carlings and ledges were added to the deck framing. There are mostly carlings which run fore and aft between the beams defining the hatch coamings and companionways. 1/8" x 1/8" cedar strips were used. The long strip was painted red on the sides and bottom like the beams. Then small lengths were cut and fitted according to the provided templates. Normally you see these morticed into the beams. Yes....you can do that if you like. But as long as they are glued in well and secure that is a lot of work to only be covered completely with deck planking. I just cut them neatly to fit. The two ledges on the forecastle were done using 3/32" x 3/32" strips. In addition, the mizzen mast partner was added which is laser cut for you. We are now 2/3rds of the way through this project. There will be four more chapters in order to complete the model (not including the barge). Here is a breakdown of what those last four chapters will entail. chapt 9 - Plank the fcastle and qdeck and remaining bulwarks. Add the cap rail. All the remaining coamings and gratings. A few other minor fittings. Chap 10 - All remaining deck fittings..... The waist will be started as well with the gangways and stairs. Chap 11 - Return outboard to add the channels and deadeyes....fenders and swivel stocks. The fancy rails along the sheer of the qdeck and fcastle. Chapter 12 - Add the 8 pounder guns. The headrails. The stern lantern and other remaining fittings. That finishes the hull and then a separate barge will be made so it can be placed on spare topmasts along the waist. Here is a look at the hull with the planking templates (already uploaded here for you). I will start the next chapter with the margin planks and move on from there. Think about how much easier the planking will be this time. The templates are done for you and lining off the hull will be simple. You just have to fold the templates along the deck beams and use them as a ready-made tick strip. Easy-Peasy.


- 1,784 replies
-
- 36
-
-
-
- winchelsea
- Syren Ship Model Company
- (and 1 more)
-
Depending on where they go... 24 gauge and 28 gauge. In addition the grating for that aft scuttle needs to be sanded flush with the deck. The other gratings in the coamings should have been flush with the top of the coamings and not recessed lower as you show them. Its those little details that will elevate your model. But it is looking lovely. Chuck
- 274 replies
-
- 1
-
-
- Cheerful
- Syren Ship Model Company
- (and 1 more)
-
Its in Philadelphia....actually Camden NJ on the Battleship New Jersey. Seeing as you are in France that would be a long trip. There is an entire topic about it however. Its been there for quite some time actually.
- 1,784 replies
-
- 4
-
-
- winchelsea
- Syren Ship Model Company
- (and 1 more)
-
Forecastle beams template along with planking templates for chapter 8. plankingfcastle.pdf forecastlebeamsledgescarlings.pdf
-
That is looking beautiful. Nice work. You are making some great progress.
-
It just sits in there. Its really quite sturdy. No wiggle at all. No reason to permanently fix it now as I do remove it from the finished base to work on it. I place it in the work base when I work on her. I dont want to damage the fancy finished base.
- 1,784 replies
-
- 7
-
-
- winchelsea
- Syren Ship Model Company
- (and 1 more)
-
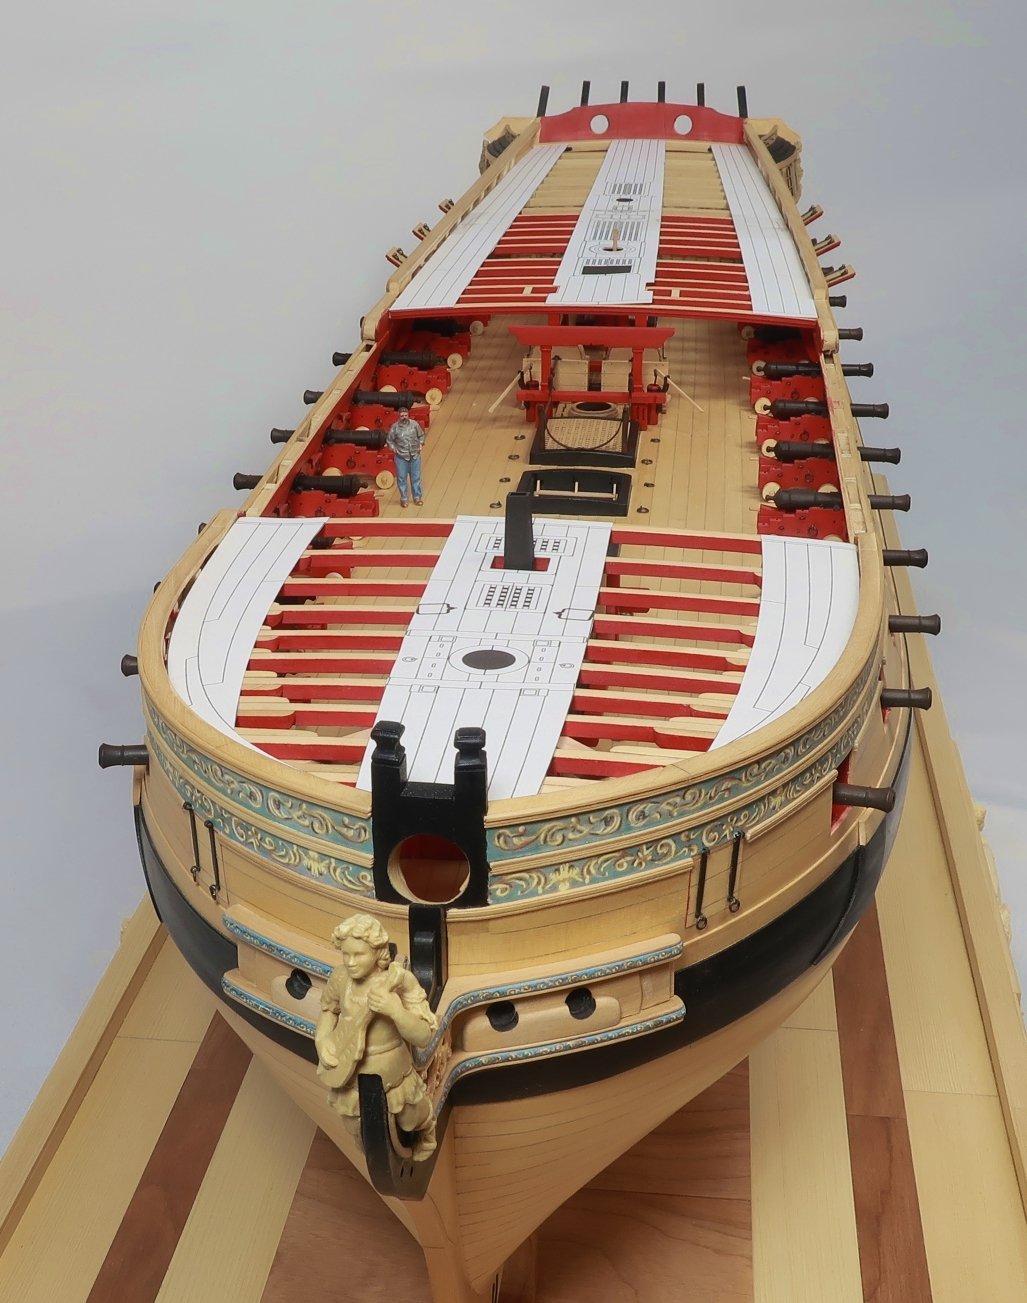
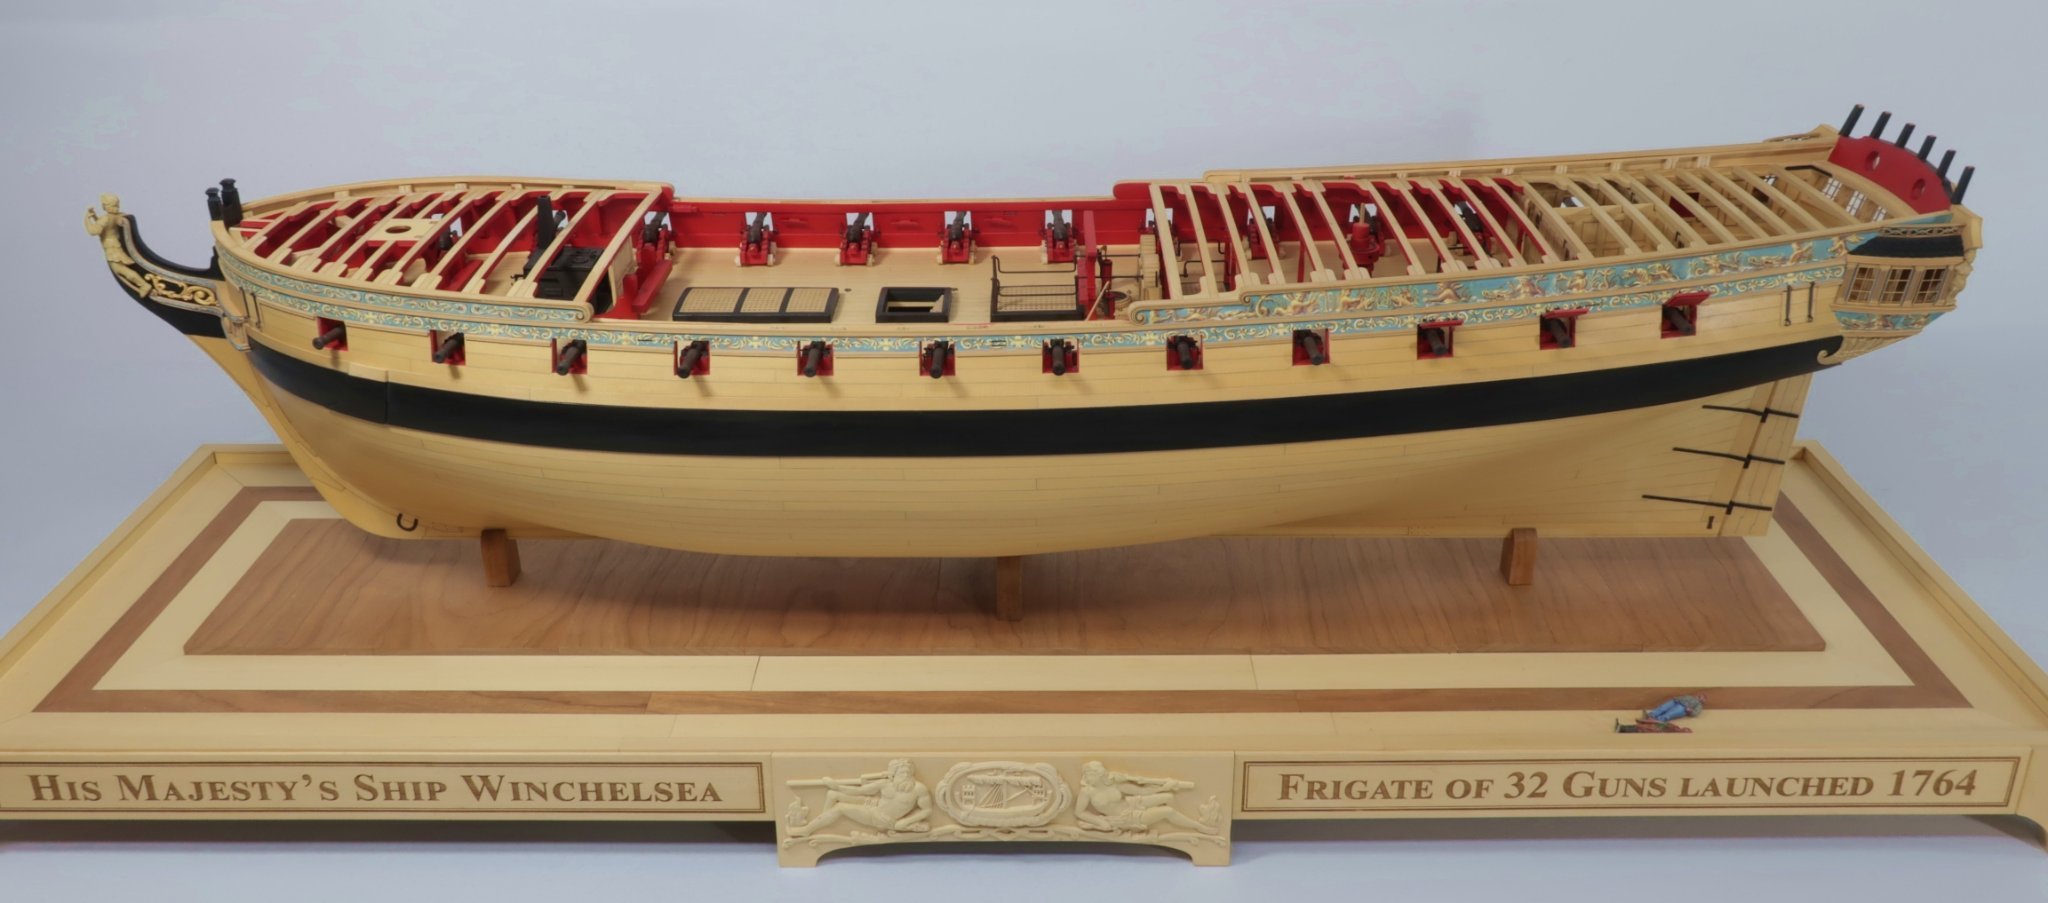
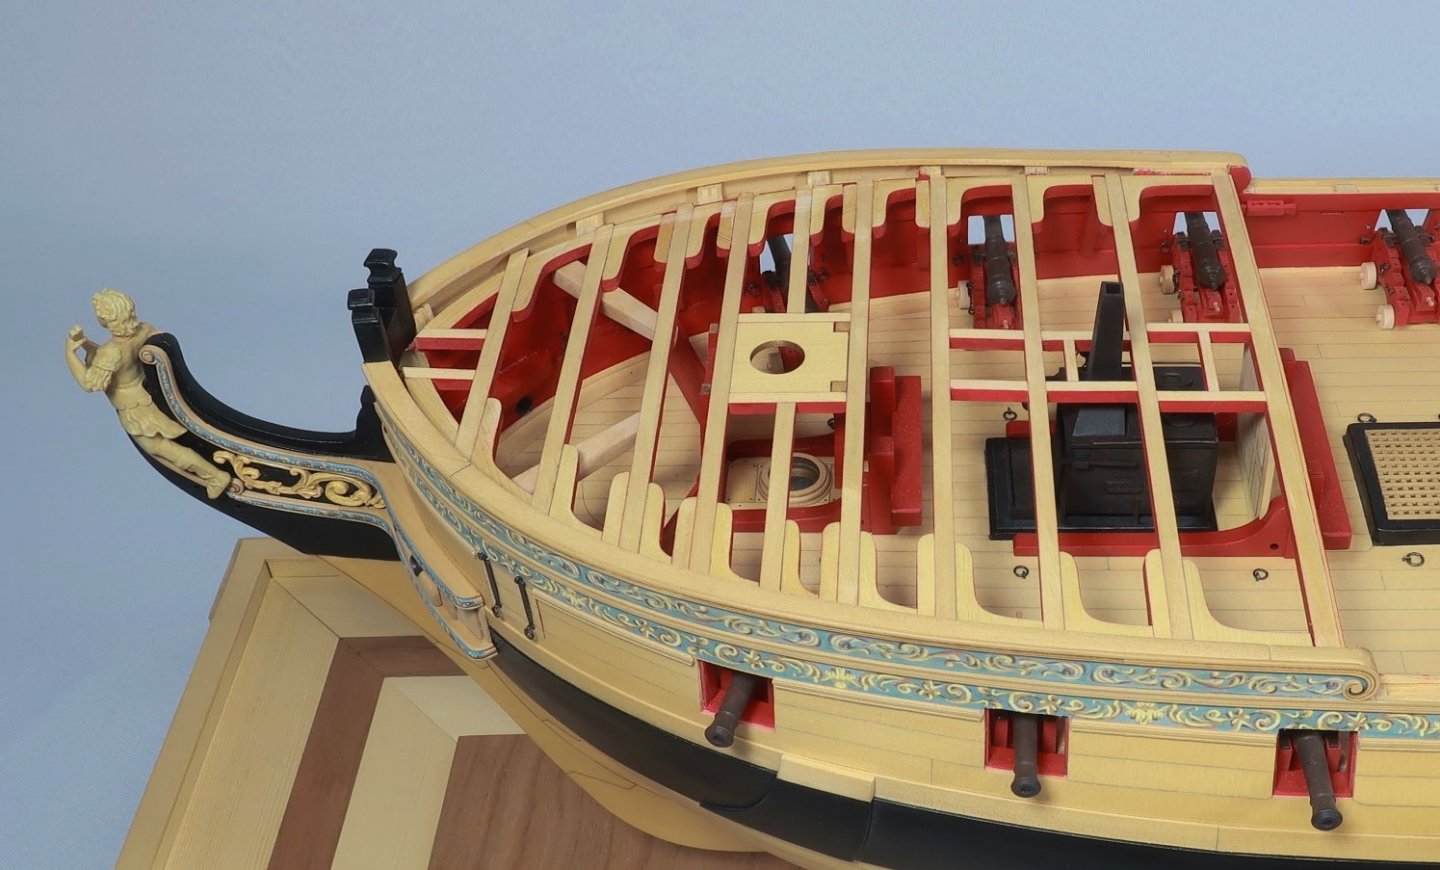
I realize I havent posted an update in a while but I am actually pretty far along. Just been swamped over the last few weeks. In fact, the store is now closed until this Sunday because this is the toughest week so far. Leaving for the Philly "ShipModelCon" on Thursday for some some rest and will resume normal daily function next week. Having said that...the Winnie is quite far along. Chapter 8 s almost finished. The only thing that remains to be done are the carlings and ledges for the deck framing. I may actually do that today and relax while working on the model. I have many many construction photos for the monograph chapter but here are some pics of how she looks today minus those carlings and ledges. Its really coming together now. Notice how the cat tails under the deck framing have inserted. The catheads will be added in two pieces to make it a bit easier. The riding bitts are painted red but you could leave them natural or paint them black as well. I will post more pics upon my return from Battle Ship New Jersey....where ModelCon will be held. I will be displaying the Winnie along with several other models I have completed. I hear there will be over 100 models displayed and the weather looks great for Saturday. Maybe I will see you there.


- 1,784 replies
-
- 32
-
-
-
- winchelsea
- Syren Ship Model Company
- (and 1 more)
-
NAIAD 1797 by Bitao - 1:60
Chuck replied to Bitao's topic in - Build logs for subjects built 1751 - 1800
Beautiful work....clean and crisp and your excellent craftsmanship is on full display. Chuck -
Glenn,, Nope, i may provide some sort of plan for a base but each person will have to make their own. This will be a great opportunity for folks to design and create something that sets the whole display apart from others.
- 1,784 replies
-
- 9
-
-
- winchelsea
- Syren Ship Model Company
- (and 1 more)