Chuck
-
Posts
9,718 -
Joined
-
Last visited
Content Type
Profiles
Forums
Gallery
Events
Everything posted by Chuck
-

Dying/coloring rope; sources for purchase of quality rope
Chuck replied to Tomculb's topic in Masting, rigging and sails
Cotton and natural rope actually sags more than poly. It is so finicky when it comes to moisture. What you describe as sagging one hour and super tight the next absolutely happens with natural and especially cotton ropes. In fact....if you rig with cotton rope on an especially humid day and make your lines tight......when it dries out the next day the lines will shrink. I have seen belaying pins pull away from the bulwarks when this happens because cotton shrinks when wet and then it dries. Poly on the other hand is more slippery but has much more stretch. So if the lines are taught the stretchiness tends to prevent any sagging at all. Its a trade off. I like the natural stuff but it tends to be fuzzy. I also like the poly ropes because it is so crisp and clean. Now that the unravelling issue is solved, it is just a matter of personal preference. I never belay my lines permanently when first rigged. I let them sit and adjust for a while. Then I tension them later and permanently belay them. That helps with either material. With poly line there is no dye needed. Only certain brands are really shiny. So many colors to choose from. Cotton is more problematic that way although good color choices are out there. It just tends to be kind of fuzzy. Chuck- 28 replies
-
- 11
-

-
They moved it up to the gun deck. It was a real mistake to have it on the lower deck. They did the same with the pumps. This was indicated on the original draft and other primary notations. Its another difference between the contemporary model. Changes shown in red....I have a few of these showing the update. Chuck

- 1,784 replies
-
- 13
-
-
- winchelsea
- Syren Ship Model Company
- (and 1 more)
-
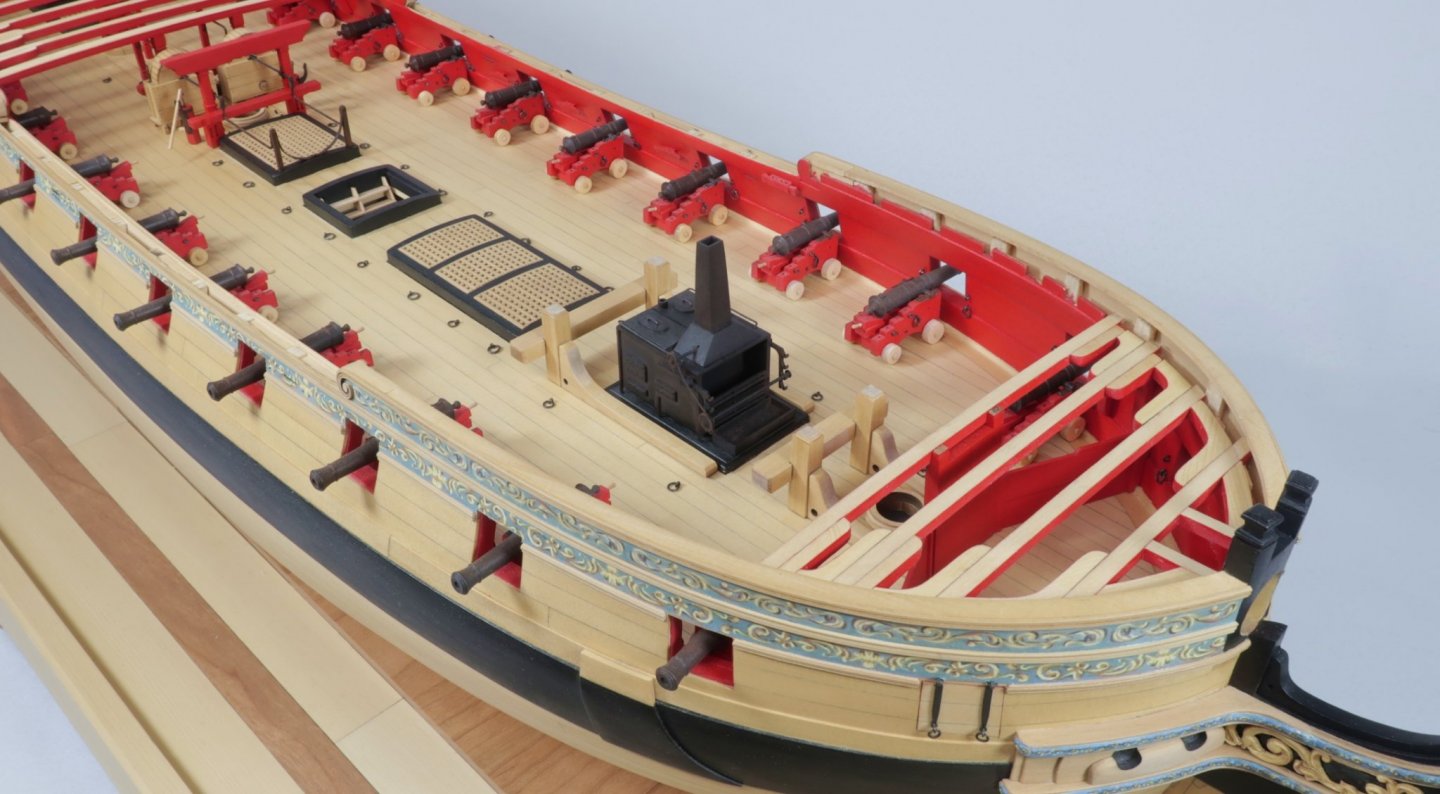
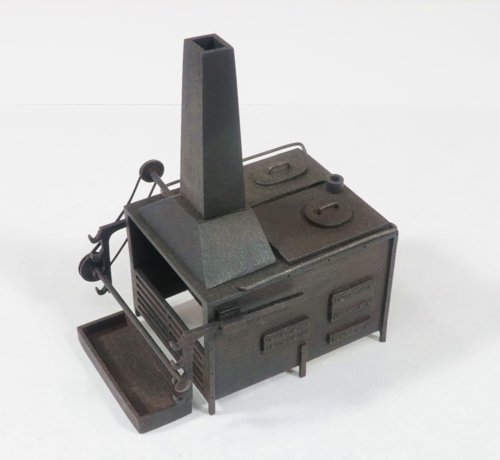
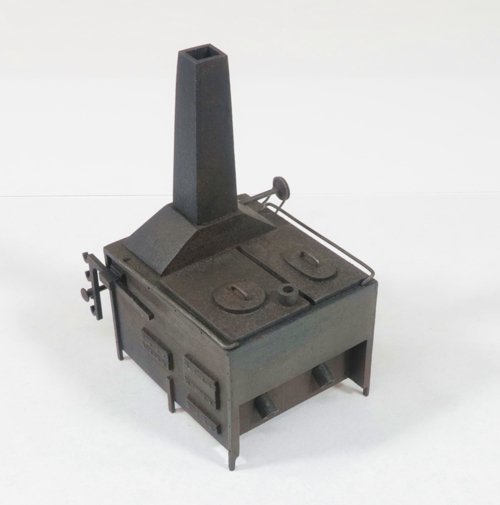
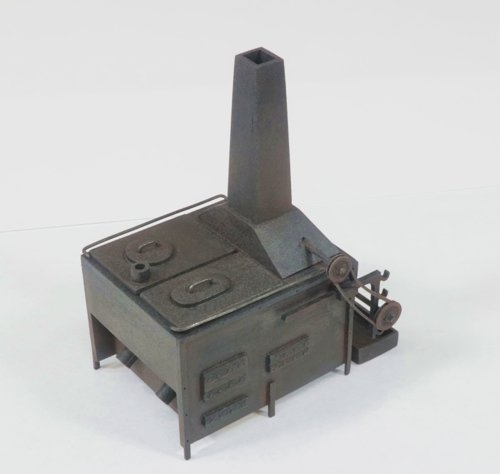
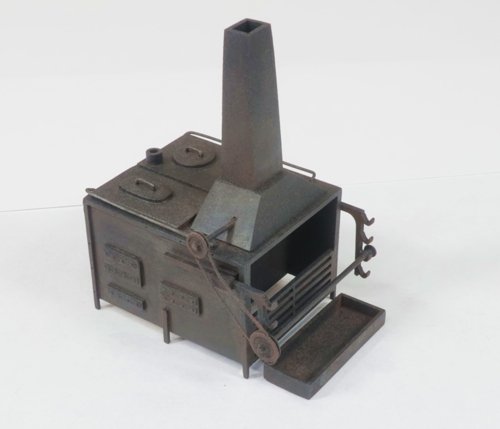
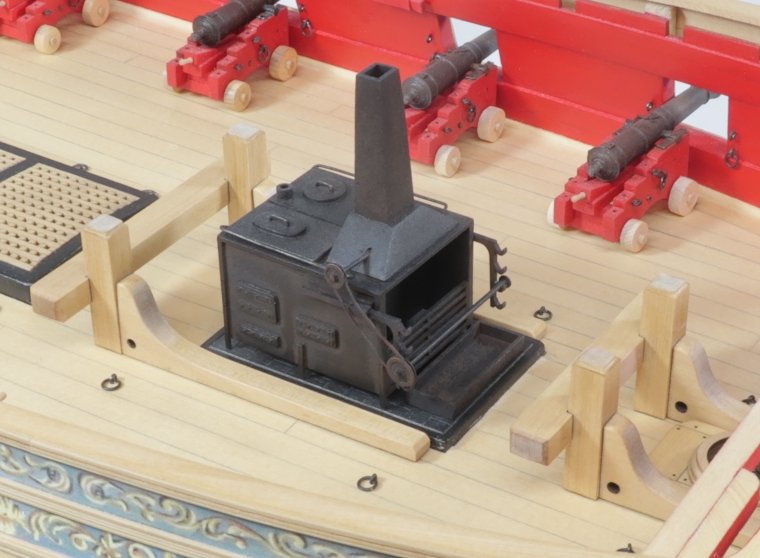
I decided to design and make the stove before I put any more beams in position. I just wanted to have it ready when its time to glue it in permanently. Usually when I design new mini-kits like this I have to make five or six of them. I got lucky and this time everything went together perfectly on the first go around. Unfortunately I didnt take any construction photos so I am going to have to make another one anyway. Maybe it will come out even better the second time around. Here are some photos. Except for a 1mm brass rod and a bit of 24 gauge black wire, this stove kit is made entirely of boxwood, yellow cedar and laser board. The pulley is laser board for example. The close ups are pretty brutal but on the ship it looks really nice. It was hard to photograph a black stove so you guys can see all the details.
- 1,784 replies
-
- 43
-
-
- winchelsea
- Syren Ship Model Company
- (and 1 more)
-
Ahh!!! Good times…i remember it fondly. Topes all over the place, LOL. But its looking good.
- 778 replies
-
- 1
-
-
- cheerful
- Syren Ship Model Company
- (and 1 more)
-
Chapter six....Chaptersix.pdf Making gun carriages... Chapter seven is nearly finished.
-
I am happy to report that wood packages of ready-milled strips are now available for the Winnie Group Build. I know that many of you were hesitant to jump in on this project because you didnt have a Byrnes Saw or equivalent. But now all of the wood strips for planking and other elements can be bought through MODELERSSAWMILL.com http://www.modelerssawmill.com/ Joe will cut your wood for the Cherry or Alaskan Yellow Cedar projects. I have painstakingly reviewed every chapter so far completed and all future chapters to determine what strips will be needed. Its mostly for hull and deck planking but there were a few other odds and ends. So if the only thing stopping you from jumping in to build this fantastic model was the fact that you couldnt mill your own strips......there is no longer a reason not to join in on the fun!!! The package includes hundreds of strips including 310 milled 1/4" x 3/64" planking strips for the hull and decks. A few misc. wood sheets are also thrown in there for good measure where needed. Wood list Winnie.pdf
-
If you want. But have a look at some planking expansions for fifth rates. That anchor style planking is correct. Its not something you would see on a contemporary model that often. But it is historically correct to show it planked like that. BUT it is a little “kitchen sink” for my tastes. Check out the the swan class series for a good example in that series of books. By David Antscherl. If not done neatly and cleanly it usually looks pretty bad and can really make a model look sloppy. So proceed carefully.
- 1,784 replies
-
- 5
-
-

-
- winchelsea
- Syren Ship Model Company
- (and 1 more)
-
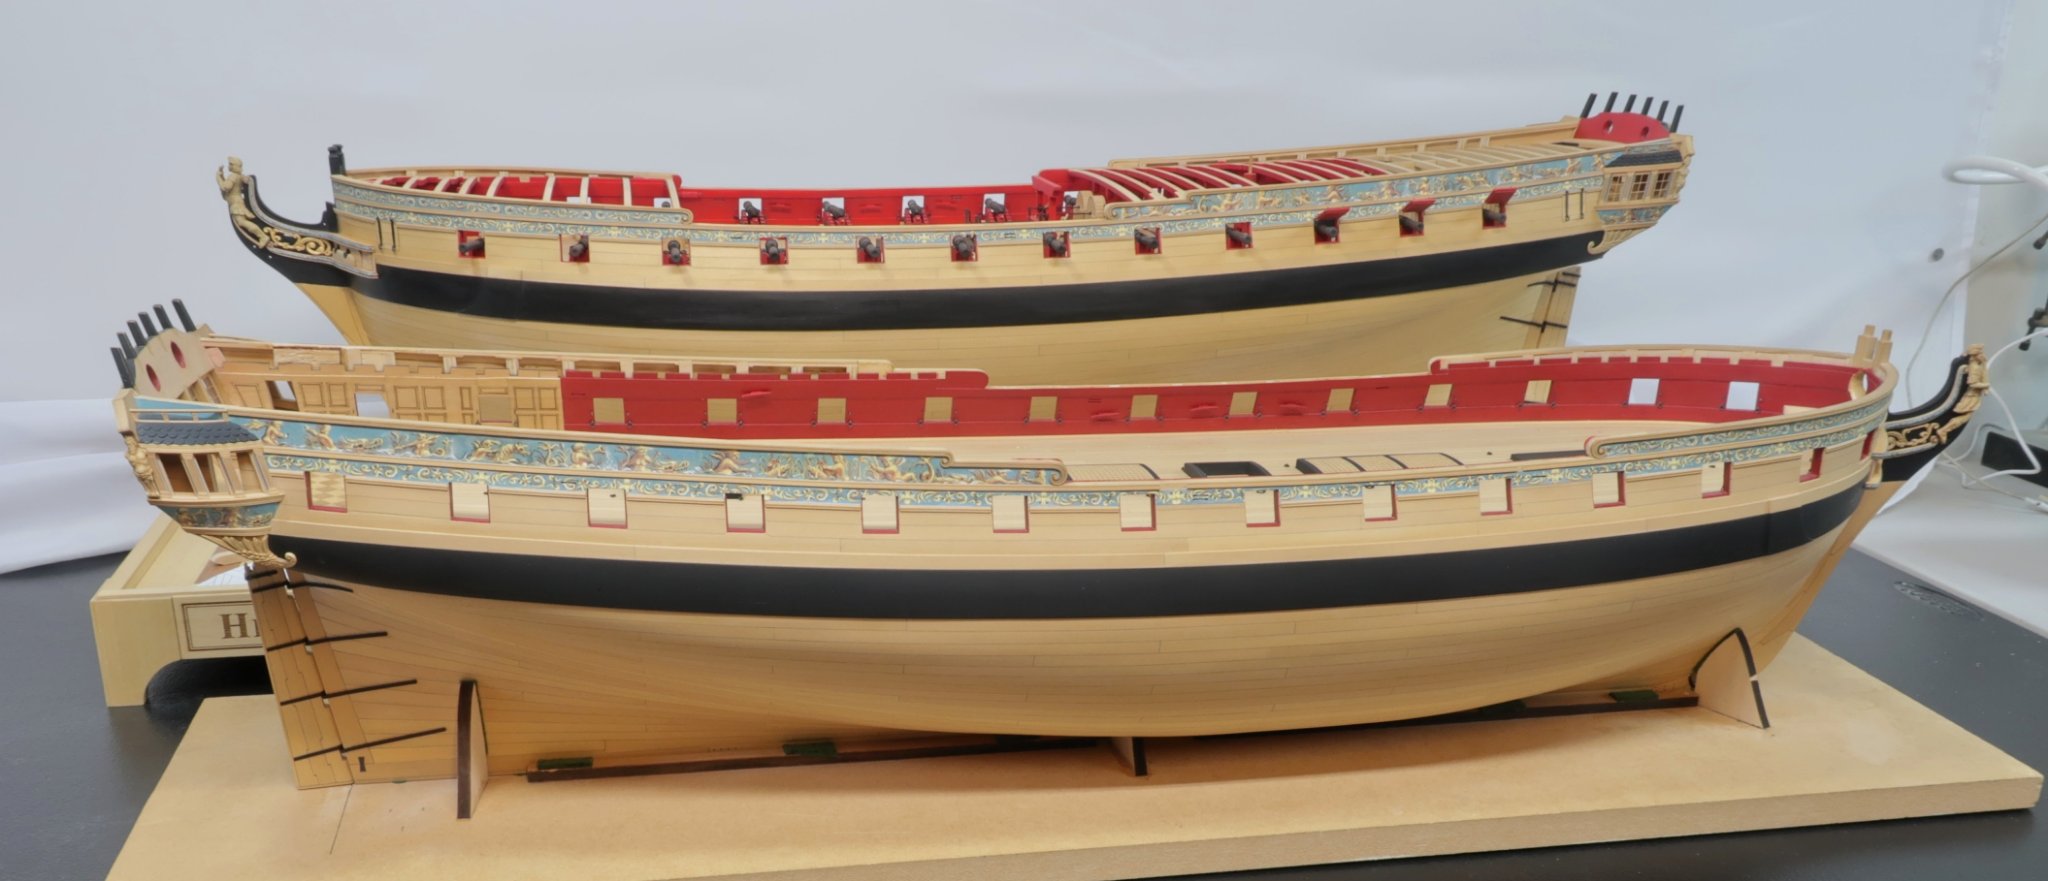
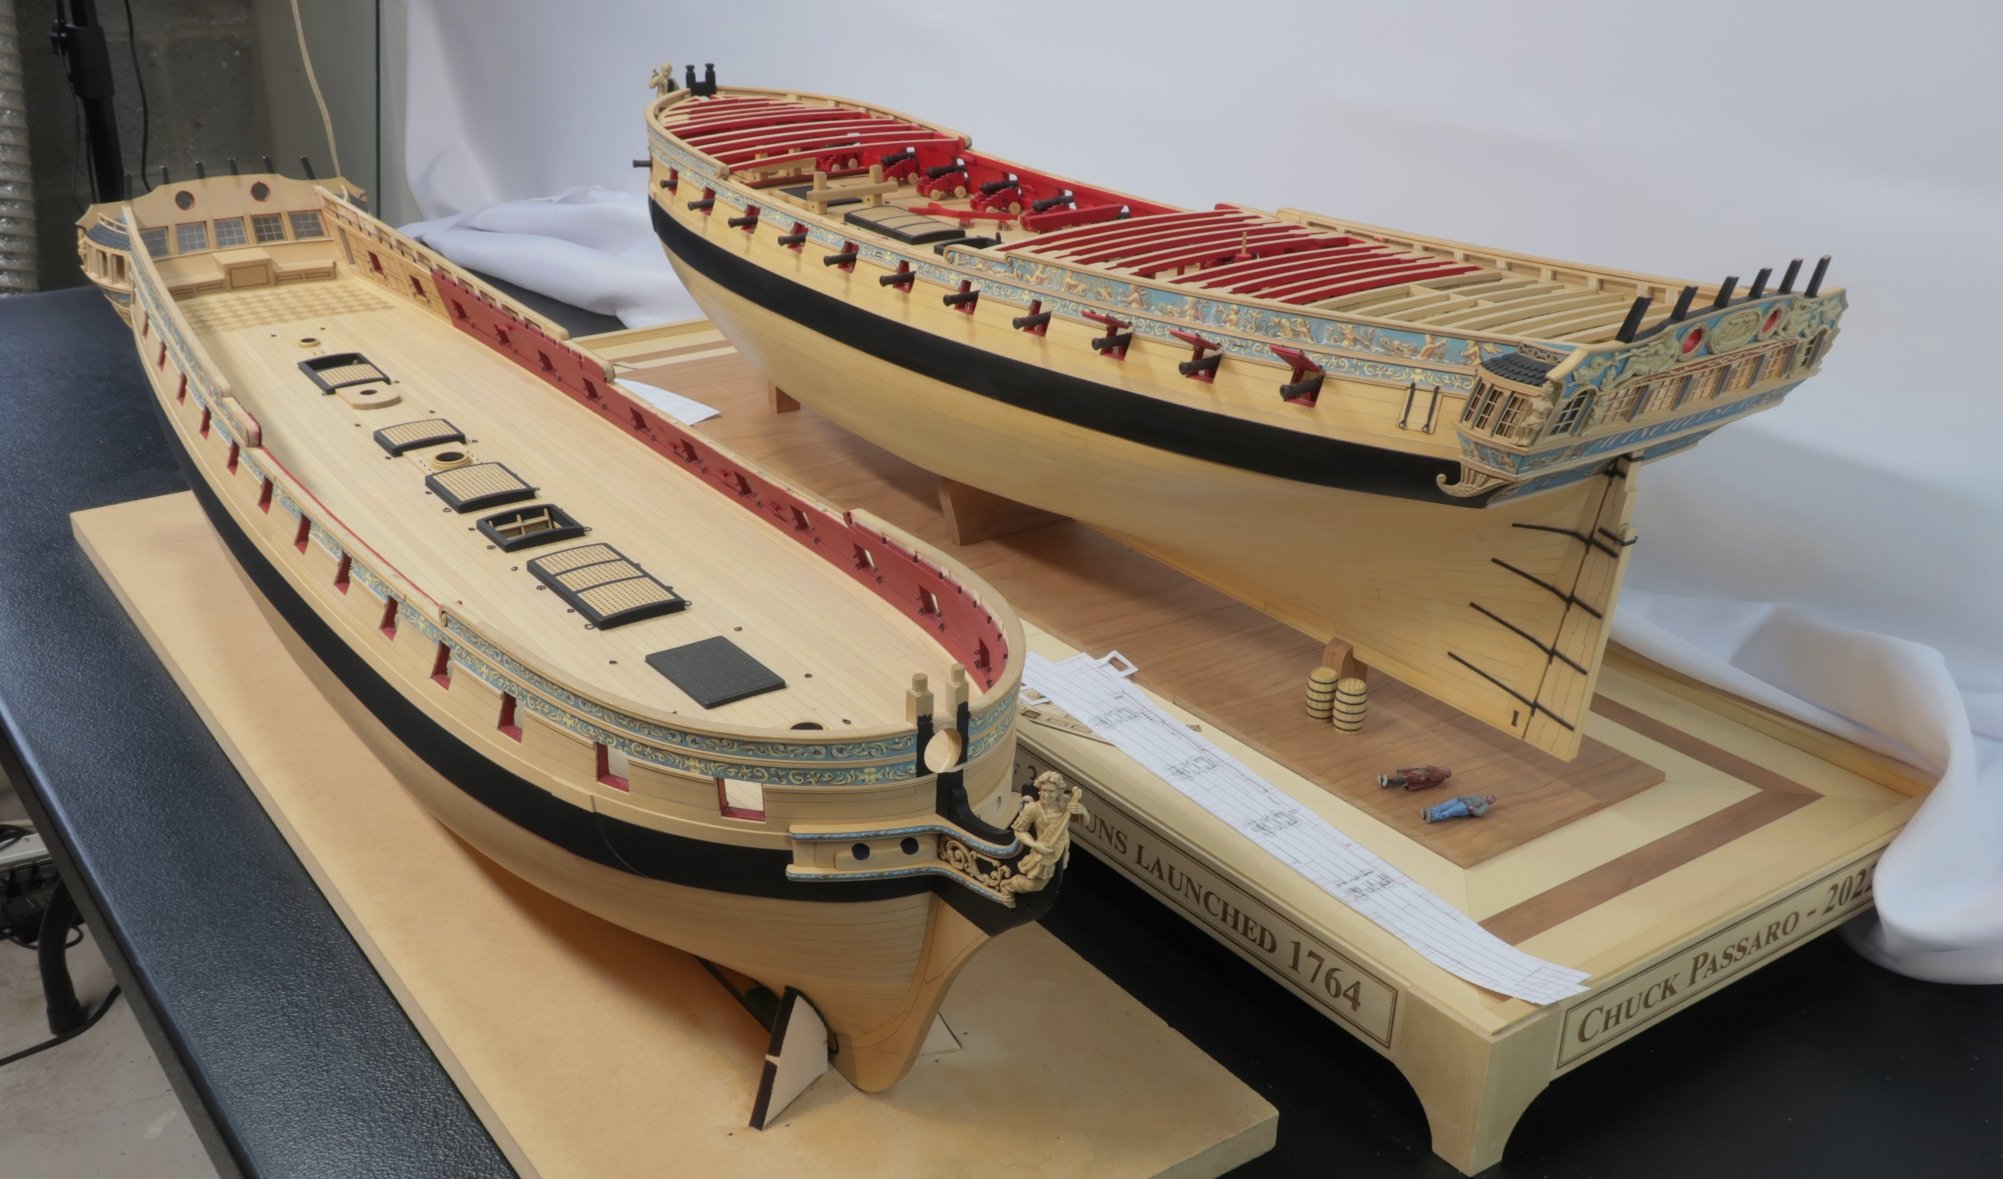
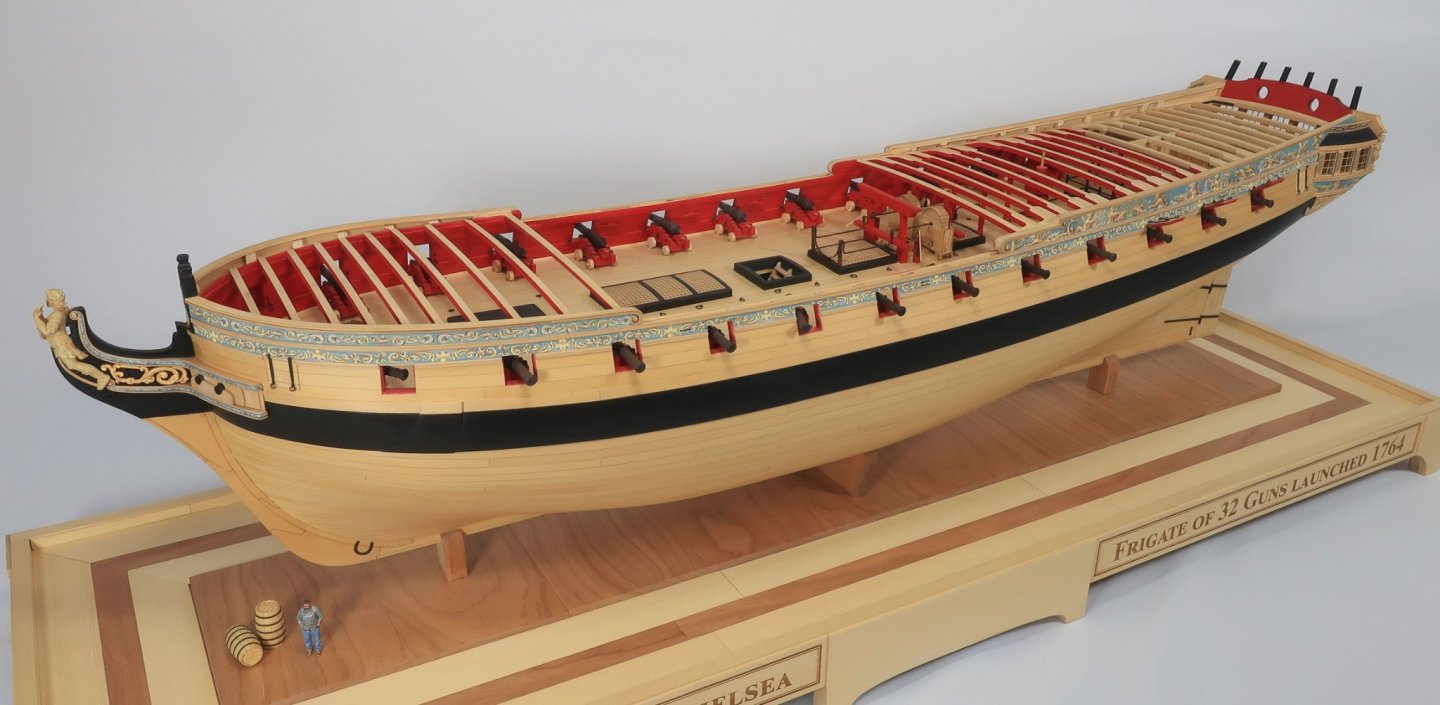
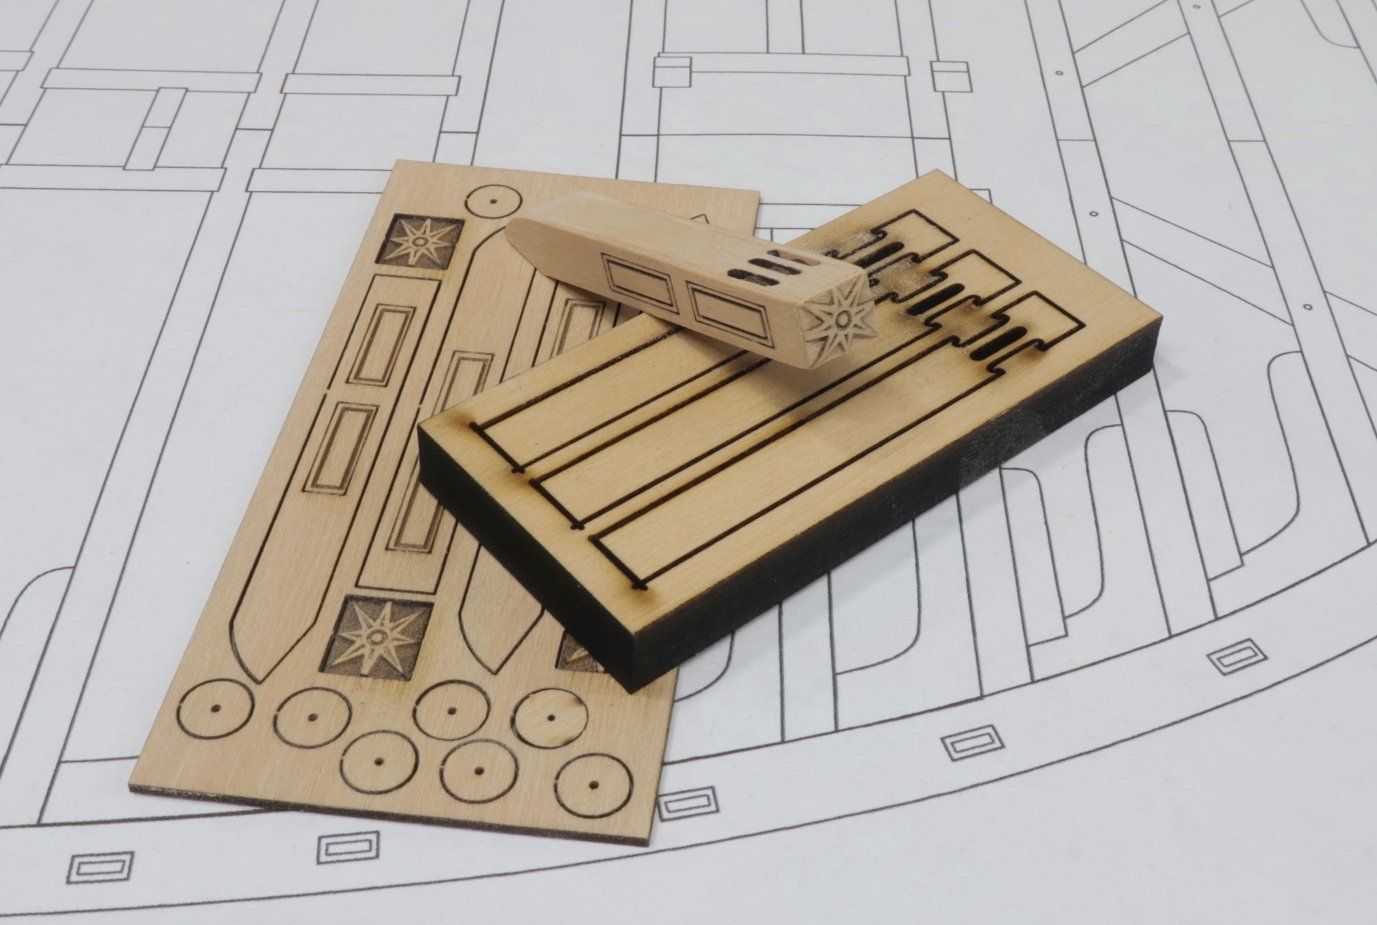
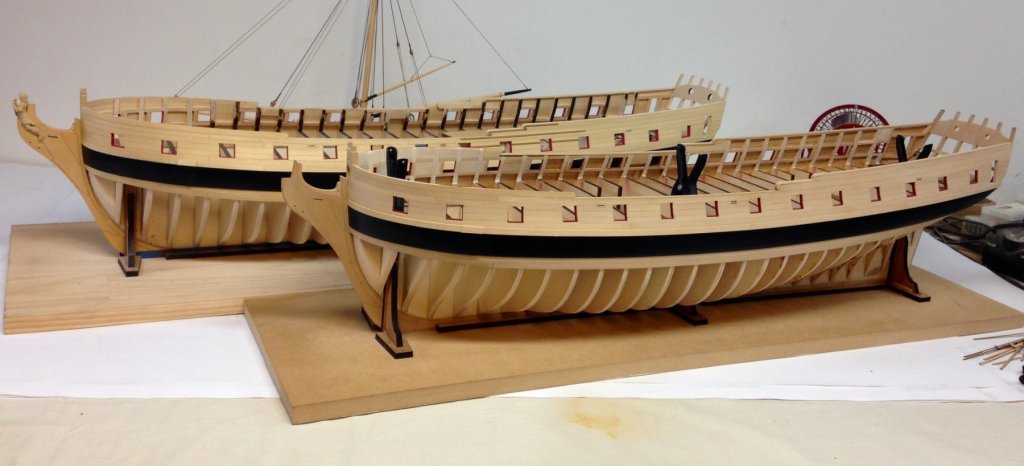
Two winnie's.... I know these pics arent that good but it was tough to take pictures at the time. Mike's Winnie next to mine again .... Most notable to mention...One is made entirely of Boxwood while the other is made almost entirely of Yellow cedar. Can you tell the difference? Yellow Cedar at a third the cost of Boxwood, LOL. It was such a nice afternoon. And a quick look at what I am designing for the catheads. I am working on the design for parts we will need much later in the project. I am making some beta tests. Here is the cathead under development. I think this is the final iteration I will go with. Laser etched side panels and star carving. Actual working sheaves as well. Its a little too short and I just have to lengthen it about 3/32". Then its good to go. Each piece of this project was probably tested and remade about 5 or 6 times before you get the final parts.


- 1,784 replies
-
- 30
-
-
- winchelsea
- Syren Ship Model Company
- (and 1 more)
-
Everything looks good to my eye. Let the planking commence!
-
Looking good. Glad to see your progress.
- 137 replies
-
- 1
-
-
- winchelsea
- Syren Ship Model Company
- (and 1 more)
-
Just a heads up as well. I am nearing completion of the first 12 chapter seven parts in cedar. It takes a long time. Nearly 25 laser cut boards in this chapter. It may not seem like a lot but keep in mind that the parts for this chapter are more complex. Most are laser cut on both sides which nobody else does. This nearly doubles the number of boards as far as time goes. Its like butting 50 boards per chapter. Many if not most of the parts are also boxwood. I probably should have made this two chapters in hindsight. Anyway.... I have a request. Because these take so long to laser cut....if you are not near needing these parts immediately, please refrain from buying it. I know many of you havent even started the project yet. I would ask that you let the folks who are at this stage of the project and really need the chapter seven parts to buy this first batch. I think you understand why. No sense in having them sit on a shelf for a year while we have people who actually ready to start chapter seven. Thank You in advance. When I get back from Washington DC I will start making the first cherry chapter parts. Chuck
- 1,784 replies
-
- 13
-
-
- winchelsea
- Syren Ship Model Company
- (and 1 more)
-
Its looking very good. 😀
-
Thanks Mike....Tomorrow I have to remember to take pictures of both our Winnie models next to each other. It will be interesting to see both together now that we are so much farther along. Way back when we managed to take a picture at this stage....we have come a long way since then. It will be really fun to get the guys together after 18 months....I am looking forward to it. We have about a guys from our club coming by the shop for some lunch and they will be bringing their models that they have been working on during the lock-down!!! Good times!!!
- 1,784 replies
-
- 15
-
-

-
- winchelsea
- Syren Ship Model Company
- (and 1 more)
-
He will be cutting that split area away anyway as that beam need to be moved forward. My original slot was not in the correct position. So most of the work is done for him already. None of the deck clamps will be visible. They are all covered by the lodging knees etc. se the latest update in my prototype build log.
-
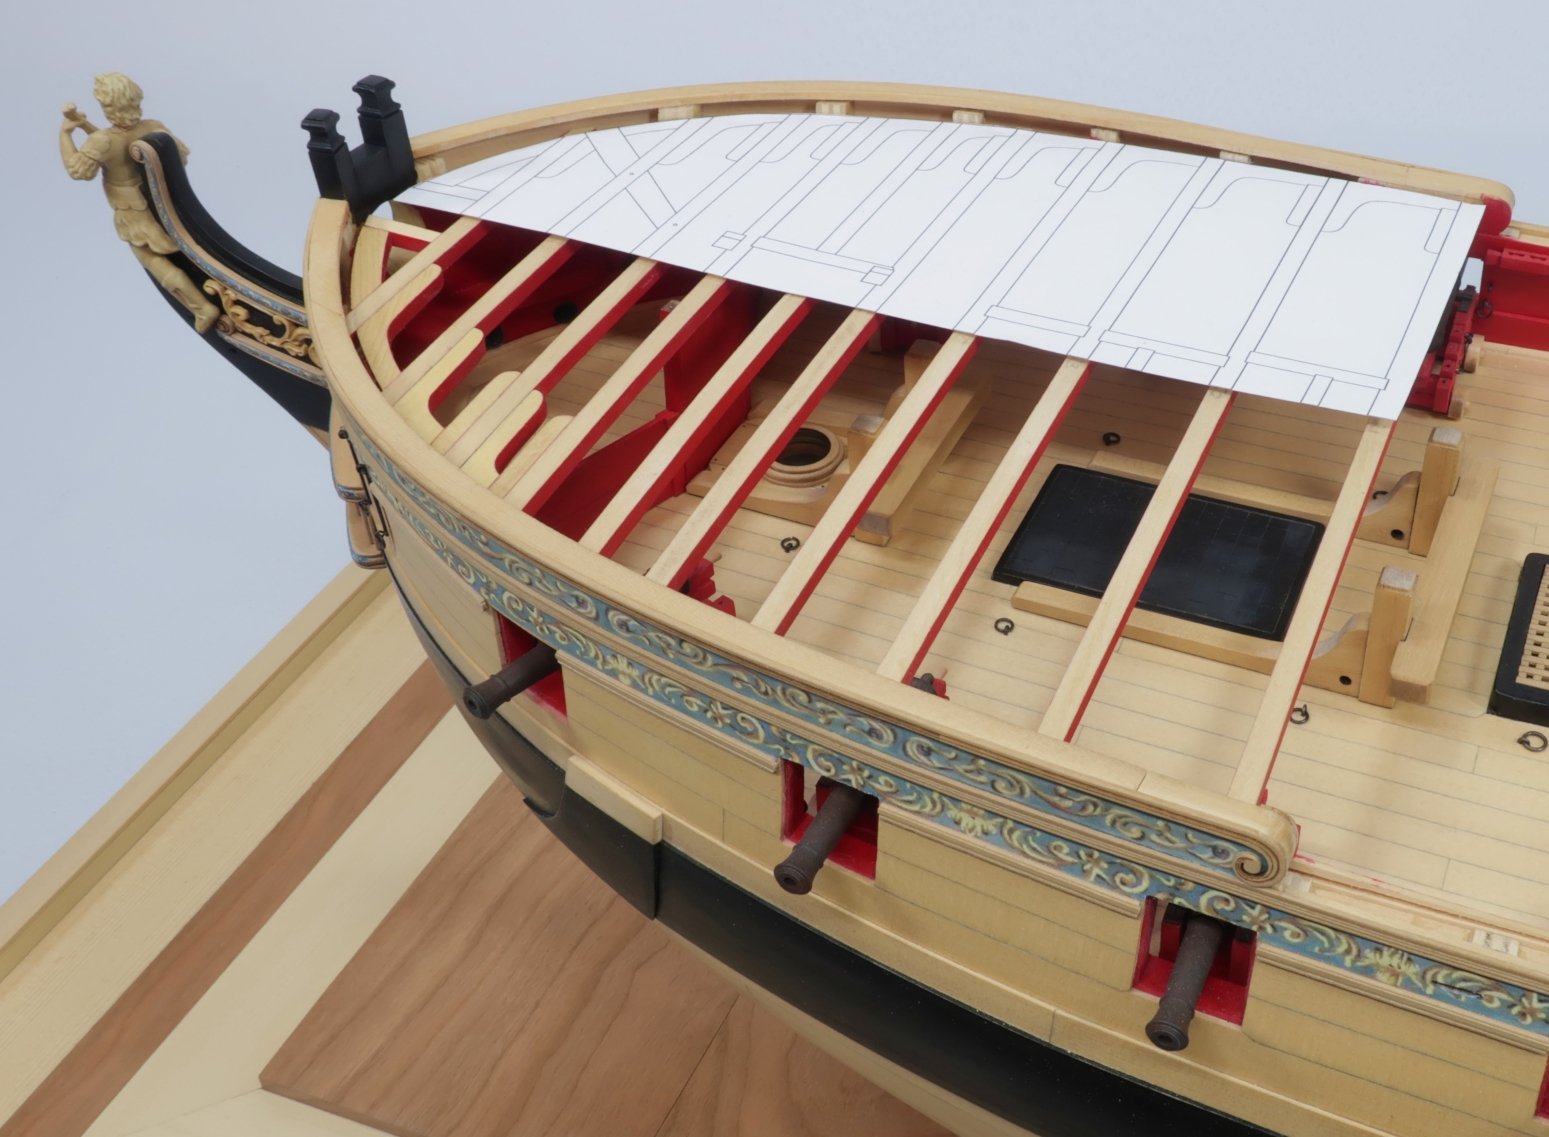
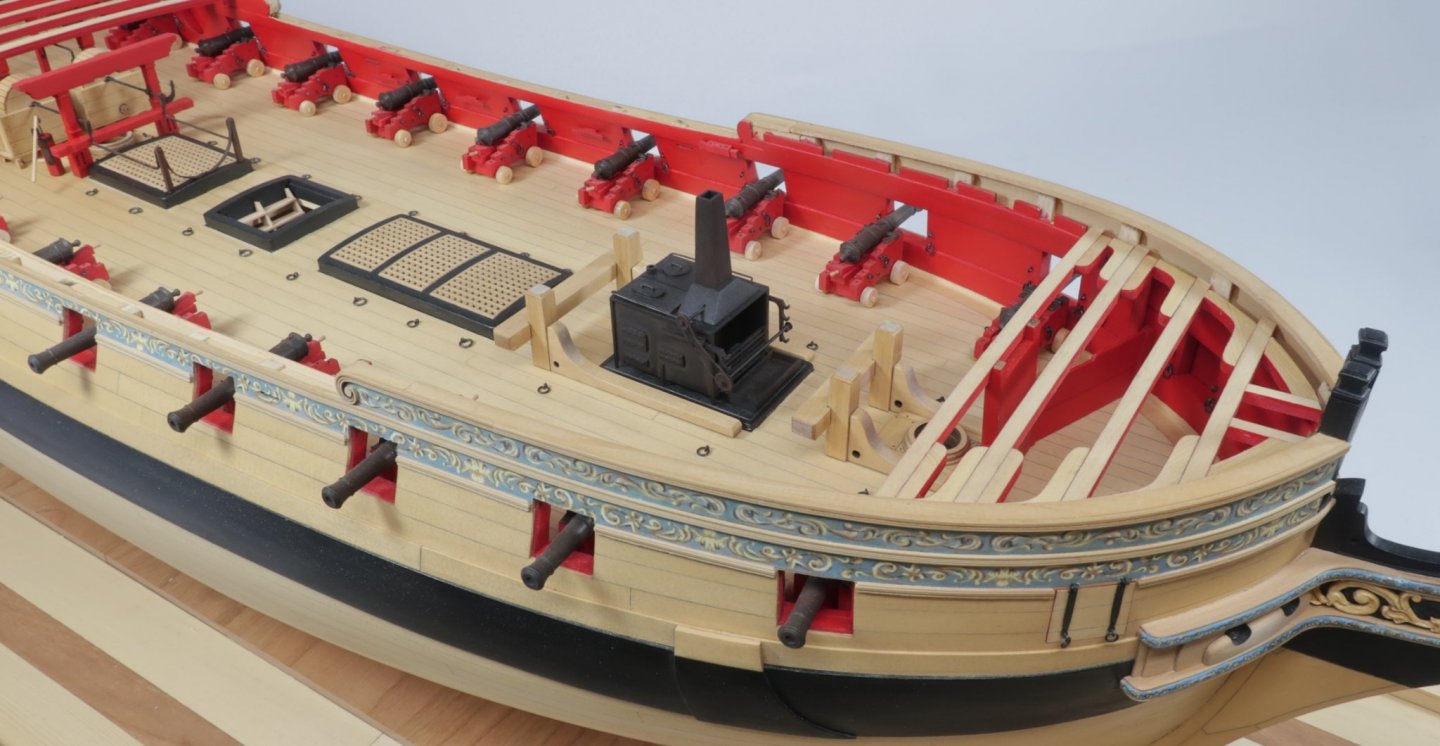
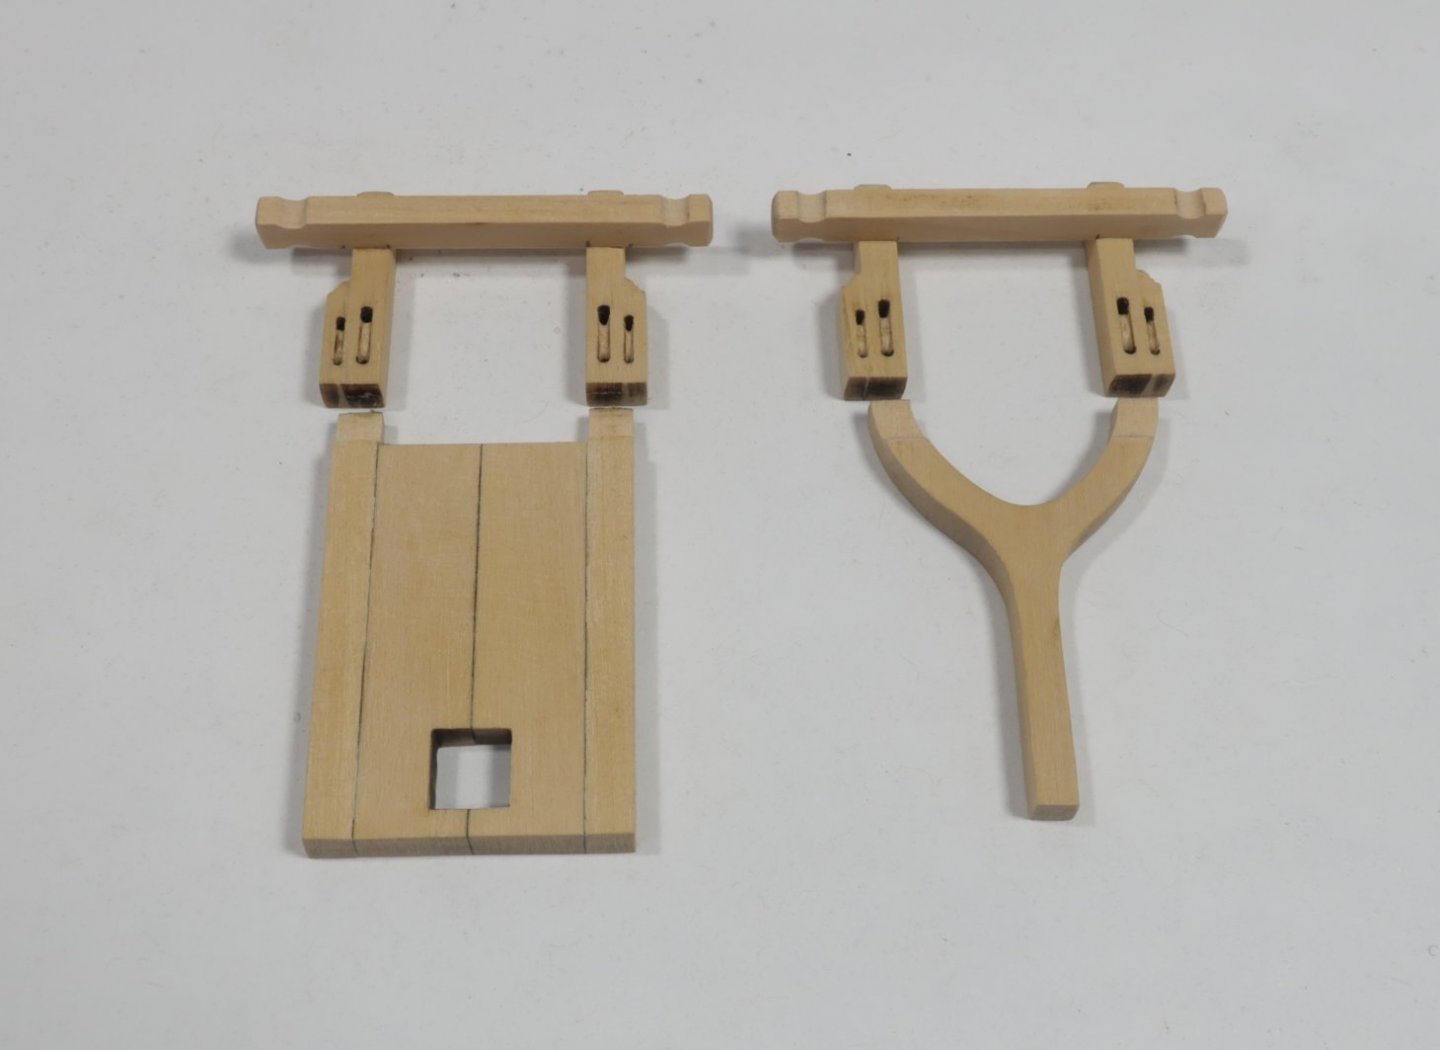
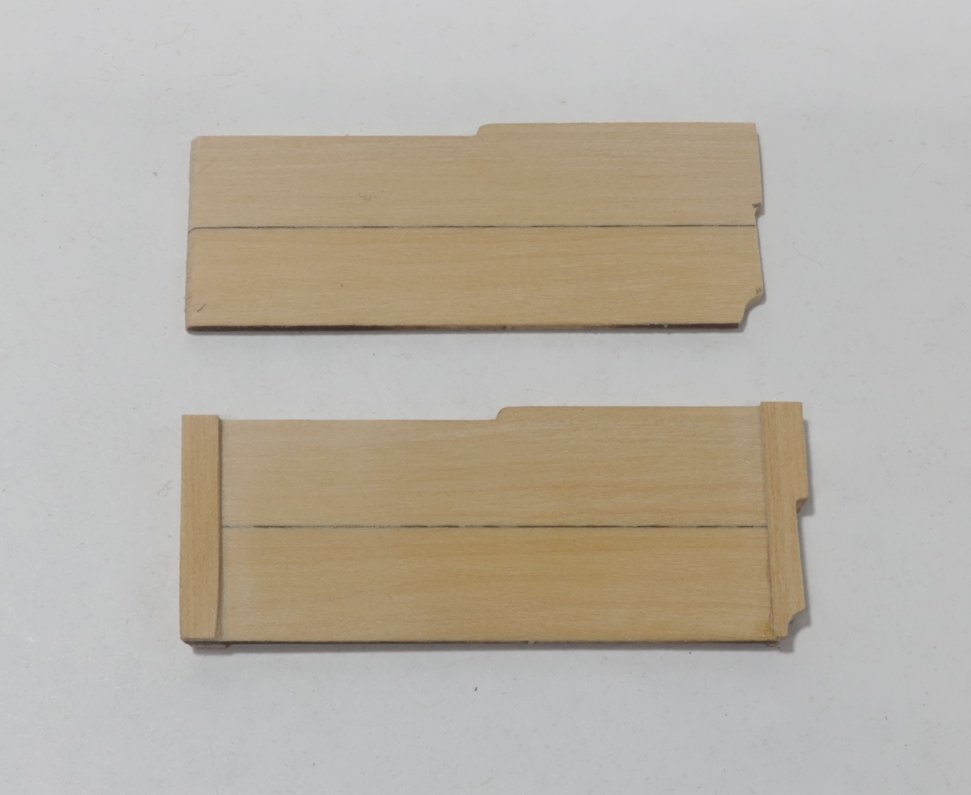
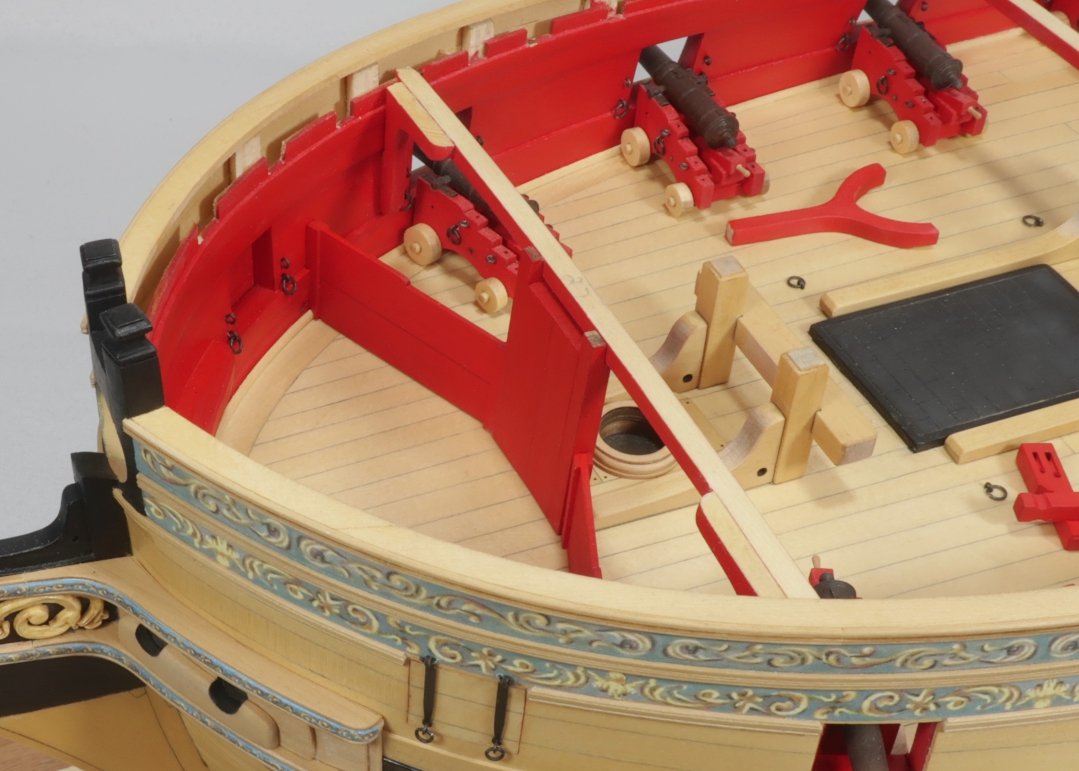
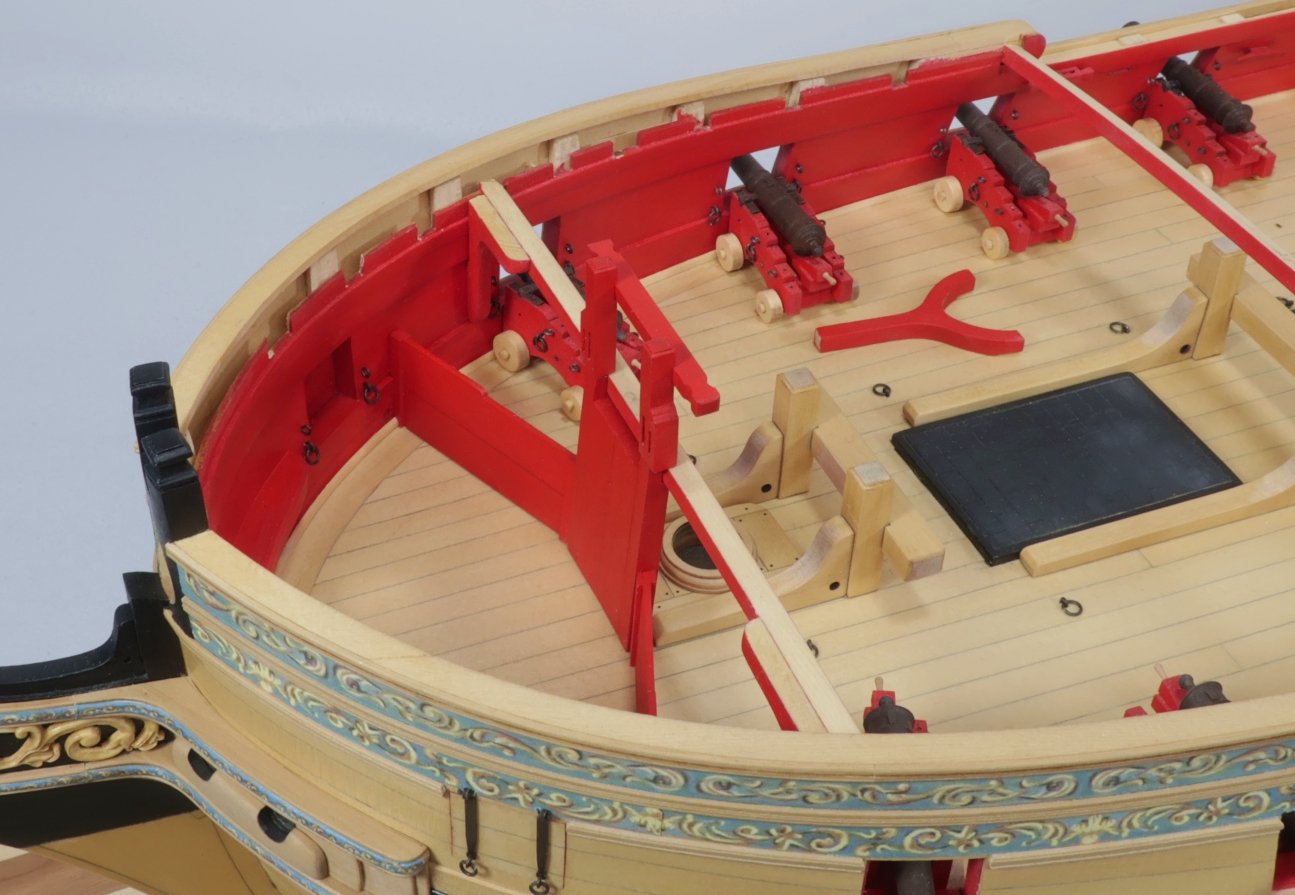
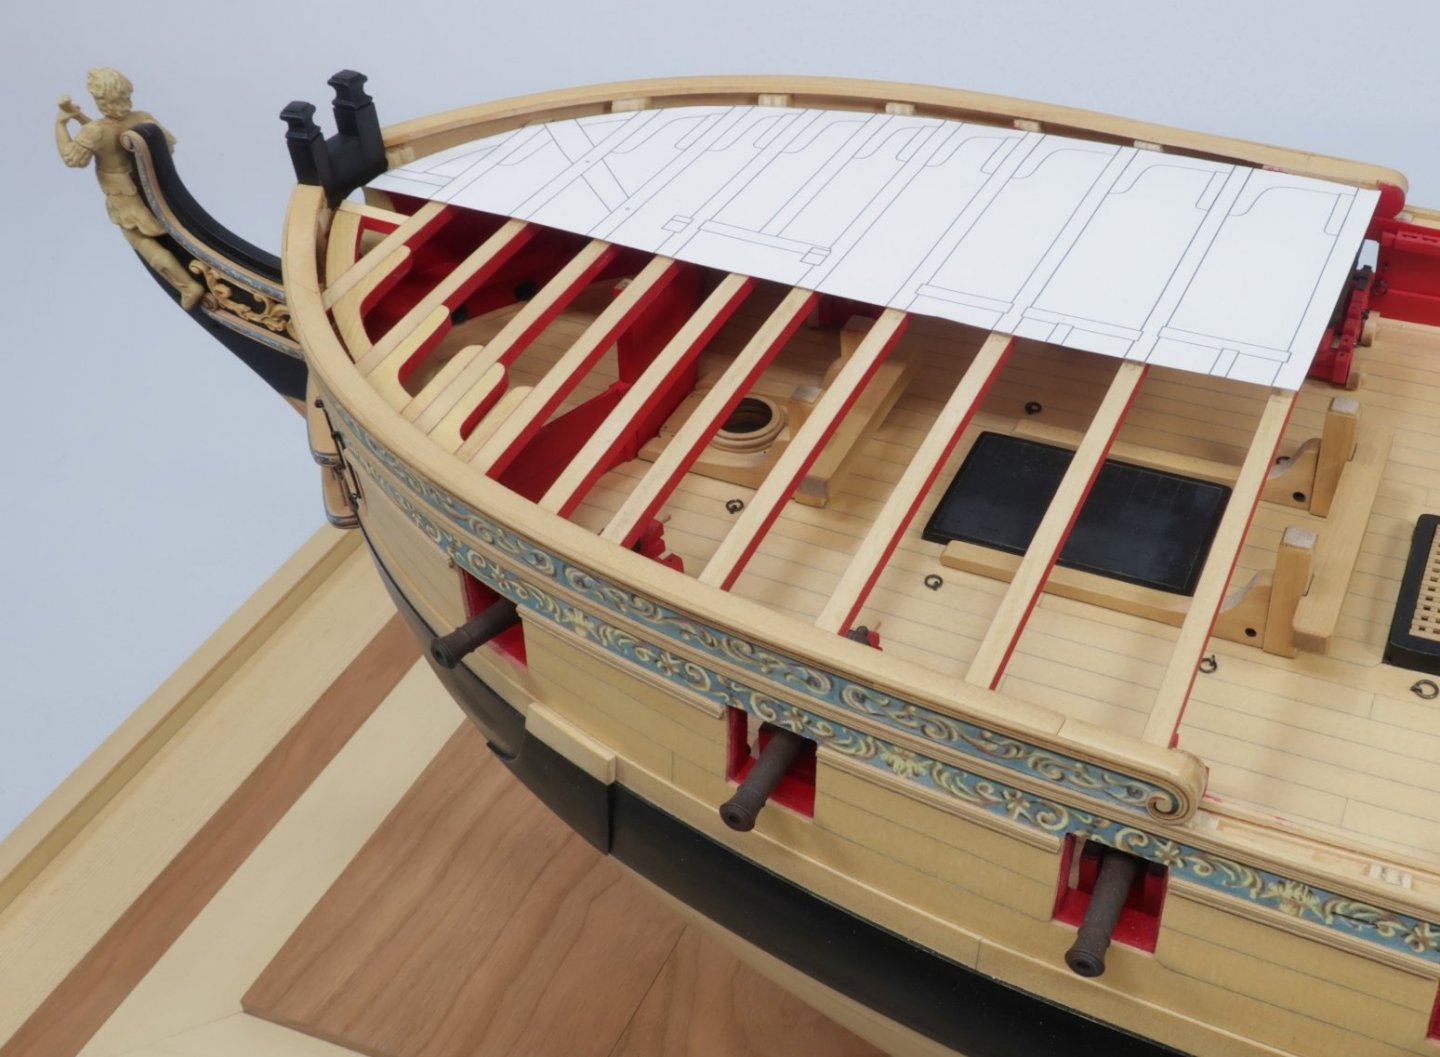
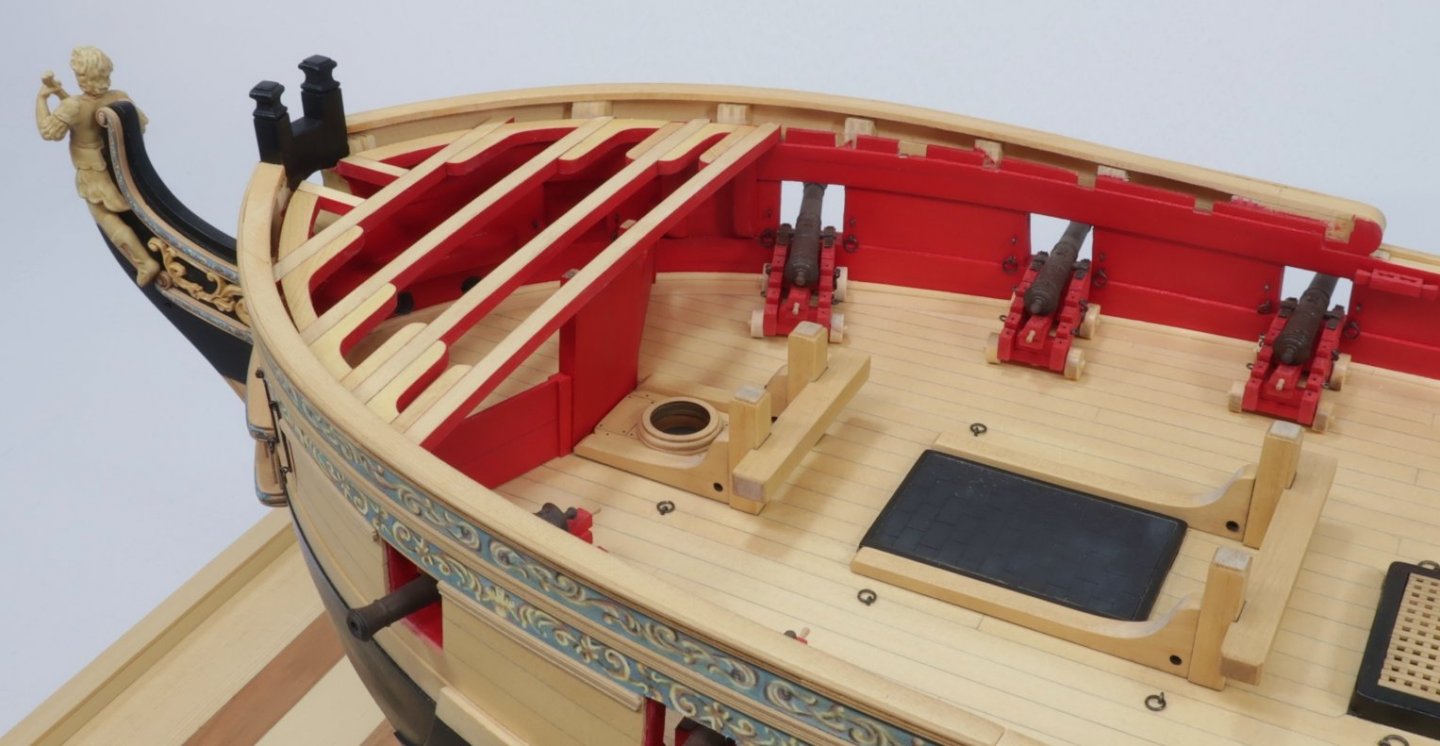
There are two rails/fore bitts forward and aft of the foremast on the Fcastle. These are interesting fittings in that they extend from the gundeck through and up to the f'castle. So we will start chapter 8 with those. But first a little prep work. I knew when I drafted the plans for Winnie ....specifically the deck clamps...that at the extreme bow I would probably incorrectly space the notches for the deck beams. This turned out to be true. It was difficult for me to design the deck clamps as the rounded the bow so the beams of the f'castle would be properly spaced and positioned. I knew I would be adjusting them before I started making the fittings below the f'castle beams. Turns out that only forward six deck beam notches need to be altered. They need to be moved forward a bit in ever increasing distances as the get closer to the bow. This is very easy to do as you guys only have to widen your notches for those six forward deck beams. So place all the beams temporarily in their current notches and use the supplied template to see how far forward all of those six beams should be moved. The last or forward most beam has to be moved 5/32" forward and requires the most extreme shift to the notch in the deck clamp. Here is a photo of the template in position after all the forward deck beams were moved. You will be referring back to this template often as you work. With that completed lets build the bowsprit step and two rails. But remember that these are all one piece on the actual ship BUT split in half between decks on our model to simplify matters. Even though you will be building the actual rails now for the f'castle they wont be needed until a much later chapter. Its just easier to build them together so they are the same width when completed. This will help the illusion that they are all one piece later on. There is the bowsprit step made from 4 laser cut pieces.....which has a rail above it. There is a "Y" shaped element on the aft side of the foremast which also has a rail above it and was one continuous piece. Or at least they should look that way when done. So build these from the laser cut boxwood pieces. Note the square hole for the aft end of the bowsprit tenon. That was actually a mistake from my original design. The bowsprit angle was changed during construction as noted on the original draft/plans to a steeper angle. This hole was actually below deck and wouldnt be seen so I removed it and made another which you will see. Note how the rails are the same width as the parts below deck and thus its easier to build these together even though we wont be mounting the rails above the deck beams yet. But this is what it will look like and what we are shooting for if it was mounted. We are starting with the fourth deck beam from the stem. The rail is just temporarily in position to show you guys how it should look. But we are basically adding the fourth beam first..... Then positioning the bowsrit step. This has a slight angle as shown on the plans. Then I added the two manger barriers on either side of the bowsprit step. The manger barriers are basically a wooden partition on either side of the bowsprit step. They are laser cut for you. First glue the two flat boards together edgewise to form the barrier. shown on top below. Then take that barrier and position it on the model. Both ends need to be shaped to fit you bulwarks and beveled to fit against the bowsprit step. Each partition will be slightly longer so you can take your time and care to get the correct shapes. Once they fit....add the strops on each end.... 1/8" x 1/64" strips to simulate the slotted fixture these two boards would be slid into. These partitions were always being removed and repositioned to give access to the manger area. As you can see I painted mine red. This is what it looks like all done without the rails above the bowsprit. Note that I also added the hanging knees on each side of the fourth deck beam. It was just easier to add them know. When positioning the manger partitions....CAUTION.... Beware that the position along the bulwarks is important. You will need to keep it clear of where other hanging knees will fall and the scupper should you choose to show them. From this point I added the remaining deck beams....knees and lodging knees moving forward towards the stem. Just use the template and plan as a guide. Its no different then adding the knees for the qdeck. The only difference is that they are on the opposite side of the deck beams this time. Next up I will add the cat tail for the catheads. It will be much easier to add them at this point before I start adding any more fittings and deck beams!!! Any questions.??? Oh yes....I did make the riding bitts but they are just temp positioned. I still have to finish those and paint them. I should have removed them from the pictures before I took them.
- 1,784 replies
-
- 29
-
-
- winchelsea
- Syren Ship Model Company
- (and 1 more)
-
That is looking pretty darn good. Yes the deck clamp will be all but impossible to see.
-
HMS Snake by BenD - Caldercraft - 1:64
Chuck replied to BenD's topic in - Kit build logs for subjects built from 1751 - 1800
Nice looking rope. Well done! I am sure you will Have many customers. -
5/32" singles..... Rope sizes are more difficult. But I figure .018 for the tackles and .050 to .054 for the breach line. Chuck
- 144 replies
-
- 1
-
-
- winchelsea
- Syren Ship Model Company
- (and 1 more)
-
As I am finalizing and cutting Chapter seven parts...here is a sneak peak of what will be chapter 8. I have just started working on these fittings under the fcastle deck beams. There are far fewer items so this chapter should go quicker. The most detailed item to make will be the Stove. The other stuff is quite straight forward.
- 1,784 replies
-
- 29
-
-
- winchelsea
- Syren Ship Model Company
- (and 1 more)
-
I use 15" long at Syren because that is the length of my laser cutter bed. Actually its 16" but I like to use 15" long sheets on the laser. Other than masts it is unlikely you would ever need a piece longer than that. That is if you plank with scale lengths which follows actual practice. Best to keep widths to around 4" to 5" because any sheets you mill that are wider have the tendency to cup. Narrower sheets are more resistant to this. But in the end its up to you. Chuck
-
Nicely done!!