Chuck
-
Posts
9,717 -
Joined
-
Last visited
Content Type
Profiles
Forums
Gallery
Events
Everything posted by Chuck
-
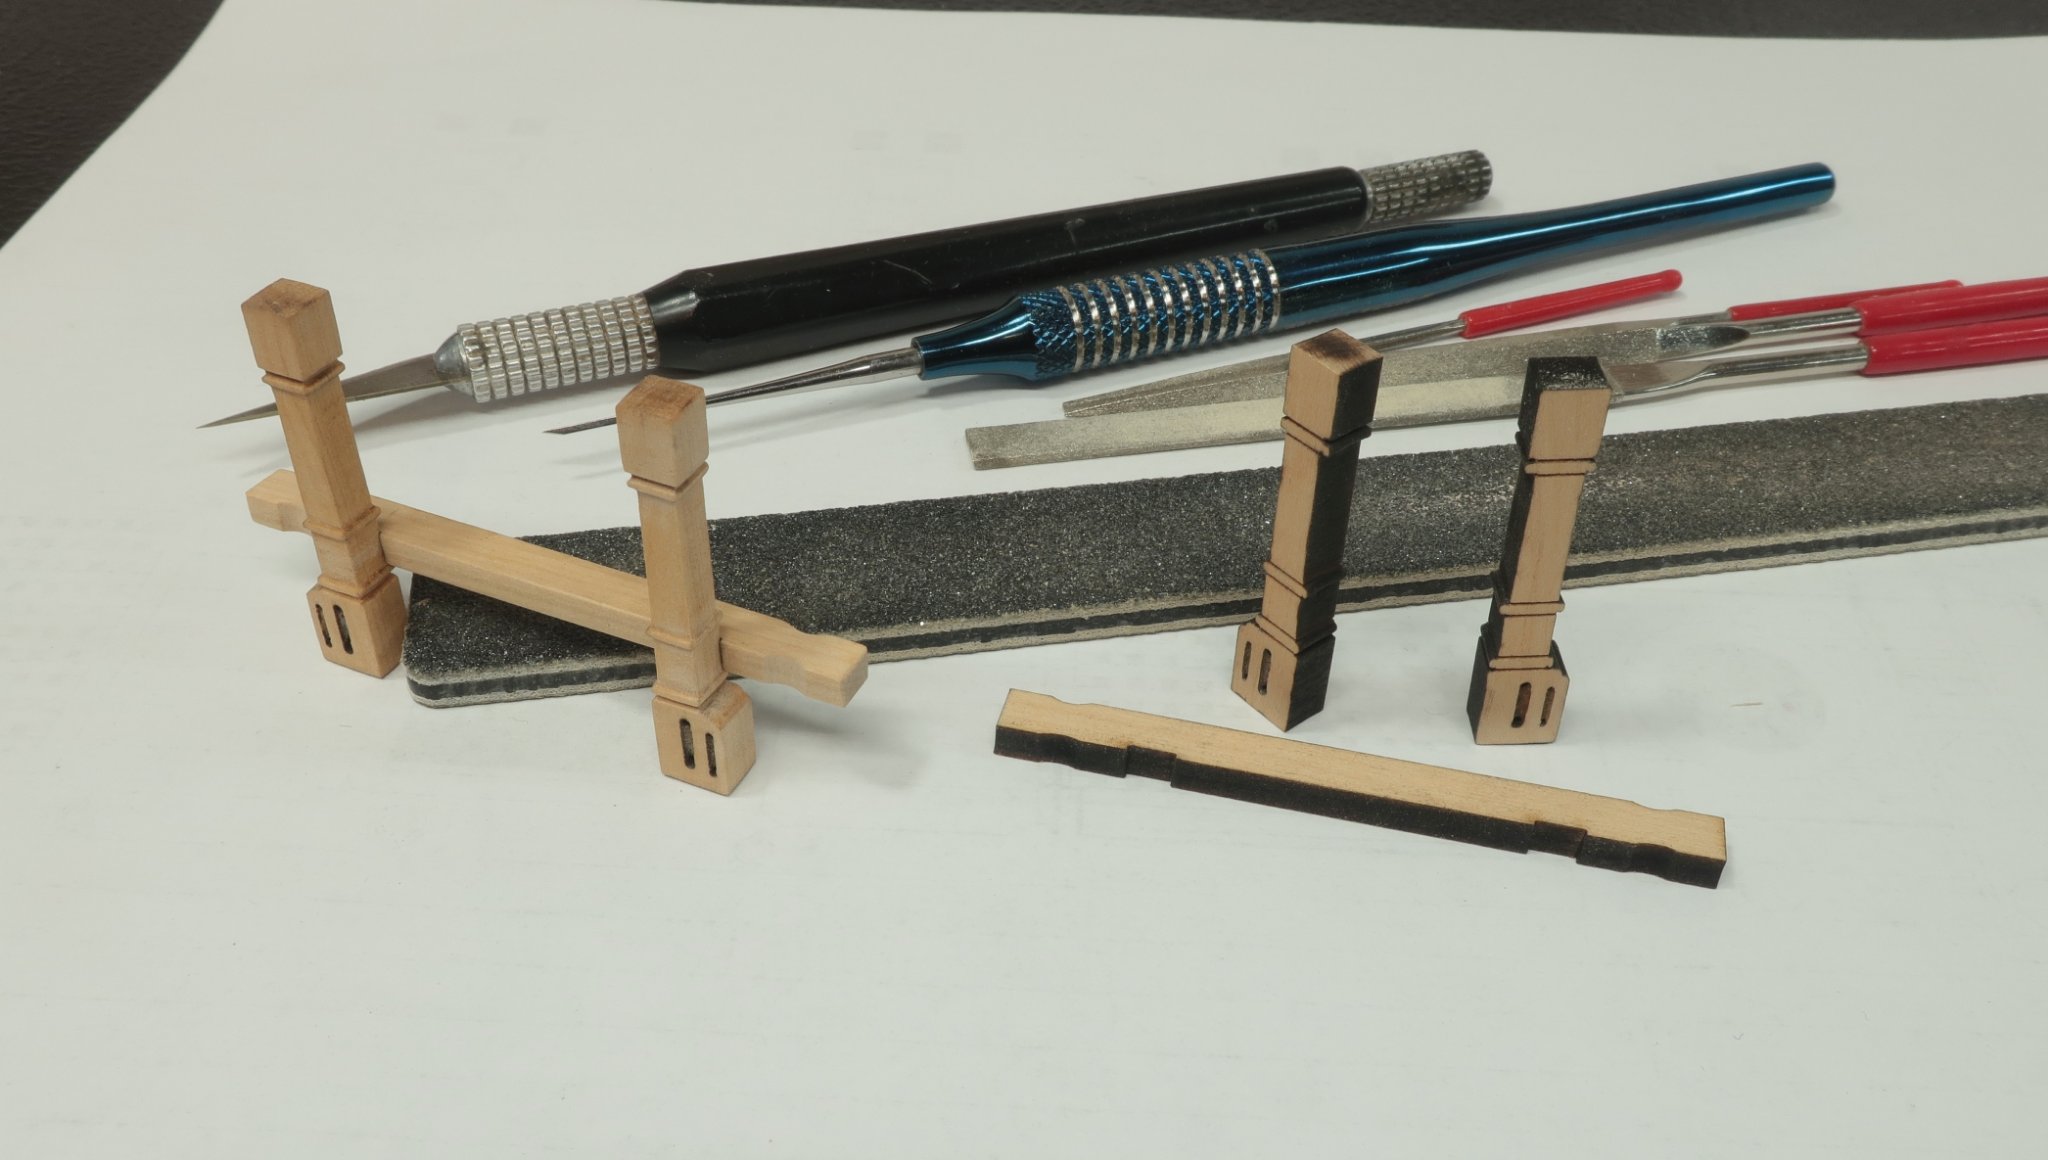
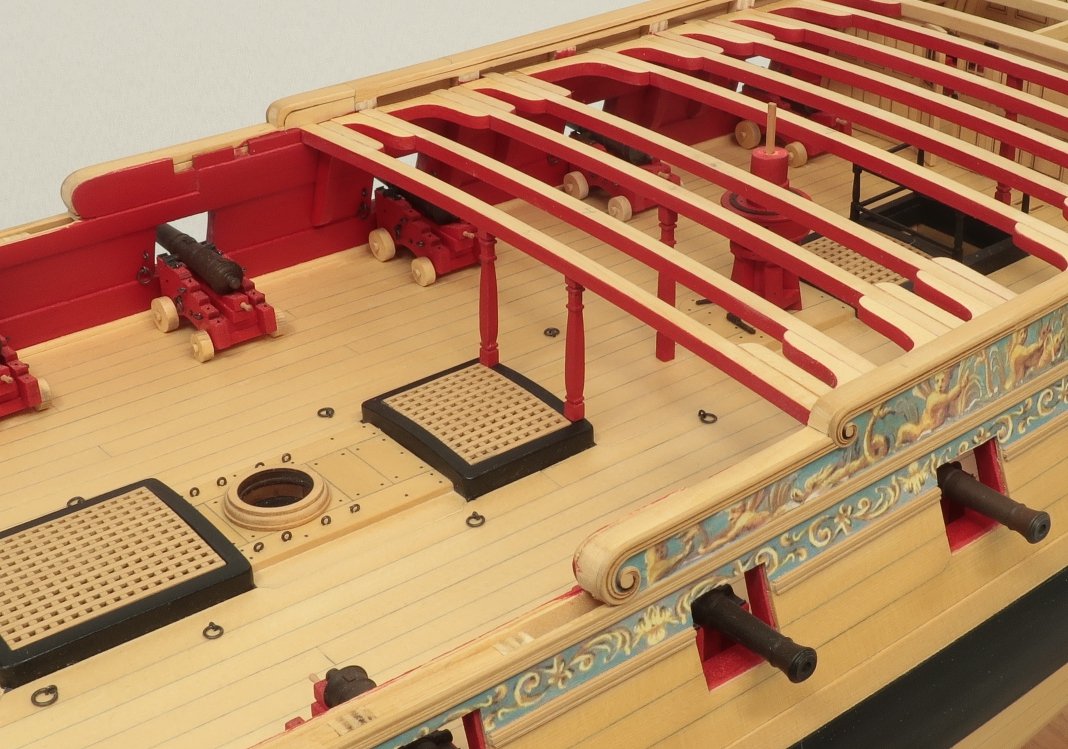
 Moving right along.....or forward so to speak You saw me build the capstan and I am using the red one....all I had to do was really make the two pawls. I just used a strip of 3/64 x 3/64 boxwood. I cut them to length.....shaped them as shown. The arse end being rounded off. I drilled a hole through that end so I could insert some black fishing line to simulate the bolt or pin on the pawl. Painted them black with some weathering powder and glued them on. Notice how I sanded the back of each pawl thinner so the part that engages the capstan is thicker. Dont mind all the dust!!! Then I continued forward adding beams ....lodging knees and hanging knees... UNTIL I reached the area you see below. The beam is permanently installed. But the two columns are not. These are just temporarily positioned. Do not glue these two columns in yet. Note how they were morticed into the coaming. These two columns will need to be lined up perfectly with the Main jeer bits......and gallows. The crank handle for the chain pumps will run through all of these elements and the need to be positioned only after the chain pumps are made. That will come soon. So just position them like this without glue. In fact....the next two (the last two) deck beams wont be added permanently yet either. They will not be glued into position until after we have the chain pumps all finished and those crank handles installed. But you will be testing with them while you build those elements... For example....time to make the Main jeer bitts. These actually sit directly under the forward most deck beam or breast beam. They are laser cut and just like the columns, the uprights are etched on both sides for reference. These are boxwood as well. You will notice some heavy char on the sides of these because they are very thick at 3/16" thick. Rather than just sand or file off the char from the sides of these, I scraped the char off first. I used a number 11 blade. That should remove most of it so whatever remains can be cleanly and easily sanded away. Boxwood in this thickness requires much more laser power to cut through and thus more charring. Notice how the front and back of the uprights are flat without any dimension. You have etched reference lines but you must still use some blades, chisels, files or whatever you are comfortable with....to mimic the profile laser cut on both sides. These take some time to shape and do properly but they arent difficult. As you can see they clean up beautifully and make some really nice jeer bits. The two sheaves are all laser cut for you on both sides.....how nice is that??? You could round off the sheaves if you like for extra credit. The jeer bitts were painted red and positioned beneath the Breast beam or that first qdeck beam. Nothing is glued in yet....these are just tests in preparation for completing the chain pumps. It rests right against the coaming behind it. The cross beam is on the aft side. But I will mention.... This is important, the Breast beam is actually wider than all of the other deck beams. Its 3/16" wide. In addition, you must scrape a decorative molding and glue it the fore side of this beam. The molding was scraped from a 3/32" x 1/32" boxwood strip. Deck planking and margin planks will over hang this breast beam and look very nice. I dont know if you can see or make out the molding on the beam. But the jeer bitts are tested under it. It is starting to look good now that more fittings are being added. Next up the gallows which is almost the same as the jeer bitts but has a fancy top. It is positioned just forward of the main mast. Thats next!!! A little farther away to see more of the hull at this stage....remember those two remaining deck beams are NOT glued in yet...... And farther away still as the fittings continue to be added...
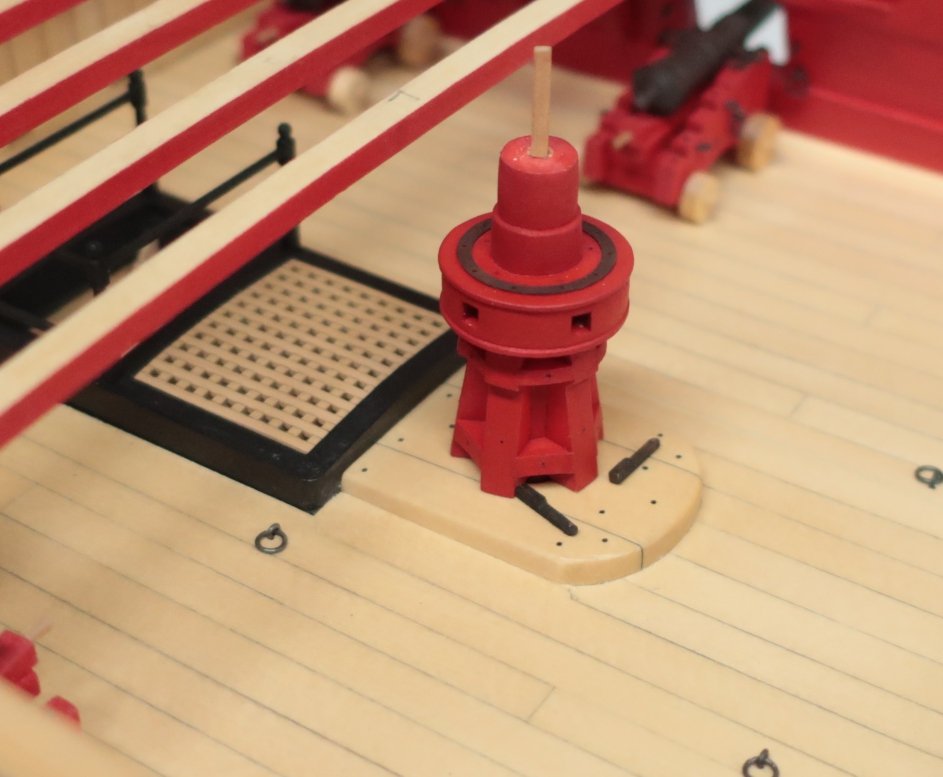


- 1,784 replies
-
- 40
-

-
- winchelsea
- Syren Ship Model Company
- (and 1 more)
-
That looks pretty darn good to me. Well done...
-
Looks fantastic…really nice. If anything I hope this gives you some confidence to carve more stuff in the future. I really enjoyed it although it does take a lot of time and cant be rushed. But it makes a world of difference on the model.
- 185 replies
-
- 1
-
-
- queen anne barge
- Syren Ship Model Company
- (and 1 more)
-
Ken thats much better and not to tight at all. It looks great. If it untwists a bit when you release it that is fine. But remember only cut one ebe free and let it untwist until it stops. Then it wont kink up. You have to hold it while it untwists until the rope is in balance from the opposing tensions you put on it. that rope looks perfect.
- 238 replies
-
- 5
-
-
- sloop
- providence
- (and 1 more)
-
Really nice Rusty. You are getting to all the fun stuff now.
- 642 replies
-
- 2
-
-
- winchelsea
- Syren Ship Model Company
- (and 1 more)
-
Yes but depending on how it fits in the coaming you could thin it more. Its up to You. I made mine pretty thin but then I had to increase the height of the rabbet strip it sits on within the coamings. You have to keep that in mind. Thinner is better as that is more accurate but as you show it is still 100% better than the gratings found in most kits. I think mine were around 3/64” thick when done after sanding a little on top and bottom until it looked right to my eye.
-
Looks good Ken but go even tighter. More initial twists and more final twists.....It will make a tighter lay of the rope and look even better.
- 238 replies
-
- 1
-
-
- sloop
- providence
- (and 1 more)
-
That looks very good indeed. Good stuff!!!😃
-
I think I figured out the white background thing..... auto white balance is a wonderful thing...I prefer to do as little editing as possible but that is almost impossible. Thank you for pushing me to keep trying....but yes white like this is very stark.

-
I actually just had delivery of some led lighting as I too was tired of taking poor pictures. I have little room left in my brain to really learn how to use a camera correctly with with so many settings. I have a pretty good camera that takes some really nice pictures. I also bought a white backdrop 10 x 10 white linen.... but it looks light blue or gray in the pictures afterwards. I dont mind this at all. The cool blue looks really good to my eye against the warm tones of the hull. I try and get the sharpest details and try to make the saturation correct so the yellow cedar looks true to its actual color. If I can get that and the background is not perfectly white I am perfectly fine with it. Here are some test shots from just today as Mike (stuntflyer) was helping me understand the camera setting etc. Just too much info to learn on this stuff.... Luckily I dont have to get it perfect.....just pretty good.....I hope. I also want to try focus stacking. So I downloaded some freeware. I will try that next. But having those new lights made a huge difference. I am pretty happy about the new lights ...backdrop...and the fact that you cant see the crap laying around my shop next to the model in every photo I take. They are cheap ones for sure but work fine.

-
Here is a carved example with Gold as I know you like that look as well. Something to consider.
- 185 replies
-
- 4
-
-
- queen anne barge
- Syren Ship Model Company
- (and 1 more)
-
That looks very good. I rounded quite a bit as you can see with the resin version. That is a cast from my carved boxwood version. I did more detail carving of the crown as you can see. Keep smoothing .....it will get even better. Chuck
- 185 replies
-
- 1
-
-
- queen anne barge
- Syren Ship Model Company
- (and 1 more)
-
That looks excellent Mike. You will be caught up with me in no time...😁
- 607 replies
-
- 2
-
-
- winchelsea
- Syren Ship Model Company
- (and 1 more)
-
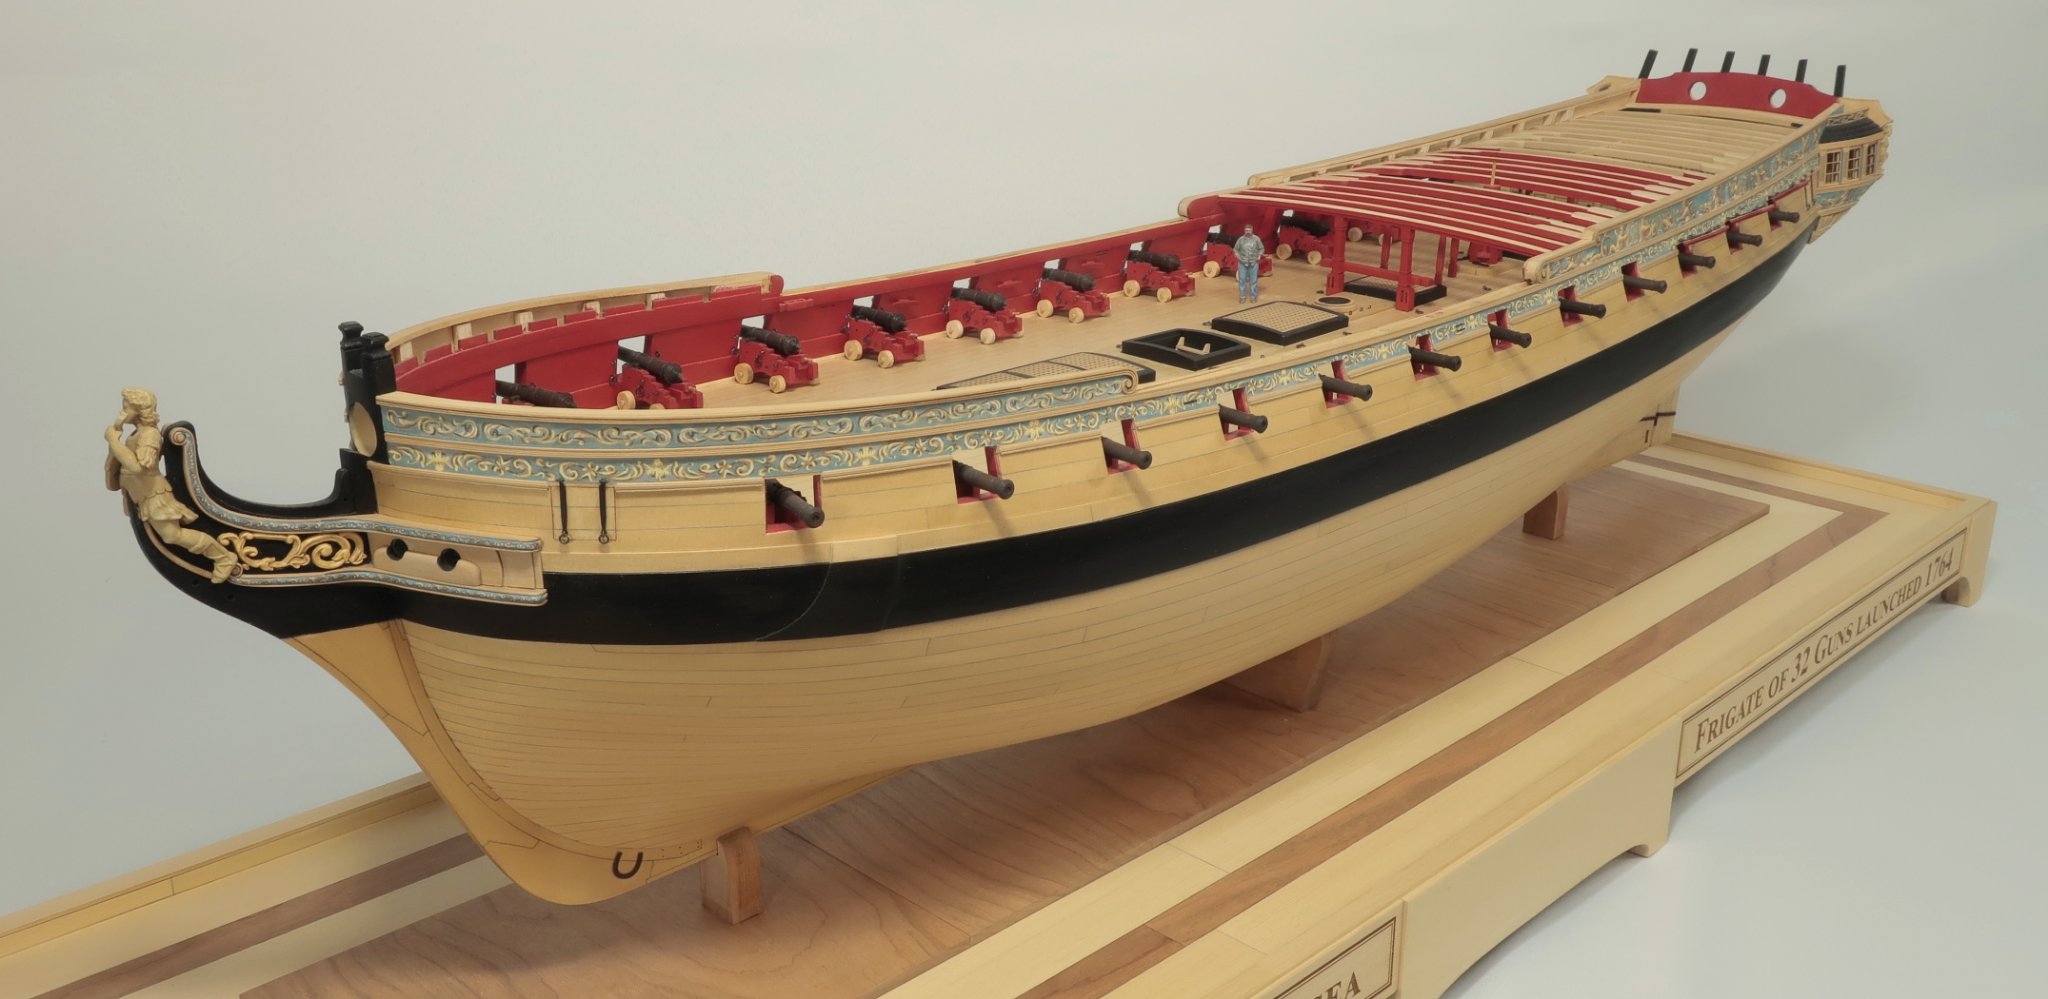
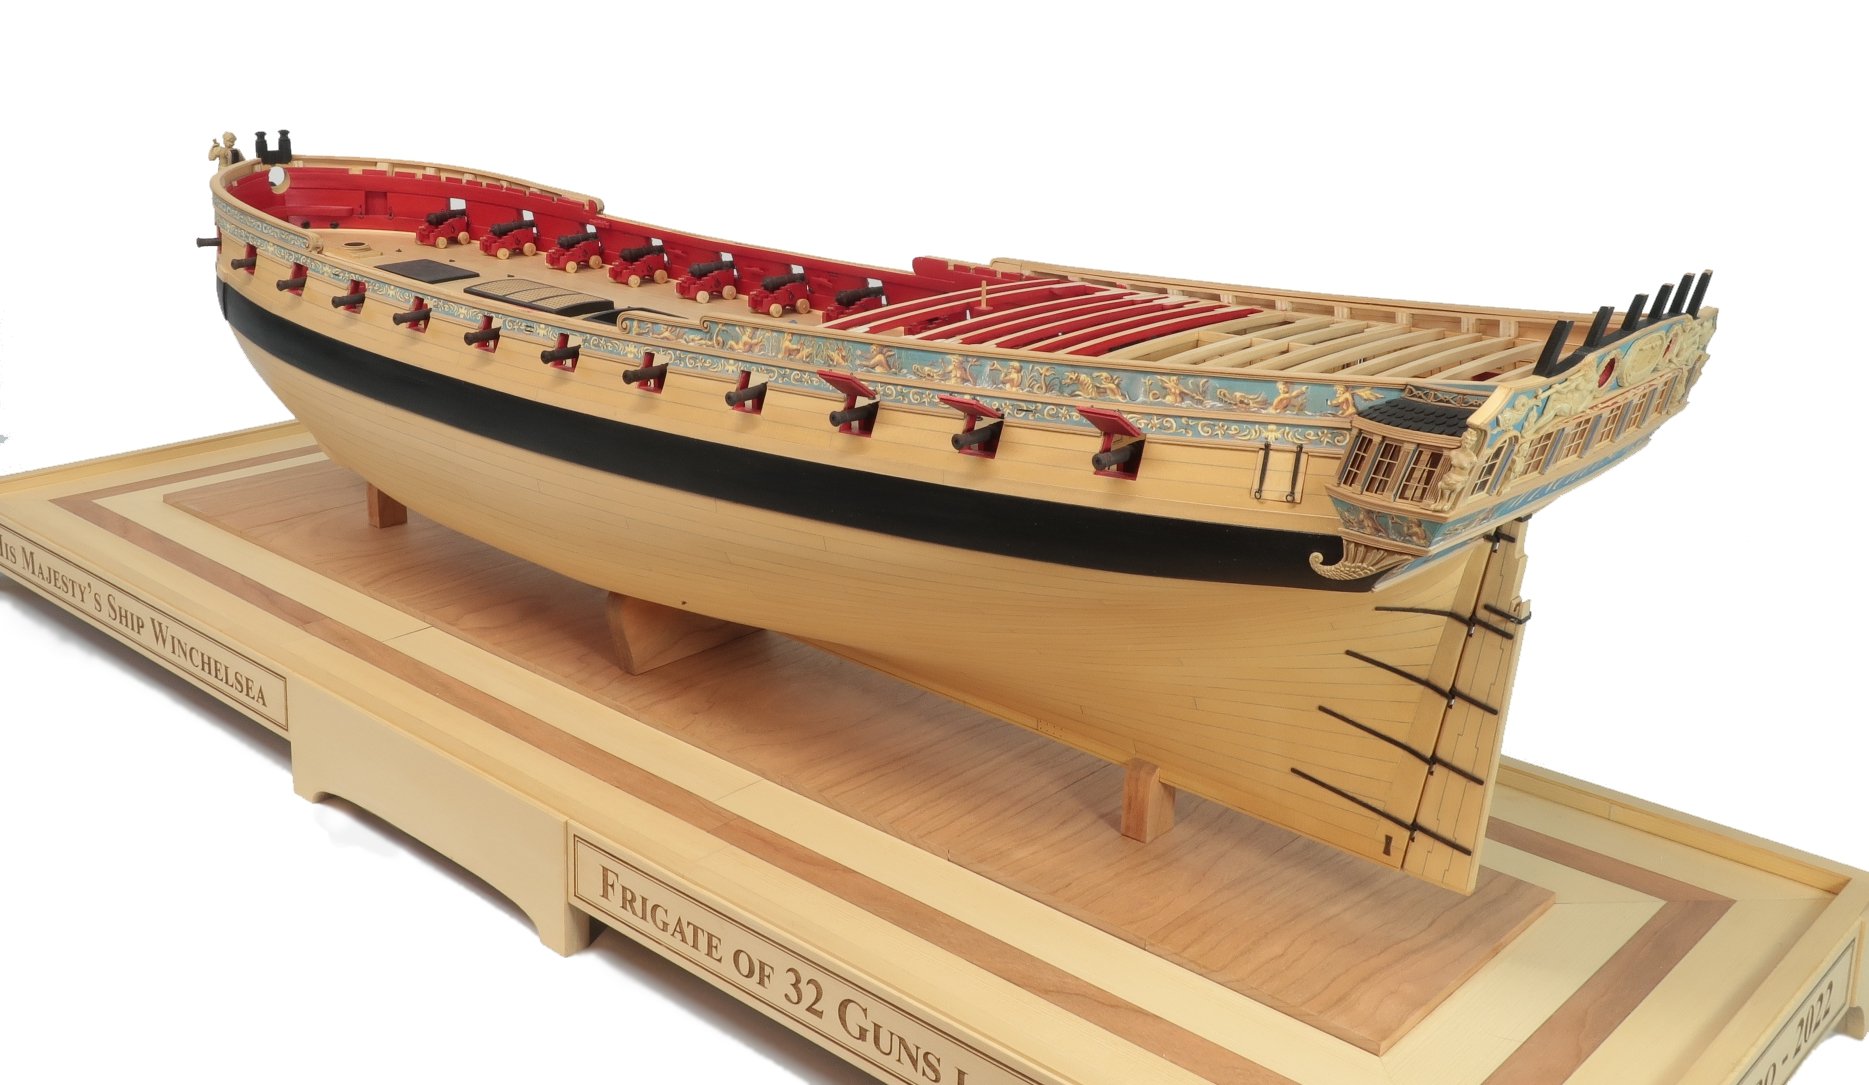
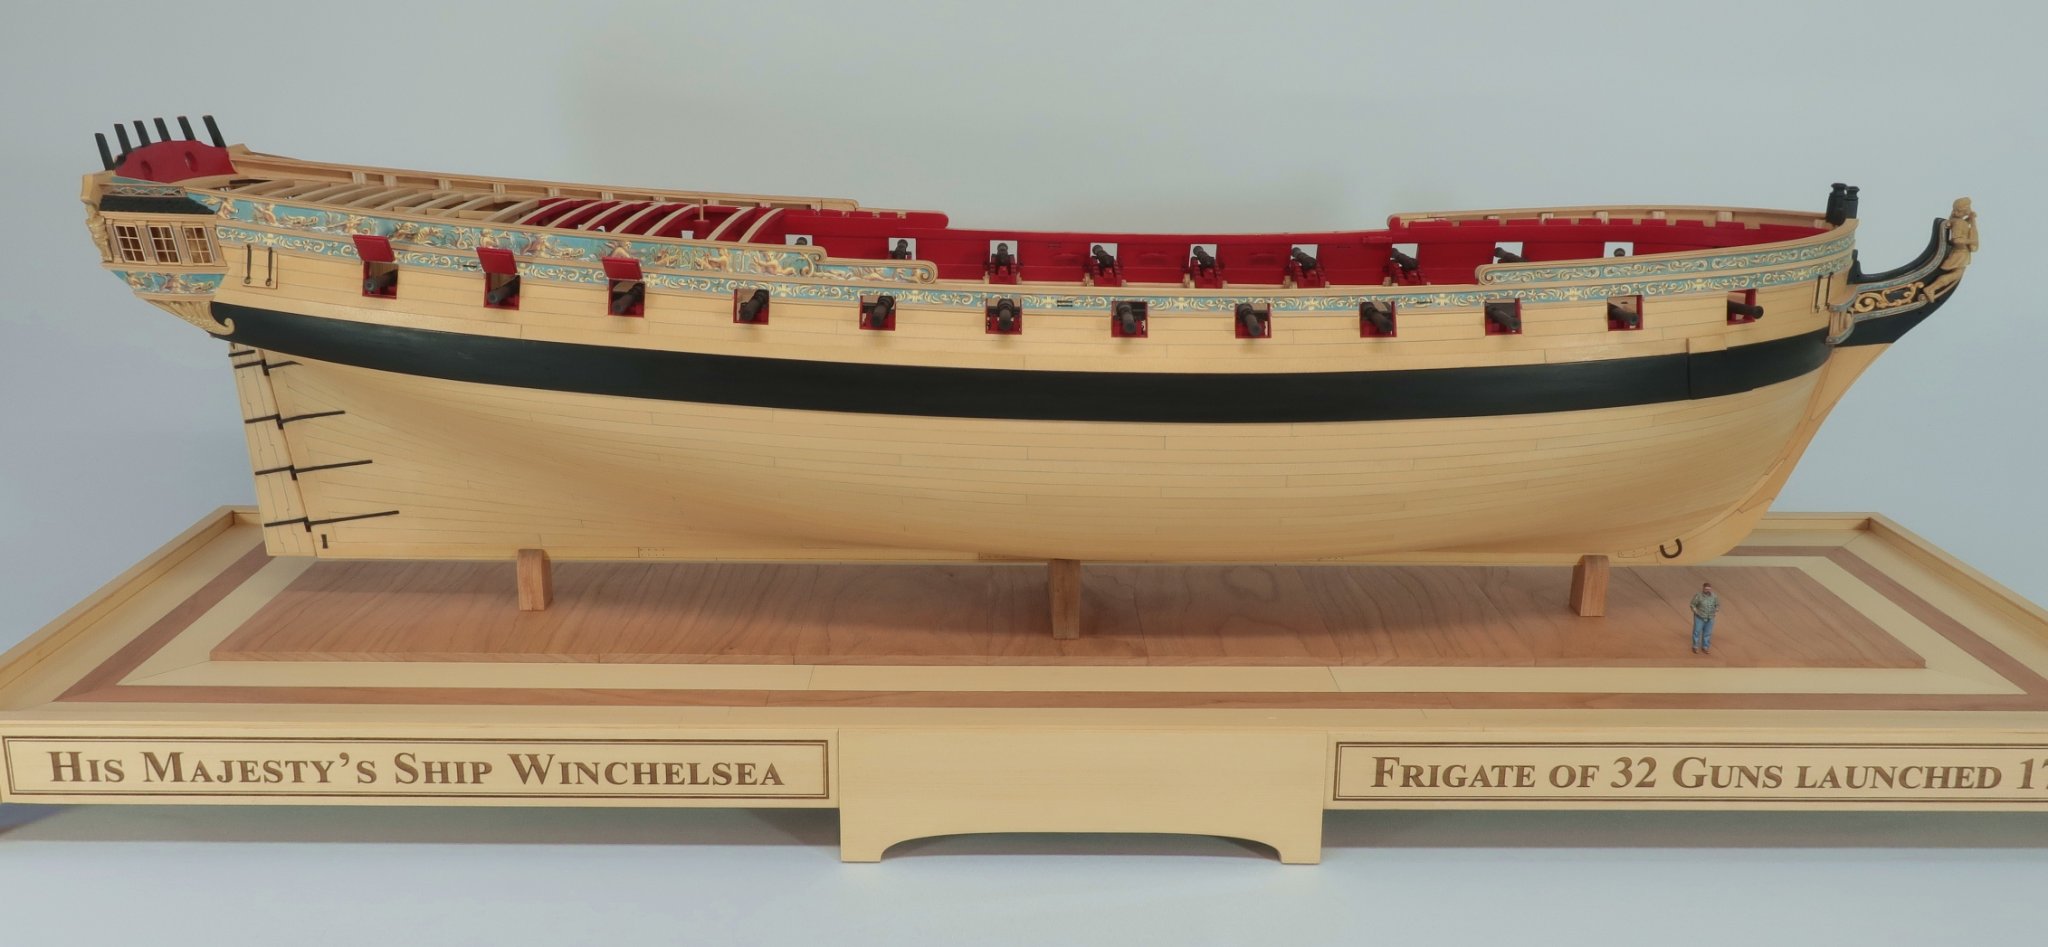
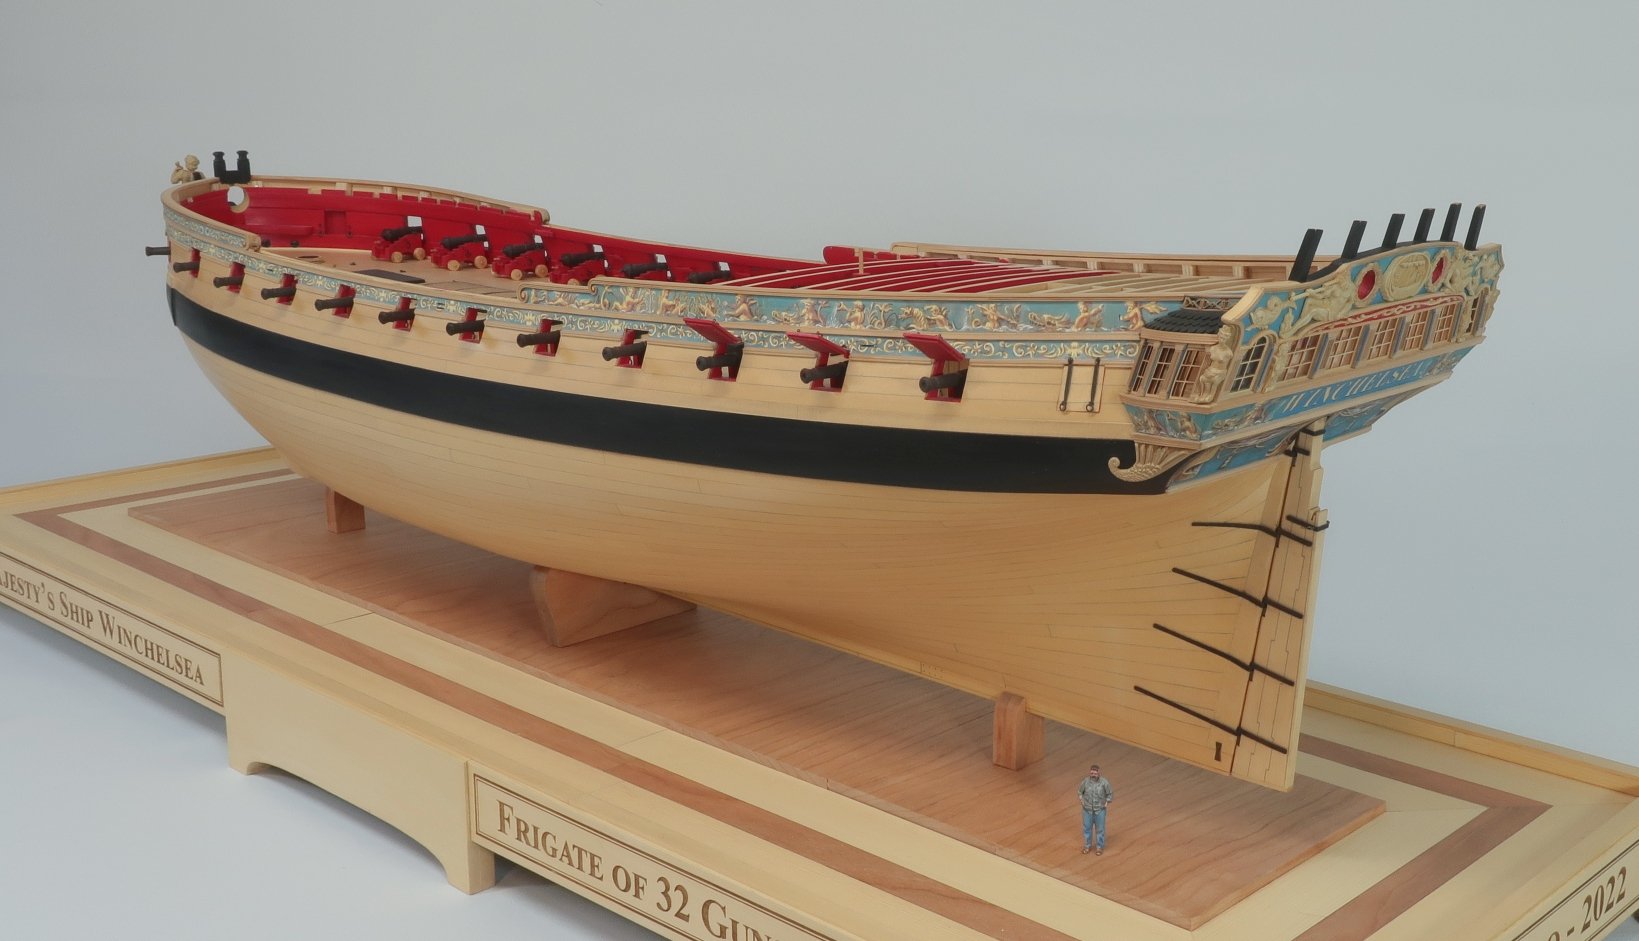
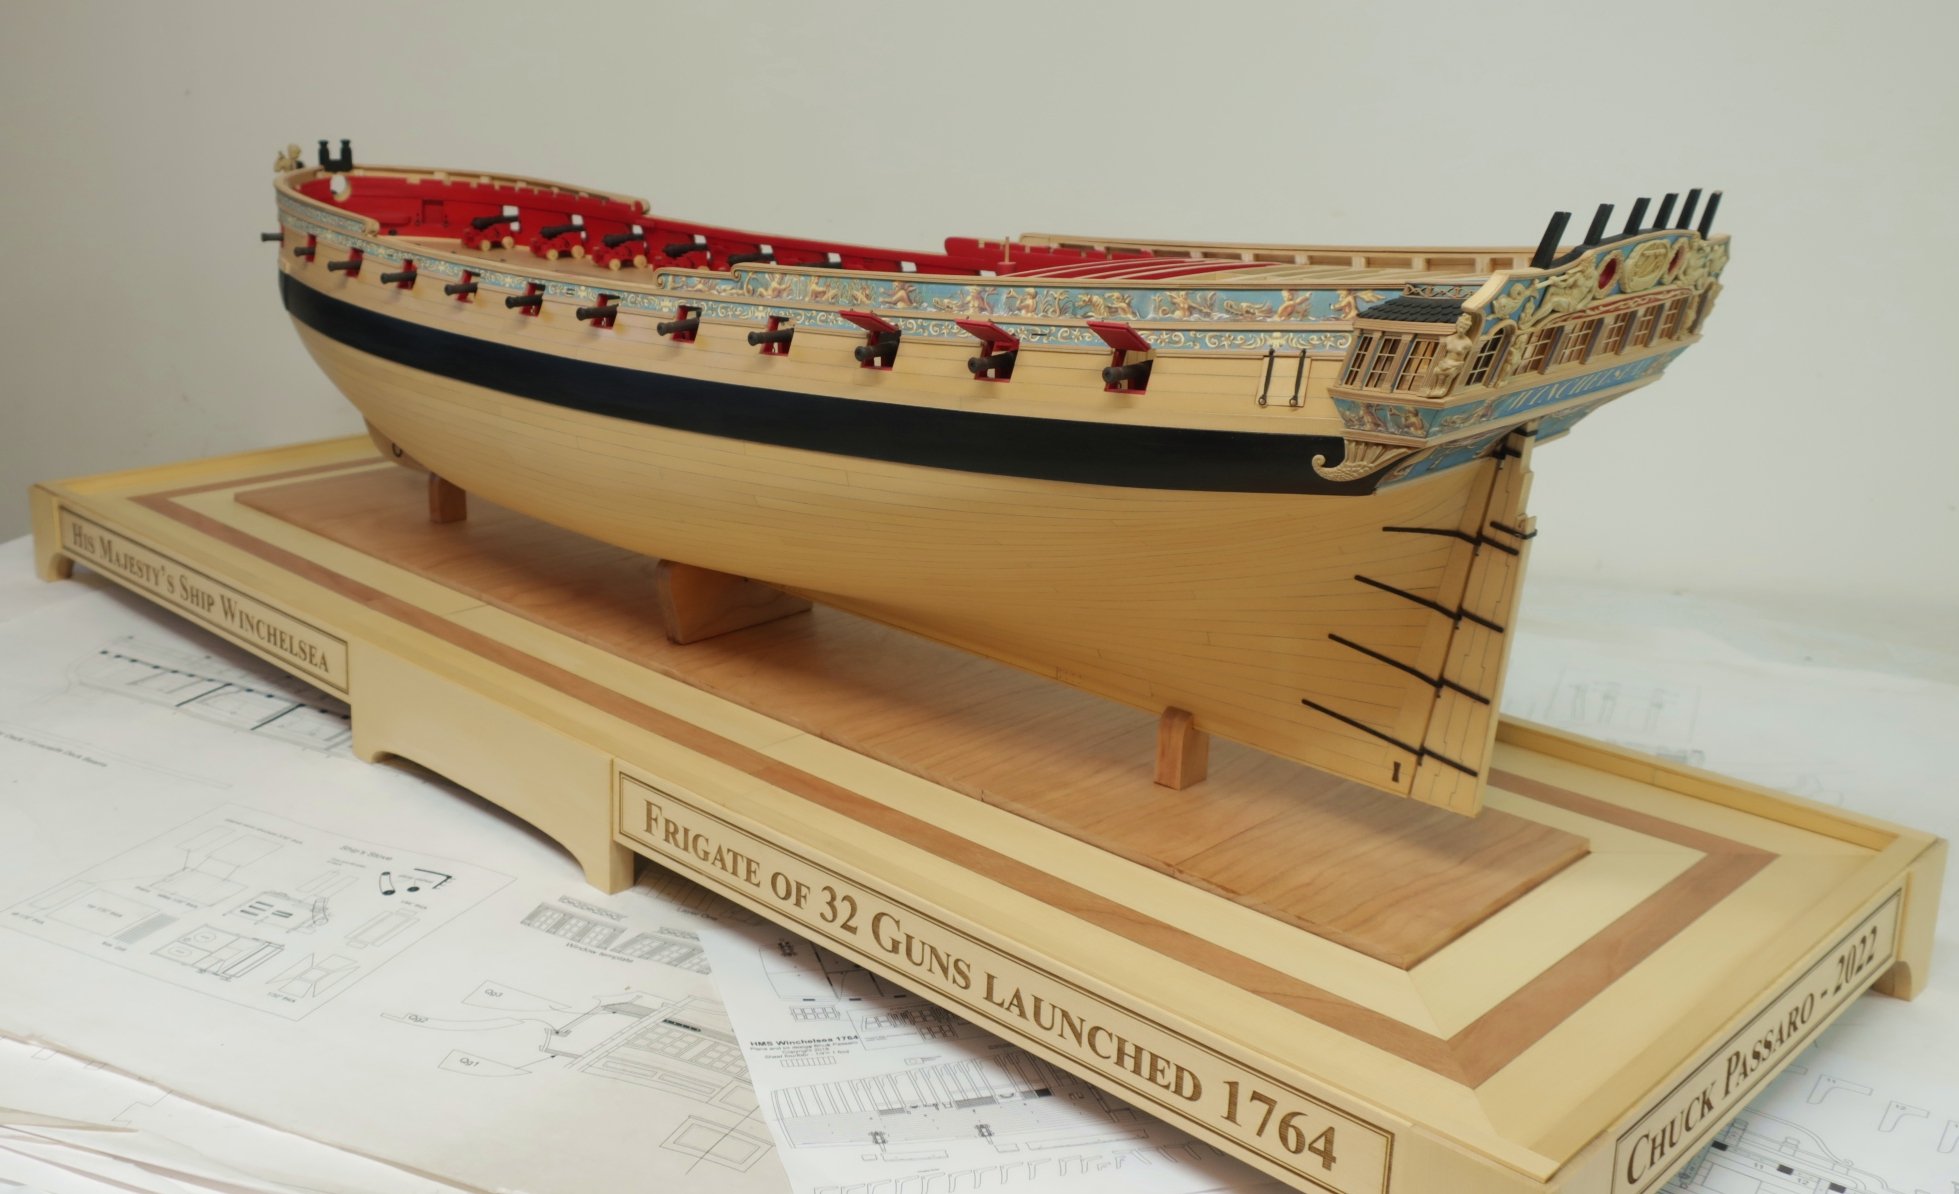
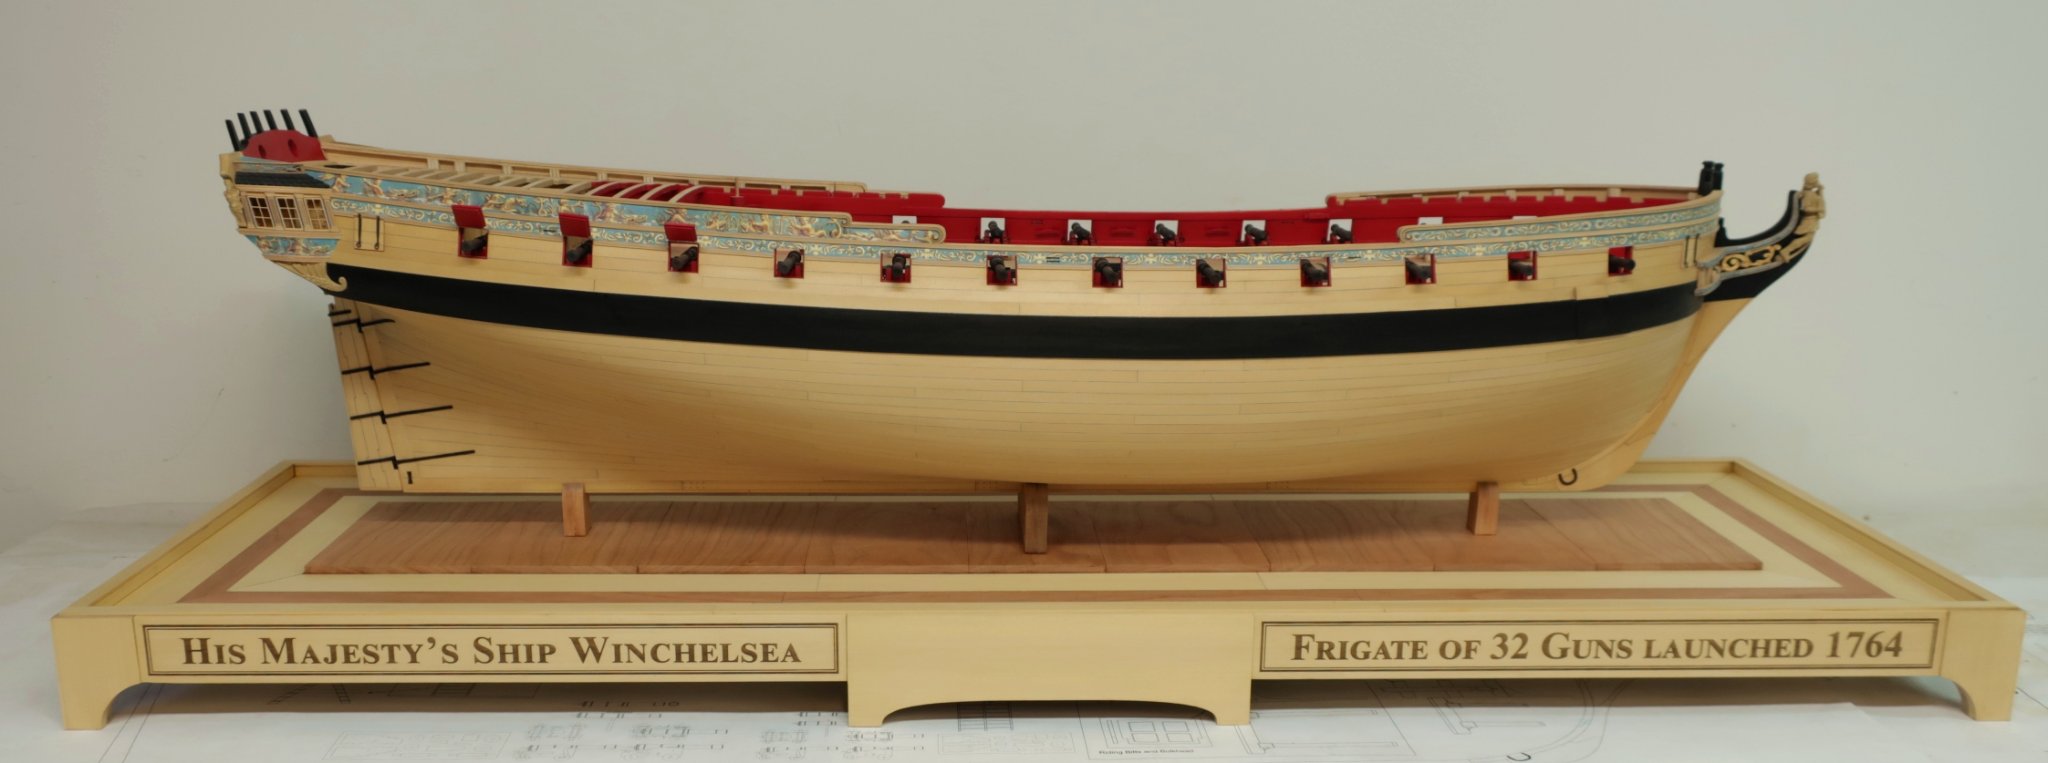
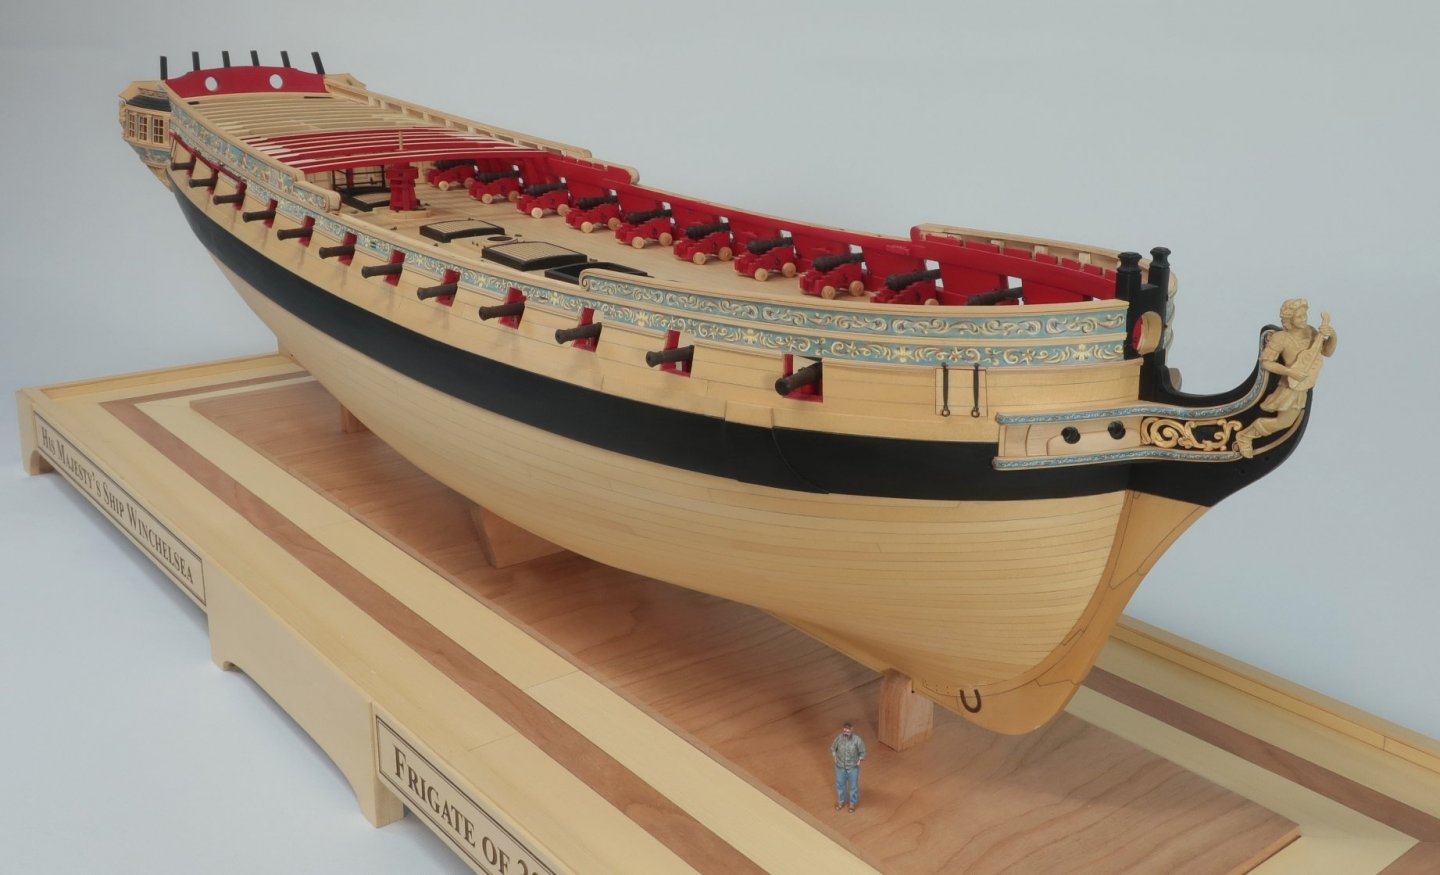
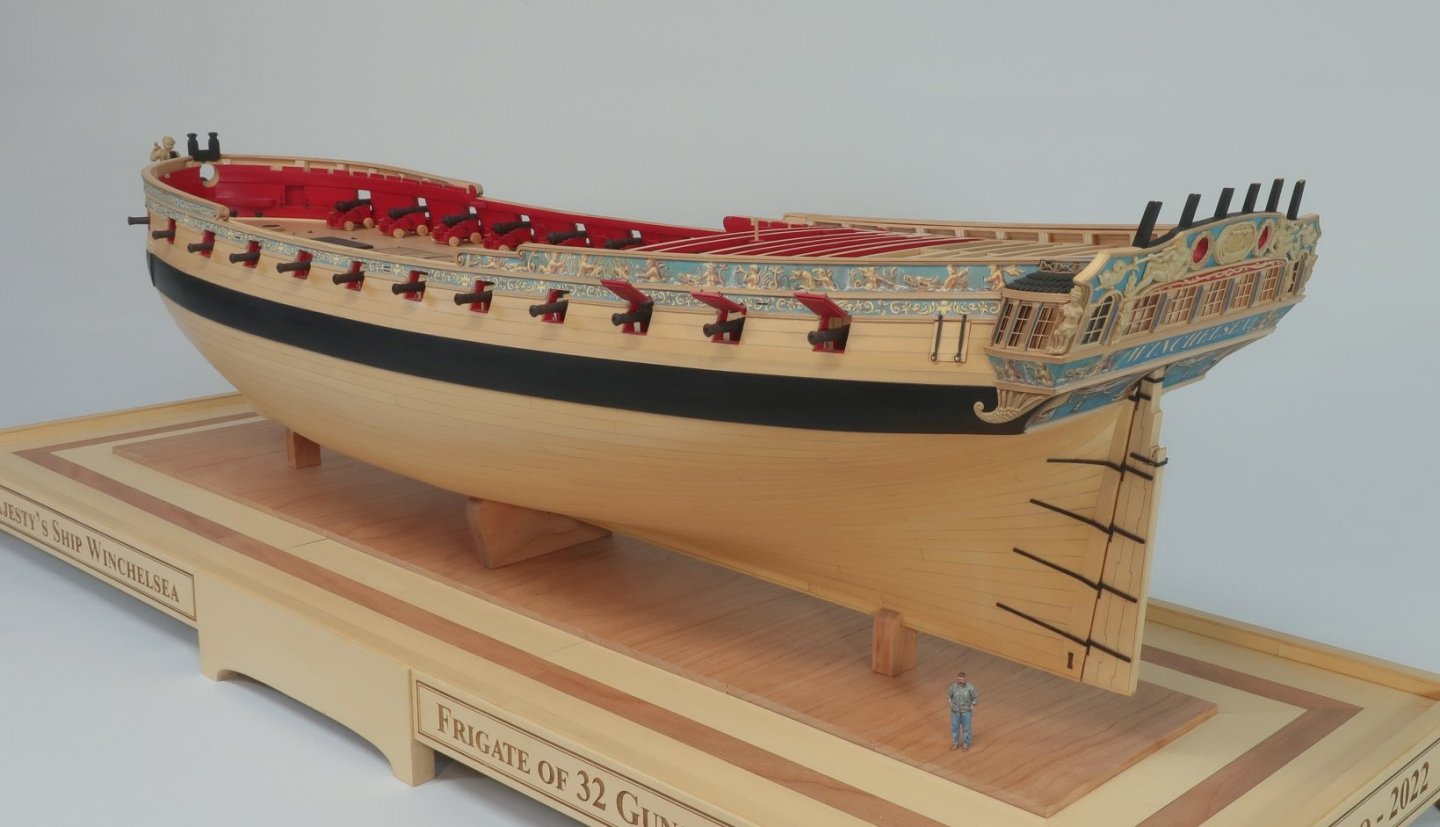
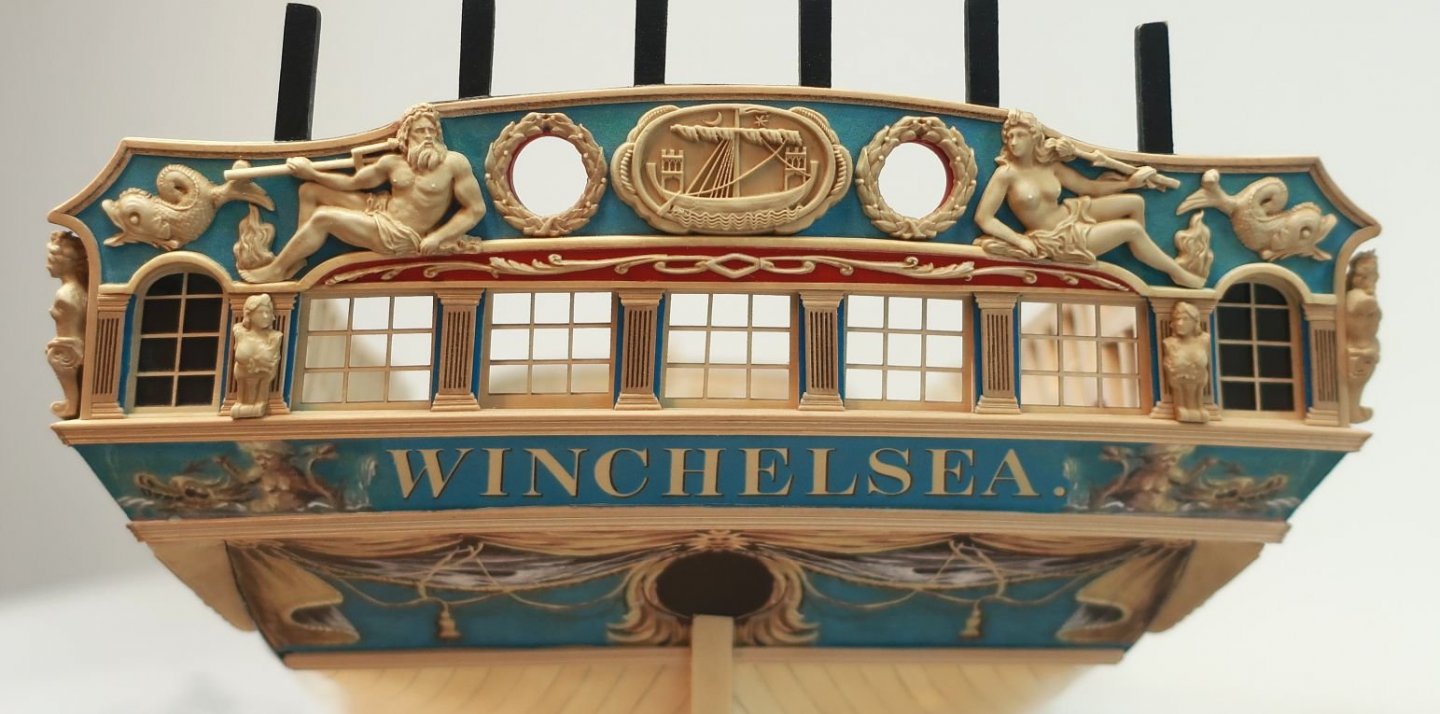
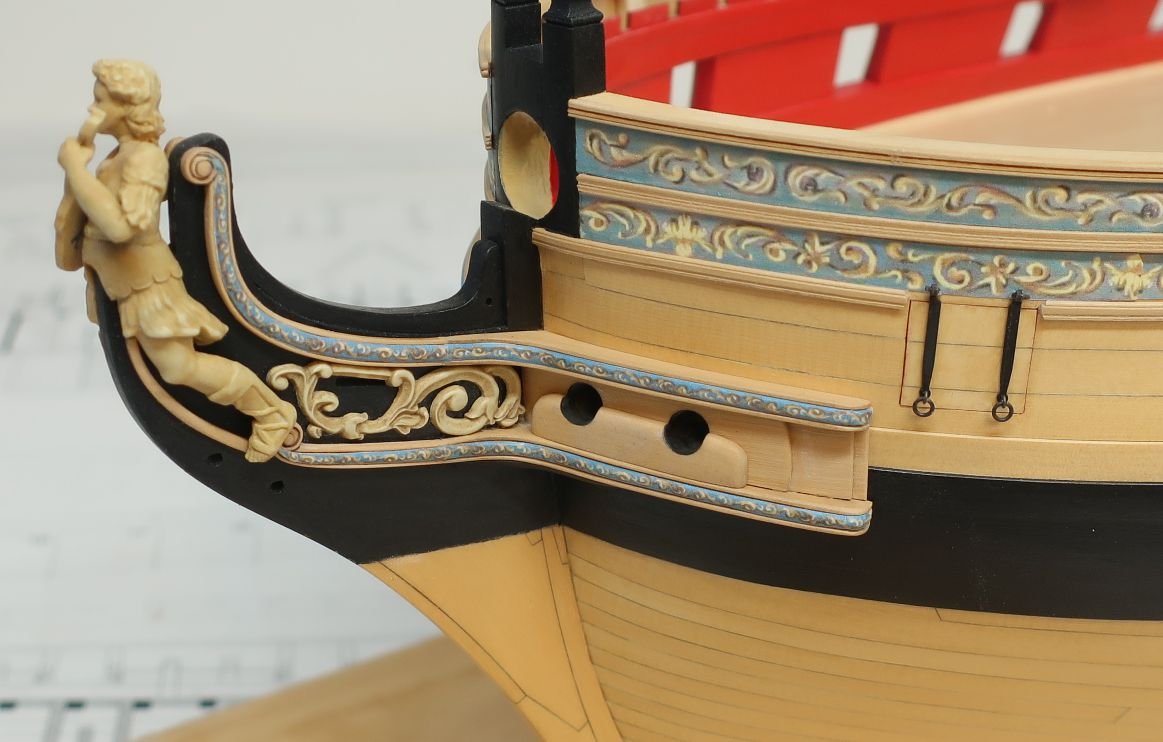
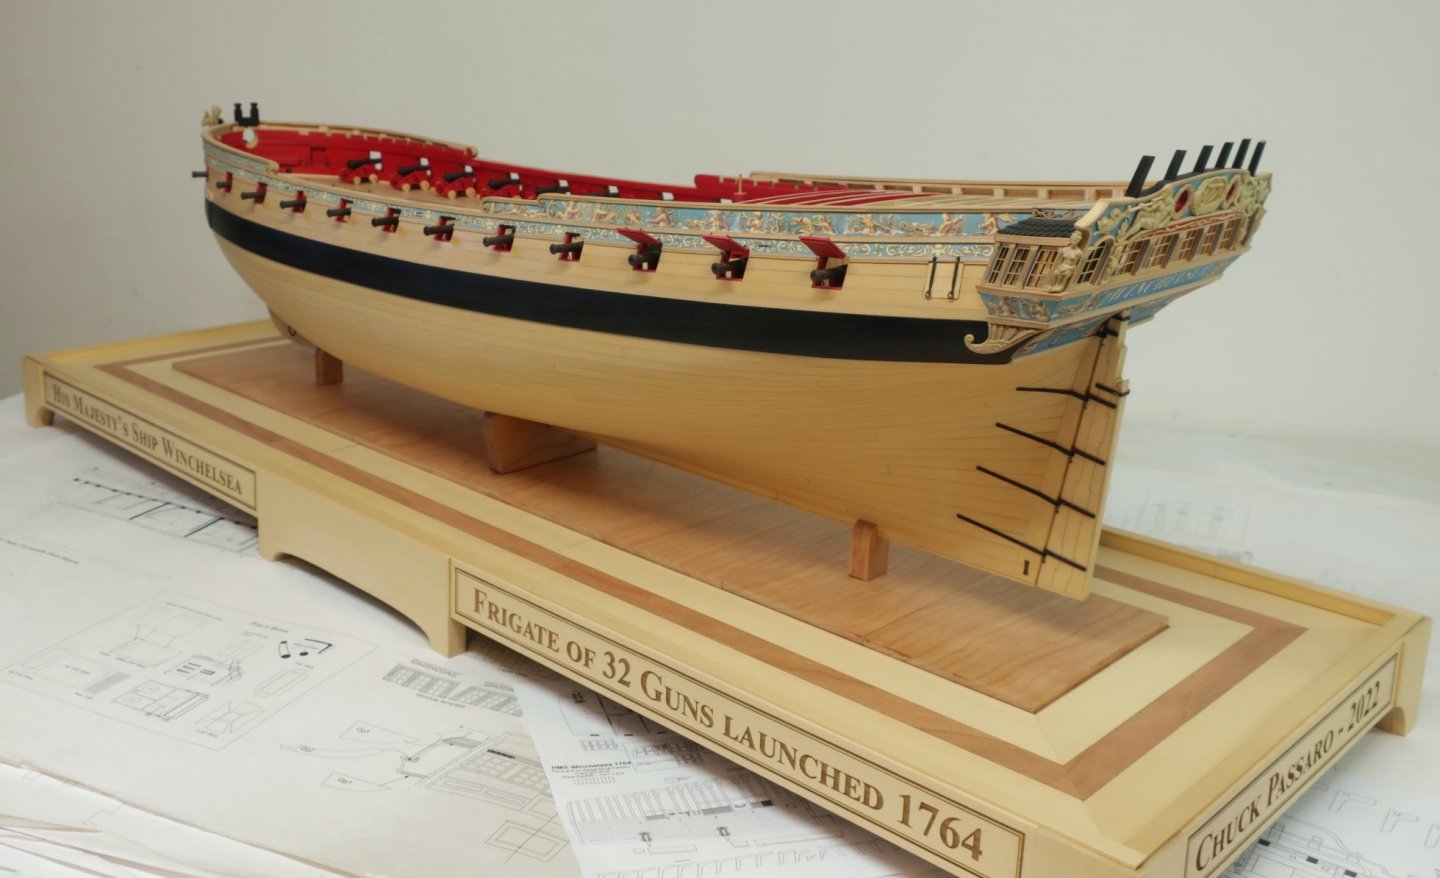
You are more than welcome to join the latest group build of Winchelsea here on MSW. It is certainly a High end model. It is basically a kit with 95% of all pieces being laser cut but you have to mill your planking strips so you will need a hobby saw. We have over 55 people building it as a group here. It is a 1/4" scale 32 gun English frigate 1764.... I would consider it an intermediate to advanced kit....or somewhere in between. But you can ask the folks currently building it. You wont see detail like this on any other commercial project if you compare the headrails and quarter galleries and transom details and deck fittings etc. Its POB....check out the build logs here https://modelshipworld.com/forum/92-member-build-logs-for-the-hms-winchelsea/


- 11 replies
-
- 11
-
-
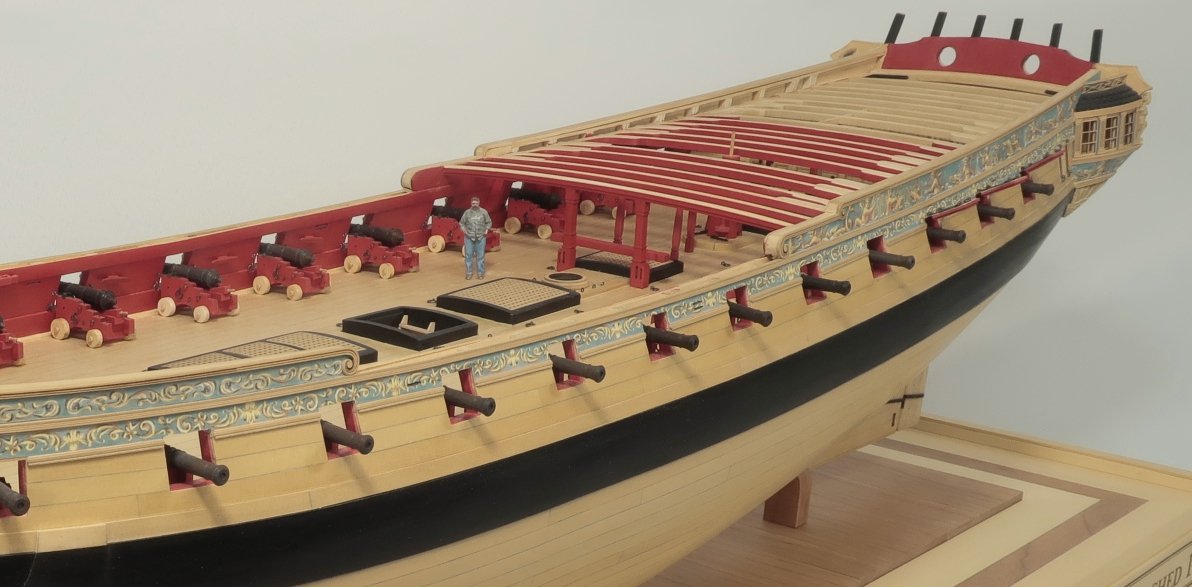
Under the quarter deck there are six per side including one that is curved or shifted around a gun port.
- 1,784 replies
-
- 2
-
-
- winchelsea
- Syren Ship Model Company
- (and 1 more)
-
Thats up to you...they wont be seen at all so its a bit of a waste of time for my needs. But I see folks adding bolts for everything. I am not sure if the beams were bolted themselves or if the knees are bolted and thus keep the deck beams in position. That is something I would read up on in the Full Framed Model books if I were to add those details. Chuck
- 1,784 replies
-
- 4
-
-
- winchelsea
- Syren Ship Model Company
- (and 1 more)
-
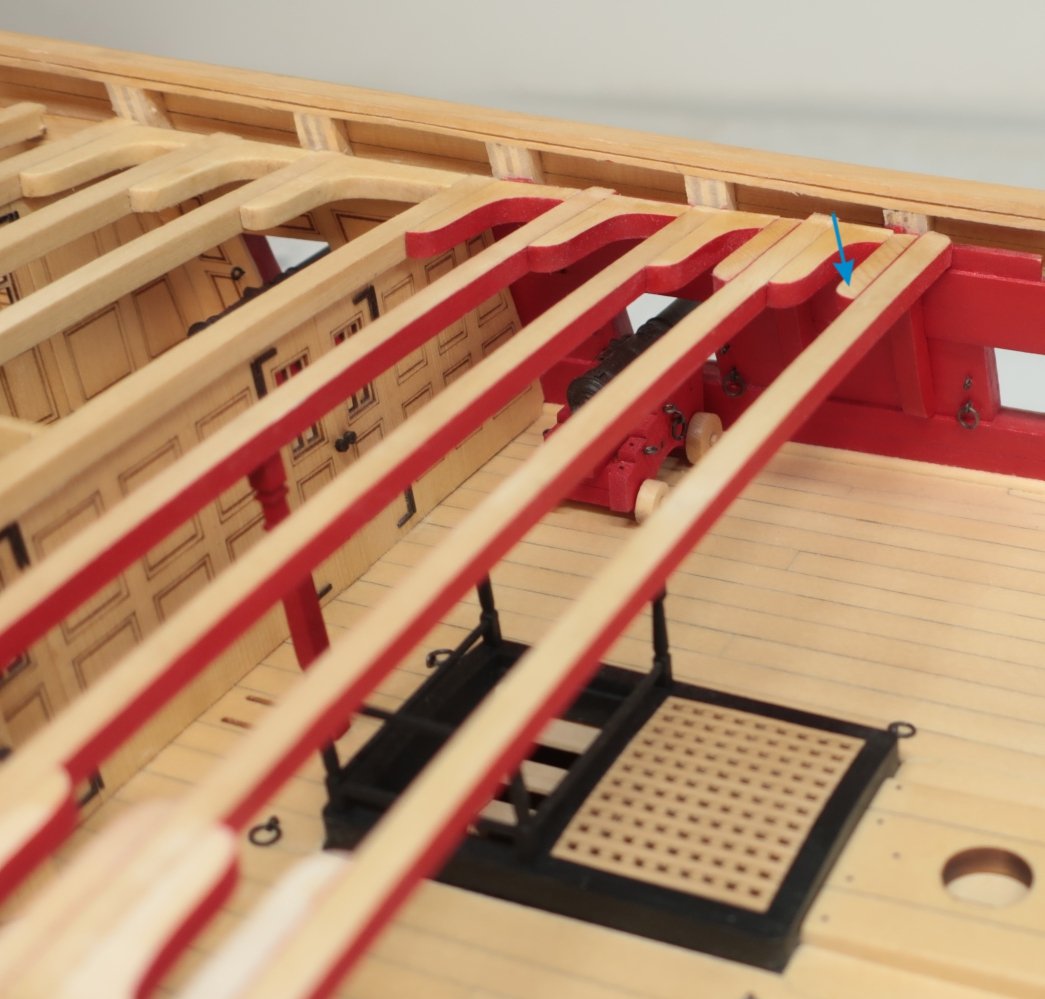
Thank You... The hanging knees are laser cut just like the lodging knees. BUT you have considerably more shaping to do. Yes you must tweak it to fit snug against the bulwarks while siting against the deck beam. But there is more to it. Everyone has the deck clamp along the bulwarks but it may be a different height or even width on everyone's model. So the knee is laser cut without any notch for the deck clamp. You must temporarily place the deck beam in position so you can hold the knee in place to test its fit. Then mark where the deck clamp should be so you can file the notch in the hanging knee. This will allow the knee to sit flush against the bulwarks. The pic below shows the next two hanging knees for this deck beam. I filed those notched to fit around the deck clamp. This required a lot of frequent testing and re-testing for a tight fit. Then I painted it red but kept the top natural with a clean unpainted area. NOTE: You also have to round off the inboard end which you can see as indicated by the blue arrow in the last photo. Do this ahead of time as well. You can add bolts if you want before gluing the knees in position but they will hardly be seen at all. The hanging knee is glued against the aft side of the beam as you can see. I added two on each side so far. The deck beam was only glued in position just before adding these pre-shaped knees. You can see the lodging knee sitting on the deck beams ready to be glued into position next. Note that blue arrow which shows how you should round off the end of the hanging knee so it mirrors the end of the lodging knee I just place behind it. I hope that makes sense. I will now move forward and place another deck beam and shape the lodging or hanging knees for it. I proceed to work one beam at a time after the deck fittings are finished below them. Slowly I am working may way forward to complete the quarter deck framing. Any questions on the knees.


- 1,784 replies
-
- 26
-
-
- winchelsea
- Syren Ship Model Company
- (and 1 more)
-
Looks good. Dont use a stealer. Use a wider strip. Cut it from a 3/64” x 4” sheet if you have to. That would ruin the look of an outstanding planking job.
-
Where did you get those oarsman? They look like a pretty perfect fit for the model. All you would need is a queen and helmsman. I looked all over for those when I built it. Chuck
-
Frieze painting techniques
Chuck replied to allanyed's topic in Building, Framing, Planking and plating a ships hull and deck
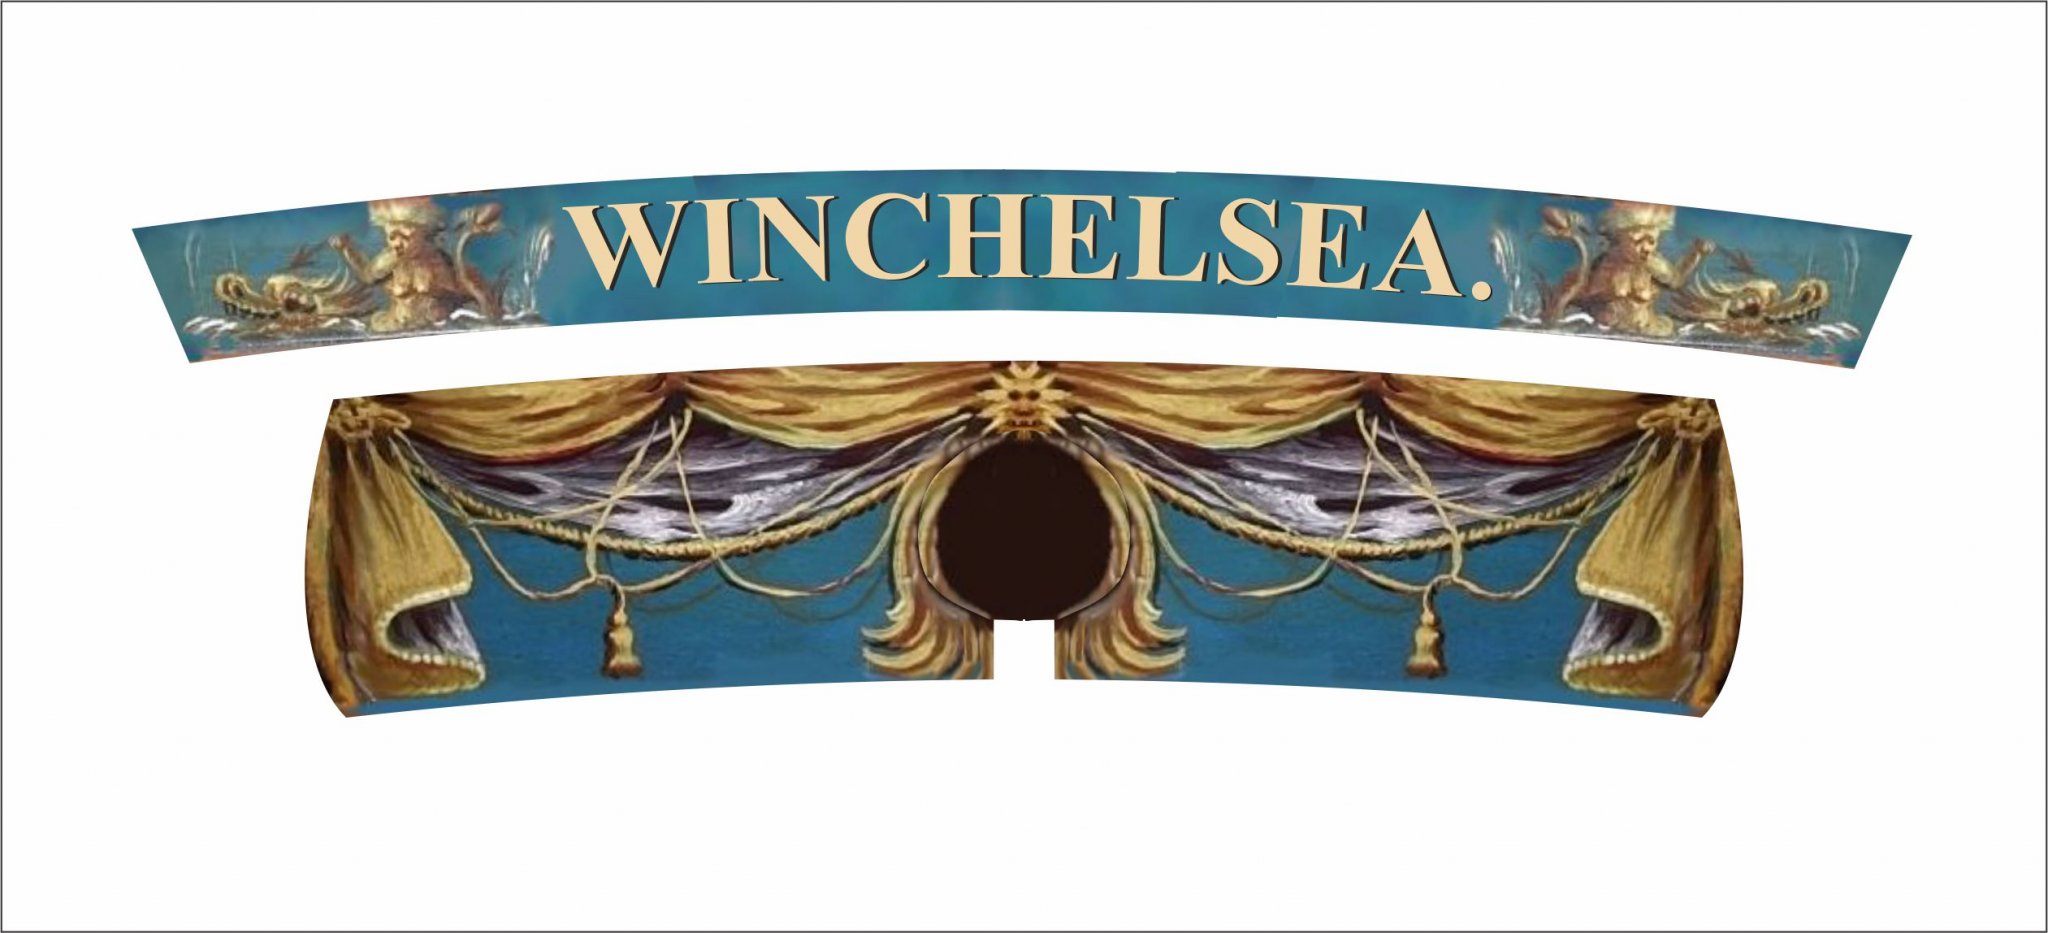
For me....the best way to go is to paint and print. Paint and prepare the frieze off the model on any paper. Then scan it and make adjustments in photoshop. If a pattern repeats this is very easy to cut and paste. Inkjet printing inks have gotten very sophisticated. But all claims aside only time will tell. But many of the larger and more advanced photo printing services claim to UV protecting dyes they use to print their photos and do so on archival paper. You can recreate this in your home but its far cheaper to just upload your frieze and have these services peint them on archival paper. In addition, for a second layer of protection, spray the print with UV protective fixative. Many are now made specifically for photo prints to prevent fading. Lastly....when you case up your model, use UV protective glass. With these three layers of protection, some photographers claim your prints will last 100 years and remain vibrant like the day they were first printed. And finally, dont display your model in full sun or in front of a window. Using paper off the model and printing is great but their is no substitute for seeing the brush work from the original painting on a model if done neatly. Therefore after spraying with a fixative, one can actually repaint some areas of the printout to give the feel of an original painting. Sort of like a paint by numbers after printing it. You have to do the work twice but painting over a printout that is scaled and printed to fit perfectly makes life a lot easier.....on archival paper. and printed and glued on the model.... The contemporary model it was inspired by...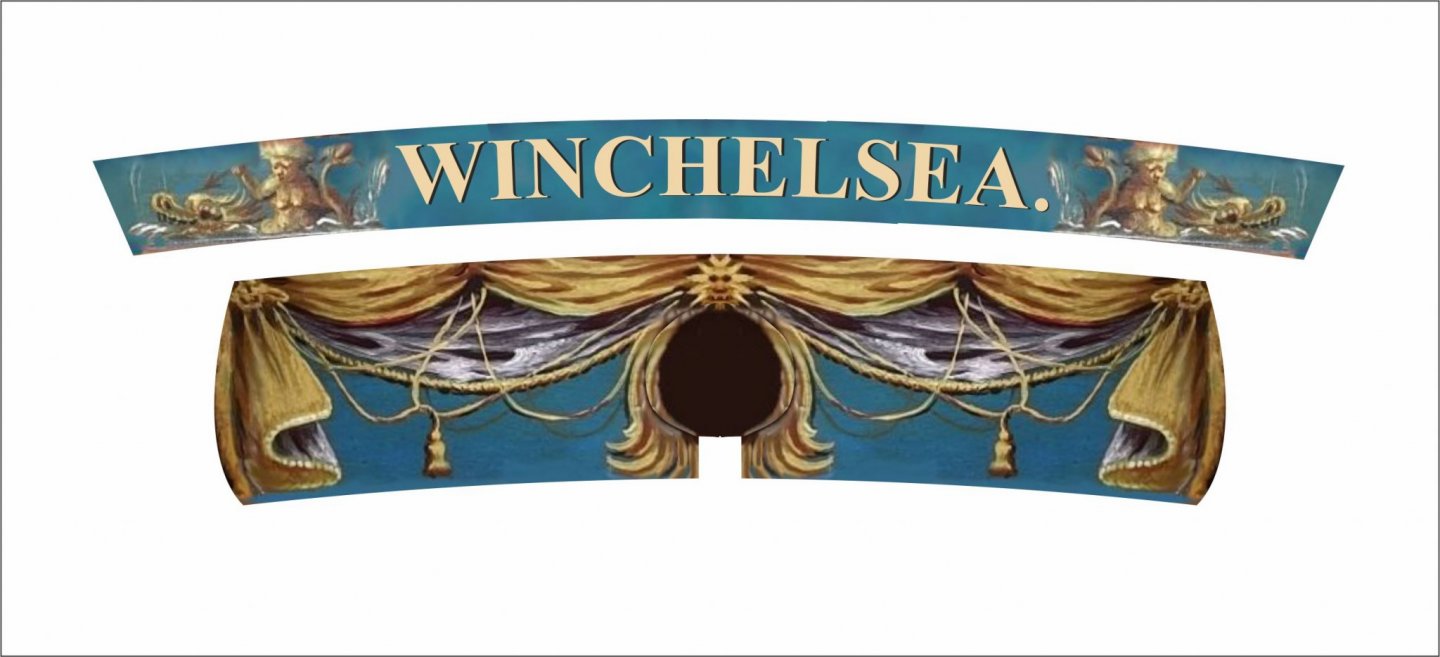
- 18 replies
-
- 15
-
-
Beautiful work and glad to see their will be no more anxious moments on this project. 😉
- 433 replies
-
- 5
-
-
- open boat
- small boat
- (and 1 more)
-
The Ontario is just $500 if you buy direct from the MFG. Shipping wont cost you $400. It all depends on how much the kit is marked up by a distributor and what the wholesale cost it. Remember too that the Cheerful isnt a kit. You will need a table saw to rip your own planks which reduces the cost of parts. All told about $500 rigged for Cheerful also. In addition you need to look at the wood types. Niagara is all basswood which is very cheap wood. Better woods like Yellow cedar and boxwood used for Cheerful will add costs. Lots of it.... Shop around for prices.....and consider the quality of the contents. Also check the build logs here for those kits to see if it is well designed and made of good materials. What are castings like? Good quality resin castings.....brass turned guns or awful white metal castings. Lots to consider beyond size. Chuck
- 34 replies
-
- 14
-
-
Third time is a charm. I redid them a few times to add a whole bunch of detail filks would need. I think they are good to go now. Hours can easily be spent in prep work like this before and sawdust starts being made again.
- 1,784 replies
-
- 7
-
-
- winchelsea
- Syren Ship Model Company
- (and 1 more)