


Chuck
-
Posts
9,044 -
Joined
-
Last visited
Reputation Activity
-

 Chuck got a reaction from Hubac's Historian in Sloop Speedwell 1752 by Chuck - Ketch Rigged Sloop - POF - prototype build
Thank you Jim...
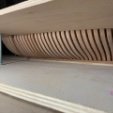
I have completed all of the hatches, gratings and partners to be placed on deck. You have seen how the gratings were made. The two hatches are pretty similar. The only difference is they have cover boards rather than gratings within in the coamings.
The photo below shows the laser cut coamings assembled. There is no need to remove the laser char from the lap joints at the corners. In fact it probably isnt a good idea at all. They are precision cut so you end up with a perfectly squared up coaming the correct size. You can and should sand both sides of the sheet before removing these laser cut parts to clean the char from those sides. Just glue them up using the same right angle jig provided earlier. Then sand the char off the top of the completed coaming being careful to keep the round-up consistent.
You can see the smaller hatch completed. The larger one shows the three cover boards also laser cut waiting to be glued into position. But this you will also note the ledge created on the inside of the coaming that the cover boards will sit into. These are laser cut for you and can be glued on the port and starboard insides of the coaming.
This photo shows the three coverboards in the coaming. They are pretty thick, but only so they are flush with the center of the coaming to allow for the round-up. The round-up along the sides of the coverboards should be sanded flush to the top edge of the coamings along the P & S sides. I know some folks like to show one or two coverboards off the coaming. You can do this if you want to. But then you should sand that roundup into the bottom of the coverboards as well. But I will show them all in place like the contemporary model.
To finish off the hatches...round off the corners using the right angle jig like you did for the gratings. Trim them down to the top of the deck planking. The bolts were added using black fishing line in the same way. The iron ring for handles were made just like those on the lower platforms. Exactly the same.
Also shown in the photo above are the mast and capstan partners. These are completely laser cut for you. They have etched lines to show the separate sections. All you have to do is sand them clean and round off the corners as described earlier for the capstan partners only. Soften the top edges as well. Add the fishing line bolts and the eye bolts on the main mast partners. Now some of these can be glued onto the model. They are all ready to go so you can start planking the decks.
BUT there are a some like the main mast partners and capstan partners that need some extra work. I will describe that next. For example the elm pump tubes below the main mast partners and the capstan drum as well.
More to follow...but here is a photo with the all of the hatches, coamings and partners simply test positioned on the model. They are not glued into position yet. I did however glue the smaller grating and coaming on the forecastle deck in permanently....those are all finished up. Its getting there!!!
-

 Chuck got a reaction from fake johnbull in Sloop Speedwell 1752 by Chuck - Ketch Rigged Sloop - POF - prototype build
Thank you Jim...
I have completed all of the hatches, gratings and partners to be placed on deck. You have seen how the gratings were made. The two hatches are pretty similar. The only difference is they have cover boards rather than gratings within in the coamings.
The photo below shows the laser cut coamings assembled. There is no need to remove the laser char from the lap joints at the corners. In fact it probably isnt a good idea at all. They are precision cut so you end up with a perfectly squared up coaming the correct size. You can and should sand both sides of the sheet before removing these laser cut parts to clean the char from those sides. Just glue them up using the same right angle jig provided earlier. Then sand the char off the top of the completed coaming being careful to keep the round-up consistent.
You can see the smaller hatch completed. The larger one shows the three cover boards also laser cut waiting to be glued into position. But this you will also note the ledge created on the inside of the coaming that the cover boards will sit into. These are laser cut for you and can be glued on the port and starboard insides of the coaming.
This photo shows the three coverboards in the coaming. They are pretty thick, but only so they are flush with the center of the coaming to allow for the round-up. The round-up along the sides of the coverboards should be sanded flush to the top edge of the coamings along the P & S sides. I know some folks like to show one or two coverboards off the coaming. You can do this if you want to. But then you should sand that roundup into the bottom of the coverboards as well. But I will show them all in place like the contemporary model.
To finish off the hatches...round off the corners using the right angle jig like you did for the gratings. Trim them down to the top of the deck planking. The bolts were added using black fishing line in the same way. The iron ring for handles were made just like those on the lower platforms. Exactly the same.
Also shown in the photo above are the mast and capstan partners. These are completely laser cut for you. They have etched lines to show the separate sections. All you have to do is sand them clean and round off the corners as described earlier for the capstan partners only. Soften the top edges as well. Add the fishing line bolts and the eye bolts on the main mast partners. Now some of these can be glued onto the model. They are all ready to go so you can start planking the decks.
BUT there are a some like the main mast partners and capstan partners that need some extra work. I will describe that next. For example the elm pump tubes below the main mast partners and the capstan drum as well.
More to follow...but here is a photo with the all of the hatches, coamings and partners simply test positioned on the model. They are not glued into position yet. I did however glue the smaller grating and coaming on the forecastle deck in permanently....those are all finished up. Its getting there!!!
-
 Chuck got a reaction from mtaylor in Sloop Speedwell 1752 by Chuck - Ketch Rigged Sloop - POF - prototype build
Thank you Jim...
I have completed all of the hatches, gratings and partners to be placed on deck. You have seen how the gratings were made. The two hatches are pretty similar. The only difference is they have cover boards rather than gratings within in the coamings.
The photo below shows the laser cut coamings assembled. There is no need to remove the laser char from the lap joints at the corners. In fact it probably isnt a good idea at all. They are precision cut so you end up with a perfectly squared up coaming the correct size. You can and should sand both sides of the sheet before removing these laser cut parts to clean the char from those sides. Just glue them up using the same right angle jig provided earlier. Then sand the char off the top of the completed coaming being careful to keep the round-up consistent.
You can see the smaller hatch completed. The larger one shows the three cover boards also laser cut waiting to be glued into position. But this you will also note the ledge created on the inside of the coaming that the cover boards will sit into. These are laser cut for you and can be glued on the port and starboard insides of the coaming.
This photo shows the three coverboards in the coaming. They are pretty thick, but only so they are flush with the center of the coaming to allow for the round-up. The round-up along the sides of the coverboards should be sanded flush to the top edge of the coamings along the P & S sides. I know some folks like to show one or two coverboards off the coaming. You can do this if you want to. But then you should sand that roundup into the bottom of the coverboards as well. But I will show them all in place like the contemporary model.
To finish off the hatches...round off the corners using the right angle jig like you did for the gratings. Trim them down to the top of the deck planking. The bolts were added using black fishing line in the same way. The iron ring for handles were made just like those on the lower platforms. Exactly the same.
Also shown in the photo above are the mast and capstan partners. These are completely laser cut for you. They have etched lines to show the separate sections. All you have to do is sand them clean and round off the corners as described earlier for the capstan partners only. Soften the top edges as well. Add the fishing line bolts and the eye bolts on the main mast partners. Now some of these can be glued onto the model. They are all ready to go so you can start planking the decks.
BUT there are a some like the main mast partners and capstan partners that need some extra work. I will describe that next. For example the elm pump tubes below the main mast partners and the capstan drum as well.
More to follow...but here is a photo with the all of the hatches, coamings and partners simply test positioned on the model. They are not glued into position yet. I did however glue the smaller grating and coaming on the forecastle deck in permanently....those are all finished up. Its getting there!!!
-
 Chuck got a reaction from CaptMorgan in Sloop Speedwell 1752 by Chuck - Ketch Rigged Sloop - POF - prototype build
Thank you Jim...
I have completed all of the hatches, gratings and partners to be placed on deck. You have seen how the gratings were made. The two hatches are pretty similar. The only difference is they have cover boards rather than gratings within in the coamings.
The photo below shows the laser cut coamings assembled. There is no need to remove the laser char from the lap joints at the corners. In fact it probably isnt a good idea at all. They are precision cut so you end up with a perfectly squared up coaming the correct size. You can and should sand both sides of the sheet before removing these laser cut parts to clean the char from those sides. Just glue them up using the same right angle jig provided earlier. Then sand the char off the top of the completed coaming being careful to keep the round-up consistent.
You can see the smaller hatch completed. The larger one shows the three cover boards also laser cut waiting to be glued into position. But this you will also note the ledge created on the inside of the coaming that the cover boards will sit into. These are laser cut for you and can be glued on the port and starboard insides of the coaming.
This photo shows the three coverboards in the coaming. They are pretty thick, but only so they are flush with the center of the coaming to allow for the round-up. The round-up along the sides of the coverboards should be sanded flush to the top edge of the coamings along the P & S sides. I know some folks like to show one or two coverboards off the coaming. You can do this if you want to. But then you should sand that roundup into the bottom of the coverboards as well. But I will show them all in place like the contemporary model.
To finish off the hatches...round off the corners using the right angle jig like you did for the gratings. Trim them down to the top of the deck planking. The bolts were added using black fishing line in the same way. The iron ring for handles were made just like those on the lower platforms. Exactly the same.
Also shown in the photo above are the mast and capstan partners. These are completely laser cut for you. They have etched lines to show the separate sections. All you have to do is sand them clean and round off the corners as described earlier for the capstan partners only. Soften the top edges as well. Add the fishing line bolts and the eye bolts on the main mast partners. Now some of these can be glued onto the model. They are all ready to go so you can start planking the decks.
BUT there are a some like the main mast partners and capstan partners that need some extra work. I will describe that next. For example the elm pump tubes below the main mast partners and the capstan drum as well.
More to follow...but here is a photo with the all of the hatches, coamings and partners simply test positioned on the model. They are not glued into position yet. I did however glue the smaller grating and coaming on the forecastle deck in permanently....those are all finished up. Its getting there!!!
-
 Chuck got a reaction from yvesvidal in Sloop Speedwell 1752 by Chuck - Ketch Rigged Sloop - POF - prototype build
Thank you Jim...
I have completed all of the hatches, gratings and partners to be placed on deck. You have seen how the gratings were made. The two hatches are pretty similar. The only difference is they have cover boards rather than gratings within in the coamings.
The photo below shows the laser cut coamings assembled. There is no need to remove the laser char from the lap joints at the corners. In fact it probably isnt a good idea at all. They are precision cut so you end up with a perfectly squared up coaming the correct size. You can and should sand both sides of the sheet before removing these laser cut parts to clean the char from those sides. Just glue them up using the same right angle jig provided earlier. Then sand the char off the top of the completed coaming being careful to keep the round-up consistent.
You can see the smaller hatch completed. The larger one shows the three cover boards also laser cut waiting to be glued into position. But this you will also note the ledge created on the inside of the coaming that the cover boards will sit into. These are laser cut for you and can be glued on the port and starboard insides of the coaming.
This photo shows the three coverboards in the coaming. They are pretty thick, but only so they are flush with the center of the coaming to allow for the round-up. The round-up along the sides of the coverboards should be sanded flush to the top edge of the coamings along the P & S sides. I know some folks like to show one or two coverboards off the coaming. You can do this if you want to. But then you should sand that roundup into the bottom of the coverboards as well. But I will show them all in place like the contemporary model.
To finish off the hatches...round off the corners using the right angle jig like you did for the gratings. Trim them down to the top of the deck planking. The bolts were added using black fishing line in the same way. The iron ring for handles were made just like those on the lower platforms. Exactly the same.
Also shown in the photo above are the mast and capstan partners. These are completely laser cut for you. They have etched lines to show the separate sections. All you have to do is sand them clean and round off the corners as described earlier for the capstan partners only. Soften the top edges as well. Add the fishing line bolts and the eye bolts on the main mast partners. Now some of these can be glued onto the model. They are all ready to go so you can start planking the decks.
BUT there are a some like the main mast partners and capstan partners that need some extra work. I will describe that next. For example the elm pump tubes below the main mast partners and the capstan drum as well.
More to follow...but here is a photo with the all of the hatches, coamings and partners simply test positioned on the model. They are not glued into position yet. I did however glue the smaller grating and coaming on the forecastle deck in permanently....those are all finished up. Its getting there!!!
-
 Chuck got a reaction from Tobias in Sloop Speedwell 1752 by Chuck - Ketch Rigged Sloop - POF - prototype build
Thank you Jim...
I have completed all of the hatches, gratings and partners to be placed on deck. You have seen how the gratings were made. The two hatches are pretty similar. The only difference is they have cover boards rather than gratings within in the coamings.
The photo below shows the laser cut coamings assembled. There is no need to remove the laser char from the lap joints at the corners. In fact it probably isnt a good idea at all. They are precision cut so you end up with a perfectly squared up coaming the correct size. You can and should sand both sides of the sheet before removing these laser cut parts to clean the char from those sides. Just glue them up using the same right angle jig provided earlier. Then sand the char off the top of the completed coaming being careful to keep the round-up consistent.
You can see the smaller hatch completed. The larger one shows the three cover boards also laser cut waiting to be glued into position. But this you will also note the ledge created on the inside of the coaming that the cover boards will sit into. These are laser cut for you and can be glued on the port and starboard insides of the coaming.
This photo shows the three coverboards in the coaming. They are pretty thick, but only so they are flush with the center of the coaming to allow for the round-up. The round-up along the sides of the coverboards should be sanded flush to the top edge of the coamings along the P & S sides. I know some folks like to show one or two coverboards off the coaming. You can do this if you want to. But then you should sand that roundup into the bottom of the coverboards as well. But I will show them all in place like the contemporary model.
To finish off the hatches...round off the corners using the right angle jig like you did for the gratings. Trim them down to the top of the deck planking. The bolts were added using black fishing line in the same way. The iron ring for handles were made just like those on the lower platforms. Exactly the same.
Also shown in the photo above are the mast and capstan partners. These are completely laser cut for you. They have etched lines to show the separate sections. All you have to do is sand them clean and round off the corners as described earlier for the capstan partners only. Soften the top edges as well. Add the fishing line bolts and the eye bolts on the main mast partners. Now some of these can be glued onto the model. They are all ready to go so you can start planking the decks.
BUT there are a some like the main mast partners and capstan partners that need some extra work. I will describe that next. For example the elm pump tubes below the main mast partners and the capstan drum as well.
More to follow...but here is a photo with the all of the hatches, coamings and partners simply test positioned on the model. They are not glued into position yet. I did however glue the smaller grating and coaming on the forecastle deck in permanently....those are all finished up. Its getting there!!!
-
 Chuck got a reaction from JpR62 in Sloop Speedwell 1752 by Chuck - Ketch Rigged Sloop - POF - prototype build
Thank you Jim...
I have completed all of the hatches, gratings and partners to be placed on deck. You have seen how the gratings were made. The two hatches are pretty similar. The only difference is they have cover boards rather than gratings within in the coamings.
The photo below shows the laser cut coamings assembled. There is no need to remove the laser char from the lap joints at the corners. In fact it probably isnt a good idea at all. They are precision cut so you end up with a perfectly squared up coaming the correct size. You can and should sand both sides of the sheet before removing these laser cut parts to clean the char from those sides. Just glue them up using the same right angle jig provided earlier. Then sand the char off the top of the completed coaming being careful to keep the round-up consistent.
You can see the smaller hatch completed. The larger one shows the three cover boards also laser cut waiting to be glued into position. But this you will also note the ledge created on the inside of the coaming that the cover boards will sit into. These are laser cut for you and can be glued on the port and starboard insides of the coaming.
This photo shows the three coverboards in the coaming. They are pretty thick, but only so they are flush with the center of the coaming to allow for the round-up. The round-up along the sides of the coverboards should be sanded flush to the top edge of the coamings along the P & S sides. I know some folks like to show one or two coverboards off the coaming. You can do this if you want to. But then you should sand that roundup into the bottom of the coverboards as well. But I will show them all in place like the contemporary model.
To finish off the hatches...round off the corners using the right angle jig like you did for the gratings. Trim them down to the top of the deck planking. The bolts were added using black fishing line in the same way. The iron ring for handles were made just like those on the lower platforms. Exactly the same.
Also shown in the photo above are the mast and capstan partners. These are completely laser cut for you. They have etched lines to show the separate sections. All you have to do is sand them clean and round off the corners as described earlier for the capstan partners only. Soften the top edges as well. Add the fishing line bolts and the eye bolts on the main mast partners. Now some of these can be glued onto the model. They are all ready to go so you can start planking the decks.
BUT there are a some like the main mast partners and capstan partners that need some extra work. I will describe that next. For example the elm pump tubes below the main mast partners and the capstan drum as well.
More to follow...but here is a photo with the all of the hatches, coamings and partners simply test positioned on the model. They are not glued into position yet. I did however glue the smaller grating and coaming on the forecastle deck in permanently....those are all finished up. Its getting there!!!
-
 Chuck got a reaction from druxey in Sloop Speedwell 1752 by Chuck - Ketch Rigged Sloop - POF - prototype build
Thank you Jim...
I have completed all of the hatches, gratings and partners to be placed on deck. You have seen how the gratings were made. The two hatches are pretty similar. The only difference is they have cover boards rather than gratings within in the coamings.
The photo below shows the laser cut coamings assembled. There is no need to remove the laser char from the lap joints at the corners. In fact it probably isnt a good idea at all. They are precision cut so you end up with a perfectly squared up coaming the correct size. You can and should sand both sides of the sheet before removing these laser cut parts to clean the char from those sides. Just glue them up using the same right angle jig provided earlier. Then sand the char off the top of the completed coaming being careful to keep the round-up consistent.
You can see the smaller hatch completed. The larger one shows the three cover boards also laser cut waiting to be glued into position. But this you will also note the ledge created on the inside of the coaming that the cover boards will sit into. These are laser cut for you and can be glued on the port and starboard insides of the coaming.
This photo shows the three coverboards in the coaming. They are pretty thick, but only so they are flush with the center of the coaming to allow for the round-up. The round-up along the sides of the coverboards should be sanded flush to the top edge of the coamings along the P & S sides. I know some folks like to show one or two coverboards off the coaming. You can do this if you want to. But then you should sand that roundup into the bottom of the coverboards as well. But I will show them all in place like the contemporary model.
To finish off the hatches...round off the corners using the right angle jig like you did for the gratings. Trim them down to the top of the deck planking. The bolts were added using black fishing line in the same way. The iron ring for handles were made just like those on the lower platforms. Exactly the same.
Also shown in the photo above are the mast and capstan partners. These are completely laser cut for you. They have etched lines to show the separate sections. All you have to do is sand them clean and round off the corners as described earlier for the capstan partners only. Soften the top edges as well. Add the fishing line bolts and the eye bolts on the main mast partners. Now some of these can be glued onto the model. They are all ready to go so you can start planking the decks.
BUT there are a some like the main mast partners and capstan partners that need some extra work. I will describe that next. For example the elm pump tubes below the main mast partners and the capstan drum as well.
More to follow...but here is a photo with the all of the hatches, coamings and partners simply test positioned on the model. They are not glued into position yet. I did however glue the smaller grating and coaming on the forecastle deck in permanently....those are all finished up. Its getting there!!!
-
 Chuck got a reaction from cotrecerf in Sloop Speedwell 1752 by Chuck - Ketch Rigged Sloop - POF - prototype build
Thank you Jim...
I have completed all of the hatches, gratings and partners to be placed on deck. You have seen how the gratings were made. The two hatches are pretty similar. The only difference is they have cover boards rather than gratings within in the coamings.
The photo below shows the laser cut coamings assembled. There is no need to remove the laser char from the lap joints at the corners. In fact it probably isnt a good idea at all. They are precision cut so you end up with a perfectly squared up coaming the correct size. You can and should sand both sides of the sheet before removing these laser cut parts to clean the char from those sides. Just glue them up using the same right angle jig provided earlier. Then sand the char off the top of the completed coaming being careful to keep the round-up consistent.
You can see the smaller hatch completed. The larger one shows the three cover boards also laser cut waiting to be glued into position. But this you will also note the ledge created on the inside of the coaming that the cover boards will sit into. These are laser cut for you and can be glued on the port and starboard insides of the coaming.
This photo shows the three coverboards in the coaming. They are pretty thick, but only so they are flush with the center of the coaming to allow for the round-up. The round-up along the sides of the coverboards should be sanded flush to the top edge of the coamings along the P & S sides. I know some folks like to show one or two coverboards off the coaming. You can do this if you want to. But then you should sand that roundup into the bottom of the coverboards as well. But I will show them all in place like the contemporary model.
To finish off the hatches...round off the corners using the right angle jig like you did for the gratings. Trim them down to the top of the deck planking. The bolts were added using black fishing line in the same way. The iron ring for handles were made just like those on the lower platforms. Exactly the same.
Also shown in the photo above are the mast and capstan partners. These are completely laser cut for you. They have etched lines to show the separate sections. All you have to do is sand them clean and round off the corners as described earlier for the capstan partners only. Soften the top edges as well. Add the fishing line bolts and the eye bolts on the main mast partners. Now some of these can be glued onto the model. They are all ready to go so you can start planking the decks.
BUT there are a some like the main mast partners and capstan partners that need some extra work. I will describe that next. For example the elm pump tubes below the main mast partners and the capstan drum as well.
More to follow...but here is a photo with the all of the hatches, coamings and partners simply test positioned on the model. They are not glued into position yet. I did however glue the smaller grating and coaming on the forecastle deck in permanently....those are all finished up. Its getting there!!!
-
 Chuck got a reaction from davyboy in Sloop Speedwell 1752 by Chuck - Ketch Rigged Sloop - POF - prototype build
Thank you Jim...
I have completed all of the hatches, gratings and partners to be placed on deck. You have seen how the gratings were made. The two hatches are pretty similar. The only difference is they have cover boards rather than gratings within in the coamings.
The photo below shows the laser cut coamings assembled. There is no need to remove the laser char from the lap joints at the corners. In fact it probably isnt a good idea at all. They are precision cut so you end up with a perfectly squared up coaming the correct size. You can and should sand both sides of the sheet before removing these laser cut parts to clean the char from those sides. Just glue them up using the same right angle jig provided earlier. Then sand the char off the top of the completed coaming being careful to keep the round-up consistent.
You can see the smaller hatch completed. The larger one shows the three cover boards also laser cut waiting to be glued into position. But this you will also note the ledge created on the inside of the coaming that the cover boards will sit into. These are laser cut for you and can be glued on the port and starboard insides of the coaming.
This photo shows the three coverboards in the coaming. They are pretty thick, but only so they are flush with the center of the coaming to allow for the round-up. The round-up along the sides of the coverboards should be sanded flush to the top edge of the coamings along the P & S sides. I know some folks like to show one or two coverboards off the coaming. You can do this if you want to. But then you should sand that roundup into the bottom of the coverboards as well. But I will show them all in place like the contemporary model.
To finish off the hatches...round off the corners using the right angle jig like you did for the gratings. Trim them down to the top of the deck planking. The bolts were added using black fishing line in the same way. The iron ring for handles were made just like those on the lower platforms. Exactly the same.
Also shown in the photo above are the mast and capstan partners. These are completely laser cut for you. They have etched lines to show the separate sections. All you have to do is sand them clean and round off the corners as described earlier for the capstan partners only. Soften the top edges as well. Add the fishing line bolts and the eye bolts on the main mast partners. Now some of these can be glued onto the model. They are all ready to go so you can start planking the decks.
BUT there are a some like the main mast partners and capstan partners that need some extra work. I will describe that next. For example the elm pump tubes below the main mast partners and the capstan drum as well.
More to follow...but here is a photo with the all of the hatches, coamings and partners simply test positioned on the model. They are not glued into position yet. I did however glue the smaller grating and coaming on the forecastle deck in permanently....those are all finished up. Its getting there!!!
-
 Chuck got a reaction from Katsumoto in Sloop Speedwell 1752 by Chuck - Ketch Rigged Sloop - POF - prototype build
Thank you Jim...
I have completed all of the hatches, gratings and partners to be placed on deck. You have seen how the gratings were made. The two hatches are pretty similar. The only difference is they have cover boards rather than gratings within in the coamings.
The photo below shows the laser cut coamings assembled. There is no need to remove the laser char from the lap joints at the corners. In fact it probably isnt a good idea at all. They are precision cut so you end up with a perfectly squared up coaming the correct size. You can and should sand both sides of the sheet before removing these laser cut parts to clean the char from those sides. Just glue them up using the same right angle jig provided earlier. Then sand the char off the top of the completed coaming being careful to keep the round-up consistent.
You can see the smaller hatch completed. The larger one shows the three cover boards also laser cut waiting to be glued into position. But this you will also note the ledge created on the inside of the coaming that the cover boards will sit into. These are laser cut for you and can be glued on the port and starboard insides of the coaming.
This photo shows the three coverboards in the coaming. They are pretty thick, but only so they are flush with the center of the coaming to allow for the round-up. The round-up along the sides of the coverboards should be sanded flush to the top edge of the coamings along the P & S sides. I know some folks like to show one or two coverboards off the coaming. You can do this if you want to. But then you should sand that roundup into the bottom of the coverboards as well. But I will show them all in place like the contemporary model.
To finish off the hatches...round off the corners using the right angle jig like you did for the gratings. Trim them down to the top of the deck planking. The bolts were added using black fishing line in the same way. The iron ring for handles were made just like those on the lower platforms. Exactly the same.
Also shown in the photo above are the mast and capstan partners. These are completely laser cut for you. They have etched lines to show the separate sections. All you have to do is sand them clean and round off the corners as described earlier for the capstan partners only. Soften the top edges as well. Add the fishing line bolts and the eye bolts on the main mast partners. Now some of these can be glued onto the model. They are all ready to go so you can start planking the decks.
BUT there are a some like the main mast partners and capstan partners that need some extra work. I will describe that next. For example the elm pump tubes below the main mast partners and the capstan drum as well.
More to follow...but here is a photo with the all of the hatches, coamings and partners simply test positioned on the model. They are not glued into position yet. I did however glue the smaller grating and coaming on the forecastle deck in permanently....those are all finished up. Its getting there!!!
-
 Chuck got a reaction from mugje in Sloop Speedwell 1752 by Chuck - Ketch Rigged Sloop - POF - prototype build
Thank you Jim...
I have completed all of the hatches, gratings and partners to be placed on deck. You have seen how the gratings were made. The two hatches are pretty similar. The only difference is they have cover boards rather than gratings within in the coamings.
The photo below shows the laser cut coamings assembled. There is no need to remove the laser char from the lap joints at the corners. In fact it probably isnt a good idea at all. They are precision cut so you end up with a perfectly squared up coaming the correct size. You can and should sand both sides of the sheet before removing these laser cut parts to clean the char from those sides. Just glue them up using the same right angle jig provided earlier. Then sand the char off the top of the completed coaming being careful to keep the round-up consistent.
You can see the smaller hatch completed. The larger one shows the three cover boards also laser cut waiting to be glued into position. But this you will also note the ledge created on the inside of the coaming that the cover boards will sit into. These are laser cut for you and can be glued on the port and starboard insides of the coaming.
This photo shows the three coverboards in the coaming. They are pretty thick, but only so they are flush with the center of the coaming to allow for the round-up. The round-up along the sides of the coverboards should be sanded flush to the top edge of the coamings along the P & S sides. I know some folks like to show one or two coverboards off the coaming. You can do this if you want to. But then you should sand that roundup into the bottom of the coverboards as well. But I will show them all in place like the contemporary model.
To finish off the hatches...round off the corners using the right angle jig like you did for the gratings. Trim them down to the top of the deck planking. The bolts were added using black fishing line in the same way. The iron ring for handles were made just like those on the lower platforms. Exactly the same.
Also shown in the photo above are the mast and capstan partners. These are completely laser cut for you. They have etched lines to show the separate sections. All you have to do is sand them clean and round off the corners as described earlier for the capstan partners only. Soften the top edges as well. Add the fishing line bolts and the eye bolts on the main mast partners. Now some of these can be glued onto the model. They are all ready to go so you can start planking the decks.
BUT there are a some like the main mast partners and capstan partners that need some extra work. I will describe that next. For example the elm pump tubes below the main mast partners and the capstan drum as well.
More to follow...but here is a photo with the all of the hatches, coamings and partners simply test positioned on the model. They are not glued into position yet. I did however glue the smaller grating and coaming on the forecastle deck in permanently....those are all finished up. Its getting there!!!
-
 Chuck got a reaction from AnobiumPunctatum in Sloop Speedwell 1752 by Chuck - Ketch Rigged Sloop - POF - prototype build
Thank you Jim...
I have completed all of the hatches, gratings and partners to be placed on deck. You have seen how the gratings were made. The two hatches are pretty similar. The only difference is they have cover boards rather than gratings within in the coamings.
The photo below shows the laser cut coamings assembled. There is no need to remove the laser char from the lap joints at the corners. In fact it probably isnt a good idea at all. They are precision cut so you end up with a perfectly squared up coaming the correct size. You can and should sand both sides of the sheet before removing these laser cut parts to clean the char from those sides. Just glue them up using the same right angle jig provided earlier. Then sand the char off the top of the completed coaming being careful to keep the round-up consistent.
You can see the smaller hatch completed. The larger one shows the three cover boards also laser cut waiting to be glued into position. But this you will also note the ledge created on the inside of the coaming that the cover boards will sit into. These are laser cut for you and can be glued on the port and starboard insides of the coaming.
This photo shows the three coverboards in the coaming. They are pretty thick, but only so they are flush with the center of the coaming to allow for the round-up. The round-up along the sides of the coverboards should be sanded flush to the top edge of the coamings along the P & S sides. I know some folks like to show one or two coverboards off the coaming. You can do this if you want to. But then you should sand that roundup into the bottom of the coverboards as well. But I will show them all in place like the contemporary model.
To finish off the hatches...round off the corners using the right angle jig like you did for the gratings. Trim them down to the top of the deck planking. The bolts were added using black fishing line in the same way. The iron ring for handles were made just like those on the lower platforms. Exactly the same.
Also shown in the photo above are the mast and capstan partners. These are completely laser cut for you. They have etched lines to show the separate sections. All you have to do is sand them clean and round off the corners as described earlier for the capstan partners only. Soften the top edges as well. Add the fishing line bolts and the eye bolts on the main mast partners. Now some of these can be glued onto the model. They are all ready to go so you can start planking the decks.
BUT there are a some like the main mast partners and capstan partners that need some extra work. I will describe that next. For example the elm pump tubes below the main mast partners and the capstan drum as well.
More to follow...but here is a photo with the all of the hatches, coamings and partners simply test positioned on the model. They are not glued into position yet. I did however glue the smaller grating and coaming on the forecastle deck in permanently....those are all finished up. Its getting there!!!
-
 Chuck got a reaction from tlevine in Sloop Speedwell 1752 by Chuck - Ketch Rigged Sloop - POF - prototype build
Thank you Jim...
I have completed all of the hatches, gratings and partners to be placed on deck. You have seen how the gratings were made. The two hatches are pretty similar. The only difference is they have cover boards rather than gratings within in the coamings.
The photo below shows the laser cut coamings assembled. There is no need to remove the laser char from the lap joints at the corners. In fact it probably isnt a good idea at all. They are precision cut so you end up with a perfectly squared up coaming the correct size. You can and should sand both sides of the sheet before removing these laser cut parts to clean the char from those sides. Just glue them up using the same right angle jig provided earlier. Then sand the char off the top of the completed coaming being careful to keep the round-up consistent.
You can see the smaller hatch completed. The larger one shows the three cover boards also laser cut waiting to be glued into position. But this you will also note the ledge created on the inside of the coaming that the cover boards will sit into. These are laser cut for you and can be glued on the port and starboard insides of the coaming.
This photo shows the three coverboards in the coaming. They are pretty thick, but only so they are flush with the center of the coaming to allow for the round-up. The round-up along the sides of the coverboards should be sanded flush to the top edge of the coamings along the P & S sides. I know some folks like to show one or two coverboards off the coaming. You can do this if you want to. But then you should sand that roundup into the bottom of the coverboards as well. But I will show them all in place like the contemporary model.
To finish off the hatches...round off the corners using the right angle jig like you did for the gratings. Trim them down to the top of the deck planking. The bolts were added using black fishing line in the same way. The iron ring for handles were made just like those on the lower platforms. Exactly the same.
Also shown in the photo above are the mast and capstan partners. These are completely laser cut for you. They have etched lines to show the separate sections. All you have to do is sand them clean and round off the corners as described earlier for the capstan partners only. Soften the top edges as well. Add the fishing line bolts and the eye bolts on the main mast partners. Now some of these can be glued onto the model. They are all ready to go so you can start planking the decks.
BUT there are a some like the main mast partners and capstan partners that need some extra work. I will describe that next. For example the elm pump tubes below the main mast partners and the capstan drum as well.
More to follow...but here is a photo with the all of the hatches, coamings and partners simply test positioned on the model. They are not glued into position yet. I did however glue the smaller grating and coaming on the forecastle deck in permanently....those are all finished up. Its getting there!!!
-
 Chuck got a reaction from Ryland Craze in Sloop Speedwell 1752 by Chuck - Ketch Rigged Sloop - POF - prototype build
Thank you Jim...
I have completed all of the hatches, gratings and partners to be placed on deck. You have seen how the gratings were made. The two hatches are pretty similar. The only difference is they have cover boards rather than gratings within in the coamings.
The photo below shows the laser cut coamings assembled. There is no need to remove the laser char from the lap joints at the corners. In fact it probably isnt a good idea at all. They are precision cut so you end up with a perfectly squared up coaming the correct size. You can and should sand both sides of the sheet before removing these laser cut parts to clean the char from those sides. Just glue them up using the same right angle jig provided earlier. Then sand the char off the top of the completed coaming being careful to keep the round-up consistent.
You can see the smaller hatch completed. The larger one shows the three cover boards also laser cut waiting to be glued into position. But this you will also note the ledge created on the inside of the coaming that the cover boards will sit into. These are laser cut for you and can be glued on the port and starboard insides of the coaming.
This photo shows the three coverboards in the coaming. They are pretty thick, but only so they are flush with the center of the coaming to allow for the round-up. The round-up along the sides of the coverboards should be sanded flush to the top edge of the coamings along the P & S sides. I know some folks like to show one or two coverboards off the coaming. You can do this if you want to. But then you should sand that roundup into the bottom of the coverboards as well. But I will show them all in place like the contemporary model.
To finish off the hatches...round off the corners using the right angle jig like you did for the gratings. Trim them down to the top of the deck planking. The bolts were added using black fishing line in the same way. The iron ring for handles were made just like those on the lower platforms. Exactly the same.
Also shown in the photo above are the mast and capstan partners. These are completely laser cut for you. They have etched lines to show the separate sections. All you have to do is sand them clean and round off the corners as described earlier for the capstan partners only. Soften the top edges as well. Add the fishing line bolts and the eye bolts on the main mast partners. Now some of these can be glued onto the model. They are all ready to go so you can start planking the decks.
BUT there are a some like the main mast partners and capstan partners that need some extra work. I will describe that next. For example the elm pump tubes below the main mast partners and the capstan drum as well.
More to follow...but here is a photo with the all of the hatches, coamings and partners simply test positioned on the model. They are not glued into position yet. I did however glue the smaller grating and coaming on the forecastle deck in permanently....those are all finished up. Its getting there!!!
-
 Chuck got a reaction from Canute in Syren Ship Model Company News, Updates and Info.....(part 2)
Now in stock on the fittings page.....
-
 Chuck got a reaction from JeffT in Sloop Speedwell 1752 by Chuck - Ketch Rigged Sloop - POF - prototype build
Thank you Jim...
I have completed all of the hatches, gratings and partners to be placed on deck. You have seen how the gratings were made. The two hatches are pretty similar. The only difference is they have cover boards rather than gratings within in the coamings.
The photo below shows the laser cut coamings assembled. There is no need to remove the laser char from the lap joints at the corners. In fact it probably isnt a good idea at all. They are precision cut so you end up with a perfectly squared up coaming the correct size. You can and should sand both sides of the sheet before removing these laser cut parts to clean the char from those sides. Just glue them up using the same right angle jig provided earlier. Then sand the char off the top of the completed coaming being careful to keep the round-up consistent.
You can see the smaller hatch completed. The larger one shows the three cover boards also laser cut waiting to be glued into position. But this you will also note the ledge created on the inside of the coaming that the cover boards will sit into. These are laser cut for you and can be glued on the port and starboard insides of the coaming.
This photo shows the three coverboards in the coaming. They are pretty thick, but only so they are flush with the center of the coaming to allow for the round-up. The round-up along the sides of the coverboards should be sanded flush to the top edge of the coamings along the P & S sides. I know some folks like to show one or two coverboards off the coaming. You can do this if you want to. But then you should sand that roundup into the bottom of the coverboards as well. But I will show them all in place like the contemporary model.
To finish off the hatches...round off the corners using the right angle jig like you did for the gratings. Trim them down to the top of the deck planking. The bolts were added using black fishing line in the same way. The iron ring for handles were made just like those on the lower platforms. Exactly the same.
Also shown in the photo above are the mast and capstan partners. These are completely laser cut for you. They have etched lines to show the separate sections. All you have to do is sand them clean and round off the corners as described earlier for the capstan partners only. Soften the top edges as well. Add the fishing line bolts and the eye bolts on the main mast partners. Now some of these can be glued onto the model. They are all ready to go so you can start planking the decks.
BUT there are a some like the main mast partners and capstan partners that need some extra work. I will describe that next. For example the elm pump tubes below the main mast partners and the capstan drum as well.
More to follow...but here is a photo with the all of the hatches, coamings and partners simply test positioned on the model. They are not glued into position yet. I did however glue the smaller grating and coaming on the forecastle deck in permanently....those are all finished up. Its getting there!!!
-
 Chuck got a reaction from Nunnehi (Don) in Sloop Speedwell 1752 by Chuck - Ketch Rigged Sloop - POF - prototype build
Thank you Jim...
I have completed all of the hatches, gratings and partners to be placed on deck. You have seen how the gratings were made. The two hatches are pretty similar. The only difference is they have cover boards rather than gratings within in the coamings.
The photo below shows the laser cut coamings assembled. There is no need to remove the laser char from the lap joints at the corners. In fact it probably isnt a good idea at all. They are precision cut so you end up with a perfectly squared up coaming the correct size. You can and should sand both sides of the sheet before removing these laser cut parts to clean the char from those sides. Just glue them up using the same right angle jig provided earlier. Then sand the char off the top of the completed coaming being careful to keep the round-up consistent.
You can see the smaller hatch completed. The larger one shows the three cover boards also laser cut waiting to be glued into position. But this you will also note the ledge created on the inside of the coaming that the cover boards will sit into. These are laser cut for you and can be glued on the port and starboard insides of the coaming.
This photo shows the three coverboards in the coaming. They are pretty thick, but only so they are flush with the center of the coaming to allow for the round-up. The round-up along the sides of the coverboards should be sanded flush to the top edge of the coamings along the P & S sides. I know some folks like to show one or two coverboards off the coaming. You can do this if you want to. But then you should sand that roundup into the bottom of the coverboards as well. But I will show them all in place like the contemporary model.
To finish off the hatches...round off the corners using the right angle jig like you did for the gratings. Trim them down to the top of the deck planking. The bolts were added using black fishing line in the same way. The iron ring for handles were made just like those on the lower platforms. Exactly the same.
Also shown in the photo above are the mast and capstan partners. These are completely laser cut for you. They have etched lines to show the separate sections. All you have to do is sand them clean and round off the corners as described earlier for the capstan partners only. Soften the top edges as well. Add the fishing line bolts and the eye bolts on the main mast partners. Now some of these can be glued onto the model. They are all ready to go so you can start planking the decks.
BUT there are a some like the main mast partners and capstan partners that need some extra work. I will describe that next. For example the elm pump tubes below the main mast partners and the capstan drum as well.
More to follow...but here is a photo with the all of the hatches, coamings and partners simply test positioned on the model. They are not glued into position yet. I did however glue the smaller grating and coaming on the forecastle deck in permanently....those are all finished up. Its getting there!!!
-
 Chuck reacted to Jim Lad in Sloop Speedwell 1752 by Chuck - Ketch Rigged Sloop - POF - prototype build
Very neatly constructed, Chuck.
John
-
Chuck reacted to sfotinos in Sloop Speedwell 1752 by Chuck - Ketch Rigged Sloop - POF - prototype build
Absolutely stunning!
-
 Chuck got a reaction from JacquesCousteau in Sloop Speedwell 1752 by Chuck - Ketch Rigged Sloop - POF - prototype build
Thank you Jim...
I have completed all of the hatches, gratings and partners to be placed on deck. You have seen how the gratings were made. The two hatches are pretty similar. The only difference is they have cover boards rather than gratings within in the coamings.
The photo below shows the laser cut coamings assembled. There is no need to remove the laser char from the lap joints at the corners. In fact it probably isnt a good idea at all. They are precision cut so you end up with a perfectly squared up coaming the correct size. You can and should sand both sides of the sheet before removing these laser cut parts to clean the char from those sides. Just glue them up using the same right angle jig provided earlier. Then sand the char off the top of the completed coaming being careful to keep the round-up consistent.
You can see the smaller hatch completed. The larger one shows the three cover boards also laser cut waiting to be glued into position. But this you will also note the ledge created on the inside of the coaming that the cover boards will sit into. These are laser cut for you and can be glued on the port and starboard insides of the coaming.
This photo shows the three coverboards in the coaming. They are pretty thick, but only so they are flush with the center of the coaming to allow for the round-up. The round-up along the sides of the coverboards should be sanded flush to the top edge of the coamings along the P & S sides. I know some folks like to show one or two coverboards off the coaming. You can do this if you want to. But then you should sand that roundup into the bottom of the coverboards as well. But I will show them all in place like the contemporary model.
To finish off the hatches...round off the corners using the right angle jig like you did for the gratings. Trim them down to the top of the deck planking. The bolts were added using black fishing line in the same way. The iron ring for handles were made just like those on the lower platforms. Exactly the same.
Also shown in the photo above are the mast and capstan partners. These are completely laser cut for you. They have etched lines to show the separate sections. All you have to do is sand them clean and round off the corners as described earlier for the capstan partners only. Soften the top edges as well. Add the fishing line bolts and the eye bolts on the main mast partners. Now some of these can be glued onto the model. They are all ready to go so you can start planking the decks.
BUT there are a some like the main mast partners and capstan partners that need some extra work. I will describe that next. For example the elm pump tubes below the main mast partners and the capstan drum as well.
More to follow...but here is a photo with the all of the hatches, coamings and partners simply test positioned on the model. They are not glued into position yet. I did however glue the smaller grating and coaming on the forecastle deck in permanently....those are all finished up. Its getting there!!!
-
 Chuck got a reaction from CiscoH in Sloop Speedwell 1752 by Chuck - Ketch Rigged Sloop - POF - prototype build
Thank you Jim...
I have completed all of the hatches, gratings and partners to be placed on deck. You have seen how the gratings were made. The two hatches are pretty similar. The only difference is they have cover boards rather than gratings within in the coamings.
The photo below shows the laser cut coamings assembled. There is no need to remove the laser char from the lap joints at the corners. In fact it probably isnt a good idea at all. They are precision cut so you end up with a perfectly squared up coaming the correct size. You can and should sand both sides of the sheet before removing these laser cut parts to clean the char from those sides. Just glue them up using the same right angle jig provided earlier. Then sand the char off the top of the completed coaming being careful to keep the round-up consistent.
You can see the smaller hatch completed. The larger one shows the three cover boards also laser cut waiting to be glued into position. But this you will also note the ledge created on the inside of the coaming that the cover boards will sit into. These are laser cut for you and can be glued on the port and starboard insides of the coaming.
This photo shows the three coverboards in the coaming. They are pretty thick, but only so they are flush with the center of the coaming to allow for the round-up. The round-up along the sides of the coverboards should be sanded flush to the top edge of the coamings along the P & S sides. I know some folks like to show one or two coverboards off the coaming. You can do this if you want to. But then you should sand that roundup into the bottom of the coverboards as well. But I will show them all in place like the contemporary model.
To finish off the hatches...round off the corners using the right angle jig like you did for the gratings. Trim them down to the top of the deck planking. The bolts were added using black fishing line in the same way. The iron ring for handles were made just like those on the lower platforms. Exactly the same.
Also shown in the photo above are the mast and capstan partners. These are completely laser cut for you. They have etched lines to show the separate sections. All you have to do is sand them clean and round off the corners as described earlier for the capstan partners only. Soften the top edges as well. Add the fishing line bolts and the eye bolts on the main mast partners. Now some of these can be glued onto the model. They are all ready to go so you can start planking the decks.
BUT there are a some like the main mast partners and capstan partners that need some extra work. I will describe that next. For example the elm pump tubes below the main mast partners and the capstan drum as well.
More to follow...but here is a photo with the all of the hatches, coamings and partners simply test positioned on the model. They are not glued into position yet. I did however glue the smaller grating and coaming on the forecastle deck in permanently....those are all finished up. Its getting there!!!
-
 Chuck got a reaction from jpalmer1970 in Sloop Speedwell 1752 by Chuck - Ketch Rigged Sloop - POF - prototype build
Thank you Jim...
I have completed all of the hatches, gratings and partners to be placed on deck. You have seen how the gratings were made. The two hatches are pretty similar. The only difference is they have cover boards rather than gratings within in the coamings.
The photo below shows the laser cut coamings assembled. There is no need to remove the laser char from the lap joints at the corners. In fact it probably isnt a good idea at all. They are precision cut so you end up with a perfectly squared up coaming the correct size. You can and should sand both sides of the sheet before removing these laser cut parts to clean the char from those sides. Just glue them up using the same right angle jig provided earlier. Then sand the char off the top of the completed coaming being careful to keep the round-up consistent.
You can see the smaller hatch completed. The larger one shows the three cover boards also laser cut waiting to be glued into position. But this you will also note the ledge created on the inside of the coaming that the cover boards will sit into. These are laser cut for you and can be glued on the port and starboard insides of the coaming.
This photo shows the three coverboards in the coaming. They are pretty thick, but only so they are flush with the center of the coaming to allow for the round-up. The round-up along the sides of the coverboards should be sanded flush to the top edge of the coamings along the P & S sides. I know some folks like to show one or two coverboards off the coaming. You can do this if you want to. But then you should sand that roundup into the bottom of the coverboards as well. But I will show them all in place like the contemporary model.
To finish off the hatches...round off the corners using the right angle jig like you did for the gratings. Trim them down to the top of the deck planking. The bolts were added using black fishing line in the same way. The iron ring for handles were made just like those on the lower platforms. Exactly the same.
Also shown in the photo above are the mast and capstan partners. These are completely laser cut for you. They have etched lines to show the separate sections. All you have to do is sand them clean and round off the corners as described earlier for the capstan partners only. Soften the top edges as well. Add the fishing line bolts and the eye bolts on the main mast partners. Now some of these can be glued onto the model. They are all ready to go so you can start planking the decks.
BUT there are a some like the main mast partners and capstan partners that need some extra work. I will describe that next. For example the elm pump tubes below the main mast partners and the capstan drum as well.
More to follow...but here is a photo with the all of the hatches, coamings and partners simply test positioned on the model. They are not glued into position yet. I did however glue the smaller grating and coaming on the forecastle deck in permanently....those are all finished up. Its getting there!!!
-
 Chuck got a reaction from MAGIC's Craig in Sloop Speedwell 1752 by Chuck - Ketch Rigged Sloop - POF - prototype build
Thank you Jim...
I have completed all of the hatches, gratings and partners to be placed on deck. You have seen how the gratings were made. The two hatches are pretty similar. The only difference is they have cover boards rather than gratings within in the coamings.
The photo below shows the laser cut coamings assembled. There is no need to remove the laser char from the lap joints at the corners. In fact it probably isnt a good idea at all. They are precision cut so you end up with a perfectly squared up coaming the correct size. You can and should sand both sides of the sheet before removing these laser cut parts to clean the char from those sides. Just glue them up using the same right angle jig provided earlier. Then sand the char off the top of the completed coaming being careful to keep the round-up consistent.
You can see the smaller hatch completed. The larger one shows the three cover boards also laser cut waiting to be glued into position. But this you will also note the ledge created on the inside of the coaming that the cover boards will sit into. These are laser cut for you and can be glued on the port and starboard insides of the coaming.
This photo shows the three coverboards in the coaming. They are pretty thick, but only so they are flush with the center of the coaming to allow for the round-up. The round-up along the sides of the coverboards should be sanded flush to the top edge of the coamings along the P & S sides. I know some folks like to show one or two coverboards off the coaming. You can do this if you want to. But then you should sand that roundup into the bottom of the coverboards as well. But I will show them all in place like the contemporary model.
To finish off the hatches...round off the corners using the right angle jig like you did for the gratings. Trim them down to the top of the deck planking. The bolts were added using black fishing line in the same way. The iron ring for handles were made just like those on the lower platforms. Exactly the same.
Also shown in the photo above are the mast and capstan partners. These are completely laser cut for you. They have etched lines to show the separate sections. All you have to do is sand them clean and round off the corners as described earlier for the capstan partners only. Soften the top edges as well. Add the fishing line bolts and the eye bolts on the main mast partners. Now some of these can be glued onto the model. They are all ready to go so you can start planking the decks.
BUT there are a some like the main mast partners and capstan partners that need some extra work. I will describe that next. For example the elm pump tubes below the main mast partners and the capstan drum as well.
More to follow...but here is a photo with the all of the hatches, coamings and partners simply test positioned on the model. They are not glued into position yet. I did however glue the smaller grating and coaming on the forecastle deck in permanently....those are all finished up. Its getting there!!!
-
 Chuck got a reaction from Stuntflyer in Sloop Speedwell 1752 by Chuck - Ketch Rigged Sloop - POF - prototype build
Thank you Jim...
I have completed all of the hatches, gratings and partners to be placed on deck. You have seen how the gratings were made. The two hatches are pretty similar. The only difference is they have cover boards rather than gratings within in the coamings.
The photo below shows the laser cut coamings assembled. There is no need to remove the laser char from the lap joints at the corners. In fact it probably isnt a good idea at all. They are precision cut so you end up with a perfectly squared up coaming the correct size. You can and should sand both sides of the sheet before removing these laser cut parts to clean the char from those sides. Just glue them up using the same right angle jig provided earlier. Then sand the char off the top of the completed coaming being careful to keep the round-up consistent.
You can see the smaller hatch completed. The larger one shows the three cover boards also laser cut waiting to be glued into position. But this you will also note the ledge created on the inside of the coaming that the cover boards will sit into. These are laser cut for you and can be glued on the port and starboard insides of the coaming.
This photo shows the three coverboards in the coaming. They are pretty thick, but only so they are flush with the center of the coaming to allow for the round-up. The round-up along the sides of the coverboards should be sanded flush to the top edge of the coamings along the P & S sides. I know some folks like to show one or two coverboards off the coaming. You can do this if you want to. But then you should sand that roundup into the bottom of the coverboards as well. But I will show them all in place like the contemporary model.
To finish off the hatches...round off the corners using the right angle jig like you did for the gratings. Trim them down to the top of the deck planking. The bolts were added using black fishing line in the same way. The iron ring for handles were made just like those on the lower platforms. Exactly the same.
Also shown in the photo above are the mast and capstan partners. These are completely laser cut for you. They have etched lines to show the separate sections. All you have to do is sand them clean and round off the corners as described earlier for the capstan partners only. Soften the top edges as well. Add the fishing line bolts and the eye bolts on the main mast partners. Now some of these can be glued onto the model. They are all ready to go so you can start planking the decks.
BUT there are a some like the main mast partners and capstan partners that need some extra work. I will describe that next. For example the elm pump tubes below the main mast partners and the capstan drum as well.
More to follow...but here is a photo with the all of the hatches, coamings and partners simply test positioned on the model. They are not glued into position yet. I did however glue the smaller grating and coaming on the forecastle deck in permanently....those are all finished up. Its getting there!!!