EJ_L
-
Posts
2,246 -
Joined
-
Last visited
Content Type
Profiles
Forums
Gallery
Events
Everything posted by EJ_L
-
 That wood work is indeed beautiful. I would leave part of it exposed to show it off.
 -
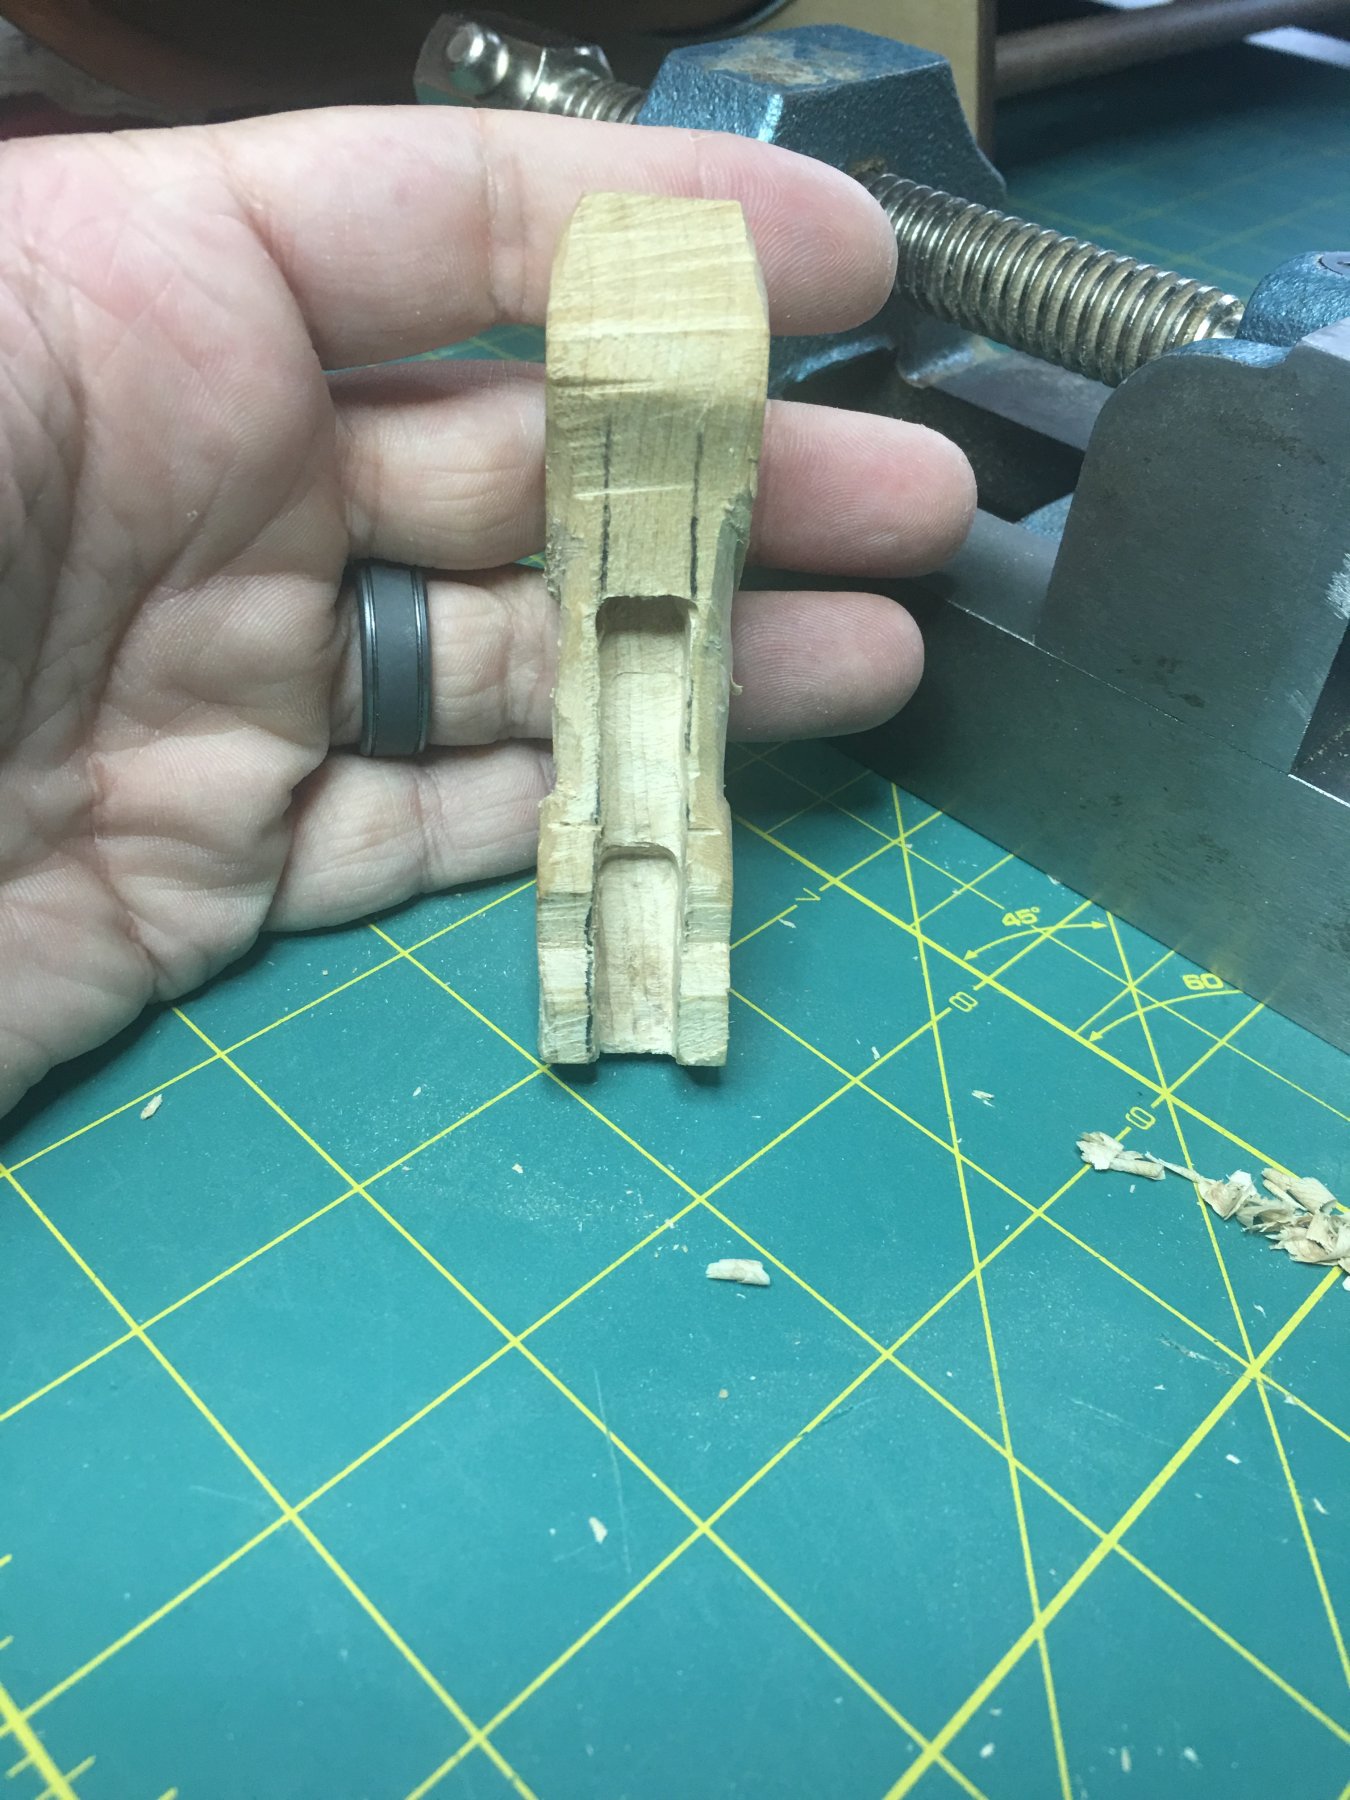
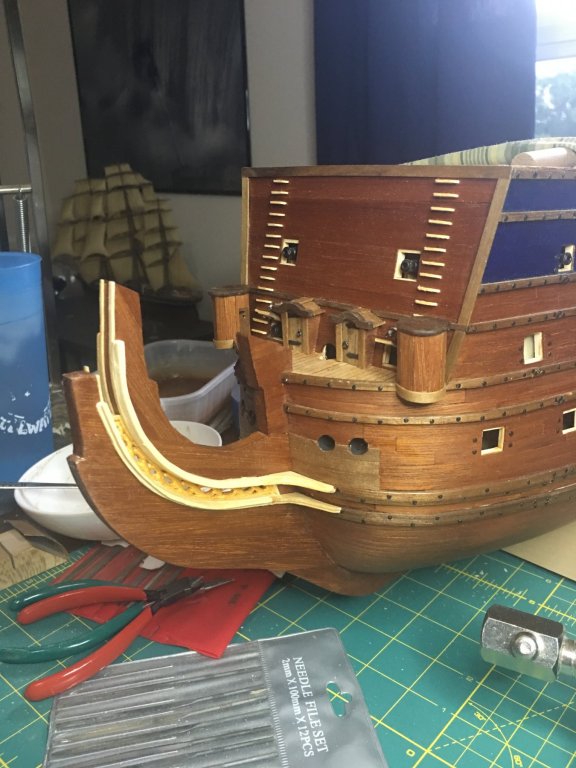
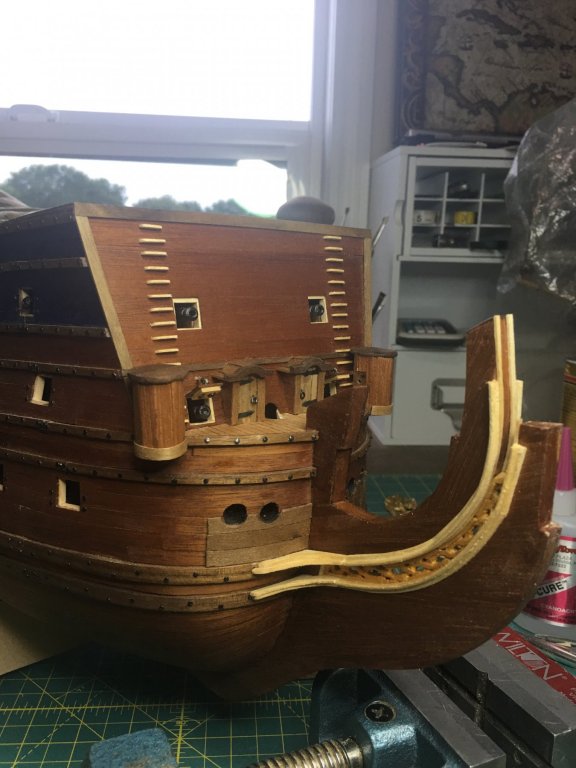
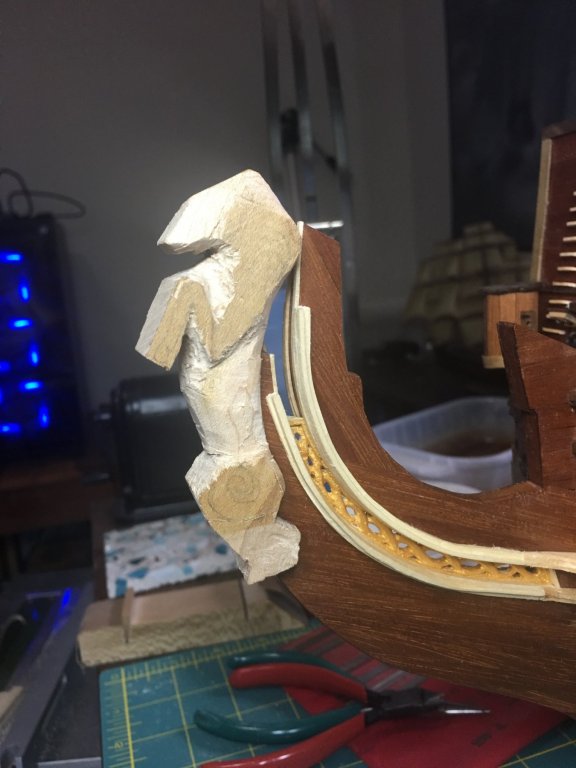
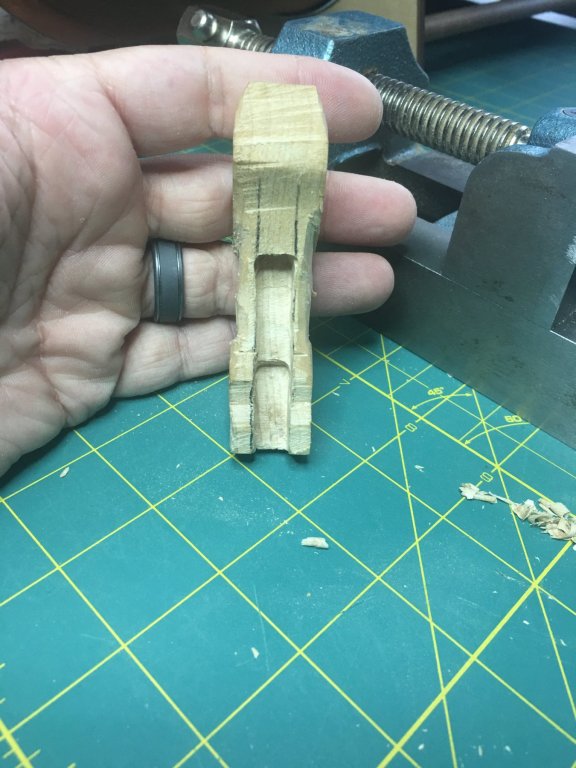
Been a while since the last update but, I’ve not been idle. Lots of work on the bow and knees. I’ve also started to carve the figure head. I’m planning on making it in two pieces, seahorse and rider. I’ve also chosen to carve these out of cherry wood as I wanted to try a harder wood to see how the details hold up and just how difficult it would be to carve.
-
I'm a bit late to the build but wow! A lot of very nice detail and great information. I'll definitely stick around to see the rest of the build!
- 128 replies
-
- 3
-

-
- mordaunt
- battle station
- (and 1 more)
-
Looking forward to this build Don. Got my chair pulled up, note pad at the ready and a drink poured. I'm ready to learn!
-
Congratulations on completing an extremely well done model!
- 75 replies
-
- 1
-
-
- constitution
- mamoli
- (and 2 more)
-
That jewelers saw will be a great asset to your ship yard. The counter on the Rattlesnake is a trickier one on shape as it curves in a few different directions. Just keep sanding and dry-fitting it as you go and it will work out. If you have not thought about it yet, I would suggest to start fairing the frames while you wait on your saw. The angle of the fairing will impact the final shape of the filler and counter blocks. It is another tedious yet extremely beneficial process for the planking coming up. When all the fillers and counter blocks have been installed and the fairing is complete, use some wood filler or even drywall spackle to fill in the low spots. Having a smooth, even surface to lay the planks down on will help out tremendously as dips can deform the shape just as much as a bump can or prevent adequate glue adhesion. Looking good so far! 😃
-
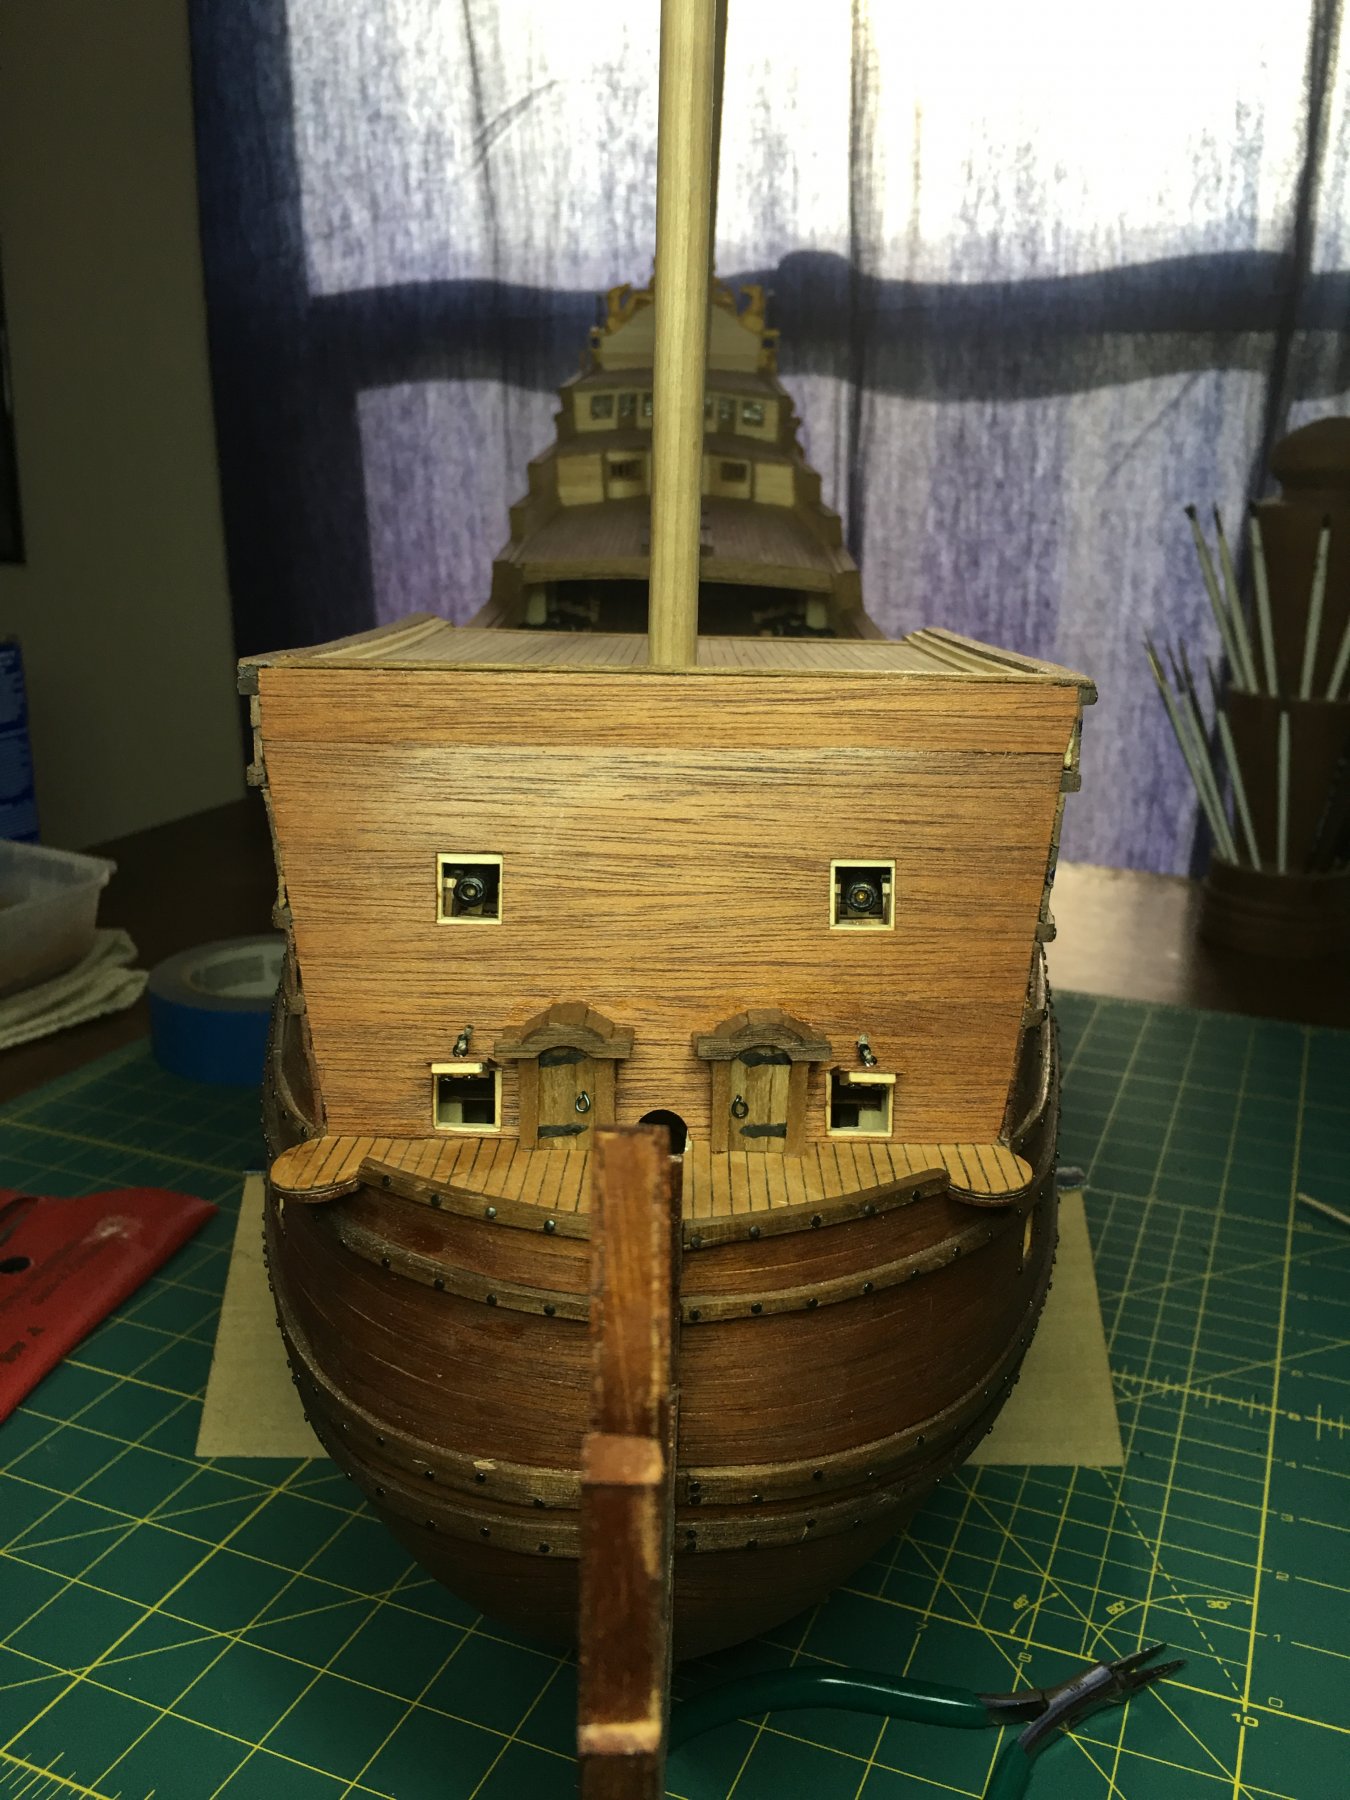
I’ve started work in the bow areas this weekend. Nice to be able to look at a different end of the ship for a change. 😁 As always, thank you all for the nice comments, likes and following along. More to follow!


-
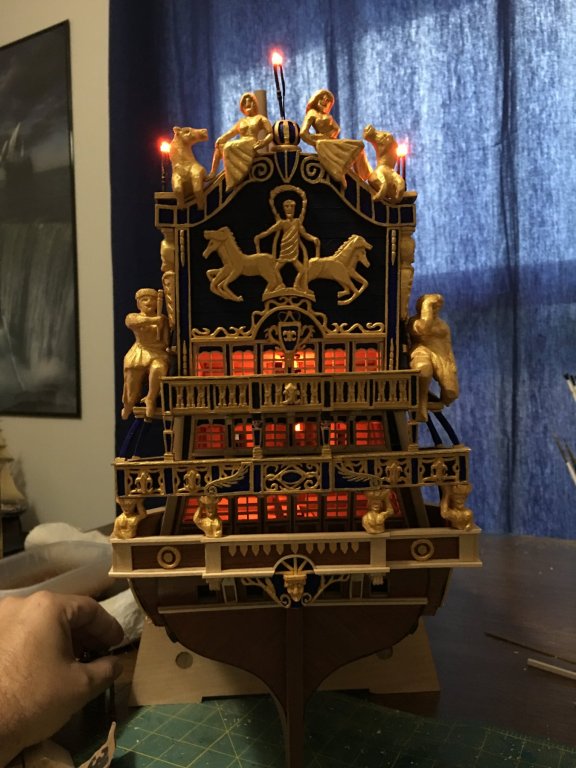
Thank you all so very much for the compliments and likes! Mike, the wood for the carvings is basswood, what can be easily found in most of the major U.S. hobby stores, Michael's, Hobby Lobby etc. It is a great wood to learn with as it is soft and easy to shape with knives and files but, due to it's softness it has a harder time taking and holding fine details. Also it is prone to splitting rather easily. I've spent a lot of time searching for tiny pieces like arms, hands, feet, vine tips and the like that flake off unintentionally. If I can find the broken piece I can often glue them back together and continue but sometimes I have to start over. Granted, that can be said about any wood but, bass wood is a bit more prone to it due its softness. I've got some cut off scraps that of cherry, apple and maple that I am starting to work with to see how those take. On this model since I am painting all the decorations I will probably continue to use the basswood for the remaining decorations with the exception of the bow figure. Due to the size and detail involved in that particular piece, I will probably try whichever sample species I like the best. Most builds I prefer not to paint the wood but instead use the natural wood colors. For those I want to use a nicer wood that will both take the detail better but also not leave the "fuzzy" look that the basswood tends to leave. I've seen a lot of very nice models where the builder has left them natural and they are beautiful. That is the goal I have set for myself. I still have some work to do... 😬 Denis, you hit the nail on the head with forgetting about the lights! My dad actually said the same thing a few days ago. He called me up saying that he was trying to show a friend pictures of my model ships and couldn't remember if it was this one or the last that had lights. I realized it had been a while since I had updated any with them on. It does add a really cool element to the build and I am glad I took the time to install them. Makes for a really cool look at night too with the lights off. I will have to try to get a picture of it that way on one of the future updates. Well, back to it. Working on the rudder tonight. Thank you all again for following along!
-
On the home page under our sponsors, Syren is a great place for rigging rope. Chuck also has the rigging size chart posted there that you can download to determine what will be needed. Typically, any standing rigging, shrouds, stays etc. (ropes that do not move) would be a dark brown - black color as they were covered in tar to help preserve them against the salt water and sun light. Running rigging, (ropes that controlled the sails and yards) would have been a tan color as they were natural fibers. As for quantities, you can try to measure out the individual stands as they come off for a rough estimate. Always add plenty of extra to any length as you will need plenty of waste to help tie off the ropes. I typically order at least 20% more than what I think I will need. Always have a "next" project that it can be used on!
-
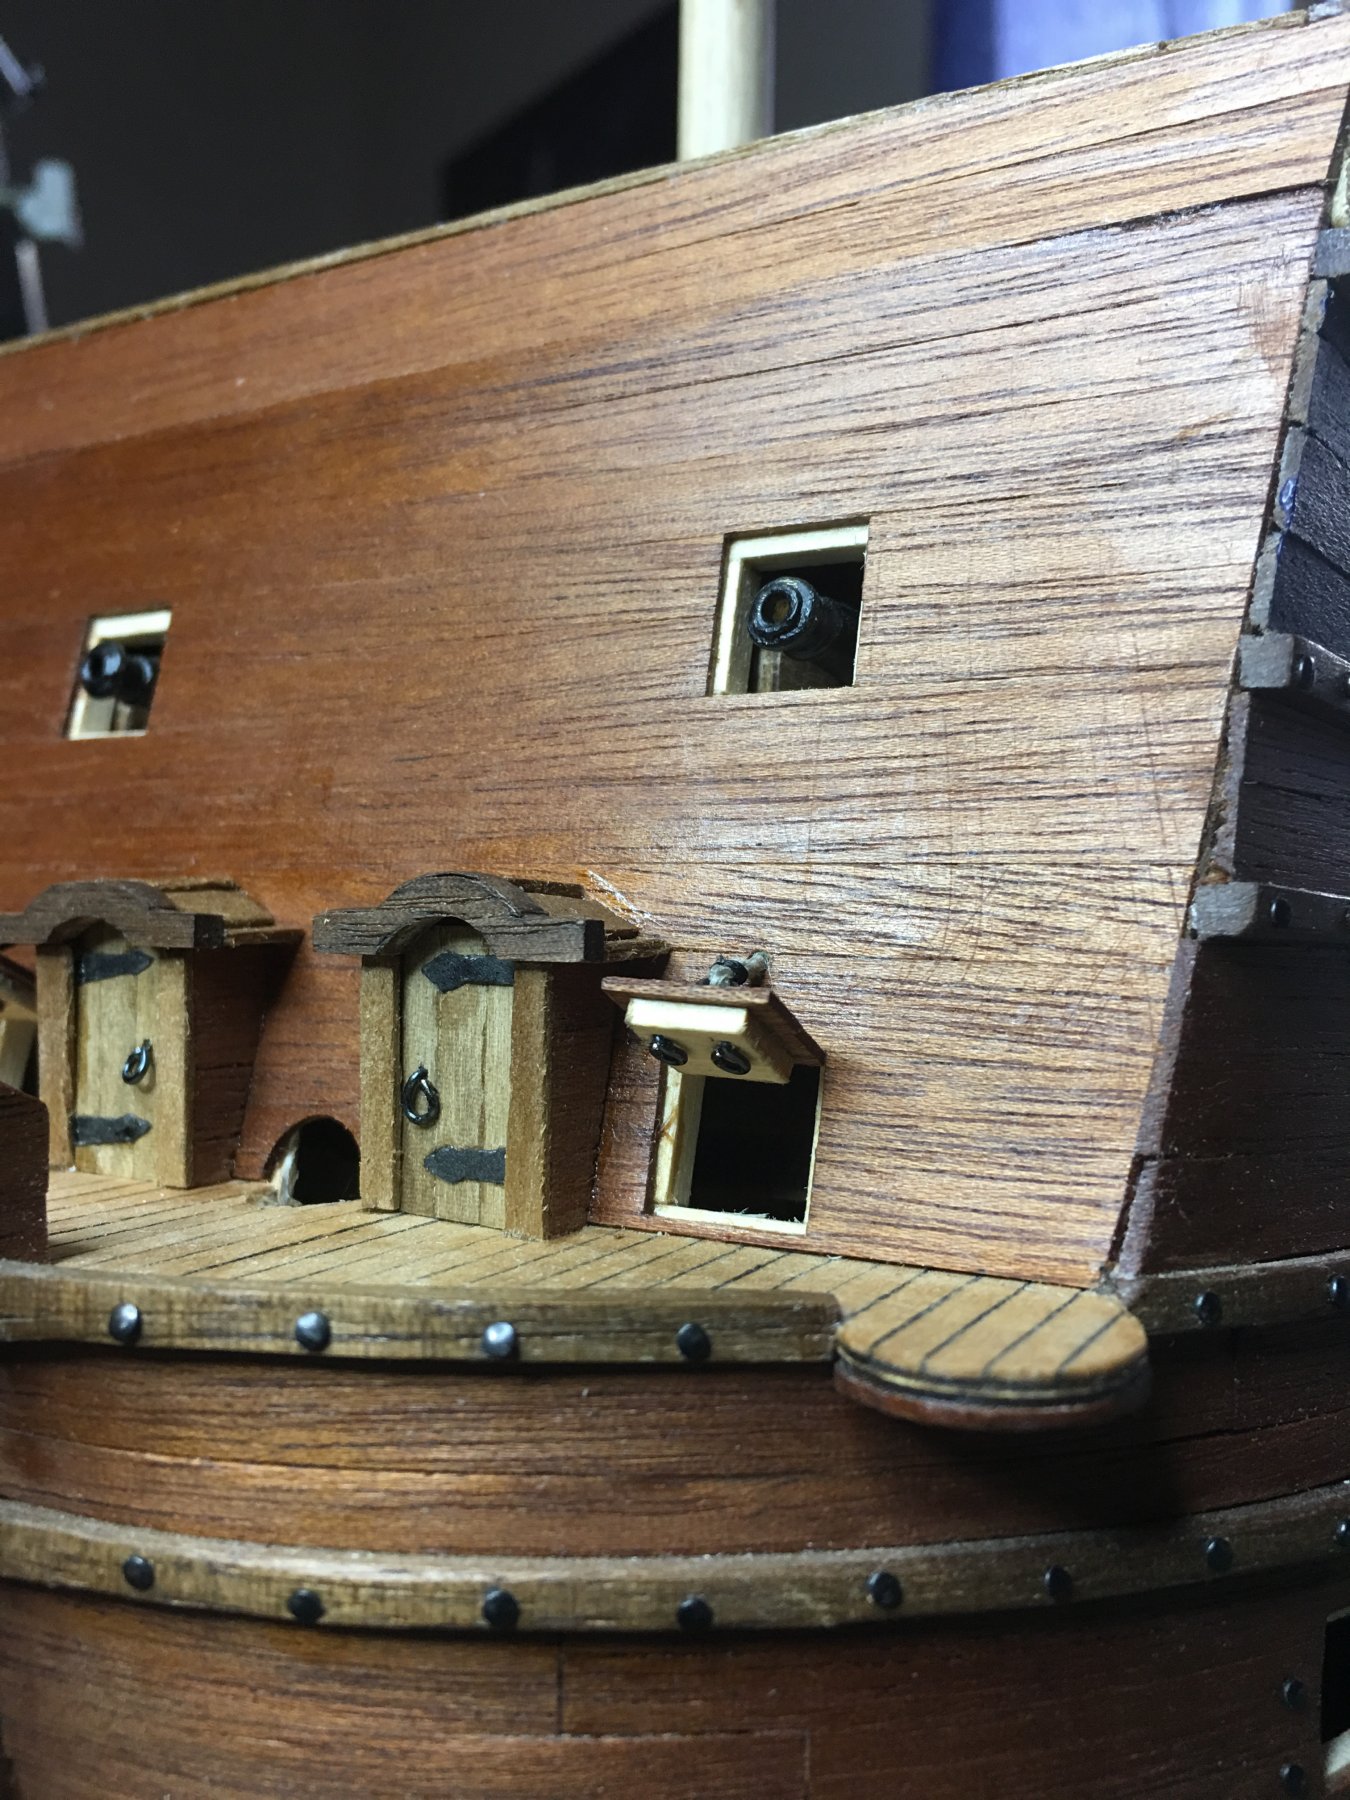
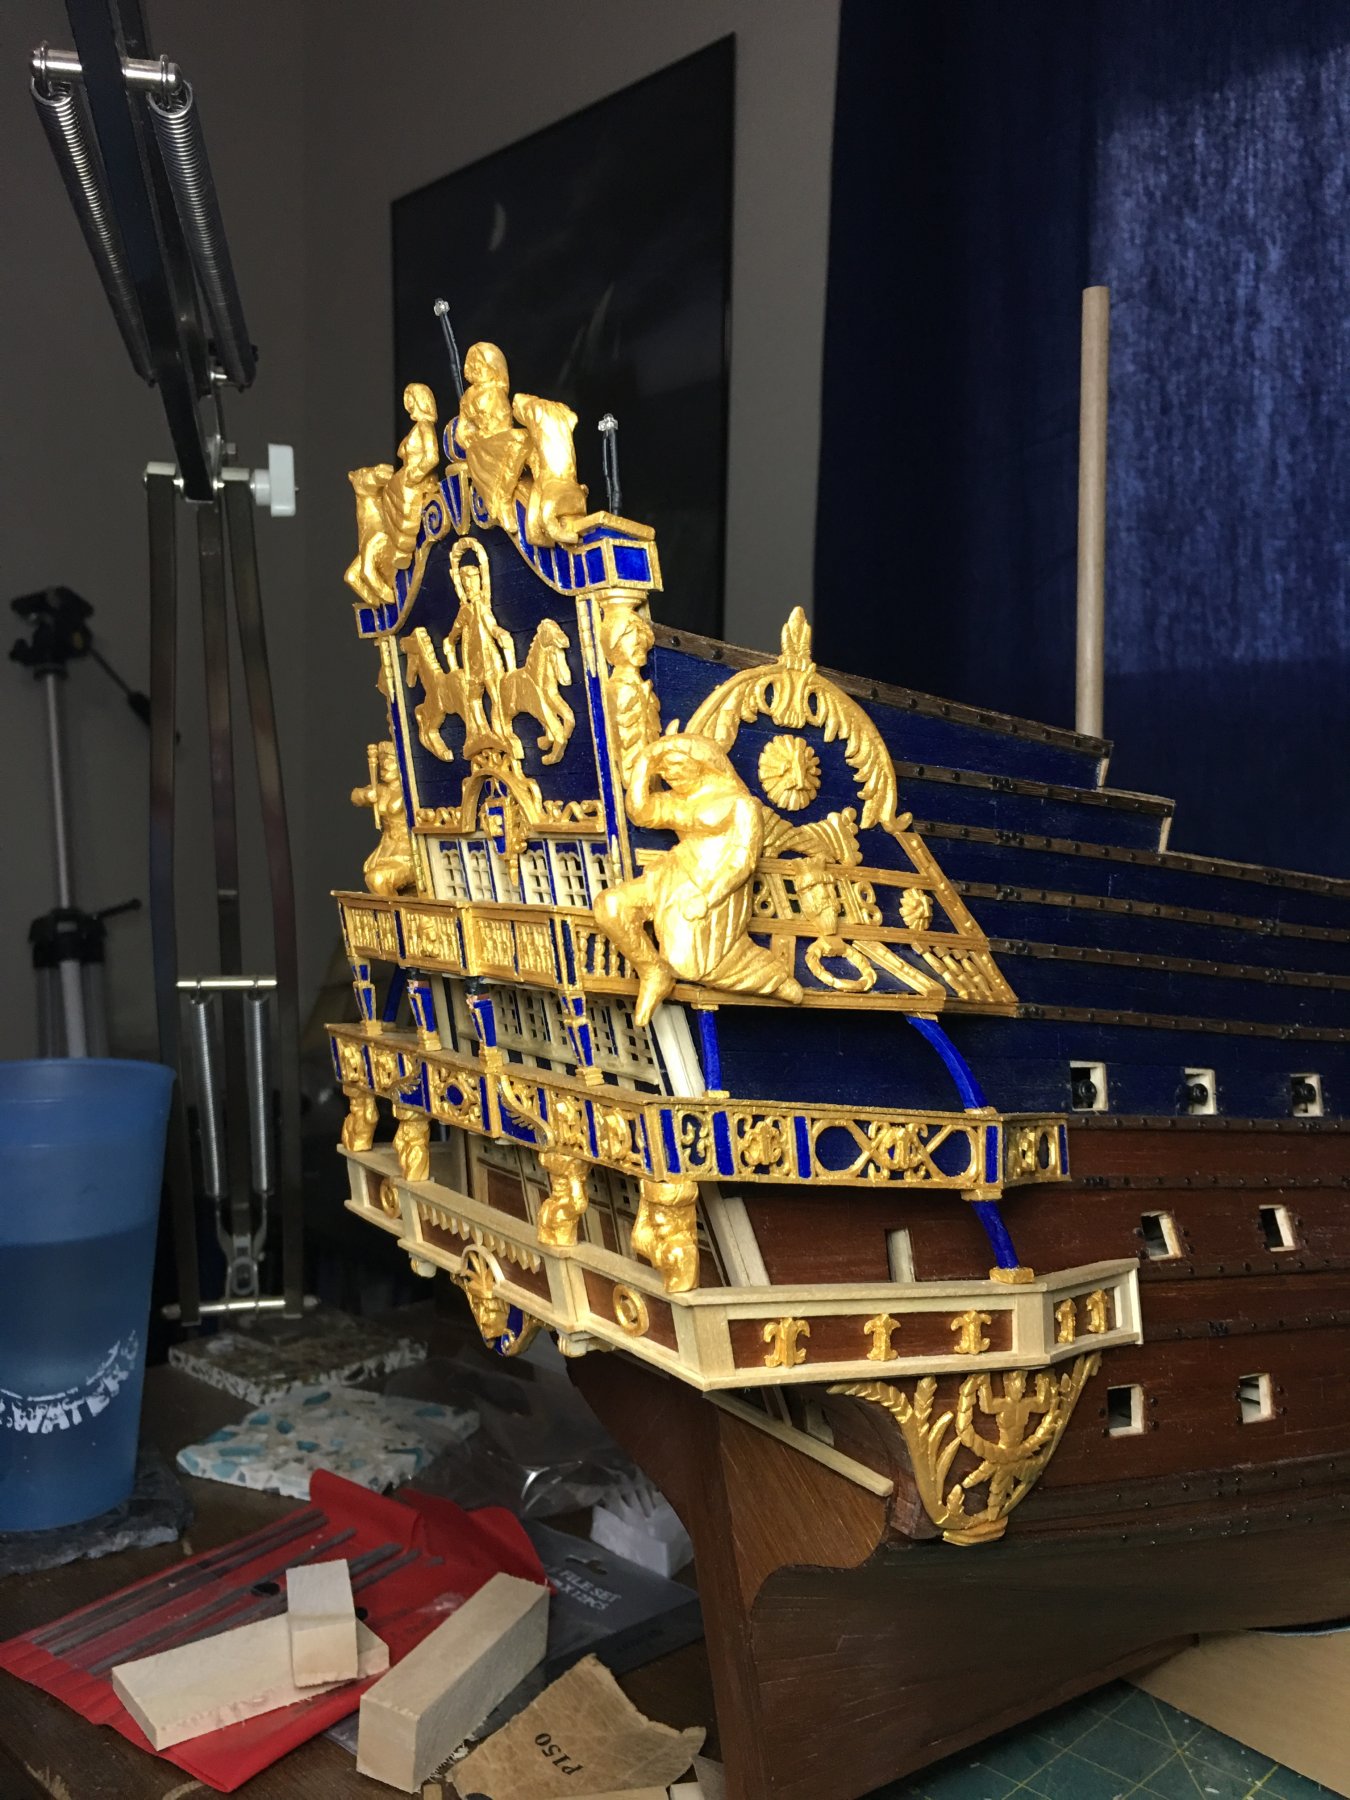
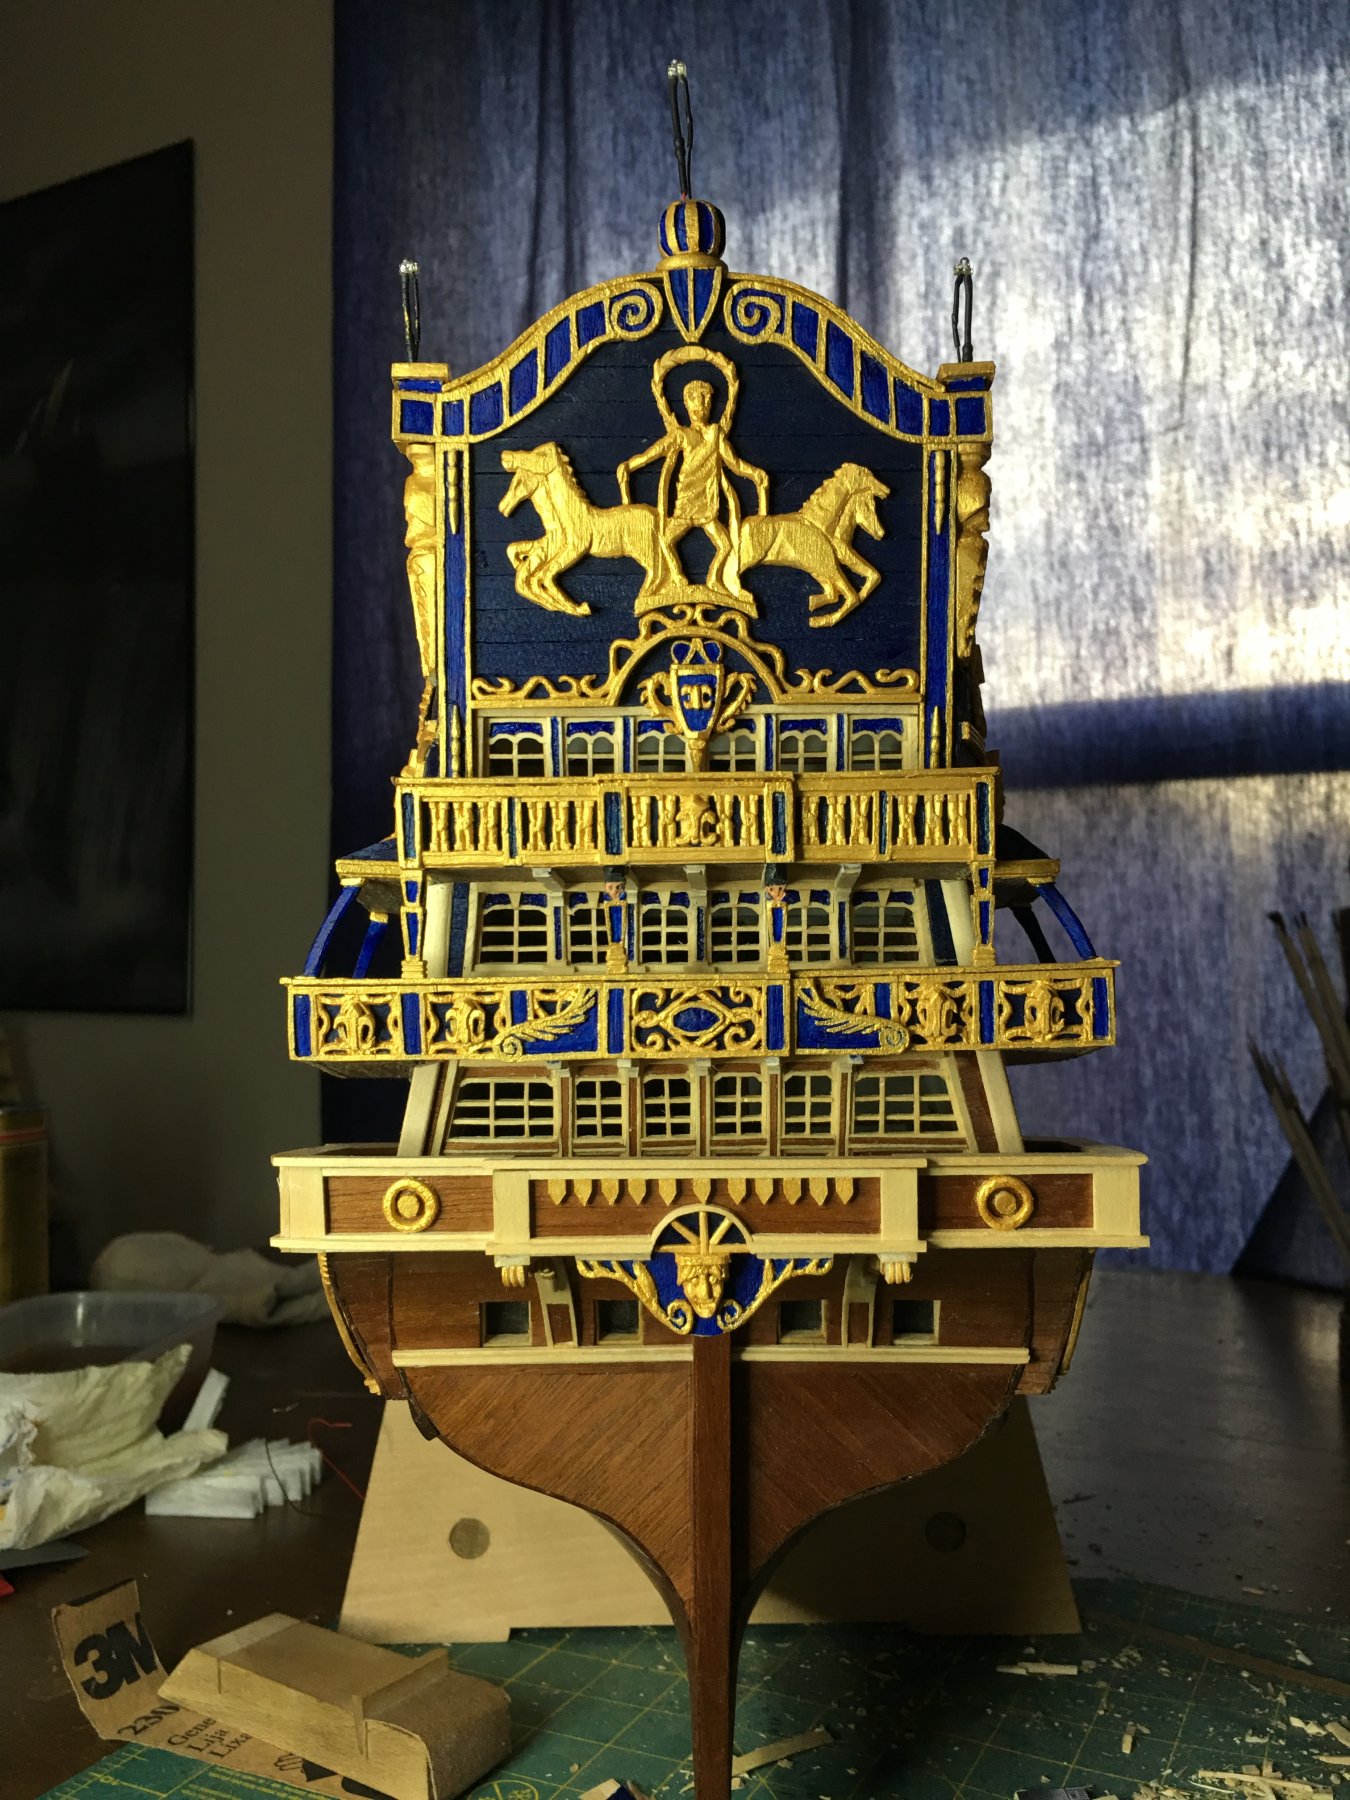
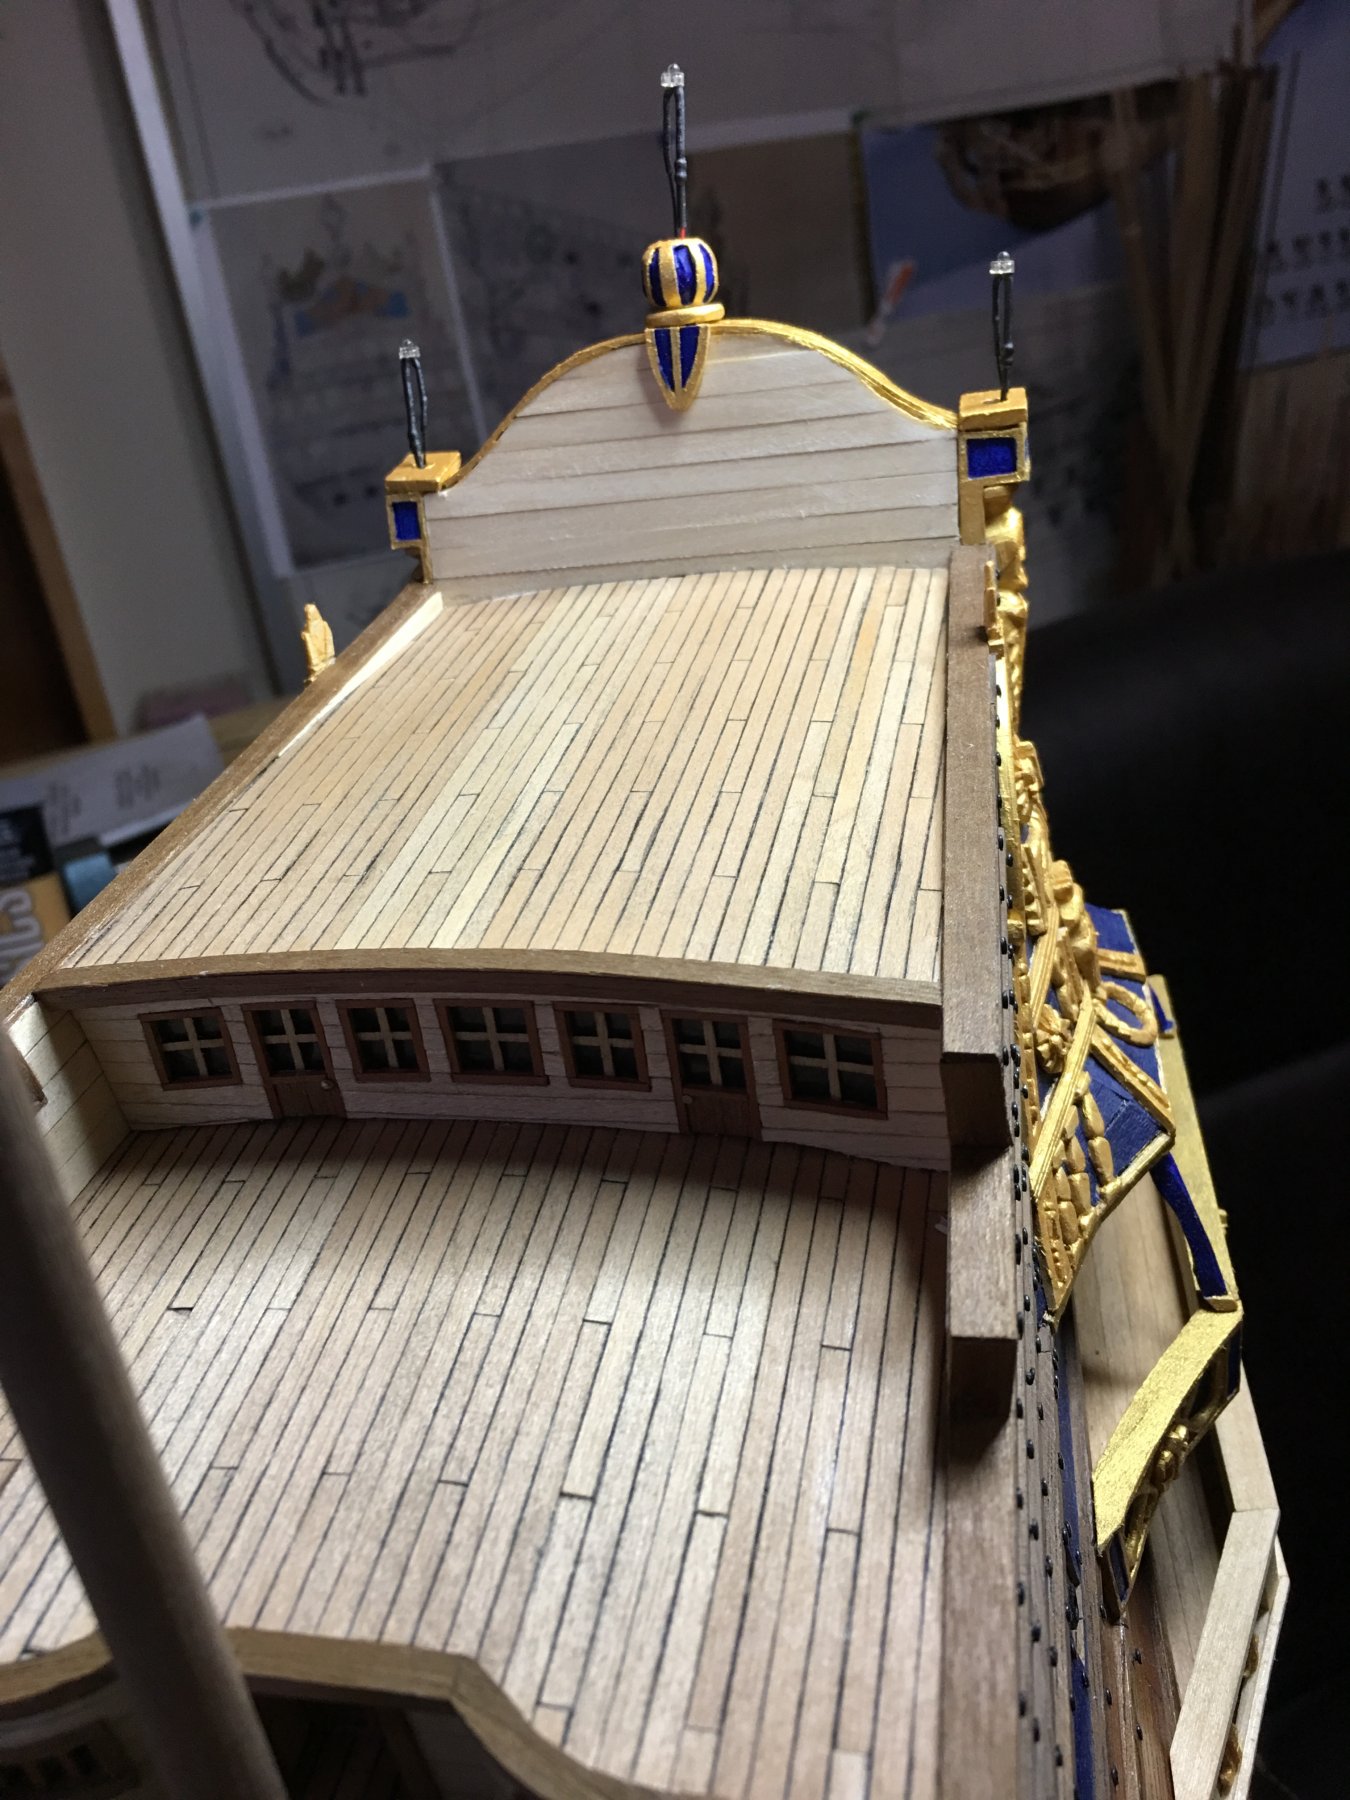
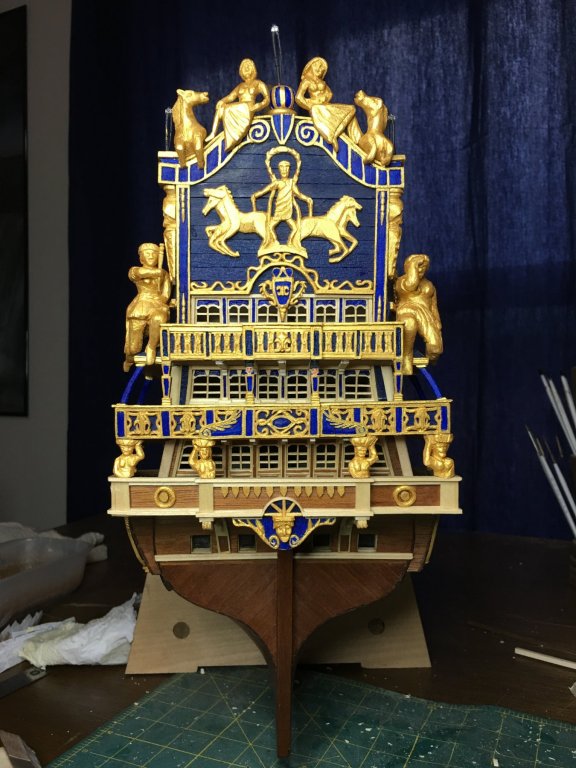
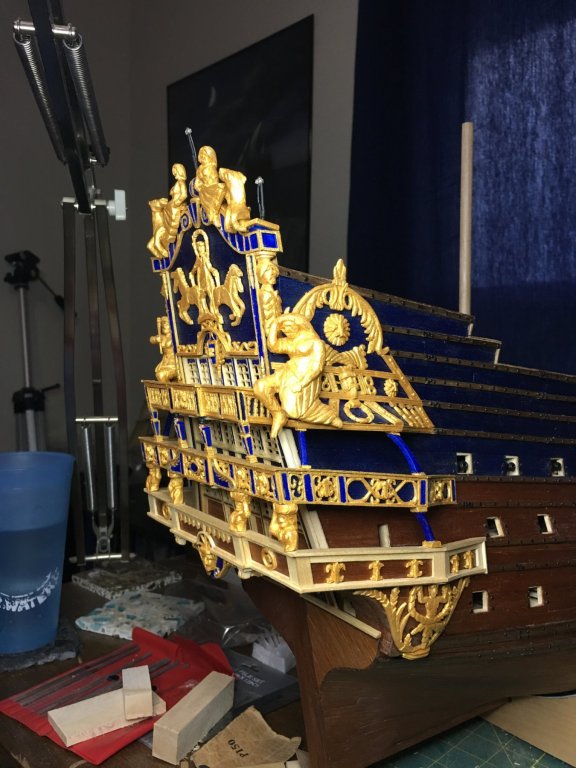
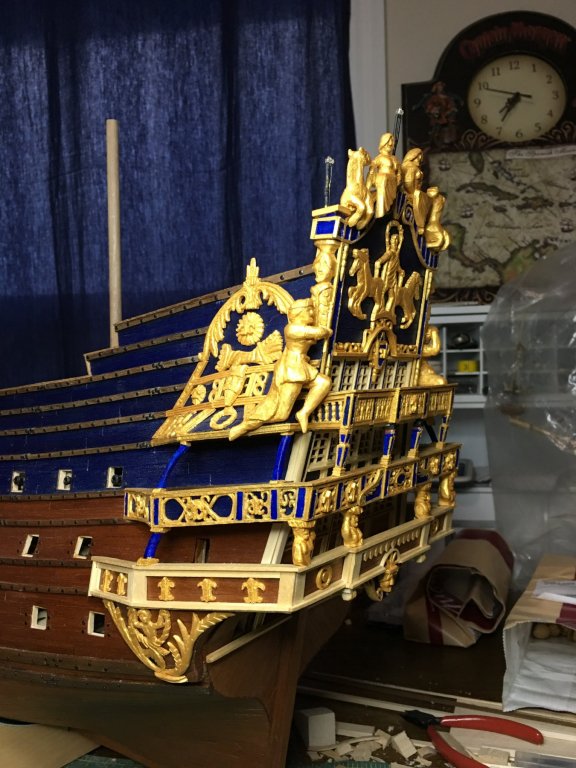
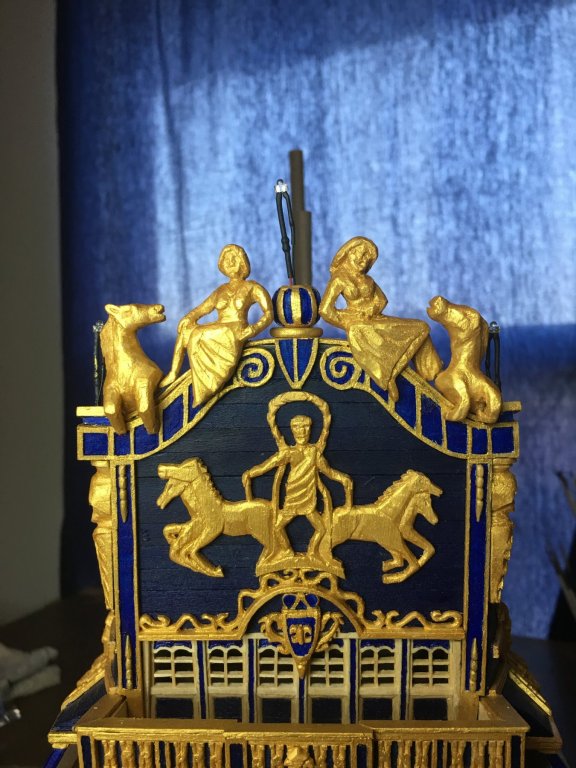
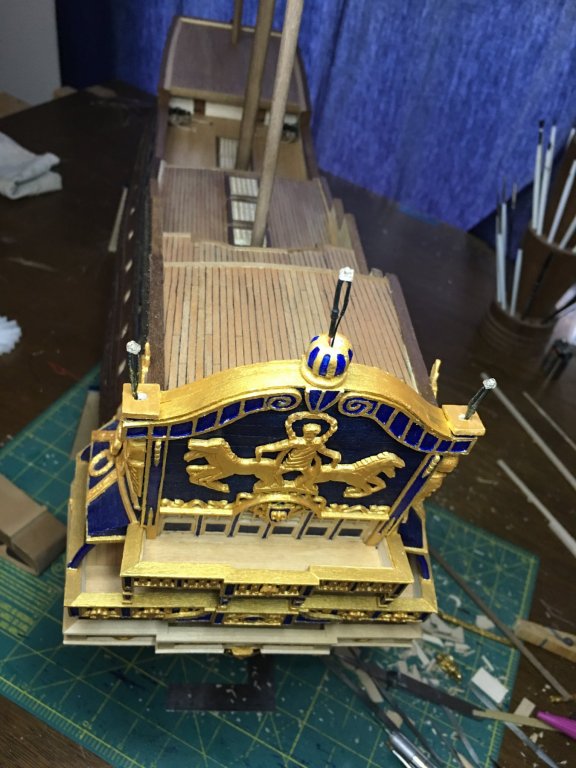
Thank you everyone for all the comments, likes and following along! Another busy week working on the ship has passed and just like that, all the balcony and quarter galley sculptures are complete! I wasn’t sure I would ever get to say that... Of course I still have a lot to go when I get to the sides but another bite of the elephant has been taken. Next up I am going to build he rudder and add the stern chasers and port lids so I can spin the ship around to focus on the bow and sides. More to come but, for now enjoy the update!
- 961 replies
-
- 12
-
-
That photo is indeed awesome! Would be a good one to get framed and set by the model display.
- 213 replies
-
- 3
-
-
- la couronne
- 74 gun
- (and 2 more)
-
Welcome and it looks like you have yourself quite a project! I will echo the others in saying that it would probably be best to redo the rigging. It will make cleaning and restoring the ship easier and you will get some good experience with rigging. In any case, have fun with it and when your done you will have a nice model and heirloom to display.
-
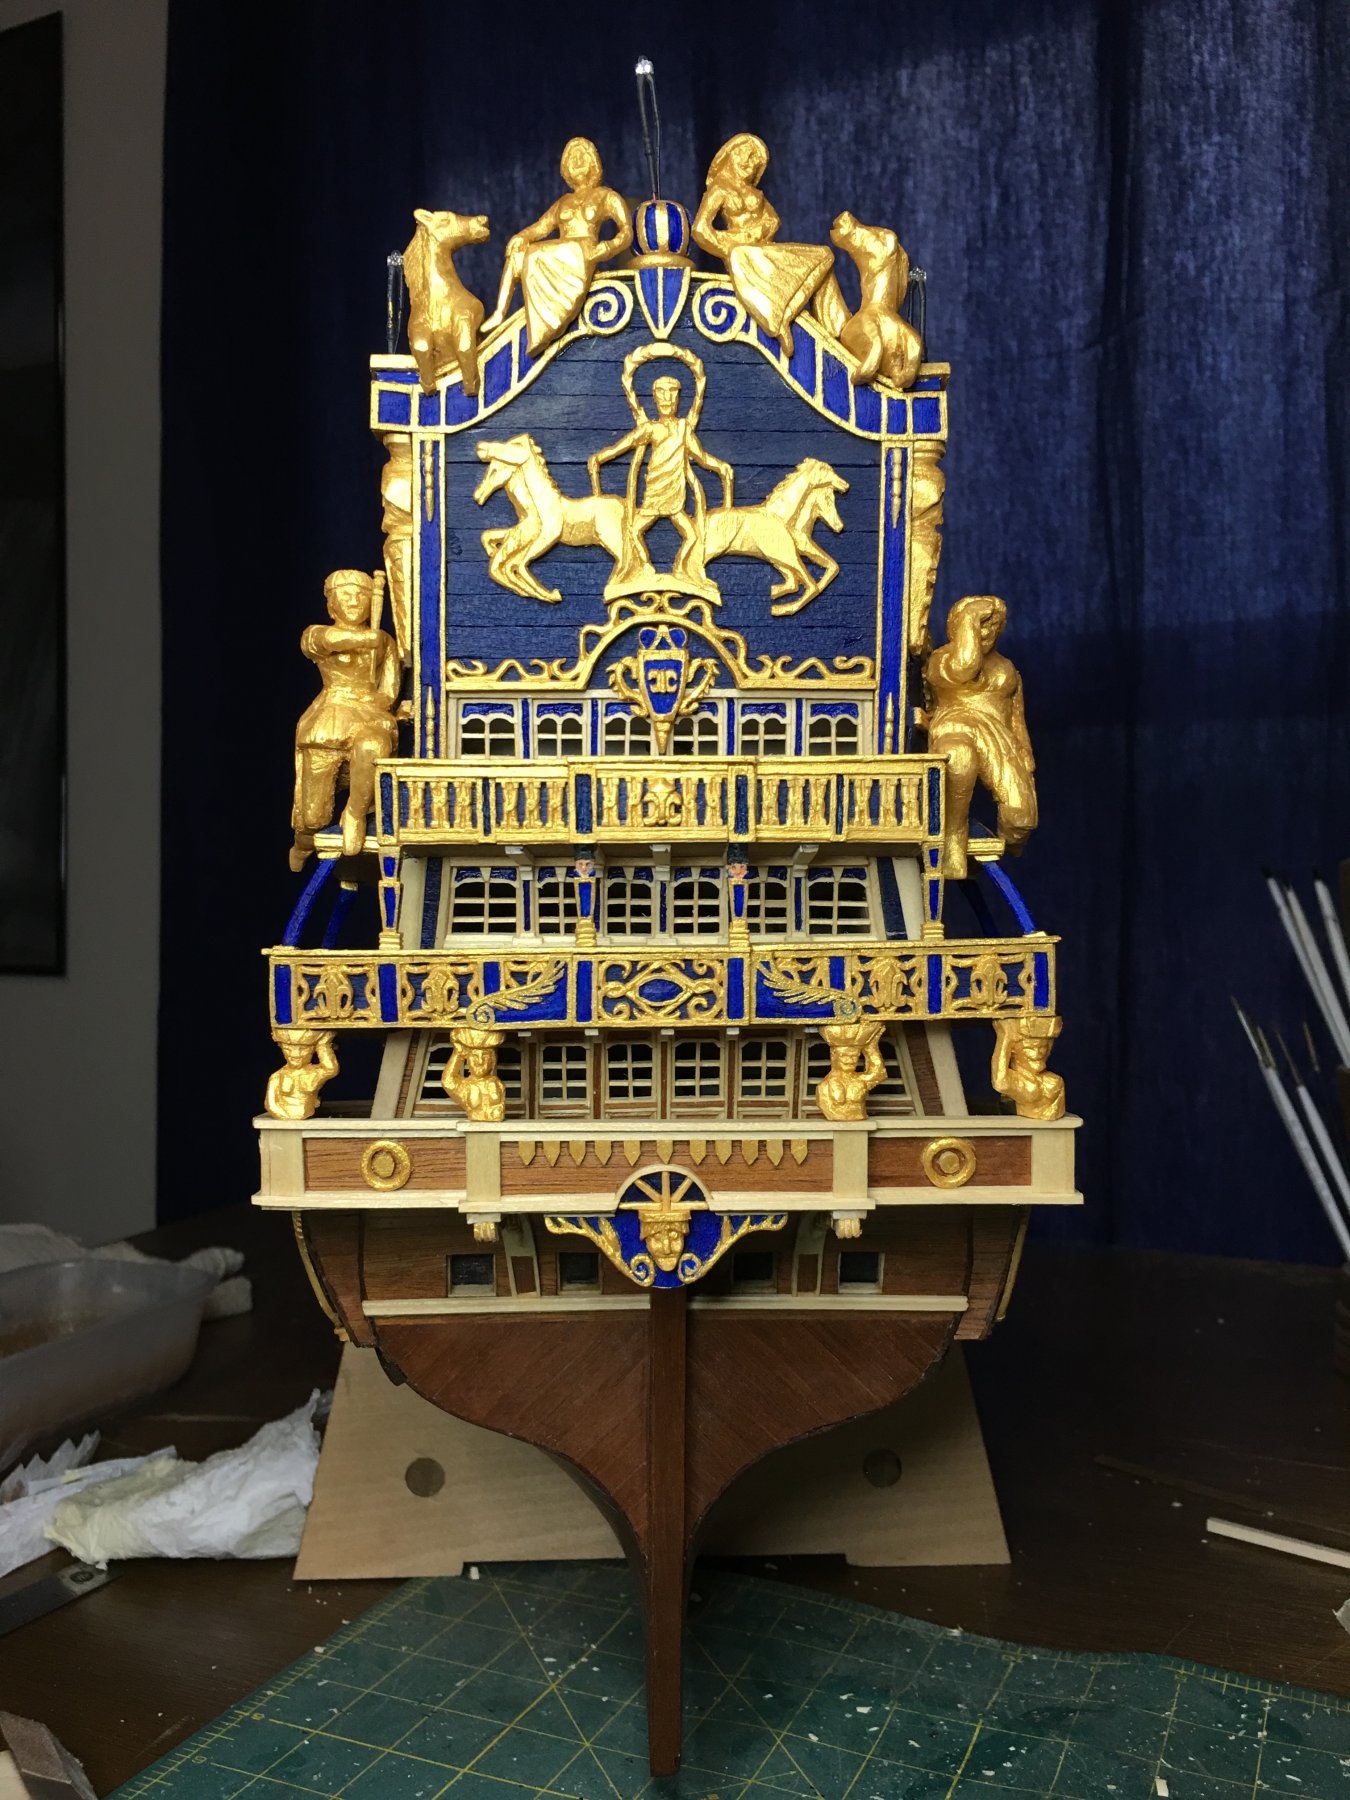
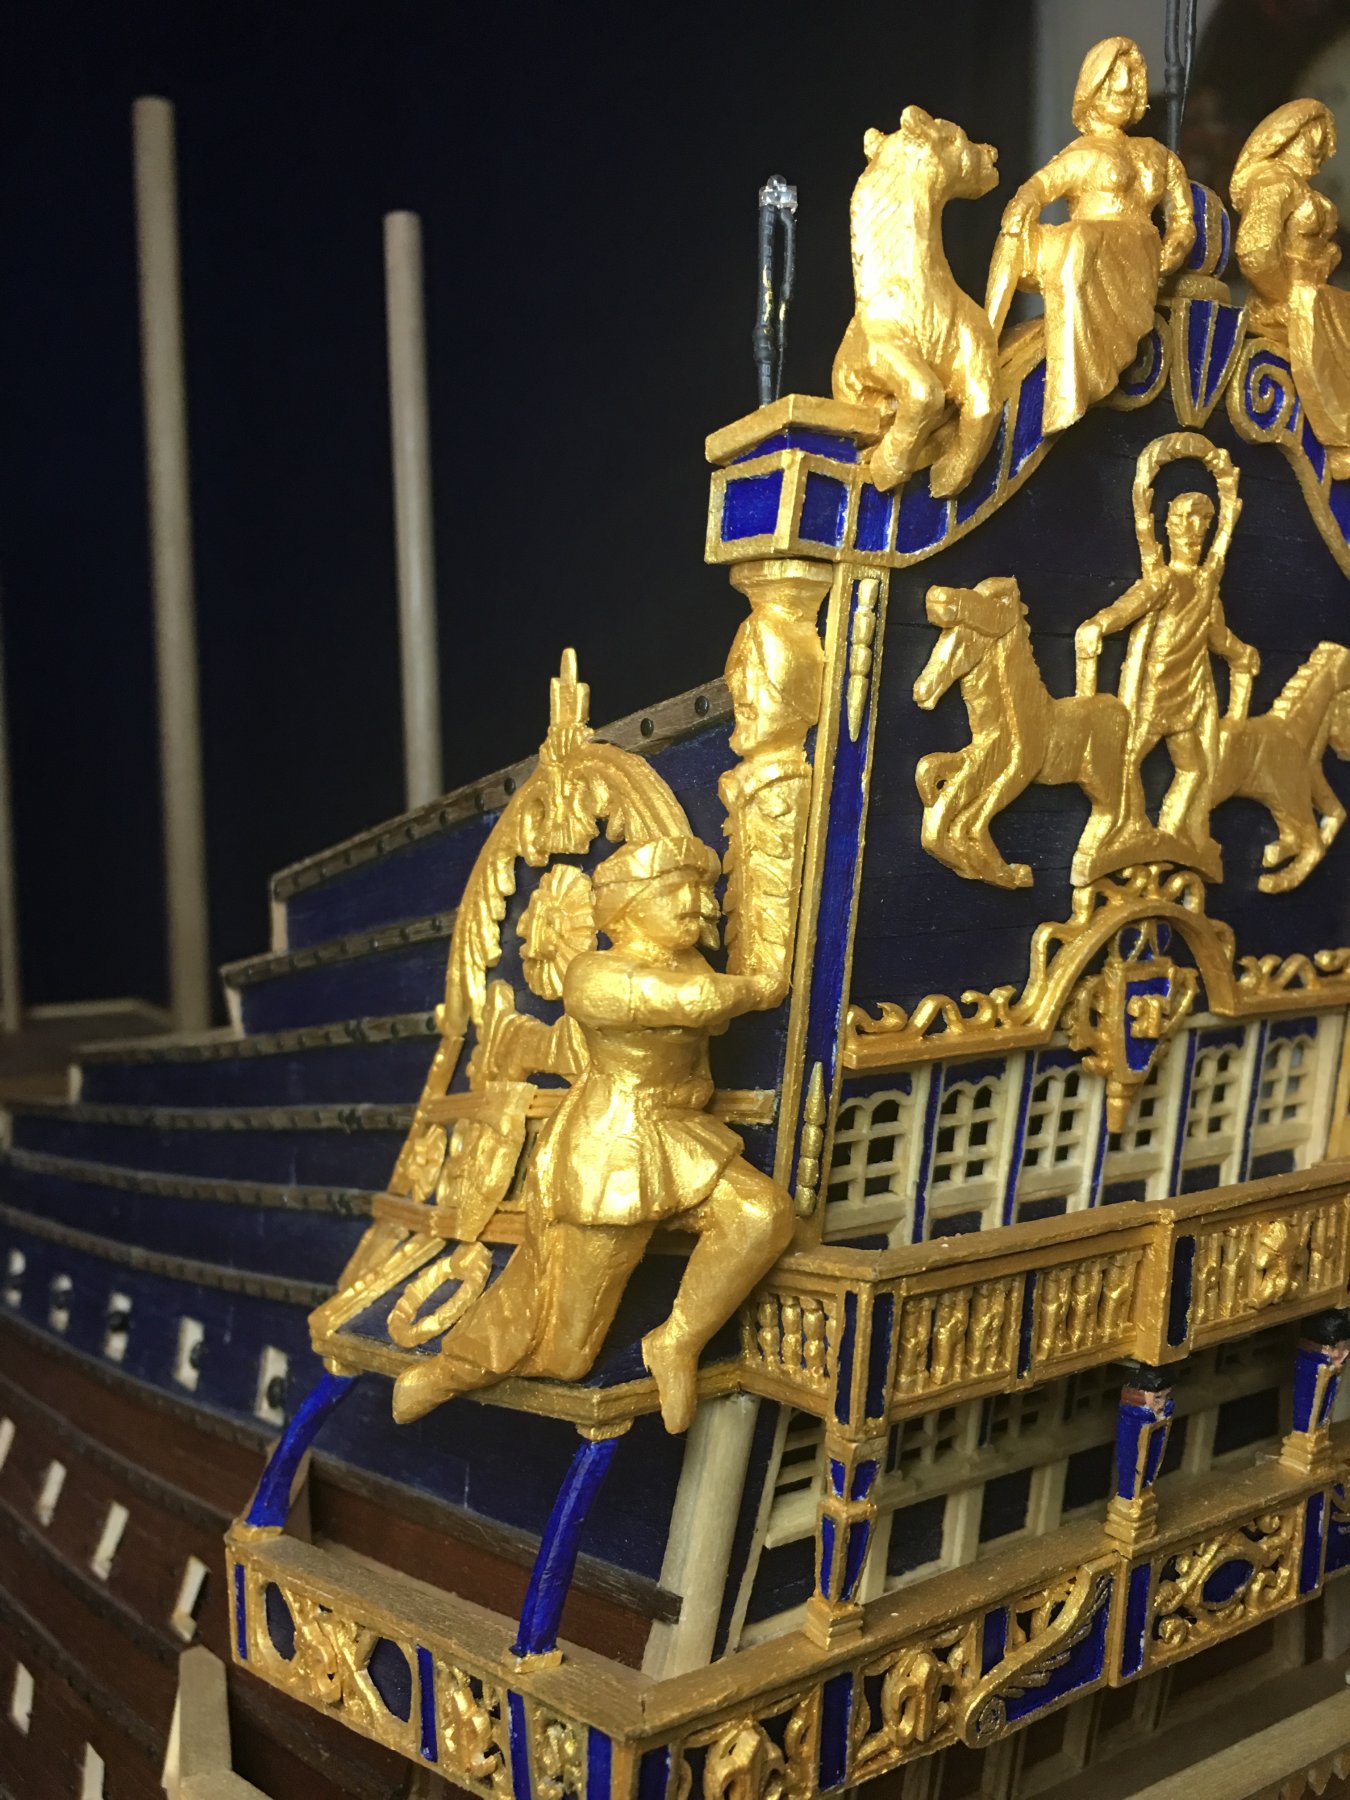
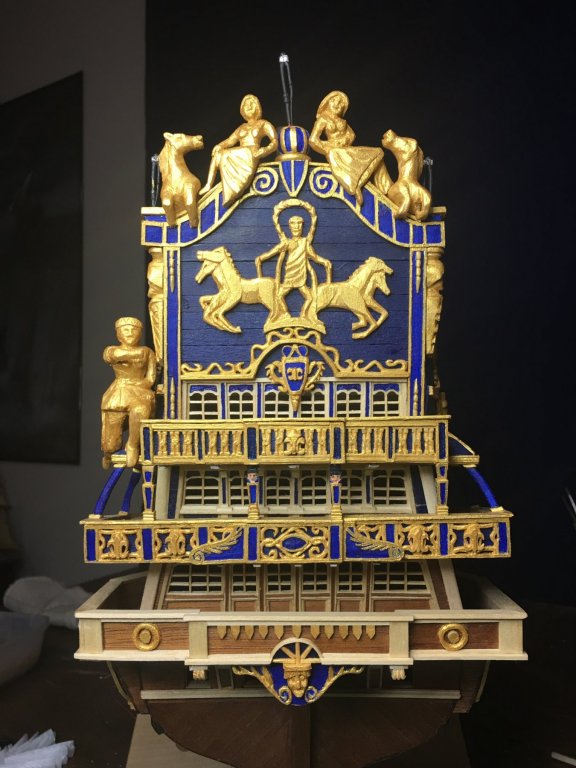
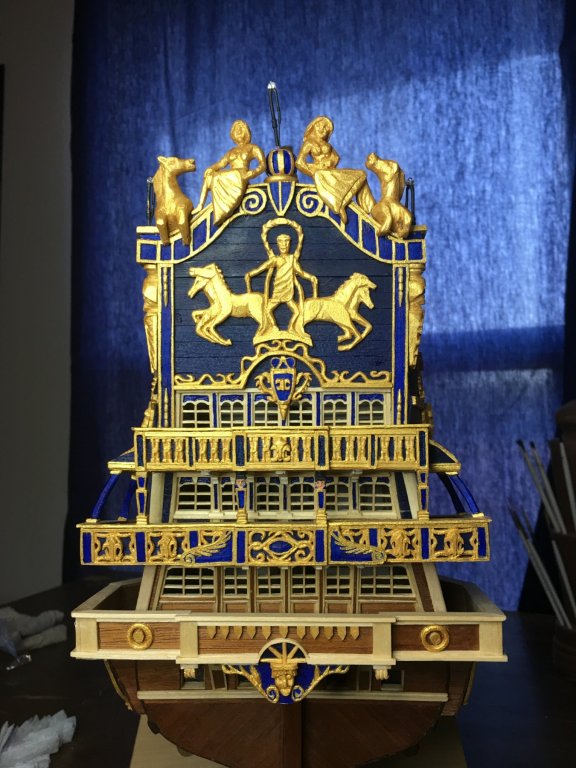
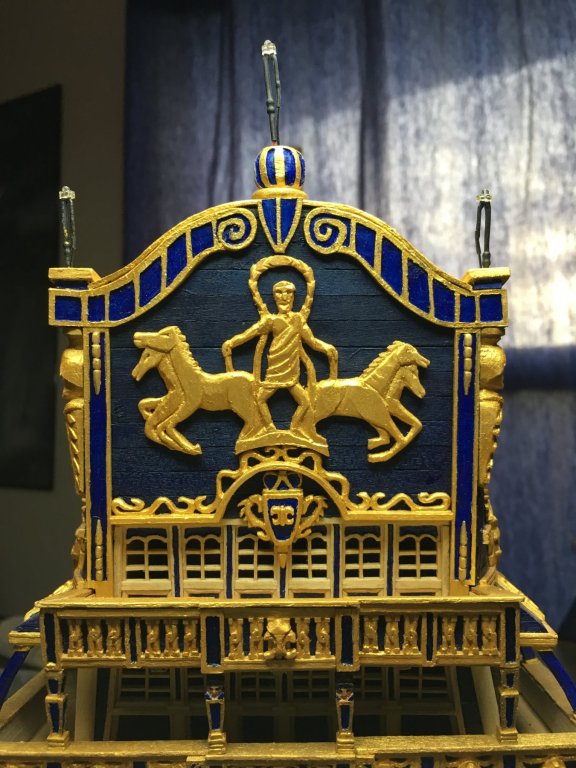
And mounted on the ship. My next question to the SR experts out there is what is she holding? I’ve seen 3 variants one being a fish, one a wheat sheaf and one a scepter so I’m thinking there was maybe some changes or just general disagreement on what she was holding. Does anyone know for certain or does it really matter much? I’m thinking either the fish or wheat would be appropriate as long as it was a food showing wealth but maybe I’m wrong in that thinking. Once I ha e a clearer idea I will add it to her hand. Next up will be the starboard figure! Thanks as always to the comments, likes and visits. The suggestions and knowledge shared is always appreciated as is just the general encouragement. This truly is a great community.

-
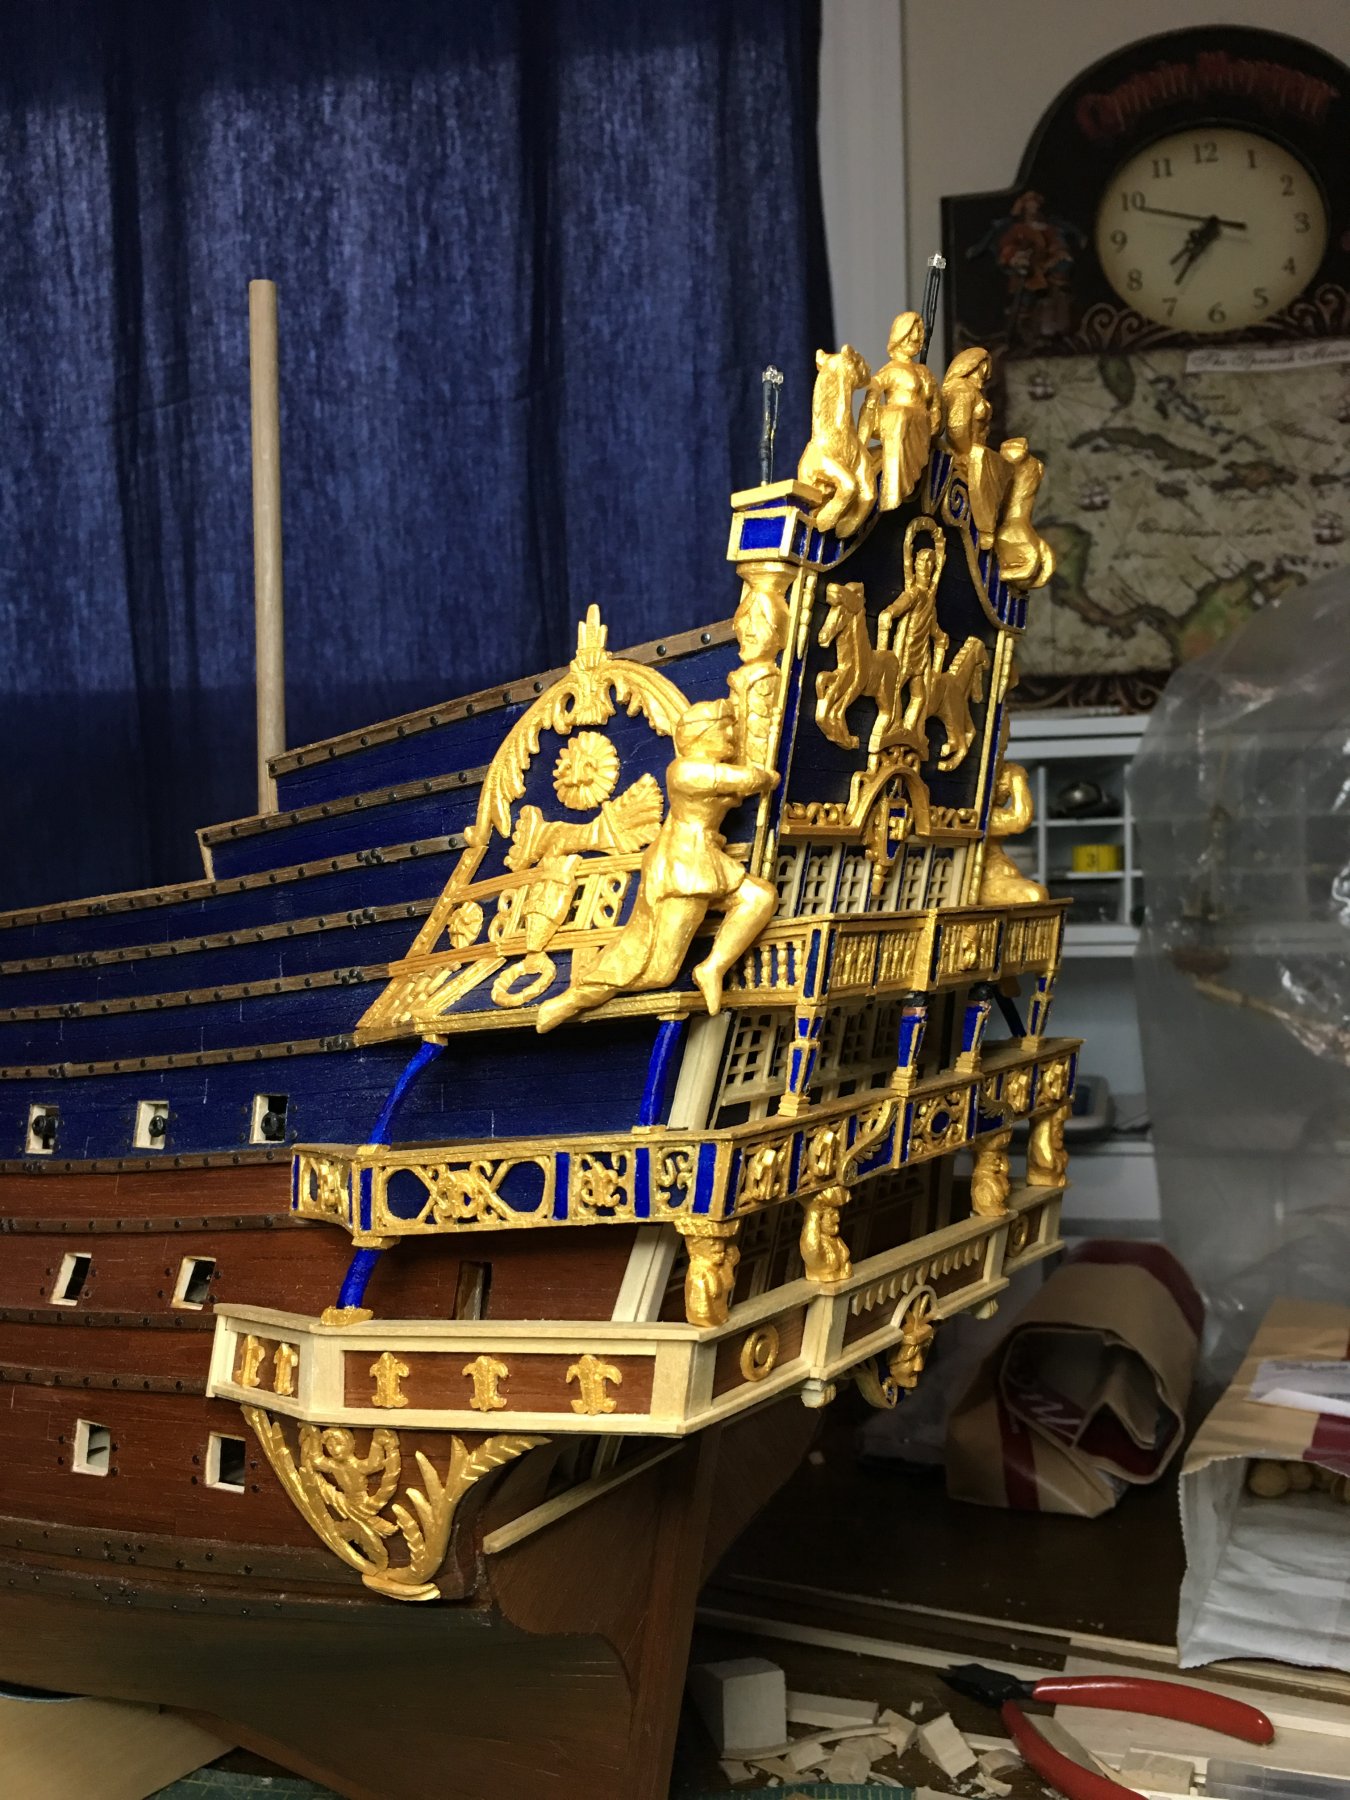
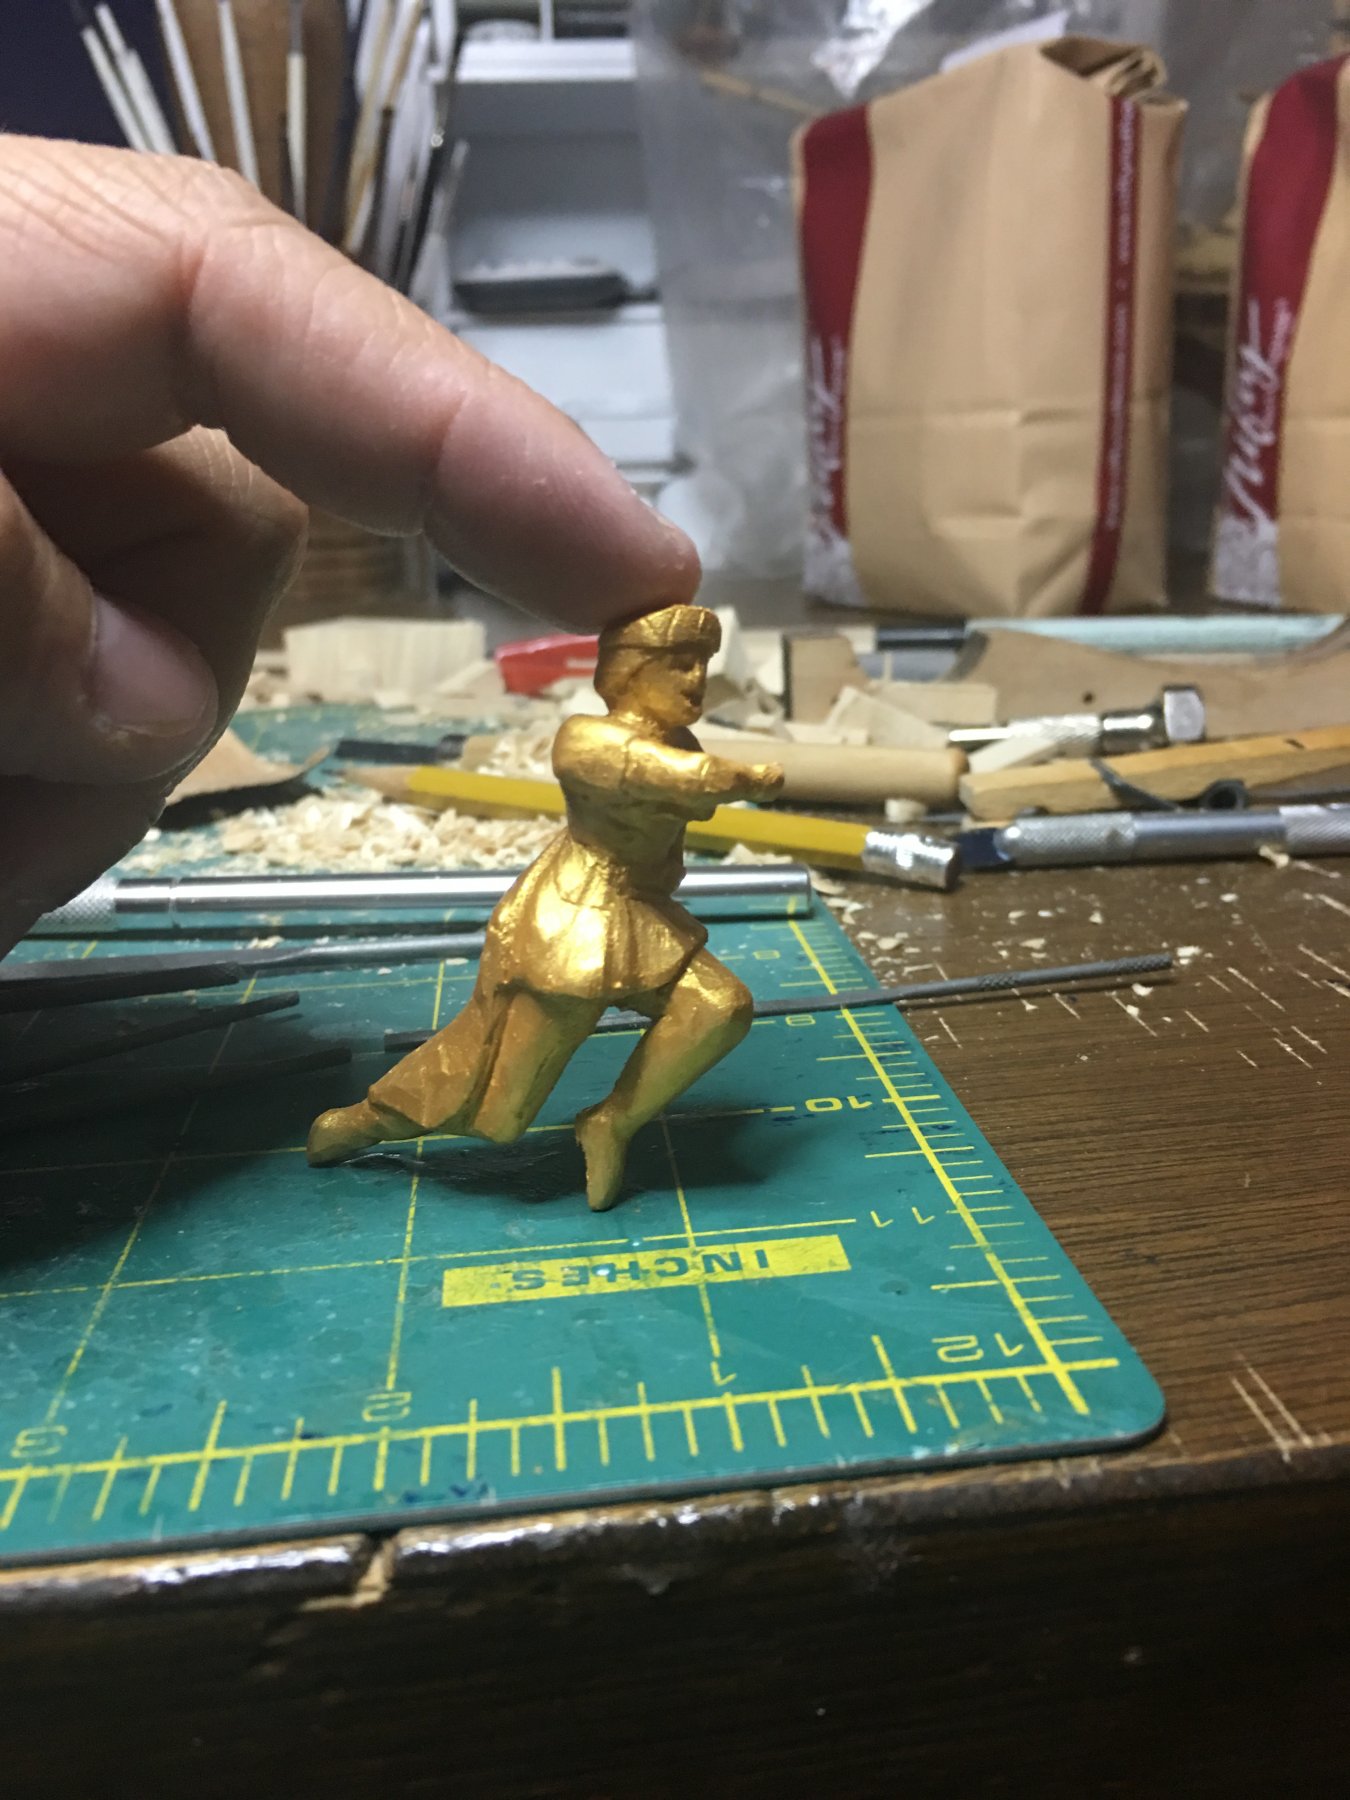
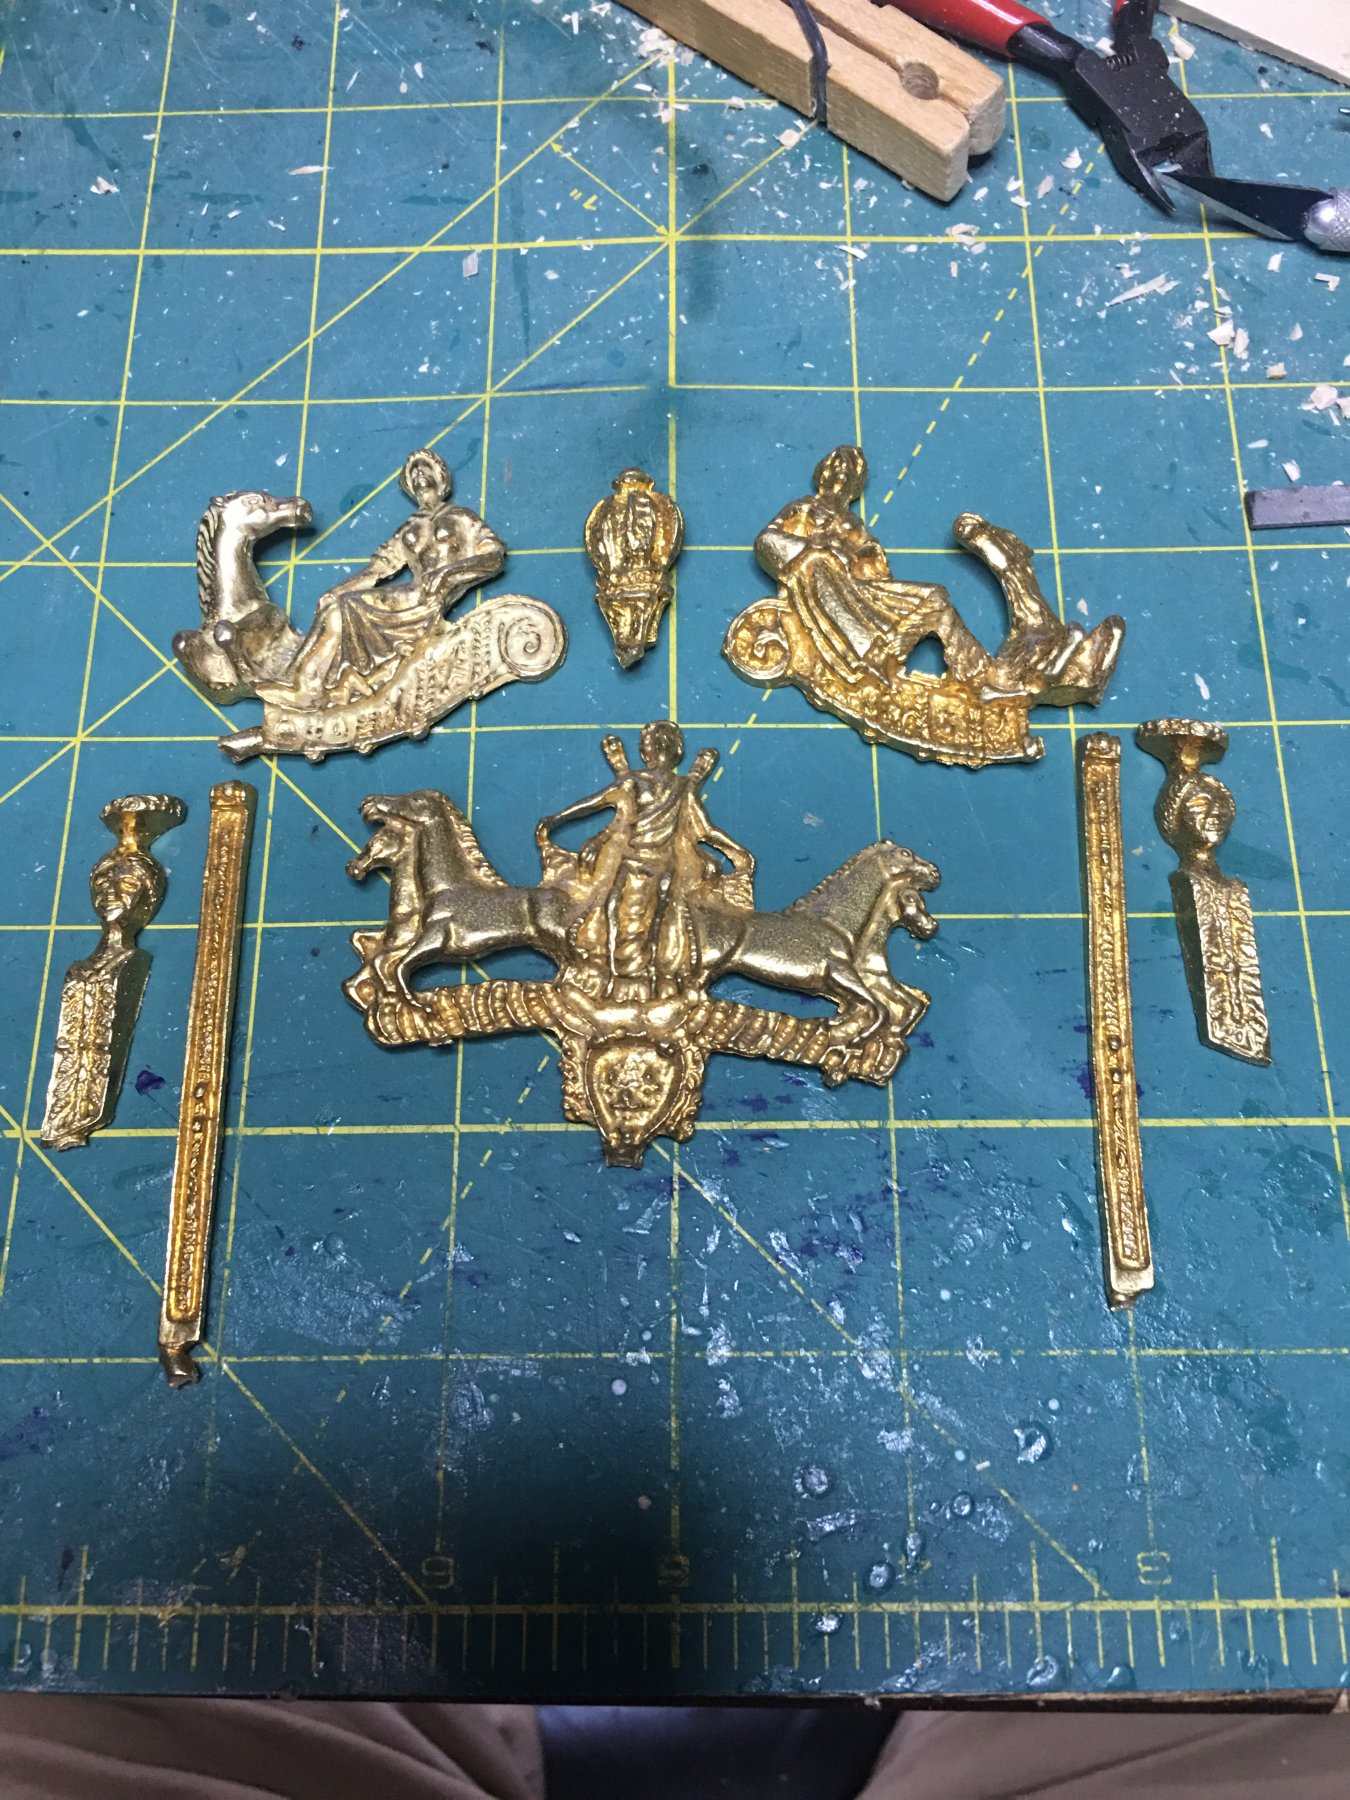
After a hard working week and weekend, the Europe and Asia figures and the horses are in place. This tops out the taffrail minus the lanterns. Now I’m down to the figures over the quarter galleys and bottom balcony supports. As a comprisson I have included a photo of the cast decorations that I have replaced. While I have no illusions to my own carving work, I am still extremely satisfied that I went this route instead of using the cast ones. As always, thank you all for the comments, likes and looking in. More to follow!

-
Sjors, thank you very much! This is going to be one of those really long builds as I am over a year and half into it with a lot more to go. Would not surprise me if this is a 3 year build especially if I start up another build which I am likely to do as I still want to build a cross section to go with La Couronne. I never thought I would hear myself say it but, I think when I reach the rigging phase the build will speed up. Then again, I've never tried to carve all the decorations before either!
-
I'm not for sure on the windows but, from looking at the assembly I would guess that they either stood on the bridge (top of the turret) and was probably a control station between the cable spools. It would offer the greatest view position and the most direct position for the controls themselves. As for the assemble itself.... WOW!! What a difference the PE parts make. Thanks for doing the kit vs. PE comparison. That really highlights the vast improvement in the parts.
- 122 replies
-
- 4
-
-
- tamiya
- King George V
- (and 2 more)
-
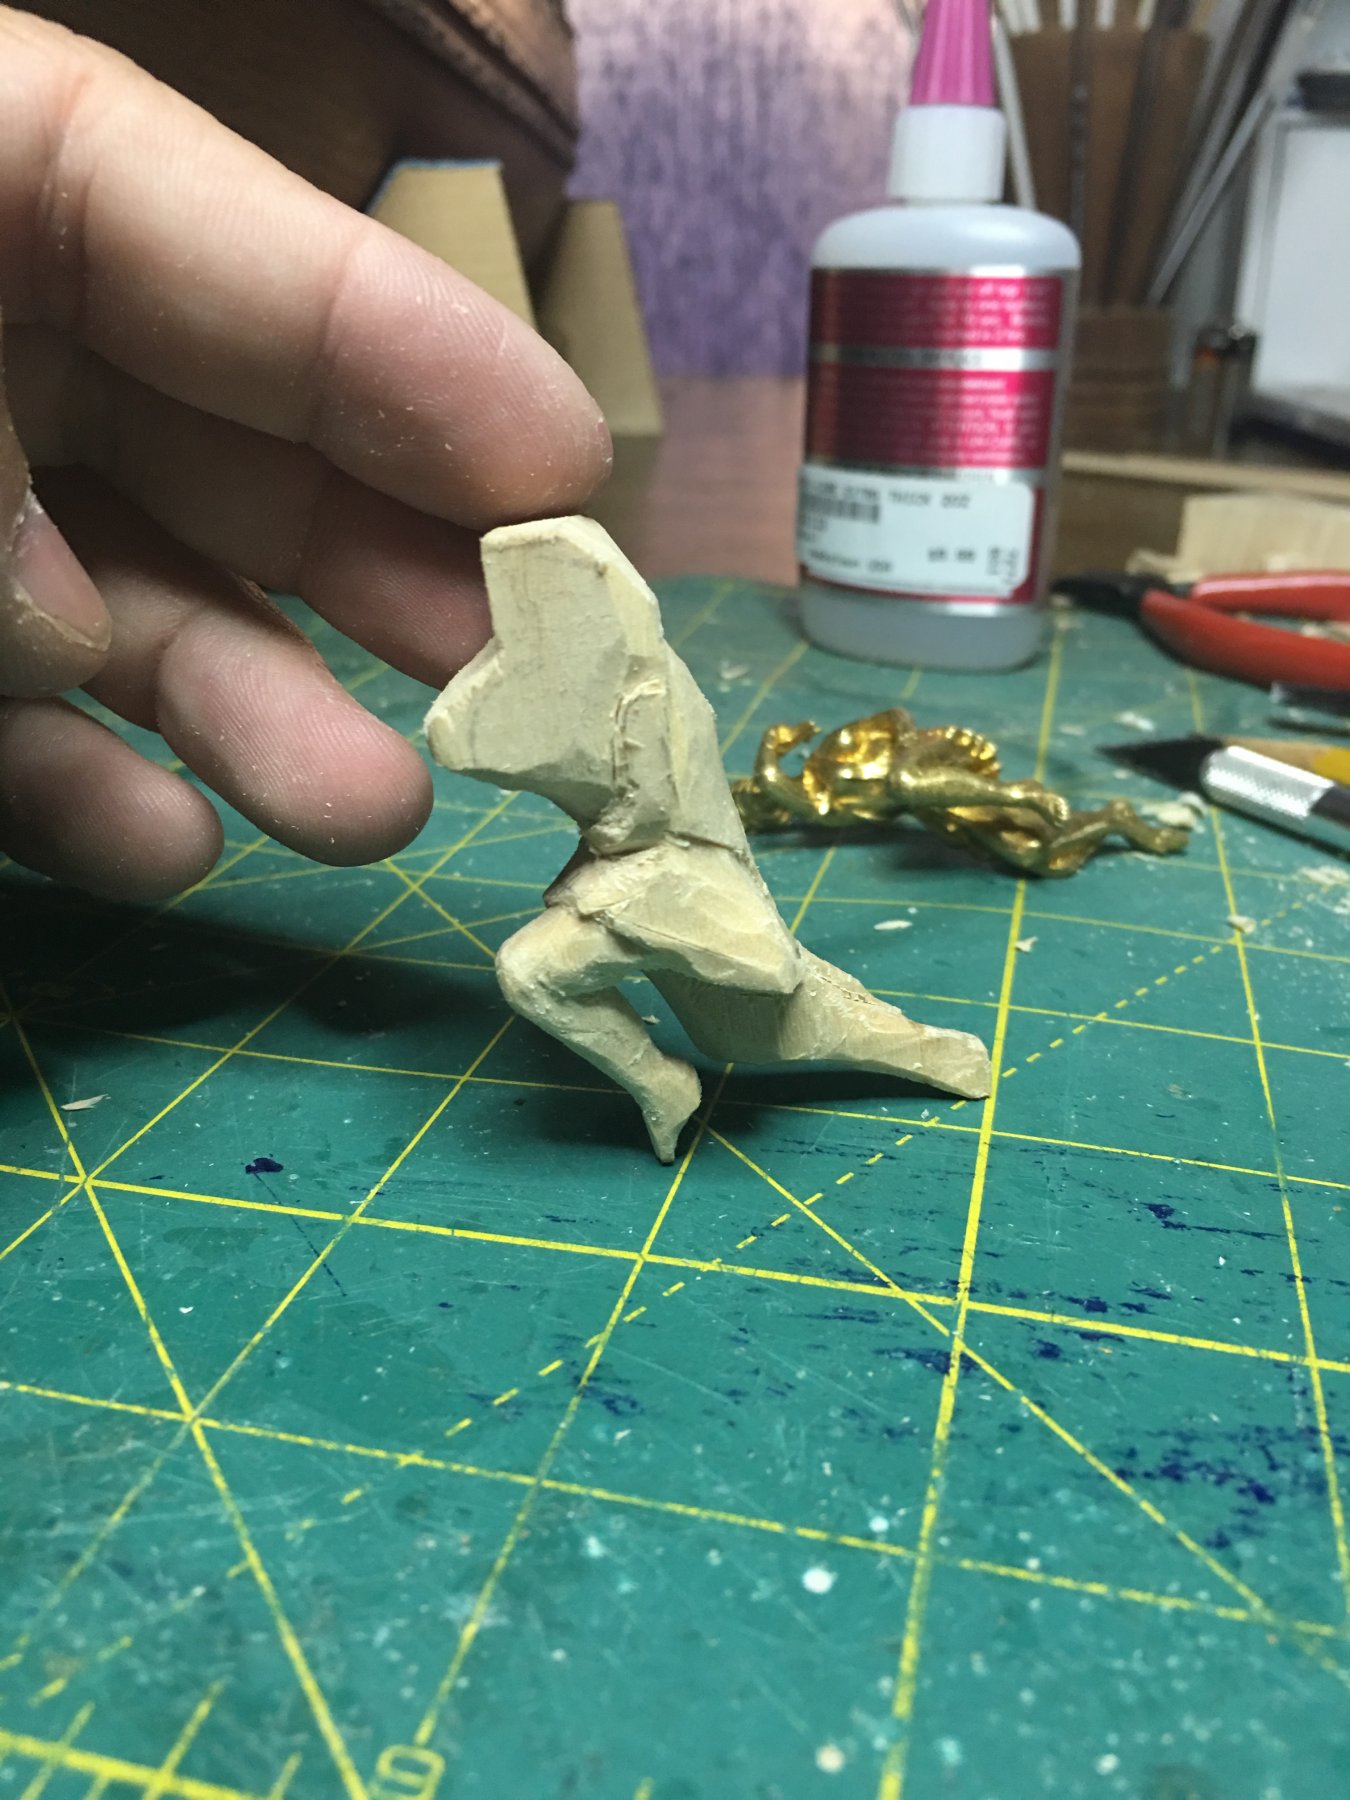
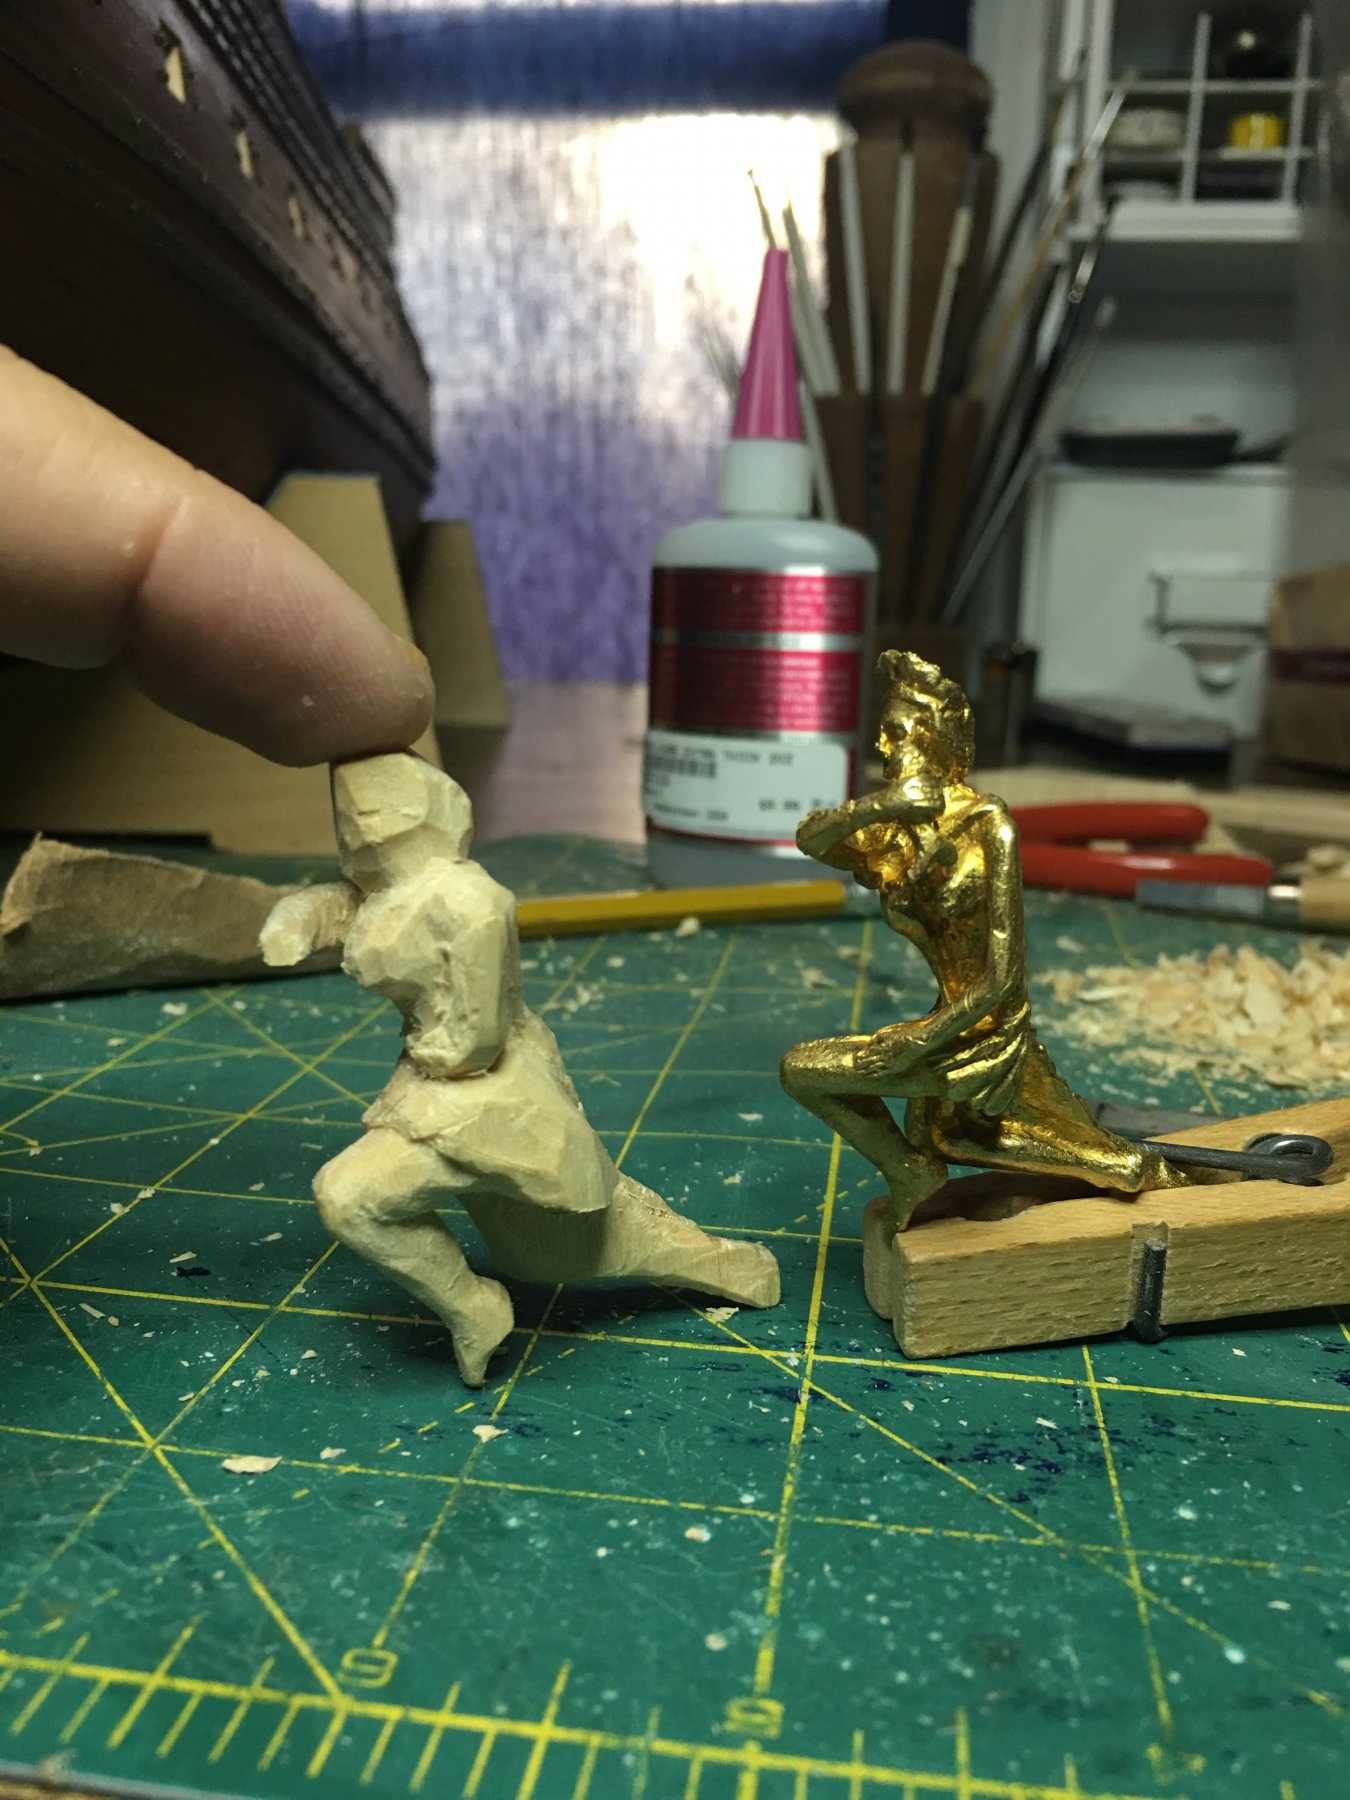
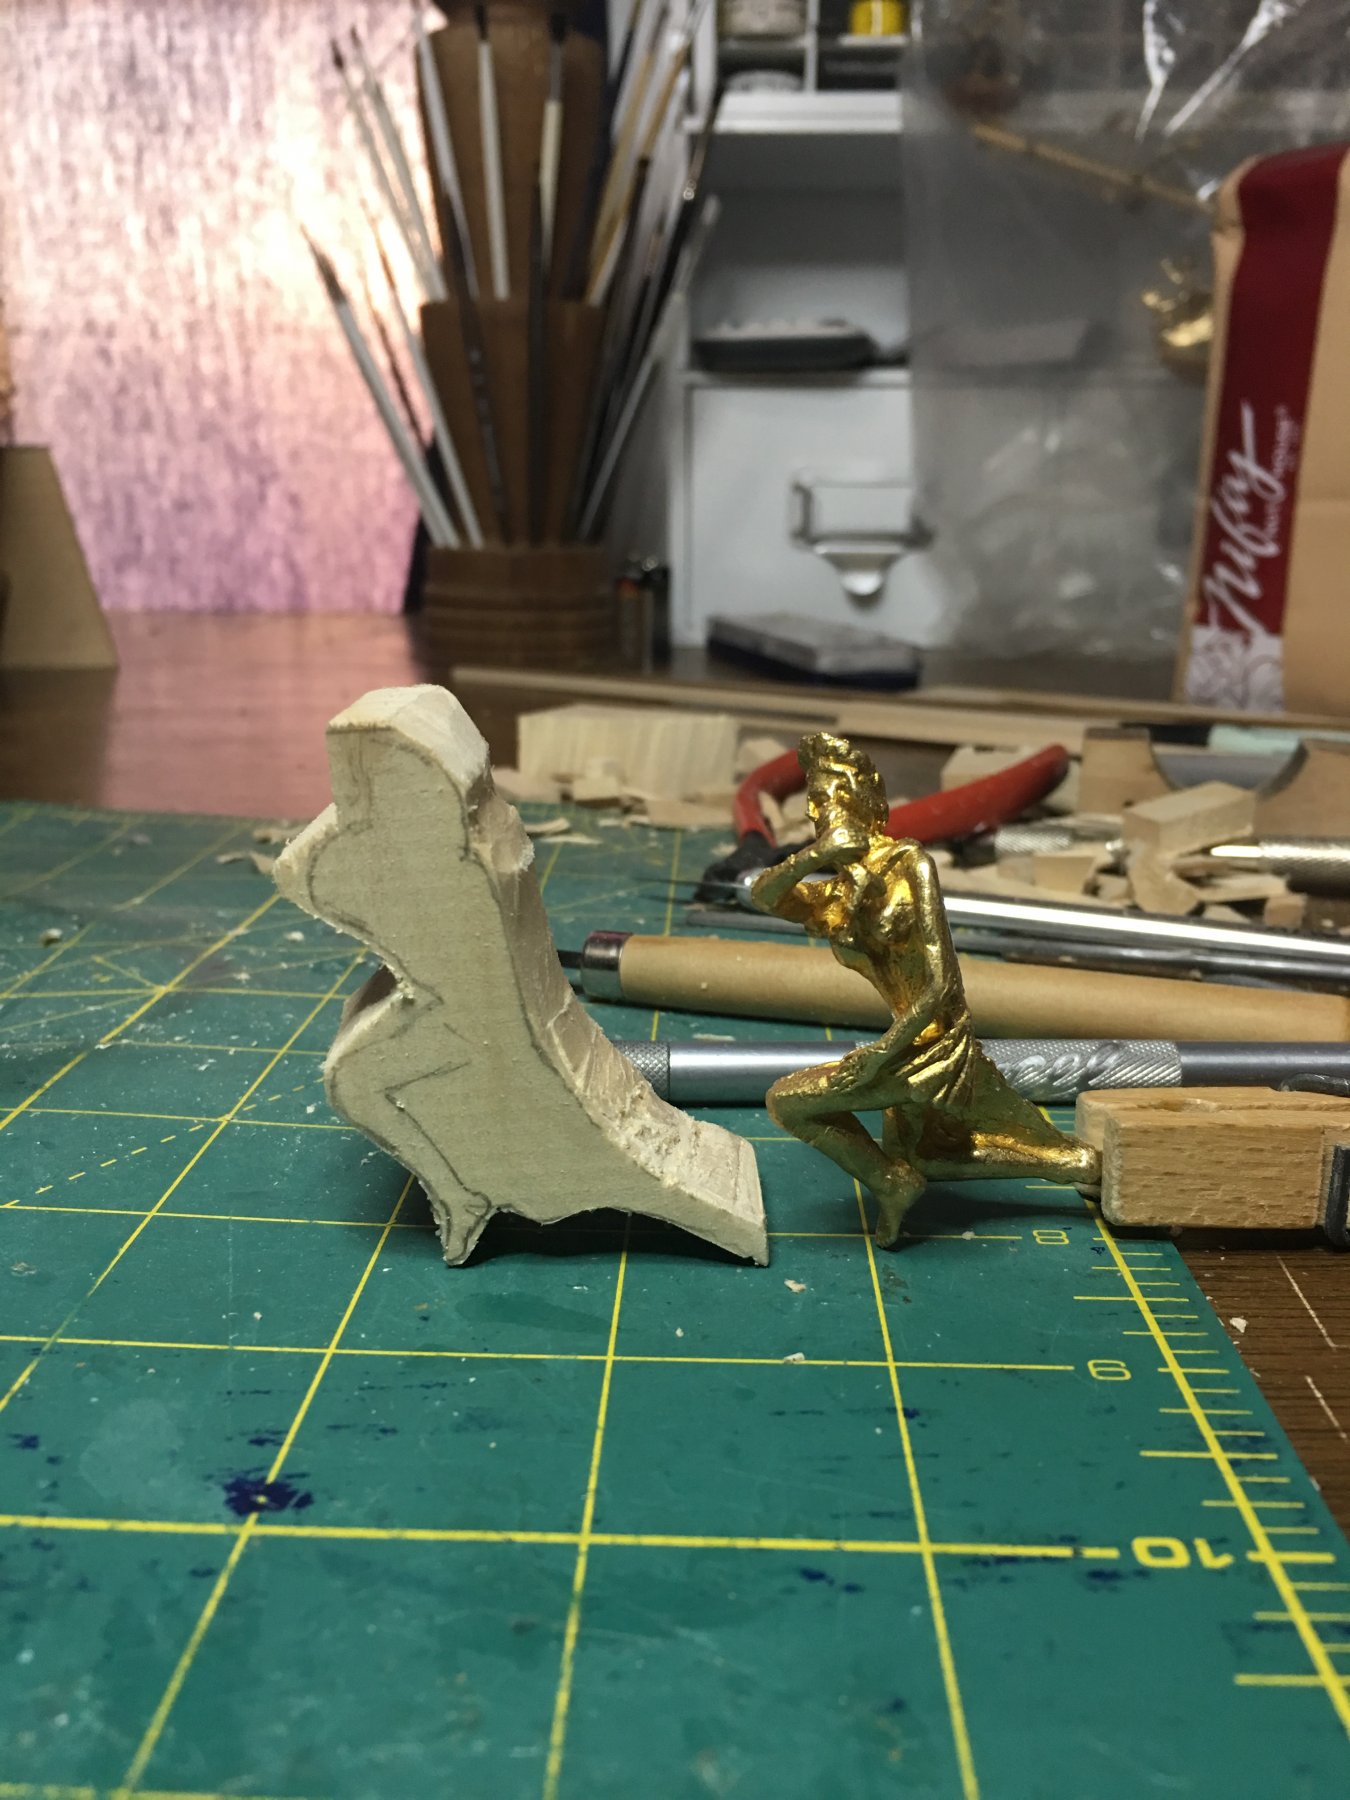
Thank you all very much!!!! This has been an exercise in patience and persistence far beyond what I was expecting and I was expecting it to be a giant pain! Still, I am grateful that I chose to take this route as it has enriched the building experience to a whole other level. I set out to kit bash this model as I wanted to add a few of my own elements to it, namely the interiors and now by the time that it is complete, only a few pieces will be "as is" from the kit. Canon barrels and hinges for the rudder and port lids are the only metal parts that will be used and the only other pre-made kit pieces that have been used to date are the false keel and bulkheads, though some of those were highly modified to allow for the interior cabins. The carvings though feel like an entire project in and of themselves. The research to try to identify what is being portrait in the cast fittings and art of the ship as well as other models of the vessel is just the first step of many. Once I have an idea on what I want the decoration to look like I then have to determine if I have the ability to draw and carve it at a 1:77 scale. Many things can hinder this, wood used, pencil thickness, tool sizes and above all my own skill set which is still learning and then I have to actually carve it! Still, the more I do and the more complete the model becomes which allows me to sit back and see the overall effect and appearance of the carved pieces compared to the cast ones, I doubt I will ever choose to use the cast ones again. (May kick myself the day I build the Vasa...) As for a current update, I am working on the first reclining figure that will sit atop the taffrail. She is coming along okay at this point. I am hoping to have both Europe and Asia ready this weekend but we will see. The horses will follow after.
-
Getting lazy over there. Must be all that time laying out in the sun in the Bahamas... Seriously though, they look fine. Sails are still one of the many items that elude m as to how to make them and make them look good. I give a lot of credit to all those who try as it is a tough skill to master. I'm sure you will make it all work out in the end!
- 171 replies
-
- 6
-
-
- krabbenkutter
- authentic models
- (and 1 more)
-
Wonderfully done Vic. She looks incredible sailing in the water. I look forward to the videos! Congratulations on a job very well done!
-
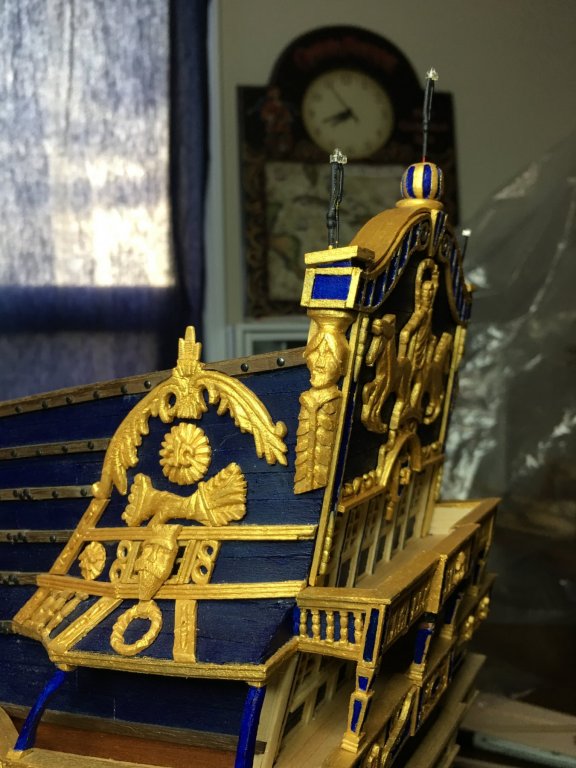
Thank you all so very much! The comments and likes mean a lot to me and are great encouragement. This is has been a very productive week and weekend. I now have a completed taffrail and stands for he lanterns. Added a few more decorations and now I have a final shape for the stern. Next up I will start working on the statues that rest on top of the taffrail. The lanterns will not be installed till much later in the build so as not to damage them during rigging or general accidents.


- 961 replies
-
- 13
-
-
Wow!! It really does add a whole other dimension of "life" to a model with that level of detail.
- 122 replies
-
- 5
-
-
- tamiya
- King George V
- (and 2 more)
-
Sorry to hear of the troubles but it is good to hear you are both doing well. Hope everything continues to improve and we'll be here wishing for the best and ready to rejoin you when you are all healed up!