Supplies of the Ship Modeler's Handbook are running out. Get your copy NOW before they are gone! Click on photo to order.
×


EJ_L
-
Posts
2,227 -
Joined
-
Last visited
Content Type
Profiles
Forums
Gallery
Events
Everything posted by EJ_L
-
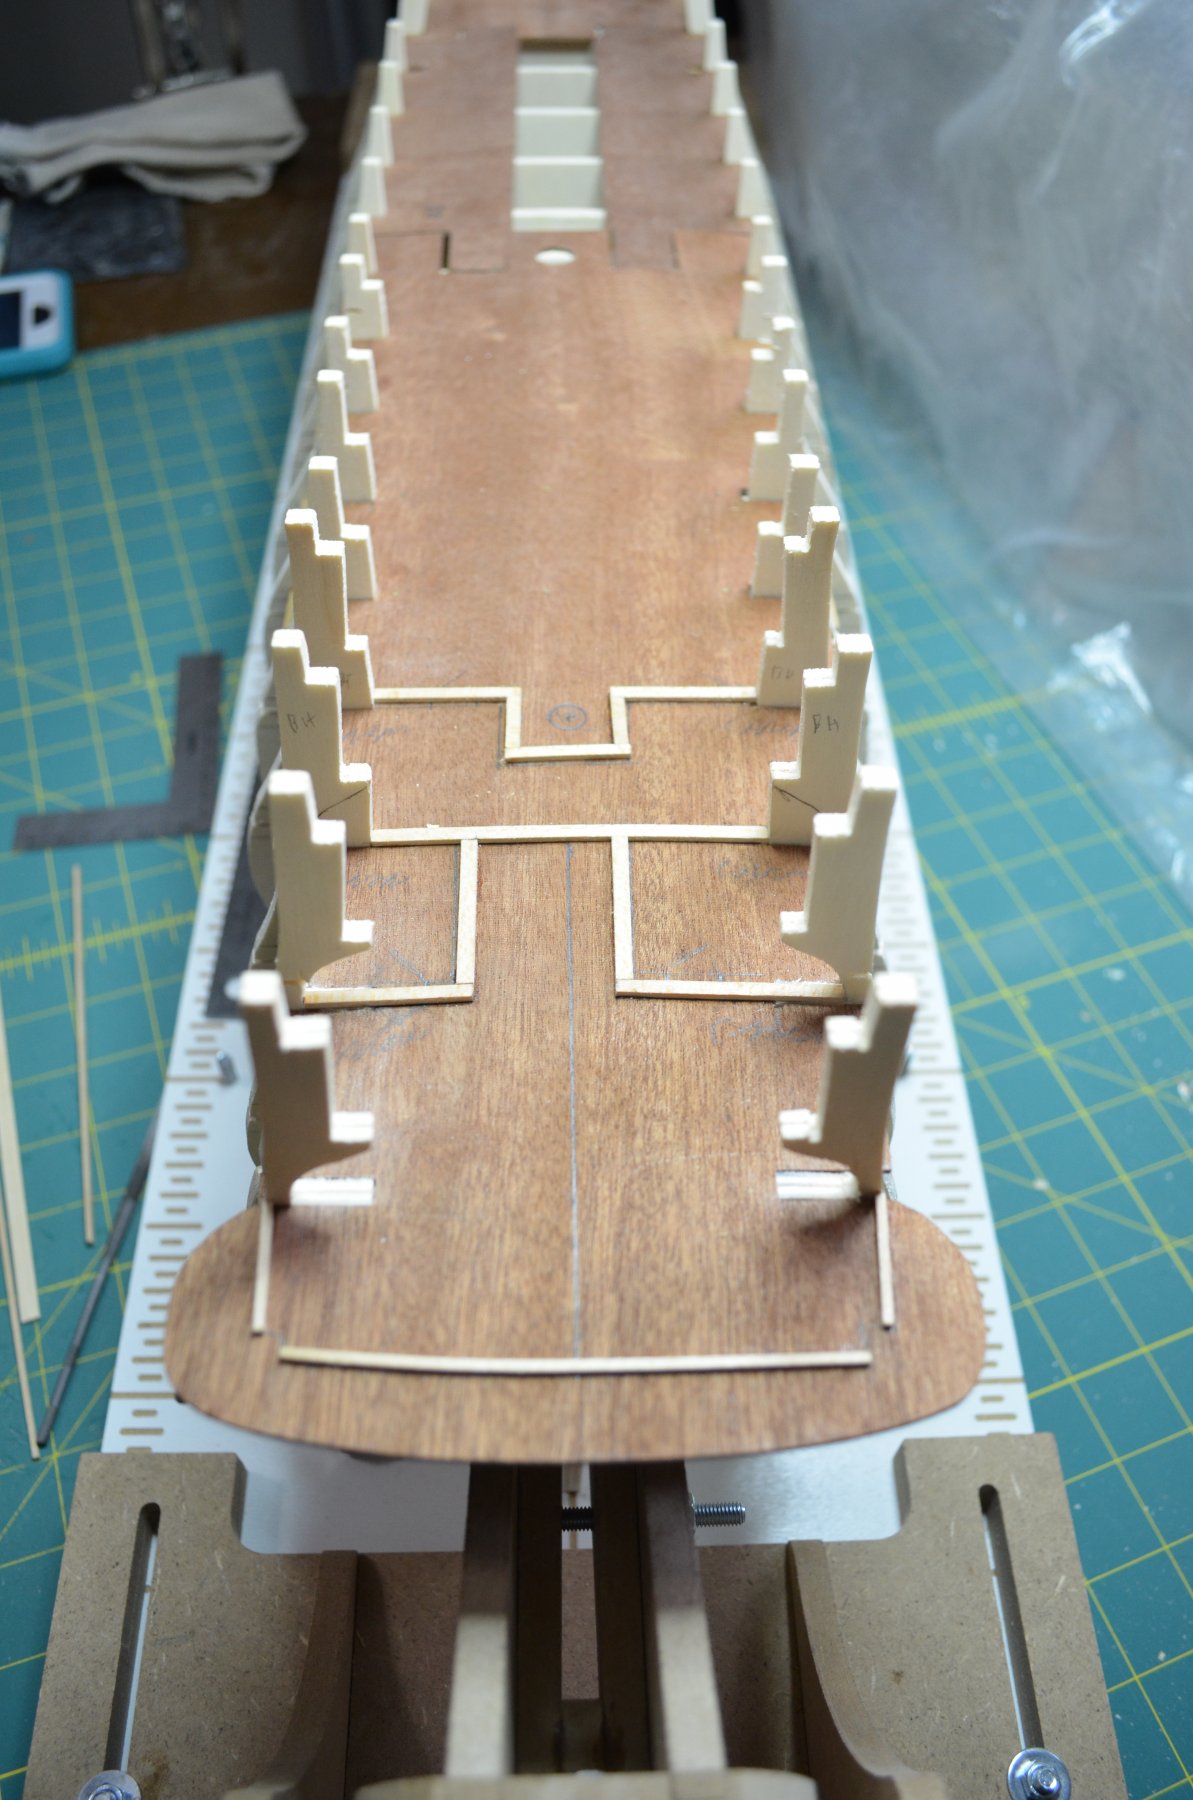
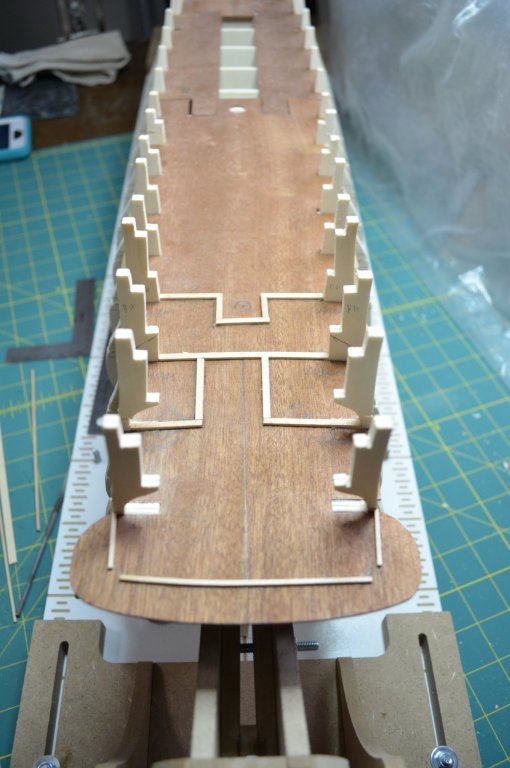
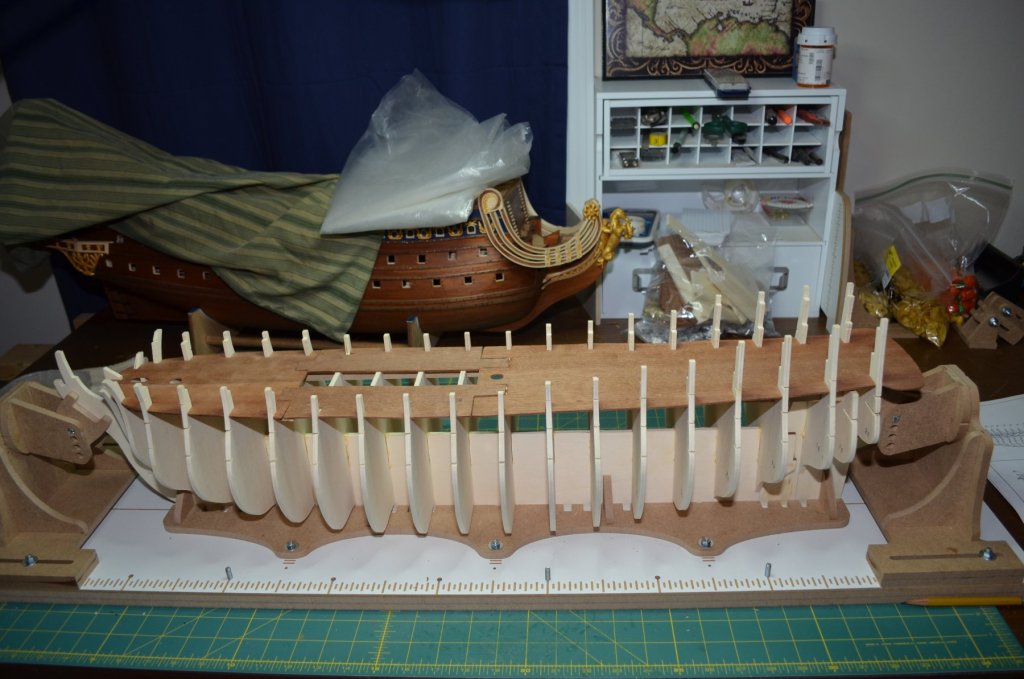
 Deck planking is coming along. I’ve had to make a few alterations and add some leveling fill to the sub strate as the laser cut was off center at the masts and hatch ways and the frame bulkheads created some hills and valleys that needed leveling. Before I take the planking to the edges, I will need to adjust the thicknesses of the frames so that they will fit within the planks and also conform to the hull shape.
-
Ouch!! I think we all have been there at one time or many. I hope you can find everything and fix what is broken. More than likely, you will be the only one to know that the parts are missing. Normally I would encourage trying to rebuild them but, with as tiny and detailed as those PE pieces are, I wouldn't even know where to begin!
- 122 replies
-
- 4
-

-
- tamiya
- King George V
- (and 2 more)
-
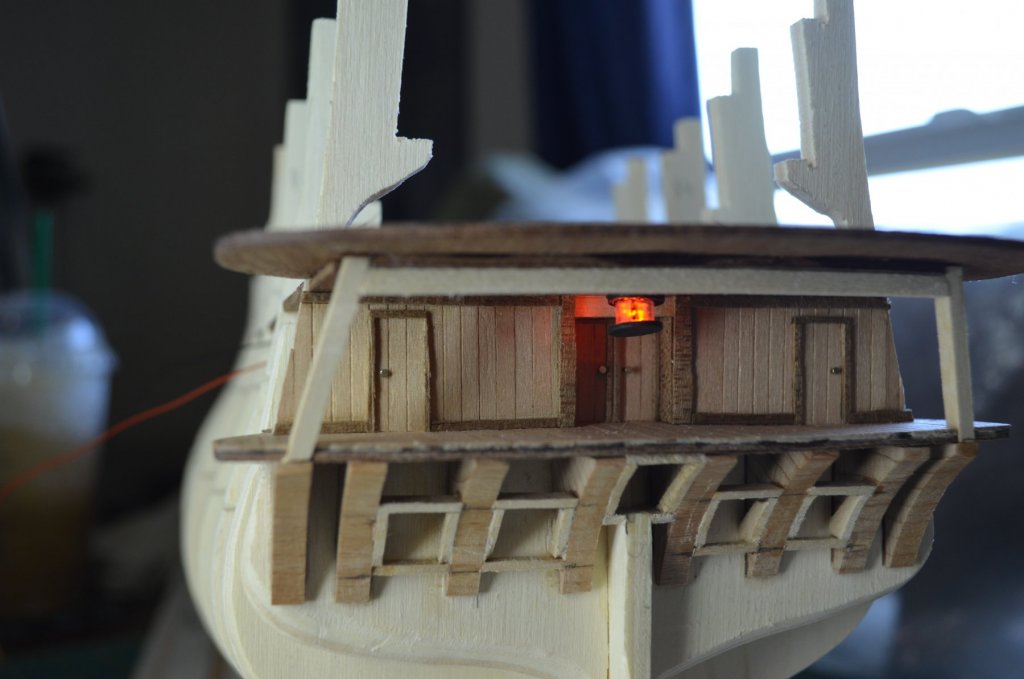
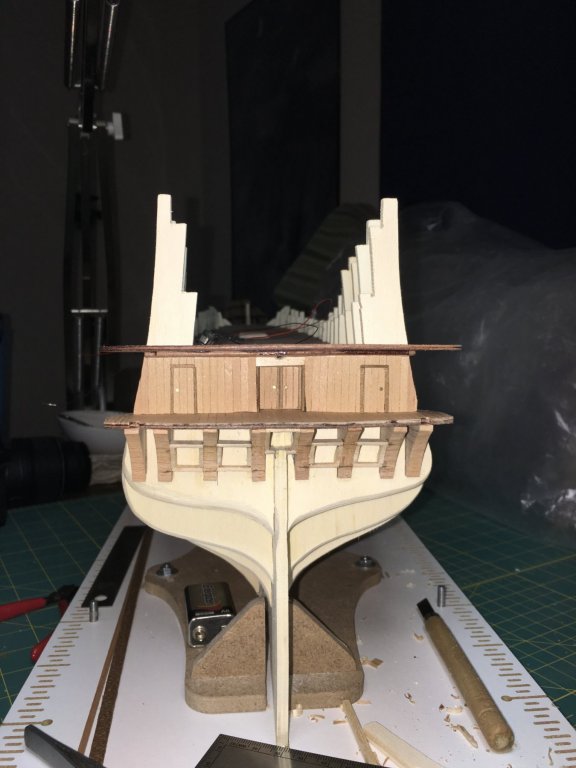
No problem O.C. and Michael. The whole point is to educate and share and I'm sure that we three are not the only ones to struggle with sails! Brief update, I have gone about as far as I can with the interior of the Admiral's cabin at till the hull is planked. Then I can build out the side walls, add furniture, secure the light and close off the stern. I'm also thinking about displaying the guns inboard and stored at least on one side. Reason being, it would give another view port into the cabin and also show how the guns would have been stored when not in use. So with that completed for now, I am turning my attention to the deck planking. I have found it easier to install this planking before the hull and it will also facilitate getting the forward cabin bulkhead installed as well as the bulkheads for the forecastle cabin.

-
Welcome all! That popcorn machine is more than welcome as I can never resit popcorn! Michael, I will be glad to take any advice and ideas you have on the sail when I get to them. S.R. is still a ways out but, I'm am certain I will be doing a mix of set and furled sails on her. I will will be in much the same place you were with first time sail construction so that is a little intimidating. Marc, to the scales between my ships, unfortunately no, they are not the same. La Couronne was 1:100, Soleil Royal is 1:77 and Royal Louis is 1:90. I wish they were all the same as I would have been very tempted to make them waterline models and placed them in a line ready for battle. As it is, the sizes of the models and then the cases for them, may end up becoming part of a dividing wall between rooms in my basement as they are so large and take up a lot of space! The cast decorations are indeed some of the better ones I have seen in a kit in some time. I would tell anyone, especially those who do not or cannot make their own to use them. For myself, I am planning on making my own. There may be some exceptions but, right now I am planning on carving my own. That is a skill that I want to keep developing and the only way to do it is to practice. Plus, it gives immense satisfaction in knowing I have carved them. Even if they don't look that great, they are still a point of pride.
-
Vince - I apologize as I wasn't thinking but, I actually went through a US vendor for Hobbyzone products, Hobbyworld-USA. It will still take you some time to get the products as they have to order them in from Hobbyzone unless they just happen to be in stock but, it will eliminate all the ordering hassles and fees etc. Hope this helps! Michael - as always, thank you for the compliments. I do indeed spend a lot of time in the scratch build sections and some of the work there is simply breathtaking! While it can be intimidating, much like your own work on your sails for Vasa, I look at it as, if they can do it, why can't I? Then it is just the "simple" matter of learning how... 🙄
-
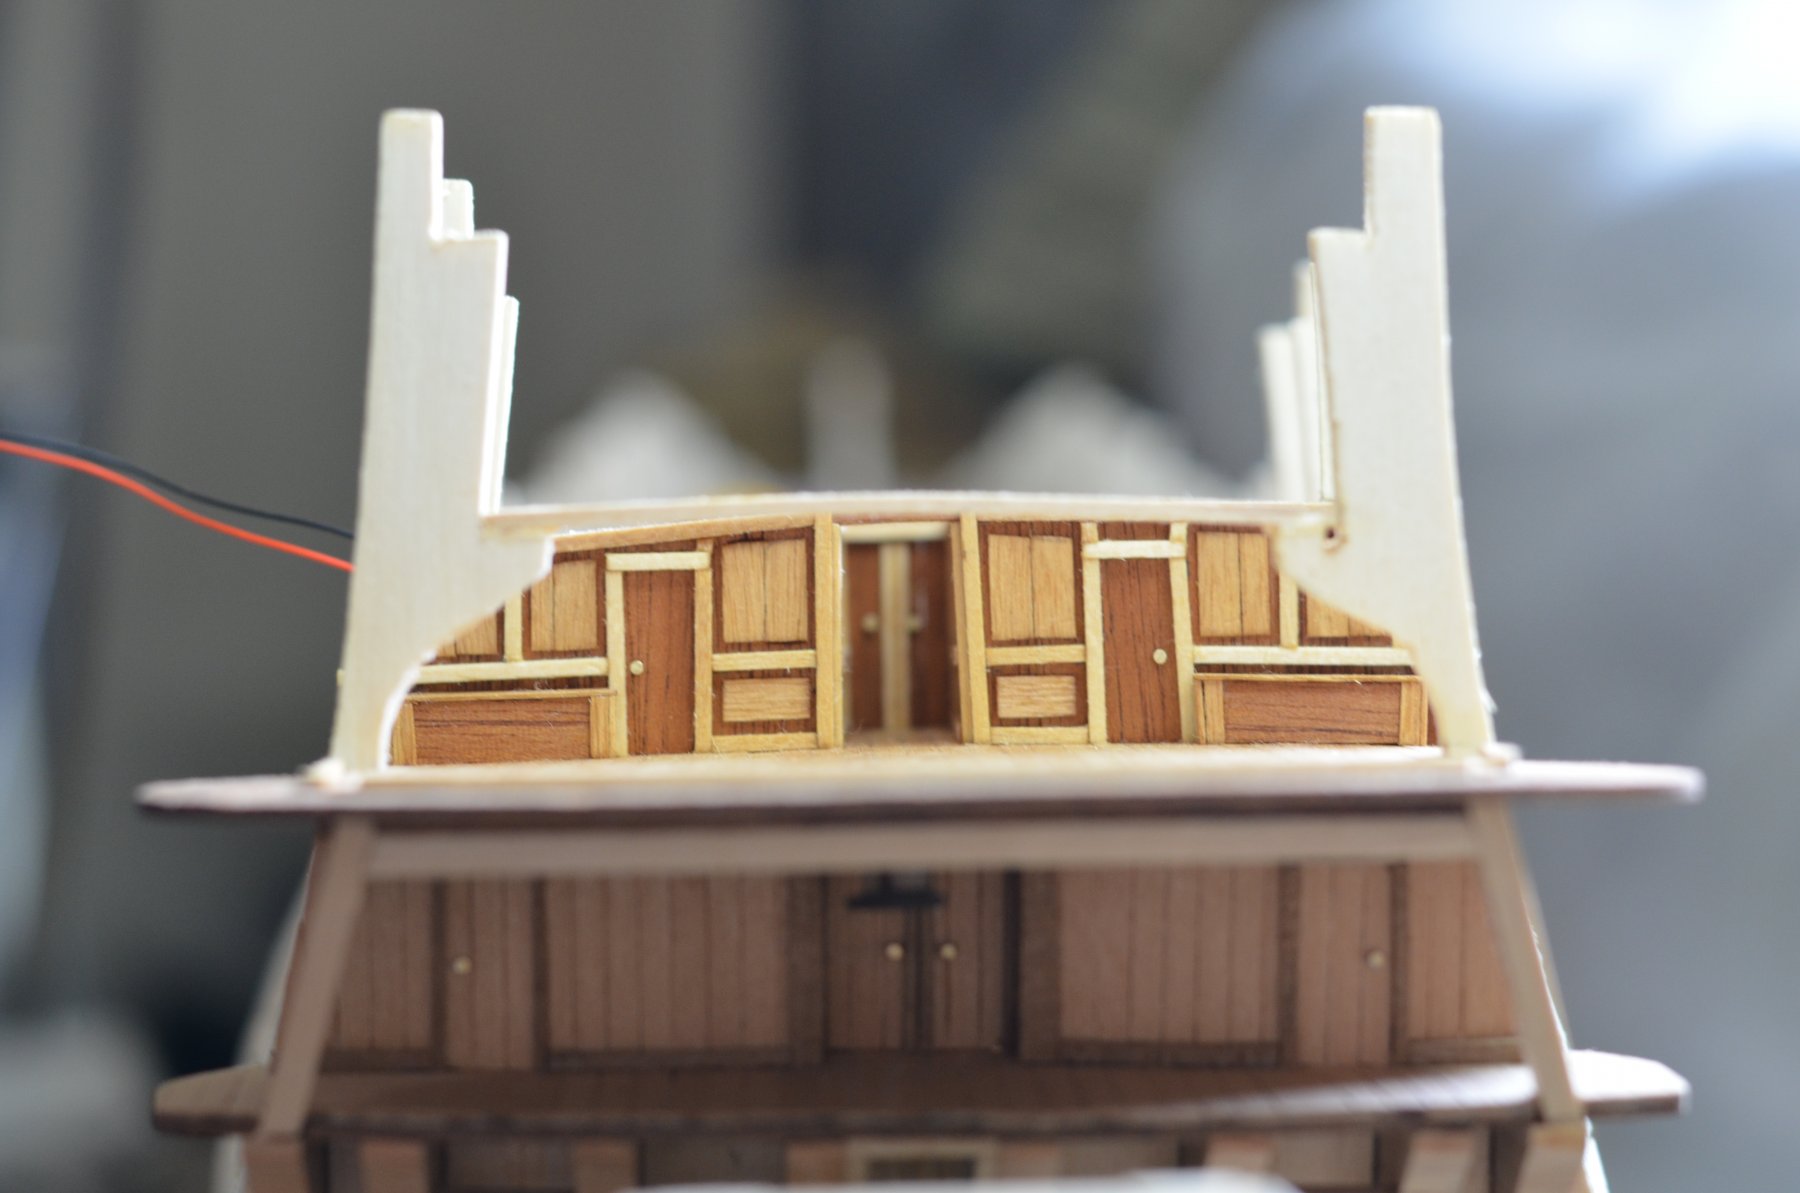
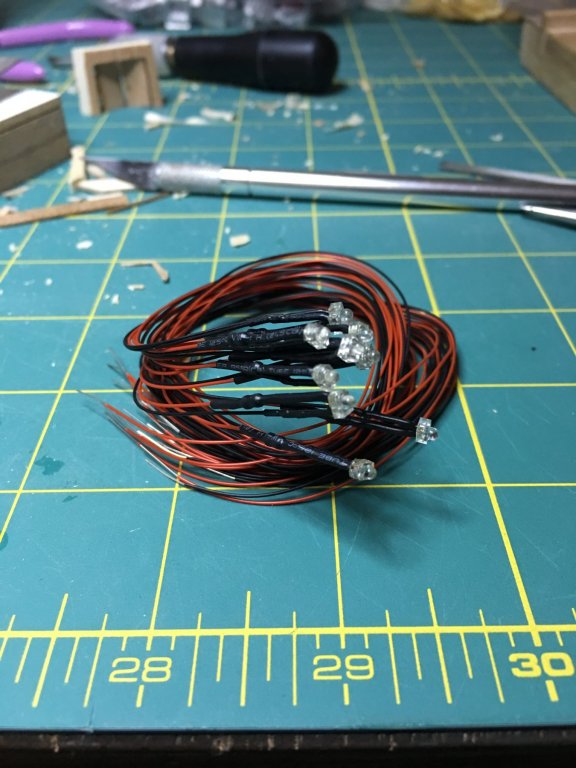
Thank you all for the comments, likes and following along and a friendly welcome to those joining! O.C. - I agree completely! Building the interiors has taught me a lot about the ships construction and interior functions that you don't really see from the outside. It is one area that I wish there was more readily available information on as it is hard to find documentation on sizes and layouts of interior rooms. I tend to piece things together from various images, guess work and common sense measurements. (Obviously, a 4 foot diameter table will not fit in a 5 foot room with space for chairs and people to sit.) To do this on most kit models, takes some thinking and modifying of the keel and bulkheads but, the effort is worth it in my opinion as you not only gain some interesting new details but, you also gain more knowledge on ship framing and construction. Lou - To set the blocks, I first test fit the cast piece with a canon in place to see where it would sit. Once i was happy with that location, I marked the back of the cast metal and used that mark as guide for the wood blocks. My thinking is that, that is now the furthest back the barrel would have been allowed to go had I used the cast piece. Once the hull is planked, I can always adjust the barrel to stick out further by adding shims at the base if I need it to stick out a little further. As to the frames, I'm not sure yet. I've always built them in the past but, using square tubing is tempting as I have so many of them to build on this one. We shall see... The ports will follow the decks. I oversized the blocks in both width and height to help in fine tuning the alignment once I have the planking on. As for what is coming up, I am currently planking the interior cabin walls that I framed up. I will detail them a little but will not add too much detail or any of the furniture yet. I need to establish the chases for the remaining LED lights to both this deck and the one above as well as the lights I intend to place in the forecastle areas. My plan is to have lighting in several places below decks. I have never done the forecastle interiors before so that will be new territory for me to explore and I think will add another fun detail that is often overlooked on models. Then I will begin planking! Some time during this I will likely take a break to work on some more carvings for Soleil Royal. Lots of fun to go!
-
Ken, I'm sorry I have missed out on this build till now but, as I have come to expect from you, it is fantastic! She has turned into a beautiful ship! I love the finish to the wood on the hull and deck and your carvings are quite nice as well. Good choice over the cast ones. Canons are looking great as well. Nice details on the carriages. You can be sure I will keep my seat for the rest. Your rigging was truly remarkable to watch on Rattlesnake and I'm looking forward to seeing what you do on this one.
- 122 replies
-
- 1
-
-
- independence
- privateer
- (and 1 more)
-
That side by side comparison really brings out the dramatic effects of the changes you have implemented. Long, exhausting and tedious though it was, once you have it all painted and assembled I think it will have been worth the effort. I don't blame you for wanting a break after all that work though. I felt the same after all the carvings on my own. My only suggestion to the base would be to maybe add some "ribs" across it for stability and to prevent warping. I would suggest some smaller strips of wood turned on end. That should prevent the styrene from warping without adding much weight or taking up much room.
- 2,634 replies
-
- 3
-
-
- heller
- soleil royal
- (and 9 more)
-
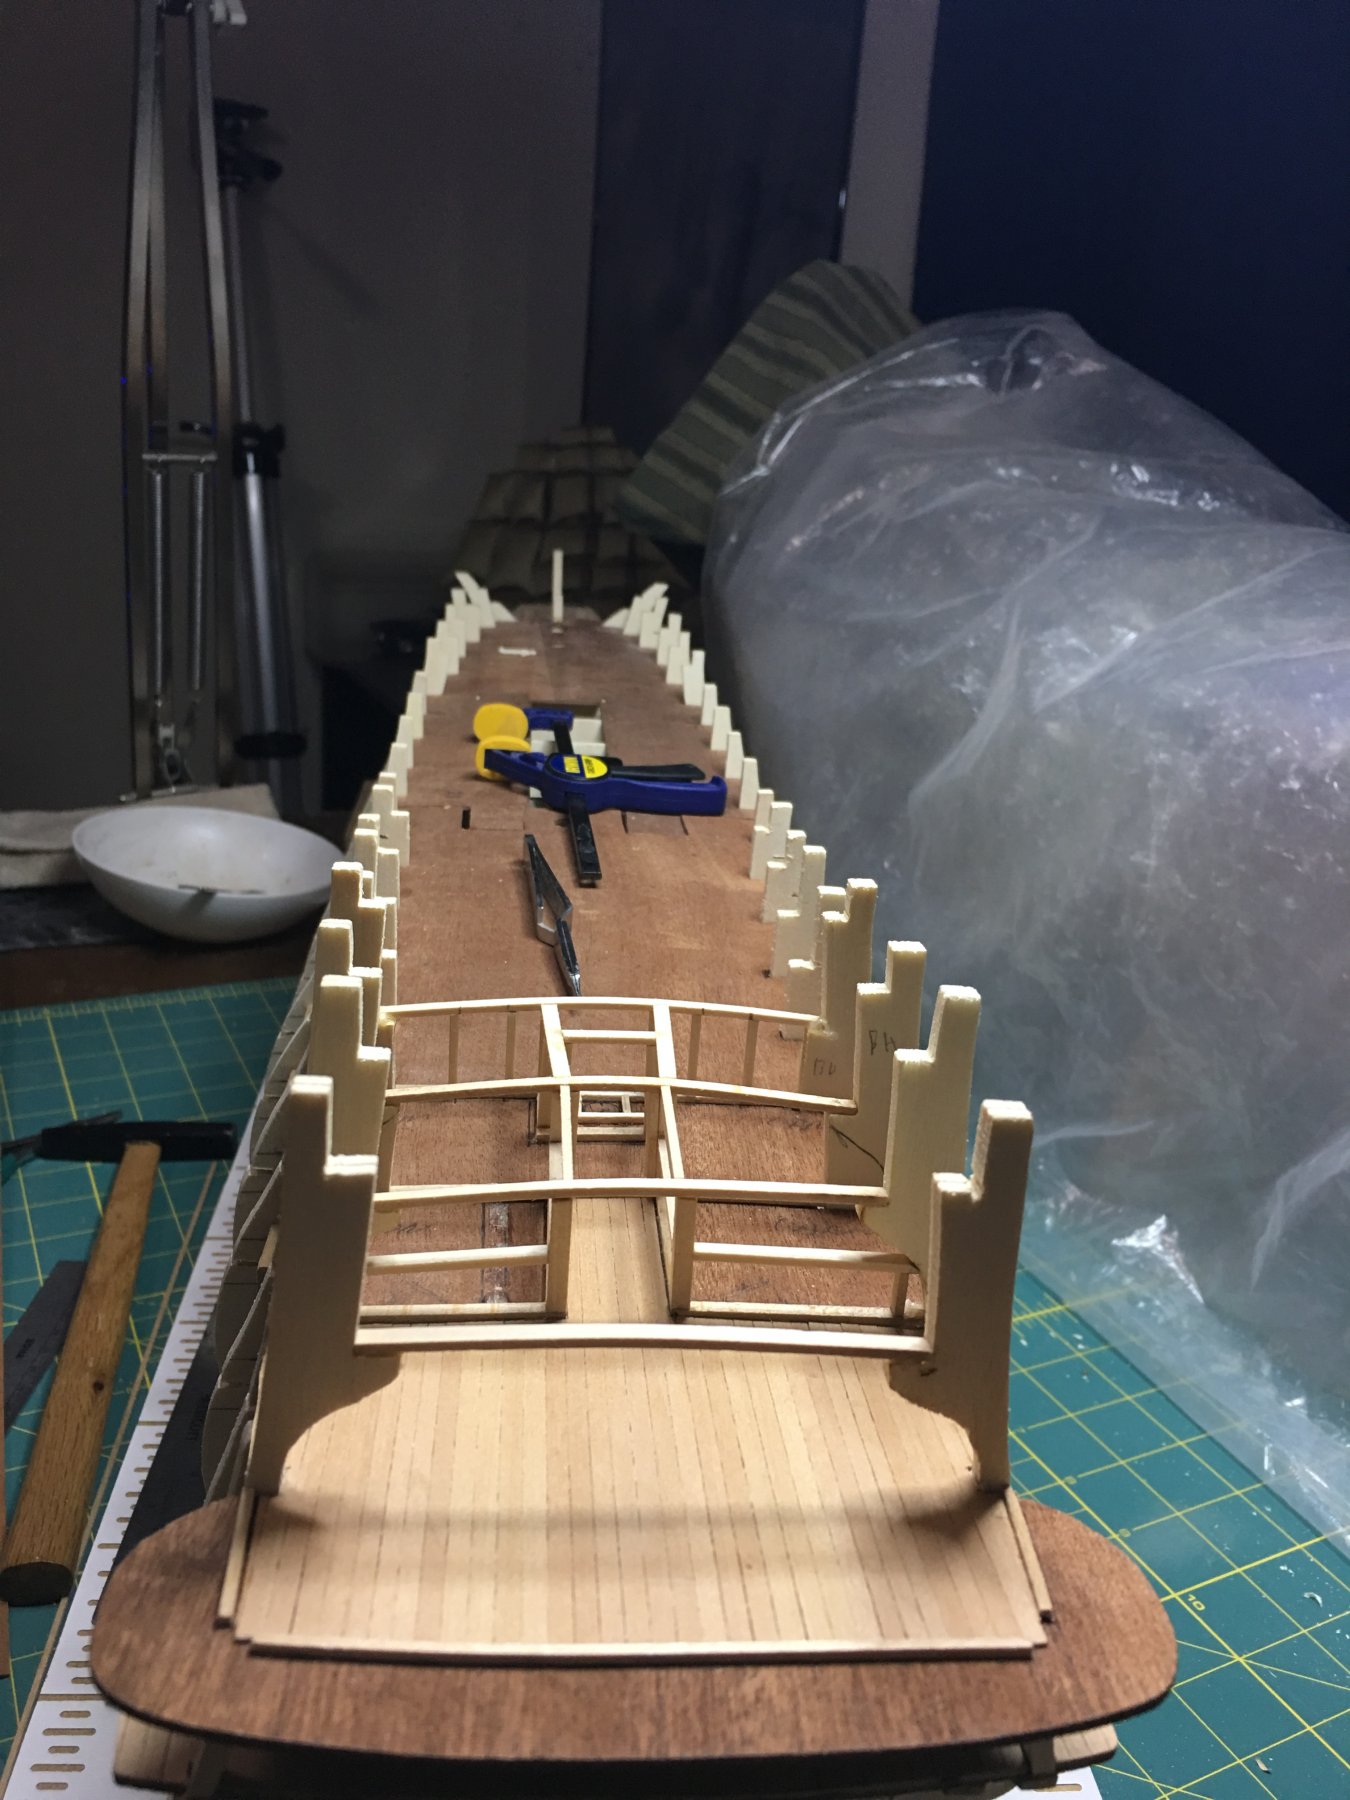
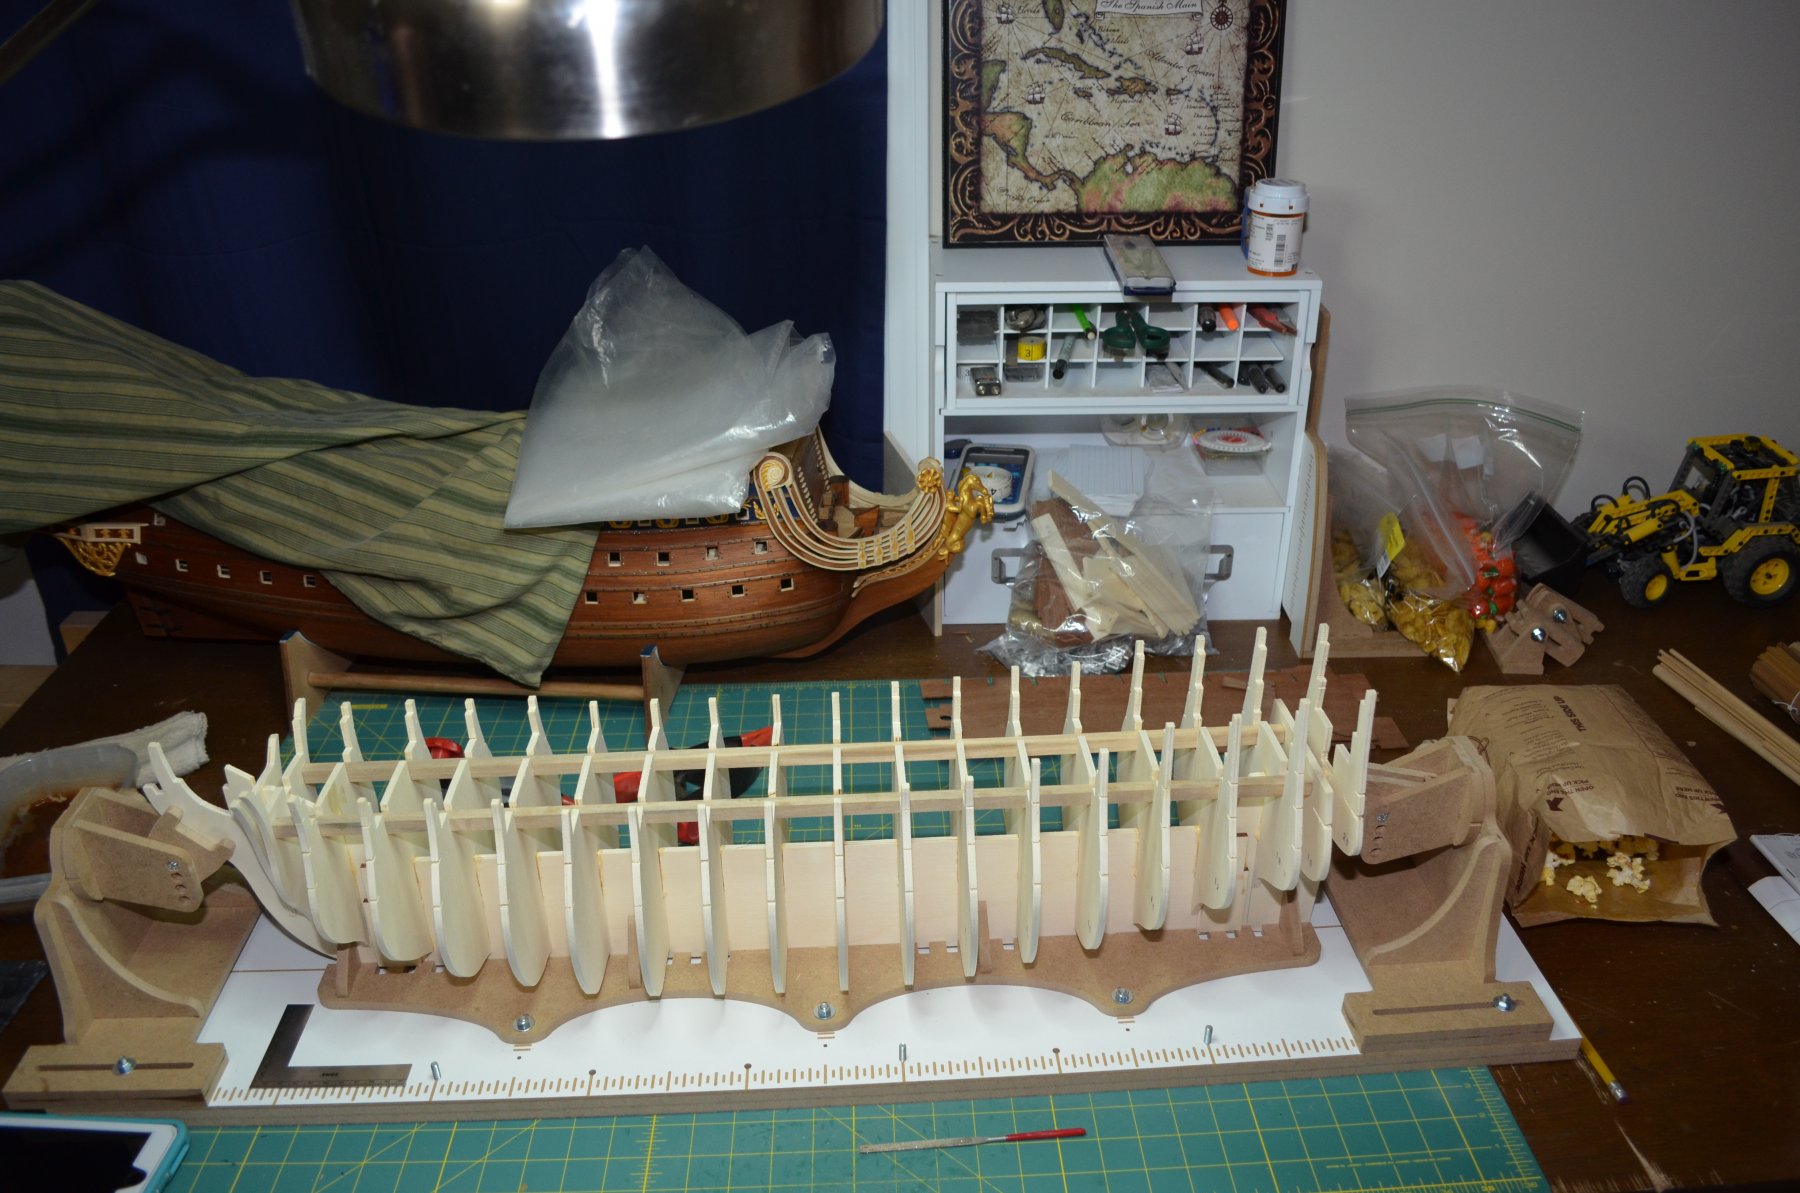
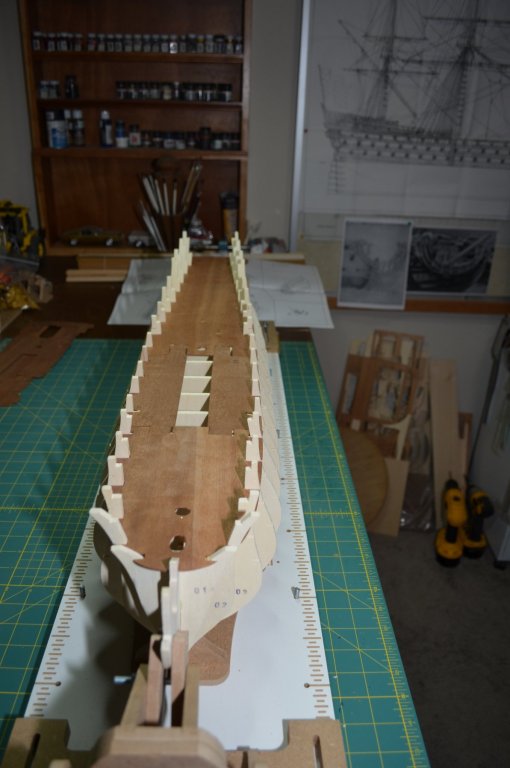
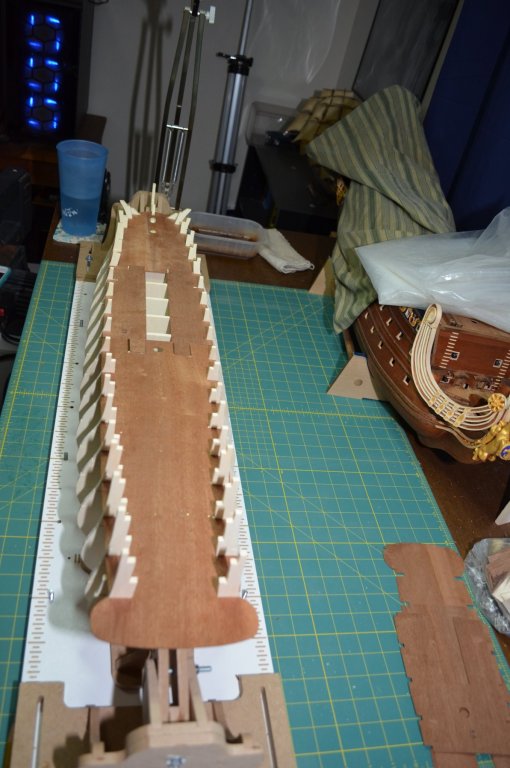
A couple more days and a few more sticks of wood are installed. The interior spaces are taking shape. I could have done these in a much simpler fashion as a lot of the spaces on this deck will not be detailed but, I wanted to take the opportunity to experiment and practice on ways to frame up the bulkheads.

-
No, that was a whoops! Indications I was getting tired and needed a break. I trimmed out the left hand side to the wrong side of the line. Easy fix but, yeah... I was going to wait to post this picture till it was fixed but, I decided it might be a good learning lesson to take a break sometimes to avoid easy mistakes. O.C. - Imagination seems to be the best way of figuring out the interiors on some of these ships. I take what few images/plans I have and combine that with pictures from actual ships such as Vasa, Victory, Constitution etc. and also with what I have seen others do and go with what I feel might be reasonable. I think what I enjoy most about the interiors is that it adds something to these kits that is completely mine. As always, thanks for the comments, likes and stopping by!
-
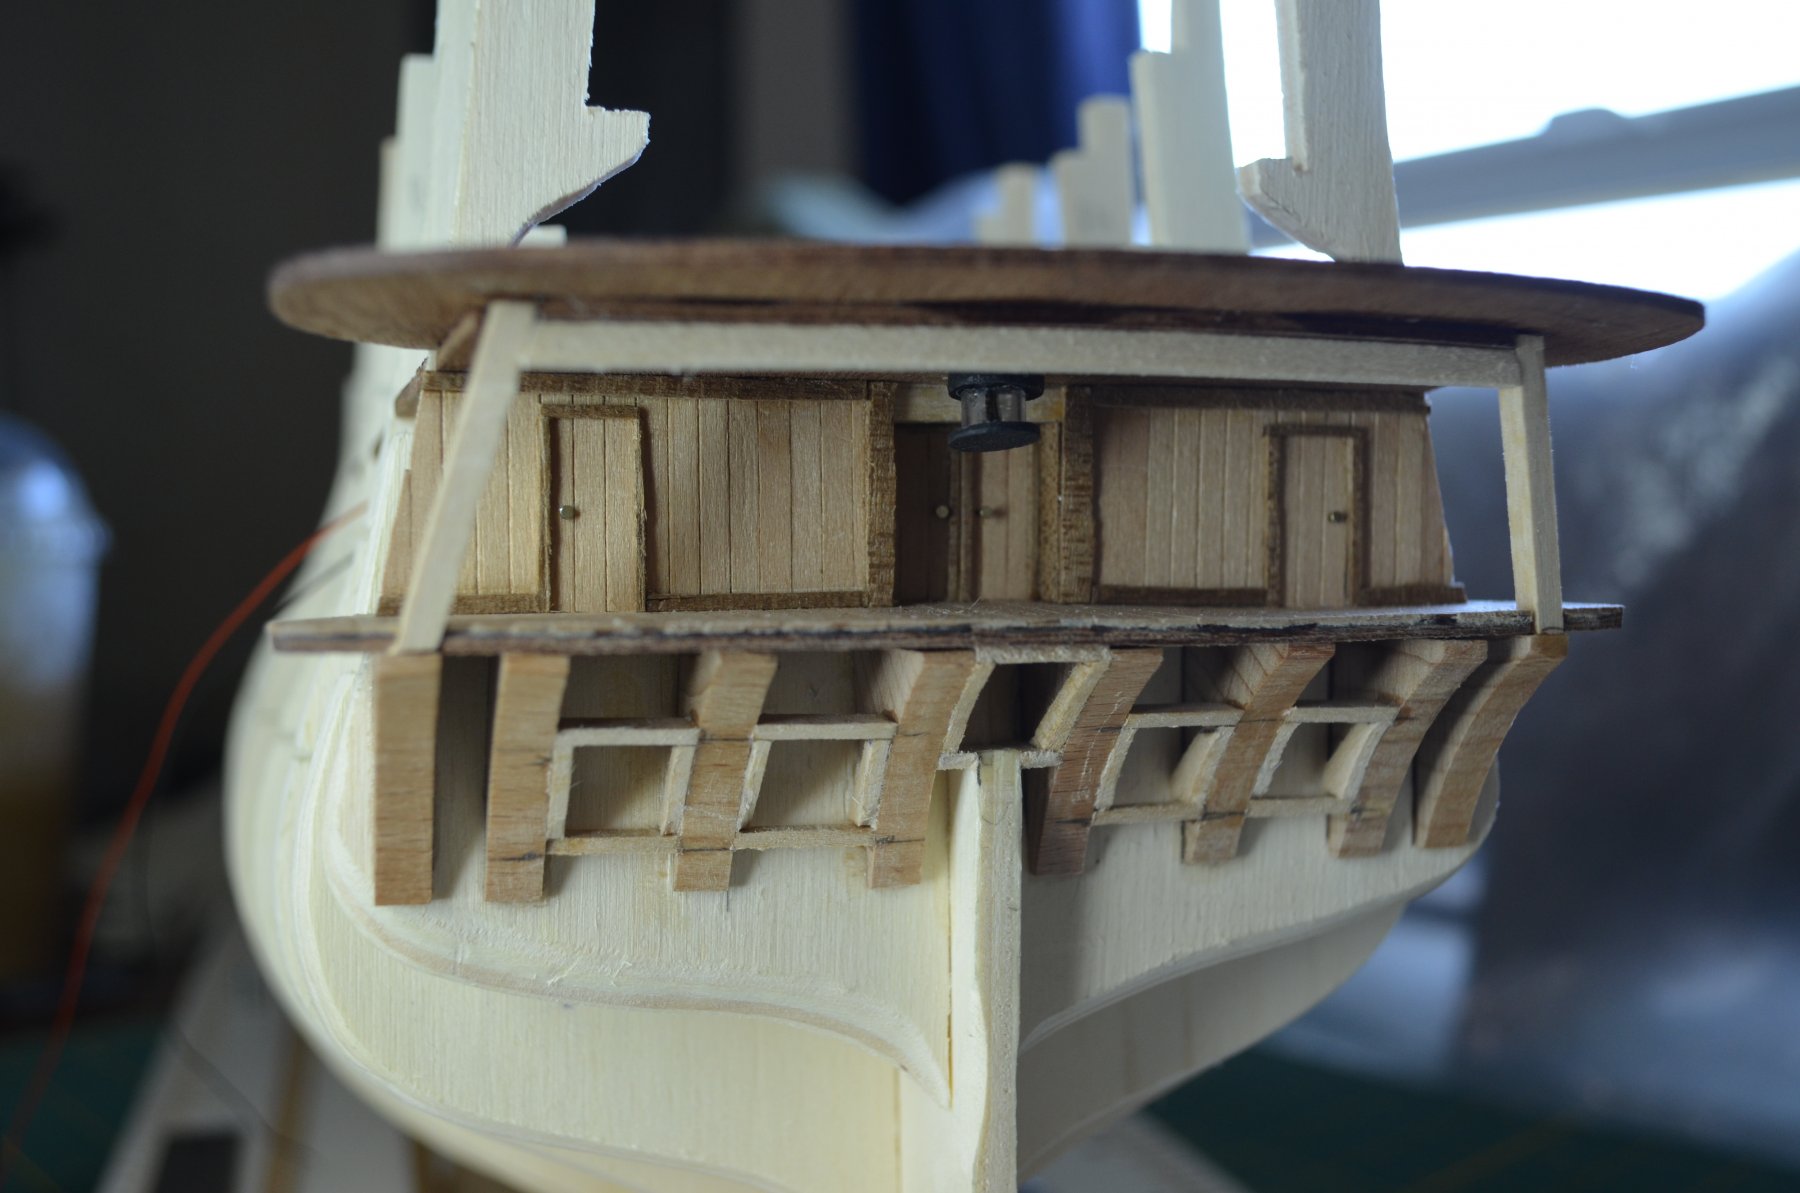
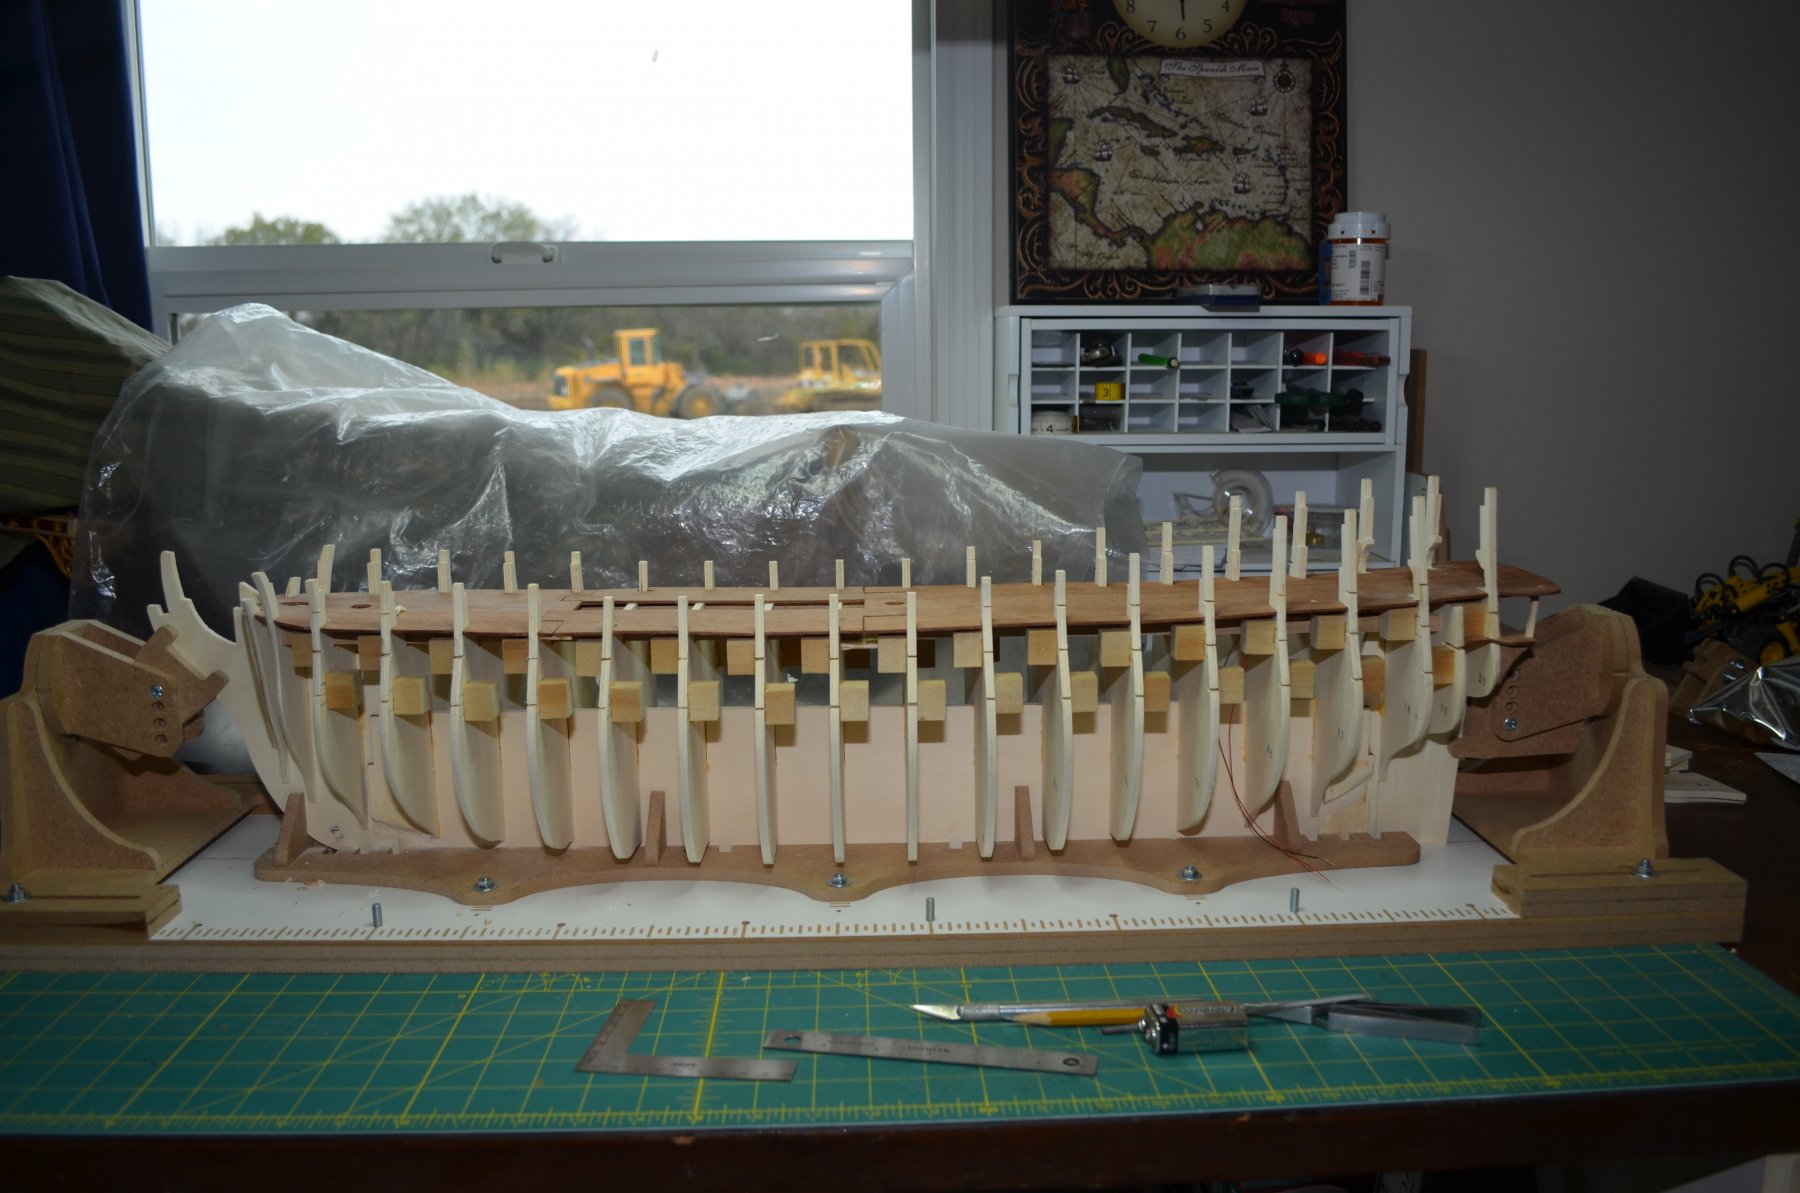
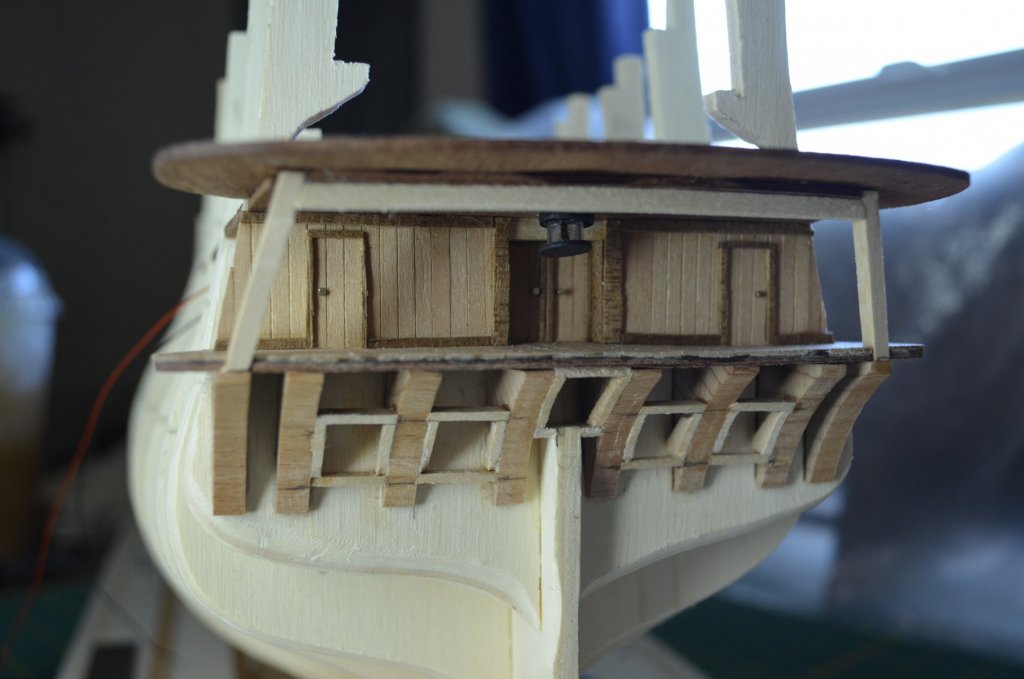
Michael, good to have you with us for another one and yes they did that as well. I did order a few other things from them as well as the Admiral also likes some of their storage cabinets and shelves for her own crafting. That may have contributed to the ease in shipping and discounts and it definitely helped to fee up the good ship Visa for another voyage. Another update on the build as the week has yielded some good work hours. Built some interior bulkheads in the lowest cabin. This space I am keeping fairly simple. I intend to put a few benches and maybe a table in here but that will be all. I did get the first LED installed so this will be visible when enclosed. Then I went back to hidden work and installed the first 66 dummy canon blocks down both sides of the hull. The kit came with cast metal supports for the canon that actually would work well except for the frame edges. Many would not match the hull's contours and I also would end up have to install wood trim over them to close out gaps and make the frames look like wood. Therefore, I decided to use wood dummy blocks and will build frames for the gun ports. Now I am back on top and laying out more interior framing. Most of these spaces will not have too much if any detail as they will not be seen but, the aft cabin will of course be furnished out and illuminated and the forward spaces may be as well. That is still undecided at this moment. I am thinking that the Captains cabin and the adjoining rooms on that deck may all be fully furnished and visible either by the windows and skylights, or I may leave some of the deck off to allow for viewing. I will know more when I reach that deck.


-
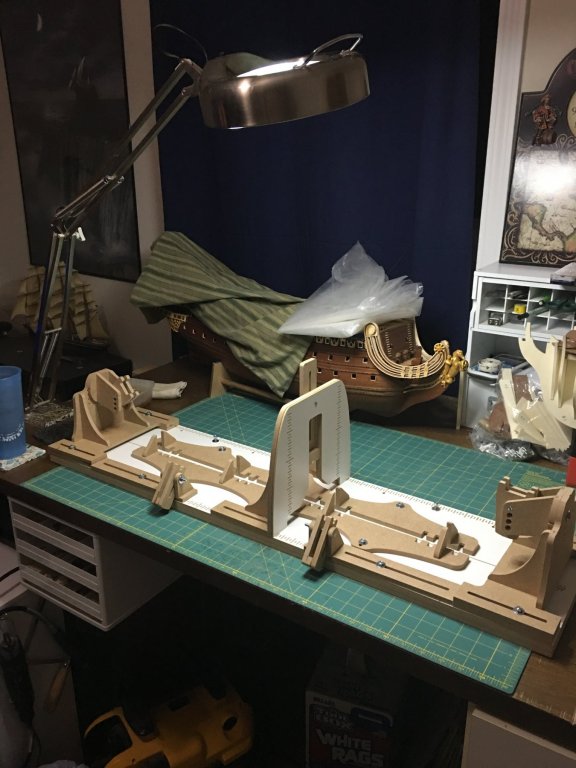
I did not have any problems with shipping, just took about a month to get it. Not a problem as I had plenty to do while I waited. So far it has been worth it. It makes a solid and steady work platform and with all the components being able to tilt, swivel, slide or simply removed if not needed, it is a very versatile piece of equipment. Looking forward to seeing how it performs when I rotate the hull over for planking.
-
Whew! That is a lot of very tiny details. They are making an incredibly intricate and interesting model that will be one of those that people will constantly find something new to look at every time they view her.
- 122 replies
-
- 3
-
-
- tamiya
- King George V
- (and 2 more)
-
Looks great! Sometimes these little builds are a nice, fun break from the big projects. I've got a couple I have been eyeing up myself but, then I start another big one! 🙄
- 171 replies
-
- 3
-
-
- krabbenkutter
- authentic models
- (and 1 more)
-
Thank you all for joining the log! O.C., of course I’m building a fleet. You can’t control the seven seas with just one ship! Hahaha!!! Been a productive week if not very exciting. Most of it so far has been spent fairing frames and building the stern counter. The fun part started happening just recently as I started to build out the interior of the lowest cabin. I also received more LED lights to illuminate the interior in the mail today. Just in time for the weekend!
-
I'm a bit late to the party but, glad I found it! I always enjoy seeing a kit for one ship transformed into another. You have a very interesting build going on here that I look forward to seeing the rest of the way through.
-
Very fascinating. I've seen some of these images before though not all of them so I always appreciate you sharing them along with the information about them. While the internet can be a great way to find and learn, not all of that information is accurate. Often times, pictures especially get labeled wrong. I have seen that second image of the stern called out for Soleil Royal several times. I too have been told that the forward most port on the lower gun battery shared the gun behind as otherwise there would not be enough room for the recoil of both guns. That port was there to give angle options more than an extra gun.
- 2,634 replies
-
- 3
-
-
- heller
- soleil royal
- (and 9 more)
-
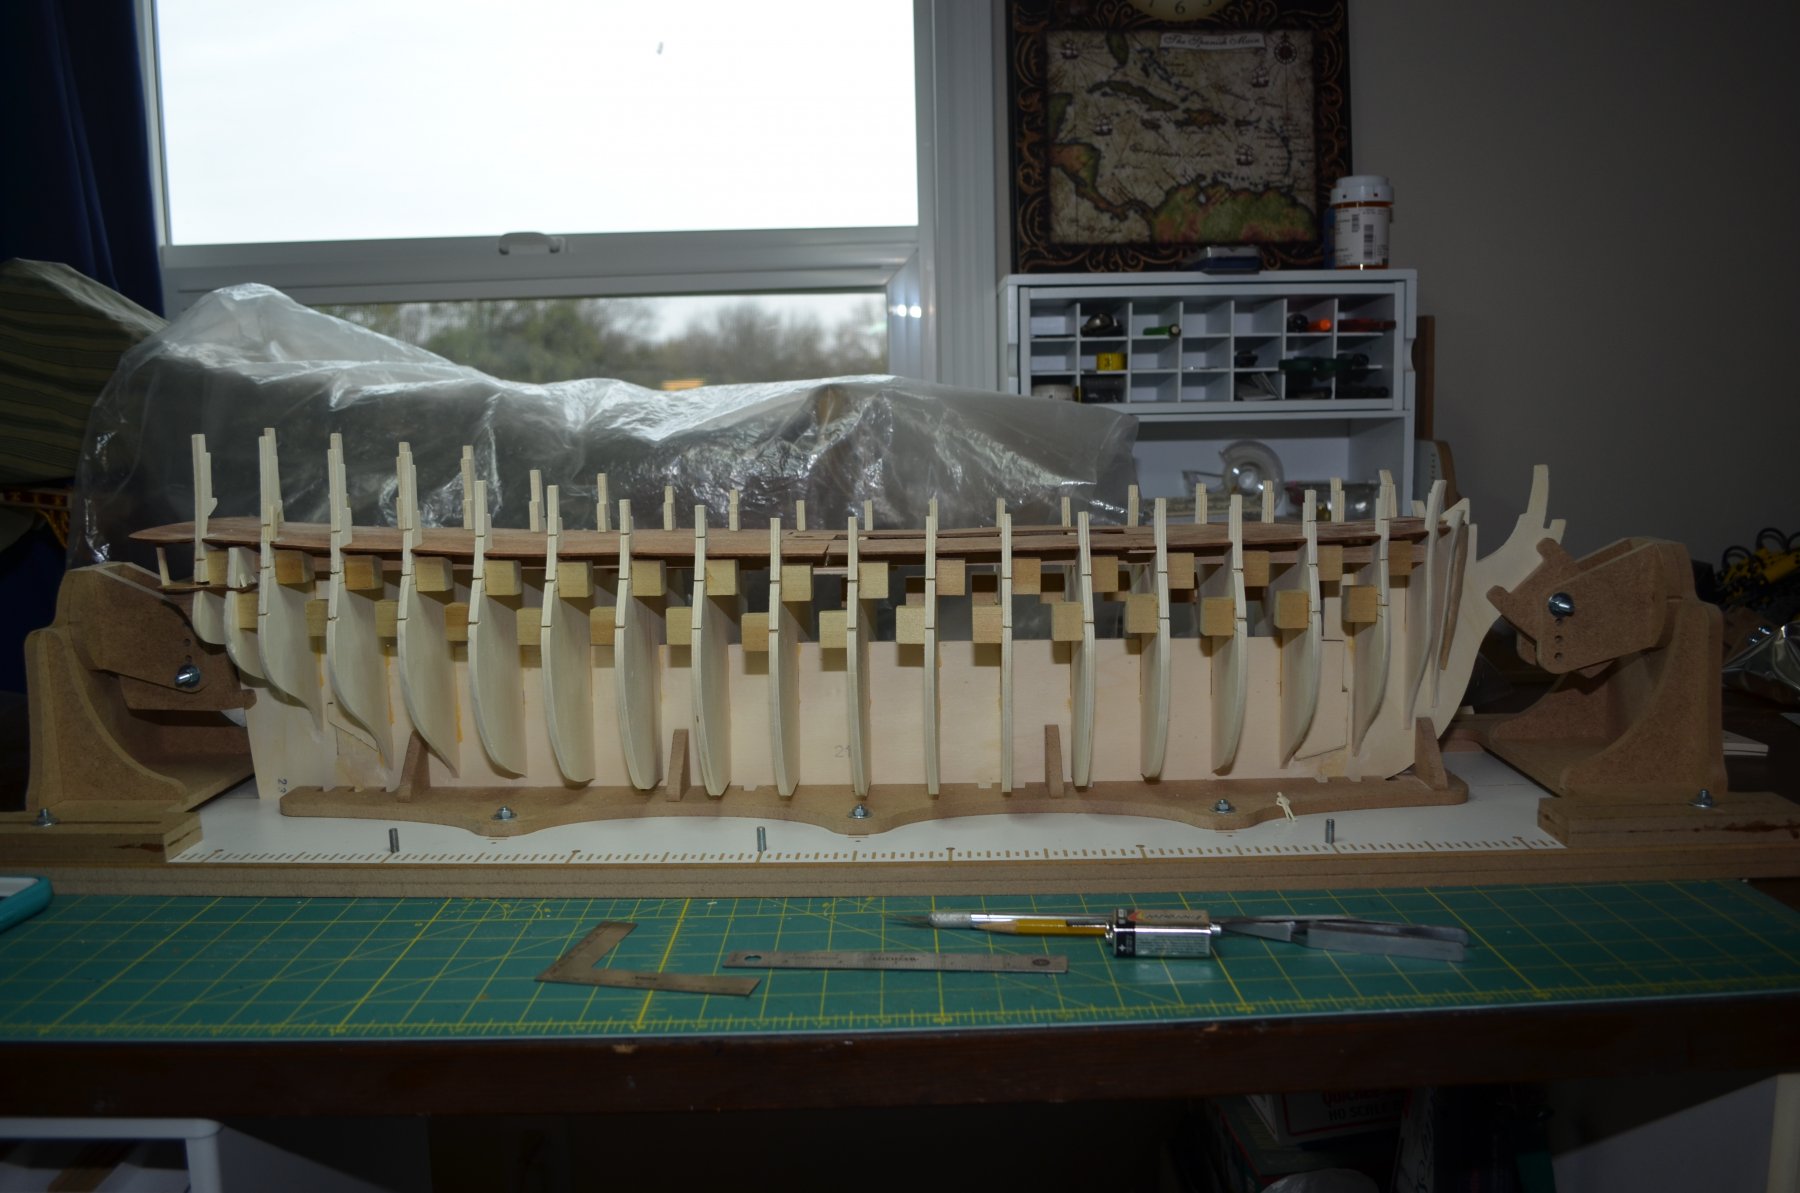
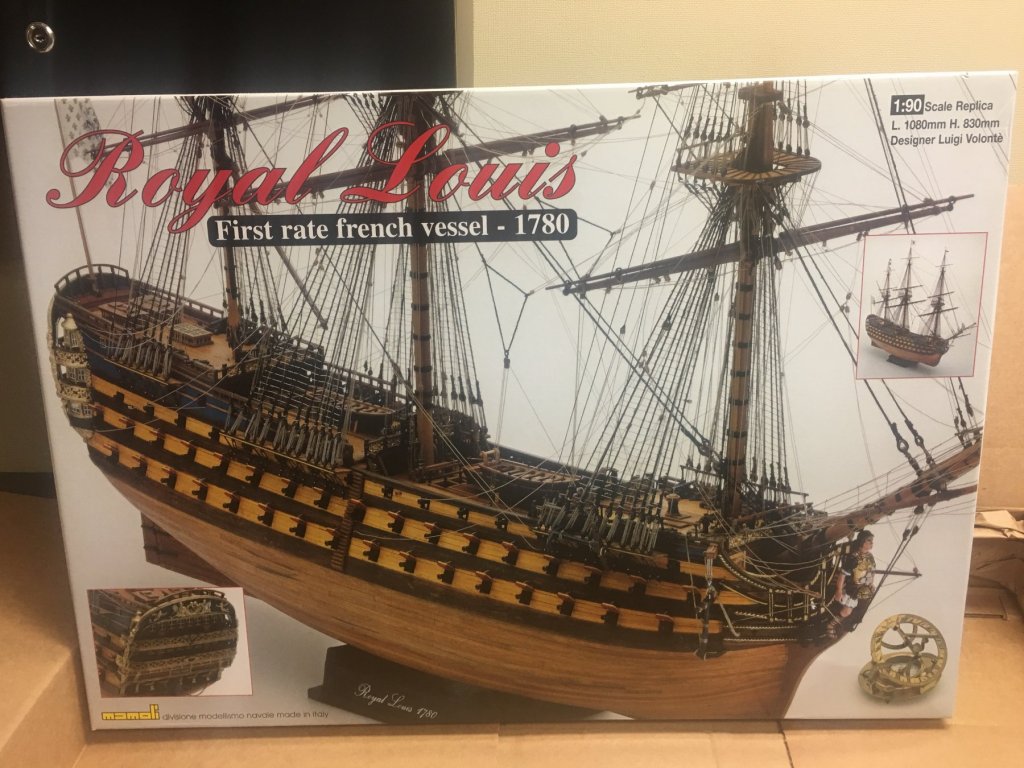
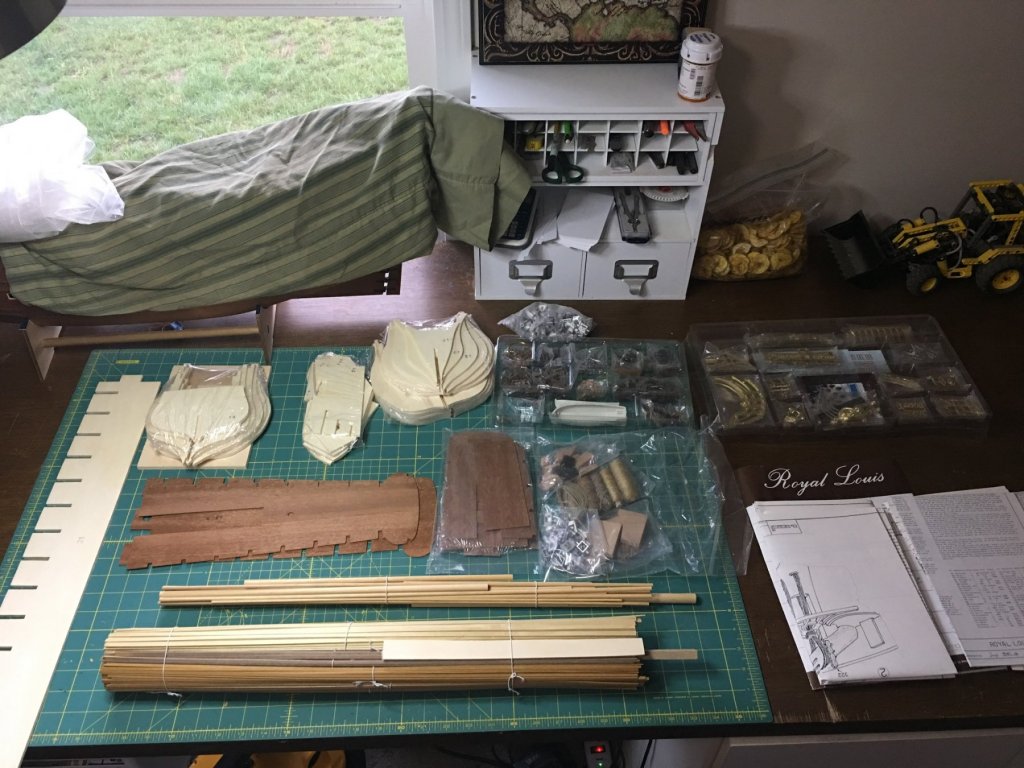
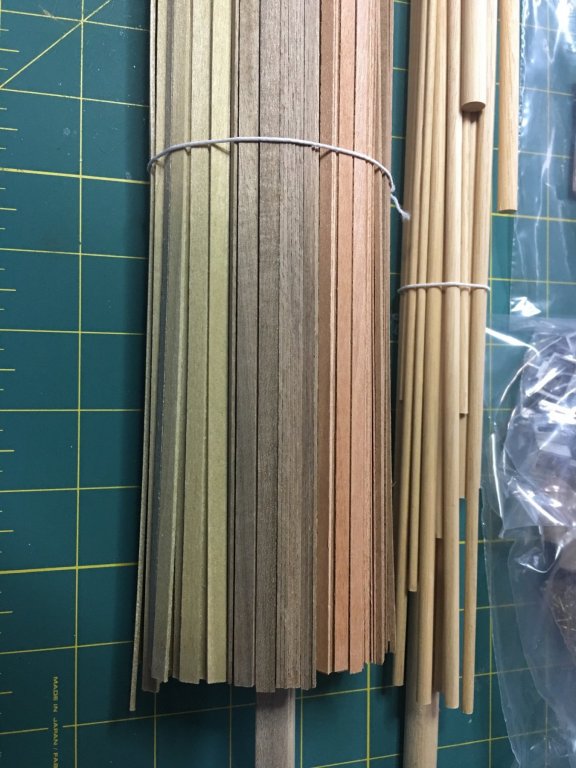
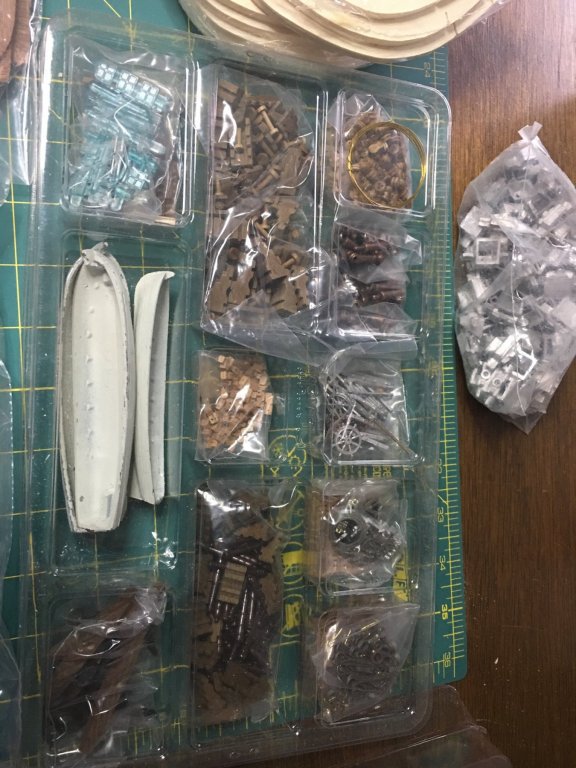
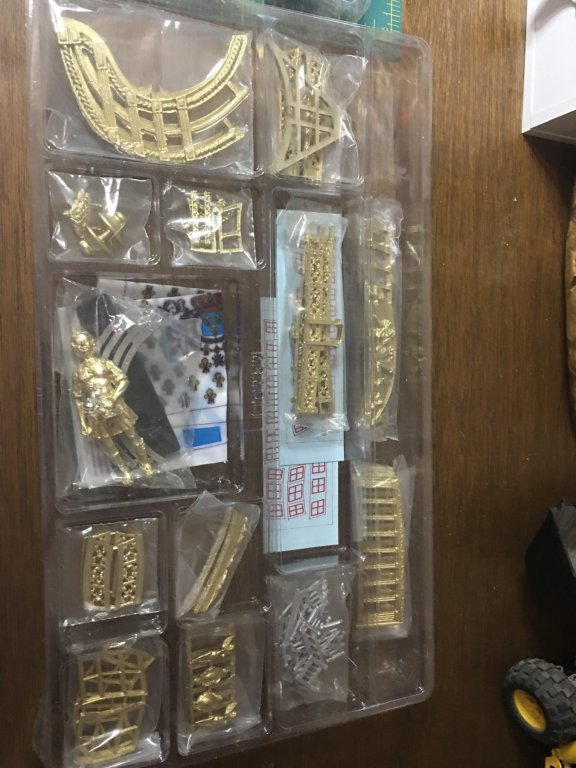
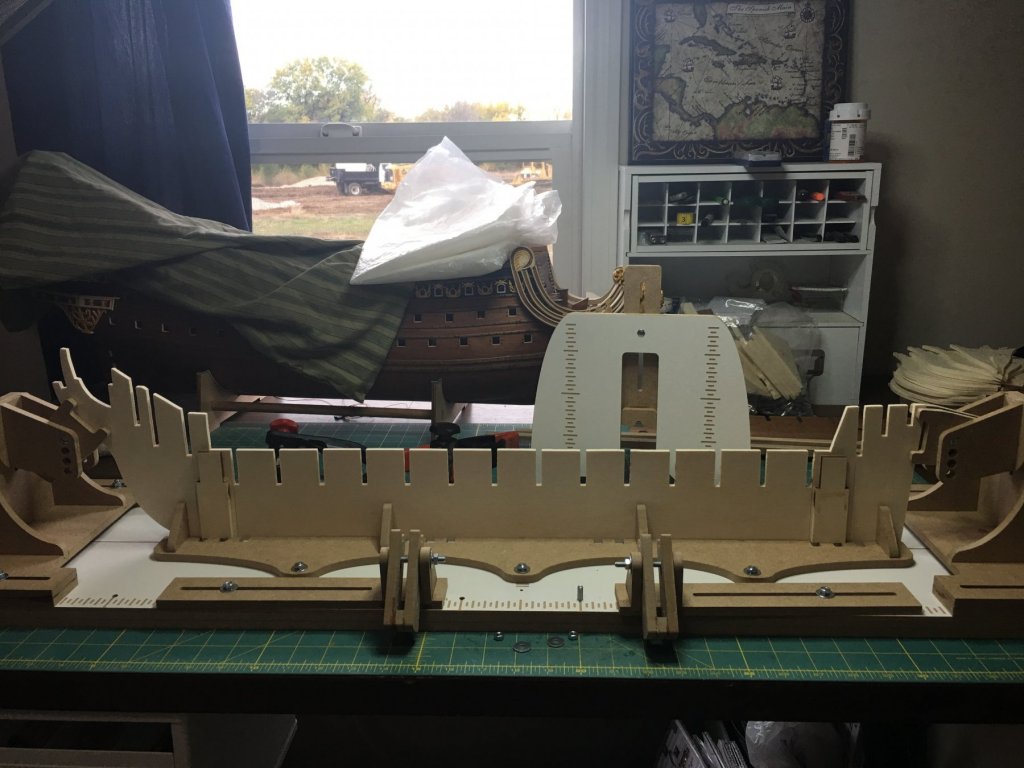
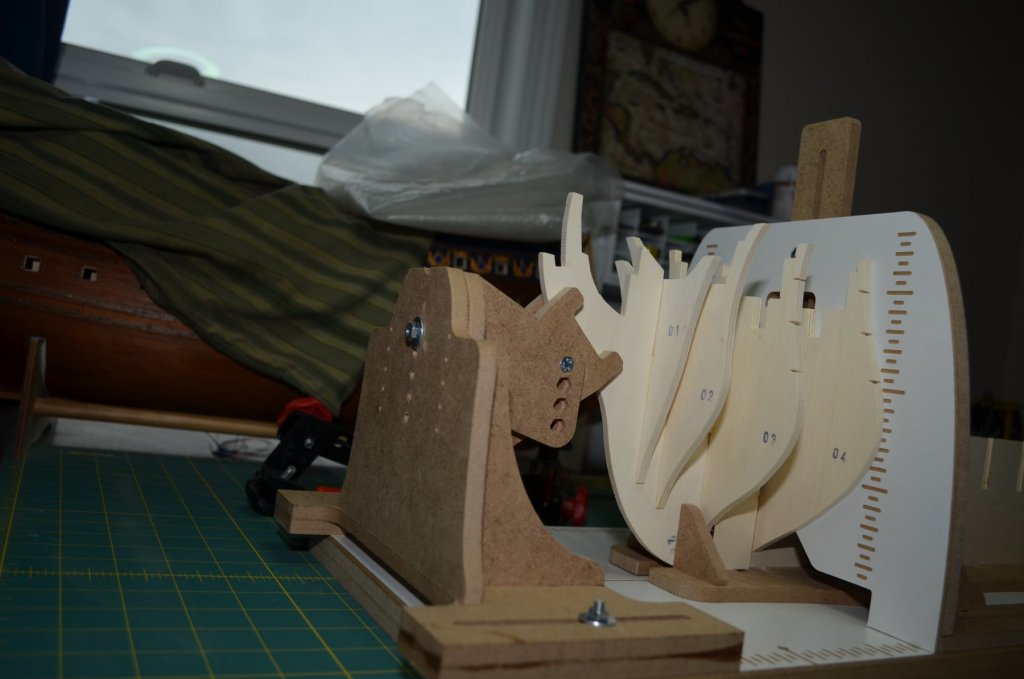
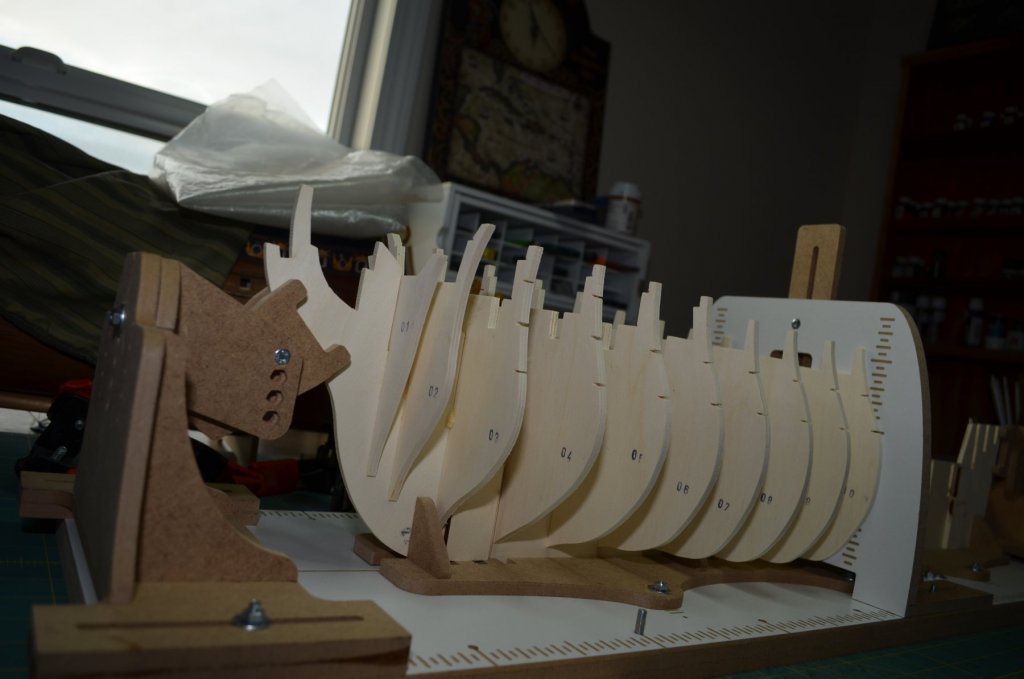
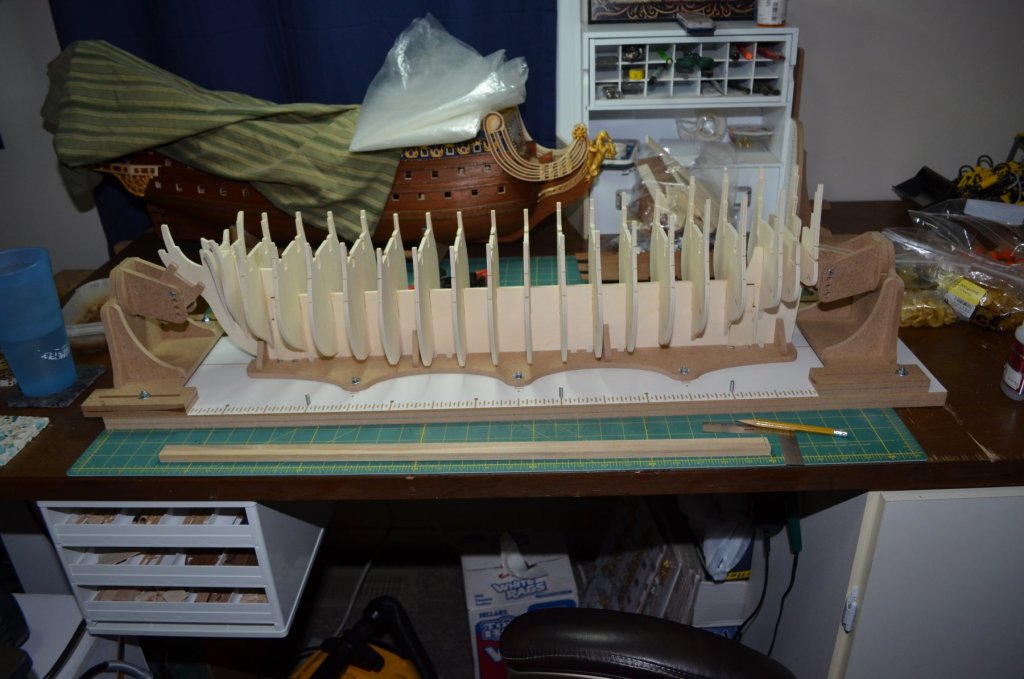
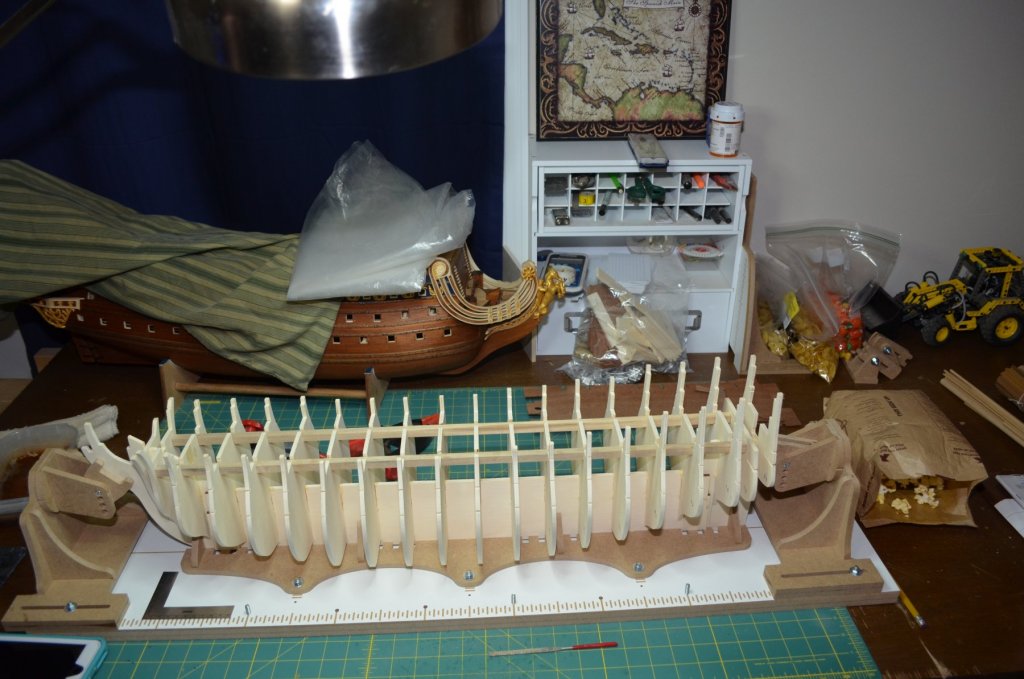
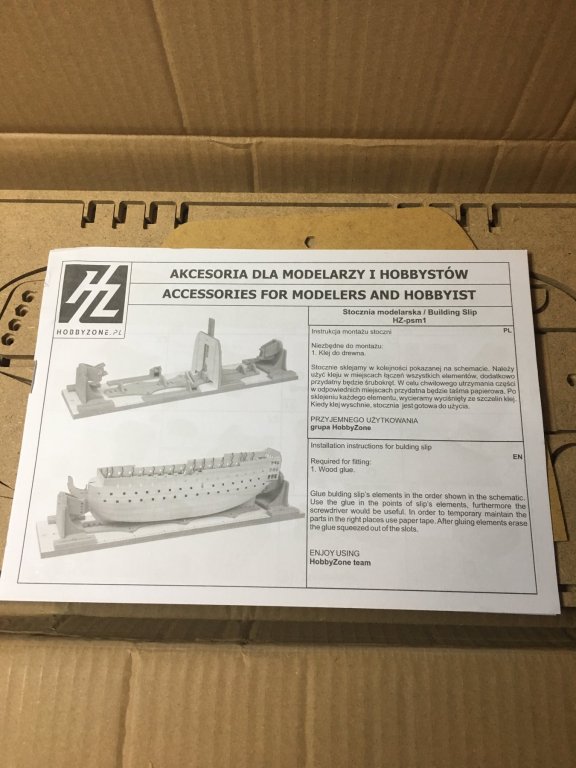
It is finally time to start the new build! Royal Louis by Mamoli. This will be my third ship in my series of French warships. First being La Couronne, second Soleil Royal and now Royal Louis. My goal with these is to show an evolution of ship building and design throughout the 17th century and into the 18th. I am no expert on the topic, and this is really just for fun but, it has been a very learning and exciting ride so far. Yes, Soleil Royal is still under construction and I have no intention of leaving her unfinished. Much like I did during L.C.'s build, I will be swapping back and forth periodically between the two builds. I have found that for myself on these large and very long builds, (Soleil Royal is quickly approaching the completion of her second trip around the sun with easily another to go) that being able to switch between projects helps to alleviate a lot of those monotonous places in the build that often times drives builders to quit. I just want to give fair warning that if the build goes silent for a long length of time, I'm most likely on the other and feel free to join me there! Next up is the newest addition to my shipyard, the Professional Build Slip from Hobbyzone. I have been wanting to build or buy a build slip for some time and a while back I read through an excellent review and tutorial on assembling this one on MSW. Link here. I decided to give it a try. So far I am happy with it and it has already been a huge help in fixing some of my common issues of bulkhead alignment. I think this will be the start to a lot of years with a great new tool. Now we come to the kit itself. Most of what is in it is fairly common kit pieces. Laser cut false keel, bulkheads and misc. framing pieces. Packages of the usual cast decorations (I will again be carving my own) canons, carriages, furniture etc. The rope looks decent. Not the best to be had but perfectly usable for anyone not wanting to upgrade and still have a nice model. The wood probably impressed me the most. Looking at the bundles, I see nice straight strips, uniform thicknesses and plenty of it. A nice change from the quality of my last two kits. How much of it will I use n this model is yet to be seen, though not from quality but, from color and species choices. Since I am trying to keep my three ships looking relatively the same, I will most likely be switching to mahogany and walnut for the outer hull. We shall see. The instructions are decent but, not for a beginner. Like most kits similar to this one, the drawings and "instructions" leave a a lot of detail out and makes assumptions that you know what you are doing in order to achieve what it shown. Plan on using a lot of outside resources for rigging, planking etc.. All part of the fun right?! Probably the most annoying thing so far that I have seen, is how much stuff is cast metal. Ladders, railings, the ship's wheel and even the boats are all cast metal. I will not be using any of those items on this build. Like most of these kits there are no sails, only the flags so I will need to make my own, though that is a very long time from now. I'm looking forward to another fun and educational build! So let us get started. While waiting on the new slip to get here, (I had a month as it was coming overseas) I was able to get the keel glued together and test fit all the bulkheads and decks to check alignments and to see what modifications I will need to do to accommodate my personal changes. The main ones being the build out of the cabins along with lighting. I did this on S.R. and intend to do the same again. Now that the slip is in and assembled, I sett he keel in place and began to set the bulkheads and installed the first deck. Off to a good start. Filler blocks, fairing the frames, extra supports and all those fun hours of sanding that go into the sub structure that make the model turn out nice is up next. I hope everyone enjoys the journey!

-
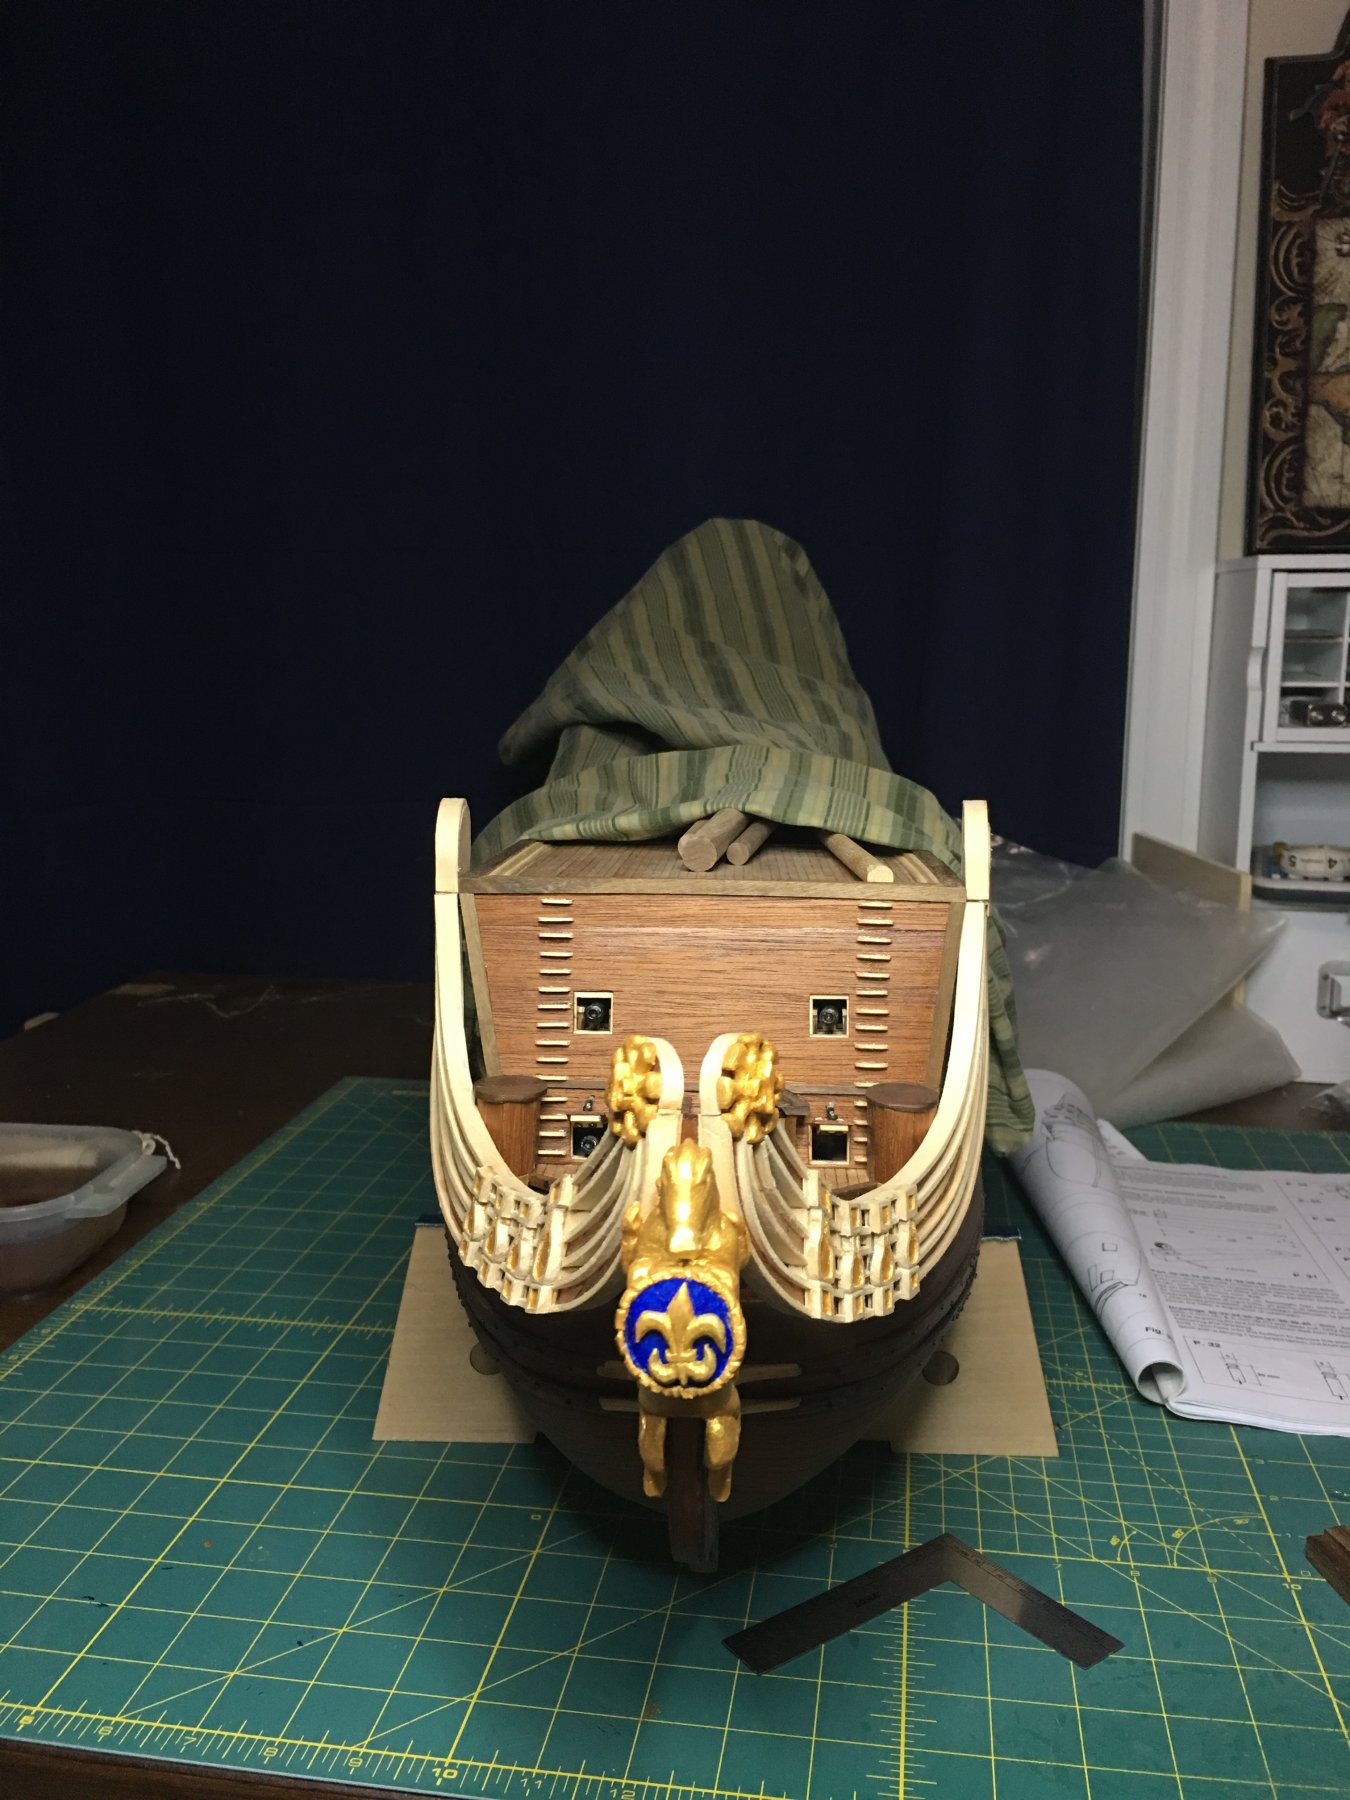
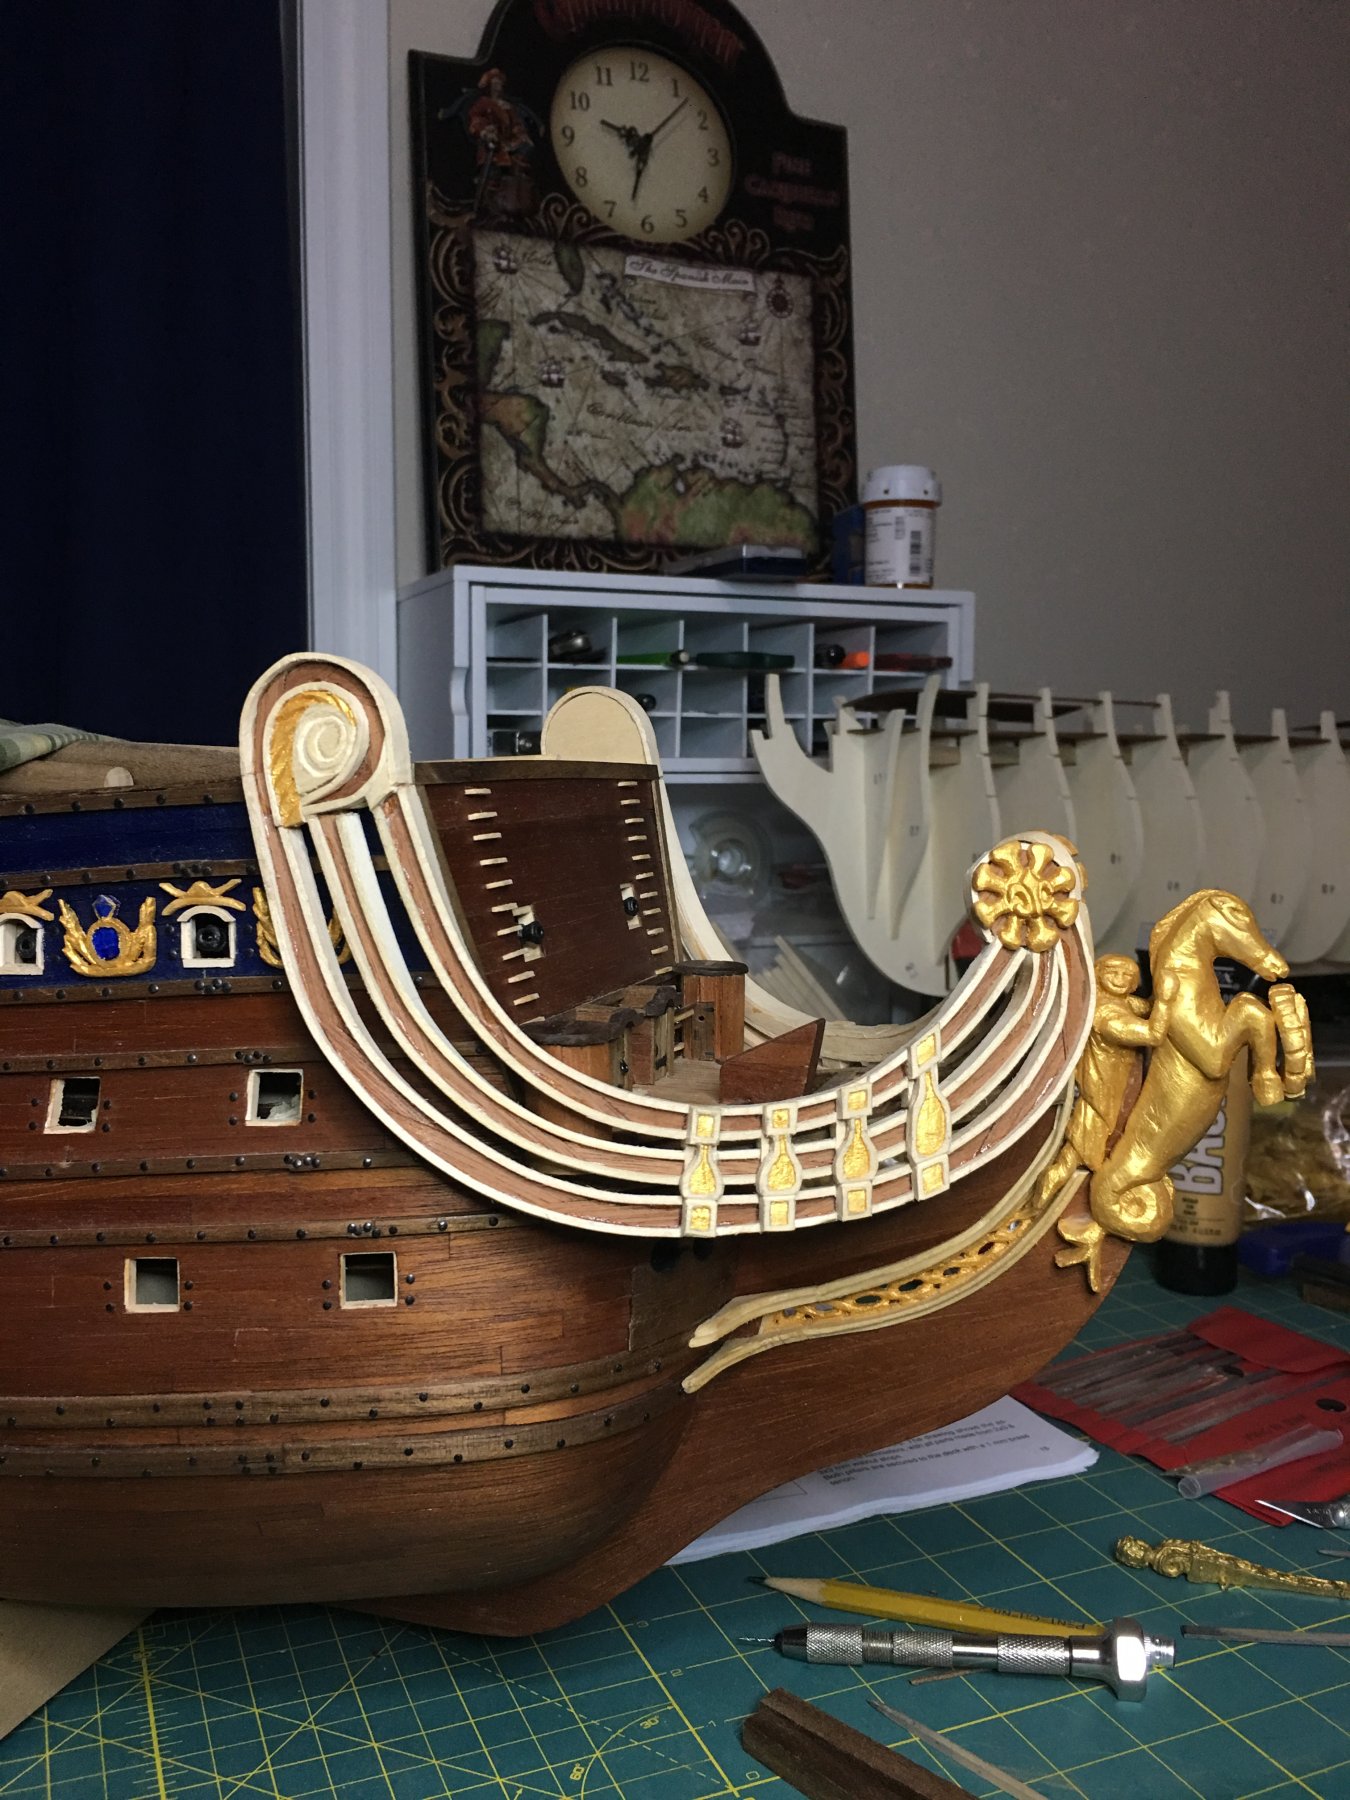
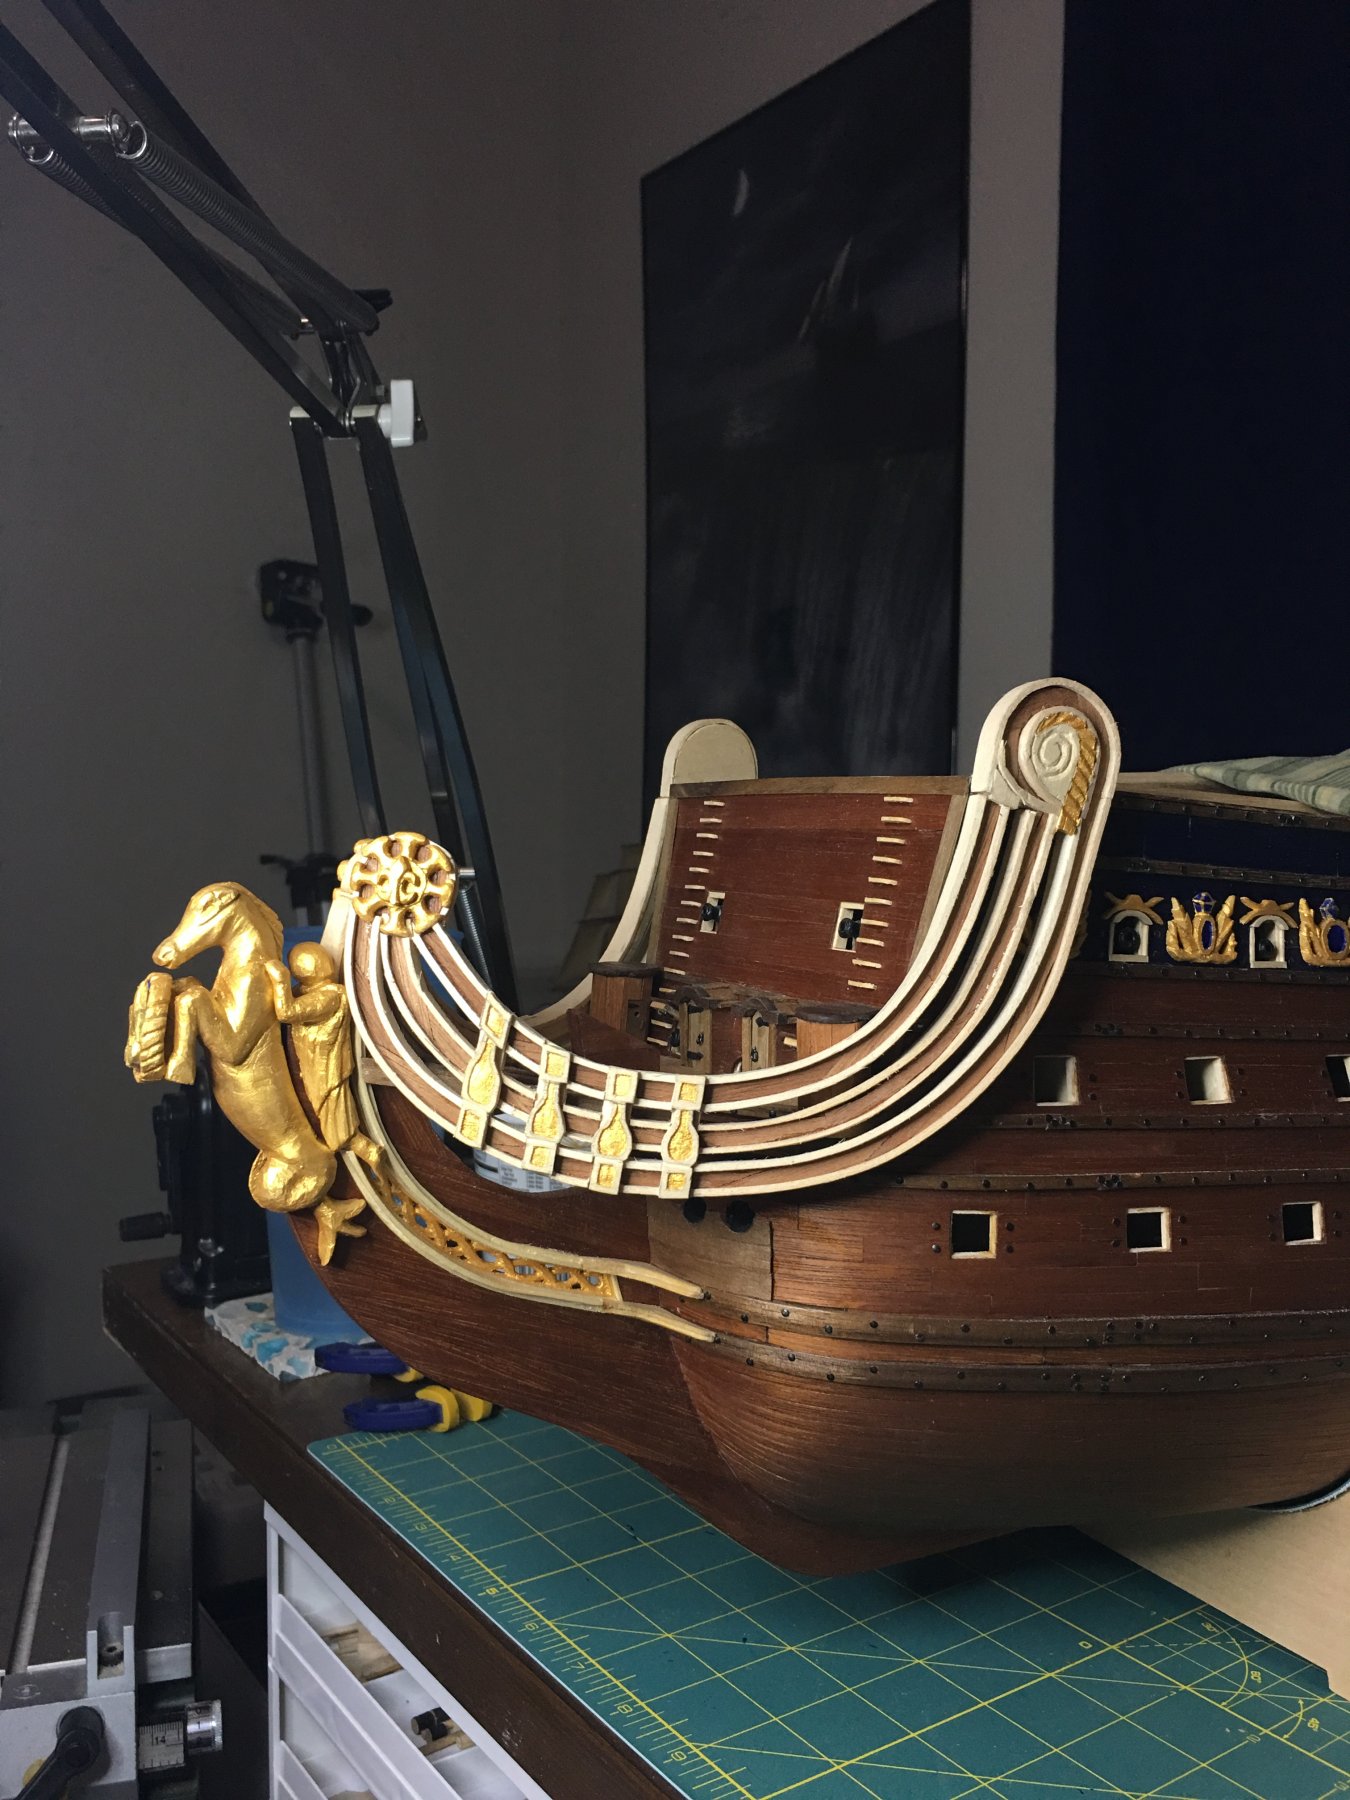
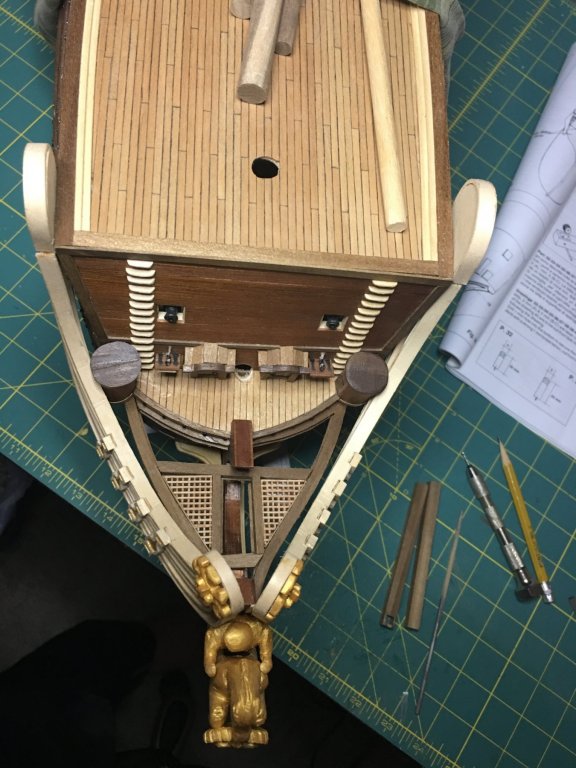
And fitted into place. Still have work to do but, the rest will be done in place. Bracing to the knee of the head and the carved cathead braces are next up. I also have horse head figures that arc over the curved upper portions and I’m debating on the figures that rest aft of these pieces. The main deciding factor on the figures tot he aft side is that they were never intended to be a part of this kit. Therefore, the gun port layout is not spaces to accommodate a figure between the first gun port and the curved piece. (I really need to find a name for these things... 🙄) Oversite on my part as I really didn’t take into consideration the decorations I would be making when I did the gun port layout. In order to make up my mind, I plan on sketching out the figure and seeing if there is a way I can fit her in the space available to me. If something works out, the carving knives will get to work and if not, well, she is still a beautiful ship and I will simply add it to the list for next time! 😀


-
Incredible!!! The frieze has turned out fantastic and will be a great addition to the model. A true example of patience and persistence winning out. I have to say, your continuing dedication to making these details and enhancing your build constantly pushes me to attempt more and more with my own. Every time I think no, that part is to small and too difficult, you and others as well, have shown me the error of that train of thought and encouraged me to give it a go. Excellent work Marc! Keep it up as she is taking shape now!
- 2,634 replies
-
- 5
-
-
- heller
- soleil royal
- (and 9 more)
-
A little more progress. I’m working both sides equally so the plus side to all the time this takes is that both pieces will be done at the end. As always, thank you to all for the nice comments, likes and following along.
-
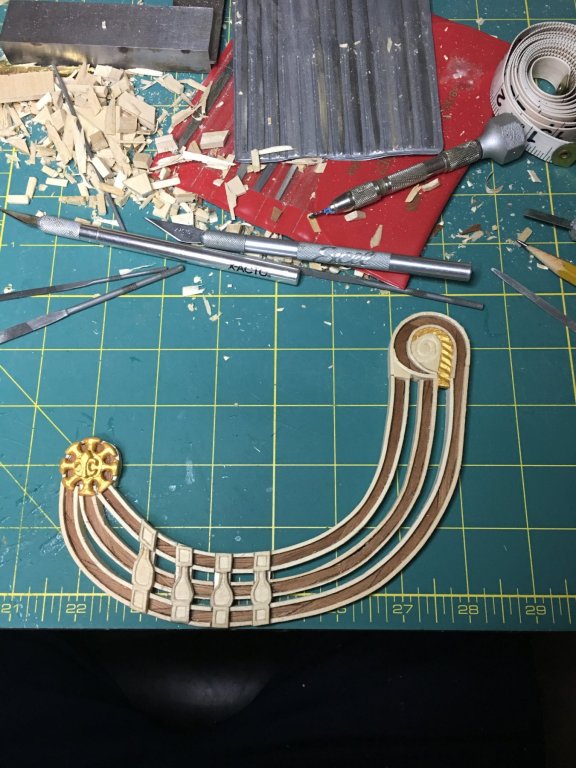
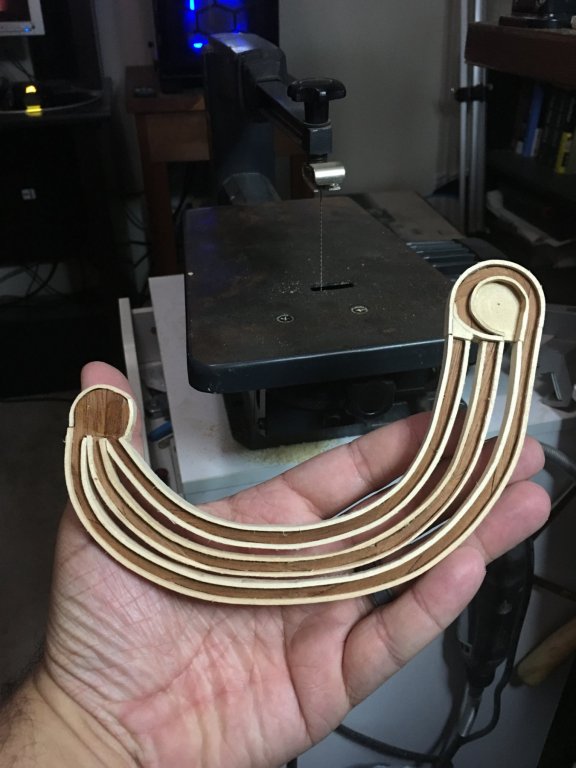
Here is one of the bow, side decorative pieces. I still have all the carved pieces to make and install but, the overall shape and construction is complete.
-
That lattice work is really going to look sharp once it is all in place and painted up! I don't envy all the cut in edge painting you have to do but, I'm certain it will look great!
- 2,634 replies
-
- 1
-
-
- heller
- soleil royal
- (and 9 more)
-
Working on these decorative pieces (not sure what they are called) on either side of the bow. I have a couple of ideas for how I am going to shape them and what all will be included for the details. Just a matter of figuring out the how... Should be an interesting week in the shipyard! 😀

-
Your canon assembly is looking incredible! Loving all the extra details you are adding.