DONATION DRIVE - SUPPORT MSW - DO YOUR PART TO KEEP THIS GREAT FORUM GOING!
×


EJ_L
-
Posts
2,246 -
Joined
-
Last visited
Content Type
Profiles
Forums
Gallery
Events
Everything posted by EJ_L
-
 Looking forward to your return when the weather warms up. Enjoy your time with your other hobbies till then!
 -
Whatever you are doing and however you are learning to do it, the finished result speaks loud and clear that you are doing it right! Learning about the ships, the people who built them and the people who crewed them, in my opinion, is just as fascinating as building the ships.
- 473 replies
-
- 7
-

-
- greek bireme
- dusek
- (and 1 more)
-
Great news Brian! Looking forward to seeing you resume your build.
-
I have used a horse trailer in the past. They do work great for moving. Got a different trailer lined up this time though. We had a few of our smaller tool trailers lined up at work that are low to the ground and have a ramp on the back. Plus they are fully enclosed so no problems with the weather. Been moving truck loads after work this week and as soon as I am done eating dinner I'm taking another one. The big push has to wait till Saturday but getting all the smaller stuff during the week is helping. Well, I guess I better get off of here or I will never get it done.
- 608 replies
-
- 3
-
-
- la couronne
- corel
- (and 1 more)
-
La Santisima Trinidad 1769 by Liberto - 1805
EJ_L replied to Liberto's topic in - Build logs for subjects built 1751 - 1800
Liberto, Incredible work! I just read through your build log and I must say that you are building a fine model. Top notch construction and the details are amazing. I will have to keep following along to see the rest of your build. Well done! -
Just checking in to say that the move is going good. In fact, La Couronne is making her maiden voyage, under tow of course, to the new ship yard today! She will have to take up a temporary berth though for a few more days but if all keeps going well the new ship yard could be open early next week. As I am on vacation from work to do this move starting this afternoon that is my plan to take a couple days and set up the new ship yard and wood shop. I'm looking forward to getting back to work!
- 608 replies
-
- 3
-
-
- la couronne
- corel
- (and 1 more)
-
Indeed, a big welcome and bigger thank you for supporting the site! I am looking forward to seeing your products and hope to do some business in the near future!
-
I thought about using one of our semi trailers from work as I can drive a big rig but, withoit a lift gate, that is a very high lift for some of the furniture. Just going to have to be my good ol truck and trailer and probably a Uhaul truck also. I did manage to get in another hour of tying rat lines tonight. Not much but every little bit adds up! It was a nice chance to relax from work before resuming packing.
- 608 replies
-
- 5
-
-
- la couronne
- corel
- (and 1 more)
-
Thanks for the luck, I'm sure it will be needed. I've moved a lot, especially while in the Navy so this is familiar territory although, back then I could fit everything I owned in the back of my truck. Now I can't even fit the entire shipyard in there!
- 608 replies
-
- 5
-
-
- la couronne
- corel
- (and 1 more)
-
All of your fittings look like they turned out very well. Good choices on making them. Looking forward to your next update!
- 213 replies
-
- 2
-
-
- la couronne
- 74 gun
- (and 2 more)
-
Thanks everyone for the compliments and likes! It may be a couple of weeks before I get another update on the build. We start moving to the new house next week so while I am trying to squeeze in an hour here and there to build, most of my free time this week is being used for packing and various other tasks that I need to do and after this weekend the shipyard will be packed away to move. Hopefully I will only be down a week or so. When the updates resume I will have to new yard up and running and will be ready to make some progress!
- 608 replies
-
- 4
-
-
- la couronne
- corel
- (and 1 more)
-
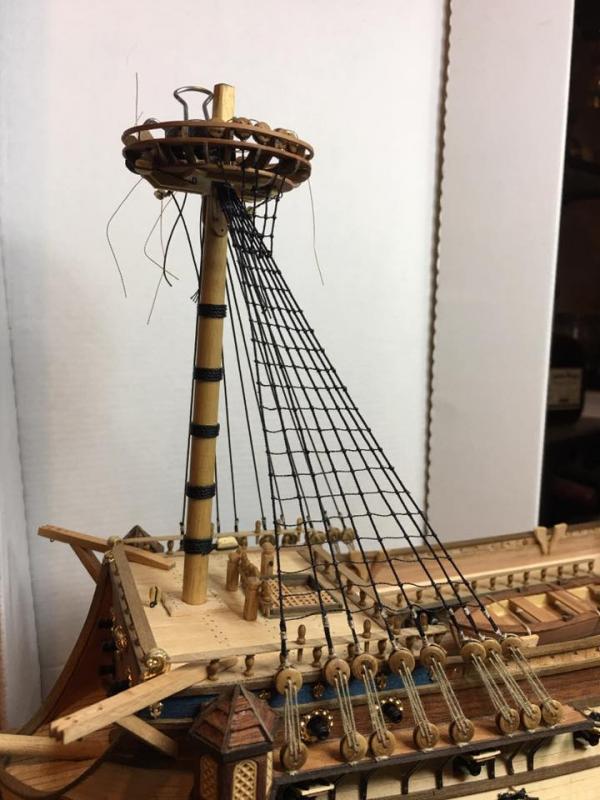
Finished running ratlines on the first half of the foremast shrouds tonight. Counted up and there are 180 clove hitches that were tied to complete it. Only had a couple get loose on on me towards the bottom so while annoyed, I'm also rather happy about those results. Now to rest my eyes so I can do the other side!
- 608 replies
-
- 9
-
-
- la couronne
- corel
- (and 1 more)
-
Well done on the griffin! Better than what I can currently do as my carving skills still leave a lot to be desired. Some red eyes would look cool on it and add a little something unique. Looking forward to seeing the rider modified and mounted.
- 213 replies
-
- 3
-
-
- la couronne
- 74 gun
- (and 2 more)
-
Goregeous boat! Well done indeed. Looking forward to seeing her maiden voyage!
- 414 replies
-
- 3
-
-
- riva aquarama
- amati
- (and 2 more)
-
A trained octopus would be an enormous help! I'm still hoping for some scale robotic sailors that could fit on the ship and run their own rigging.
- 608 replies
-
- 2
-
-
- la couronne
- corel
- (and 1 more)
-
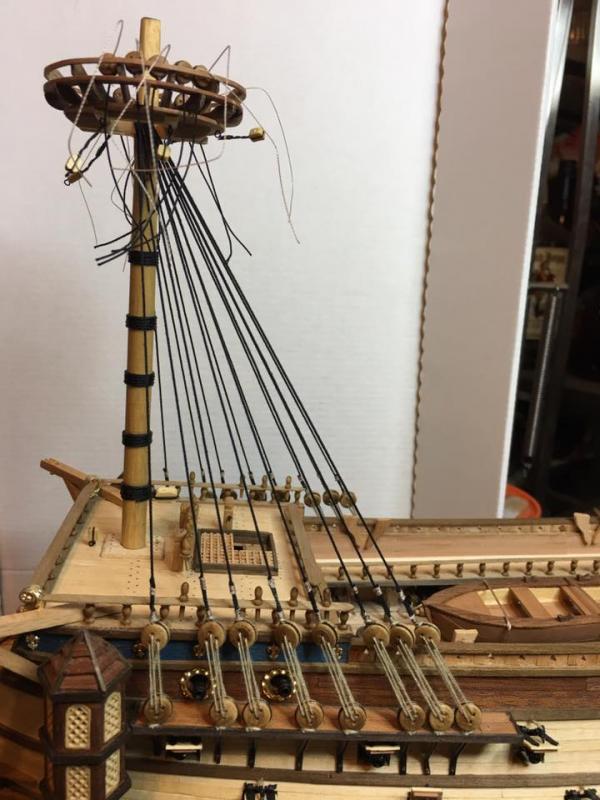
Tonight saw the completion of the foremast shrouds. Now I can start running the rat lines across them which is of course another slow tedious process but really, what is not on a model ship? All the time and effort will be worth it though once they are done. I guess I better get to it!
- 608 replies
-
- 5
-
-
- la couronne
- corel
- (and 1 more)
-
I don't think the middle roof needs to be shingled. The round roof makes sense since it is curved the shingle would do a better job of sealing it up. On the center the roof is flat which would allow the wood to seal up nice and tight without the need of a shingle layer. I think I would leave them the way they are. Those dental molds of your decorations look great. You are going to have some nice fittings I'm thinking when you are done.
- 213 replies
-
- 2
-
-
- la couronne
- 74 gun
- (and 2 more)
-
Good to see you back and with a little more progress. Great job on that bowsprit and I too like that slipway.
- 701 replies
-
- 4
-
-
- phantom
- model shipways
- (and 1 more)
-
That is just fine as I have the rest of la Couronne to finish and Soleil Royal to build before that one. Plus, I'm all for waiting so that a kit can be updated and improved upon. Whenever it is ready we will be here waiting!
-
Galley Washington by Mike40 - 1:48 - POF
EJ_L replied to Mike40's topic in - Build logs for subjects built 1751 - 1800
I think most of us are guilty of the messy work table. I think that is one of the blessings of a build log is that I try to clean up the area for pictures so the more I update, the more I can keep things clean. It isn't fool proof as some of my pictures show but it does help a lot! -
I second that, excellent carvings! I really like that railing also as well as seeing her name across the stern. Well done!
- 213 replies
-
- 1
-
-
- la couronne
- 74 gun
- (and 2 more)
-
I agree! It is one that is on my list of ships that I am building showing the evolution of French Ships of the Line. I will be keeping my eye out for that one!
-
Galley Washington by Mike40 - 1:48 - POF
EJ_L replied to Mike40's topic in - Build logs for subjects built 1751 - 1800
Hi Mike. Just read through your log and must say that you are braver than I am tackling a fully framed scratch build on the first try. I do want to build one myself one day so I think I will join you on your journey and see if I can learn something too. Your work is looking good and there is nothing wrong with a slow pace. I'm looking forward to seeing the rest of your build as you progress. -
Those oars came out very nice. I too was expecting to have two different lengths of oars but now that you explained it that makes sense. Looking forward to seeing them on board and ready for use.
- 473 replies
-
- 3
-
-
- greek bireme
- dusek
- (and 1 more)
-
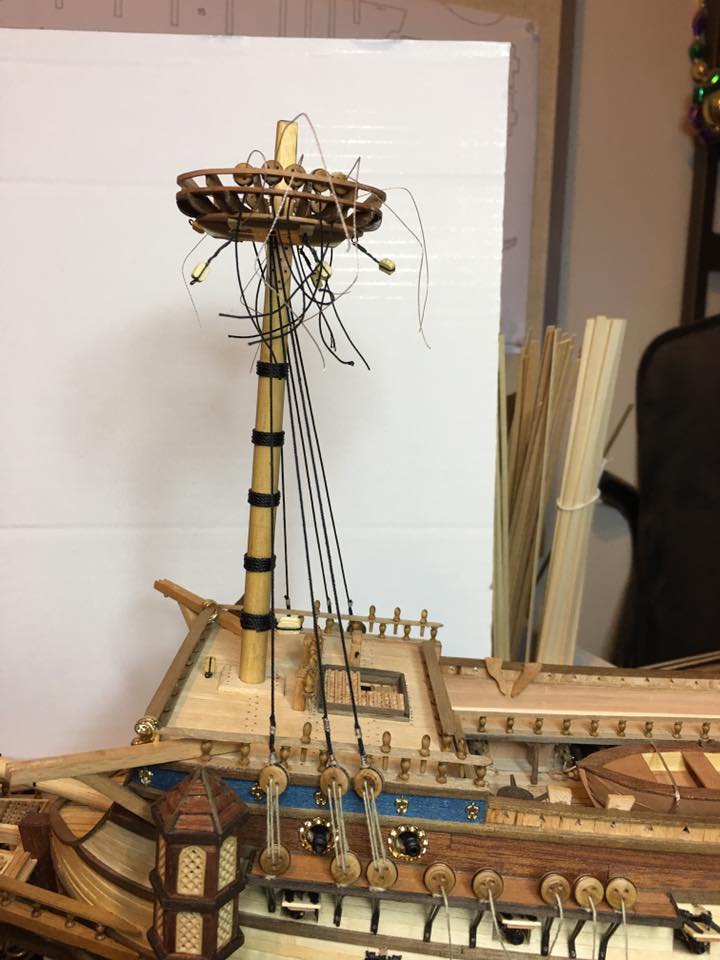
Logged in a few more hours in the ship yard today and the shrouds have started. As this is going to be a long process with each pair taking me about an hour to do, I figured I would give some smaller updates along the way instead of waiting till I was done. So without any further ado, here is the picture!

- 608 replies
-
- 8
-
-
- la couronne
- corel
- (and 1 more)