HOLIDAY DONATION DRIVE - SUPPORT MSW - DO YOUR PART TO KEEP THIS GREAT FORUM GOING! (Only 13 donations so far - C'mon guys!)
×


EJ_L
-
Posts
2,246 -
Joined
-
Last visited
Content Type
Profiles
Forums
Gallery
Events
Everything posted by EJ_L
-
 Nothing wrong with slow and steady. I've just rolled past 450 hours over almost 6 months and still have a very long way to go myself. However long it takes I will be along for the show. When I start my Soleil Royale this winter it will be nice to know someone else is building her too.
 -
Rigging is without a doubt the most complicated part of building these ships. The rigging of the 17th century ships even more so. They contain a lot of features that become obsolete in later ships such as the spritsail top mast. All of those blocks and deadeyes you are mentioning do get to be frustrating when you are trying to tie them all in place. Spending 10-20 hours just attaching them to the mast or yards before you even begin to pull your first rope through them is not uncommon. An option to consider if you are looking to simplify the process is to only run the standing rigging. This would be the stays and shrouds that hold the masts in place. You could leave off the running rigging, the lines that move the yards and sails and also leave off the yards and model her as if she was in dock for refitting. This would still leave you with a complete model to display and if you ever felt like adding the yards later you can always do that. Otherwise, practice is about the only thing that really makes it easier and it never really gets easy. There are several good videos on YouTube that show how to tie blocks that may help. Good luck to you whichever you choose to do. Your ship does look really good. I am enjoying watching your build.
-
Nice looking model. I'm going to have to pull up a seat and join in the fun. I've done a few plastic ships before I moved on to wood. Though I am in love with the wood ships, this may inspire me to go back and finish some of my remaining plastic ones. My Constructo HMS Bounty had half of its instructions printed on the bottom of the box also. That was different but nice as they came with color pictures of each step. The annoying part was having to hold up the box every time I wanted to look at the instructions. I finally ended up cutting the box apart so I could pin the bottom to my plan board. Then it was fantastic!
- 75 replies
-
- 5
-

-
- scharnhorst
- dragon
- (and 2 more)
-
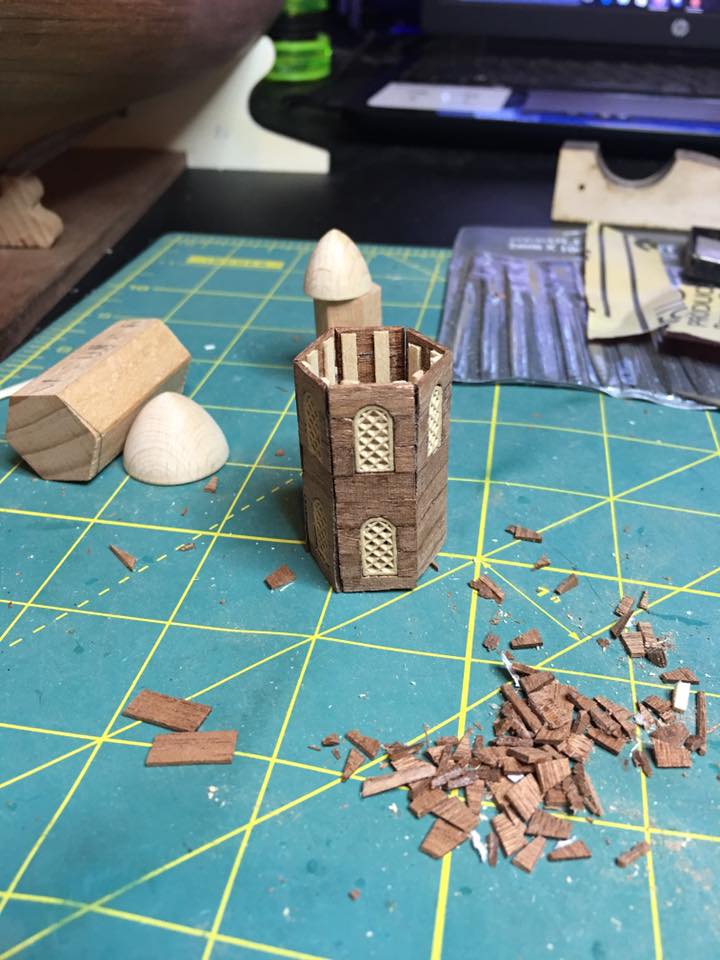
I'm trying to show some more of the in between steps and not just the finished product. Here is one of the port quarter galley towers being test fitted together. I still have some final sanding to do to close out gaps and smooth it up. I am glad I decided to build these myself. You can see the hexagonal blocks that came with the kit. The instructions call for the window frames to be glued to the surface and the roofs were supposed to be those smooth cones. By building my own walls, cutting out the windows and opening up all the window panes, you can now shine a light into the windows and see inside if you wished. Granted there is nothing to see but you can still do it. The best part of those blocks was using them as a template and support while I glued the new walls together. Helped to hold the correct angles. I m hoping to make some good progress over the weekend. Would love to get the port side done but that may be too much to hope for. We shall see.

- 608 replies
-
- 11
-
-
- la couronne
- corel
- (and 1 more)
-
Yes, there is a lot of unknowns on this one. A lot of what I have been doing is comparing pictures I have found of other models, plans from different manufacturers, what I have read about early 17th century French ships, a lot of "best guess", borrowing from similar ships and what I like. As it's long term goal is to sit in my house and make me happy, I'm okay with that. The one huge plus of having to do all this research though is I am learning a lot about ship construction of that era. I have probably learned more about ships from building her then I have from all the other kits I have done with good instructions and clear pictures. I do love a challenge and she has given me a good one!
- 608 replies
-
- 3
-
-
- la couronne
- corel
- (and 1 more)
-
San Martin by augustus
EJ_L replied to augustus's topic in - Build logs for subjects built 1501 - 1750
Wow! Augustus I just found your build and I must say you are doing beautiful work. True craftsmanship. I will have to keep an eye on her as you continue. Again, great job! -
That is why I'm looking forward to starting my next build as well. It will be nice to be able to switch back and forth between rigging la Couronne and framing/planking le Soleil Royale. I tend to have a lot of down time on both of those phases while glue is drying. Plus it helps with burn out as both of those ships are massive builds and so those two phases of building are extremely long and monotonous. I will be watching for your next log!
- 206 replies
-
- 4
-
-
- battle station
- panart
- (and 1 more)
-
Sanding is probably the most common action taken on wooden ships. It is an extremely rare day when pre-cut pieces will go together without sanding. On your bow, it looks like some sanding below the bulwarks on the filler blocks might allow them to come together where they are gaping at the bottom. That also might help smooth them out as they come around the bow. Also from the top down picture, it looks like the bulwarks are being held away from the ship slightly on the first bulkhead. I can see a gap between them and the deck on both sides just forward of that bulkhead. Try sanding it down a little more or if it is the decking sticking out past the frame then sand on it a little to close out that gap. Assuming you will be planking over the bulwark strip then yes, you can sand on it all you want to achieve a smooth curve. I would work on the fillers and bulkheads though first to see if you can get it to lay better before you take too much of the thickness out of it. I hope this helps. It is hard to try to type some of these suggestions than if I could simple show them.
- 20 replies
-
- 4
-
-
- lady nelson
- victory models
- (and 2 more)
-
Very well done Bob. Great work. I look forward to seeing your next build. Are you going to set up for the Endeavour?
- 206 replies
-
- 4
-
-
- battle station
- panart
- (and 1 more)
-
Michael, personally I like the look of yours better than the 1/10 model. Hard to say which is more accurate, but to me the 1/10 paint job would have been too much for the ships crew to maintain and therefore unlikely that they would gone to that extreme. Even considering the fact that that time period was know for lavish decorations it seems too much for a ship. Plus it is almost too "Santa's Workshop" with the color scheme. I would yhink that the simpler paint scheme, (simpler in comparisson to the 1/10 not simple in terms of detail and wow factor) that yours presents would have been more practical. This is all my opinion as I have no basis for fact only guess work. The only facts are that the 1/10 model is awesome and your model could sit with pride right next to it.
-
Good job with the stern. The extra step by step pictures are nice. Many logs, my own included, often just post the completed pucture of whatever is being built with rarely any inbetween shots showing how to get from start to finish. The extra information is nice especially for people who are trying to figure out how to build that ship.
-
Simon, indeed you are off to a great start on your Lady Nelson. I will follow along and enjoy the show.
- 20 replies
-
- 1
-
-
- lady nelson
- victory models
- (and 2 more)
-
Indeed, well done on that stain! The aged look will really add something extra to the model. Great job and good luck with the copper plating.
- 701 replies
-
- 4
-
-
- phantom
- model shipways
- (and 1 more)
-
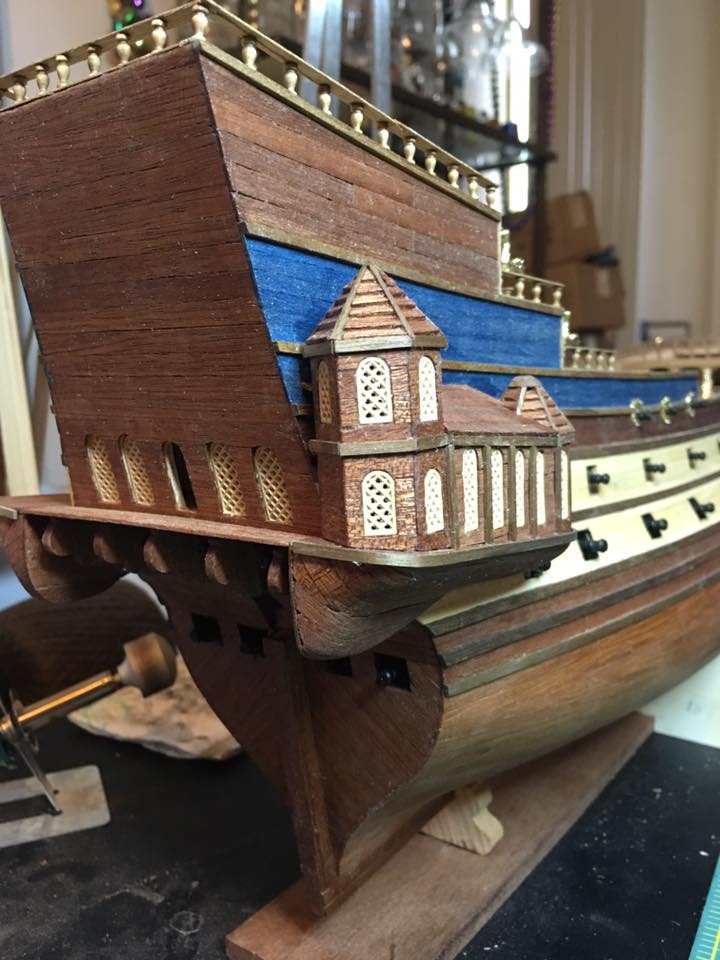
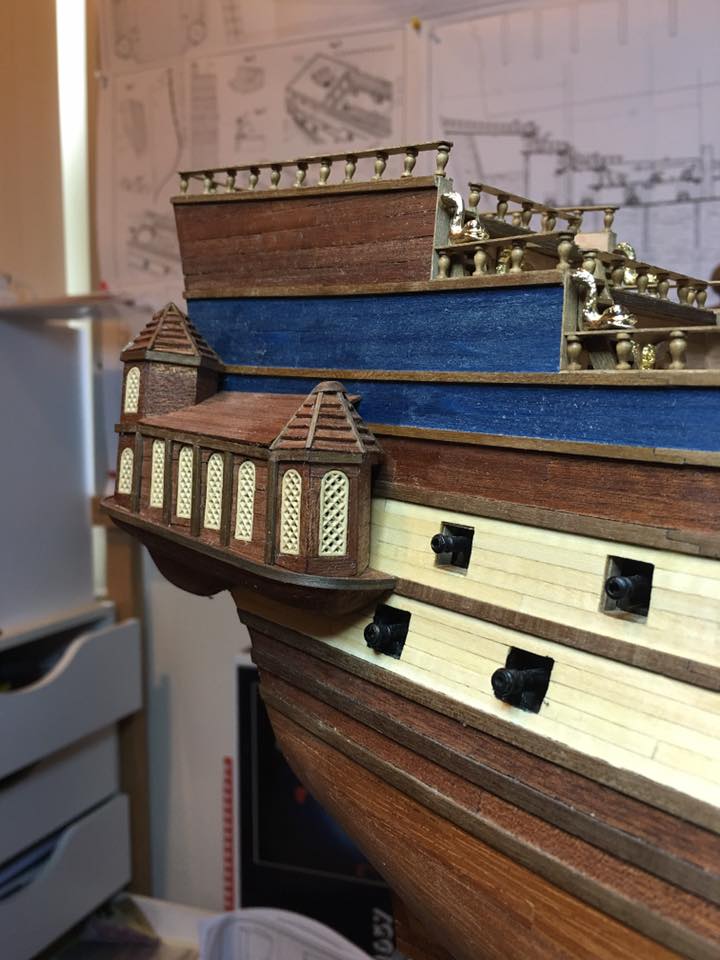
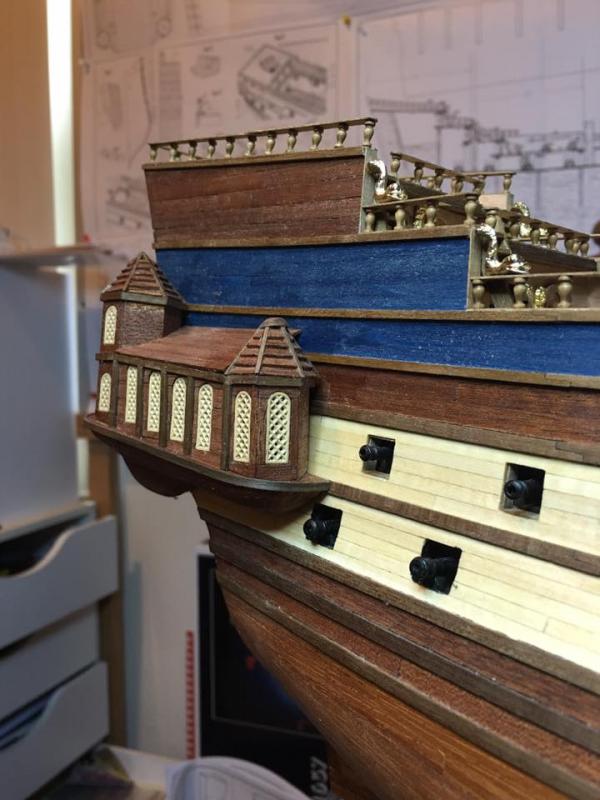
Starboard quarter galleys are complete! Lots of trial, several errors, a couple of cut fingers and one complete start over later and I was finally able to sit back and smile at my work. I'm hoping that the port side will go a bit smoother now that I have a plan on how to build them and learned several ways not to. If not, well the admiral and I did make port this weekend and restocked the bar so I can always just sit back with a glass and look at her which is nice to do also. Well, thanks for stopping by to look and enjoy the pictures.

- 608 replies
-
- 13
-
-
- la couronne
- corel
- (and 1 more)
-
One more suggestion, where rubber gloves or your fingers will match your hull!
- 701 replies
-
- 5
-
-
- phantom
- model shipways
- (and 1 more)
-
Elijah, you shouldn't have a problem with the planks falling off unless you left the whole hull sitting in the can of stain for a long time. The raw wood will absorb the stain very fast and it will take a lot to saturate it to the point that it will debond the glue. Still, light coats are best when applying stain. You will see that is does not take much to make the wood look great. With light coats you can control how dark you want the color to go. Also keep in mind that it will look darker when wet so allow the 1st coat to dry so you can see it's true color before deciding to add another. She is looking great. Look forward to seeing her shine!
- 701 replies
-
- 5
-
-
- phantom
- model shipways
- (and 1 more)
-
I think I will pull up a chair and follow along. This is a new ship to me which always peaks my interest. Don't worry aboutthis being your first build log. I'm on my first as well and I can promise you that they don't grade us on them. In fact, most of the these guys show up with popcorn and sometimes even music. Also there is no time requirements. You have alreay built a couple so you know that they take time to build. Take whatever time you need to build. We willall be here ready to see what you have built when you update no matter how long it takes. Good luck and I look forward to watching you build her.
-
I too did my boot camp up in Great Lakes. That was all the I spent there though as I was a Seabee and had my additional training in Ft. Leonardwood Mo. beforegoing to Monterey Ca. and eventually Port Hueneme. As I had boot through the winter I mostly just remember being cold and having to shovel snow. Basically the same things I do during winters here in Ks.
- 45 replies
-
- 1
-
-
- model shipways
- willie l bennett
- (and 1 more)
-
False Hull Fillers
EJ_L replied to achuck49's topic in Building, Framing, Planking and plating a ships hull and deck
Rough cutting the shapes of your blocks and then using a power tool such as a dremmel for sanding will help it go quickly. Otherwise combinations of carving tools, saws and lots of sandpaper is what you will need. I don't know if the is a easy method for all uses mostly due to the differences in ships hull design each model will have different shapes that will be needed. However as all you are doing is following the lines of the bulkheads it is a fairly easy process if a little time consuming. If you are looking to make the process faster then only worry about fillers at the bow and maybe one or two spaces back and at the ster plus one or two spaces. Unfirtunately, like most aspects of model ship building it is a lot of handwork and time. It is worth it though as this sets up the rest of the project so care should be given to make it right. Good luck when you finally get settled in and can start on your build. -
Looks good to me. At least nothing a little care with some sandpaper and maybe a little filler can't take care of. She will look real sharp once you get her all cleaned up. Great job on your first planking experience!
- 701 replies
-
- 5
-
-
- phantom
- model shipways
- (and 1 more)
-
Your framing is looking good. Taking your time with your measuring and layout will pay off big for you down the road.
-
It looks like you have a good handle on this one as she is shaping up nicely. As to the putty, that is typically what I will do. The preliminary sanding helps to show where you need the fill at. The big question is what are your plans for the outside finish? If you are double planking then go ahead and use the putty to your hearts content. If painting or staining then be carefull on both the type and quantity of putty used as it can show through both finishes if you are not careful. It is less of an issue with paint other than it can cover your planks seams but if sanded down properly amd not globbed on then you will be fine. Stain is a lot trickier as you can see it and so extra care should be taken with both the color of the filler and trying not to use too much. I have not built this ship myself so I can't really help you much on the other questions but I am sure someone will chime n shortly with those answers. Keep up the great work!
- 45 replies
-
- 2
-
-
- model shipways
- willie l bennett
- (and 1 more)
-
Okay, so after spending some time looking through my drawings and pictures that I have been using to help build this ship I have noticed that I did indeed mess up on the platforms for the quarter galleys. They are built in the right direction but where they hang down on the rear is a bit off. I have mine going almost straight down with just a slight curve towards the front. This curve should be much more defined so that it is more of a arc shape from front to rear. Hopefully if you are building this same ship you catch this before I had it pointed out to me! Whoops! Well, not the first mistake nor will it be my last on this ship. I doubt I will change it at this point. Those platforms were kind of a pain to build and honestly it doesn't bother me that much. I may change my mind if it sits and festers in my brain. We shall see. As for now I am still pushing onward with the galleys. Trying to build the center cabin now. Should have some pictures in a couple of days. May be time for a drink....
- 608 replies
-
- 4
-
-
- la couronne
- corel
- (and 1 more)
-
I would normally think the same but all the images I have seen of her show it built this way. My guess is that it help to give better stability to the taller tower. If I could see how they were actually built structurally that would help but I have not yet fund a framing plan that shows how those were built. Then again it could just be a weird design feature. Many ships from this era have designs on them that do not make a lot of sense. That is one of the things I actually like. Gves them features that stand out and sets them apart, for better or worse, from other ships.
- 608 replies
-
- 4
-
-
- la couronne
- corel
- (and 1 more)