bruce d
-
Posts
3,045 -
Joined
-
Last visited
Content Type
Profiles
Forums
Gallery
Events
Everything posted by bruce d
-
 Many thanks Ryland, I will try harder in the future.
 -
I goofed and put my Mediator scratch-build log in the 'kits' forum. If there is a way for it to be moved by me I have not found it. Can you correct my mistake please? Thanks, Bruce
-
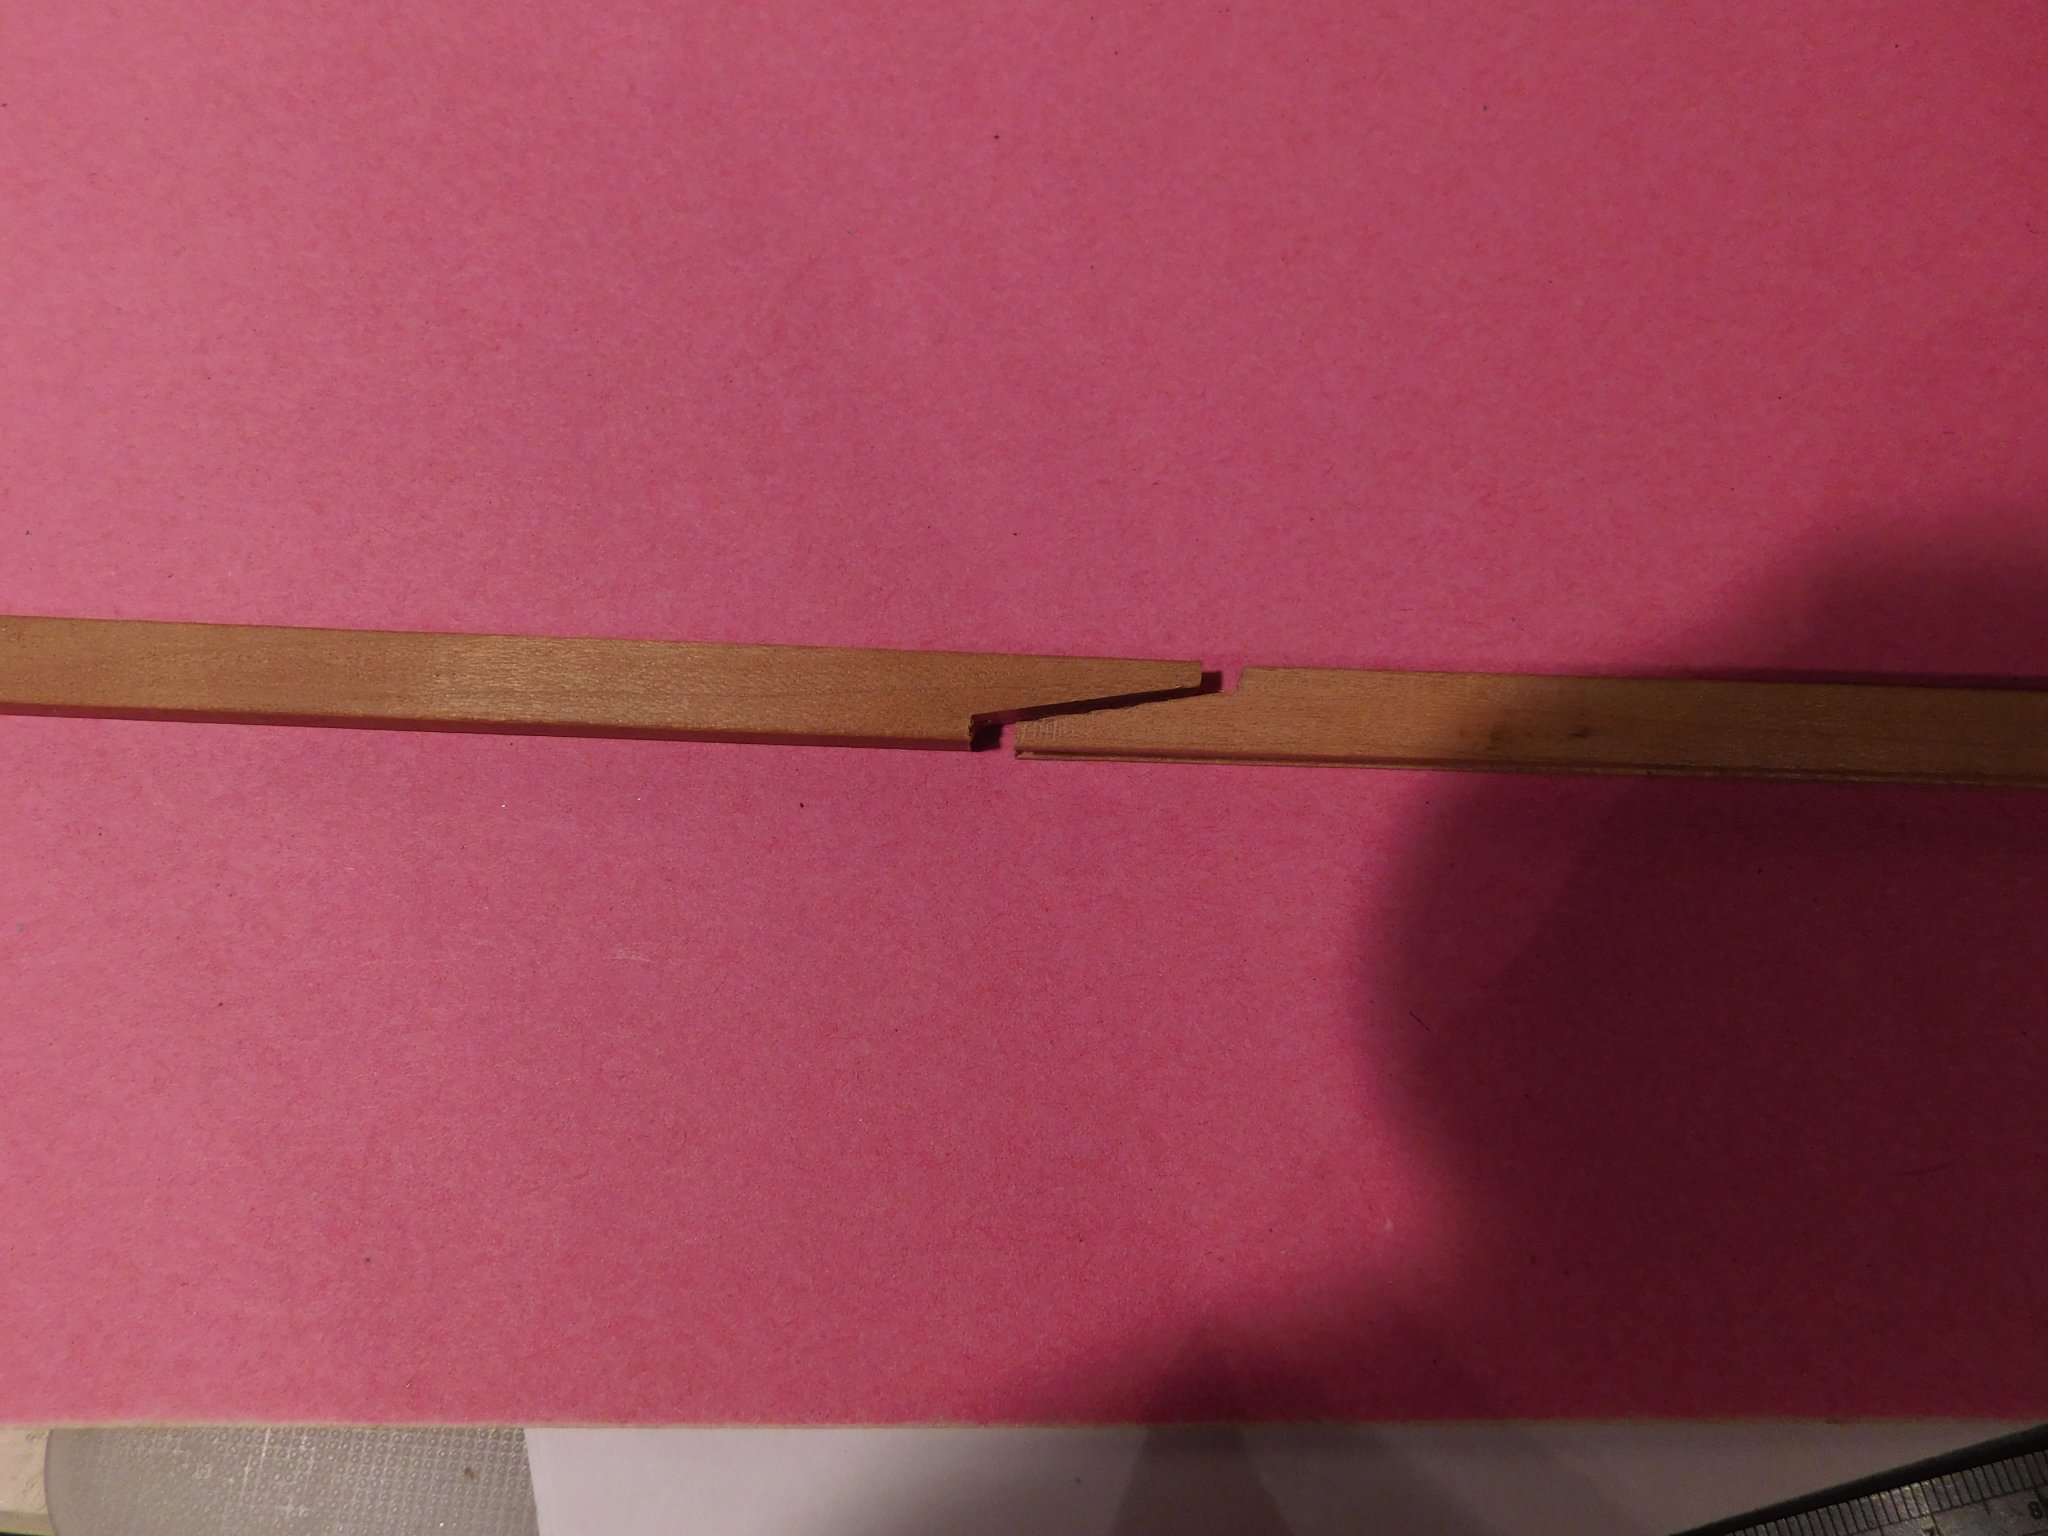
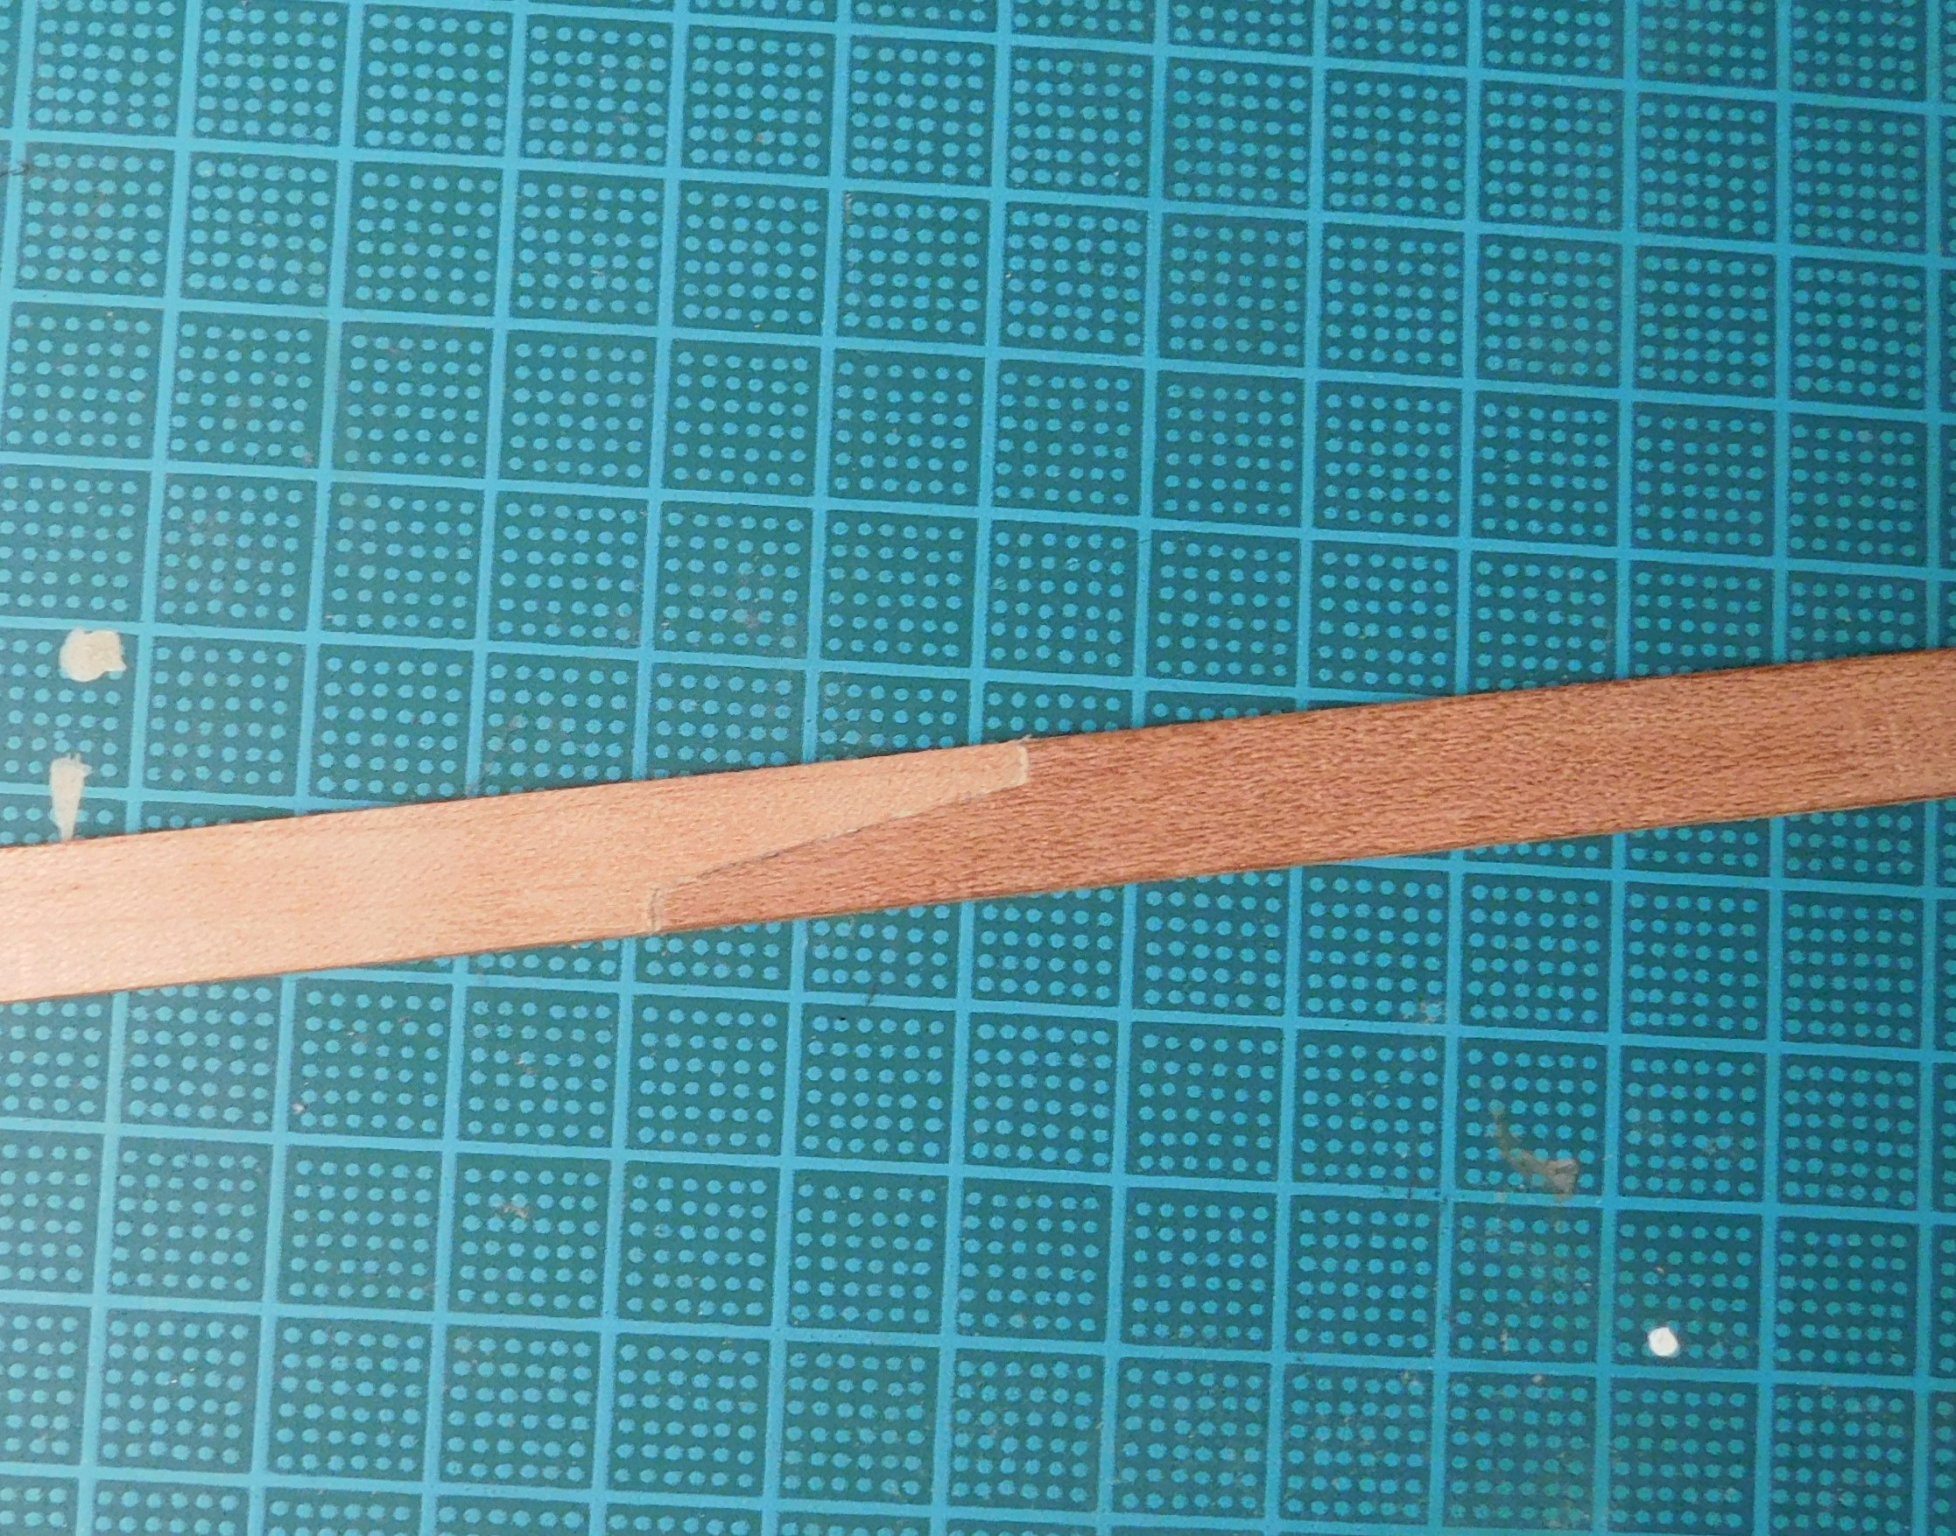
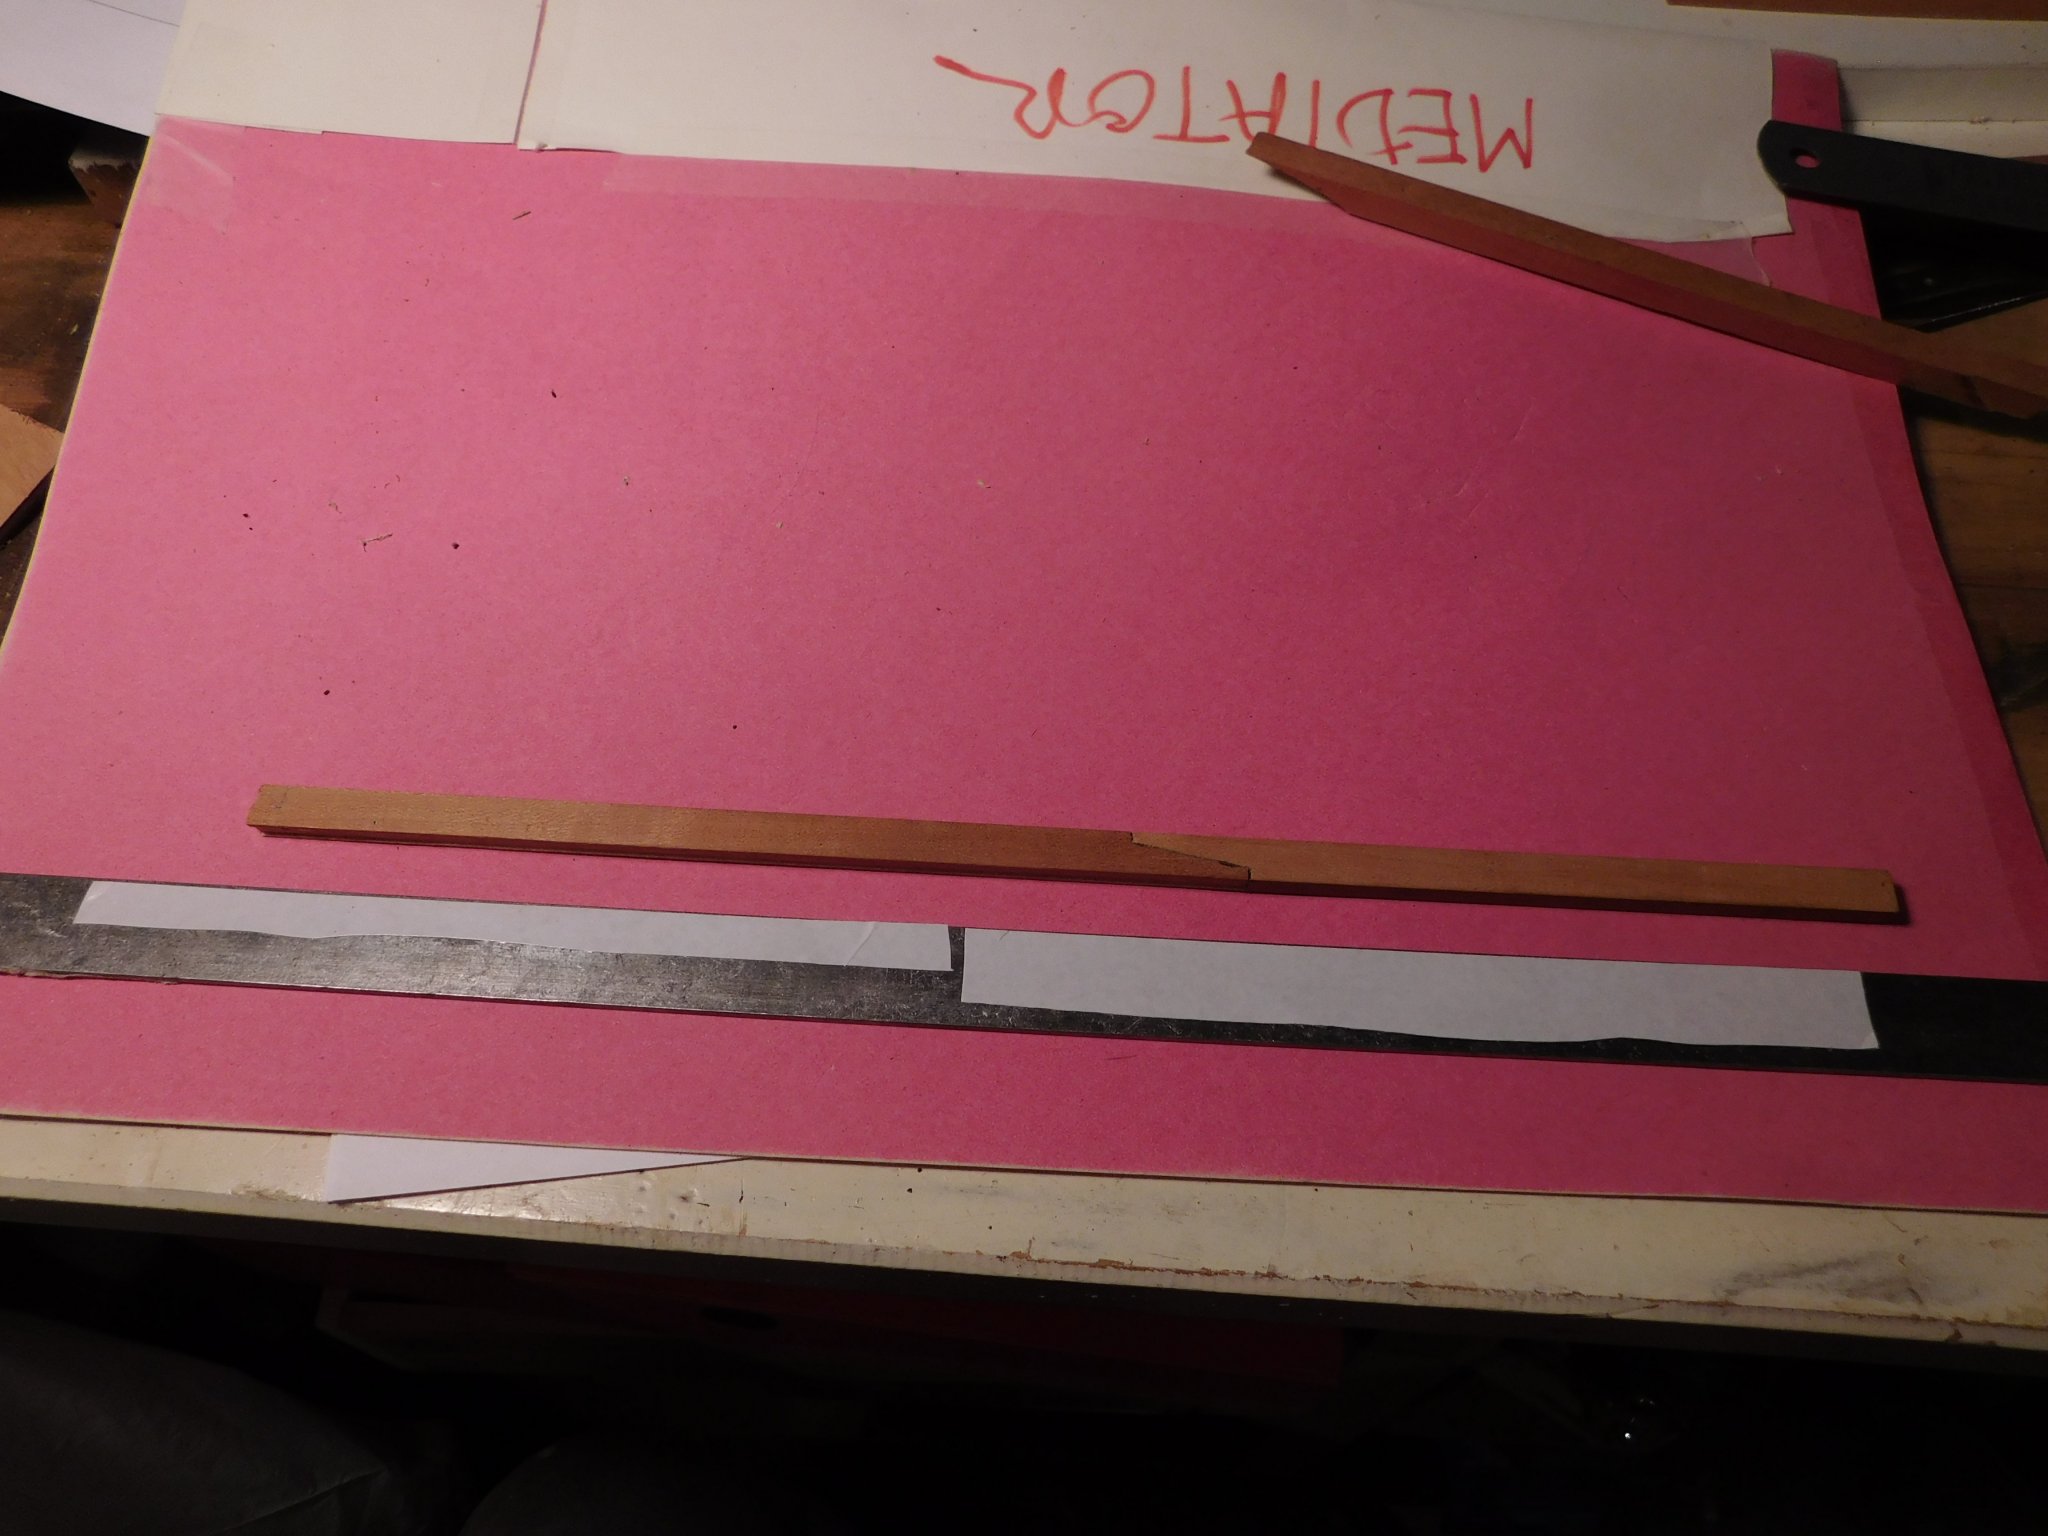
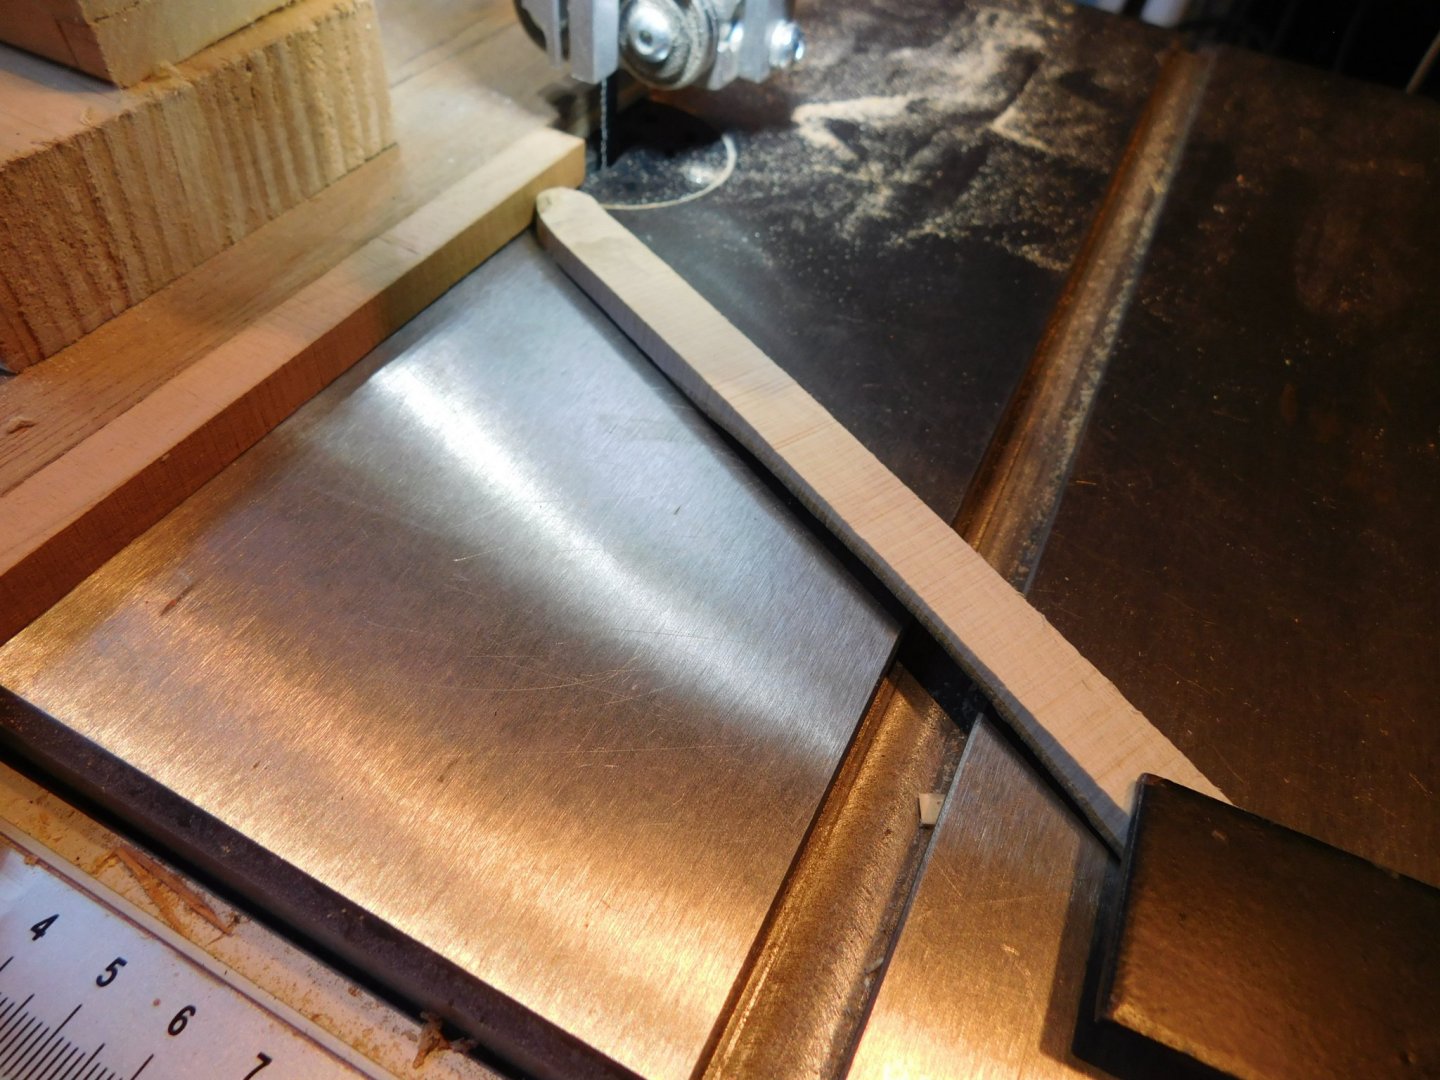
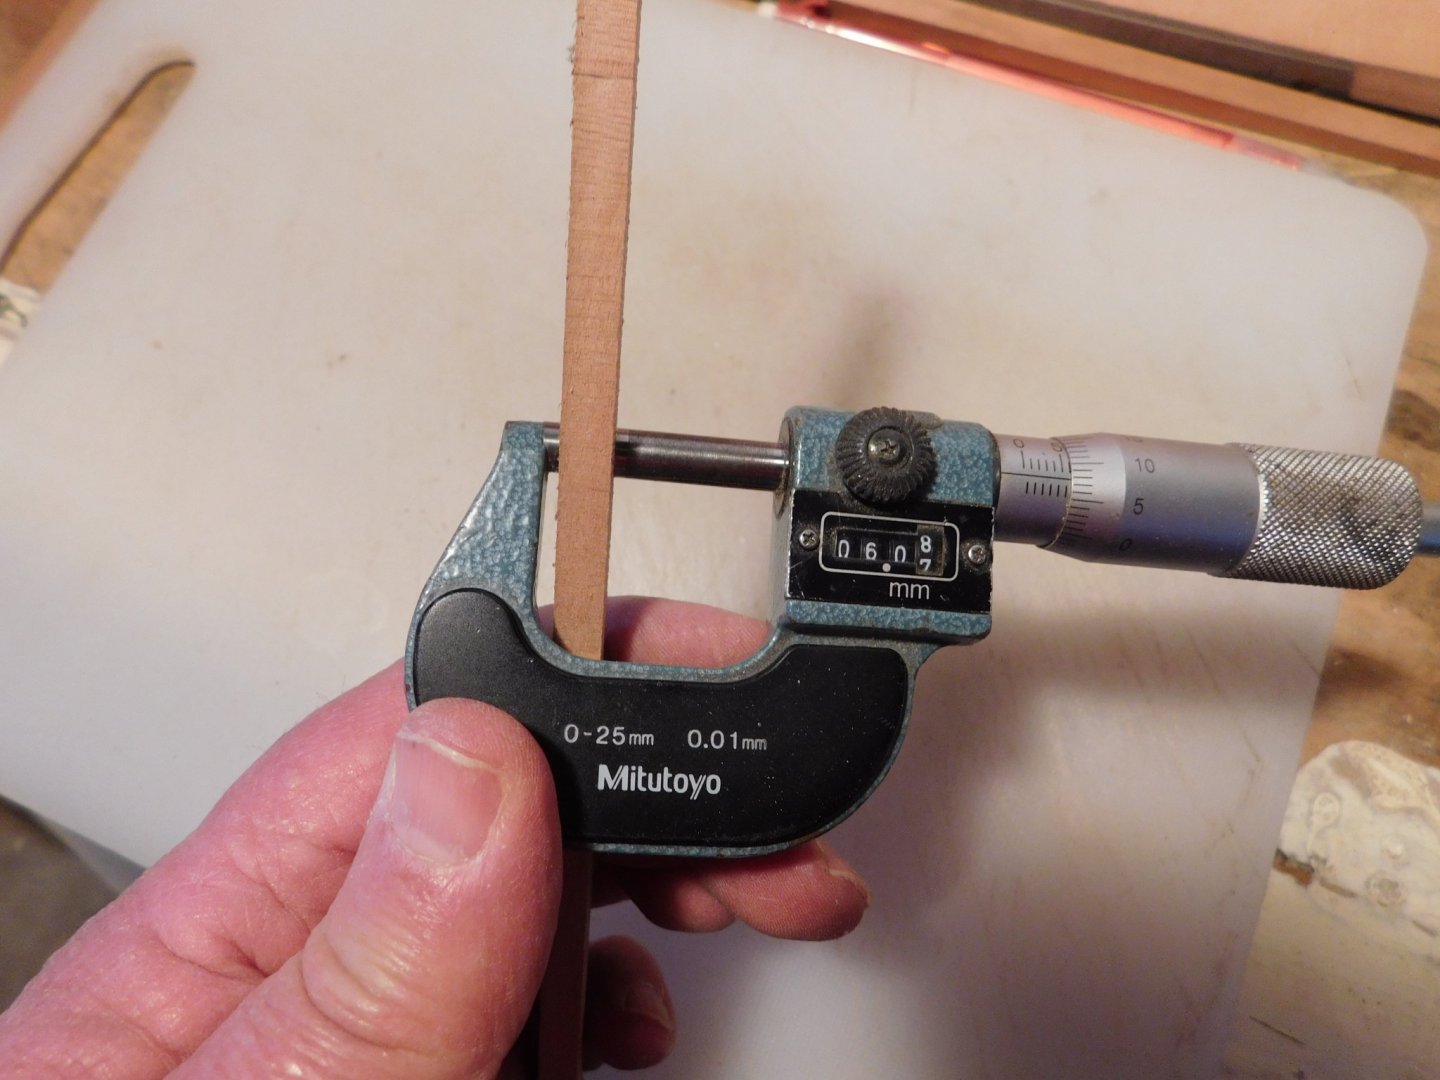
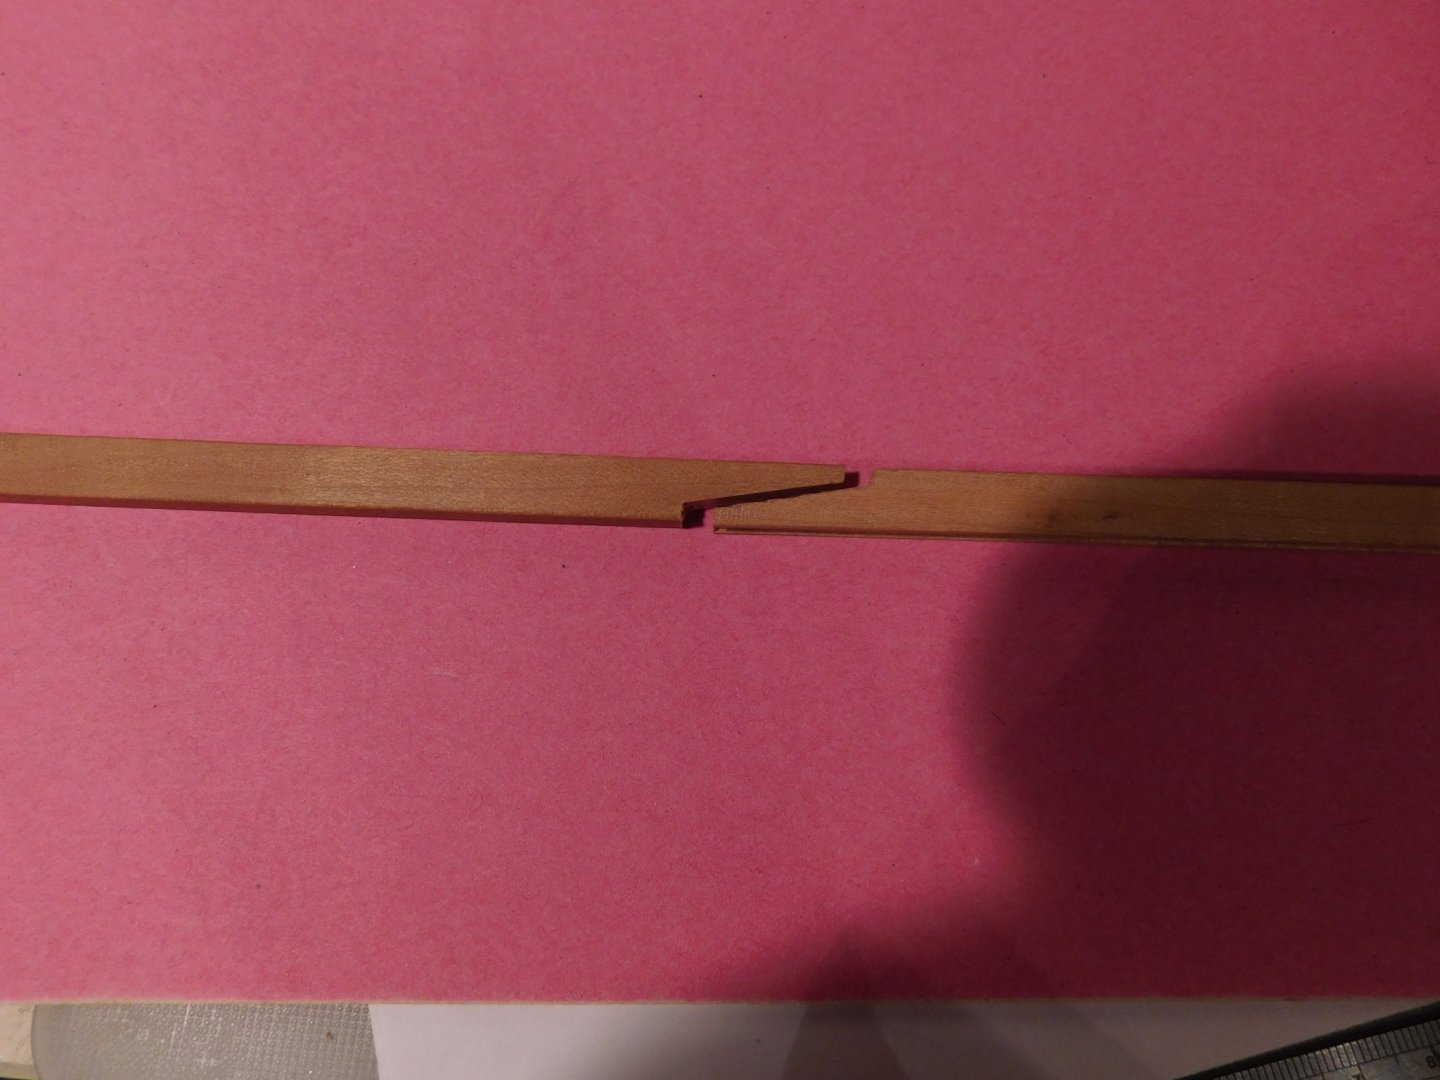
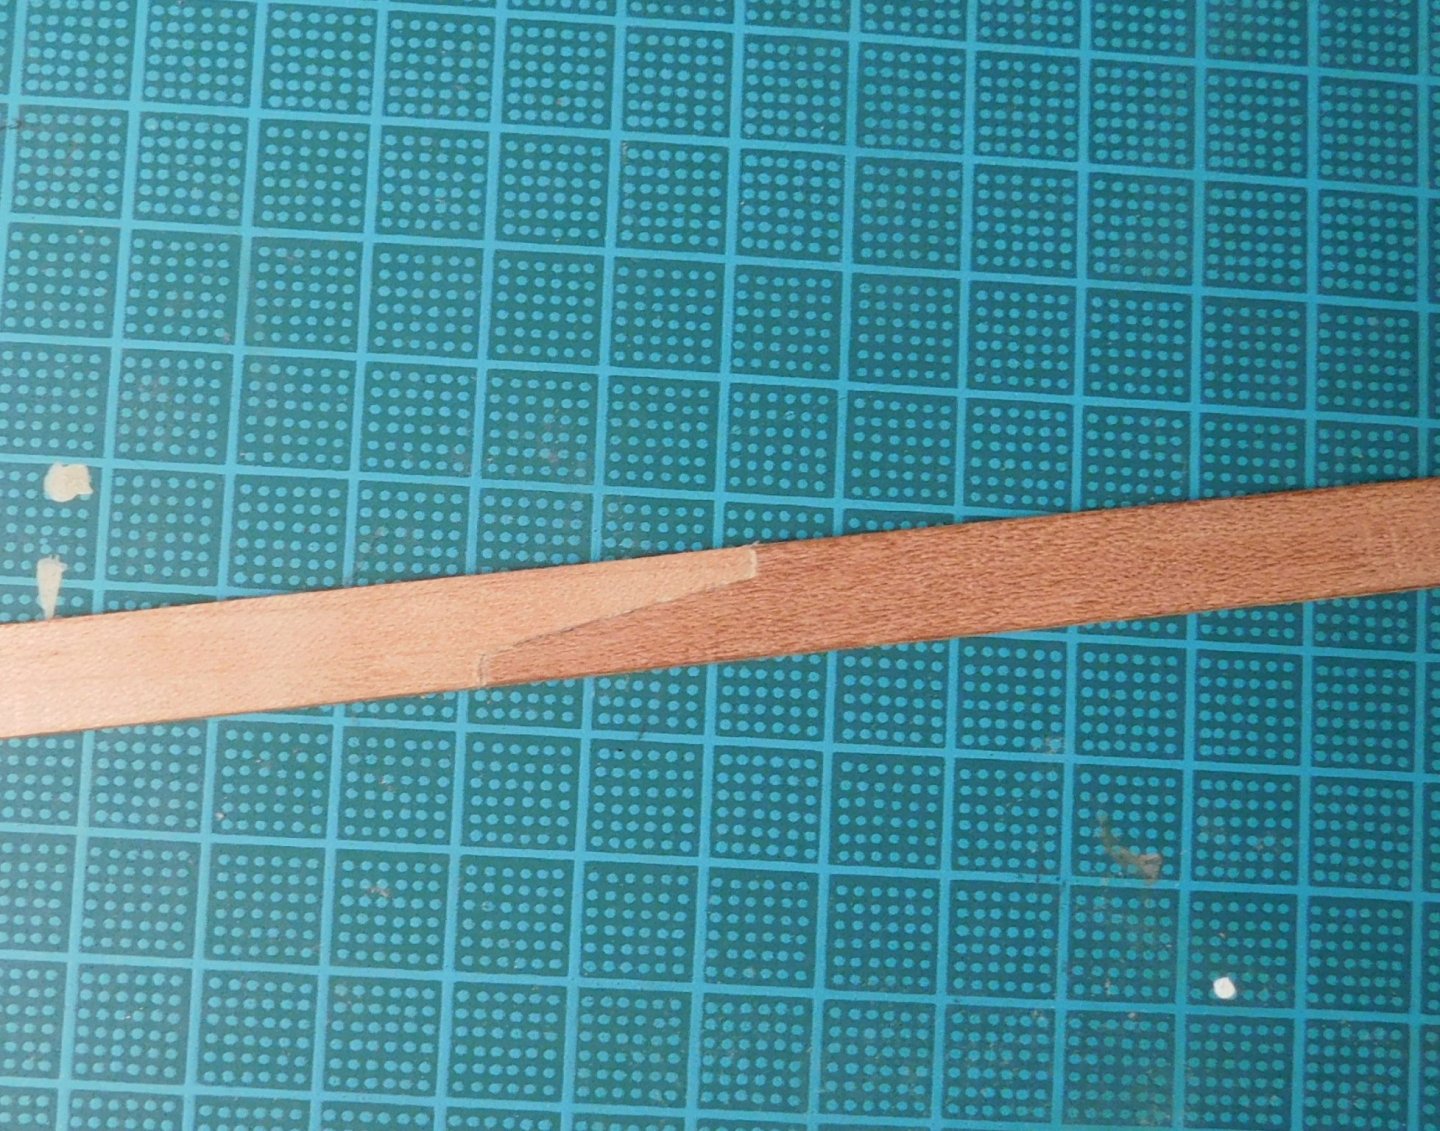
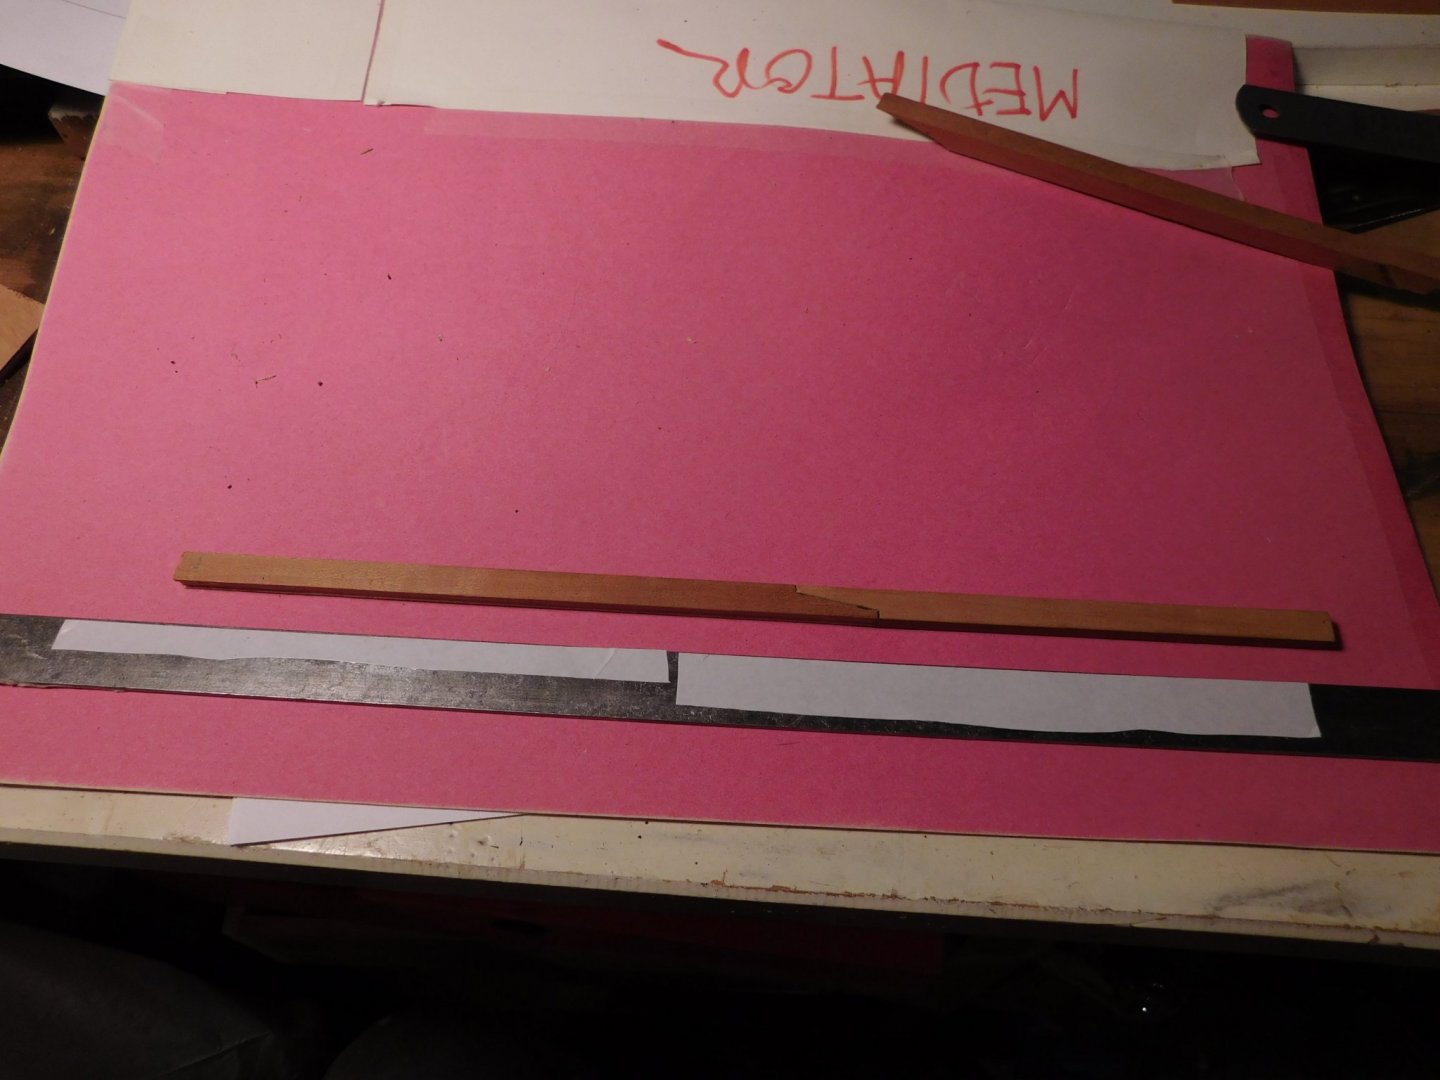
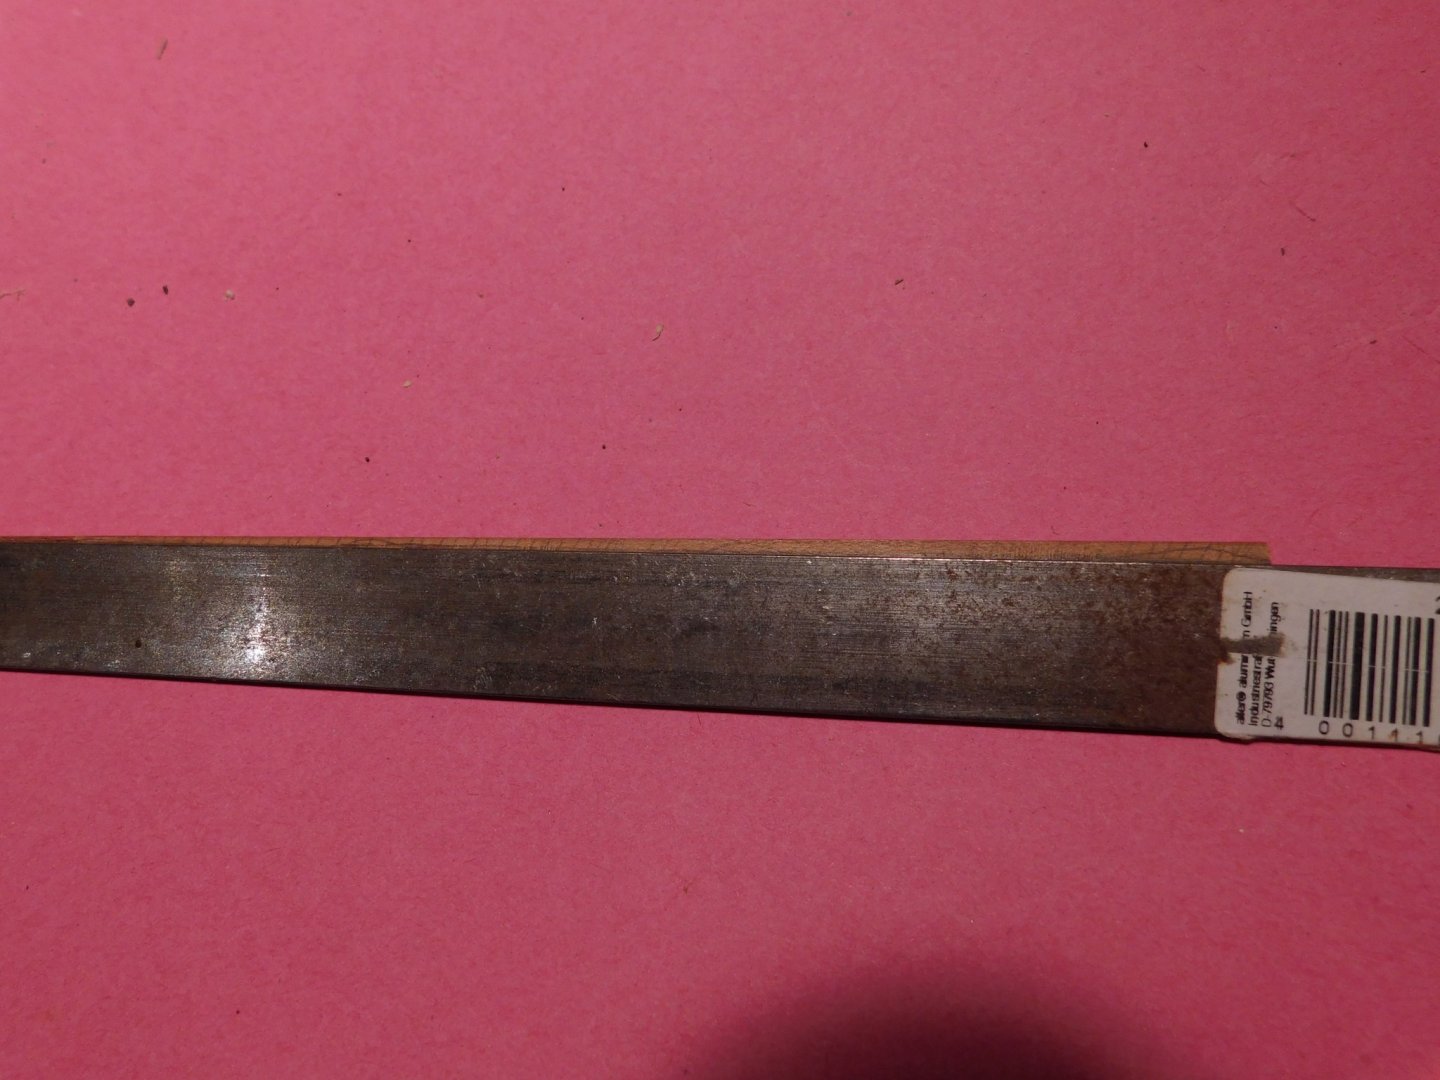
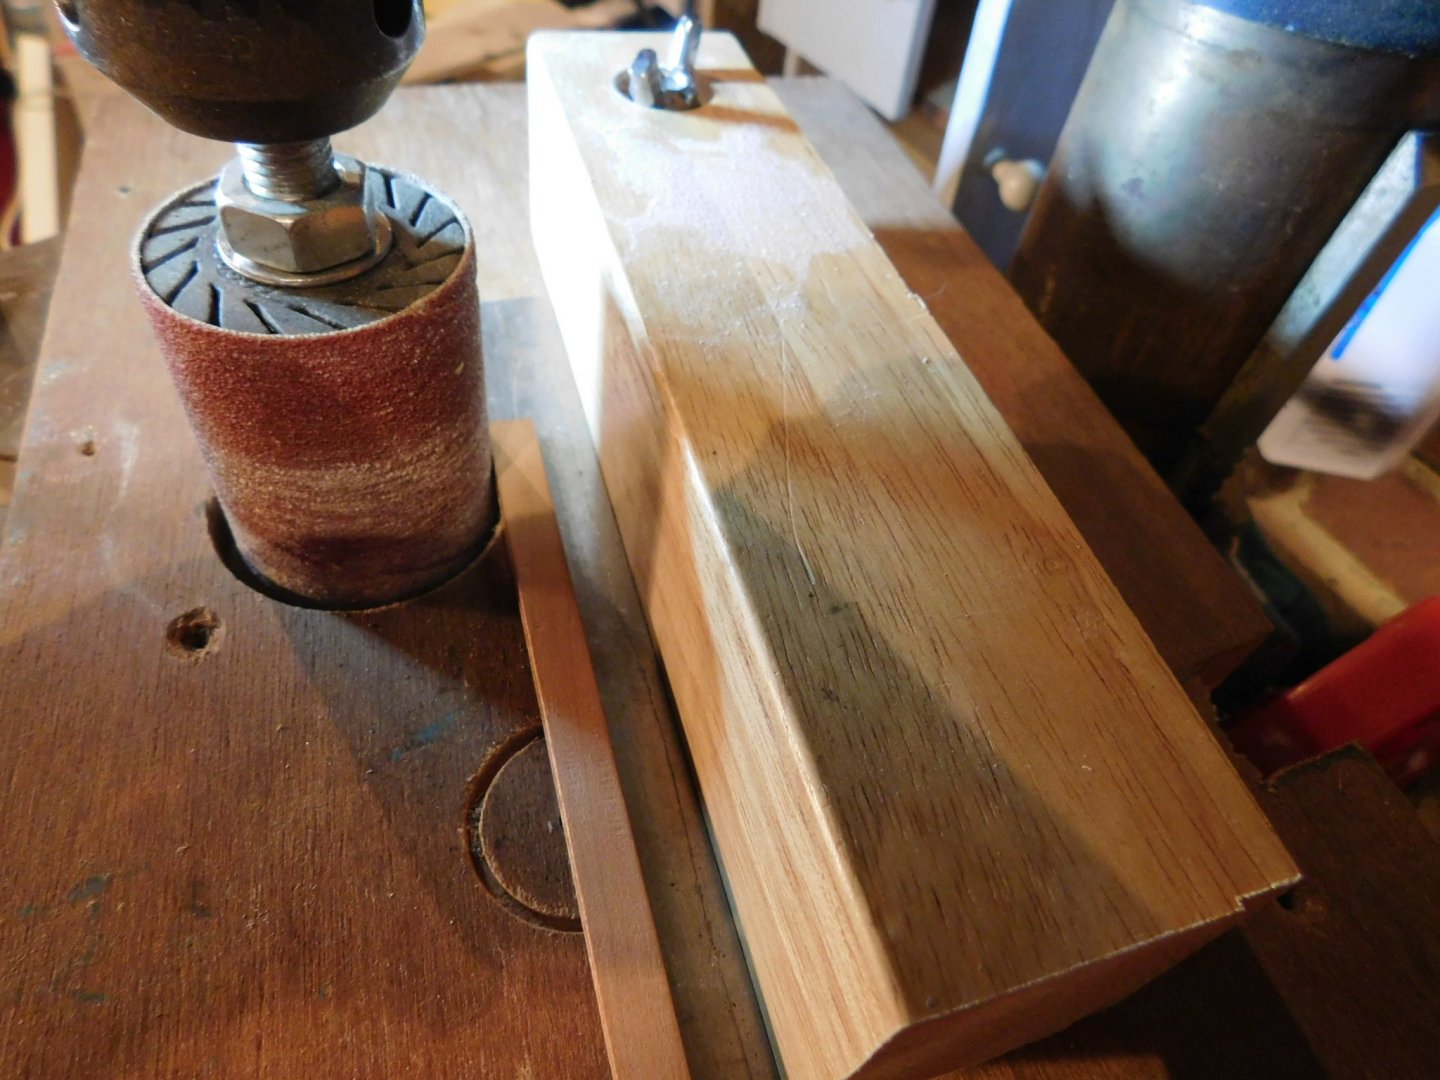
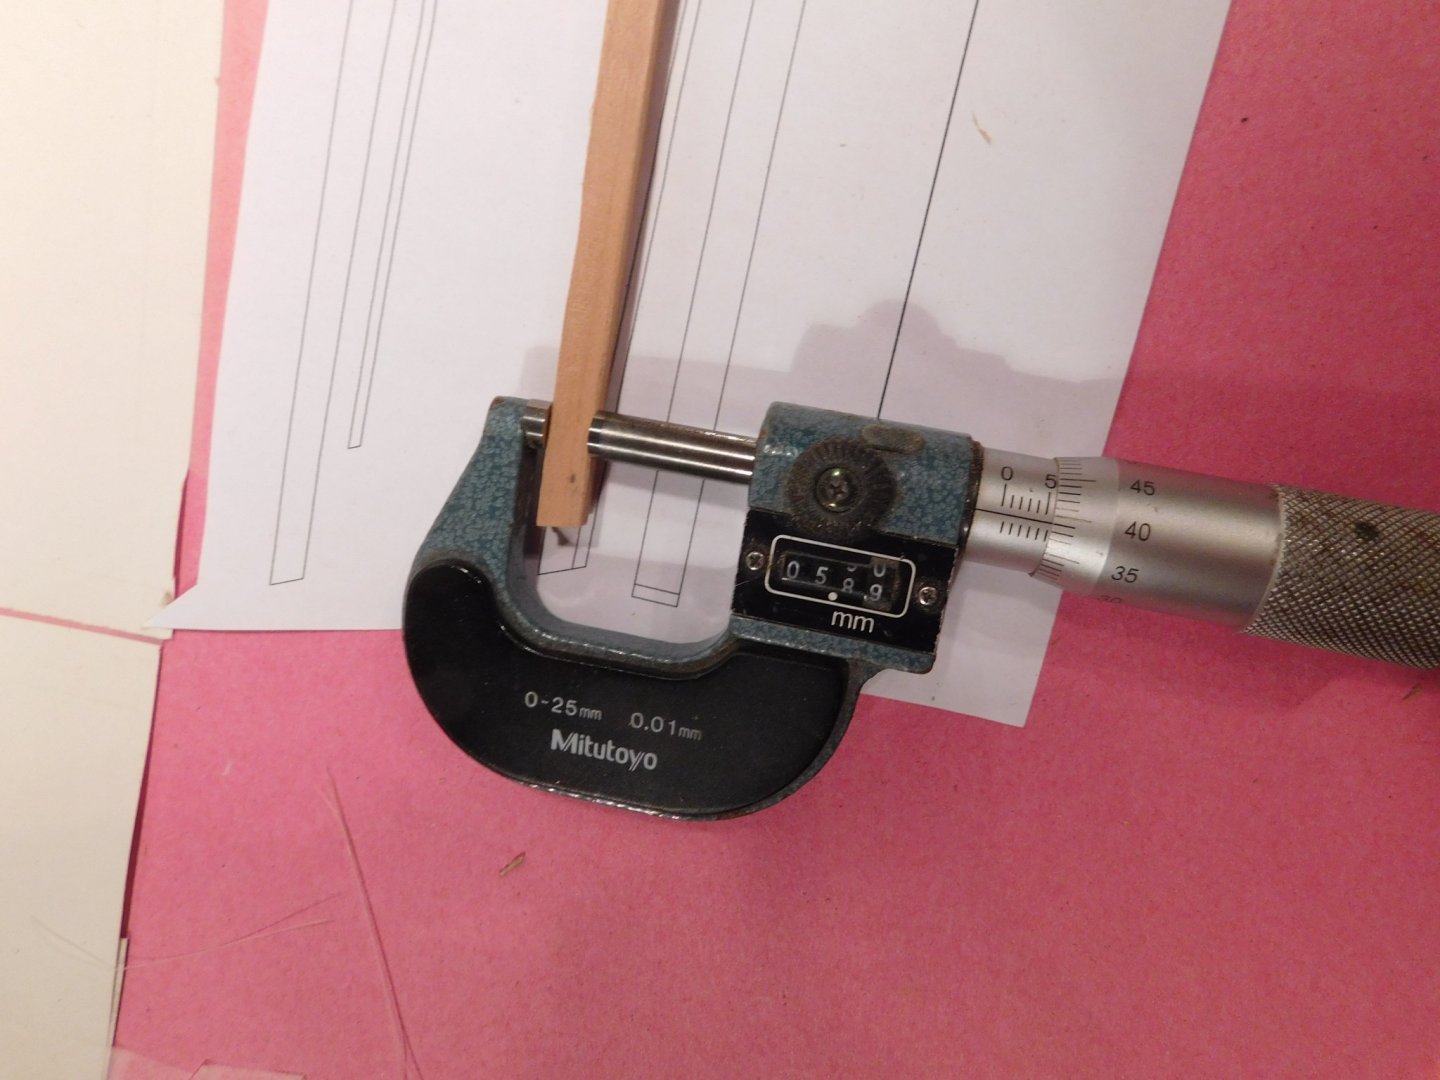
All shaping and fettling of the keel, stem and sternpost is done now before gluing the bulkheads in place. For the ‘1/4 inch material’ specified for these components, I am using cherry. Starting at the sharp end, the components are a stempost comprising three pieces. Probably due to the circular shape of the finished item, the stem gracefully butts to the keel without either deadwood or rising wood. Close examination of the NMM plan reveals nothing to contradict this so, again, my compliments to Jeff Straud for unravelling this aspect of the plan. The keel: the height tapers from thick at the fore end to less at the stern. I also will model the taper fore and aft of the width although it is drawn with parallel sidings. A false keel is fitted and it’s depth is provided for in the shape of the stem where the two meet. The sternpost is one piece and straight with a taper. The finished keel will have a single scarf joint, a taper in height from the stem to the stern, and a taper in width at each end. I think I know how I am going to tackle this combination of angles but will take stock when it is on the workbench. For the record, the plans as drawn do not include the taper in width. This is my take on practice of the time. I cut an overlong piece of cherry 6mm x 11mm on the bandsaw and spent a couple of minutes sanding it to a smooth finish. Before any shaping or trimming to length, first comes the keel’s scarf joint. I cut it at approximately the right spot and milled the two pieces simultaneously. The result seems acceptable. . Here is the glued scarf after sanding. I hope it will not be a weak spot considering the handling and fettling needed for all those angles I just mentioned. I used a dab of acrylic paint in the PVA glue and it worked but I had hoped for a more crisp line to the join. To taper the length of the keel piece I needed a jig. The taper was achieved by removing material from both top and bottom faces of the keel piece. The stern is about 4.5mm thicker than the stem and, by my laboured calculations, the new top and bottom edges would pass through the butts of the scarf at the correct spot to leave a scale-correct appearance. I spent a few tense minutes lining up a straightedge to test the theory and eventually relaxed. A piece of steel strip a bit longer than the workpiece was the starting point. It had straight, parallel sides with a clean, un-nicked edge. Double sided tape was placed along one edge. The long keel-piece was laid carefully in place with the unwanted material overhanging the edge and pressed into the sticky tape. Next, I took this little ensemble to my home-brewed thicknesser which was already set up to match exactly the width of the steel strip. The right-hand edge of the steel travels along the fence, the left just barely touches the rotating drum: the material hanging over the edge is removed. With one side down and one to go I was pathetically pleased to see the new edge passed through the butt end of the scarf exactly where it should. After carefully prising away the keel (mind the scarf!) I left the tape on the steel. After marking the other side of the keel piece and mounting it as before, re-using the same tape, I ran it through. It worked. The emphasis was more on getting two straight lines rather than a smooth finish as neither face will be visible, only the sides. Key to success: running the drum at high speed. I used 3500 rpm.

- 43 replies
-
- 6
-

-
- mediator
- first build
- (and 1 more)
-
Good grief, I dozed off on that one. Thanks! Mods, help please? Or can I do it myself?
- 43 replies
-
- 2
-
-
- mediator
- first build
- (and 1 more)
-
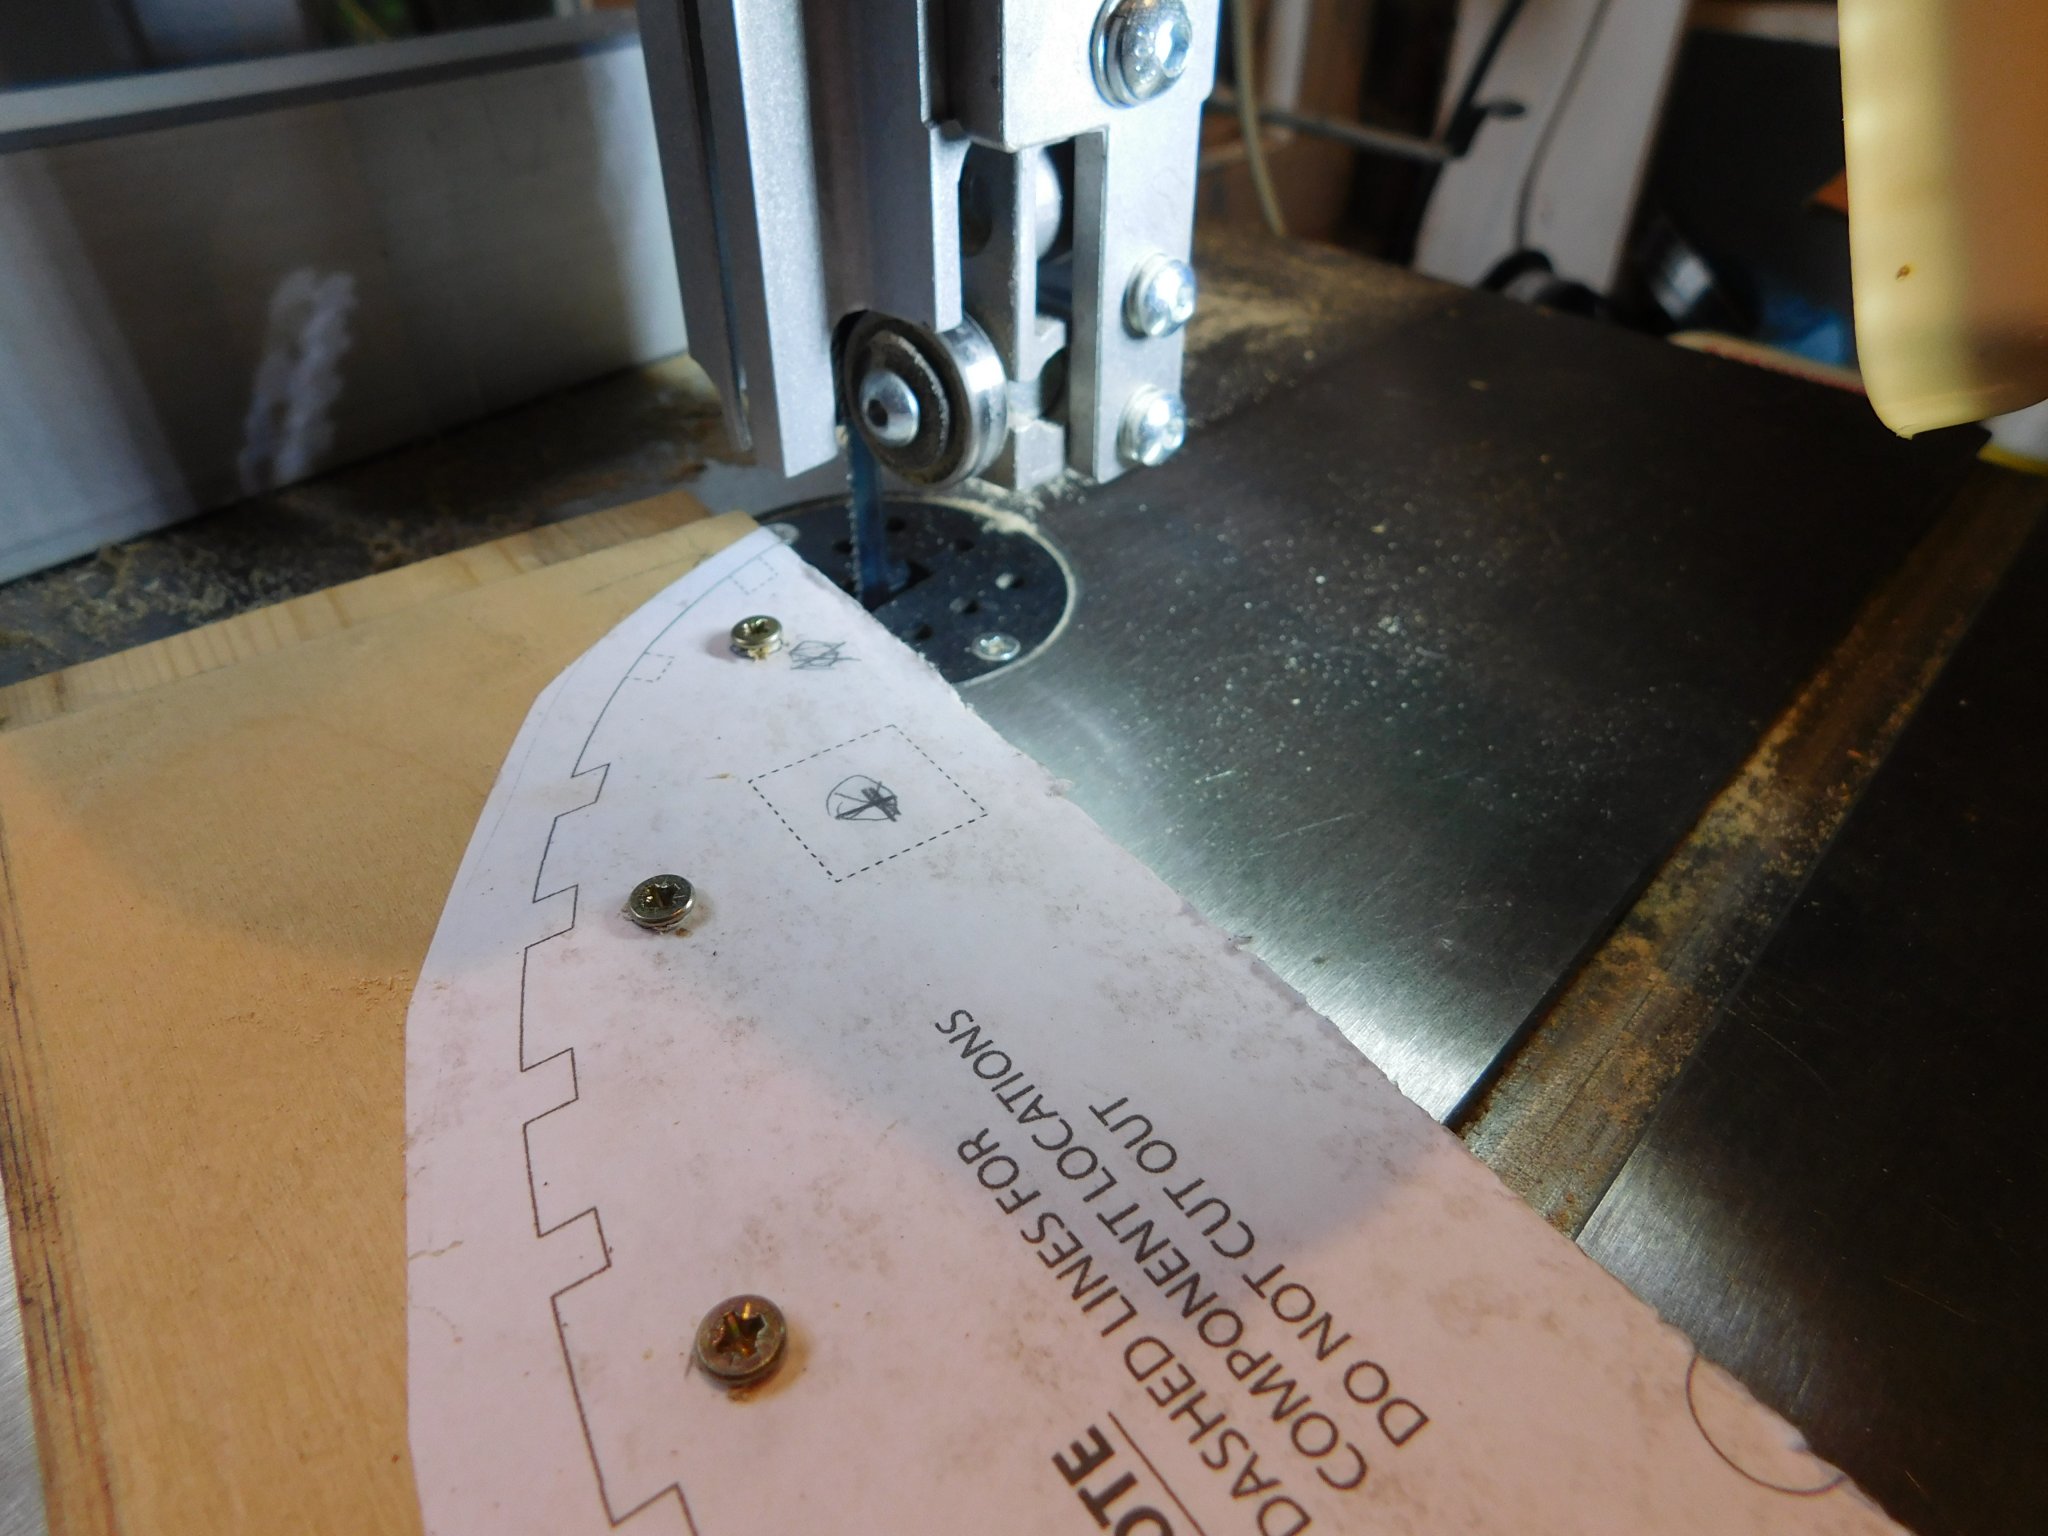
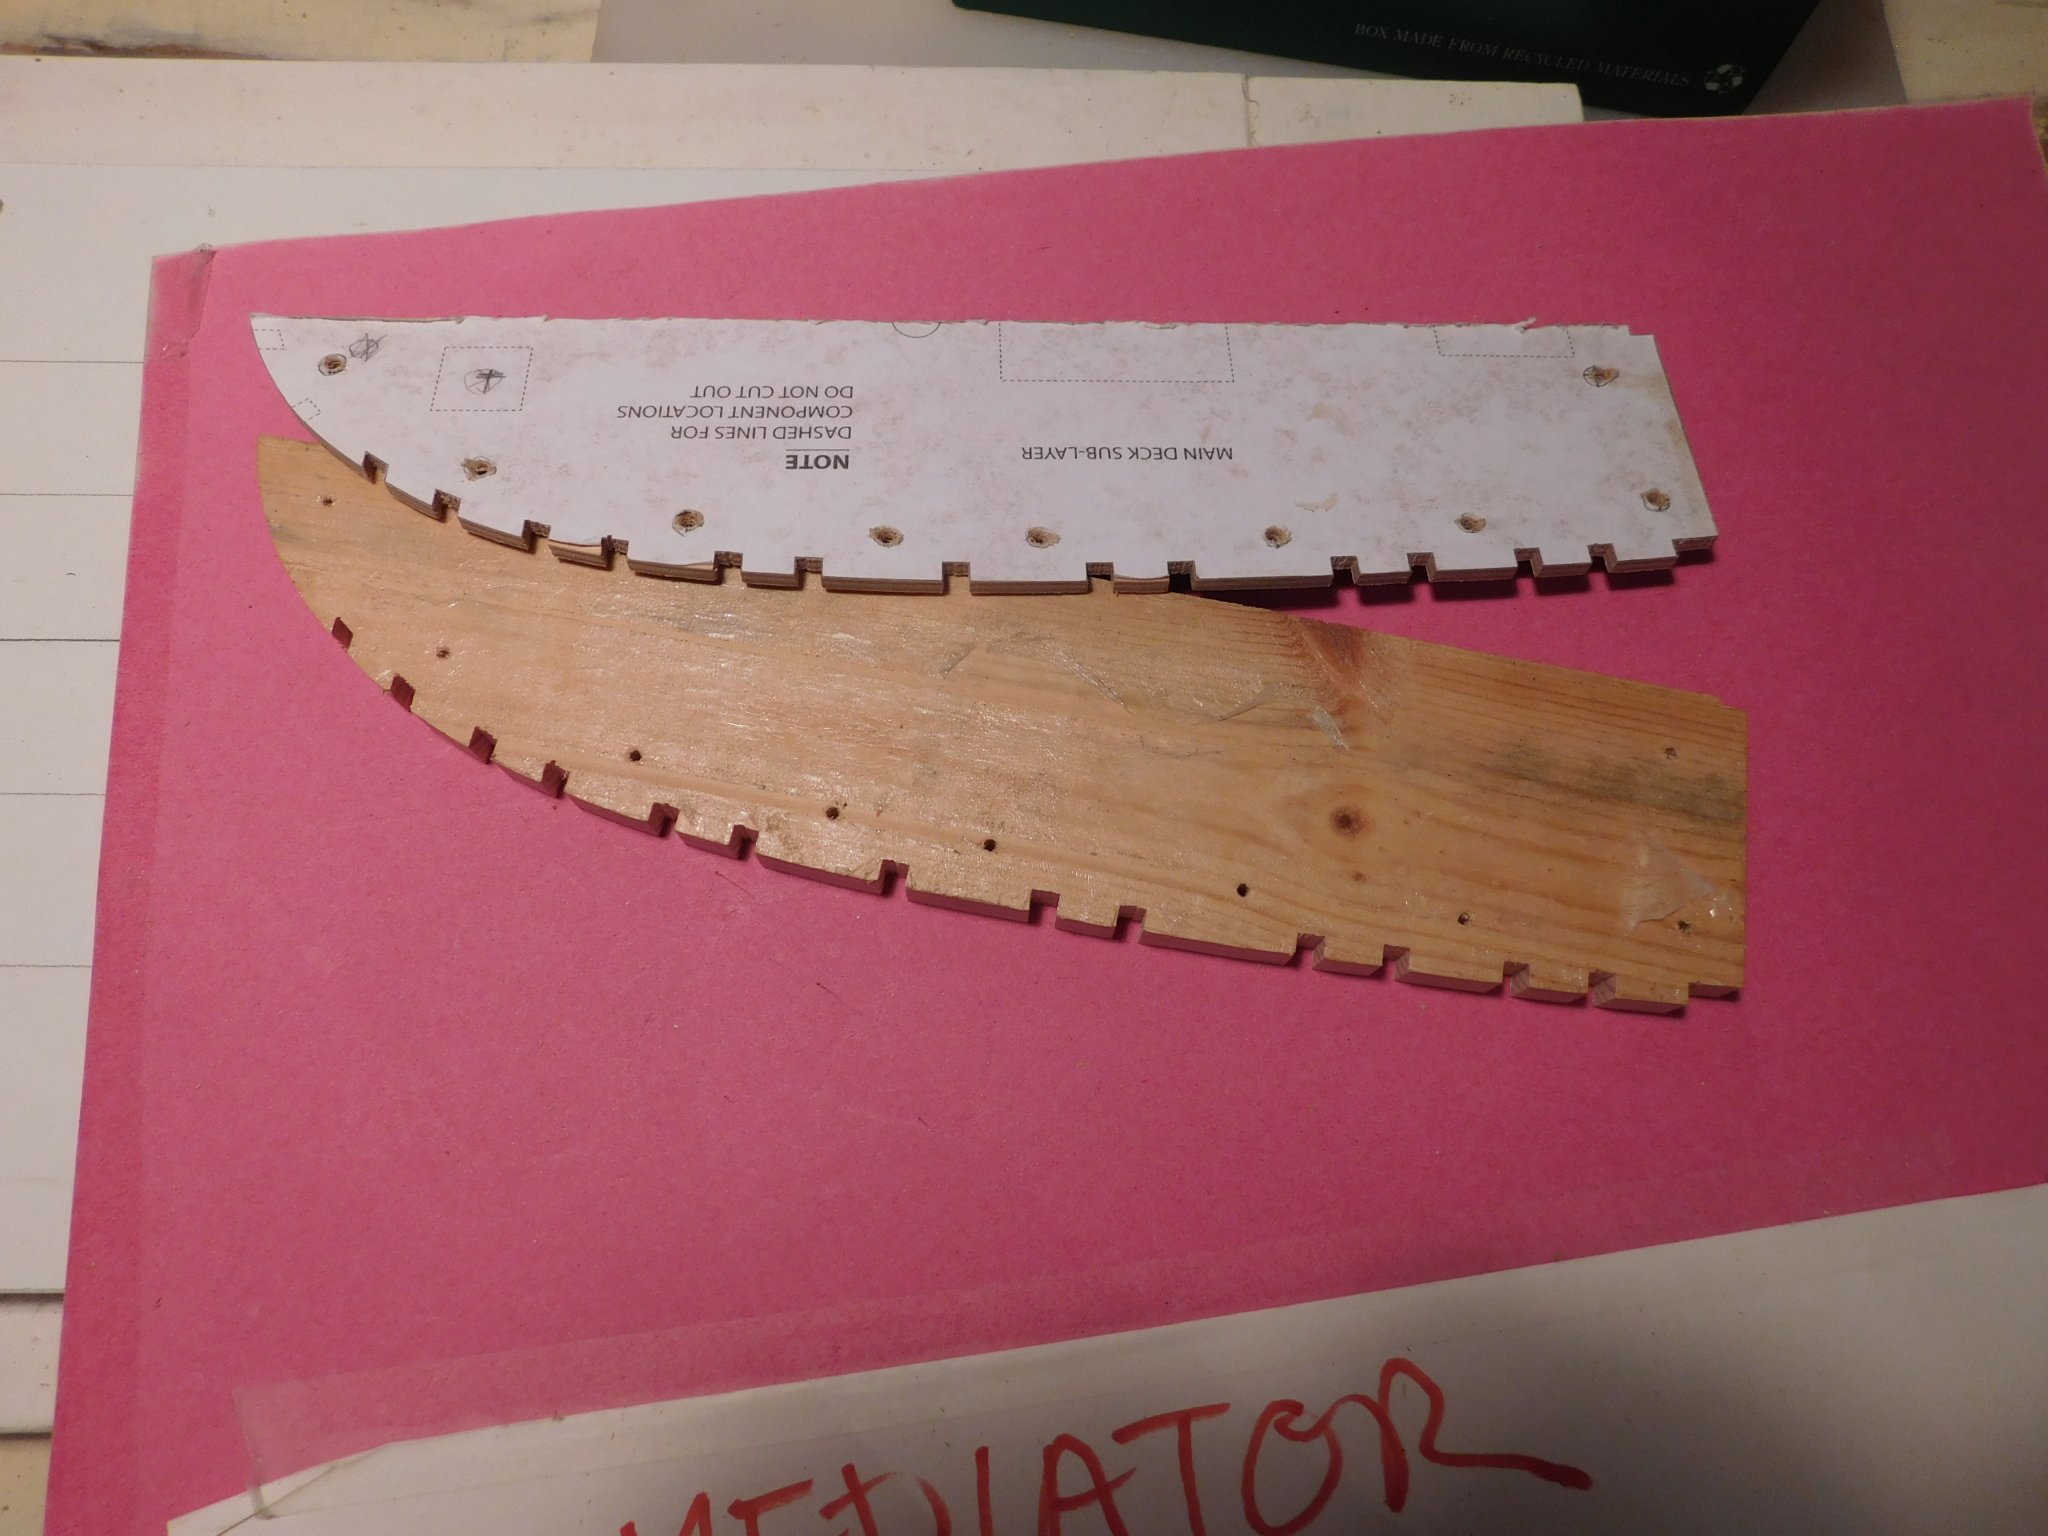
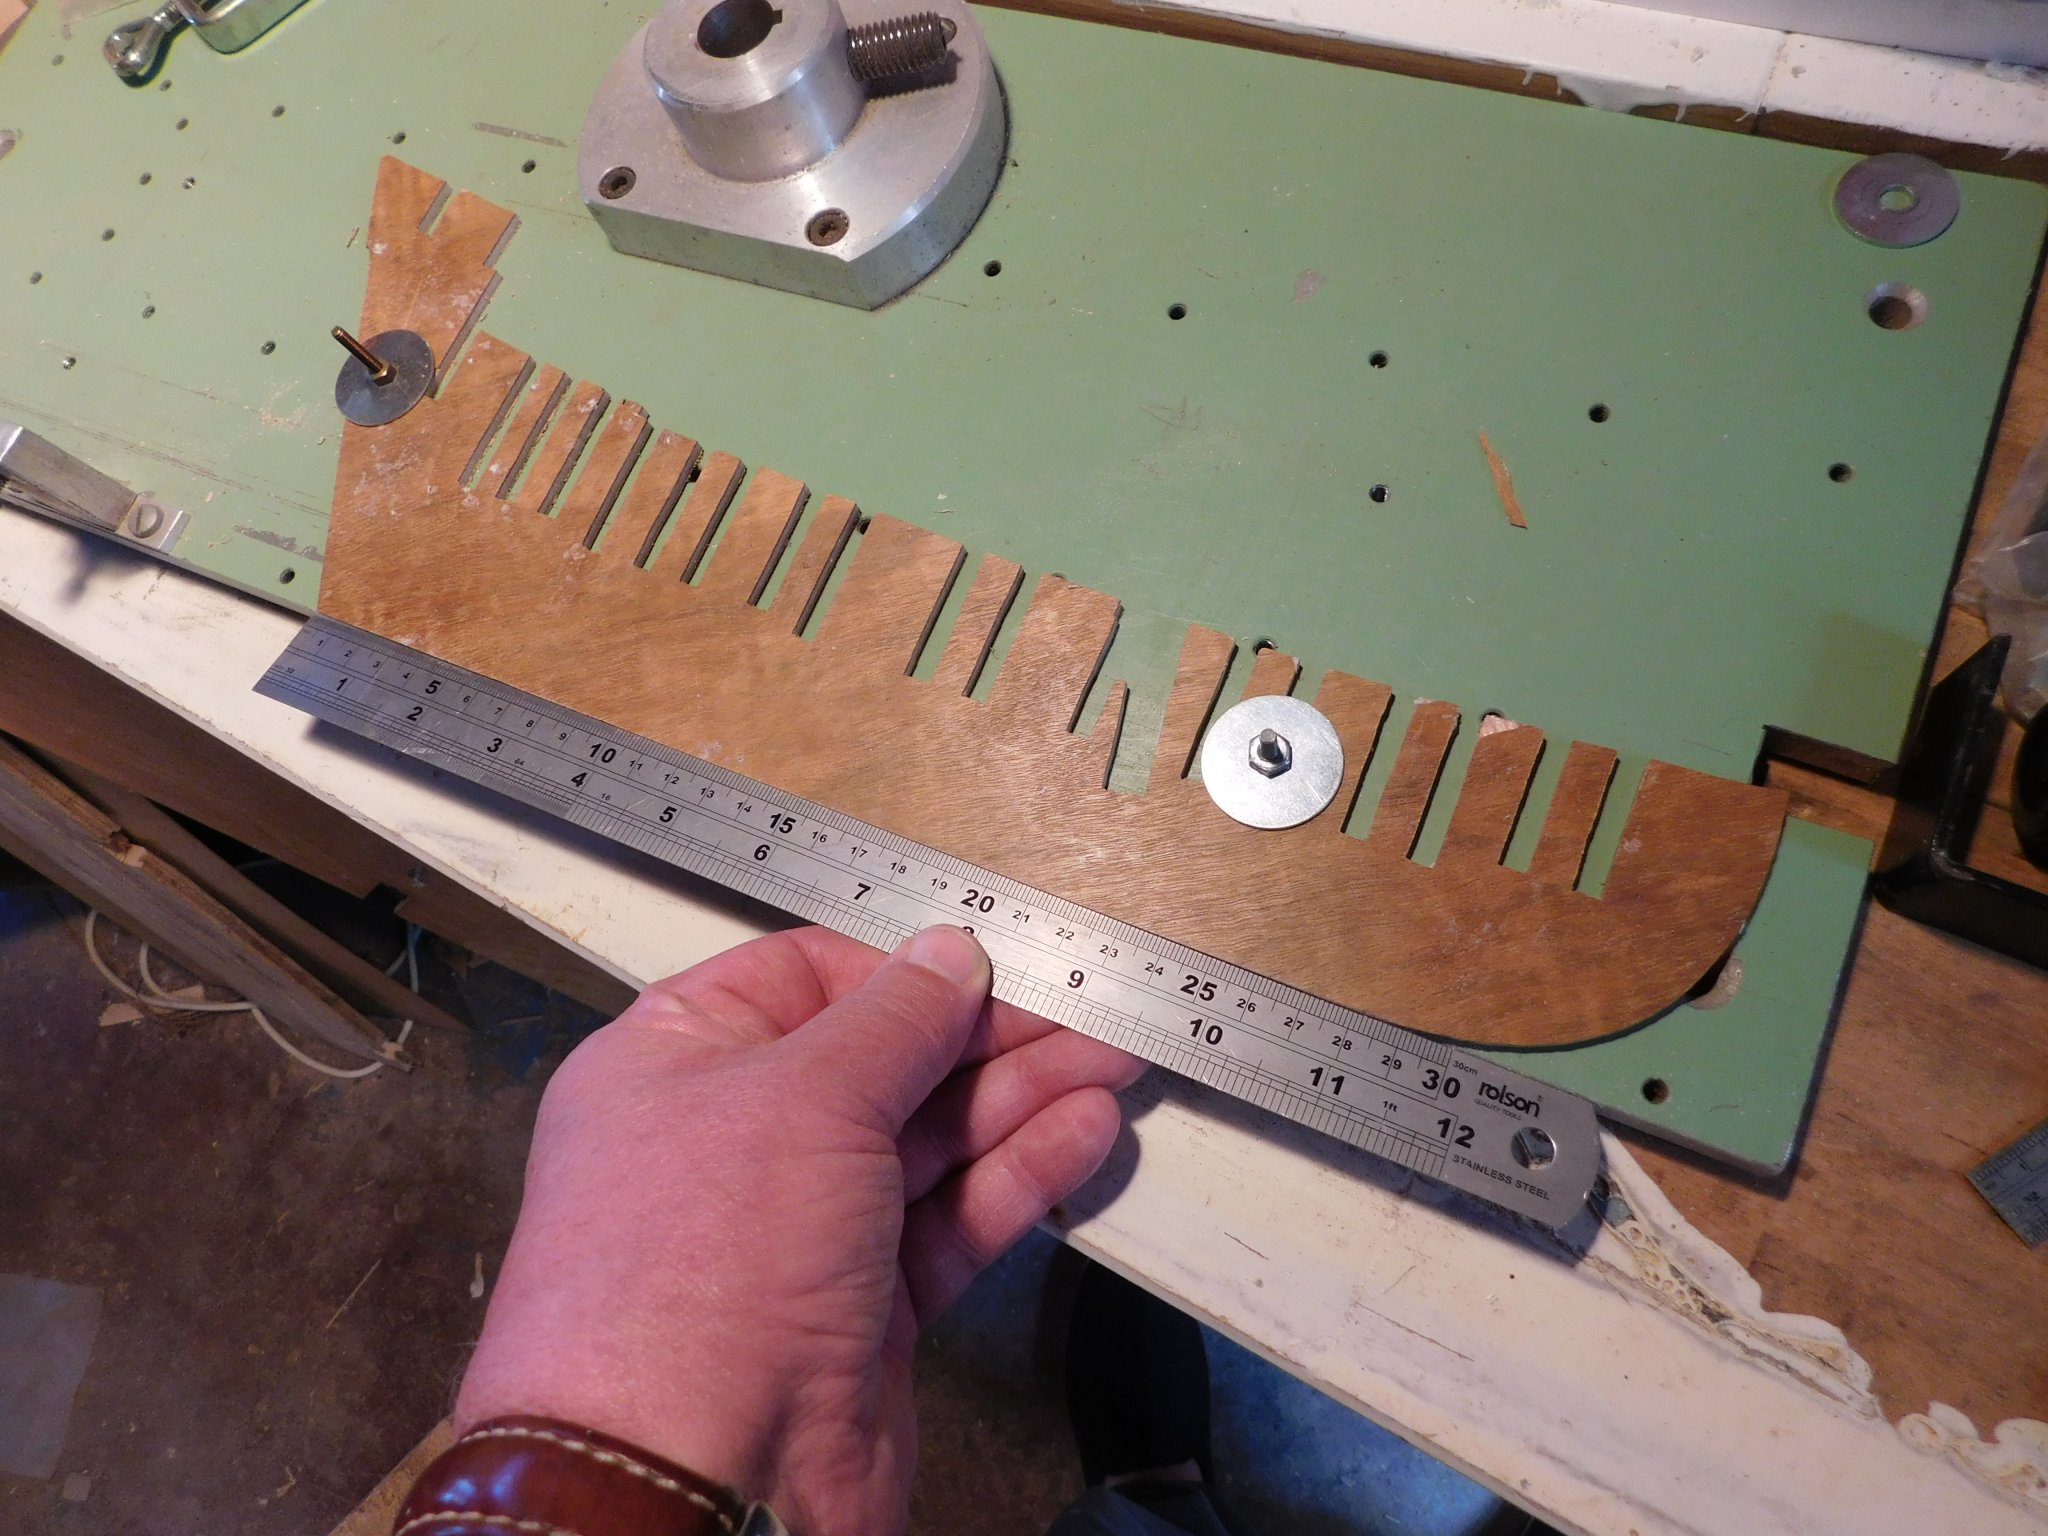
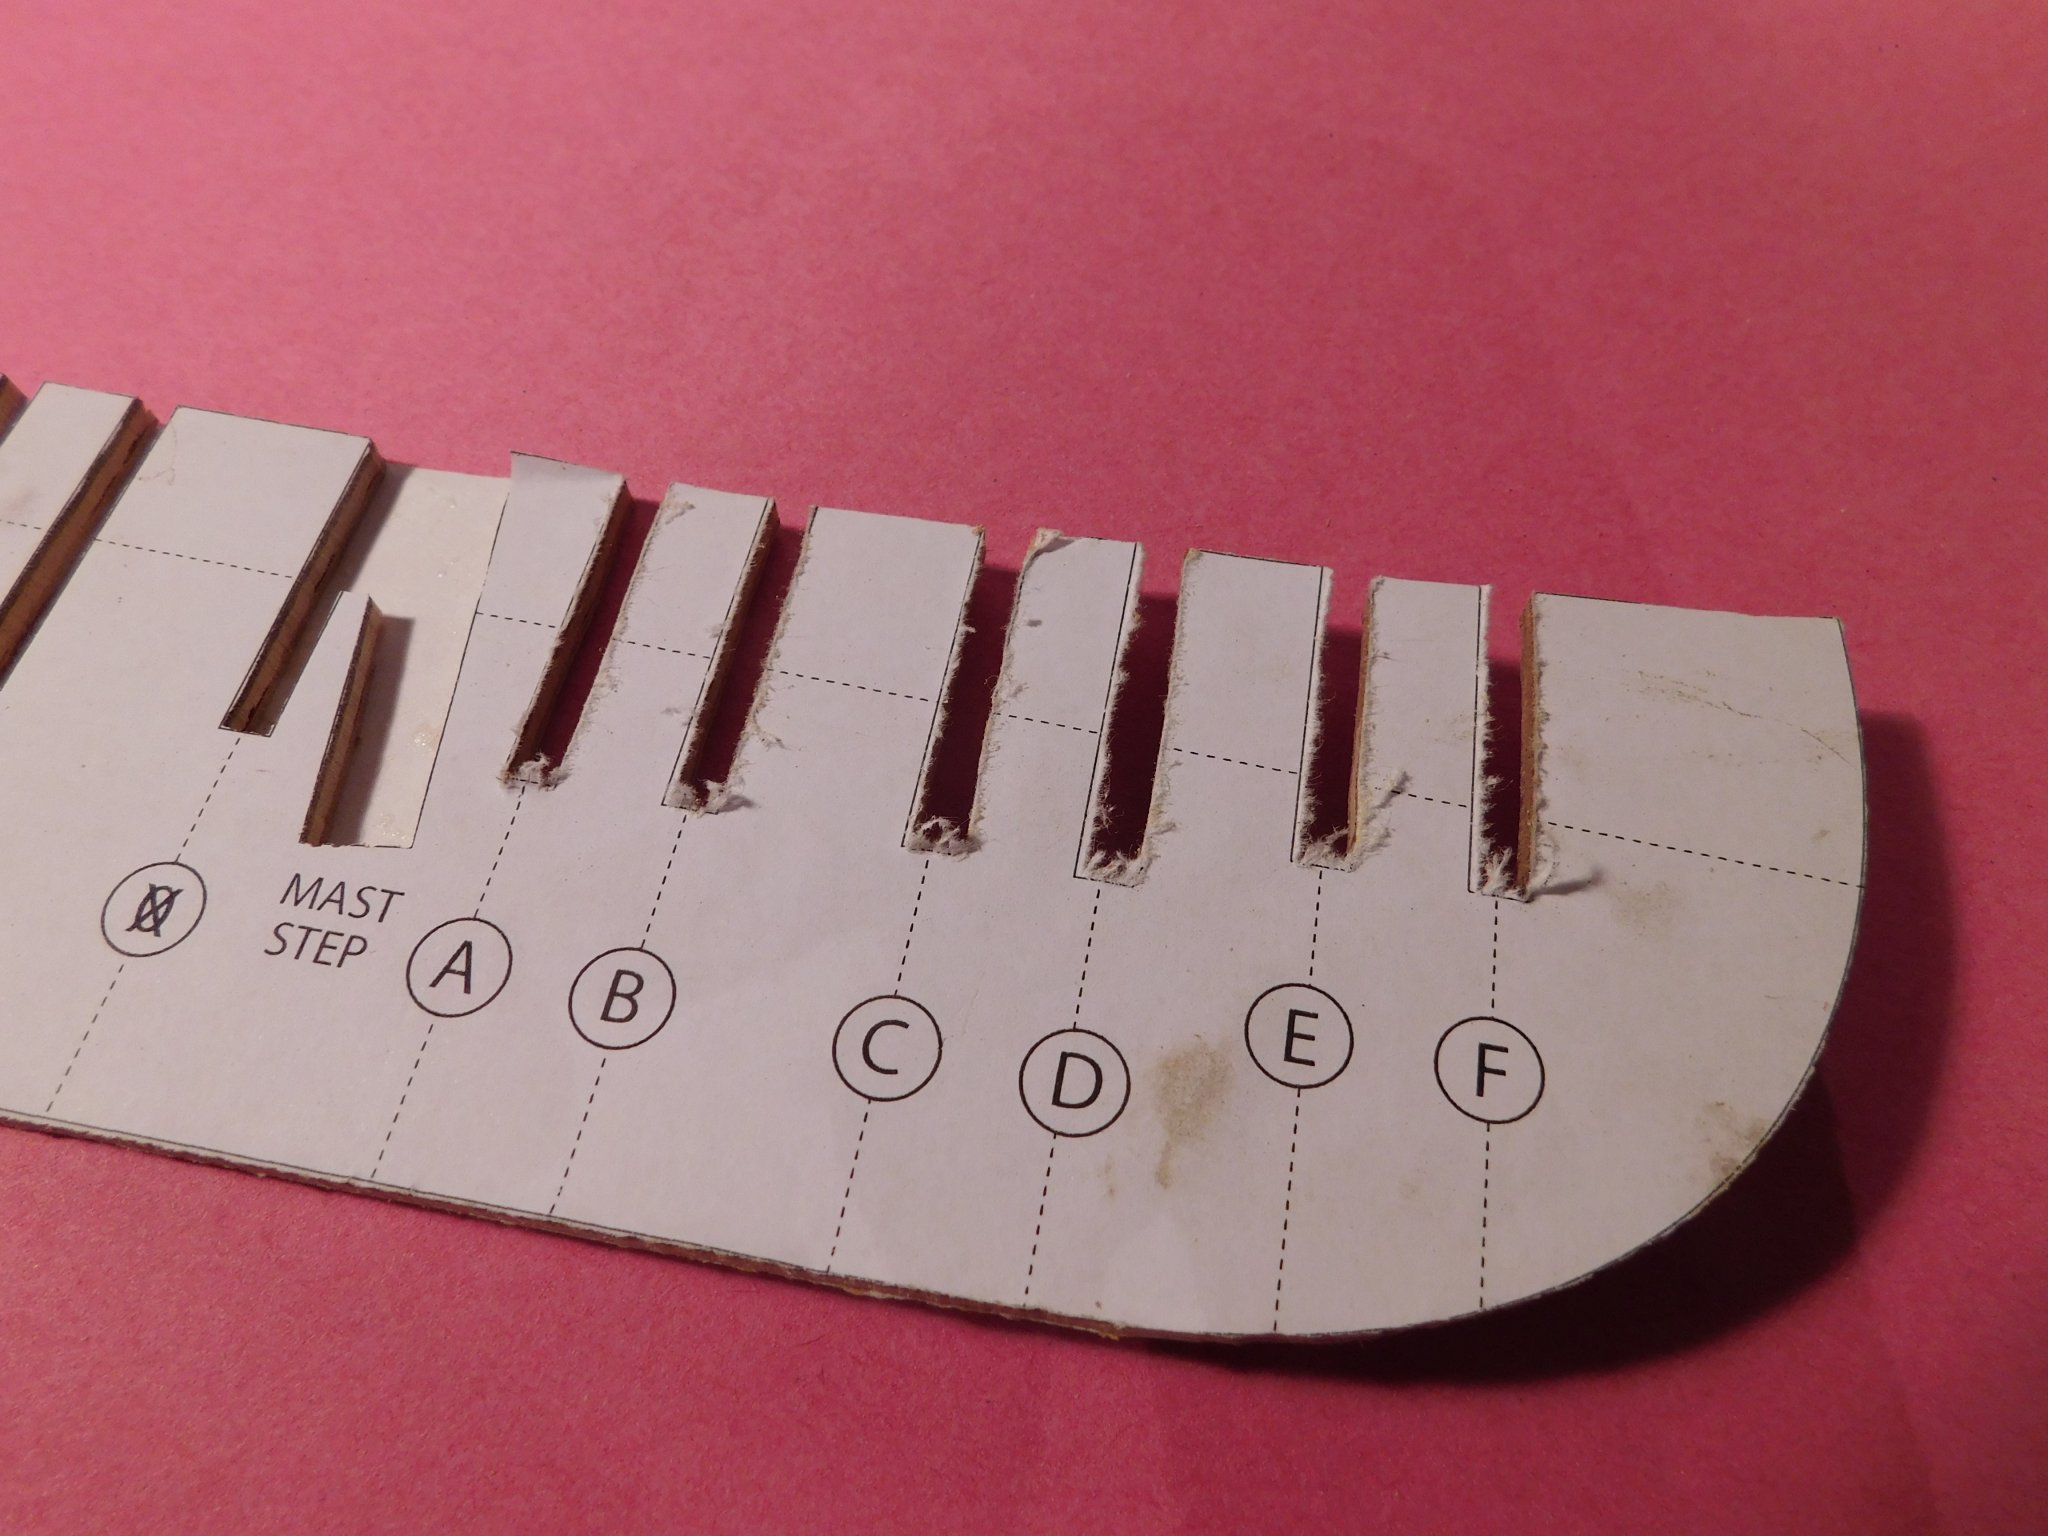
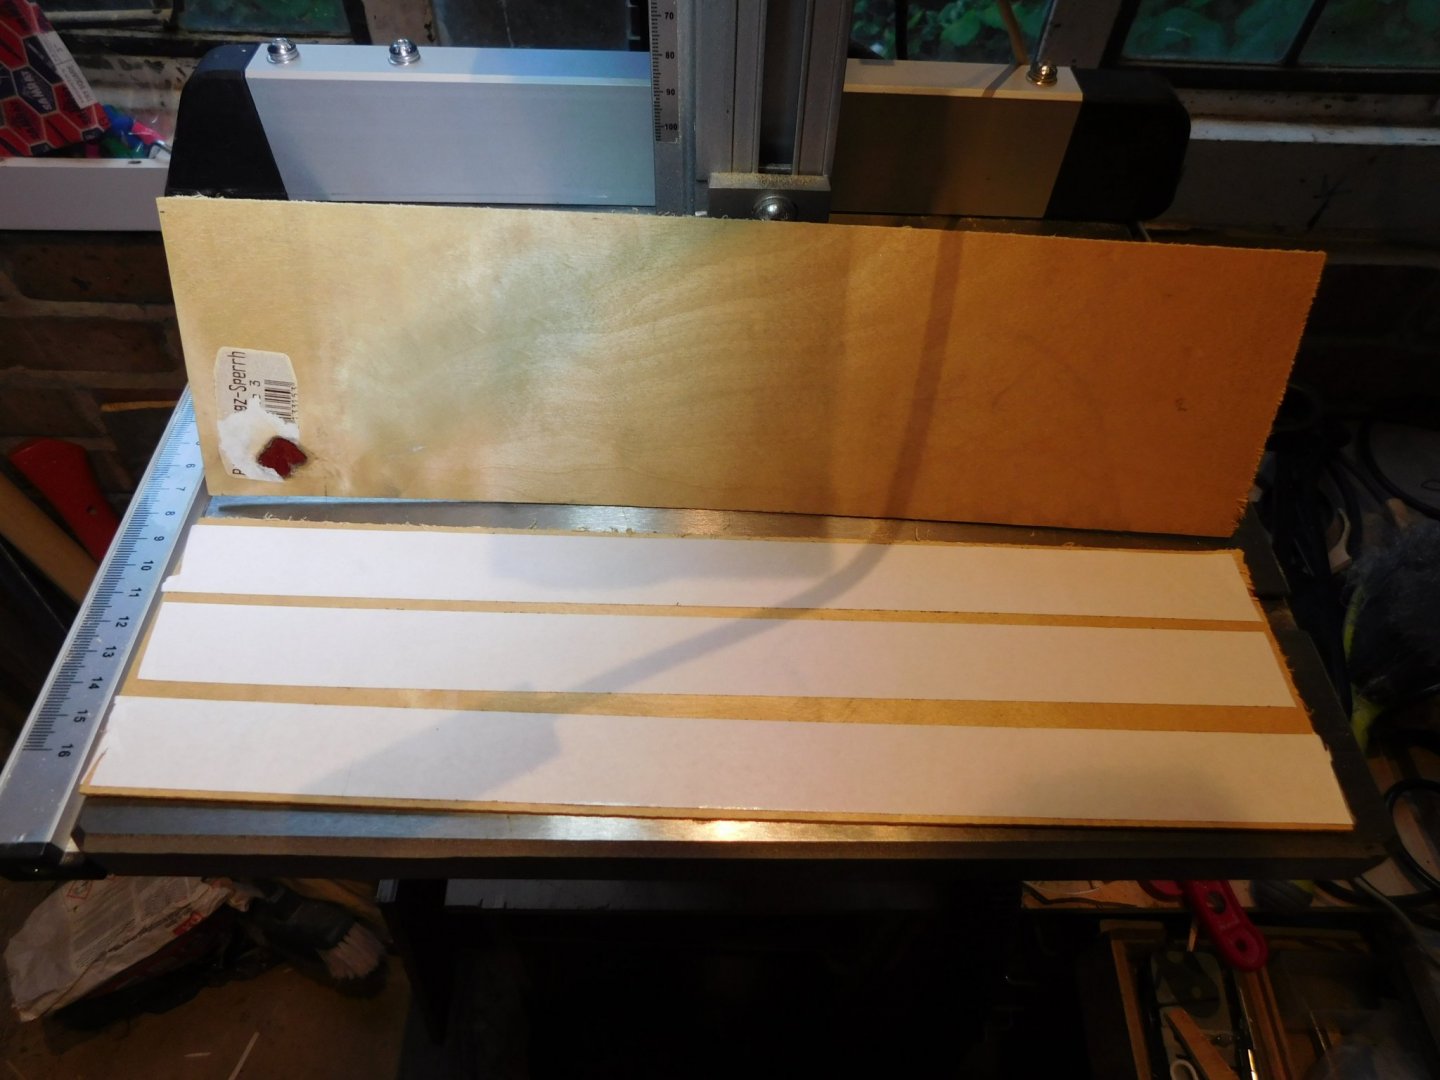
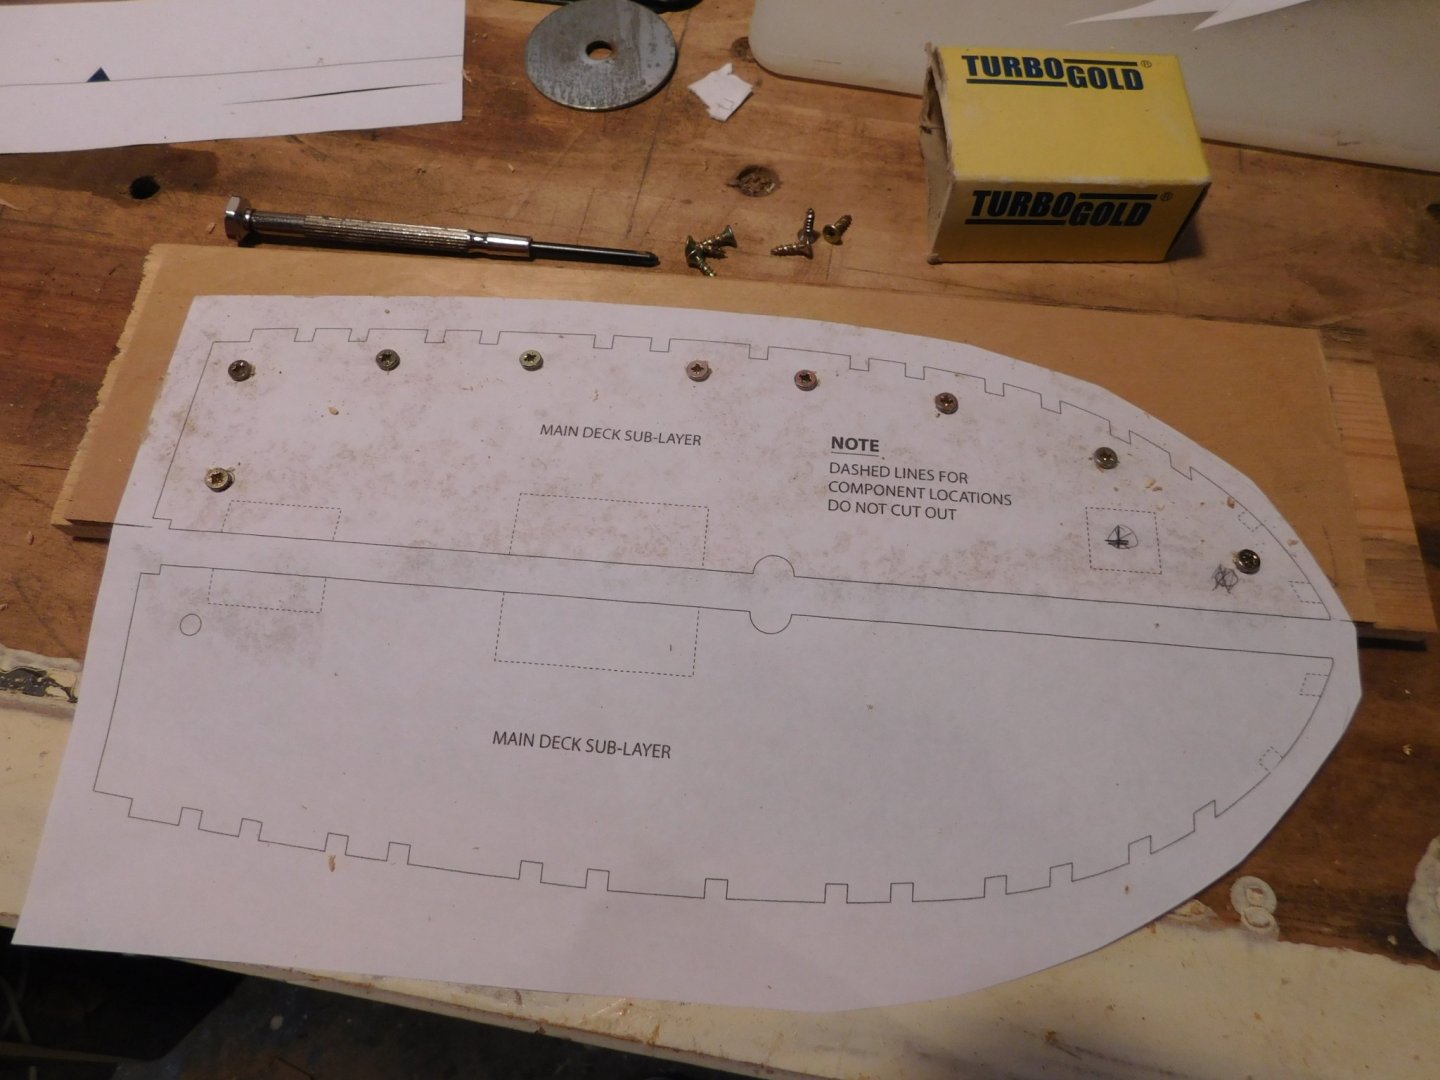
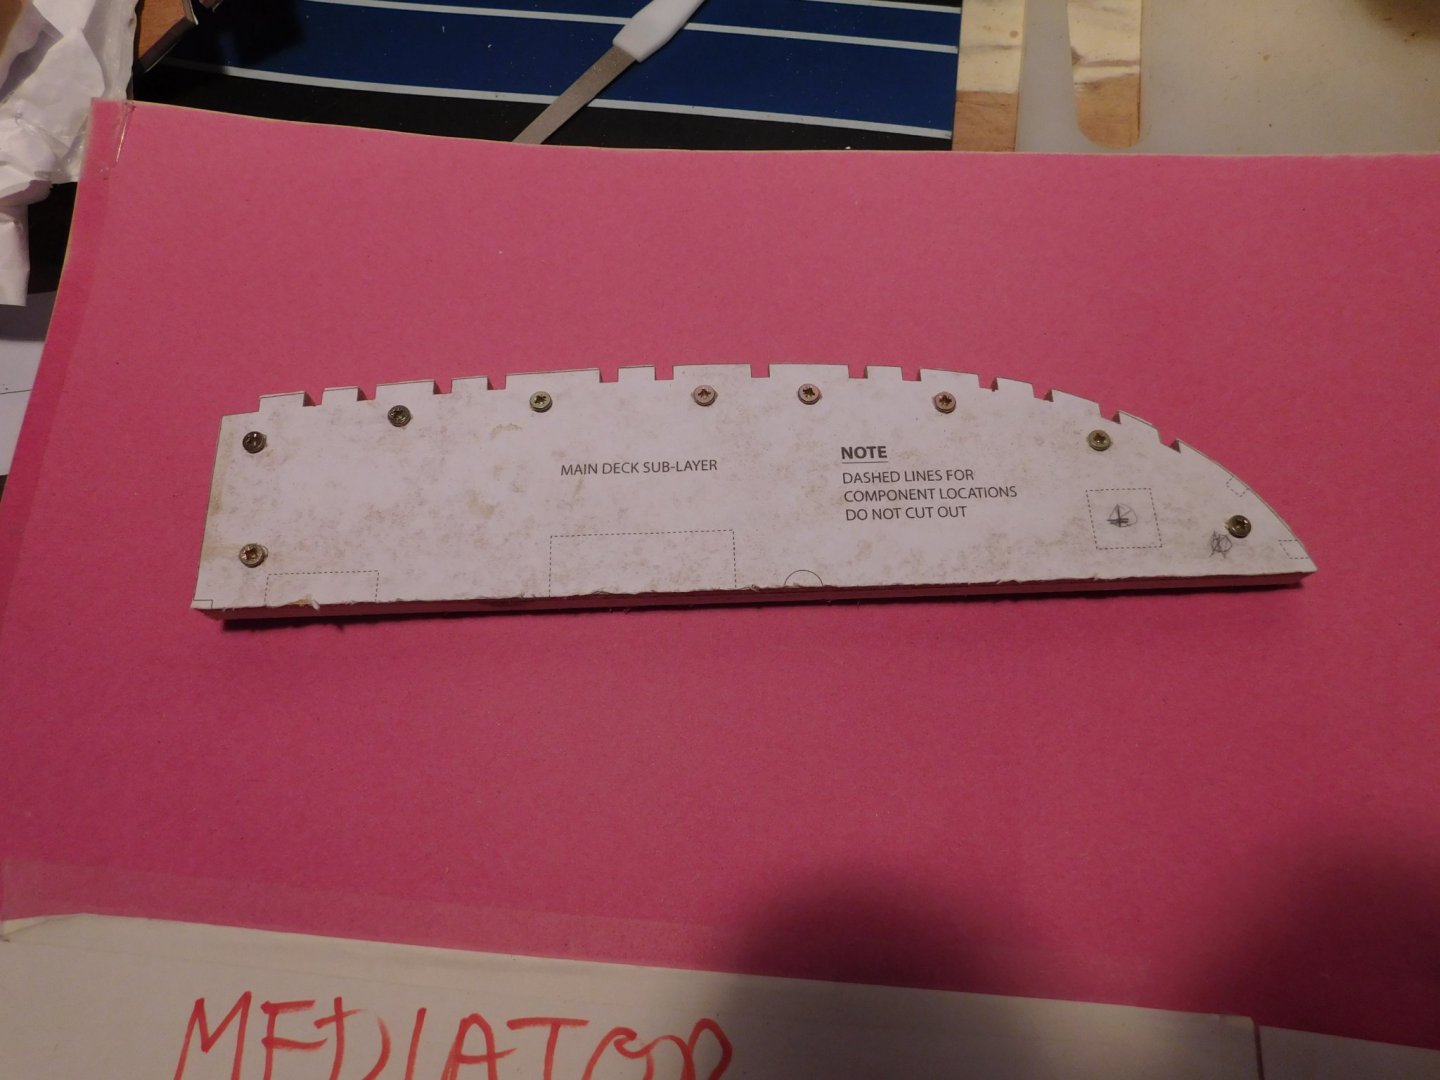
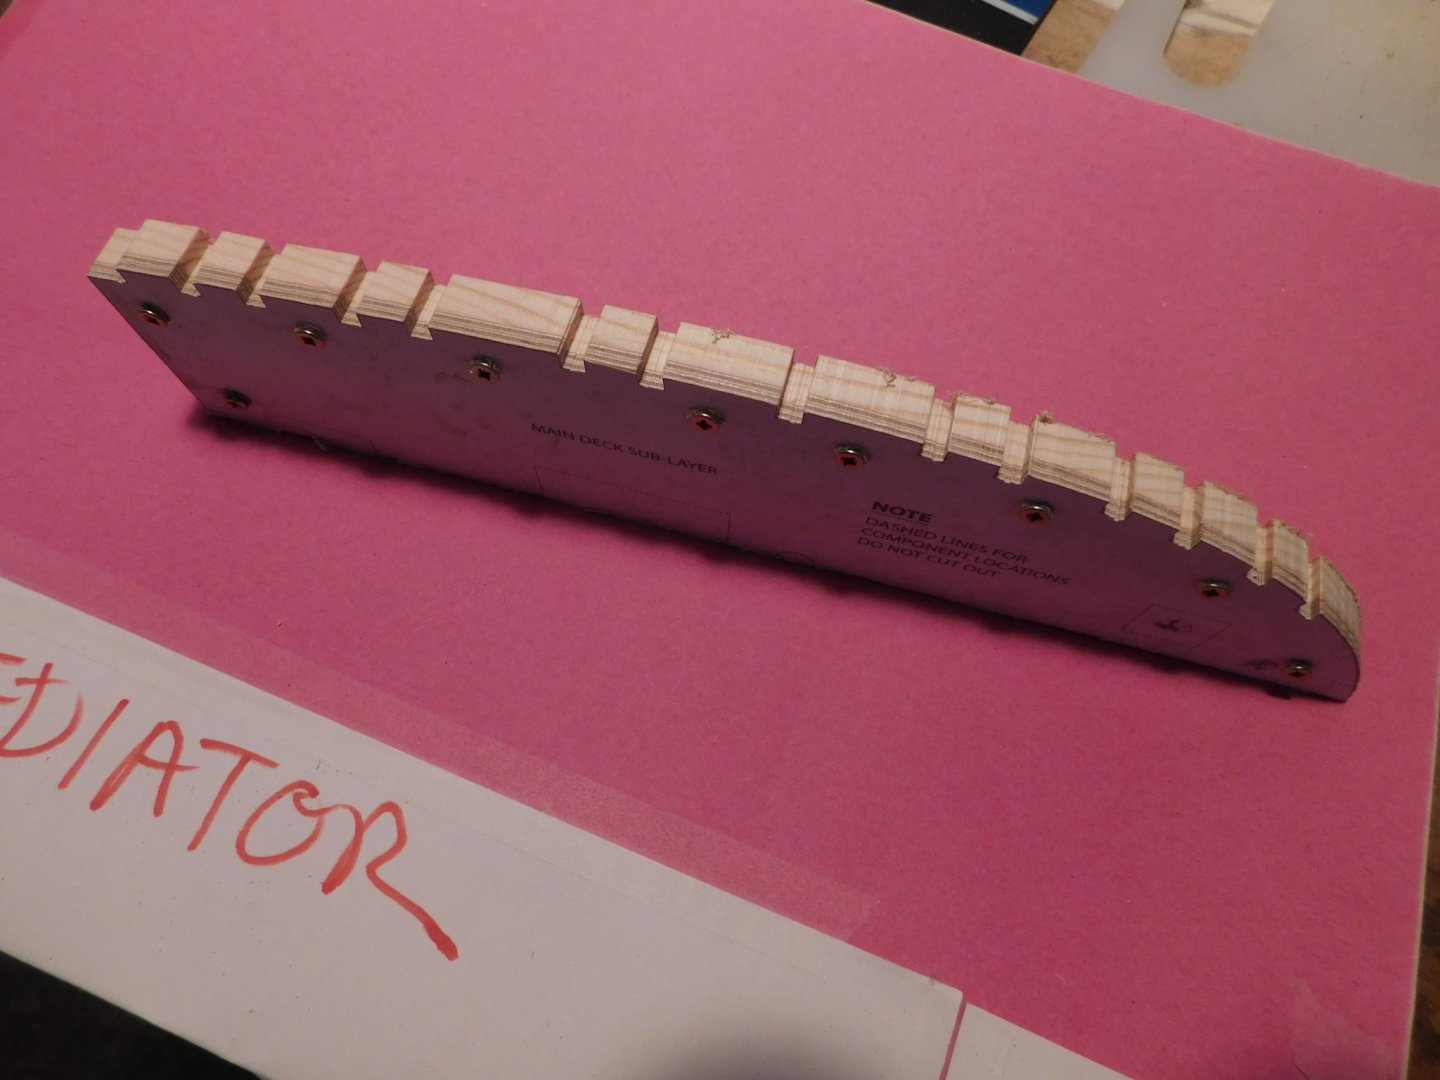
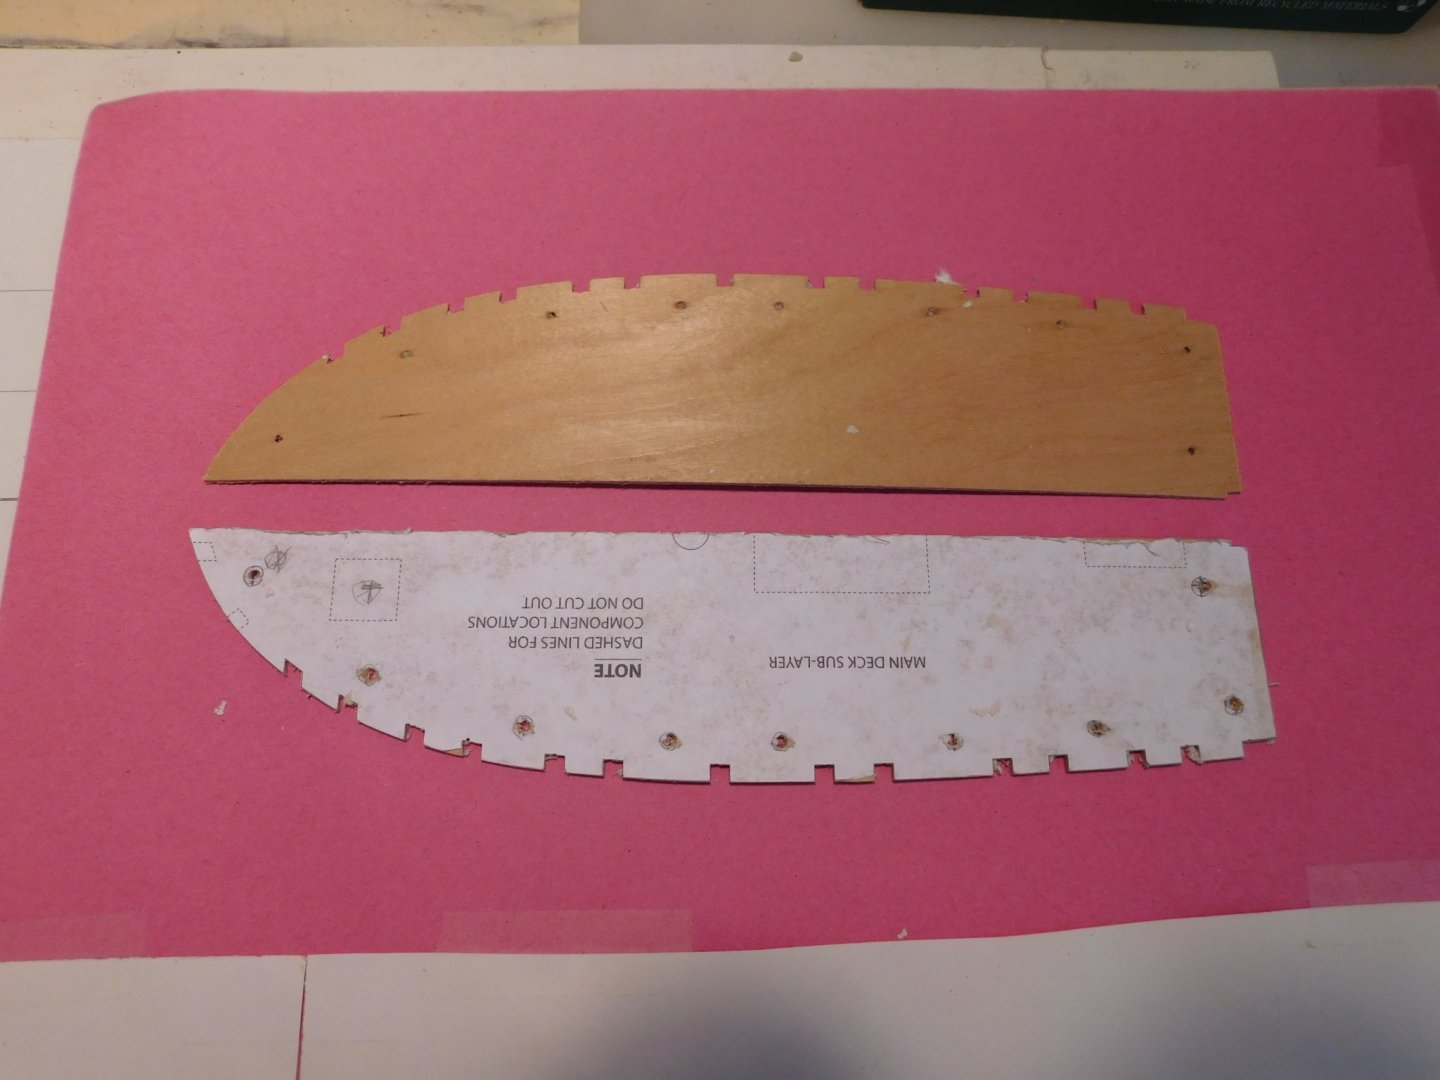
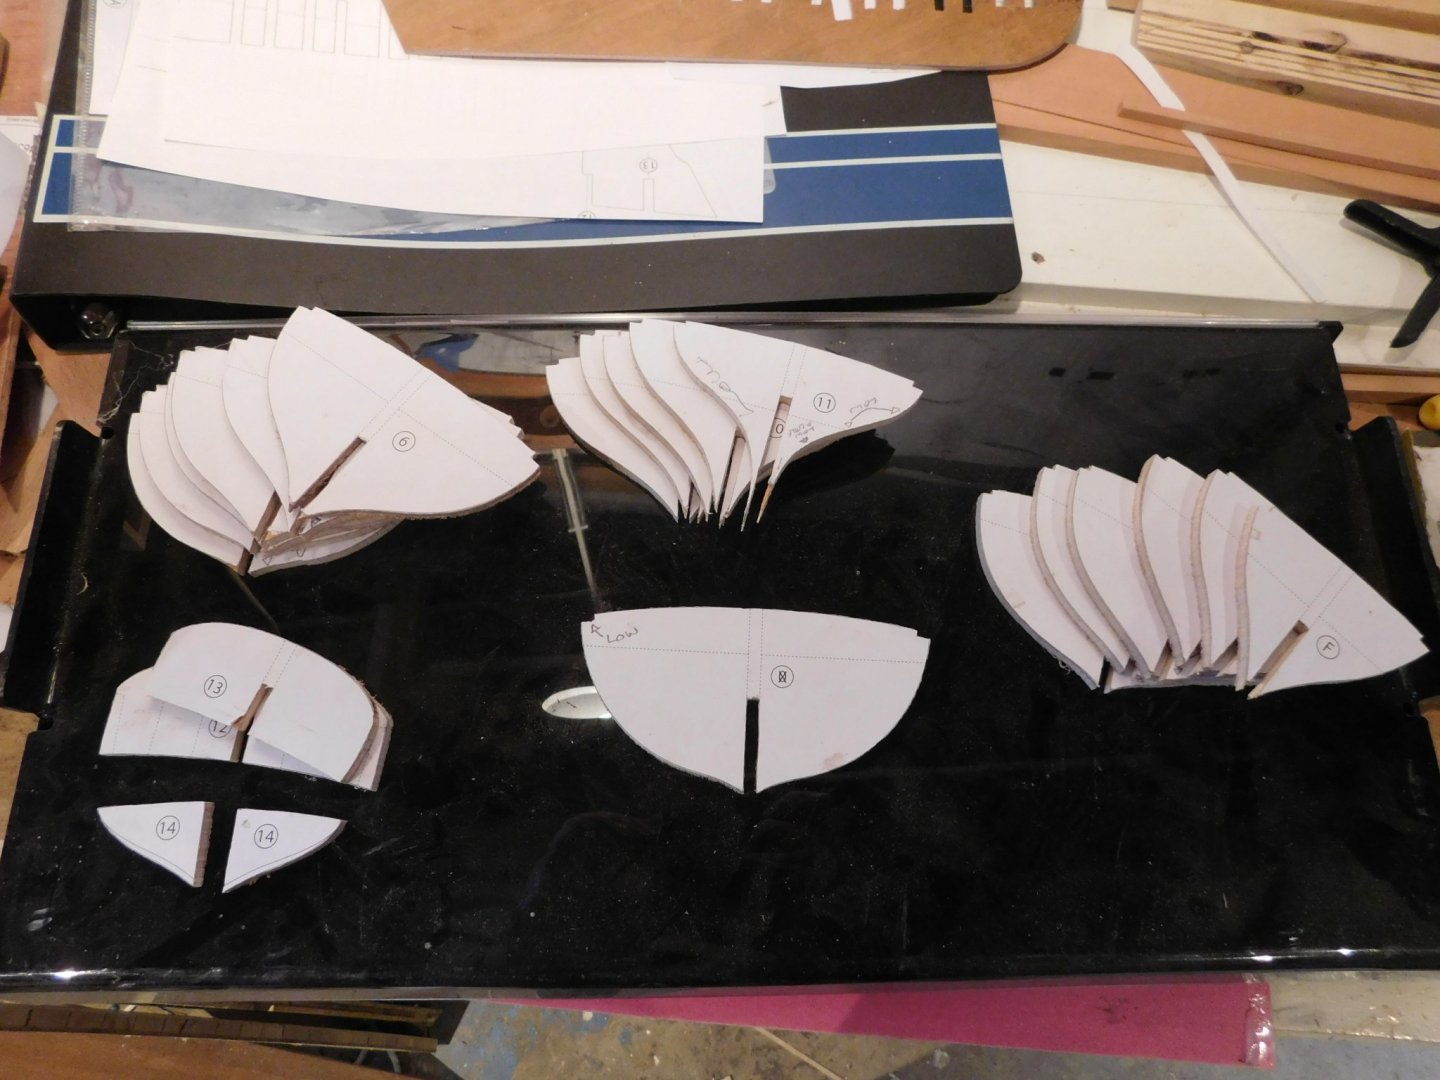
The deck planking of Mediator is laid on top of a sub-deck: the main and quarter decks are each drawn as mirrored images and the four pieces that make them up are cut from thin plywood. Each is notched to accept the bulwarks extending upward from the bulkheads. There are no instructions but I saw an opportunity here to ensure the sides were symmetrical by cutting the two pieces in one operation. In some vague sense I also felt this symmetry would pay off when it came time to deal with the top timbers. Cutting thin ply is no hardship on the bandsaw with a good blade but there is always some degree of tear-out unless precautions are taken. Bringing the pieces to be cut tightly together and mounting them on a sacrificial plank greatly increases the odds of success. I started with the main deck pieces. Double sided tape is used to first attach the workpieces face-to-face. Next the plan was glued to the top piece of ply, aligned to the edge. … and the assembly screwed to the plank. It looks like overkill but with all those notches to cut the possibility of ‘chatter’ is high unless these steps are taken. Cutting proceeds very slowly. The outline shape is cut first, the waste part of the plank is now discarded. The notches can now be cut easily. After cutting was complete, I unscrewed the workpiece and carefully prised apart the ply deck pieces.


- 43 replies
-
- 8
-
-
- mediator
- first build
- (and 1 more)
-
Getting the plans unstuck from the former was pure misery. The spray adhesive was a cheapo from a bargain store and in some places dried rock solid: I will not be using it again. Next gripe: the supposedly straight line at the bottom of the former where the keel attaches had an inexplicable curve in it. It was only a tiny bit but it would prevent the keel piece from sitting properly so it had to go. A sanding jig was improvised by temporarily fixing the former on a steel plate (a base for a small lathe) and lining up the bowed edge of the former with the straight edge of the plate. 80 grit sandpaper screwed to a square stick and run along edge, which is also known to be square, produced the straight 90 degree edge I needed. Straight line achieved.


- 43 replies
-
- 6
-
-
- mediator
- first build
- (and 1 more)
-
Thanks Druxey, I am always looking for the traps and tripwires. I don't expect to see them all but I spotted this one!
- 43 replies
-
- 1
-
-
- mediator
- first build
- (and 1 more)
-
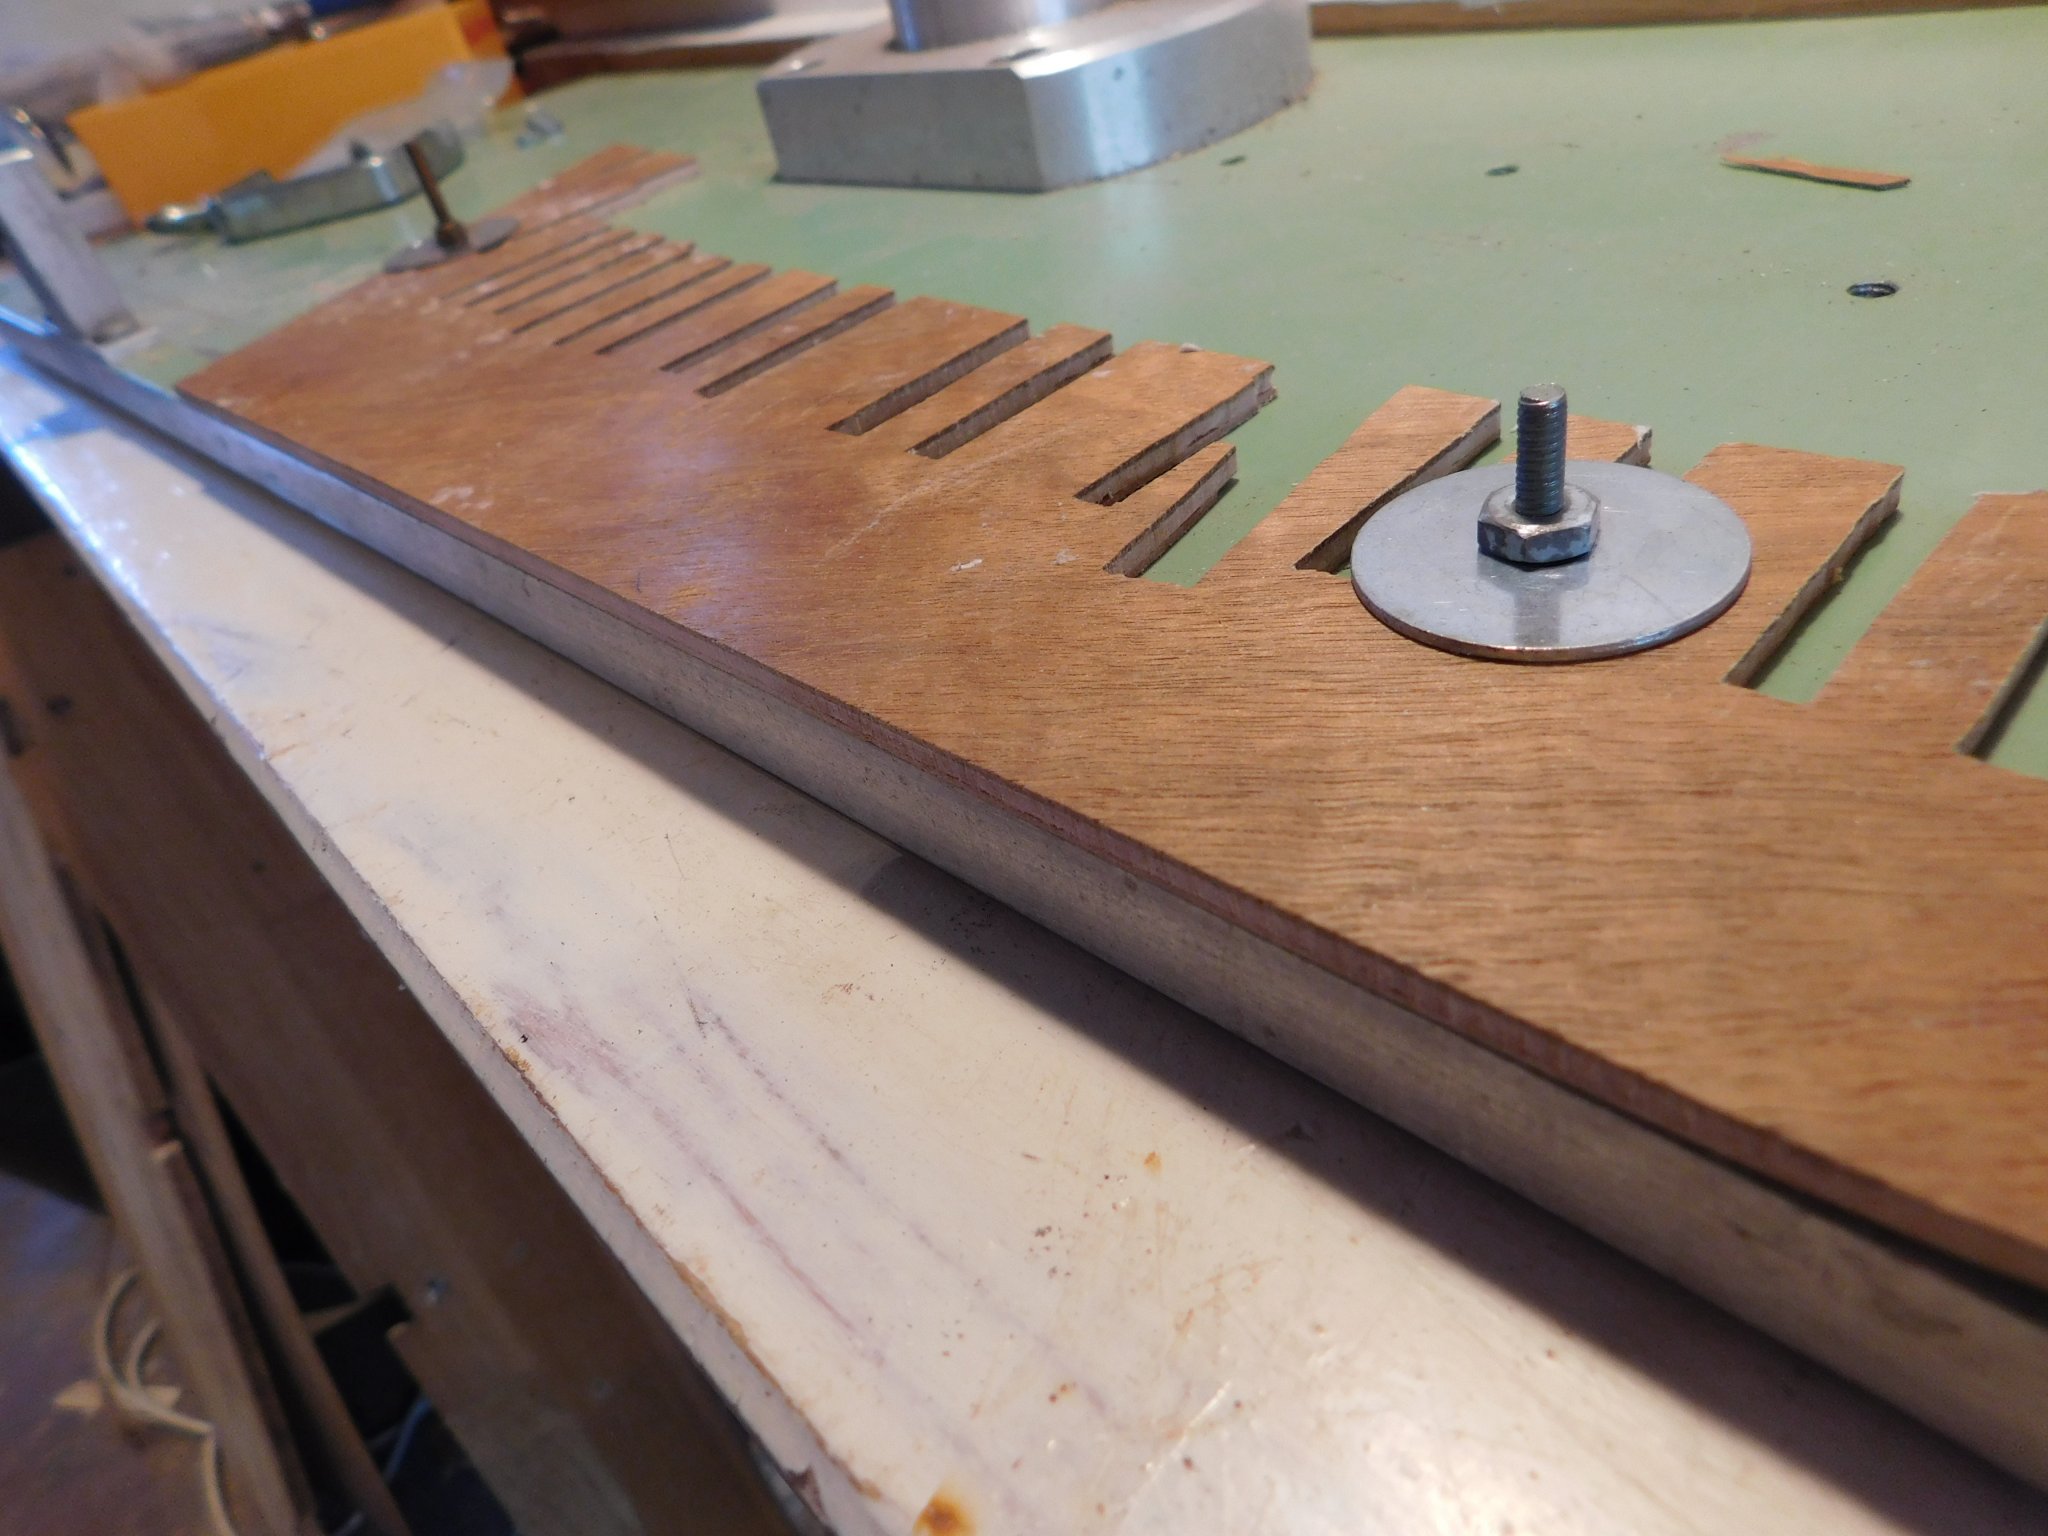
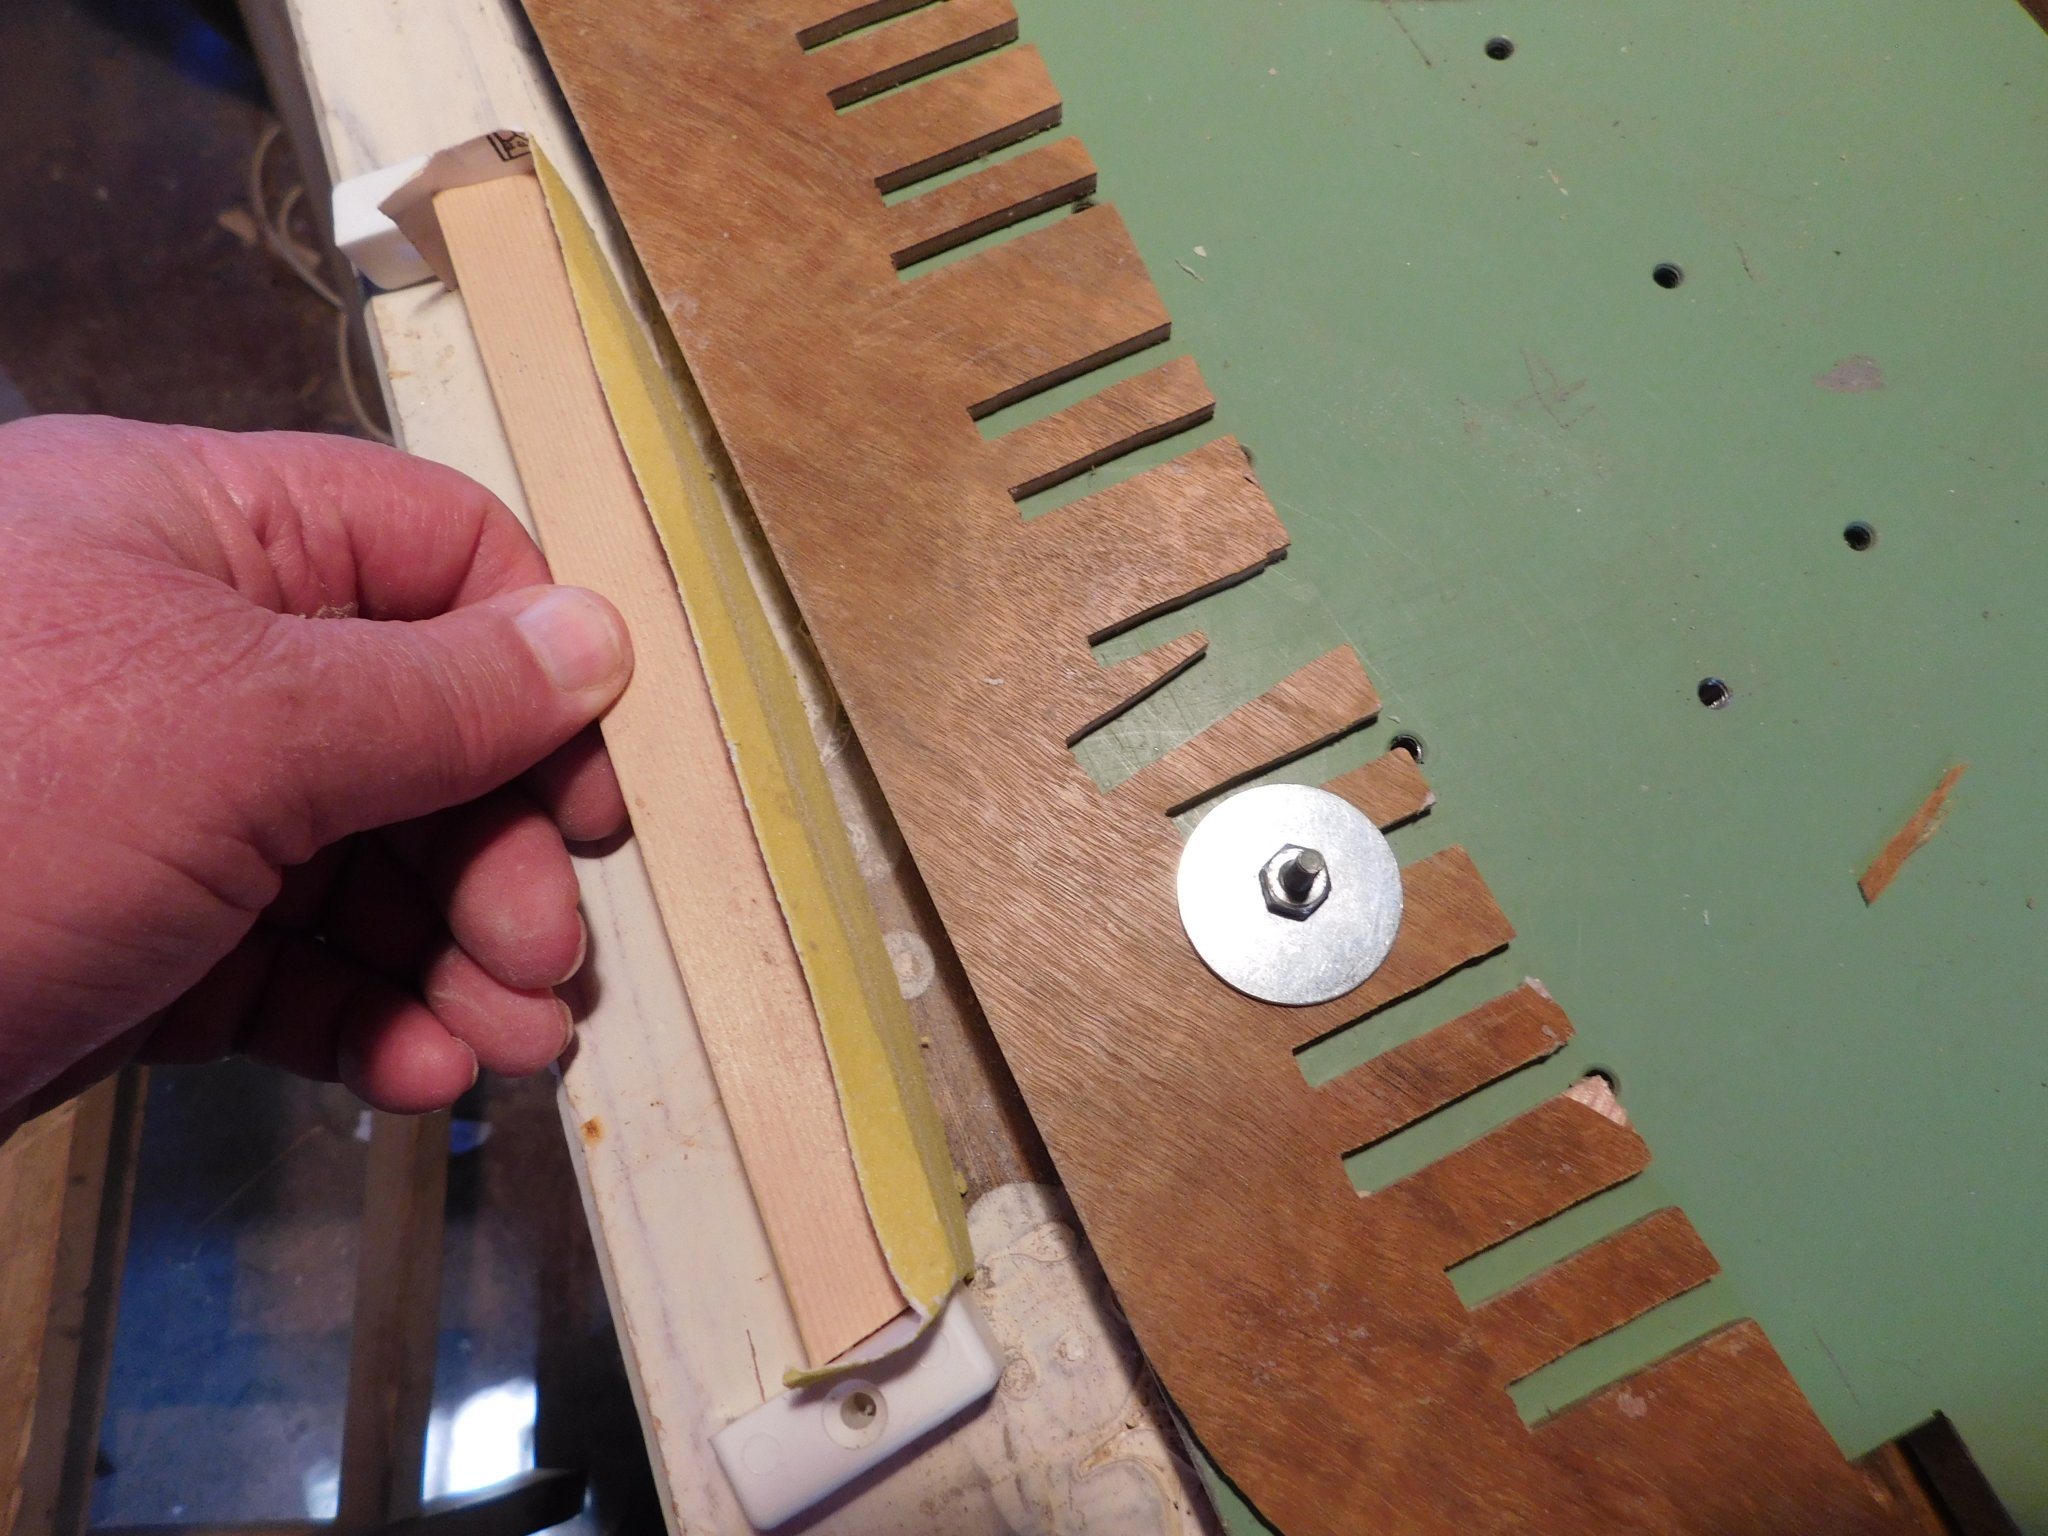
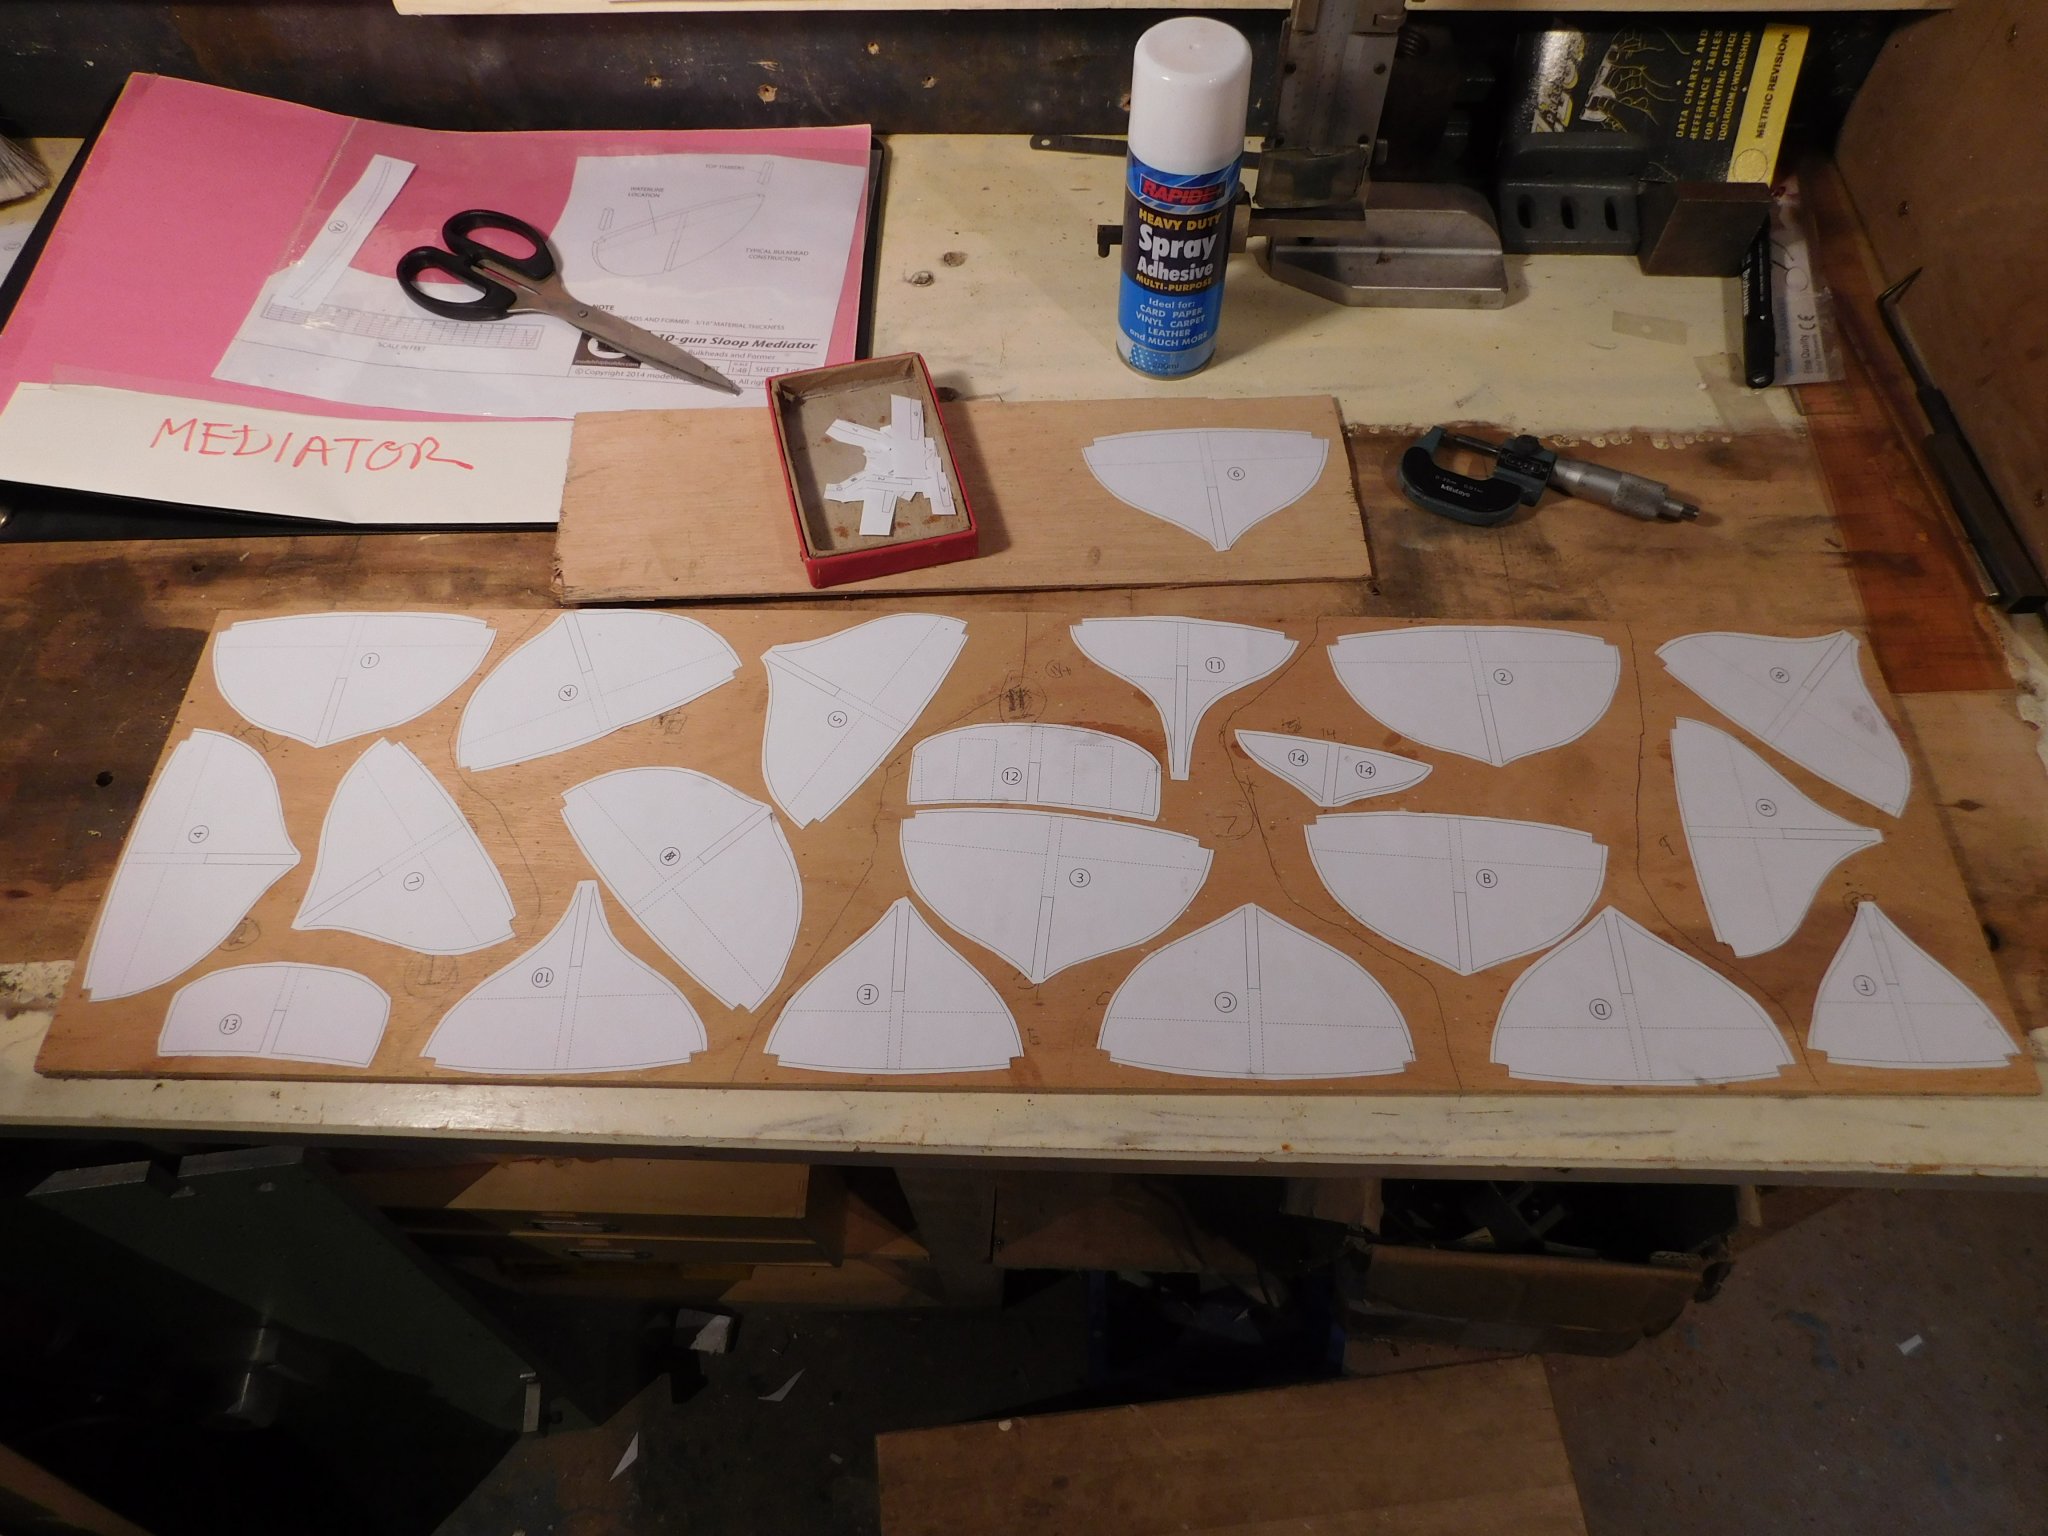
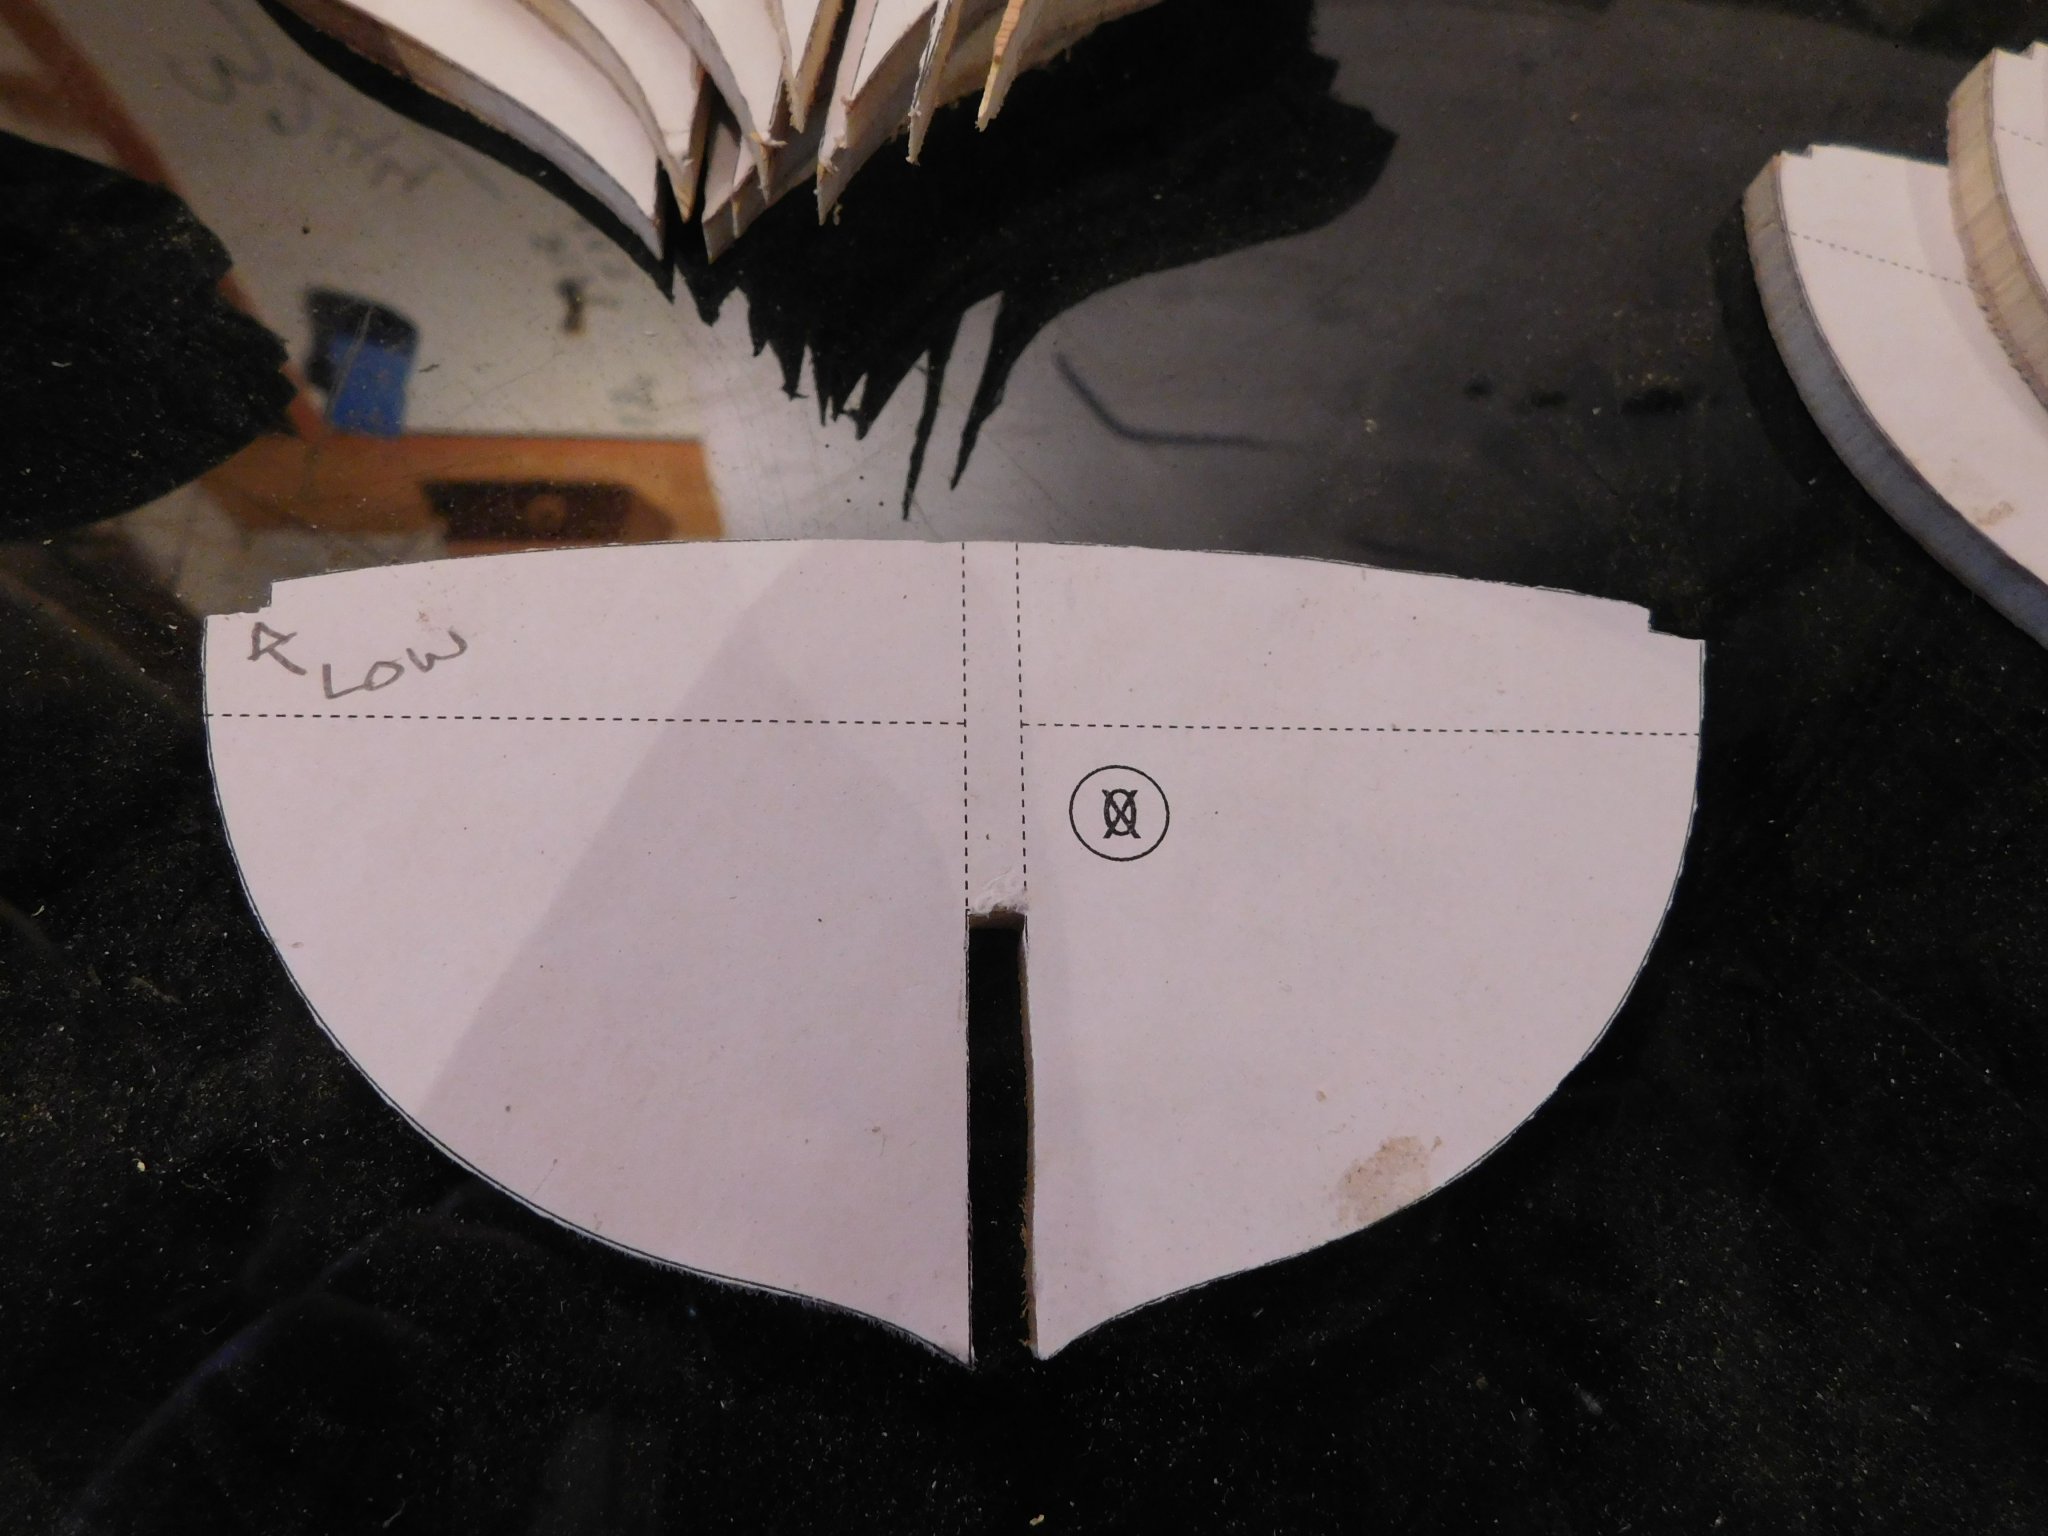
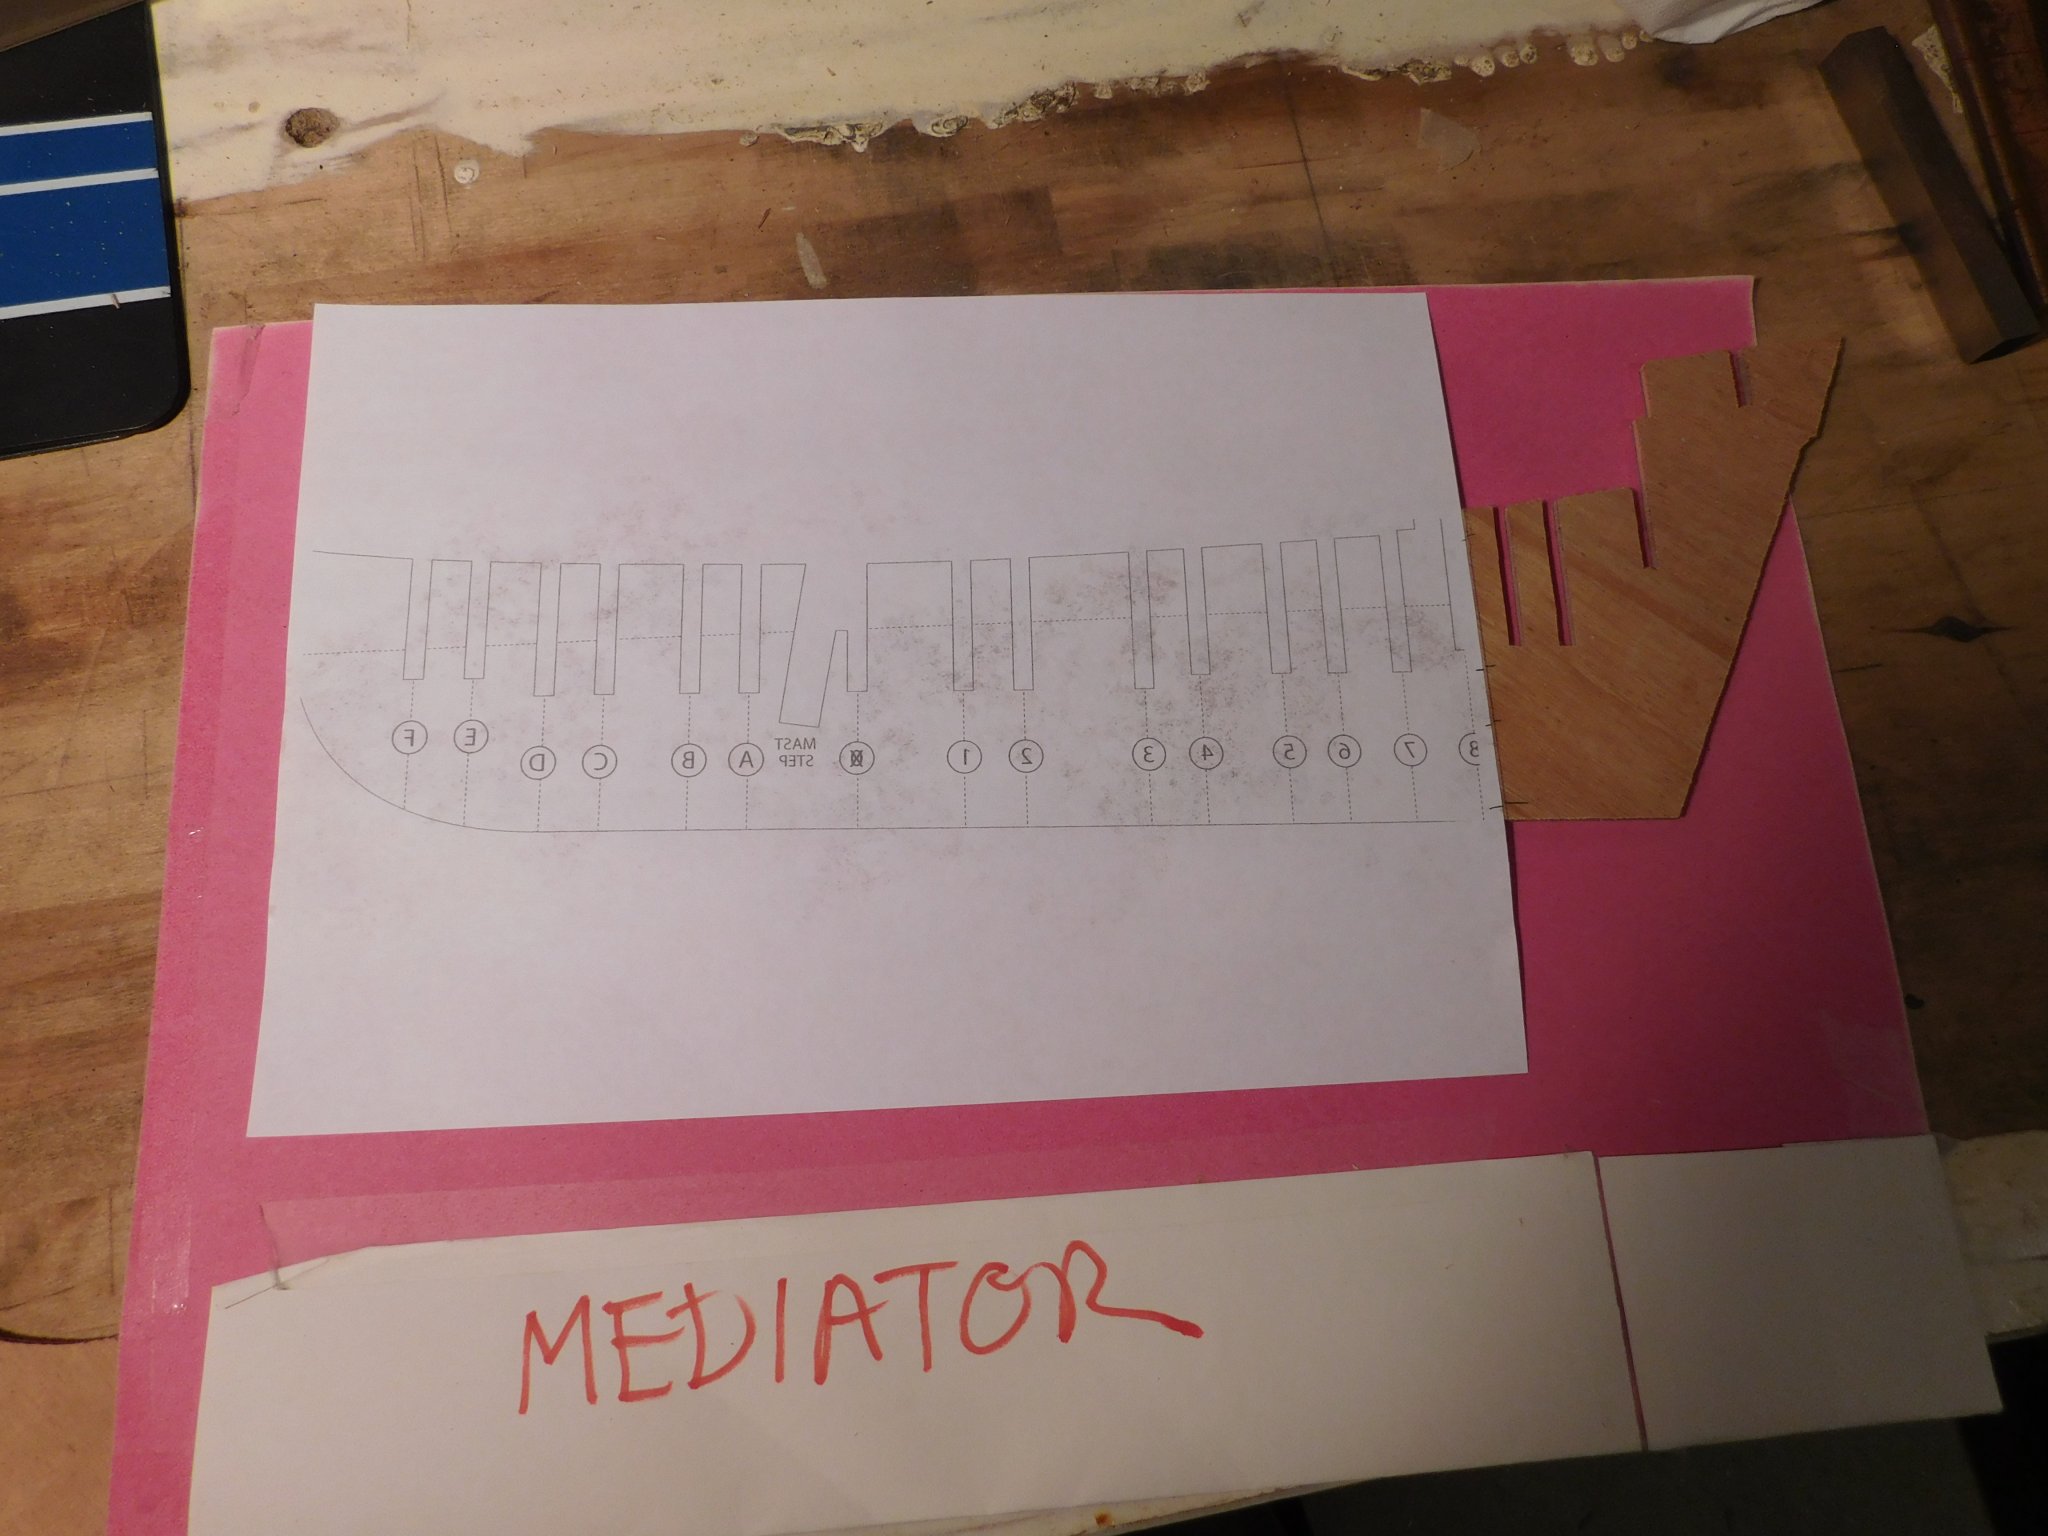
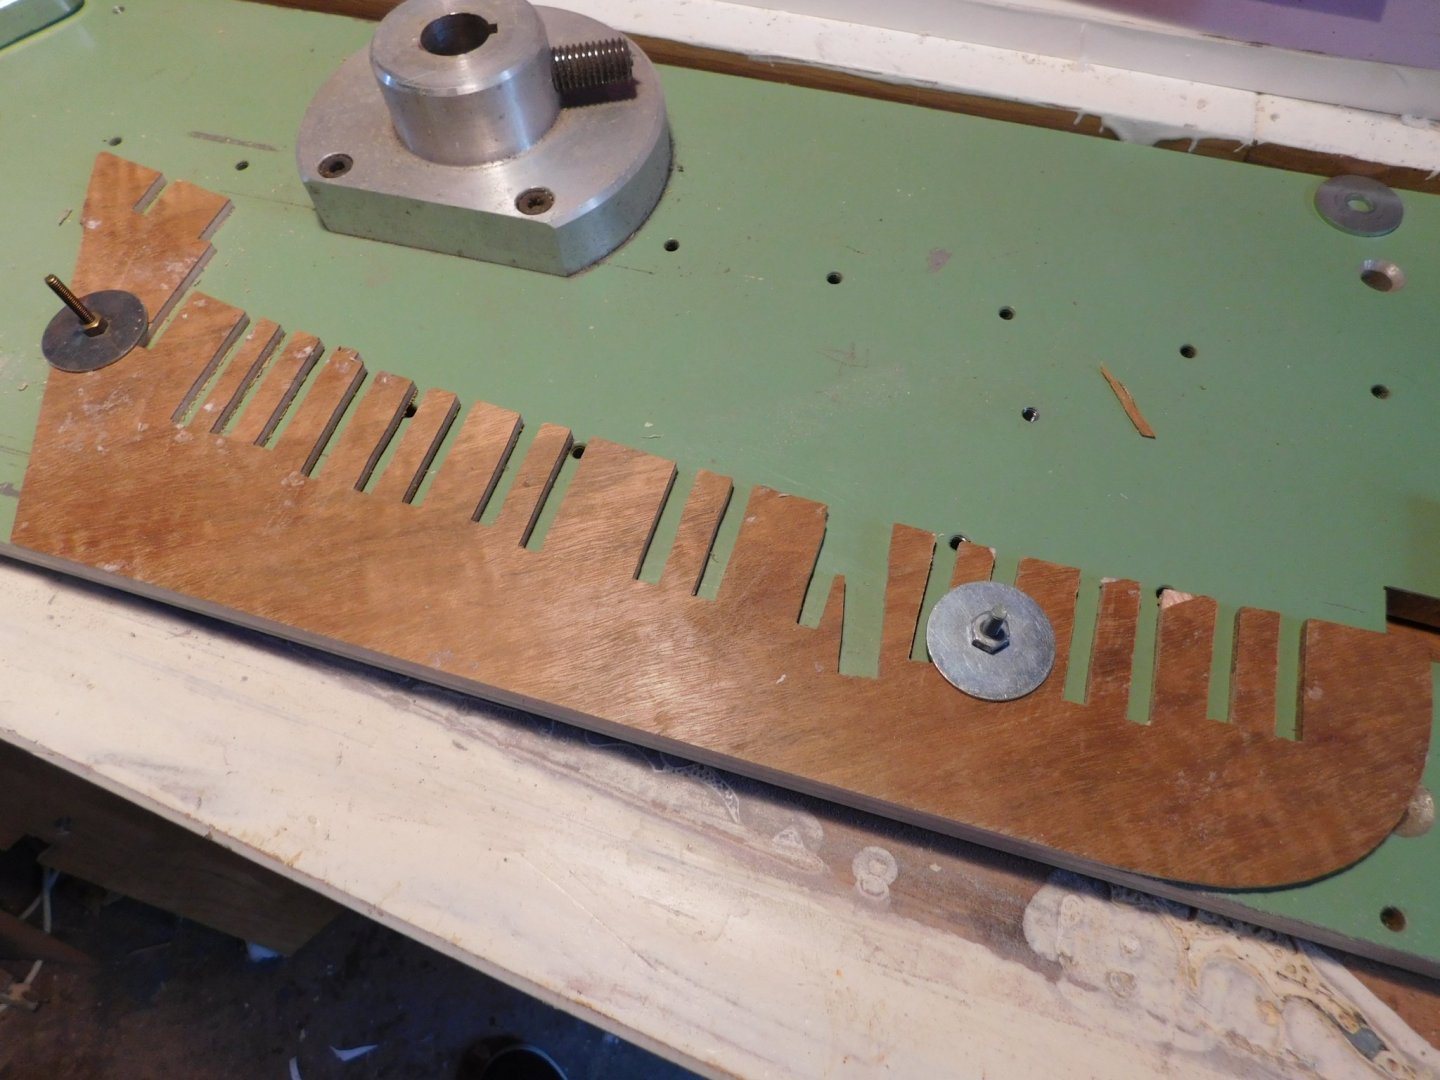
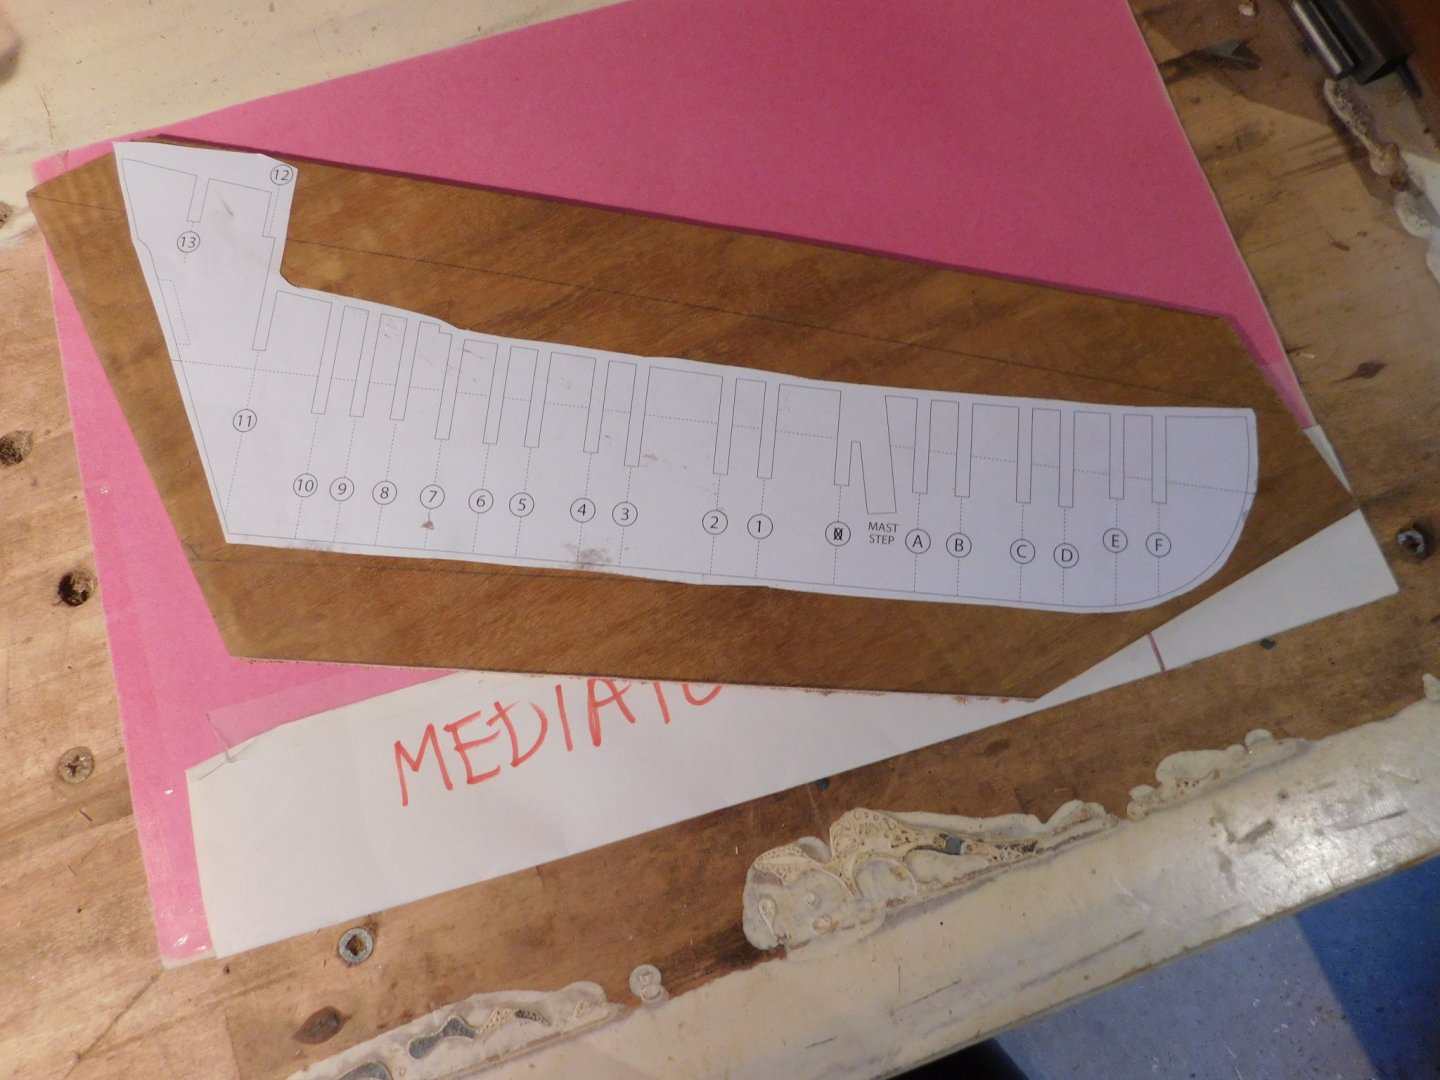
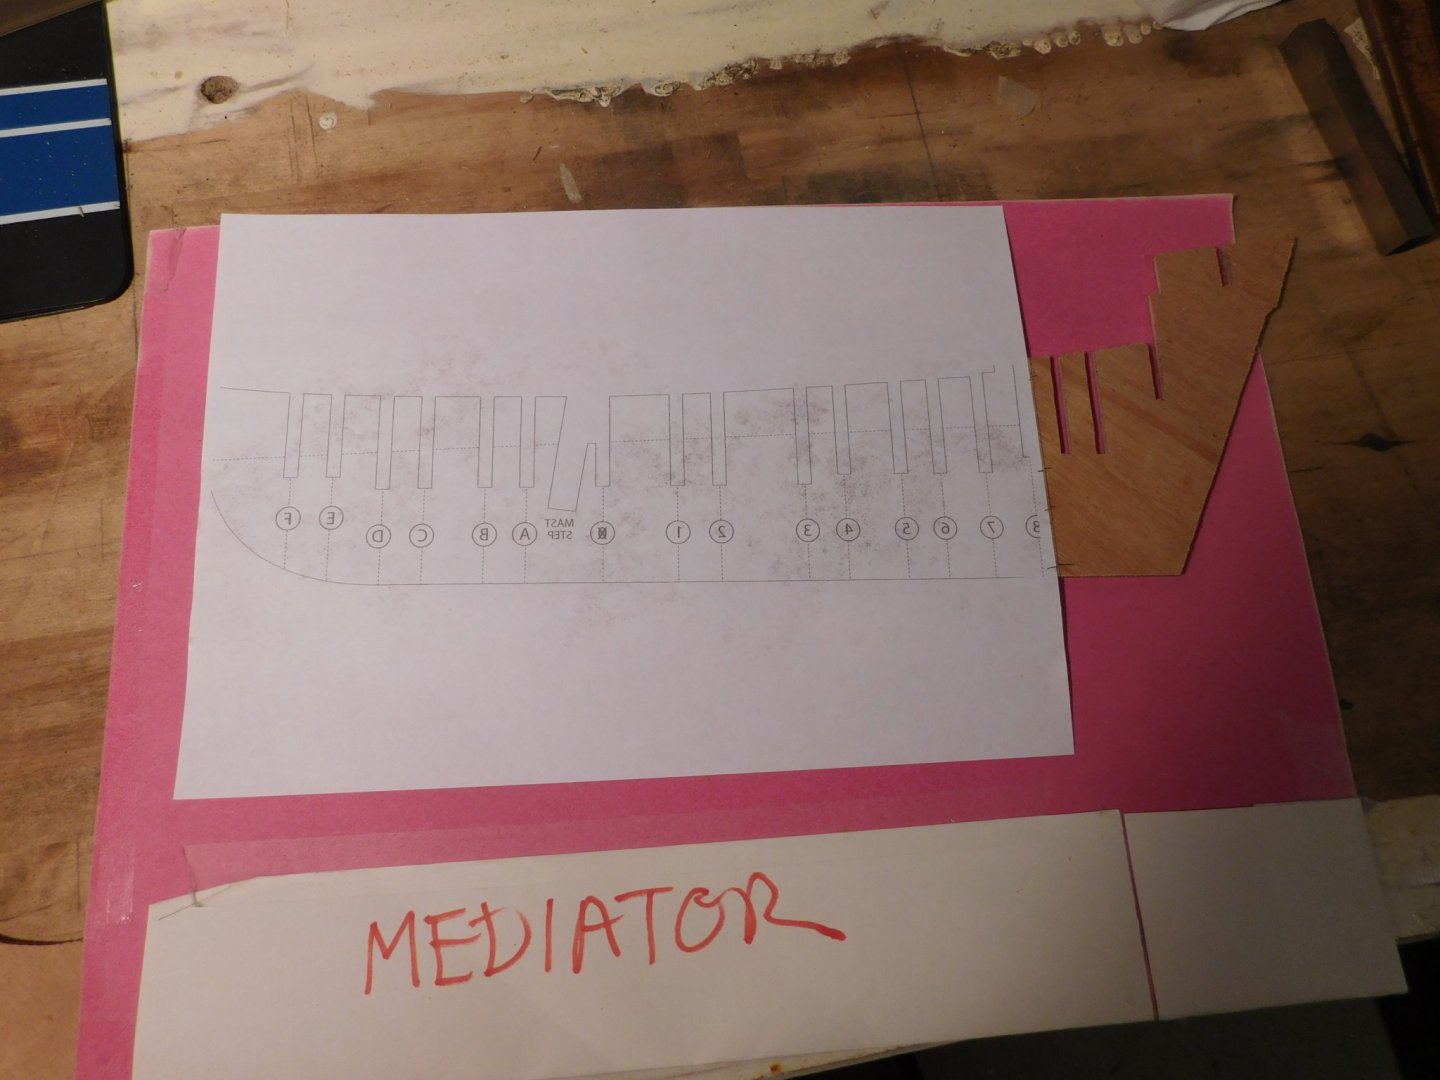
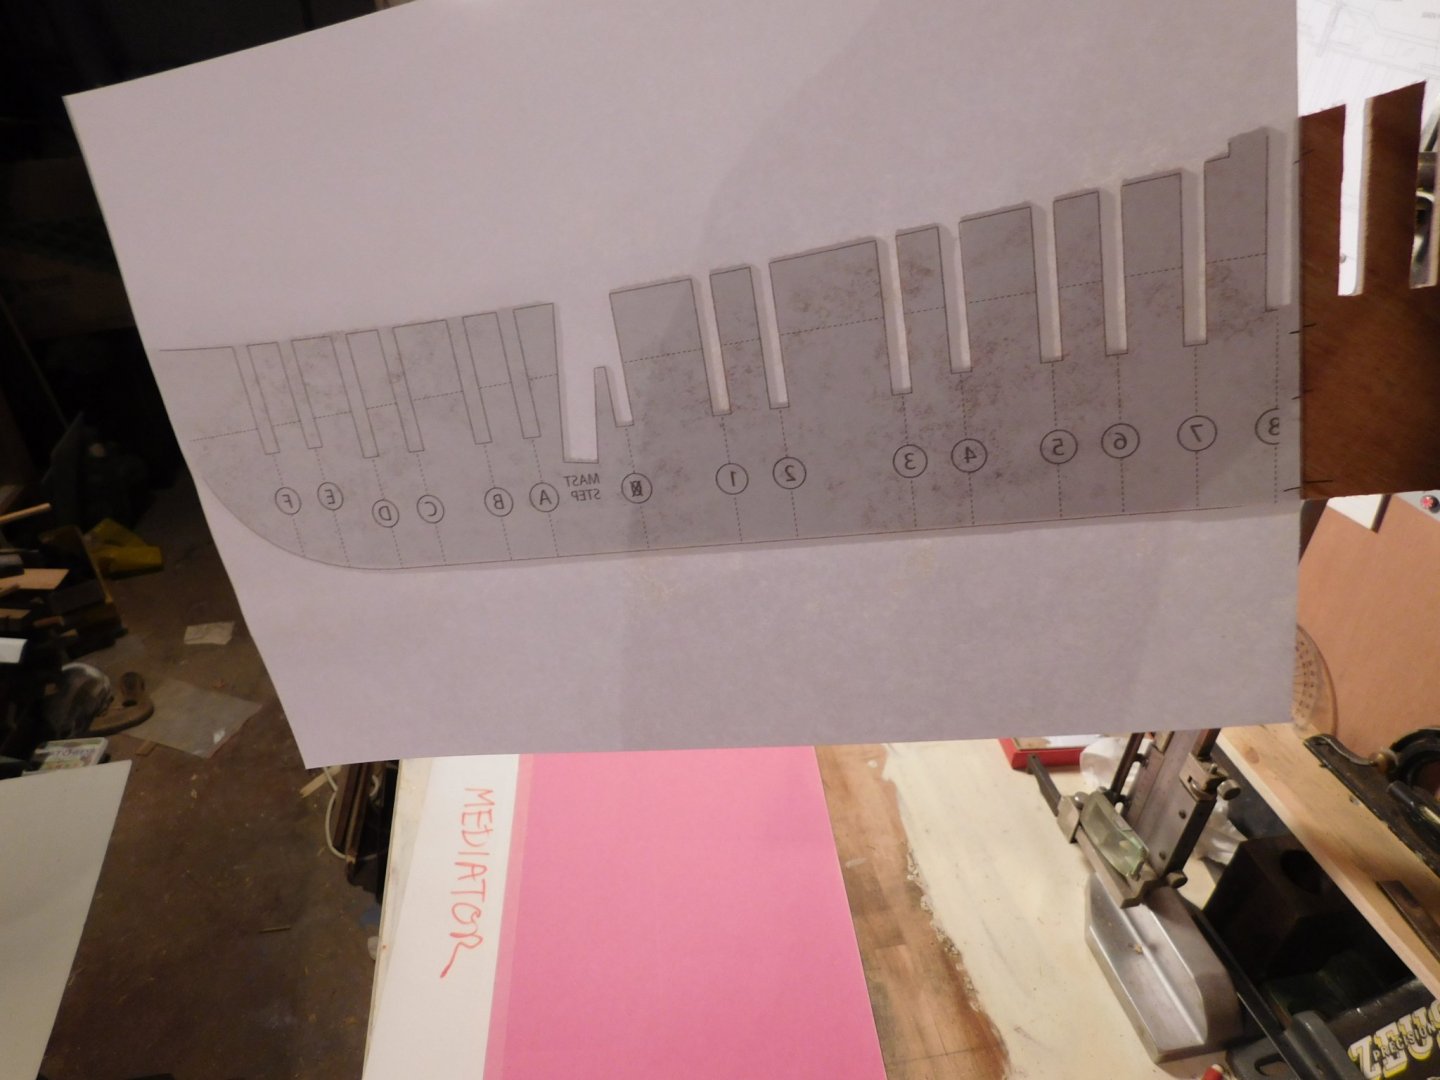
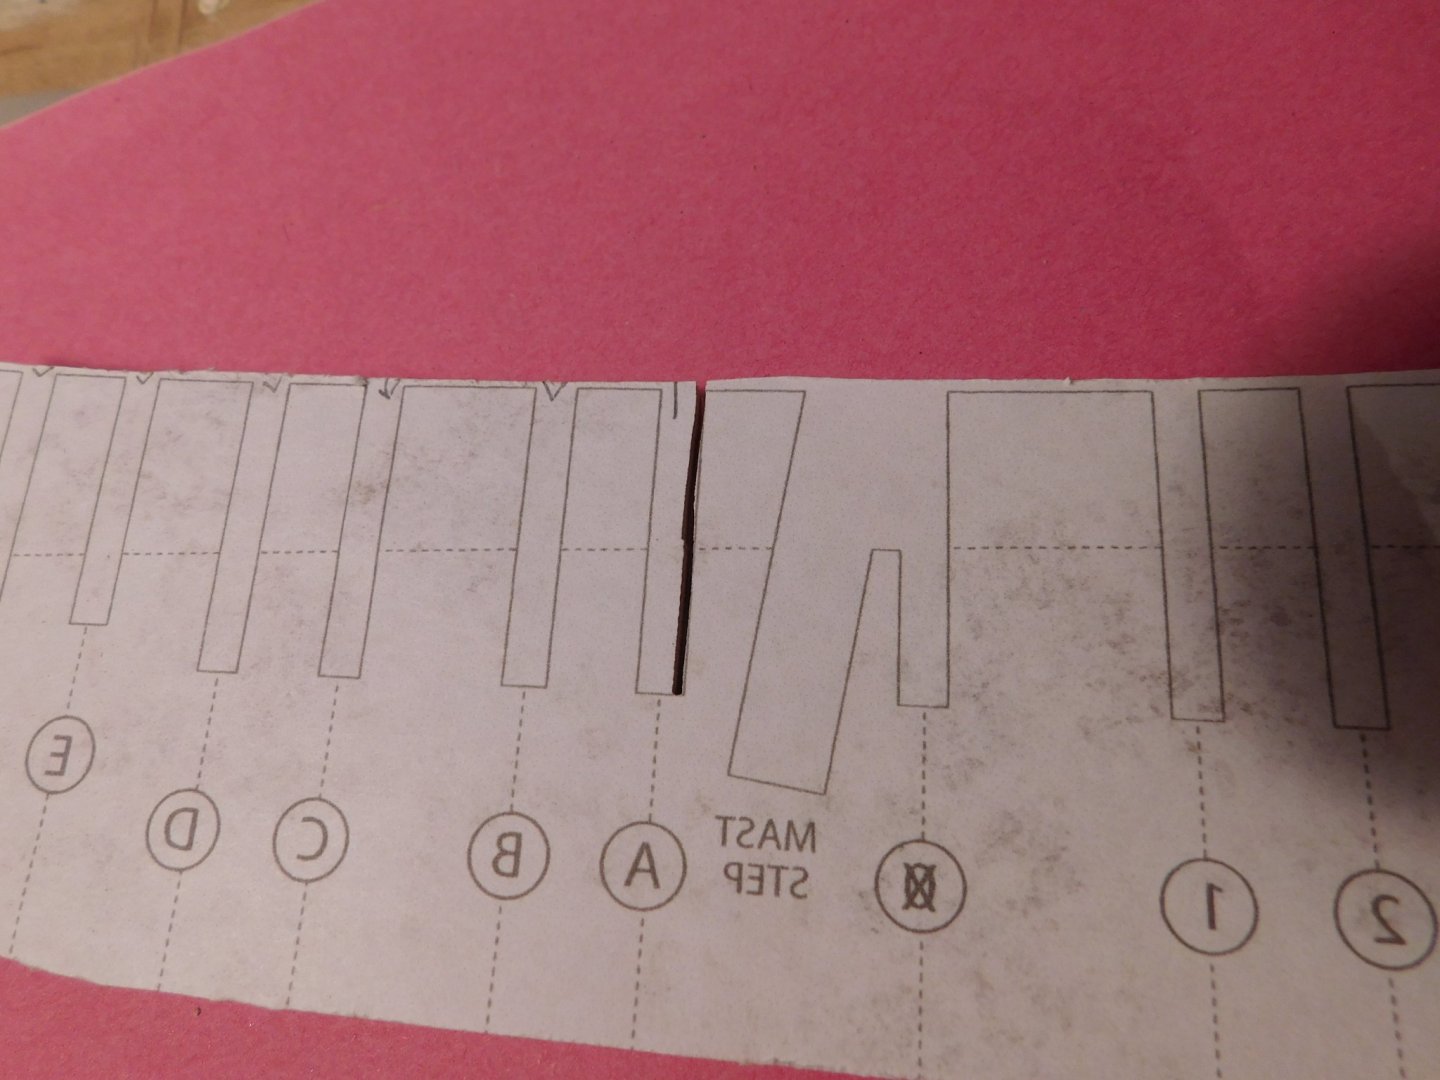
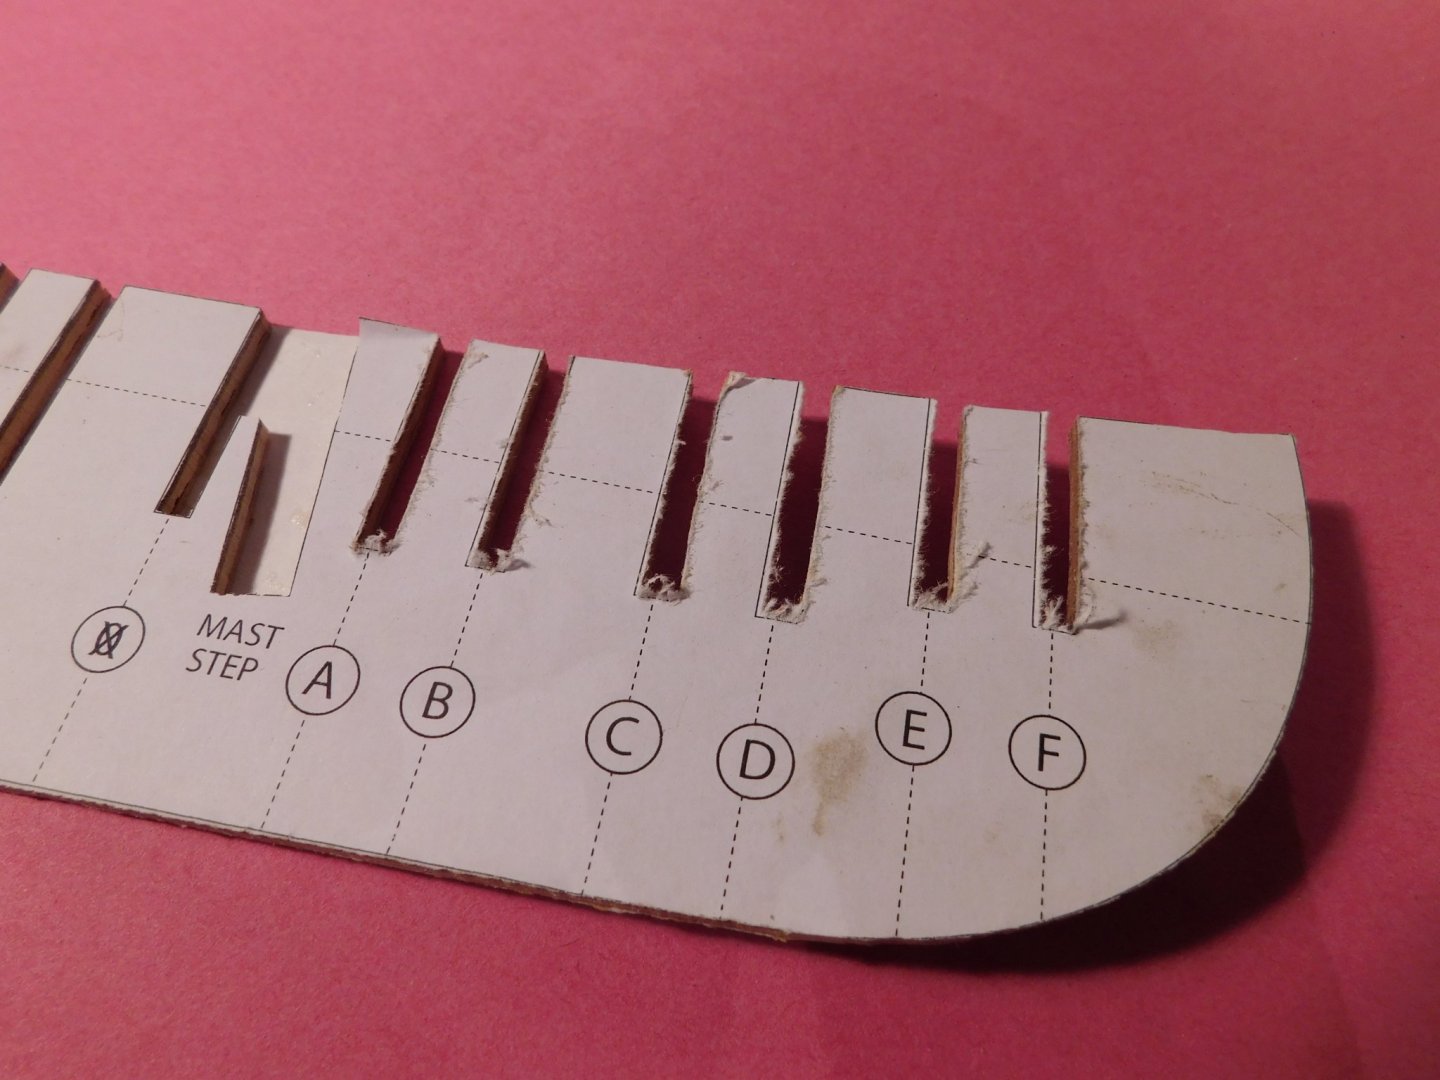
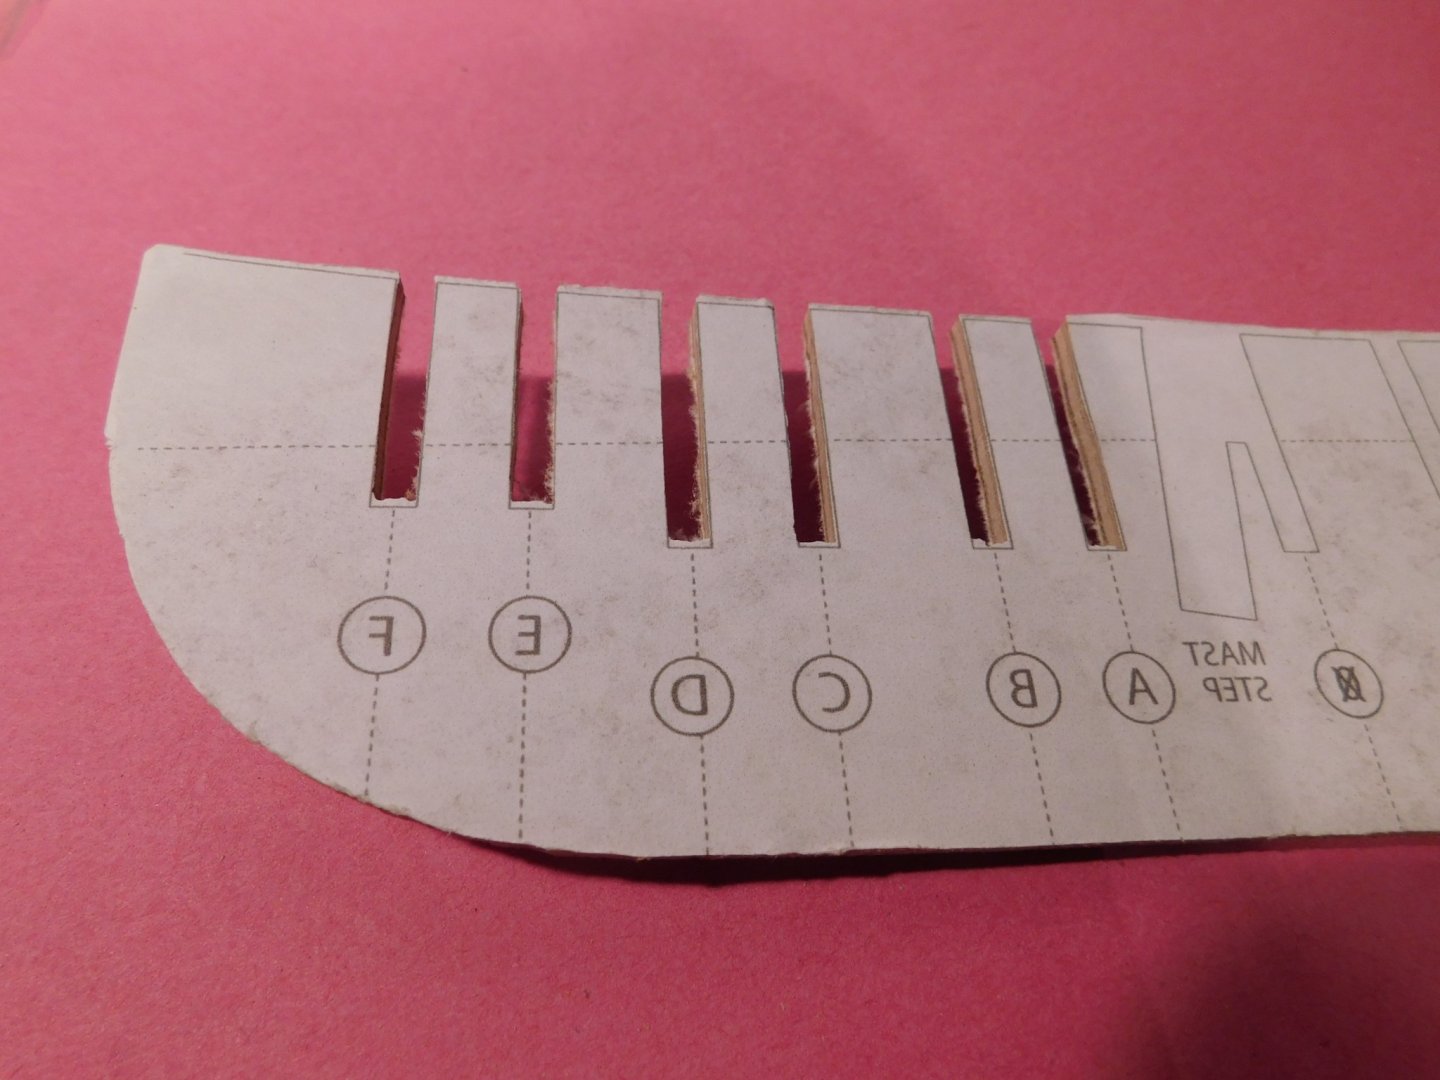
The seven A1 sheets of plans were printed by a local shop. Three of the sheets are now hung above the workbench, one was cut up to make the formers, bulkheads and a few other bits. The rest will not be needed until the build progresses. The cut out pieces of former and bulkhead drawings were scanned for future access since the originals would be glued to the plywood and lost. Before going any further I printed out the scans to check that they still matched the originals and KAPOW!! they had been reduced slightly somewhere in the digital processes of my scanner. Reprinting at 101% gave a perfect match. This is important as will be seen shortly. The plans called for 3/16th inch ply for the main former and bulkheads but I compromised to use available material. I settled on making the main former of thinner 3.8mm material and the bulkheads of 5.5mm ply. Irritatingly, the piece of 5.5mm play I had turned out to be just too small and one bulkhead had to come from a slightly thinner piece. The cut-out drawings were glued to the ply with spray adhesive (note to self: wear gloves next time). The bulkheads were cut out on the bandsaw (second note to self: just get a bigger piece of wood next time, they were too crowded to handle comfortably). I left the paper on and made notes if there was a possible low spot or other boo-boo. Each bulkhead is drawn with the ‘top timbers’ in place and I was convinced that it would be easier to make these separately instead of as integral (and vulnerable) extensions so I omitted them and left notches for each. The main former required planning. Being the backbone of the hull, it was cut to profile as accurately as possible. The throat on my bandsaw is not deep enough to allow all the slots for the bulkheads to be made consecutively from left to right: starting from the stern (the left hand side as viewed in my print-outs) most of the slots could be cut but then the stern starts to foul the body of the saw. I cut as many as I could, printed out a mirrored image of the scan of the bows end of the former, checked for accuracy of size (whew!) and trimmed closely to profile. Using the already cut slots and a bright light for registration, the mirrored image was glued to the opposite side of the former. A single test cut established that the two drawings were in pretty good registration and I was able to finish the slots from this side. Trial fitting of all pieces revealed a few tight spots. Out with the hand files, feeling pretty good. After over two years planning and drawing Pickle, it is very telling that a mere nine days after deciding to build Mediator I have a build log.


- 43 replies
-
- 9
-
-
- mediator
- first build
- (and 1 more)
-
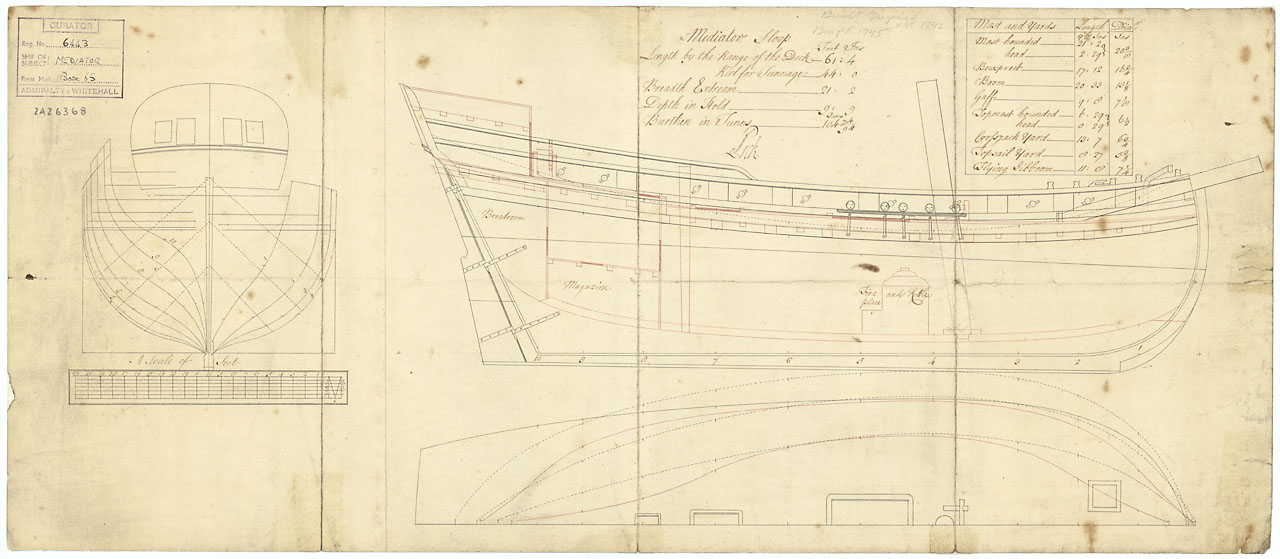
Mediator was a single masted merchant sloop built in 1741 or 42 on the Virginia shore of the Chesapeake Bay. Purchased for use by the Royal Navy in May 1745 and lost less than three months later, she was caught up in the great affairs of the Jacobite Rebellion. In those three months she was in and out of the Mediterranean; captured by the French privateer La Naiade off the Needles; retaken the following day by HMS Assistance. After repairs she was quickly recommissioned and joined the convoys supplying the English land forces in the War of Austrian Succession. She foundered in Ostend harbour on the 29th of July and was lost just days before the siege of that city began. Dimensions: 61’ 4” length on deck, 44’ length of keel for tonnage; 21’ 2” breadth for tonnage; 9’ 9” draught and 104 74/94 tons bm Crew: 60 - 80 at different times Armaments: 10x 4 pounders, 18x 1/2 pounder swivels Plans of Mediator are in the NMM, id number J0569, see image at beginning of post: https://collections.rmg.co.uk/collections/objects/86159.html … although it would be possible reading the description of the plan to believe that Mediator was built at Portsmouth: she was not, but the plan was and that is what is meant. Chapelle also re-drafted plans for Mediator, see The Search for Speed Under Sail, plates #10 and #11. IN 2013 Jeff Staudt produced plans for a model of Mediator in collaboration with Winston Scoville. They are downloadable legitimately: http://modelshipbuilder.com/page.php?192 The 1/48 scale plans are in PDF form and print out on seven A1 sheets. They are superbly detailed drawings and apart from a few comments there are no instructions per se. At 1/48th scale the length overall will be 779mm, approximately 30 ¾ inches. Looking at all the plans together, a couple of points become evident straight away. Mediator was pierced for 14 guns but the stated armament was ten: even that figure may be excessive as it is unlikely the full compliment of arms was carried while in convoy service. The crew figures I have found also seem high (60 to 80) but perhaps reflect those times when she was an independent merchant ship and needed all guns and of course gun crews. Unless I lose my favourite marbles, I will build Mediator as per the drawings. The only planned exceptions to this are details, such as to substitute metric standard plywood sizes for the main former and bulkheads, the addition of a capstan and some changes in the deck layout and planking, more on that later. Planned materials: woods = ply, cherry, castello boxwood, apple, holly; other materials = brass, card, paper and miscellaneous bits as inspiration requires. There is a back-story. I have never made a wooden model ship. After years of planning to build HMS Pickle from scratch, when the time came to start making sawdust my expectations (thanks to MSW) had grown to the point where the bar was much higher than I could achieve with my untested skills. So, as a part of the learning process, I decided to make at least some of my mistakes in a safe place. I am making Mediator as a sacrificial model that will allow me to rehearse processes that are new to me and (hopefully) still have something acceptable at the end of the exercise. In other words, I am going to build a model before I build the one that matters to me. Since this is a hobby, not a career or a marriage, it is worth admitting that I felt better about the Pickle project as soon as I took the pressure off by doing Mediator first. Who knows? With plans of such quality as a starting point I may end up with a decent model. If not, it will be down to me as there is nothing wrong with the plans. So, here goes. Sawdust begins in post #2.
- 43 replies
-
- 6
-
-
- mediator
- first build
- (and 1 more)
-
Welcome to MSW from across the pond, hoping to see the fifie.
-
4 jaw chuck for a Proxxon lathe??
bruce d replied to md1400cs's topic in Modeling tools and Workshop Equipment
Correct, the Unimat DB/SL does and some Sherline models also used that thread. I don't know about Proxxon threads but have never heard of the chucks being compatible with any Unimat models. The current Unimat production (which in reality is nothing to do with the originals) also have a M12 x 1 thread. Beware, some of the chucks from this range are plastic. -
build logs order
bruce d replied to Papa's topic in Using the MSW forum - **NO MODELING CONTENT IN THIS SUB-FORUM**
That has been my experience as well, and I find it useful. If any mods are considering fiddling with defaults as a result of this thread, great, full marks for responsive management etc but this is a feature I rely on. Please, just make it optional or controllable if this is changed. Pretty please? -
Hello Dwight, This has been discussed before, here is one thread: ... and there are others. Hope this helps, Bruce
- 1 reply
-
- 1
-
-
Micromark cutoff saw?
bruce d replied to Brewerpaul's topic in Modeling tools and Workshop Equipment
UK source: https://www.ebay.co.uk/itm/100001-Art-Craft-Mini-Cut-Off-Machine-Steel-Cutting-50mm-Mitre-Saw/292743524367?epid=6031289762&hash=item4428dfb00f:g:r-UAAOSwyulbqig~ I was interested to hear the good comments from owners. The ability to set angles with confidence makes it tempting. Maybe later. Bruce -
Hi Michael, It seems you have an OcCre kit of the 1899 Dutch built schooner ALBATROS. I haven't done any further digging but here is a summary: https://www.castyouranchorhobby.com/Item/OC50500 It should make a nice looking model, it certainly has some history. HTH Bruce EDIT: see this as well ... https://www.edp24.co.uk/business/the-albatros-sold-and-staying-in-wells-1-6599080 ... but tread carefully. Even though it says this schooner was made in Holland in 1899 the aft deck and cabin just don't match, maybe some digging?
-
hi, this is Medy lin, I am ship model bulider
bruce d replied to Medy lin's topic in New member Introductions
Hello Medy lin, welcome to MSW. Those are very nice looking models. It is good to see modern subjects, please show us some more of your work. Regards, Bruce -
Mini Lathe recommendations?
bruce d replied to jfinan's topic in Modeling tools and Workshop Equipment
Shipman, I have Unimats and must confess I can't picture this pin you describe. However, there is a locking screw on the tailstock to fix the ram in position: is it at all possible what you are dealing with lines up with that screw? Also, I expect the penetrating oil is a good aproach although it may need a bunch of gentle urging with a hardwood dowel (assuming the pin mystery is resolved). -
Looks good to me.
-
Welcome to MSW!
-
Good looking boat. Welcome to MSW!
-
Very generous of you, clearly a diplomat and visionary. All credit to the admiral who saw the possibilities and delivered the cornbread. Sopping up the syrup sounds good.
-
I'm glad you asked that question. They were round, made in a square tray.
-
Good to see you back Alan.