aliluke
-
Posts
1,359 -
Joined
-
Last visited
Content Type
Profiles
Forums
Gallery
Events
Everything posted by aliluke
-

Lynx by Basic – Panart
aliluke replied to Basic's topic in - Kit build logs for subjects built from 1801 - 1850
Welcome to MSW kit builds Basic, Lots of friends are here. I don't know of this kit - can you post a picture of the box lid? Look forward to your progress. Cheers, Alistair -
Nice one Ron - the furled sails look really good but I doubt that Supply would be able to get up on her foils in that configuration! Cheers Alistair
- 240 replies
-
- 1
-

-
- supply
- caldercraft
- (and 1 more)
-
Looking good Ken - Fair American is a fine looking ship. After Bob's build I gave a lot of thought to trying it - your build may tip me further towards it. Look forward to more. Cheers Alistair
-
Hi Richard I've turned to just wetting and bending. I only lightly clamp the plank to a former - a glass or other round thing and then just press the plank into shape between my thumb and forefinger after that, while it is still slightly wet. It may be that the kit wood - lime - I'm using makes it is easy to do this way but with gentle persuasion it takes on any shape I want as long as it is a bit wet. Nipping kind of kills the wood fibres and that is very hard to undo. But it still works and many here use it while others deride it - whatever flies your kite, I still say. Nipping sure makes it quicker but, as before, don't let it thin the planks too much. Cheers Alistair
-
Hi Mick You are doing a great job there. You have an Endeavour! Celebrate and enjoy the rest - it is all fun now that you have got past the tricky hull. Looking good, mate. Cheers Alistair P.S. We all have that macro photo cringe thing. We all know that what the eye sees is easier on it than what the photos show - don't worry about it. Experienced posters here will all understand the difference between the naked eye and the photographed version. What you see is what counts! Keep it up!
-
Richard, I agree with Augie there - you need wider stock to spile. I do not intend to go there with my ships even if it compromises historical accuracy. I find stealers and drop planks do the job along with plain tapering. When my confidence and skill improves I may go there... Your planking looks good to me. Given your excellent layouts I guess it is just a single layer? As for the dirt - it definitely should sand out. My Fly deck with pencil caulking looked like hell before sanding and now I just have the fine lines. As for a plank nipper - whatever flies your kite in my opinion. The main risk is that you will thin the planks at the most critical bends and this will give you less leeway when sanding. Wetting and bending retains plank thickness. That said I got through my first hull entirely with a nipper and with no bad outcomes. Just my thoughts. Cheers Alistair
-
Hi Bob That's a bugger (in my Kiwi lingo). An uphill fight against the fundamentals of hull structure, frames and basic set outs must certainly turn a fun hobby into a chore and a bore. While I do not take anything away from ME and MS kits - their service is fantastic and their AVS model, which I cut my teeth on, is an absolute beauty - as I'm sure many of their other kits are, but perhaps your fine skills should be tried on another kit maker after this experience? With any decision I hope you get back on track and enjoy it. The Essex is a fine looking ship and I know you'll do it justice with the right foundations. Cheers Alistair
-
Hi Pawel, Your work is looking really good and is similar to my start on the Fly. Excellent modifications on your badges - that is hard work starting from a cast white metal piece. For me doing these early details was about getting familiar with the scale - 1/64 in my case. I think it is a useful way to find "the eye" for the whole build. I hope you launch into the hull soon and I look forward to that progress. Cheers Alistair
-
Thanks so much Timmo - I've just had a look - that first link is my Fly - love these plans which I'll discretely order. We are on a budget... Cheers Alistair
-
Hi Timmo Halftime - can you give me a link to where on the NMM site you get those plans? I just can't find them. Thanks Alistair
-
Great work on the serving and all round - your rigging looks completely authentic. I'm going to have to learn how to serve a line - plenty of time for that before the skill is needed. I have the TFFM series so some of the equipment is in place... Cheers Alistair
-
Very cool Timmo - now I'll have to look into whether they have plans for the Fly - much to wife's disgust. If you do laminate get it done professionally unless you have talent in the area. I recently took on my own lack of talents by trying to glue paper maps to MDF backing boards. Looked good to start with, the next morning = air bubble city. It would have been fine if Golden Bay and Tasman Bay were mountain ranges...(ironically the mountain areas were all dead flat). I reckon framed and sitting on the wall behind/above the ship would be a good solution in my opinion. Cheers Alistair P.S. Go the AB's
-
Nice work Andy - very tidy. I look forward to getting where you are at and doing half as good a job. In the meantime...planking... Cheers Alistair
-
Hi Ron I like your work on the sails. Adding sails in any form, furled or otherwise, is a very courageous modelling step to take - a step that I'll skip for the meantime being too difficult for me. Good on you and they are looking really good. I think they will really enhance your model and I look forward to the finished shots - not far away! Cheers Alistair
- 240 replies
-
- 1
-
-
- supply
- caldercraft
- (and 1 more)
-
Great stuff Bob. Kudos also to ME for making kits with this number of bulkheads - closer to a fully framed model than a POB kit. It makes for better planking I'm sure. I'm looking forward to all your updates. Cheers, Alistair
-
Hi Hamilton You really have headed into the depths of scratch model making with all of the research and testing of ideas. And it all looks very good indeed! I can't imagine an out of the box kit ever satisfying you again. A great progression - one day I may catch up with you. Cheers Alistair
-
Good work on the windlass Mick and I hope that my book recommendation doesn't make you regret spending 8 pounds. Actually I know it won't. Your bell - sorry mate, ditch the glitz in my opinion. The roof of the belfry could be gold but gold all over??? Too much in my opinion but, hey, it is your ship - up to you. Glad to see you've taken to cheating too . Cheers Alistair
-
Hi Adeline Your first planking looks really good. I'm a bit behind you but we might stay on the same track for a Fly build. Having just made cannons with aftermarket barrels and carriages I would seriously recommend that you ditch the kit versions and look elsewhere - Chuck Passaro is doing them through is Syren Ship Model company for instance. The kit ones are way too big - both the barrel and the carriage. I know getting new ones costs but it seems little to me in the overall context of the building process and the time invested. I look forward to your updates. Cheers Alistair
-
Hi Bill You are getting there and fill and sandpaper will help. Not sure how you aren't those planks tight to each other. Maybe more dry fitting first? All your pictures suggest the right methods. But don't worry, there are lots of weapons at your disposal - fill and sand being the best of them. Also remember to bevel the plank edge to the plank above - this helps keep it much tighter. Further I'd suggest that your hull framing is probably pretty strong - do not be afraid to apply pressure to get the planking tight. Another recommendation is come down from above as well as up from below. I think the plank that is most troublesome is the one in your picture: first first planking 001.JPG. It is creating a lens shaped planking area between the bow and stern and this is always going to cause trouble. You now have a lot of planking space at the stern to fill and very little at the bow - this will hurt. I'd plank it however you can now - just get past it, fill and sand and then look at the planking tutorials here for the second round of planking. Plan the second planking with care and you'll be away and sailing. I hope this encourages, it is meant to - wood ship modelling has many ways of digging holes but equally as many ways of getting out of them. You'll be fine. Cheers Alistair
-
Looks good Ken but I wish your photos were more in focus Home straight now - I know nothing about sails so can't help there. Cheers Alistair
-
Mick, you will be happy with this book - guaranteed. It has more in it than you'll ever need to know and the drawings are amazing. Well done on the price - I think I bought mine new when it was still in print so it was about $NZ40 or 20 UK pounds. 8 UK pounds is a steal. Good buy - enjoy. Cheers Alistair
-
Hi Jason Your carronade looks very fine to me - very crisp and clean. I use Morope for my rigging but you might consider Chuck's rope and some others out there. Morope isn't cheap, has it's own "features" but does look really good in my opinion. It also has a springy character which is really useful when you figure out how to exploit it. I would definitely suggest an aftermarket rope for your kit (or for future kits) should be considered. Your great work deserves a good rope. Cheers Alistair
- 800 replies
-
- 1
-
-
- snake
- caldercraft
- (and 1 more)
-
Mick The square marks are square holes into which handspikes or bars are inserted to give leverage to turn the windlass. The suggestion that they are marked rather than formed is probably because making a square hole is difficult without a milling machine. You probably can get away with a round hole although it isn't technically correct. I reckon you'd be well served by getting yourself a copy of "Historic Ship Models" by Wolfram zu Mondfeld. It will answer most questions about bits of ships and has a wealth of very good drawings and modelling tips. I'm sure many here have a copy - I sure do and enjoy leafing through it. It also has a picture of an Endeavour model on the cover! Cheers Alistair
-
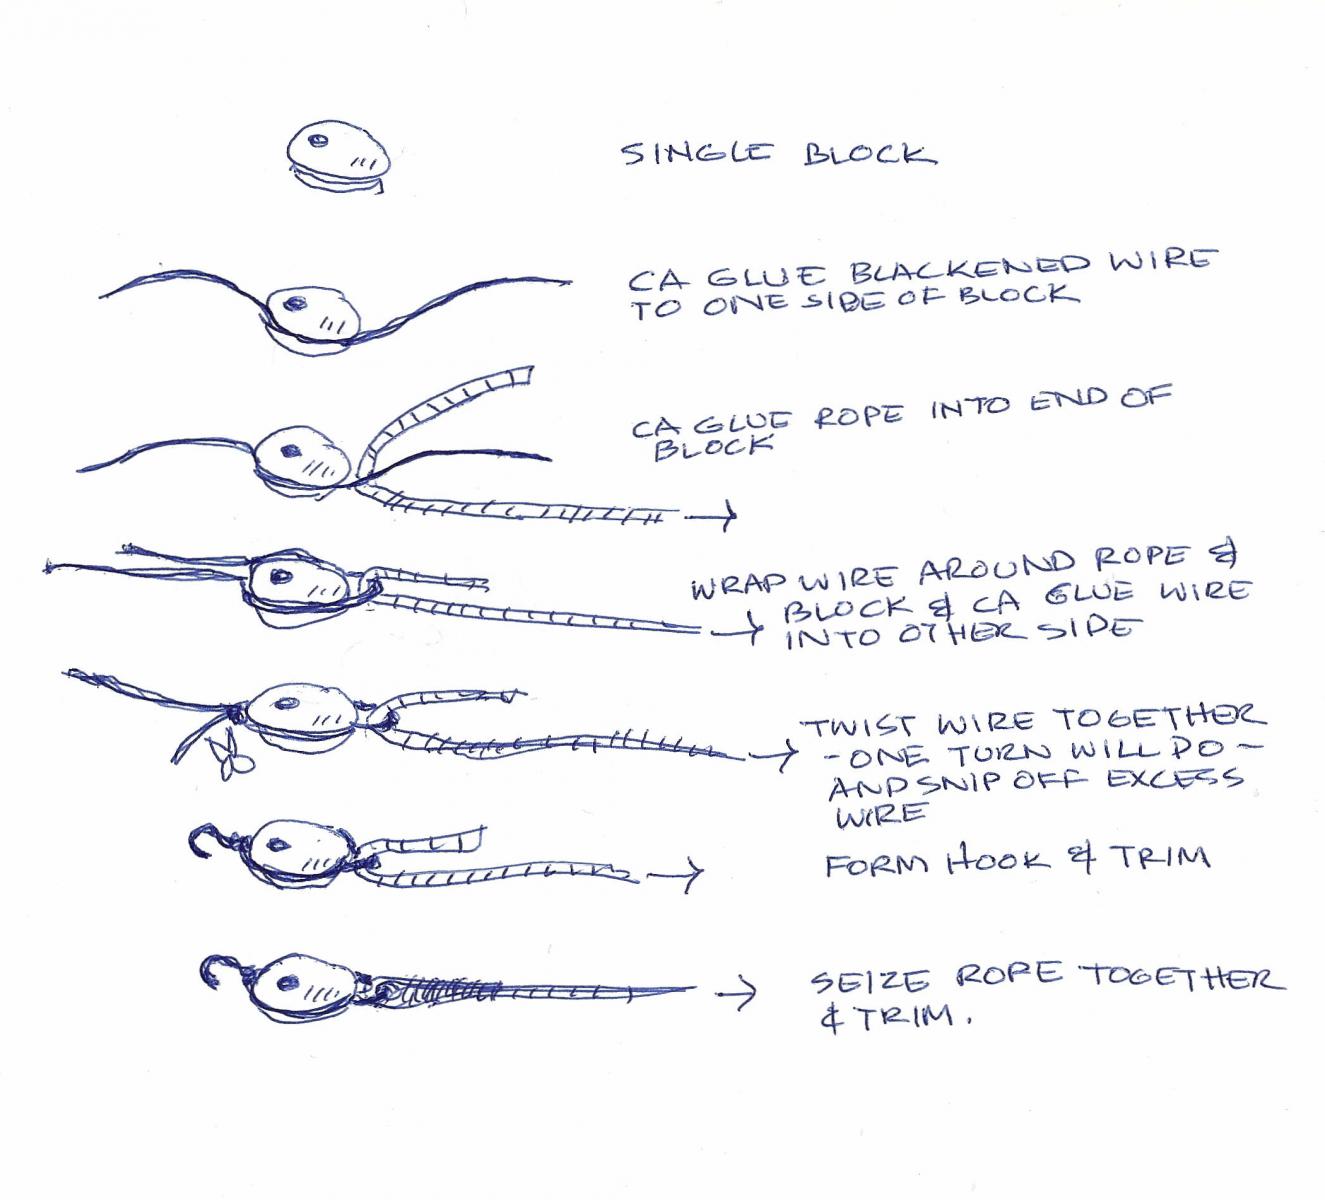
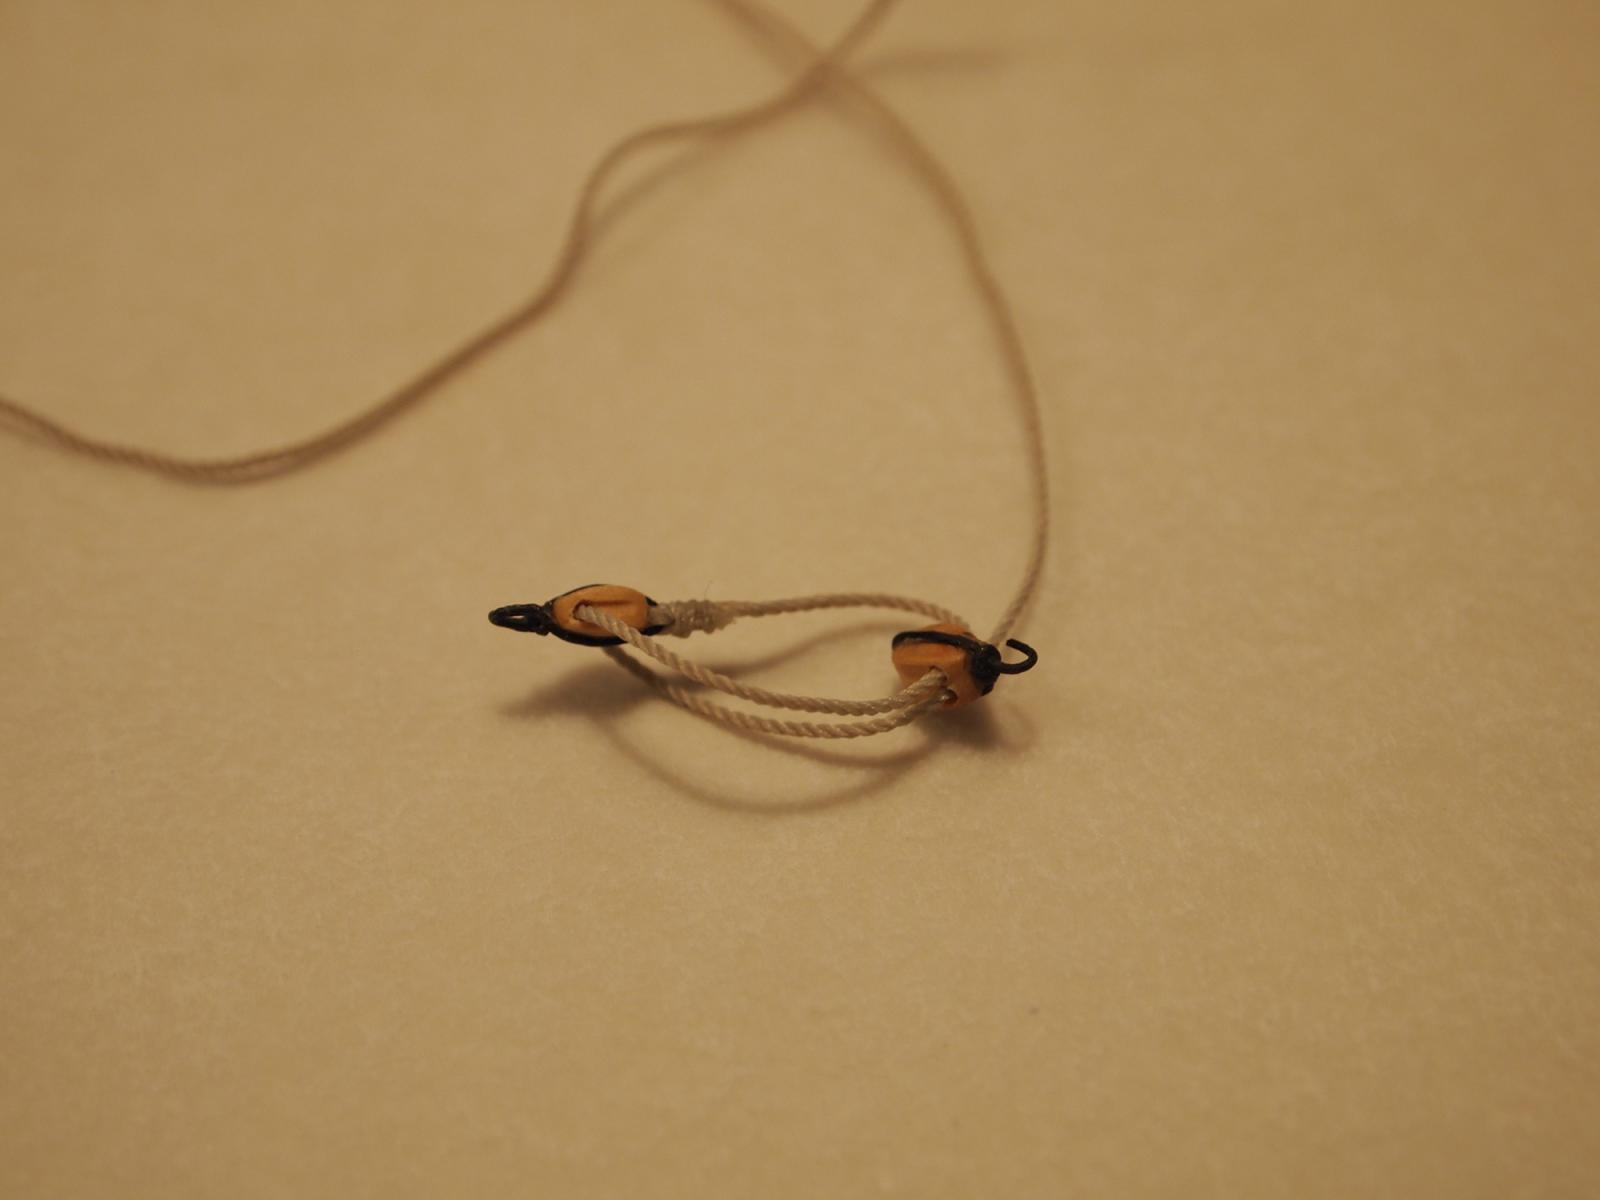
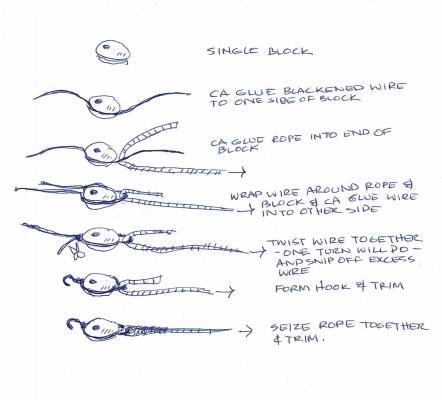
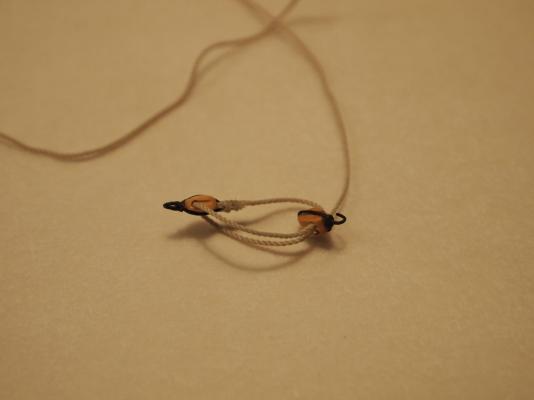
Hi Jason I've been looking at your log without reply. You are doing fantastic work - crisp, clean and precise. I like it very much! As for your tackle problem: consider fixing the rope to the blocks without a separate hook. This saves a lot of room but does give you an iron bound block rather than a rope bound one. I did this on my AVS which I reckon is a tighter rig than yours and got good separation between the blocks. I use a very thin blackened jewellery wire for the process. The same process is used for the double block but without the rope seizing. Here is a diagram I did a while ago and a picture of the roped tackle with 3mm blocks. You can also look at my AVS log for the results. I reckon you'll gain all the space you need but it will look slightly different than your carronade rig. I also have no idea what that eye bolt standing up from the rear of your cannon carriage is for - haven't ever seen one there... Really great work - I'll keep following. Cheers Alistair
- 800 replies
-
- 8
-
-
- snake
- caldercraft
- (and 1 more)
-
Richard I'm surprised you have to wait for Jeff - I never have. But the wait is worth it! Superb product and very friendly service. As to your sanding question - I say do not be tempted to test sanding to see how things look. It is a spiral of disaster - you'll over sand the area with no reference to the remainder of the planking and then you will over sand it again when you correct the rest of the planking to it. Cheers Alistair