


aliluke
-
Posts
1,359 -
Joined
-
Last visited
Content Type
Profiles
Forums
Gallery
Events
Everything posted by aliluke
-
 Hi Mick Looking good. As to your question - if there is tension on a part from the rigging in particular, you should use pins as well as glue. If the part fails during rigging you'll regret not having reinforced it. Much easier to pin now and be safe later! If it is not going to be under any stress then CA should do. For the most stressed pieces I also tend to use epoxy glues even though I really hate working with them. Epiglass Epiglue for instance, once cured (that takes 4 days!), forms a bond that will be stronger than the pieces it connects. In other words the wood will fail before the bond does. CA is much more brittle especially if there is not a lot of bonding surface. Hope that helps. Cheers Alistair
 -
That planking is looking really good vths. I'm also looking back in your log and admiring the deck planking work too. Just being in this phase makes me realise what a fine job you did on that. I never contemplated tapering the deck planks towards the aft - as good as that looks - it is hard enough just to cut them square and to length!! Impressive work by you. Cheers Alistair
-
Nice stuff Hamilton - the boat looks great. I'm waiting for Syren - Chuck - to come through with a boat or boats but I'm far from needing them at the moment. I'll have to stick to decking and planking for a while yet! Cheers Alistair
-
Very nice work Ken It reminds me of the AVS and one thing, amongst others that are good about their kits, is the number of bulkheads that MS kits provide are a great foundation for a hull. Other manufacturers give you great distances to span. Cheers Alistair
-
Hi Mick The main keel should definitely be painted white with the hull. Below is a link to my model of the AVS (I still haven't figured out to link it through my signature....) You can see the effect. Work out a painting sequence allowing for the addition of the strakes and other bits. Painting requires as much patience and thought as all parts and while you'll have to do touch-ups as you go you want to get the sequence right in the first place. I haven't done the Endeavour and urge you to look at the other logs for it and look at the approaches to the sequence. You've got the hull sorted out - take your time and make the rest really sweet! For masking I'd suggest Tamiya masking tape. I know that lots of others here use it. Properly applied it has no bleed. Take your time and enjoy. http://modelshipworld.com/index.php?/topic/392-armed-virginia-sloop-by-aliluke-model-shipways-148/page-1 Cheers Alistair
-
Looks really good Mick I wouldn't rush into the painting. Have a look at other logs - it might be wise to do some other work first. In other words, I'd plan a sequence to work out when painting is "the next step". The paint is the finish and if you damage it during the rest of the build it is very hard to fix (I speak from bitter experience). Cheers Alistair
-
Hi Timmo Solid wood over ply every time. Right choice and very nice work by you on the fenders and steps. Cheers Alistair
-
Hi Mick I didn't understand your question until I realised, from the later photos that this was your third layer of planks. You have probably spotted the issue but you have to much space midships for planks compared to the bow and, particularly, the stern. The area looks like a lens in shape with a wide centre and points at both ends. I don't think this is going to go away whichever direction you head in. The "lens" will get smaller but it will not go away. It means you'll be bringing planks to finish as points. This isn't correct. I wouldn't despair however. My advice is: - Finish your planking as best you can and with regard to making it symmetrical - port/starboard - at best. - Fill and sand the hull below the waterline until it is smooth as a baby's bum. - Paint the hull below the waterline (this is no shame and it looks good too!). I've never built Endeavour but have tackled a hull as difficult if not worse - The Dutch Whaler by Sergal. My planking of this is totally wrong but I had no idea at the time and no internet and no other leads. However it worked in the end. The trick, I think, is you have to get some upward sweep of the planks fairly early on instead of running the planks parallel. The upward sweep gets rid of the consequence you are now facing. I'd post some pictures here but I don't think they'd be useful. My thoughts. Cheers Alistair
-
Great work Ron. Home straight now and she's going to be a beauty (already is). Cheers, Alistair
- 240 replies
-
- 1
-

-
- supply
- caldercraft
- (and 1 more)
-
Hi Mick You'll get there! The most important aspect of your effort is that your difficult hull now has the correct shape. Please don't take this the wrong way but your lower planking set out is a bit eccentric. The upper works look great though. I'd suggest a painted - aged white - lower hull to the waterline. This is consistent with how the Endeavour was finished. Just my thoughts... Cheers Alistair
-
Hi Steve I used blackened jewellery wire for my hooks. It is very soft but holds the tackles to the eyebolts just fine. It goes down to very thin gauges and is very cheap. I've got 2mm blocks for my Fly model - 1:64 - but I agree that even if they look right they are ridiculously small to try to work with. I might have a go, they came as a part of the upgrade kit, but will probably settle for 3mm blocks too. The AVS cannons even at 1:48 are smaller than the Fly cannons and 3mm blocks worked out fine for them. I also bought different cannons for the Fly about a year ago but wish I'd waited for Chuck to come out with his. They look much better...maybe I will indulge... Look forward to your updates - it is very nice work that you are doing. Cheers Alistair
-
I think you are in really good shape Mick. The upper works are the most important, being the most visible and unlikely to be covered with anything but paint. Depending on how you finish the lower hull - painted or coppered, the lower planking can be a little more loose. Best thing is your hull shape looks great - well founded and that is what really counts. Cheers Alistair
-
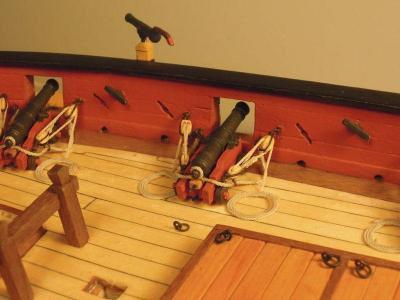
Your cannons look great. Hate to suggest the magnification required...but 3mm or 2mm (best) blocks will unclog the assembly. The bugger is that they are extremely hard to assemble! This is my cannon assembly at 1:48 scale with 3mm blocks. They burned me out but I was pleased with the look. Cheers Alistair
-
Hi Jean-Pierre You may find some here who are horrified by the use of the Amati plank nipper. For me and for this hull shape, it was a saviour. Couldn't have done without it and still have it! Keep going - you might even inspire me to revive my kit - I still have all the bits. Cheers, Alistair
-
Hi Matti I have just had a look through your log. This is an exceptional build. Your details around the galleries and towers are amazing. I'll check in to your log more often, Great work. Cheers, Alistair
-
Looks great Andy. Very nice seizings. I look forward to being where you are but I'll enjoy the journey. Cheers Alistair
-
Good to see you back Jean-Pierre and your hull has really come together well. The hardest part is over now for the fun bits! I look forward to your updates. Cheers Alistair
-
Smart stuff Bill - you are on the right track. Fairing is as much about adding as it is about subtracting. Annoying as it is to add, I found that for my AVS build this was critical. It is about thinking through the whole thing and never assuming the kit maker got it entirely right. Good foundations on your part! Cheers Alistair
-
HMB Endeavour by mikec - Eaglemoss
aliluke replied to mikec's topic in - Kit build logs for subjects built from 1751 - 1800
Mike Do the mouldings come from the kit? Or, are you making them some other way? Looks great whatever the answer! Fantastic work. Cheers Alistair -
Hi Danny Although I think I've seen it before (MSW1 versus MSW2 - will do this to you) I was just alerted again to your Vulture project. I'm just starting on the kit Amati Fly - a poor cousin- and would like to thank you for the enormous wealth of information that your build provides for these ships. Just incredible - knowledge plus skill. Beautifully made! I'm going to start back at page 1 and just look and learn... Cheers, Alistair
-
HMB Endeavour by mikec - Eaglemoss
aliluke replied to mikec's topic in - Kit build logs for subjects built from 1751 - 1800
Hi Mike Never did see this on the old site but it looks great. Nice to have another Kiwi here too - we are too rare! Look forward to more. Cheers Alistair -
Andy Your shrouds look perfect. I really enjoy the rigging - thought I'd hate it. As long as you enjoy it and armed with TFFM IV this will turn out great! Cheers Alistair
-
Excellent work Ron. I've seen some get an "hour glass" effect on the shrouds when the ratlines are added. Your clamping and template method have clearly served to avoid that. Cheers Alistair
- 240 replies
-
- 1
-
-
- supply
- caldercraft
- (and 1 more)