HOLIDAY DONATION DRIVE - SUPPORT MSW - DO YOUR PART TO KEEP THIS GREAT FORUM GOING! (Only 13 donations so far - C'mon guys!)
×

tlevine
-
Posts
2,032 -
Joined
-
Last visited
Content Type
Profiles
Forums
Gallery
Events
Everything posted by tlevine
-
 Thank you, John. And thanks for all the likes. Maury and Danny, I agree with both of you. I will be sanding it down before final installation. Overhead stowage of the pump dale between the beams makes sense to me Druxey. I will probably install the port side dale.
 -
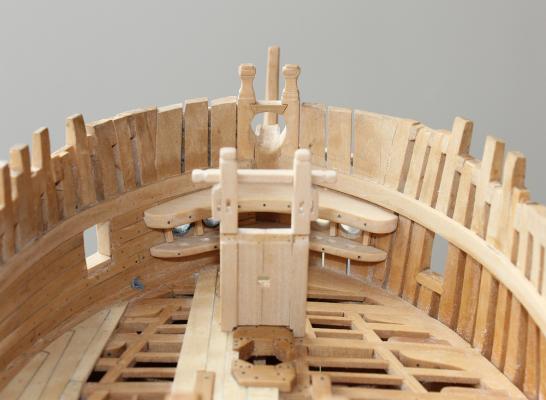
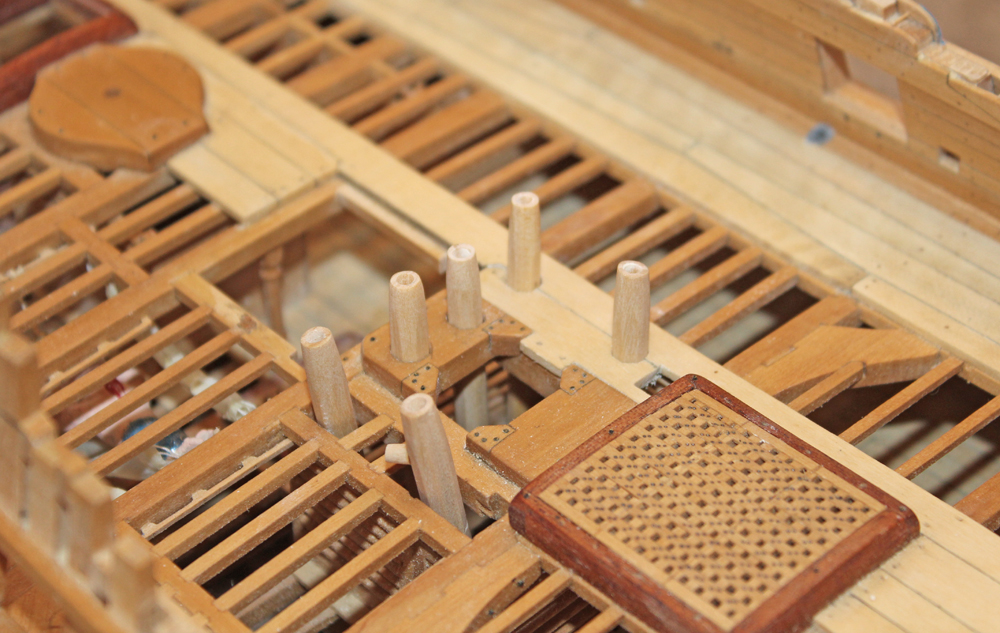
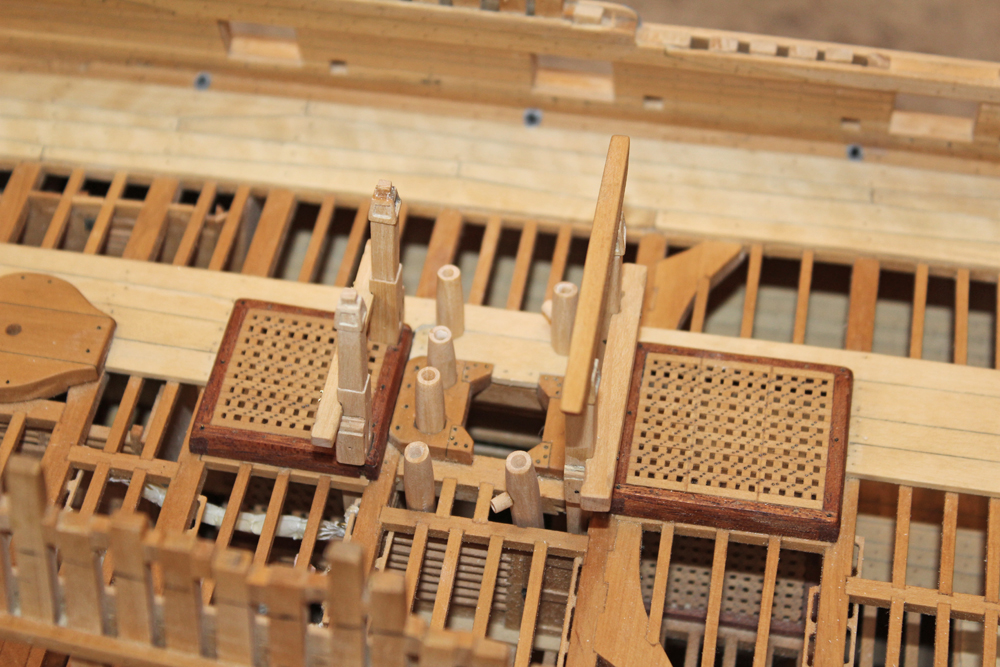
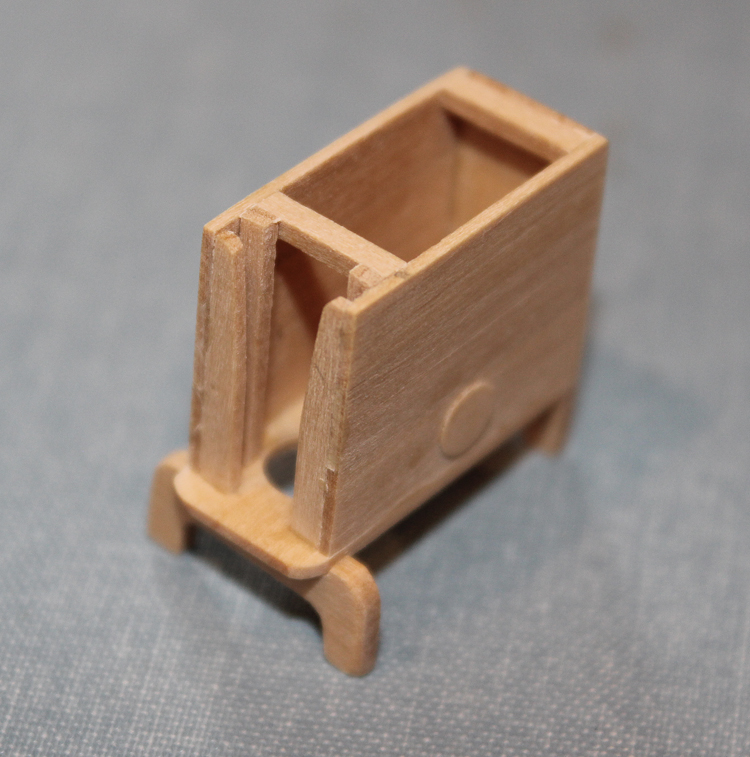
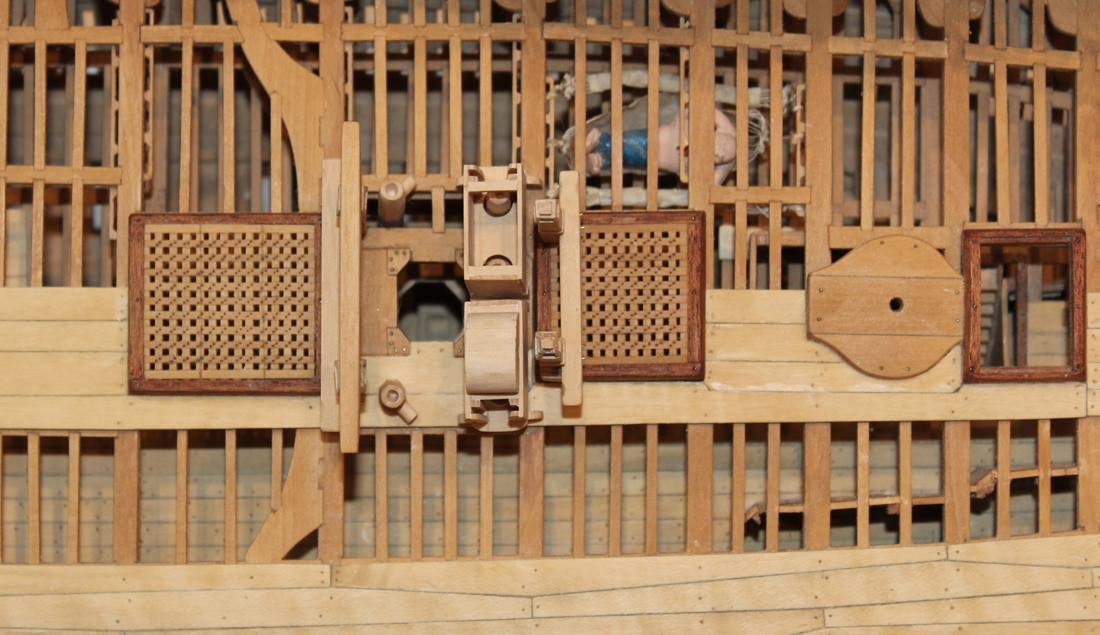
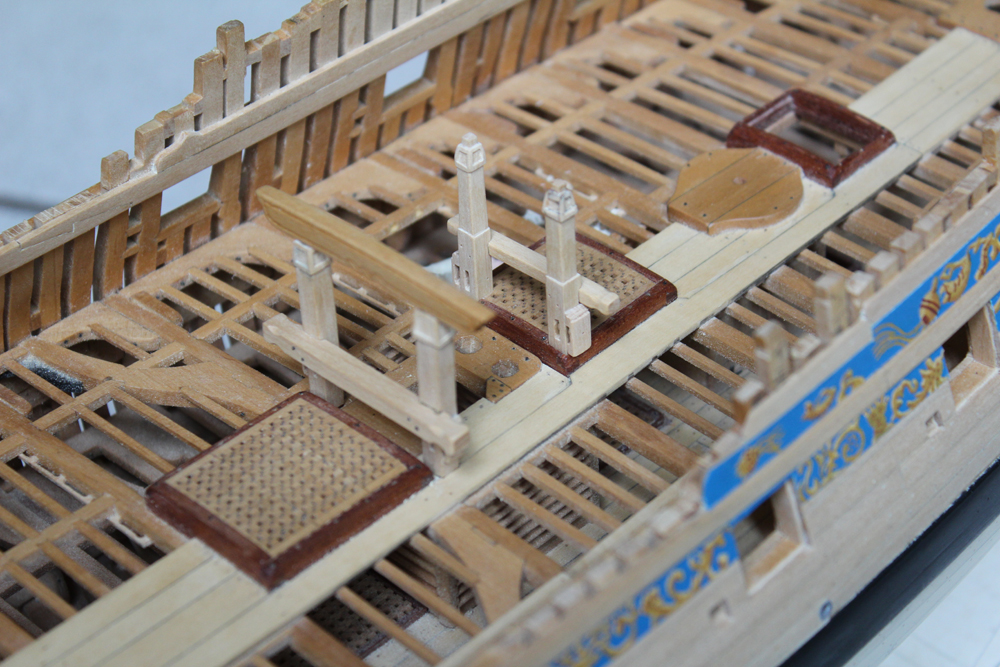
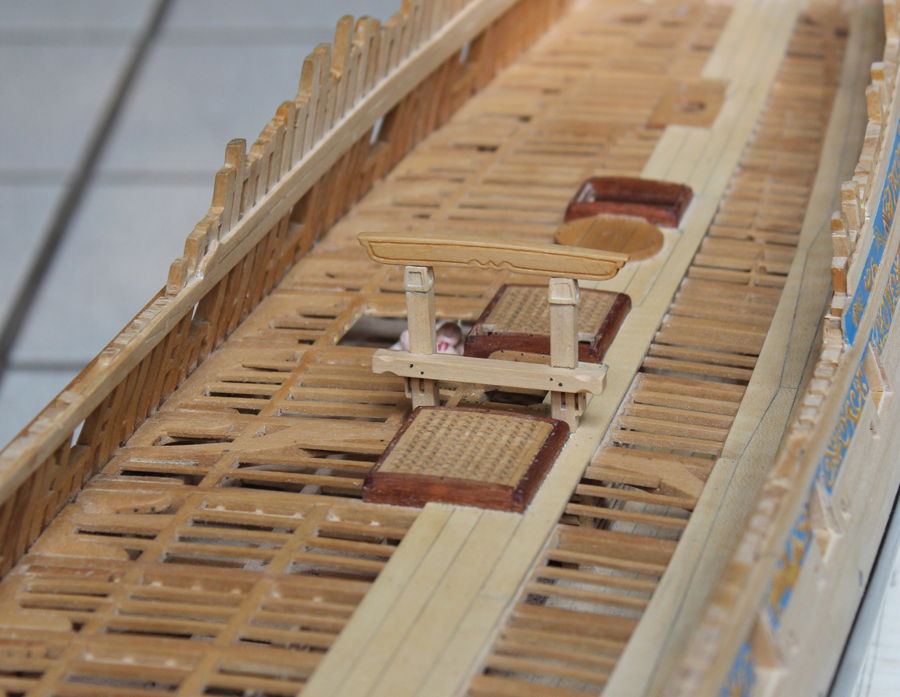
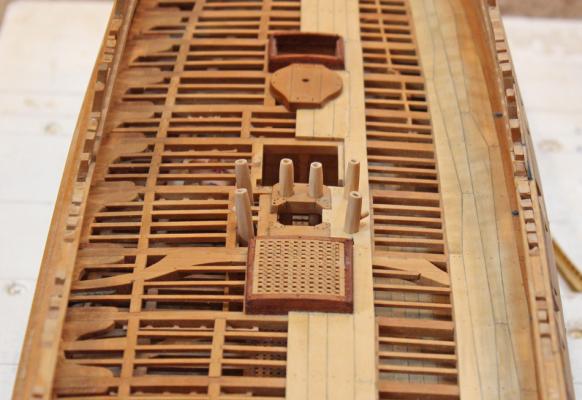
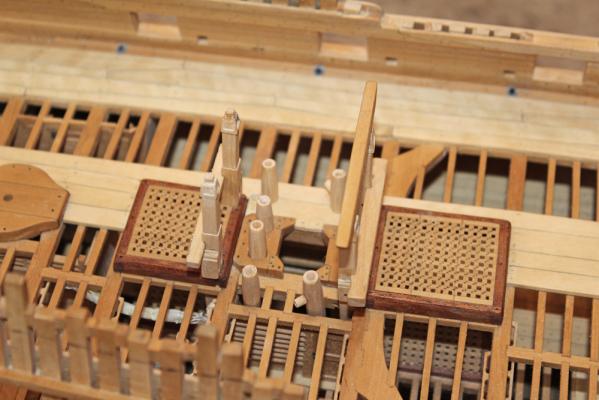
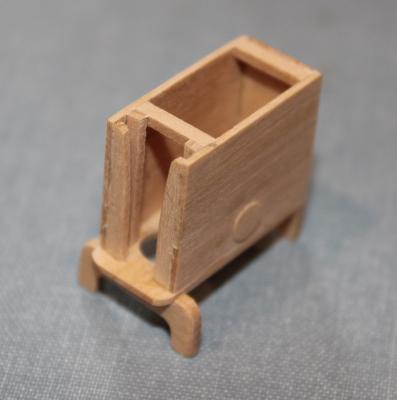
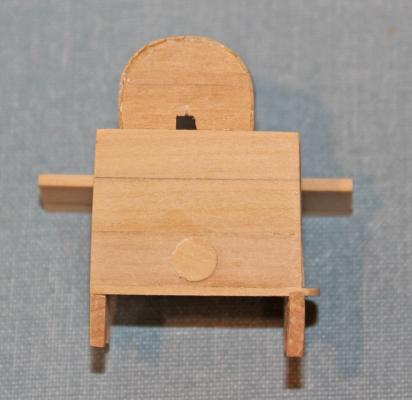
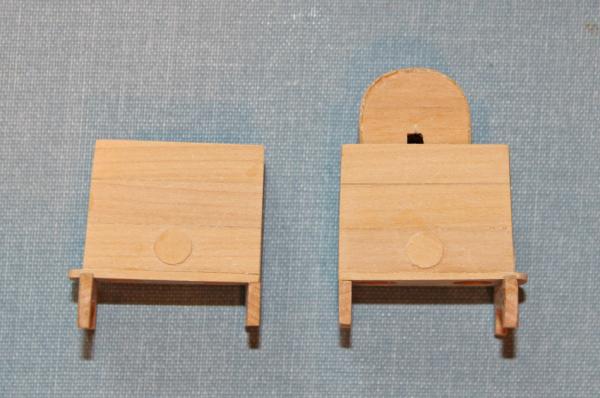
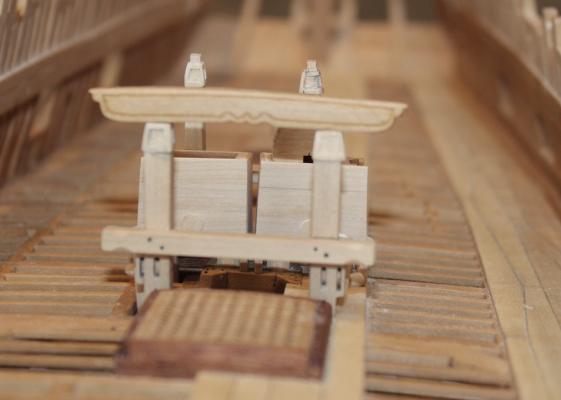
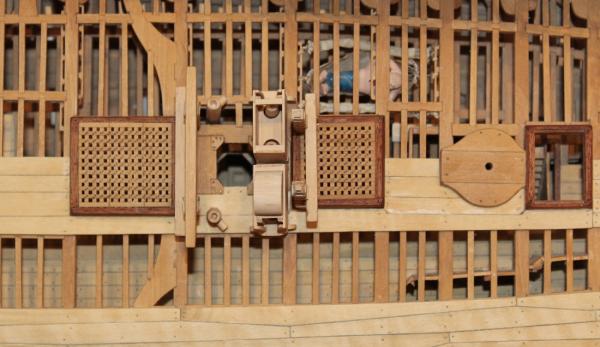
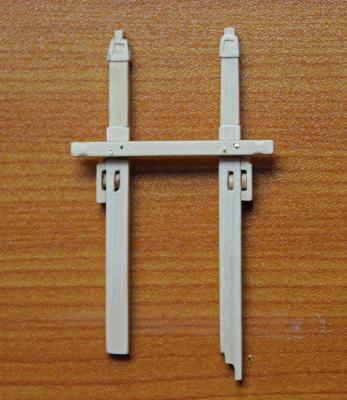
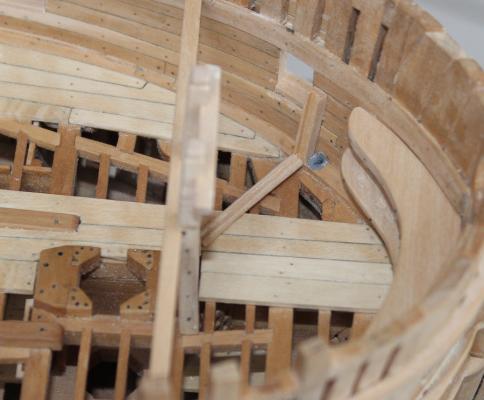
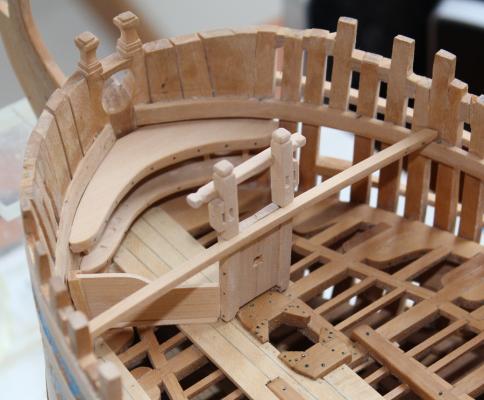
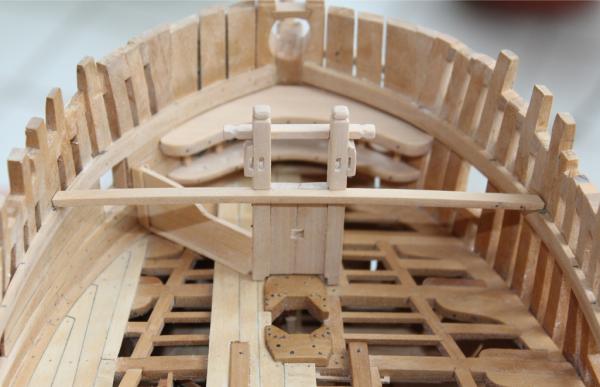
Time to work on the pumps and cistern. I had previously rough-shaped the hexagonal pump tubes and left them long for final shaping later. There are four tubes that terminate in the cistern and in front of them are the two hand pumps. Each of the tubes was cut to length based on the drawings in TFFM. They were bored for insertion of the pistons later. They have been dry-fit into their openings in the deck and main mast partners. The nozzles for the hand pumps point 45o aft. I did not have any metal supplies with me this week so they will be finished and permanently installed later. The cisterns are relatively straightforward. They are essentially boxes with two vertical side and two canted sides sitting on legs which are wider in the front than in the back. There is a slot outboard for insertion of the pump dale and holes in the bottom for the pump tubes. The outboard feet are taller than the inboard ones to compensate for the thickness of the mast partner. There is a removable cowling which covers the pump wheel and chain assembly. I have decided to make the port cowling and leave the starboard cistern uncovered to demonstrate the wheel and chain. They still need to be detailed and I have not decided whether to show the pump dale. Where would it be stored when not in use? The cisterns are temporarily set in place behind the main mast. There are a lot of structures in a very small space.


-
Thank you Remco and thanks to everyone for the likes. Maury, he's a lazy piece of you-know-what and I can't get him out of his hammock. Actually, I had to remove some of the ledges to install the jeer bitts. I never liked the colors so he is going to receive a new paint job.
-
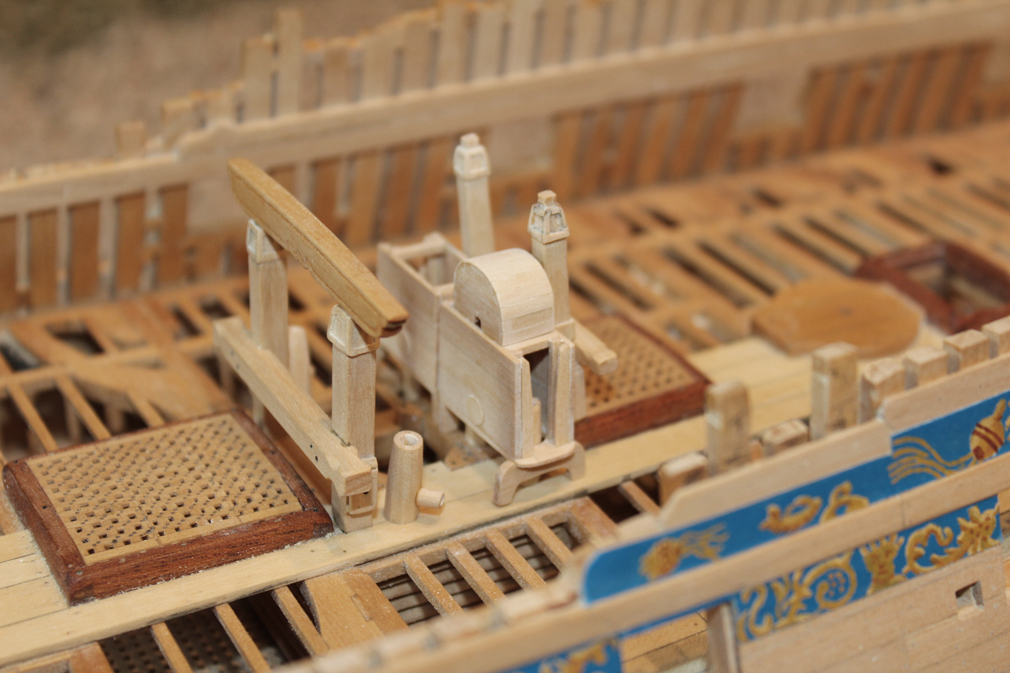
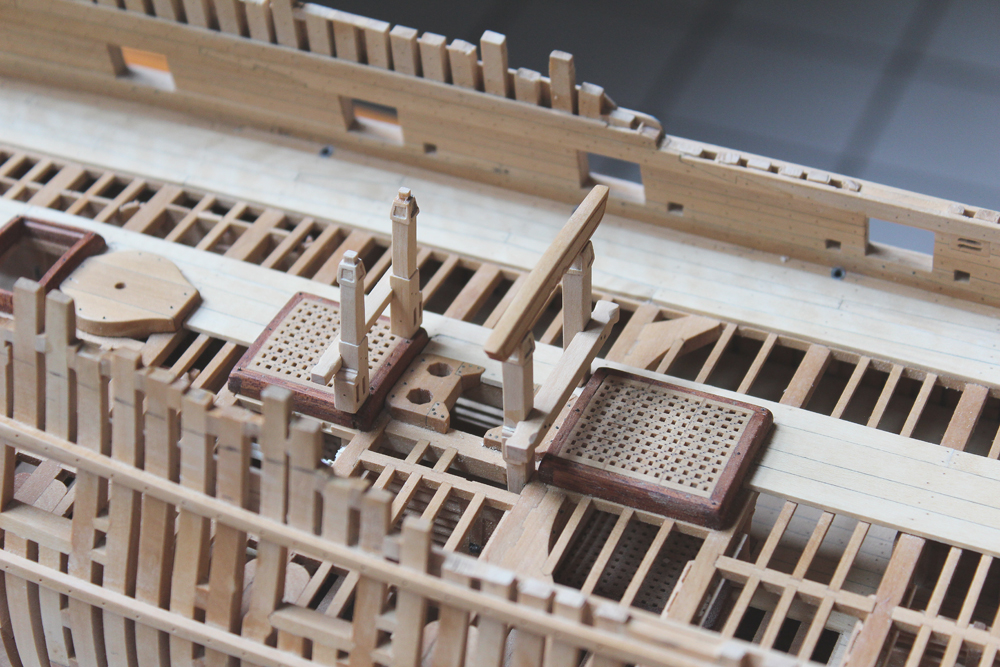
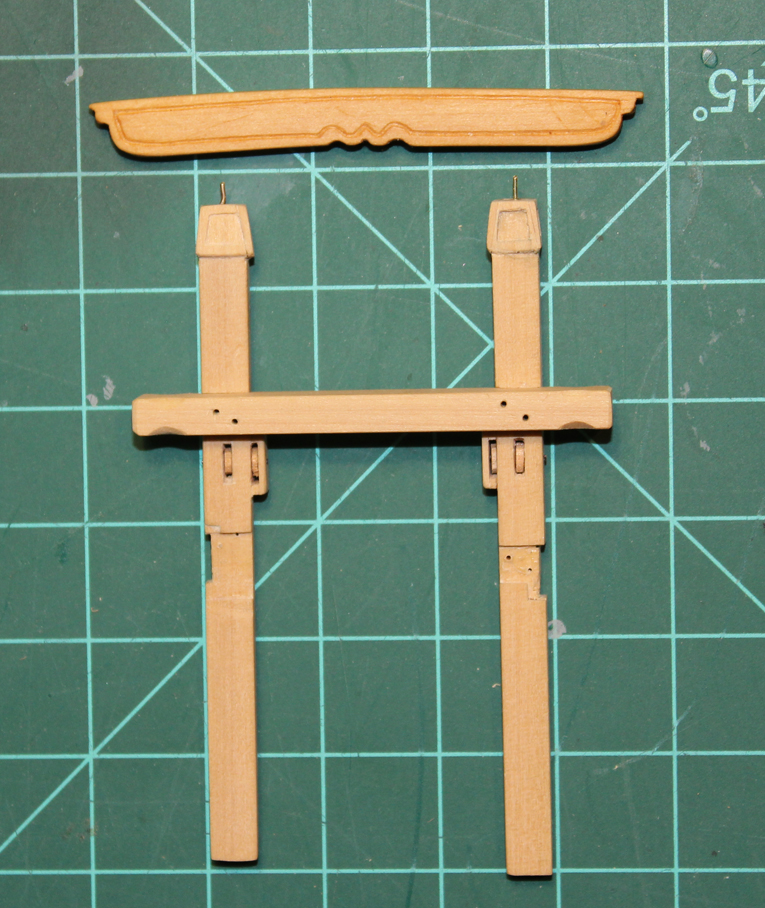
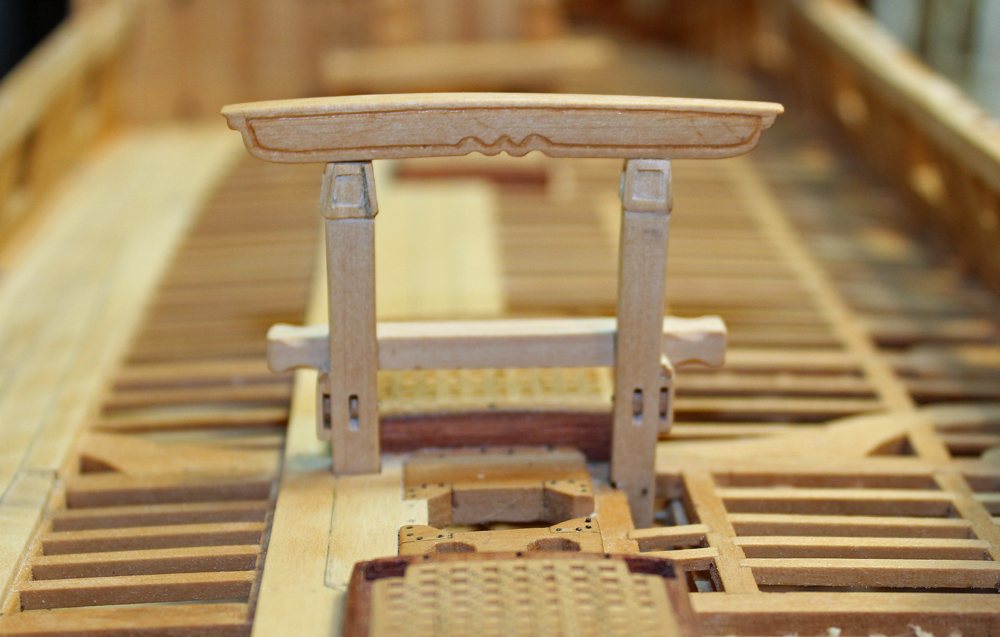
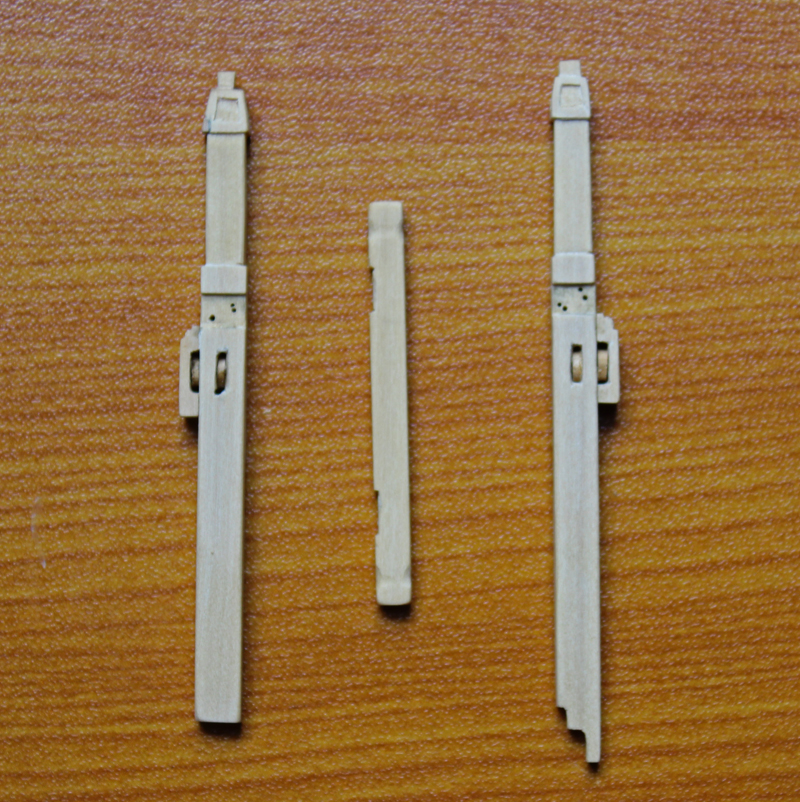
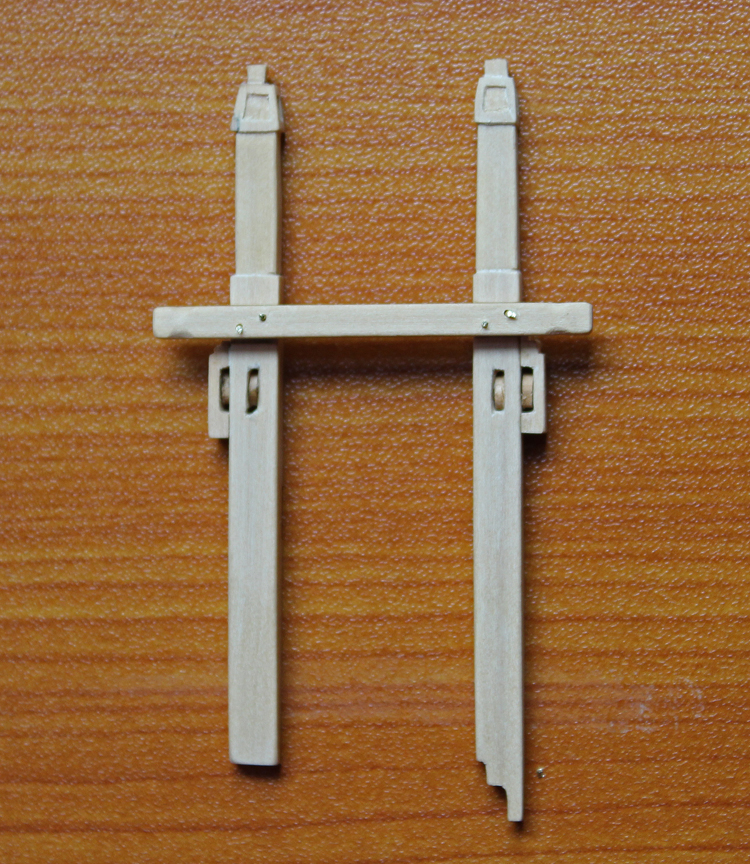
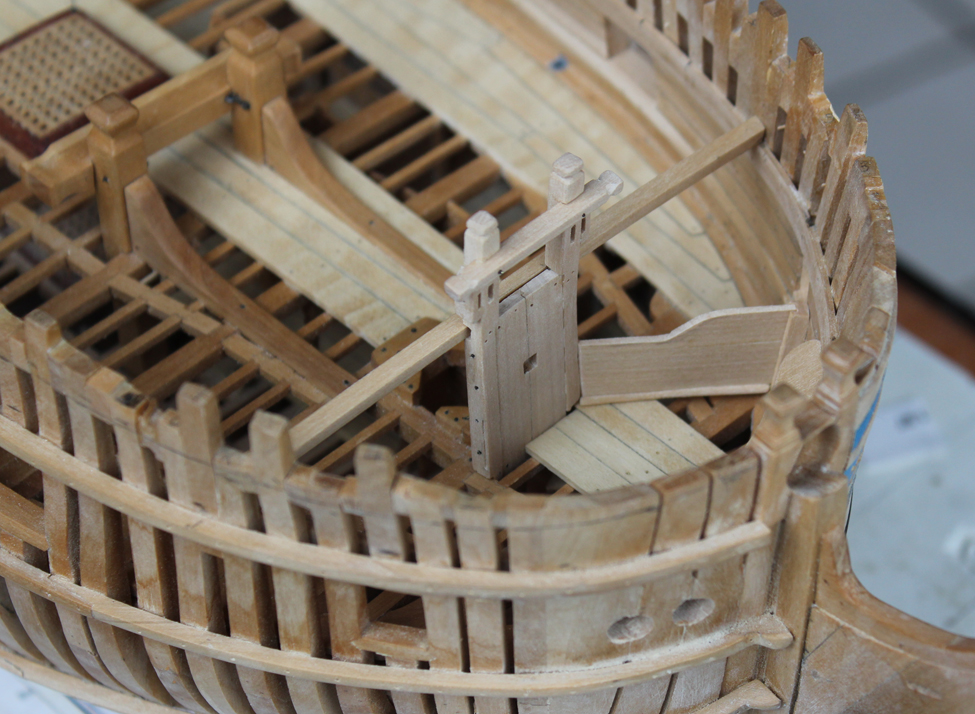
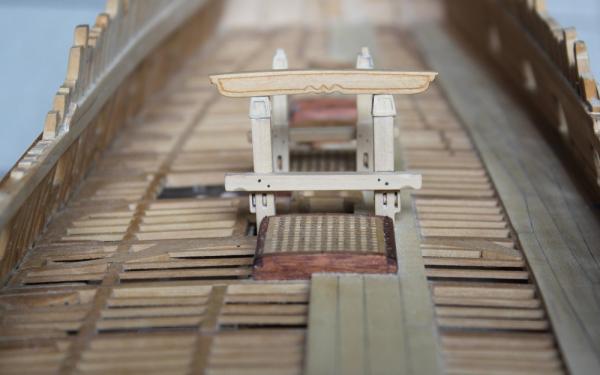
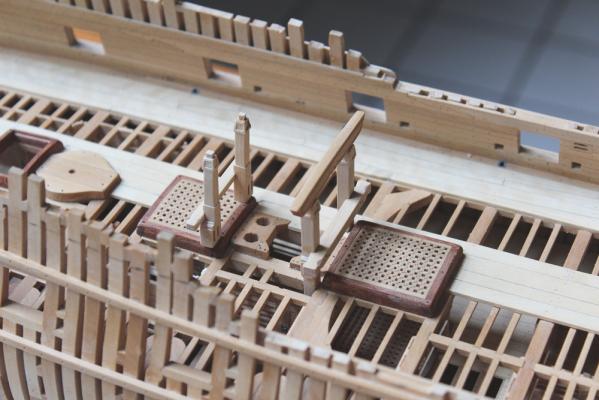
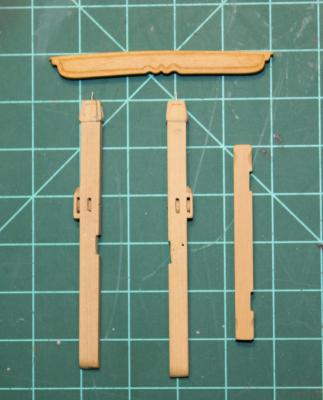
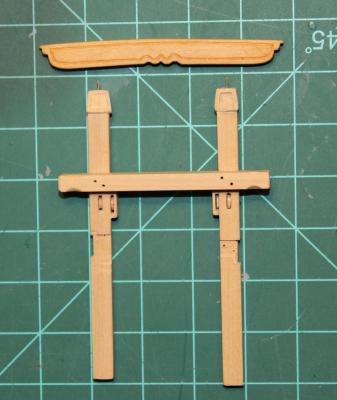
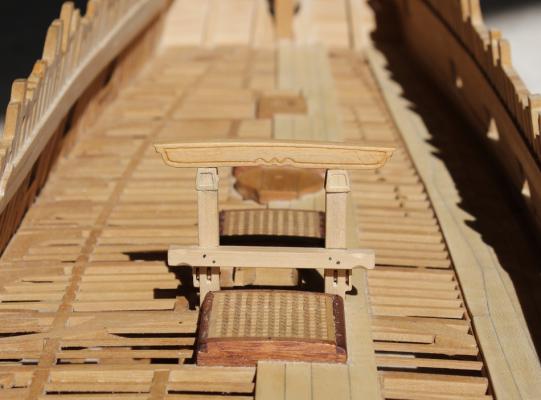
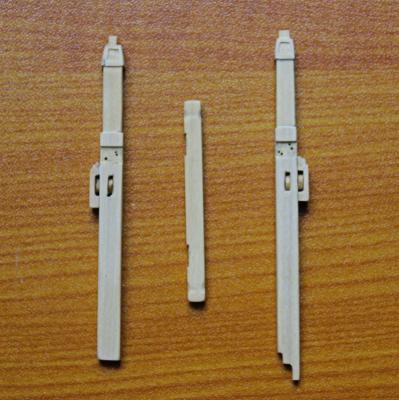
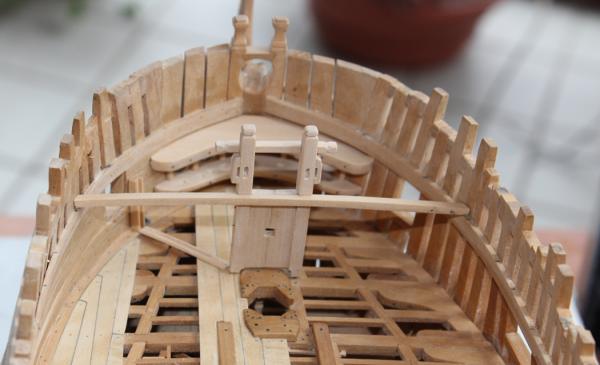
Work has reared its ugly head again and left me very little free time for modeling. I finally was able to devote a few hours to Atalanta over the weekend. Moving aft, the next items to fabricate are the main topsail sheet bitts (mtsb), the gallows cross-piece and the main jeer bitts (mjb). None of these items will be permanently installed until later to prevent inadvertent damage and to facilitate installation of the pumps and axletree. The mtsb consists of two bitt pins, the bitt cross-piece and the gallows cross piece. The pins are secured to the upper and lower deck beams with bolts and there is a score for the upper deck beam on the fore face of the pin. There are also scores in the fore face for the insertion of the cross-piece. This is also bolted to the bitt pins. Finally, there is a sheave in the pin just below the cross piece, along with a cheek block. The top of the pin has a decorative panel as seen on the plans. These were made by adding vertical and horizontal strips of wood to each side of the bitt and then tapering them to give the appearance of a beveled panel. A pin was placed in the top of the bitt to secure the gallows cross-piece. You will notice that the lower ends of the bitt pins for both the mtsb and the mjb are different port and starboard. This is because the port side is fully planked and the starboard side is left open. I did not want to damage the lower deck planking during their installation. In TFFM, David gives three examples of typical gallows cross-pieces. I selected the one with the ogee edge as anything fancier is beyond my carving capabilities. At this point the piece looked too plain and I recalled how nice Remco's looked so I decided to try and give it a decorative edge effect. Using French curves, I first drew in the shape of the carving with pencil. I knew some of the lead would end up in the depth of the cut and make it stand out better. Next, I used the tip of a dull #11 scalpel blade (also with the French curves) to start outlining the carving. Once there was sufficient depth, I switched to the tip of a triangular file to widen and deepen the cut. All of the edges are chamfered. Finish was applied to the gallows cross-piece but not to the bitt pins and it was pinned in place. The bitts will be given a finish after they are permanently installed. The mjb is similar in construction to the mtsb with a few exceptions. First, the cross-piece attaches on the aft face of the bitt pin, not the fore as in the mtsb. Secondly, the top mortises into the lower side of a quarter deck beam. I made a card template of a quarter deck beam to set the exact height of the pin. Finally, on Atalanta, the pin narrows above the cross-piece.


-
Erik, as you peruse other build logs you will find that most of us are PVA-people or CA-people. Several years ago I almost exclusively used medium viscosity CA. I could move along more rapidly and the only clamps required were my fingers. But if you make a mistake, acetone is required for debonding. It also is brittle (if you use it on rigging). PVA does not get absorbed into the wood the way CA does so if you apply a clear finish there is less chance of glue stains on this very thin and porous basswood planking. If you let the two mating surfaces become tacky, it takes much less time for the bond to strengthen. In case of mistakes it debonds with isopropyl alcohol, which is much safer to work with. When I build the longboat, the only times I used CA was when I was gluing the planking into the stem rabbet.
- 222 replies
-
- 4
-

-
- 18th century longboat
- model shipways
- (and 2 more)
-
Today I made a Light (box) Stand
tlevine replied to AON's topic in Modeling tools and Workshop Equipment
I use an old X ray view box as my light table. With everyone switching to digital, they are relics taking up room in a lot of doctor's offices. In my hospital, they are being thrown out whenever an area gets repainted. -
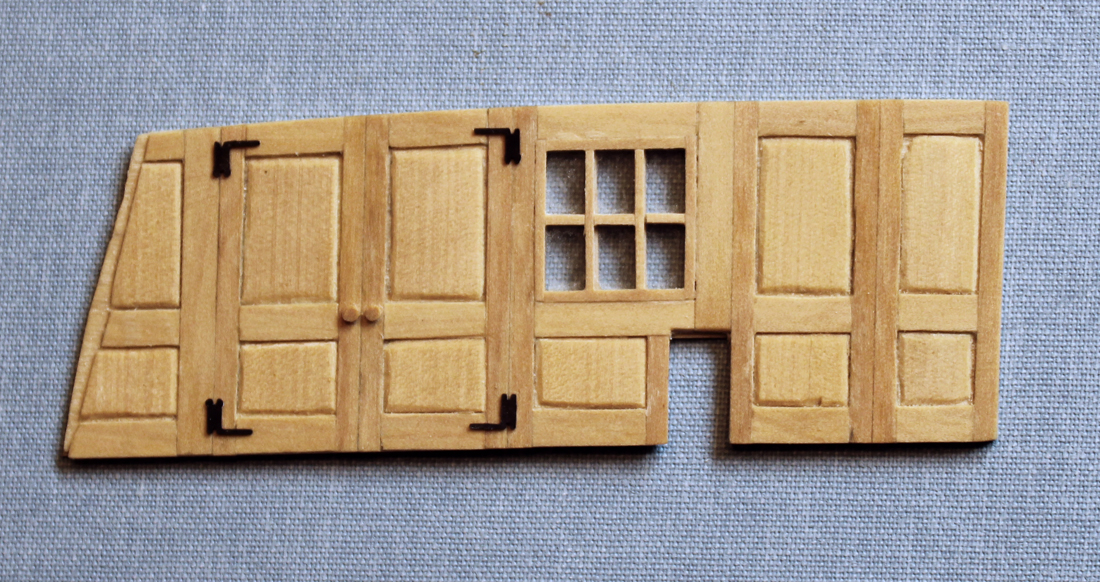
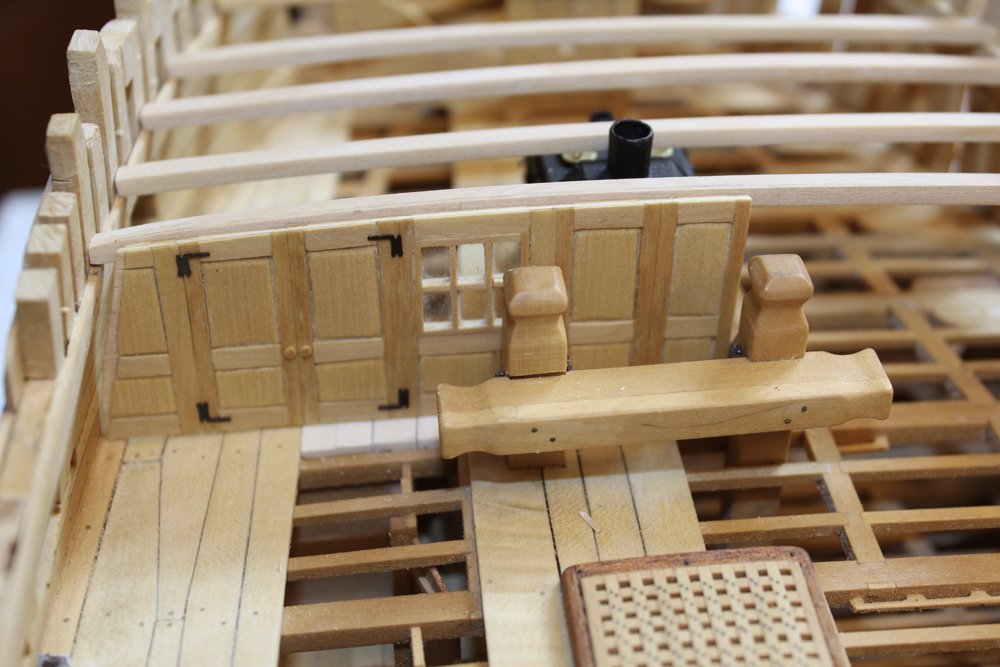
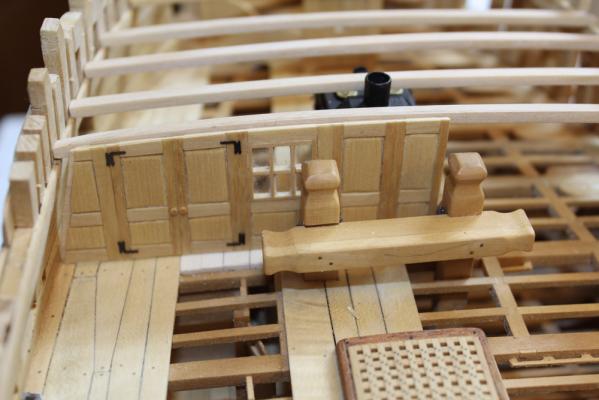
Maury, there would be a cant (sill) into which the bulkhead would fit. In my case, I will make edge pieces rather than rabbet out a cant. These will be installed after the bulkhead is permanently installed, after the forecastle deck is completed. Robin, thank you for your comments. Everything you say makes total sense and I remember the discussion from Dan's build. However, when in doubt follow the plans. Atalanta's deck plan from the NMM show the double doors in the location I have constructed. So either there was a "doggie door" built into the bulkhead for running cable or else the bulkhead was removed as it would be in a combat situation.
-
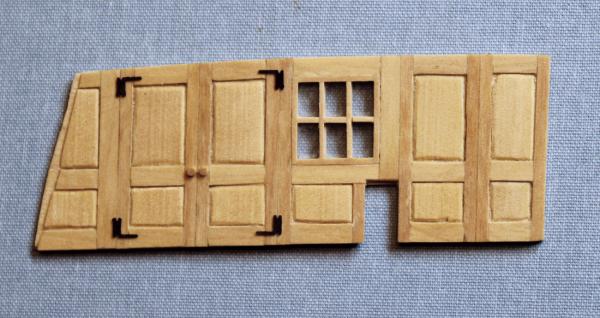
There has been very little time lately for modeling but I was able to build the forecastle bulkhead. In keeping with the rest of the model, I only made the port side and mid-portion of the bulkhead. I made this up with a center core of basswood sheet. Costello was then applied to both sides of the basswood to represent the bullkhead and doors. The edges of the center panels are sanded down to simulate a floating panel. At this magnification, I must admit that some of the edges look a little rough but when you look at it installed, it really looks ship-shape. The hinges are brass photoetch from Admiralty Models. The window is glazed with acetate. I will not install this until the forecastle beams are permanently glued into place. Once installed, I will add the edge piece that intersects with the hull and the deck cant into which the bulkhead inserts.
-
As I recall, the height of the sheer was incorrect. When I get back home later this week I will look at my plug. Greg should also remember the problem. I would check the height of the plug against the plans.
-
I had the pleasure of taking Admiraltys course on building the cutter. There is enough wood for two models. As I recall, there was a problem with the top height of the plug. It wasn't too big a deal but easier to fix now than later. Enjoy!
-
Thanks everyone for your kind thoughts. Robin, now I understand what you are referring to. I deliberately left out some of the filling pieces to allow daylight to enter the lower aspect of the hull so possibly some detail could be seen.
-
Thank you Michael, Christian and David. Robin, I have been away for the weekend so am not near the ship. I will take a good look at her tomorrow and hopefully have some type of answer for you. As to the four-legged friend, Sadie is doing very poorly and will probably be put to sleep tomorrow. Thanks for asking about her.
-
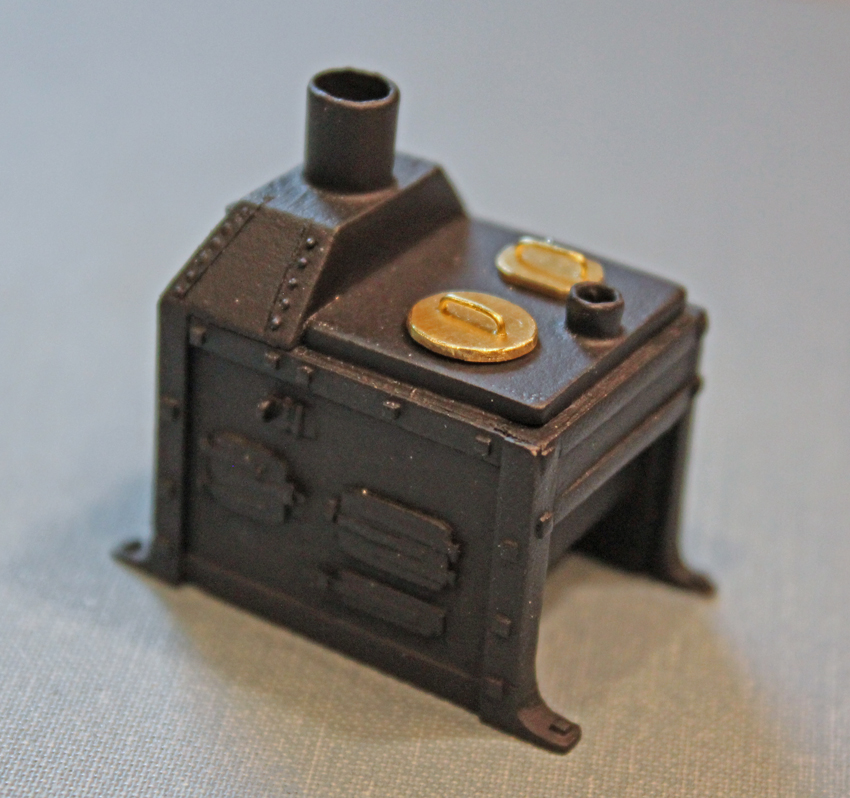
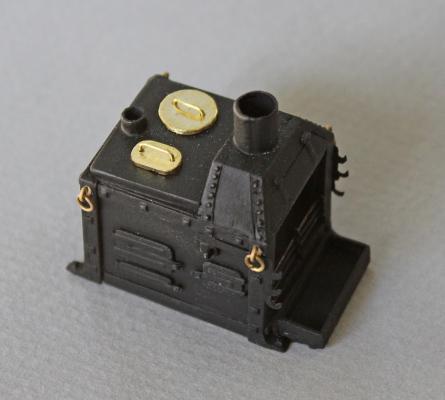
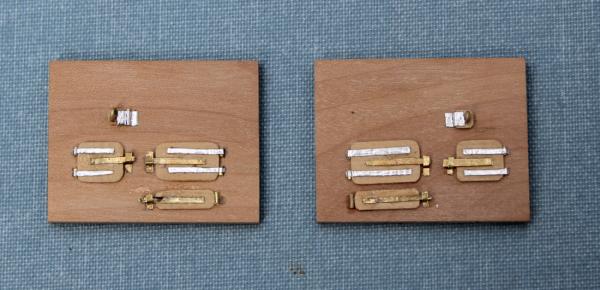
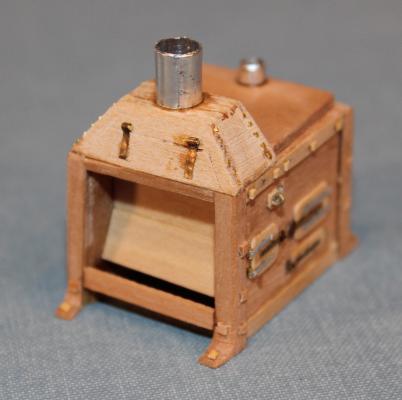
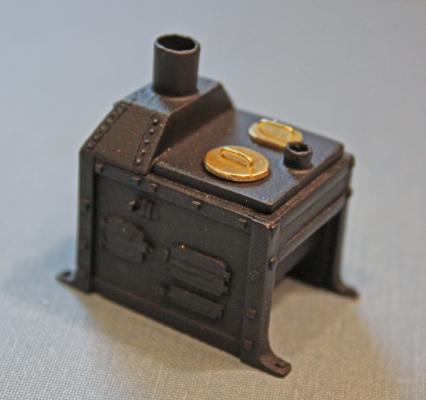
Grant and Greg thanks. Martin, I thought about using brass sheeting rather than wood, just for the experience. However, wood is a lot easier to cut. The more I look at the stove installation, the more likely I will keep the "iron" plate underneath the stove.
-
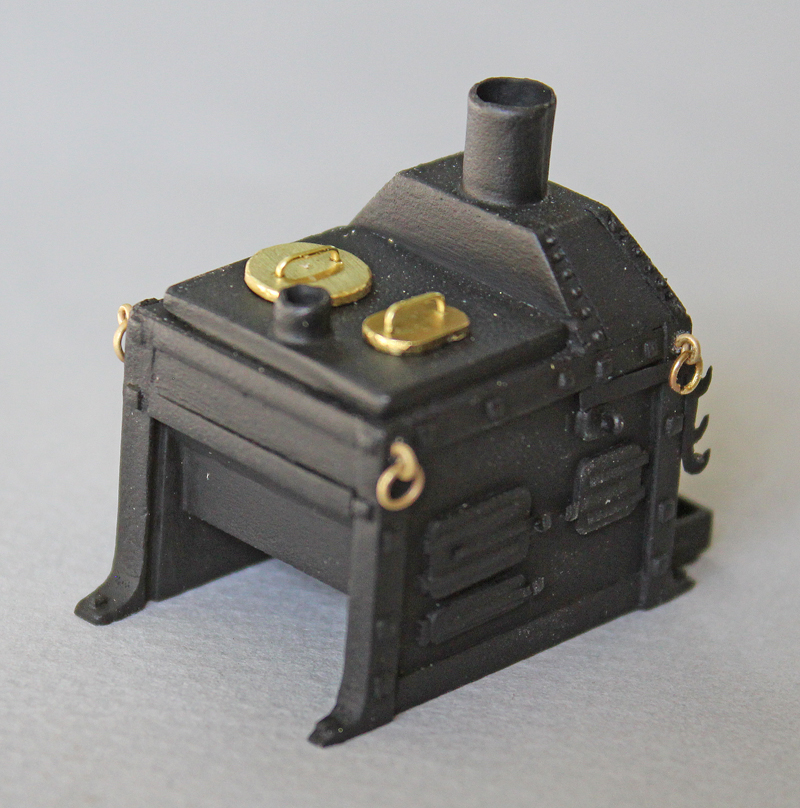
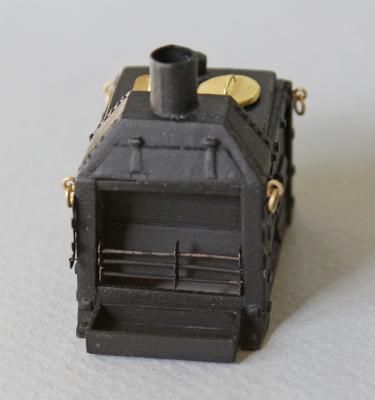
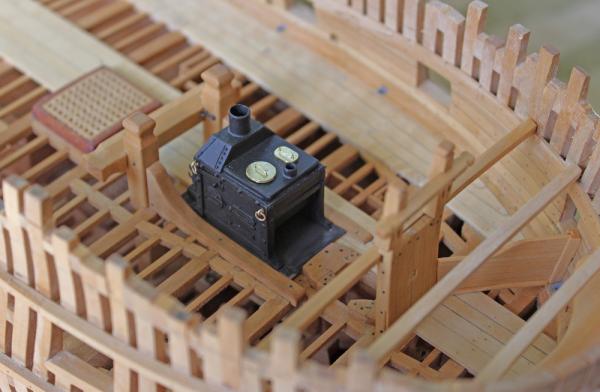
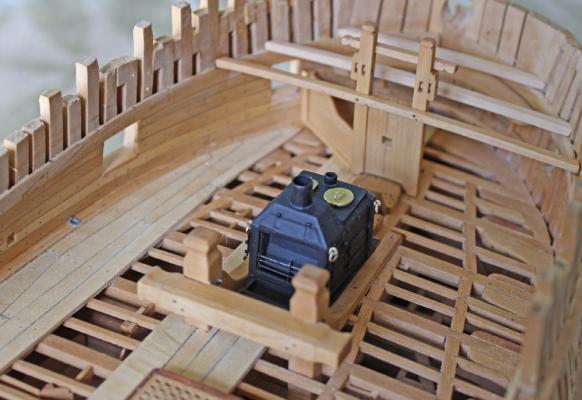
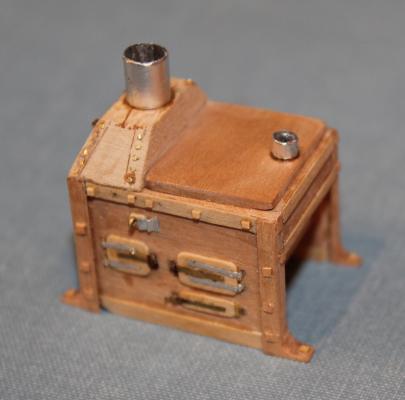
System, thank you for sharing your picture of Sadie with me. Hopefully my Sadie will be able to pose for the camera soon. Thank you everyone for your kind comments and thanks for all the likes. The good thing about a recuperating dog is that they sleep a lot. So I got in a little workshop time today. With something as complex as a stove, one needs to ask how much detail is necessary. I decided to make the spit holders, the vertical ash grate (the horizontal one cannot be seen once the stove is installed) and the ash bin. These were made from brass wire and shim brass cut and filed to shape. I rolled the grate rods between my fingers to get that "used" look. I left the ring bolts bright just for some contrast. I may change my mind and blacken them before final installation. They are only press-fit in place. The stove and ash bin sit on an iron platform. I used blackened brass and burnished it to get some color variations. I am considering removing it as the stove visually fades into the black background when viewed from above. One must remember, unless I put a fiberoptic scope through a gunport, the only way the stove will be seen is from above. I will decide in the next few weeks.

-
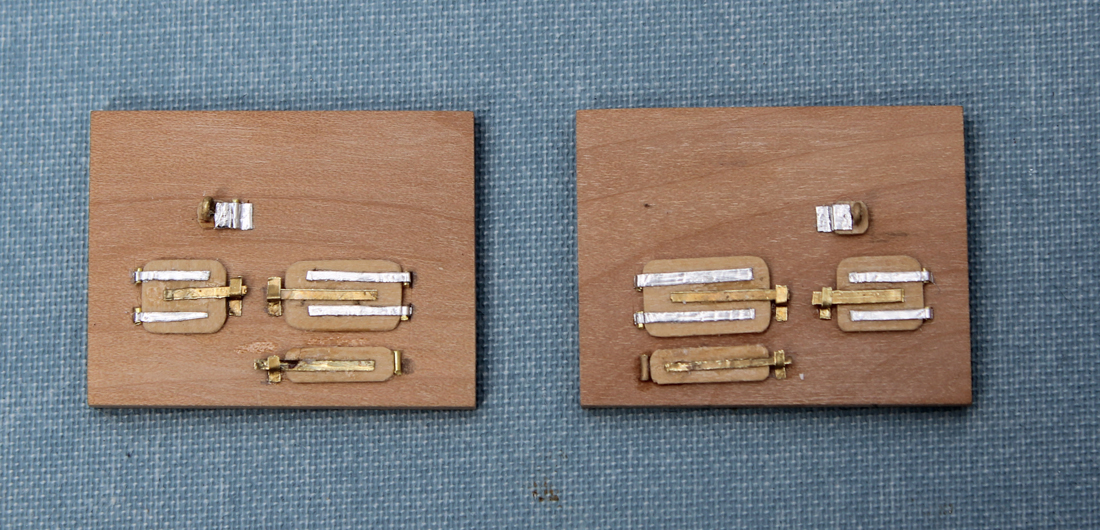
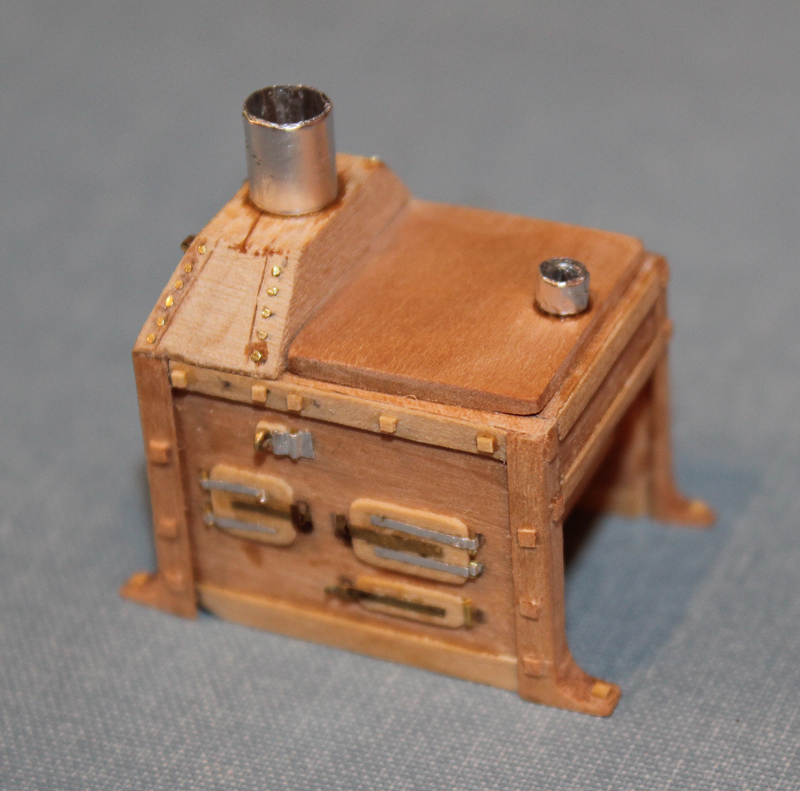
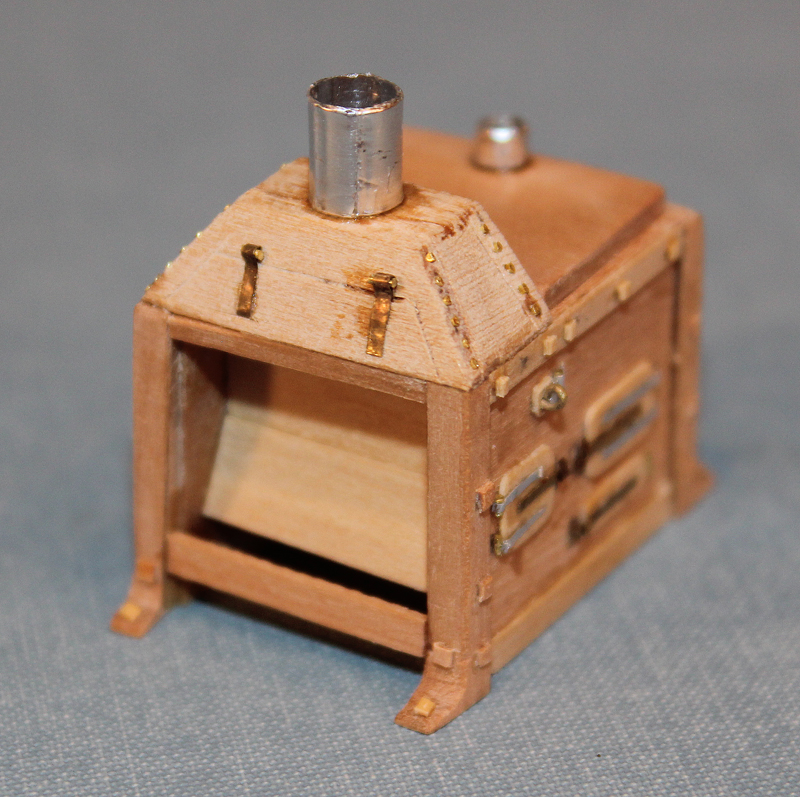
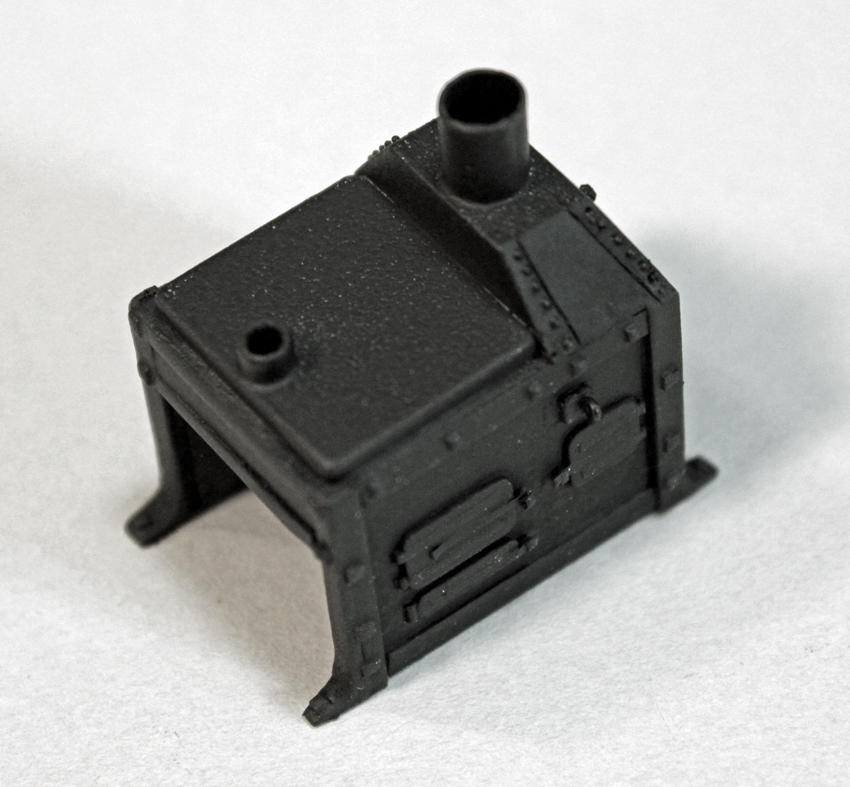
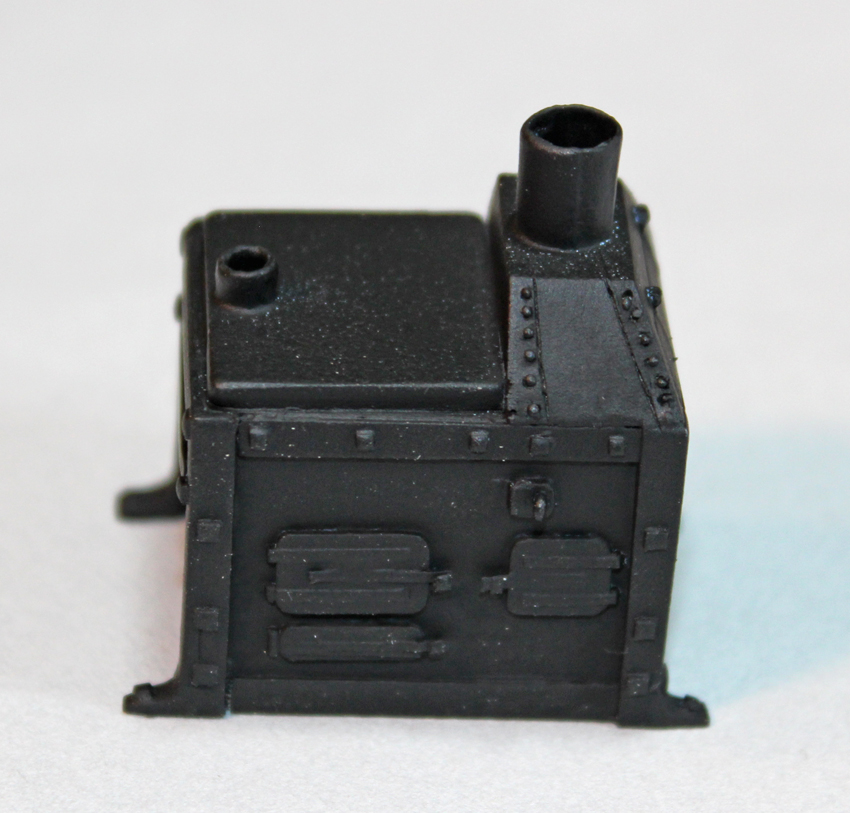
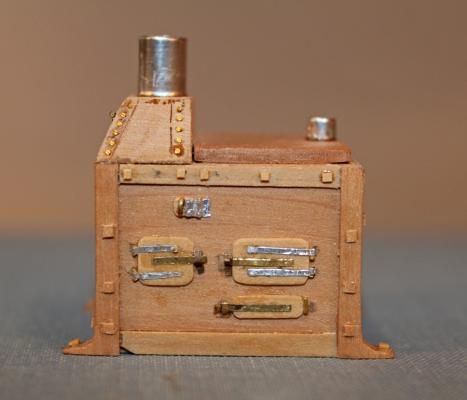
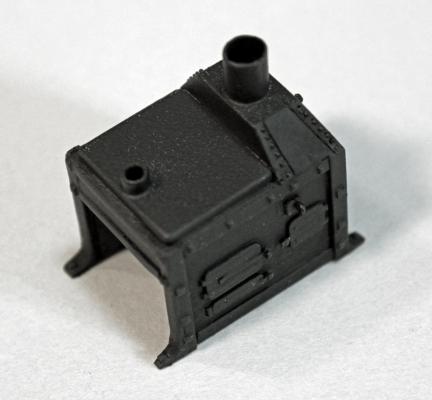
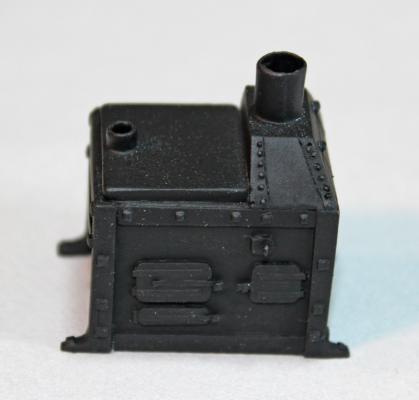
Thank you everyone for your kind thoughts. She is sleeping right now so I have a few minutes to post my progress on the stove. There are a lot of descriptions of the galley stove on MSW as well as in TFFM Vol 2, so I will not belabor that here. The stove is a model in itself and I have been playing with it for a month already. The first decision to be made was what materials to use. This would also drive the construction technique. I decided that this was a detailed "representation" of a stove but that no one would be cooking with it. Therefore, sheet brass was eliminated from consideration except for details. What I came up with is a collection of wood scraps, aluminum adhesive tape and shim brass. The side panels have three larger doors and one small one. After these were made, a spacer was put in the middle of the stove and the fore and aft faces were constructed. The bolts, cooktop and chimney were added. The rest of the details will be added later. The stove was fit in place on the model and was too tall. So back to square one. I shortened the height by 6" and it fits nicely. It was painted with flat gray primer and flat black (Testors rattle can). I am sorry the pictures are not of be best quality. It is hard to pick out details on a black object so I played with Photoshop so you could see more than a black blob. The lids for the pots are brass sheet which was drilled for the brass wire handles. So far I am happy with the results. It actually looks like a stove! Next up will be adding the details to the stove, making the base plate and installation.
-
Let me give you an example of life getting in the way. For the last 8 days I have been dealing with a sick dog. To make a long story short, my 12 y/o dog stopped eating and was obviously in pain. Two trips to the vet later, an X ray demonstrated a foreign body in her stomach. Off to surgery we go. She becomes critically ill during the night and a repeat X ray was performed. The overnight vet called to ask why they had only removed one of the two foreign bodies! Back to surgery the next day to remove the other two foreign bodies. She has been teetering on the edge of life all week but decided to eat some scrambled eggs today. They have decided she is depressed and, besides, I am a physician, so she would do better at home. So now it is six medications, each on a different dosing schedule, syringe feedings and hourly walks since (for the docs and vets out there) she is starting to mobilize the 4 kg of fluids she acquired during her holiday. At least she got a complimentary nail clip. For you savvy dog people out there, the middle foreign body is the Daily Growl, a white plastic squeaky toy that she has not had access to in several years.

-
Robin, thanks for your concern. Life has a tendency to get in the way of the workshop. I am working on the stove and hope to post something soon.
-
Looks great, Dan.
-
Very nice work, Iosto.
-
Thanks guys. And thank you everyone for the likes. I am making the rest of the forecastle deck beams and then comes the stove. Looking forward to that with a combination of dread and excitement. There are so many fantastic representations out there that I am just a bit intimidated.
-
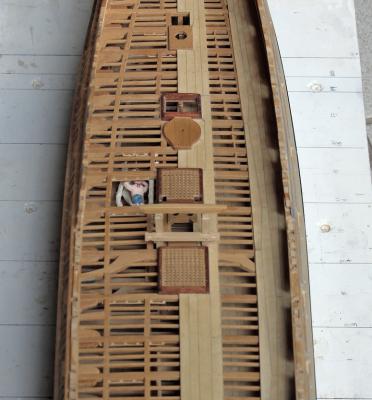
Shipyard time has been tight and will remain that way for a while but I wanted to post a small update. The manger is a triangular area at the bow formed by removable wood partitions. A scupper drains the water that accumulates from hauling in the anchor cables. It fits into a waterway to prevent the water from seeping under the manger wall onto the upper deck.

-
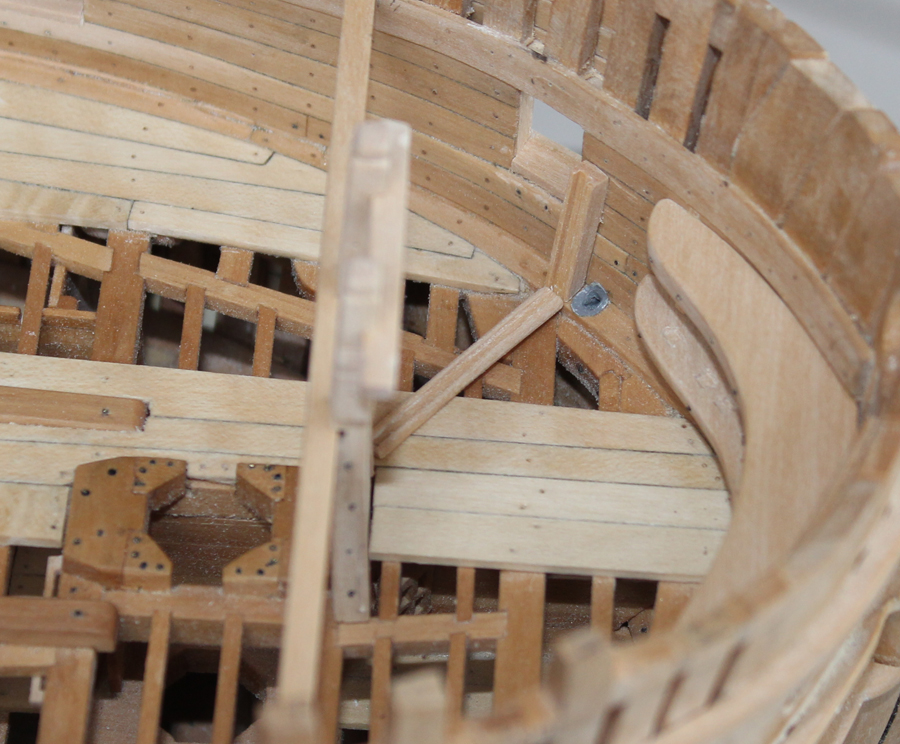
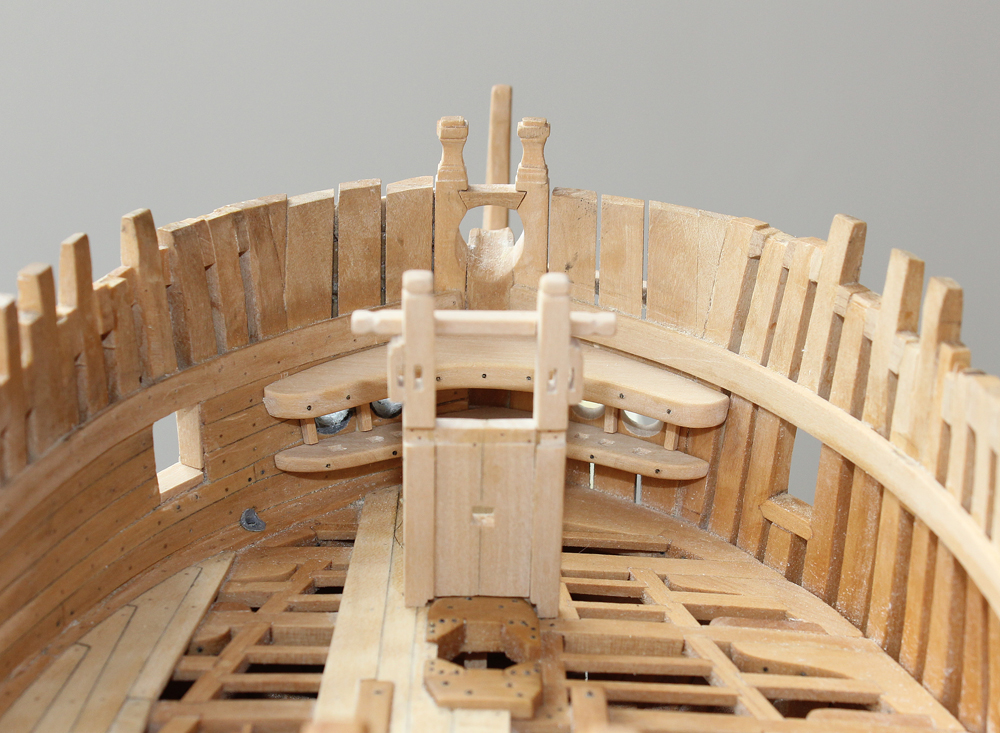
The upper deck hook and the support for the bucklers frame the hawse holes. The support is simply a less robust hook. They are "bolted" to the hawse timbers. I made mine asymmetric because there is no ceiling planking on the starboard side. There are mortises on the top of the support and the bottom of the upper deck hook for the buckler bars. Bucklers can be viewed as removable doors which prevent water from entering the ship through the hawse holes while at sea. There is also a perforated buckler to use when in port to allow the hawse rope to pass. Since I was not installing the bucklers, I did not put the mortises on the upper deck hook. There are three cant posts between and to either side of the hawse holes to support the bucklers.