tlevine
-
Posts
2,032 -
Joined
-
Last visited
Content Type
Profiles
Forums
Gallery
Events
Everything posted by tlevine
-
 Thank you Robin, Ben and Richard. I will definitely remember that suggestion for the rudder coat. Richard, the rudder will not be shipped until much later in the build. The next project is the upper deck breast hook/buckler assembly.
 -
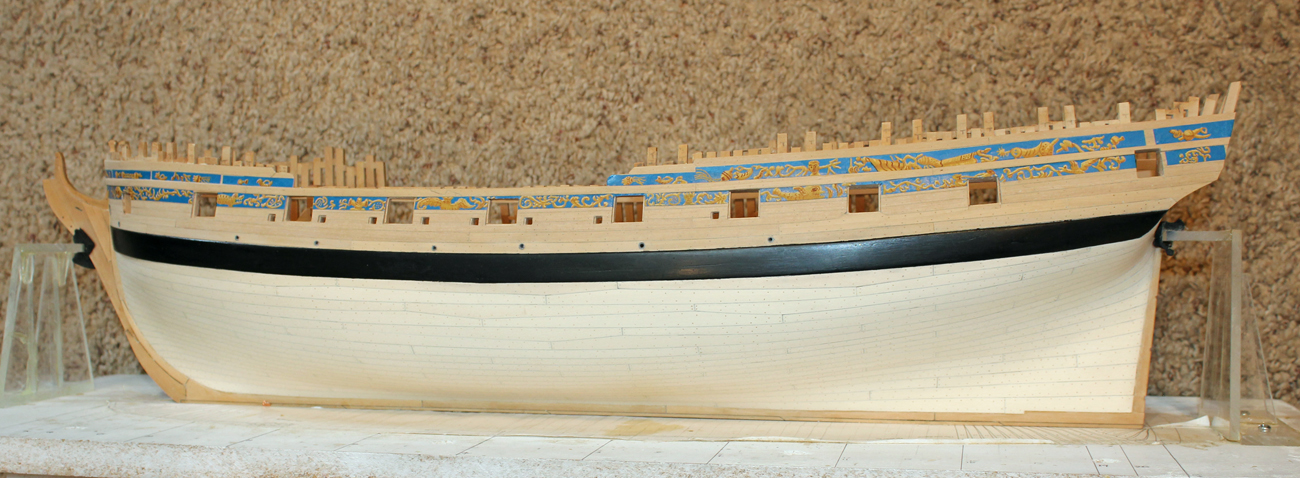
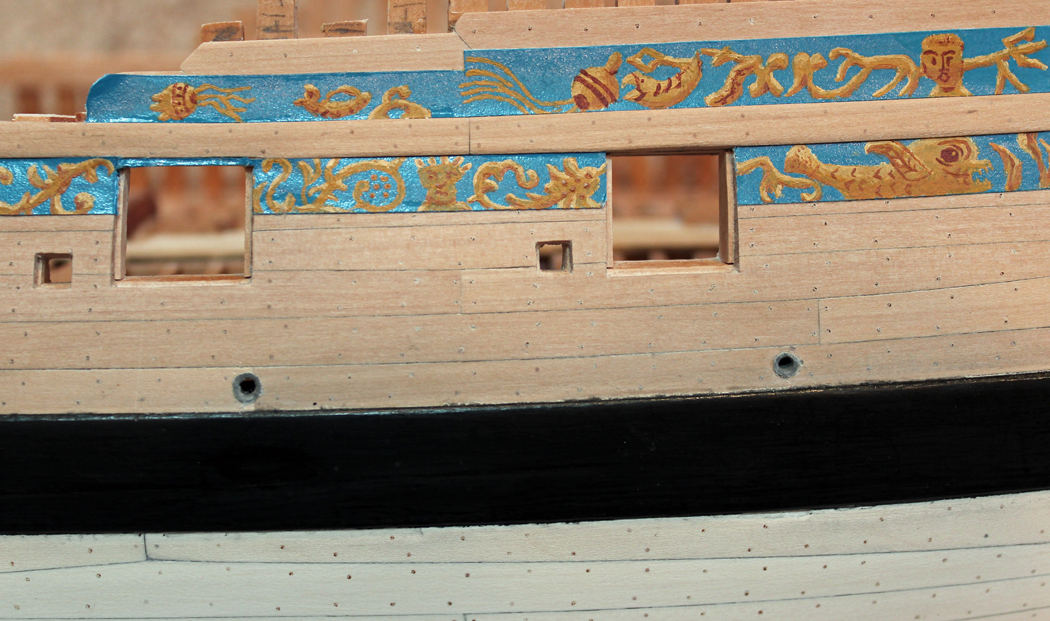
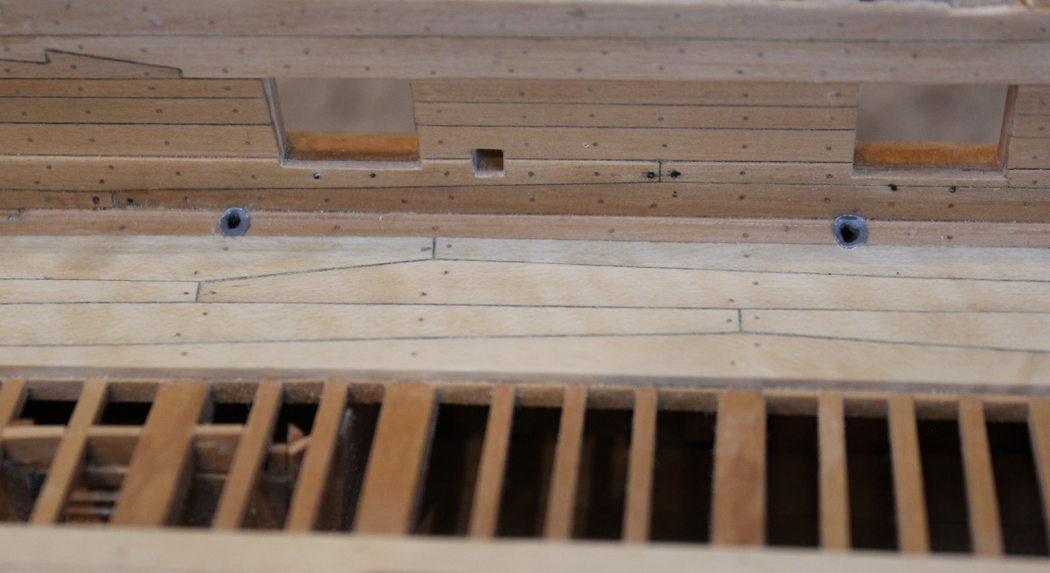
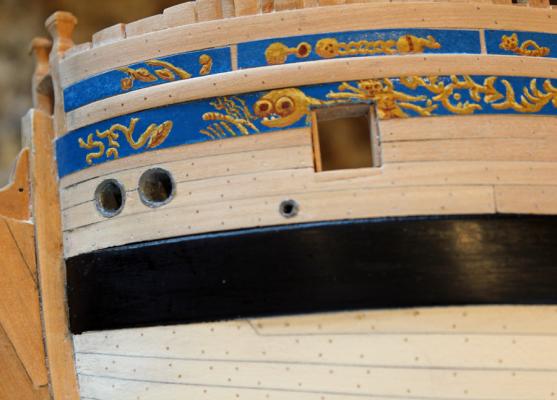
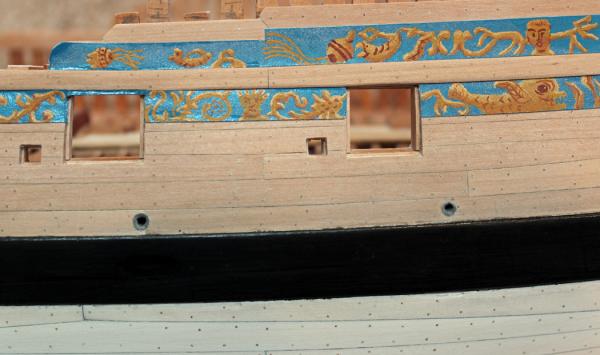
The scupper and hawse hole linings ended up taking much more time than expected. There are five regular scuppers and two larger ones for the manger and the pump effluent. The scuppers are lined with lead sheeting. I tried several approaches including aluminum foil formed over a dowel, self-adhesive aluminum and paper. I ended up making the inner and outer openings with grey paper. The paper and the scupper holes were painted with grey artist acrylic. The shiny appearance of the frieze painting is from the lighting. The hawse holes were lined with either lead or copper. I did not want the shiny look of clean copper and so lined the holes with the same gray paper. "Lips" for the lining pipes were added to hide the edge where the paper tube and the wood meet.
-
I had the pleasure of seeing Bob's longboat over the weekend at our monthly club meeting. It looks even better in person than in the photos. I can't wait to see what you find out as regards the rigging.
-
Thanks, Druxey. I have two of the scuppers drilled out. It ended up not being as scary as I thought. Once they are all drilled out I will decide on how to line them. I like Danny's way with softened Evergreen tubing. I have some adhesive backed aluminum I will play with as well.
-
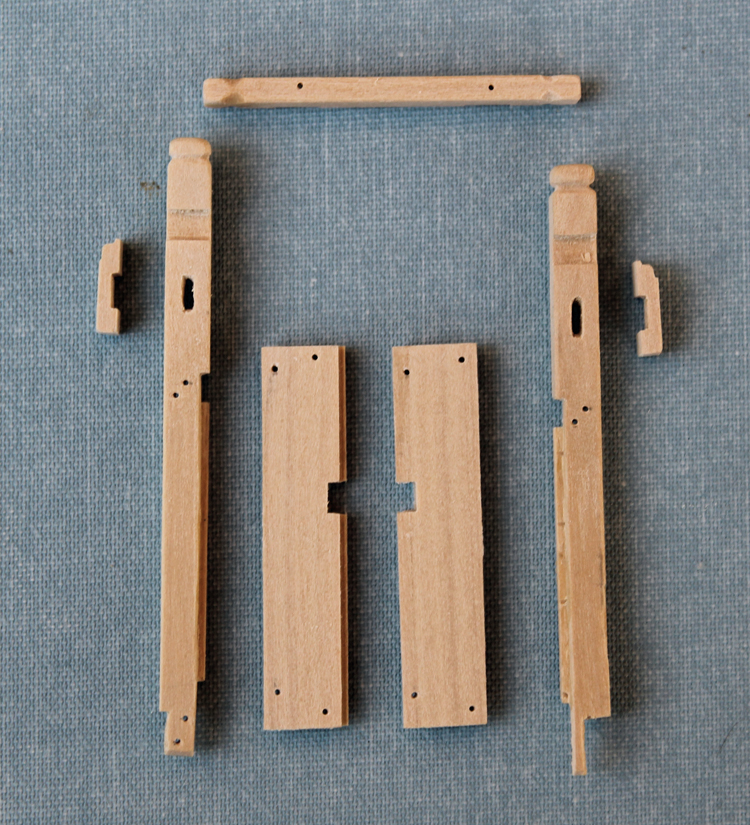
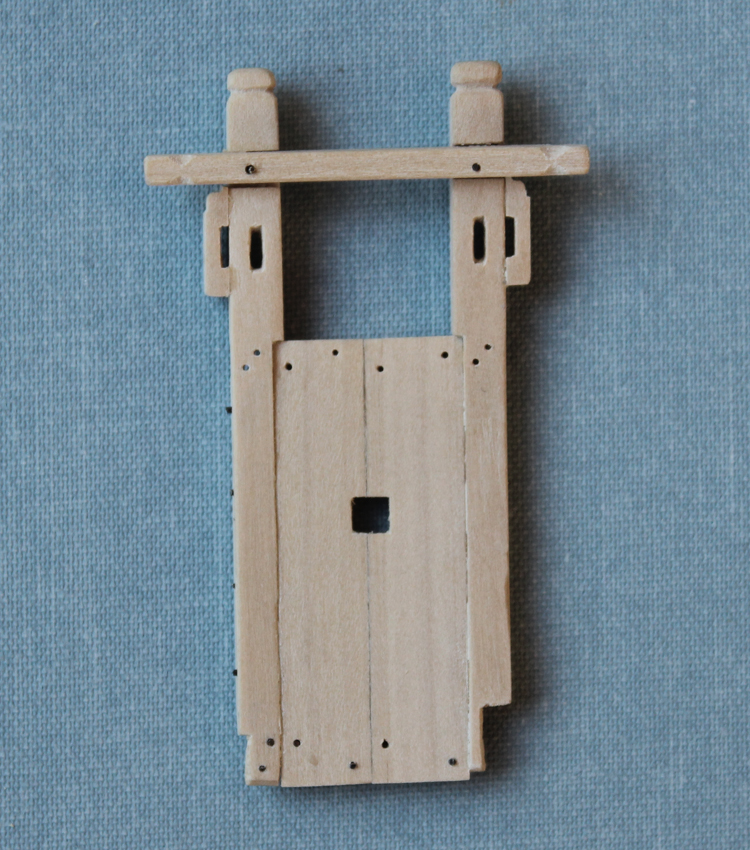
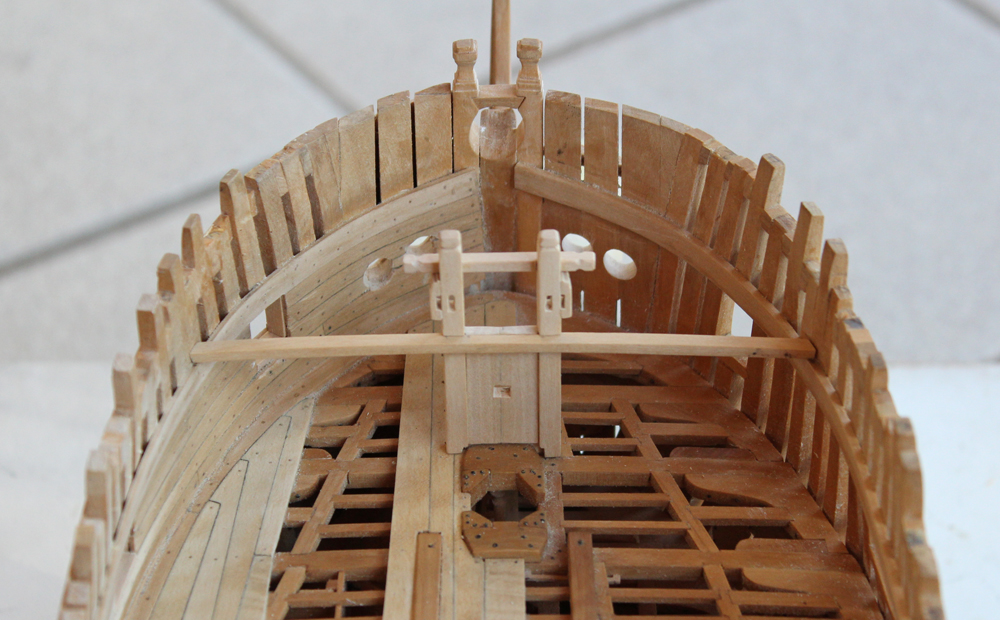
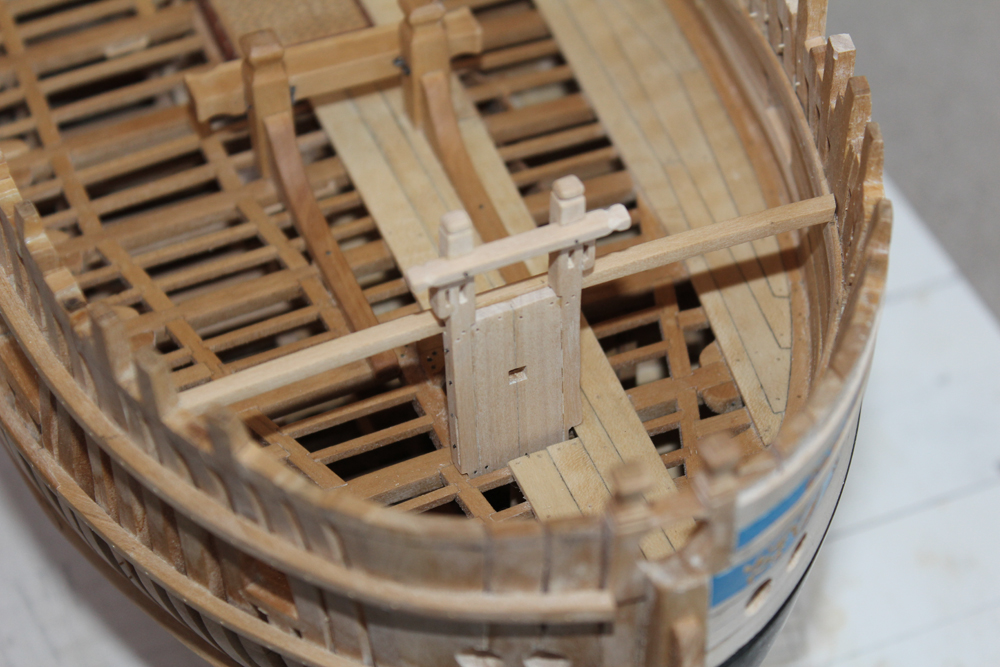
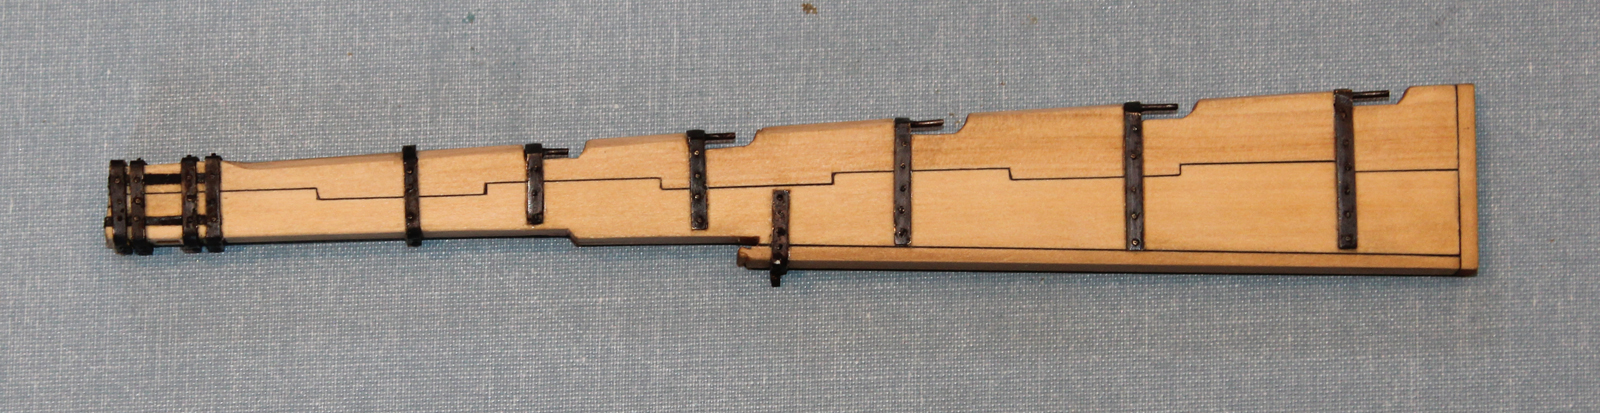
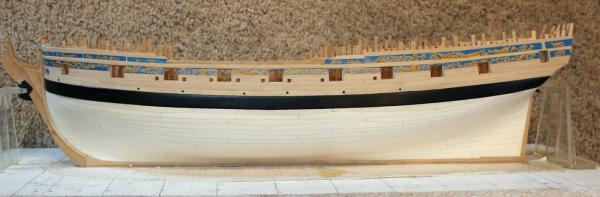
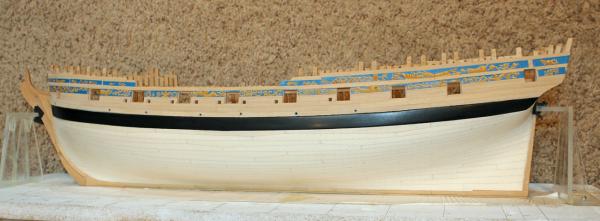
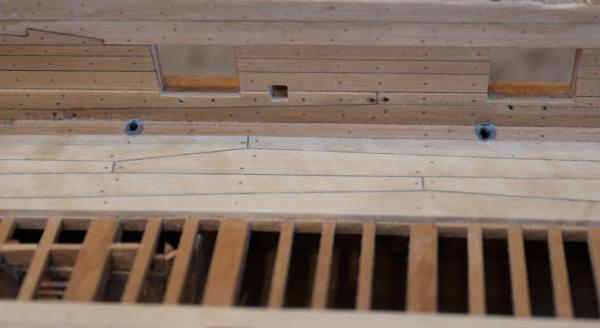
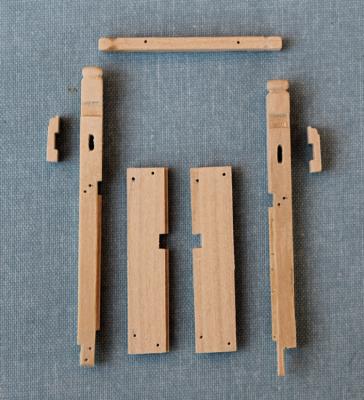
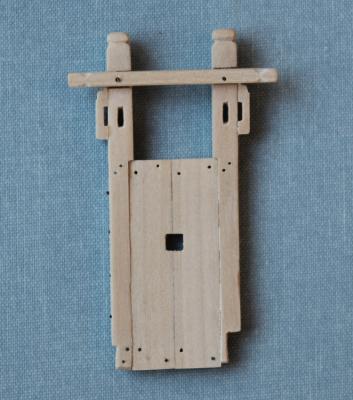
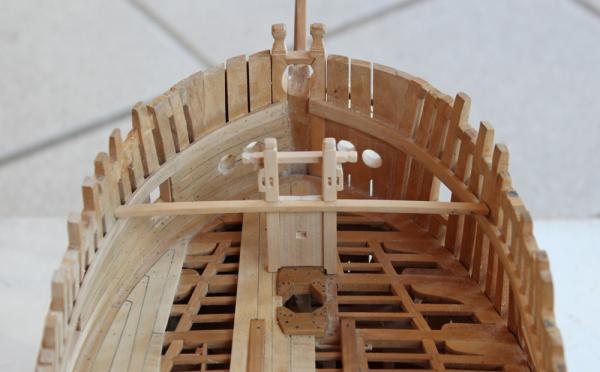
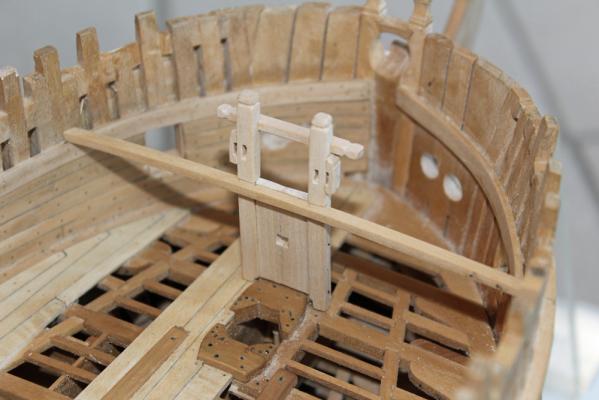
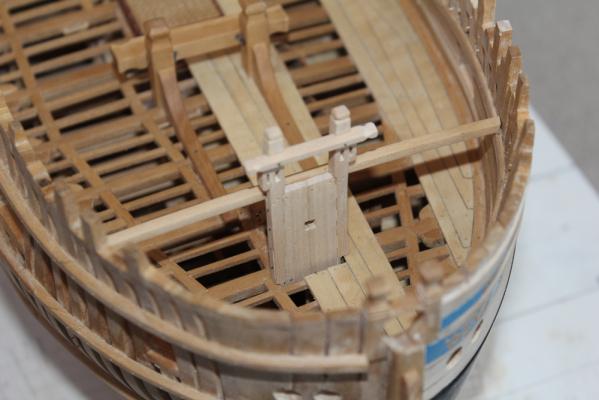
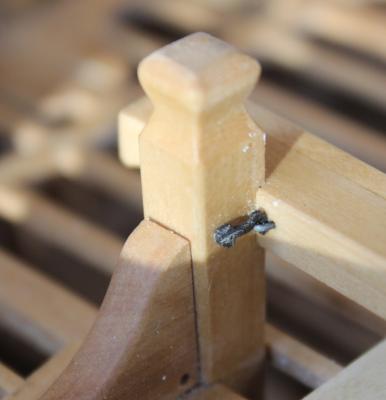
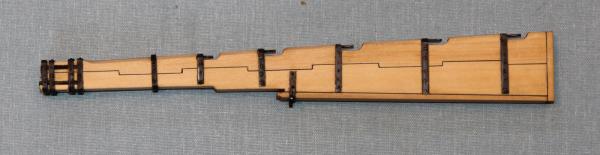
Dave, the compliment is appreciated. But I look to Remco's and Dan's builds to set the bar that I strive for. Work on the upper deck will proceed from outboard to midline and fore to aft. I was not emotionally ready to drill holes in the hull for scuppers (and risk damaging the exterior hull) so I decided to build the manger. This is a closed off area in the bow which could be used for livestock but actually helped contain and dispose of water drawn in with the hawse cables. In order to make the manger walls, the supports had to be built first. This means building the fore topsail sheet bitts/bowsprit step assembly. The bitts extend from the upper deck to the forecastle deck and are angled such that the part of the bitts extending above the forecastle deck is perpendicular to the water line. This meant building a forecastle deck beam to determine the correct height and angle. The bitts are notched into both beams. On my model the port side has the deck planking installed. Rather than risk damaging the planking, I trimmed the foot of the bitt to fit the remaining space. The bitts have a sheave above the forecastle deck and a cheek block on the lateral aspect of the bitt. The top of the cheek block has an ogee shape as do the cheek blocks elsewhere in the build. I have not put in the sheaves yet.There is a rabbet on the side of the bitt for the manger wall. On Atalanta, the rabbet does not extend onto the fore end of the bitt so the manger wall extends from the outer face of the bitt rather than the corner. Some of the ships had the upper end of the bitt shaped into a timber head. Atalanta was one of these. The cross piece was rabbeted into the fore side of the bitt. The bowsprit chock is made up of two edge rabbeted planks. You cannot see the rabbet but it makes the assembly stronger. I lightly penciled the joint to highlight this. I temporarily glued the chocks together to facilitate cutting rabbets in the bitts and the aft side of the chock. Although I do not plan on masting Atalanta, I did want the step to be in a reasonably accurate location in case I change my mind later. To find the location for the step I installed a dummy bowsprit, deriving the angle from the plans. This was then marked on the step. They were unglued and the step was cut in using the table saw. I glued them back together and fine-tuned the meeting edges. The chock was bolted to the bitt with four bolts and was bolted to both the upper and forecastle beams. The lower bolts are dummies but the bolts for the forecastle beam will be functional. After temporarily installing the bitt assembly I noticed that the deck planking in front of the chocks did not extend far enough back. These will be removed and remade to the appropriate length.
-
Nobody's planking is perfect. The key is to make it look "correct". Take a look at my stern for a great example of not-perfect. (http://modelshipworld.com/index.php/topic/198-hms-atalanta-by-tlevine-1775-148-scale-from-tffm-plans/page-47) Don't forget, there is a molding at the edge of the planking that will hide some of the discrepancy. I would be concerned that removing too much planking would damage the first layer and you would end up with a whole new dimension of problems.
-
Martin, don't forget that the bands of planking are arbitrary. I would probably lift up the aft 10-20% of the last two rows of planking and taper them to about 75% of the plank width. That would give you room for three rows of planking to attach to the transom. Whatever space is left is your new middle belt.
- 467 replies
-
- 1
-

-
- fly
- victory models
- (and 1 more)
-
Thank you gentlemen and thanks for all the likes. I should have cleaned the bitt better for the photo but I was running out of daylight. Now I get to return to actual woodworking for a while.
-
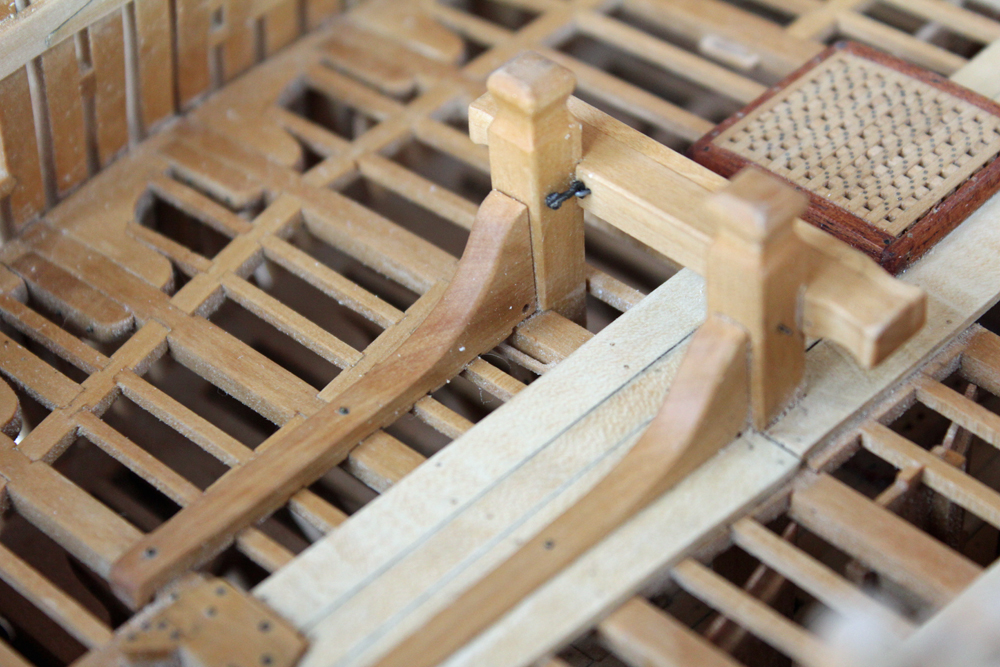
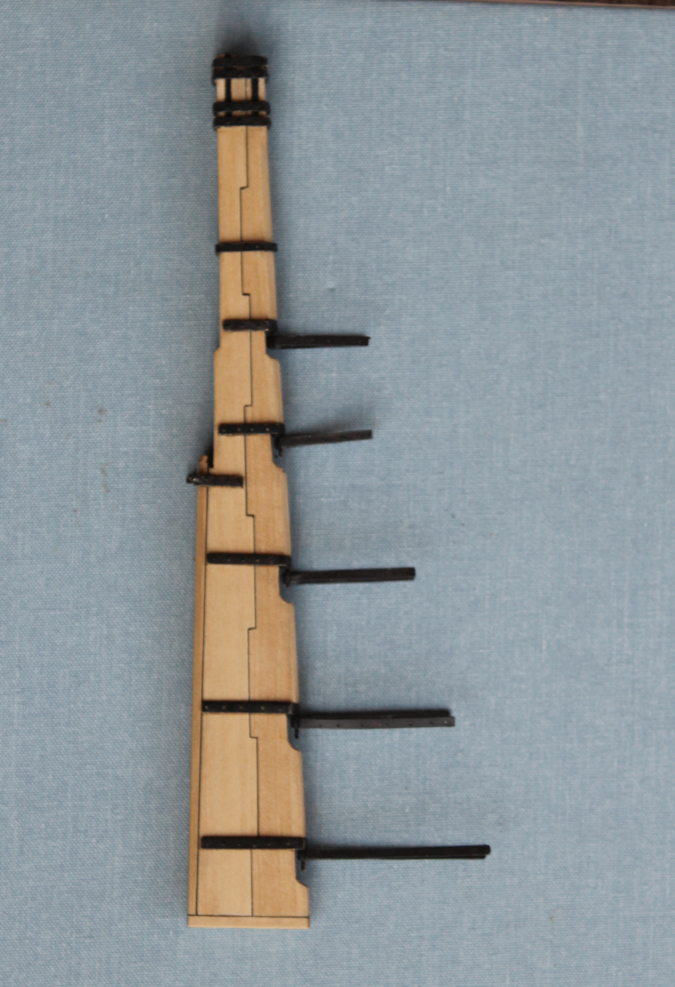
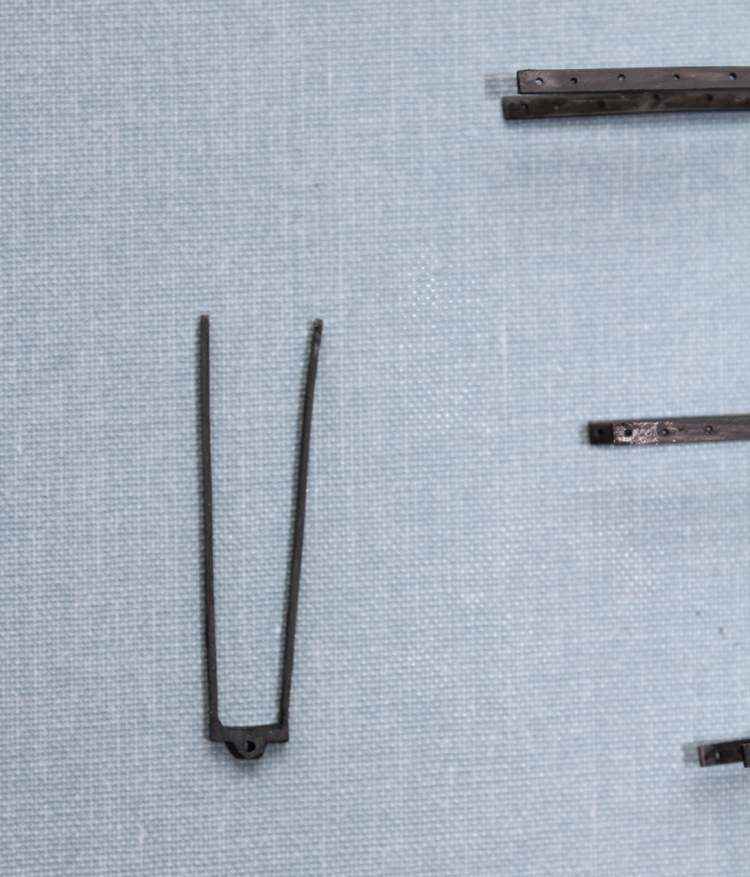
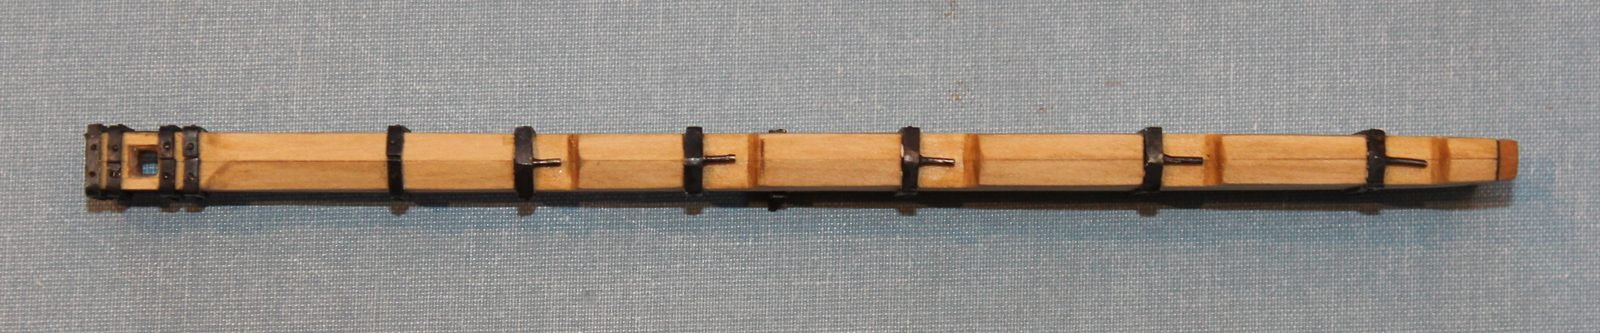
Thanks everyone for the likes. Not much time for the model over the last few weeks but I was finally able to finish the gudgeons. There were made in a similar manner to the pintles, two pre-drilled brass straps connected by brass bar which was then drilled for the pin and filed to shape. Some of the detail is obscured by the blackening. I have not decided yet when to install the gudgeons but will not ship the rudder until much further along into the build. Since I was playing around with metal I decided to make the hook and eye assembly for the riding bitts. The crosspiece is not bolted to the standards. It is held in position with a hook and eye attached to the medial side of the two standards. These are made from 1" thick brass which was filed to shape. The eyes and the bolts are made from brass wire. Sorry for the dust in the picture.


-
Meet Your NRG Directors and Officers
tlevine replied to tlevine's topic in NAUTICAL RESEARCH GUILD - News & Information
William M. “Mike” Lonnecker. I am a retired engineer with a degree in Mechanical Engineering (BSME) from the University of Kansas. I worked in Texas and California as a Program Manager and Project Engineer in the Defense and Aerospace Industry until retiring in 2002. I currently reside in Poway (San Diego) California with Sandy, my wife of 44 years. My interests have included woodworking, flying sailplanes, sailing, hot rodding and modeling all types of “vehicles”. I have been a student of design, modeling and building projects since completing my first plastic model car at age 6 or 7. I now prefer to work on 1: 48 scale ship models of the late 18th century and am building my fourth ship model, The FLY, using David Antscherl’s Swan series of books. I am a member of the San Diego Ship Modelers’ Guild and serve as Guild Master (President). I am also an active member of the Ship Modelers Association of Fullerton (SMA) and, of course, am a Director of the NRG where I am also chair of the mentor program and am currently mentoring one member. I enjoy sharing my modeling and machining skills with other modelers and regularly give demonstrations at club meetings and invite other members to my shop to work out difficult problems or aid new modelers with their projects. My MSW screen name is Mike.
- 17 replies
-
- 24
-
-
Meet Your NRG Directors and Officers
tlevine replied to tlevine's topic in NAUTICAL RESEARCH GUILD - News & Information
Toni Levine Like so many of us, I started building models when I was a child. The first model I remember building was a Monogram F6F-5 Hellcat which was originally given to my brother but it seemed that the “girl” had more aptitude for this than he did. My first ship models were small Scientific carved hull models which I built during high school. Model building was then shelved for several years while I completed my education (BS and MD from the University of Illinois) and residency training (Northwestern University). My first plank-on-bulkhead model was Peregrine Galley by Mantua. It is my only model built with a full coat of sails. Over the years, my projects progressed from out-of-the-box kits to kit-bashing and finally scratch building. My current project is Atalanta, a Swan-class sloop built in the fully framed style popularized by David Antscherl. I have been a physician since 1980 and specialize in otolaryngology (ear, nose and throat). Like so many of us, my career prevents me from spending much time building ships. I am a member of the Nautical Research and Model Society of Chicago and have been a member of the NRG since 1989 and a Director since 2013. I live in the Chicago area with my husband. My other interests include gardening, water gardening and home brewing. My MSW screen name is tlevine.
- 17 replies
-
- 25
-
-
Meet Your NRG Directors and Officers
tlevine replied to tlevine's topic in NAUTICAL RESEARCH GUILD - News & Information
Phil Roach I have practiced law since 1988 and have had a private law practice in Bonita Springs since 1994. I graduated with a Bachelor of Arts Degree from the University of North Carolina at Chapel Hill in 1985 and then attended Campbell University School of Law where I received my Juris Doctorate (J.D.) degree in 1988. Following graduation I moved from my hometown of Fayetteville, N.C. to become a full time resident of Southwest Florida. I belong to the Collier County Bar Association and the Florida Bar. I have been married to my wife Marina since 1988 and we have two children, Nicholas and Elizabeth. I am an active member of the Rotary Club of Bonita Springs Noon and am currently serving on the Board of Directors. My prior service to the Club includes holding the position of President, Club Rotary Foundation Committee Chairman and I have served on the Board of Directors for various terms over my more than 20 year membership in the club. I am also an active member of the Southwest Florida Ship Modelers’ Guild and I currently hold the position of President. I also served as liaison to the Nautical Research Guild for the Regional Conference previously held in Fort Myers, Florida. I enjoy American history and its maritime heritage. My modeling interests are sailing ships and lately, that interest is gravitating backwards in time to vessels of the Revolutionary War period, vessels of the Colonial era, and the vessels of exploration of the North American Continent. Although my full time practice of law forbids me from modeling as much as I would like, I very much enjoy the research. My MSW screen name is roach101761.
- 17 replies
-
- 23
-
-
The Board of Directors of the NRG has decided it would be a good idea to let our members know a little about ourselves. As you will see, your current Directors and Secretary come from diverse backgrounds and have varied interests. Some of the names you will recognize, others you will not. Even if a name is unfamiliar to you, please know that this is a hands-on Board and each Director contributes a substantial amount of time and sometimes money to the Guild, time that would otherwise go towards our passion of model ship building.
- 17 replies
-
- 24
-
-
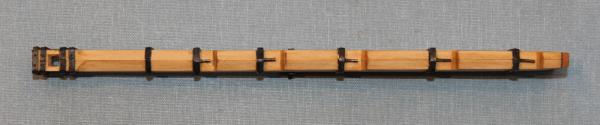
I measured the piece on the Atalanta plans from the NMM and it is 36 x 3.8 (w) x 3.1 (h) mm.
-
I have finally finished and installed the pintles and spectacle plate. Everything was blackened with Birchwood Casey. The bolts are 24g brass wire. There are two straps above and below the mortise for the tiller as well as two straps going over the top of the rudder. I played around with brass for the vertical straps and decided to use black paper instead. I could never get the horizontal straps to lie snugly against the vertical brass straps. In full scale practice, I assume these would be applied hot and would then shrink to shape with cooling.
-
I had no intention of masting and rigging my Swan but looking at how sweet Vulture looks I am tempted. Marvelous work, Danny.
-
Is there a better #11 blade handle
tlevine replied to roach101761's topic in Modeling tools and Workshop Equipment
Also consider using a #7 handle. This is long and thin (think pencil) and allows you to see the tip of the blade without your hand getting in the way. -
Blackening brass problem
tlevine replied to Maury S's topic in Metal Work, Soldering and Metal Fittings
Maury, I typically dilute the Birchwood Casey 1:10. I have never tried it full strength. -
Echo by Maury S - FINISHED - Cross-Section
tlevine replied to Maury S's topic in - Build logs for subjects built 1751 - 1800
The problem is most likely the soft solder. I believe Stay Brite will blacken. Most soft solder will not. -
Sorry for the delayed response. I would suggest an archival marker instead of Sharpie. The ink is alcohol based and so is stable with alkyd products like Minwax and Danish wood oil. You can pick them up at Hobby Lobby. The office supply stores and Michaels do not carry them.
-
Has anyone got or used headband magnifiers?
tlevine replied to vossy's topic in Modeling tools and Workshop Equipment
And having a Xenon light source with fiberoptic lighting helps too! Last week I became the proud recipient of a "new" headlight and light source that my hospital was throwing out. I can only use cheaters with it rather than the Optivisor because of the headband but the pinpoint lighting is fantastic. -
Since you are using a Sharpie, what finish are you going to apply? Any oil-based finish will cause the Sharpie ink to bleed.
-
Has anyone got or used headband magnifiers?
tlevine replied to vossy's topic in Modeling tools and Workshop Equipment
I use an Optivisor for all of my modeling. If it looks good at a magnified view, it will even look better with the naked eye. I have an aftermarket LED attachment for the Optivisor. The good points are the intensity of the light and the natural color of the light. The bad points are that it eliminates shadows, making depth perception difficult at times. Also the battery pack attaches to one side of the headband so unless you add a counterweight to the other side (rendering the headband extremely heavy) you have to tighten the headband a lot to keep it from listing to starboard. -
Thank you gentlemen. And thanks for all the likes. Richard, I pickle parts both before soldering and before blackening. All the pickle does is remove surface contamination. This is critical in both soldering and blackening. Depending somewhat on my mood I will use either a jeweler's pickling solution (Sparex is one brand), 90% isopropanol or acetone followed by a water rinse. Just as important with silver soldering is knowing that it is not gap filling the way soft solder can be. The parts are fused to each other so good contact is imperative.
-
John, Druxey, David and Dave thank you. The eggs are a fun distraction. I always keep dyes ready to go in the fridge. Michael, I did not mean to imply that I built the cases. We had a cabinet maker build them. The mere thought of using "big boy" tools makes me shudder. Now if there was a kit... Actually we have built furniture but it was always provided pre-cut as a kit. All that was required was assembly and the finish.