

tlevine
-
Posts
2,033 -
Joined
-
Last visited
Content Type
Profiles
Forums
Gallery
Events
Everything posted by tlevine
-

Ticking off the bulkheads
tlevine replied to rudybob's topic in Building, Framing, Planking and plating a ships hull and deck
The run of the garboard looks OK, maybe just a tiny bit high at the stem. Is your keel piece glued in place or just placed there for the photos? I ask because there is a considerable gap between it and the stem. Which kit are you building? -
Ticking off the bulkheads
tlevine replied to rudybob's topic in Building, Framing, Planking and plating a ships hull and deck
Are you attempting to spile the planks or simply develop a run of planking for kit-provided strips? If you are spiling, take a look at the Half Hull Planking Project, starting at Post #22. -
Tips for the Second-Time Model Builder
tlevine replied to Melissa T.'s topic in Wood ship model kits
A bit late to this thread but I love your list. When I was at the point of deciding on my second model (first "real" model was the Revell Connie), the PC hadn't been invented and the only wood kits I could find were sold by a now-defunct craft retailer called Lee Wards. They sold two kits, Mantua's pirate ship and Peregrine Galley. I bought the better-looking of the two and was thrilled to find a catalogue included with the kit...Model Expo. It is so much easier now to find something that appeals to one aesthetically or historically or simply for the challenge. -
I went to your build log and have the impression that you want to drill holes into the hull with the drill press. If so, that is absolutely the wrong tool for the job. If your hands are shaky, your best bet is to make a dimple impression with a punch or pin and use that dimple to guide your hand. Whether you use a Dremel or a pin vise, this will keep you in the correct spot. I do own a Proxxon drill press and find it useful for parts that do not need to be or cannot be secured in a vise.
-
What are you using the drill press for?
-
This SWMBO likes shiny things where appropriate. What are you building? A modern pleasure boat has a much different appearance than an 18th century warship. Why are you considering a spray-can product when you have much more control with a hand applied one? I use Danish wood oil if I want anything other than a flat finish. Apply, wait a few seconds, wipe off. Adding more coats increases the gloss.
-
I use both carbide bits and HSS. If I am using a pinvise, the only type of bit I use is HSS. I will almost always use a carbide bit when I am using a drill press or the sensitive attachment on my Sherline mill. For drilling treenails, I usually use a carbide bit in my variable speed cordless Dremel. This requires a steady hand because any torque will snap the bit off in the wood.
-
Scratch built chainplate
tlevine replied to RossR's topic in Metal Work, Soldering and Metal Fittings
Taking a look at Allan's book "Scantlings", I found dimensions for Bindings of the deadeyes on pages 238-9. There probably is not much difference in the diameter between British and Spanish practice. A fifth rate of 34 guns would have had a binding of 1.5" fore and main and 1.25" mizzen. -
You could try copper tubing or sterling silver tubing, patinated with liver of sulfur and then burnished. The silver will look just like pewter but the copper is cheaper.
- 257 replies
-
- 4
-

-
- pegasus
- Swan-class
- (and 1 more)
-
My scuppers were made from a silver-gray craft paper. I rolled the paper around an appropriate diameter dowel to form the scupper.
- 257 replies
-
- 1
-
-
- pegasus
- Swan-class
- (and 1 more)
-
When I grow up, I hope to be only half as skilled as you are. Your work is amazing.
-
Jerry, this is how I tapered the planks on my Fair American. Measure the width of the deck at the fore end of the quarter deck and at the transom. Decide the width of planks at the break of the deck, for example ten inches. Divide the deck width by the plank width. It obviously will not be whole number. So if your deck width is twelve feet, you will have fourteen whole planks and an extra four inches. Add a quarter inch to the width of each plank and you have the width of the planks at the break. Now divide the width at the transom by fourteen and you have the plank width there as well. Now that you know those two numbers, make one deck plank out of card and use it as a template to make the planks. For installing, start at the midline. It is a lot easier to hide an odd plank at the waterway than in the middle of the deck. And don't forget the slight taper along the plank edges to compensate for the camber of the deck.
-
Ken, the etchant in this case is the vinegar. If you are asking about the Birchwood Casey, I use a 25% solution. I rarely use vinegar. I prefer to use a warm solution of Sparex (dilution instructions are on the package). It keeps forever in a glass or ceramic container. Mine is kept in a tiny crock pot which I turn on low when needed.
-
Drifts
tlevine replied to tlevine's topic in Building, Framing, Planking and plating a ships hull and deck
Great photo, Roger. Let's face it, nothing we do as modelers is completely authentic. We use alternate materials and various construction techniques. The whole idea is to learn something new and, most importantly, have fun. -
Drifts
tlevine replied to tlevine's topic in Building, Framing, Planking and plating a ships hull and deck
Thanks, Bob. I will keep an open mind when construction begins. -
Drifts
tlevine replied to tlevine's topic in Building, Framing, Planking and plating a ships hull and deck
If I go ahead, my plan is to build at 1:24 scale. I will not be steam bending any frames; they will be cut out like "typical" frames. Unlike Atalanta, I won't have to deal with chocks between the frame components! -
Drifts
tlevine replied to tlevine's topic in Building, Framing, Planking and plating a ships hull and deck
Bob, your response is exactly what I needed. As I mentioned earlier, this project is still in the planning stage. As with Swallow, I was captivated by the looks of the boat. Details to be worked out as I went along. My hope is to build a reasonably accurate recreation but if necessary, I will fully plank her and hide my errors. -
Drifts
tlevine replied to tlevine's topic in Building, Framing, Planking and plating a ships hull and deck
Thanks, Druxey. -
Drifts
tlevine replied to tlevine's topic in Building, Framing, Planking and plating a ships hull and deck
Thanks for the explanation. -
Drifts
tlevine replied to tlevine's topic in Building, Framing, Planking and plating a ships hull and deck
Thanks for the suggestion, Allan. I discovered that a drift is a type of fastener that is wider at the head than at the toe. Jaager, I am not quite sure I understand what you mean by long arm/short arm. -
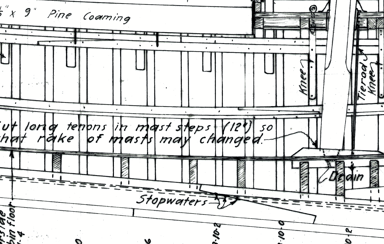
I am in the process of developing the next build, Glad Tidings, from Chapelle's plans. Half of the frames are connected to each other by floors. The other half have no visible means of support. On the plan it states "Floors drifted to keel and deadwood." What is meant by "drifts"? Does anyone know how the remaining frames would be secured to the keel? The frames are so lightweight (1.75" x 2.5") that I would think bolting them to the keel at the foot would compromise the frame.

-
Preac fence still in production? I assume this is an aftermarket product since the company no longer exists.
-
La Palme by Tobias - 1:36 - POF
tlevine replied to Tobias's topic in - Build logs for subjects built 1501 - 1750
In the States it is called sanding sealer. There are several brands, both acrylic and solvent based. Beautiful work, as always.

