


garyshipwright
-
Posts
901 -
Joined
-
Last visited
Content Type
Profiles
Forums
Gallery
Events
Posts posted by garyshipwright
-
-
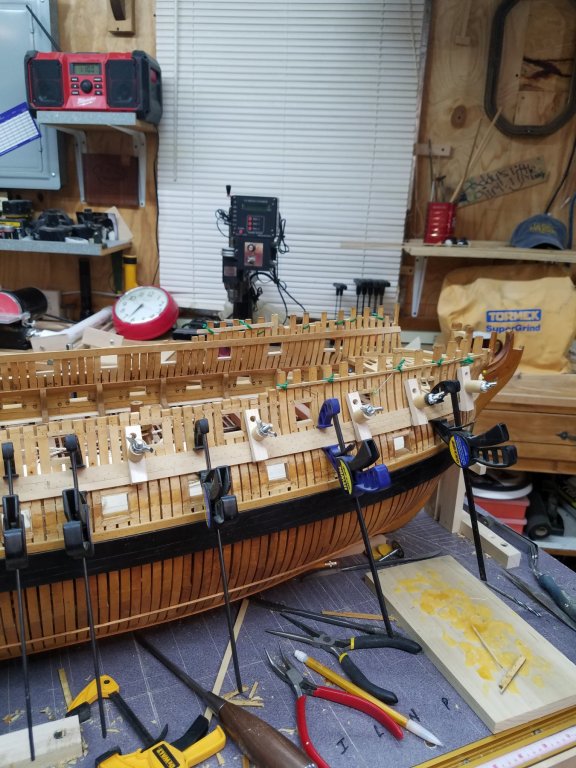
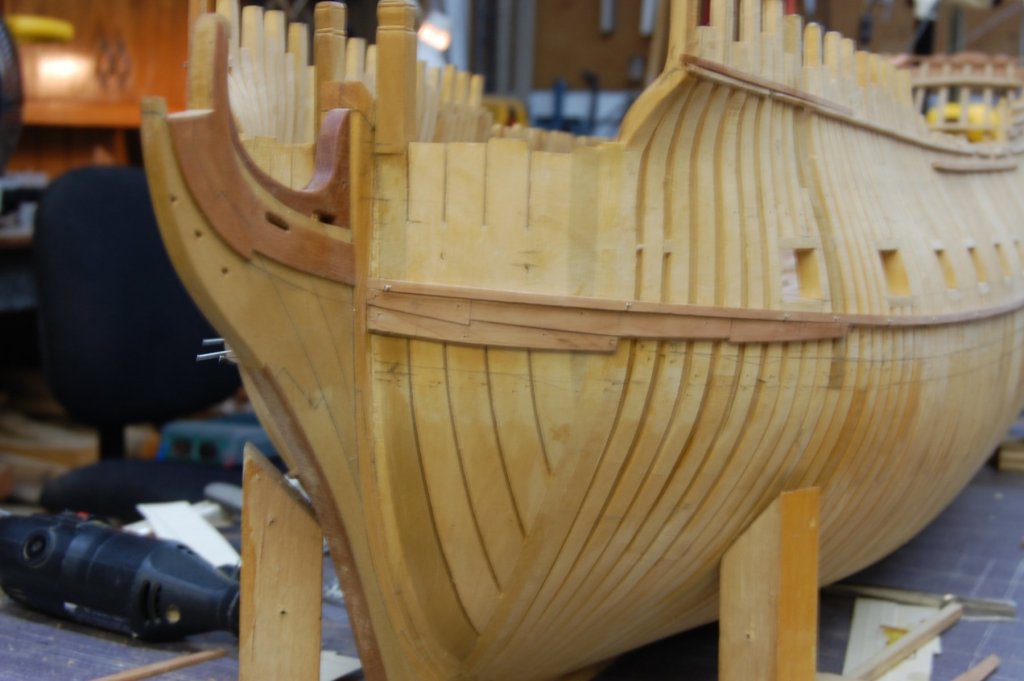
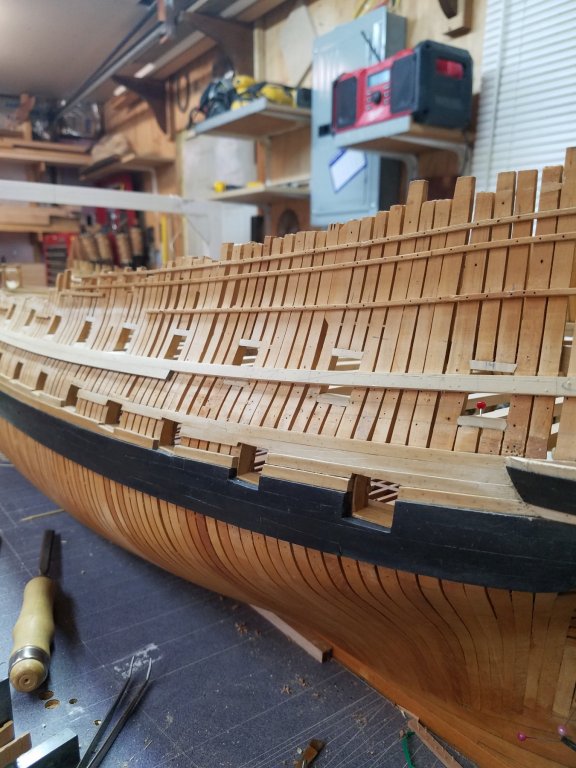
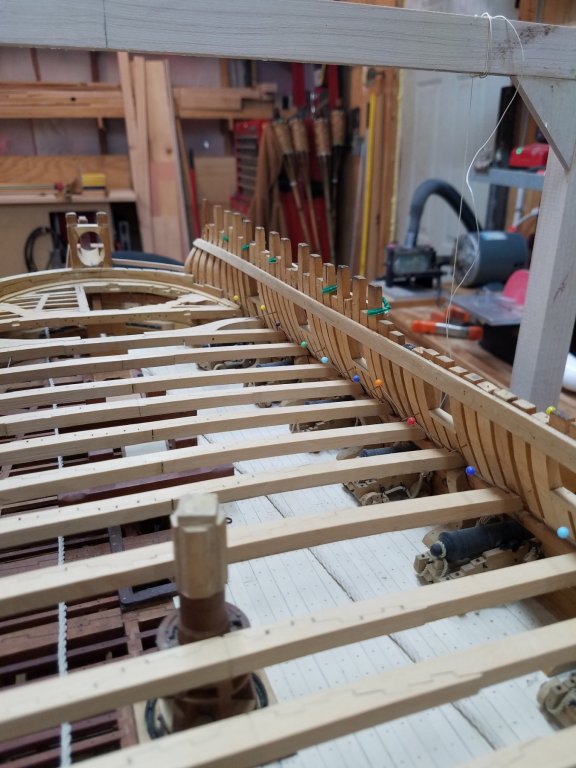
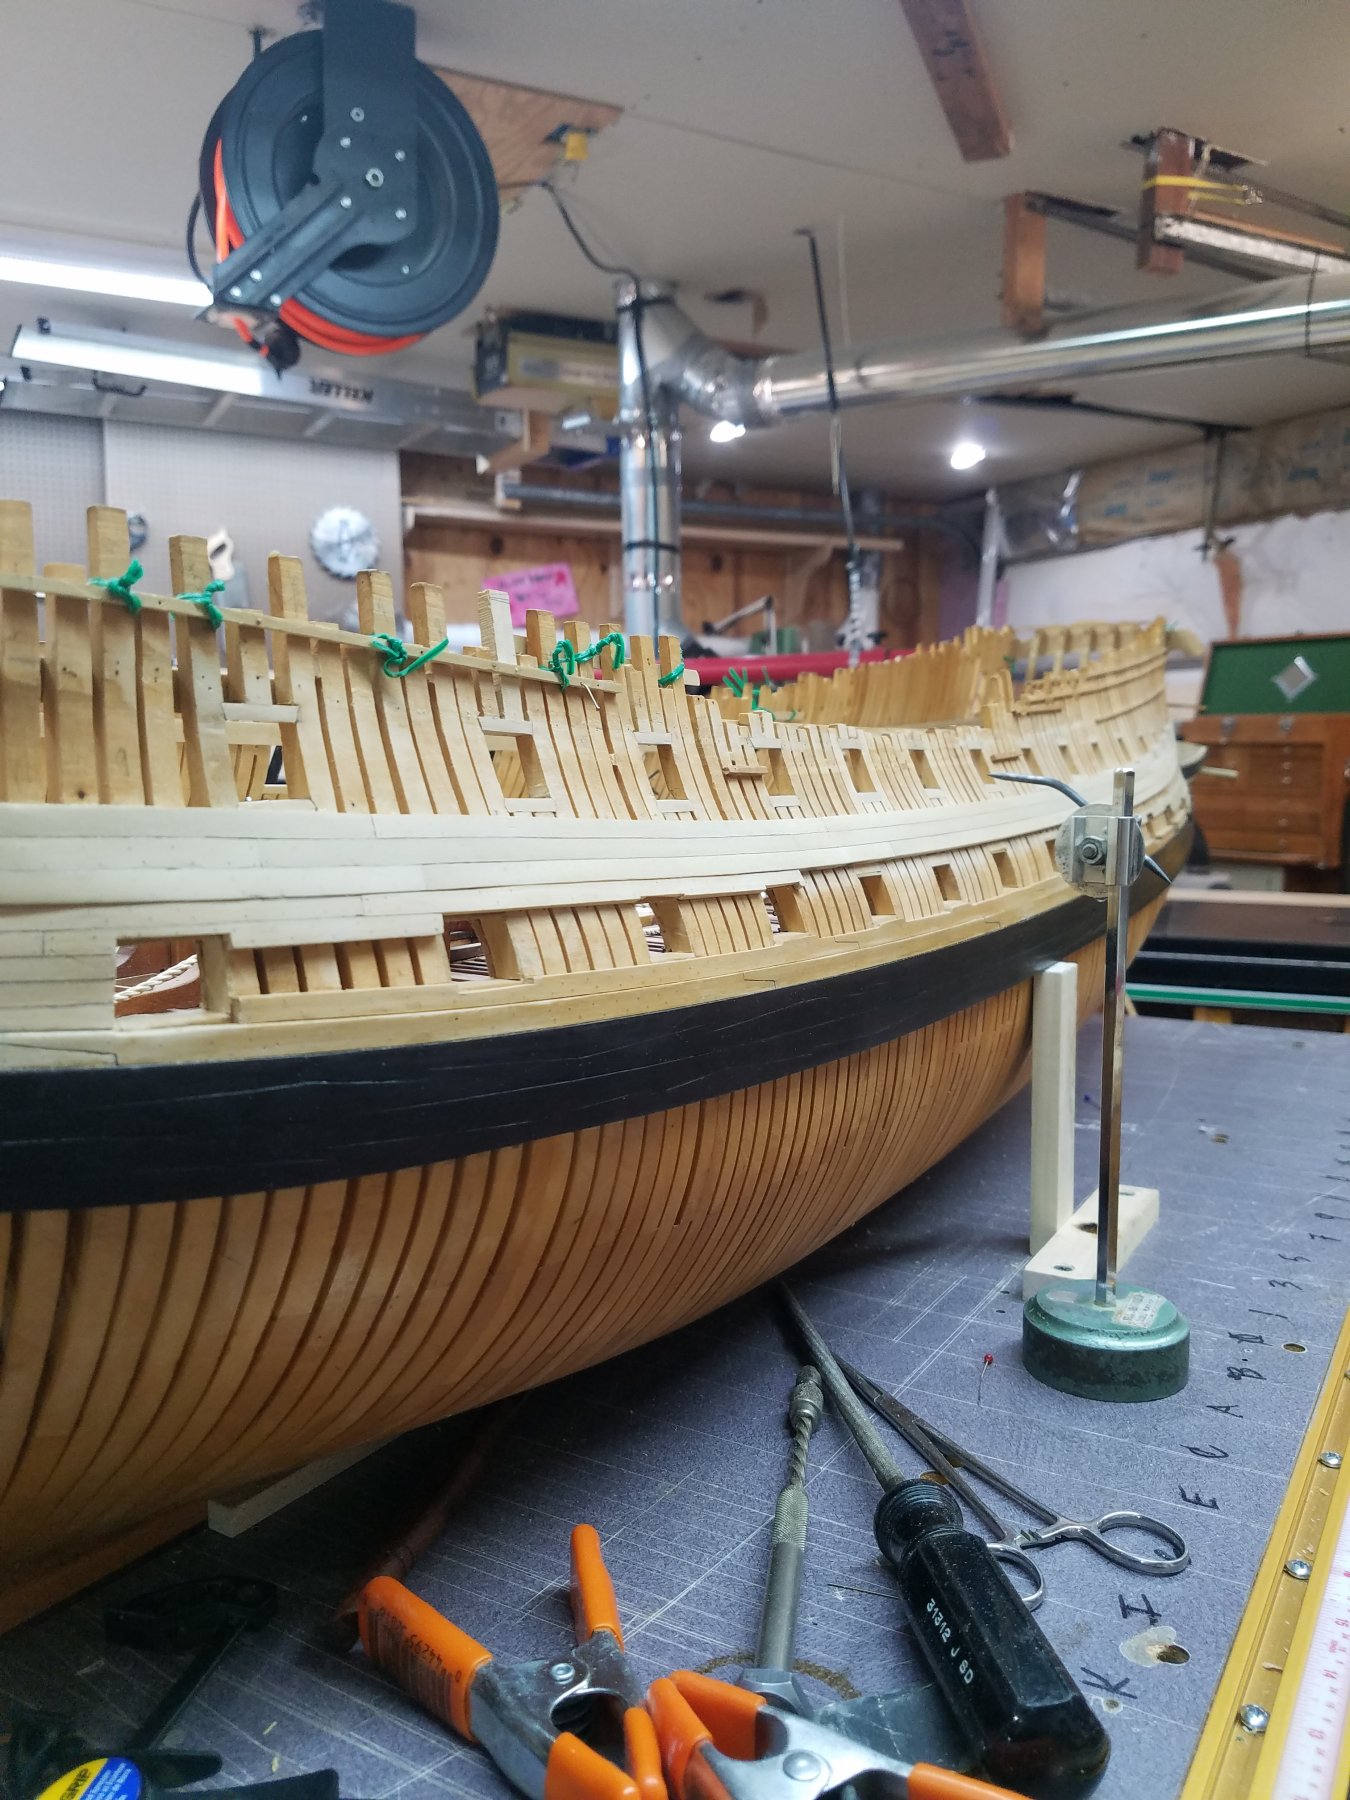
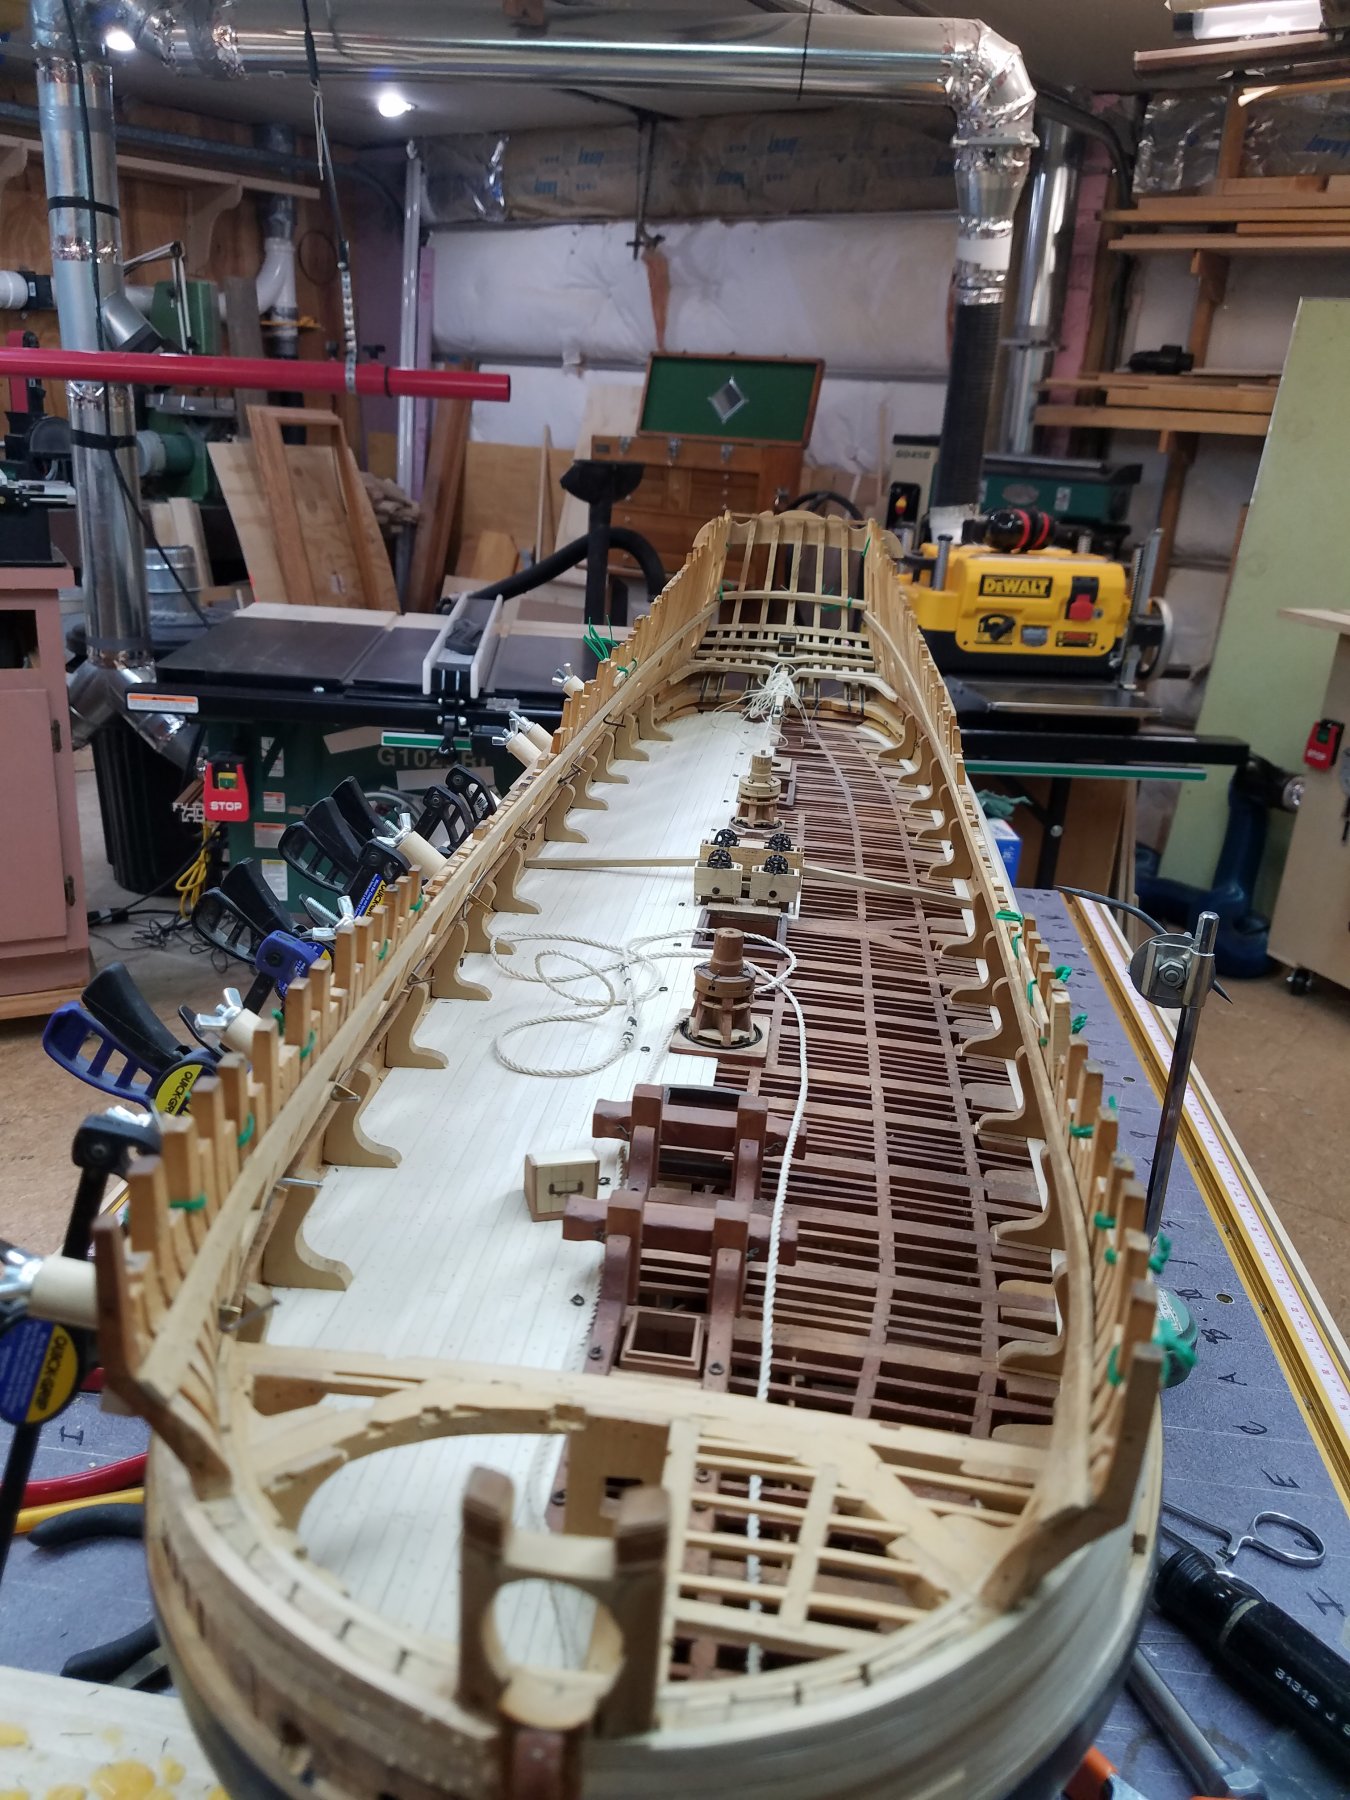
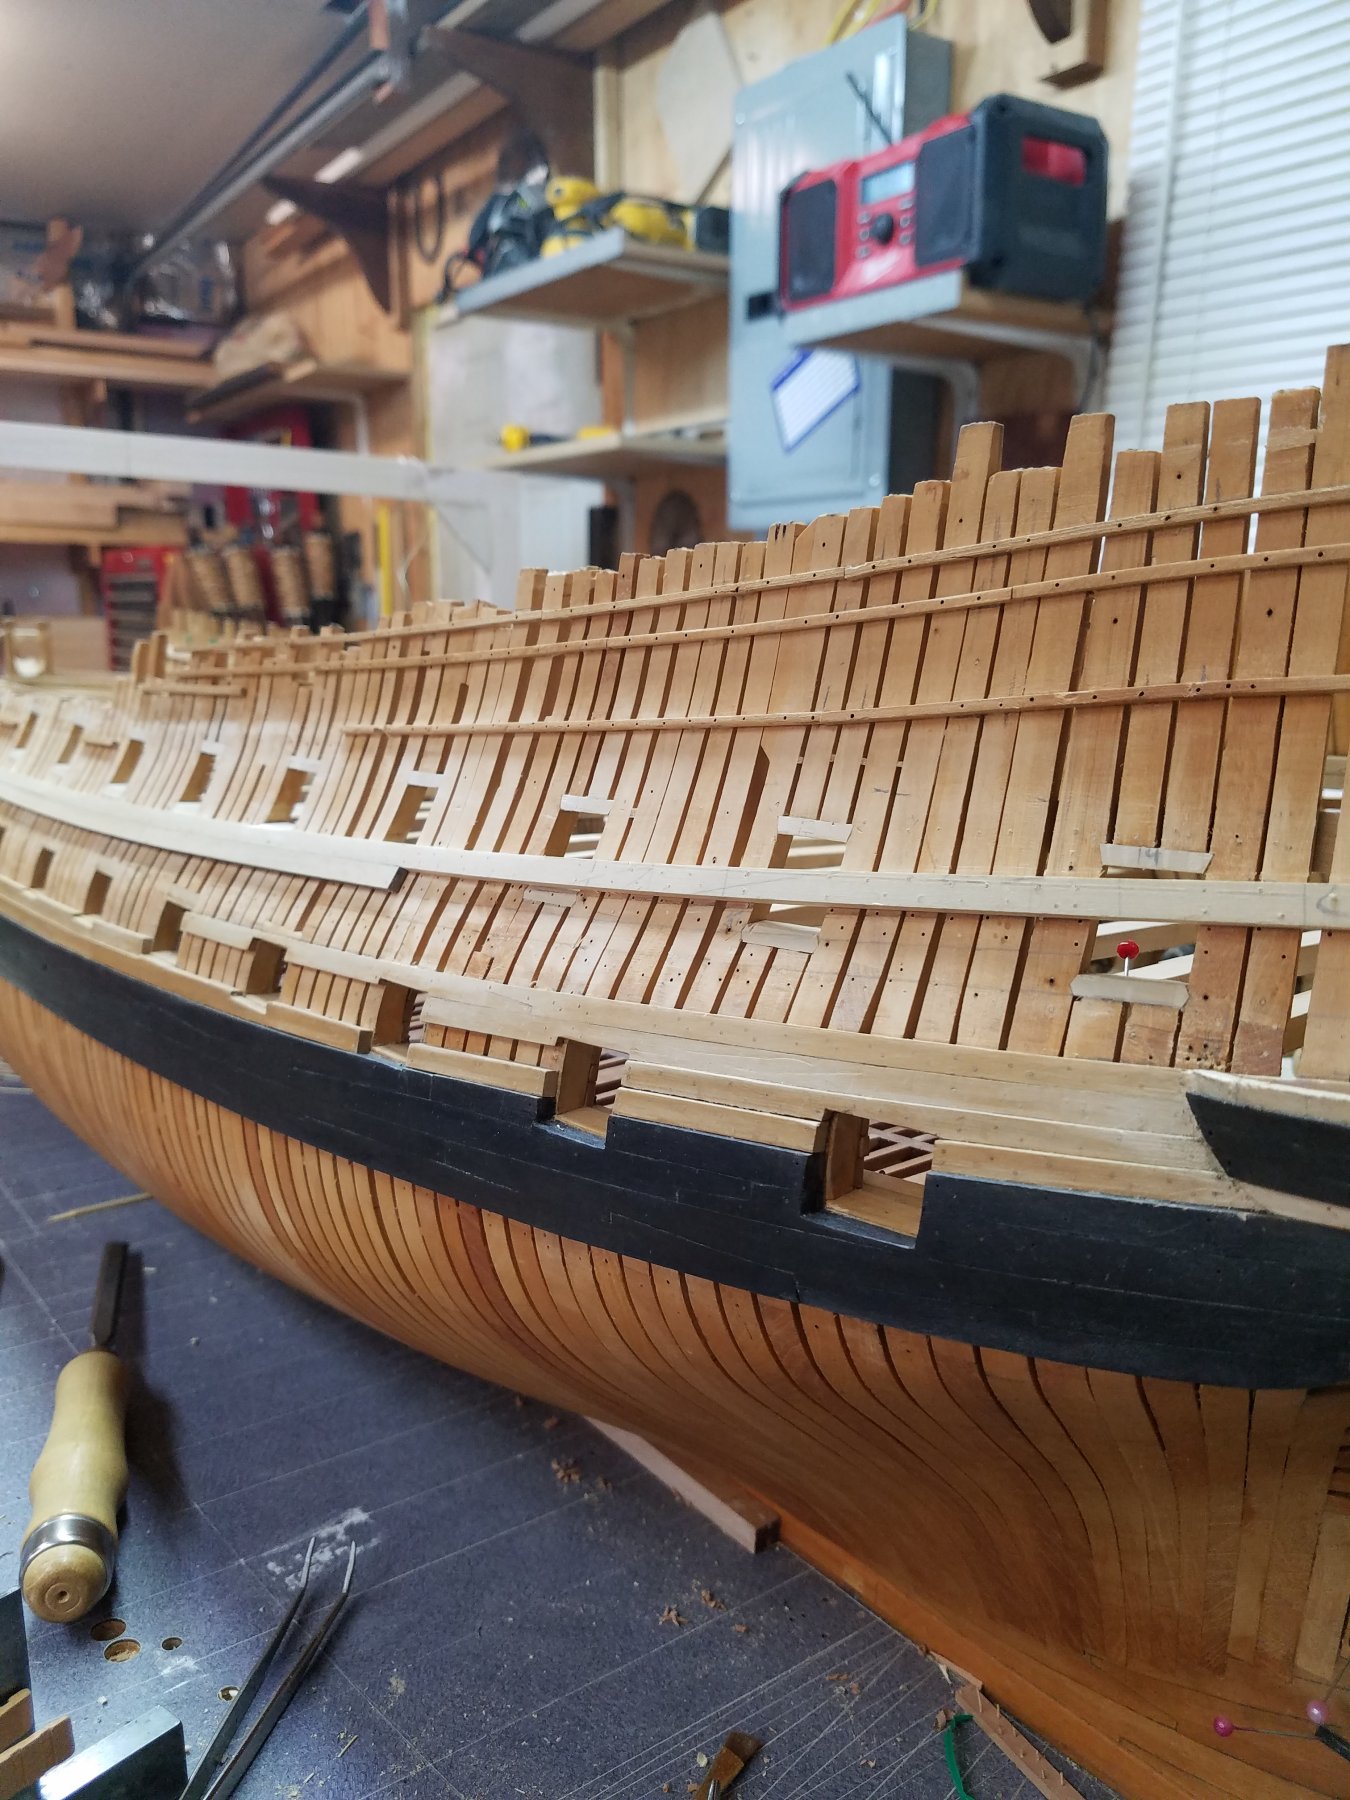
Hi Guys. Here is another update, small one but one I have been working on. Some thing I did along with at least half of the channel wale done on the port side was to remove some of the planking above the main wale on the other strbd side along with taken her main guns off to add some more detail to them. Another thing is the eyebolts will be removed from the sides till the upper deck hanging knees are fitted. They have to be in place first then the eye bolts. Kind of late but Merry Christmas and a happy new year.
gary


-
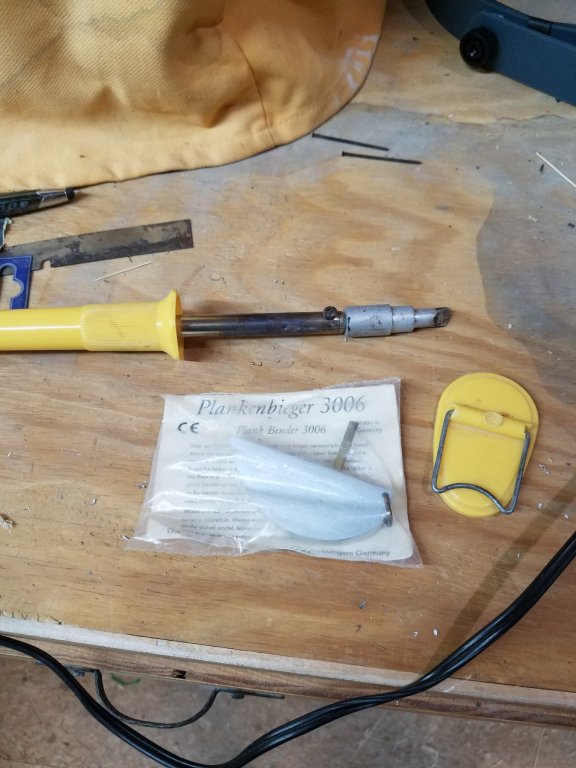
Sounds about right Mark. Another thing, you could do like your doing, then clamp it on the hull, take a very small paint brush lightly wet it down and take your little plank bender heater and heat it. Not sure you have the little heater I have but looks like a little soldering iron with a couple of different tips made for planking. Just a couple of ideals to help get your planks to fit. I take a photo of it which may help. Gary
- mtaylor, Mark P, GrantGoodale and 1 other
-
 4
4
-
EdT, Am sure you have heard every word in the book about you build and all I can think to add to it, she is a very very fine looking lady. Your build is outstanding and am so glad that you are posting the build of her. When do you figure your next book will be out, have a open space on the book case for it. :o) Gary
-
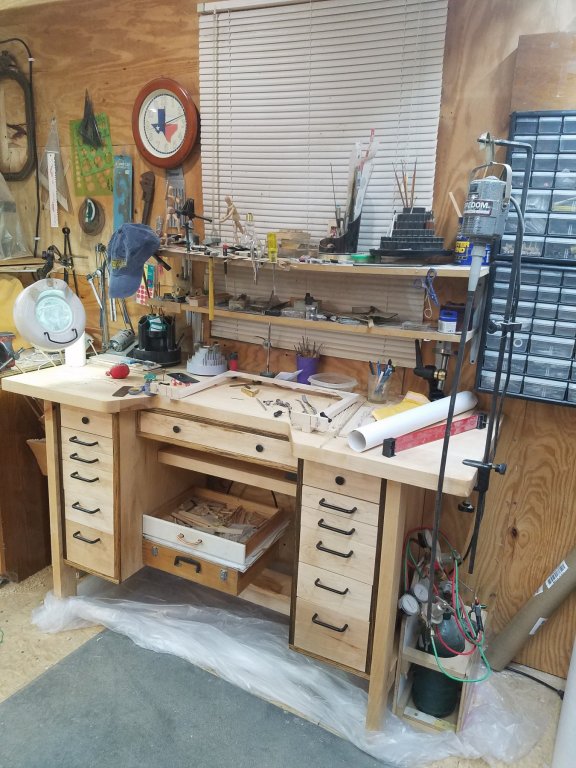
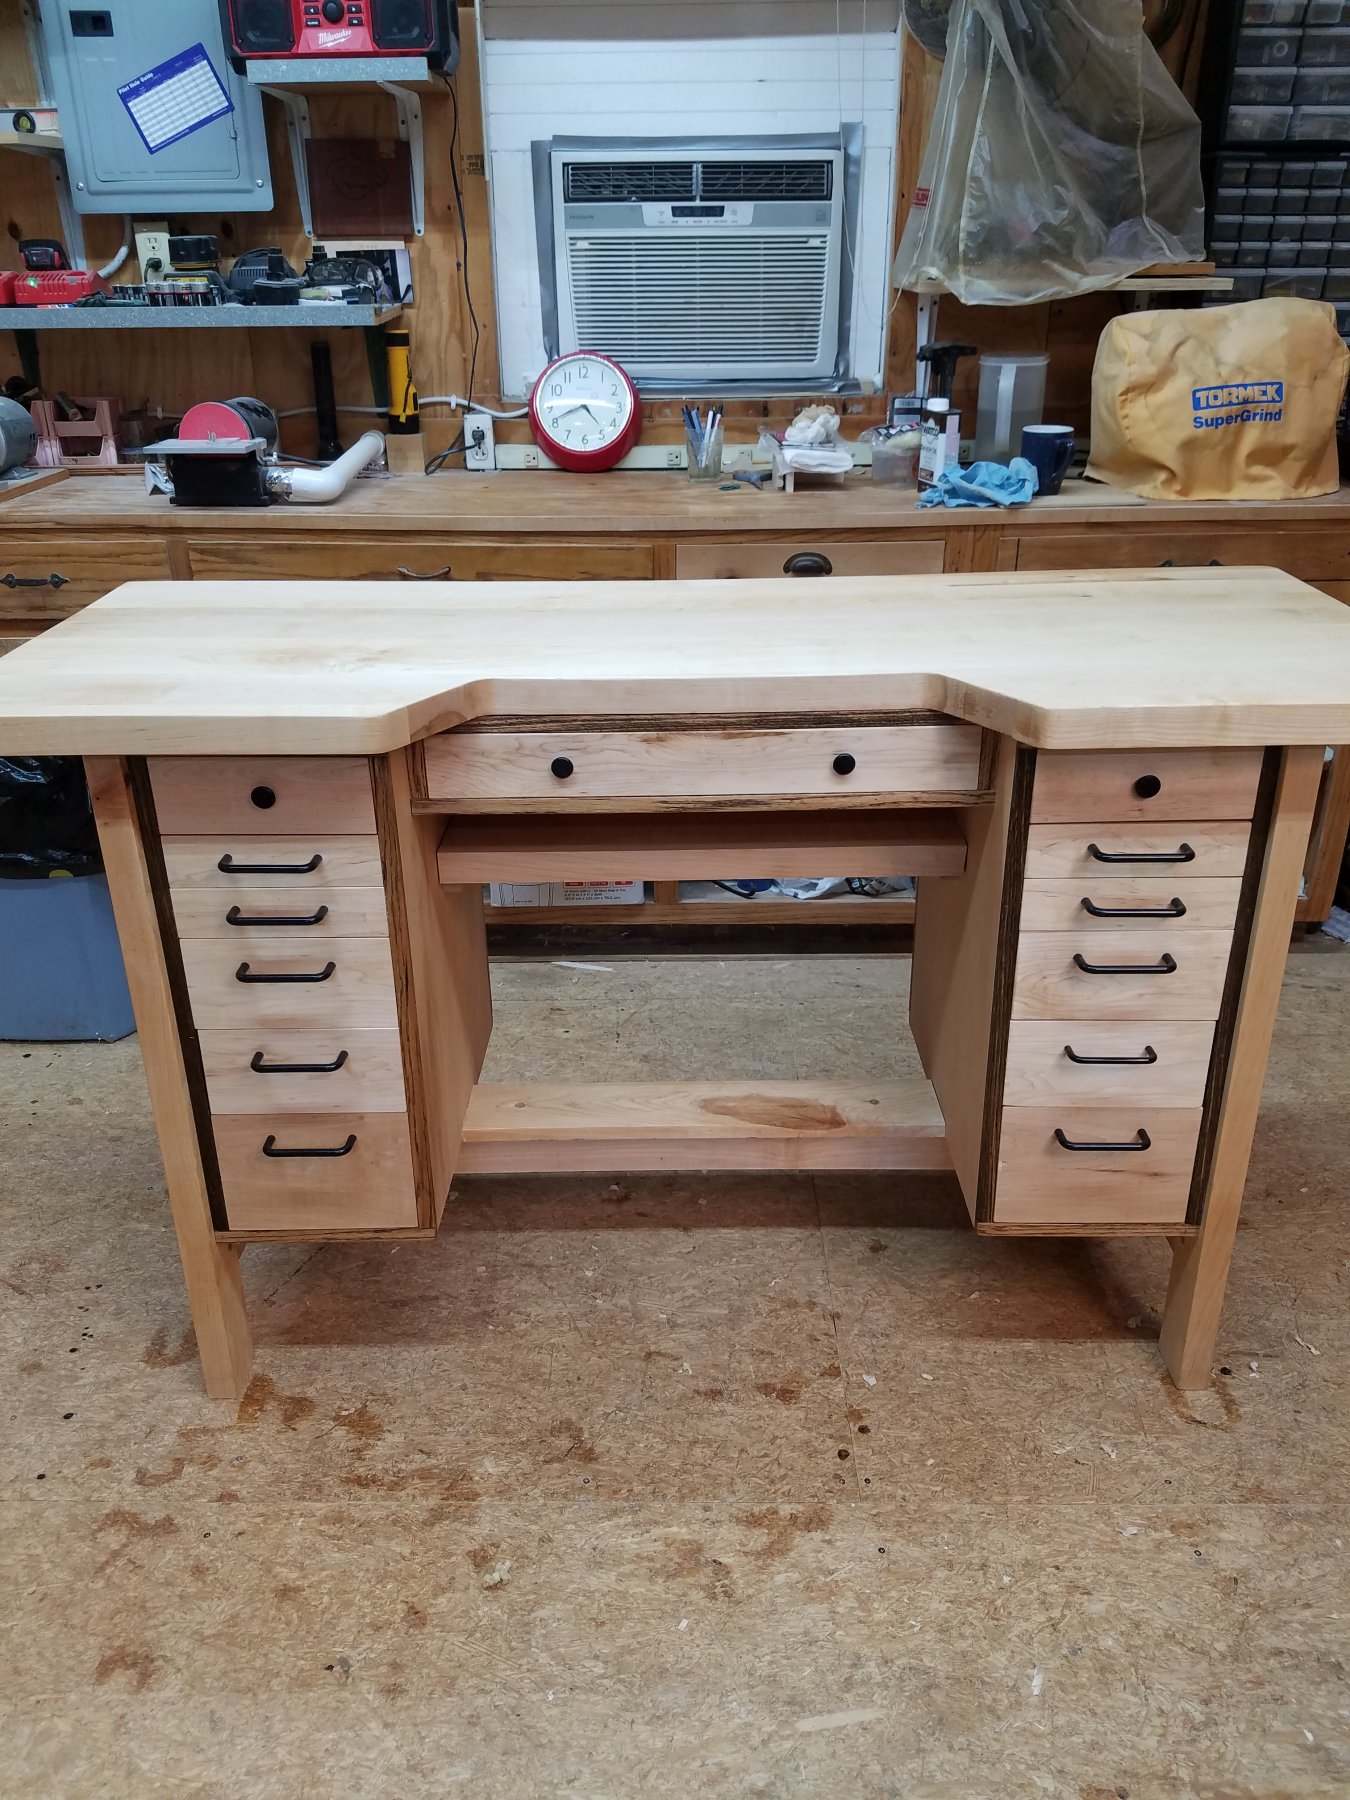
Thanks Nils and EdT. It did take me a couple of months to build the hobby bench and really enjoyed building it. Gary
- Mirabell61, mtaylor and Bob Legge
-
3
-
3 hours ago, Gaetan Bordeleau said:
I see 2 ways to build a model: according to the plan or to the model.
I always build on the model because if I would build according to the plan, It would never fit on the construction site.
Hi Gaetan. I have to total agree with you. One thing I have learned and do believe some one said it, the plan is just a guide to building her, and making a boo boo is just part of it, nothing says that you can't just cut it out and replace it, Am really sure that is what the did back then. Its also how we learn to fit two pieces of wood together. Wood is very forgiving, if it doesn't fit or is cut wrong, just toss it and cut another one. Gary
-
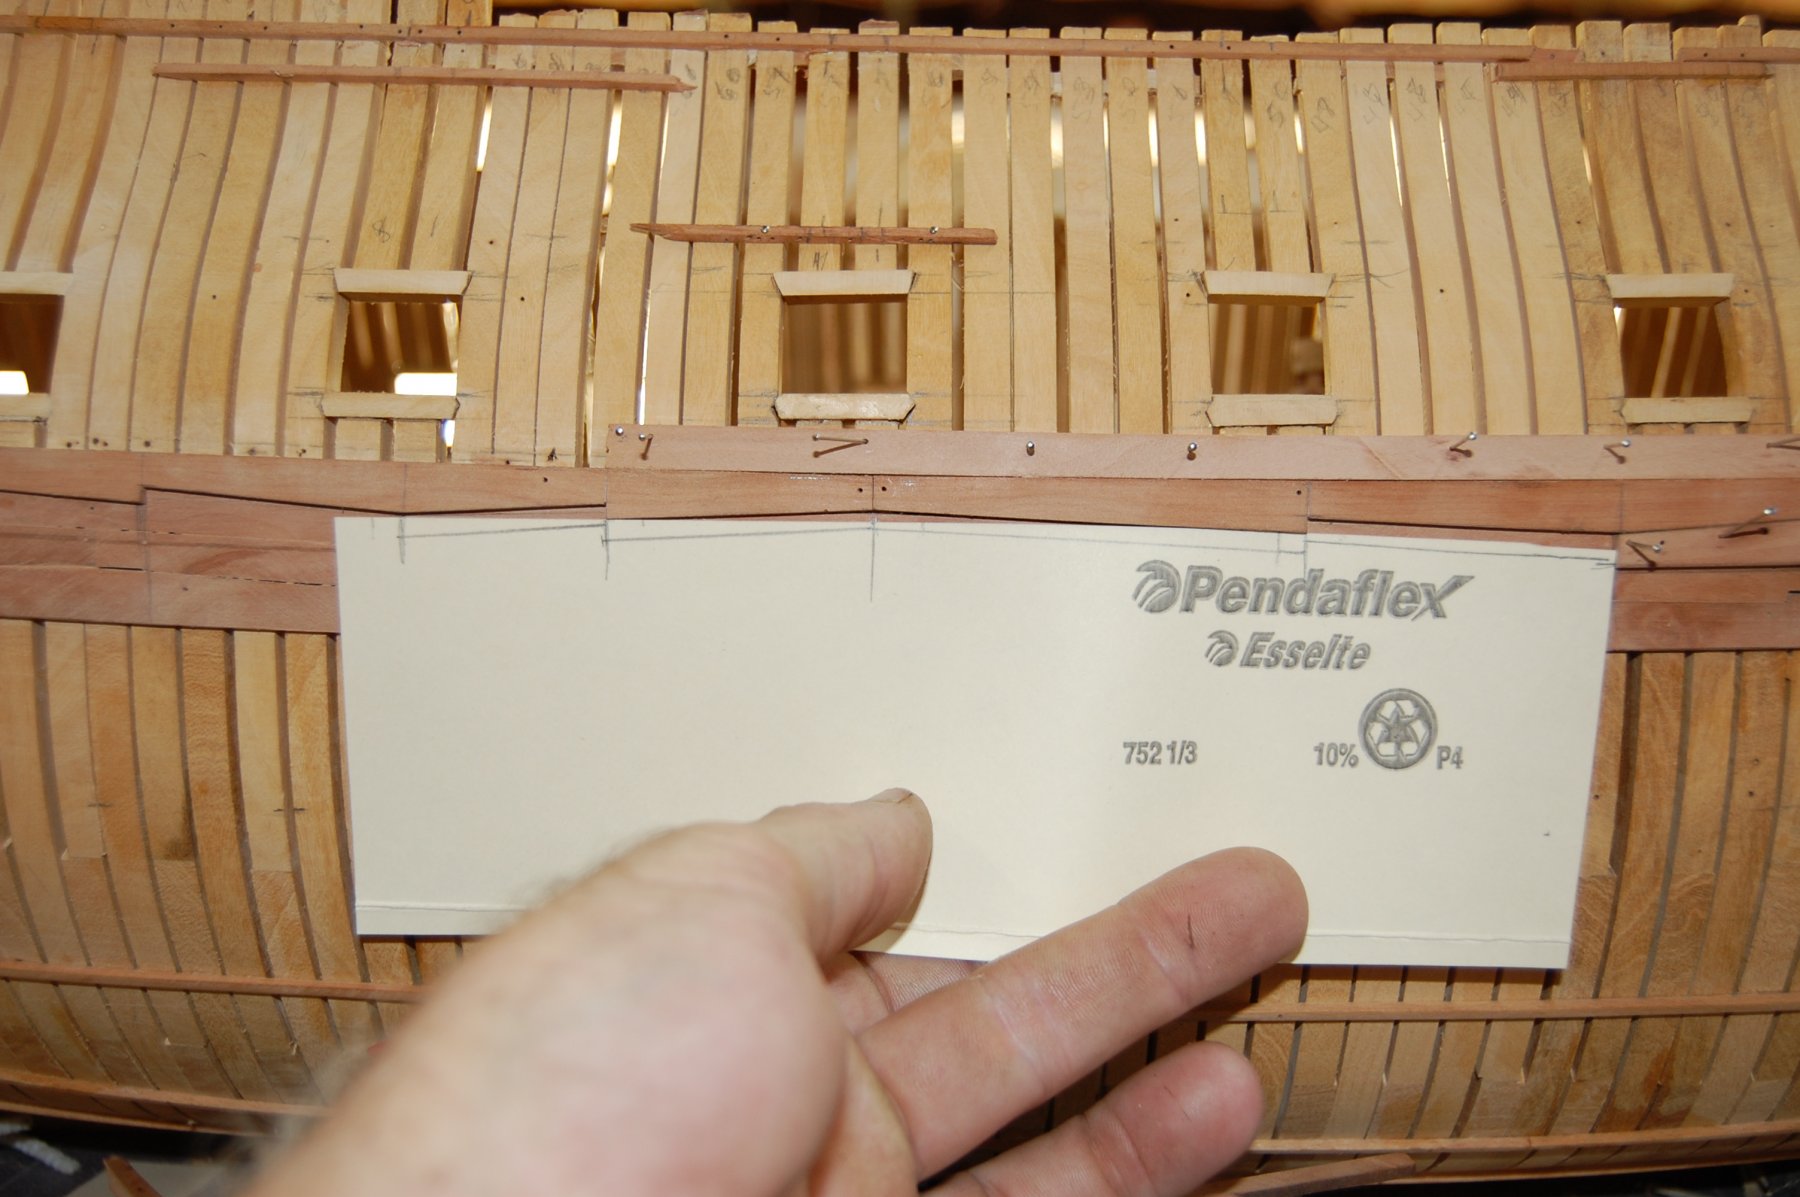
Hi Mark as far as running planks against the batten I wouldn't do it any other way. Of course once you get the planks next to it installed you don't need it any more, and can just remove it. I also found out that taken the second row of planiks and clamping them like I have in the photo helps to close the gap and does a really fine job. Gary
-
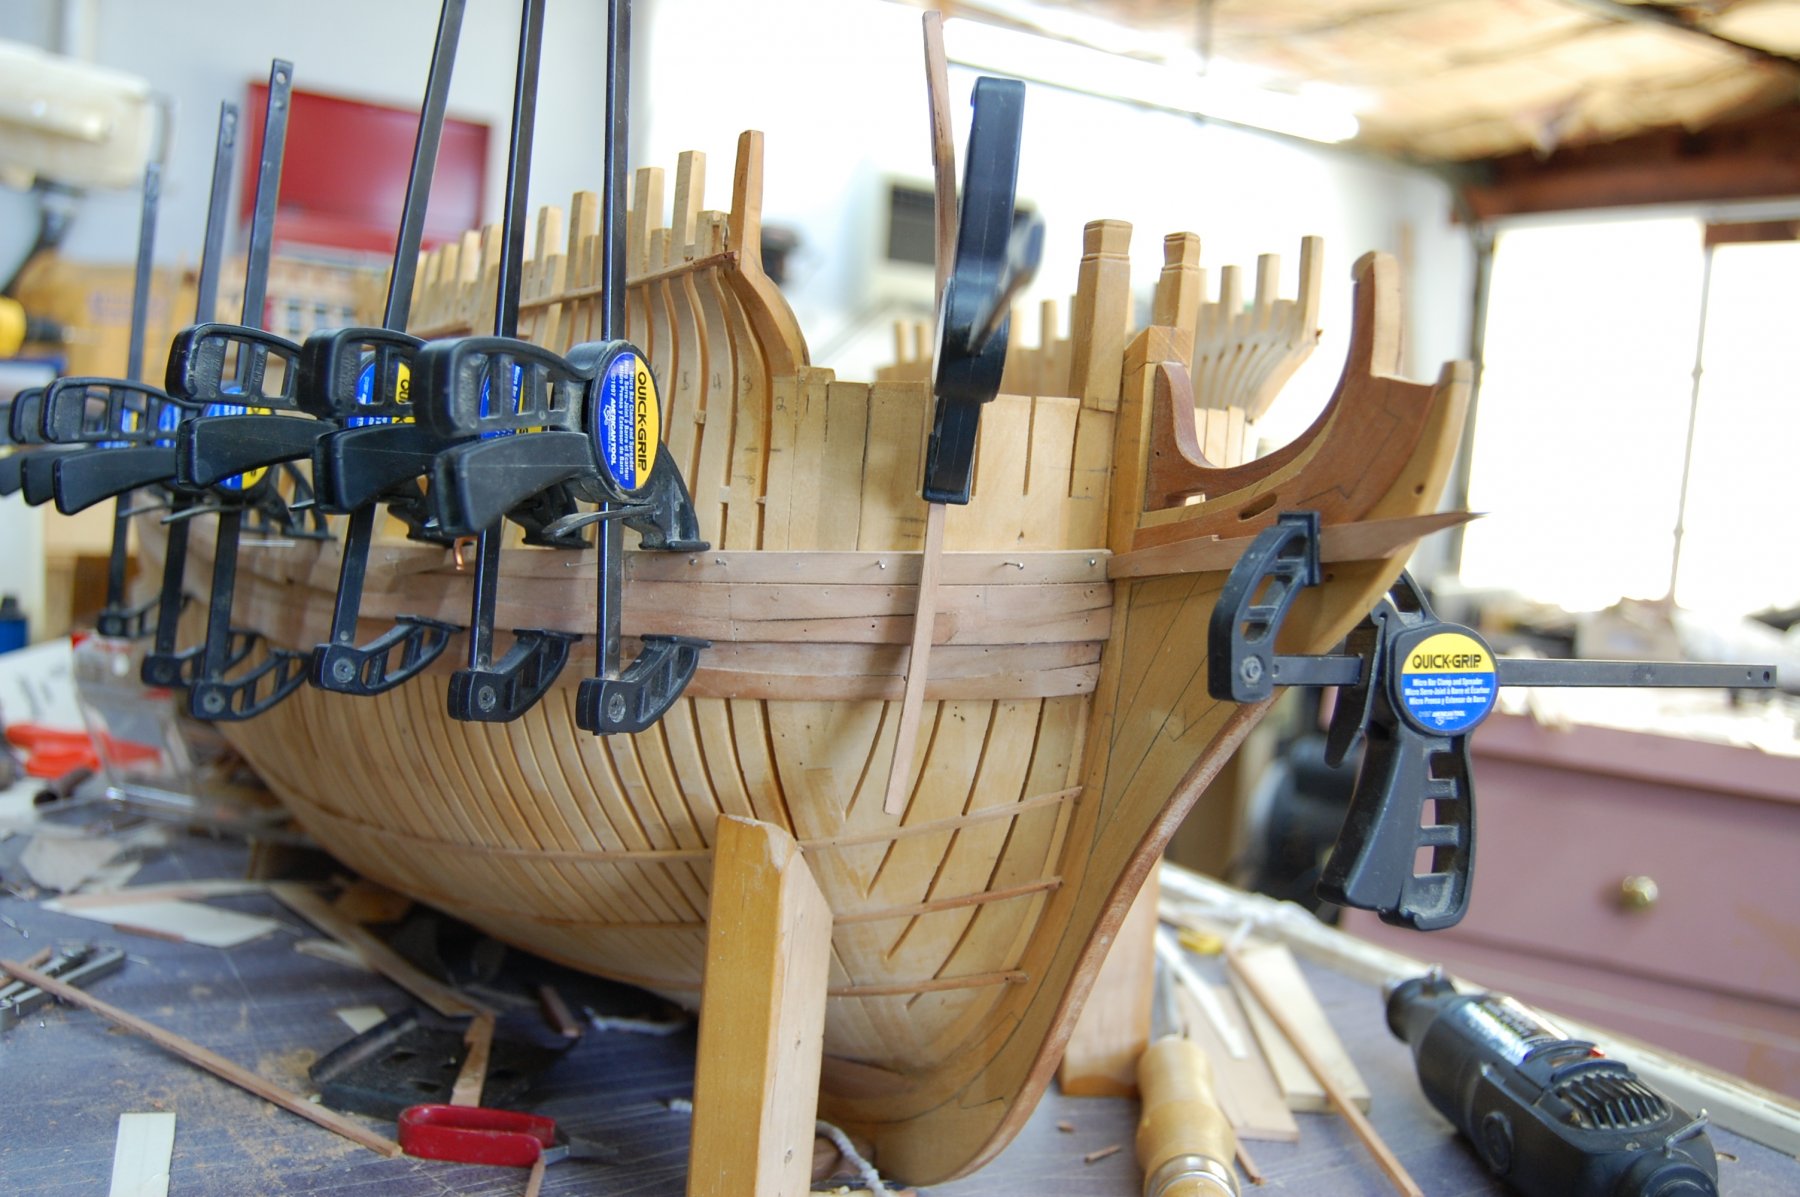
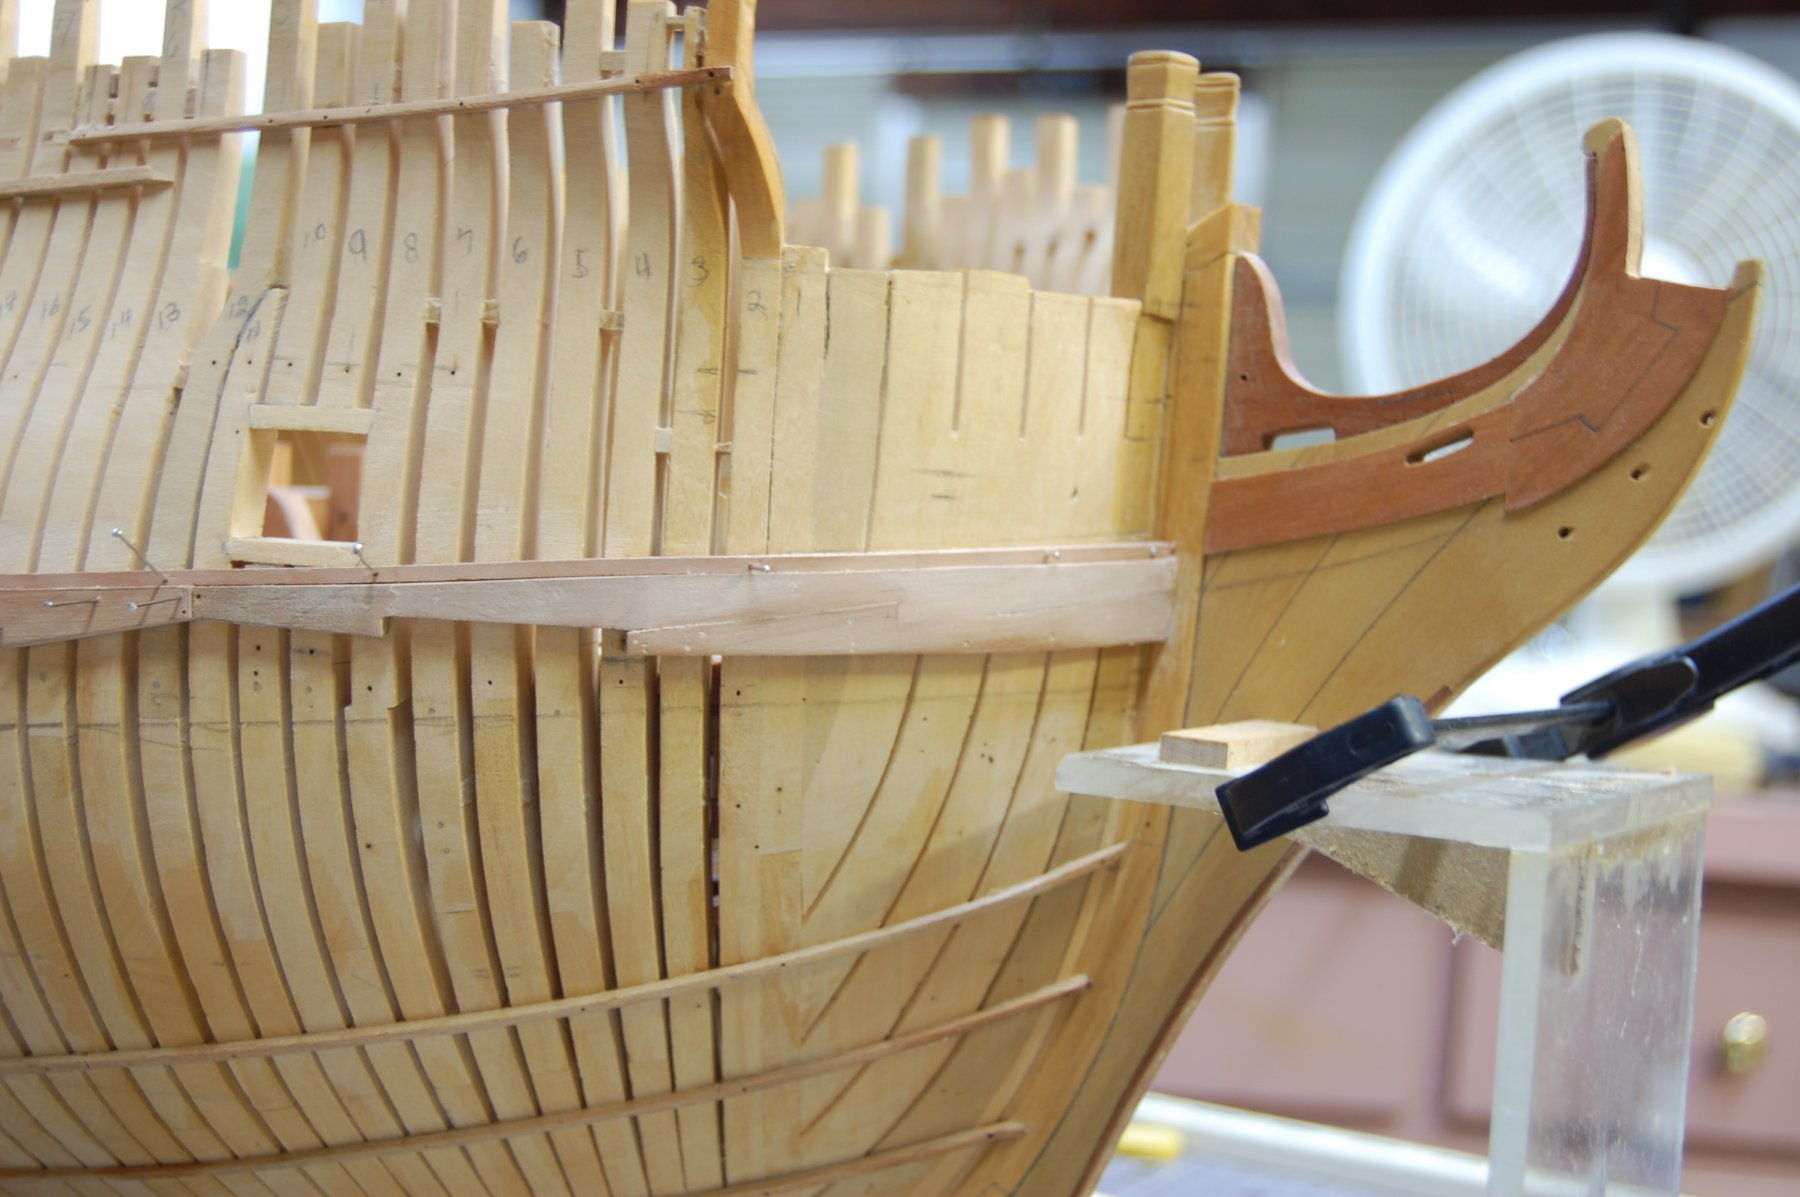
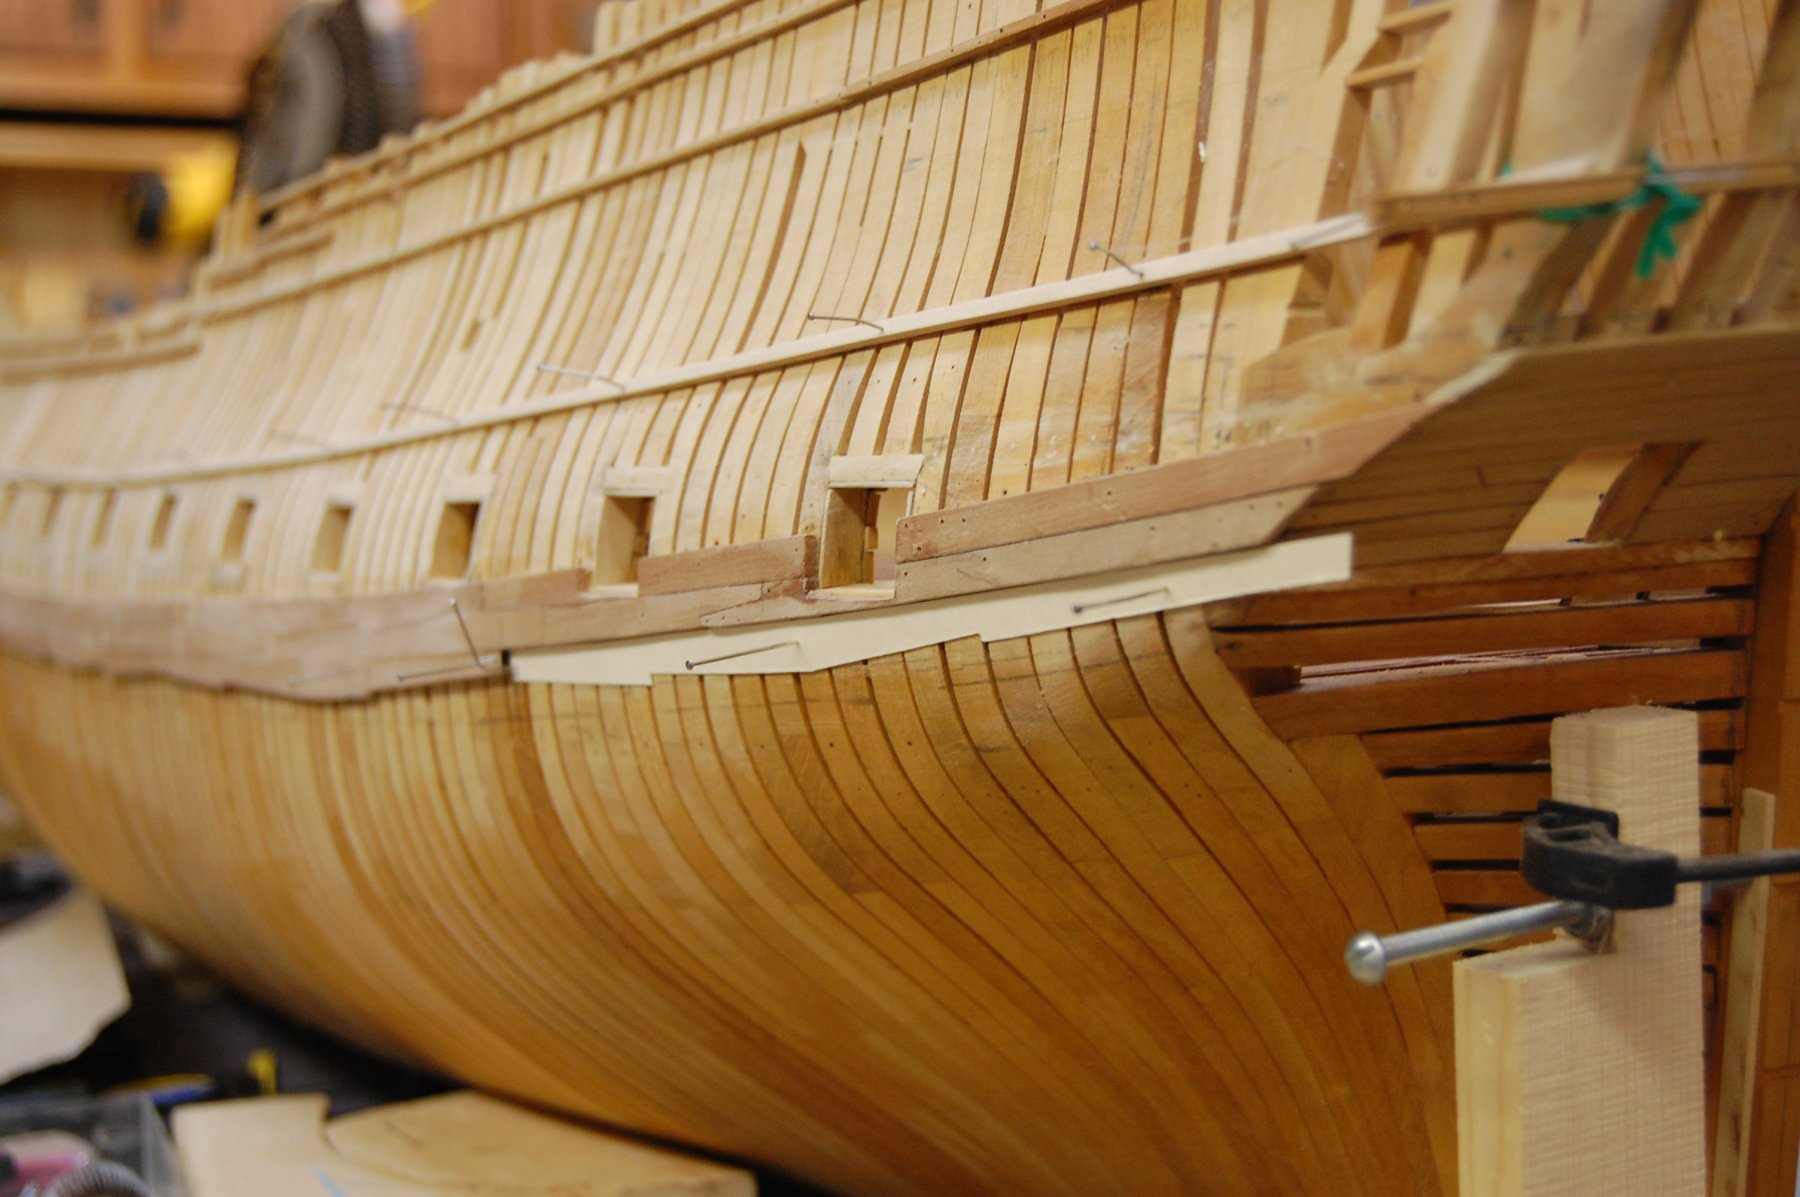
Mark when I did mine at the bow I fitted the first top one pinned in place with out any glue. As you said I made up a piece of wood the had the curve of the bow and after soaking the piece, it was clamp up in the form and left over night and fitted the next day. You might also want to put just a little bit more of a curve in the form making sure you have enough curve in the piece. After that make up a file template of the next one using the shape of the first one on the ship it self. Cut out the template, lay on the wood you making the pieces out of, cut to shape, soak, steam and after a little be of dry fitting pin it to the hull, replace the pins with trunnels/treenails and your done. As far as putting glue on the plank, I just put glue on the trunnel and after you have 75% of the tunnels in place that plank isn't going any where. I don't like gluing the plank to the frames because if you make a boo boo then its a lot harder to get the plank off. With just the trunnel glued its just a matter of prying up the plank fix the mistake and keep going. Had to replace a few planks on account of mistake, which am sure most of us have a box full. Then you do the next set and then the next set untill you have you wale the length of the hull. I did enjoy putting Alfred's on and was like putting a jig saw puzzle together. Of course am not worth a hoot when it comes to putting them together. Gary


- aviaamator, robdurant, EdT and 6 others
-
9
-
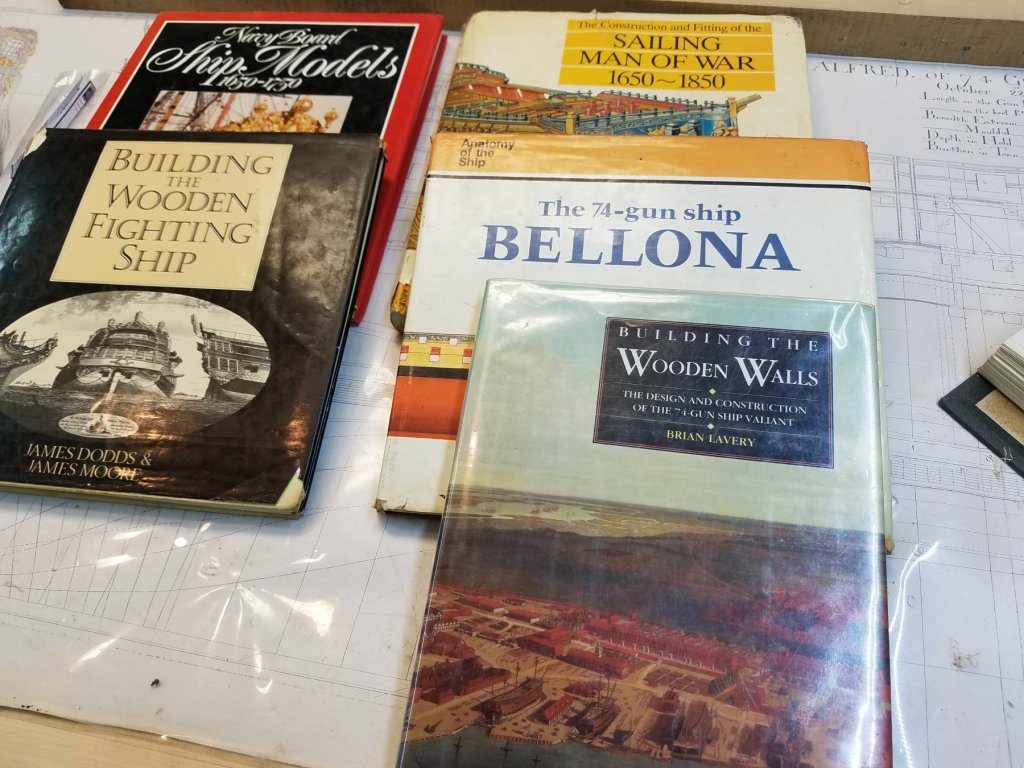
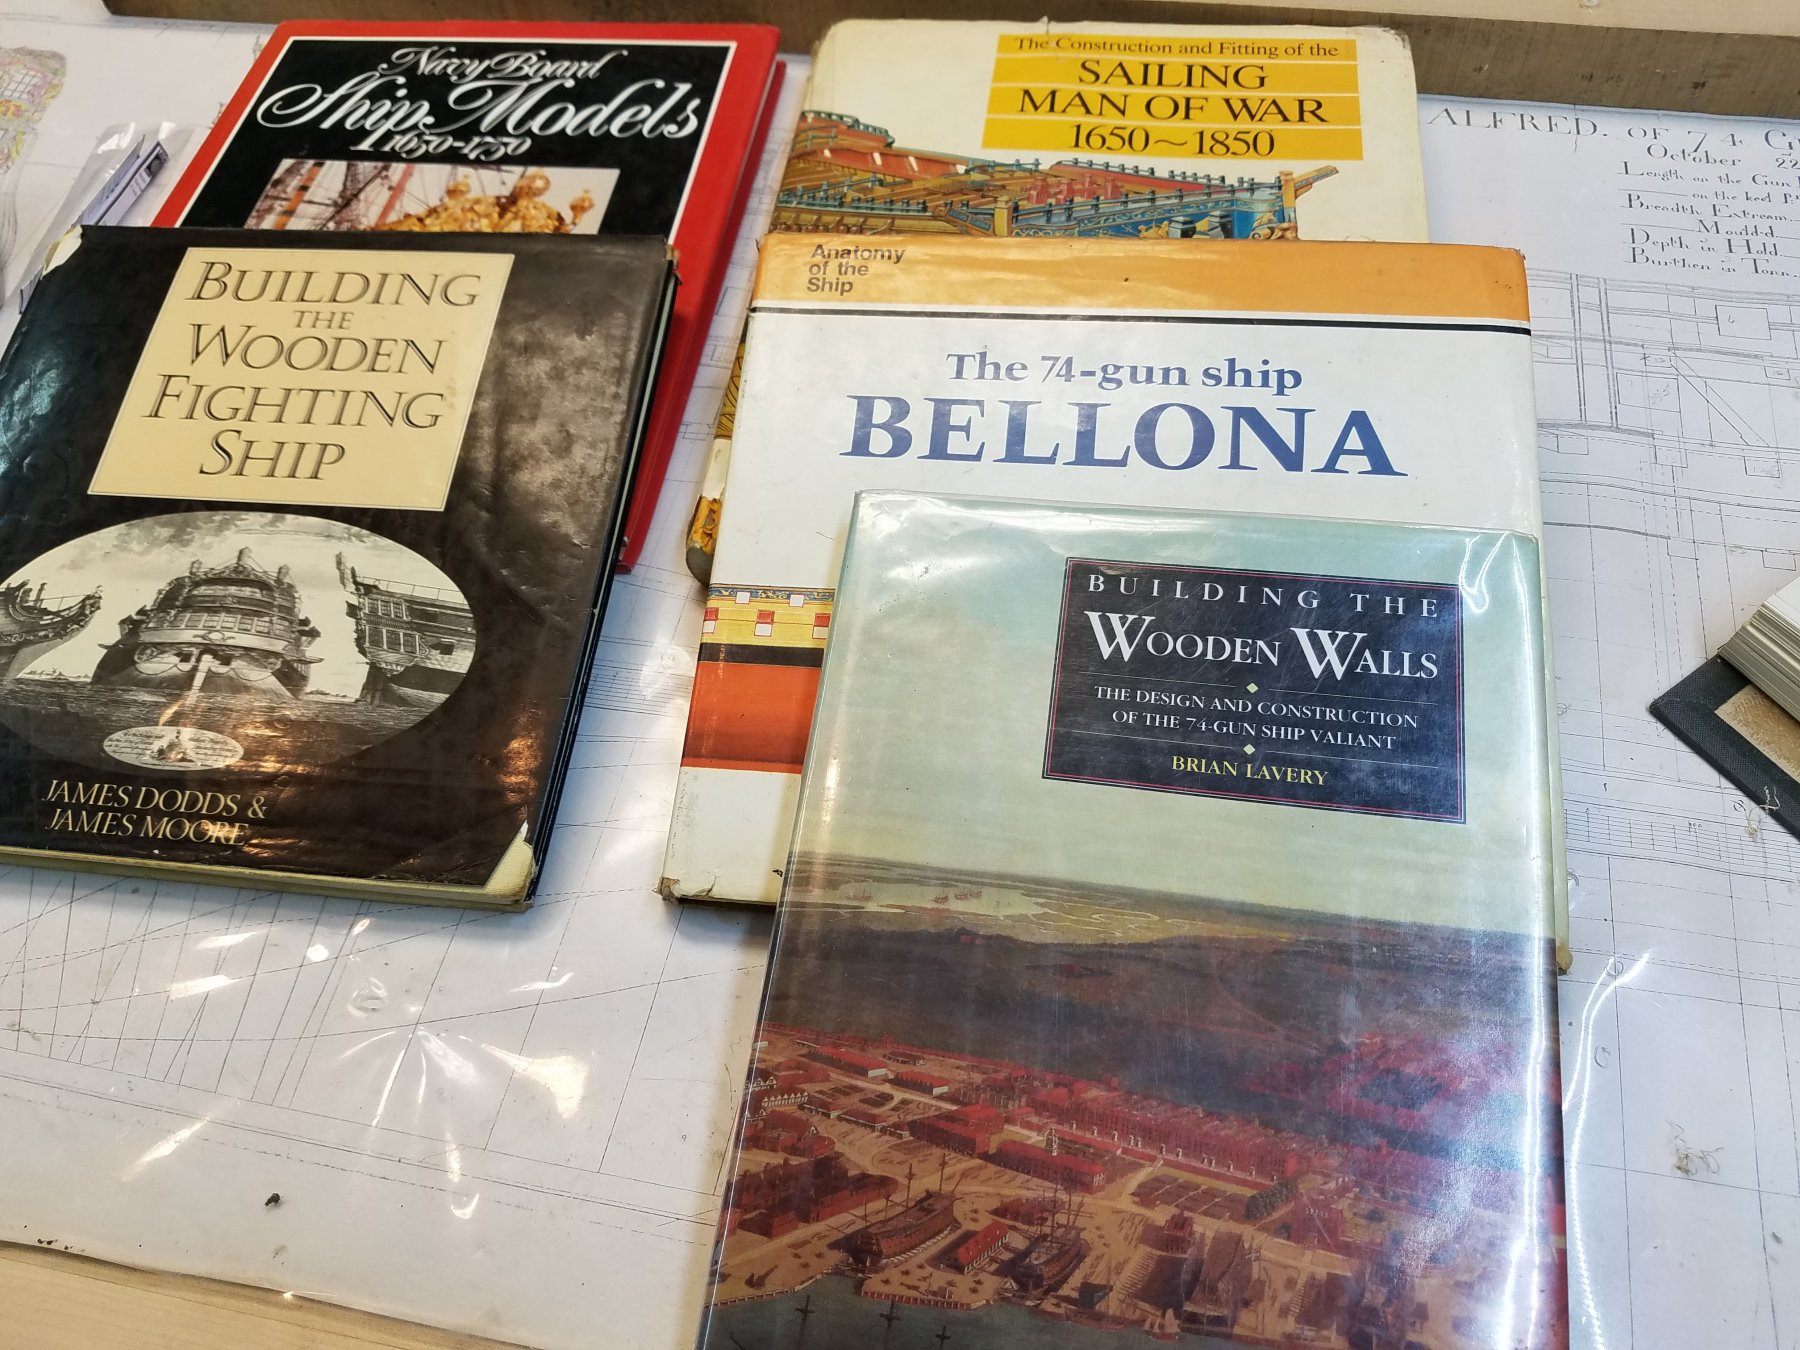
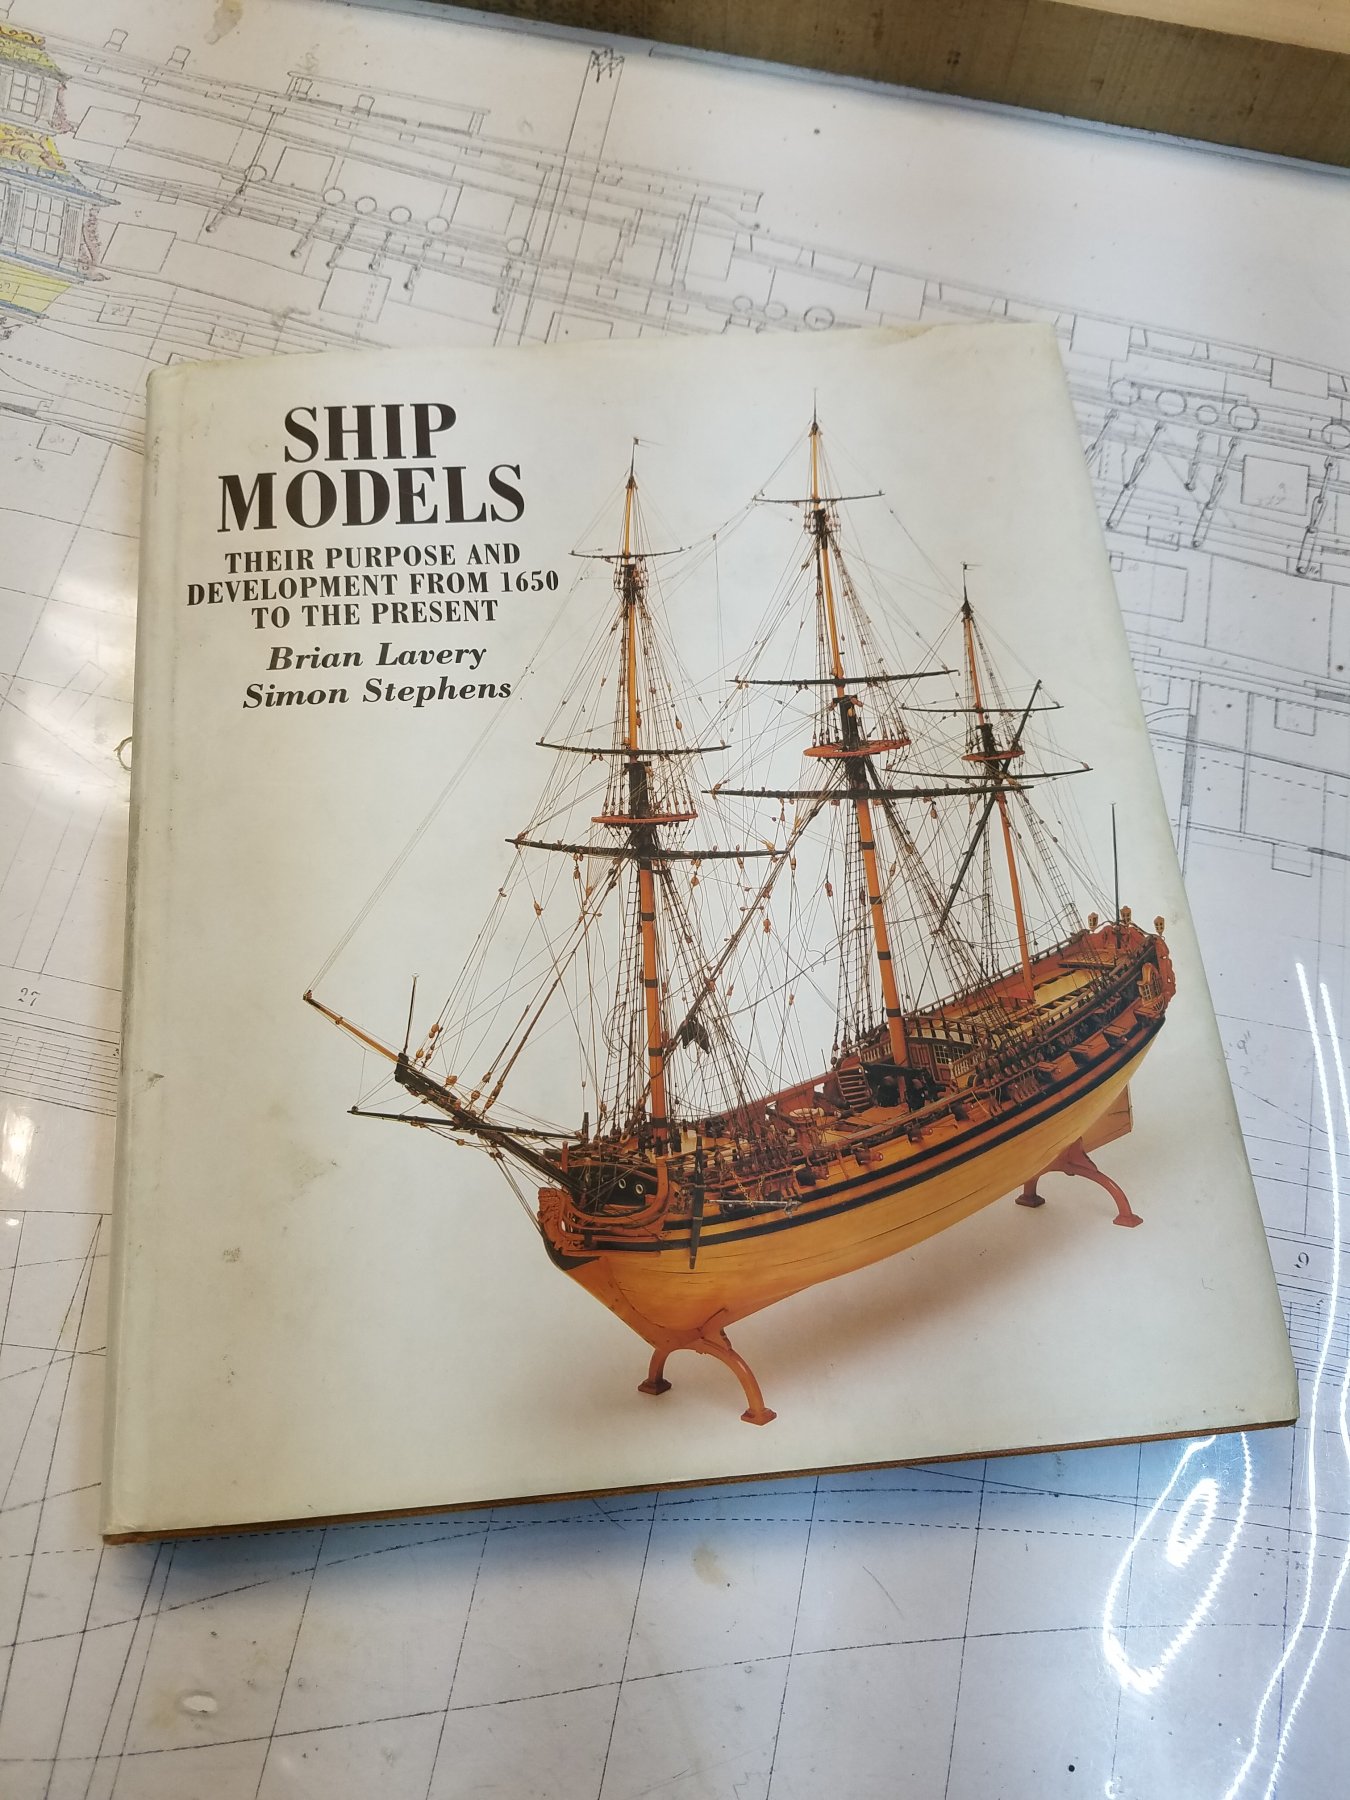
Hi hjx. All of those books are good and contain certain information that helps in your shipbuilding. To me the library I have built up over the years has more then paid for it self and to me is really really important to researching and building them. I have added photos of those books which should help. You do what to figure out which era you want to build from so your cost on books won't go through the roof. Happy reading Gary
- Captain Poison and mtaylor
-
2
-
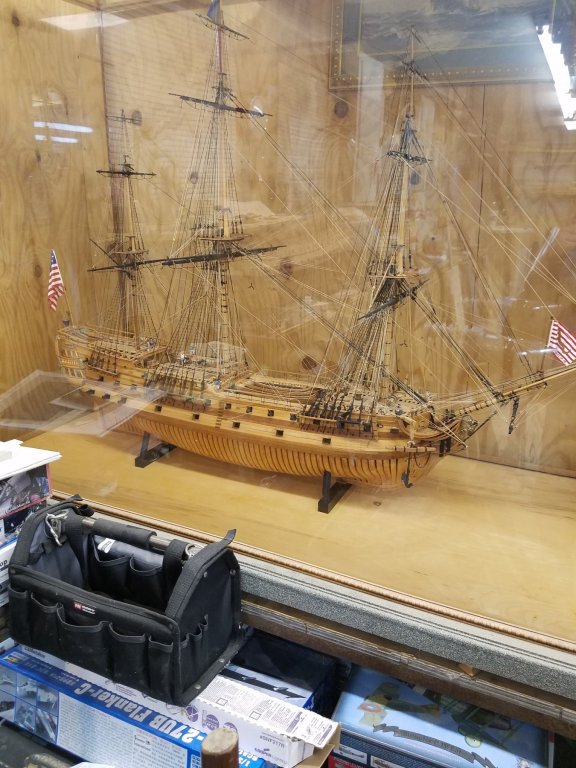
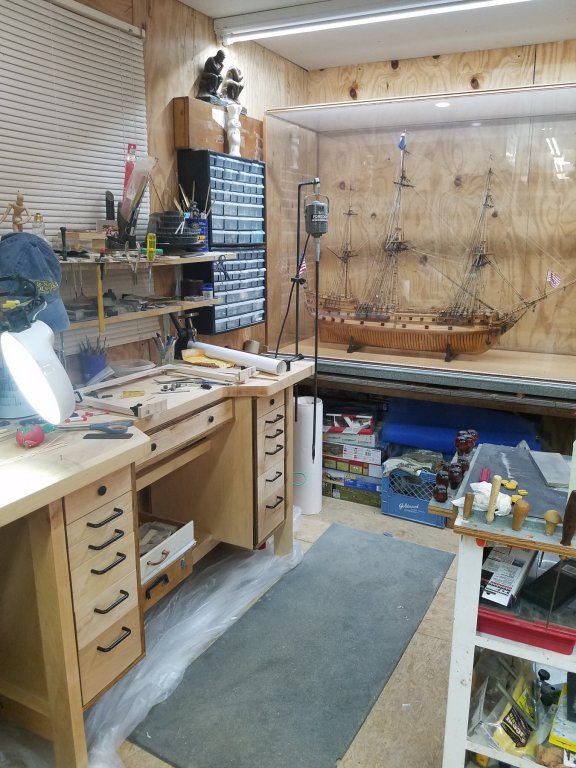
Thanks Grant, Ed and Gaetan, its good to be back. Have missed you guys and seems a lot has gone on since I have been gone. Ed the ship that was in the back ground is the Bonhomme Richard, 1779. Built her in the nintys and was the one I built before starting on Montagu. Believe I finished her right around the time the misses had our daughter, which would make Richard about 19teen years old. My how time fly's when your having fun. Gaetan you are so right and building it got me back out in to the workshop and close to Montagu. Seems she kept calling my name, Gary build me and they will come. Thats my story and am sticking to it. Have added a photo of Richard here for you Ed.
gary
-
Hi Alan. I must say you have been very busy the last few years from the research to drafting plans to building her. I went through you build log and don't believe that I would do the plans on the computer, to much of a learning curve. Do believe I stick to pen and paper. Keep up the great job and will be watching your build as you travel the road that many have taken on. Gary
-
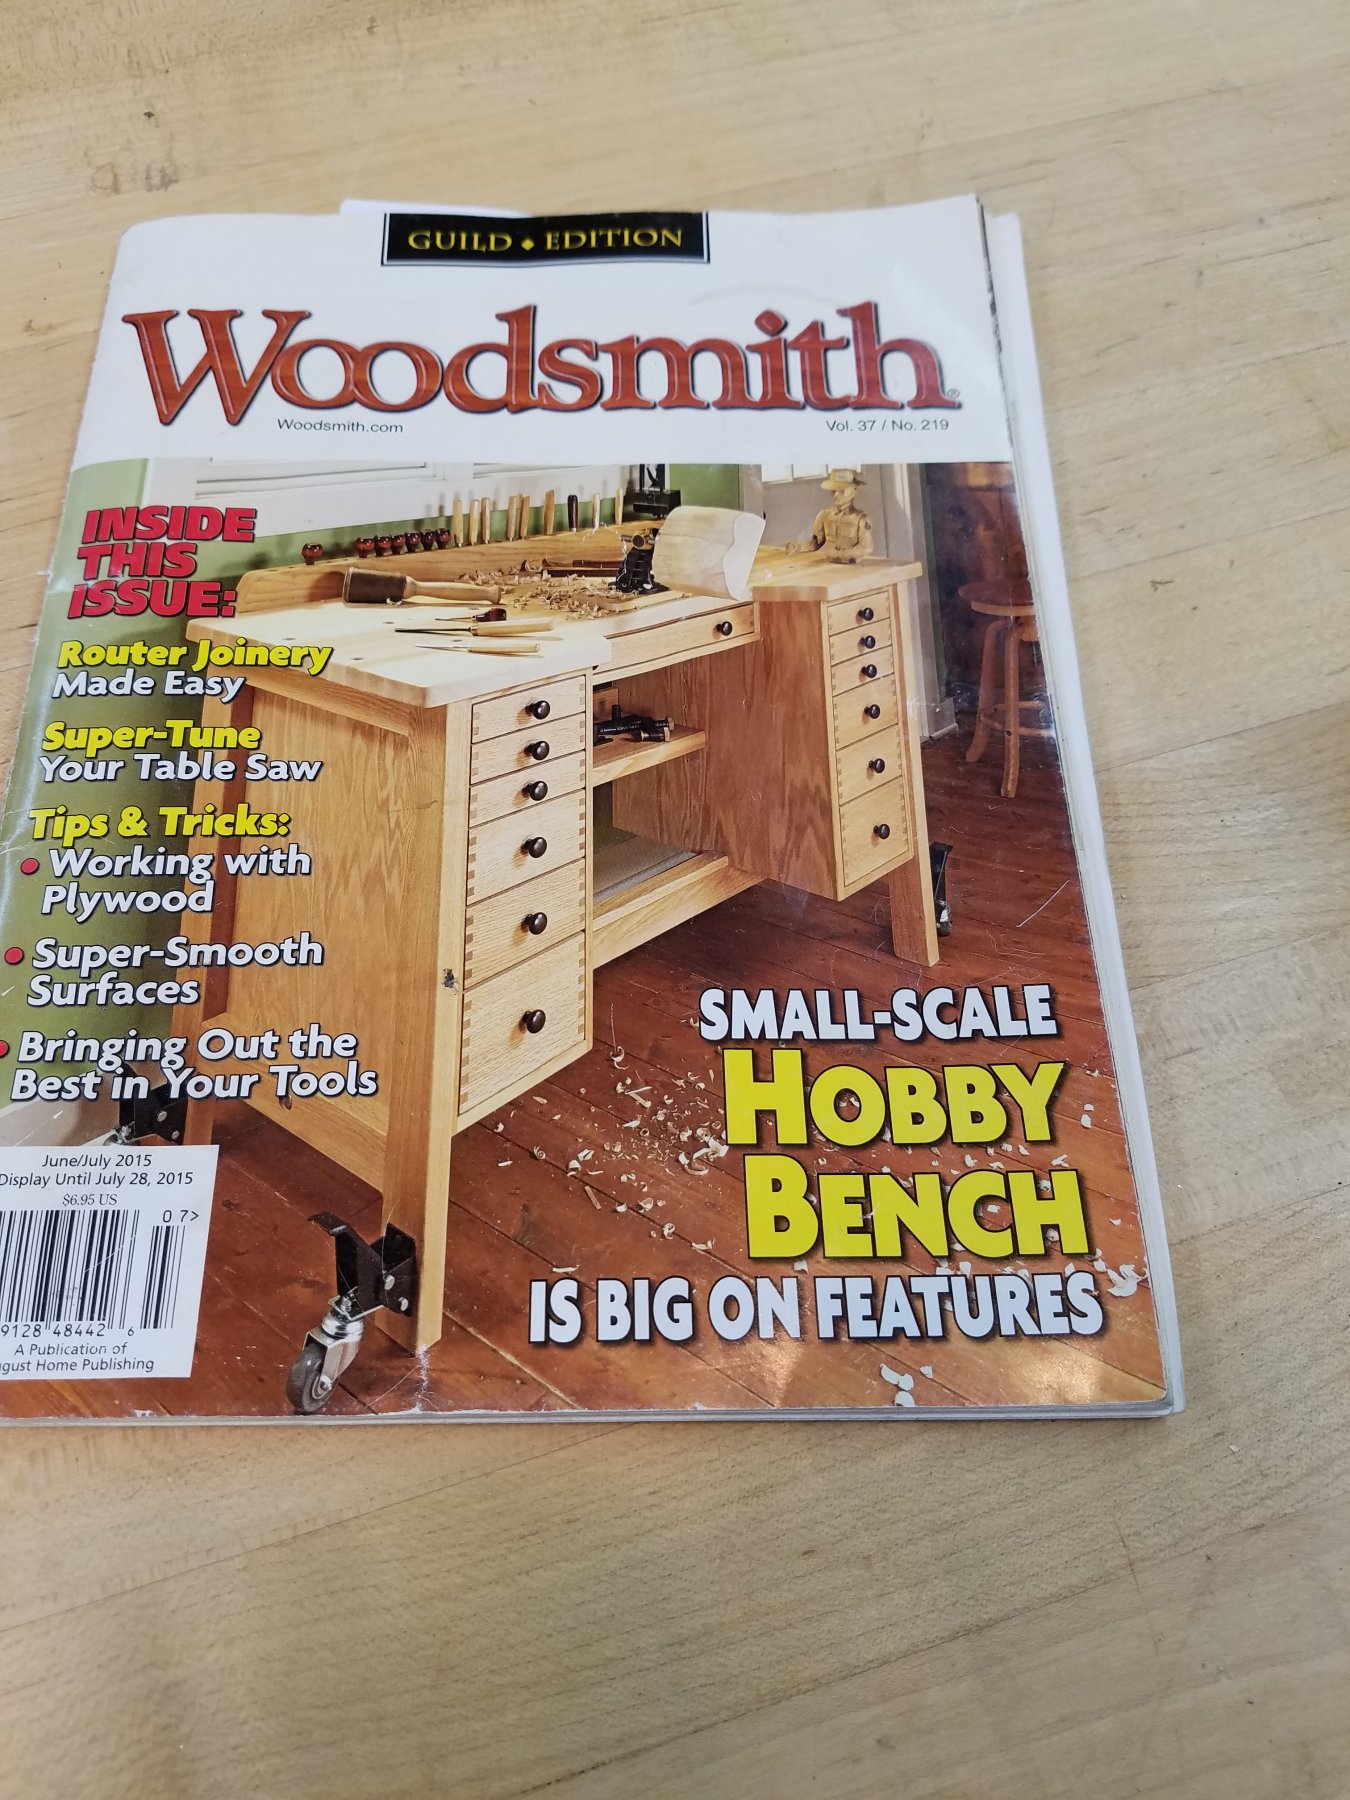
Thanks druxey. I did enjoy building the work bench and always wanted one. Seems the drawers took the longest to build which probably had some thing to do with them being dove tailed together. That was interesting for sure. Didn't come out to bad. if I didn't have the leigh dove tail jig probably would have just made box joints. If any one is interested in building one I added the cover of the magazine showing the bench. Hi Michael. For me it just right. To hard on the eyes if it was any smaller. Hi Mark. Every thing is ok at the moment and seems am very happy to be back to work on her. Who knows maybe I just might get the upper deck built, that is if I get the outside planking done. ;o) Gary

- John Cheevers, popash42, mtaylor and 1 other
-
4
-
Thanks every one and am hoping the updates will be a whole lot sooner then what they been. Mike she is 1/48th scale, can't remember for sure, about 45 inches long with out her mast, and about 13 inches wide. Gary
- mtaylor and Landlubber Mike
-
2
-
-
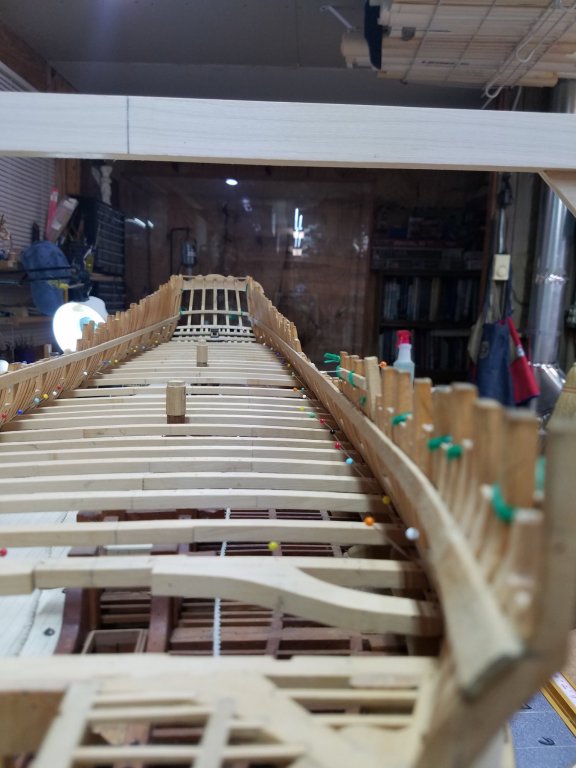
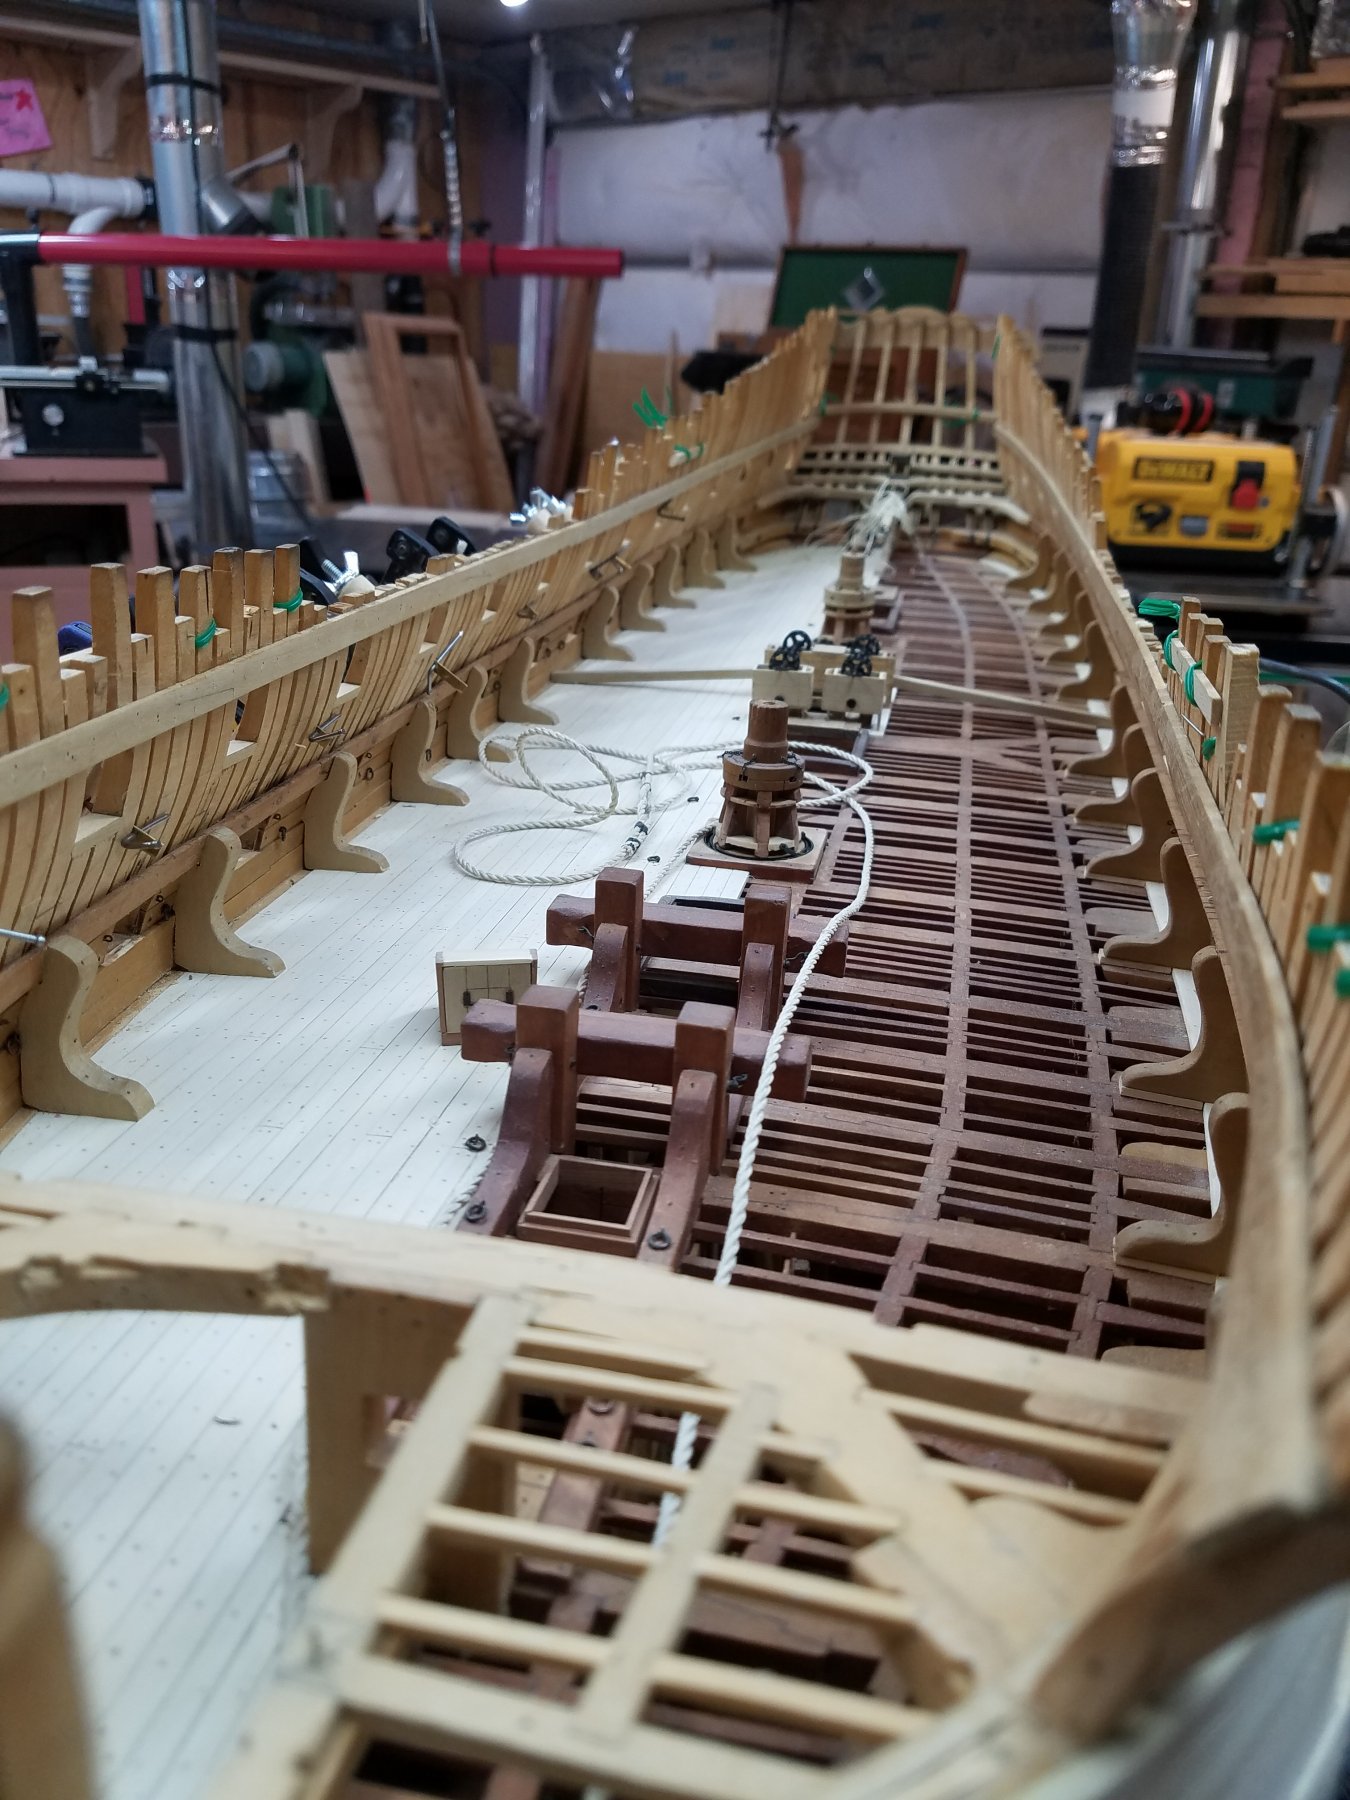
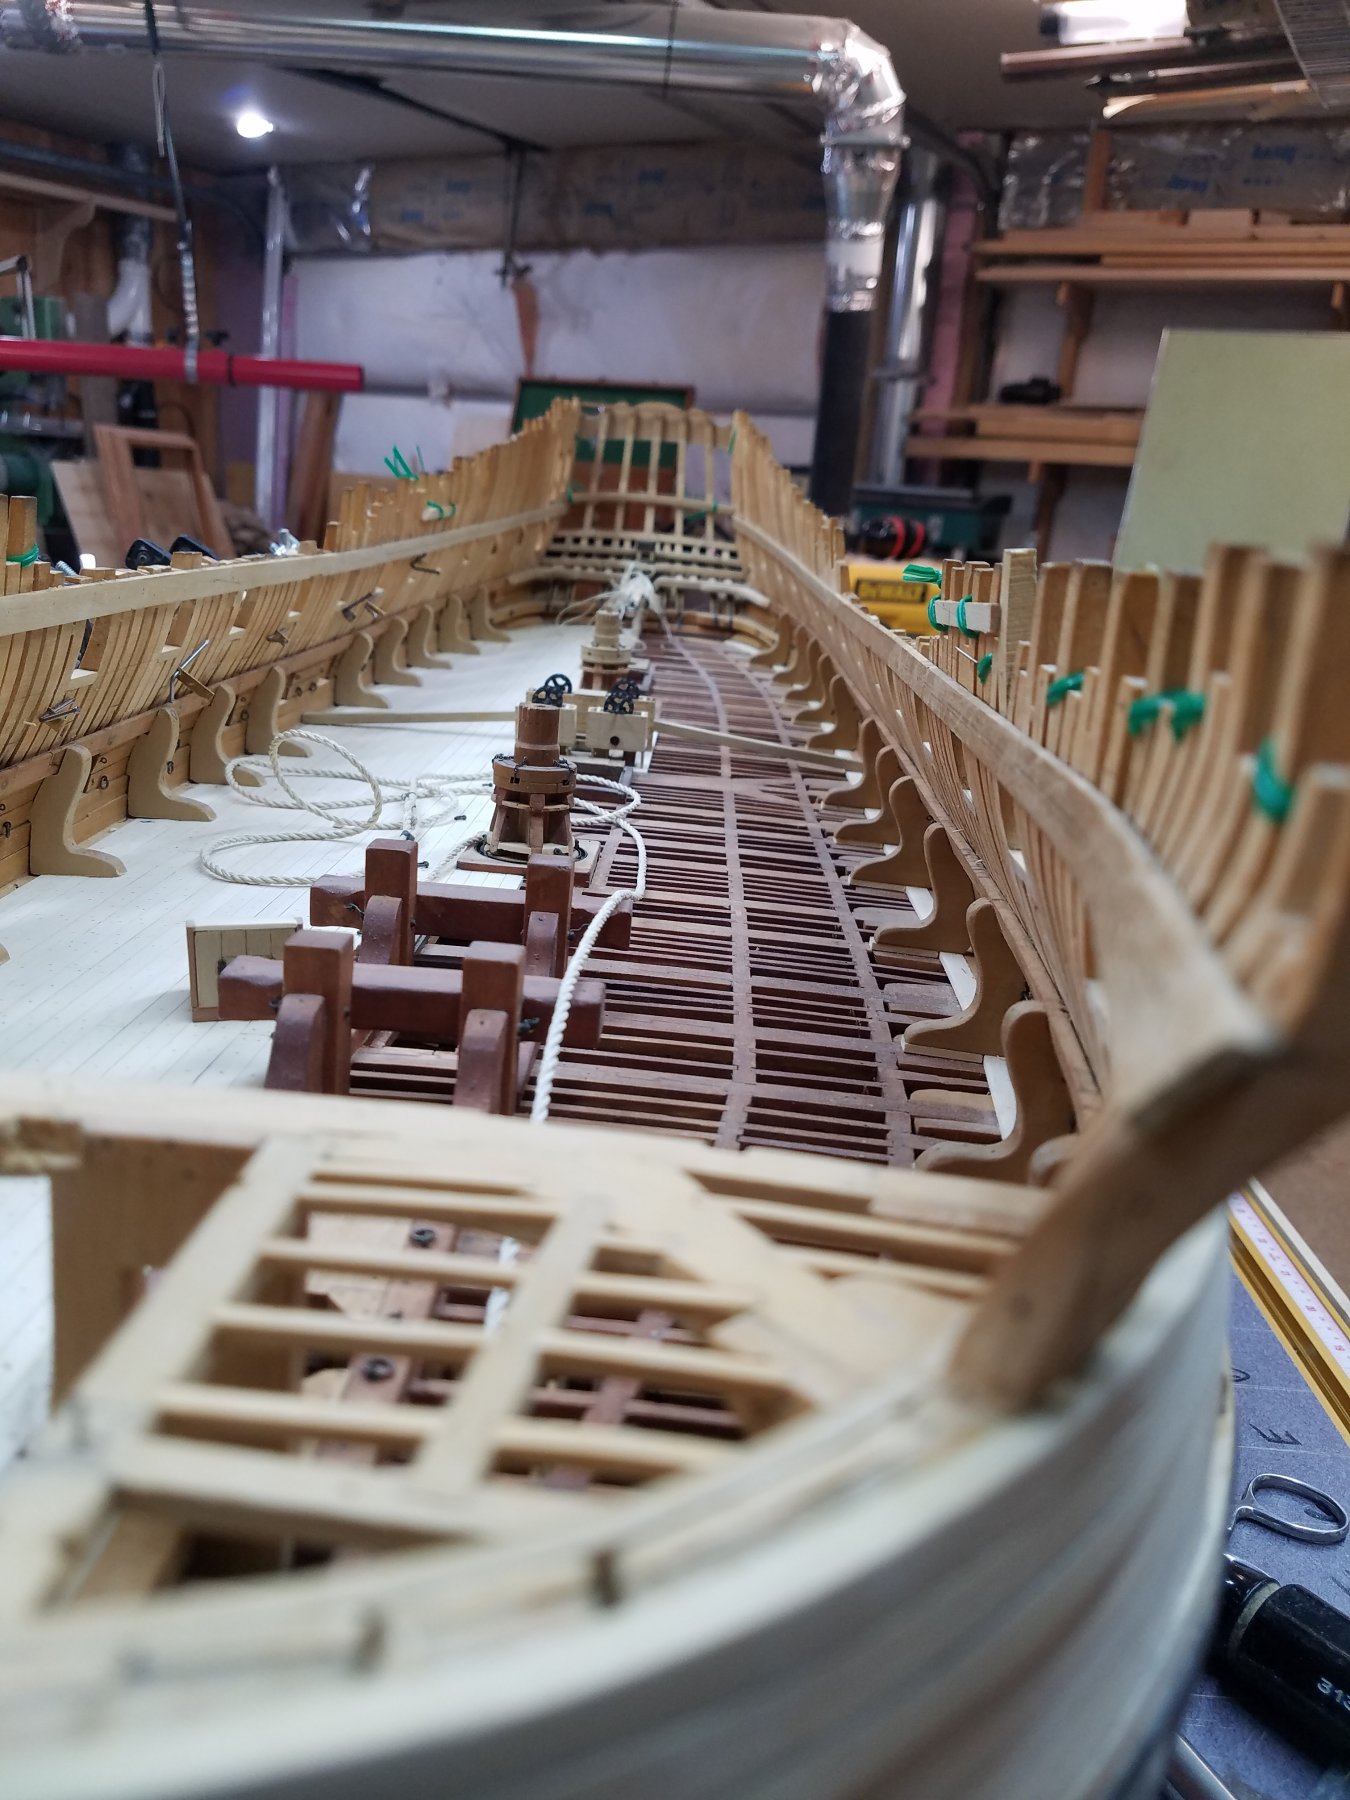
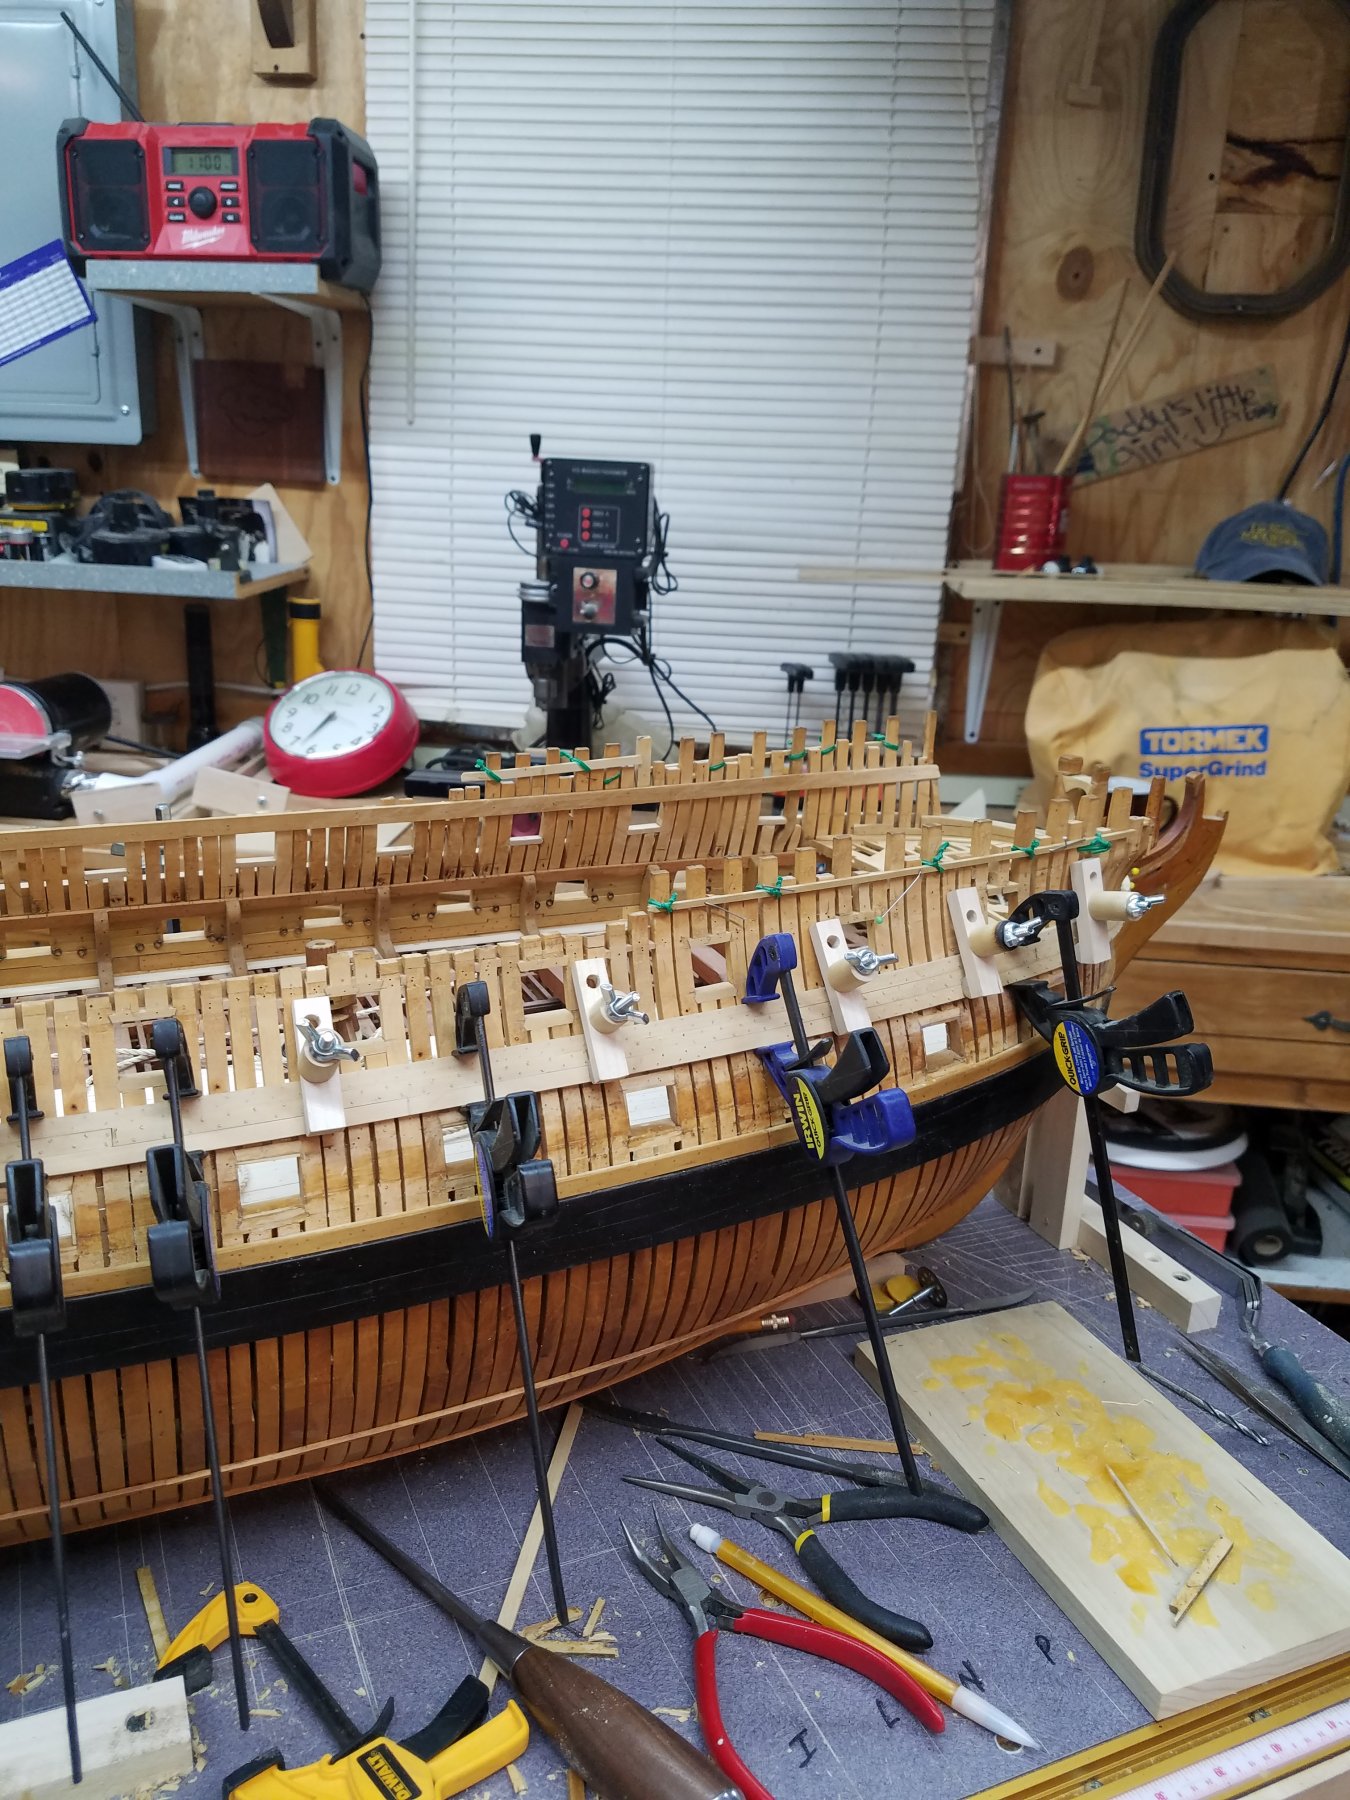
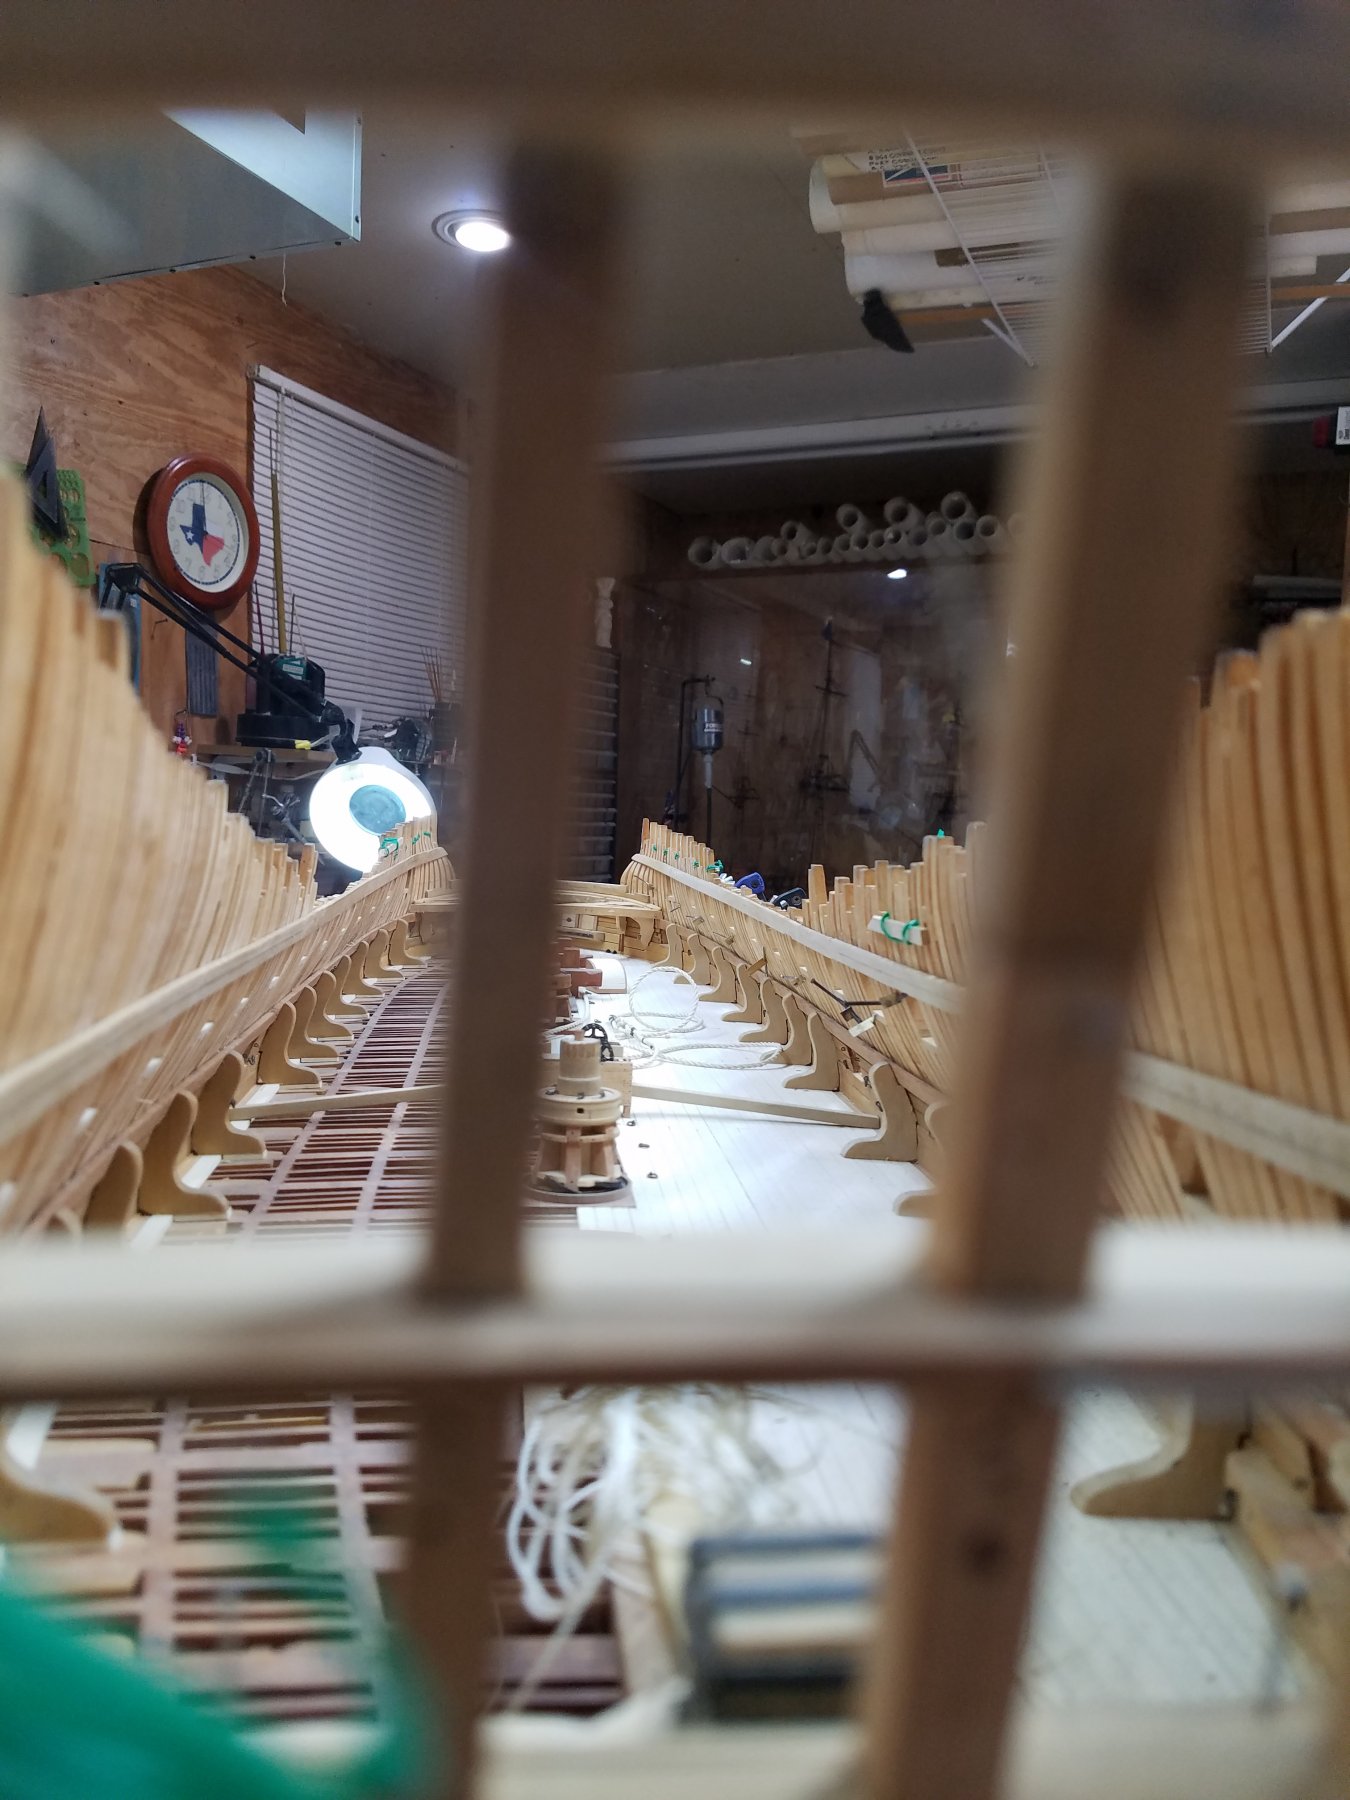
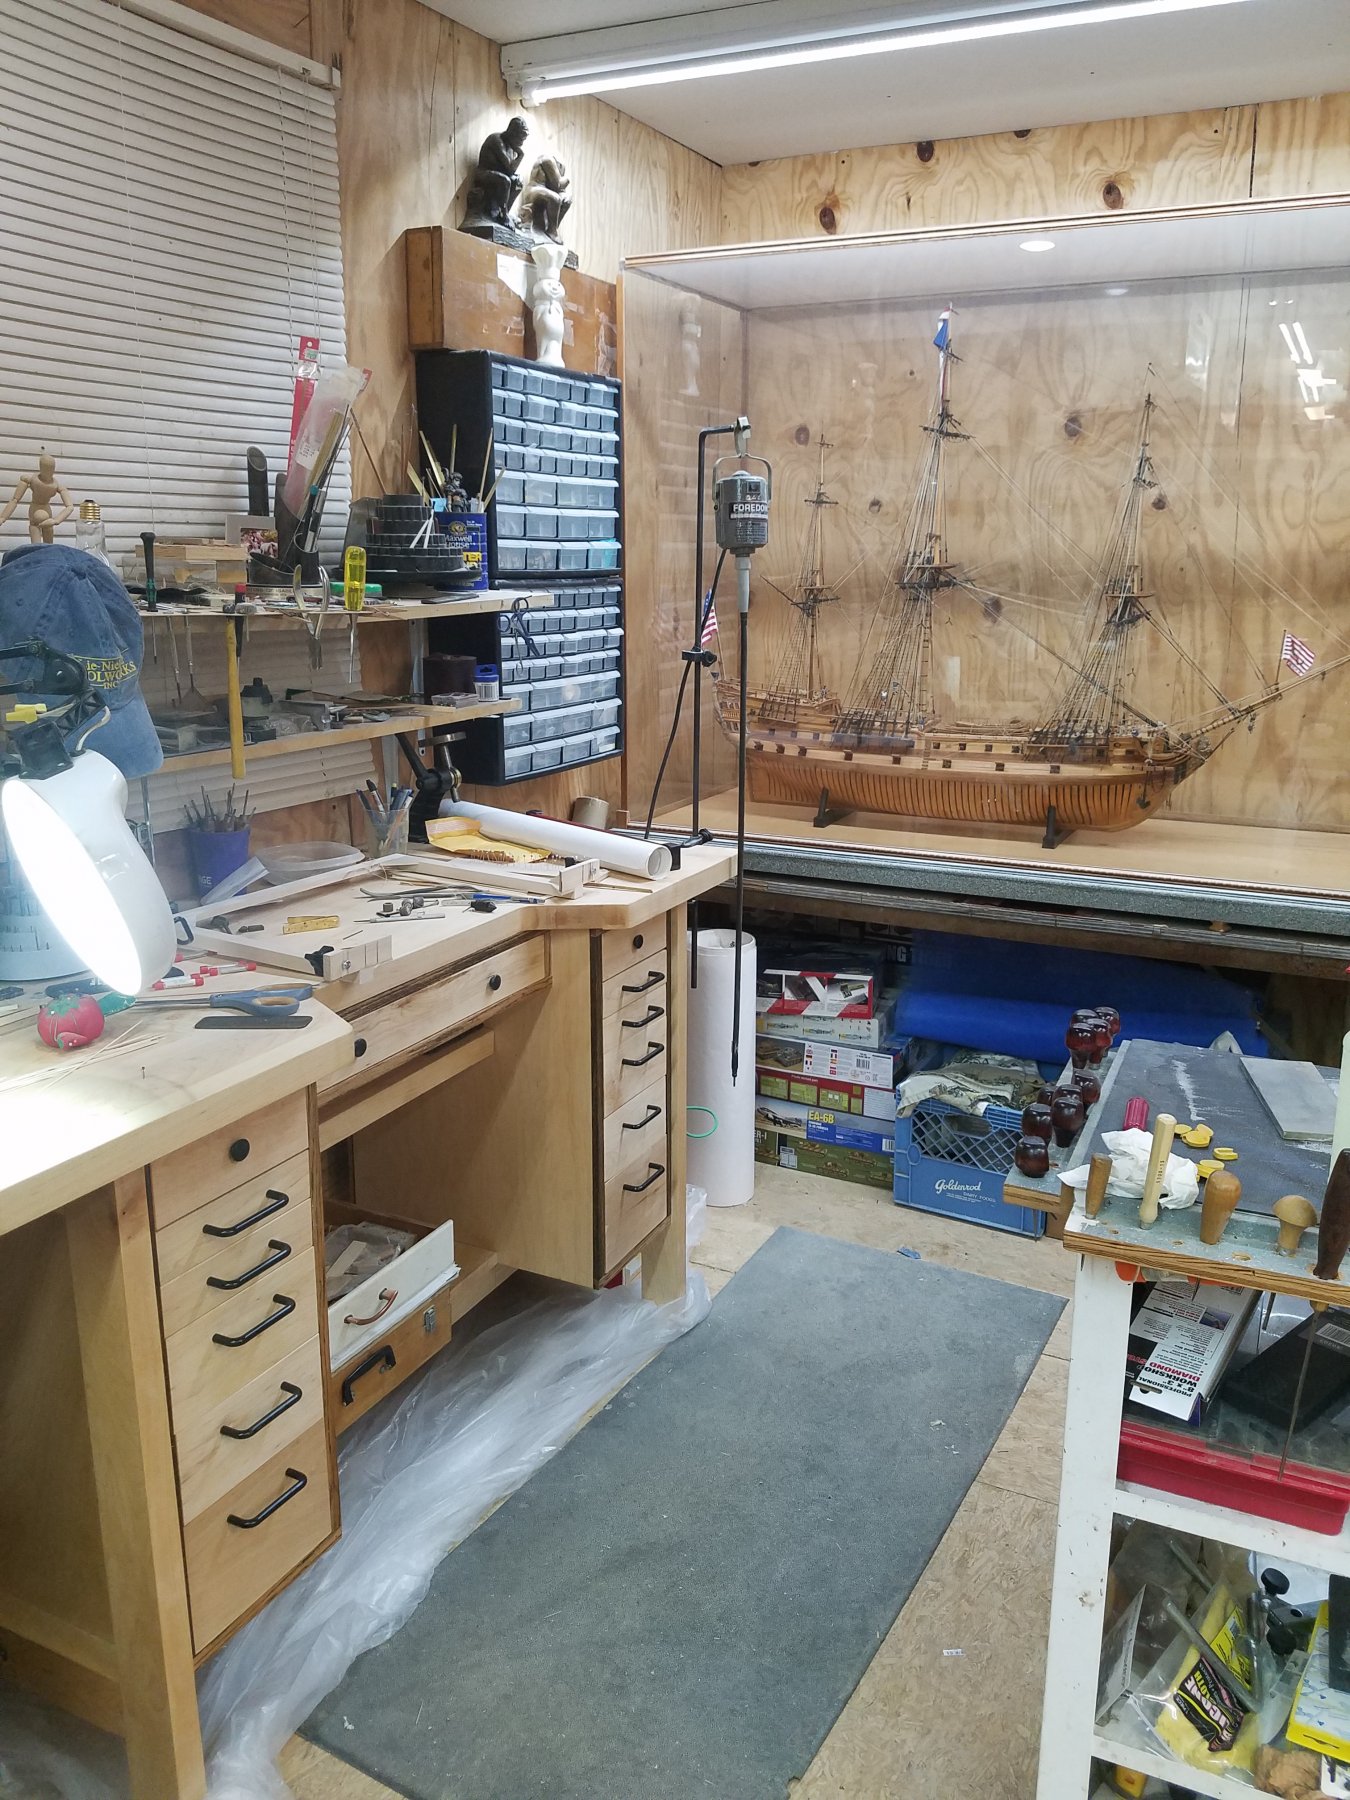
Hello Every one. I finally went back to work on Montagu after a long break due to work and a few health issues. I was building some plastic models but nothing like building and working on Montagu. Also have done some changes to the work shop and do believe that I finally have the ship yard just the way I like it. Other then a few larger tools and a new drafting board hung from the ceiling not much more to do but get to work on Montagu. I did finally get around to making my hobby bench and not only was it a joy to build but is even more enjoyable to work on. Hope you enjoy the photos of Montagu. Also added a gantry to the building board that was taken from Eds idealy and book. should come in real handy. For the last couple of days I have been working on the port side channel wale. At first I did it in pear but didn't like the color of it against the frames and changed it to boxwood and looks a whole lot better. If you have any question's let me know, and glad to be back. Gary


-
3 hours ago, SJSoane said:
So those could be compass wood knees. Some of those are from very twisted trees!
Gary, I can't remember, did you get as far as installing those knees?
Mark
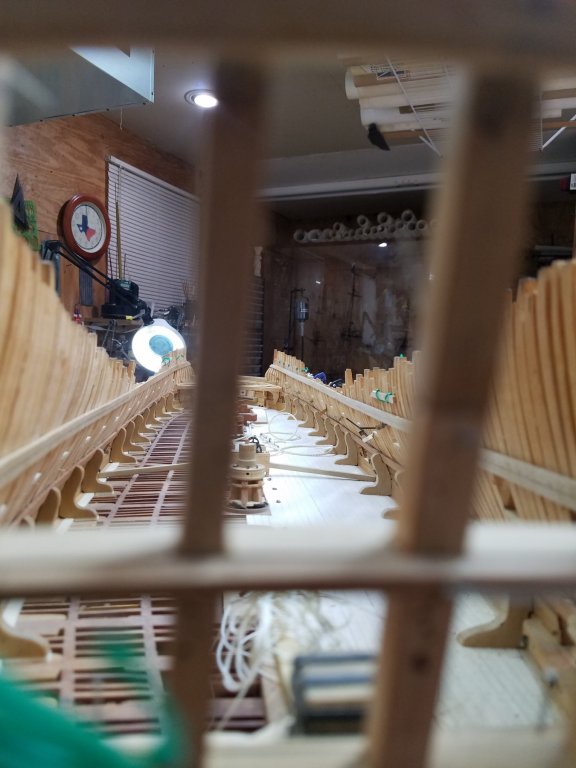
No sir have not done the hanging knees yet but have done the upper deck beams and fitted in place. Doing those knees, well that is yet to come. ;0)
-
-
26 minutes ago, SJSoane said:
Well spotted, Mark, I never noticed the backwards hook! The lesson I will take from this is to draw each piece ahead of time, so I don't get distracted and cut one of mine backwards. I am wondering about my apprentice theory...
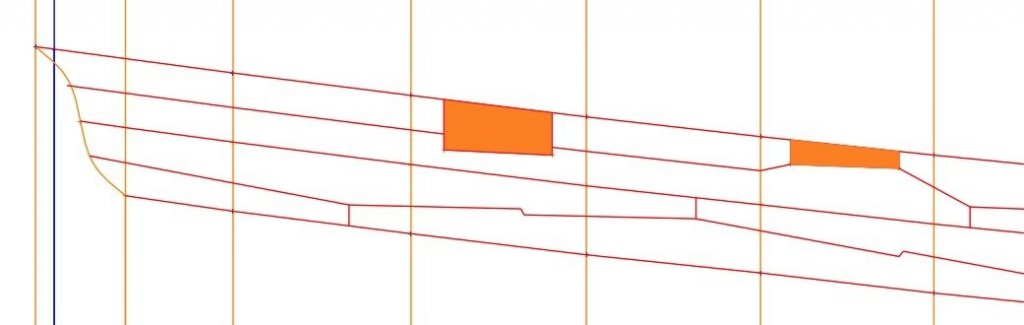
I printed out the wales from the CAD drawing and taped it to the hull. I was off in length by 1/8th of an inch (too short in the drawing), so I adjusted by marking the actual station lines on the paper and readjusting the station lines back in CAD. All is now good to go, except for wondering if the aft-most gunport would be allowed to cut into the second strake down as shown in the second image without adjustment.
Best wishes,
Mark

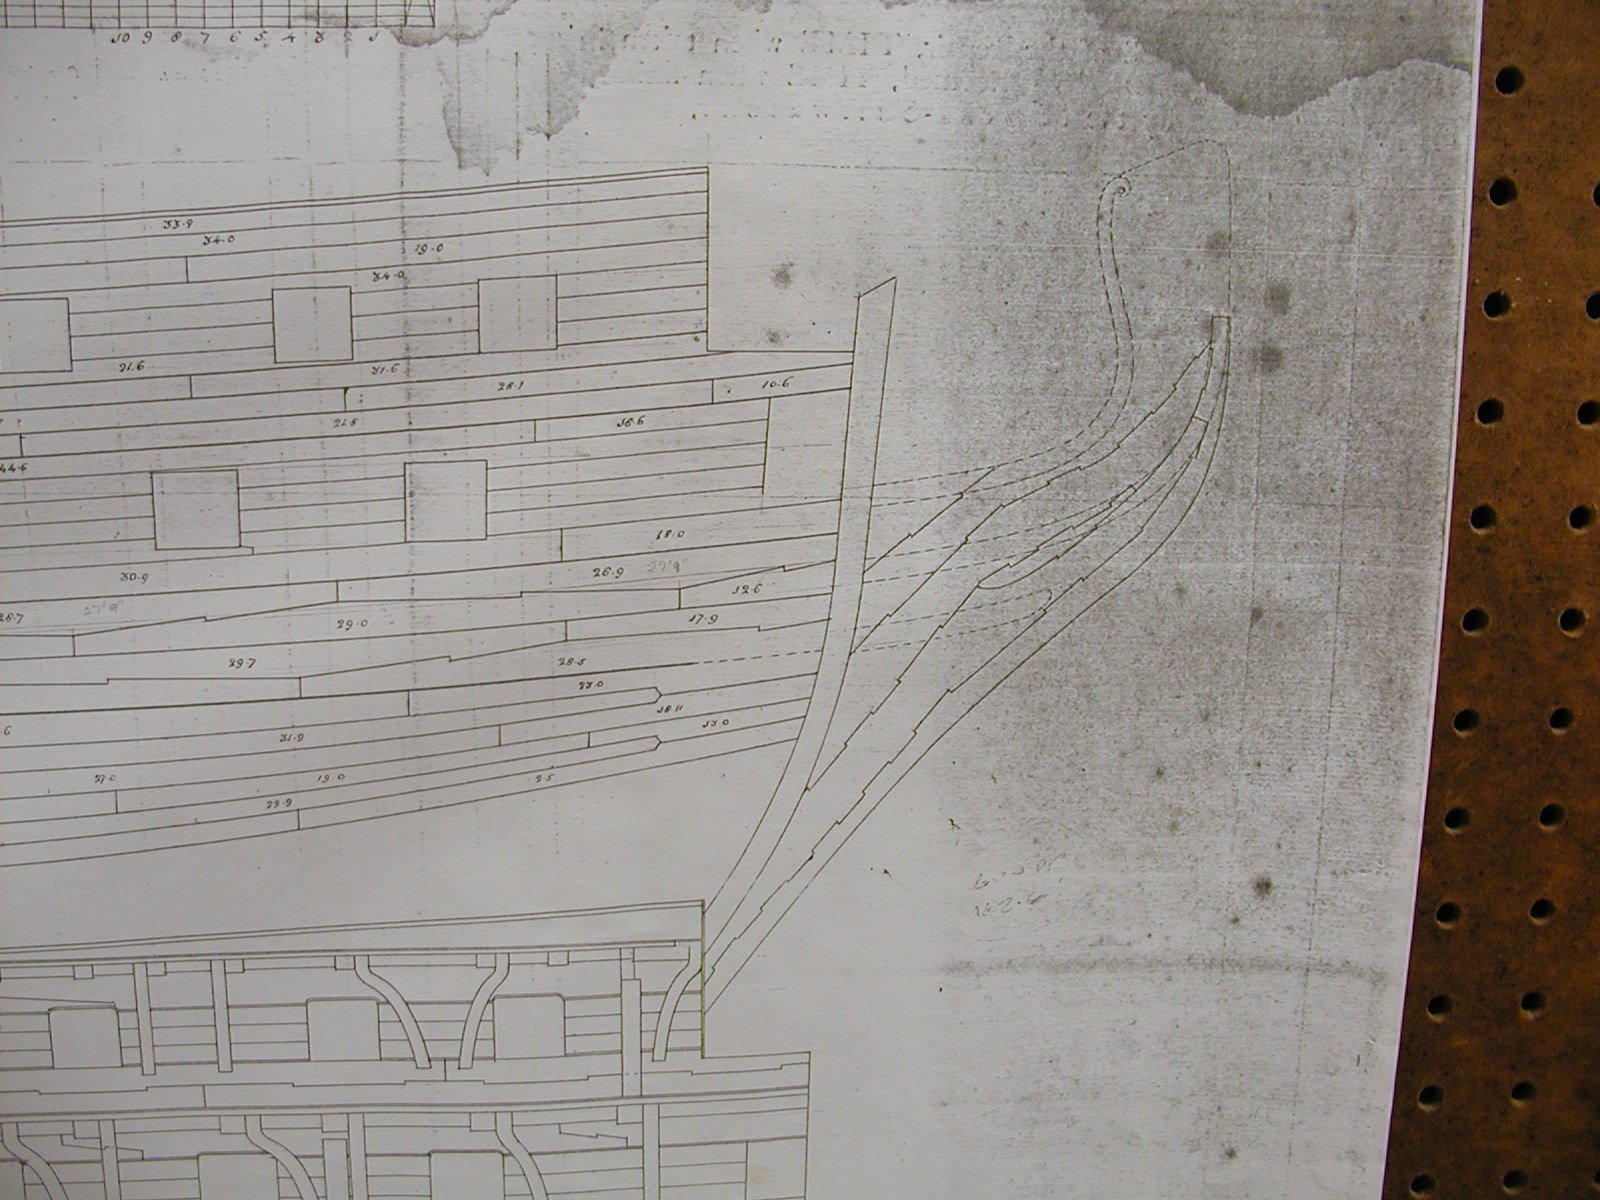
Hay guys the plan is for the Berwick, and if it had a number on it for ordering it has faded. Hum maybe I can find the paperwork on it and it is of the whole wale and upper side planking. I take some photos of it and see if I can find some numbers for ordering it . As far as length's for the planks, seems they run all the way from 31 feet down to 25 feet 9 inches. Have to agree about cutting off the planks just to get them all the same length is a big waste of wood. When they cut them like this it allready was a big waste of wood, but waste or strength they went for strength. Just my two cents guys. Ok I go back to work on my hobby bench now. :o}
-
27 minutes ago, EdT said:
Hello, Gary. It is good to see that you are still tuning in and keeping an eye on us. Miss your posts and contributions.
Ed
Hi Ed and thank you. Love this hobby to much to be to far away. Looking forward to your next book. The last ones were a hit on my list. Gary
-
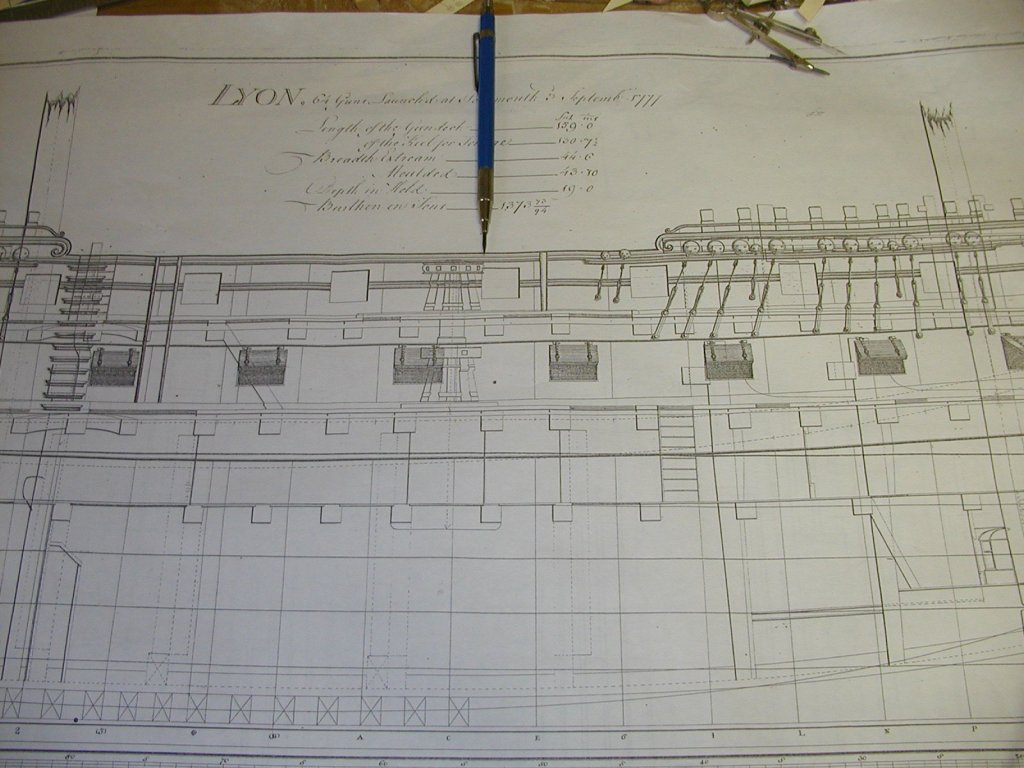
Hi Mark and thanks for asking. Seems that life has been keeping me busy, some times good sometimes not so good. I am keeping a eye on you and the other good folks here and must say you are doing a outstanding job. At the moment am building a hobby bench to replace what I am using at the moment which is a make shift desk. If you get the magazine Woodsmith, on the cover, it shows the hobby bench, vol 37/ no 219. Should look real nice when I get it finshed. On a different not, on the wale there is a plan that shows the wale on, I believe a 74 and gives the shape and size of the wale pieces. I have to find the plan and get you a number for it and I will see if I can at least post up one of the photos of it. Hope it helps you. Excuse the plan of the Lyon can't seem to get rid of it. Gary


-
Mark, Steel has a plate that shows the removable capstan and the parts below it. There are plans that shows a step on the orlop deck for the captsan when it was lowered down. Go in to my log on Alfred and I did build her forward capstan and you can also see the step I installed on the orlop deck. I can't remember what page but should be of some help. Also in the book of the AOS Bellona shows a room on the orlop deck that was called the capstan room, believe its is shown on the amidships section. Wish I could give page number, but am not at home and won't be till the weekend. Mark check page 9 of my build log, it also shows Steels plate. Gary
-
-
Hi Mark.
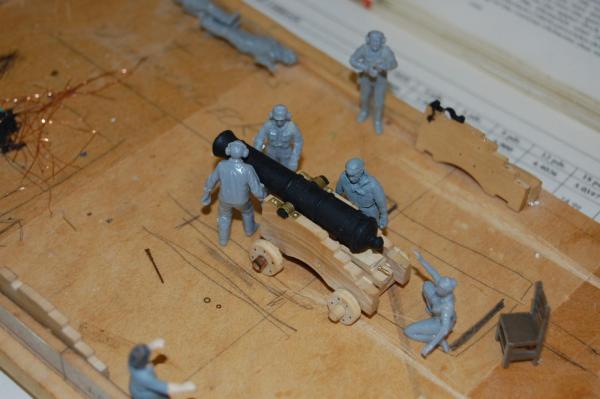
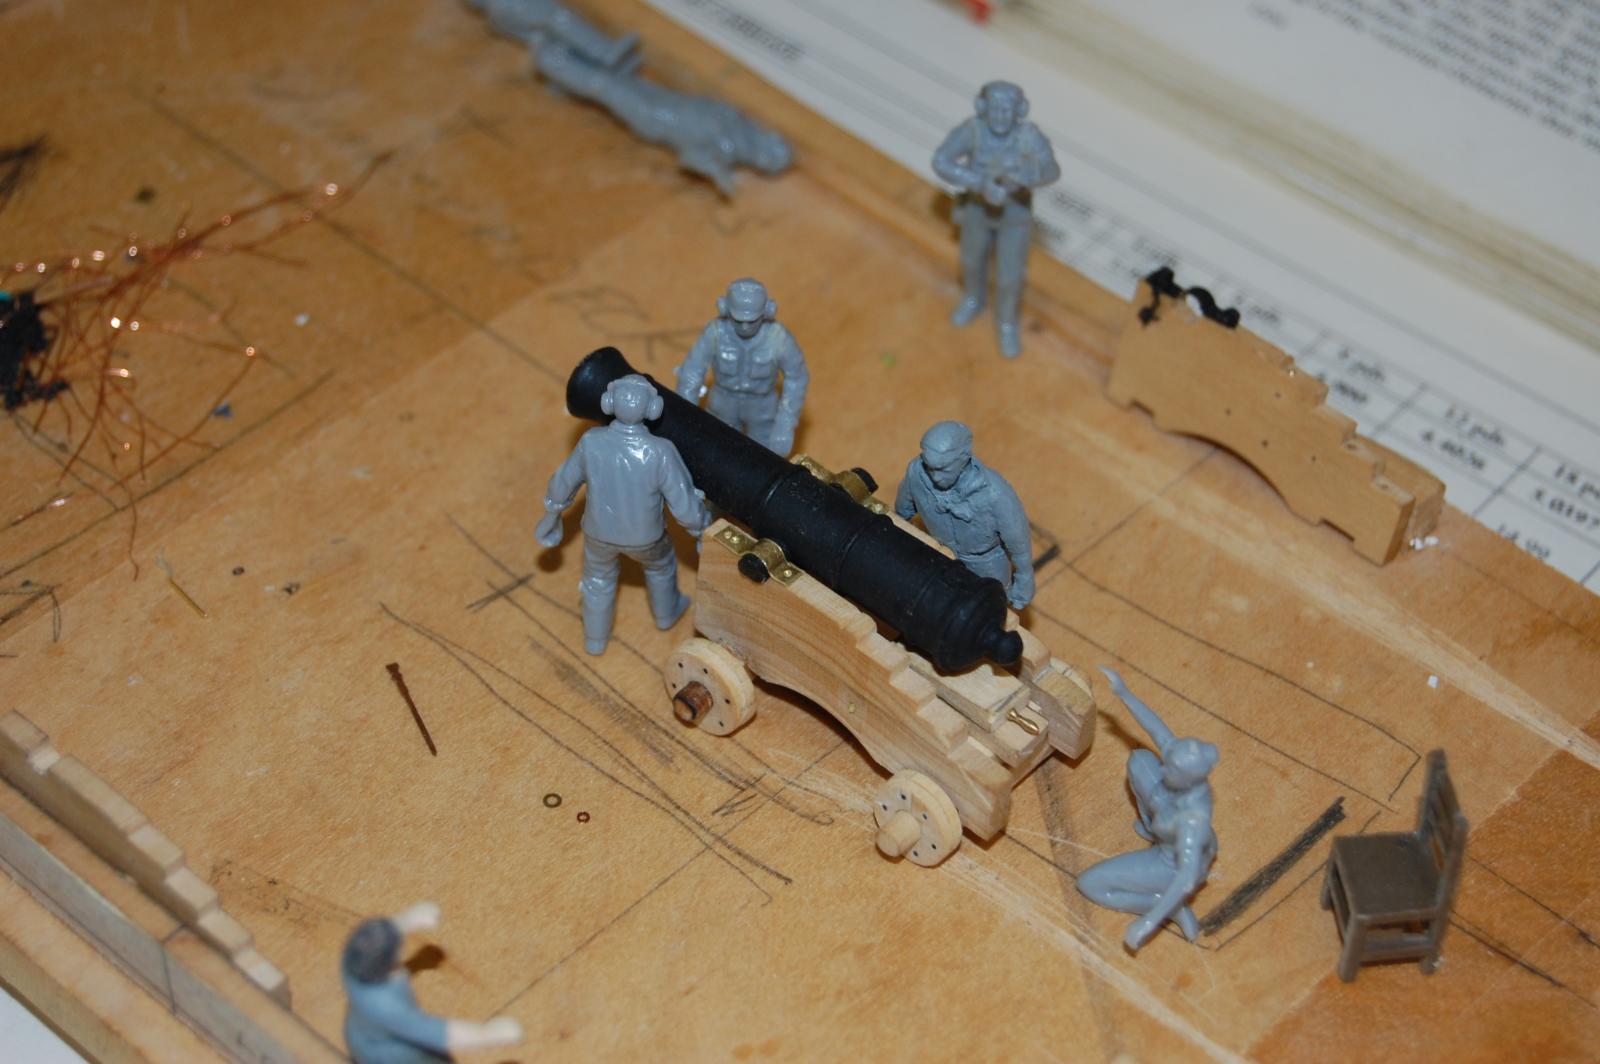
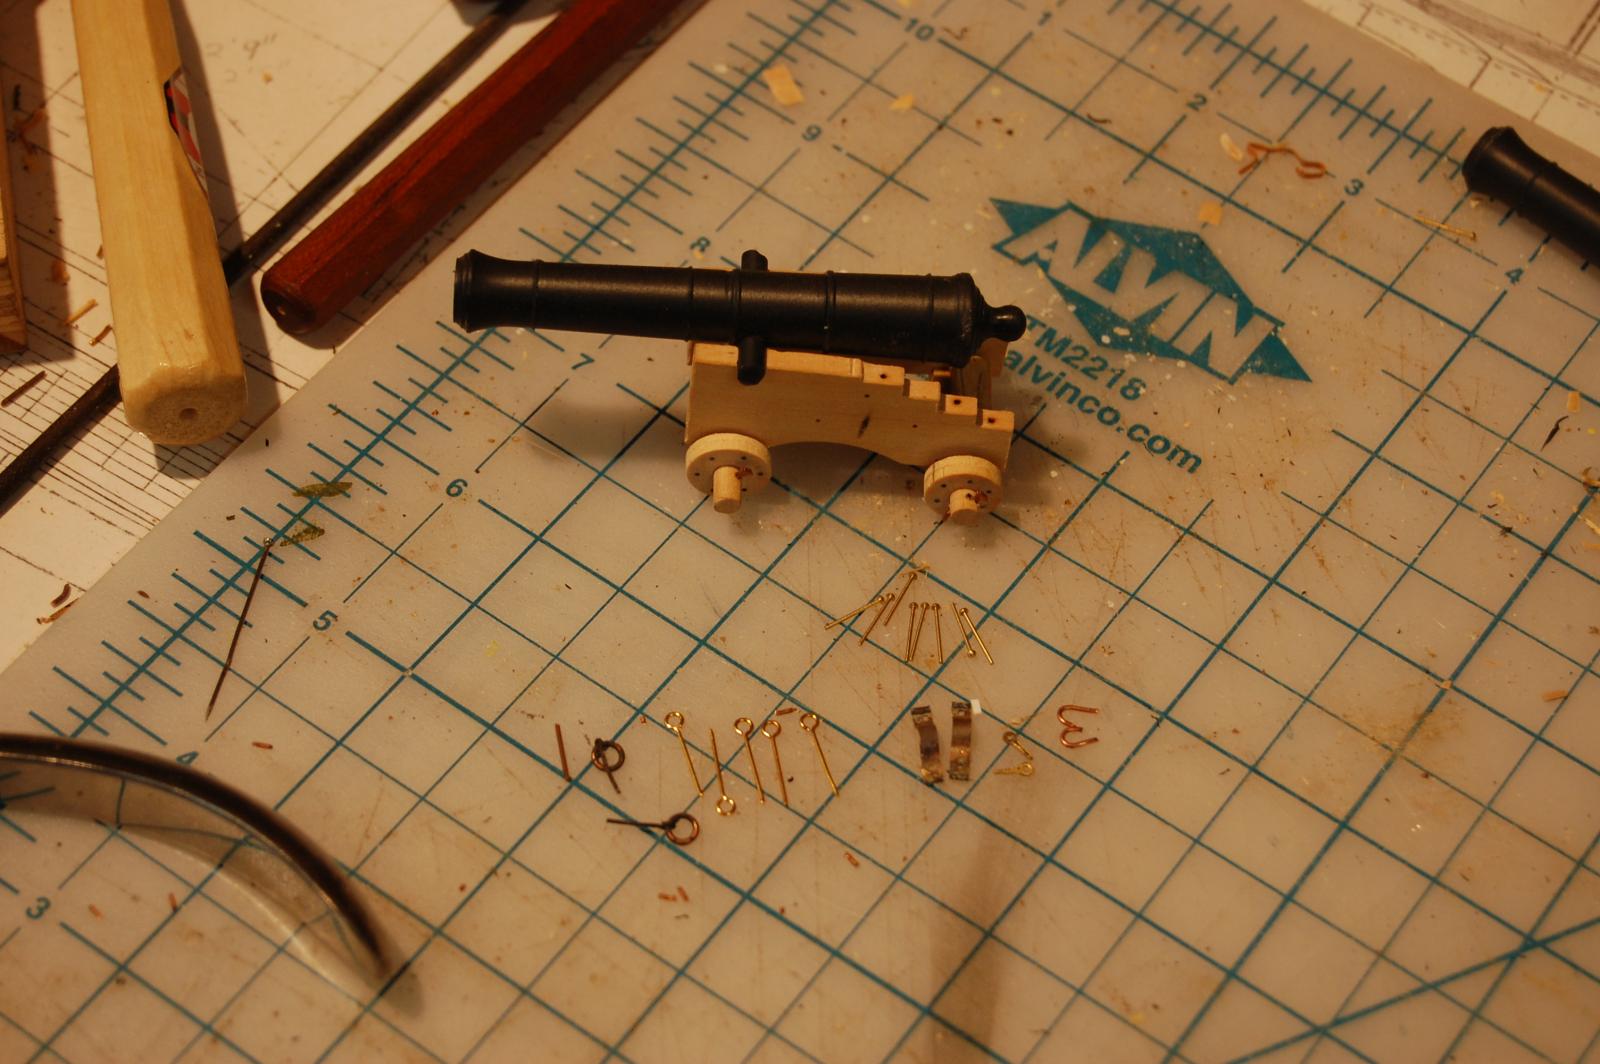
Sorry to take so long in getting back to your question, and work is keeping me away from home. As far as the metal pins for holding the trucks in place, came from the scrap bin along with the little eyelets that hold the capsquare in place. They were modifie to look more like the item's and then given a coat of black paint I believe. Some of the parts came from places like scale hardware and model expo, and even hobby lobby. The good thing about getting small parts like this if you can, save's one time to put in to other things, which of course seems that even that little bit of time is spent making a living. Enjoy the photos sir, maybe one day I will some time to work on her. In the first photo, slightly to the bottom left, you can see the spike that hold the trucks in place and in the second photo to the right of the capsquare is the small eyelets and the u shape round copper that is used to hold the capsquare in place. When the small eyelet is installed a small pin is inserted to keep the capsquare locked in place.
Gary

-
-
Thanks Siggi. I really really like the detail and gives me ideals about adding some of this to Alfred's gun deck. Gary


HMS Montague 1779 bygaryshipwright - 74-gun Alfred-class
in - Build logs for subjects built 1751 - 1800
Posted · Edited by garyshipwright
Thanks Albert, Mark, Pat and for those who gave it a like. Mark as far as the cannon's go they are only being placed on the stbd side, the port side will remain as you see it. Gary