


gsdpic
-
Posts
749 -
Joined
-
Last visited
Content Type
Profiles
Forums
Gallery
Events
Posts posted by gsdpic
-
-
1 hour ago, RolBerg said:
Nobody has dvd anymore.
The instructions are just a few PDF files on the DVD in my experience (with the Sopwith Camel). If you have no computer with DVD, the PDF files can be downloaded from the AL web site.
Having said that, it is still a little bit of a pain to use that vs a paper manual though I certainly understand why they went that route.
-
Thanks to everyone for the comments and likes/wows.
@kgstakes the "wear" on the tires was mostly my marginally successful effort to remove the mold line running the circumference of the tires in the middle. Being an old kit, the tires felt a little squishy and fragile so I did not want to push it too far.
When cleaning up, I also found one part that did not make it on to the model. Not sure if I can retrofit it now. The shift rod to control the transmission is shown in step 35 with a note saying not to actually put it in place until step 43. Of course by the time I got to step 43 I forgot about it. Not clear if I can get it in place now with the model complete. Oh well.
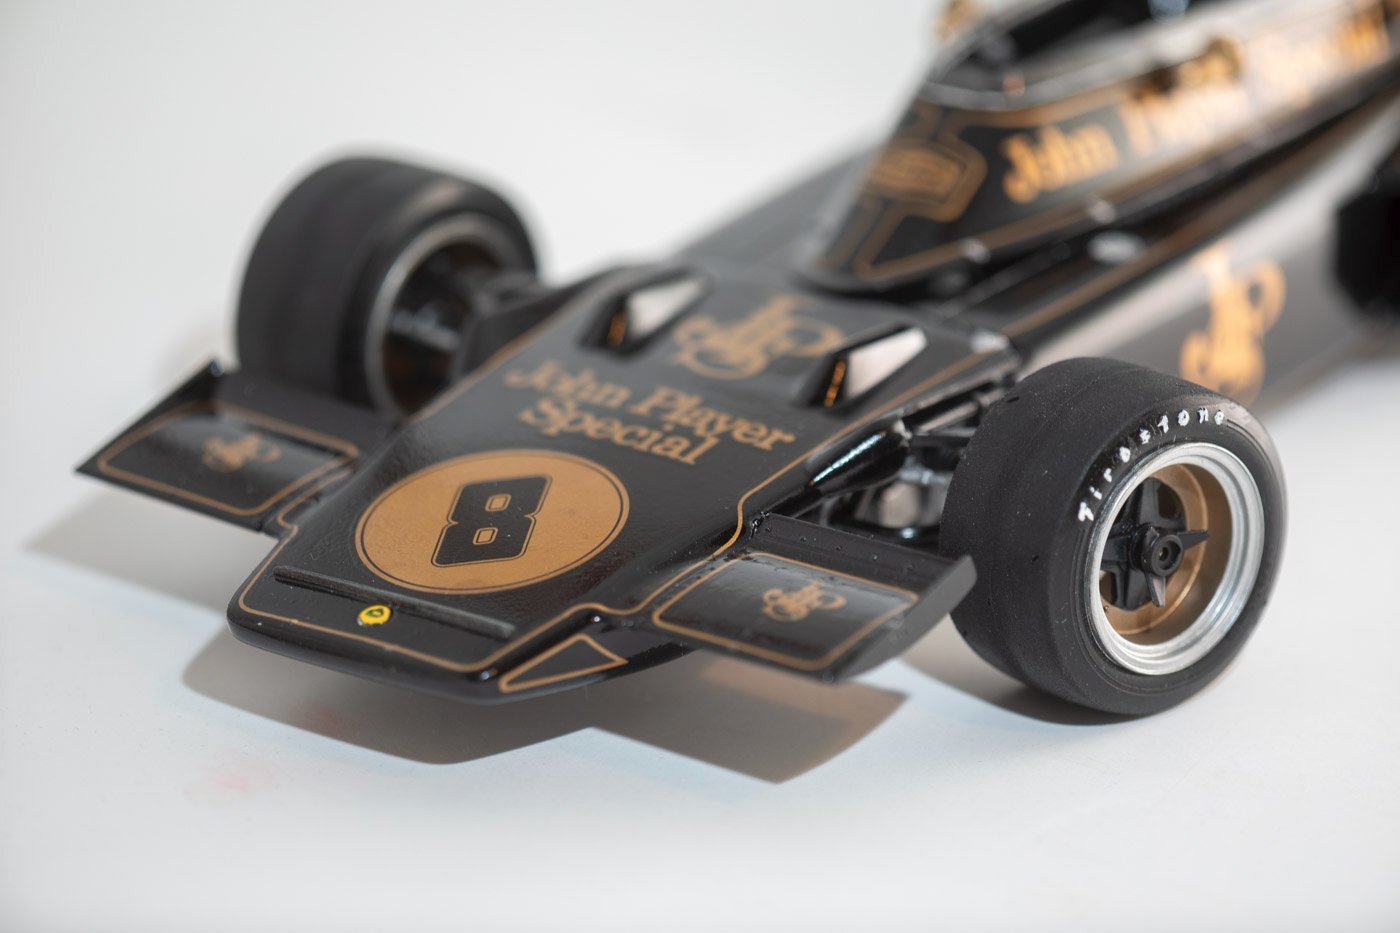
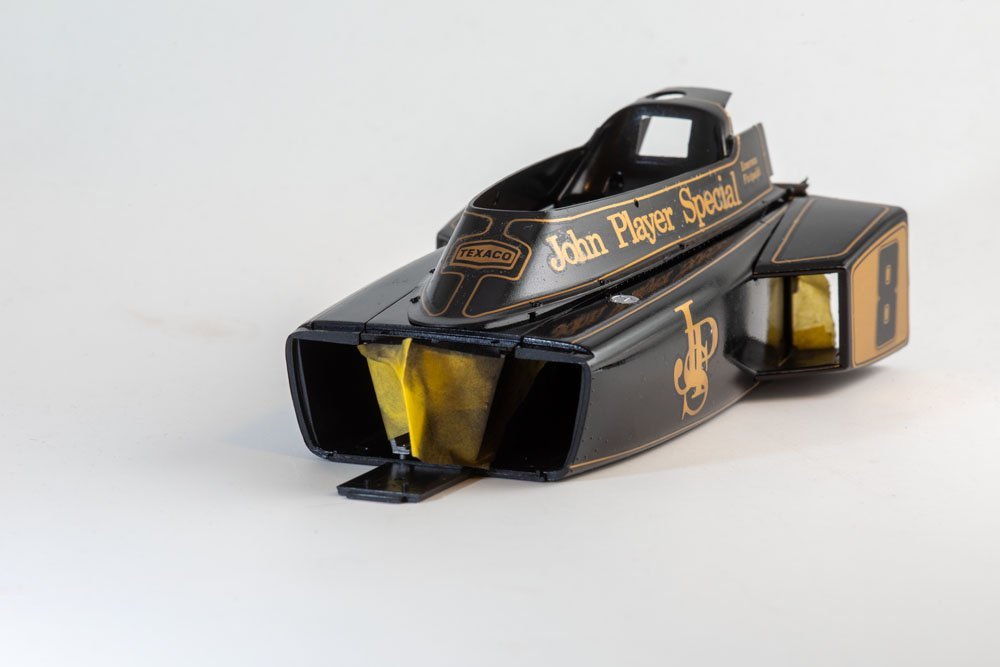
I am also still undecided about the hand painted lotus logo at the front of the nose. There was a small, molded in raised circle there but no decal provided for it. Looking on the web, the car seemed to either have a lotus logo there or a gold "JPS" logo. I chose to try to replicate the yellow and green lotus logo but I sometimes think it looks a bit out of place. I guess I'll leave it but I've been tempted to try to change it at the risk of screwing it up.
- mtaylor, Old Collingwood, Egilman and 3 others
-
 6
6
-
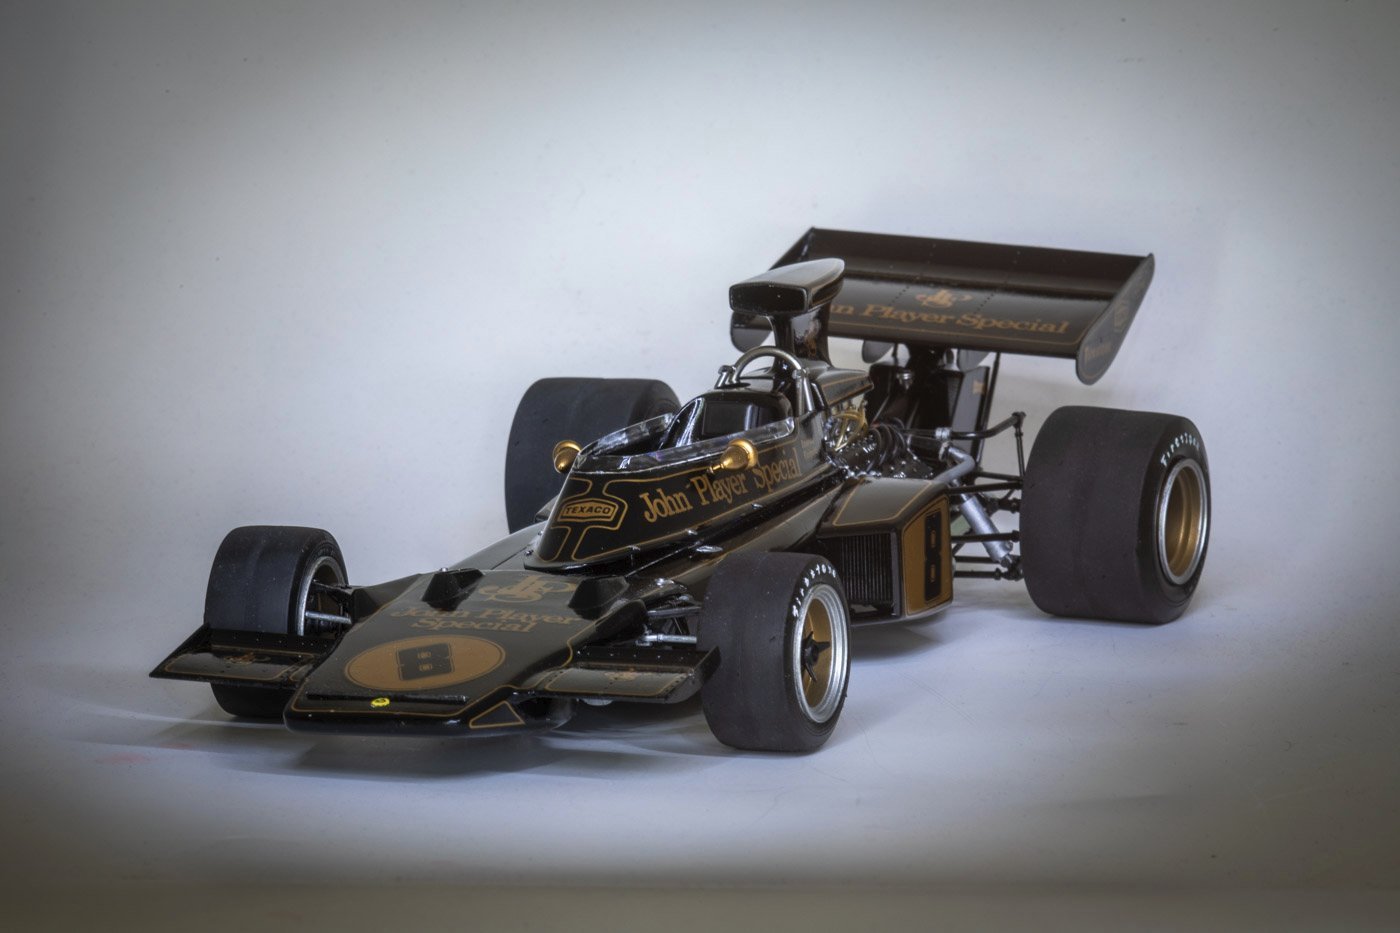
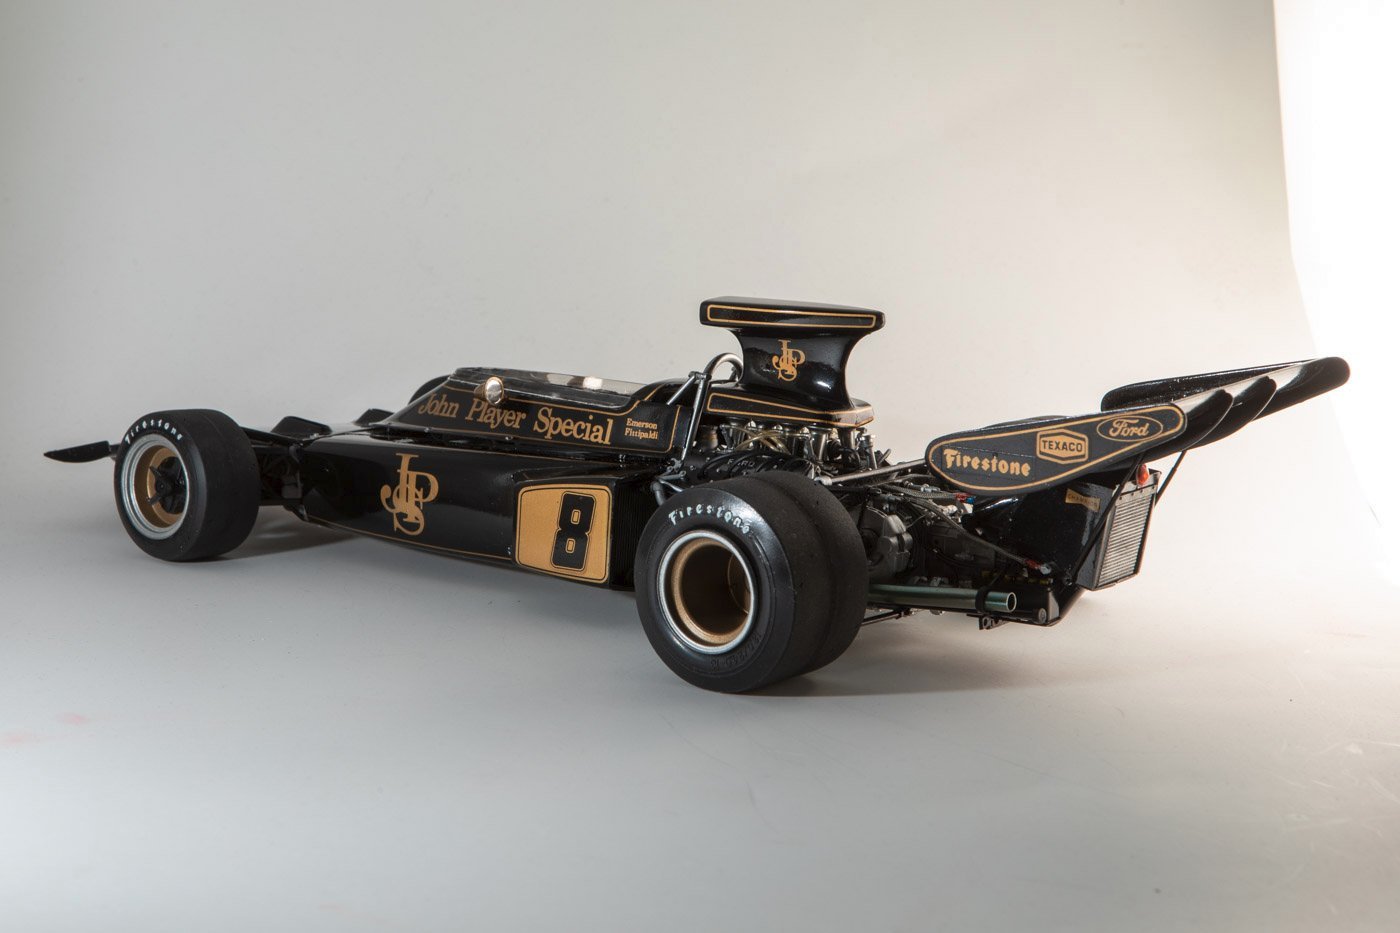
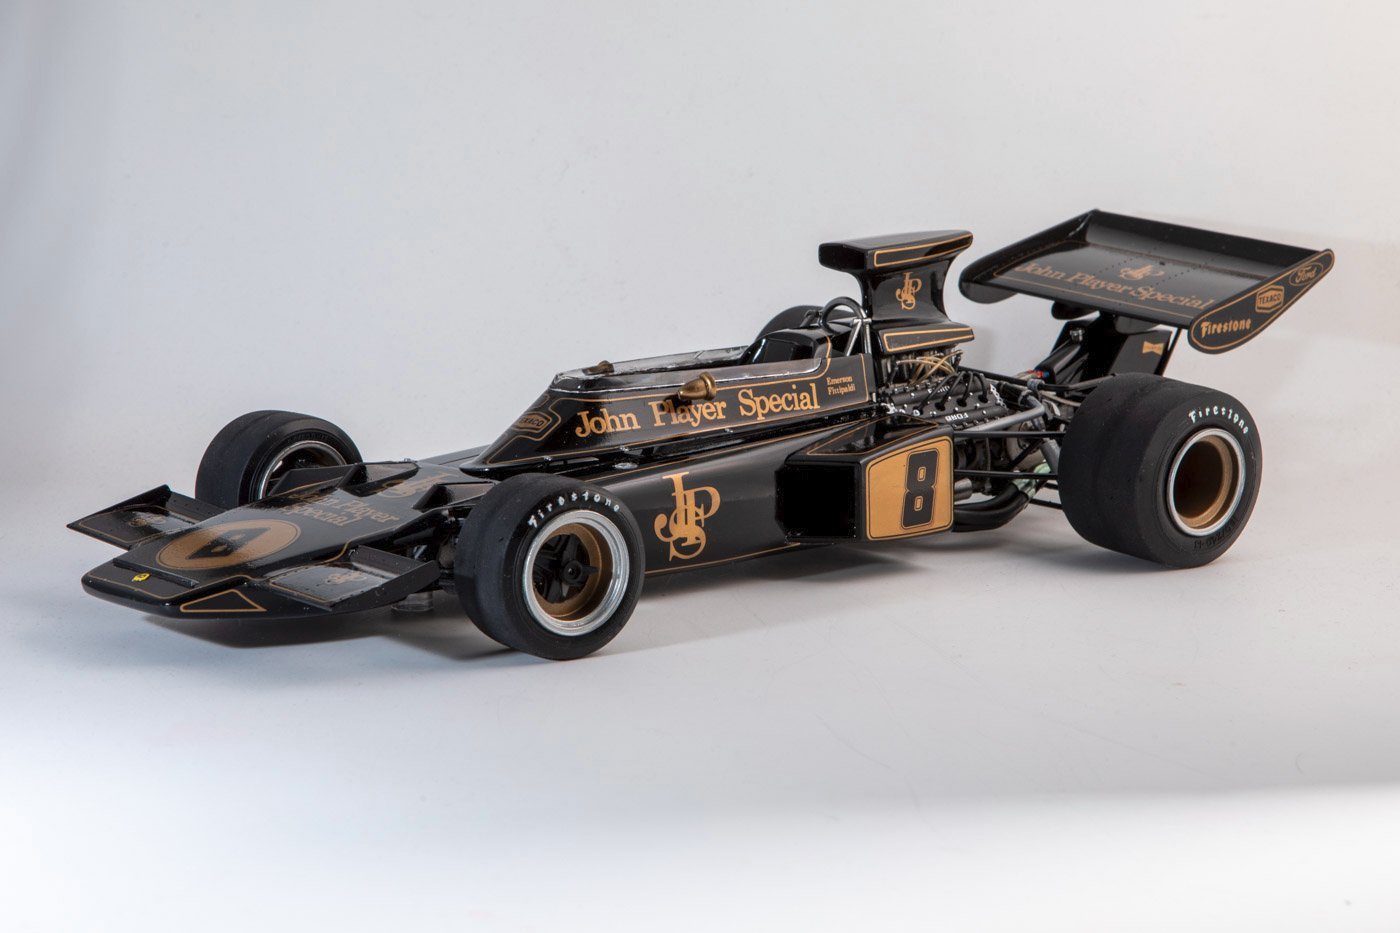
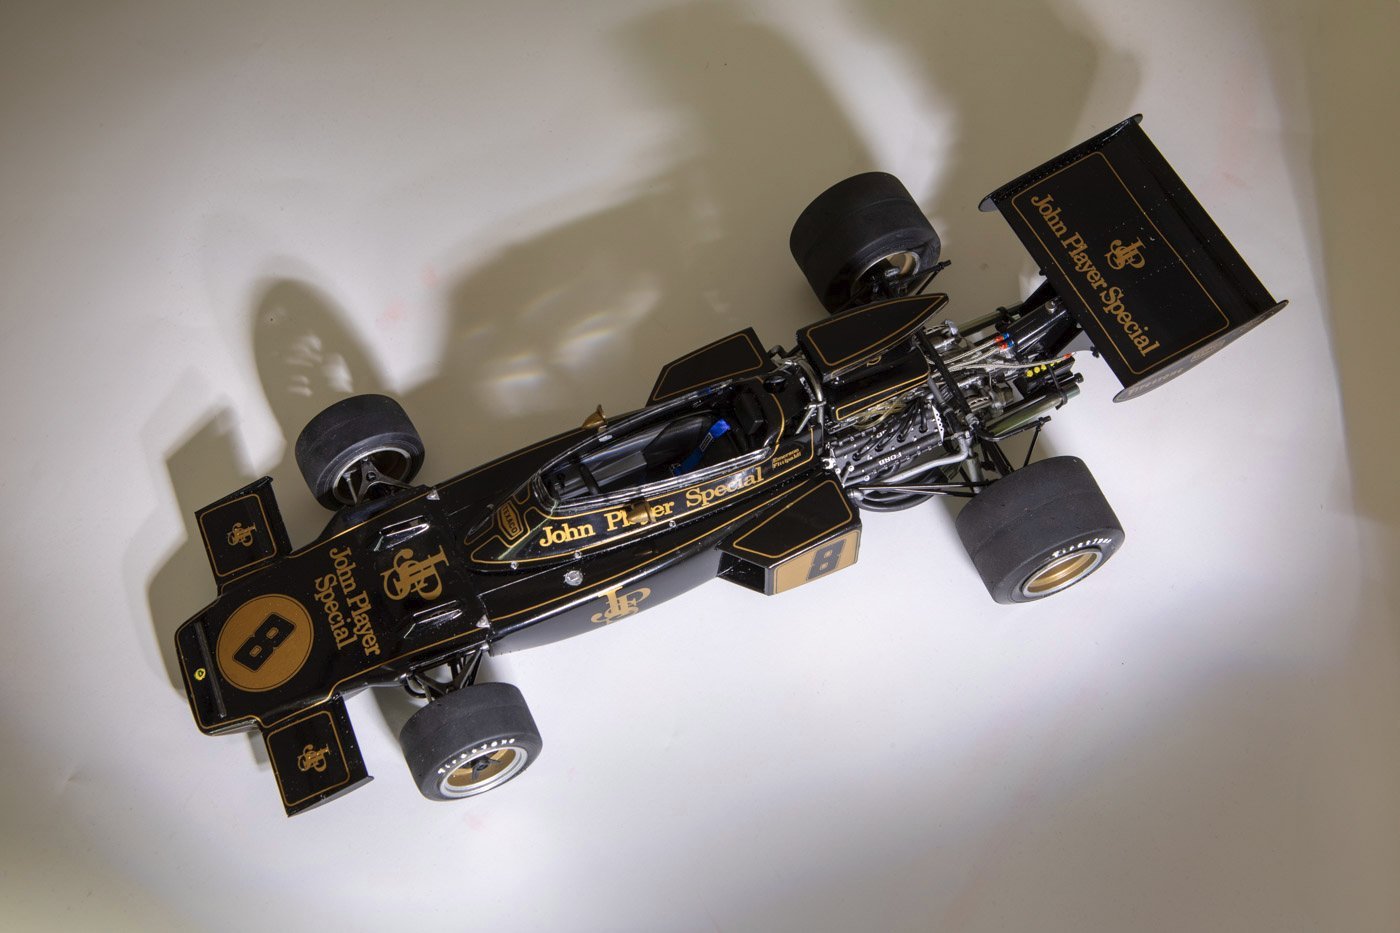
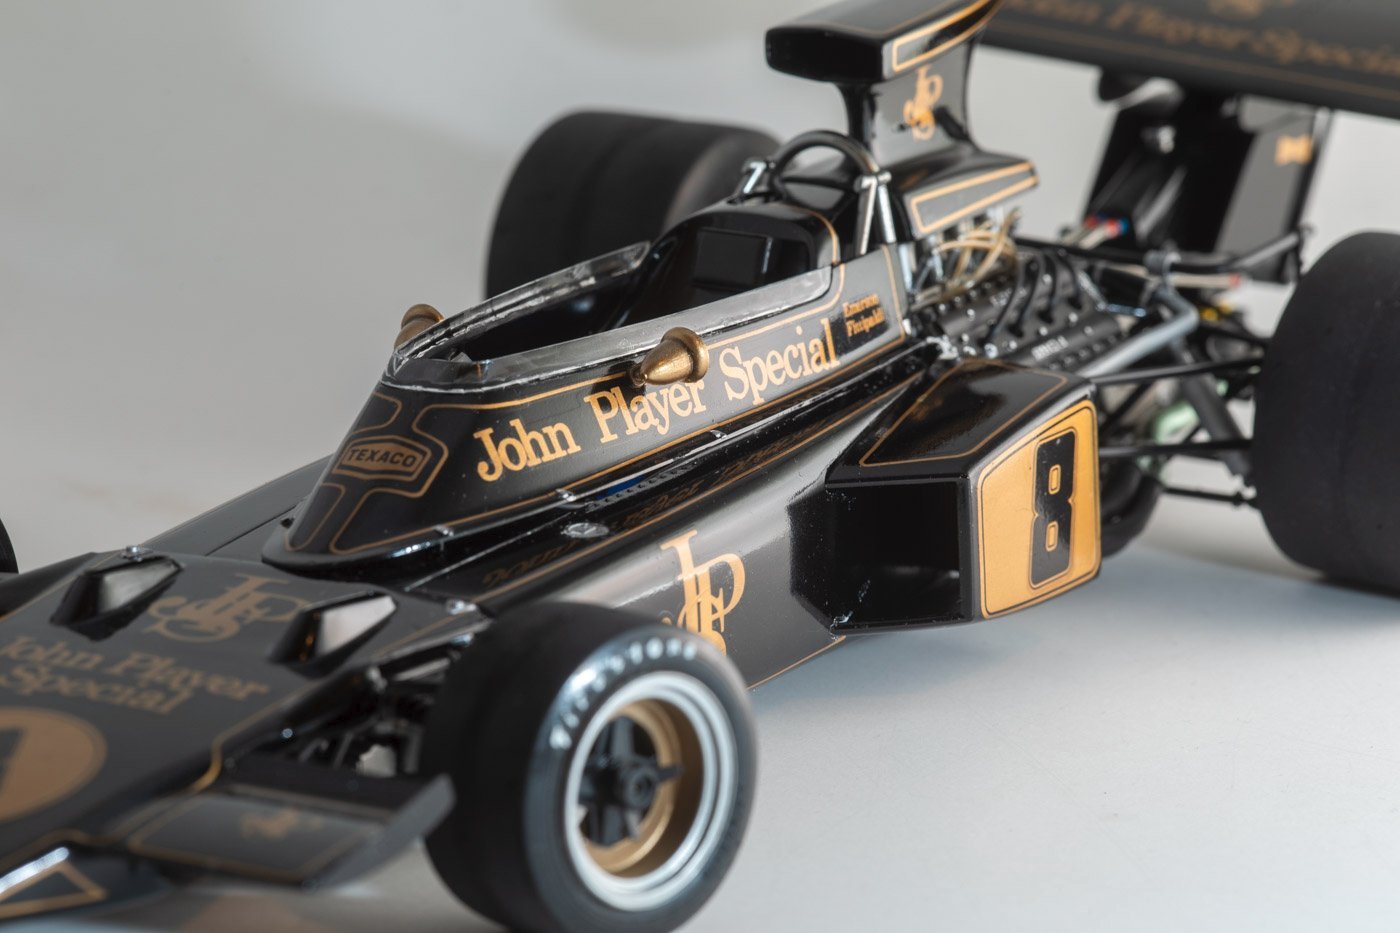
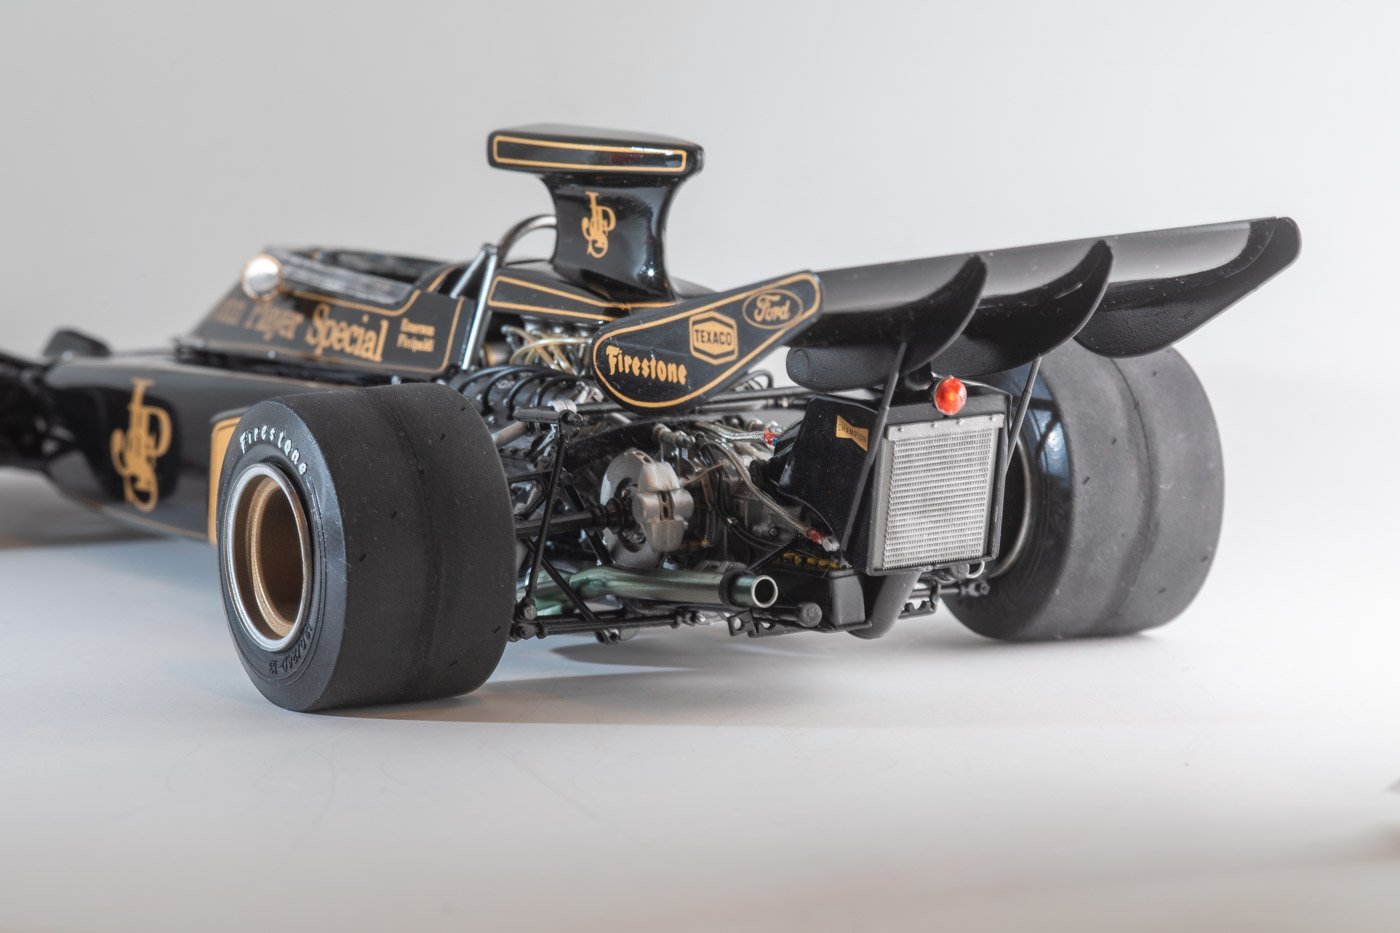
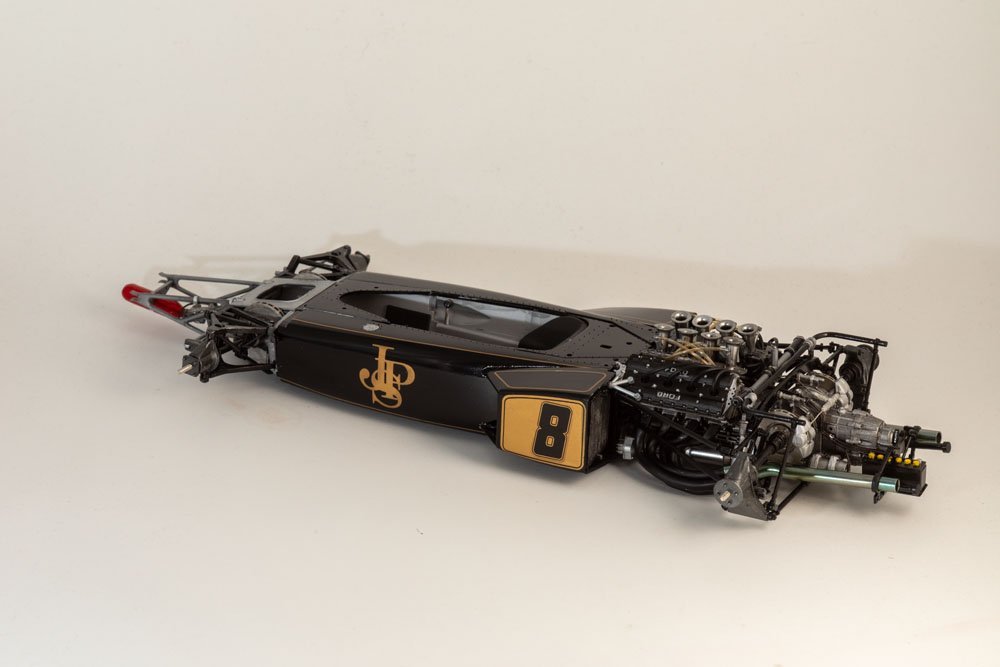
I am now declaring this one complete. For the first time for a plastic car model, I feel like I should get/make a case for this one.
Thanks to everyone for following along, hitting the like button, providing comments and suggestions, I appreciate it. Below are pictures of the finished model. This model is quite large....almost too big for my homemade macro photo booth which is basically a cube of 18 inch PVC pipes. In a few cases I used (for the first time) the Photoshop "generative fill" to fill in corners and edges of the white background where the real thing was not large enough, revealing the wall behind it. That's kind of like using a sledgehammer on a fly I think. I also had to switch away from my 180mm macro lens for the overall shots because I could not get far enough from the model to include the whole thing in the frame.

-
Thanks as always for the likes and wows and comments. I appreciate it.
I am done except for attaching the oil lines to the oil cooler (seen here draped over the rear tire) and doing the rest of the flat black paint on the clear part. I did just a small section and it is an improvement, so I'll do the rest more carefully. As for the oil lines, I want to let the glue holding the wing cure a bit more, as that is a rather large piece hung off the back with four fairly small attachment points. So tomorrow I'll wrap that up and then do a more extensive photo shoot. But for now here is one teaser picture.
Under the car, you may also see a little bit of one of two clear plastic disks on the underside of the car, supporting some of the weight of the model. I guess they did not trust the suspension pieces to hold the car indefinitely. Probably a good thing.
I am also debating gluing the air induction scoop or not. The instructions indicate to glue it but it will cover up some of the engine. But if you don't glue it, the slightest bump will knock it off. The front cowl and the upper part of the cockpit both snap on and will be ok unglued. The cockpit part was a bit warped, and still is a tiny bit, so I thought I might have to glue it down as well. But I think it is close enough that it will stay on without the seams/gaps being too unsightly.
-
3 hours ago, mtaylor said:
Looks fantastic. Don't sweat the tach being rotated as often times the drivers get them turned such that max rev position is at a place they don't have to look for like at the top, bottom or on to the side. If for example, max revs is set for 0 degrees (vertically) they just do a quick glance to set that it's there (or close).
Thanks, though I think the tach is the large central gauge. Can't really see it in this photo, but the main needle on that gauge is in the 4 o'clock position at 0, and 10, 11, 12 thousand RPM are straight up, just as you describe. So that one is the correct orientation. The gauges to the left are something more minor like oil pressure or temperature or something. Oh well.
2 hours ago, king derelict said:Really stunning work. Those black and gold Lotus were great looking and your model captures it all
Alan
Thank you. Really glad that the metallic gold decals still worked ok. I learned that this iteration of lotus was the only one that actually had metallic gold....the lotus 78 and 79 that had similar "John Player Special" livery actually just used a non-metallic yellowish tan color. Furthermore, I learned that at least some of the third party decals available for this car are also non-metallic.
-
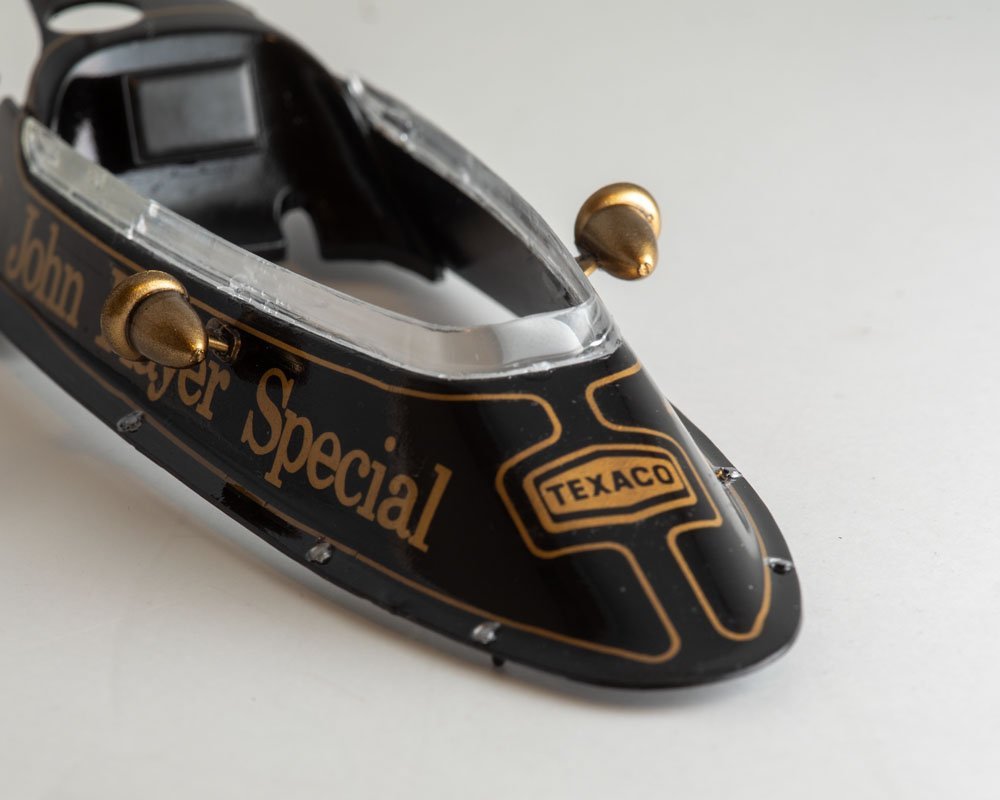
52 minutes ago, Danstream said:
Outstanding build.
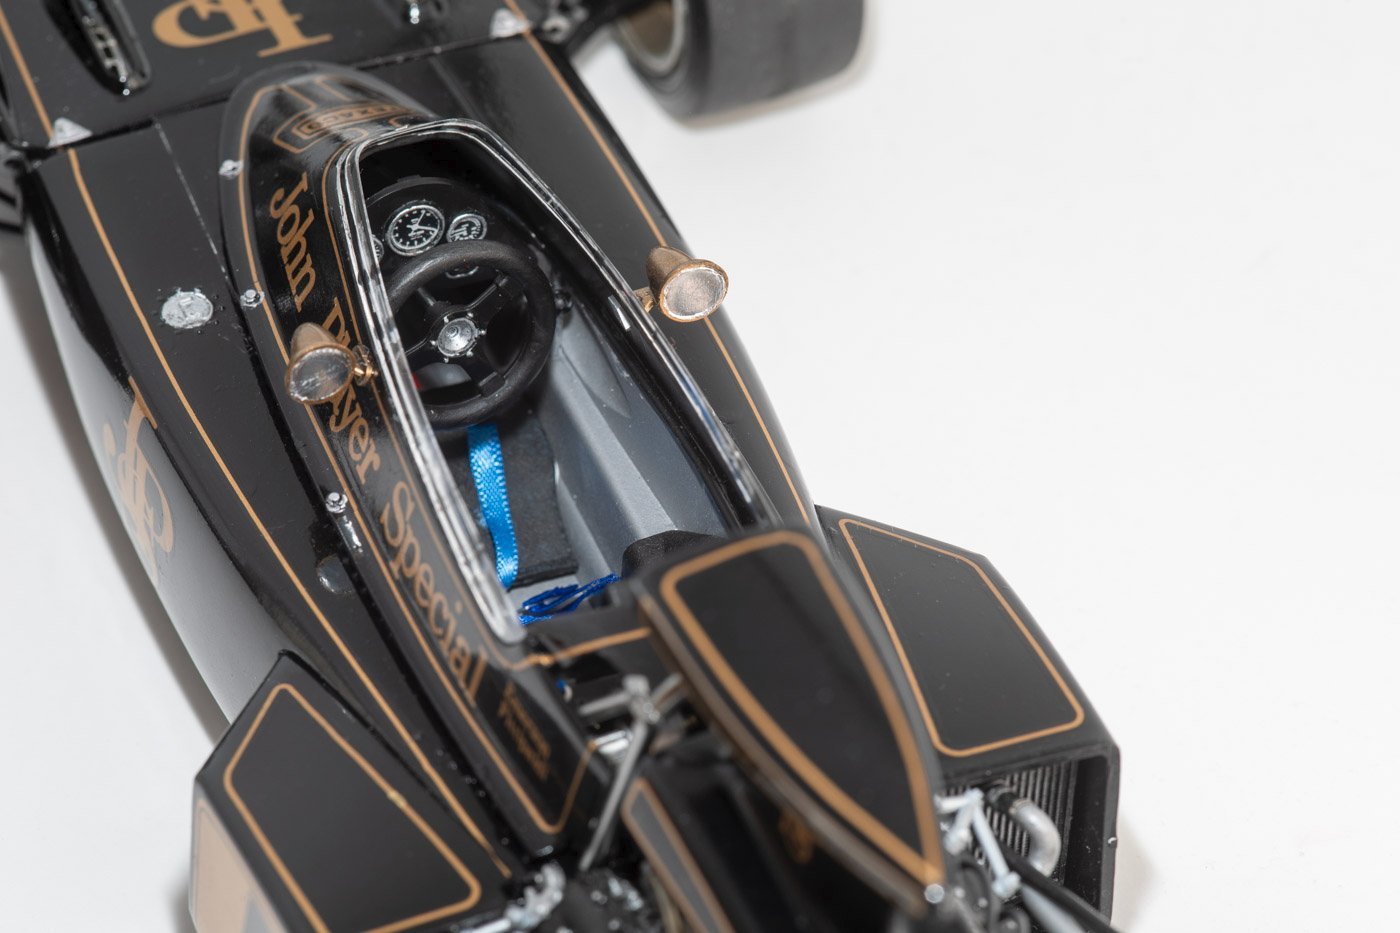
I have a suggestion, if I may. The transparent part is somehow spoiled by internal reflections of light on the plastic edge. It is possible to suppress them by painting with matt black the thickness of the edge of the transparent part in contact with the car body.
Best regards,
Dan
Thanks. You and anyone else certainly may provide suggestions. And this sounds like a good one. I'll have to try it out. I definitely agree that the thin clear part sort of spoils the whole look of the model, so any improvement will be welcome.
- Jack12477, Canute, king derelict and 2 others
-
5
-
I have been working on a lot of little details, but I am getting close to wrapping up this project. I might even complete it today, we'll see. I believe that all that remains are the seat belts, attaching the rear wing/oil tank including attaching 3 oil lines, and attaching the wheels. Below are pictures of some of the details.
Unidentified important bits between the seat and engine. I thought about adding more lines between these bits and the engine but really should have done it before attaching the roll bar. And I should have done a better job with the mold lines on the roll bar

Dashboard front and back. Yes, I purchased some tiny turned metal toggle switches to replace the molded in ones. And again, I could have created more wires to the back of the dashboard for those switches, but did not. I put two on there but they are not really visible in the pictures, behind the hoses that go to the gauges. Oh, and I realized too late that the left dashboard instrument decal is on upside down. 🙃
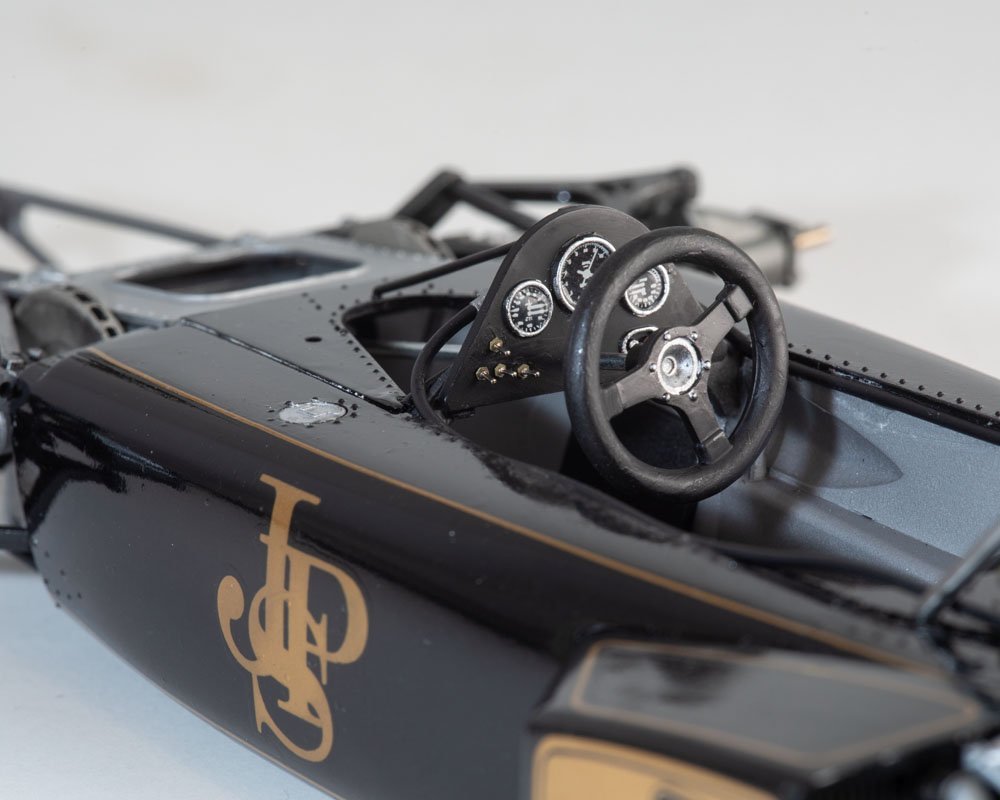
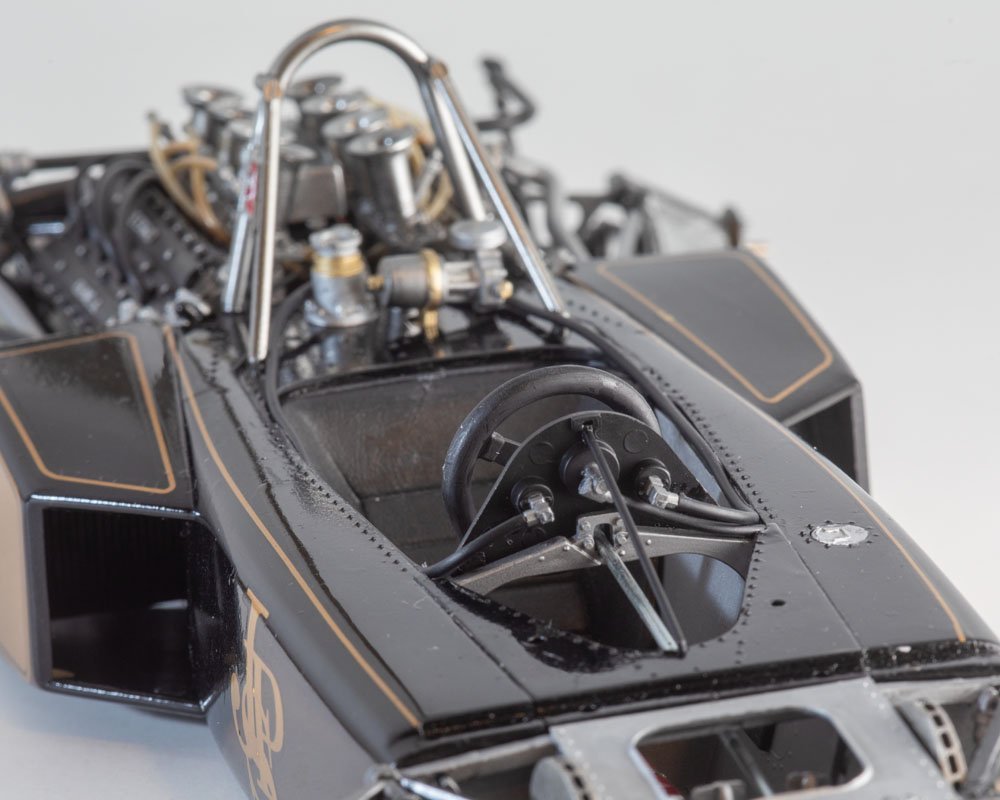
Main cockpit upper cowl.
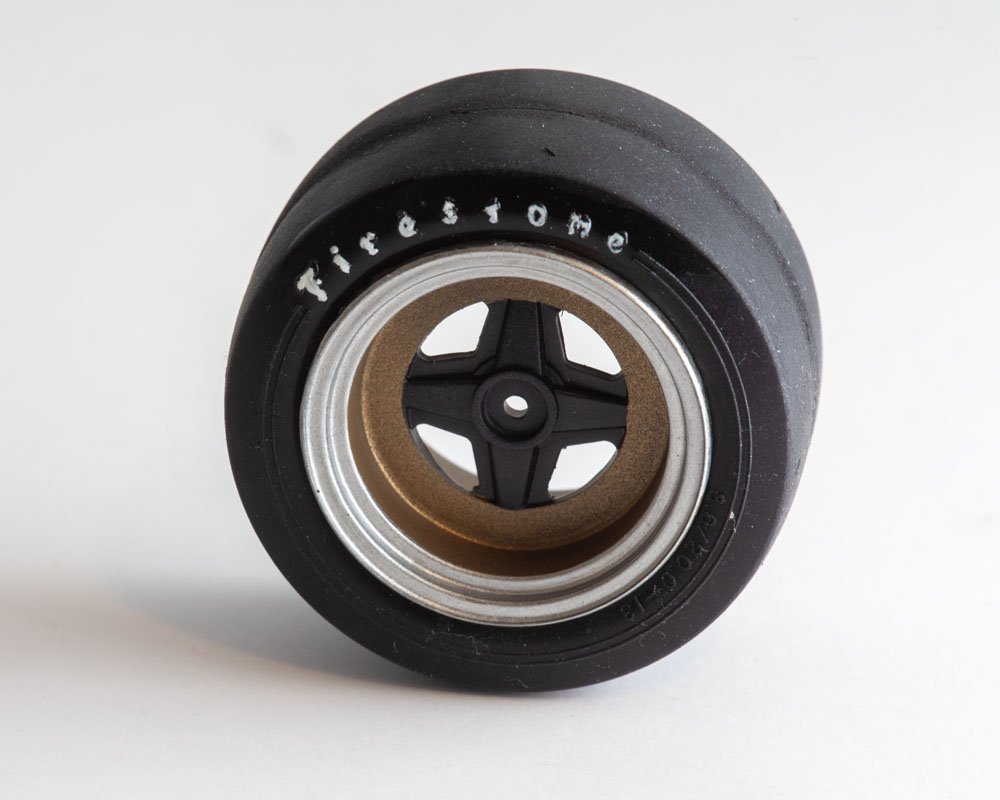
Wheel and tire with hand painted Firestone logo on the tire. I should get some better quality tiny brushes for such work, though it looks ok. Oh, I forgot I also bought some tiny valve stems and have not put those on the wheels yet.
-
A lot of good progress. The "Mr. Dissolved Putty" looks interesting, I had not heard of that though I've recently used some of the Mr Color paints for the first time and liked them. I've used the Tamiya putty in a tube but it can be difficult to apply smoothly and is often required in places that are difficult to sand well. It sounds like this stuff might be a better solution.
-
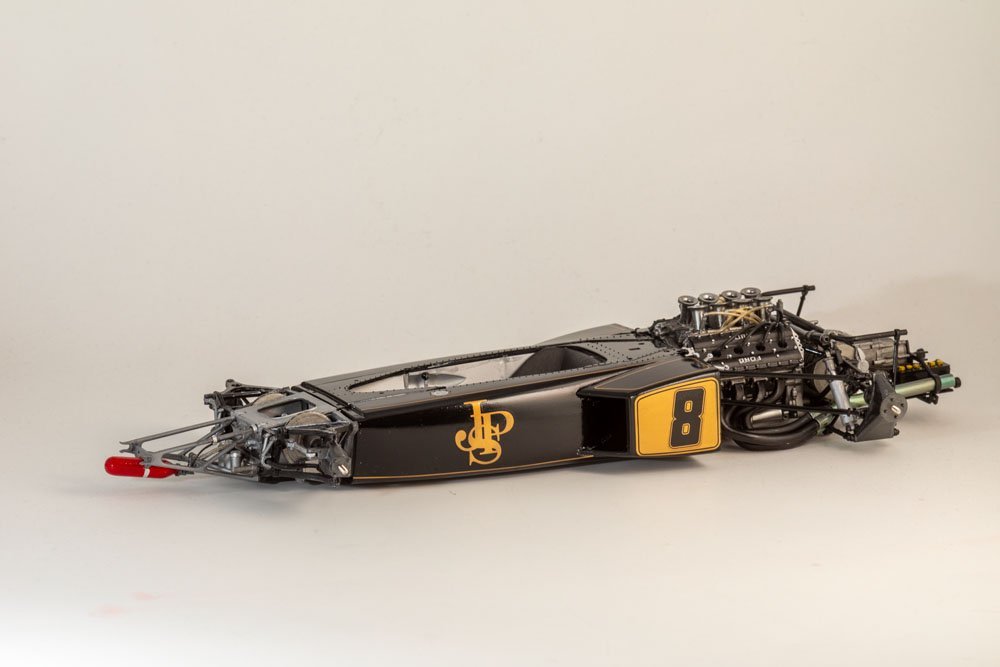
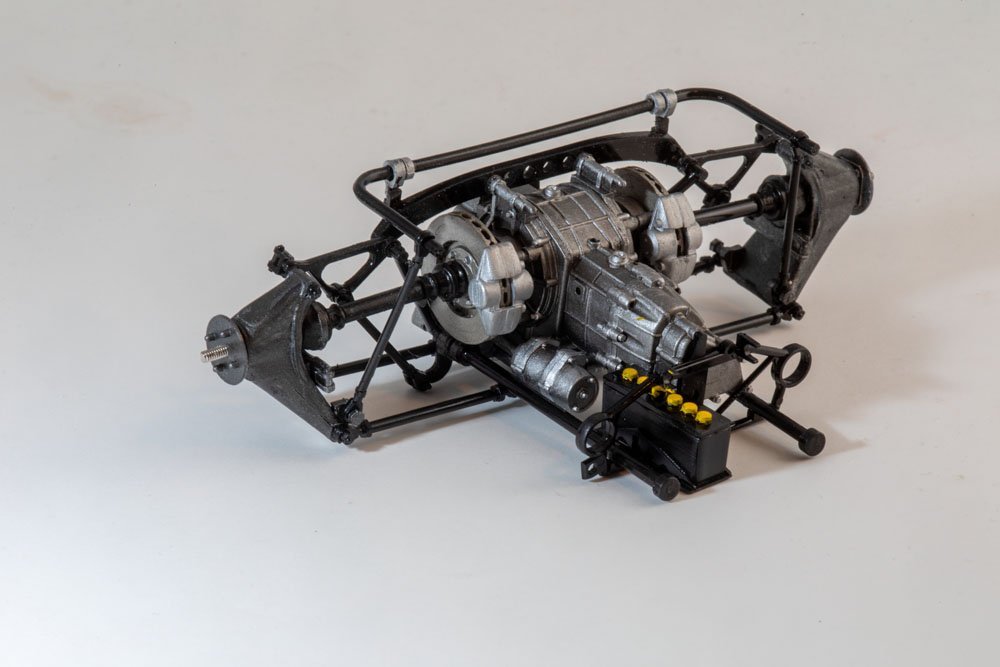
Bit of a milestone today as I joined the front suspension assembly and the drivetrain/rear suspension to the tub. I still have some coolant pipes and hoses to join the radiators to the engine and then some oil hoses to join the engine to the oil tank and cooler which also serves as the base of the rear wing. In the cockpit area, I need to do the dashboard and a few other bits including roll bar between the cockpit and engine, and then attach the rear wing, front cowl, and wheels and I am done.
-
12 hours ago, DocRob said:
The Model Factory Hiro belts are a very nice addition and more detailed than the ones Tamiya supplies.Interestingly, it takes about the same time for the Spot Model parcels to arrive on my doorstep, but I live in Spain. The Canary Islands always need some extra effort, to ship goods here
 .
.
Your engine looks busy and sports fantastic details. The exhausts are great.
Cheers Rob
That's funny about the shipping to the Canary Islands taking almost as long. The Spot Model web site said it would be 10 to 30 days for delivery to the US, and it was at the very low end of that range.
On the older version of the kit like I have, the only seat belts supplied by Tamiya are molded into the supplied driver figurine, which I plan to not use. They did not provide any seat belts to use if you are leaving the driver out. I found some other 1/12th scale seat belts by another brand but they did not look as good as the MFH ones.
- Old Collingwood, mtaylor, DocRob and 2 others
-
5
-
Welcome to MSW.
Is that different from the stage coach that is listed on the Artesania Latina website? If that is the one, they have downloadable instructions there:
- mtaylor and Keith Black
-
2
-
Thanks guys for the comments, and to others for the likes.
One other quick note today...I like the seat belts from Model Factory Hiro (like docrob used on the Renault) and could not find a US supplier. So, I ordered some of them and a few other things that seem difficult to source in the US from Spot Model in Spain. I ordered them on September 15th and they arrived by US mail today. So that was not too bad at all.
I've also started doing the clear coat of the main body parts. Have a few more coats to do, not sure how many. Today I did one light mist coat mainly over the decals, then one heavier coat. I'll likely do at least a couple more tomorrow and see what I think from there.
-
As always, thanks for the comments, the likes/wows, and for just looking in and taking a peek at what I am doing.
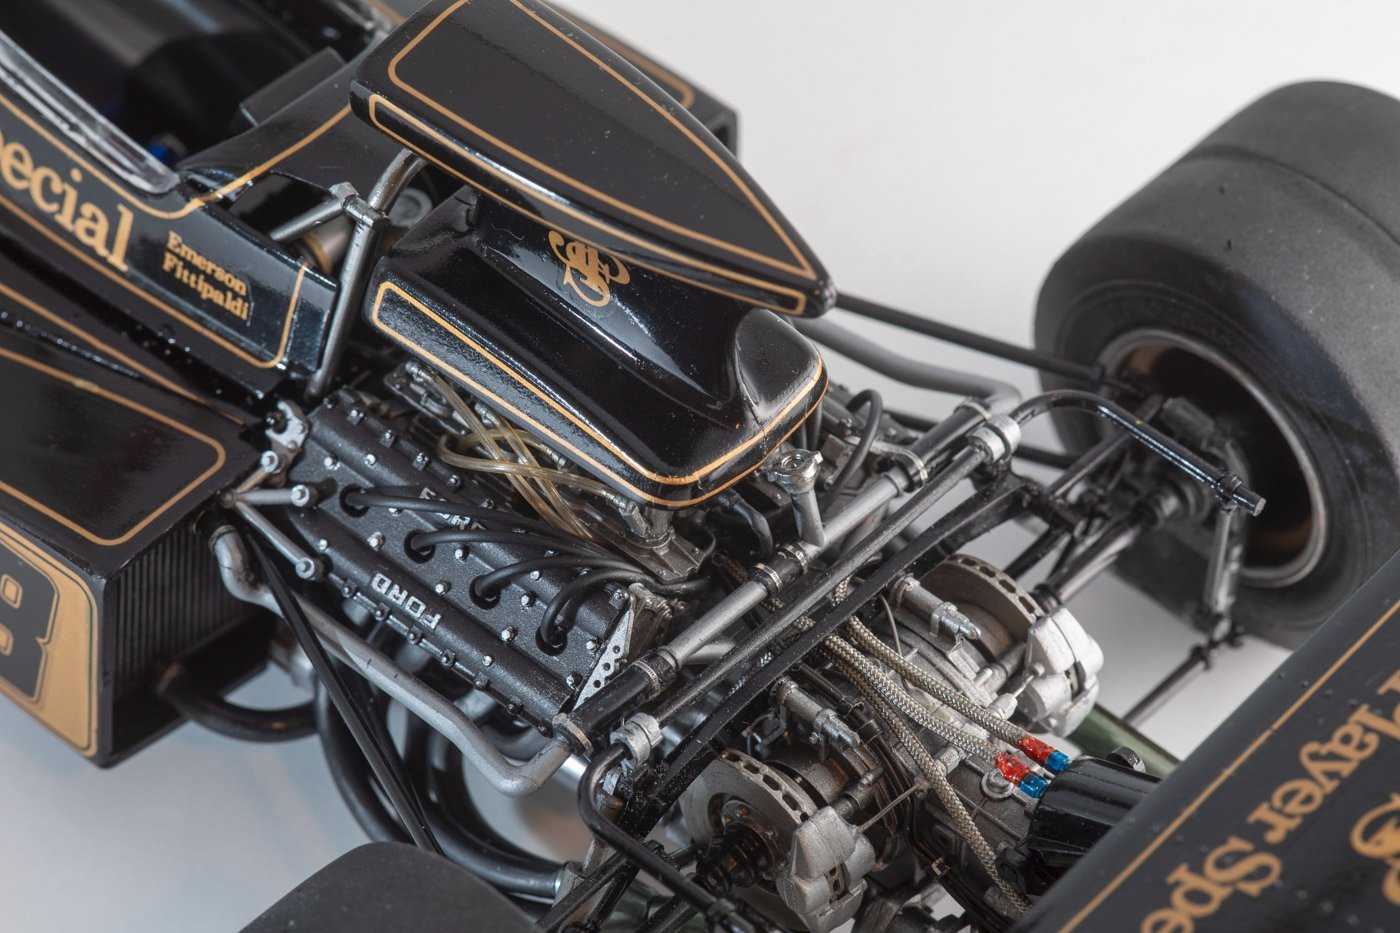
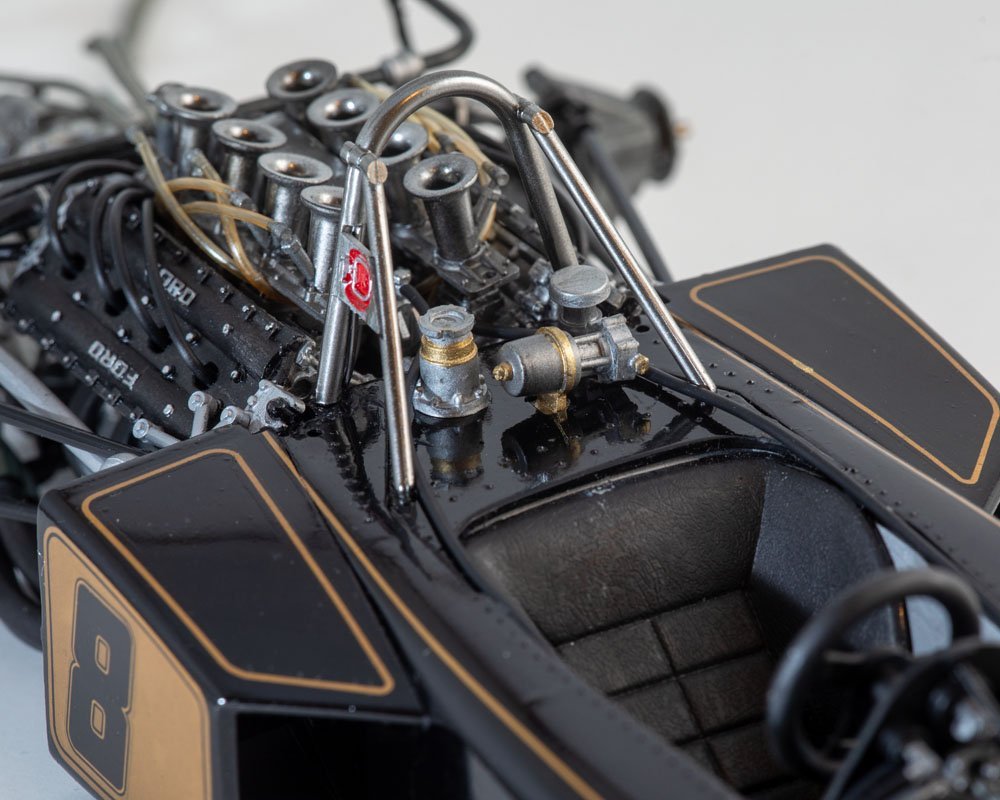
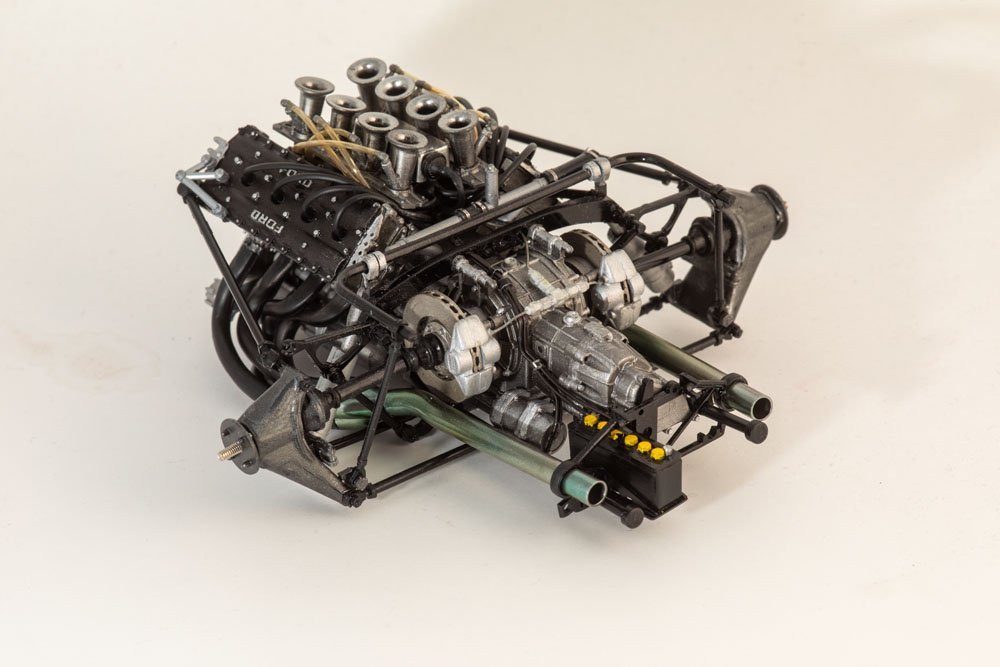
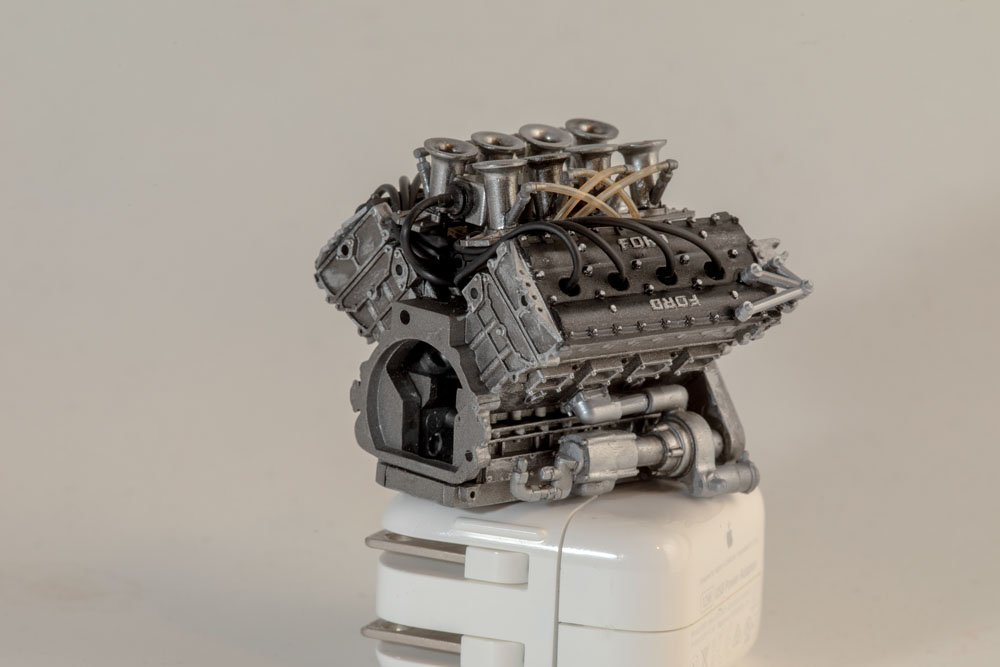
I've now finished the whole engine and gear box and joined them together. Above and beyond what is in the kit, I added some "wiring harness" and the rear brake lines over the gear box. If you look closely, you might also see a few of the photo etched "hose clamps" that I bought. I like them, but they are a real pain. Of course they come flat, so have to be wrapped around the "hose", but they are a bit springy so they resist being glued down, even with CA. And of course I glued some of them to a flat black painted surface and the CA just lifted the paint. Others were glued to the rubber hose provided in the kit but the CA also did not seem to work well there either.
The exhaust was a bit of an issue too. It was tough to get the four individual pipes joined together correctly and glued into the cylinder head. Then when I put the gear box and engine together, the end of the exhaust pointed right at one of the suspension members so I had to squeeze it in some to get the exhaust through the suspension, which loosened the other end of the exhaust where it was glued to the cylinder head.
Oh, I tried something on the exhaust as well. The pipe is painted with Alclad Chrome, then I put a bit of clear yellow and clear blue on it to represent the heat discoloration.
When I attach this unit to the tub, there will be a couple more connections and hoses added, as well as some hoses from the engine to the oil tank and cooler which also serves as the support for the rear wing. I also have some work to do on the dashboard, but otherwise there are not too many remaining parts. I still need to work on clear coat on all the body pieces.

-
Looking good! On the prior pictures of the chassis...maybe there is a white balance problem or something, but the "light gull grey" looks rather green. I thought I'd clicked into a build log for an army truck.
")
I assume the first picture of post #25 is much closer to the true color.
- Egilman, Old Collingwood, Canute and 1 other
-
4
-
24 minutes ago, Roger Pellett said:
Great video! I see that they have removed the anti-torpedo blisters. This should make the ship easier to maintain.
Does anybody know where she will ultimately be displayed?
Roger
I believe that it is still undecided exactly where she will ultimately end up, but as I understand there is some funding from the Texas government that requires the ultimate location to be somewhere on that upper/eastern Texas coast, around Galveston or in the bays or channels leading up toward Houston. To me, seems to make sense to put her back where she was near the San Jacinto monument, though I guess she'd get a lot more visitors if she was in Galveston.
- mtaylor, Canute and Roger Pellett
-
3
-
Resurrecting this old(ish) thread. I happened across a new youtube video with some drone shots of the current state of the restoration of the USS Texas.
Edit: Not my video, video by https://www.thirdcoastdrone.com/
-
Wow, Mike, sorry to hear that about your eye diagnosis. I've enjoyed following several of your builds, though I know you've said in the past that you were considering slowing down on the modelling. Hope the progression is slow and does not hamper other activities too much.
-
Thanks for the comment CDW and thanks to all the others for the likes and the wows. Not sure my work lives up to a "wow" but I'll take it.
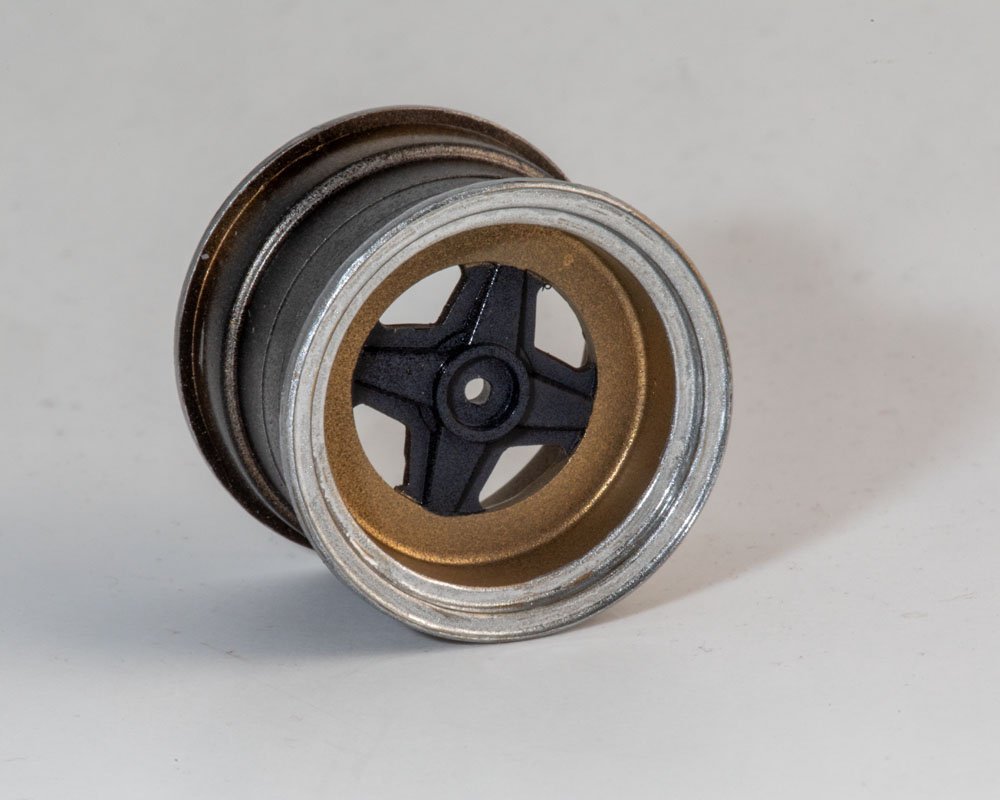
So I said the exhaust was next but I skipped ahead a little bit and worked on painting the wheels. The wheels presented a couple of conundrums.
But first, back when I built the Ferrari shown above, I wondered about the goldish tone of wheels on race cars from around 1970 and google told me all about "DOW 7". For those unfamiliar, the wheels were made of magnesium to reduce weight, but it is fairly reactive to the environment, so the magnesium was coated with some chemical mix to prevent corrosion. "DOW 7" is the current name for one such mix; not sure if that is what it was called back in 1970. It is a sort of non-metallic goldish tan color, sometimes with a little tinge of green, though looking at net pictures of magnesium wheels shows a wide variety of color.
As for the conundrums (conundra?), the various pictures and youtube videos of this car (not to mention models of this car) show a variety of wheels and a variety of schemes for coloration of the wheels, usually with a silver rim along with some parts in a goldish color, and some times black as well. So the first issue was just how to paint the wheels. For the front, as shown, I've gone with a black inner section, gold wheel, with some silver trim around the edge. The rears are a different style and very deep so I did not do the black inner section on them.
The second conundrum is regarding the gold color. Was the gold wheel on the 72D a magnesium wheel coated with DOW 7? Or was the wheel painted gold to match the livery of the car, with the gold stripes? As much as I might have wanted the latter, I assumed the former.
So I started out painting the wheels with the dreaded alclad gloss black, thinking I might be painting some polished aluminum over it, though that did not occur. I then did a light mist coat of flat "German Grey" Tamiya paint just to knock down the gloss and blackness of the inner part a bit. Then I masked the inner wheel section and painted the wheel with Alclad's "pale gold". That was the first time I used it, and I have to say it went on beautifully. At that point I was tempted to pretend the wheels were painted gold to match the livery and let it go. But no, I continued with my original plan to attempt to make the wheels more "DOW 7"ish, and put on a mist coat of Tamiya Flat Earth with a couple of drops of green in it. Finally, I went around the rim of the wheel using the molotow chrome paint marker. Below is what it looks like now. I'll likely go over the rim with another pass or two of the molotow paint marker and then maybe shoot the whole thing with a semi-gloss clear coat. But, even as is, I am quite pleased with how this came out.
If you made it this far, thanks for reading this overly long explanation for painting a wheel
-
Thanks for the history lesson, egilman, and thanks to others for the likes.
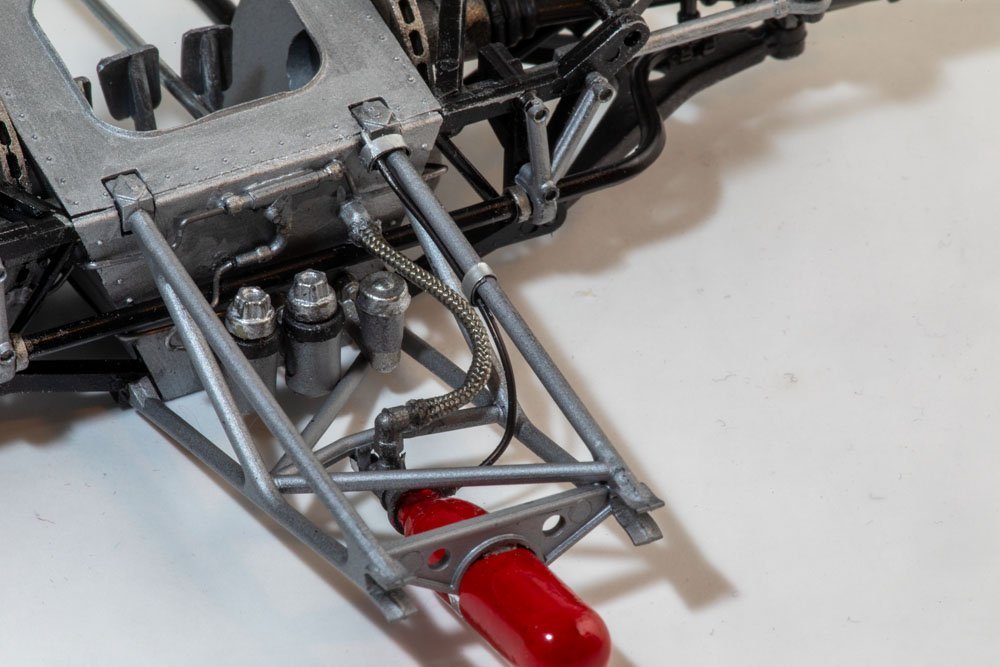
I received the braided metal line that I ordered and used it for the front fire extinguisher. The diameter is not quite as large as I expected and it is a bit floppier than I expected, so not sure if it will be appropriate for the oil lines. I'll figure that out much later in the build.
I've also almost completed the gearbox and rear suspension. It was not quite as tricky as the front, but close. The remaining thing to do is to add the shock absorbers (aka dampers) which is done when attaching the gear box to the engine, as the shock absorber mounts on a brace between the two pieces. I hope to still do a bit more detailing on the gear box, with some brake lines to the calipers and also some wiring harness to connect to the battery and I think that is the starter just ahead of the battery.
Next up is exhaust, then connecting the gearbox and engine to each other and then to the body. But, I still have not done any clear coat on the body panels. I am waiting for a delivery that is expected on Friday that includes some Tamiya X-22. I have more experience with that since I got my air brush than any other clear, so figured it was the best/safest choice for this model.
-
I'm in. Just what I need, to be tempted by another 1/12th scale old race car build. I prefer the fresh out of the factory look, but only because I am too chicken to attempt any serious weathering. Maybe some day. I am preparing to be amazed by what you come up with
- Egilman, Jack12477, Old Collingwood and 3 others
-
6
-
On 9/17/2023 at 11:01 AM, yvesvidal said:
I can't wait to see the rest of the collection.
Yves
I hope you are patient
And and thanks to the others for the likes.
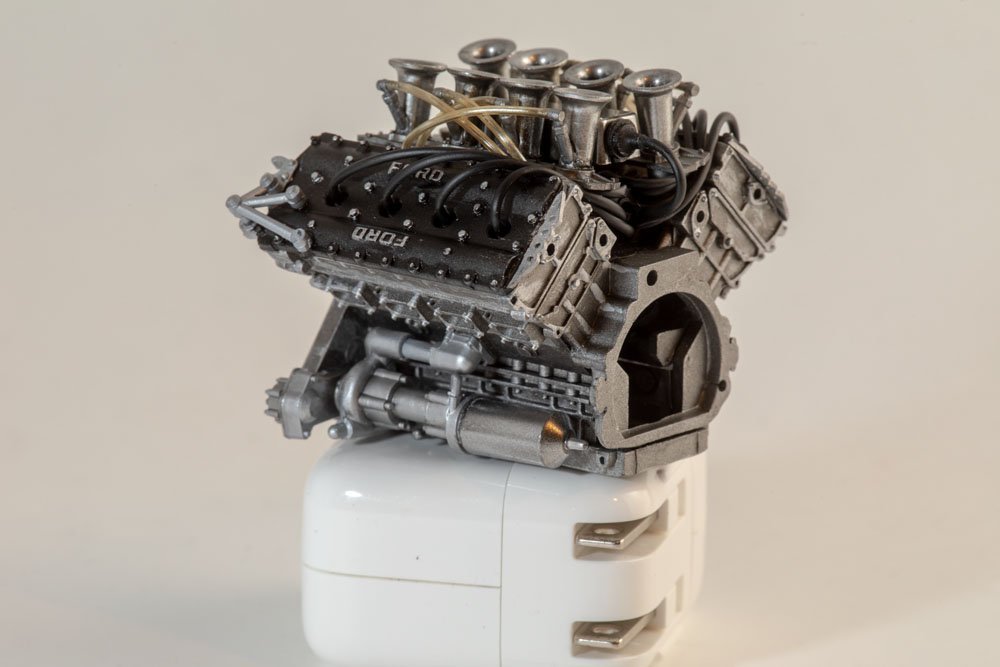
I've now pretty much completed the engine. The gear box, along with rear suspension and rear brakes, is next.
I painted the engine block with metallic gray (XF-56) then used black panel line accent and some dry brushed flat aluminum (XF-16) to provide some variation. I have to say in the pictures, the variation shows up more than it does in real life.
I also think the spark plug wires/tubes are a bit out of scale but will leave them for now. Funny thing is that in my stash I have both the Lotus 49 and the Lotus 78, which were also powered by the Ford/Cosworth DFV engine so I'll have two more chance to build pretty much the exact same engine, whenever I get around to doing those other two.
- Ryland Craze, hof00, Old Collingwood and 8 others
-
8
-
 3
3
-
-
Thanks to OC for the comment, and to everyone else for looking in and hitting the like button.
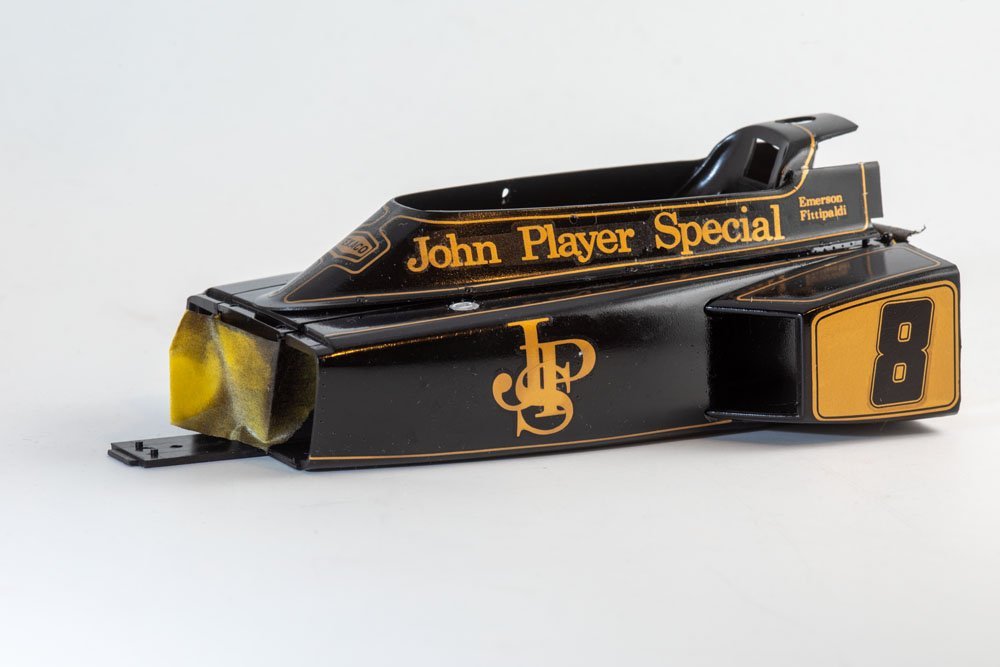
I've completed the decals on the body parts. It went quite well....sure there are a few wrinkles and a few places the decals tore and a little bit of silvering here and there but overall I am pleased with the way it went. I was surprised that the long skinny stripe decals did not pose too much issue, though a couple of them did break apart. But I was able to just nudge the two edges together. The larger decals seemed a little more problematic, as there were more likely to be spots where the decal film did not want to release from the backing paper. In a few cases I had to grab the decal with tweezers and delicately pull it off of the backing paper.
Below are a couple of pictures. Excuse the masking tape, I am leaving that in place until after I do the clear coat, which I have not started yet. Also, the upper cowl is just sitting on the main tub now. Unfortunately it is slightly warped. I think the kit intends you to not glue that in place so that it can be removed for better viewing of the cockpit but I may need to glue it down to have it sit nice on the tub. That's probable not a big loss as there is not a lot to view in the cockpit.
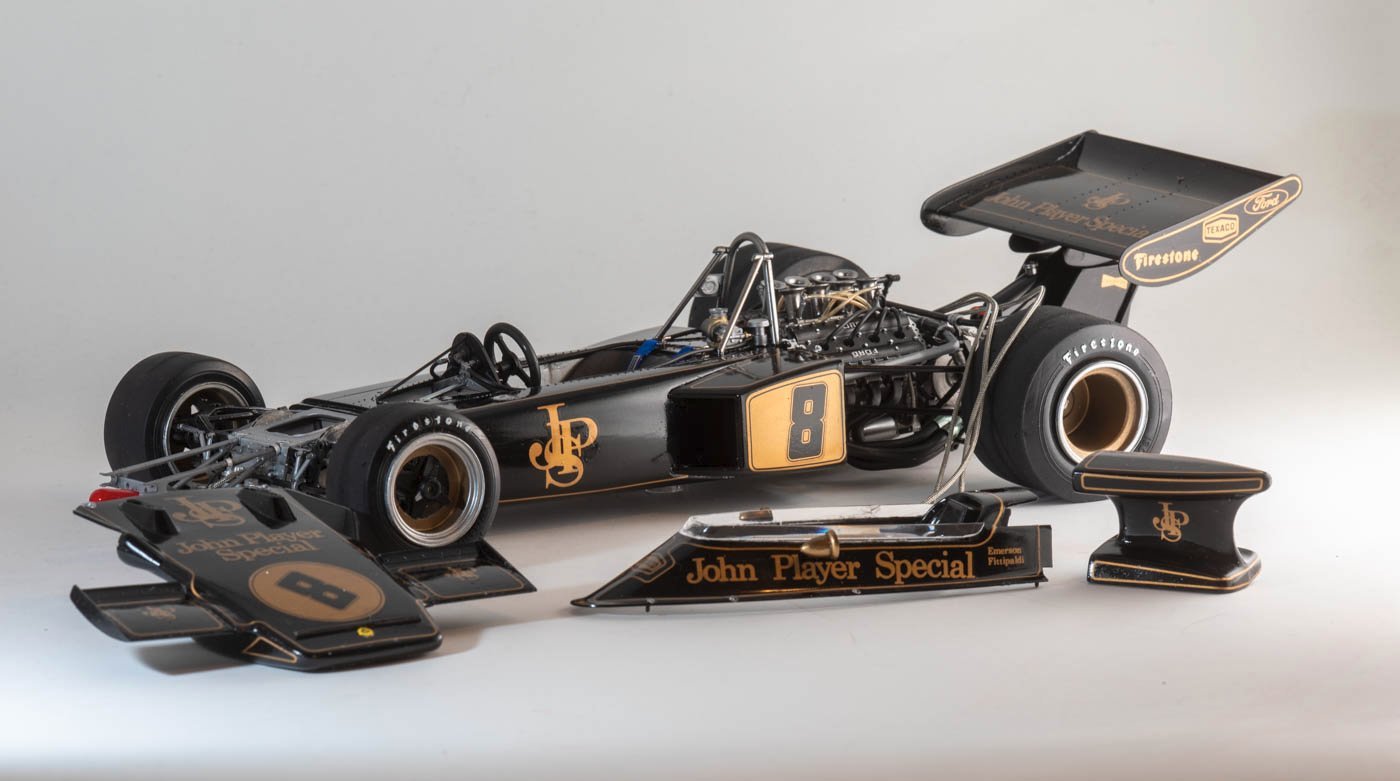
I also started assembling the engine and gearbox. I placed the front cowl, the body, the engine/gearbox and rear wing all next to each other on my table and was a bit surprised just how big this model is going to be. I guess I should have thought about that before I started hoarding 1/12th or 1/16th scale car models bought off of ebay.
This is one of 9 that I have. Oops.
- Haliburton, mtaylor, hof00 and 7 others
-
10
-

Sanson by Diver - Artesania Latina - 1:50 - Tugboat - Updated Version
in - Kit build logs for subjects built from 1901 - Present Day
Posted
Looks like a handsome tug. Do you plan to do RC or just a static model?