


gsdpic
-
Posts
541 -
Joined
-
Last visited
Content Type
Profiles
Forums
Gallery
Events
Posts posted by gsdpic
-
-
If you are referring to your profile picture, click on your user name in the upper right, then click on Profile. Once on the profile page, click on the little picture icon in the upper left, the thing in the lower left of this tiny screen grab:

Which Sopwith Camel did you buy? I recently started building the one from Artesania Latina and have a build log in this section. I think there is also at least one build log for the Model Airways sopwith camel.
As noted, MSW is obviously more about nautical subjects, but you are in the right place for the limited number of non-nautical subjects on this forum.
And welcome to MSW.
-
Thanks all for the comments and likes.
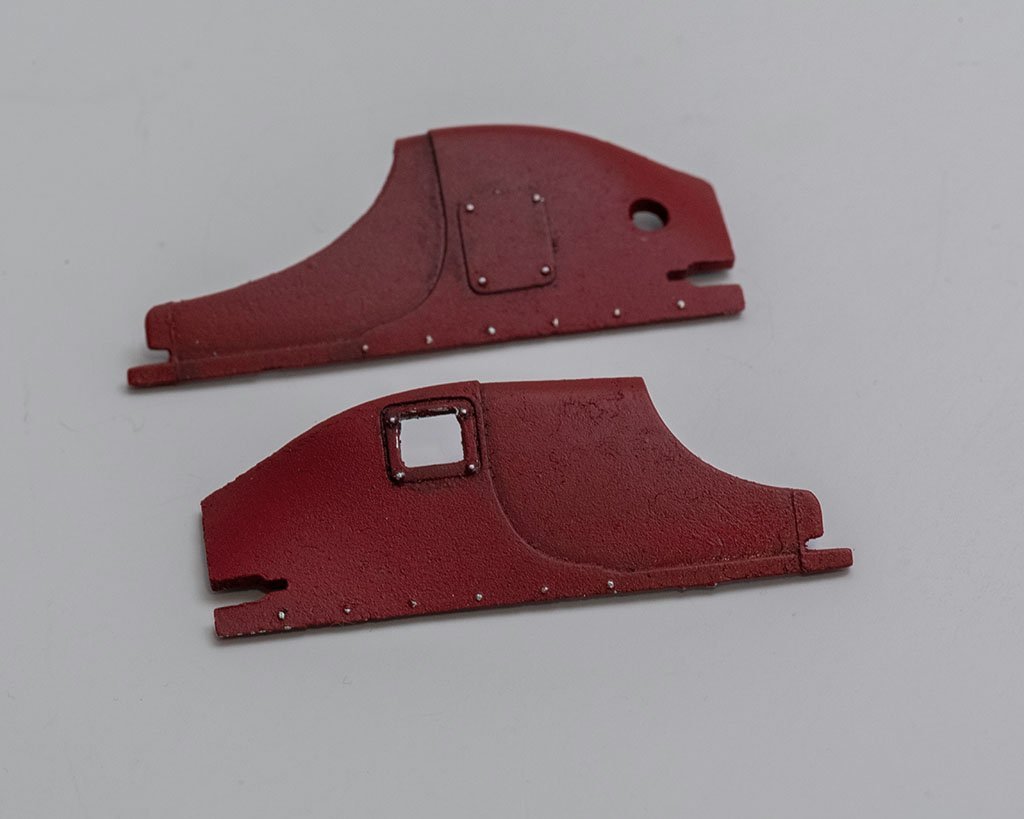
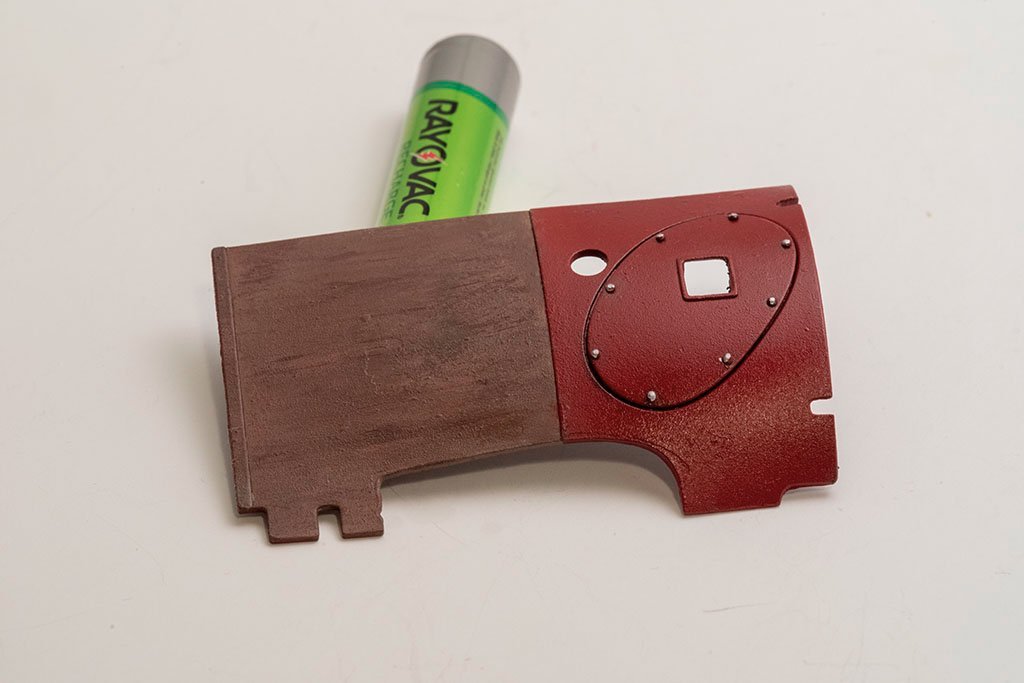
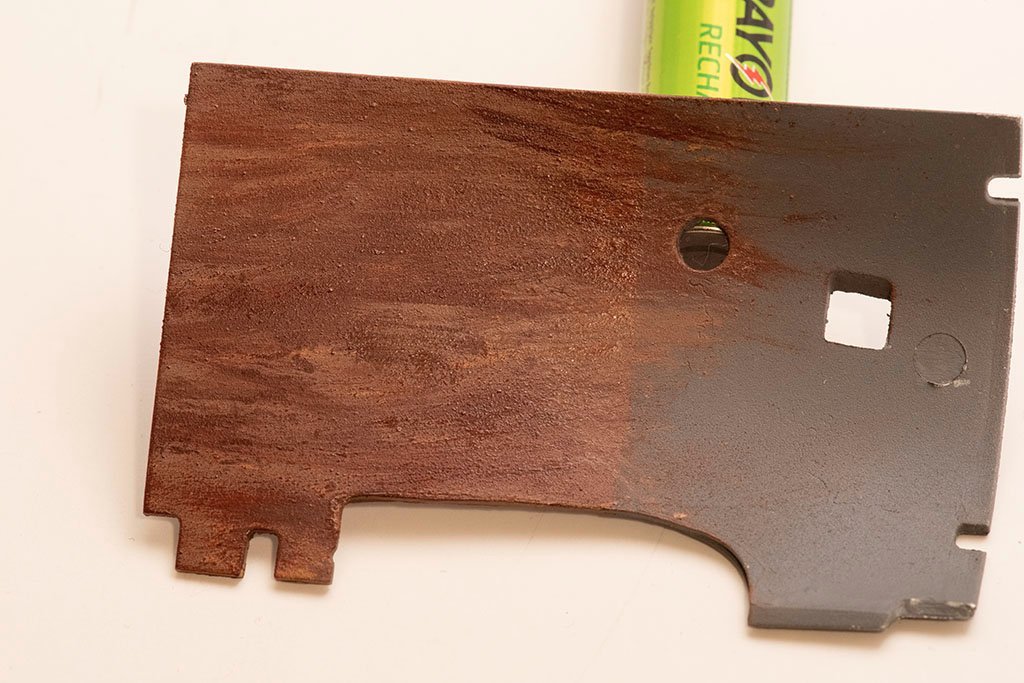
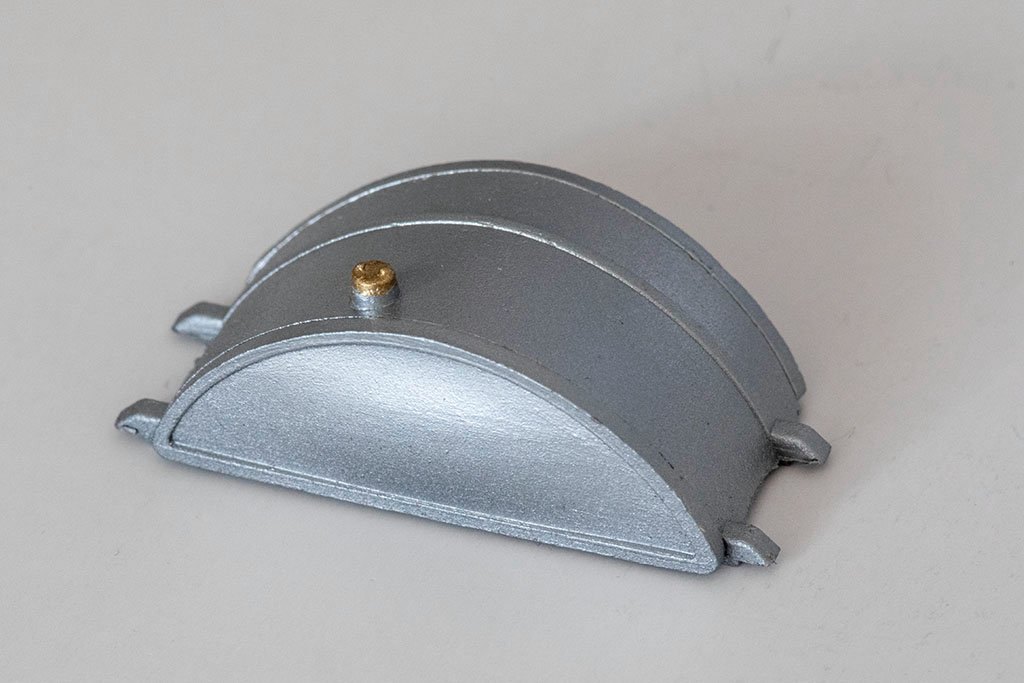
I did not make a lot of progress this week, though I did work on painting the various metal cowling bits. I toned down the wood look a bit for these. For the metal parts, I first primed with grey primer, then used the normal Tamiya X-7 red, followed by a light coat of a mix (about 70/30) of X-7 Red and XF-9 which is a dark reddish brown color, using the air brush. I've not coated the parts yet, thinking I may add a coat of semi gloss clear of some sort. Also the "wood" pieces have a raised edge that you can see in the pictures. The pictures in the instructions just show those as brown/wood but thinking about maybe doing something else with the edges....red, silver, black, I don't know. Anyway, here are the pictures. Oops, I see now I should have been more careful and consistent with the white balance adjustment.


-
-
Well done! I missed this log until now, but that is a very tidy result.
-
11 hours ago, Canute said:
It looks good for the wood effect. Good technique.
5 hours ago, mtaylor said:Looks like wood to me. I wouldn't bother with the stencil.
4 hours ago, BobG said:Wonderful work, Gary!
Thanks all for the votes of confidence, that helps. I did try a slightly different technique tonight on a scrap bit of plastic but did not like the results quite as well. I want to practice a few more times but I think I'll need to get more of the "flat earth" Tamiya paint. I am doing this now because the next steps involve the piece of the cowl on the underside, and I'd like to paint all of the cowl pieces at the same time, as I plan to mix a little black or brown with red, so will not be using the color straight out of the bottle.
-
Thanks all for the comments and the likes and to those who just looked in.
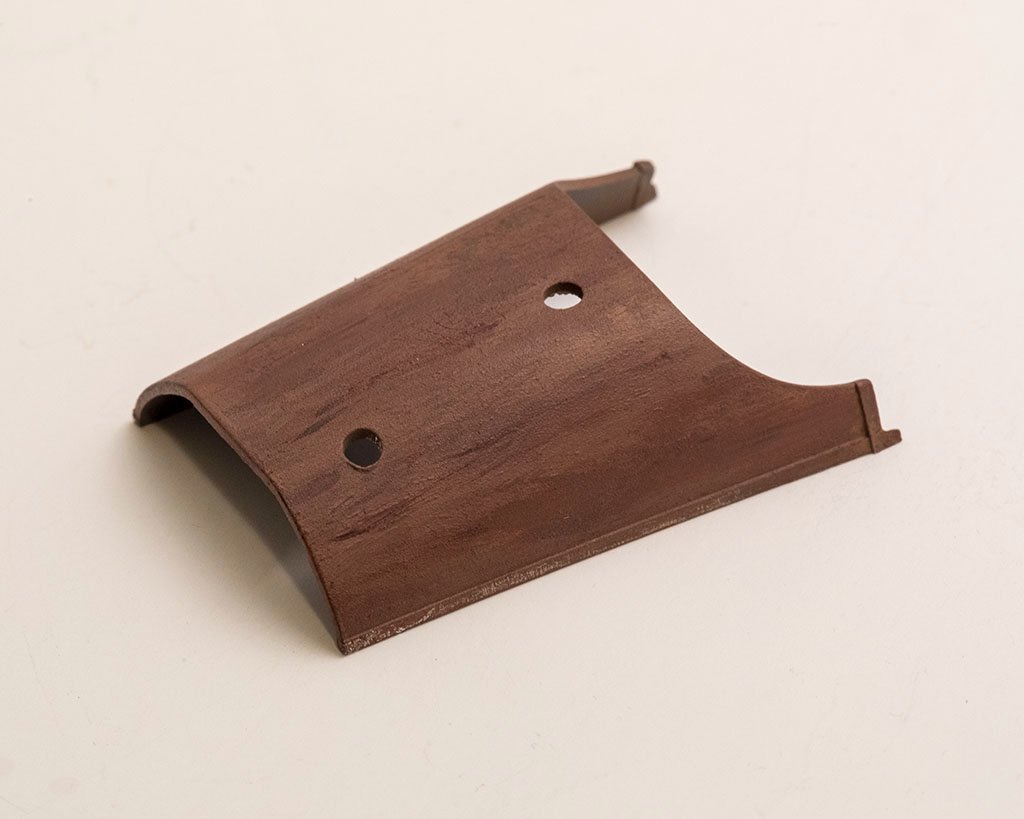
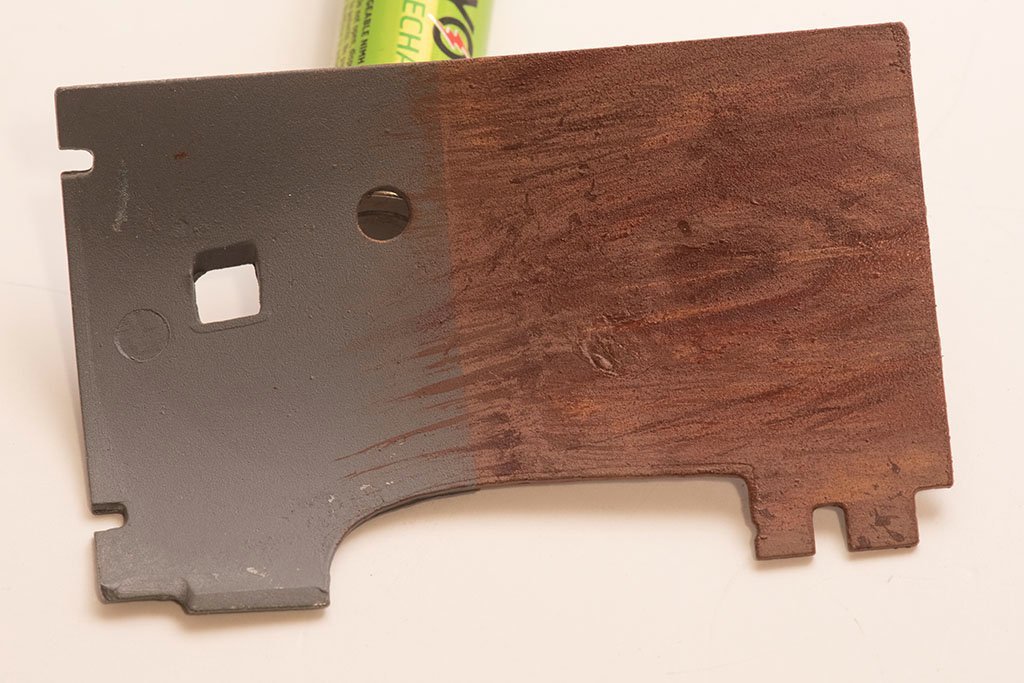
So, does this look at all like 1/16th scale wood? As you can see in the very first post, there are some exposed wood panels. Artesania Latina sells a photo etched mask/stencil to give a wood grain affect but I thought I'd try by hand, as I am not sure how available that stencil is. I started with the two pieces below, on the side that is on the inside of the cockpit so will not be very visible. I just airbrushed on some Tamiya flat earth, then used some stiff bristle brushes to add streaks of a few other brownish colors, all Tamiya acrylics. I've also heard of people using oil paints as the long dry time allows more time to make streaks and such in the paint.
Any comments , critiques, and especially suggestions would be very welcome, even if it is just "buy the stencil and use that".
-
Wow, I was not paying attention and missed this until now. You are flying right along. It looks great so far; well done with the paint and weathering.
- mtaylor, popeye the sailor, Canute and 1 other
-
 4
4
-
2 hours ago, Egilman said:
Build Log, Where for art Thou Build Log.....
{chuckle}
I for one Gary would love to see it as well...
Looks like you found it....but thanks, this reminded me to add the link to my signature.
-
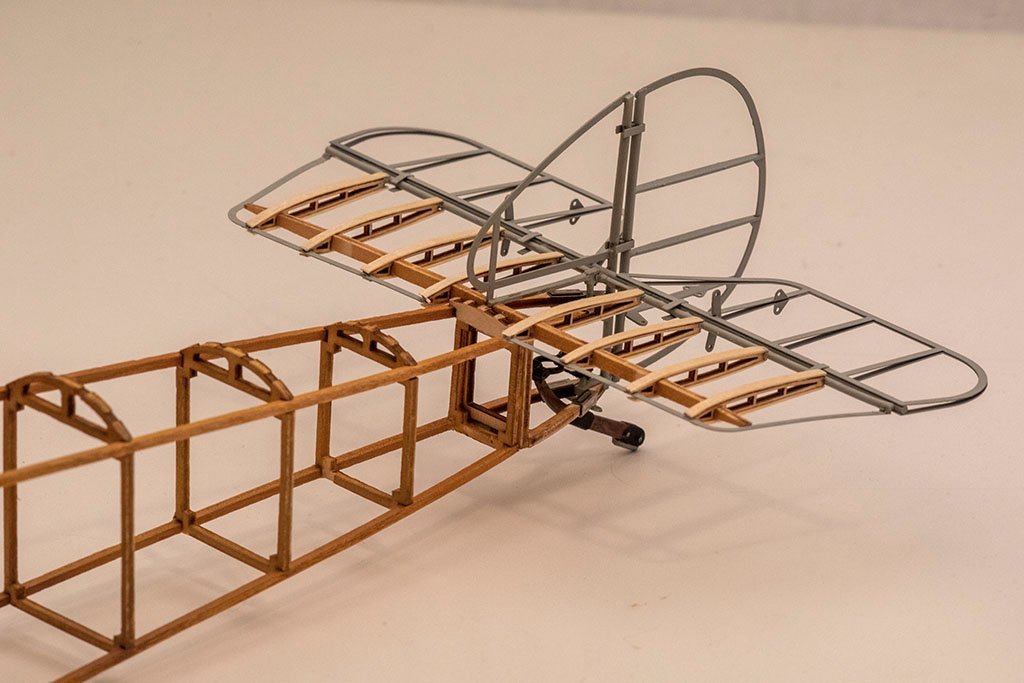
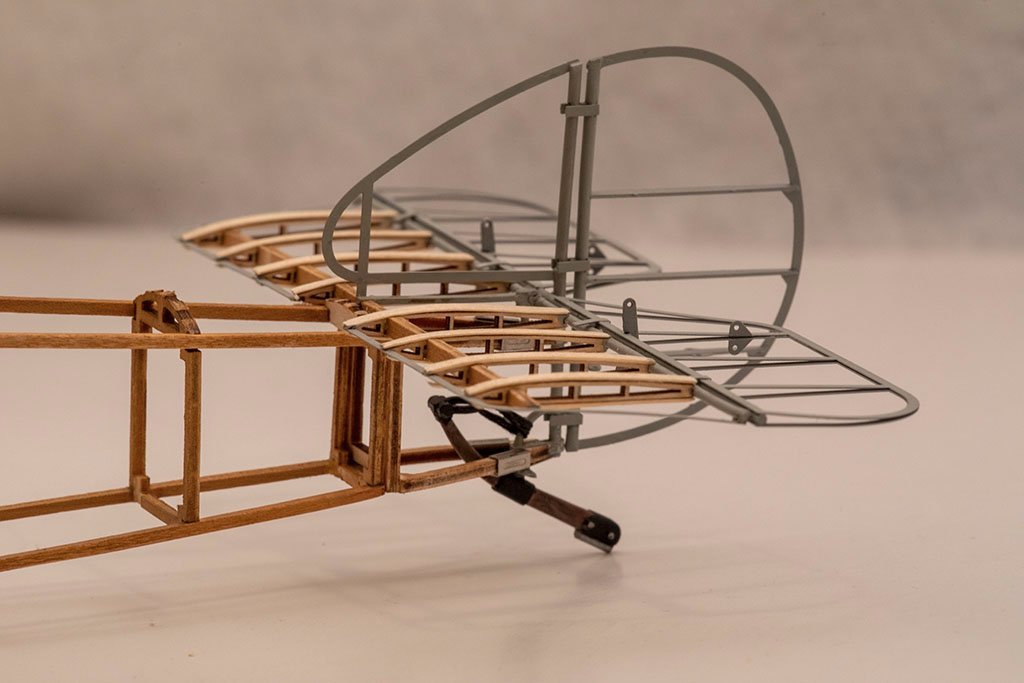
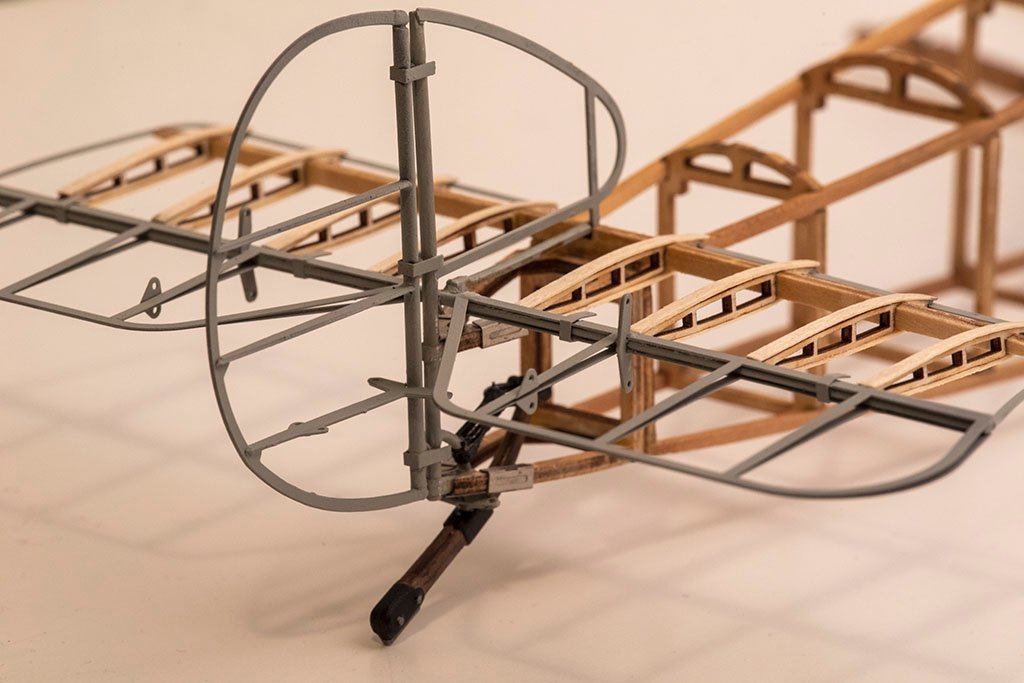
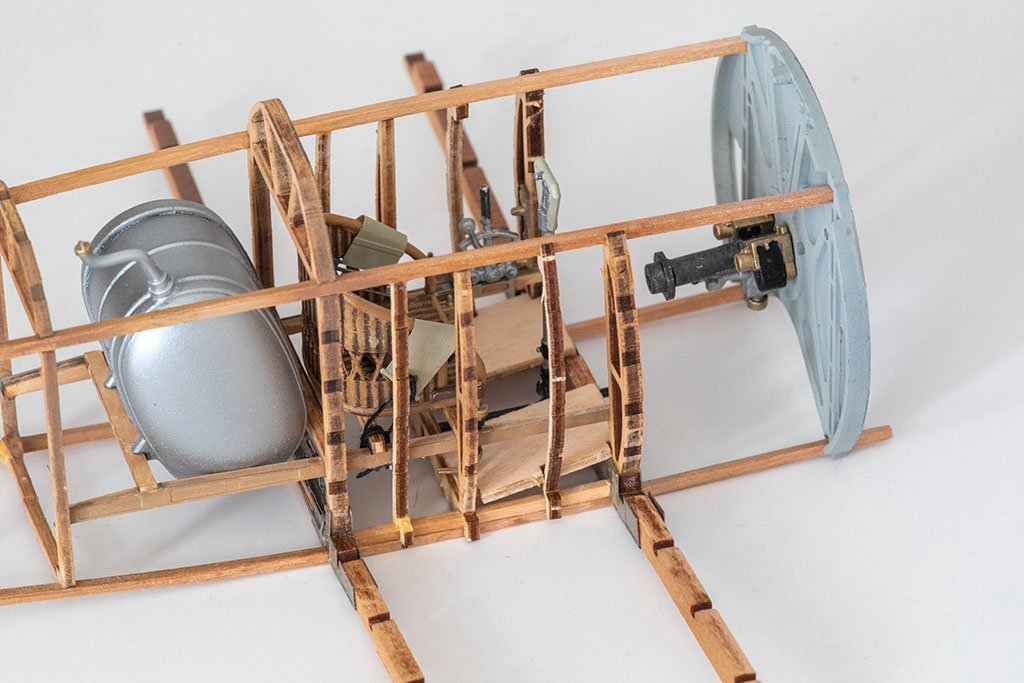
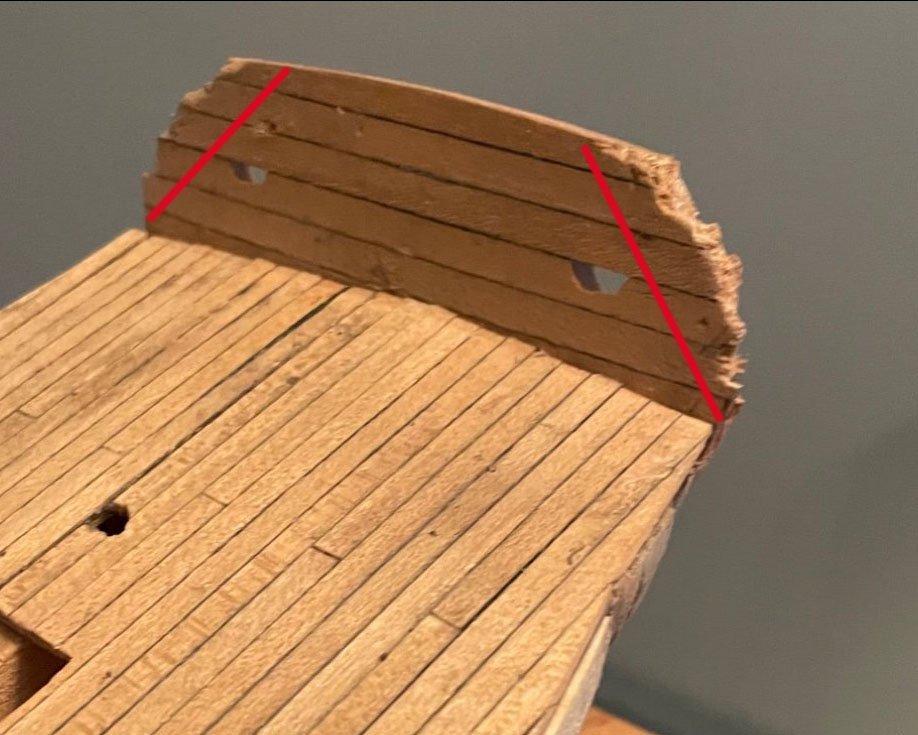
Well I was a bit ahead of myself, there were one or two more steps before I had to worry about any rigging. First, I did redo the oil tank to better fill in the seam. It is a bit of an improvement but still not perfect. I then put the four horizontal wood pieces on each side of the cockpit. This was affected a bit by those ill-fitting vertical pieces, but none of that will be visible from the outside once I put on the front fuselage panels.
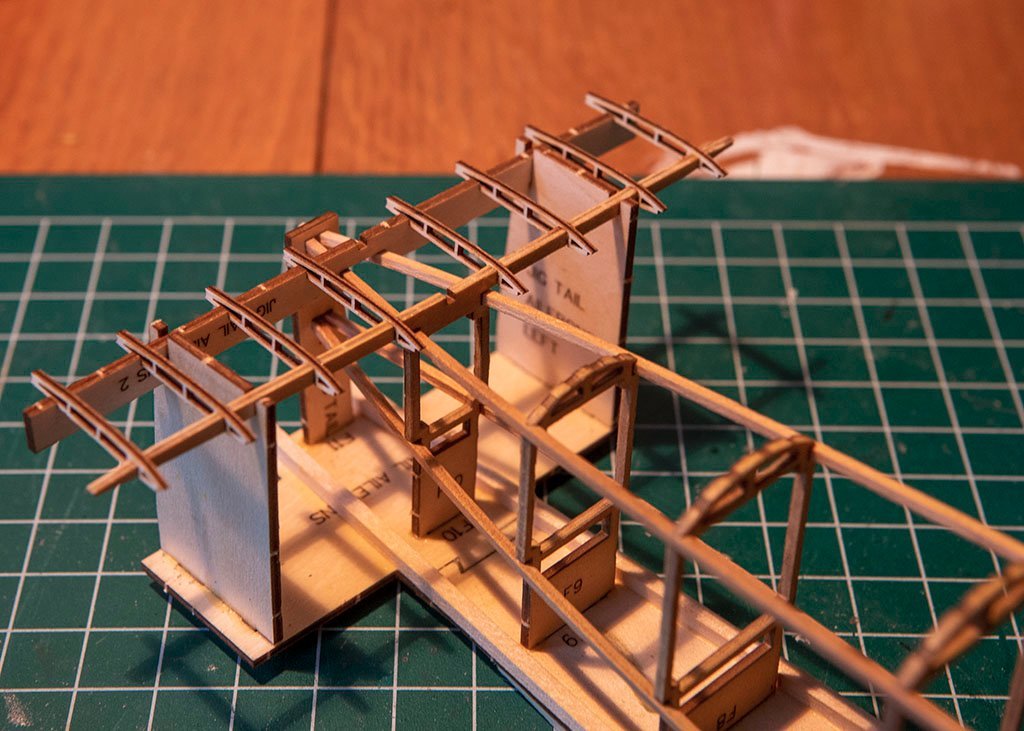
Then it was on to the tail, adding the tail skid, the elevator, and the rudder. That all went fairly well, though the elevator was a bit of a tight fit between the tail and the vertical part of the rudder.
And so now I am through step 13 in the instructions, with the next thing being the control line for the elevator, then the rudder pedals and all the attendant control lines for them.
Oil tank:
Cockpit
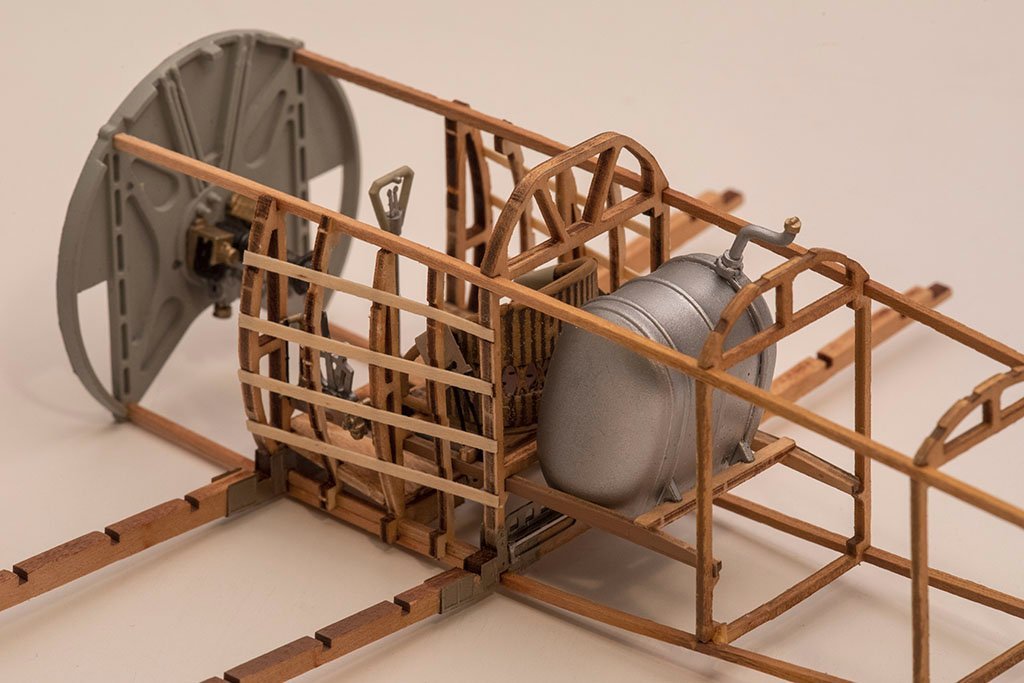
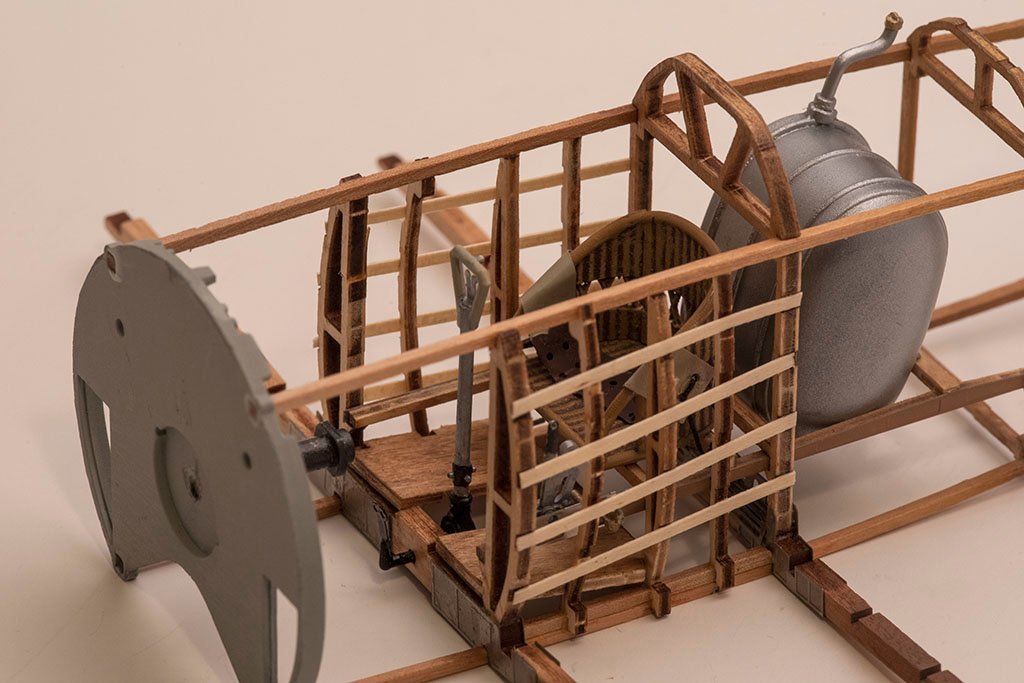
Tail assembly:
-
Thanks to everyone for the comments and the likes, and for just looking in.
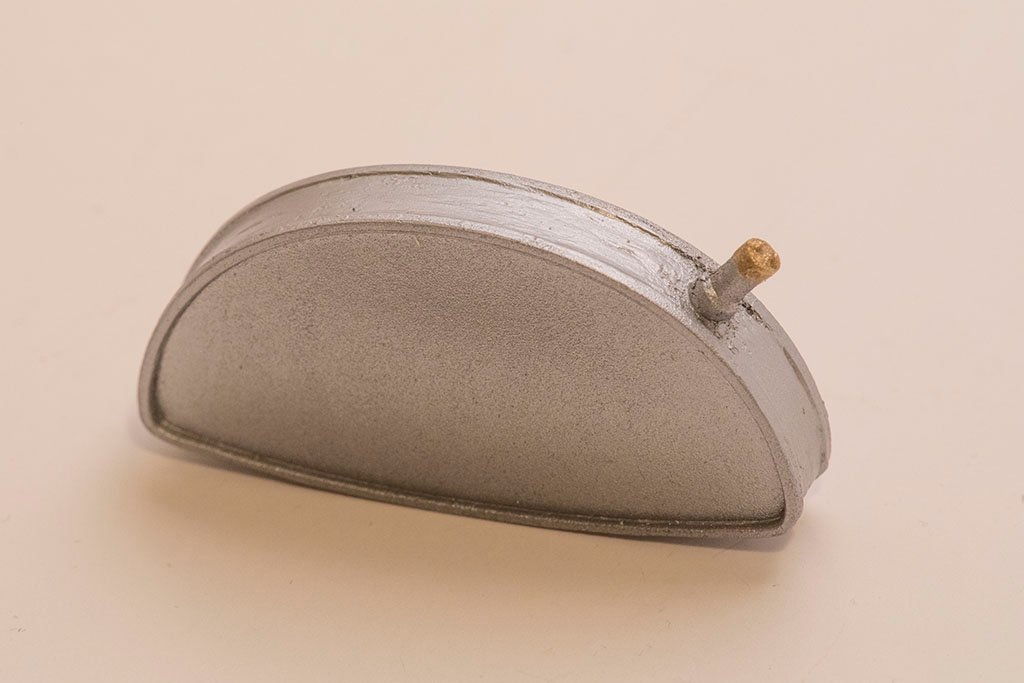
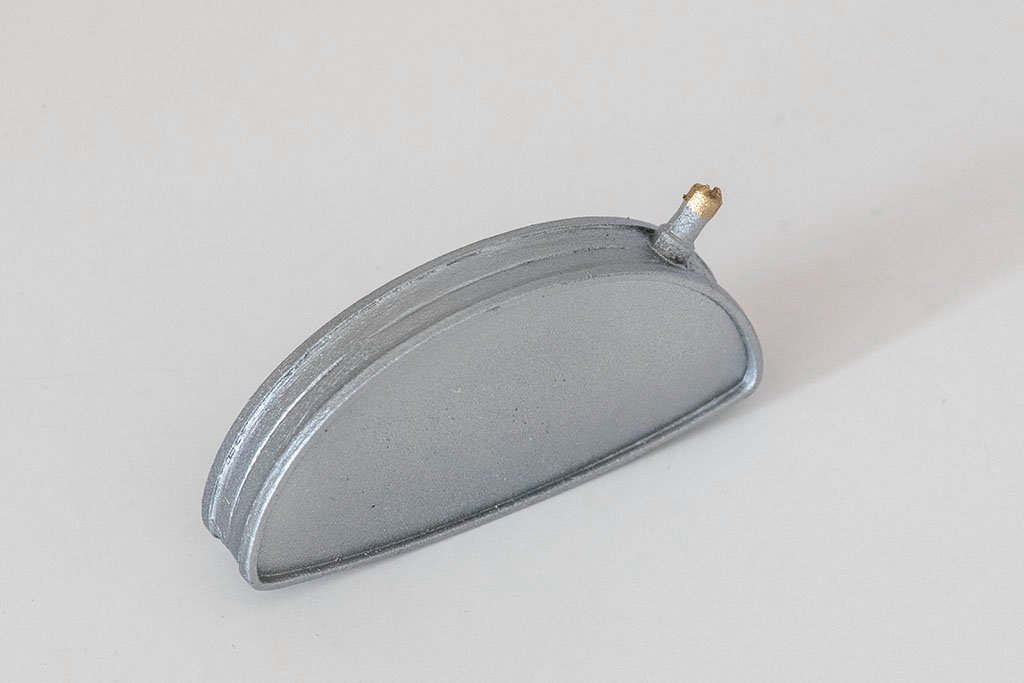
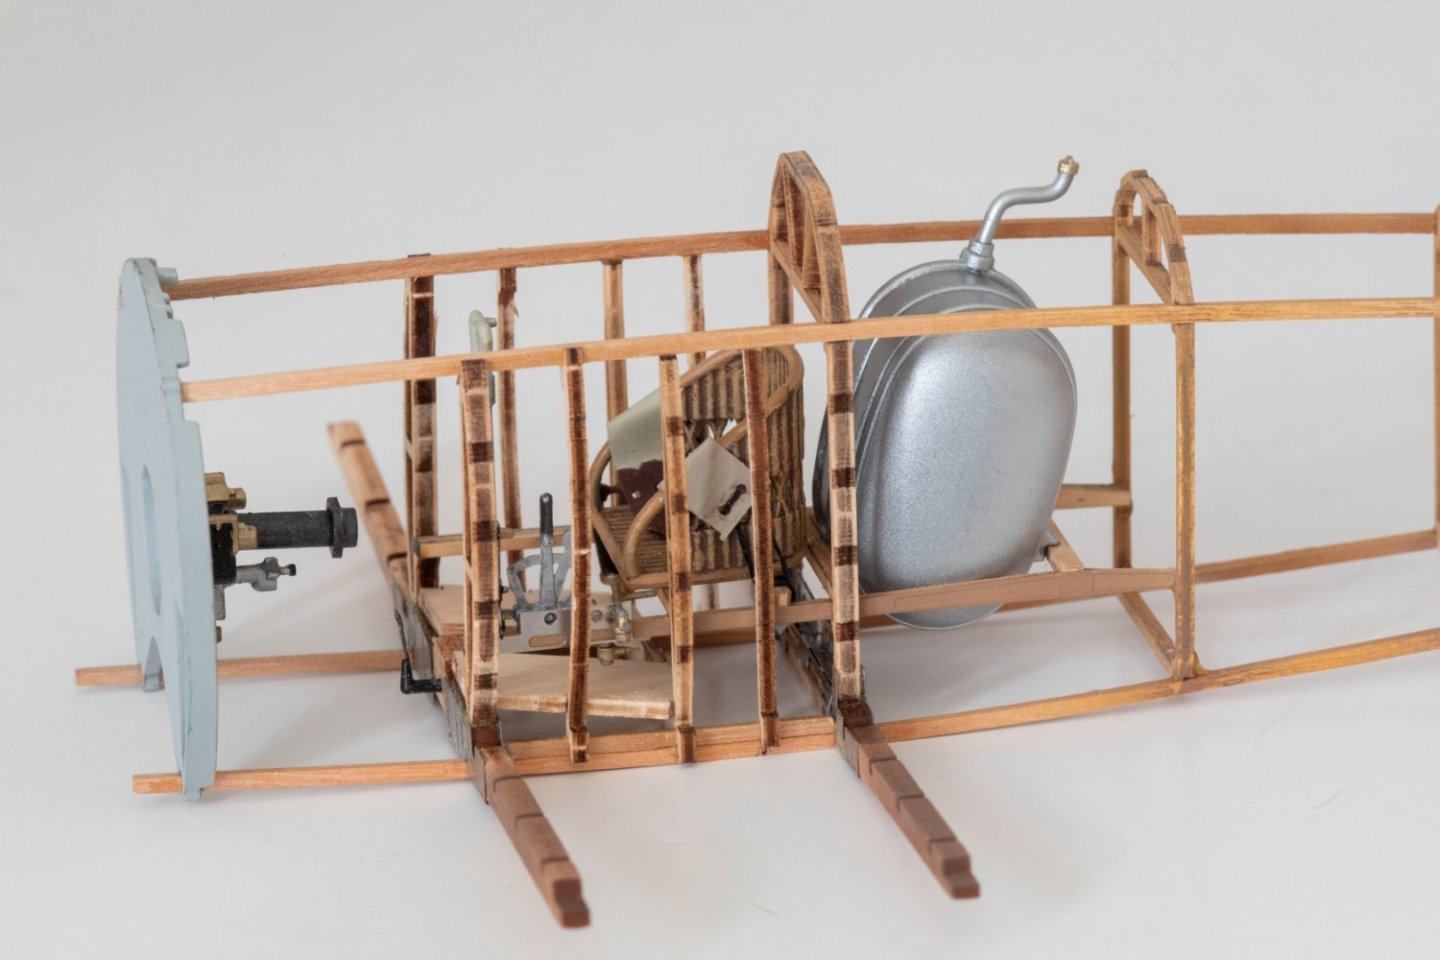
I received the Alclad aluminum paint and was pleased with it on the fuel tanks and oil tank. Though especially looking at these pictures I think I need to try again to fill in that seam on the oil tank and repaint it.
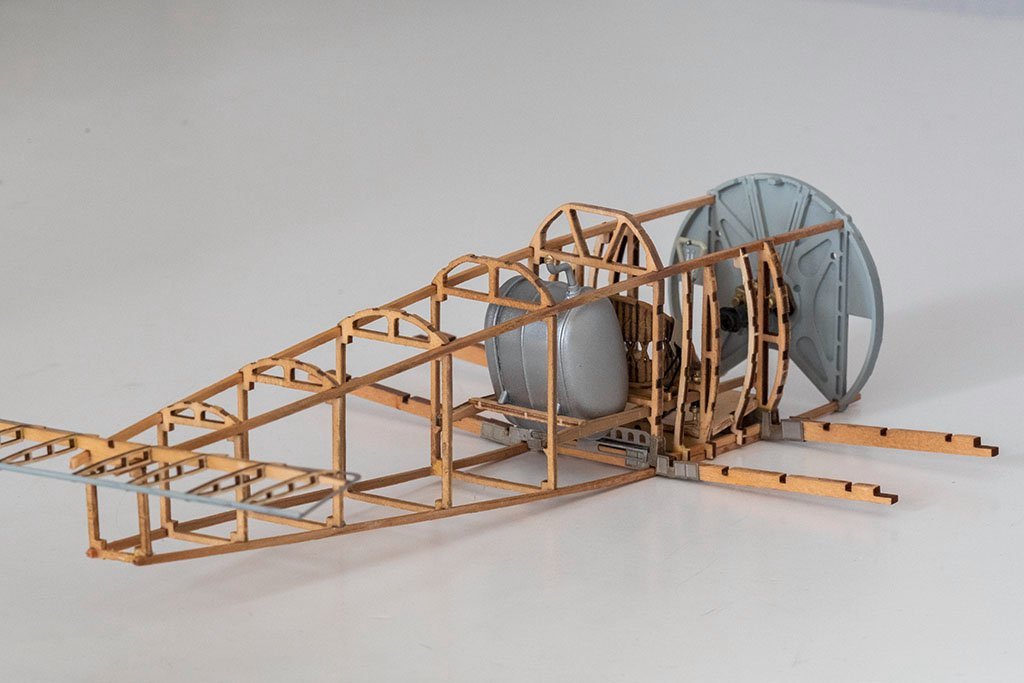
Otherwise, I mostly glued in some of the cockpit bits that I previously painted and took the big step of removing the fuselage from the jig. I am mostly through the first 10 steps out of about 50 in the instructions. The next steps have a lot of rigging of sorts, for both the control lines and the tension wires.
I did run into one issue that I hope does not present problems down the line. The two vertical pieces by the cockpit were a bit too short, indicating the upper and lower lengthwise stringers were a bit too far apart. I knew that the lower one was not fully seated into the slot, though I did not think it was off by much. I ended up putting a new piece of the 1.5mm square wood stock on top of the lower stringer and then placing the vertical pieces on that. You can see the extra piece on the third and fourth pictures below. My fear for the future is that the metal cowling pieces might not fully meet up, there may be gaps between the panels. We'll see.
Oil tank:
Gravity tank:
Cockpit and fuselage pictures:
- CaptnBirdseye, mtaylor, Ian_Grant and 14 others
-
17
-
I've been following this build and clicking on the like button, but felt like it was about time to comment. This is a really nice looking build! I too like the appearance of the more natural finish, though have not tried it myself. It takes a really careful, neat, tidy build when you know that you cannot cover mistakes with paint and you are certainly accomplishing that.
-
You do not indicate where in the world you are that you are trying to buy the kit, which might help. MSW sponsor Model Expo sells some Falkonet kits. I do not see one identified as a "long boat" but there is a "4-oared yawl" which maybe is what you are referring to.
Note that Falkonet is not on the "banned kit manufacturers" but 2 or 3 years ago there seemed to be at least a bit of question of how legitimate they are. If you search this site for both "falkonet" and "falconet" you will see a few hits that might provide more information.
By the way, this topic might have been better placed in the "general ship model discussion/wooden ship model kits" section.
-
Just now, mtaylor said:
Try going back and hitting "edit" after "submitting" when this happens. Or just open a new post for those that won't go up.
BTW, I like the weathering on guns. They appear to have seen some usage.
Thanks, yea after I hit submit I went back to look at the thread about that problem to see what the solution....doing the edit worked for me.
-
Well, Tuesday came and it was back to work full time....that seems like a bad habit I need to break one of these days
")
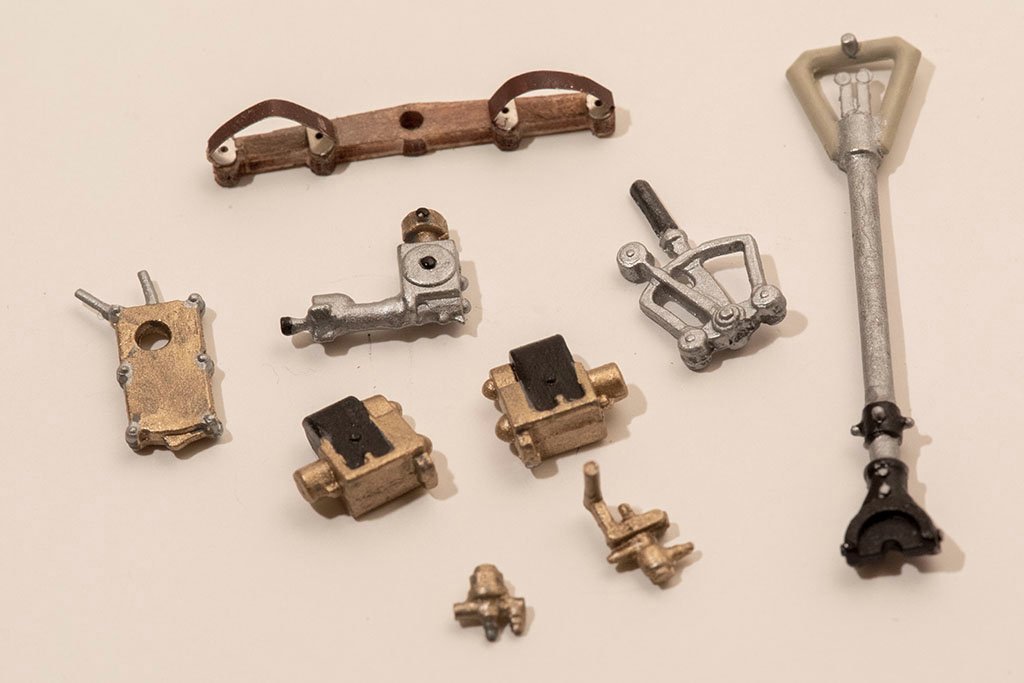
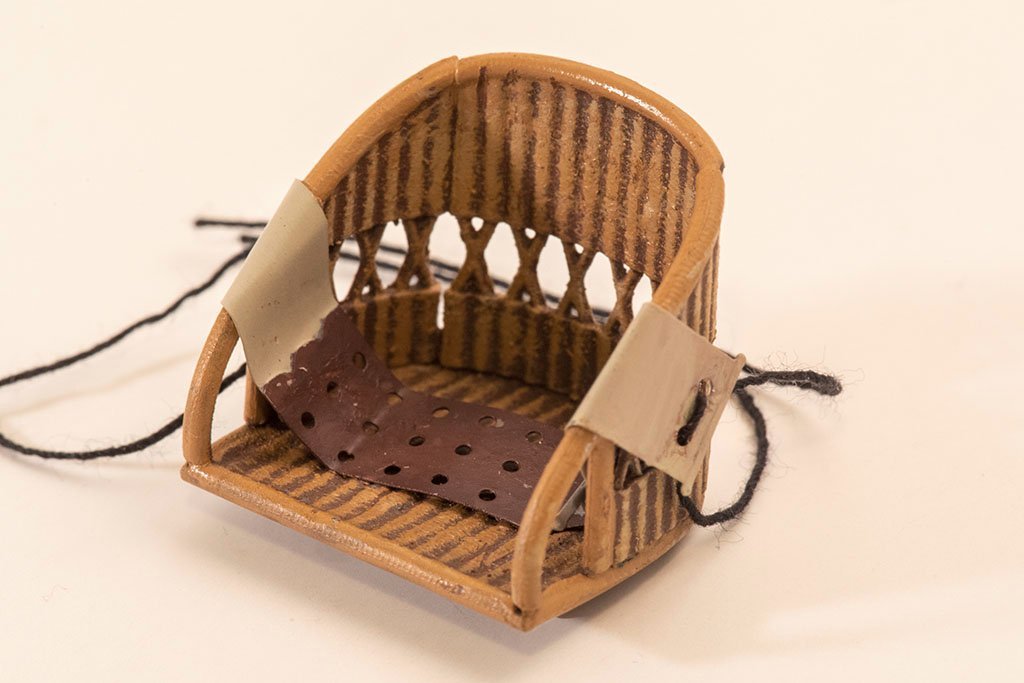
With that, progress slowed a bit. The next steps in the instructions were mostly for assembling and painting some of the metal bits around the cockpit, including fuel and oil tanks. I am still waiting on some Alclad Aluminum paint that I want to try on the tanks, but have painted the other bits. I then skipped ahead through the instructions looking for other small subassemblies to build and paint. So here's what I have:
Miscellaneous tiny bits:
Seat
Guns. I did some dry brushing with silver, might have overdone it a little bit.

Tail skid:
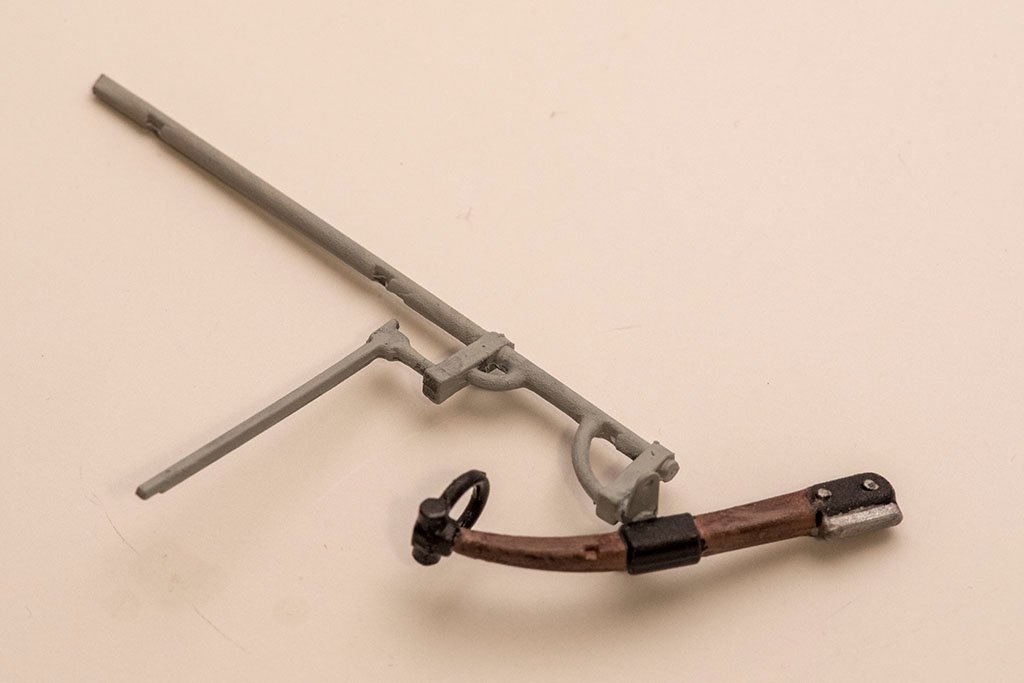
Rudder and elevator:
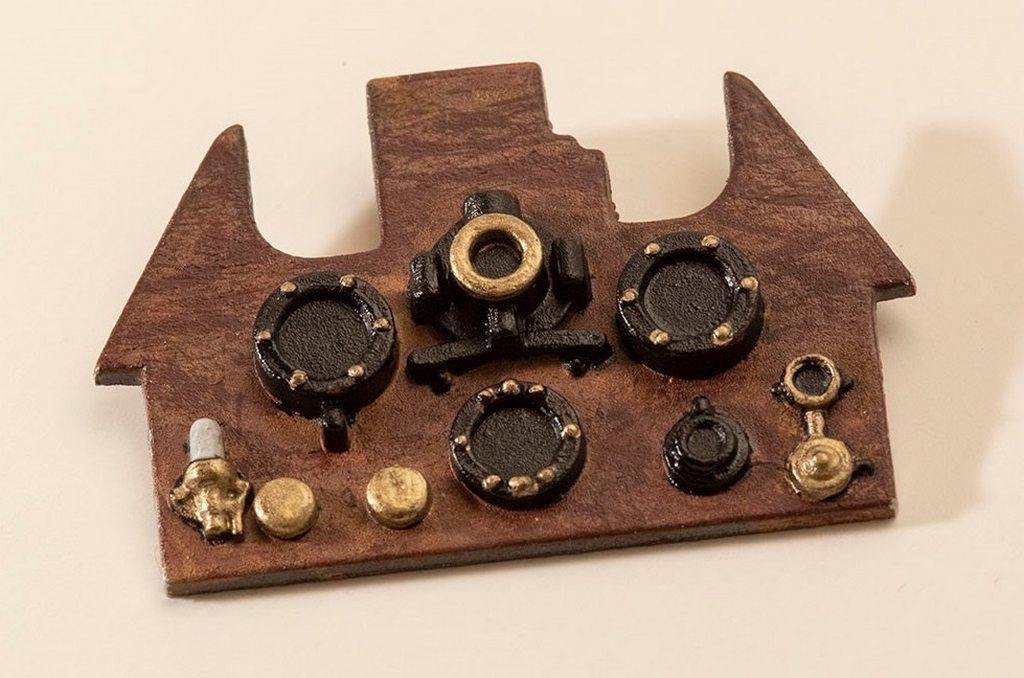
And the instrument panel. The kit includes some decals for instrument faces but I have not applied them yet.
- Edwardkenway, BobG, el cid and 16 others
-
19
-
First, thanks all for the likes.
OC....yea, delicate is a good word. I cannot imagine flying one while being shot at. Something about sitting in a wicker seat surrounded by sticks and fabric would not give a lot of security.
Tim....had not heard of "Dancing Wings Hobby". A little googling showed me more about those kits, looks interesting. Looking forward to seeing some pictures of the Fiat.
- Egilman, Old Collingwood, Canute and 2 others
-
5
-
I dunno, the cat looks pretty innocent!
I am no expert but seems like you could remove those planks from the front of the transom, saw down at about a 45 degree angle to remove the chewed portion, add in new triangular pieces to restore the original shape, then plank front and back of the transom to hide the repair.
- GrandpaPhil, Etcher and yvesvidal
-
3
-
Looks like you are off to a good start.
Regarding the "forward rake" of the bulkheads....my guess is that the bulkheads are perpendicular to the water line but the bottom of the keel is not parallel to the water line. In other words, the stern section of the keel sits lower in the water than the bow section, so the keel slopes downward a bit from front to back. Thus the bulkheads appear to rake forward relative to the keel. But in reality the bulkheads are vertical and it is the keel that is at an angle. you can see that on the plan in your post #3.
Edit: And by the way, welcome to MSW. You may wish to do a little intro post in the new member introductions if you have not done that already. There are several other Maine residents active here.
-
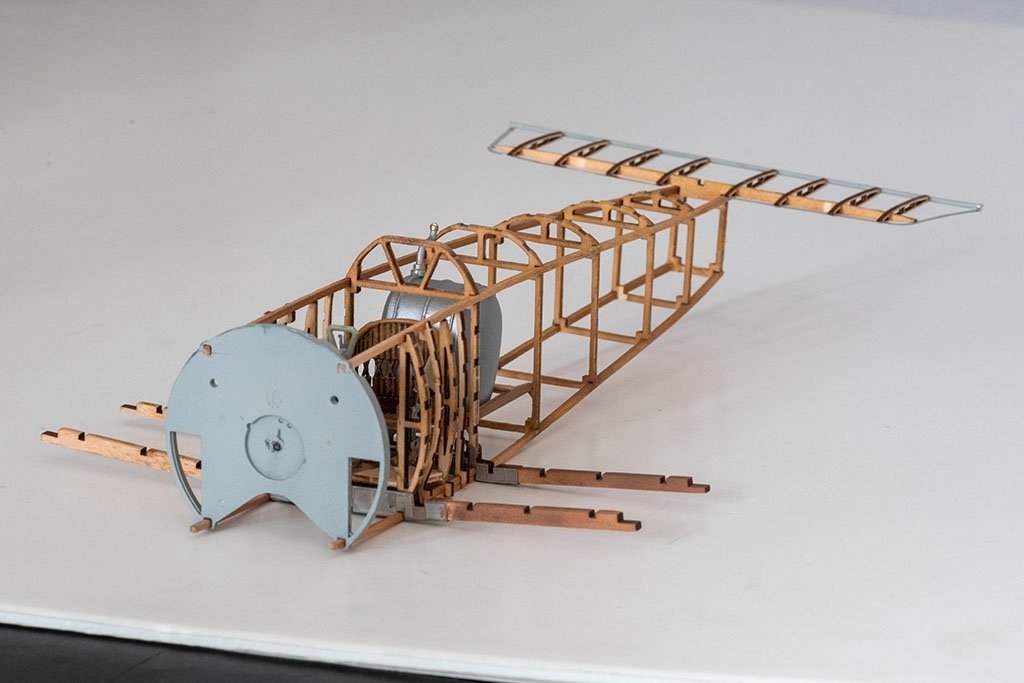
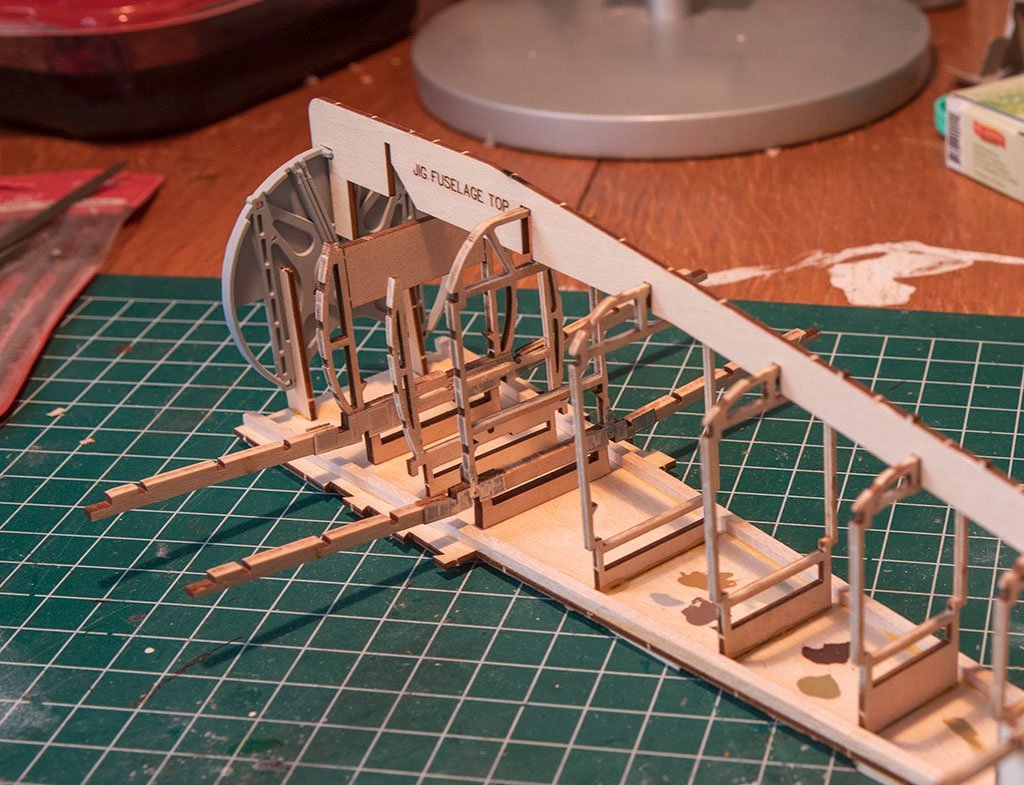
Did a bit more work on the tail wing and some supports around the cockpit which I did not capture in a photo. That completes most of the wood work for the fuselage. I also used the airbrush to lightly spray on some "Golden Oak" stain and also some light brown Tamiya paint just to give the bass wood a bit more color and to hide some of the laser cut char which I had also partially filed off. The kit instructions suggest leaving the char but painting over it with a "light wood" color. I am very much enjoying using the new air brush.
The next steps are mostly painting some of the smaller metal bits for the cockpit controls, some engine bits, fuel and oil tanks, etc. At least some of that work means waiting for the UPS delivery of some paint. I may skip ahead and do some other subassemblies if I get impatient with that wait.
-
11 hours ago, Tim Moore said:
Hi Gary glad to see you doing this beauty - looks like a pretty sweet project. I actually had this pegged as my next build but inexplicably careened off track and decided to try an italeri kit of a Grand Prix car for something different. I’ll be watching with interest to see how you make out, Diorama sounds like a cool idea.
I think you and I have similar ideas of what we like to build. Are you going to do a log of the Fiat, or at least post a few pictures when finished?
11 hours ago, ccoyle said:Great! I love these large-scale models. Ever thought about covering half with fabric?
Thanks, I think I'll leave it completely naked. As I recall, one of the build logs of the Model Airways Camel did that half covered/half uncovered look.
-
As mentioned, I have started the kit, and am on about page 18 (of about 270) in the instruction manual. The build starts with a jig for the fuselage frames and then building up the fuselage. And yes, 2 of the first 4 parts I glued together I did incorrectly. But that is inconsequential I think.
For the "required supplies" the instruction manual lists only CA but I have also been using wood glue for some of these bits.
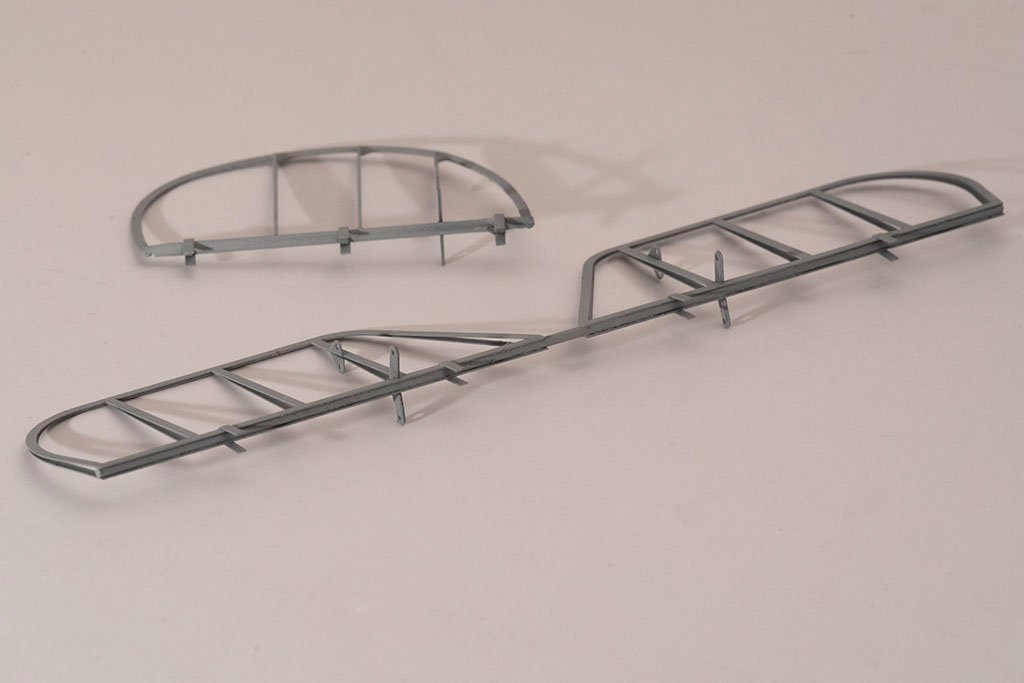
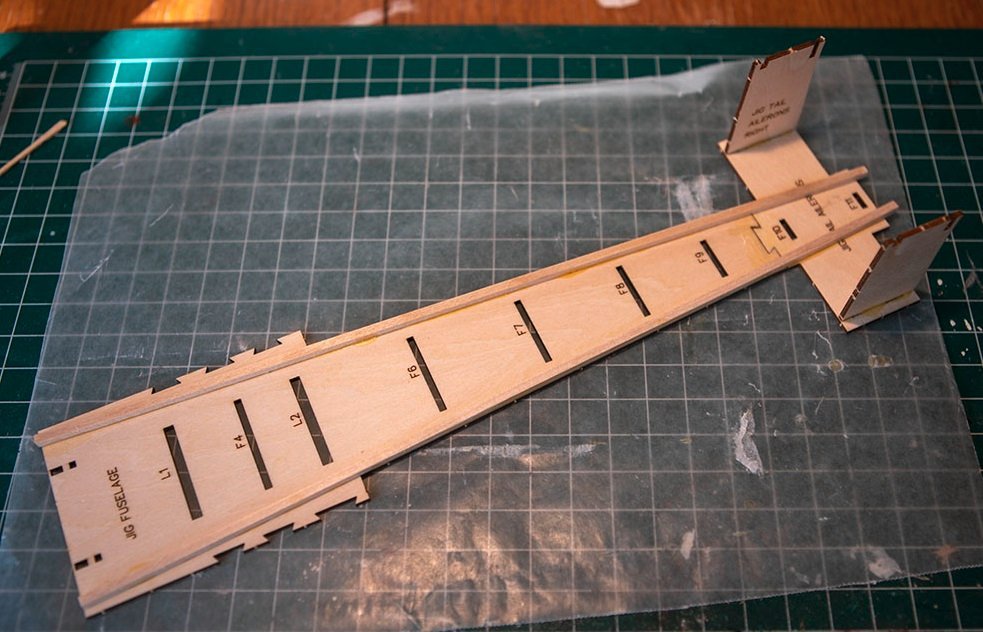
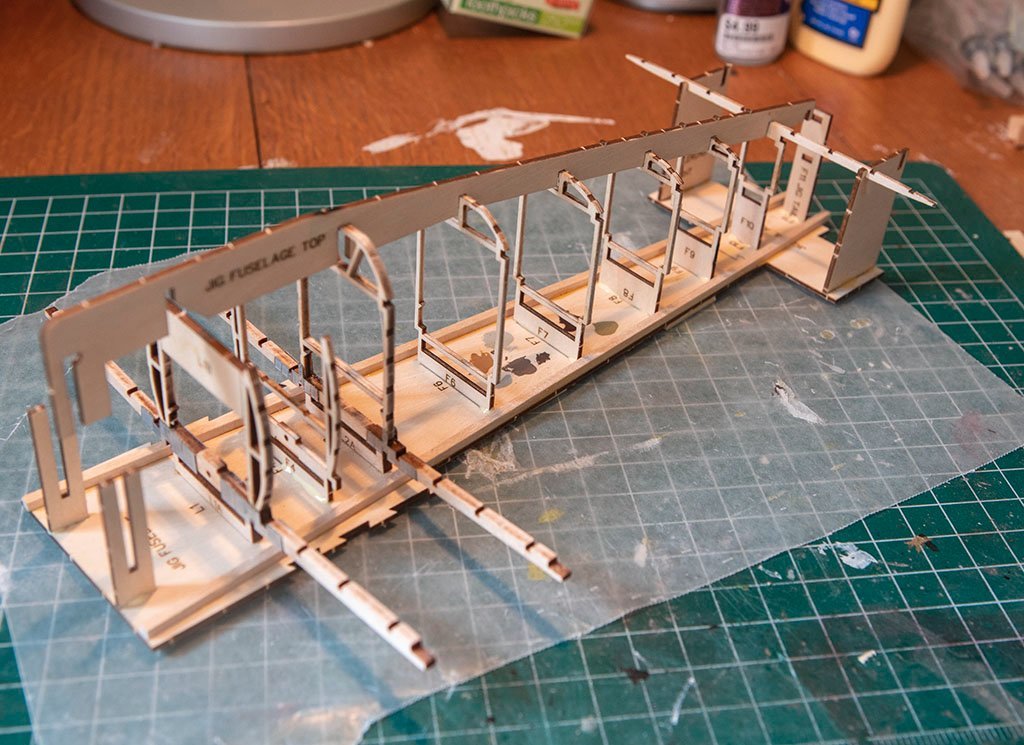
Fuselage jig:
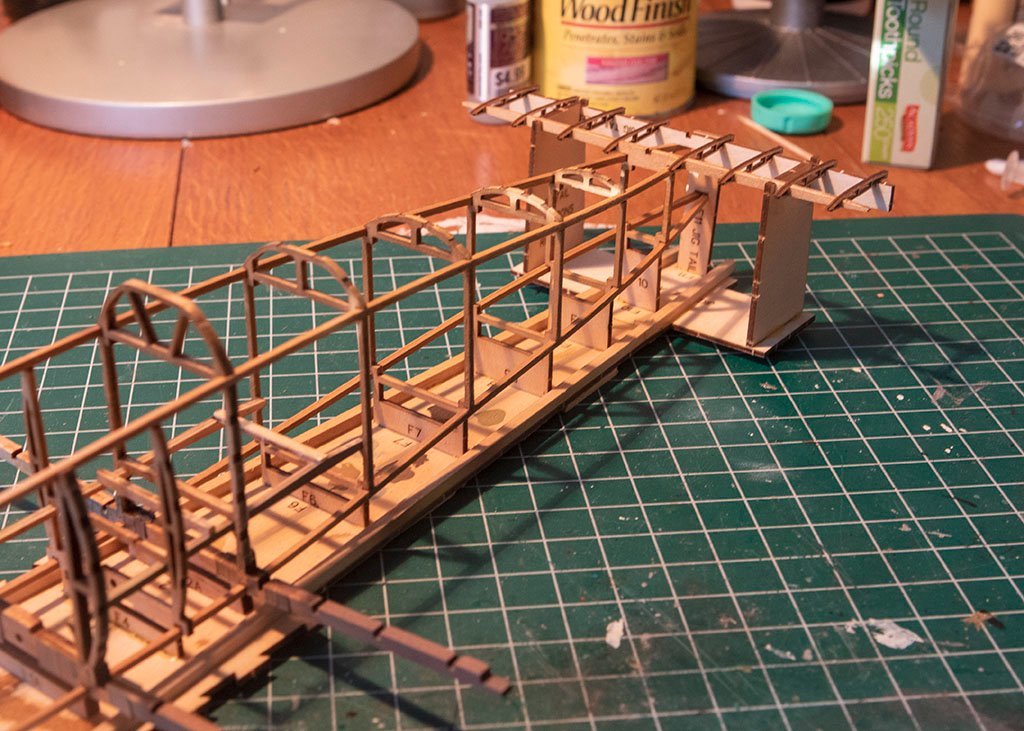
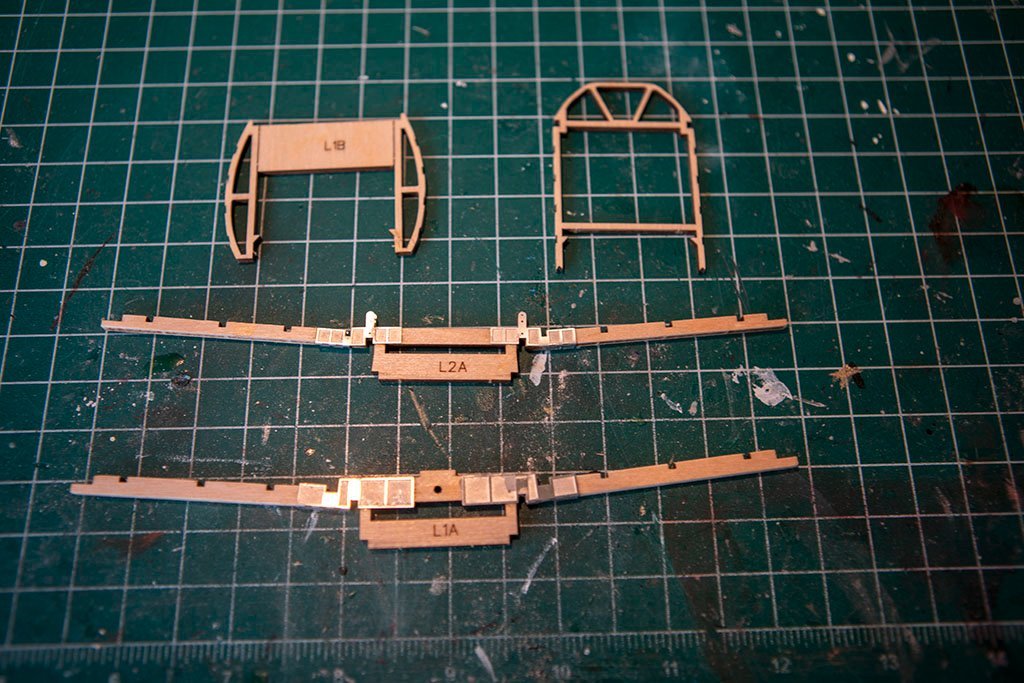
Frames around the cockpit and main wing spars. Some of these frames are quite delicate and easy to break, as I have already done a couple times. The photo etch pieces here I felt did not fit great as they were a bit larger than the wood piece that the wrap around.
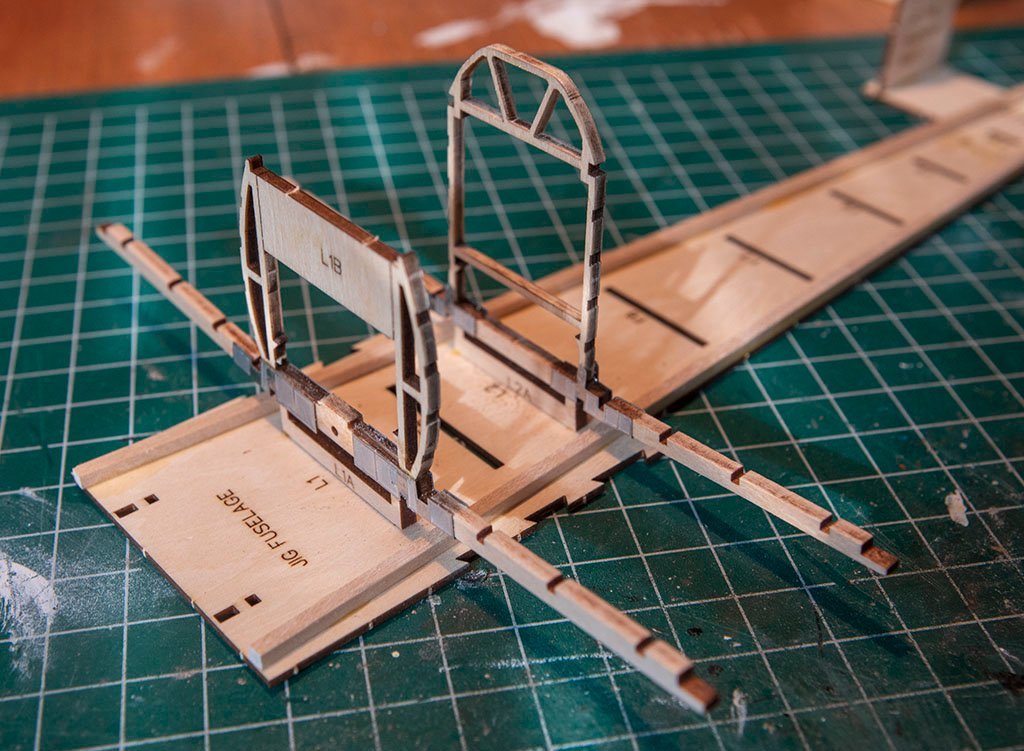
Remaining frames in place, followed by front structure/firewall:
-
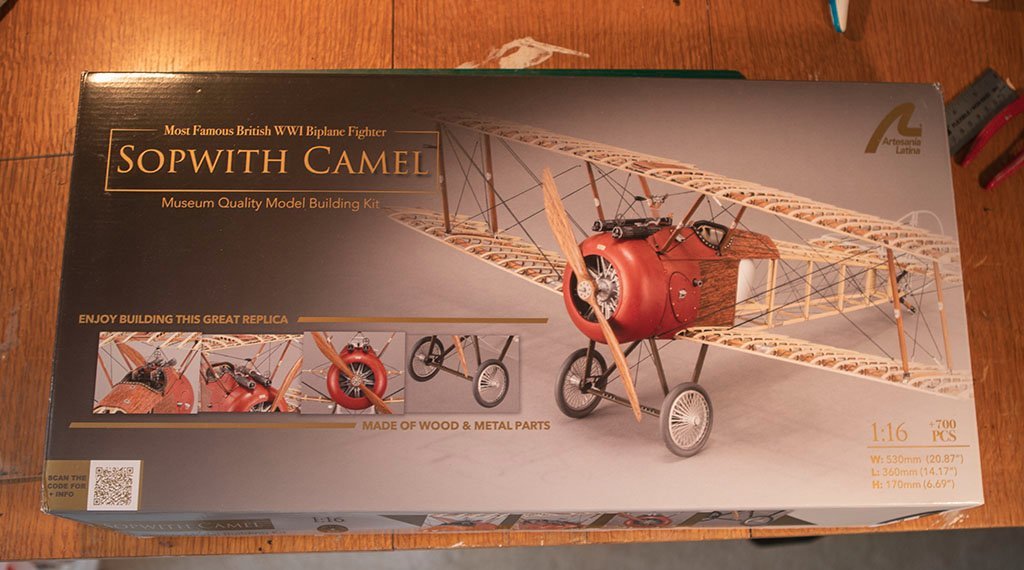
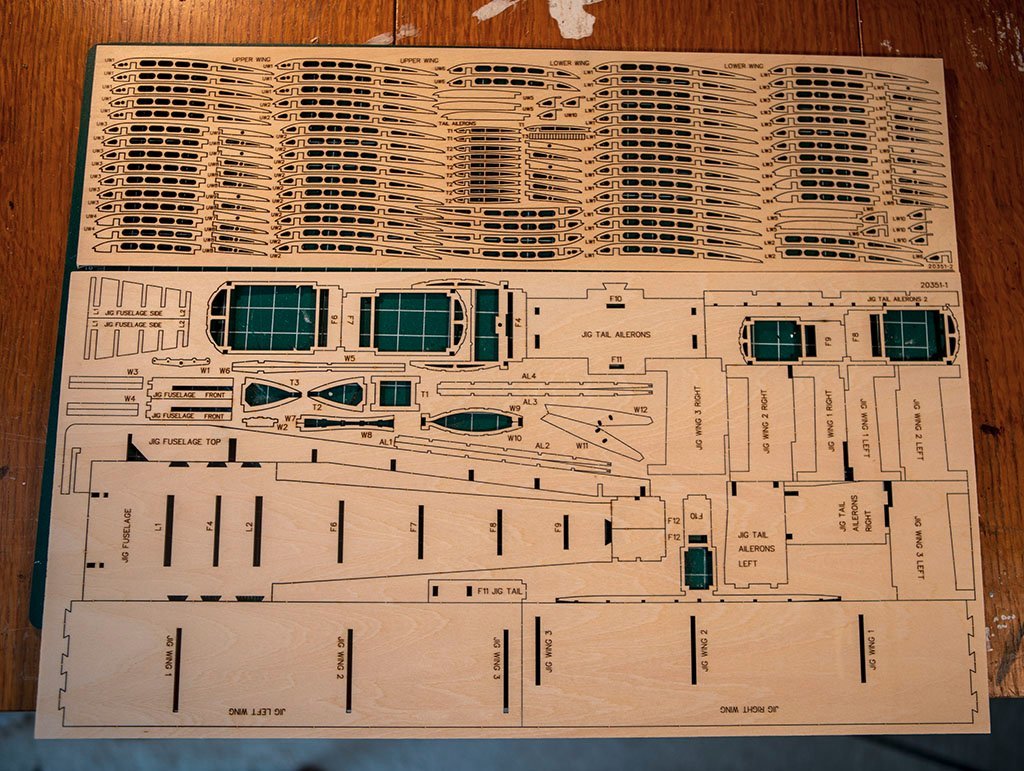
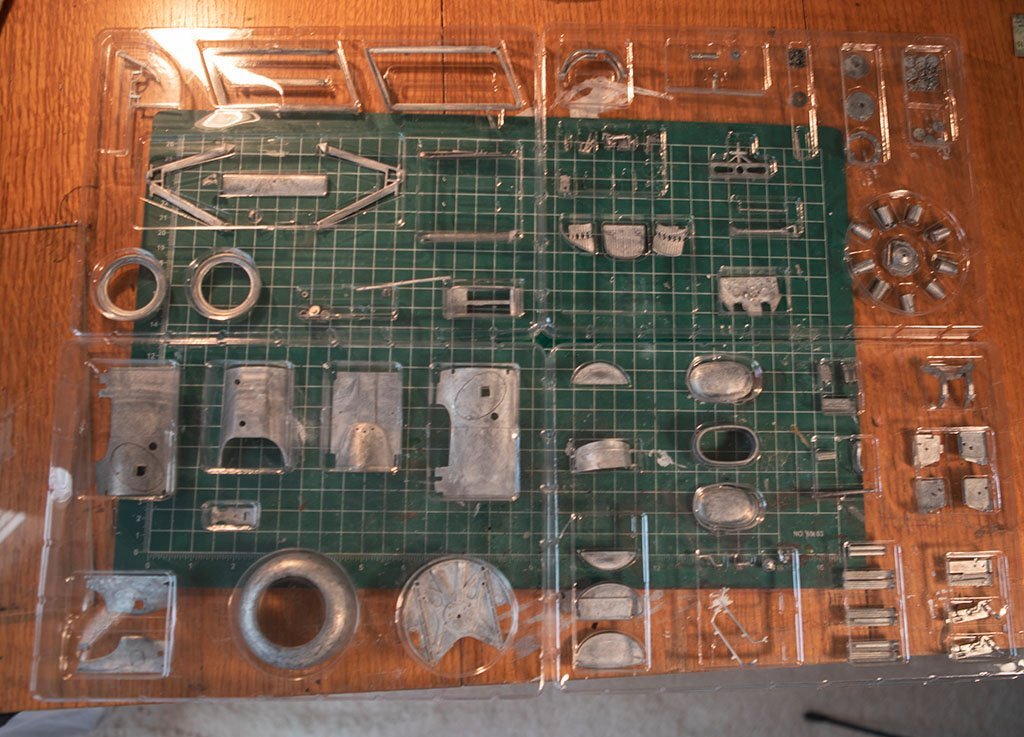
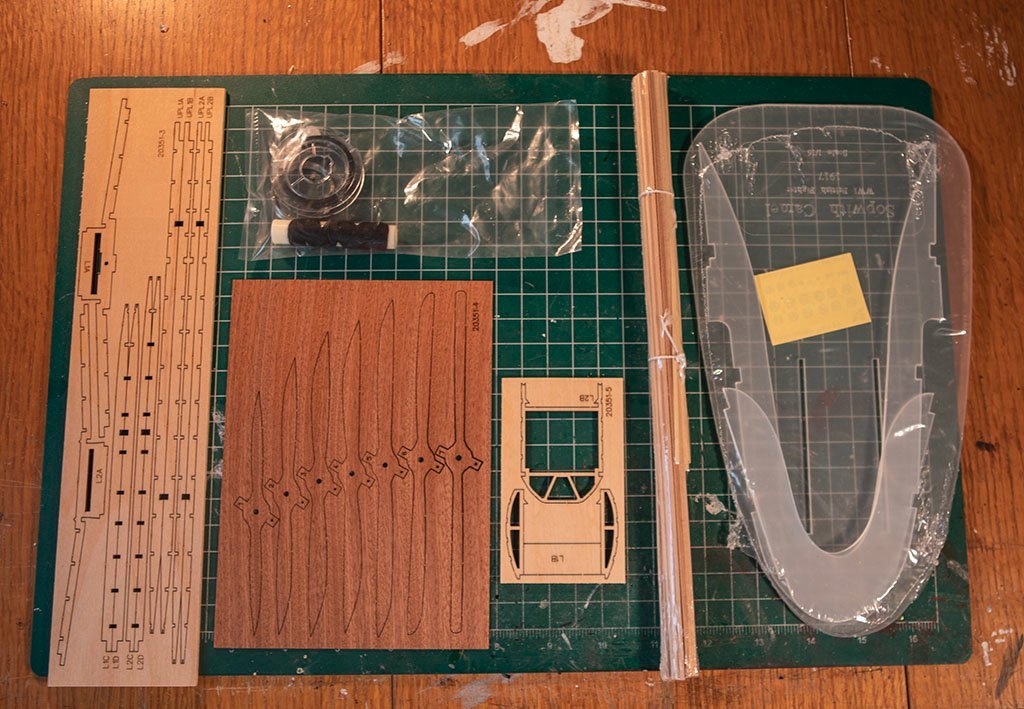
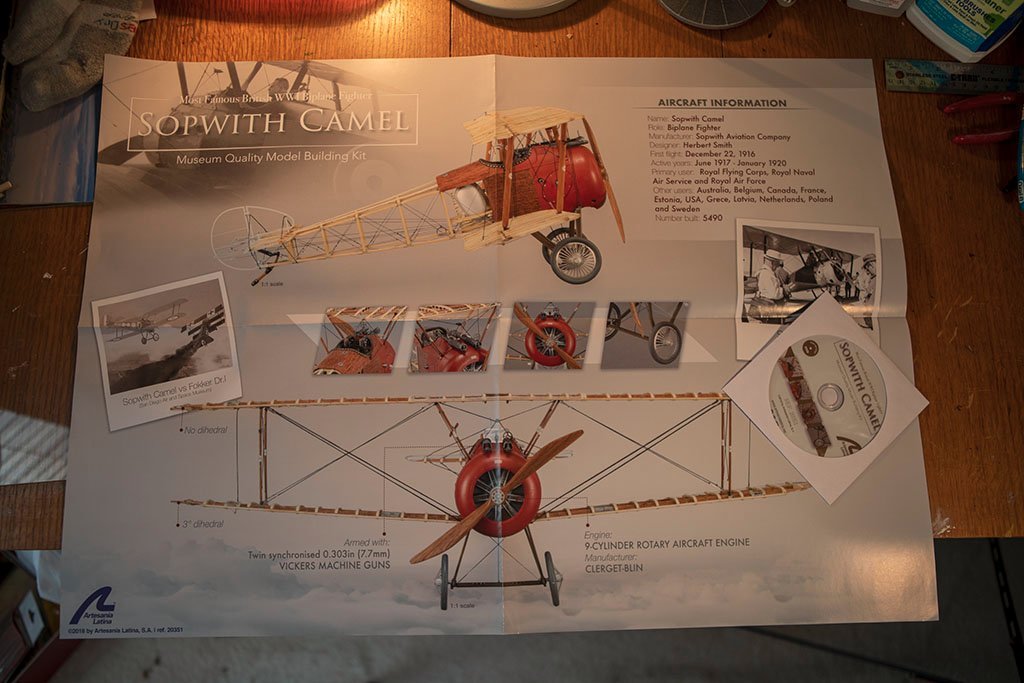
When I posted the Clerget 9 cylinder rotary engine a while back, I mentioned that I also had and intended to build the Artesania Latina version of the skeletal Sopwith Camel in 1/16th scale. I've now started on that build. I don't really intend to do a full build log but will try to occasionally post progress pictures. But I will start with some unboxing pictures. The kit has laser cut parts (both plywood and solid wood), strip wood, cast metal parts, a bunch of photo etch stuff, some miscellaneous stuff, a poster and a CD. It is missing a printed manual....that is on the CD in PDF form. I am still getting used to that. I've transferred the PDF to my iPad and have used that, but the danger is touching the iPad with a finger that has glue or paint on it. Otherwise the contents of the kit seem to mostly be high quality, and the laser cutting seems to be well done, with a bit of char but no scorch marks. Many of the laser cut parts are actually jig parts to hold the fuselage and wings during construction.
There's a lot of work ahead, but I have already started thinking about possibly doing some sort of diorama for this....e.g. displaying it on a grassy field with the front of a WW1 style hangar, perhaps with the engine I previously built displayed on a stand. We'll see once I get to that point. Who knows when that will be.

- Edwardkenway, Egilman, BobG and 10 others
-
13
-
-
Looking very nice! I struggled a bit with the transom but yours appears to be in good shape and good alignment.
-
Welcome to MSW! Be sure to check out some of the smuggler build logs, and start your own when you get going. There are a lot of helpful people here, including the owner of Bluejacket, in case you get stumped along the way.
- Ryland Craze, Keith Black, JeffT and 1 other
-
4


Swampscott Dory by Melissa T - FINISHED - BlueJacket Shipcrafters - 1:12
in - Kit build logs for subjects built from 1901 - Present Day
Posted
Well done! Congrats on a fine looking first model.