


gsdpic
-
Posts
543 -
Joined
-
Last visited
Content Type
Profiles
Forums
Gallery
Events
Posts posted by gsdpic
-
-
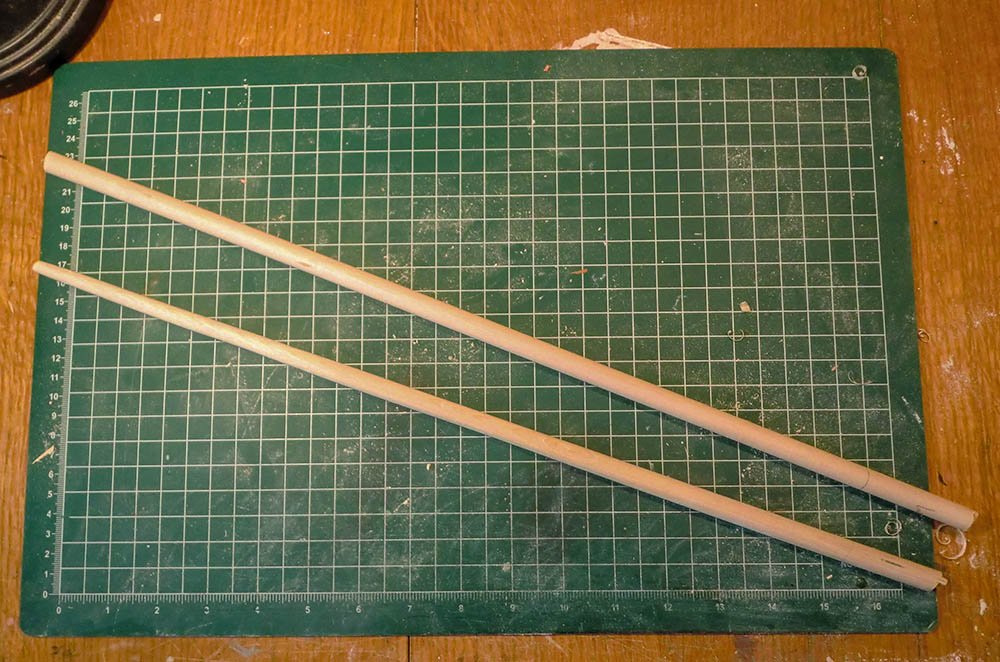
Thanks for the looks and likes. Progress has slowed to a crawl as I have been occupied by other things lately. The picture below represents pretty much all of the progress I have made in the last three weeks. I cut the two masts to the proper length, and began tapering the fore mast (the lower one in the photo). It is close, though it still needs some sanding.
-
On 10/18/2018 at 2:50 PM, Nirvana said:
Kevin, the uploads of pictures didn't work. Try again.
Hmm, I can see the pictures, and she is looking great. Ok, there is one duplicate "silkspan drying" post that has no pictures, but otherwise they are there. Looking forward to how you do the furled sails with the silkspan.
And by the way, the holes in the top mast that you have the question about....I checked the plans for the bluejacket kit and it does not have those holes, so sorry, no help there.
-
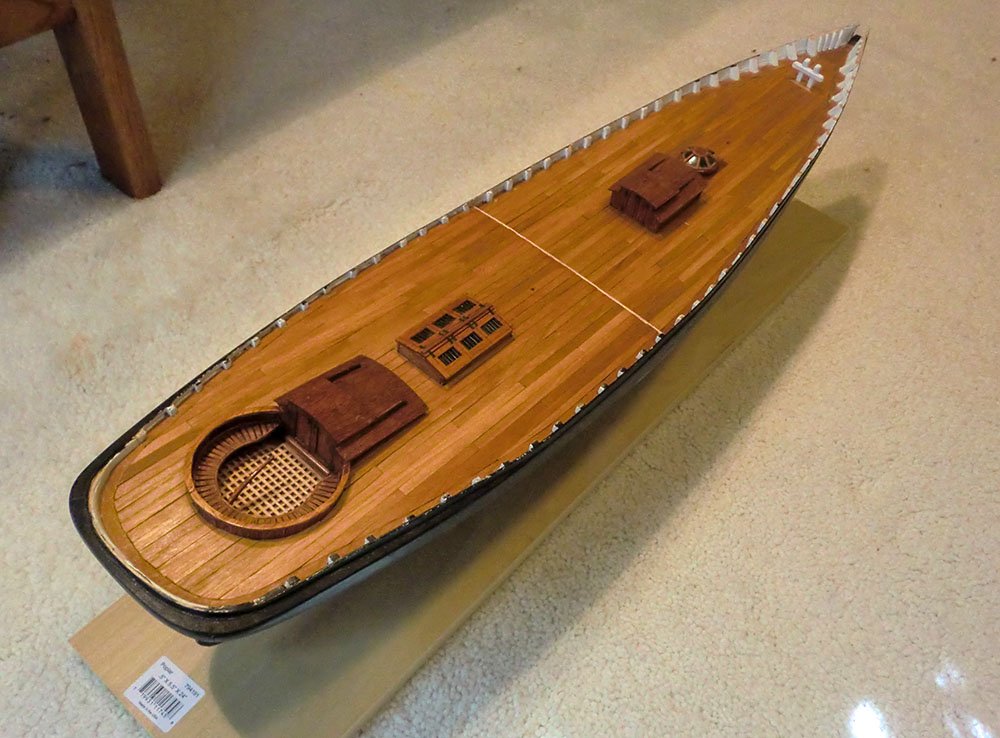
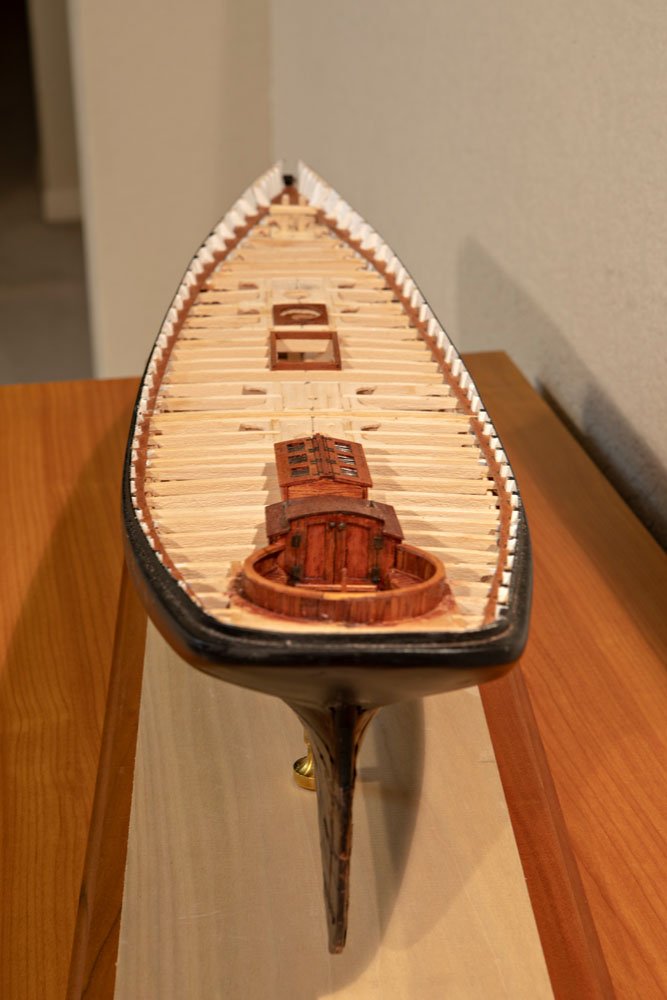
Deck Planking Complete
I've completed planking the deck and gave it a couple coats of finish. It is not perfect, not as smooth as it could be and probably not as accurate as could be, but I am still happy with the results. I'll be glad to finally get the cap rail on to give it a more finished look. I am not sure if I'll do that next, or just what my next step will be. There are a few other bits and pieces I need to attach to the hull and deck. The next big step will be working on the masts and booms and gaffs.

- CiscoH, FriedClams, bob porter and 7 others
-
 10
10
-
On 10/8/2018 at 6:08 AM, Kevin Kenny said:
Hi Gary
since there is no known confirmed plan of the boat there is no way of knowing the size of the deck planks. Having said that they do look a bit over size. In terms of your approach to planking i found it much easier to plank the entire deck except the cockpit placing the various fieces of deck furniture on top of the deck. This allows for a clean line bewteen the deck and the deck furniture. The only area where this was not possible was at the cockpit . i had to instally a moulding to get a clean transition between the external wall of the cockpit and the deck. She looks beautiful and you should be very proud.
Thanks for the comment, Kevin. The deck strips were 3/16th, same as supplied by the kit, but that would be 9 inches in real life which does sound pretty wide.
I assume that the method of attaching the deck furniture first and planking around it was a nod to the plank-on-frame construction and those who may not completely plank the model. Doing a molding around the cockpit is a good idea, though I am not unhappy with what I have in that area now.
-
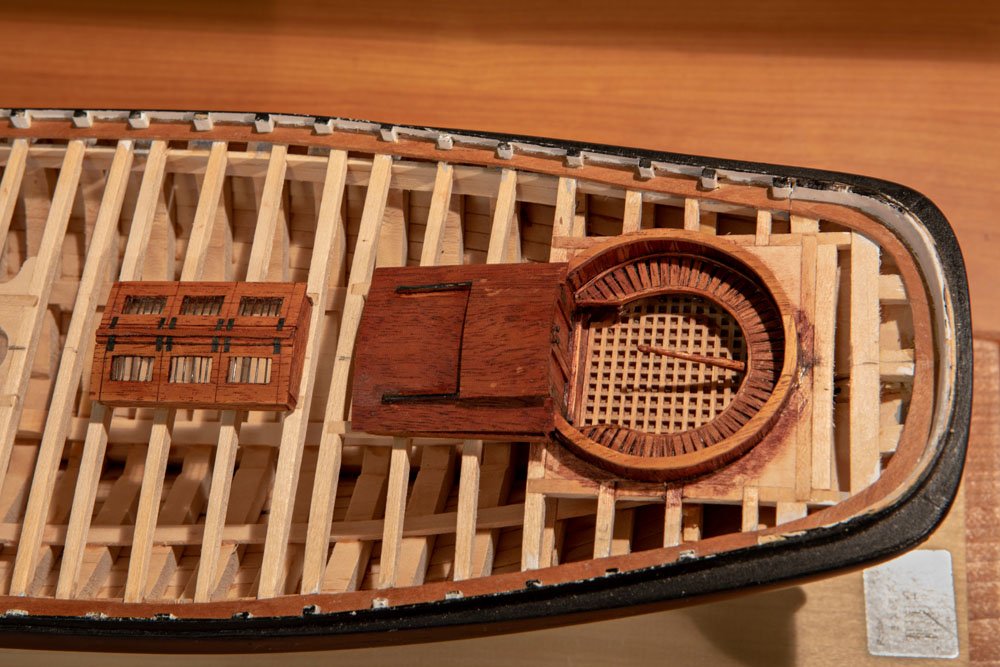
More Deck Planking
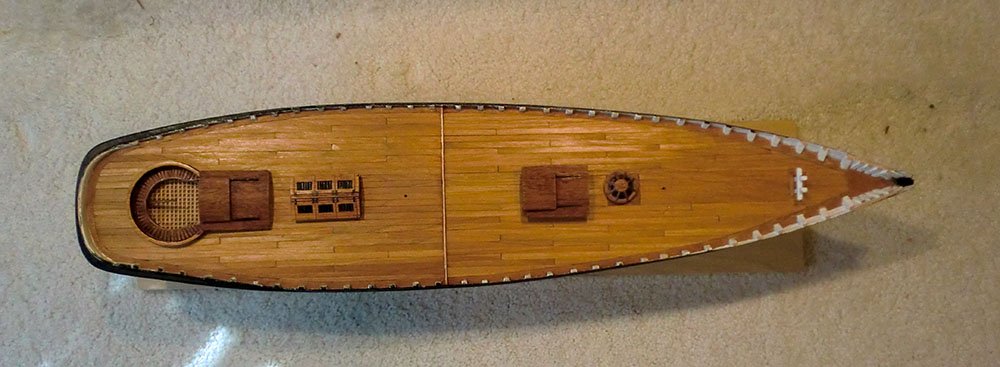
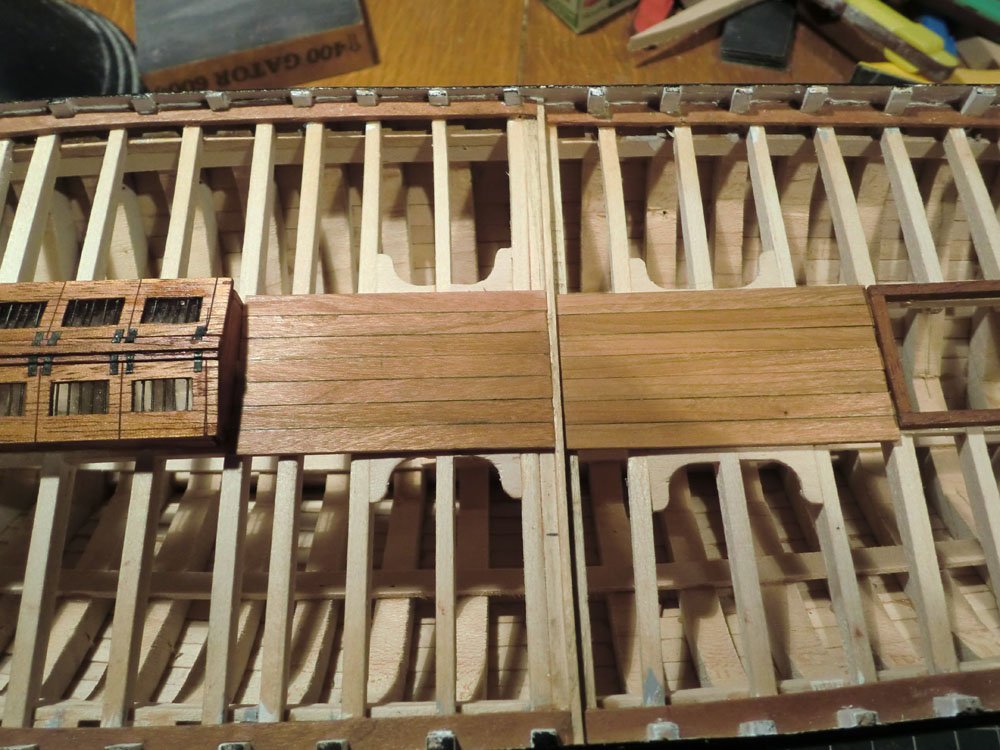
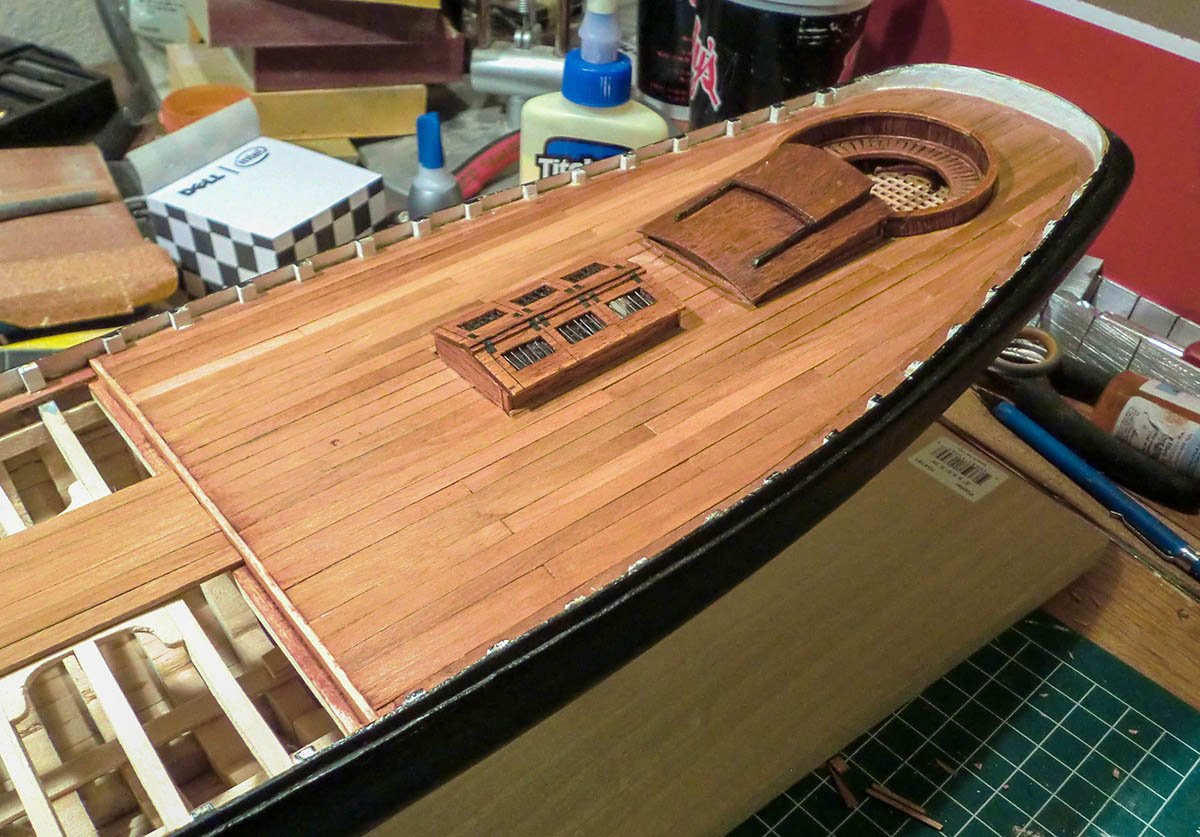
Thanks for the looks and likes. I've continued the deck planking, and have now completed the aft section of the deck. I have not been nibbing my planks...I think these planks are probably wider than scale and to properly nib I think I would have needed wider waterways. Even though I pre-finished the planks, I ended up sanding parts of them down. So I applied another coat of the tung oil finish before taking the pictures. I may apply another coat or two once I have the entire deck planked. Enough boring words, here are two pictures:
Oops, I feel the need to add a few more boring words.....You can see that I planked right over the hole for the main mast, though I did mark its location. I also went with a 3-way shift on the deck plank butts. So I had three lengths of planks next to the grub beam....1 2/3 inches, 3 1/3rd inches, and 5 inches.

- FriedClams, ccoyle, Duanelaker and 4 others
-
7
-
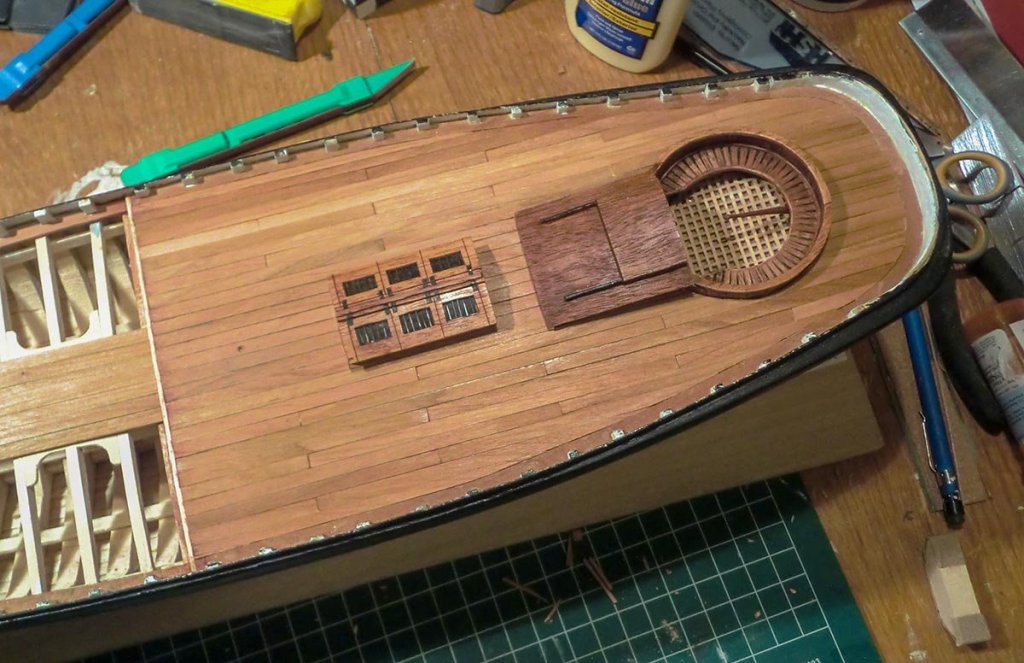
Back in the Saddle
So, after a bit of a break, I have resumed working on my America. I have started the deck planking. As noted earlier, I bought some cherry strip wood for the deck planking, just to give the deck a bit of a nicer, richer color. I started from the center, which means doing a bunch of short planks between the various bits of deck furniture. Once I get away from the deck furniture, I plan to use 5 inch long pieces, which works out to deck planks that are 20 feet long. I'll stagger the butts of course though have not decided on a pattern just yet.
I have 7 planks done from the aft side of the forward hatch all the way to the stern. I have more work to do around the cockpit, and some very short planks between the forward hatch and the skylight, and then it will likely move a bit faster.
Oh, I pre-finished the deck planks, using the same tung oil finish that I used on the deck furniture. I'll likely still go back and do one more coat after all the planks are installed, but I still think it was a useful thing to finish these planks before putting them on.
Here are two pictures of what I have completed.
-
Very neat and tidy work. Interesting arrangement with the deadeyes inboard of the bullwarks. I have not seen that before but I am far from any kind of expert. The build logs (like yours) of these Maristella kits have me very interested in possibly trying one myself for my next project.
- Seventynet, EJ_L and Old Collingwood
-
3
-
-
1 hour ago, Kevin Kenny said:
She is really looking beautiful . The inside molding on the seat would not be done that way simply because you would not be able to sit right back . But that’s nitpicking. First class model
Thanks...yea, that is probably true, even though at scale is it barely more than an inch wide. I should have made the trim flush with the top of the bench. By the same token, the inside of the cap rail probably should have been flush on the inside so the back of the bench was smooth.
-
Time for a Break
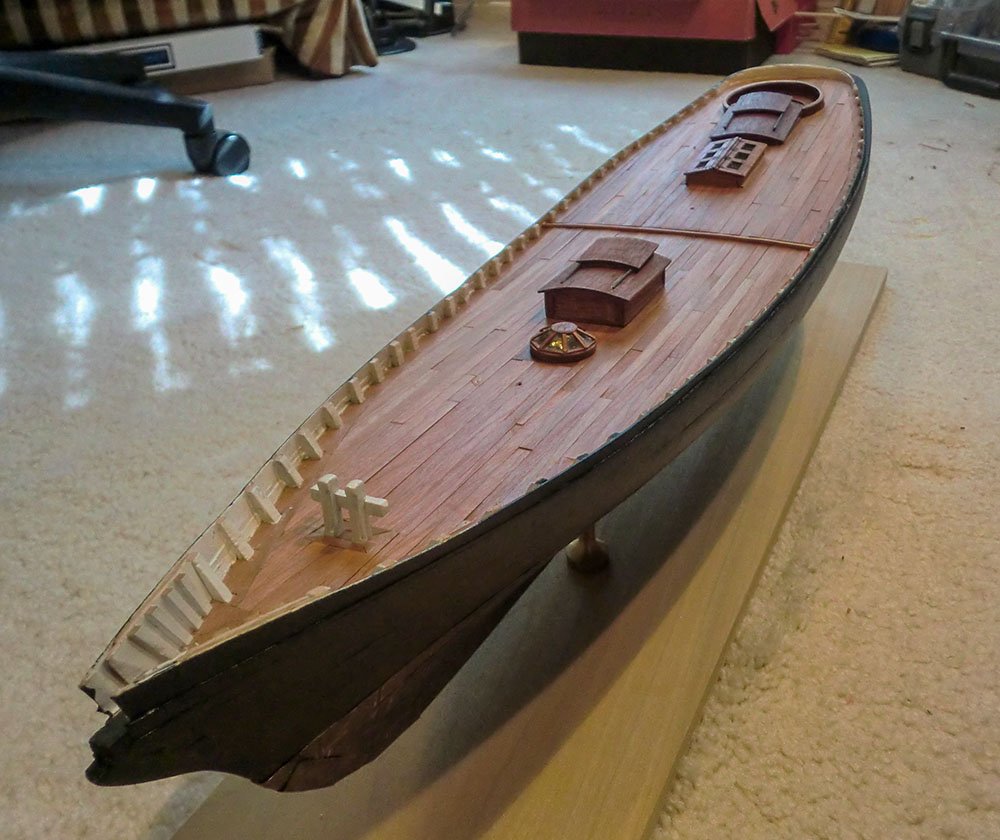
I got the finish applied to the cockpit, so I got out the "real" camera and took a little more care with some photos, to show the current state of this project. At this point, I need to clean up the shipyard a bit. Other obligations for the next few weeks will probably keep me away, so I'll likely not be able to work on the deck planking until Oct 1 or so. Here are the pictures:


- FriedClams, GuntherMT, tarbrush and 5 others
-
8
-
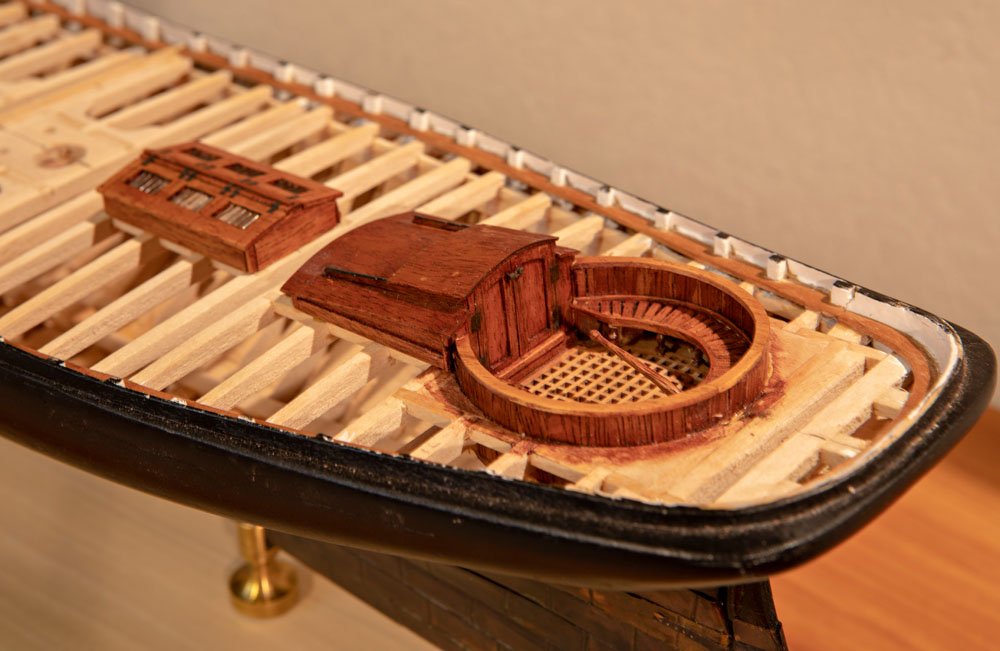
Cockpit
First, thanks for the looks and likes and thanks Tim for the comment. I did clean up around the hinges despite what you said, and the "knob" darkened on its own without me doing anything else to it.
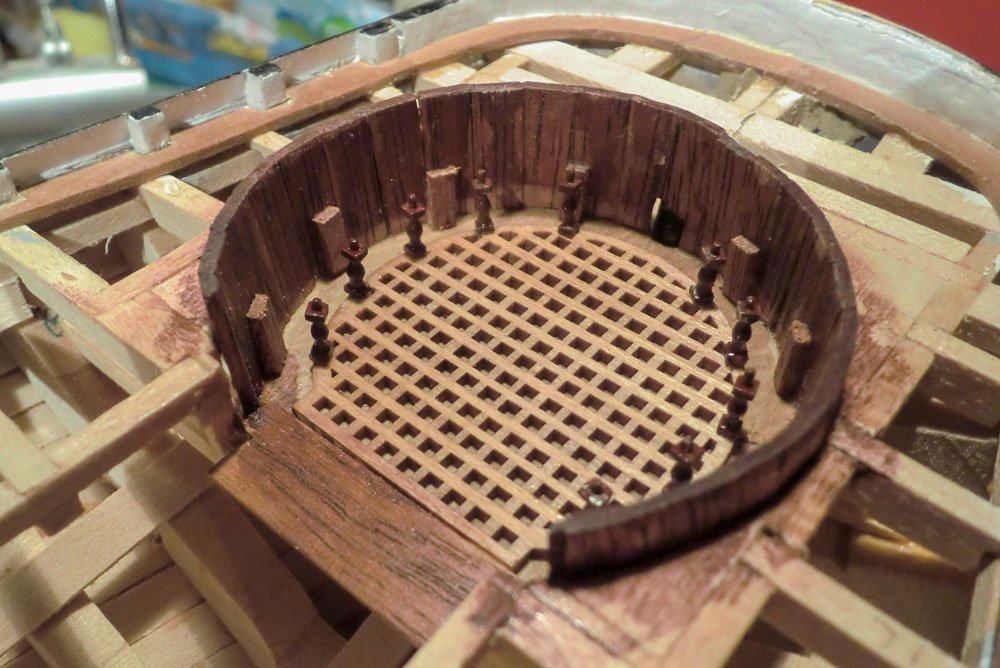
I am now done with the cockpit, and this time I managed to take pictures along the way. Here's what I did, with pictures of each step to follow.
1. Cut some small pieces of mahogany the same height as the stanchions and glued them around the inside of the cockpit to support the seat.
2. Painted and installed 10 stanchions. The kit supplied 12 but I thought 10 looked like enough and wanted a couple spares in case I lost or broke one. The supplied stanchions are britannia metal. I primed them, then dug up some old brown paint to paint them, then brushed on some tamiya acrylic "clear red" to give them a little more reddish brown look. After all that, they are almost invisible once the seat is installed.
3. Installed a seat base. This was cut in three sections and shaped to fit into the cockpit. Drilled holes for the pins at the top of the stanchions. Also installed a little trim strip around the outer edge of the seat.
4. Painted the seat base black.
5. Cut and glued on a bunch of slats on the seat. Once dry, sanded the inner edge to the edge of the seat base then installed a trim strip around the inner edge of the seat and sanded everything a bit again.
6. Finished trimming the seat. Glued on the cap rail around the top of the cockpit (made from three sections of mahogany), then glued in the companionway and the tiller.
Next I'll stain and finish these new parts of the cockpit and glue on the other deck furniture.


- GuntherMT, Gregory, Duanelaker and 2 others
-
5
-
Kevin, nice little ship's boat. What are your plans for it?
The bluejacket kit does not have any provision for boats, though the plans indicate that they were likely removed for racing, could be hung outboard from removable davits midships, or lashed to the deck midships. I've messed around with trying to make a couple little boats, thinking I may put one or two on the deck or hung from davits, but have not decided yet.
Oh, and by the way, the main model is looking fantastic with those sails.
-
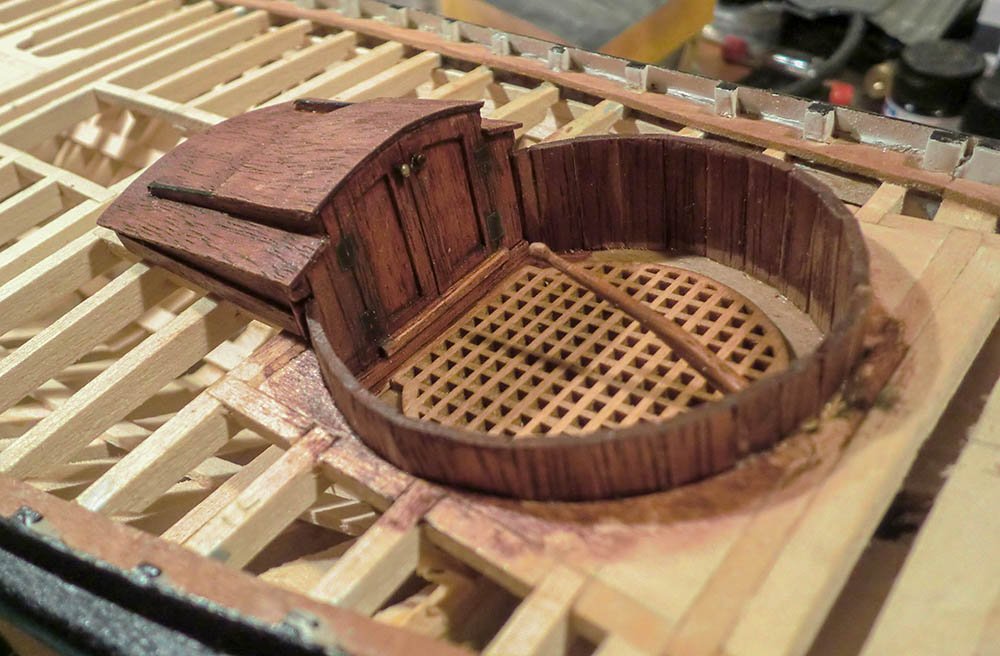
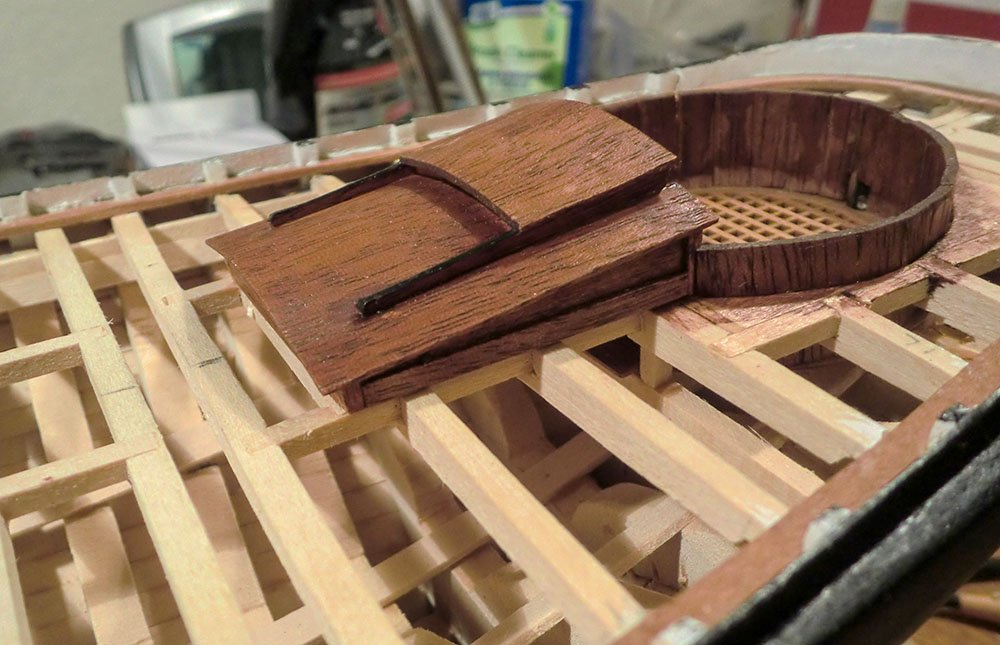
I have now completed the cockpit's companionway/hatch. I have also made the cap rail for the cockpit but have not installed it yet as I figured it may get in the way when putting the seat in. I am still trying to decide the best way to do the seat. The instructions just say "make the seat of mahogany" without any other hints.
")
I applied stain to the cockpit area and companionway to match the other deck bits...you can see some of the cockpit wall the stain absorption was affected by glue. The seat should hide at least some of that.
Anyway, here are a couple pictures of the companionway. Seems for some reason the blackening did not have much affect on one of the door knobs. Might have to try that again. I might also try to clean up the wood around the hinges...it seems the blackening of the hinges also darkened the nearby wood.
- BobG, Duanelaker, mojofilter and 5 others
-
8
-
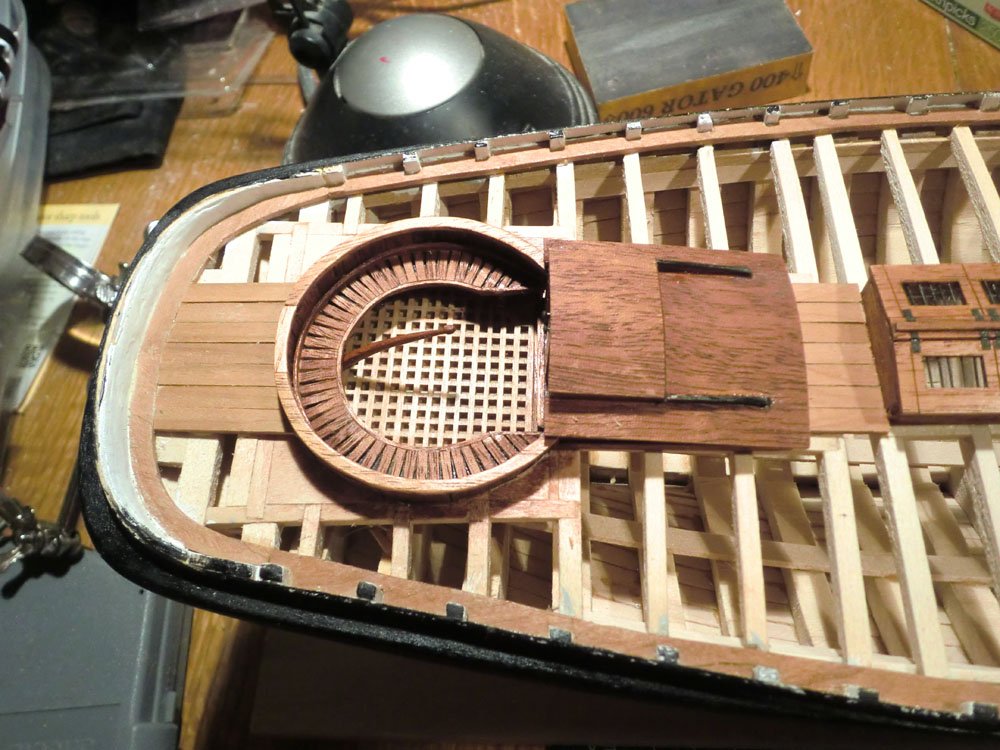
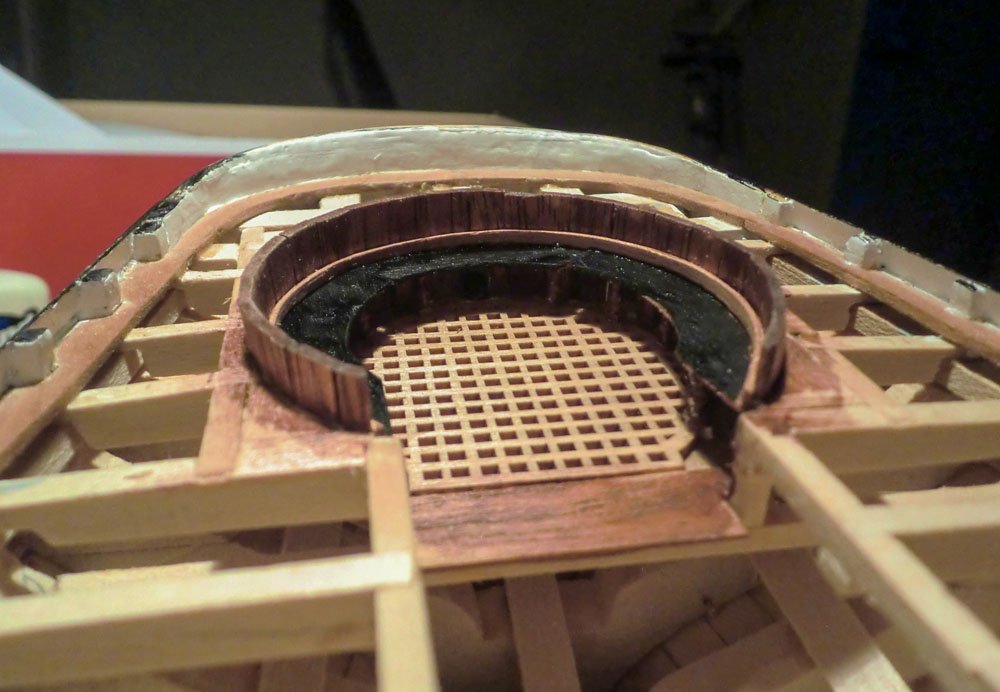
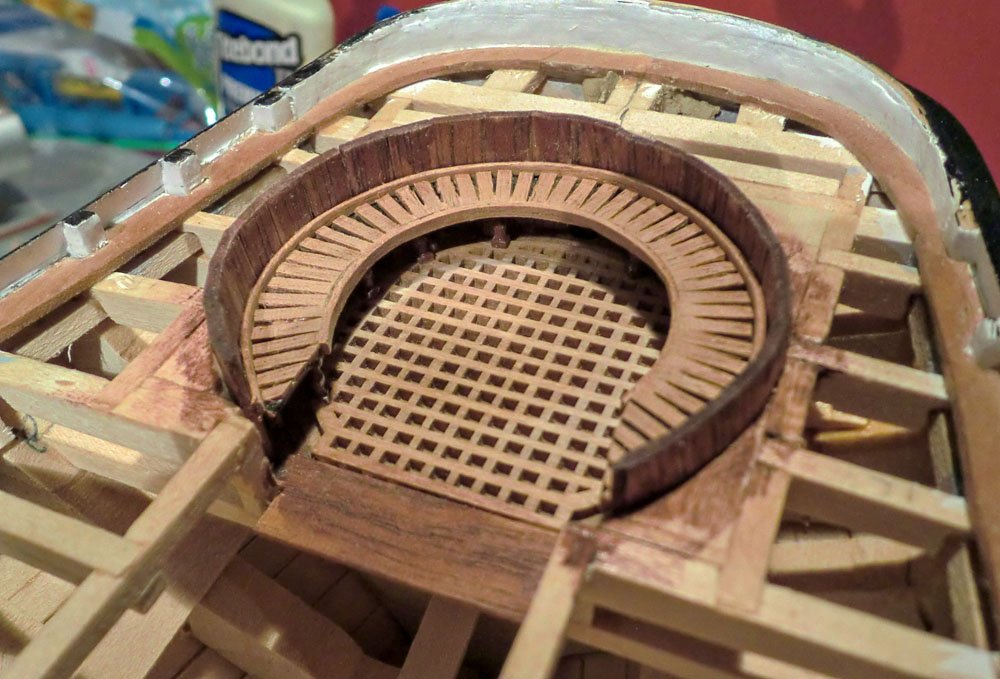
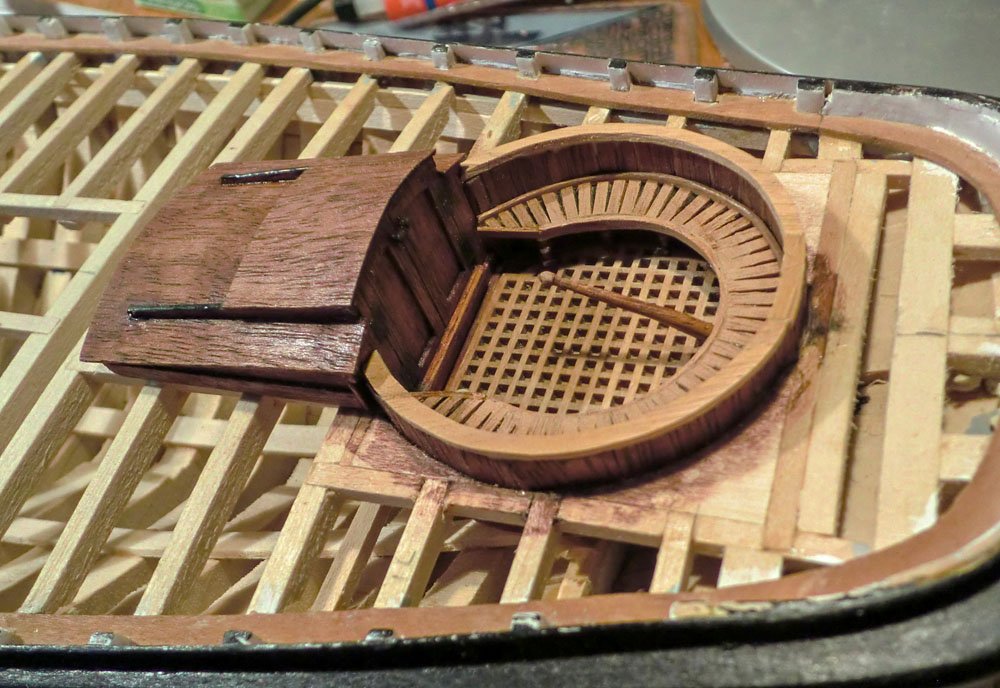
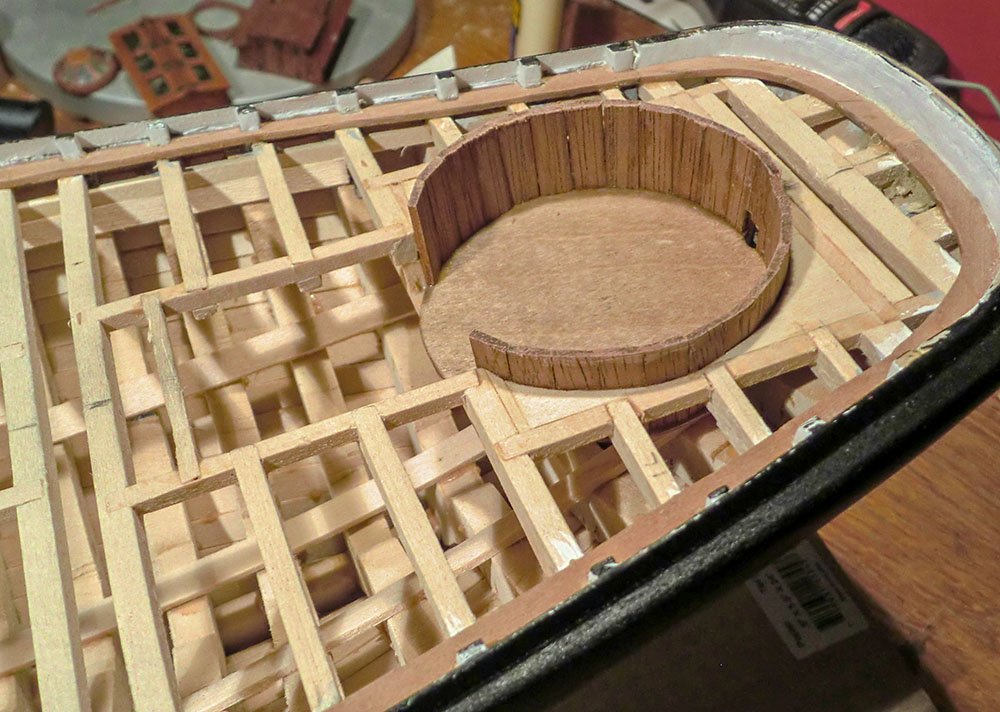
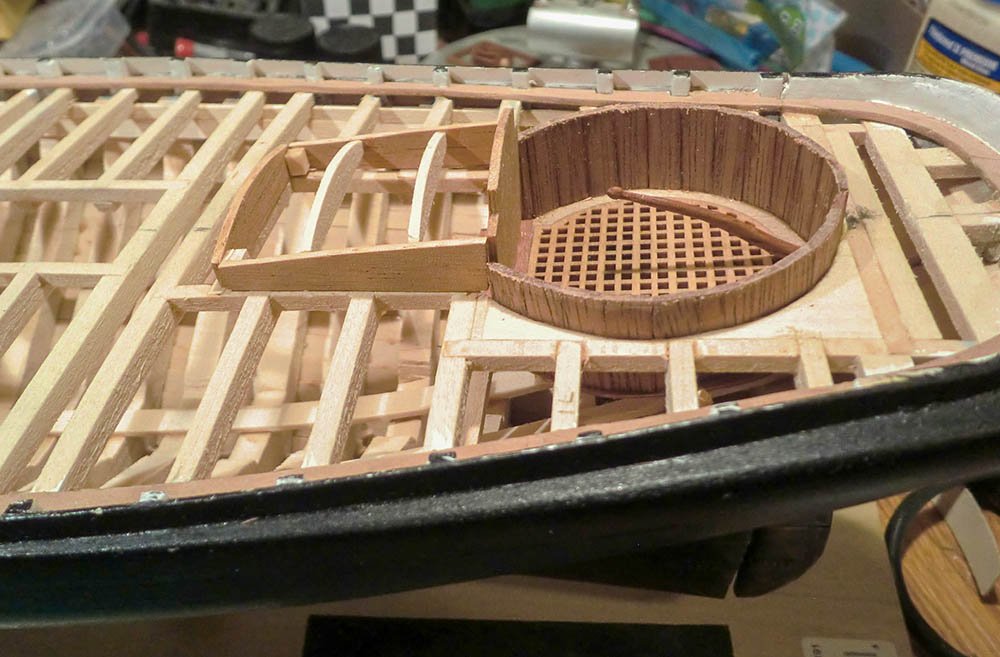
I have made some progress on the cockpit but more to do. The kit came with a (kind of cheesy) strip of plywood to bend around the cockpit as the vertical wall. It was a half inch wide and I think my cockpit is deeper than it is supposed to be, so it was not wide enough. I used that as my excuse to pitch it. Instead, I cut a bunch of lengths of 1/16th x 1/4 mahogany and stood them on end (sanding down one edge a bit for better fit) and placed them around the cockpit.
The kit also provided some laser cut grating for the cockpit floor, which I used.
I've started to build the companionway, but have more work to do on it. I have not started on the seat and I'll also put some sort of cap rail around the top of that cockpit wall. The kit includes a dozen or so britannia metal stanchions to use to hold the seat up, which I will probably use (after painting a reddish brown).
I've also not applied any finish to these bits....the color of the cockpit sides is pretty good, but the mahogany I am using for the companionway is a bit pale and yellowish, as I mentioned before, so will likely stain it a bit.
Below are pictures of the three things I described above. I am getting anxious to wrap up this part of the project and work on planking the deck.

- FriedClams, russ, Fright and 4 others
-
7
-
Interesting comments about the coppering. I can see both sides, and having done it once I feel like I could do better next time, if there was a next time. I think I'll avoid the issue by building only small work boats that never had copper on the originals.
As for my build, the copper was already getting darker and a bit more even color. I was liking the way it looked and decided to apply a few coats of satin clear, and I think it looks even better now. So I am actually getting happier with the way it turned out.
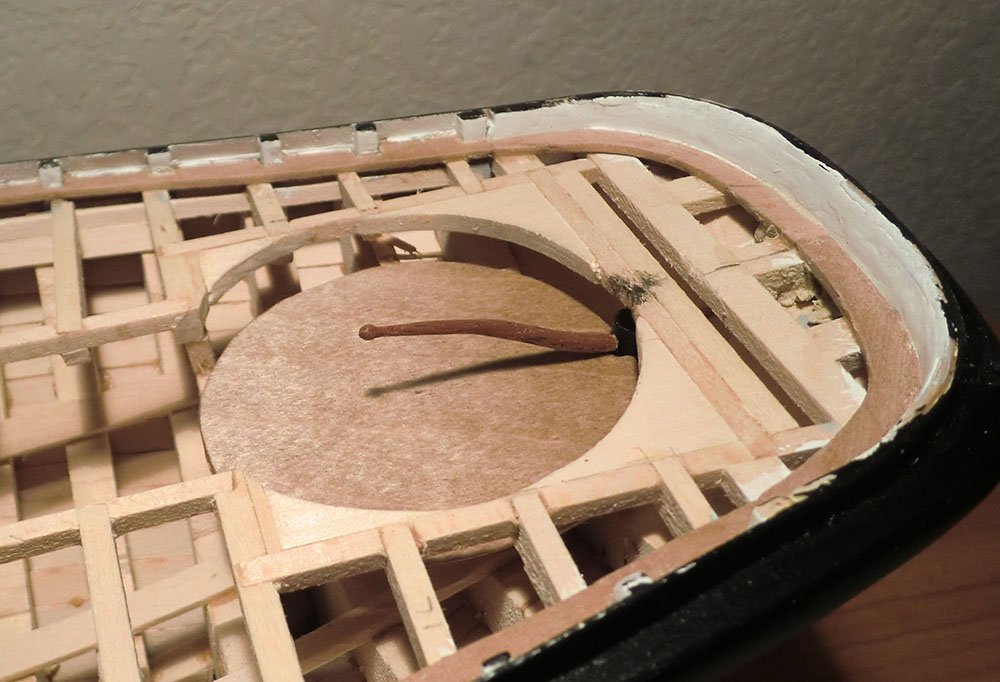
I've also done the rudder, and glued it on, and started work on the cockpit. I've cut the floor of the cockpit and also carved the tiller from a piece of mahogany. In the picture below it is just stuck into the rudder, not glued yet. My rudder post did not really line up with the cockpit the way it should, only about half of it intersects the cockpit floor. But this will be hidden under the bench so is not a big deal. Here's a picture of the tiller and one of the coated hull with the rudder in place.
- FriedClams, BobG, GuntherMT and 1 other
-
4
-
Thanks @Kevin Kennyand Robert/ @Fright for the comments.
Kevin, even before your comment I was reviewing your video on the work you did on the cockpit. I'll likely use that as inspiration and try to emulate at least some of what you did. We'll see how it goes. Before that, I started working on the rudder and ran into the same issue you mentioned, where the rudder did not fit. I should've learned the lesson and done the rudder much earlier. Instead, like you, I had to remove some of the copper and shave down the stern post to get it to fit. I'll likely not do "real" gudgeons and pintles. The ones supplied in the kit would be tough to fit over the copper. I'll just put some fake metal bands on the rudder and stern and then glue the rudder in place.
-
I bought something similar from Amazon, though a different brand (Kraftex). I ended up not using it. The copper is quite thin, like heavy duty foil, and I was concerned about the durability of the adhesive. But I've seen a number of build logs here using it or something similar and no one that I have seen had issues with it falling off.
I ended up buying a roll of 36 gauge copper...it was thicker but still cutable with scissors. I cut strips and did something similar to what was described in the article, along with some aging using liver of sulphur. Here's the stuff I bought: https://www.amazon.com/St-Louis-Crafts-Copper-Inches/dp/B00S3TYN1M/ref=sr_1_2?ie=UTF8&qid=1534389581&sr=8-2&keywords=36+gauge+copper+roll
I used a household/craft glue with it, so who knows, maybe my copper will fall off sooner than if I had used the tape.
I was somewhat happy with the results....I'd give it about a 6.5 out of 10. See my America build log for more details and pictures. Note this was 1/48th scale. If working in something like 1/96th, that might make this method more difficult and might make the thinner foil more appropriate.
-
Main Hatch/Companionway
Thanks for the comment Russ, and to others for the likes and looks.
This week's progress was completion of the main hatch/companionway. Sorry, I did not take any pictures during the process...nothing special, just cut pieces out of 1/16th or 1/32nd mahogany sheets, glue'em together, stain and finish. The kit supplied two small brass nails to use as door knobs, I used some of the copper tape to create hinges, then blackened both. I also put some blackened copper on the rails for the hatch to slide back on.
Next up is the aft hatch and cockpit and rudder.
- GuntherMT, Duanelaker, Estoy_Listo and 2 others
-
5
-
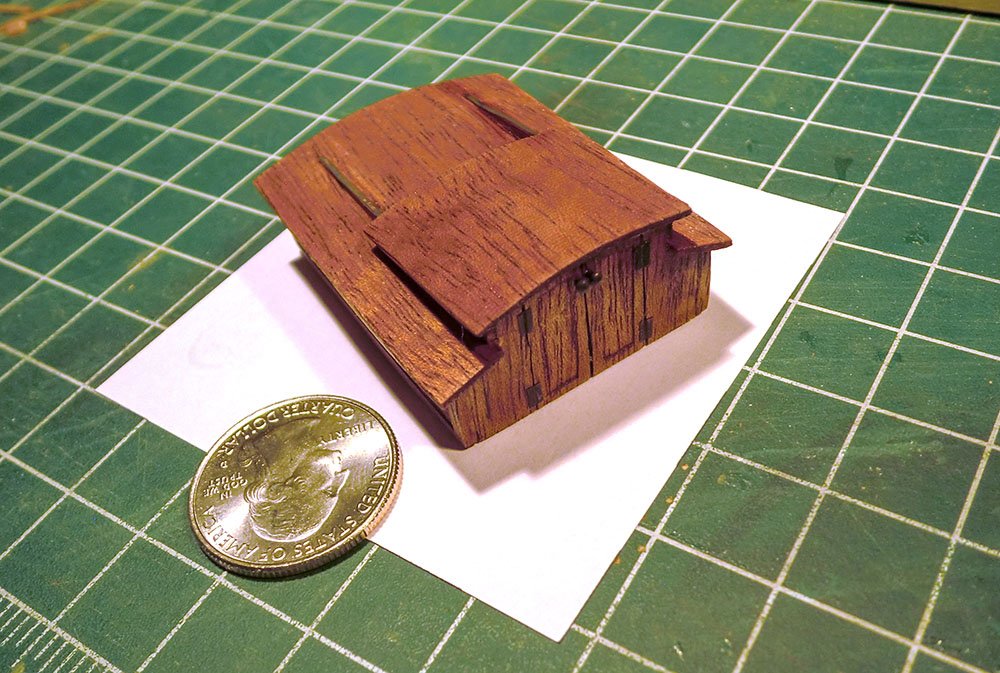
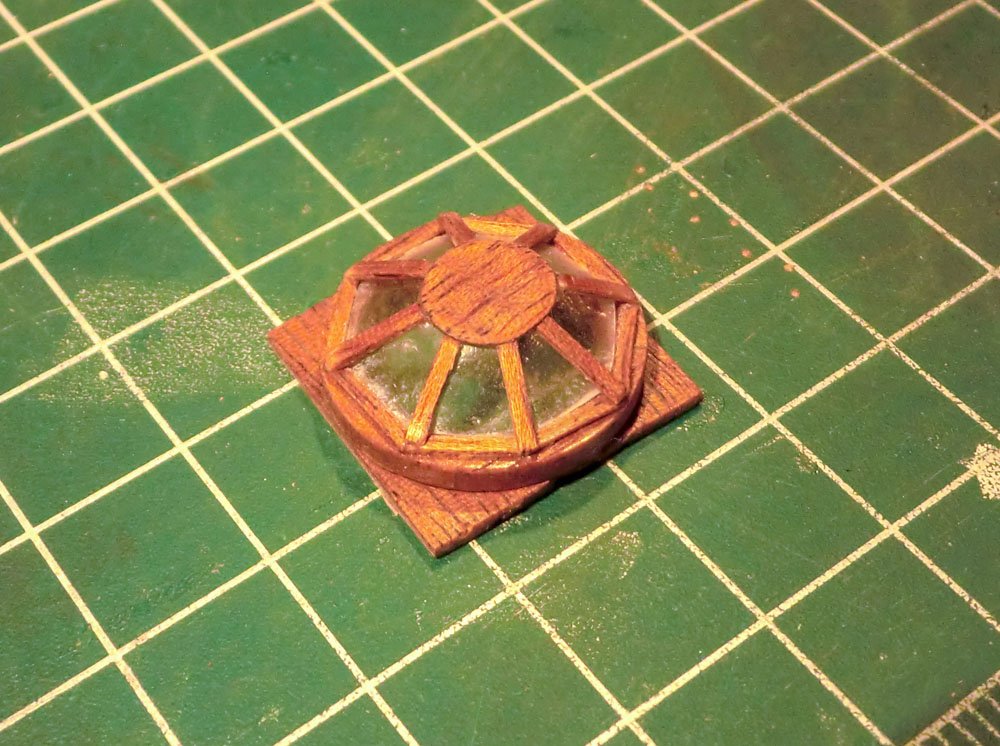
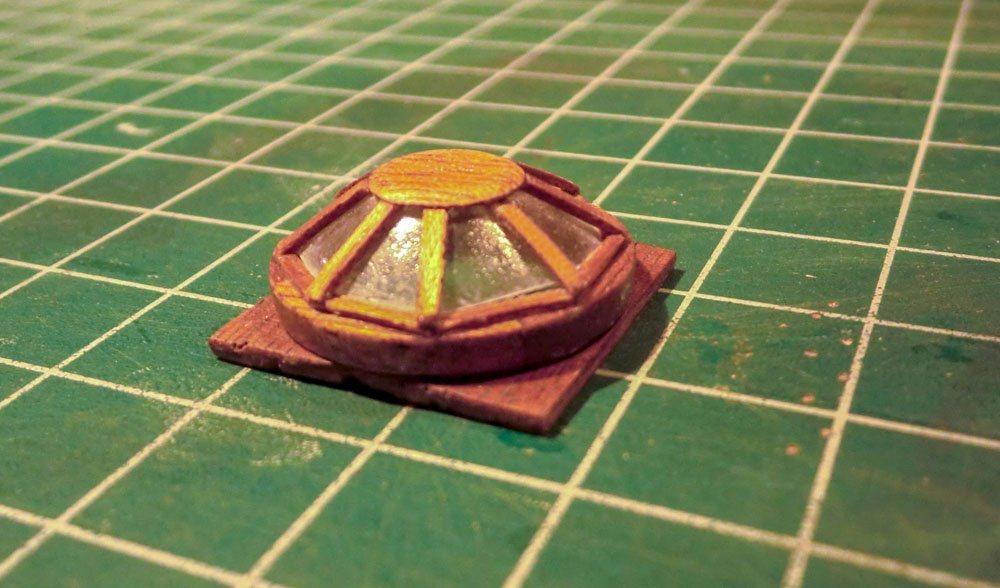
Aft Skylight
My relatively glacial build pace continues, hindered by a short but unexpected trip last weekend. But I have now completed the aft skylight and just started a bit on the forward companionway. I maybe cheated a little bit on the aft skylight. There are corner posts that were supposed to fit into the corners of one of the rectangular openings crafted into the deck beams. However, I noticed on my model that particular opening was a little bit off center. So I built the skylight off of the deck and will glue it on centered on the deck instead of centered on the rectangular opening. Since I plan to fully plank the deck, the difference will not been seen (I believe).
The skylight was made out of mahogany supplied in the kit. The sheets of 1/16th inch thick mahogany were rather pale and yellowish so I used some minwax mahogany stain to make its color more similar to the forward skylight and capstan. I'll be doing the same for the two companionway/hatches and the cockpit. When completed I also rubbed on a bit of the tung oil finish that have.
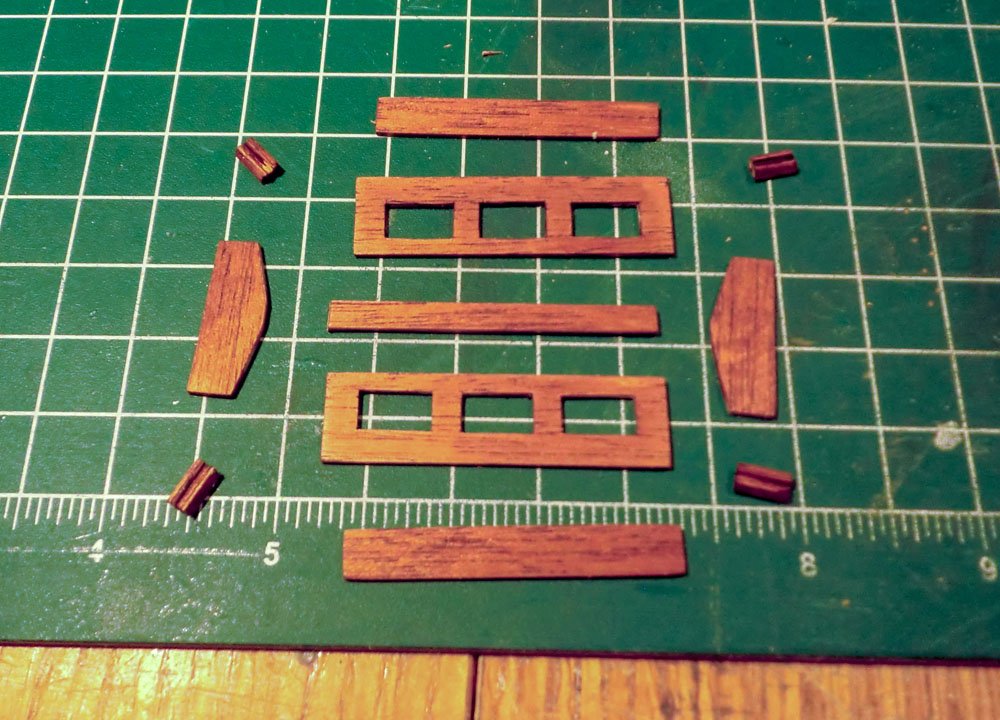
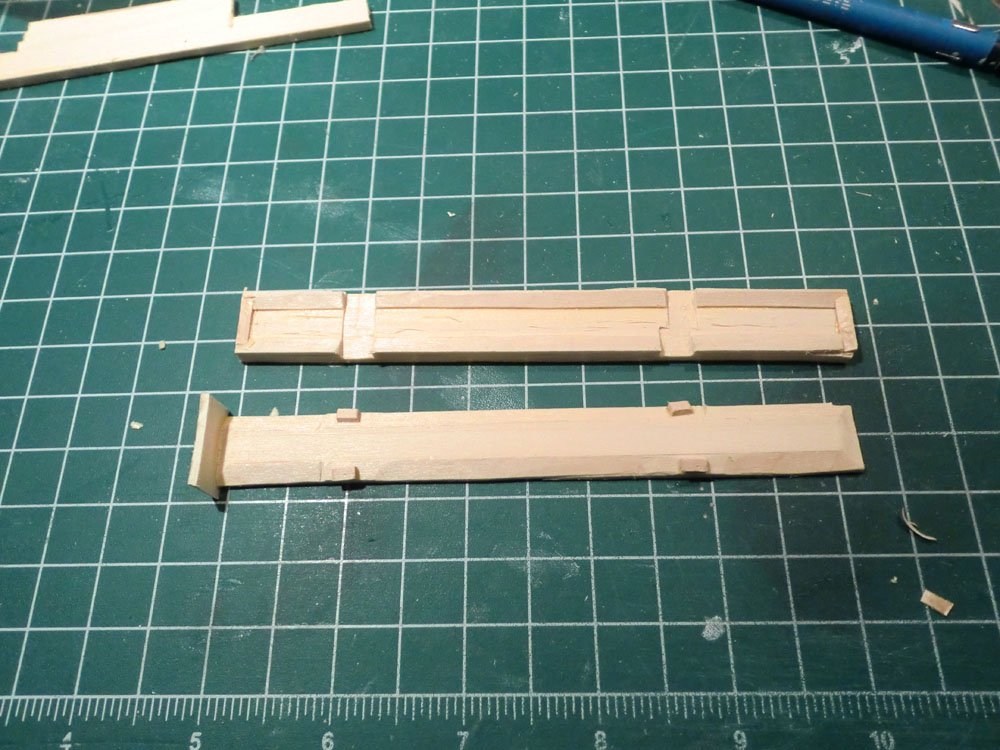
The collection of parts I made to build the skylight:
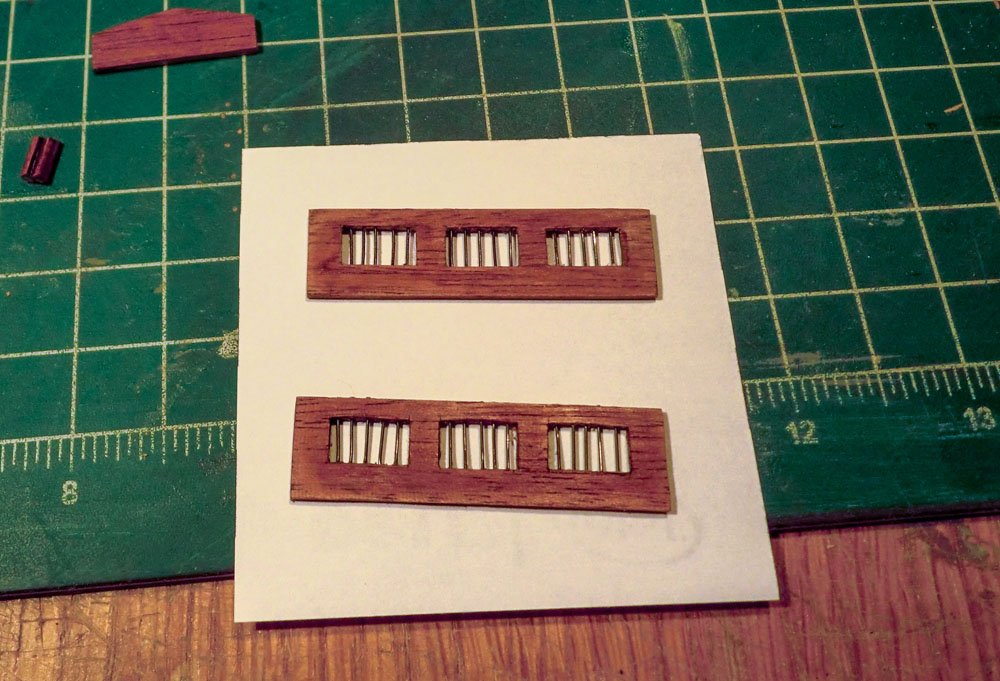
The the skylight with the window bars installed. I used a #75 bit and a pin vise to very carefully drill down from the top of the skylight then inserted chunks of wire provided by the kit:
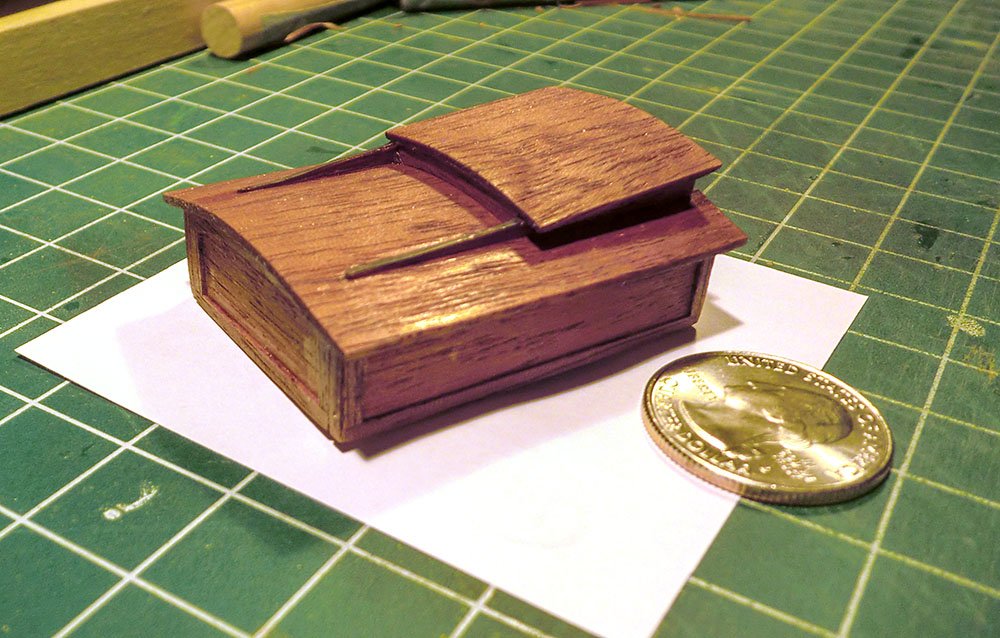
The completed skylight:
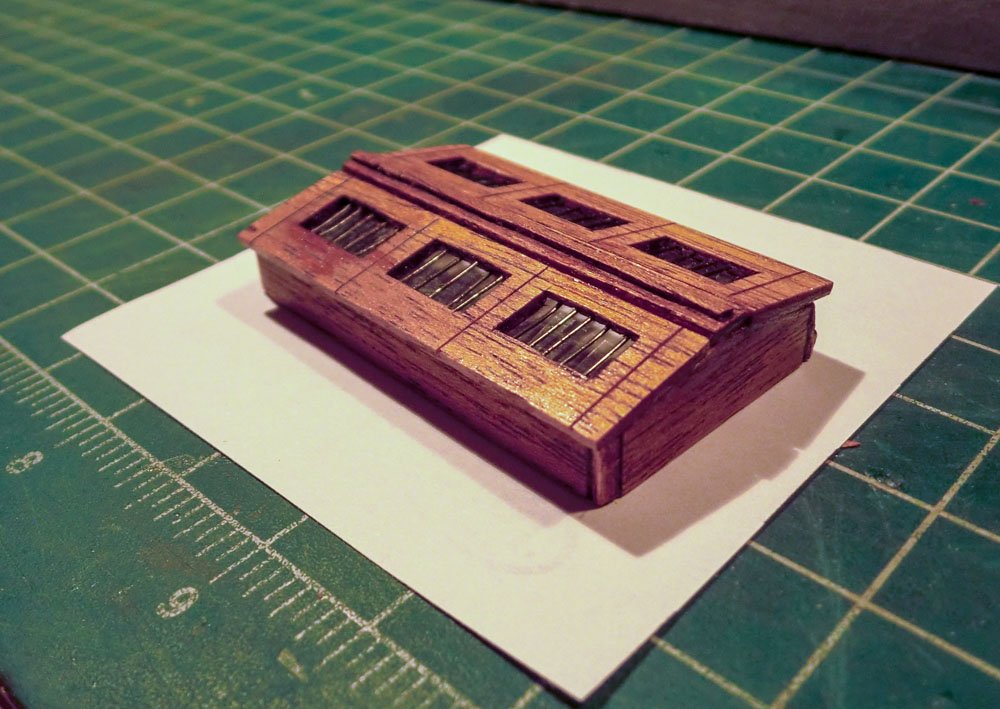
The skylight placed into its position on the deck. After I do the deck planking, I will put a small trim strip around the base of the skylight to hide any gaps between the decking and the skylight.

- GuntherMT, Duanelaker, russ and 1 other
-
4
-
Capstan 2.0
Or maybe it is 3.0. As noted above, I attempted to build a capstan in place of the metal piece supplied in the kit. I used some of the Mahogany from the kit (and a bit of scrap basswood, just for the central post). I built one but had some issues with the whelps. I maybe could have salvaged it but decided to start over. Below is a picture of my capstan and the metal one from the kit. The wood one is actually only a tiny bit taller....it just appears so much taller because the hole it is stuck in is not deep enough.
I have not applied any finish to the wood one. I'd probably try to do a little more clean up sanding and filing then apply the tung oil finish that I used on the skylight and on the baseboard.
Any comments or suggestions would be welcome. Should I put some chocks between the whelps, maybe one third or half way up, to make it look a little stronger? Any other suggestions?

- Duanelaker and BobG
-
2
-
Thanks all for the looks and likes, and thanks Kevin for the comment. After I made that post last night, I reviewed the part of your video on making the capstan. This kit supplies a cast metal part but I'll try to make my own from scrap wood, using some ideas from your video.
-
-
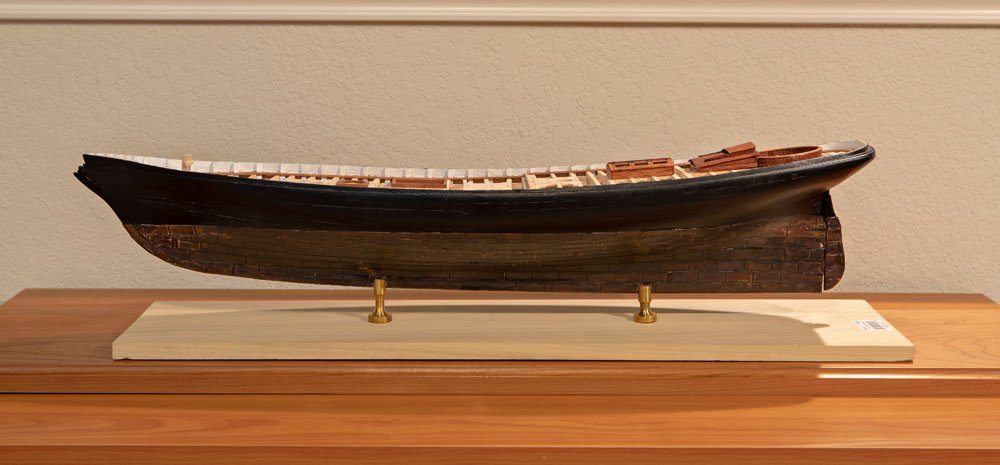
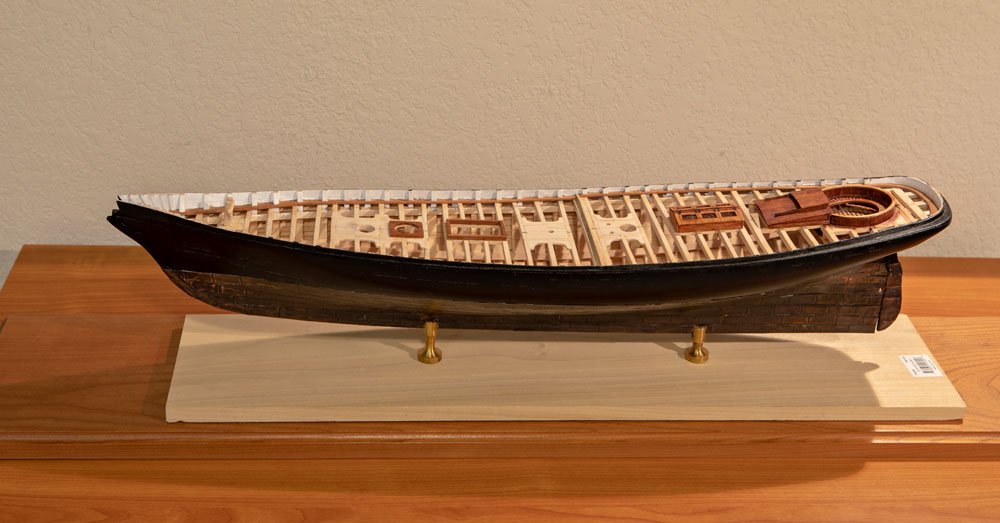
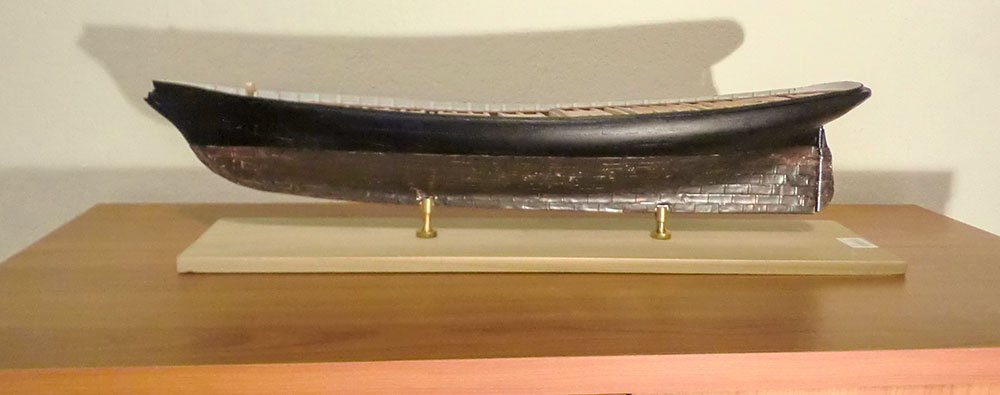
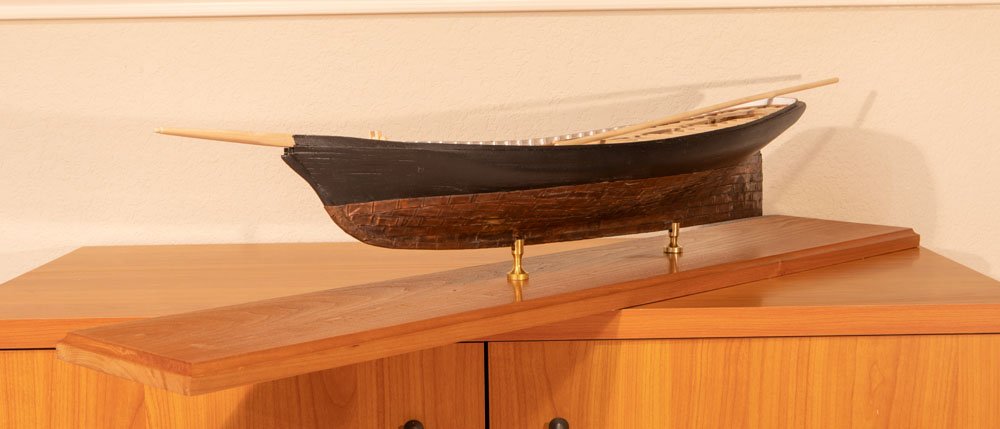
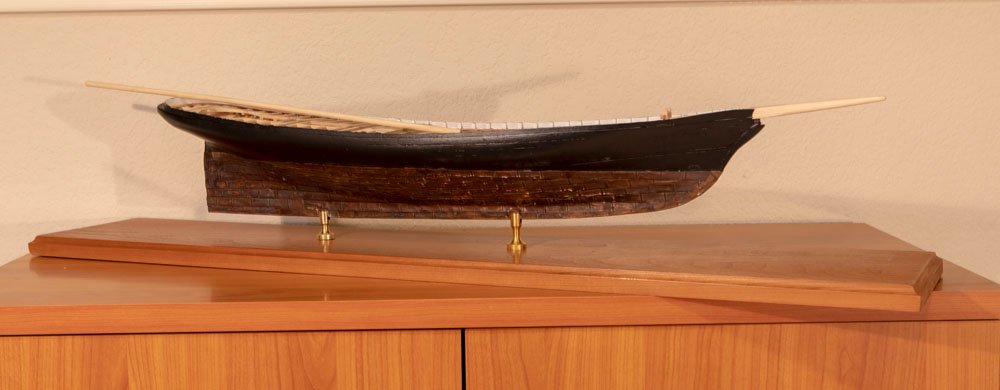
Hull Complete
After a bit of a break for a brief vacation, I resumed the coppering, and have now completed the other side of the hull. I also applied a finish to the baseboard. Below are a few pictures....this time of both sides of the boat. And of course in looking at the pictures, I see I need to apply more of the finish to the end of the baseboard. Otherwise I am fairly happy with how this came out. I perhaps wish it was a bit more smooth and consistent, but I don't think it will draw to much attention to itself, which is what I wanted.
Next up is to work on the deck furniture. The layout of the deck of the bluejacket kit is a little different from the Mamoli kit. This kit has no forward hatch, but has a hatch/companionway midships where the Mamoli kit just had grating. I'll probably work on the deck furniture from simplest one to most complex....in other words, the two skylights first and the cockpit last. I still need to do the rudder as well....I guess that will be done with the cockpit.
I've probably also reached the point where the build logs for the other America kit builds become more relevant, more useful, and provide ideas for details to add.
Here are the pictures of the completed coppering. I stuck in the bowsprit, and placed a dowel on the deck to simulate the boom. For now the hull is just balanced on the base board and not mounted.

-
Coppering the Hull
So on my America, I wanted to try some real copper of some sort on the hull. But I wanted a fairly subtle "old penny" look. I did not want the bright and shiny new copper look and did not want the zillion overscale nail head look either.
I first acquired some copper tape. That seemed like a possibility, but the tape was very thin and delicate, and the words "tape" and "durable" aren't exactly best buddies. I was afraid the tape would start peeling off before I even completed the rigging, given my pace of construction.
I then went off to Amazon to see what I could find. I first bought a couple of 6 inch by 12 inch sheets of 28 gauge copper. This seemed promising, but it was a bit thick to work with. There's probably some tool that would easily make many nice, straight cuts in this copper but whatever that tool is, I don't have it.
So, it was back to Amazon. I found there a 12 inch by 5 foot roll of 36 gauge copper. The description explicitly stated that it could be cut with scissors. So I ordered a roll of that stuff, and it turned out to be just about perfect. It was more substantial than the foil but still easy to cut, as promised.
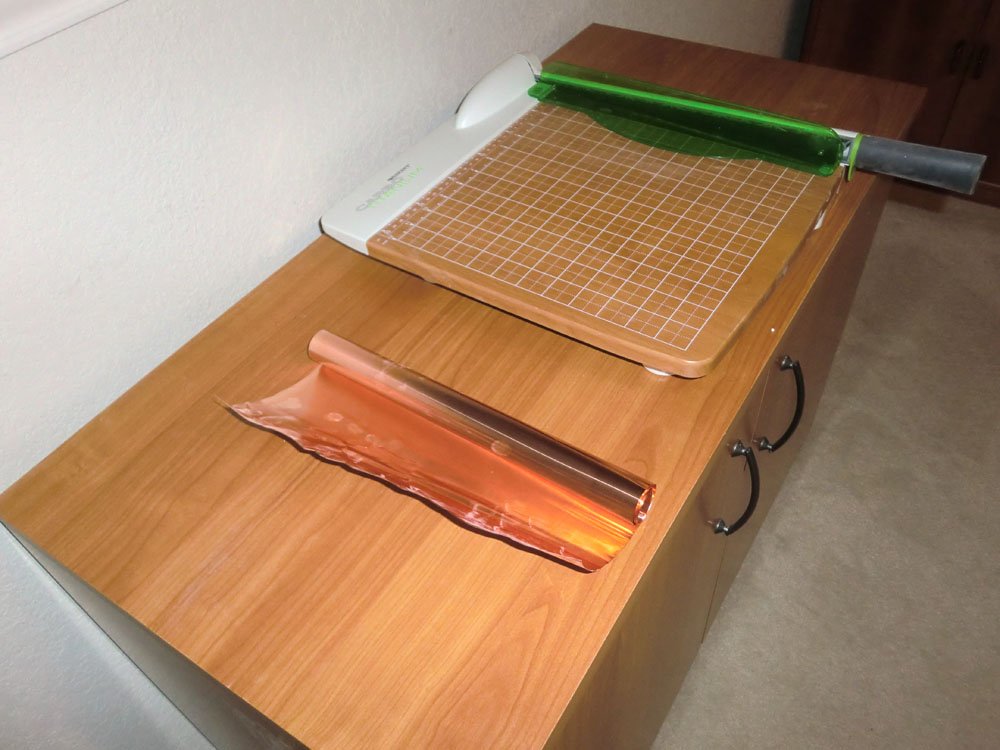
While on Amazon I also investigated methods for aging the copper and came across something called "liver of sulfur". So I bought a jar of that too. A few experiments gave me decent results, similar to what I was looking for. And while the copper could be cut with scissors, it was tedious so I got a guillotine style paper cutter. I decided on making my copper plates 3/8ths inch but 7/8ths inch (1.5 feet by 3.5 feet at scale). So with that it was off to the production line.
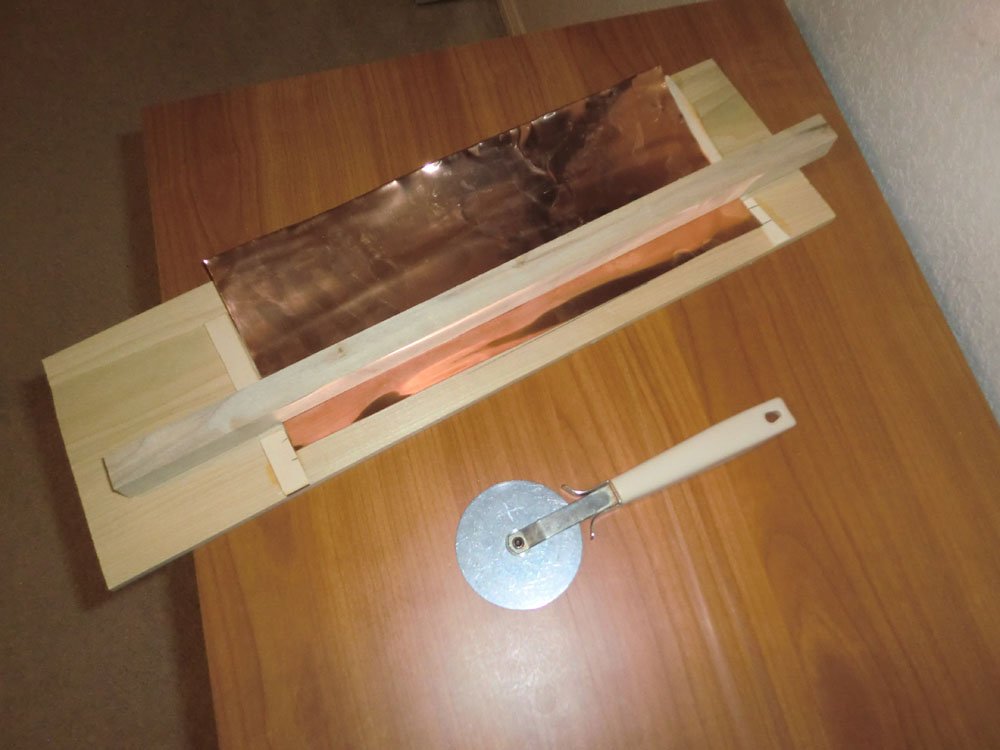
This first photo shows the copper roll and the paper cutter. I had to be concerned about fingerprints as they affected the aging solution. So I wore latex gloves while handling the copper. The fingerprints you see are just from the powder on the gloves.
I cut a piece that was 5 1/4th inch wide. That would give me 6 copper plates at 7/8ths inch each. I built the jig below and then scribed a dent into the copper to indicate the edges between the plates. Yes, that is an ordinary pizza cutter that I used to scribe the plates. It was dull enough to give a nice dent in the copper without cutting it.
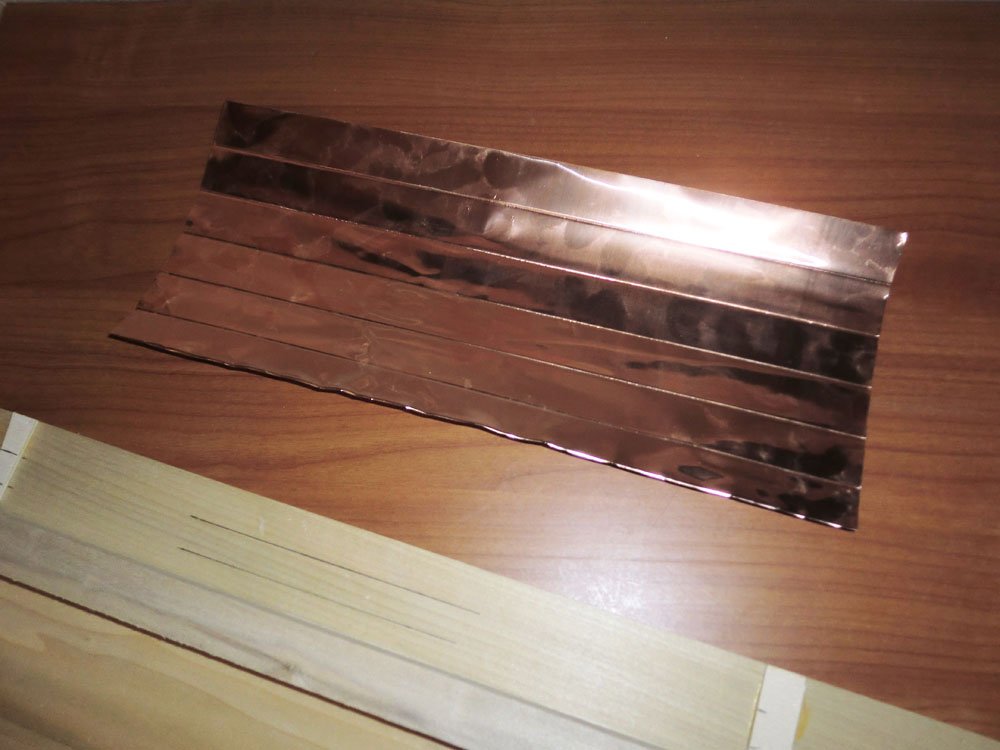
And here is the piece of copper with the plate widths scribed onto it.
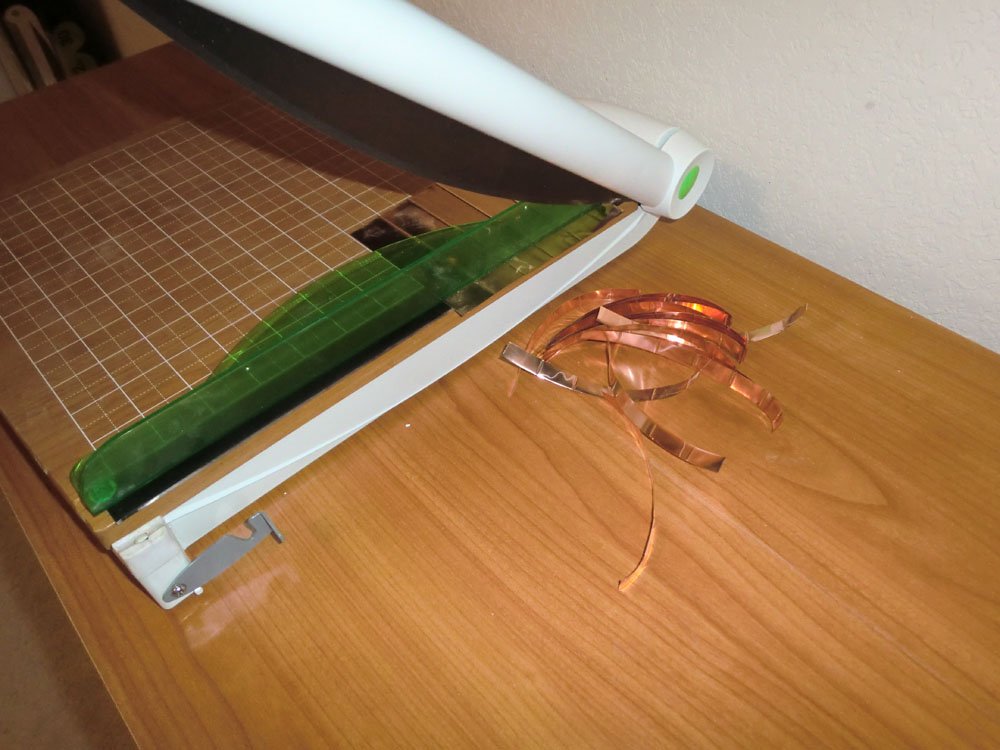
Then it was back to the cutter to cut the scribed copper into strips that were 3/8ths inches wide.
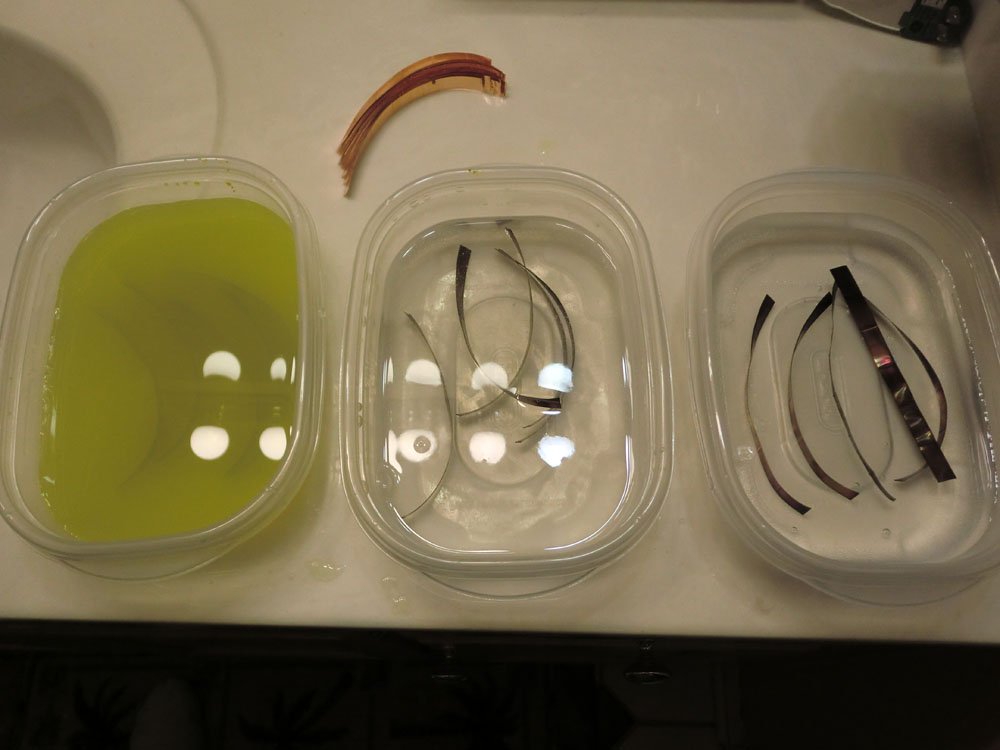
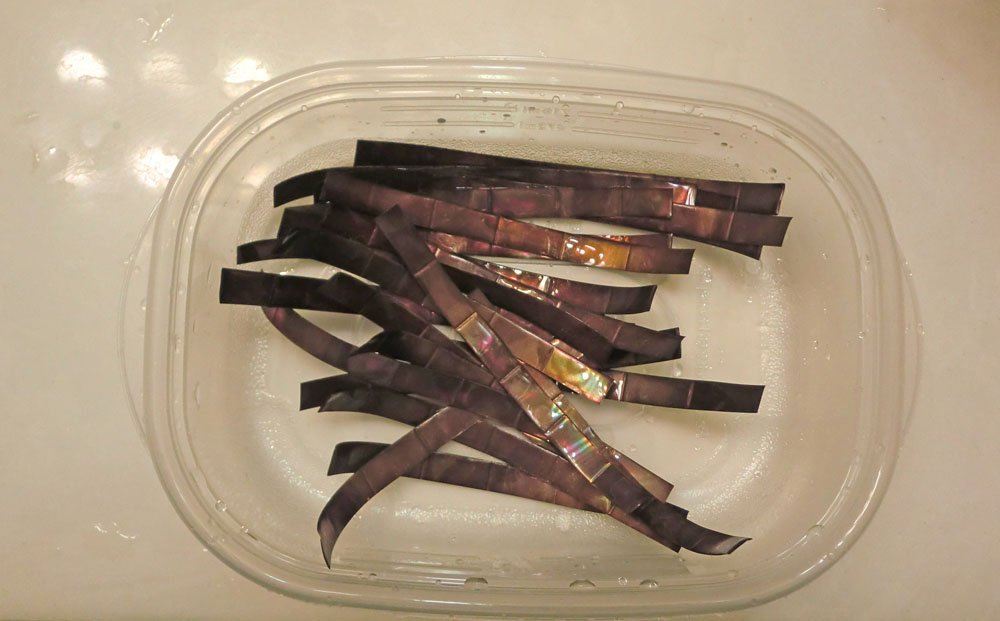
And here is the aging process. The left container has the liver of sulfur solution. I just used room temperature water instead of hot water and used a more dilute solution than suggested by the instructions. Even so, it only took 20 or 30 seconds for the copper to darken. After that, I moved the strips to the middle container which had water and baking soda (as suggested by the instructions) to neutralize the liver of sulfur and stop the reaction. The third container had just plain water to rinse off the strips. And yes, the "liver of sulfur" smelled just about the way you'd expect of anything that has "sulfur" in the name.
And here is the container of almost finished aged copper strips. After they dried, I did polish them with an automotive paint polish. In some cases the coloration was a bit too dark and too gray for my liking. Using the polish and even some very fine sandpaper brought back more of the copper color.
One last step was to press the strips in this little jig I made, to try to give the copper strips a little more shape, and to turn the edges down. This only sort of worked. In most cases, the shape was mostly lost as I installed the strips on to the hull.
For the most part, I installed the plates in these strips of 6, though in some cases I cut the strips shorter. The end result can be seen in my prior post.
I have not decided yet if I am just going to leave the copper as is, with the potential for it to naturally darken some more, or if I may spray it with a coat of clear gloss or clear satin. I'll probably finish the starboard side, then spray some of the left over copper to see how I like the look of it with the clear coat on it. For the most part I am very pleased with the look of it as it is now. I wish it was maybe a little darker and a little more consistent in color but overall it is close to what I was shooting for.


Bowdoin by Jond - FINISHED - BlueJacket Shipcrafters - 1:48 - DIORAMA
in - Kit build logs for subjects built from 1901 - Present Day
Posted
Jon.....I have purchased a variety of acrylic sheets (for non-modelling projects) from https://www.inventables.com/. You might check them out and see if they have something useful for you. They seem to have a limited range of sizes....I thought in the past they had more variety listed. Other sizes might be available if you ask.
Gary