


gsdpic
-
Posts
523 -
Joined
-
Last visited
Content Type
Profiles
Forums
Gallery
Events
Posts posted by gsdpic
-
-
I find the website scalemates.com very useful for this sort of question. I have no idea where they get their information from or how reliable it is, but when you look at a kit there, they show the history of when it was released, under which brand names, when it was "reboxed", etc. I searched there for Kearsarge and Alabama, and found the following, which I believe are likely the two kits you are referring to. According to scalemates, both were released in 1961.
https://www.scalemates.com/kits/revell-05603-civil-war-steam-ship-uss-kearsarge--103477
https://www.scalemates.com/kits/revell-5621-css-alabama--143850
-
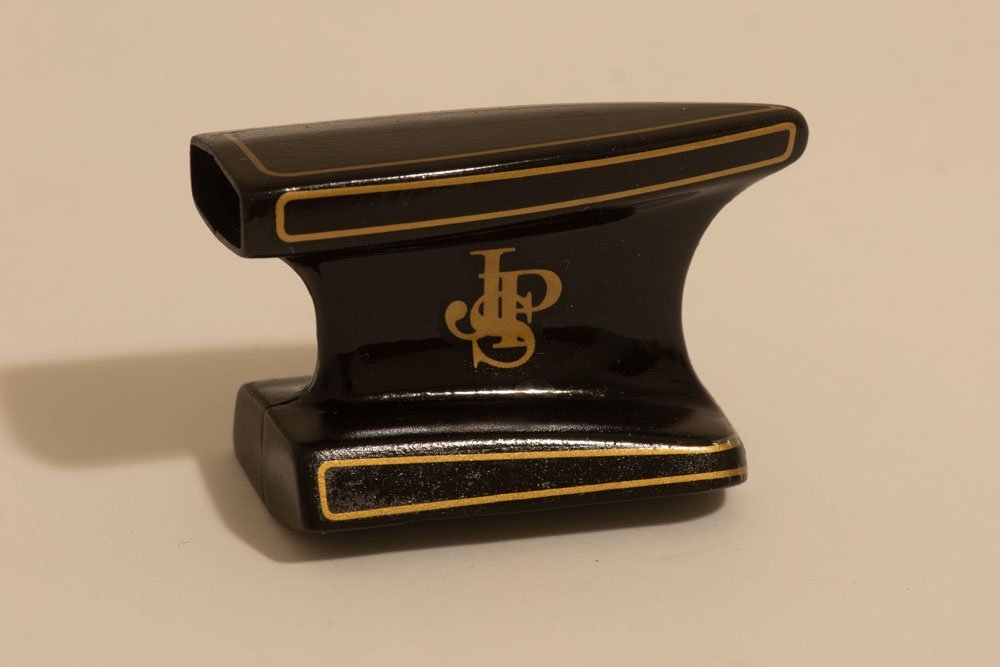
The first step of the build has you construct some of the body parts such as the wing, front cowl, oil tank and cooler, and the air induction box. This all went fairly well, though as was the case with DocRob's Renault, the fit and molding of the parts was not quite up to the current standards of Tamiya. It also seemed to me that this plastic was a bit harder than they use today or perhaps it is just because it is older. Anyway, I got those parts assembled along with fixing (or at least reducing) some of the flaws with the Tamiya putty as shown below.
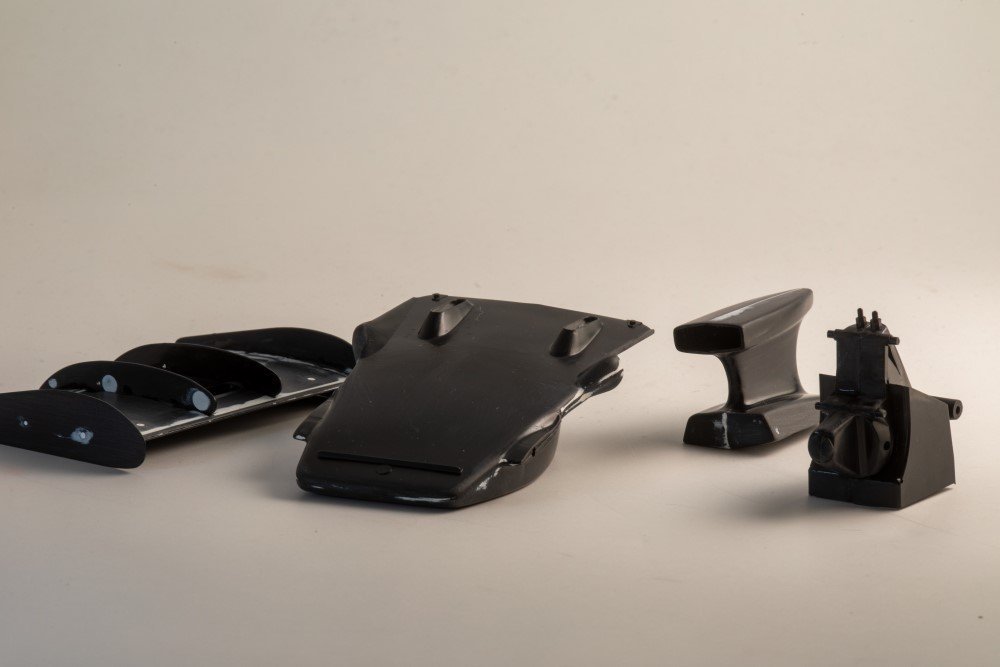
It was then time to paint them and start on the decals. For paint, I first used the alclad black primer/microfiller, particularly on the parts that had the putty patches and any other possible scratches from sanding. That went on well. For the finish coat, I am trying to use the Alclad gloss black base. That is normally used as the base coat below their chrome or other shiny metals. But I have a largish bottle of the stuff so figured I'd use it here too. But it seems a little problematic, as it stays tacky for quite some time, then even after it seems to no longer be tacky, once you start handling the part it becomes tacky again, I guess just from the heat from your hands. Or, if you try to polish or sand it, the heat generated from those operations make it tacky again as well, at least for the first 24-48 hours.
Anyway, I have painted all four of the parts shown above as well as some additional body parts, and started applying the decals to those parts. I think I have all the decals on the air box done and just 2 (out of about a dozen) decals on the rear wing. Unfortunately you can see a little bit of "silvering" on the air box decal and the one on the other side has a couple very small wrinkles that I could not remove. Once I have all the decals in place on the body, I'll apply some sort of clear gloss though I have not yet decided which clear gloss to use.

- GrandpaPhil, Egilman, DocRob and 11 others
-
 14
14
-
Hello to all of you troublemakers, like me, who read and post non-ship build logs on MSW
")
Inspired by @DocRob's recent Renault F1 car build, I decided to both build and log my Lotus 72D. This is part of the same series of 1/12th scale F1 cars by Tamiya. They have very recently re-released this model, including some photo-etch parts. However, I am building the old, original version. I got this kit off of ebay. The box was in a bit rough shape, as shown below, but the kit contents appear to be in good shape. The part sprues were all still in their plastic bags. I might've preferred the new one, but this one was about 60% of the cost of the new one.
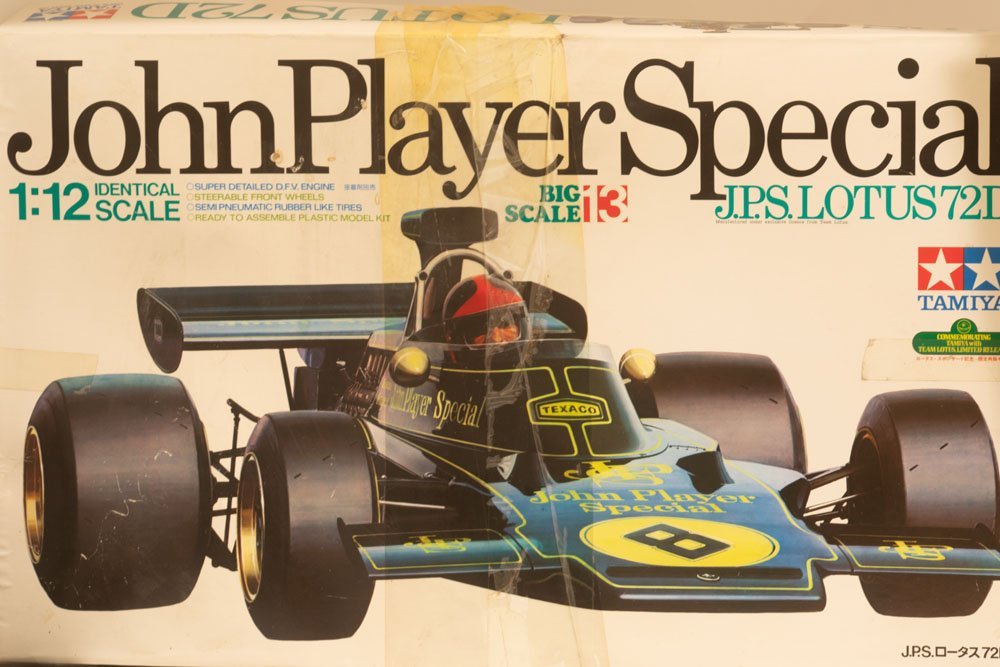
The Lotus 72 was used in Formula 1 by Team Lotus for several years, from 1970 - 1975, in several different versions. The "D" version was used in 1972 and for the first few races of the 1973 season. I believe that 1972 was also the year that the black and gold "John Player Special" livery was introduced. Emerson Fittipaldi was the lead driver and won the 1972 championship and Team Lotus won the team championship. Fittipaldi had victories in Spain, Belgium, Great Britain, Austria and Italy that year. I'll be building it as shown on the box, which represents the car raced in Great Britain in 1972 (info from The Single-seat Lotus Formula 1 and Indy Cars, a definitive history by Doug Nye).
The seller indicated that the kit came from an estate, so the seller had no more information on how old the kit is. The decal sheet had a 1991 copyright date, while several of the sprues had molded in copyright dates that were even older, so it could be as much as 32 years old. Those decals were my main concern about this kit. There were a few extras (e.g. the markings include the driver name so there were decals for both drivers but only one will be used. The decals also provided three different numbers, 6, 8, and 32). Before starting, I tried out some of these spare decals and they worked fine. However, some of the decals near the edge of the sheet look like they might be in a bit rougher shape. I have a bottle of Microscale's liquid decal film on the way in case I need it to help revive those decals (thanks to Ken @Canute for making me aware of that product). The decals, particularly the thin gold lines, may be a challenge.
I will likely mostly build it out of the box, with a few enhancements, I hope. For one, I likely will not use the included driver figure but the only seat belts supplied are molded into the driver figure. I really like the MFH seatbelts that DocRob acquired but MFH products seem difficult to purchase in the US. I might need to order them from Europe or Japan if I want them. I may add or replace a few other connectors, fuel lines, spark plug lines, etc. as well. That will mostly come in to play when I get to the engine, which is pretty far into the build if I follow the order of the instructions.
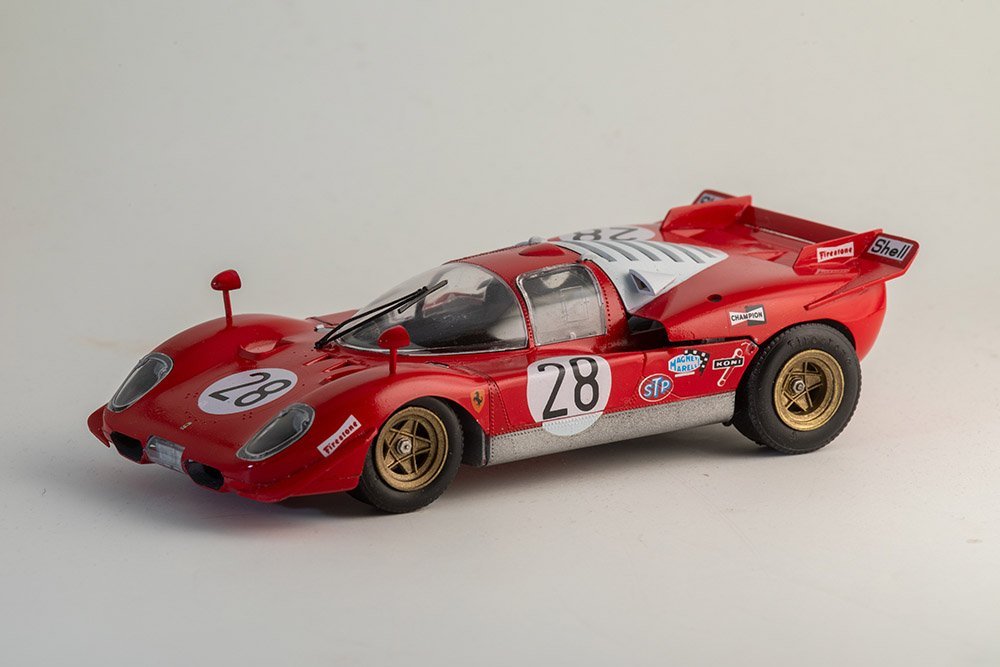
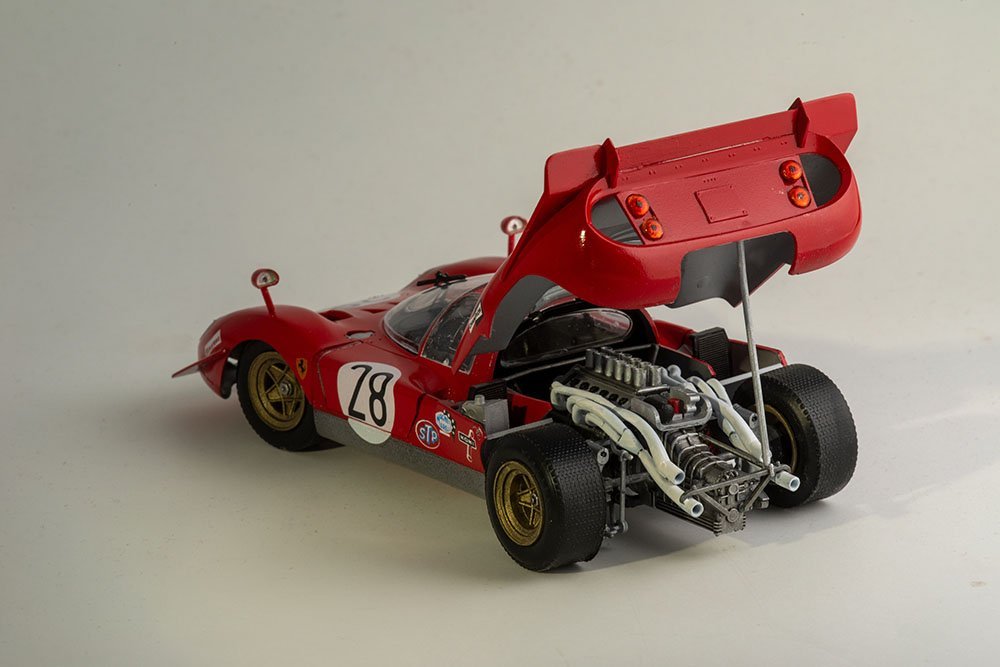
And yes, one of these days I'll get back to working on my Sopwith Camel, but for now it is on the shelf. I've been on a bit of a plastic car model kick lately. Below are two pictures of the most recent one, the Testor's (nee Heller) Ferrari 512S 1/25th scale. This one was driven by Andretti at the 24 hours of Daytona in 1970.
That's enough of an introduction. I've actually started on this kit so will add another post or two with the initial build steps.
-
I renewed membership and donated a couple weeks ago. Just adding a comment now to bump the thread and increase visibility!
- Ryland Craze and ferretmary1
-
 2
2
-
1 hour ago, DocRob said:
why not starting one?
The usual...life gets in the way, I have two other kits in progress, I spend too much time looking at MSW and not enough building.
Actually, this week I expect to have more time and hope to make a lot of progress on one of those in-progress builds, a Ferrari 512S race car (testors, 1/25th). And just today I received the Tamiya 1/12th scale Lotus 72D I snagged off of ebay. The kit looks complete but could be as much as ~30 years old, so who knows what will happen when I try to use the decals. 😬
-
-
Wow. I agree with Yves, it looks fantastic, both the wing picture and the other pictures as well. I know you mentioned using the AK Extreme metal line of paints. I've not used them, though I've used the alclad metal paints a few times. Maybe your technique is better or maybe the AK paints are better, but the metal bits definitely look more metallic than I've achieved with the Alclad paints. And it is not just the wing...the exhausts, turbos, brakes all look like metal. I might have to give the AK paints a try.
One minor nit....and maybe it is just the photo angle or maybe there is more you plan to do with it....but that one braided line in the wing picture looks a bit loose, like it would just be flapping in the breeze there. Maybe add a couple of wine cap foil clips to hold it to the structure.
-
-
-
8 hours ago, James H said:
Focus stacking is a doddle.......if you use Photoshop!
And with that, google sees a small spike of "doddle definition" searches from the USA
dod·dlenouninformal•Britishnoun: doddle-
a very easy task."this printer is a doddle to set up and use"
-
-
I've heard or read that the plastic parts can have some residual mold release agent as well. I often do a quick wash and rinse of the sprues before using them and then try to not touch the actual parts (much) before paint or primer. Having said that, I've never seen a problem arise from not doing it. And just make sure you do not wash a small part down the drain while cleaning.
-
4 hours ago, DocRob said:
and bundled them with clamps made by tiny strips of wine cap foil.
I've thrown away quite a few bits of wine cap foil while thinking that it may possibly be useful in modeling....thicker than regular foil but not as thick as aluminum from a soda or beer can. Maybe next time I'll actually save it.
And the changes you made are a definite improvement.
- Canute, Old Collingwood, mtaylor and 3 others
-
6
-
Note that the description of the "Bluenose" muddles the original vs the replica. The Bluenose was the original fishing schooner as described on that paper. Bluenose II is a replica that was built later. The sail layout on this "bluenose II" model also looks a bit odd. There's plenty of info about the Bluenose/Bluenose II out there, for example on wikipedia: https://en.wikipedia.org/wiki/Bluenose
I agree with Allan that the first is reminiscent of a J class racing yacht.
-
Fascinating history lesson. I'll follow along to see your canoa come to life.
- JacquesCousteau and mtaylor
-
2
-
Good to see you back and making progress on the Corsaro. Sorry to hear about the illness....I got hit after traveling by air last Christmas. The cough and fatigue dragged on for a while.
- Ryland Craze and mtdoramike
-
2
-
Looking good! I think you need to source a bunch of small figures of ladies with long skirts and big fancy hats to put on your deck like in that photo. Should be relatively easy to find HO scale figures.
- FriedClams, Keith Black, Canute and 3 others
-
6
-
Nice, off to a great start. Just earlier today I was distracting myself looking at both the Tamiya and Italeri versions of this car on ebay and elsewhere. I have two of the Tamiya 1/12th scale F1 cars in my stash....the Lotus 49 and the Lotus John Player Special.
- Old Collingwood, Ryland Craze, Canute and 5 others
-
7
-
1
-
Thanks for sharing this, I really enjoyed following this brief build. The joy you had in making it and the joy that I am sure the recipients felt really came through in your log, in part due to the bright colors of these happy little boats. Congrats on this fine build and on...I assume...earning massive brownie points with your wife and her family.
-
Very attractive little boat...just keep it away from the cat! Or at least stop giving the cat reasons to detect or imagine slights
-
This is just jaw-dropping. I recently downloaded blender and just started learning it. Still very much in the phase of making simple cubes or spheres and learning how to view them and move them. I cannot imagine the time taken to learn blender well enough to create a model like this, let alone the time to actually create the model. I guess it brings to mind the old joke...how do you eat an elephant? One bite at a time.
Thanks for sharing.
-
I only occasionally checked your build log, but this is amazing work and amazing dedication to the project. The result is beautiful and worth all the effort.
- Forlani daniel and mtaylor
-
2
-
-
Wow, thanks for taking the time to write all this up. I hope to get into 3d printing some, likely later this year, and posts like this will prove to be valuable.
- thibaultron and mtaylor
-
1
-
1
-
Nicely done! Both a good learning experience and a fine result. And I second Bob's vote for more small working craft, whether kit or scratch!


Lotus 72D by gsdpic - FINISHED - Tamiya - 1/12
in Non-ship/categorised builds
Posted
Thanks, I noted your praise for the Tamiya Laquers in your build log. They also are a bit hard to find, though I have seen at least one USA based web site that carries them. But for now I pretty much have all the body panels sprayed with the Alclad base, so maybe next time. And yes there will be a next time as I also have the Lotus 78 in my stash.