Captain Slog
-
Posts
904 -
Joined
Content Type
Profiles
Forums
Gallery
Events
Everything posted by Captain Slog
-
 Yet more stunning photo etch! This is torture fighting the urge to drop everything and dive in to a build where I can use it because of your fantastic examples. Cheers Slog
 -
Hi Danny, Thats disappointing was just thinking you should get it in the next day or two. Have you tried contacting GPM, although they aren't the most responsive to e-mails. They normally send an email confirming when it was shipped within a day or so which I am guessing you haven't received. Your work on the ships boats is looking good. Cheers Slog
- 193 replies
-
- 2
-

-
- cerberus
- paper shipwright
- (and 1 more)
-
Hi Danny believe me they will give your eyes a work out 65+ parts for each gun ! cheers Slog
- 193 replies
-
- 4
-
-
- cerberus
- paper shipwright
- (and 1 more)
-
Hi Danny your new steam pipe looks much better. RE Bismarck book I was lucky to pick it up in a sale somewhere. Not sure of its accuracy. I got it more for the 'iron work' as the GPM Bismarck doesn't really give details on this as it's part of the print. I really can't say if worth getting or not as I never got round to using it for my intended purpose. I think I would go for the 3D rendered book if doing it again. Cheers Slog
- 193 replies
-
- 2
-
-
- cerberus
- paper shipwright
- (and 1 more)
-
Looking good Dan, small tubes are tricky to handle. Another tip is to undercut the join so when the 2 sides come together there isn't a small groove but a closed joint. Cheers Slog
- 193 replies
-
- 2
-
-
- cerberus
- paper shipwright
- (and 1 more)
-
Hi Dan, just got home and what a surprise. Lots of great looking progress. I am glad my log is of help to you. With regards to the PITT pens I assume you are using the 'B' for brush tip. Similar in shape and size to the picture Popeye posted. The problem I've had which may be similar to yours is that when doing a lot of edge colouring the tip loads up with paper dust so I do this to clean it and I suspect might help you restore your pens. Get some kitchen roll as it is most absorbent and I like to think it helps wick the ink out of the tip. Hold the pen in a shallow angle like 5 or 10 degrees so that the full length of the tip is in contact with the kitchen roll and gently press the whole side of the tip down against the Kitchen roll whilst slowly turning the pen so the full length of the brush tip is rolled 2 or 3 times. For me this removes the dust and gets the ink flowing again. You lose some ink into the kitchen roll but gets it going again. Might work for your problem. As an aside to the PITT pens I read somewhere in the shop display? or maybe off the side of the pen? that they are supposed to be stored flat/horizontally so don't store them standing up in a coffee mug etc. Again might help stop your issue with them. Let us know if the tips above work for you. Cheers Slog
- 193 replies
-
- 4
-
-
- cerberus
- paper shipwright
- (and 1 more)
-
Love the Pom Poms Craig, very well done. They are one of the things I am looking forward to eventually doing on the Hood, although at 1/200 scale should be a bit easier than yours. Your build is really shaping up nicely. cheers Slog
- 151 replies
-
- 7
-
-
- duke of york
- tamiya
- (and 2 more)
-
Hi Dan, have a look through my log for the Bismarck and Borodino as I have used sharpened brass tube to punch out the portholes. The Rp tools punch from BNA models is on my to get list also. Cheers Slog
- 193 replies
-
- 4
-
-
- cerberus
- paper shipwright
- (and 1 more)
-
Hi Dan, I look forward to following another card model. Interesting subject as well. Cheers Slog
- 193 replies
-
- 5
-
-
- cerberus
- paper shipwright
- (and 1 more)
-
Hi Greg, will be following along also. Looks like an interesting build. Seeing it along side the Yamato, it isn't as small as I imagined it would be. Cheers Slog
-
Welcome back Doris, this will be a joy to follow another master piece in the making! cheers Slog
- 1,035 replies
-
- 4
-
-
- royal katherine
- ship of the line
- (and 1 more)
-
Hi Craig, great stuff, I'll be following also. its good to see more and more of these type of ships appearing on the site. looking forward to more. cheers Slog
- 151 replies
-
- 8
-
-
- duke of york
- tamiya
- (and 2 more)
-
Nice work Craig. You know what my choice would be 😉 Cheers Slog
- 44 replies
-
- 4
-
-
- schnellboot s-100
- revell
- (and 2 more)
-
Looks great Craig. Whats that white disc immediately behind the forward gun? Does it have flags and markings to go on also? Cheers Slog
- 44 replies
-
- 3
-
-
- schnellboot s-100
- revell
- (and 2 more)
-
Congratulations Greg on finishing another magnificent and inspiring build. Look forward to seeing what you do next. Cheers Slog
-
Hi Eddie, thanks for the comment. Yeah, all paper and card. The coloured parts are the kit book supplied bristol paper and the laser cut forms (1mm thick if I remember) are optional extras. If you don't use the laser cut stuff you would need to supply the relevant thickness of card and glue the templates onto for cutting to shape. Some of the provided parts also need to be laminated on to card to bring to the correct thickness. Food packaging from the kitchen usually supplies that. Brass rod is needed for the axles and a few details and you would need some clear plastic for the 'glass' Cheers Slog
-
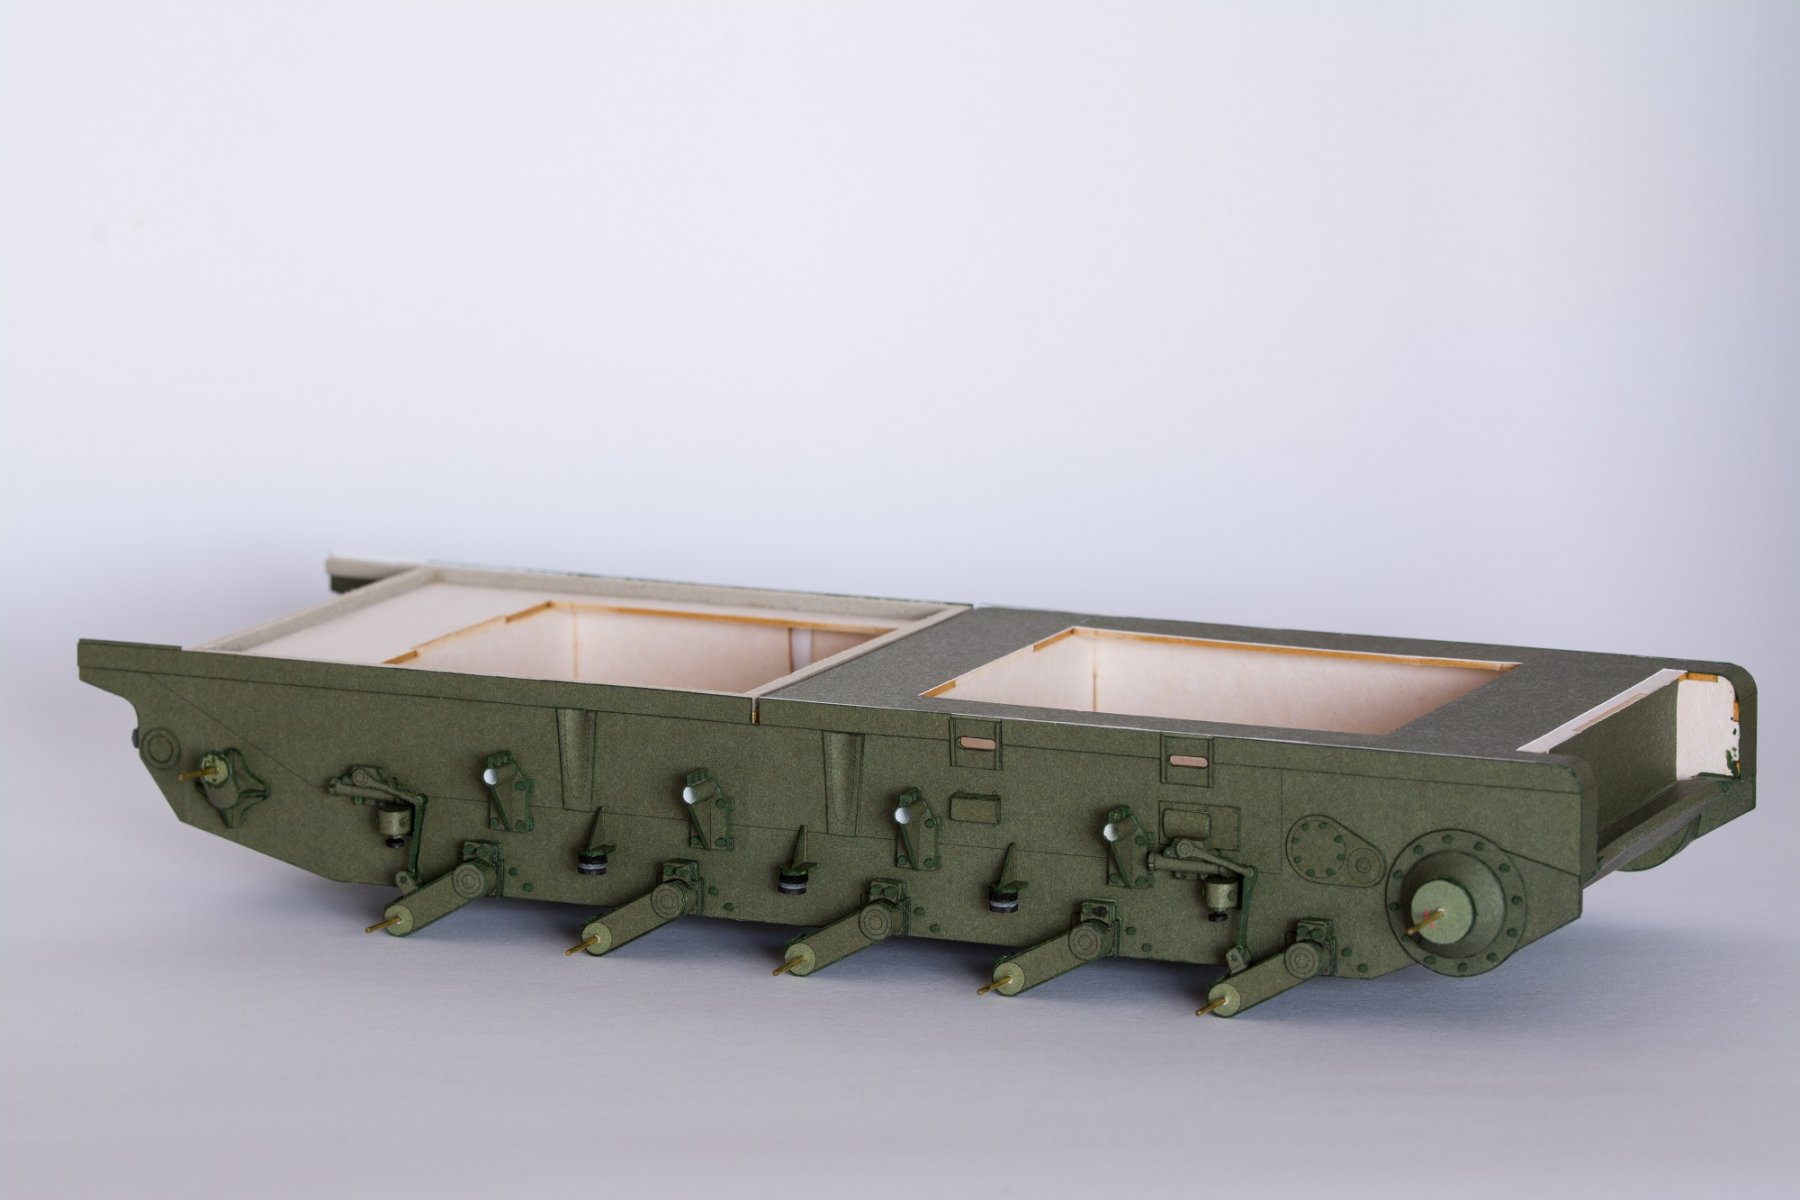
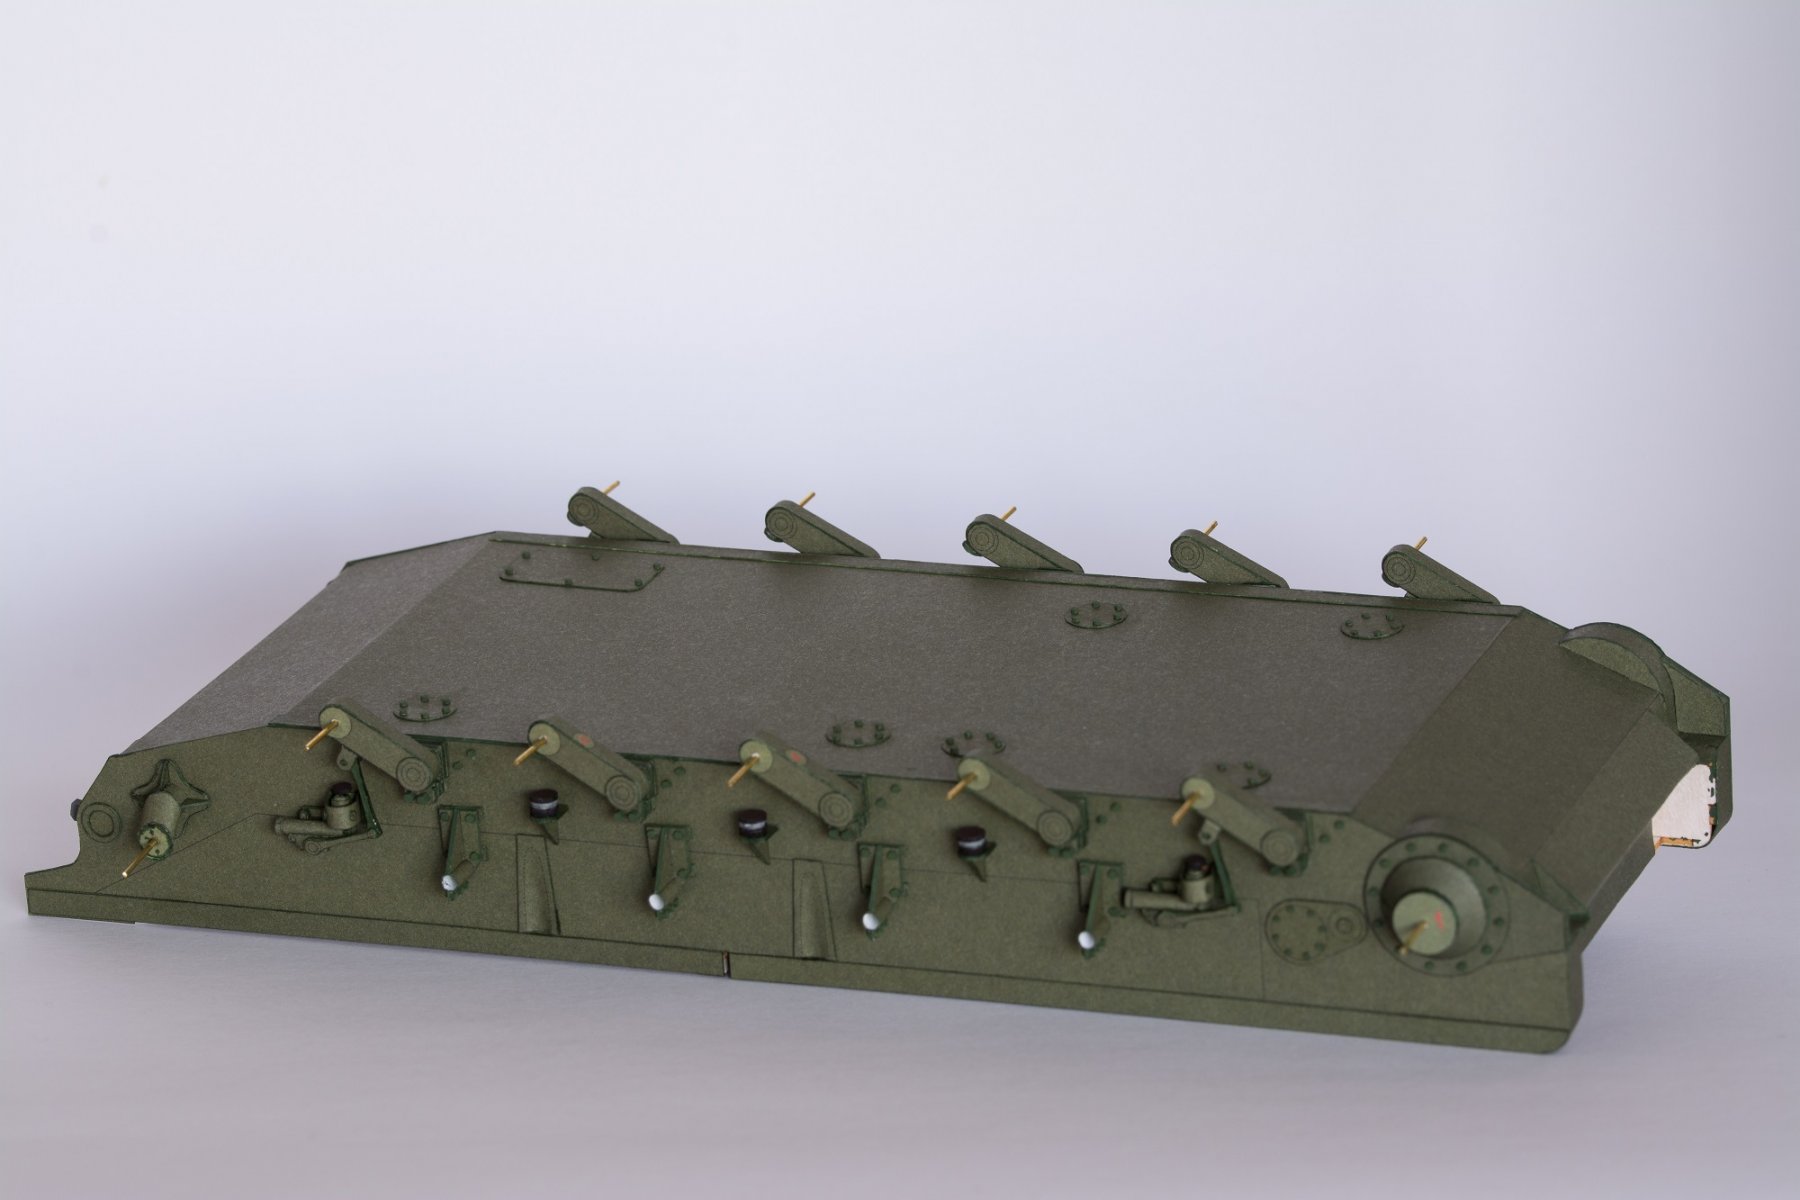
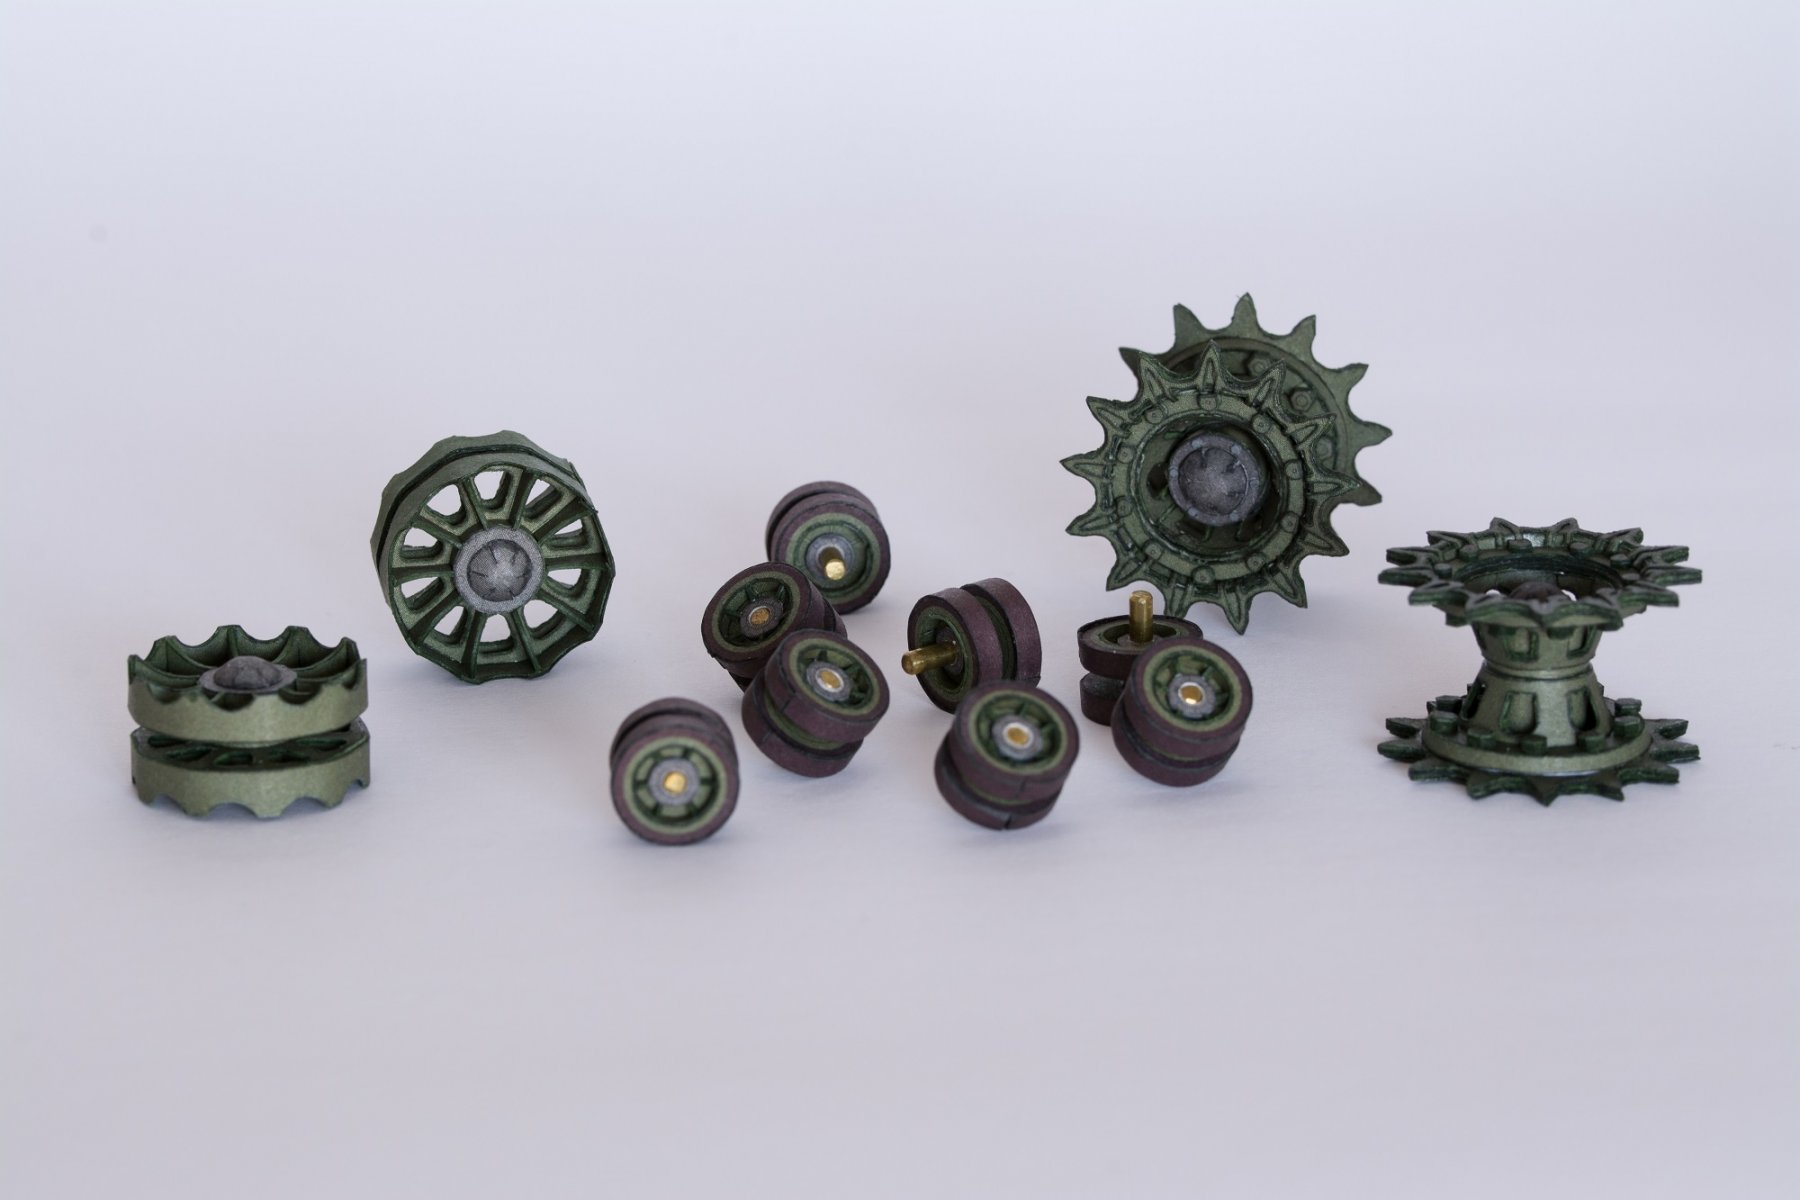
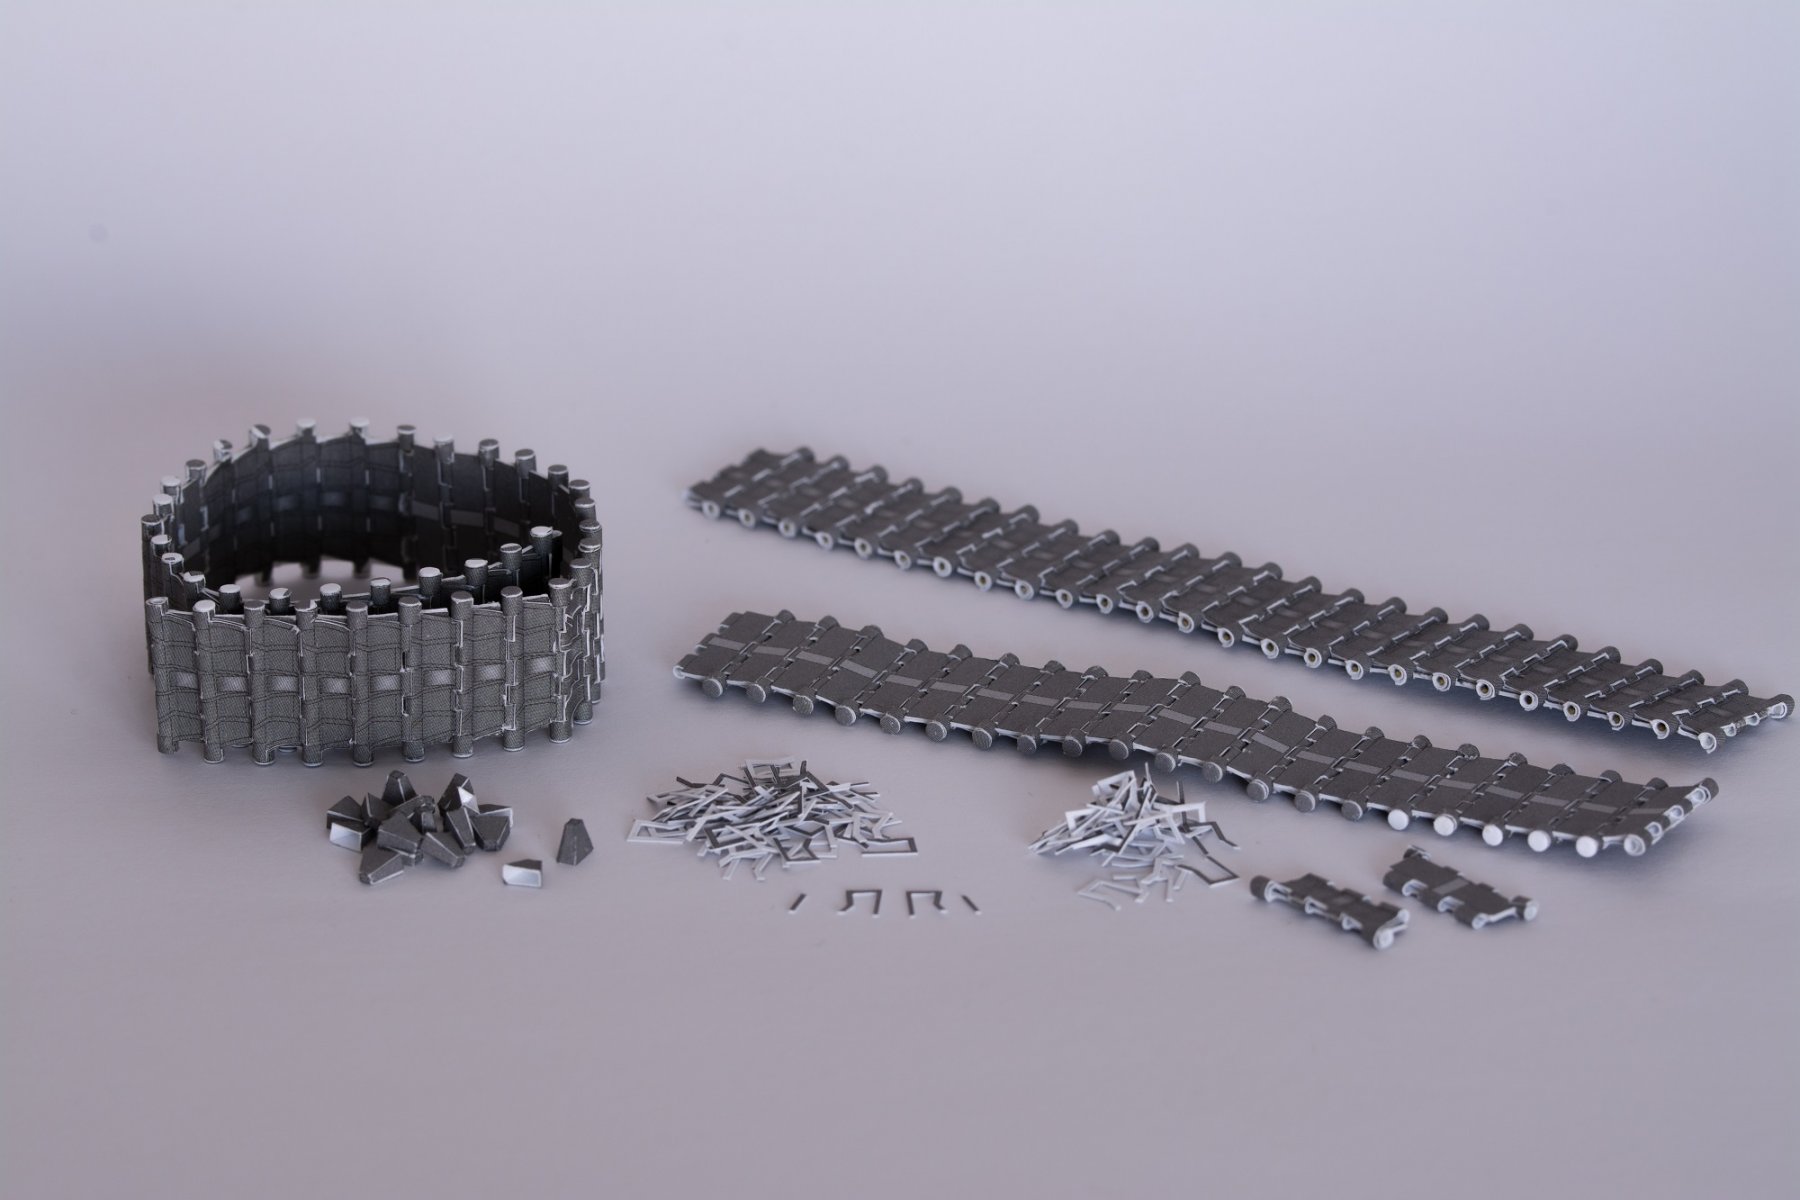
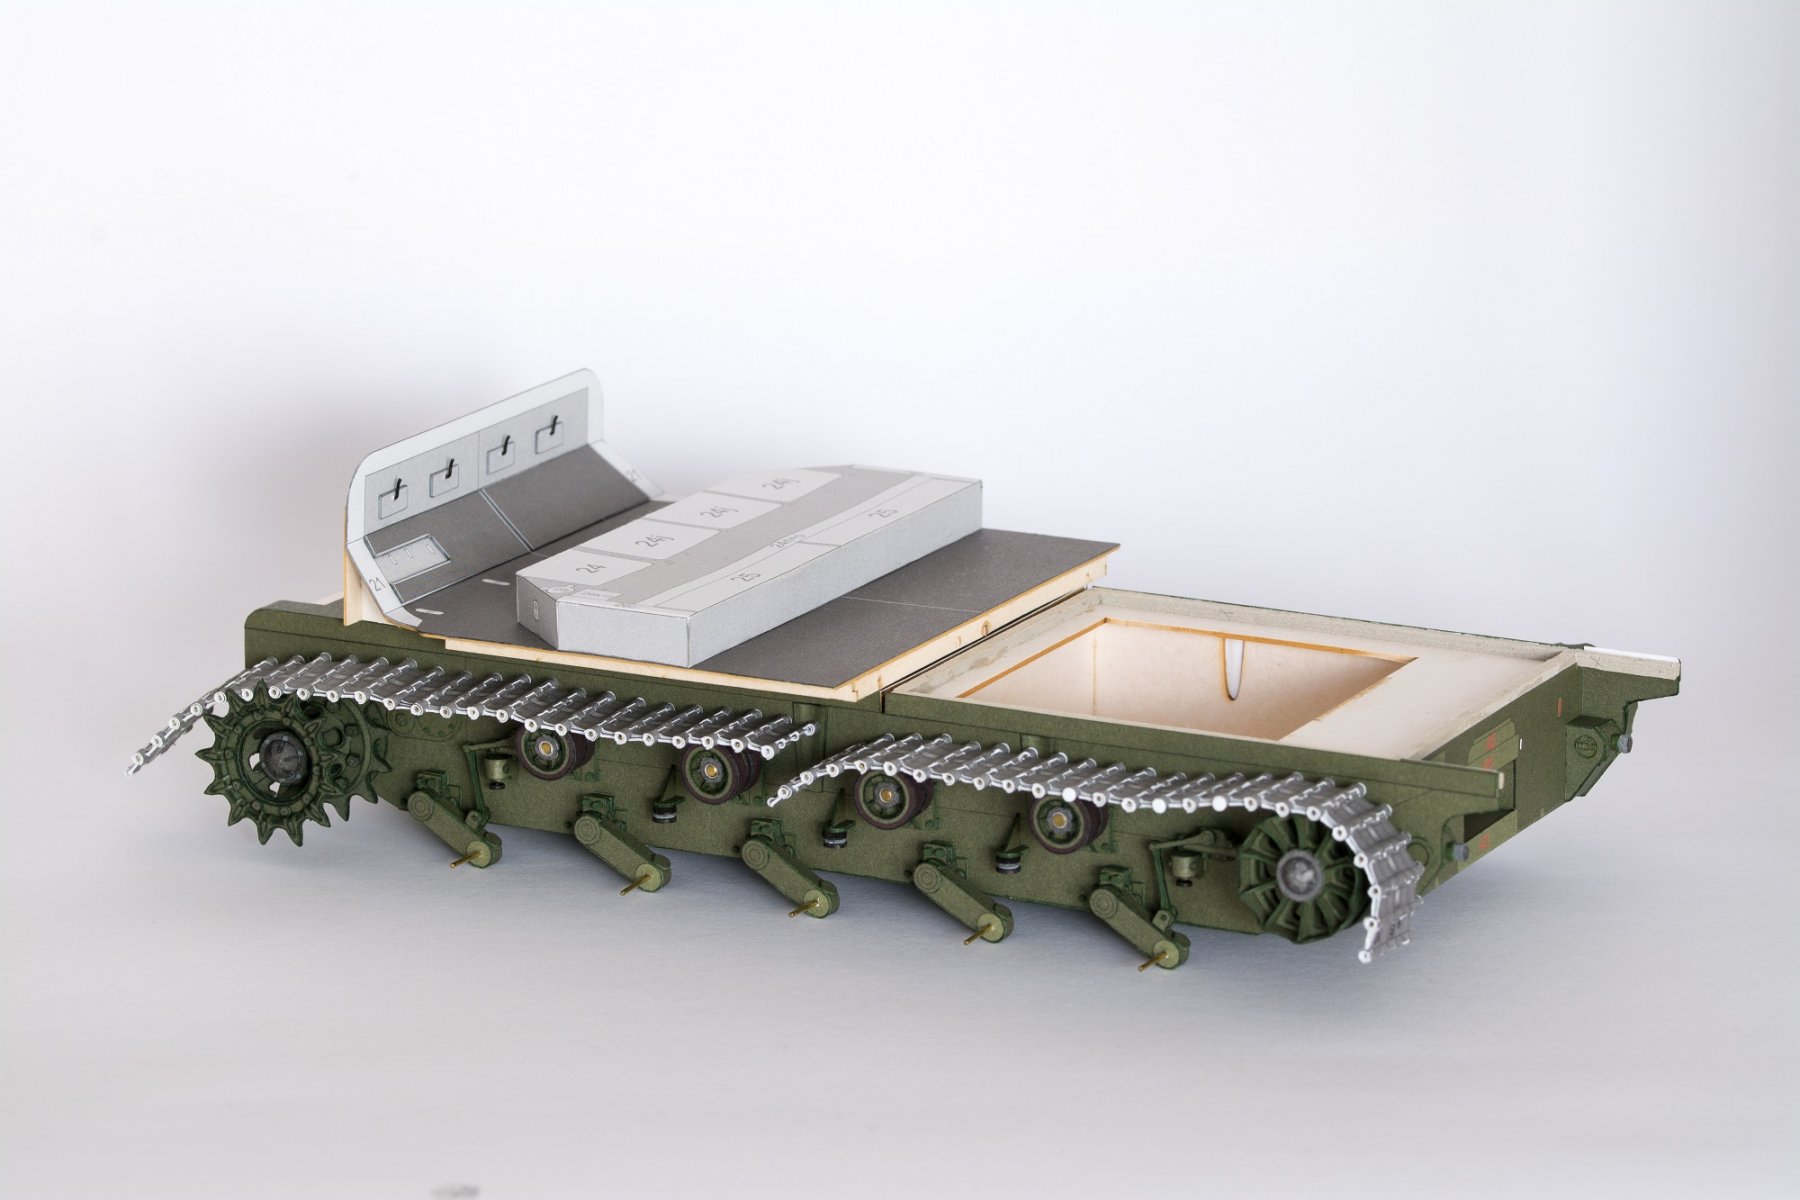
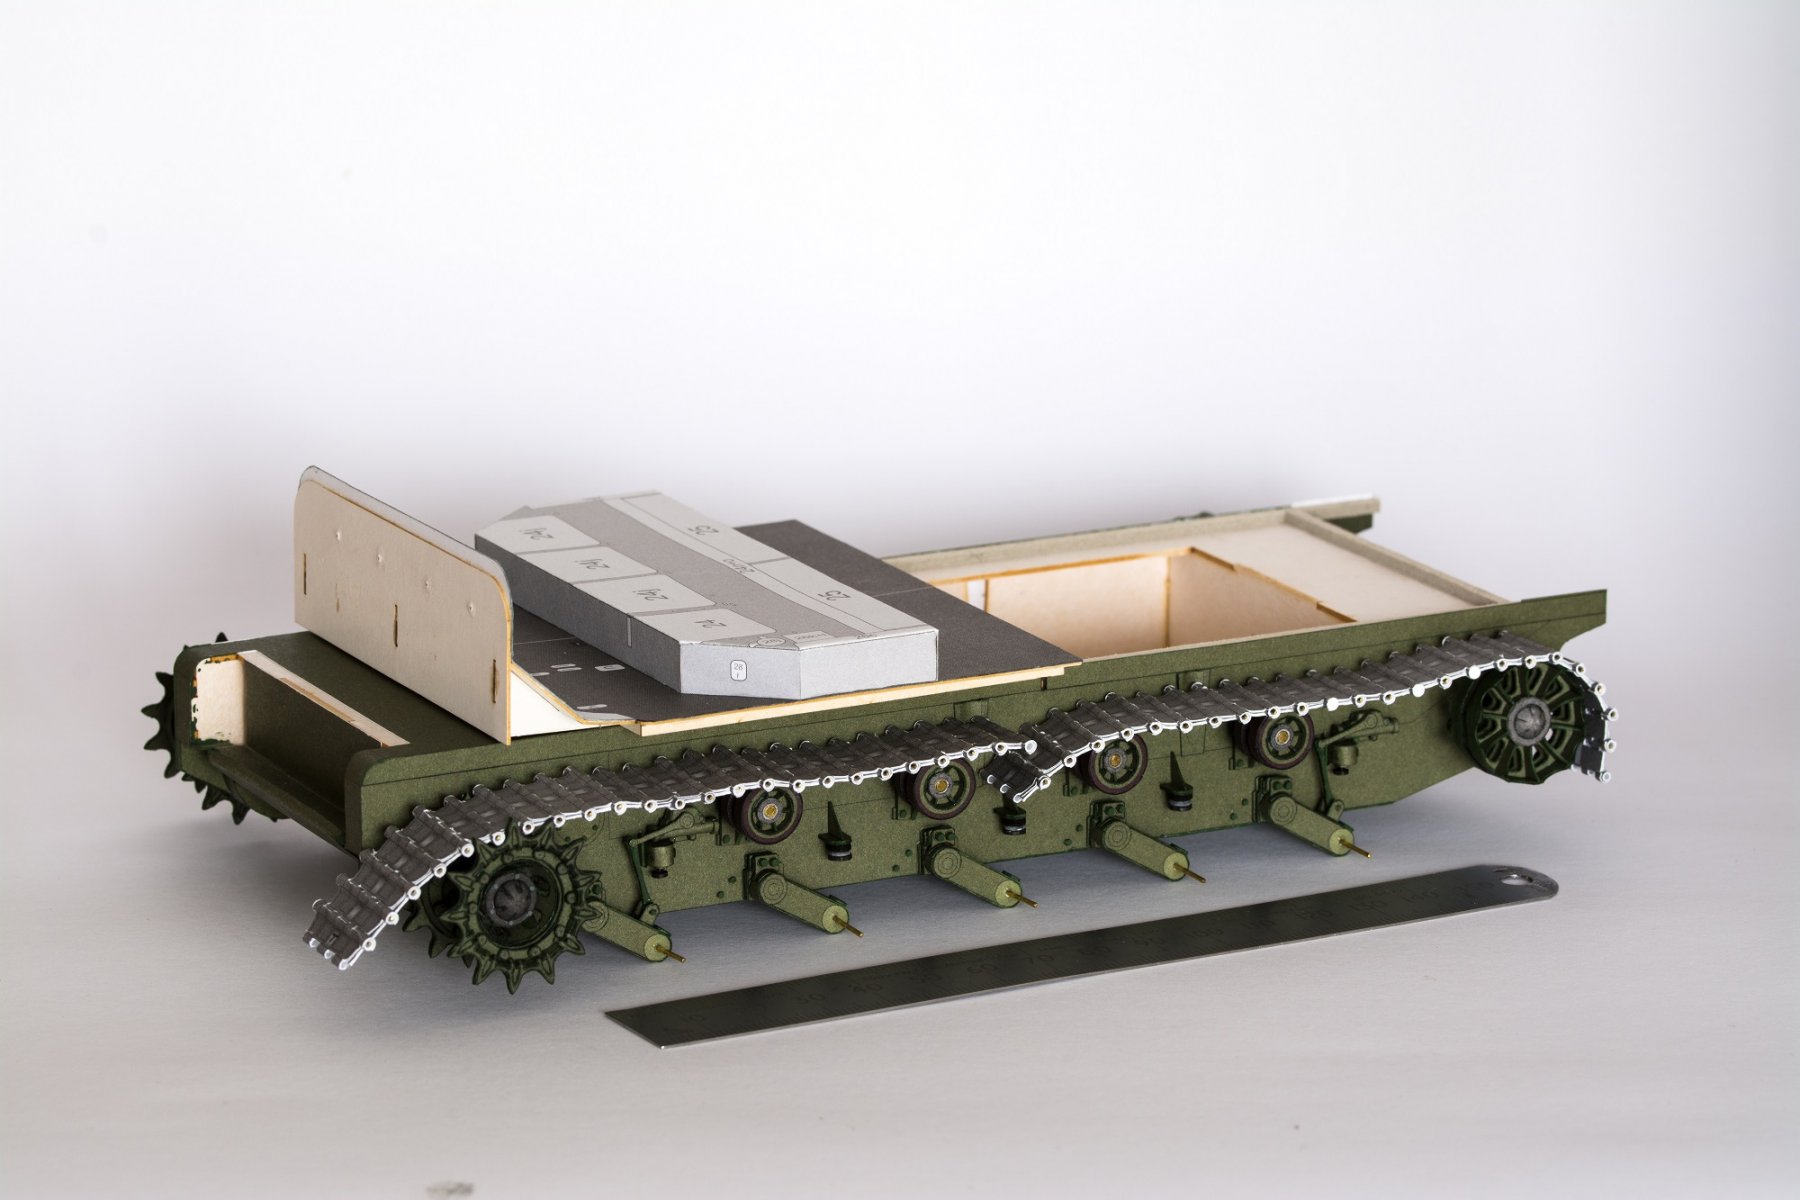
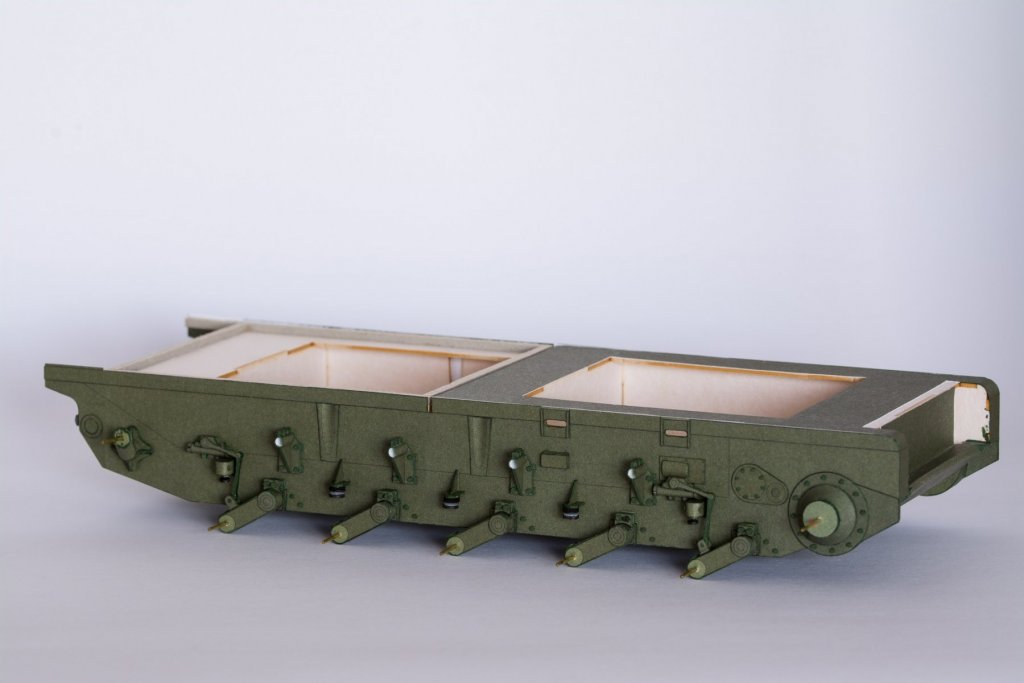
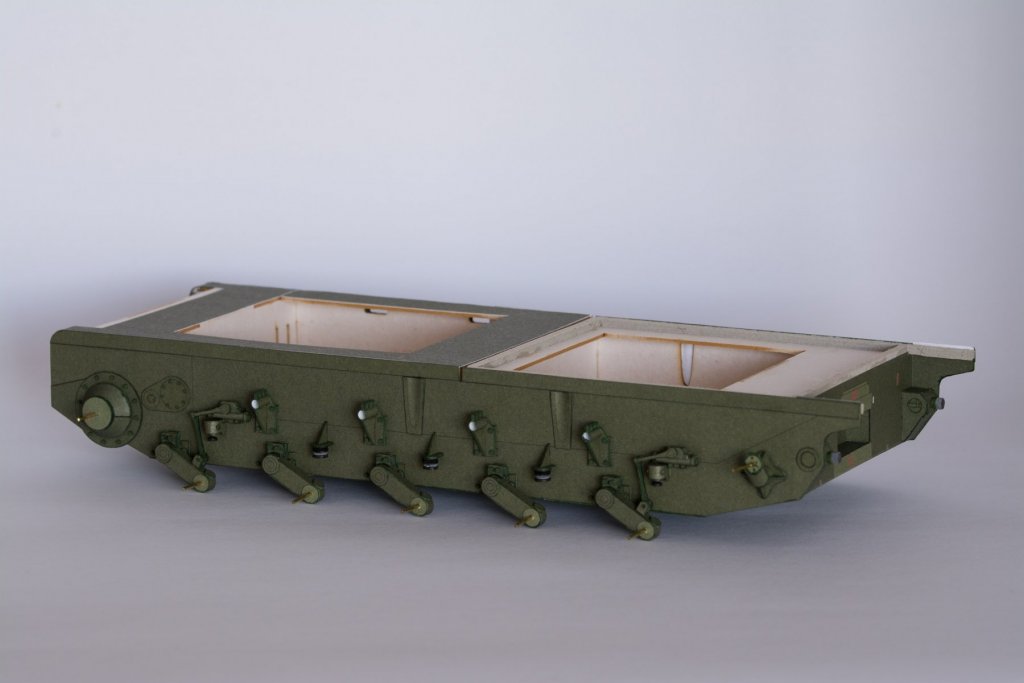
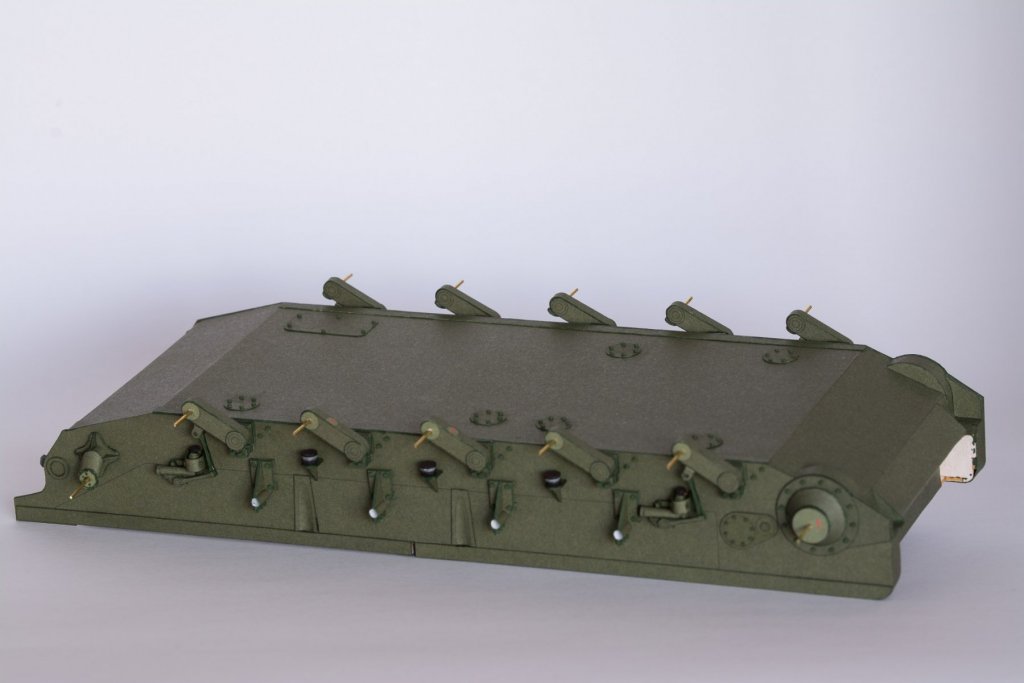
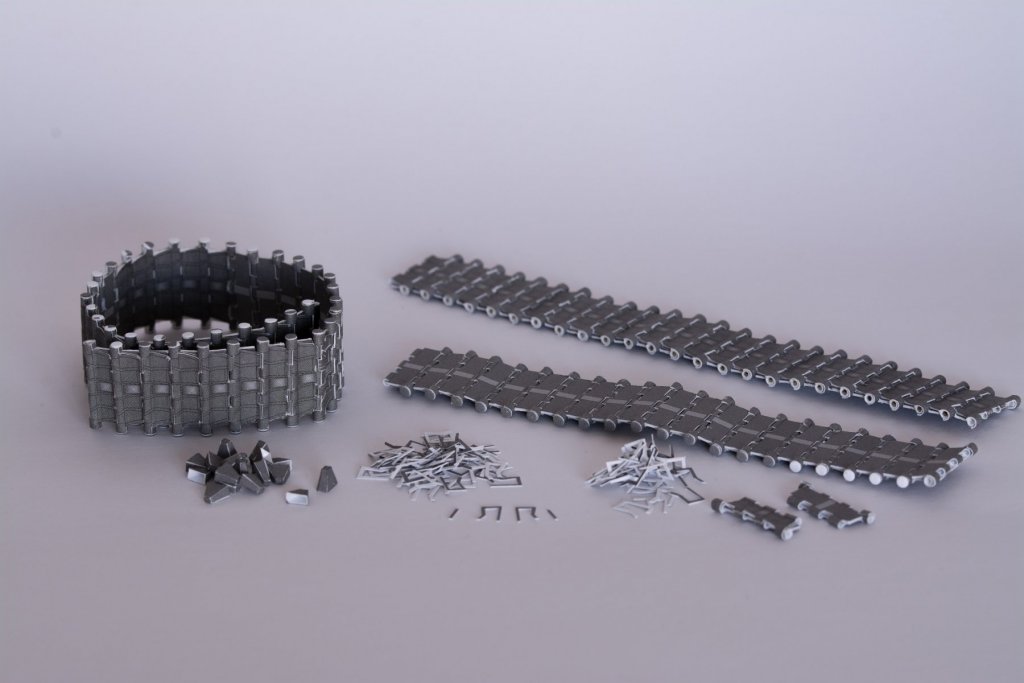
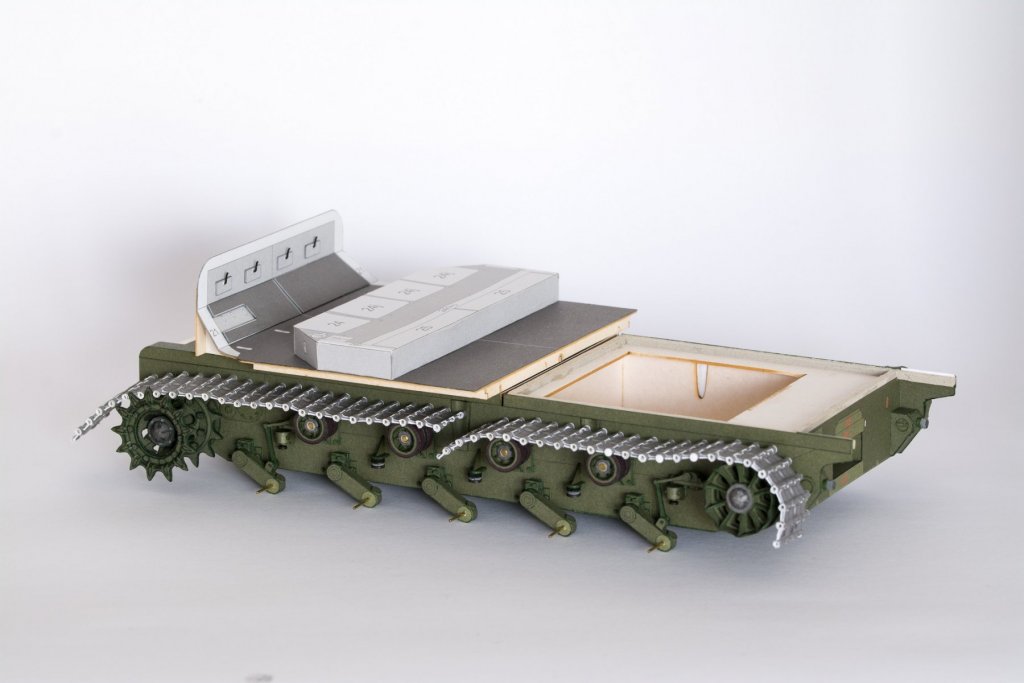
Hi, I thought I would jump on the non-ship model build log bandwagon (or stage coach / bus if you prefer!) to try and bring more awareness to card models on the site. The artillery tractor is in the popular card vehicle scale of 1:25 which provides quite sizable models depending on the subject (rail guns are absolutely massive!) Detail wise I would say this model falls somewhere in the middle as probably more detailed than others but not as detailed as say a Halinski Sherman. I was working on this prior to the Borodino until the build stalled doing the road wheels as these are pretty complex and a real head scratcher to work out the assembly. Once I understood the orientation of the individual wheel spokes it became a struggle to fit them hence it being placed on the back burner. Saying that, I haven’t forgotten about it and as my card modelling experience increases I am feeling more and more confident in revisiting it and finishing them off. The main problem with tracked vehicles is the repetitive tasks such as multiple wheels and numerous track links which can be soul destroying. The following series of photos show my total progress to date and covers 293hrs spread over 2 years and I last worked on it in June 2016 (as you can see I am not a quick builder LOL) But will start chipping away at it again besides working on Borodino. The main chassis with all the running gear attached. The box structure consists of laser cut forms skinned as usual and multiple components cut, formed and attached using all the same techniques as covered in my Borodino log. Thankfully I haven’t had to resort to painting except for the normal edge colouring (and the tracks which I will discuss below) and hope to finish it without painting. Underside showing inspection hatches with 0.8mm laser cut card hexagonal nuts. I actually find the repetitive nature of gluing and placing nuts very relaxing/soothing LOL. The 0.8mm nuts are the limit I can work with. I also have 0.6mm laser cut nuts but try as I may I just can’t work with them. Here is a selection of the various wheels showing the drive sprockets, rear idlers and track return wheels. There are a surprising amount of parts used to make up just these wheels alone. For the road wheels I had gotten as far as making up the 20 rims, the hubs and a trial of the wheel spokes before the build stalled. The 20 completed wheels in 10 pairs will consist of 250 individual parts. The tracks of these vehicles can be soul destroying depending on how you tackle them (some kits have laser cut track links available). In this case the kit book provided 2 options. The 1st and easiest option is to make the tracks from continuous strips of printed paper, doubled up for thickness or option 2 which is to build each individual track link. Of course being a masochist I choose this option as I think they look better and have a more realistic shape and weight to them. It goes without saying the time and effort required is far greater. The tracks consist of approximately 162 individual links (81 per side) and are held together with brass wire as link pins. Very happy how these are turning out as the track is fully flexible and it contours over your fingers etc. Due to the tedious nature of doing 160+ links I would tackle each step over a period of time coming back now and again to finish one step before moving on to the next. I still have to add the grousers (treads – x4 per link) and the guide horns (1 per link) which are shown in the photos. (Parts count on the finished tracks will be 1,620 give or take!) I haven’t edge coloured these as I always planned on painting and weathering the tracks and as mentioned, hopefully the only thing to be painted. Some photos showing it all loosely together. I will probably start adding the track grousers and guide horns next as a precursor to getting the road wheels done. The base of the crew cab also utilises laser cut card formers, although not necessary as the kit (as usual for all card models) supplies the templates for making your own. But the convenience, fit and accuracy of laser cut forms far out way the minimal extra cost. There is a vast array of card vehicles available for all interests and I suspect cover more obscure or less known prototypes than what’s available in plastic. The usual suspects are also available. The comparatively low cost and larger scale are also appealing and if painted are indistinguishable from similarly painted plastic kits. Due to the sheer number of parts to do one of these kits you certainly get your money’s worth in build time for relatively little outlay. Cheers Slog


- 4 replies
-
- 14
-
-
Hi Dan, Thanks for dropping by, didn’t notice that this log had been posted to. As for the reason in giving up on the Bismarck here is what I posted in the Traders section when giving it away; Due to my card modelling interests changing over time the Bismarck doesn’t fit in with my interests anymore. I want to concentrate on WWII Japanese ships (I have the Fuso already and there are 2 others I want) and Imperial Russia pre-dreadnoughts as well as several card vehicles. If the Bismarck was further progressed than just 70% of the hull then I would have continued with it but as it is these ships are labour intensive and any time spent on it would detract from time spent modelling things I really want to do. If you want to do a card Bismarck then I have seen a few very nice GPM examples. Going by the kit I.D. number it appears to be quite old now and it does show in some areas not being very detailed such as a lot of printed only detail on the superstructure. The parts fit for the little I had done was very good and I don’t think I came across any issues by others on its construction. It also doesn’t give any advice on the foot rails, step irons and other ‘iron’ work as these are all printed on. A couple of other options are a Halinski Bismarck but this has been out of print for quite a time so you would need to track one down second hand. The ultimate would probably be HMV’s Bismarck which is 1:250 scale and is very detailed I believe. The underpinnings are more papery than the GPM card formers so probably a lot more difficult. The HMV would be a massive undertaking. I don’t know much more about it as it is not in ‘my scale’ so tend to ignore anything other than 1:200. If your interest is in any other ships you would have to go on a case by case basis although I will say there are several publishers I don’t look as the ships I am interested in appear quite basic in details. Good luck with whatever you decide on and look forward to following along. Cheers Slog
-
Hi Craig, Really starting to take shape with the addition of the cockpit. The shape of it is really distinctive. Cheers Slog
- 44 replies
-
- 5
-
-
- schnellboot s-100
- revell
- (and 2 more)
-
Just catching up on your progress and what a treat. The Japanese 127mm twin guns are one of my favourite looking guns. Just noticed the decals on the funnel as well, really looks the part. Cheers Slog
-
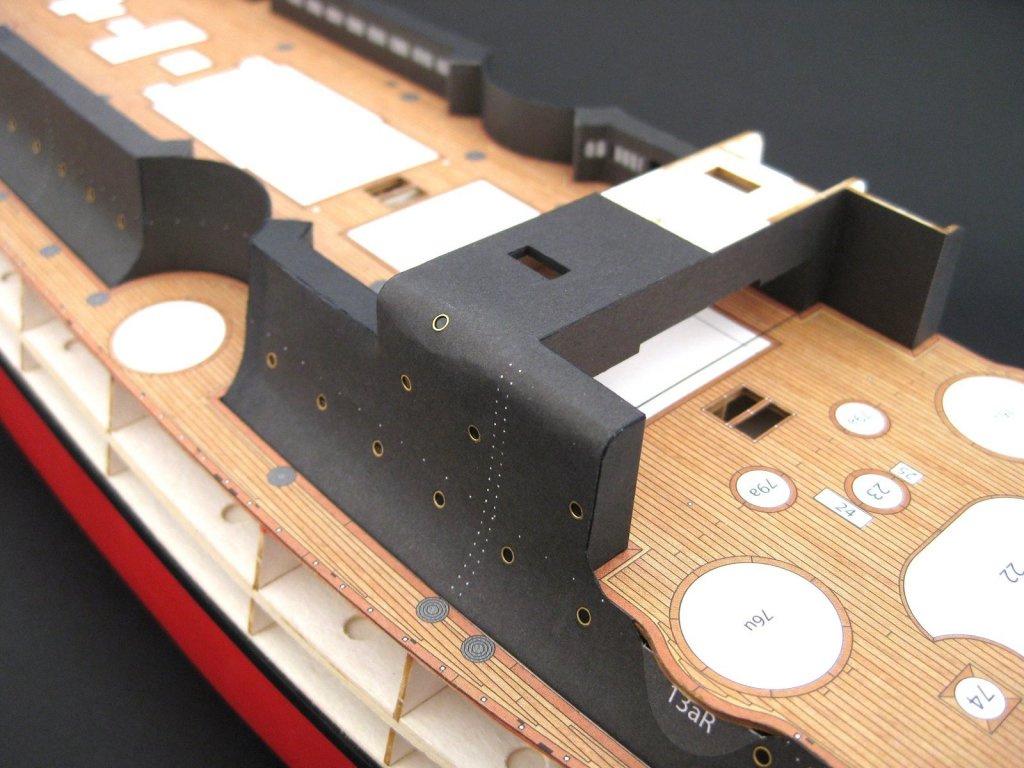
Thanks to all for the likes Thanks Grant. Hi Sam in this case not to well, especially the black which quickly turns grey, but…I am not sure if this due to the change of glue or the print itself. Previously when I used wood workers PVA any excess, as long as it was relatively fresh and hadn’t been touched could be cleaned off easily with a soft damp paint brush with no issue. But on this build I have been using Roket card glue which has the consistency of skimmed milk so doesn’t sit on the surface like PVA so trying to clean this up can damage the print. But in its favour because it is thin can be spread like paint on the mating surface without squeezing out. Most of my issues with this glue going on the wrong place is trying to get a glue loaded brush into a tight area and inadvertently touch it against something I shouldn’t. Thanks for the info Craig, I went with the mylar due to the effect it gives. I have been looking at the photo and although the mylar probably contributed to the buckling (by holding the port hole firmly in place) I now think the issue is with the brass photo etch port hole. The area where it sits is unsupported from the rear and being right on the apex of the curve it had nothing to bend the brass against. A close look at the photo shows the port hole is still flat. I think without the mylar backing it would probably have popped out. For the other side I may try and remove the porthole and refit it after bending and fitting the skin. Cheers Slog
- 244 replies
-
- 4
-
-
- borodino
- dom bumagi
- (and 1 more)
-
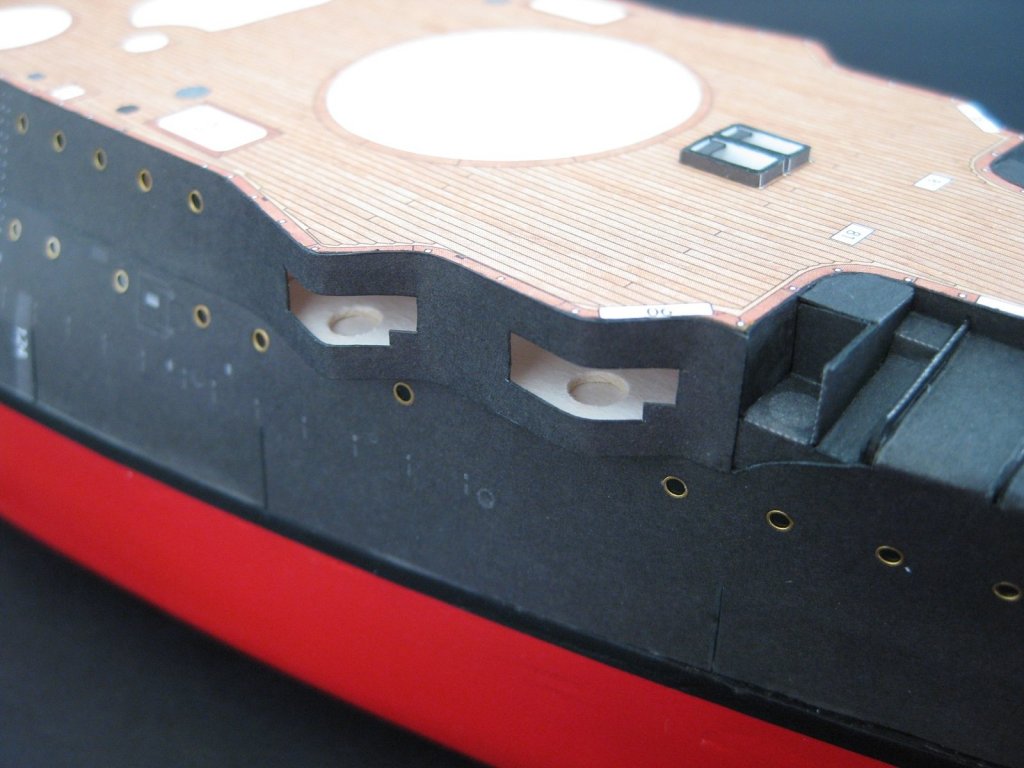
Hi All, A bit more progress on the hull skins. First up is the upper rear port skin to match the starboard side done last time. Not perfect but happy enough. With both rear side skins on I could do the rear bulkhead. The hatches 14b are supplied with inner and outer surfaces so decide to remove the entrances so I could attach the doors ajar later down the track. The hatches 14c are also doubled but didn’t remove them as will just attach in the closed position. A photo showing the other side. The rear deck is only temporary in place as I will wait until the lower skins are fitted so I can do final tweeks before fixing. I am not sure if the little white triangles left between the rear and sides have a part to cover them; if not I will either just paint black or fit little paper ones. The front upper starboard skin now attached. I was able to determine I can manoeuvre the 3” guns through the gun ports later, which is a relief as they wouldn’t have survived the skinning process otherwise. A close up of the skin going up and over the bridging structure. This is the only area of the side skinning so far I am not totally happy with. Despite taking care to pre-roll the curve and press home with a rolling motion using a flat smooth ruler I got a bit of buckling right on the bend. I am a 100% certain this is due to the porthole being right on the curve and the mylar ‘window’ behind it. The side decking is only trial fitted for the same reasons described earlier. On the whole really liking how its shaping up. Cheers Slog

- 244 replies
-
- 17
-
-
- borodino
- dom bumagi
- (and 1 more)
-
Hi Craig, Enjoying your progress. The paint work looks really smooth and flawless. cheers Slog
- 44 replies
-
- 3
-
-
- schnellboot s-100
- revell
- (and 2 more)
-
Hi Nick, Good to hear you will be continuing with your build shortly, look forward to seeing more. cheers Slog
- 20 replies
-
- 2
-
-
- maly modelarz
- Batory
- (and 1 more)