Keith Black
-
Posts
6,613 -
Joined
-
Last visited
Content Type
Profiles
Forums
Gallery
Events
Everything posted by Keith Black
-
 Keith, thank you for sharing your furniture delivery experience. Eric and Kurt, thank you both for your sage thoughts. Time to devote to Lula has been in short supply as of late but I have been laying out her design elements and I should have her profile on paper within the next few days. During layout I was worried about the pilothouse being so far astern until I realized the pilothouse has to be as far astern as possible because of her job pushing the pile driver barge. Forget about trying to see around a stack, the pilot is trying to see around the pile driver tower! Photo Lula's pilot house has two windows on both the port and starboard sides with the only door at the stern. Knowing the pilot needs as much aside view as possible I think I need to replace the forward windows with doors. Lula's water tank will be built into the hull set forward allowing the boiler to be set closer to the engine room also a coal bin will be set forward of the boiler. Sacked coal would not have been used because of the numerous coal tenders working the harbor. She'll also have a boom lift near the bow. Because of the water and coal weight plus the mast and boom lift weight I think I can justify placing the boiler closer to the engine room. I debate with myself whether to have the boiler exposed or inclosed. Exposed makes for a more rough working like appearance while enclosed would be better for keeping steam temperatures elevated. An exposed boiler also provides more visual interest. Thank you to everyone for following along in these early days of Lula's development. Your thoughts are greatly appreciated! Keith.
- 732 replies
-
- 14
-

-
- Lula
- sternwheeler
- (and 1 more)
-
Beginner - Rigging Tools
Keith Black replied to nheather's topic in Modeling tools and Workshop Equipment
Neat tool, Paul. -
Finish sequence
Keith Black replied to shipman's topic in Painting, finishing and weathering products and techniques
One can paint over polyurethane using acrylics. It's easy to get outside the line when working at small scales, when painting on top of polyurethane it's very easy to remove that area of paint where a mistake occurred. -
Beginner - Rigging Tools
Keith Black replied to nheather's topic in Modeling tools and Workshop Equipment
For myself, the best line/thread cutting tool I've found is flush wire cutters. Years back I bought a cheap ten piece pack off Amazon, five flush cutters were designated solely for cutting line/thread and the other five were designated for cutting wire. I marked the handles so I wouldn't confuse between the two. I like flush cutters due to the flat profile. I use high magnification glasses (6X) when modeling and depth perception is a problem. Flush cutters allow mw to get into those tight spaces between lines and make cuts with less fear of making a mistake. I find cuticle trimmers to be much more cumbersome. The link below is for a five piece pack, searching "flush cutter" you'll also find singles both expensive and cheap. https://www.amazon.com/dp/B09V7ZSJGM/ref=sspa_dk_hqp_detail_aax_0?sp_csd=d2lkZ2V0TmFtZT1zcF9ocXBfc2hhcmVk&th=1 -
Thank you, Eric. I hope your time away was enjoyable.
-
Wipe On Poly Techniques
Keith Black replied to Freebird's topic in Painting, finishing and weathering products and techniques
I use a brush. -
Graig, that's some dandy work on the tup, sink and WC.
-
That's so cool, John. Do you ever give em a show and pretend to break something?
-
Thank you for joining in, Keith. In the past couple of weeks I haven't thought about modeling as our ten year old refrigerator started failing October the 16th and the need for a new refrigerator has been paramount in my mind. We've been living out of an ice chest for the past couple of weeks as the old frig completely died on October the 29th. Delivery of the first frig ordered was supposed to have taken place on November the 1st. At the time of the order the vendor (big box) said the frig was in stock and would be delivered November the 1st but two days before delivery they said the frig was on backorder from the factory. Order canceled. Second frig ordered, when delivered, was too large to fit through the four doors to the kitchen so we had to buy another that would fit through the doors. It was delivered yesterday and successfully installed. Of course during this time our house looked like it had been stirred with a stick due to doors being removed and furniture pulled away from the door openings. Thank God for our new refrigerator! Hopefully I can focus my attention on Lula now that we're no longer camping out.
- 732 replies
-
- 10
-
-

-
- Lula
- sternwheeler
- (and 1 more)
-
Gary, great detail in woodworking and weathering. Thank you for the update.
-
Ratline thread recommendations 1/75 scale
Keith Black replied to John AA's topic in Masting, rigging and sails
For seizing a polyester fishing line would be dandy. -
Ratline thread recommendations 1/75 scale
Keith Black replied to John AA's topic in Masting, rigging and sails
Why try using fishing line when Guermann polyester thread replicates cotton line very well with less fuzz plus the added benefit of longitivtiy? -
Simon, how goes life? I've missed seeing your updates.
-
It's a good time to head to Hawaii with the election and all. Have a safe enjoyable trip, Glen.
- 301 replies
-
- 4
-

-
-
- Constitution
- Bluejacket Shipcrafters
- (and 1 more)
-
Ratline thread recommendations 1/75 scale
Keith Black replied to John AA's topic in Masting, rigging and sails
John, most have gone to polyester thread because of longevity and much much less fuzz. One source of Gutermann threads in the UK. https://www.myfabrics.co.uk/guetermann-thread?gad_source=1&gbraid=0AAAAADpLKWABIbKJHXc4mAxNNMV2DY97G&gclid=EAIaIQobChMIivahq4TFiQMV-Eh_AB0q7AQIEAAYAiAAEgIEWvD_BwE -
Ron, sorry to hear modeling is no longer enjoyable, All the best to you and I hope you're able to dispose of your model stash without issue.
-
Absolute beginner here - new to ship modeling
Keith Black replied to AlanR's topic in New member Introductions
Alan, welcome to MSW. Glad to have you aboard. Take advantage of MSW's search engine and search "Chris Craft", you should get a fair idea of what's involved to tackle that project and if your current skills would meet with moderate success. A lot of folks start with the Lowell Grand Banks Dory which comes with tools. Most have found that the tools provided are not sufficient but by searching Dory build logs you'll discover what other tools you'll need to purchase. -
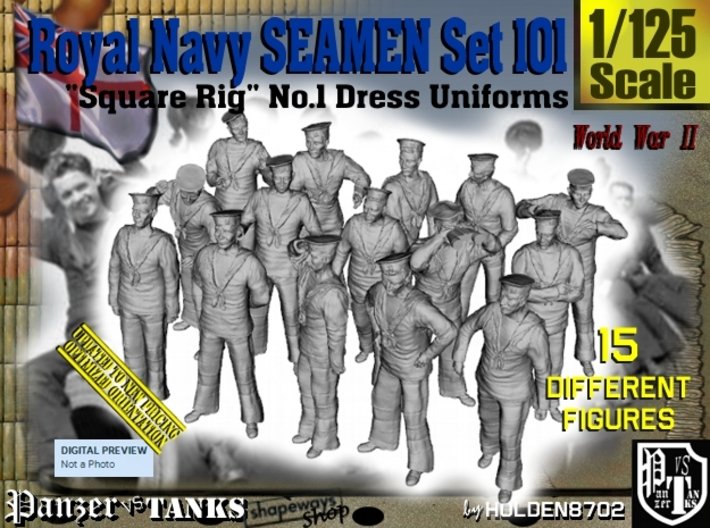
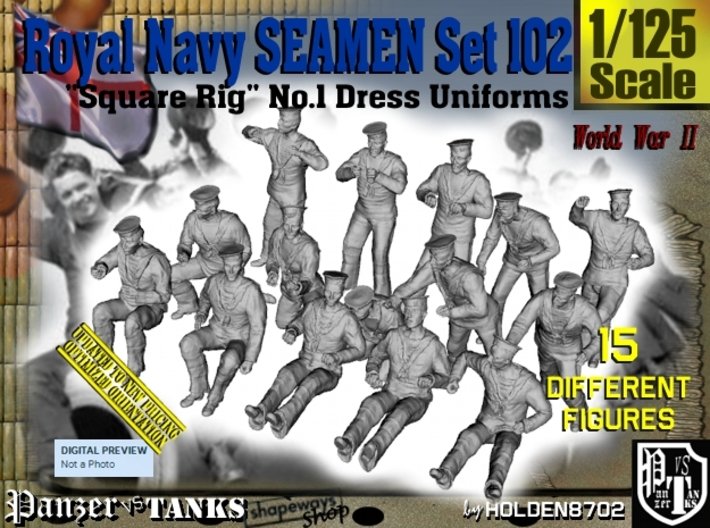
George, beautiful model, congratulations. When Shapeway was still in business I ordered the below sets by Holden. Last I saw Holden was offering his figures on Facebook.
-
For the most part men aren't neat and tidy creatures. The 65 foot Duyfken had a crew of twenty and I expect they would have left a proper mess in their wake on a normal sailing day. But a some point a Captain would have had to order the deck cleared and the ship made tidy once more for reasons of safety more so than aesthetics.
-
Thank you, Gary. Thank you, Tom.
-
Joanie, welcome to MSW. Glad to have you aboard.
-
Thank you, Rick. Thank you, mcb.
-
Eberhard, do you like working at 1:160 scale or is it a case of continuing to work at that scale having geared up to do so early on? I hope I asked that question clearly. I started with 1:120 and have continued because of tools and leftover inventory. There are times when I wish I had started with 1:87 because of the availability of figures and fittings.