
HOLIDAY DONATION DRIVE - SUPPORT MSW - DO YOUR PART TO KEEP THIS GREAT FORUM GOING! (Only 20 donations so far - C'mon guys!)
×


lmagna
-
Posts
5,885 -
Joined
-
Last visited
Content Type
Profiles
Forums
Gallery
Events
Everything posted by lmagna
-
 If you consider where the information come from then it is pretty obvious that it almost has to be first hand experience. The use of the "forked" stick, while possibly not as handy as a pair of pliers like you show is not a heat sink and will not be all that intrusive to the working area while heating the stanchion. I would probably use the pliers also, even better would be a pair of tweezers as they would have less surface area to act as a heat sink, but Steve seemed to be having issues with paint damage and heat transfer so I suggested an alternative that I thought might help.
- 446 replies
-
- 3
-

-
- zebulon b vance
- deans marine
- (and 3 more)
-
https://www.ebay.com/sch/i.html?_from=R40&_trksid=p2334524.m570.l1313.TR1.TRC0.A0.H1.Xtru-color+paint.TRS0&_nkw=tru-color+paint&_sacat=0&LH_TitleDesc=0&_osacat=0&_odkw=tru-color-model-paints&LH_TitleDesc=0 http://trucolorpaint.com/military-ships/ Hope this is useful to you Joe
-
If I had the skill, and I am certain that you do, I would tend to go for the slightly weathered look. The Bismarck was not that old or heavily used but I am almost certain that she would have shown some kind of light wear by the time of your build, especially around the waterline and lower hull.
-
Here is a possible modification for you Steve. Sorry that I didn't think of the silver solder heat range difference that Carl pointed out, but I almost never bothered with silver solder finding standard solder fully adequate for work like this. If you assemble the stanchion/railing assemblies using brass wire for the railings instead if using a set of needle nose pliers use a stick like an icecream stick of whatever fits that is wider than it is thick. Cut a 1 or 2 mm slot into the stick that will allow the stanchion to fit into the slot while either side rests on the railing wire . Keep the slot as small as possible to allow the stanchion to fit with as small a gap as you can and still be able to place and remove it easily. Then when it is time to place the stanchions you can place the "Fork" stick on the stanchion at the middle or even lower rail and hold it with downward pressure while applying heat to the lower portion of the Stanchion. The wood would not form a heat sink while it should allow you to have pretty good control in the area being heated. There is little need to worry about the solder melting at the stanchion you are working on as everything will be held pretty much in place with the other already soldered stanchions up and down the assembly. As soon as you remove the heat everything at that stanchion will almost instantly become solid again as the solder cools. BTW grabbing the hot end is HIGHLY advised against. The best treatment in my opinion is to run cold water over the burn for several minutes even after it starts feeling better. Sometimes they hurt even worse on the next day! (There is little need to ask why I know this)
- 446 replies
-
- 3
-
-
- zebulon b vance
- deans marine
- (and 3 more)
-
German WW2 Armor Models by nickbud - PLASTIC
lmagna replied to nikbud's topic in Completed non-ship models
After 1965 it was the ford GT 40 years ending in one of the closest races in Le Mans history when Jacky Ickx won in 1969 with the same car that had won in 1968! Then the Porsche 917, (Remember the Steve McQueen movie Le Mans) ran away with the show for the next couple of years. Then finally France got what they had been working for years on when the Matra 670s finally got everything together and won over the next three years. Then here comes Jacky Ickx, again driving for the blue and orange painted Gulf Oil Sponsored J.W. Automotive Engineering 3.0L Mirage. Even though it was listed as a Ford it really was a revamped F-1 Ford Cosworth engine and chassis and had little in common with it's Ford GT40 based predecessors. But this was the end for Gulf Oil, JW Automotive and Ford at Le Mans. None of them have won at Le Mans since. Then it became the years of the porsche's until 1987 sweeping almost every year with only a few other manufactures winning. then until present the only other run of years of note have been by Audi, (13 years). As for your Ferrari, i think you have a 250 GT LM or more commonly called just the 250LM standing for Le Mans. In reality they had 3.3L engines and should have been called 330LM but Ferrari insisted on calling them 250LMs so that they could run in the GT category instead of competing directly against the 330Ps. It is even a little more convoluted than that but I guess this is after all a ship forum and I don't want to get people upset by talking cars too much. Still some great models no matter what you call them. -
Hi Steve One method you might try is to determine the spacing between stanchions and drill the required size holes in a scrap piece of wood. Place the stanchions in the holes, string the rails through the holes in the stanchions flux and solder everything together. Remove, lay on a flat surface and clean then again place the assembled railings in the jig and paint. When dry place the assembly on the ship and melt into place. You only need to hold the soldering iron on the very top of the stanchion and the amount of damage to the painted surface will be minimal or even nonexistent. This also eliminated most or all of the need to hold the stanchion with tweezers or needle nose pliers that act as heat sinks as you can hold the assembly rather than the single stanchion. This will decrease the time needed to sink the stanchion into place.
- 446 replies
-
- 3
-
-
- zebulon b vance
- deans marine
- (and 3 more)
-
Wood scraps in the rigging would look kind of tacky, at least in my opinion for what it is worth. I think it would much better if you buy some 1 or 2 mm seed beads. They still don't look exactly like blocks but they are cheap and easy to work with. As for dead eyes they are readily available through a number of dealers here on MSW and elsewhere. They are also much easier to make using a dowel and small drill. You might want to give it a try before just going super simple.
-
German WW2 Armor Models by nickbud - PLASTIC
lmagna replied to nikbud's topic in Completed non-ship models
One of mine is the LM/250 except mine is the #21 winner of the 1965 Le Mans driven by The crazy American Mastan Gregory and Austrian veteran Jochen Rindt. It was a NART entry and Mastan pushed the living daylights out of the car and no one thought it would hold together through the night, including Rindt who was in his trailer when Masten came in for driver change. They not only held together for the full 24 hours when none of the Ford Gt 40 or factory Ferraris made it, but they won first place in both over all and the GT class. It was the fifth win in a row in as many years for Ferrari but also the last, they have never won at Le Mans since. Nice job on your "Cars" conversions. i would have never figured out the Lightning McQueen was even a conversion' Also I really like your "Roger". He does seem very lonely though. Great work all around. -
So now you get to go from horizontal sticks to vertical sticks! That's called progress! Congratulations
-
He was also an accomplished writer for the age he lived in his status in life. One does not normally accredit a seaman of that period as having this much command of the written language, even though you do say that this was written long after the actual incident.
-
The detail almost overwhelms the ability for the eyes to take it all in! It is astonishing just how small all this stuff really is. The pictures make it look easier because they make it look so big.
-
That doesn't look much like the kit either! Don't the kit manufactures have ANY respect for "Scale"? But if you blow up the picture you can see that the gundeck band has a slightly red/black color compared to the hull above and below. That being the case I would think you could do what you want. ( red band, red band, red band, red band) No really, your build your vision and choice. She is really looking good.
-
If she is like mine she will want you RUNNING the vacuum! Dumb question I suppose at this point but do you have any intent on adding the faded red sides along the lower gunports that shows in some of the Pictures of the Pearl?
-
Take it from a semi expert OC. Doll houses for the spoucial unit need to be taken in small doses with more manly endeavors filling in. They can make ship building look like a short term project!
-
Dave's 1951 XK120 Jag Roadster - FINISHED - 1/24th scale
lmagna replied to SawdustDave's topic in Non-ship/categorised builds
The focus is a little off for me, (Or it is entirely possible my eyes are giving out at last) Dave, but if light reflection is an indicator then the one on the left seems to be the better deal. Here is another possibility: https://shop.bestreviews.com/products/12x78chrome-mirror-silver-vinyl-wrap-sticker-decal-film-sheetself-adhesive?cid=1478216846&aid=56672288785&eid=&tid=pla-293946777986&ul=9033346&mt=&n=g&d=c&dm=&dt&sn&adid=282858957008&k=&p=&pc=&ap=1o3&gclid=CjwKCAiA8rnfBRB3EiwAhrhBGiD5WMn9ph-s9OE2w2_Vy0ARDKf7jhVd1qftC-_2MWZMUsyPx6cI6RoCHhUQAvD_BwE It appears you can also pick this stuff up at your local hardware store but it seemed like it was more expensive. Either way it should be a lifetime supply! -
The story and people behind the ship. That is what it is really about, at least to me. Thanks Frolick
-
Dave's 1951 XK120 Jag Roadster - FINISHED - 1/24th scale
lmagna replied to SawdustDave's topic in Non-ship/categorised builds
Those side draft carbs bring back some, (not so) fond memories! With all the above suggestions I am probably wasting your time But years ago in my poorer days I think I did pretty well with contact glue and household tinfoil with the shiny side out. You need to be VERY careful not to wrinkle the foil and to rub it down with a soft cloth but when applied with that in mind it makes some pretty nice "Chrome". You can even make it look a little shinier by painting over it with Johnsons Acrylic floor wax. Almost makes it look wet shiny. -
I bought a set of the warm white/yellowish mini LEDs for the Titanic build I have lined up for my wife. Mine have a remote control as well that allows me to dim them, turn them on and off, and a couple of other things. I would think that you would need the bright white ones for your diorama. They are really tiny but put out a lot of light. Don't let the boss catch you pillaging the Christmas stuff! I must admit though that I have been guilty of commandeering stuff from the kids toy box in the past!
-
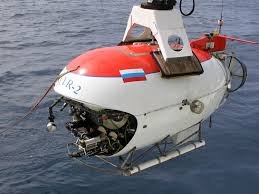
Hi KP In 1/350 scale the MIR Submersibles used on the Bismarck dive would have been about an inch long, (26 feet)) any ROVs would have been even smaller. It looks like the vehicles you are using are about the same size as your painted whale! Have you considered using lights like these: https://www.ebay.com/itm/10-20-LEDs-Button-Cell-Powered-Copper-Wire-Mini-Fairy-String-Lights-Home-Decro/332878570007?hash=item4d811be217:m:ms6HbSdrUN0oLWVLYb1WB8w:rk:5:pf:1&var=541995880702&frcectupt=true Each light is about 1 mm in size and would easily fit inside say a .22 shell casing with a hole (s) drilled in the side as spot lights. A similar length of brass tubing would also work. They produce a considerable amount of light, especially for their size. You could remove the unwanted lights by adding a resister and cutting off the excess lights. That should give you even longer battery life. Some of these strings have remote controls and USB power ability as well. https://www.ebay.com/itm/2M-20Led-3M-30Led-Usb-Operated-Mini-Led-Copper-Wire-String-Fairy-Lights-FU/153259375889?hash=item23aef87d11:m:mq2mWEOrPdrHPMxozZy5lYQ:rk:11:pf:0 The weight of each light could easily be supported over the top of the ship with nothing more than the wires needed for the light then the wire could be painted black. It can take a little while to get them from China or Hong Kong but I think you would find the wait worthwhile for your needs.
-
I am no expert, heck I'm not even a novice, but I think you will find the same is true here. Do the standing rigging first starting at the foremast and work your way aft to the Mizzen. Some people may also like to do the fore stays along the center line before do the back stays along the outer hull.
-
Dave's 1951 XK120 Jag Roadster - FINISHED - 1/24th scale
lmagna replied to SawdustDave's topic in Non-ship/categorised builds
Definitely a win! -
It will probably be a lot of kit modification to configure her to the present day look but like you say you have plenty of research information close by. As for the Slater, she is almost identical to the proceeding class of DEs, the Buckley class. The USS England is a typical Buckley and if you looks close you can see that almost the only difference is the two angled uptakes that lead from the boilers to the stack. They are missing on the Slater because she is diesel electric powered like a fleet sub and didn't need them. I'm sure that further research will show more differences but at first glance they are almost the same design. https://www.amazon.com/England-Buckley-Class-Destroyer-Trumpeter/dp/B000F6A4T6
- 140 replies
-
- 6
-
-
- the sullivans
- trumpeter
- (and 2 more)
-
At this scale you would probably need silk span to make it look right, or tissue paper with needle holes punched in it!
-
There you go, problem solved again!