
HOLIDAY DONATION DRIVE - SUPPORT MSW - DO YOUR PART TO KEEP THIS GREAT FORUM GOING! (89 donations so far out of 49,000 members - C'mon guys!)
×


VTHokiEE
-
Posts
1,528 -
Joined
-
Last visited
Content Type
Profiles
Forums
Gallery
Events
Everything posted by VTHokiEE
-
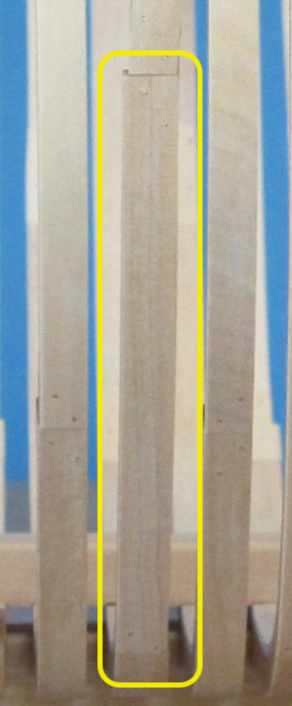
 Thanks this part makes sense; it’s the futtock width that I’m not entirely certain about. It seems like you may have used a thicker futtock than what the sides dimensions specify (but it’s hard to tell from the picture).
 -
Thanks, I will definitely be making it out of a wider piece - I wonder if I should simply taper it down instead of changing the futtocks. I suppose either path will work in the end (assuming it doesn't look off). Thank you! It has definitely been an experience (and I'm hardly started ha!)
-
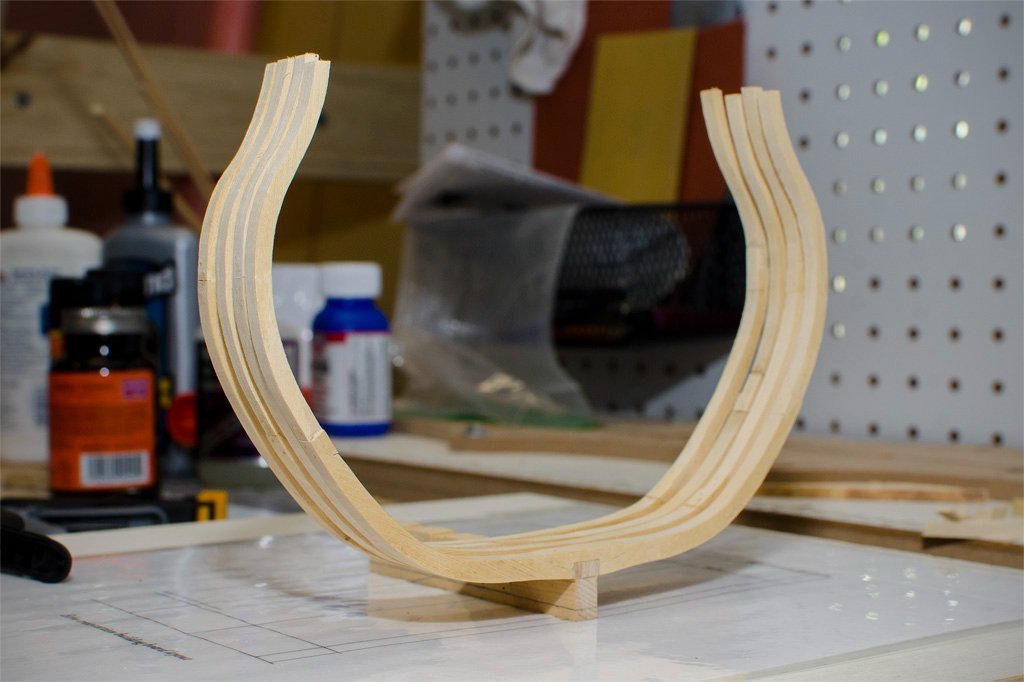
So I have run into a slight problem reading the plans (currently available here: http://www.admiraltymodels.com/Tips.html) and I am hoping that some advice from the forum can help me determine the best way to proceed. The top timber on frame 3 aft casts forward to make the side of a port. In the sided frame dimensions this top timber is marked as 9" and the second futtocks is marked as 8 1/2". I added the second futons and was preparing to deal with the top timbers (I've honestly am not certain how to approach shaping this yet which has not helped motivate me to work faster) when I saw that in the sided frame dimensions image it doesn't appear as if the toptimber extends past the second futtocks as shown in the next picture (which it would have to if it were indeed 1/2" thicker). So then I started looking at pictures of the finished frame and it looks like the second futtocks is the same thickness as the floors (10 1/2"). Right now I think I need to remake the second futtocks thicker but since this is counter to the sided dimensions I was hoping that some could advise? Thank you!

-
I place drops down (or on the plank) for a small section (how big is up to you) and then press that down and secure it. I then add a few more drops (I usually use a pipette type applicator) and press the next section of the plank down slowly working my way across the entire plank. I think attempting to glue too much at once may not end well.
-
In a word - slowly. I have 7/12 frames completed (and hopefully correctly 🙂 ) and have broken ground on the 8th. Life took me for a bit of ride out of the shipyard at the beginning of the year (nothing bad) and as much as I wish I could spend more time on the build life and the temperature in my garage are currently against me. I'll keep slowly working away at it though but I figure no one really wants to see pictures of 3 (and ultimately 8 ) more fairly similar frames - ha.
-
Some builders (cough, cough myself included) separate this into two pieces of line. You tie off the first line and then glue a coil, that was created off ship, on separately.
- 362 replies
-
- 6
-

-
- Amati
- Lady Nelson
- (and 2 more)
-
USF Confederacy by Rustyj - FINISHED
VTHokiEE replied to Rustyj's topic in - Build logs for subjects built 1751 - 1800
Congratulations!- 149 replies
-
- 2
-
-
- confederacy
- frigate
- (and 1 more)
-
Mine (and I believe others) are in: Kit build logs for subjects built from 1751 - 1800
-
Congratulations! Looking forward to the reopening!
-
Wow just saw your log - what a great job so far. I really like what you did with the floor; I wish I had done that on mine but it was my first rodeo so I stayed pretty true to the kit.
- 29 replies
-
- 2
-
-
- first build
- Chesapeake Bay Flattie
- (and 2 more)
-
If I'm looking at the same hole it is for the Bowsprit 'Iron Hoop" placement (PE-12 and PE-13) in the instructions I have on hand.
- 562 replies
-
- 3
-

-
-
- vanguard models
- alert
- (and 2 more)
-
Have you seen how @Beckmann did this on his Winchelsea? Take a look at posts #213 and #217, it might be useful.
-
Do you mean Mamoli instead of Caldercraft?
-
Festool shop vacuums - a quieter option
VTHokiEE replied to druxey's topic in Modeling tools and Workshop Equipment
I went through that dizzying process, finally settled on a model, and unfortunately they raised prices in the new year and priced me out when I was ready to buy :-(. I eventually came up with a different plan but someday I hope to get one of these (and hopefully be able to be more lax on the ear muffs). -
It has components that you sand down to fit from what I’ve seen (I own a set but I haven’t used it yet). I do know that Blue Ensign has used them on many of his 1:64 builds (including his Alert which is a similar style ship). I would also assume it can be used at 1:48 since that is primarily what Chuck’s kits are.
- 362 replies
-
- 3
-
-
-
- Amati
- Lady Nelson
- (and 2 more)
-
I think this link works: https://syrenshipmodelcompany.com/laser-cut-ship-model-fittings.php#!/Pintles-&-Gudgeons-Laser-Cut-Mini-Kit-1-16-wide-straps/p/65643912/category=5764789
- 362 replies
-
- 3
-
-
-
- Amati
- Lady Nelson
- (and 2 more)
-
Can you use the pintels and gudgeons kit from Syren for fixing the rudder?
- 362 replies
-
- 2
-
-
- Amati
- Lady Nelson
- (and 2 more)
-
Looking really nice! I’m really enjoying your build. Come on in the water’s warm.
-
Nothing really to report but I'm a third of the way through the frames. There's not enough time in a day lately so it took me a little longer to get through swapping the treenails around to correct my last error. Now for the special toptimbers, wish me luck!
-
I’ve seen it mentioned that you wouldn’t want to plank an entire side first as it may create some twist to the assembly. I can certainly see how that has potential with some out skeletons but I would think the amount of reinforcement here would prevent that though. I would do a belt (or less) on each side at a time so that I could keep them in alignment from side to side better, but that may simply be a personal preference.
-
Very excited to follow your build! I’m glad that you’re doing a log as I have been considering this as an eventual first framed scratch build.
-
Apparently my mind was on autopilot and read what it wanted instead of what was there. Thanks for the correction, I’ll be checking out the PowerPoint today when I’m at a PC.
-
Ahh, I apologize I must not have read closely enough.
-
I think there is confusion about underway; I believe you meant in action and moving while an alternate definition might be in the process of being built. I’m curious if you could add the link to the description of the gallery? I think there are text sections that can be used to describe the completed work.
-
Do you use these, comments?
VTHokiEE replied to Dave_E's topic in Modeling tools and Workshop Equipment
Making a custom version of the last one can be useful for rigging. I picked up that version and it was simply too big. I use it for other random things now.
