


VTHokiEE
-
Posts
1,528 -
Joined
-
Last visited
Content Type
Profiles
Forums
Gallery
Events
Everything posted by VTHokiEE
-
 I have done some searching and am trying to determine if anyone has successfully removed the musty, mildew smell (and potential marks) from old books? And if so which method did you use? I’m currently going through a few of my books and trying to decide if they can be saved or not. Hoping to avoid the weeks/months of storing them in a sealed container if it doesn’t really work. TIA
 -
Ahh understood - I think it’s fully up to you. Looking at pictures of the finished models with the deck beams I think you could easily get away with it. For my taste I would probably try to smooth the frames some - but I imagine you could get away without doing it.
-
Disclaimer: I have no idea. That being said, are you trying to determine what to sand off before fairing? Seems like the safe bet would be to leave more on than not and fair it after you raised all the frames on the keel?
-
Great work so far! Such a joy watching it come together
-
Very interesting ship and looks like it is coming along quite nicely.
-
Thanks @dvm27 I appreciate the insight! The angle did feel jarring at first but I think I’m coming around to a slighter angle. We’ll see how it ends up 🙂
-
It would have been wise for me to clarify this. Yes the atf end is to the left. The narrowing had crossed my mind as well. I’ll continue to tweak with the understanding that there will be some angle to the plank. Thank you!
-
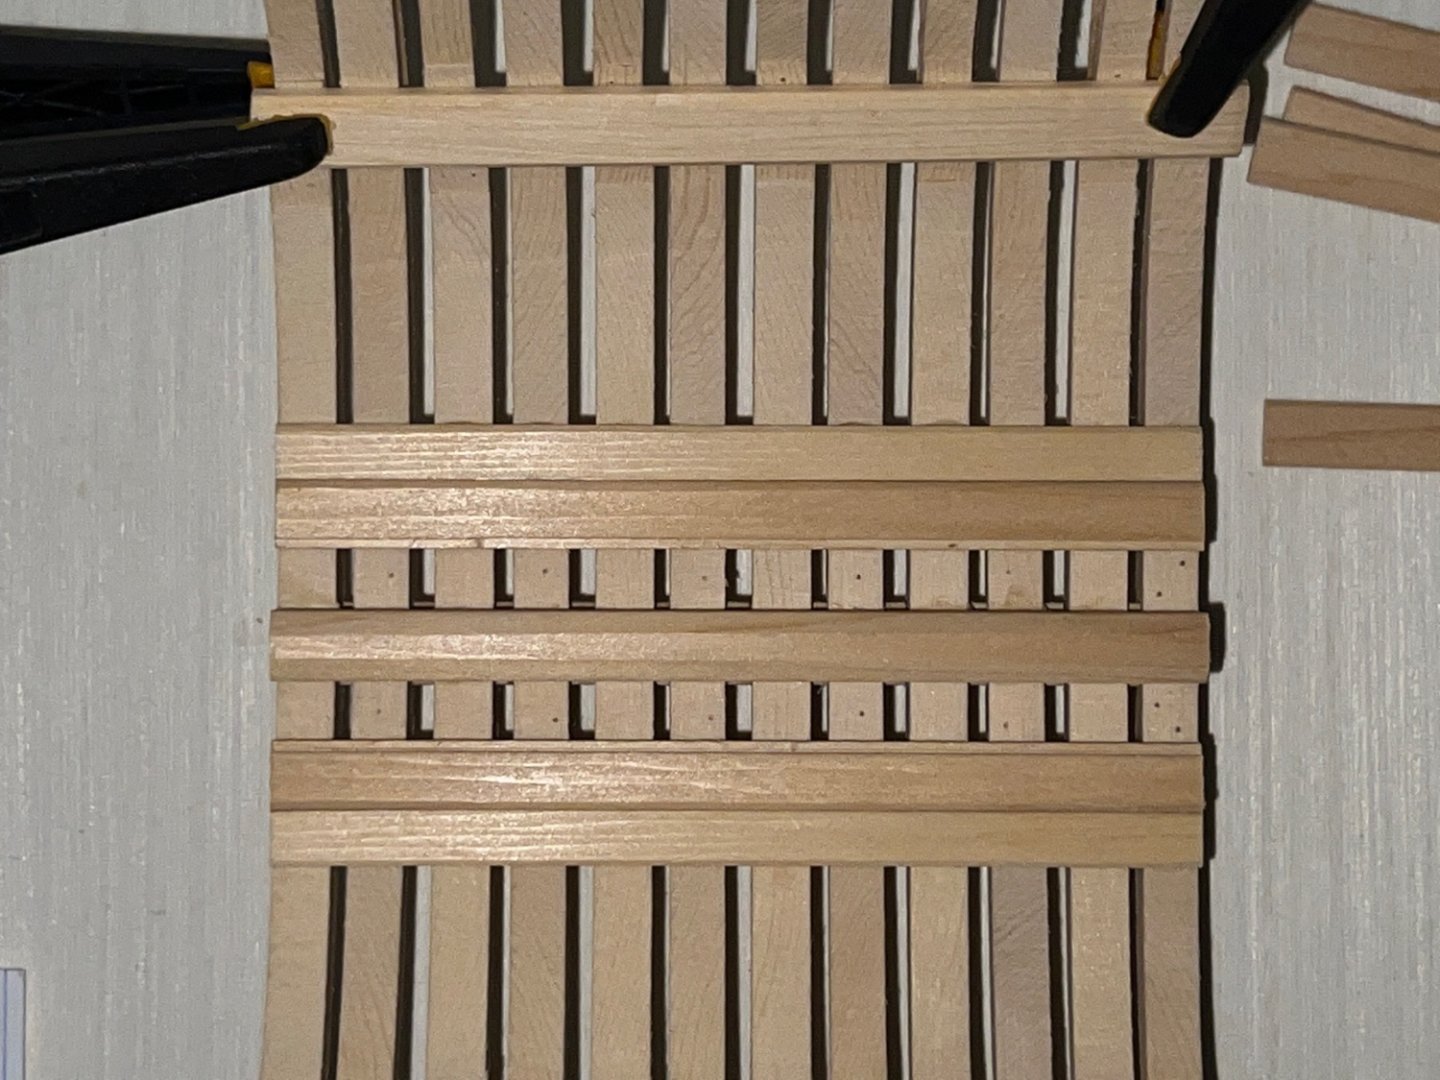
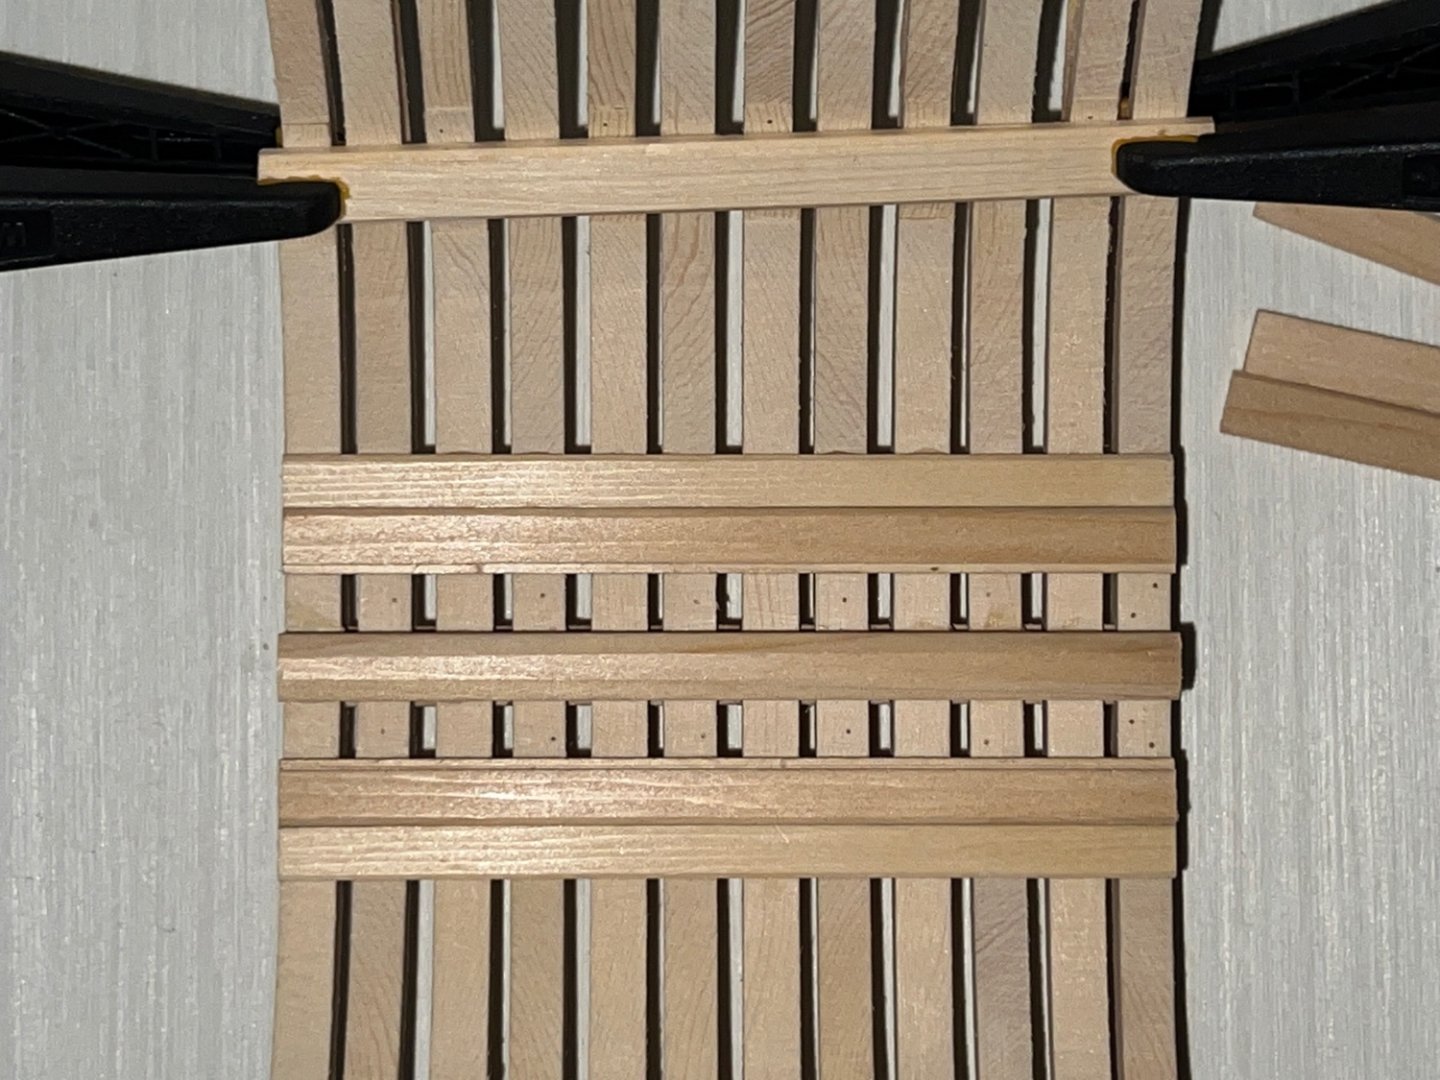
Hi all - looking for an opinion regarding fitting the “thick stuff” over the floor heads. I think the chock location in the aft most frame isn’t in the exact precise location (my error, probably when I was raising and aligning frames). This means that I’m not 100% certain what the proper run for these planks are. I think it is the following picture where the planks are pretty much parallel to the other planks (there might need to be some final tweaks if the run should be fully parallel): Or if there really is an angle (exaggerated below) and the run isn’t exactly parallel. I “think” from other logs that the top image is correct. Any opinions and advice would be very much appreciated as I feel like missing the mark too much here will create some significant issues later.
-
Yes, I did use a thicker rope for the bolt ropes that I added but kept the running rigging at 0.012”
- 55 replies
-
- 1
-

-
- sharpie schooner
- Midwest Products
- (and 1 more)
-
I think when using chemicals it is probably better to be over cautious; I believe their safety sheets say to keep it off you skin (gloves) and away from your eyes (goggles) but I don’t recall seeing comments about needing a respirator but you could double check. I tend to use it in a well ventilated area regardless; I will admit that I don’t tend to use googles, any typically use plastic tweezers, but sometimes latex gloves if I think I may need to handle the part more.
- 55 replies
-
- 1
-
-
- sharpie schooner
- Midwest Products
- (and 1 more)
-
I usually use a specific blackening product (detailed some here): There are many topics on blackening brass here though: https://modelshipworld.com/forum/19-metal-work-soldering-and-metal-fittings/
- 55 replies
-
- 1
-
-
- sharpie schooner
- Midwest Products
- (and 1 more)
-
So I’m looking closely over the finished build and appear to have used 0.018” brown rigging line for the majority (I must have bought it later in the build when I was messing with bolt ropes). I think you could probably get by with that instead of the thinner rope. I only used one package (and I think he sells larger packages now) so you should be all set. I would probably get the 0.018” instead of the smaller though, apologies for not adding that in my earlier post as I had forgotten about it.
- 55 replies
-
- 1
-
-
- sharpie schooner
- Midwest Products
- (and 1 more)
-
Chuck made a few videos: Part 1: Part 2:
-
I sent you a direct message.
-
I think there are a few components names that you can probably google to find some images such as mast boots, mast step, mast/deck collars, etc - here was a page I turned up: https://www.rigrite.com/Spars/SparParts/Mast_Steps.php (it also showed some other parts that were related). In my Alert instructions that part was called a boom stool, but I'm not certain if that name is the same for smaller vessels.
-
Unfortunately that probably means he is out of them. His store gets a fair amount of traffic and unfortunately some items are tricky to keep in stock. There are a lot of block sizes missing from his site so I imagine that he’ll be doing more some time soon.
-
Some of the metalwork can be done with black card paper as well f you’re up to experiment with other materials.
-
I did a little kit bashing and used deadeyes to attach the shrouds and added a little metal work to attach the deadeyes to the hull. Not certain the accuracy but I saw the style on a different build log and liked it.
-
I noticed your comment about filler - I’ve used this Hobbyco Hobbylite Balsa Filler (which doesn’t seem to be available any longer on Amazon) https://www.amazon.com/gp/aw/d/B0015H4EB8 I haven’t done too much with staining but it has blended in well whenever I’ve needed it as a touch up. I’ve been trying to use sawdust mixed with white glue as well but I haven’t perfected that yet.
- 55 replies
-
- 1
-
-
- sharpie schooner
- Midwest Products
- (and 1 more)
-
I think you can get some brass sheet metal from K&S online (https://ksmetals.com/collections/brass-sheet). I picked up a small thin sheet at Home Depot or Lowe’s (but I don’t know if they still sell it). I tried to make my own parrels and ended up going with seed beads. I wish I had cut the arms back on my sharpie for the parrel loop so that it contained more beads. I didn’t know any better at the time though.
- 55 replies
-
- 1
-
-
- sharpie schooner
- Midwest Products
- (and 1 more)
-
Beautiful work! I feel like my card attempts always fall short - but you and @ccoyle inspire me to keep trying! I need to figure out a workflow for edge painting for future endeavors.
-
I’m not certain if it’s helpful but I picked up the following from Syren Ship Model company to enhance my sharpie: 0.012” Tan rigging line (qty. 2) 0.008” dark drown rigging line (qty. 1) 3/16” single sheave blocks (qty. 1) 4mm deadeyes (qty. 1) 5mm cleats (qty. 1) Looking at the finished model I should have gone larger on the dead eyes and a touch smaller on the blocks (IMO).
- 55 replies
-
- 1
-
-
- sharpie schooner
- Midwest Products
- (and 1 more)


