


realworkingsailor
-
Posts
3,175 -
Joined
-
Last visited
Content Type
Profiles
Forums
Gallery
Events
Posts posted by realworkingsailor
-
-
21 minutes ago, CDW said:
Great looking airplane and a fine model Andy. I used to play a MMO aerial combat game and this was a favorite plane for me to play. A dive bomber but also a very stable gun platform. It was slow but maneuverable. Could take a lot of punishment but give it out as well. Not sure how closely its game performance matched reality but it was fun to play. You could drop the flaps and easily turn inside the faster fighter planes. Excellent low speed handling. With that big wing area, it’s no wonder it was so stable in flight.
Thanks!
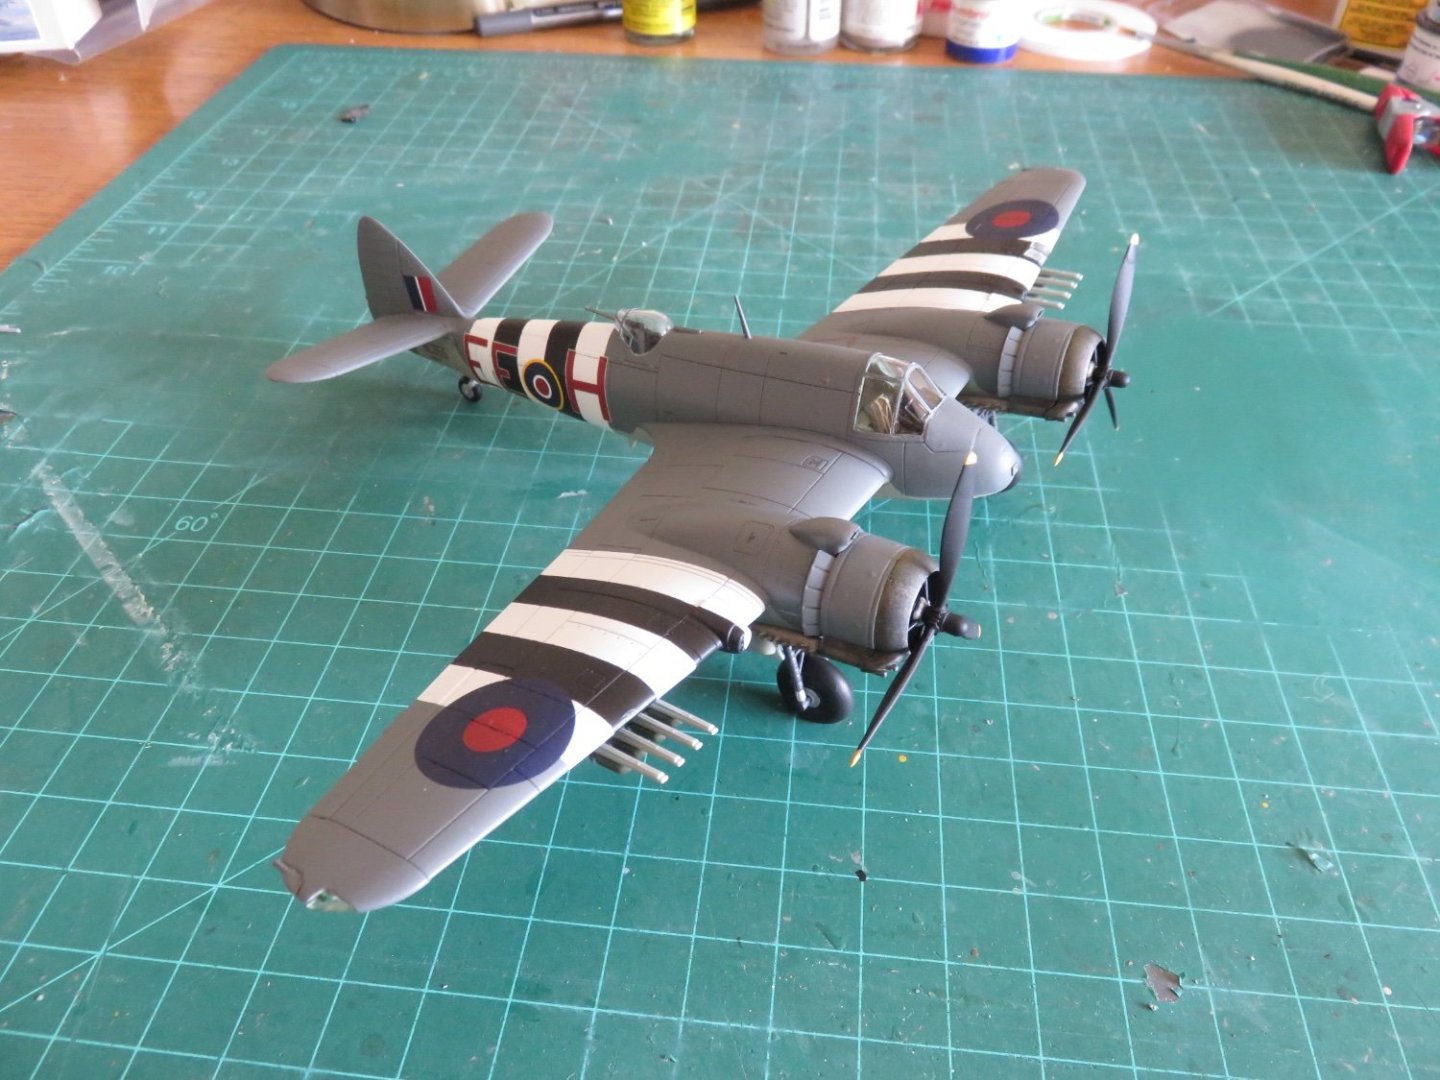
Of its contemporaries (Stuka, Val, SBD, and SB2U), the Skua had the best offensive armament, at least in terms of numbers of guns.
Did you get a chance to see the above video from Eric “Winkle” Brown? His Skua trick was to get low to the water while hugging the fjord wall. When the 109 has committed to his attack, Brown would pop the dive brakes causing the 109 to overshoot, while exposing his belly to the rear gunner (since the 109 could only break up and away from the fjord wall).
Sadly, encounters with 109s usually ended up badly for Skuas and their crews. They had little to no armour plate, and only a belated addition of armoured glass for the pilot. The gunner was even issued a bag of various sizes of bottle corks in order to plug any holes in the internal fuel tanks.
Andy
-
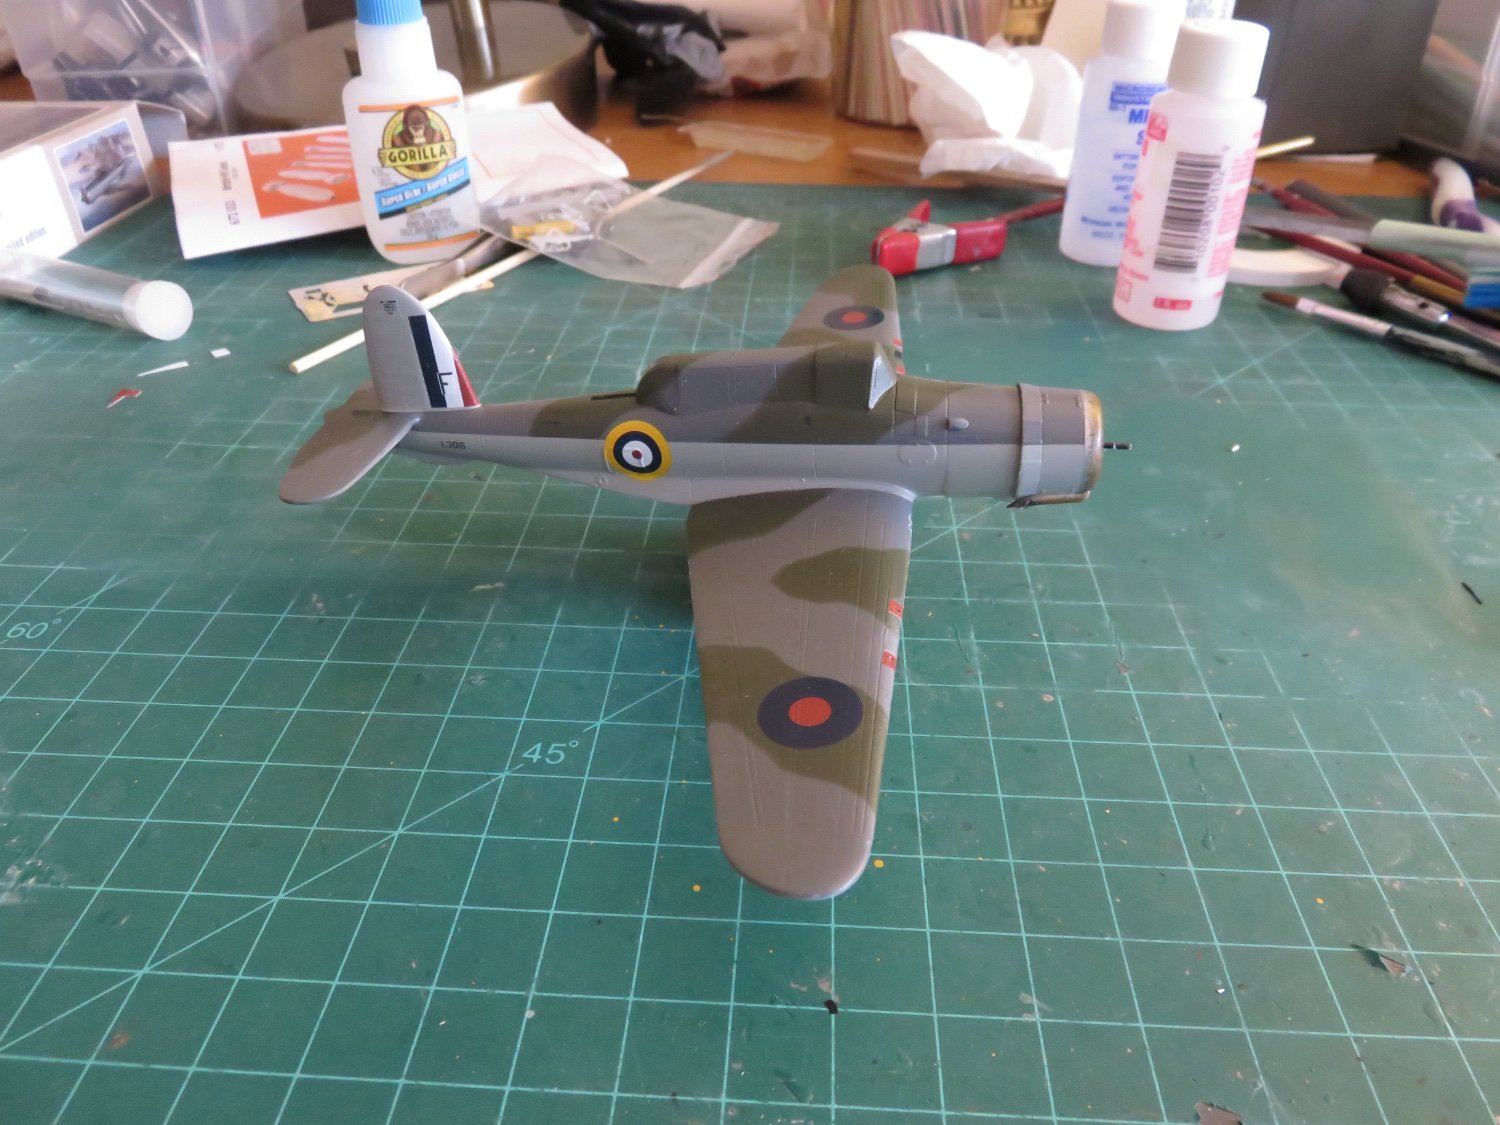
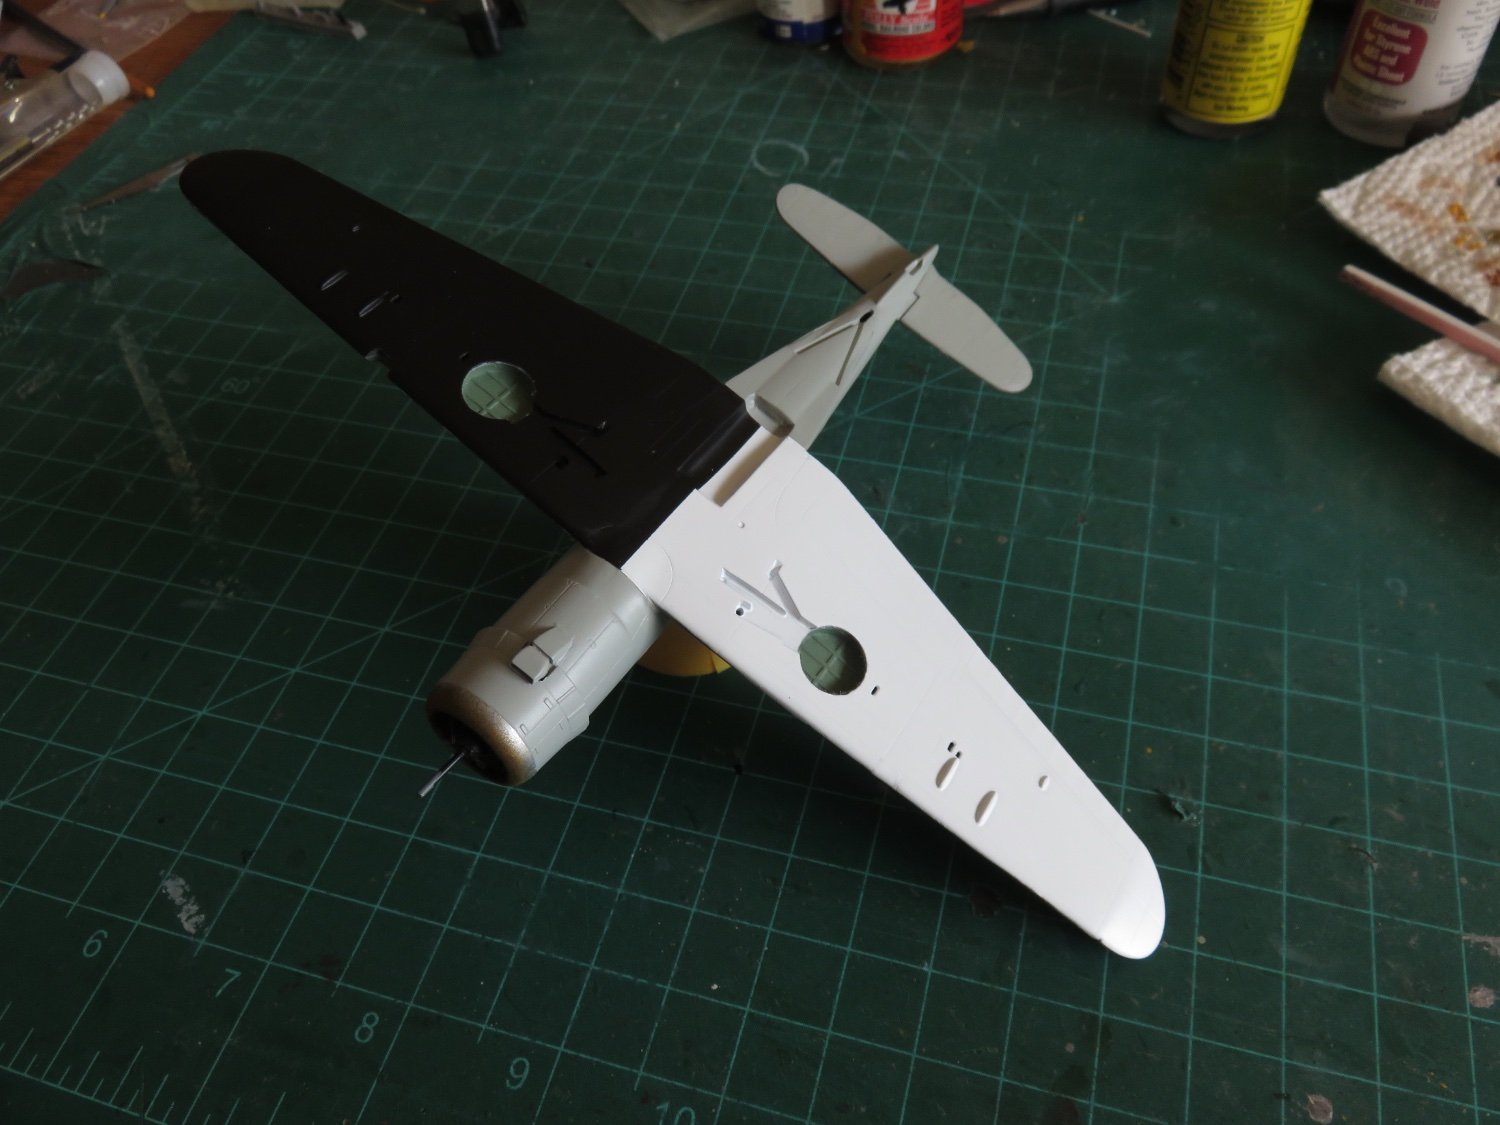
Inching a little closer to the finish line.
The remaining details went on fairly easily. the largest items were on the underside, consisting of the arrestor hook, as well as the bomb crutch:
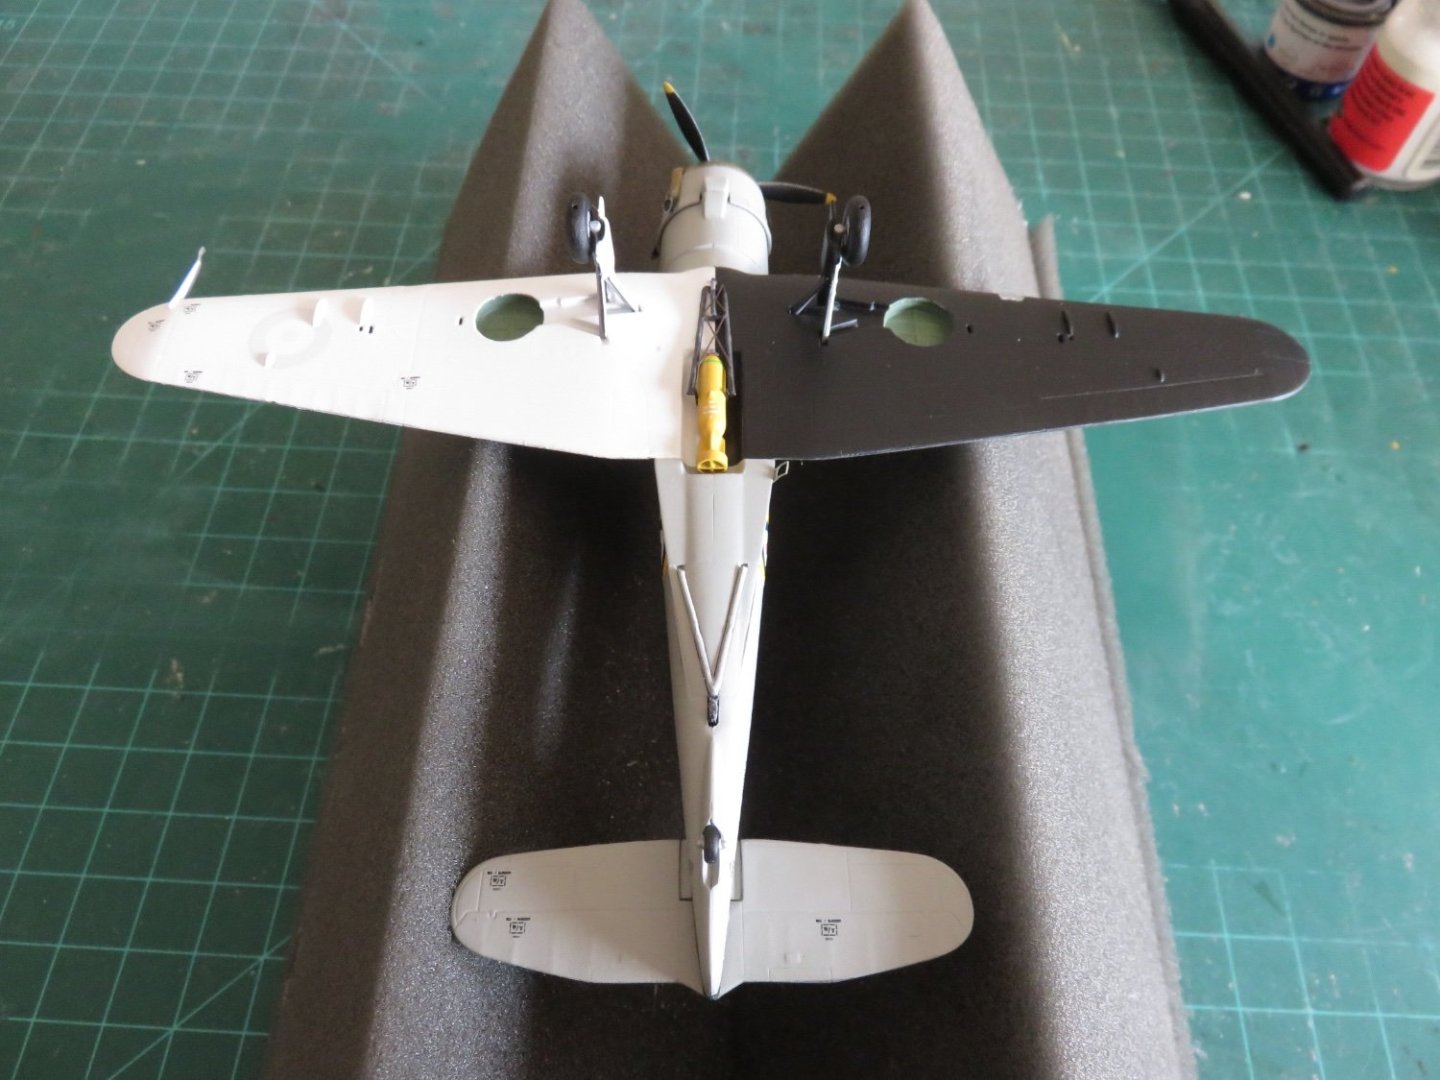
The bomb crutch has no locator pins or any clear indicator where it is to be properly located. By adding a bomb, this greatly simplifies the matter. In my case, I had a leftover 500lb MC bomb from an Eduard resin set that fit the bill. The maximum bomb load of the Skua was only 500lbs, relatively light by contemporary dive-bomber standards, however still enough to sink the cruiser Konigsberg. In the case of my Skua, with an MC bomb ("Medium Capacity"), it must be tasked with a raid on some oil installations instead of a ship (a common target for Skuas during the Norwegian campaign).
The remaining belly item was the arrestor hook. This consists of a plastic "V" attached to a resin hook. Although not clearly visible in the above photo, I dry-brushed some silver and gunmetal to simulate paint removal caused by the friction of the arrestor wire.
After adding the remaining details, a layer of Dullcote was applied to seal everything in and the canopy masking has been removed.
The pitot tube on the starboard wing required some delicate trimming in order to fit cleanly around the leading edge of the wing. For the antenna mast on the canopy, I drilled a #78 hole in both the bottom of the mast and the centre of the canopy (again, no locating pins or holes provided in the kit), and used a short length of .012" brass wire to secure the two together.

There is a small boarding step located just aft of the trailing edge of the port wing. On the prototype it was hinged at the bottom and folded up into a small recess in the fuselage. Many prototype photos show this step deployed in flight (rather noticeably if you know where to look).
Finally proof of concept:
The propellor spins quite freely.
All in all, I'm please with how this kit has turned out. While not a kit for beginners, and having a few (easily addressed) errors, it is nevertheless an enjoyable build for anyone with a little experience. I should also point out that Special Hobby made a few errors in their historical references for the three kit-supplied paint schemes. SH claims that each of the three Skuas was shot down during the raid on the Scharnhorst on July 13 1940. However only one of the three options (L2963/F) represents a Skua that was. Of the other two Skuas, L2940/A force landed after shooting down an He-111 on April 27 1940. Both crew survived (SH claims the TAG was killed, and the pilot became a POW), and eventually made their way to the coast and were rescued and sent back to the UK. On their way to the coast they came across a cabin where the survivors of the He-111 were also sheltering. Apparently there was still a level of gentlemanly conduct and after spending the night together, each went their separate ways in the morning.
The final Skua L2991/Q was forced to ditch on April 26 1940, also after tangling with some He-111s, in this case SH also gets the names of the aircrew wrong. The pilot Lt Cecil Filmer survived and became a POW, unfortunately his TAG, Petty Officer Kenneth Baldwin was killed.
As for my own Skua, there remains a bit of weathering to do before I can call this build fully finished.
Andy
-
Either of the raised white letter slicks might look good (with or without whitewalls). Do you have to rush to get the tires mounted? Can you wait until the body and frame are painted and partly assembled, or, at least, mocked up? It might give you a better idea how things might look, rather than guessing now and being unhappy with it later.
Andy
-
-
-
Thanks for all the "likes", everyone!
Some developments in my Skua project to report!
I've finished re-doing the fin flash and the airplane ID letter has been replaced. A bit fiddly, as the second set of supplied letters lacked the white outline that was present to define the letters better in the dark blue area of the fin flash. Easy enough to create from some white decal film, but fun to try to get lined up.

The port side letter was the most fun, as only the top bar of the "F" required an outline, but things came out alright.
As you may surmise from the above photo, my Skua is now sitting on her legs. I've also glued on the twirly-whirly bit on the front.

When Blackburn designed the Skua, they weren't that familiar with retractable landing gear, all they really knew was that carrier landings were rough. As a result, the Skua, and it's sister the Roc, had very robust, and rather complicated landing gear, made more complicated by the folding wings, as all the mechanism had to be confined to the fixed part of the underside (even though the majority of the landing gear bay was in the folding part of the wing).

Each landing gear leg consists of one main strut, to aft bracing strut and an inboard running hydraulic actuator. To add to the general oddness, the Skua's and the Roc's landing gear was perpendicular to the ground when the plane was at rest:

This gave a rather pronounced swept-back look whenever the plane was taking off or landing. I guess Blackburn though that if the wheels accidentally snagged an arrestor wire, it would be deflected downwards to a point where the plane would roll over the wire, rather than get caught.

Things are starting to move towards the finish line. Next to be added are the bomb crutch and the arrestor hook, followed by a few final small details (pitot tube, antenna mast, etc).
Andy
-
On 11/8/2023 at 3:04 PM, realworkingsailor said:

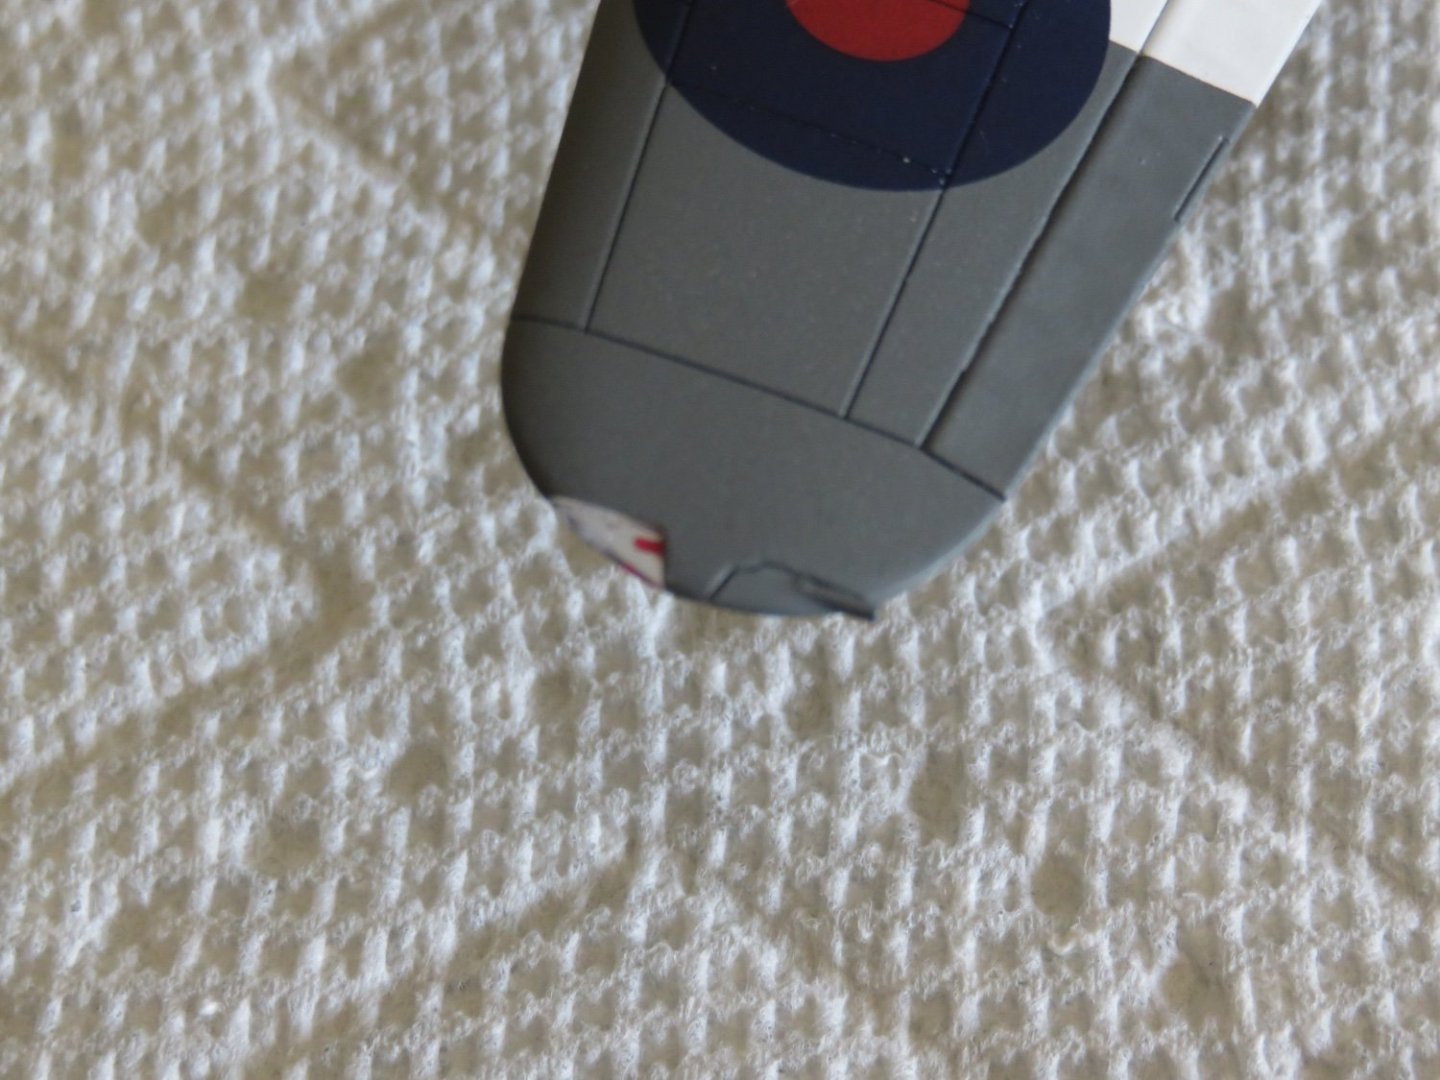
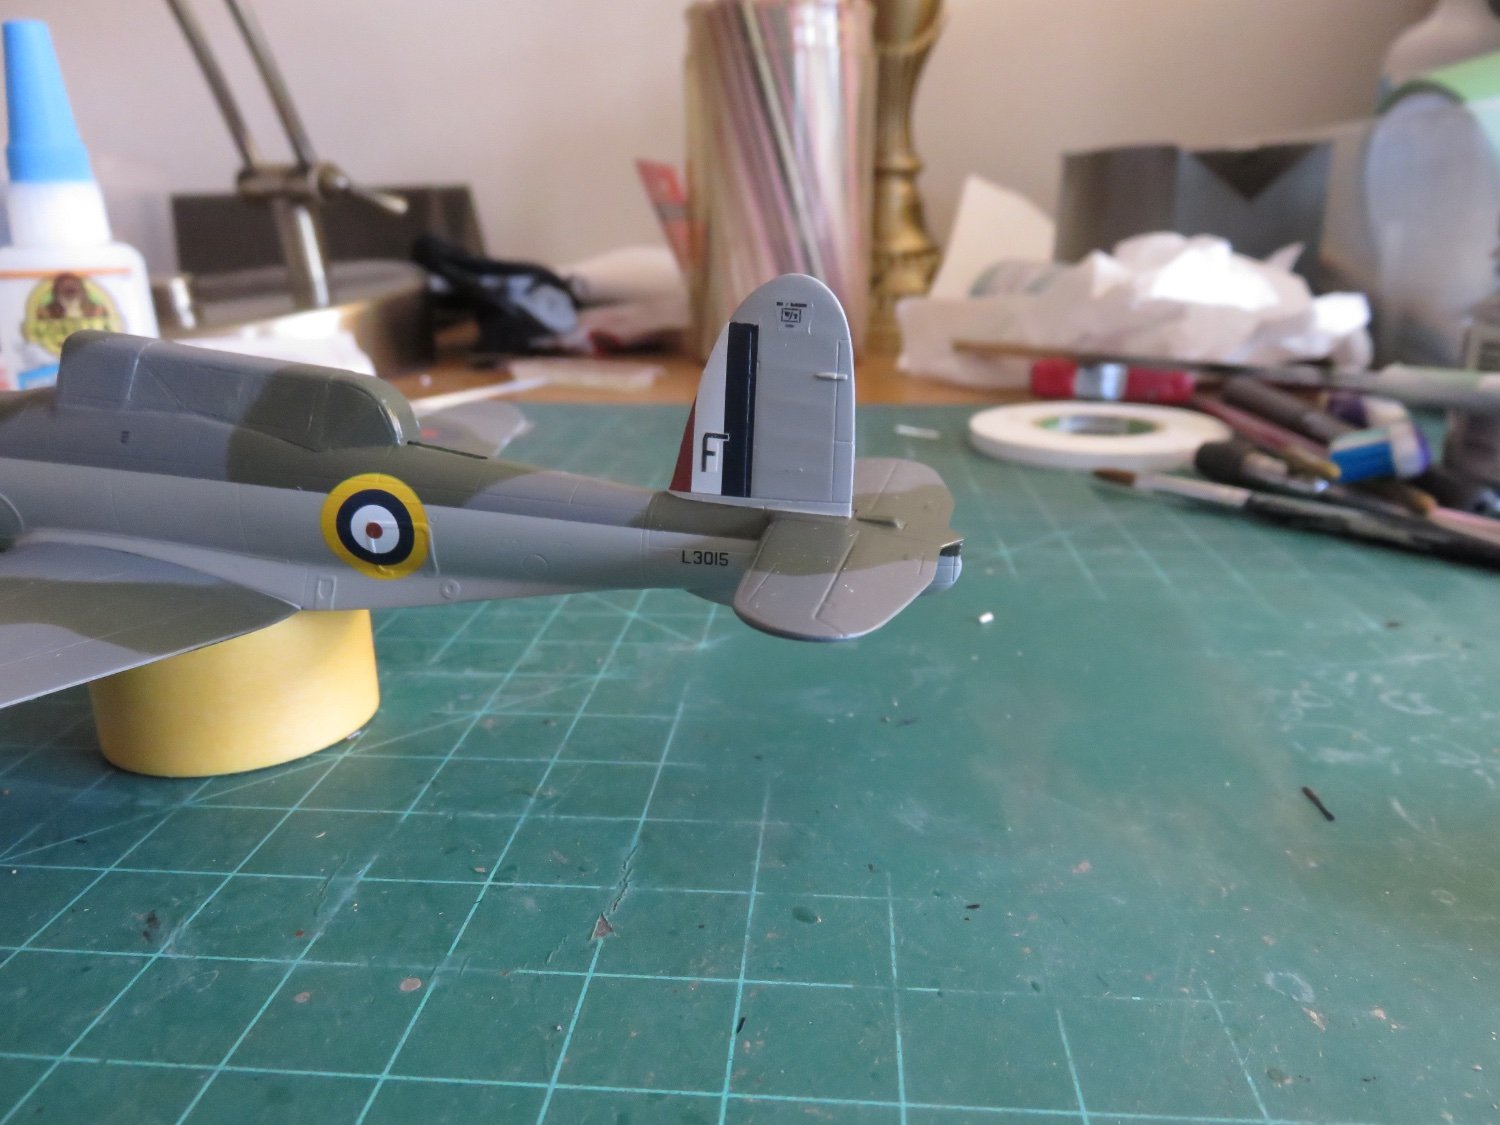
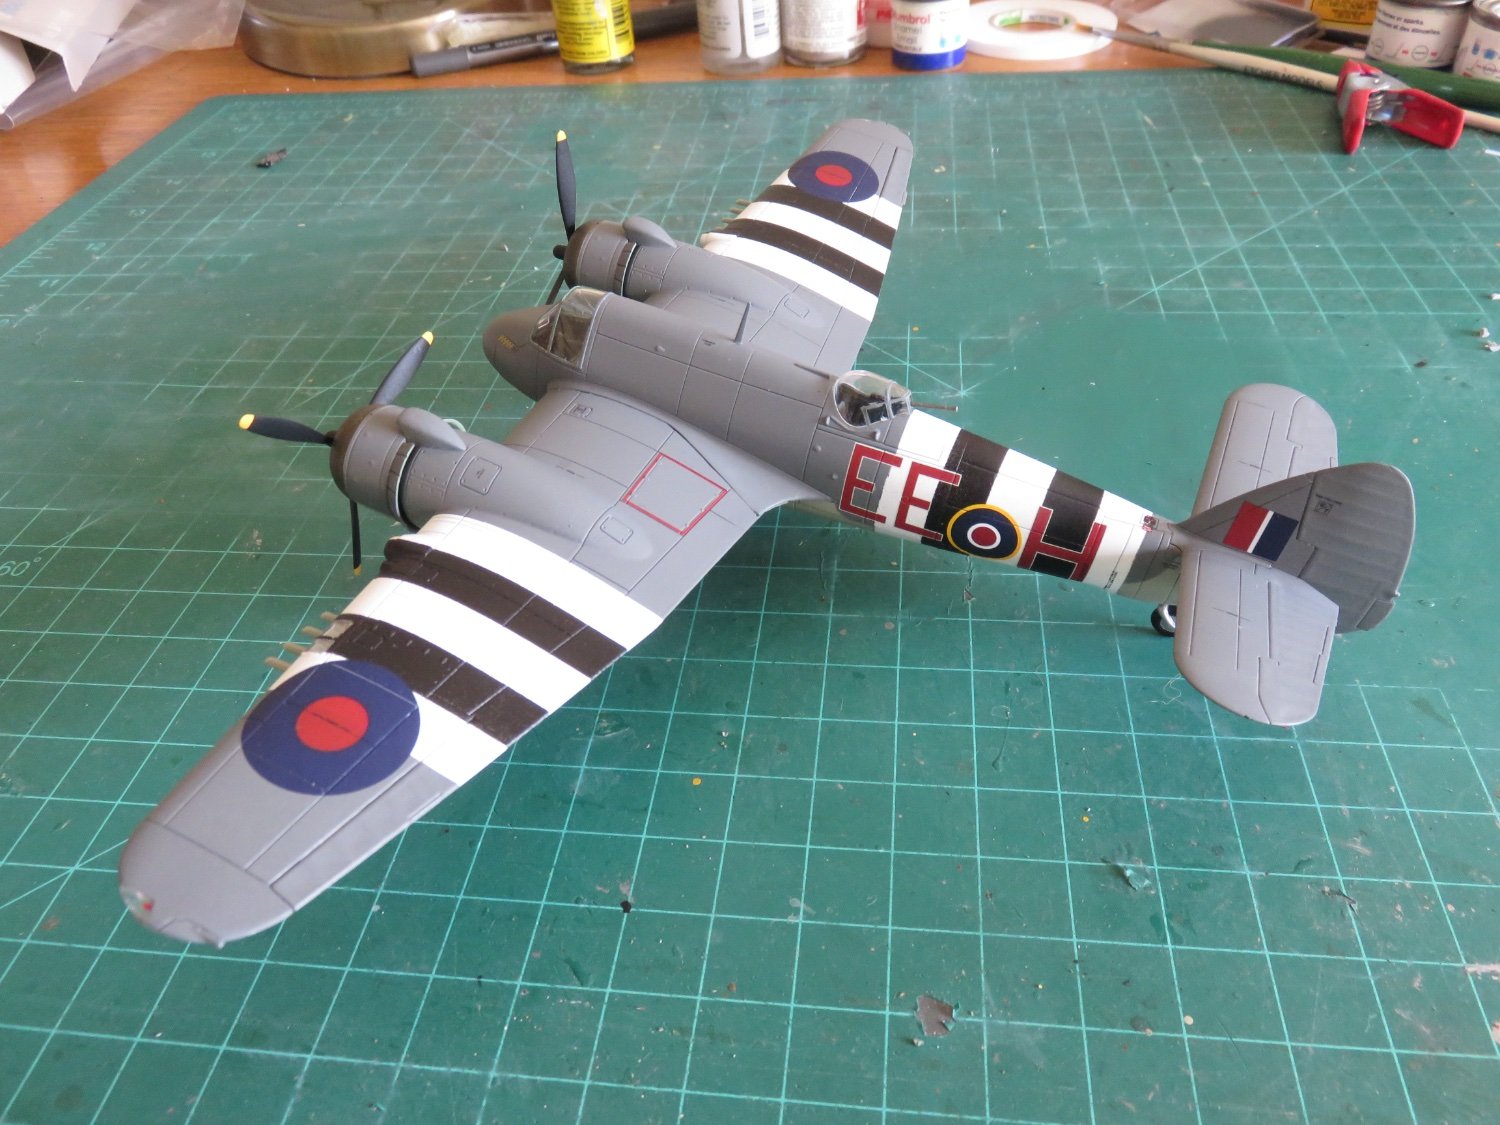
So that was the before, here is the after:
This is better, the replacement fin flash fits the Skua more correctly. It’s not 100% perfect, but there’s actually a red stripe, rather than a red sliver. I still need to add the airplane ID letter and I will post more photos once that has been done.
Andy
- ccoyle, Old Collingwood, Canute and 5 others
-
 8
8
-
19 minutes ago, allanyed said:
I get it Chuck and it was fun while it lasted, but why is there still a Non-Ship build forum that has cars and what not? It does not matter to me, but curious why one is OK the others are not. In the end MSW is 44,000 times better than any other ship modeling site!!!
Allan
9 minutes ago, James H said:Simply because we understand that some modellers also want to post side projects, other than ships.
That area should have the same rules for posting within as the ship build logs. It's not a general chit chat place.
I’m glad you kept that part of the Shore Leave forum, and I understand the reasons behind the suspension of the other part. I hope that things can remain this way, as regardless of subject, MSW is a great forum to belong to.
I know lately I’ve been away from ship modelling (it’s a “mood” thing), but as part of my researching for my “other projects” I stumbled across another forum that uses the same type platform and similar format as MSW (I will not name it). While there was a similar wealth of information and a similar community of enthusiasts, some of the threads I read turned into almost outright nastiness: “You’re wrong!” “No, you’re wrong!” (I’m paraphrasing, but I hope you get the idea). I was considering joining as it would be a more appropriate venue for my current modelling endeavours, but after seeing the darker side, I lost my appetite.
I truly hope that things are allowed to continue here in the newly adjusted format. I think, for the most part, the people posting down there at the bottom of the forum are still following the MSW rules (it really isn’t a high bar to step over, if you think about it).
And if I do do something in error, please let me know so I can correct it, if possible, and avoid making a similar misstep in the future.
Andy
-
The freeing ports would not used for mooring ropes as the edges would have been too sharp, and the shell plating would not have been inherently strong enough to handle the forces applied by the ropes. They would have simply been holes in the bulwark shell plating. If you look closely at your Corsicana picture, you can see a Panama fairlead (the name for the reinforced and faired edge casting) between the second and third openings, forward of the house, and between the fourth and fifth openings, aft of the house.
Andy- Mirabell61, mtaylor, Keith Black and 3 others
-
6
-
A quick update, my decals arrived today, hooray!
Some quick work with MicroSol and a stiff bristle paint brush and the offending fin flashes were removed:

Suspicions confirmed, the SH decals are of the removable film variety. There are a few (many) videos on YouTube discussing the pros and cons of this type of decal. I’m not about to open a debate here as the topic seems to be pretty contentious.
A quick couple of photos for comparison:
The replacement sheet overlayed over the FAA set. The Skua fin flash in the set has stripes that are the same width as those next to the “7C”.

You can see here how the stripes in the generic set are much thinner and match the original SH decal better, and should actually fit the model (!). Not sure how Xtradecal came about that error, but be warned.Andy
-
Looks great Nils!
Instead of cutting out the scuppers (freeing ports is the term I think you mean), many of these ships had hinged flaps that covered the opening on the outside. The hinge was at the top so the flap would open to let the water out, and close to slow any water wanting to come in. Maybe an option to avoid risking damage to your hard work!
Andy
- Canute, Keith Black, FriedClams and 4 others
-
7
-
Thanks to everyone again for your "likes"!
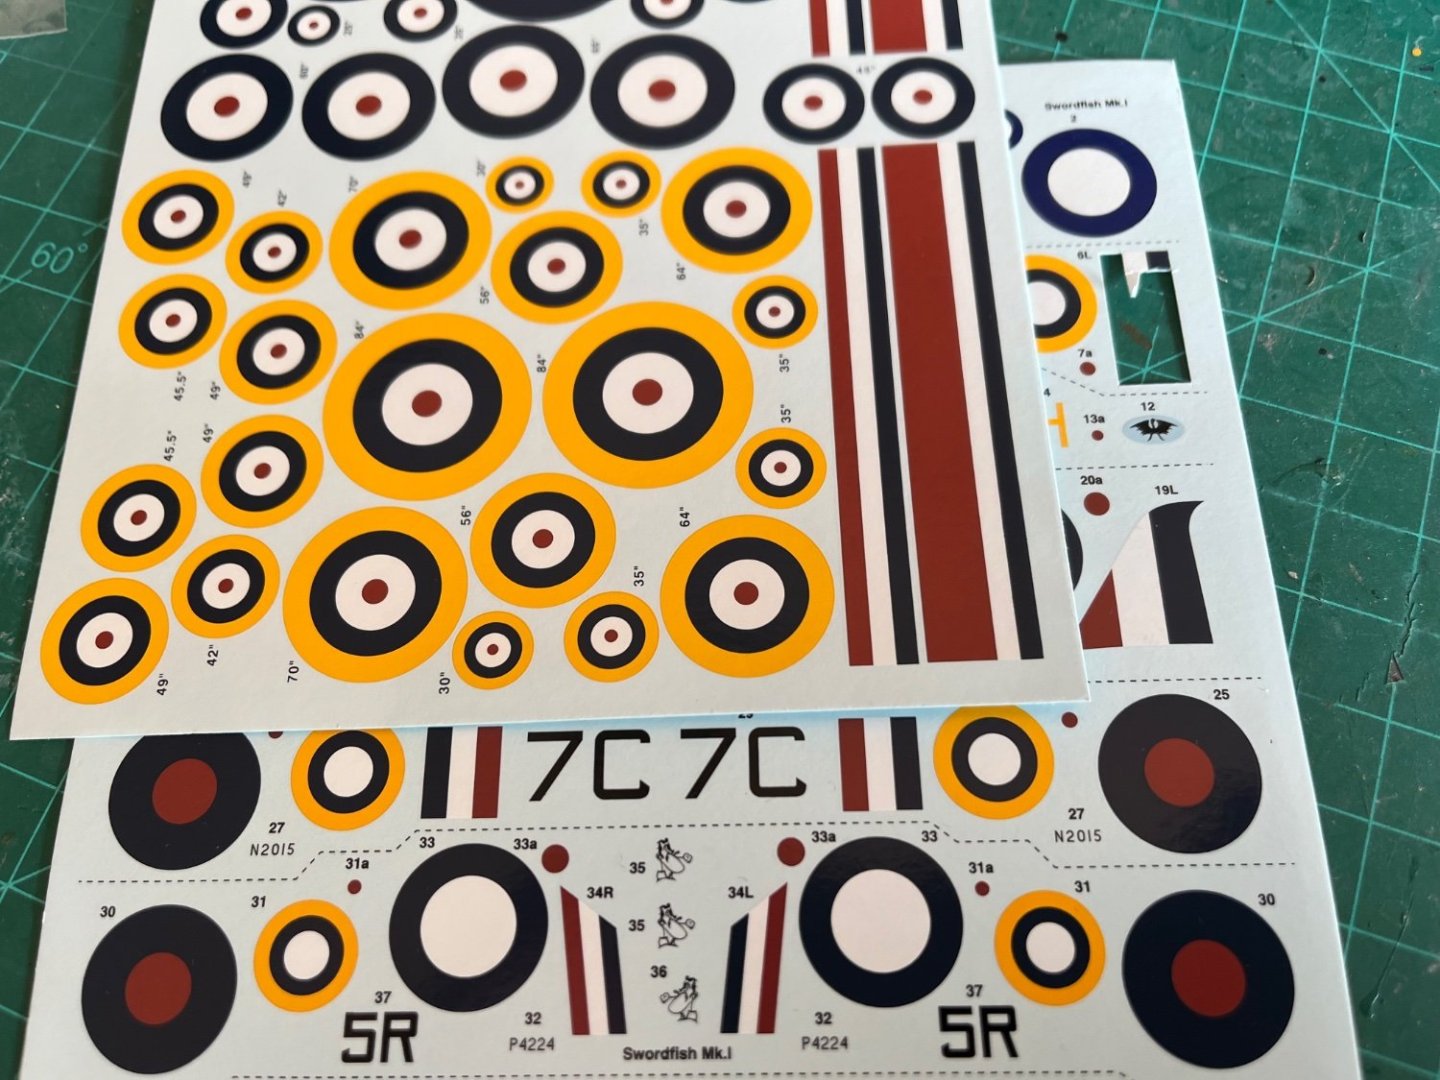
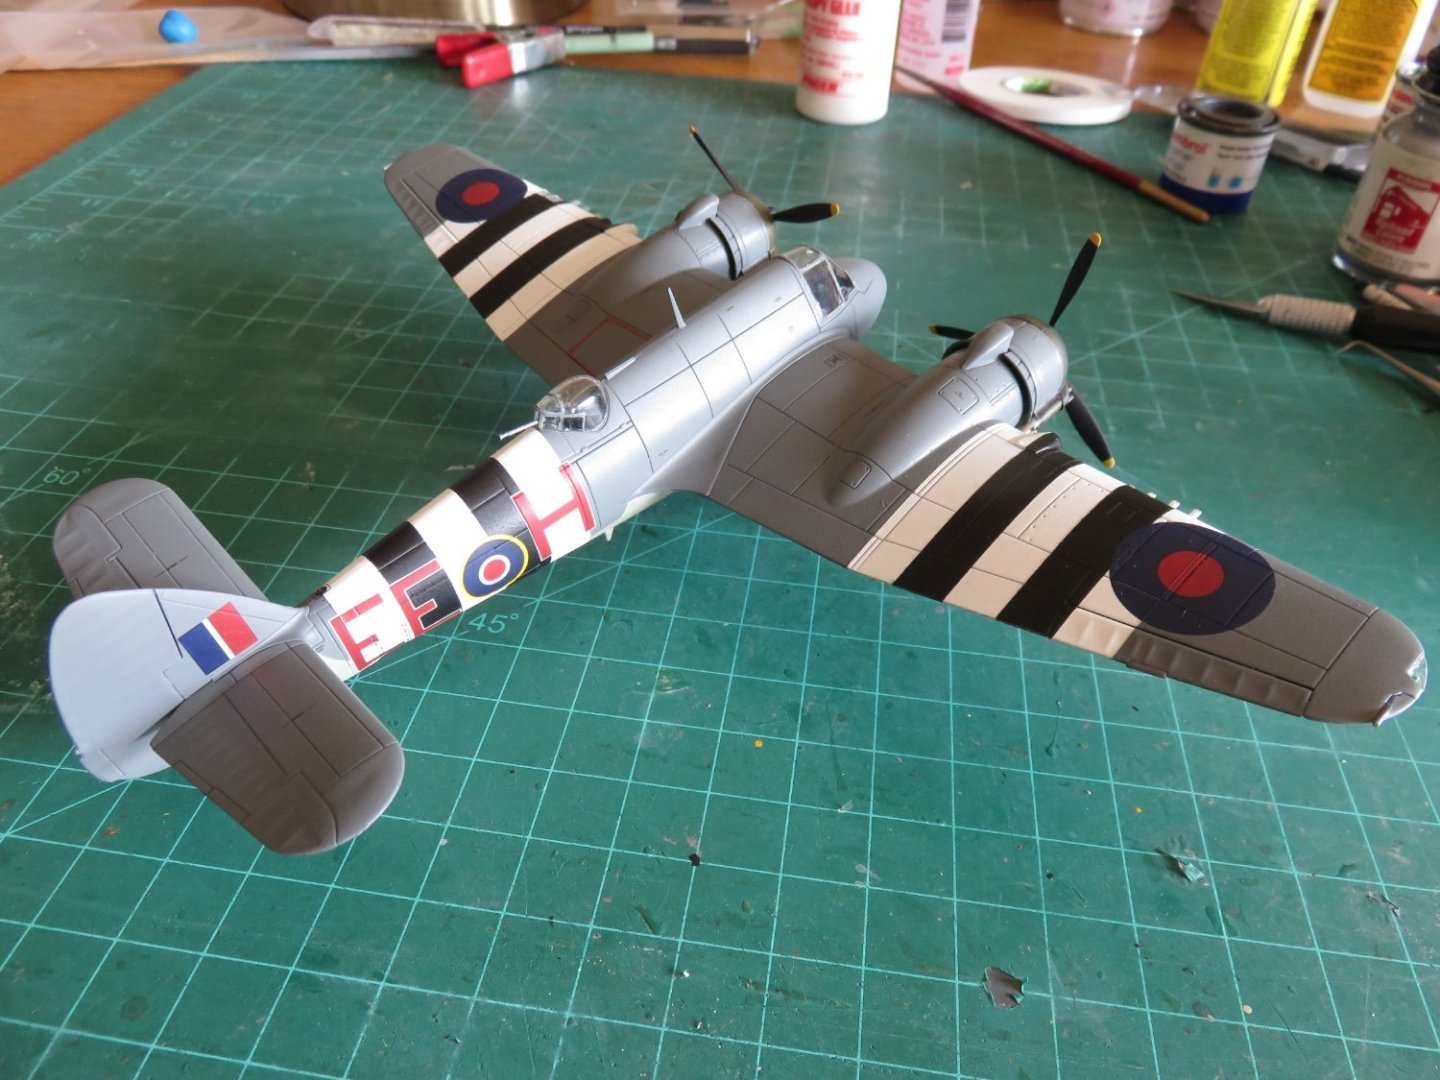
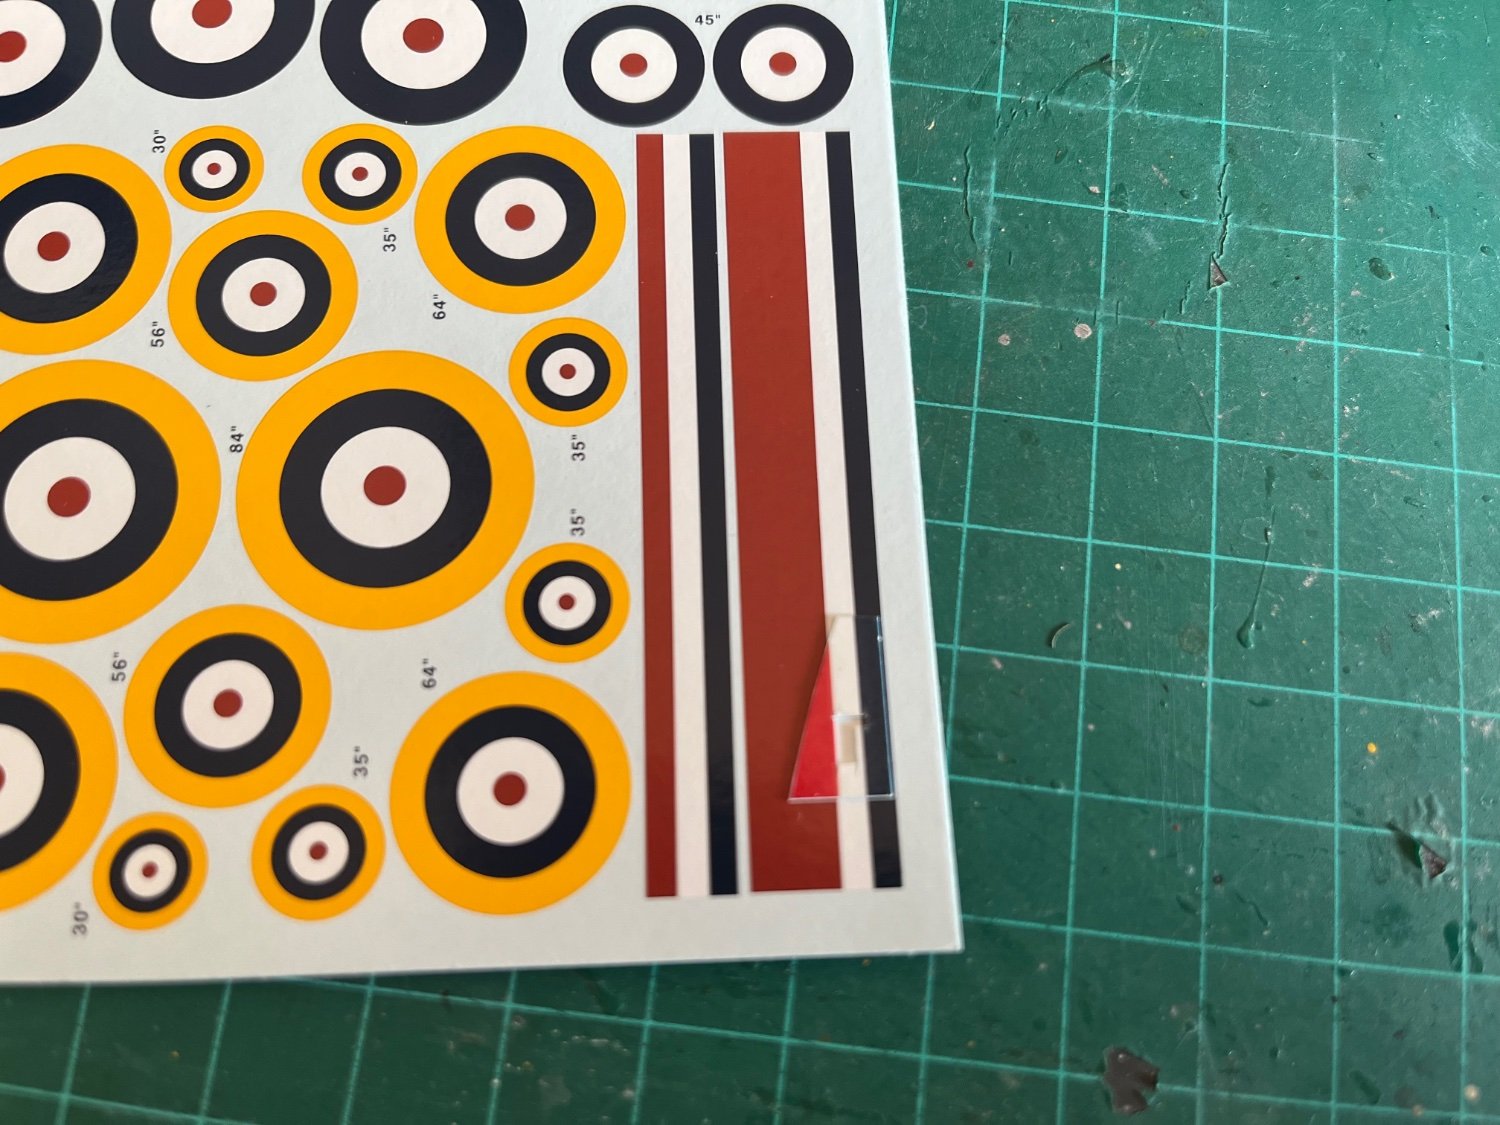
I've been having a bit of a decal-palooza (decal-pocalypse?). First off, the quality of the Special Hobby decals leaves a bit to be desired. I think, but I'm not certain, that these decals share something in common with Eduard's new "removable film" decals, but I'm not certain. The film on the SH decals seems rather thick, and in some places appears like it's detaching from the coloured part of the transfer as the film appears to be on top of the transfer, (like the decals have pre-silvered). The registration on the fine stencils is not great, and they are barely legible (by comparison, the Cartograph decal stencils supplied with Airfix kits are perfectly legible under magnification. For anyone else building this kit, I strongly recommend going after-market, but with a few caveats!
For my Skua, I bought the Xtradecal FAA 1939-1941 set (as it includes one set of markings for a Skua). It's not entirely a bad set, but as some aftermarket sets are wont to do, the little red dots in the roundels have to be applied separately. The real failing(s) of the Xtradecal set comes in the decal for the Skua's fuselage side roundel as well as the fin flash (more on the later in a moment). The roundel in the set is really too big in diameter when compared with prototype photos. There are smaller roundels for other aircraft in the set, but I "borrowed" a set of roundels from the Hawker Hurricane set I had in my stash (these ones had the red dot printed in place too, so there was no mucking about with that issue).
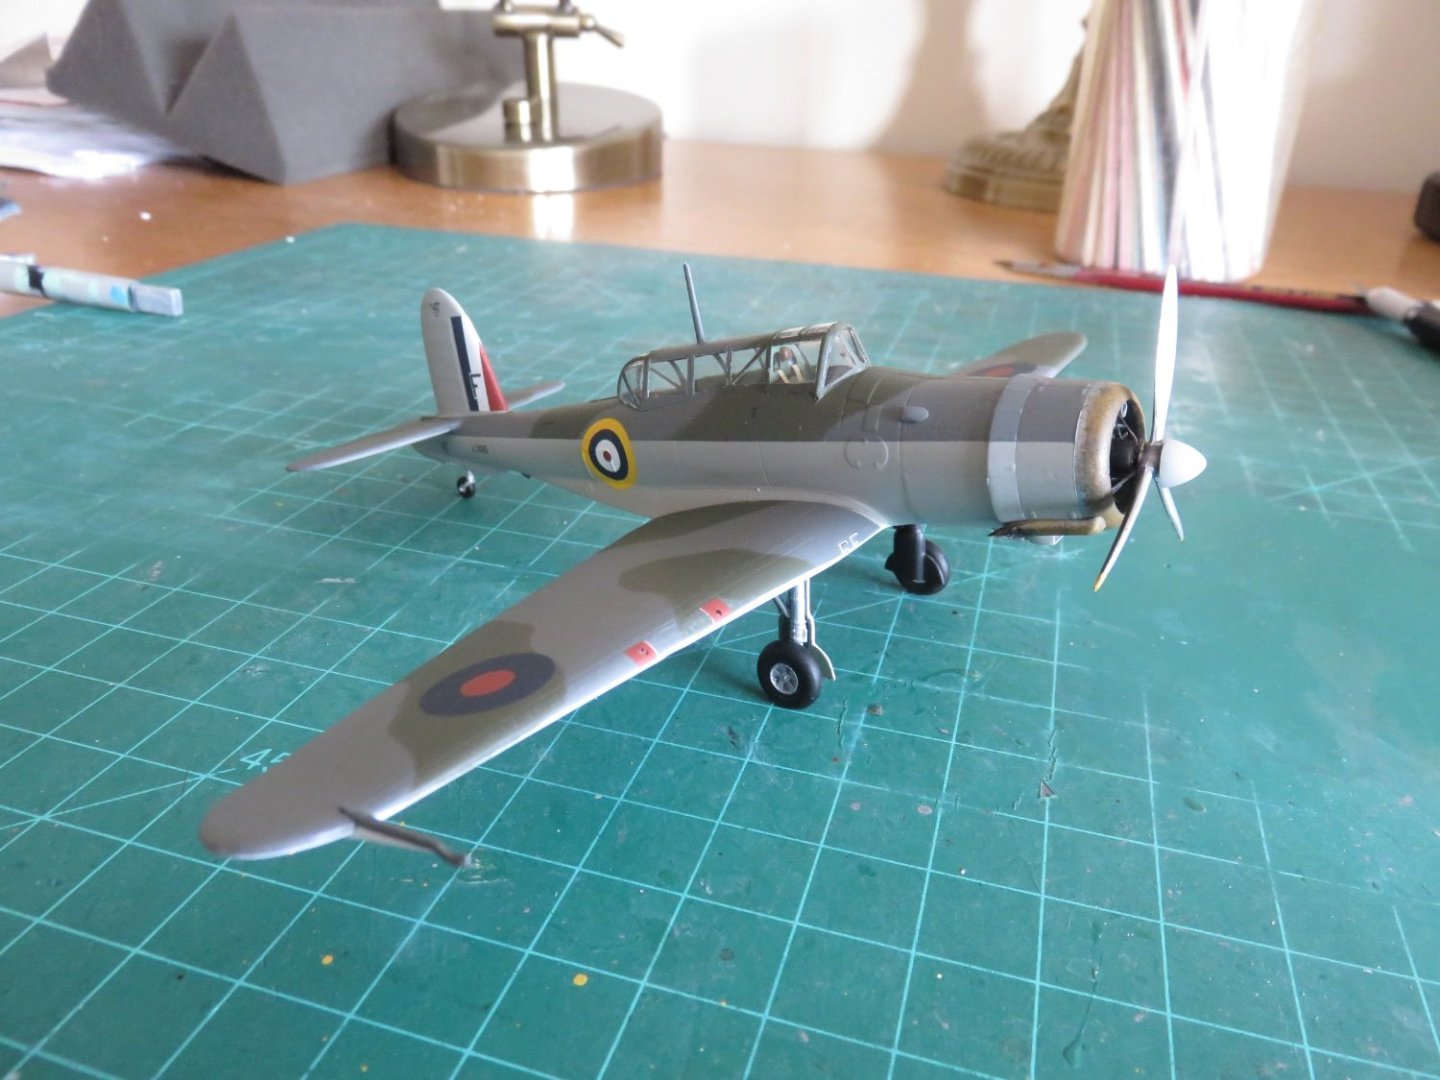
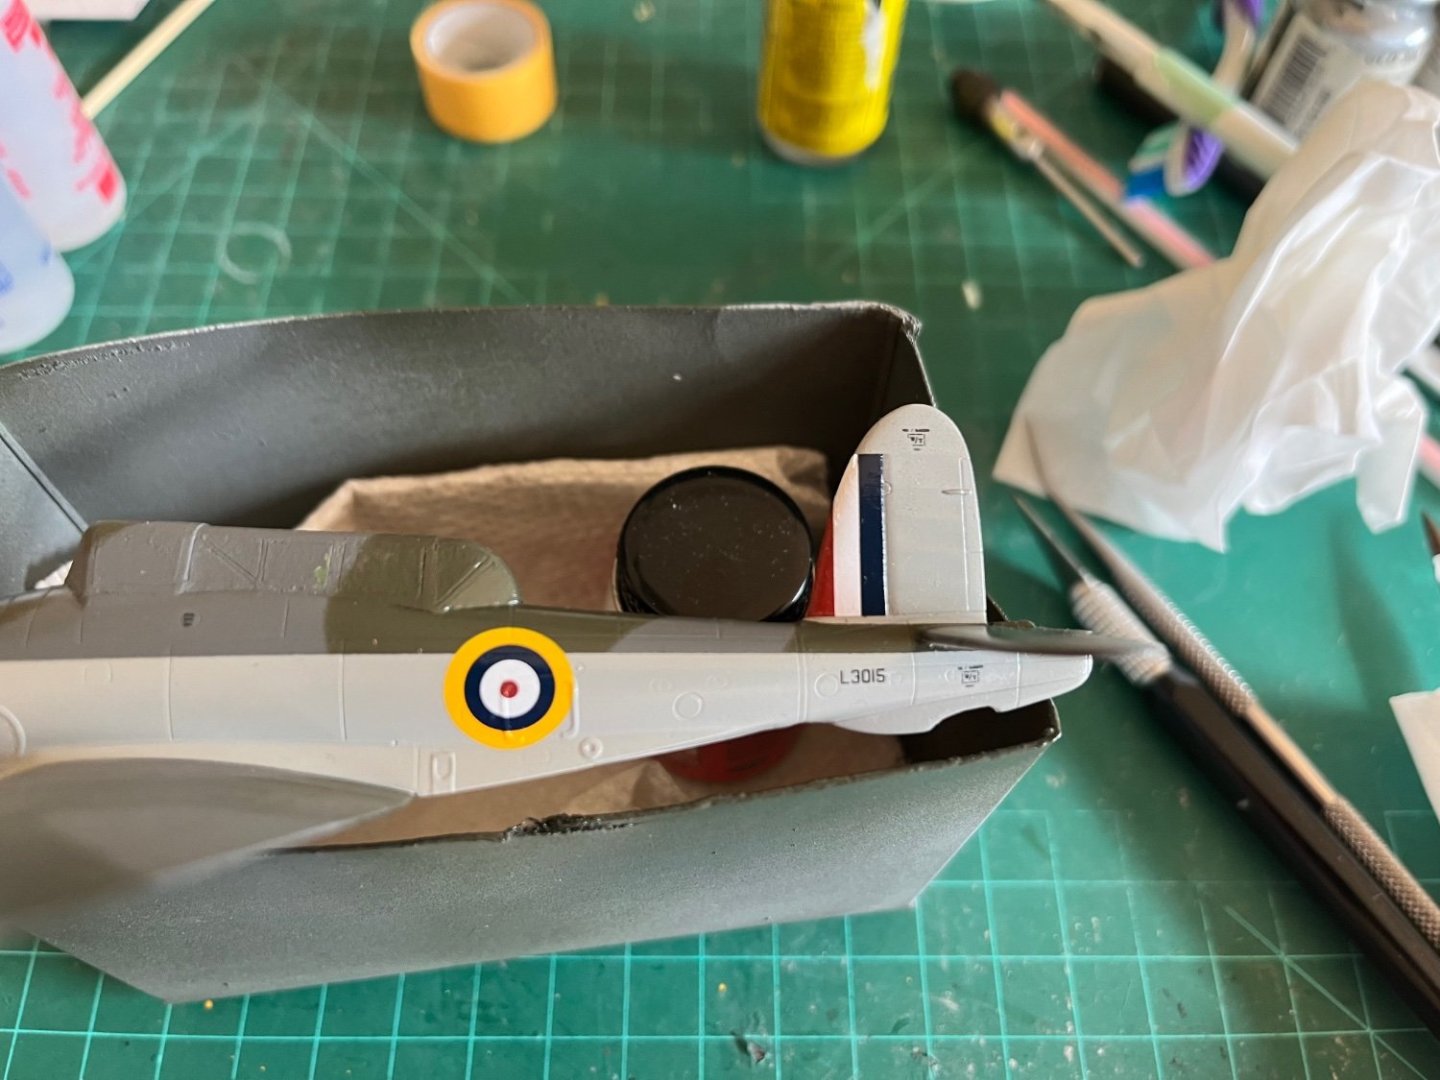
So as things stand, here is my Skua:

I should mention the kit supplied decals are in the pre/early war "bright" colours, I prefer the duller colours.
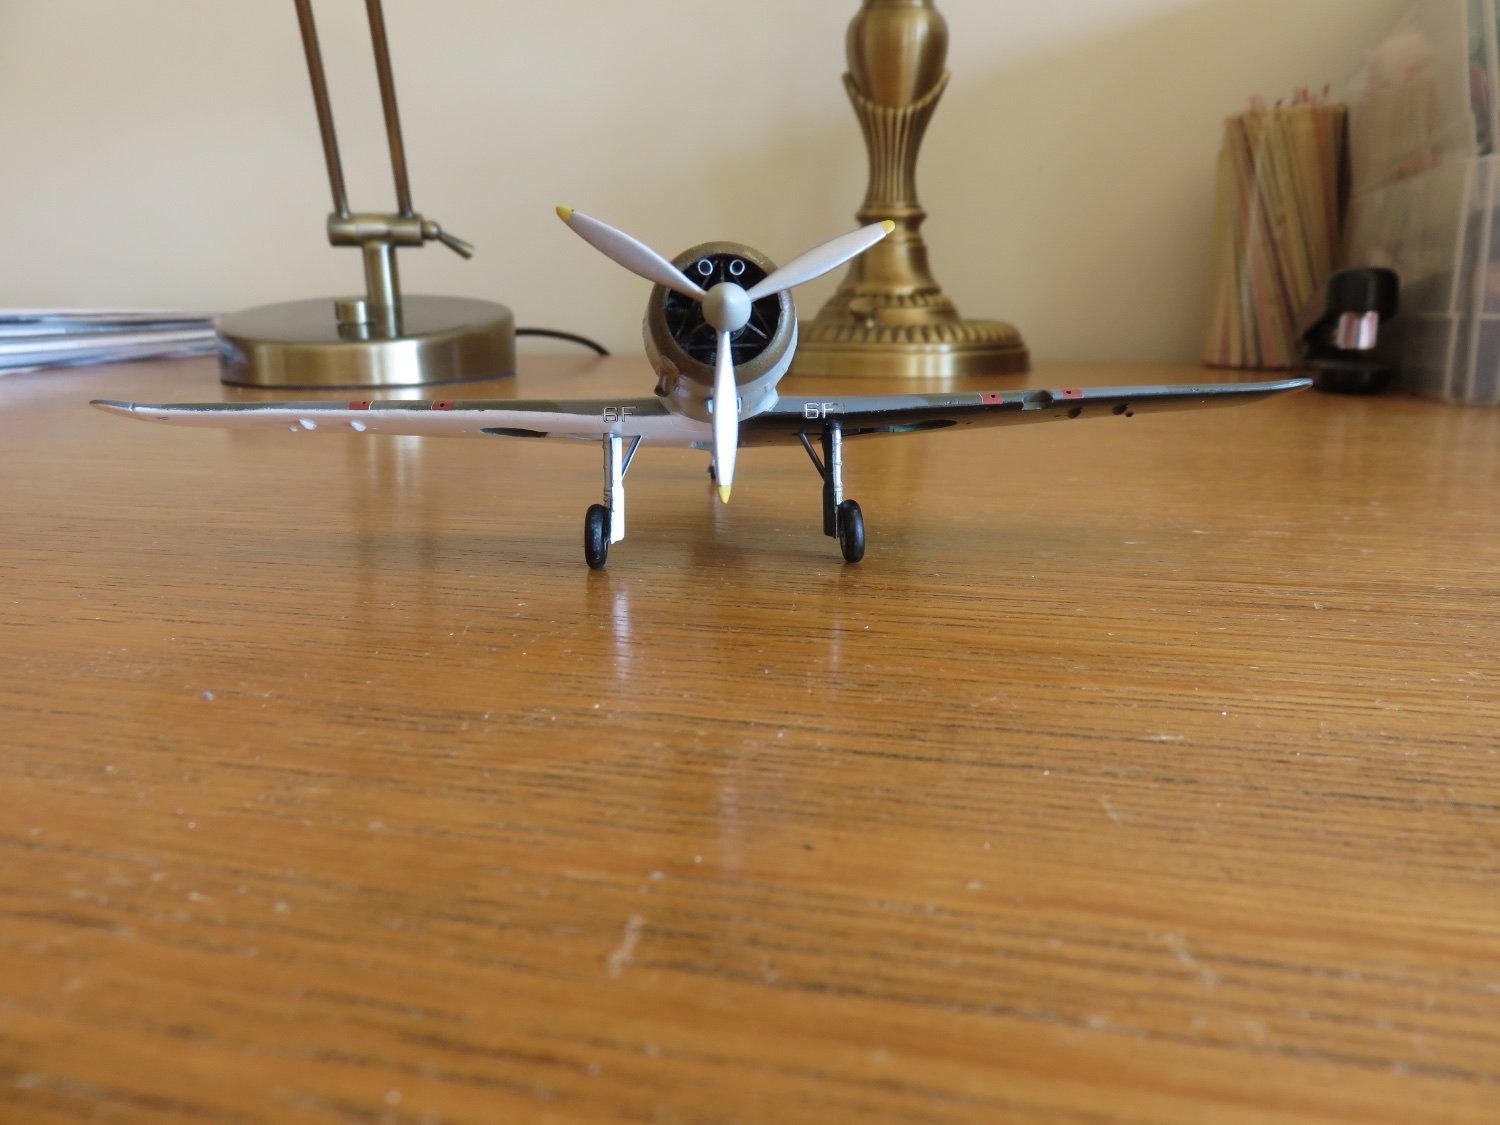
Beginning sometime in the early summer 1940, the airplane's identity numbers where painted on the leading edge of the fixed part of the wing. This helped crew's locate the planes in crowded aircraft carrier hangars. The plane I've lettered mine up for is L3015 (A6F). The "A" indicates the Skua was assigned to Ark Royal, "6" indicates the squadron (800) and "F" is the individual airplane code. At the start of 1940, the squadrons were ordered to drop the carrier code, when you look at the history of the Skuas, the squadrons were frequently switching between shore based and ship based assignments, so having a carrier code didn't make any sense (some squadrons even dropped the squadron code as well.
No set that I used included the red gun port tape, so I improvised using leftover bits from the red part of the fin flash.
Speaking of the fin flash:
I really wasn't happy with the fin flash and it took a good hard look at it the other day to discover why I didn't like it. It boils down to the width of the red/white/blue stripes.... they're too wide! If you look closely, the blue overlaps the joint between the rudder and the fin, and there's barely a hint of the red on the forward edge of the tail fin. I have ordered another set of decals that should arrive in a few days, this is just a set of roundels and fin flash striping, so redoing my Skua shouldn't be a problem. The "F" came with the Special Hobby decal set, but for some reason (very fortuitous) they included an extra pair.
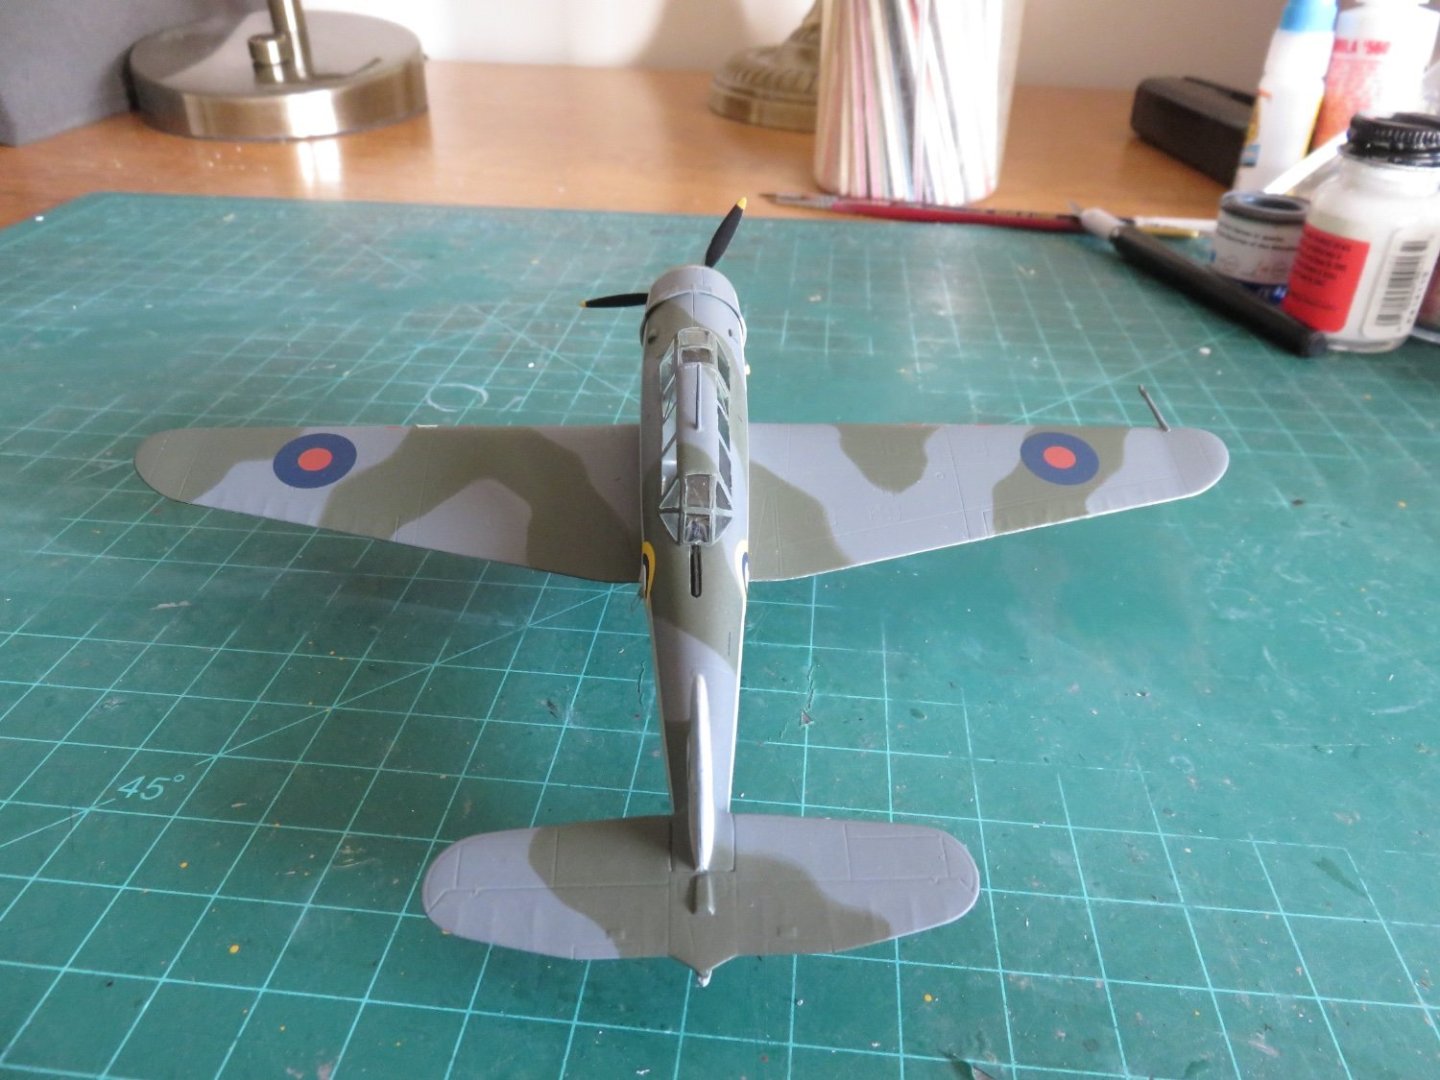
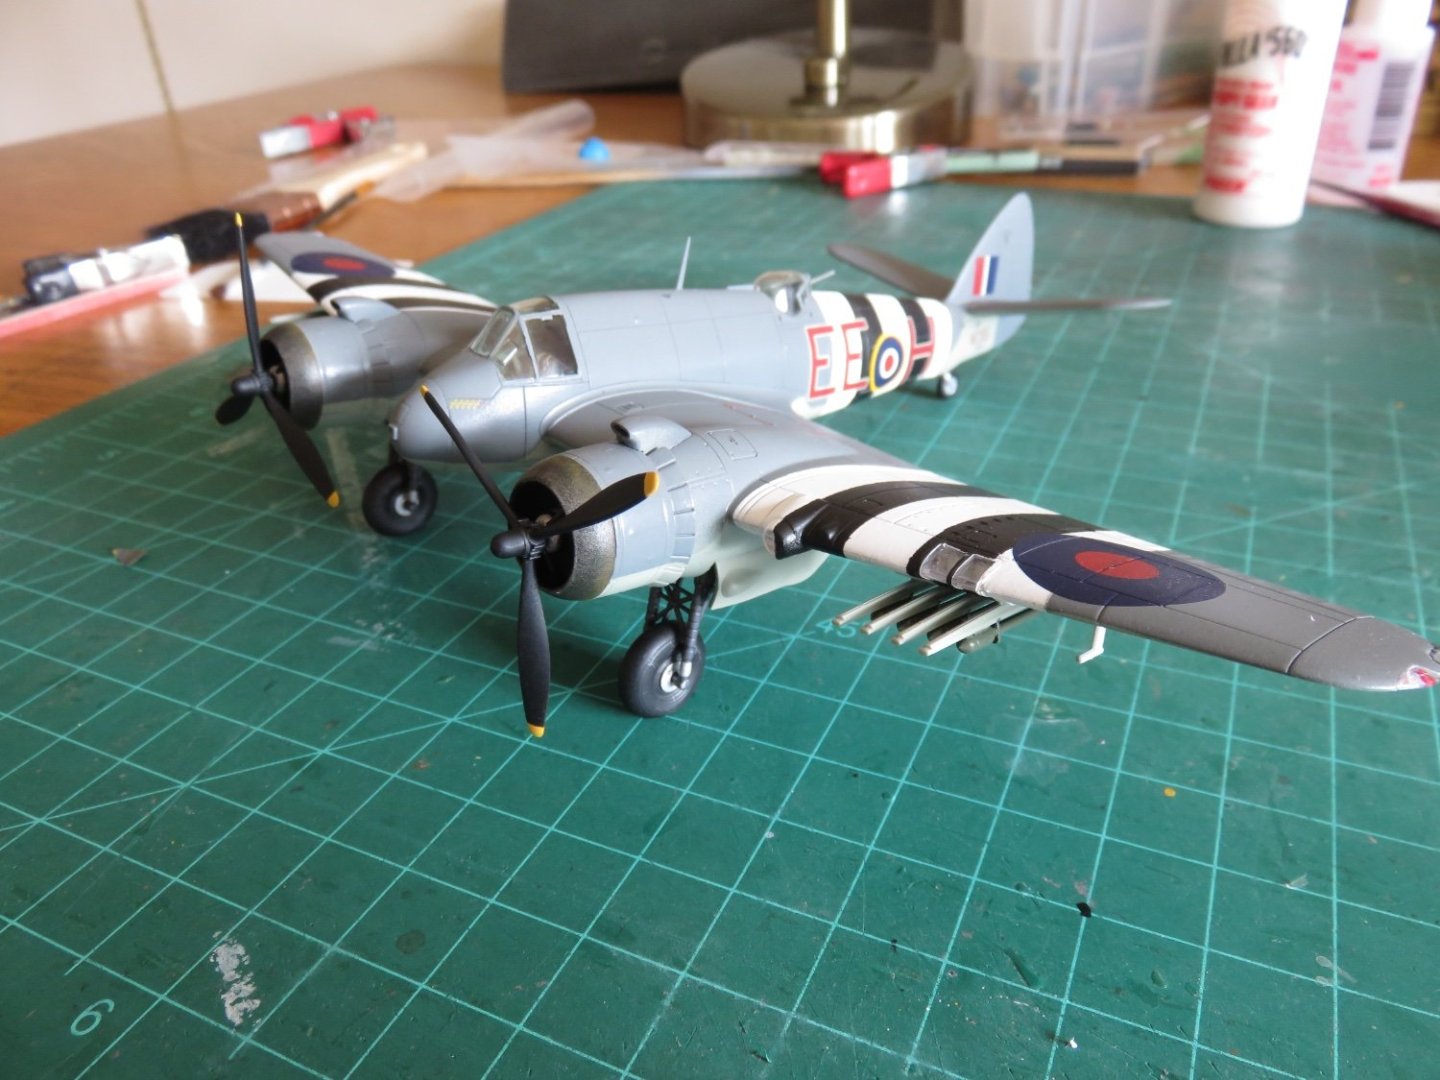
There really weren't too many markings on the underside of the Skua, other than a few stencils, but I took a little inspiration and modellers license from a photo found on John Dell's web pages: https://dingeraviation.net/skuaroc/blacksundaymyth.html:
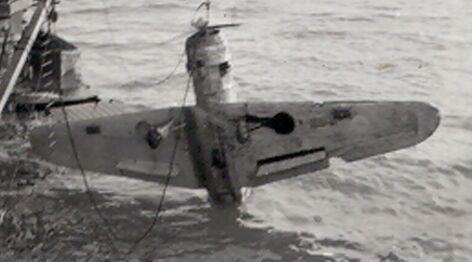
The photo depicts a Skua being hauled out of the drink after an incident in Bermuda in July 1940. If you look carefully at the port wing, there is the faint hint of an underwing roundel peaking through the paint.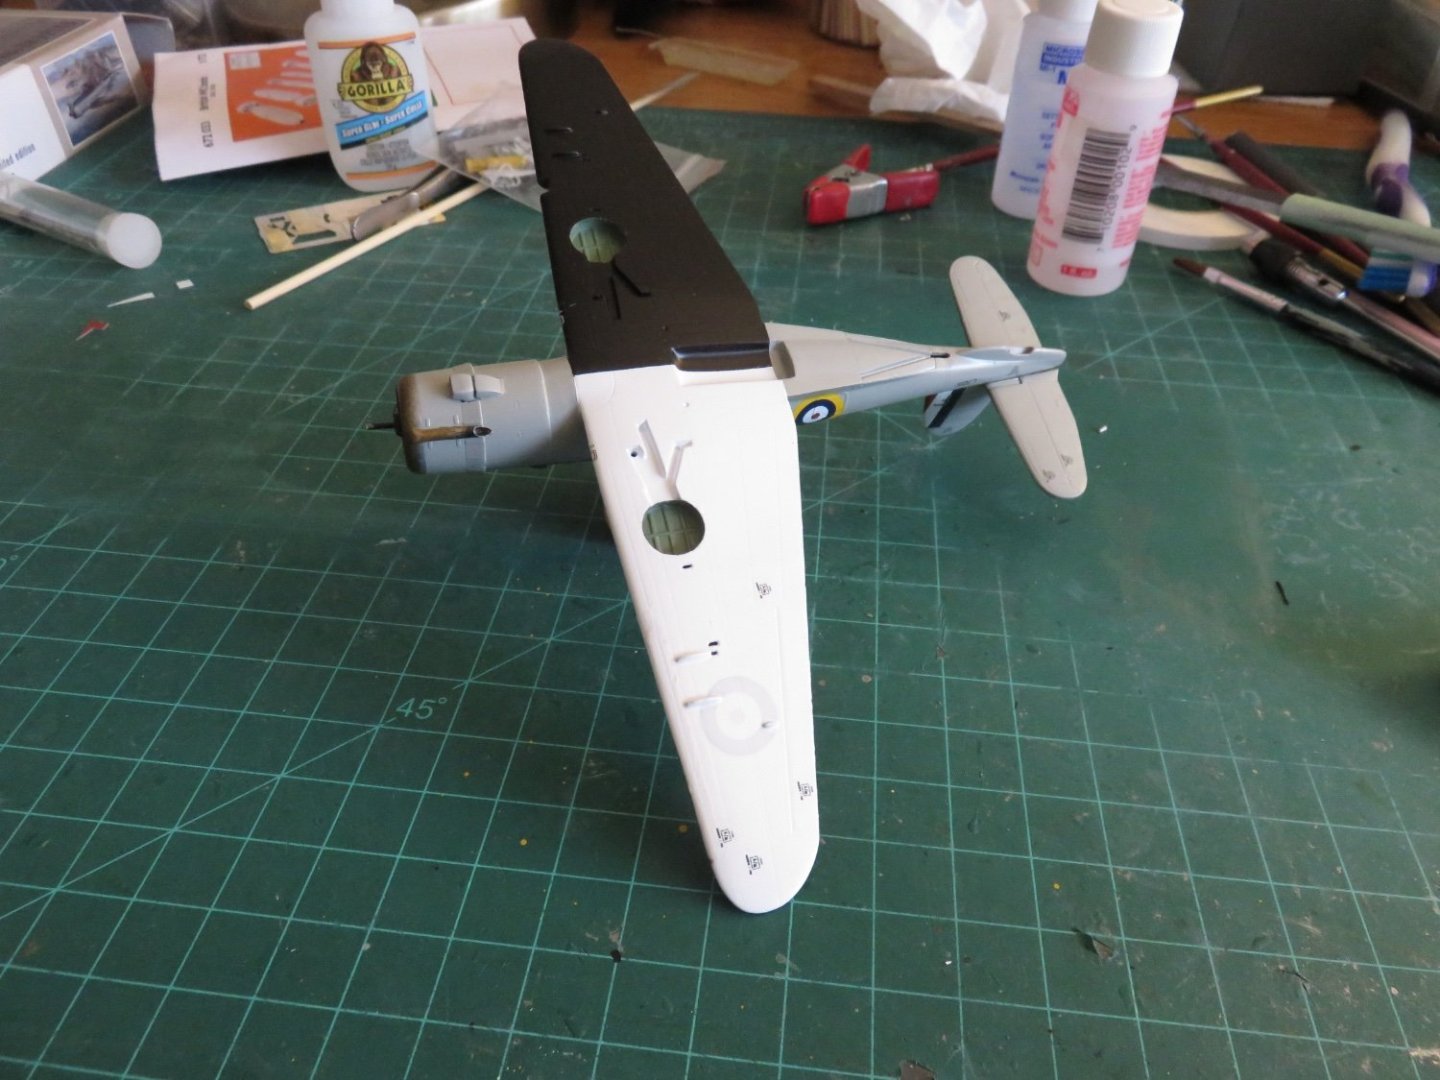
I attempted to replicate this on my Skua by first applying a roundel to the underside of the wing (starboard in my case), then lightly over spraying with white until the desired effect was achieved. I am pleased with the results as it gives a hint of an airplane with a bit of a service history. I had considered doing the same on the port wing, but I thought better of it and left it looking a little lop-sided, weathering is seldom even and symmetrical in real life anyway.
So that's about it for now. Hopefully the replacement decals will arriver soon and I can re-do that fin flash.
Andy
-
Furthering Roger’s reply, you may want to source a boiler backhead detail kit. Aside from a sight glass, there should be valves and plumbing associated with the injectors (water), as well as blow down valves etc.
Grandt Line made a detail set for a small Porter switcher:
Should fit your rotary, and fill in a few missing parts if you can find it.Andy
- thibaultron, yvesvidal, mtaylor and 6 others
-
9
-
If I had to guess from some vague photos, it looks like a Clark-Chapman single chain windlass. I don’t see a cable drum, so you might want to try taking the gypsy from the Sylvan kit (which is a steam windlass), and using to to replace the cable drum on the second one you have.
Andy
- mtaylor and Keith Black
-
2
-
Here’s a couple photos of an assembled HO version, if that helps:
I’ll dig around and see if I can find the actual corresponding instructions.
Andy
Edit: Have a look here, post #3:
- mtaylor, JKC27 and Keith Black
-
3
-
Thanks to everyone for the "likes", it is time for another update!
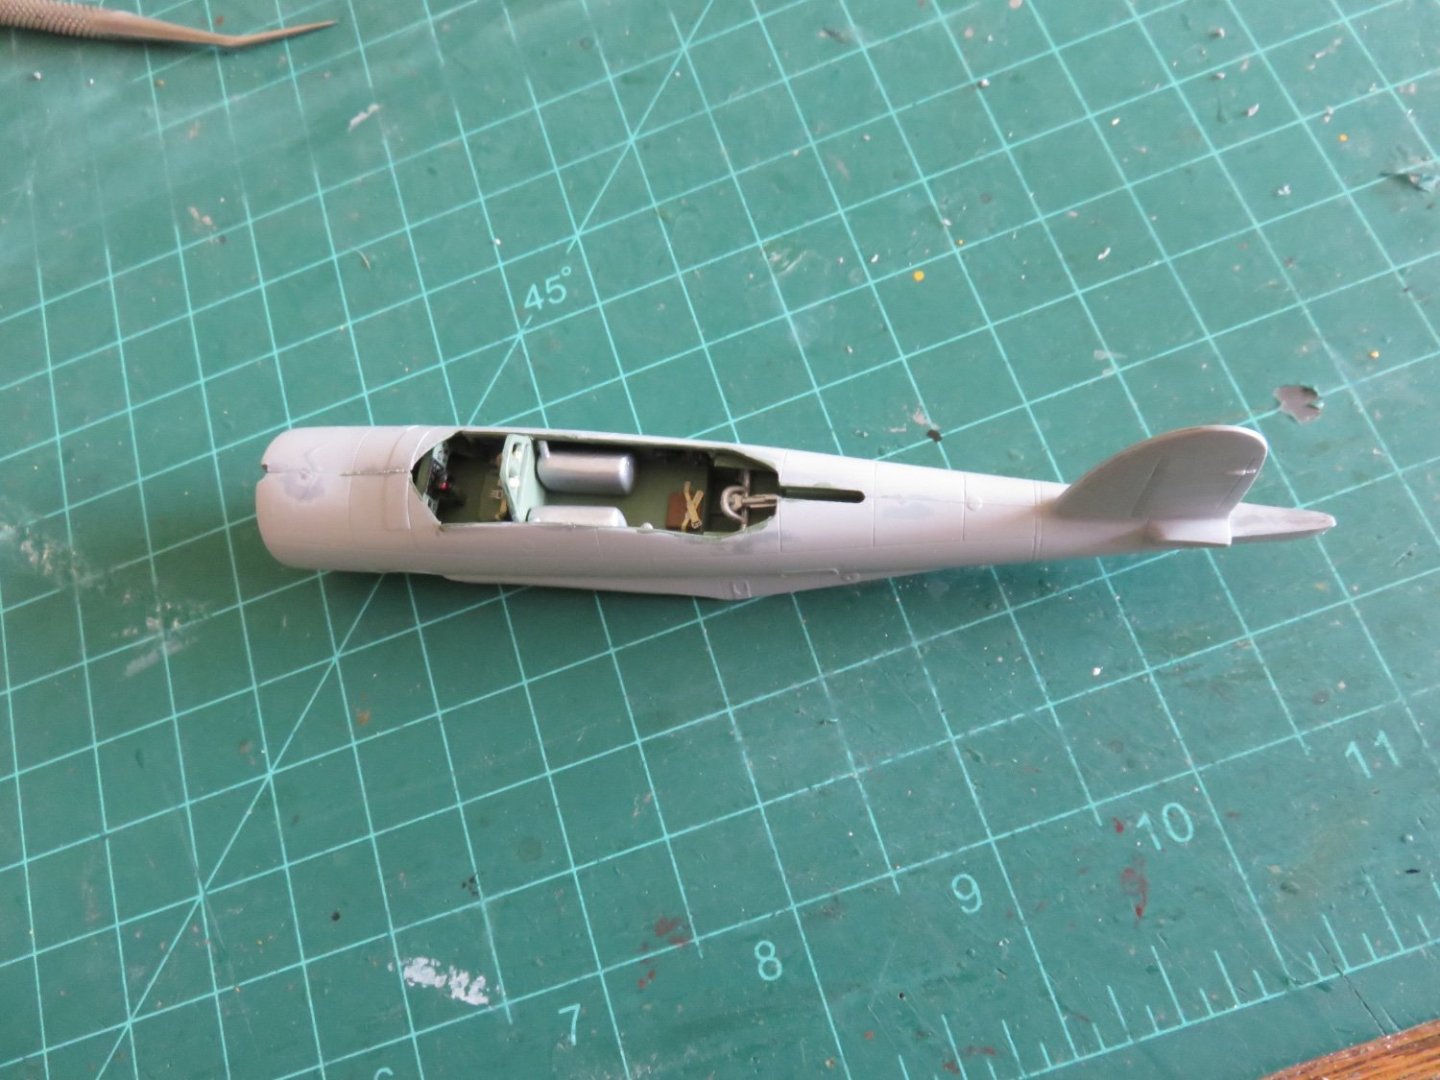
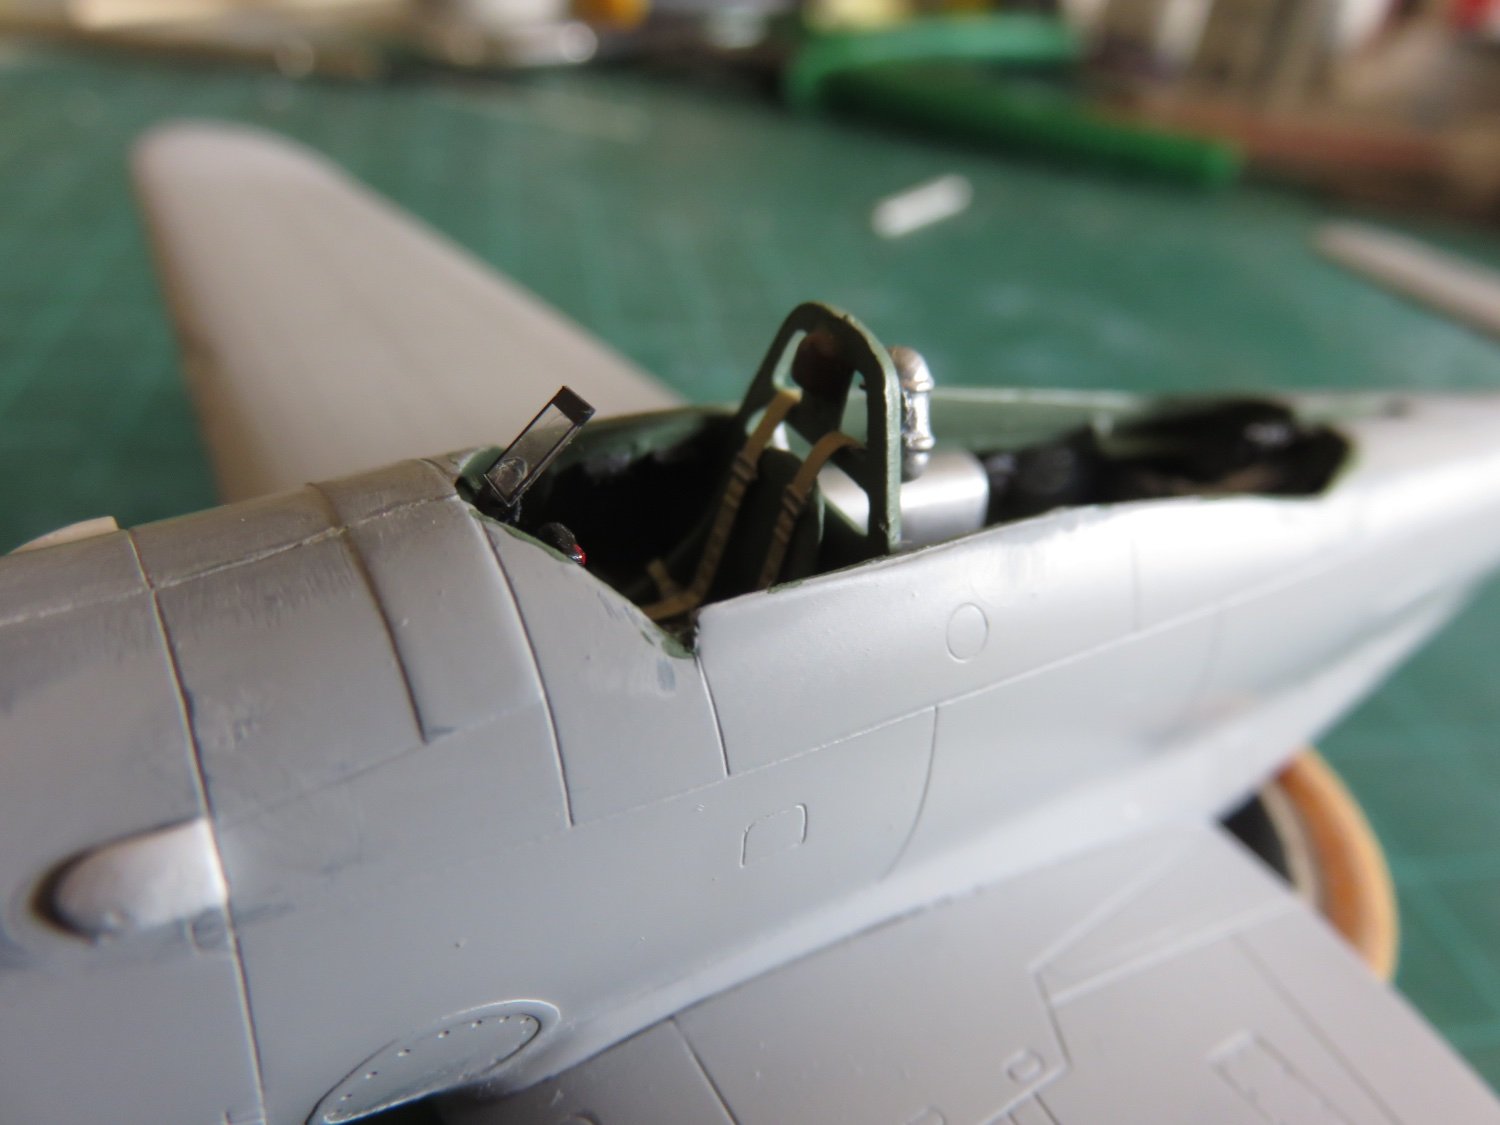
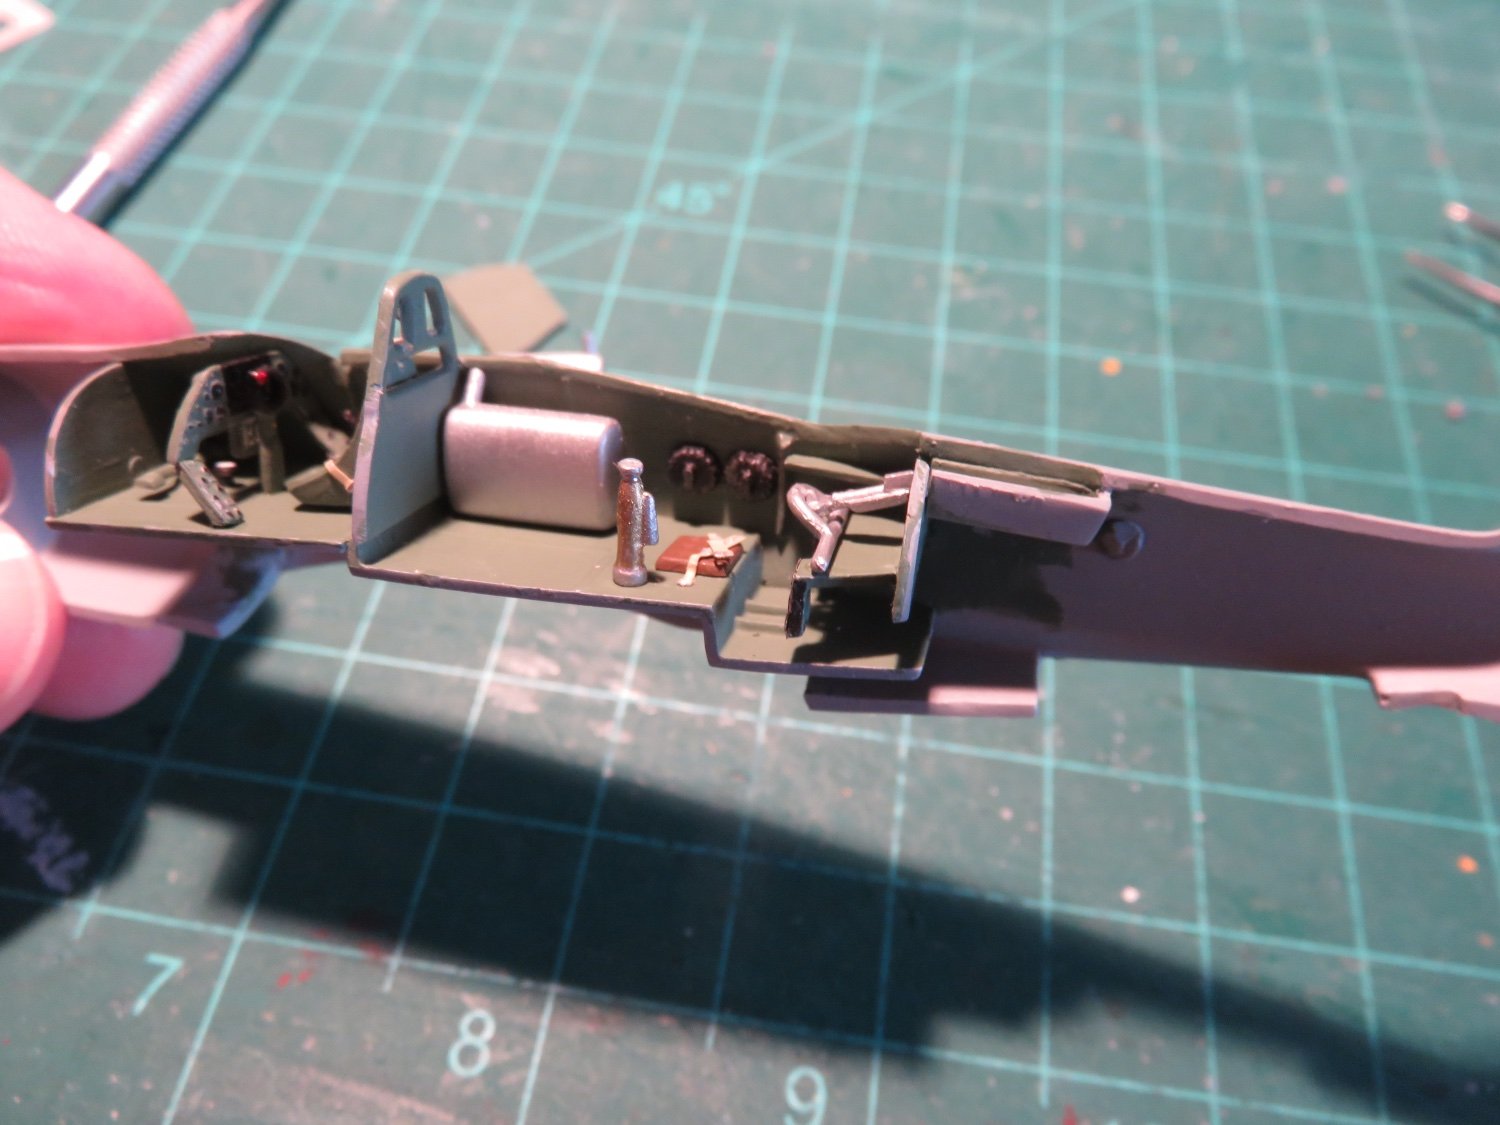
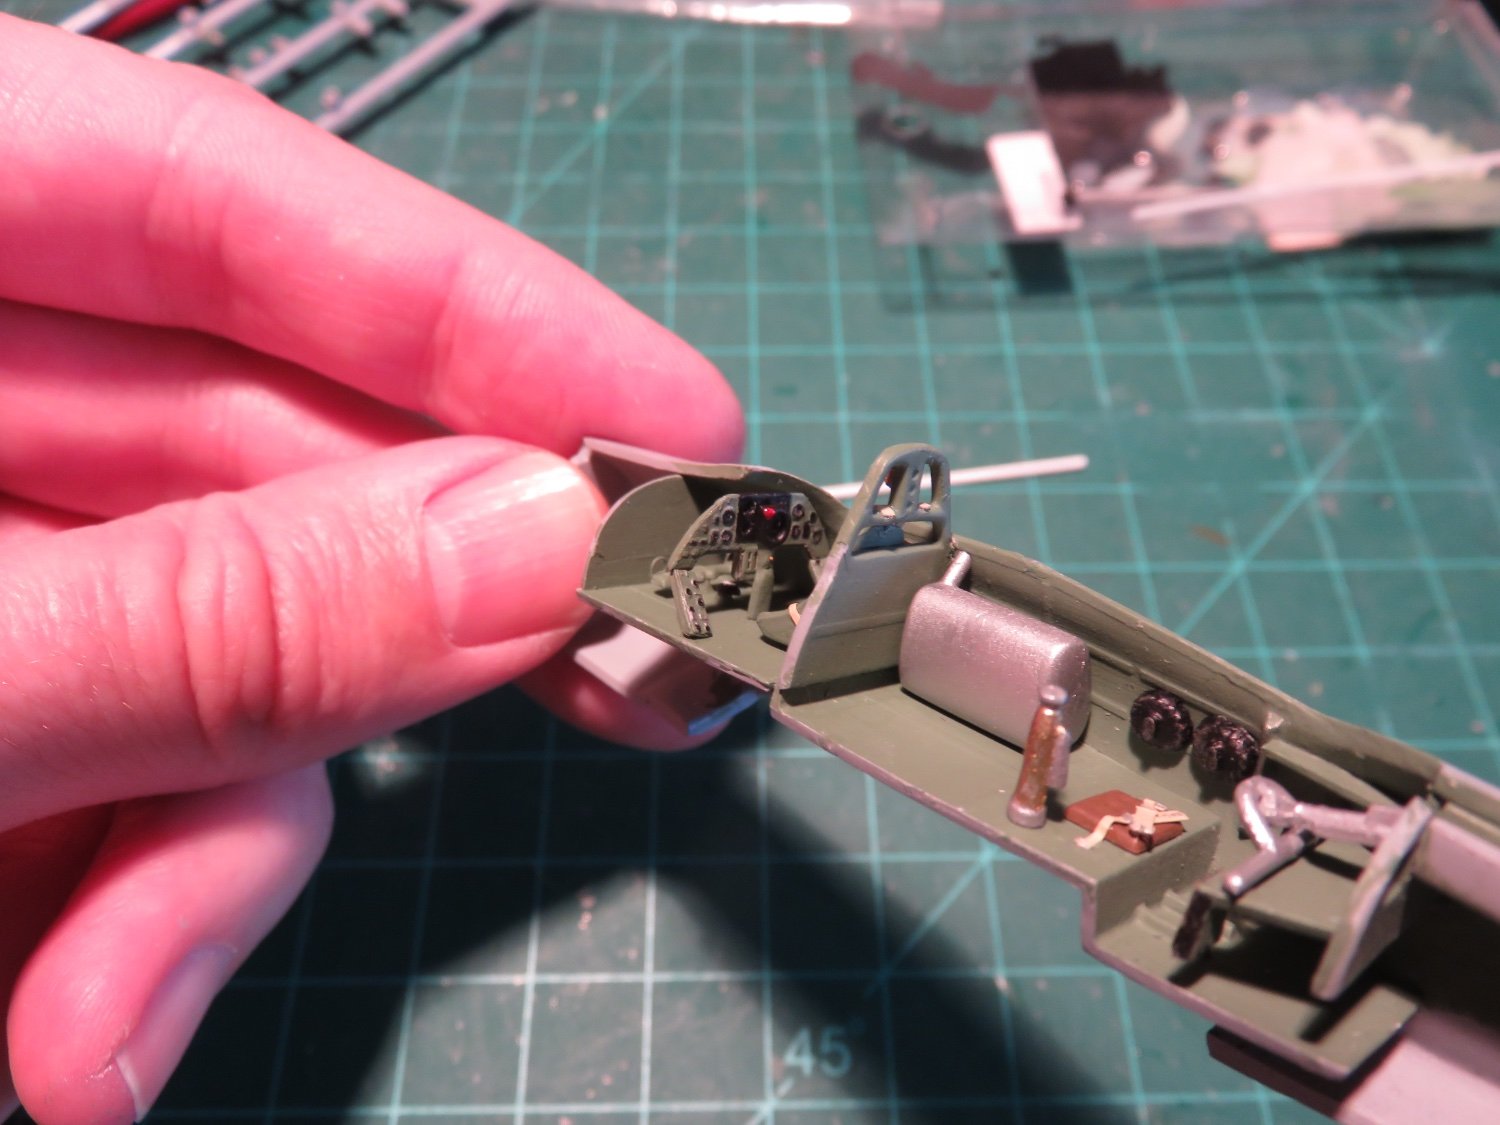
A couple of items remained to be installed in the cockpit. First off the gun/bomb sight was added above the control panel. After this there was a small tank that had to be added to the pylon behind the pilot. Some online speculation supposed this was an air tank, but intact it was a hydraulic tank, I suspect it was an accumulator (this is a tank that holds a quantity of hydraulic oil under pressure, so that should the pump fail, a minimum of hydraulic functionality remains.

Also to be added in the rear cockpit was the TAG's gun. As originally equipped, the Skua used a Lewis gun in the rear position, but as 1940 wore on, many aircrews swapped to Vickers "K" guns, as the Vickers had a higher rate of fire than the Lewis gun. One of the many mistakes that other, older Skua models make, is they frequently show the gun deployed while having the rear canopy closed. In reality, it was impossible to use the gun in this manner, and it was even impossible to stow the gun with an ammunition drum attached. On my model, as the canopy would require major surgery in order to be displayed open, I left the gun neatly stowed in its recess.
I then turned my attention to fitting the canopy and getting it masked and ready for paint. I didn't take any photos of these steps, not much to see really, a little sanding, some tape, and a little canopy cement and things were ready for paint.
Referring frequently to John Dell's Skua pages, especially his detailed treatise on Skua paint schemes. It's a worthwhile read, and I highly recommend it.
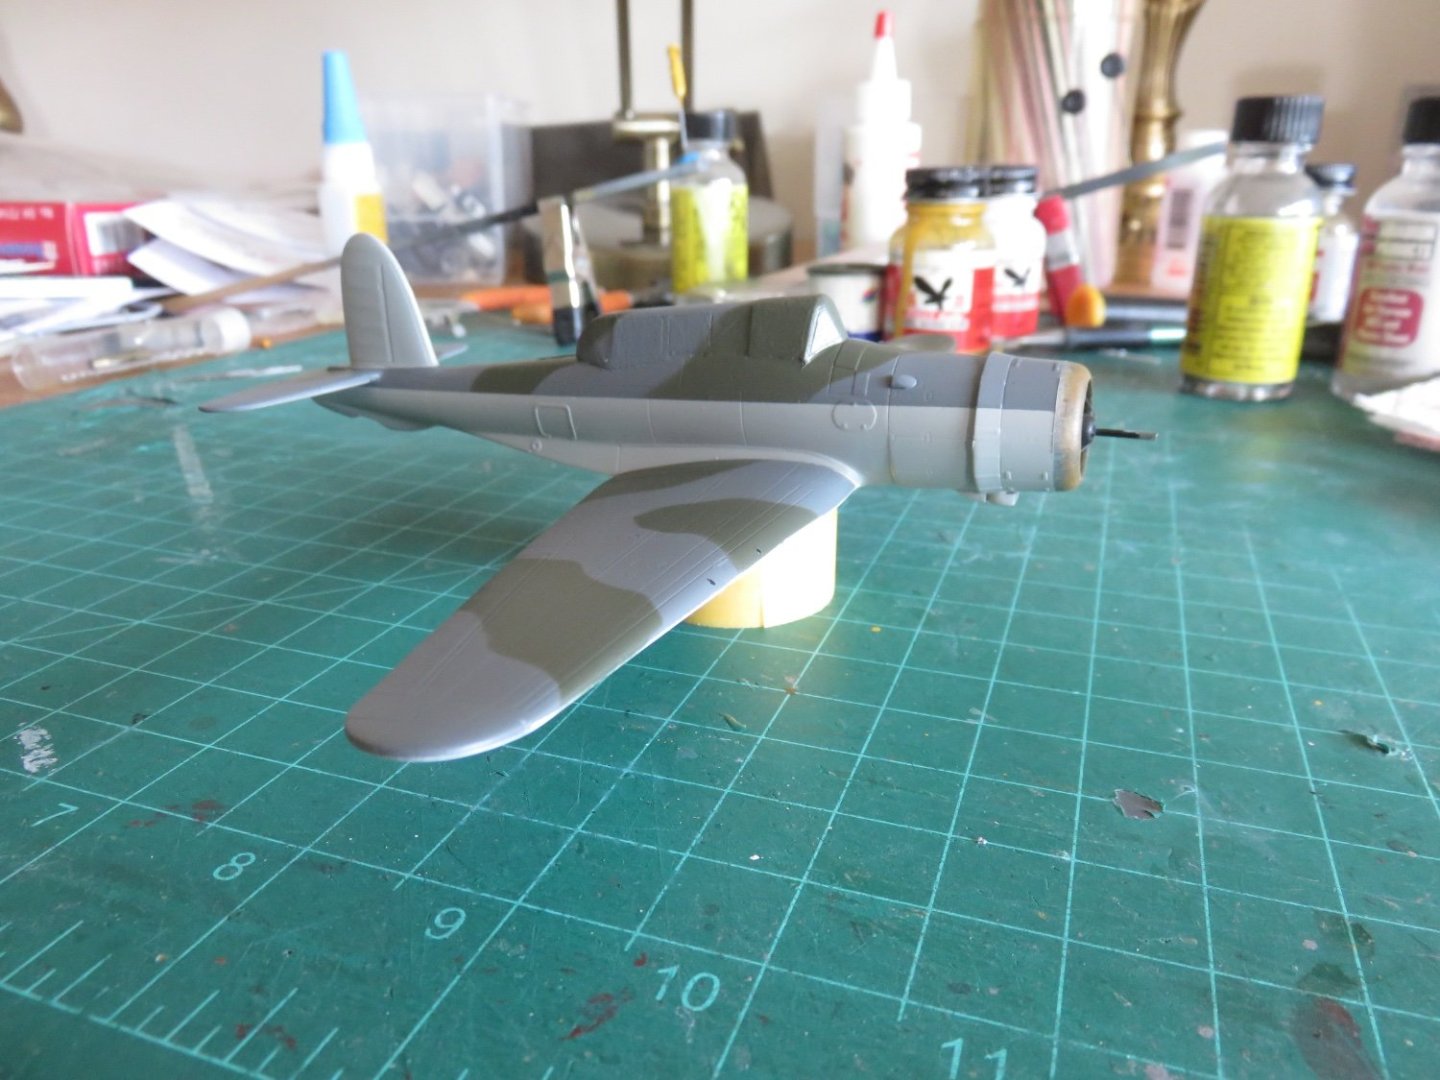
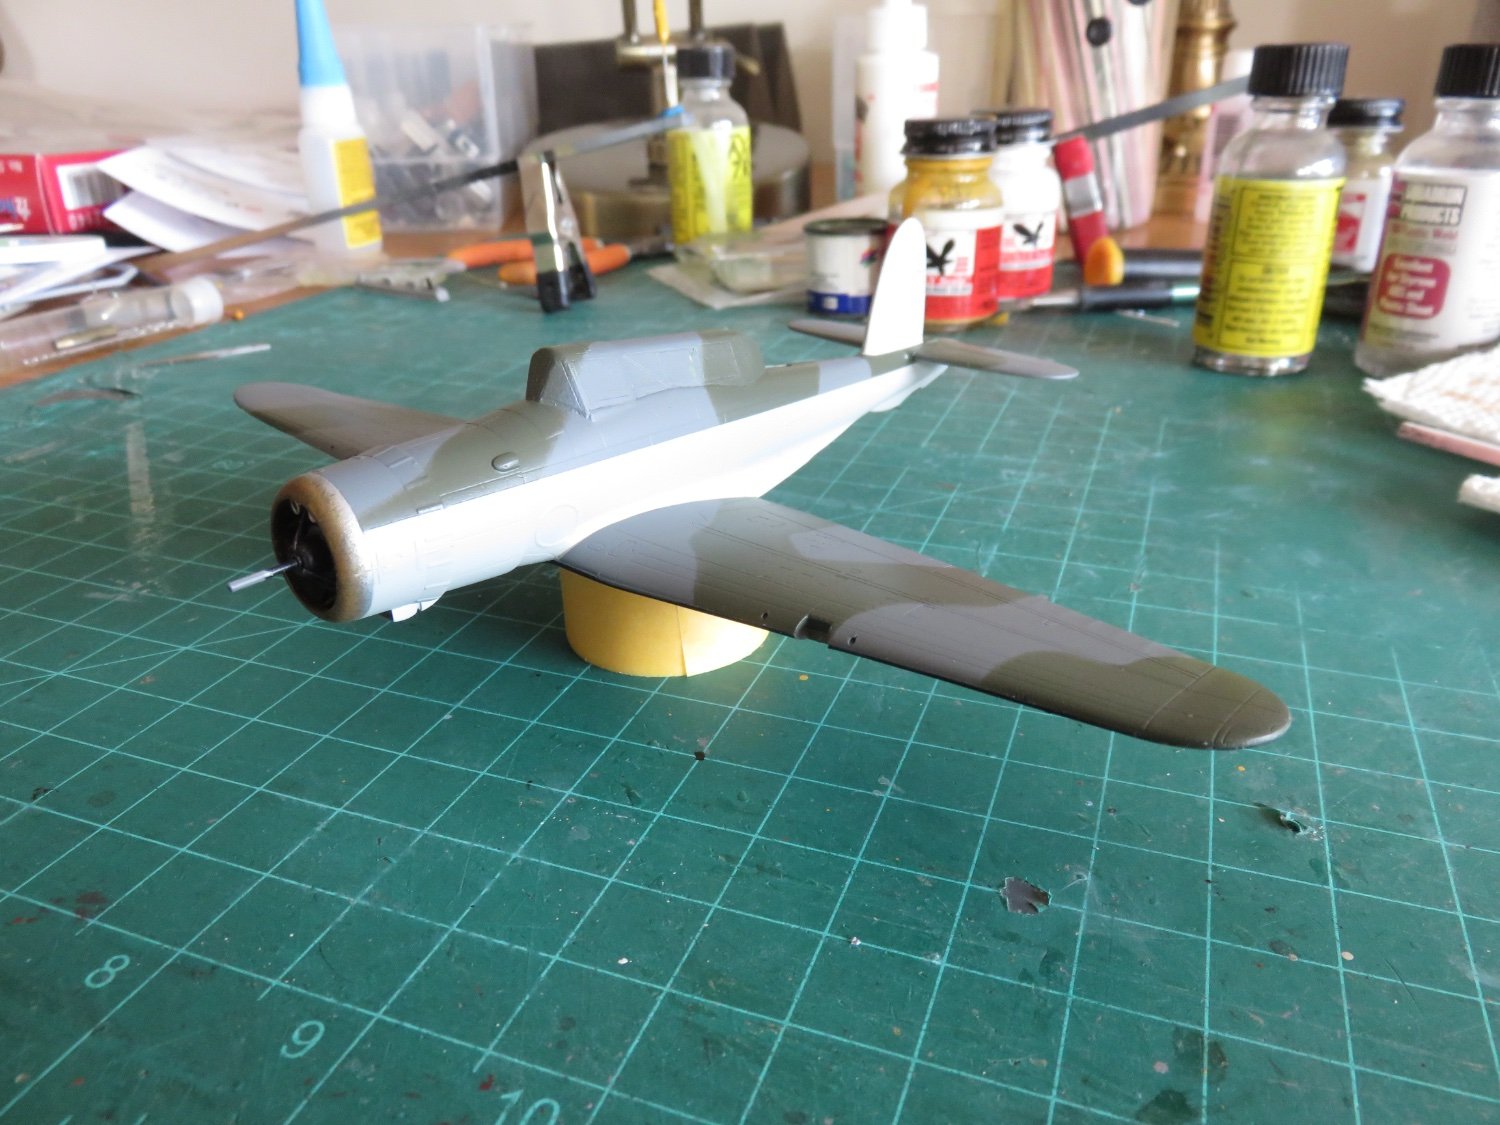
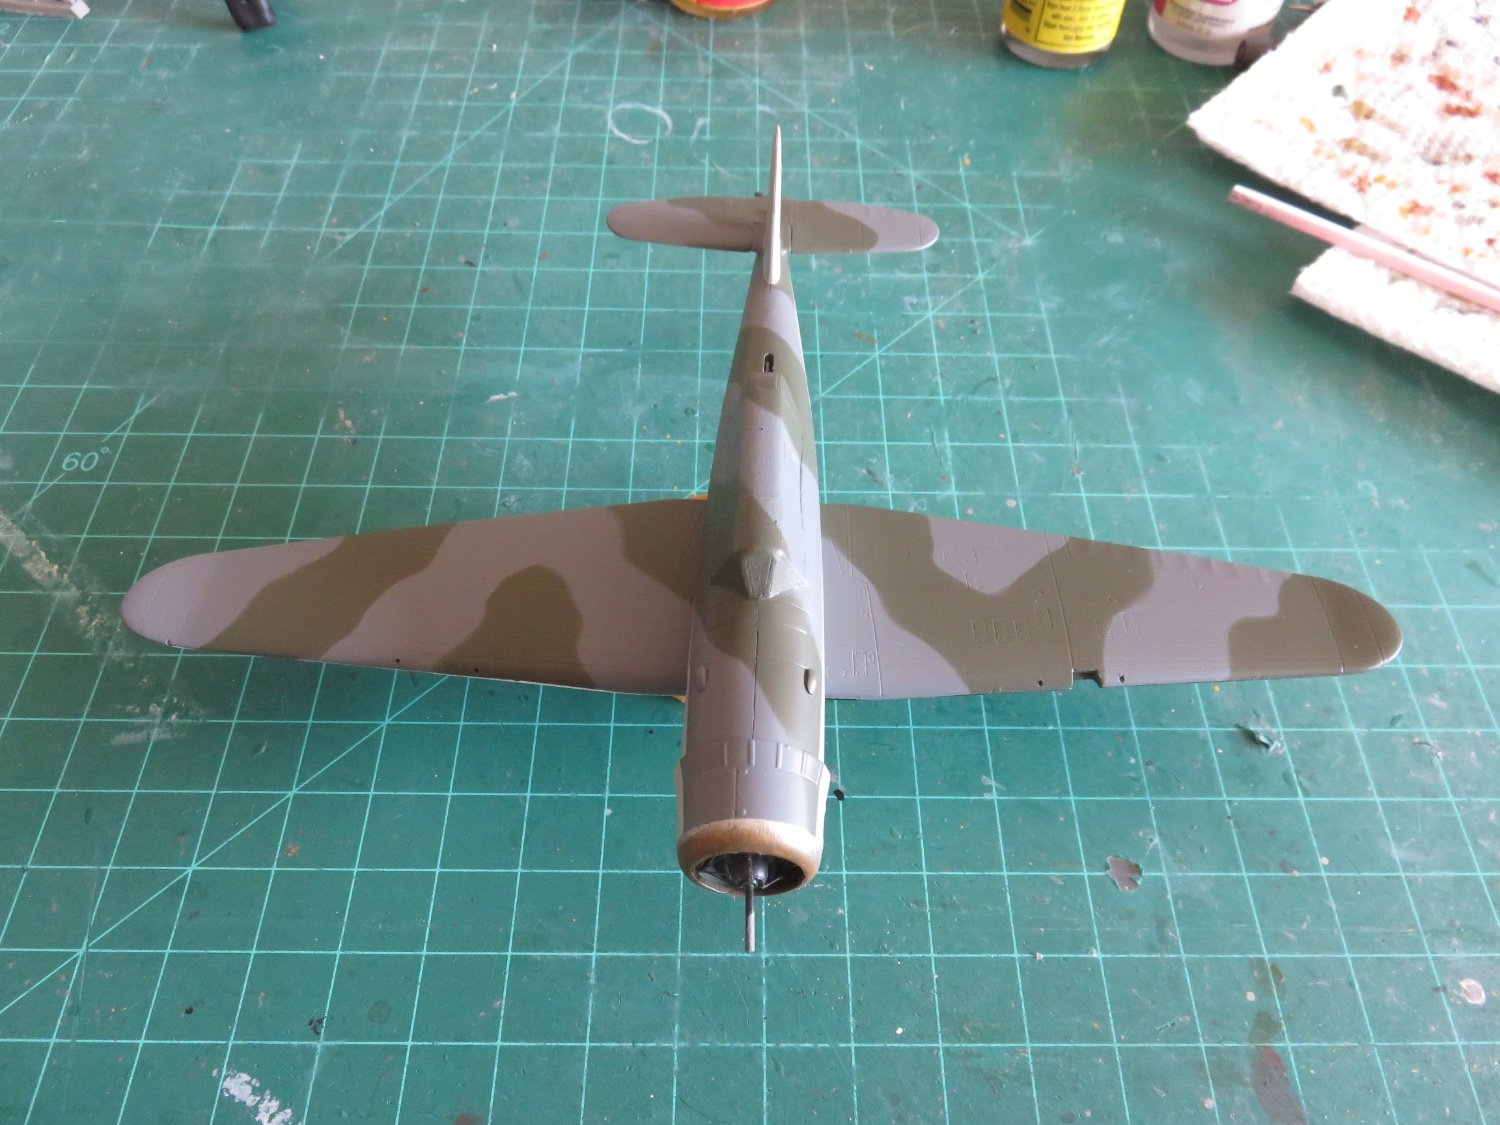
I'm making my Skua representative of some of the airplanes involved in the Norwegian campaign, in the spring of 1940. Early in 1940, the Admiralty decreed that FAA airplanes were to be painted in camouflage scheme S1E (which had been first promulgated in March 1939). This consisted of a disruptive pattern of Extra Dark Sea Grey and Dark Slate Grey on the upper wings and tail planes, and on the upper part of the fuselage, extending 1/3 down the sides. The lower fuselage sides, airplane undersides and the vertical fin and rudder were to be painted in Sky grey (not Sky type "S"). At the start of the war, the in service Skuas had the underside of the wings painted in black and white (like other early war Hurricanes and Spitfires). This colour was applied before the S1E scheme, and the Skua's flying during the pursuit of the Graf Spee had black and white wing undersides and pre-war silver colours. In the summer of 1940, the B&W undersides were replaced by Sky Type "S", and following the Dunkirk evacuations, the disruptive camouflage pattern was extended further down the fuselage. The reason for the latter change can be traced to a couple of unfortunate instances of friendly fire over Dunkirk, as the original demarkation line was very similar in location to that of the Bf-109.
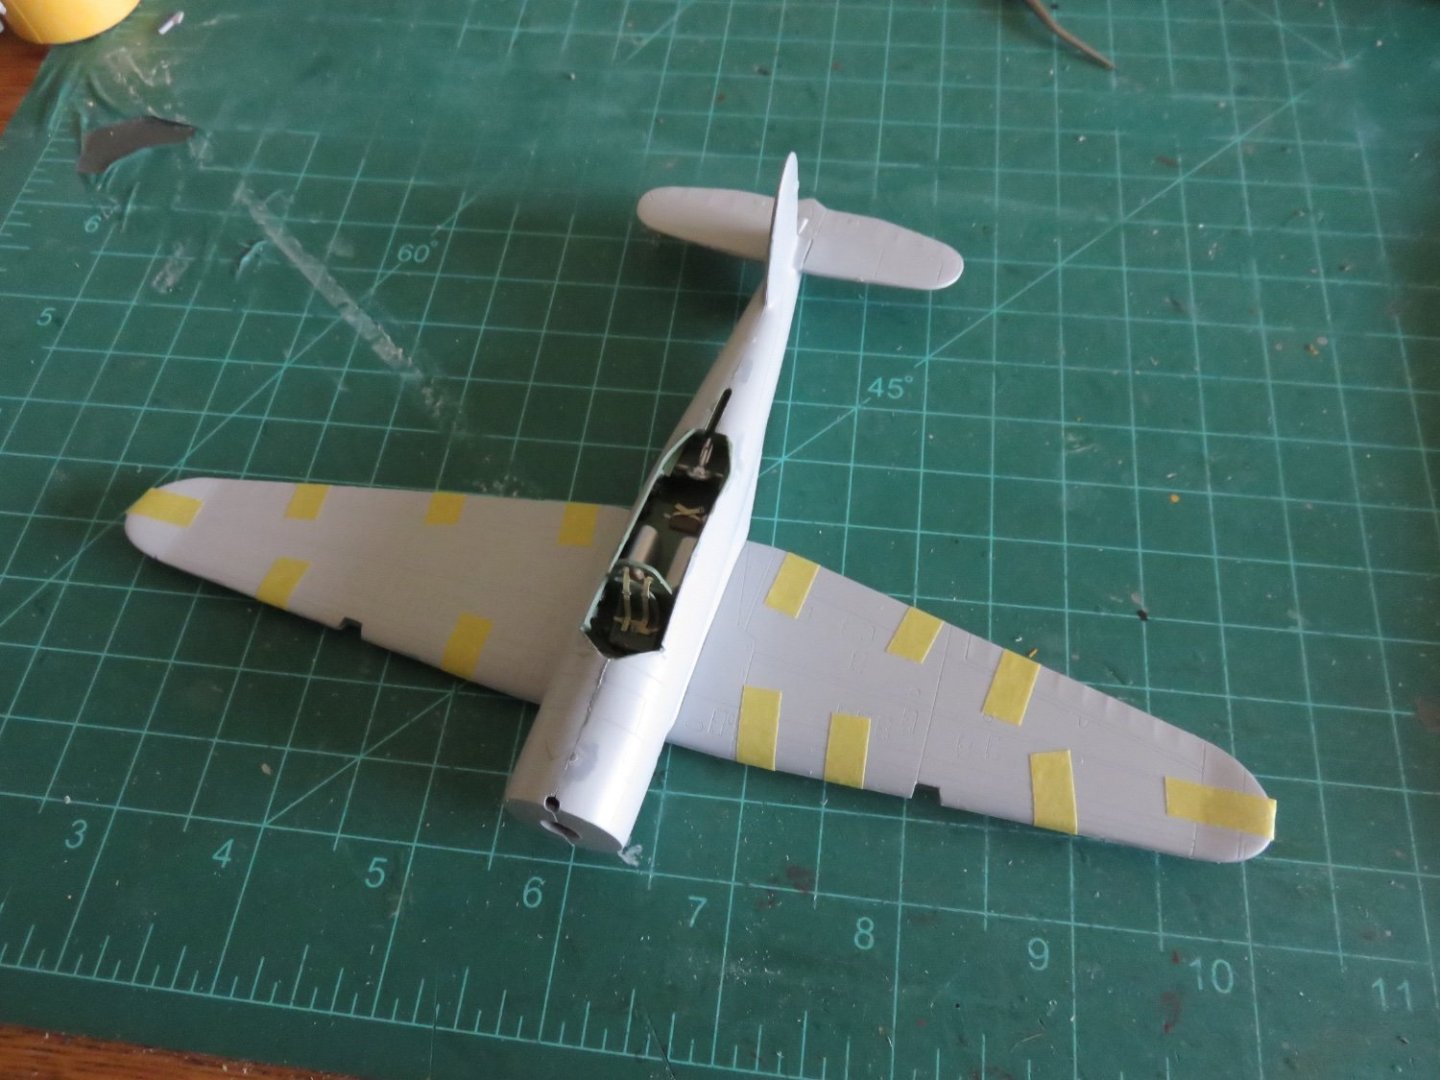
I first began painting my Skua by doing the black and white wing undersides, following a similar, but far less complicated, procedure for painting invasion stripes. Once dry, the underside was completely masked and the Sky grey was applied, and subsequently followed by the upper EDSG/DSG camouflage pattern.


Overall, I am pleased with the way things have come out. The most nerve wracking part of the build has now passed (the removal of multiple layers of masking tape.... and poster putty worms), now I can relax and get on with the decals.
Andy
-
A small update for today.
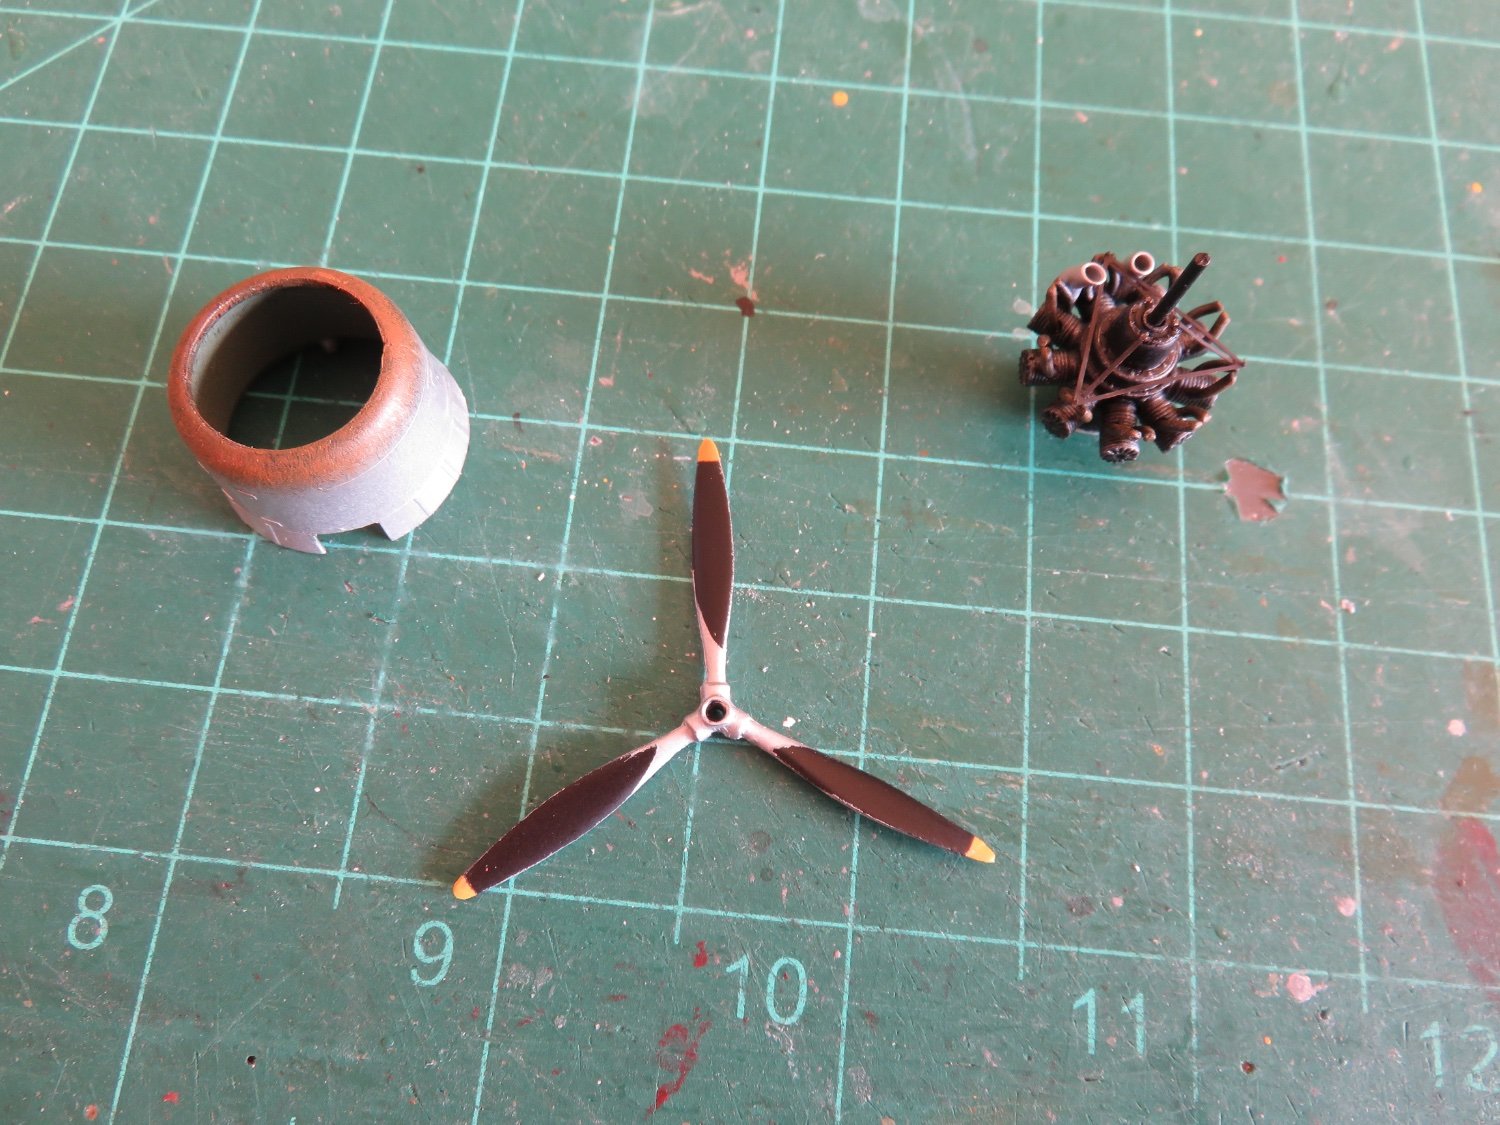
I have been busy working on the engine. The Skua was powered by a 9 cylinder Bristol Perseus engine rated and 815 continuous Hp (900 Hp at war emergency power). A rather underpowered airplane. The Perseus engine was a sleeve valve engine derived from the poppet valve Bristol Mercury. The first sleeve valve engine produced by Bristol, it is the direct ancestor of the legendary Hercules and Centaurus engines. The 2 prototype Skuas used Mercury engines, however production of the Mercury was allocated towards the Bristol Blenheim, and so production Skuas were equipped with the Perseus.
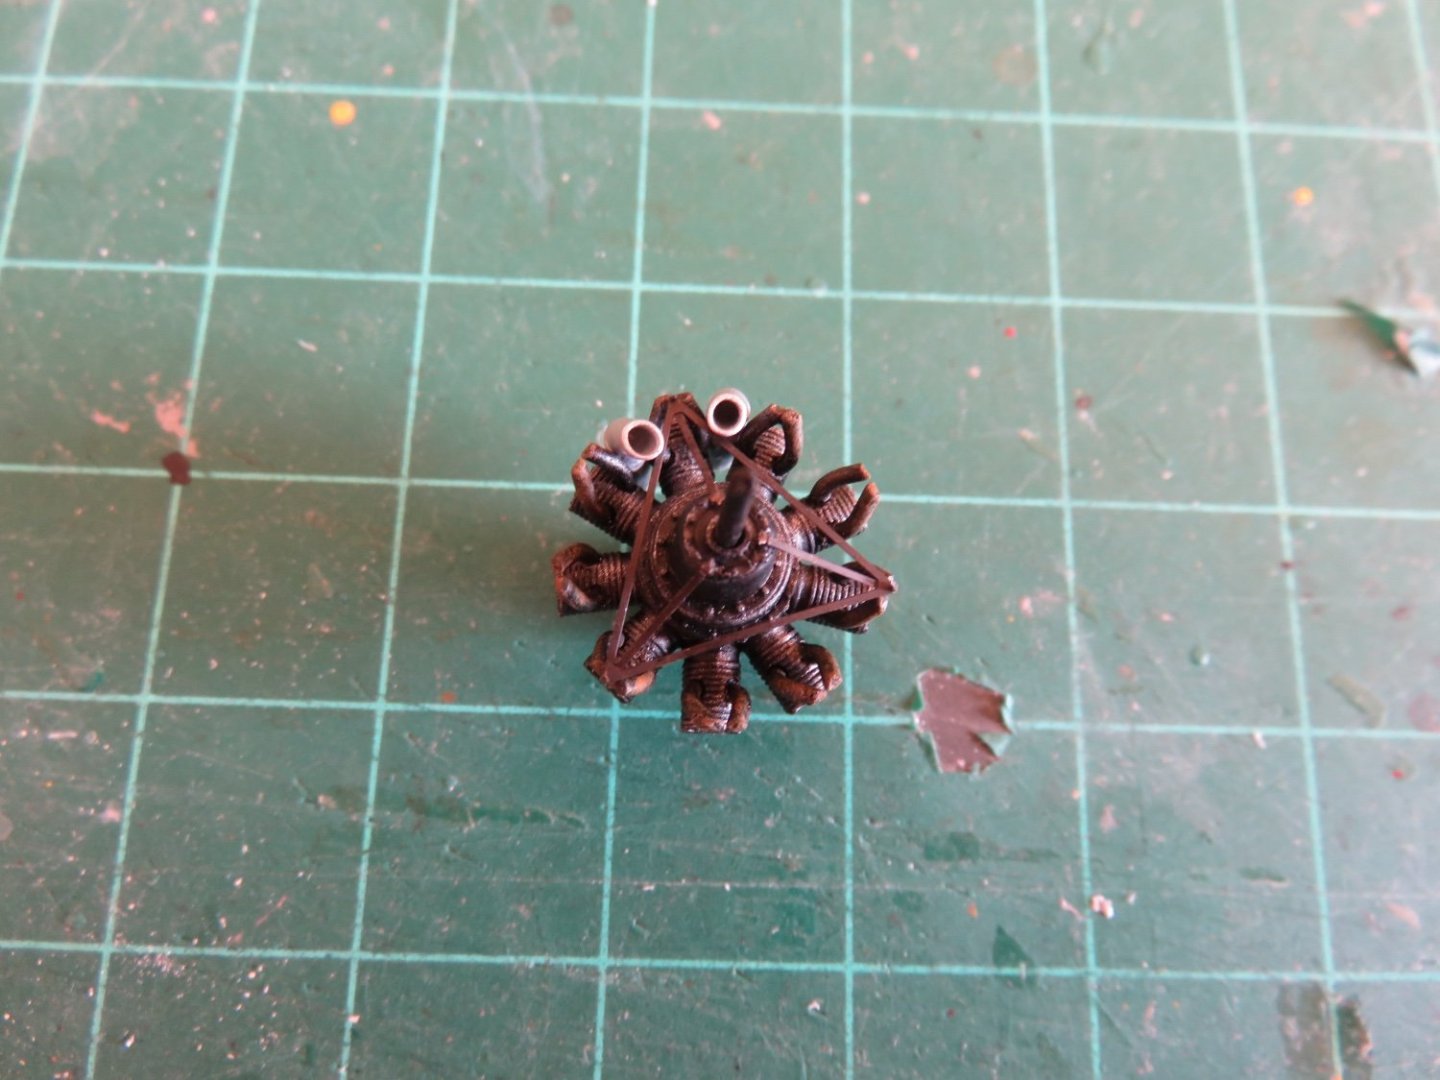
The engine included in the kit is a nicely cast resin piece. The exhaust pipes on each cylinder are separate pieces, unfortunately the instructions aren't quite clear on their correct installation, the same is true for the two oil cooler intakes at the top of the engine (the two silver pipes). The final piece to be added is the triangular PE collector ring support bracket. A finicky piece! The engine was painted black, the cylinders were dry-brushed with Humbrol "gun metal" and the exhaust pipes with "rust" to bring out the details.
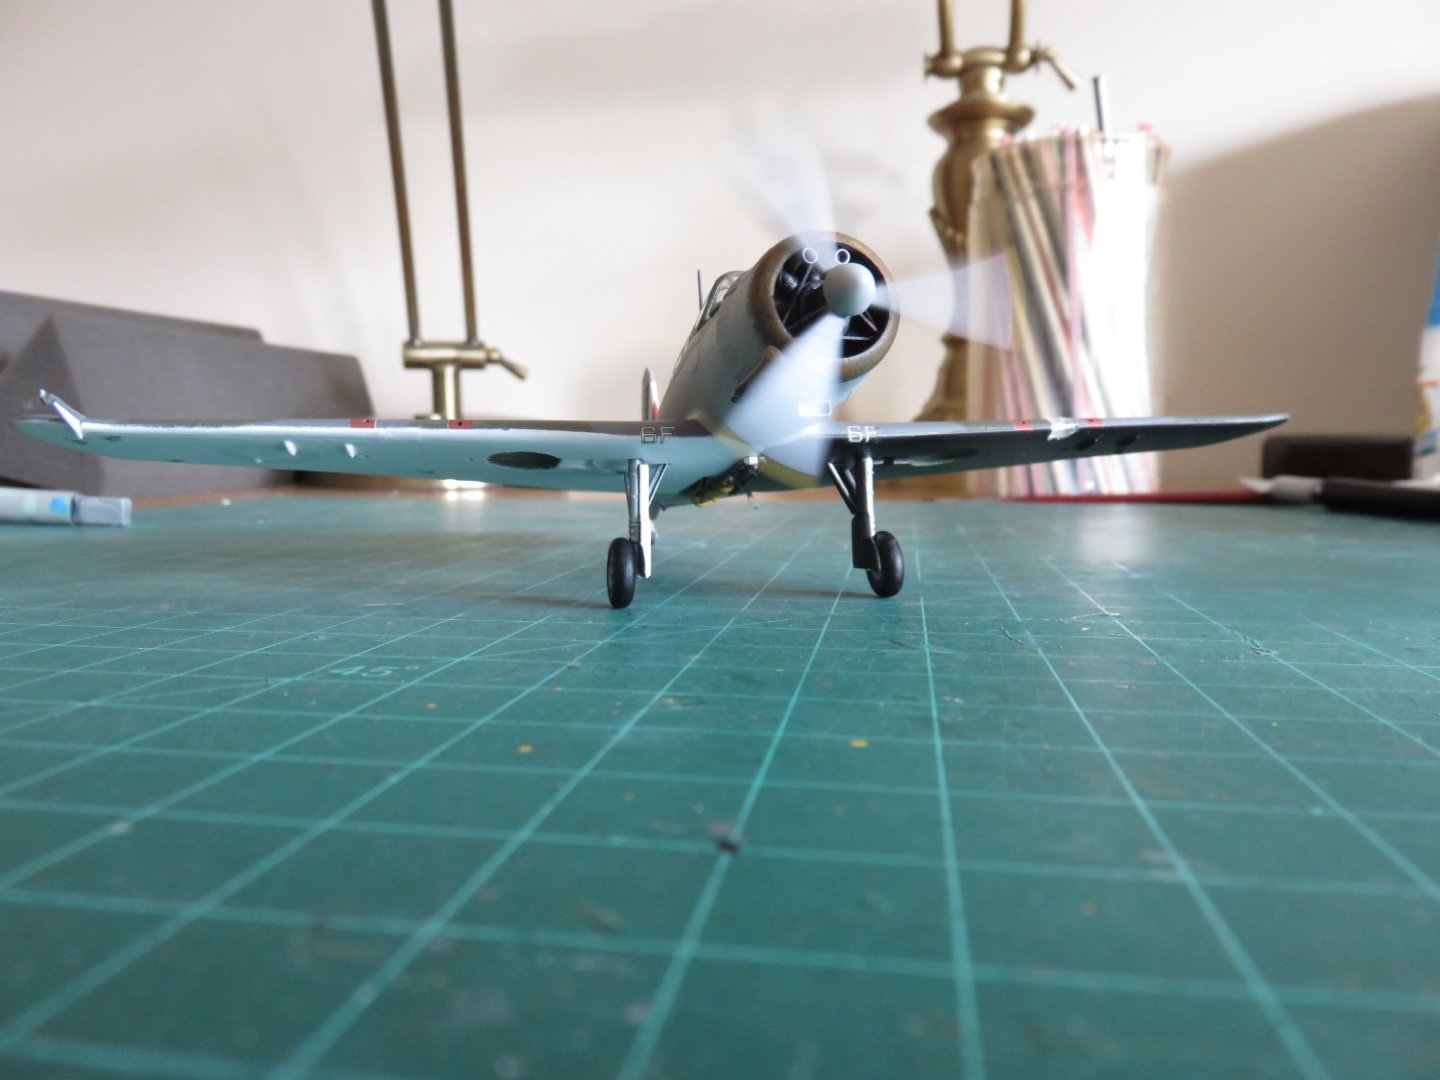
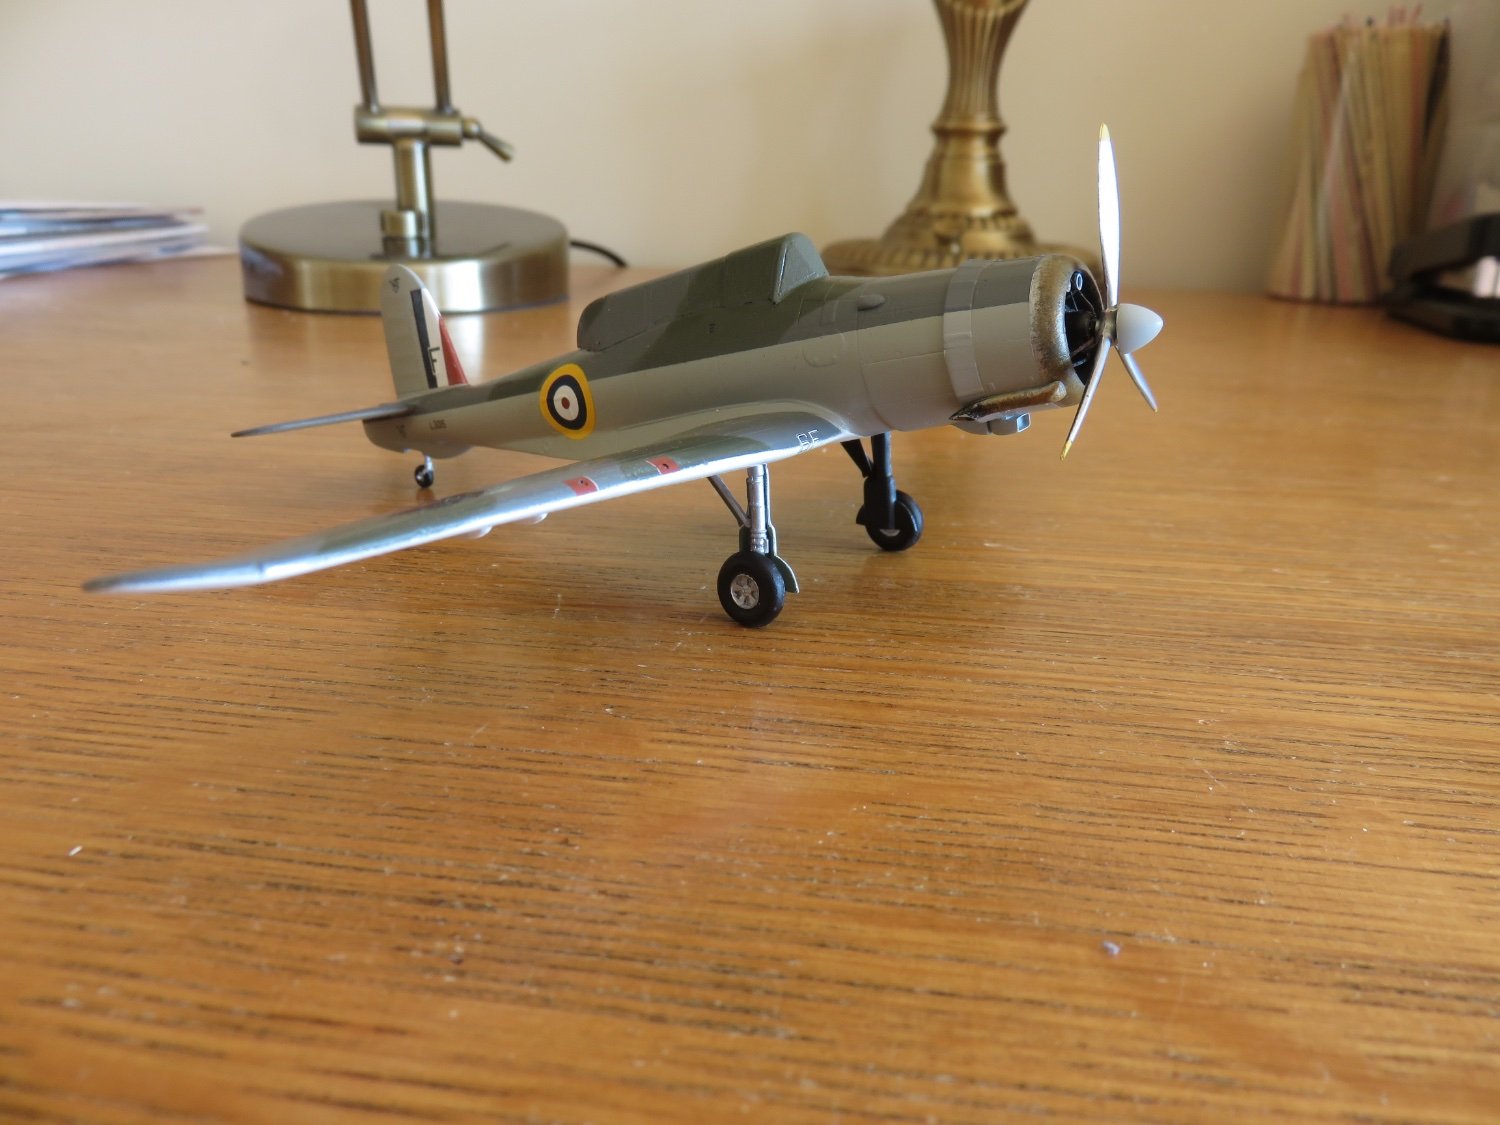
As provided, there is no provision for a spinning propellor. I know some people have preference for fixed props, but I much prefer the whirly parts to be whirly. I first drilled out the engine casting with an appropriately sized drill. Once through, I drilled from the back with a 1/8" bit to create a cavity. This was smoothed out and a new propellor shaft was created from some styrene rod. To one end I attached a plug of styrene, rounded and shaped to fit in the cavity in the rear. Finally a small amount of styrene sheet was glued to the back, sealing the prop shaft in the cavity. I now have the ability to have a properly spinning prop.
Speaking of propellors...
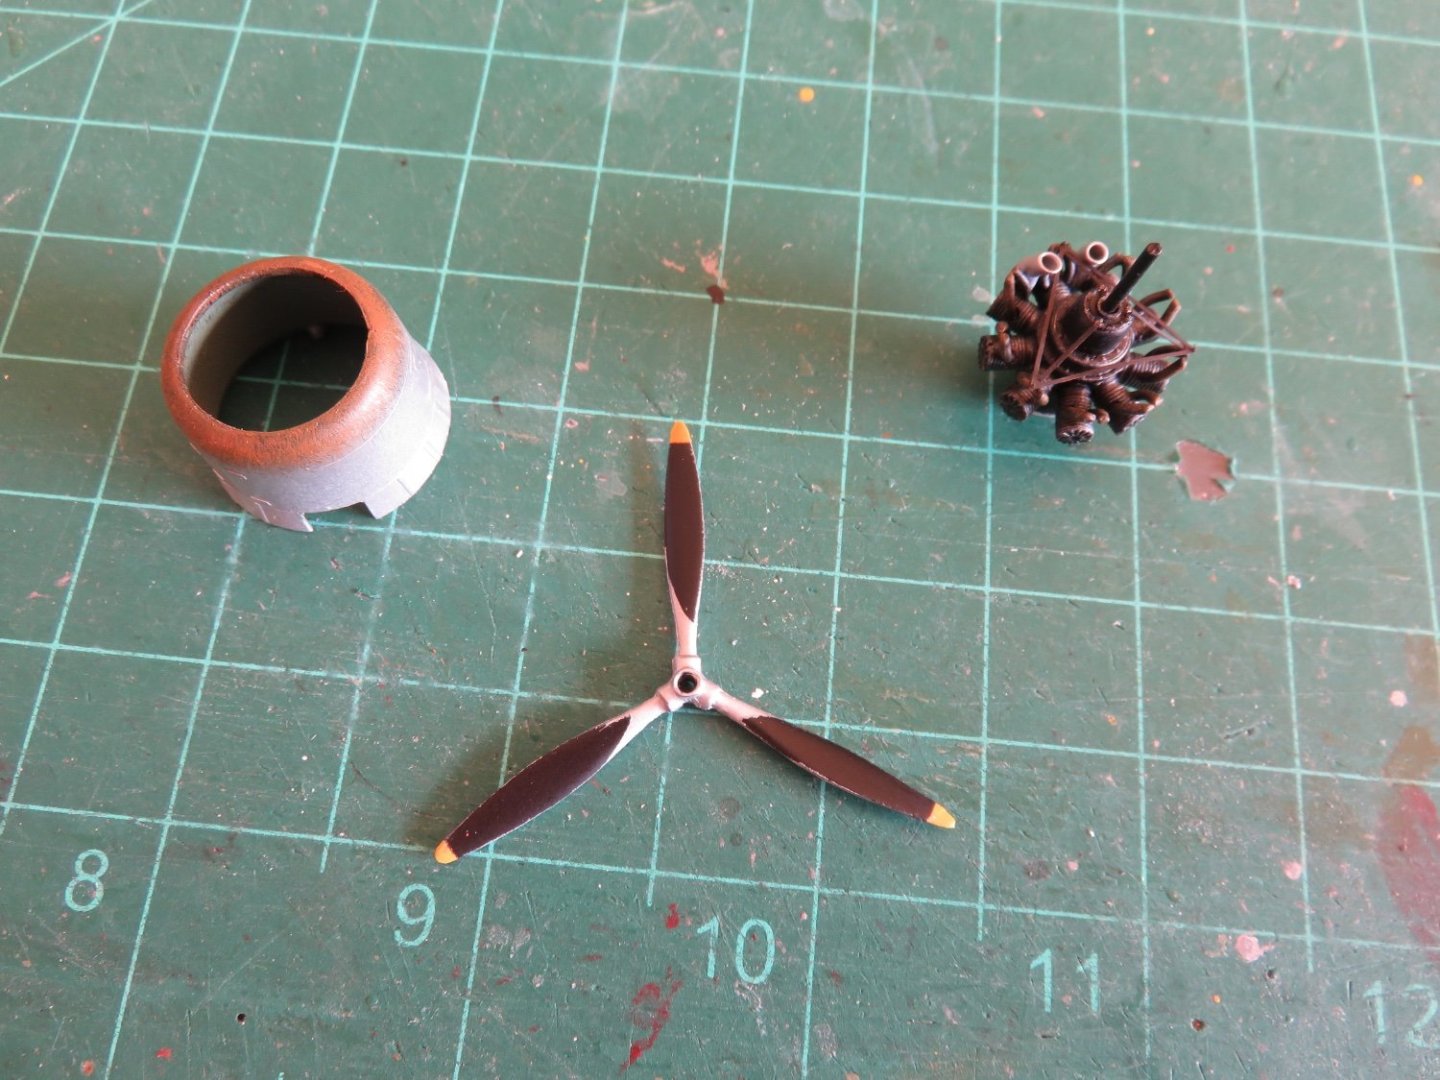
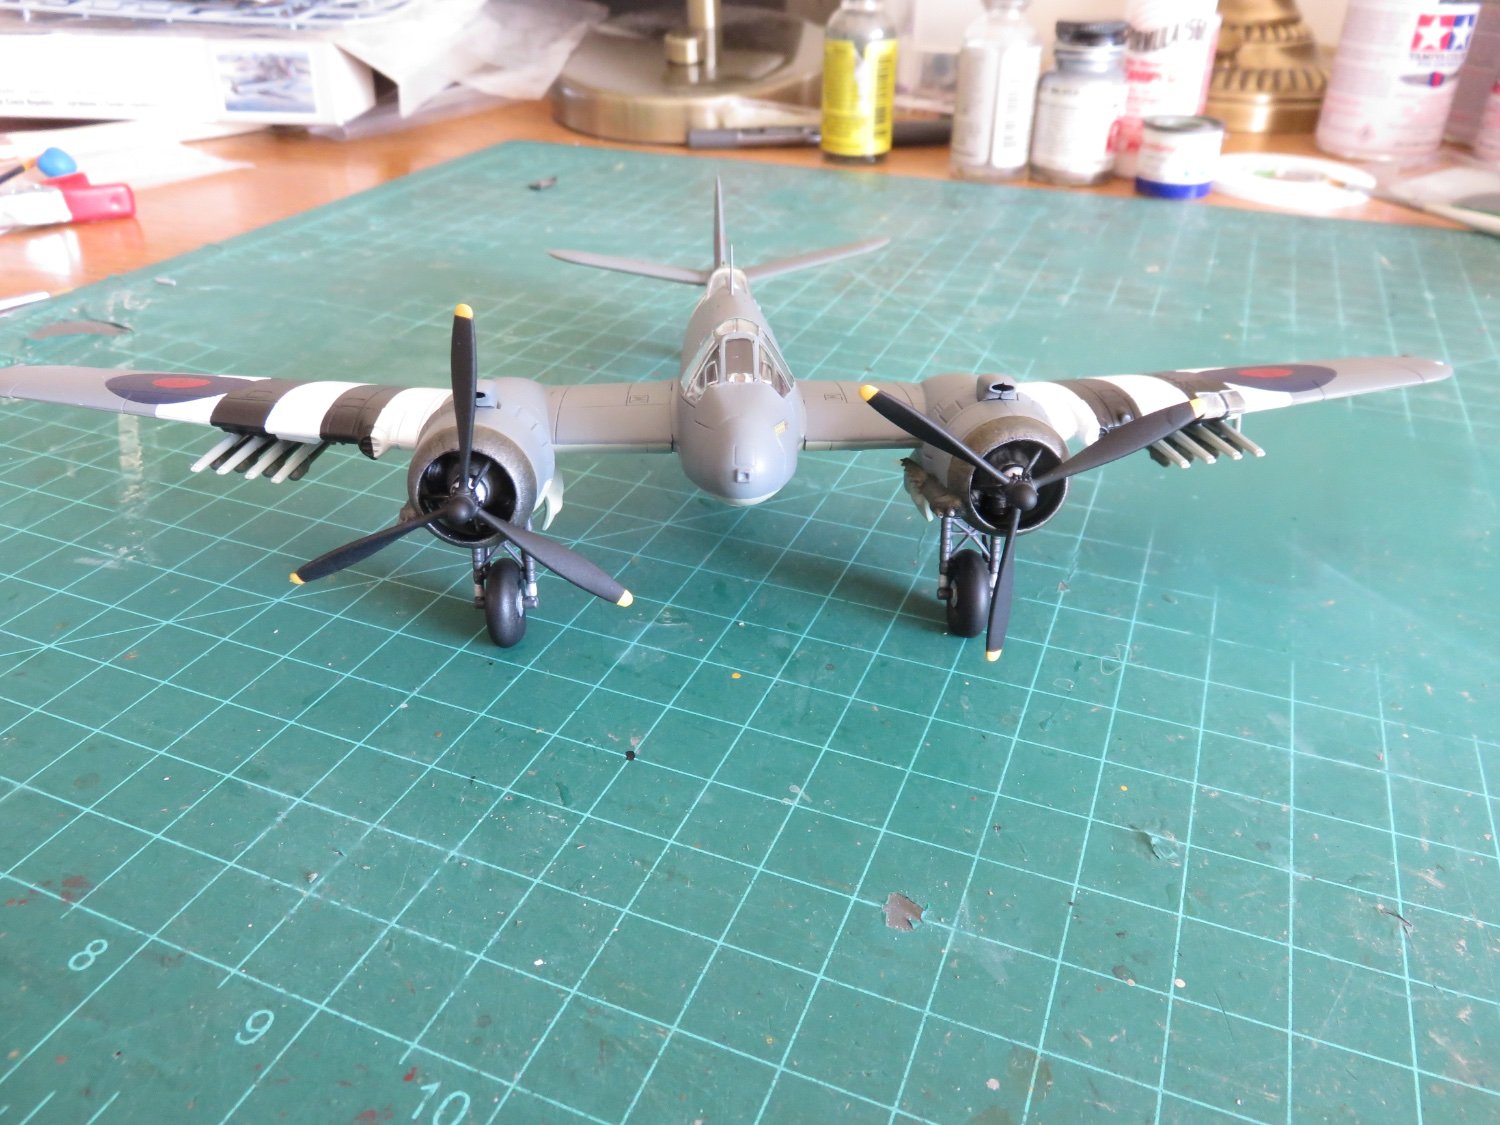
As originally built, the Skua's prop was bare metal finished with no yellow tips. The rear side was painted black, however this did not carry down fully to the blade root, but tapered off some way up. Sometime in early 1940, yellow tips were applied and by May/June they props were painted fully black, although there is no consistency when the latter happened, so there is a bit of modellers freedom that can be exercised here.
Also included in the photo above is the engine cowling. When delivered the exhaust collector rings appear to be a silver metal colour (from whatever heat resistant alloy they used), with time and use, the metal darkened and discoloured and oxidized. After laying down a base layer of silver and subsequently dry brushed layers of black, bronze and rust to make my Skua look like it has seen some service.
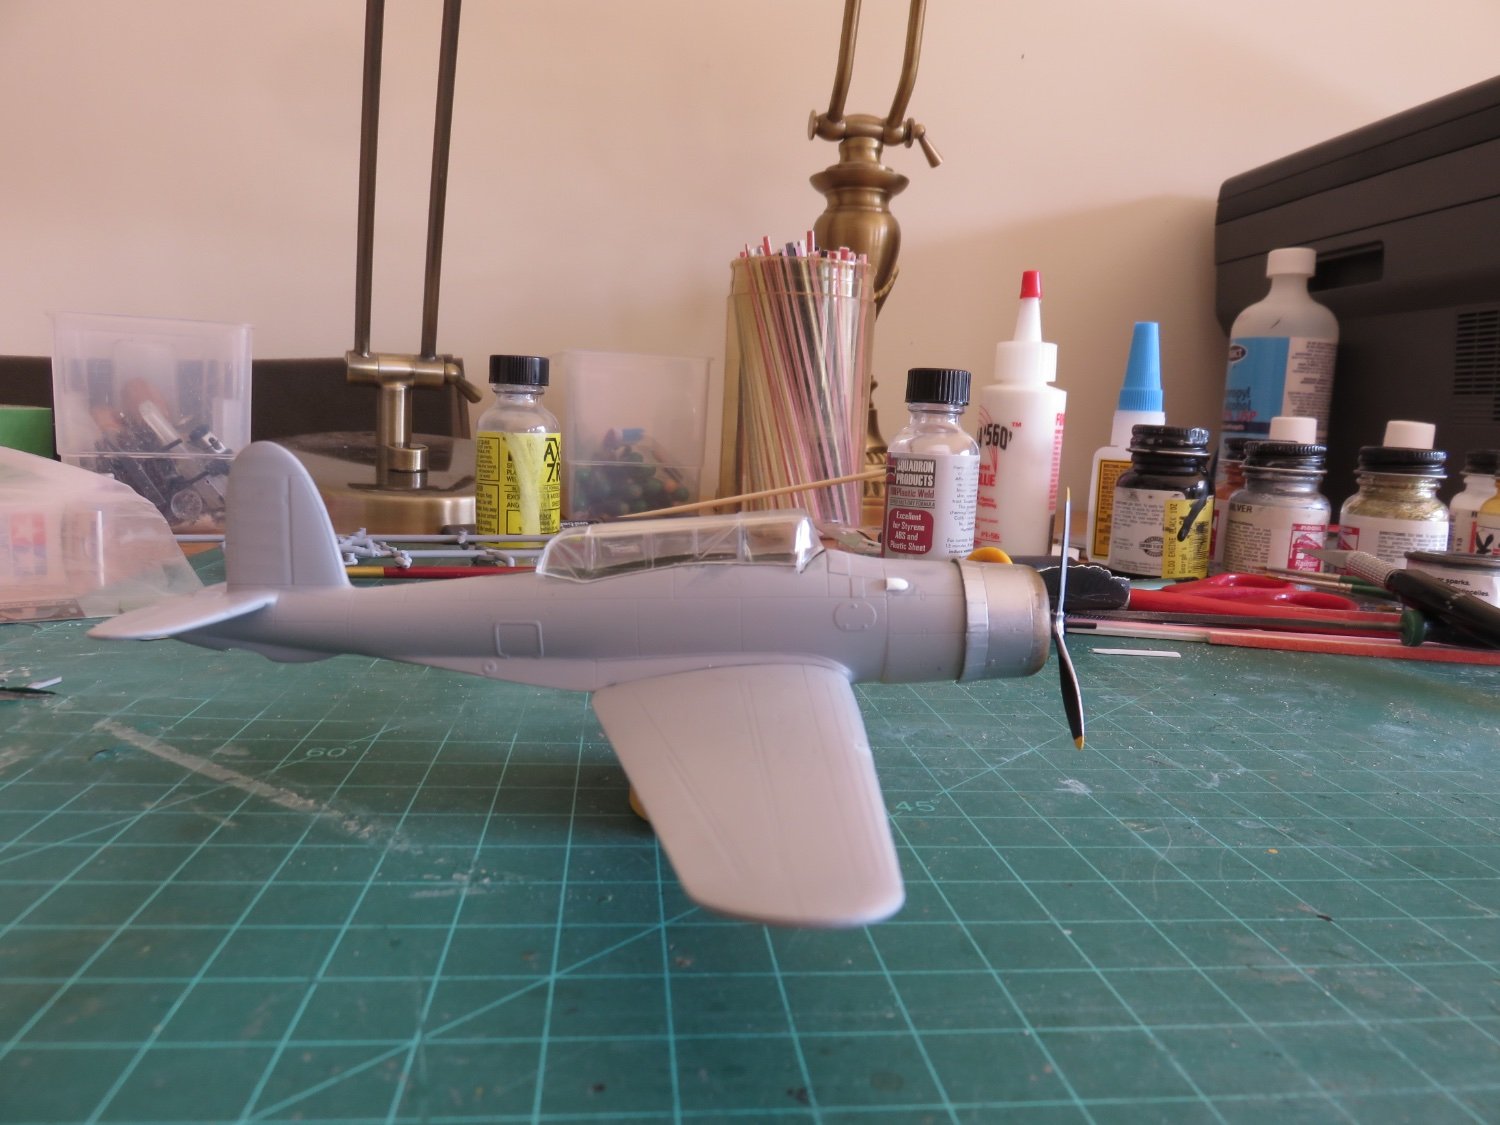
Finally a couple of overall photos with the engine/cowling/prop and cockpit canopy dry fit:
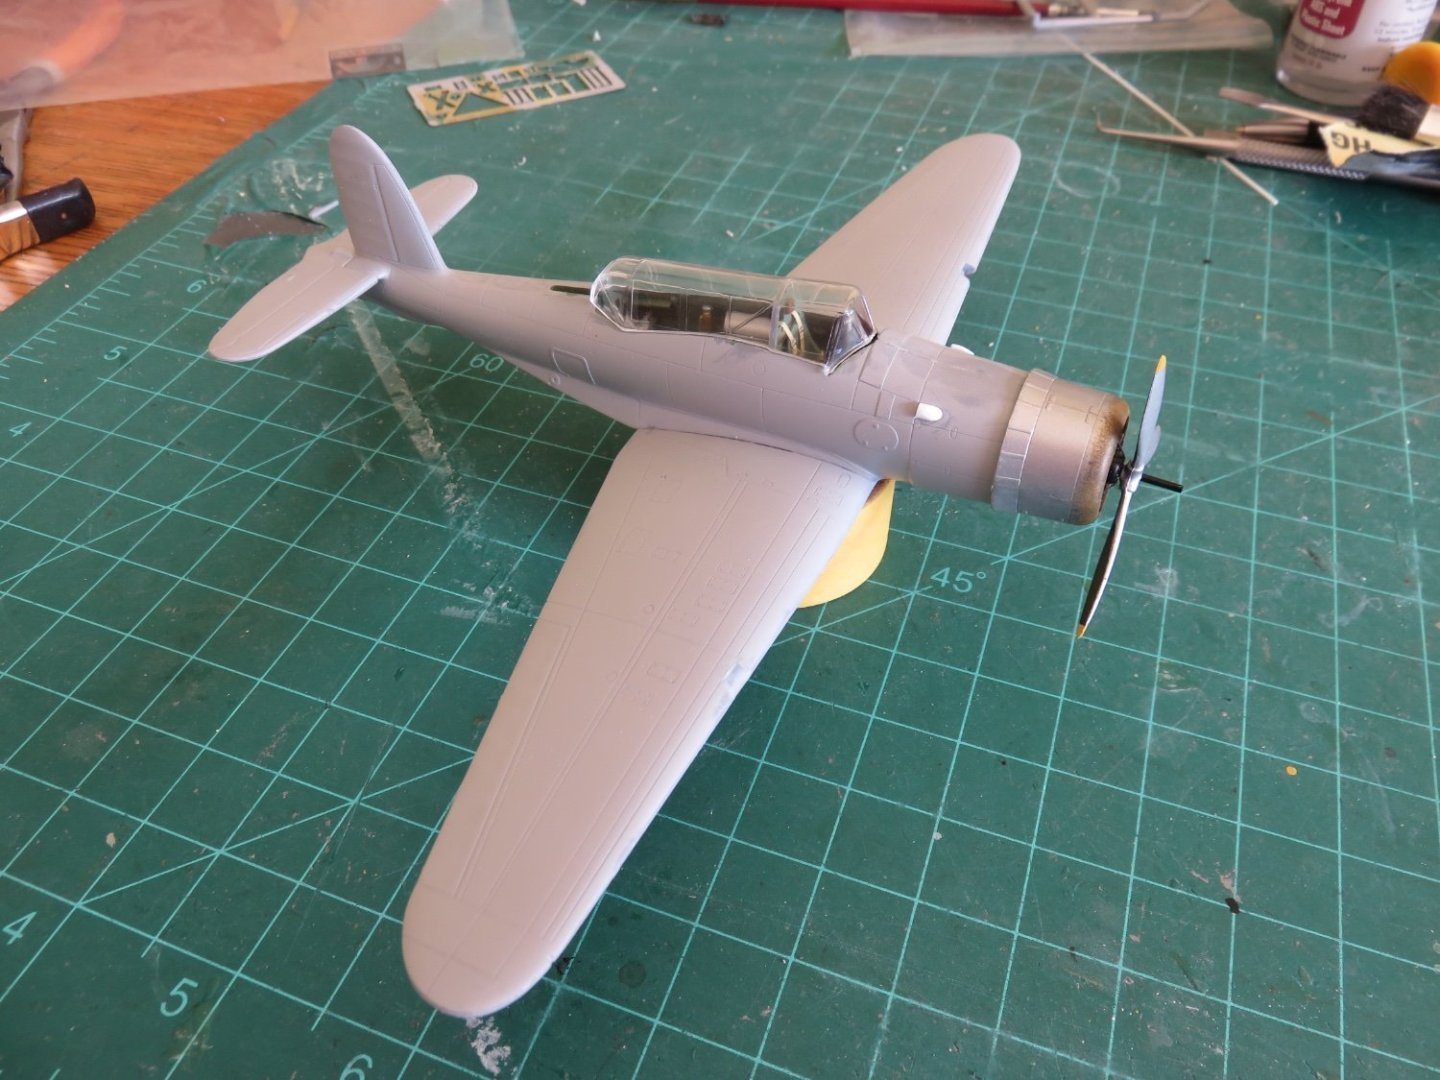
Things are really coming together nicely, although I do laugh thinking that the Skua does resemble something that an 8yr old might draw if you asked them to draw a plane.
Andy
-
Thanks, everyone for the continued interest!
I have been moving right along, now that most of the cockpit is out of the way. The fuselage halves have been closed up, they went together fairly well. I was worried about maintaining alignment, but things fit fairly well, I guess the little locator nubs did do something after all! A little tape was used to hold everything in place while the glue set.
After assembly, the second fuel tank was added to the interior. The Skua had at least three fuel tanks that I'm aware of, the two in the cockpit and one ahead of the pilot. This gave an endurance of over 4 hours at cruising speed (a "head spinning" 187 mph!). As impressive as that endurance may seem, the Skua did not have anything near a great rate of climb. Its service ceiling was reported as being just over 20,000 feet, but it would take the Skua almost 45 minutes to get there (!).
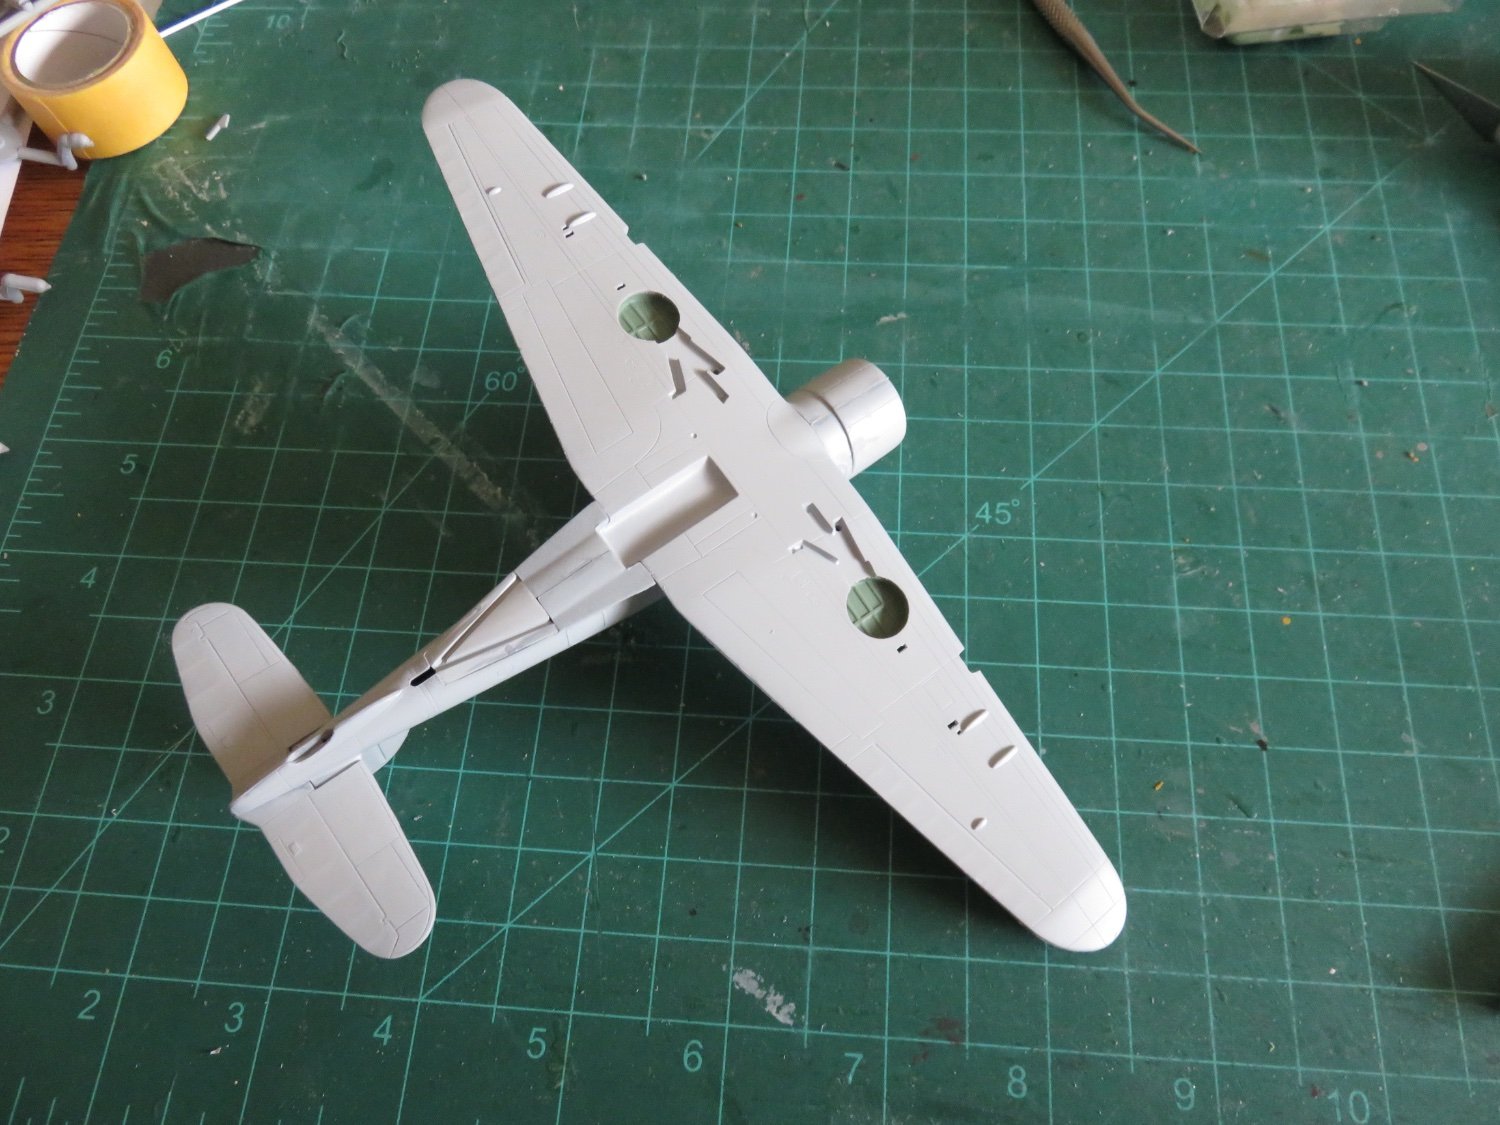
After the fuselage, I moved on to assembling the wings. The kit provides a couple of circular inserts for the landing gear bays, these must be thinned in order for the upper wing pieces to sit correctly. There is a little cutout notch in each insert to accommodate a moulded bulge from recess for the landing gear legs, so sanding the inserts had to be done from the top. This was only a minor inconvenience, and some 100 grit sandpaper made short work of it, and soon the wings were assembled. There are, once again, no locating pins or nubs, so care must be taken to align everything. Luckily the Skua featured upturned wingtips, so there was just a hint of a positive position indication!
The fit between the wings and fuselage was very snug, and some sanding was necessary, mostly at the forward end, as well as at the rear. A bit odd, as the bomb recess moulded on the wing underside, fits inside the fuselage.

The tailplane was next. The tailplanes were moulded as one piece and a little sanding was once again needed to get it to sit properly. I skipped ahead a bit in the instructions, and finished closing up the fuselage with a small piece with the recess for the arrestor hook. Overall there are very few areas in need of filling, mostly just the aft end of the bomb recess, and as you can see above, the underside of the tail plane will need some attention too. There were virtually no gaps at the wing roots, and only a little light sanding will be needed to clean up the remaining seams. I'm somewhat impressed.
This is were I came to the second error in the SH kit.
If you look at this photo I've borrowed from John Dell (Dinger's Aviation Pages), you can see there was a vent of some sort that stuck out prominently:
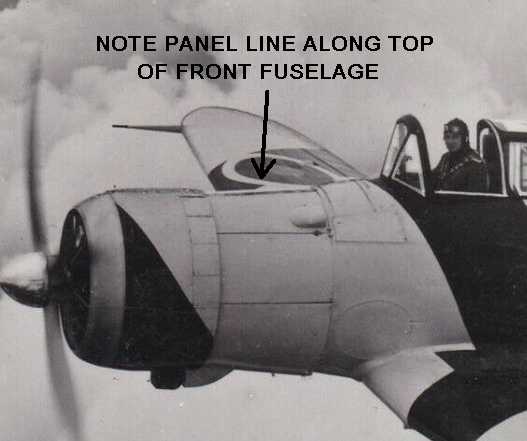
SH neglected to mould these vents (there was one on the opposite side as well, however they took the time to scribe a panel line in the shape of the vent (although it, and the other panel lines are somewhat in the wrong location!). Anyway, I replicated the missing vents out of some spare styrene stock: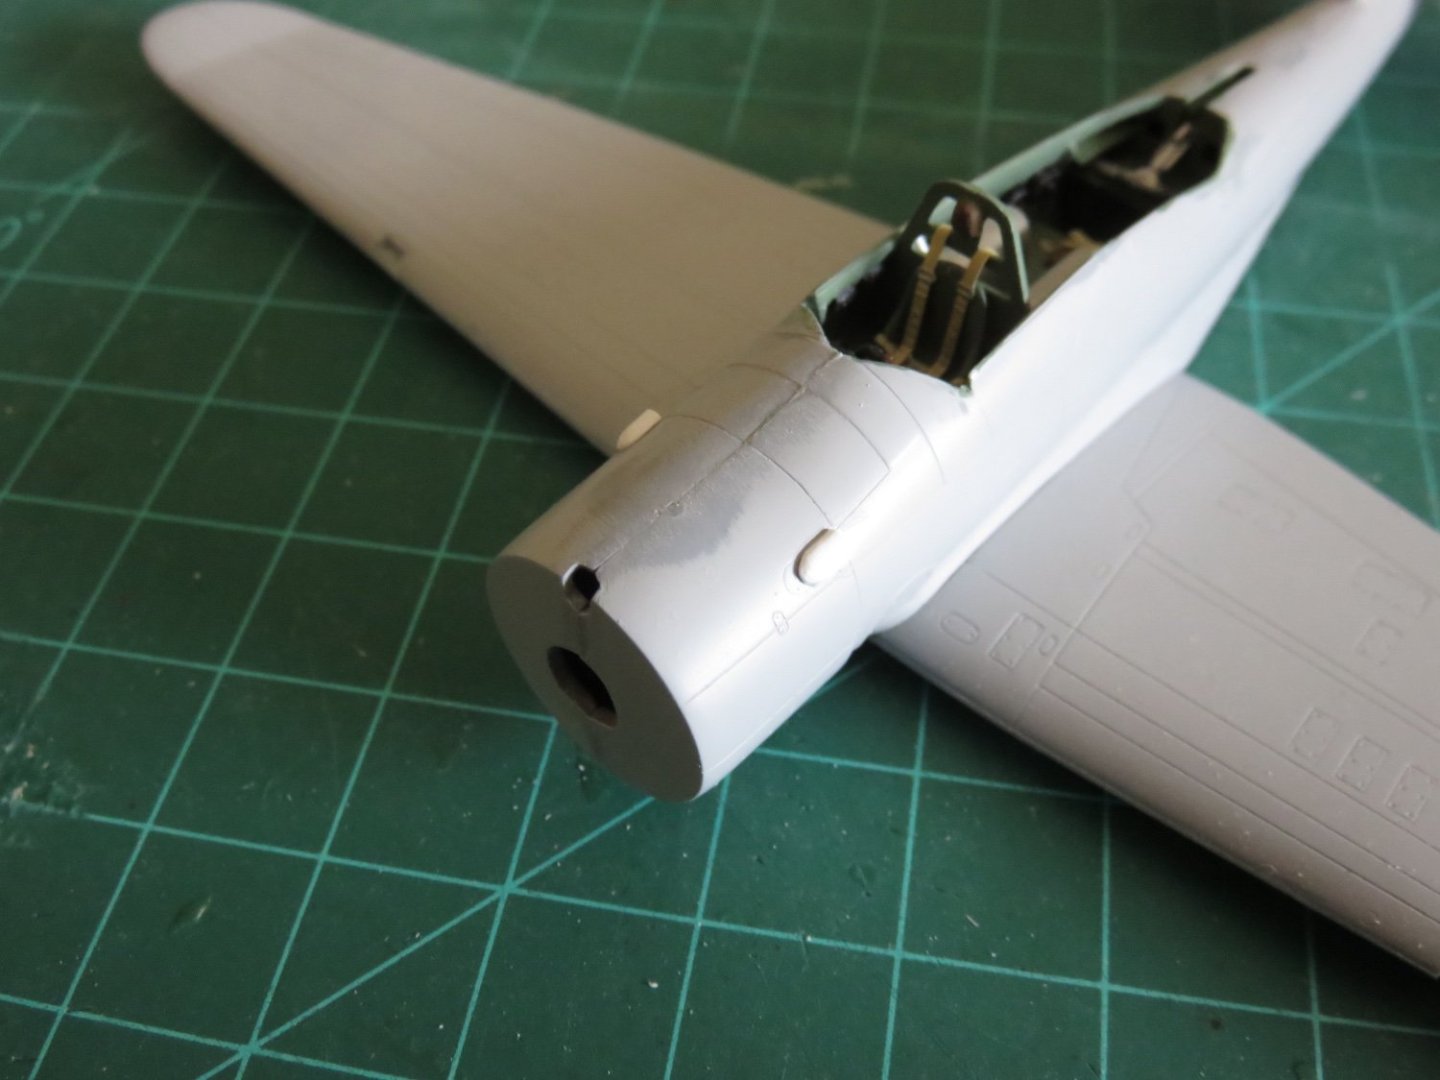
I also scribed the panel line along the top of the nose (as was helpfully pointed out in the reference photo too. A couple passes with my knife, followed by a couple more passes with my scriber and we should be good to go. It's also worth noting that Skuas from serial number L2933 and higher had only one landing light in the port wing. SH supplies clear glazing and wing cut-outs for two lights, so I took this opportunity to add the clear part on the starboard side and sand it smooth with the wing, it will be painted over anyway.
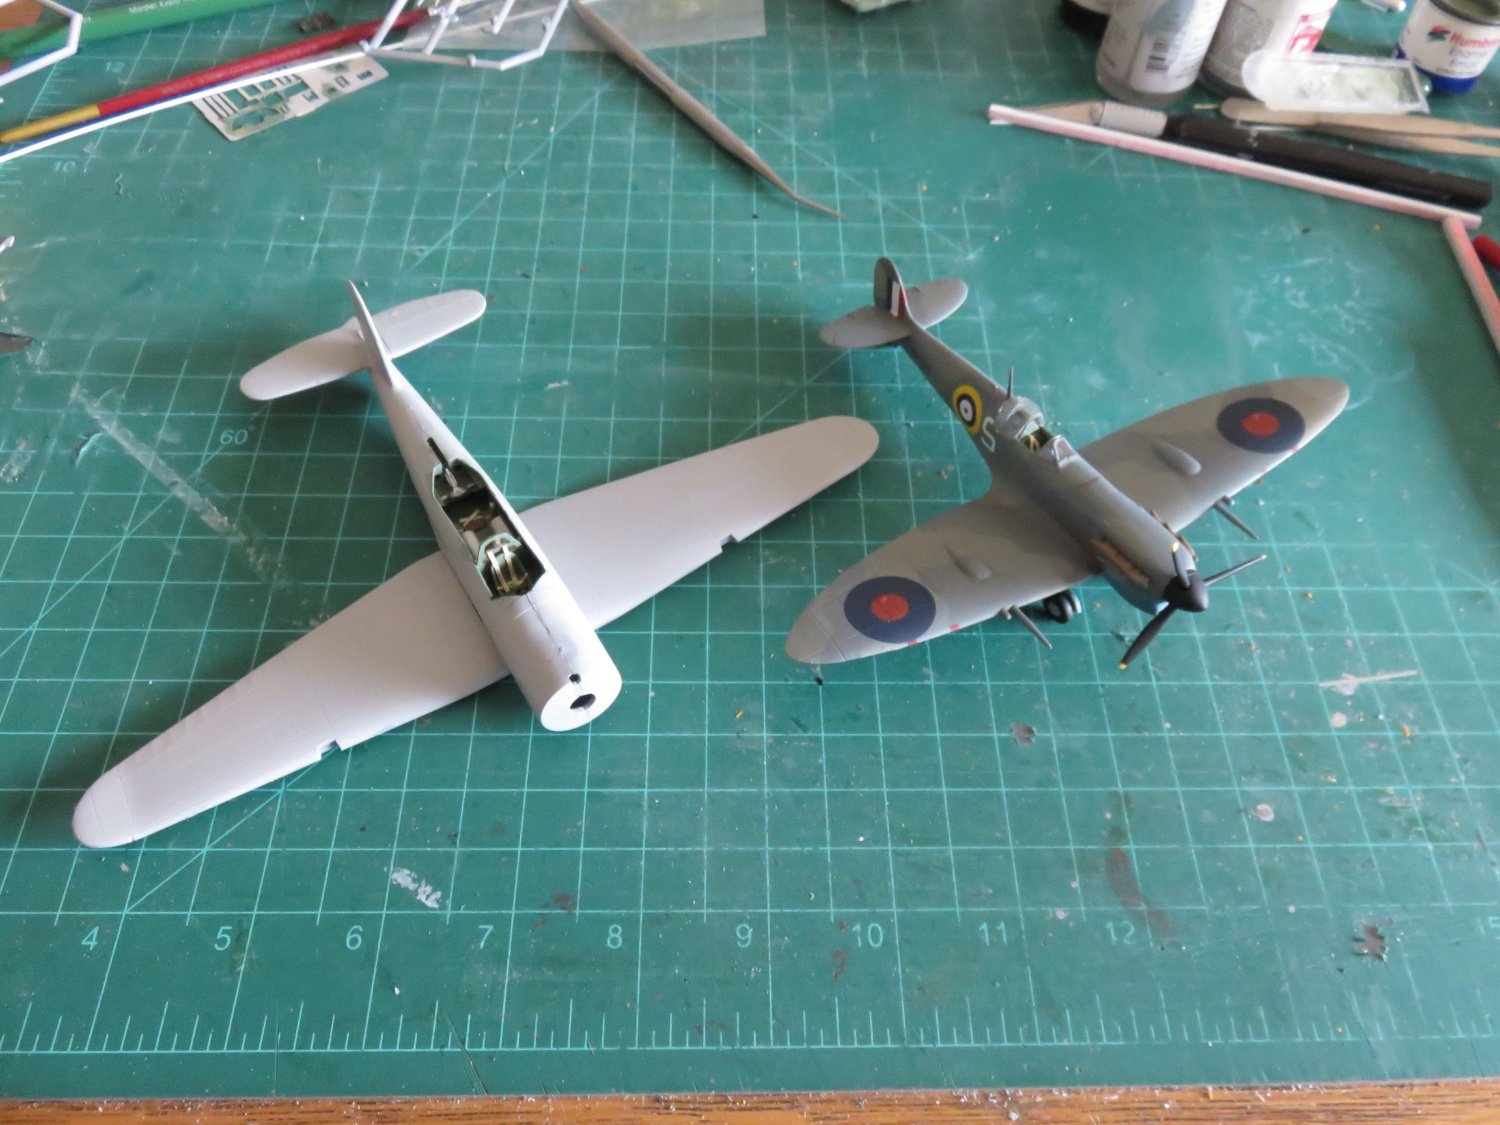
One more size comparison for you all, this time it's Skua vs Spitfire:

And I still need to add the engine and front cowling!
I am still enjoying this project, and I do recommend this kit for anyone who wants to put their modelling skills to the test.
Andy
-
12 minutes ago, mtaylor said:
Interesting airplane though having the fuel tanks in the cockpit seems bizarre to me.
The Skua had some interesting features, for sure. The area below the cockpit was subdivided into two watertight compartments. If the compartments were undamaged, the airplane could remain buoyant after ditching. During the war at least a couple of aircraft were recovered just because of this feature (one in Norway, the other off Bermuda). Having the watertight compartments necessitated moving the fuel tanks into the cockpit. Although it’s worth noting they were not self sealing, and there was little to no armour plating, so……
Andy
-
Thanks everyone who's joining in on this interesting little airplane. Actually, it's not that little:
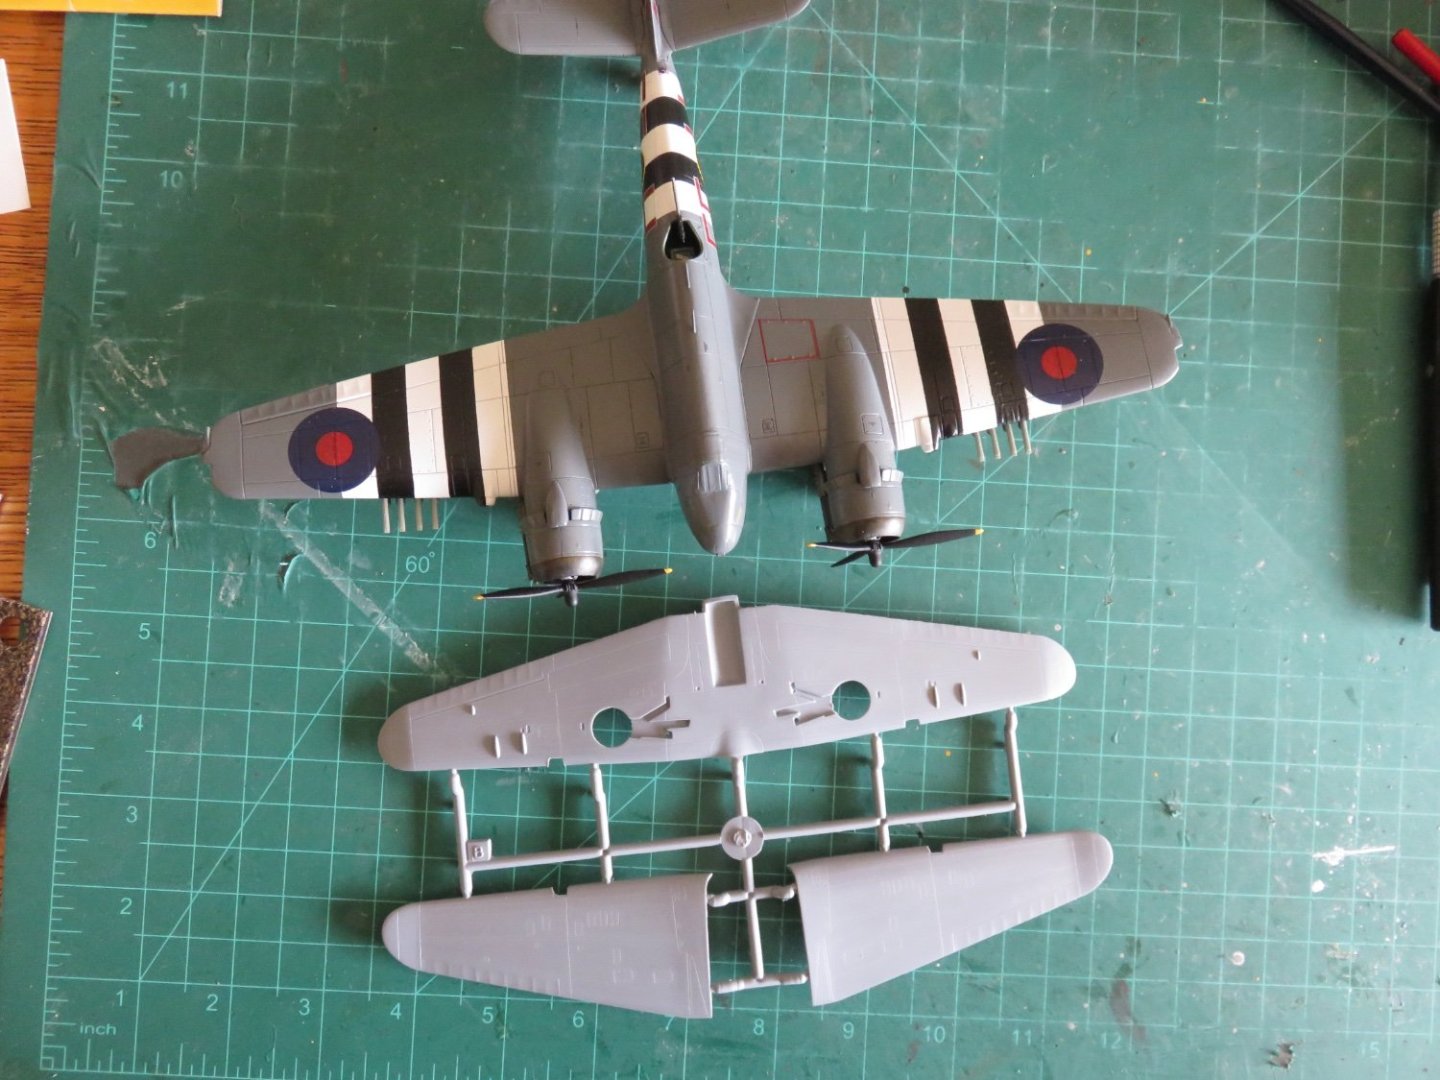
The wingspan of the Skua looks something like 2/3 that of a Beaufighter, this was no small plane!
So far I've found the build of this Special Hobby kit to be not too bad. The instructions could be clearer, and they really could have done a better job with the locating nubs. Calling them "pins" really does other modellers a disservice, in that they really serve are general sort-of guidelines that maybe a part is supposed to go here or maybe not. I think a medium to slow curing CA is your friend here as trying to figure out how everything lines up takes time, and the odd reposition. I initially tried using regular plastic cement, but the SH kit plastic is a little soft, so it quickly turns into a gooey mess. I figured before I made a total bodge of everything that I should change glueing strategy. I will resume using styrene cement with items who's alignment is not called in to question.
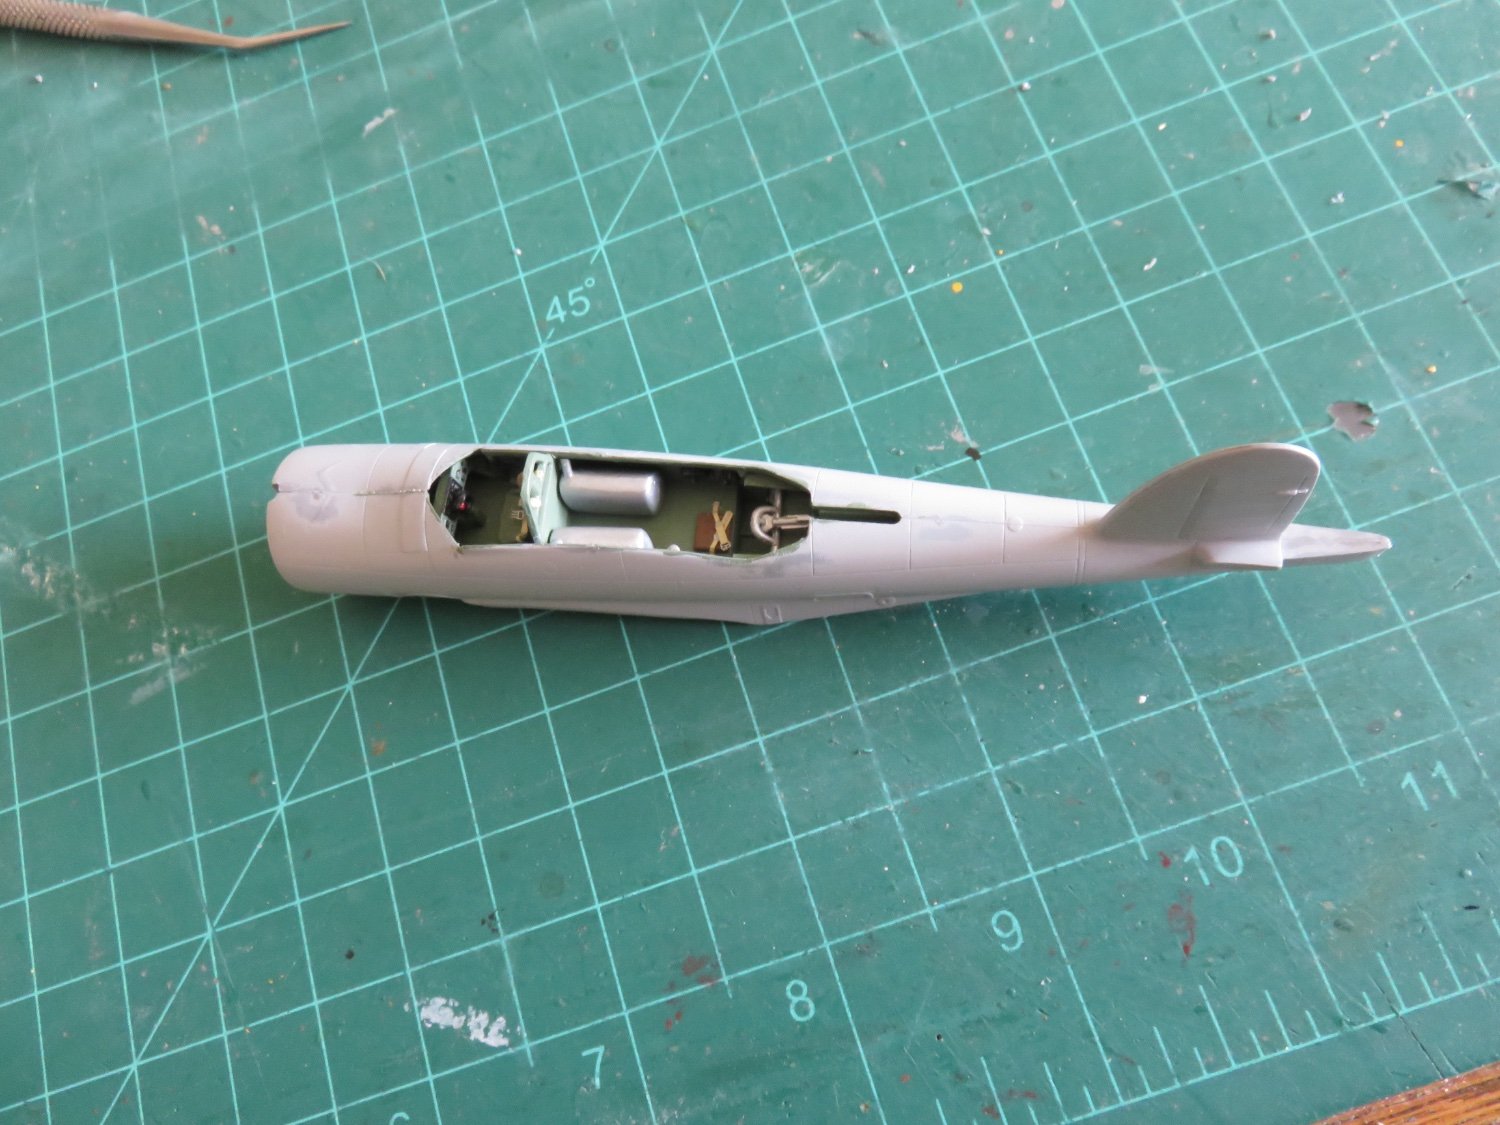
There's quite a lot going on in the large cockpit, and lots of small details to be worked out. Following the advise from one of the Britmodeller builds, I elected to assemble the cockpit in one half of the fuselage, rather than having things flying around in mid air. Starting from the forward bulkhead and installing the floor and working my way aft.
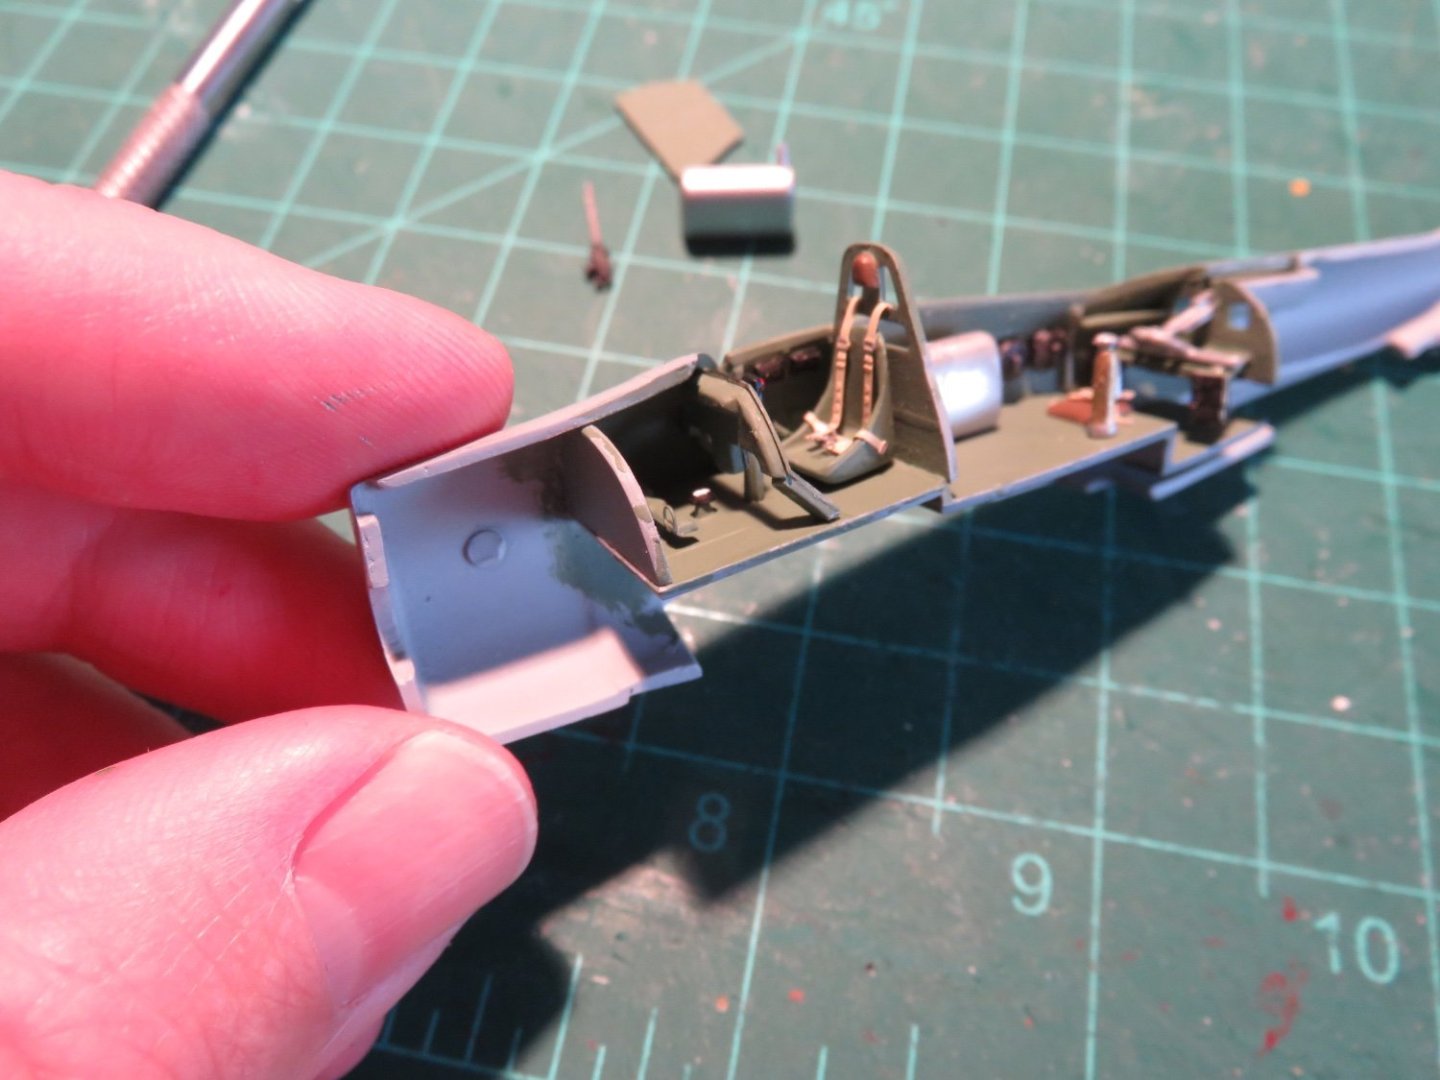
There is an error in the kit (again, this was pointed out in one of the Britmodeller builds). The SH kit includes a bulkhead and seat back for the TAG (that's what they called the rear position), in reality this did not exist. The gunner had nothing but a slightly padded bench, and allegedly no seatbelts either. Easy enough to fix by just omitting the extraneous parts, but I felt bad leaving off the seatbelts. I find that a bit hard to believe given the rough carrier landings the Skua would have been required to perform, to say nothing of the acrobatics when being used as a fighter, or when dive-bombing! The poor TAG would have been tossed about like a rag doll, and probably barely conscious (or knocked senseless) after landing back on the carrier!
So a bit of an explanation to the acronym "TAG". Despite entering service in the late-is 1930s, Skuas still communicated with morse code, and only with ship/shore stations. There was little to no communication to other planes in the flight, other than by hand signals. So in Skuas the rear seat occupant was known as a Telegraphist/Air Gunner (TAG). Also, despite plenty of references, unlike other two seater airplanes of the Fleet Air Arm (such as the Fairey Fulmar), the TAG did not perform any navigational duties, beyond the attending to the radio.

Getting back to the model, as I noted earlier, there is plenty of detail in the cockpit, a large amount of which will not be seen once the plane is assembled, but I like to know it's all there. The instrument panel is in three pieces, the main centre section and two angled sections at the sides. For the most part the pieces are fairly well moulded, although the details some of the plastic parts a a little soft, the spare ammo drums on the fuselage side, for instance. The Skua had two internal fuel tanks in the cockpit, I have installed one, but will wait to install the second until after I've closed up the fuselage, so I can insure the filler neck isn't "disconnected". The large brass thing is apparently a fire extinguisher, the poor TAG really had it rough if things went bad.

So this is about as far as I've made it on this build. I should be glueing the two halves of the fuselage together soon. Repeated dry fitting hasn't revealed any problems in that respect, so things should continue to go relatively smoothly. This has been a bit of a learning experience, and AIrfix kit, this definitely isn't! However once the foundations are established, things do go together well, and I think having some experience with wooden ship kits is a great benefit, in so far as having some familiarity with vague instructions advising you to "put this part in this general area".
Andy
- Canute, ccoyle, BLACK VIKING and 7 others
-
10
-
Nicely done Nils!
You may wish to add a couple of side doors to your wheelhouse, so the Captain can get out to the bridge wings!
Andy
- Keith Black, Mirabell61, FriedClams and 2 others
-
5
-
The prototype would have been tar paper. I’ve seen many modellers replicate the effect using tissue paper (kleenex) using just black paint to adhere the tissue to the surface.
Great job on your build!
Andy
- Canute, Old Collingwood, Jack12477 and 4 others
-
7
-
Thanks for all the kind comments and "likes", it's great motivation to keep building!
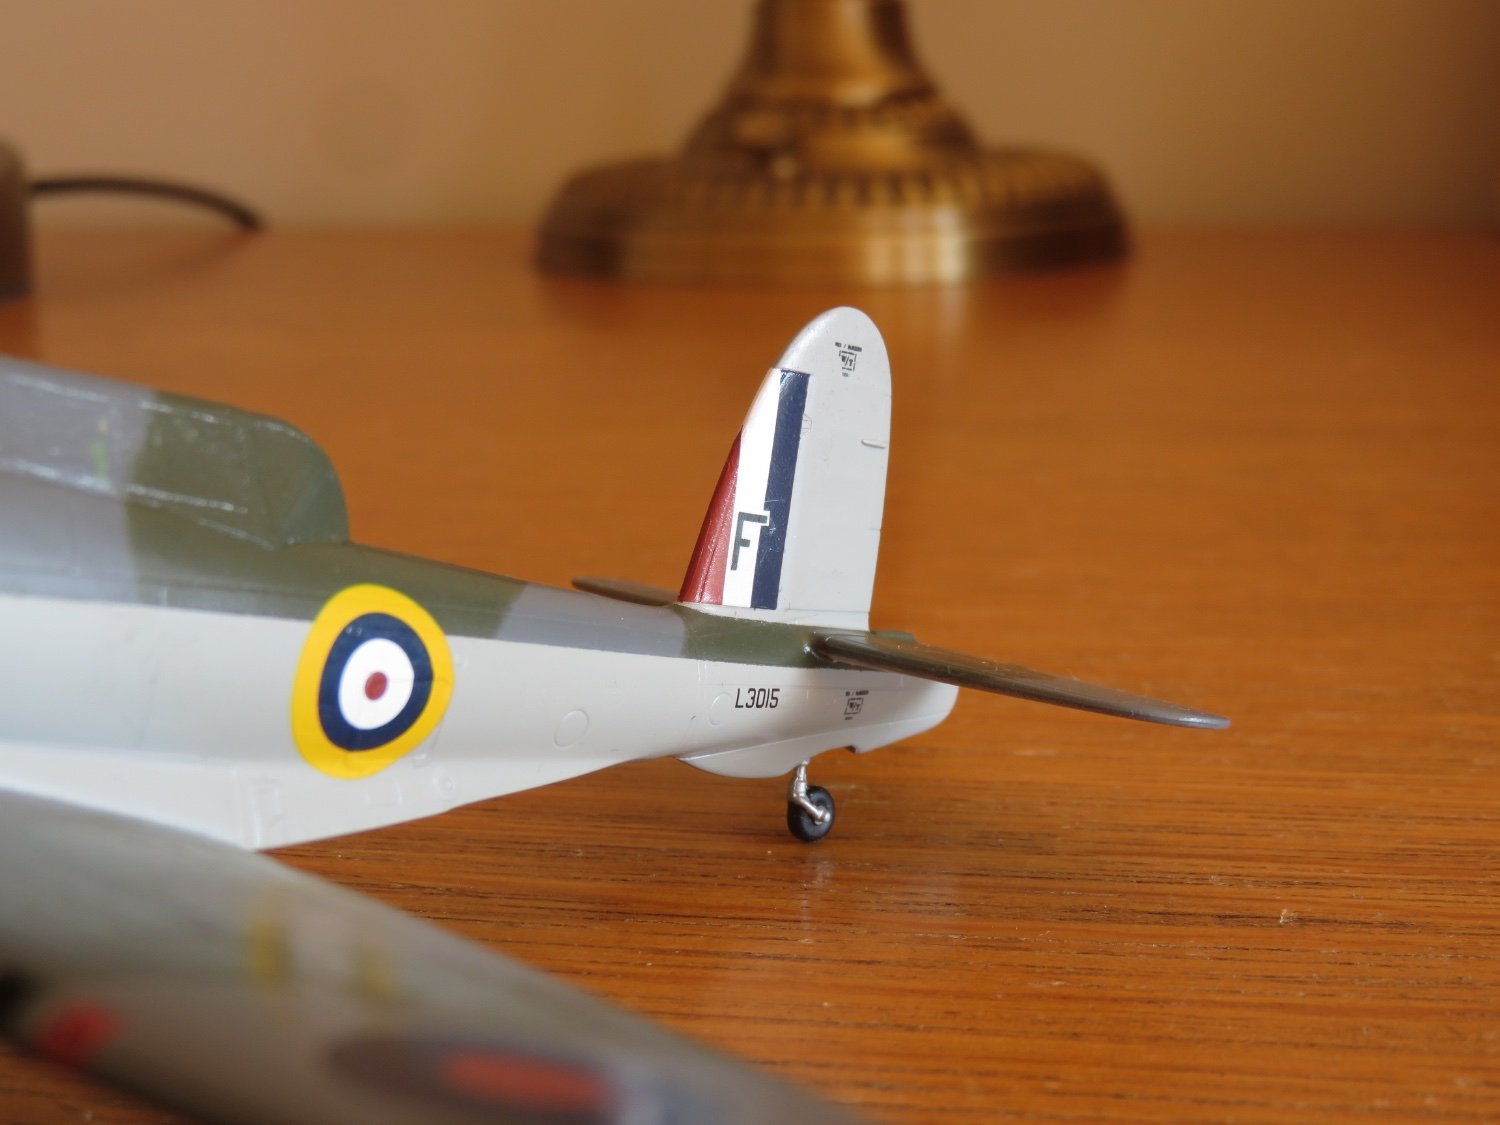
Among the last remaining items to add were the lights and the gunner's canopy.
I discovered that on this airplane, the aft wingtip lights had been painted over, while the kit makes no mention of this, it was evident in prototype photos. As a little extra touch, I drilled a small hole in the aft end of the forward light and added a little red or green paint, as appropriate, to simulate the navigation light bulb.
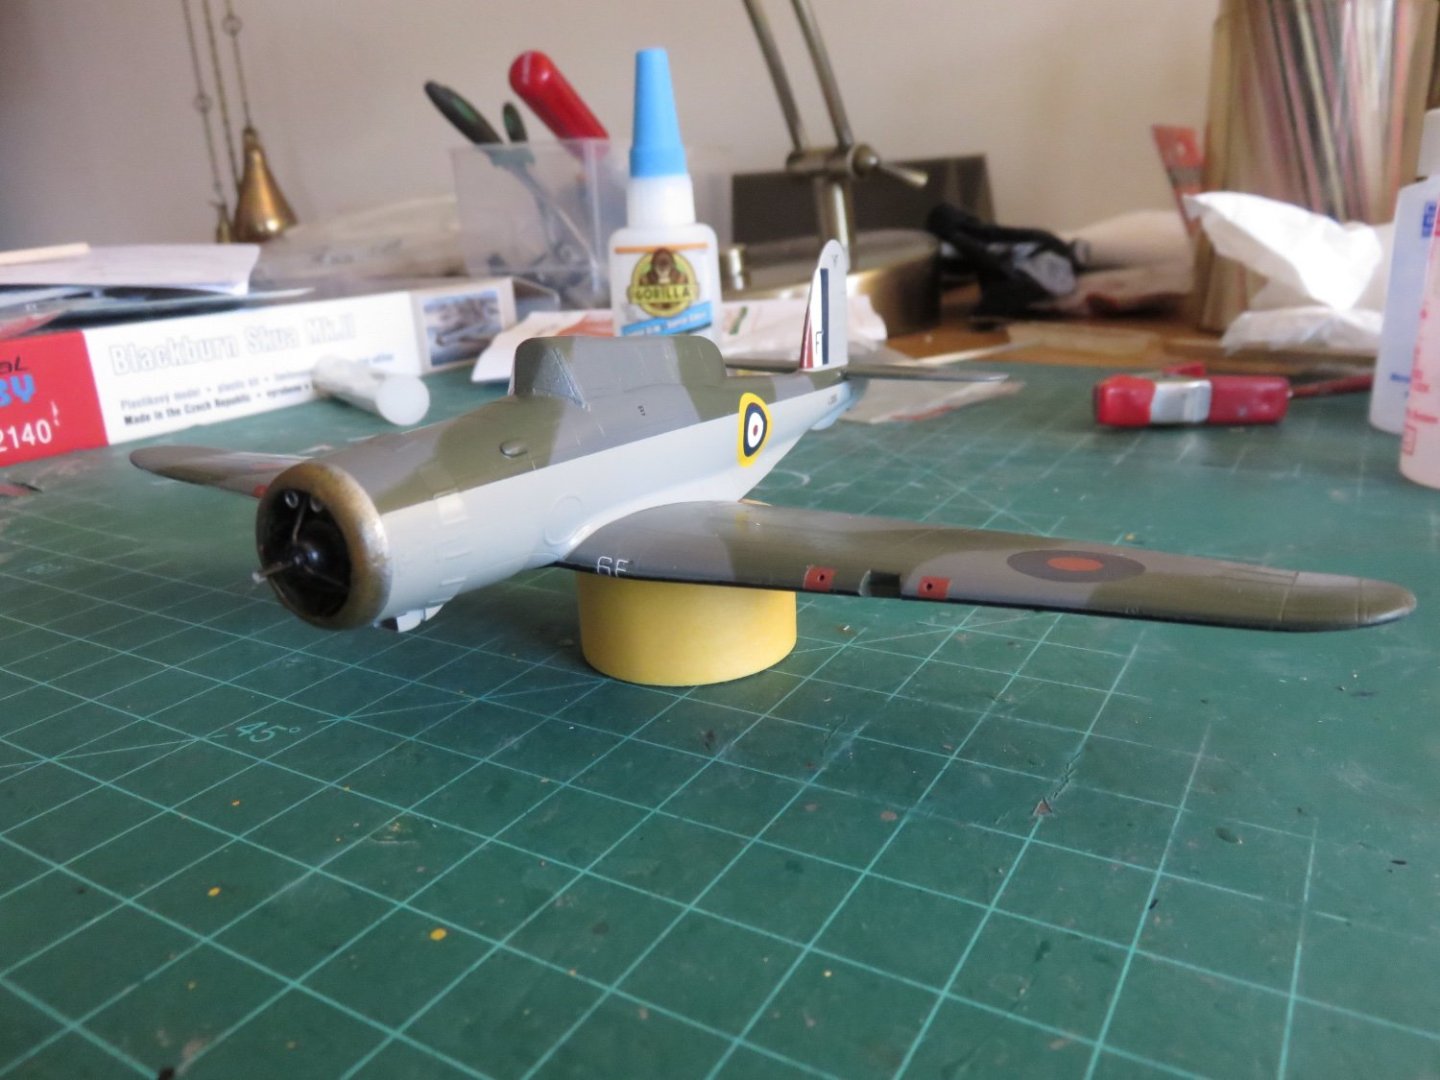
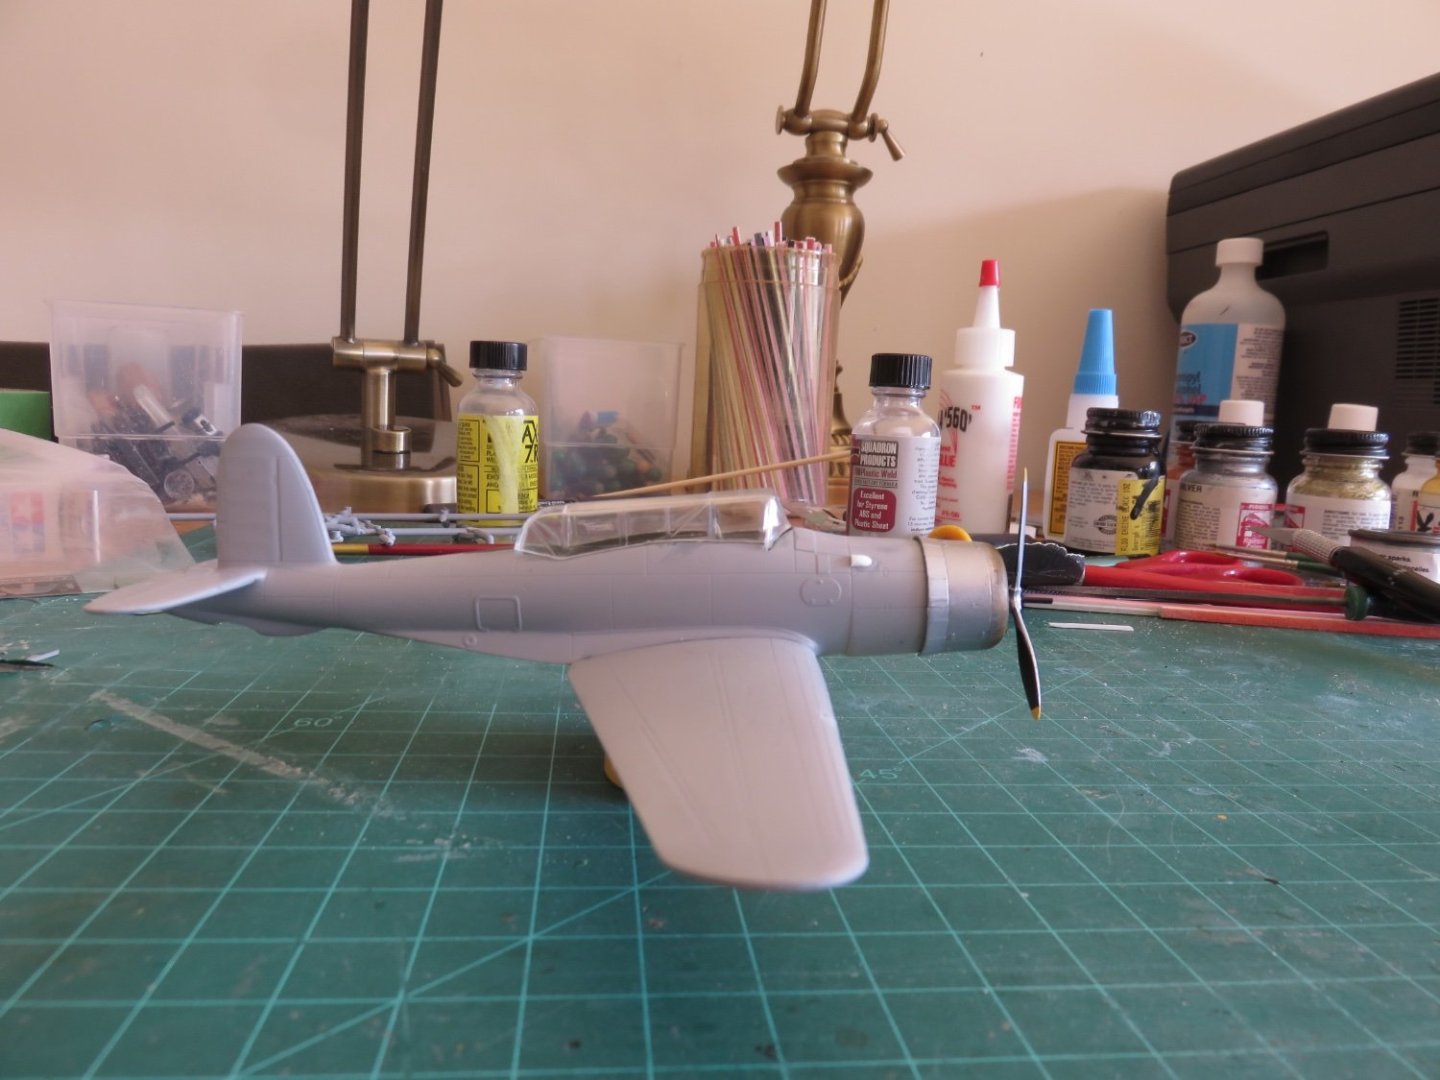
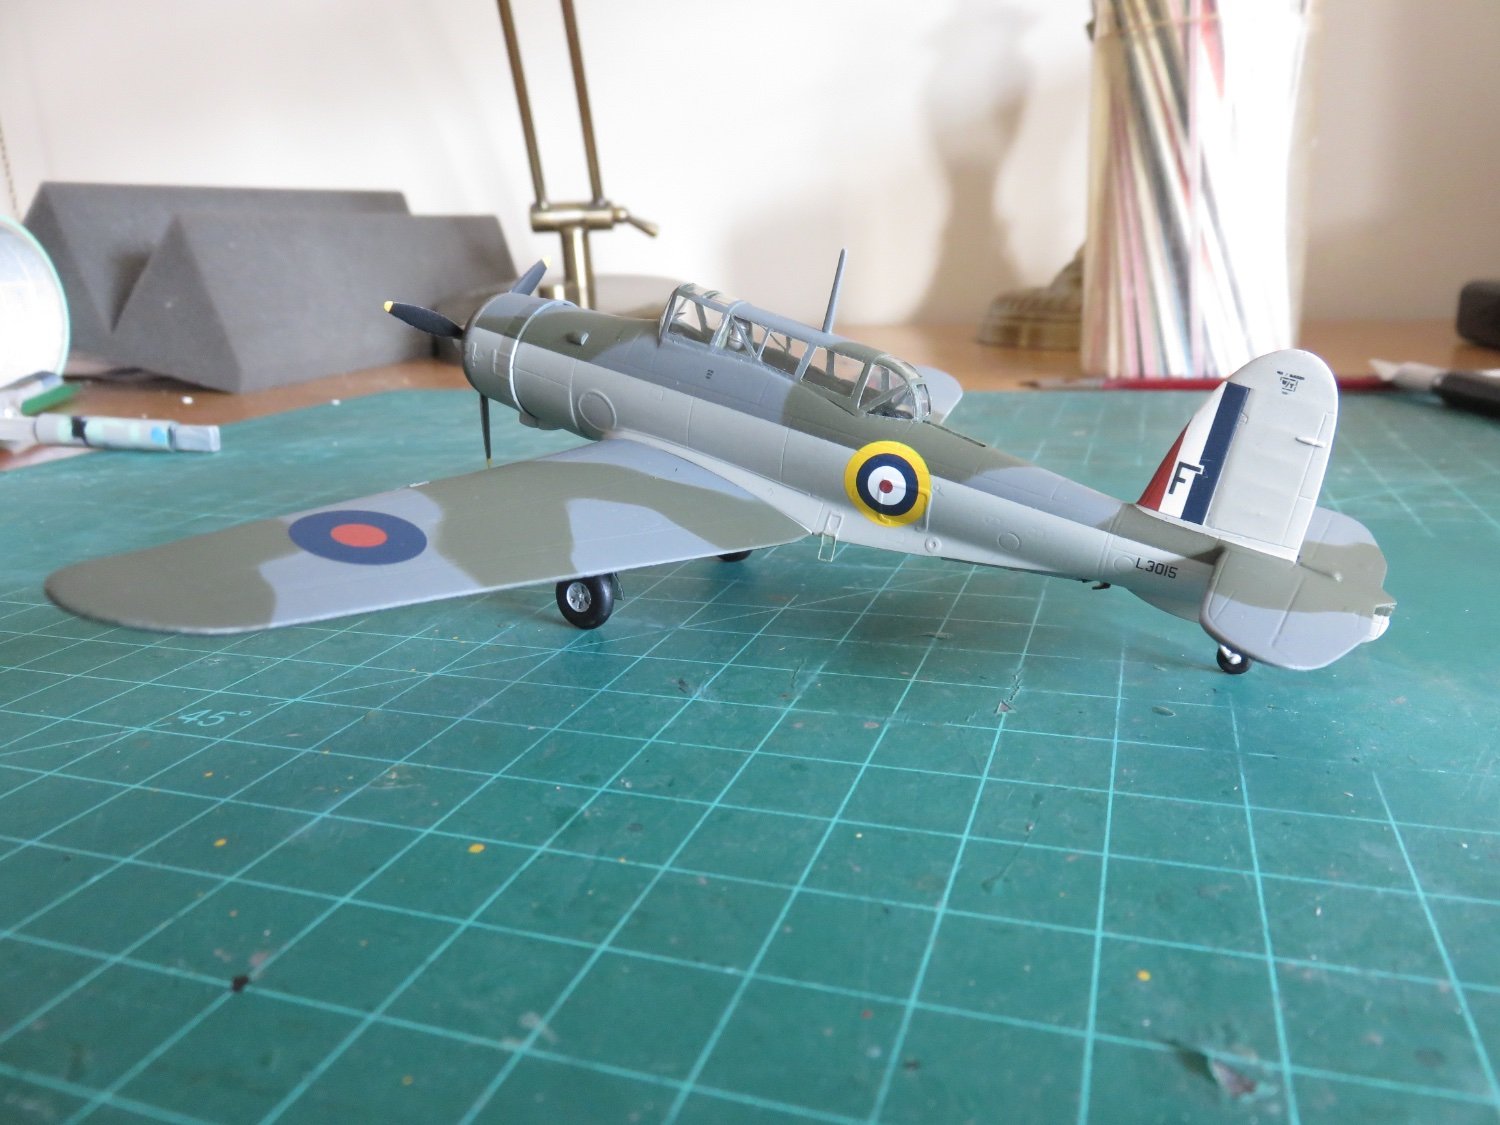
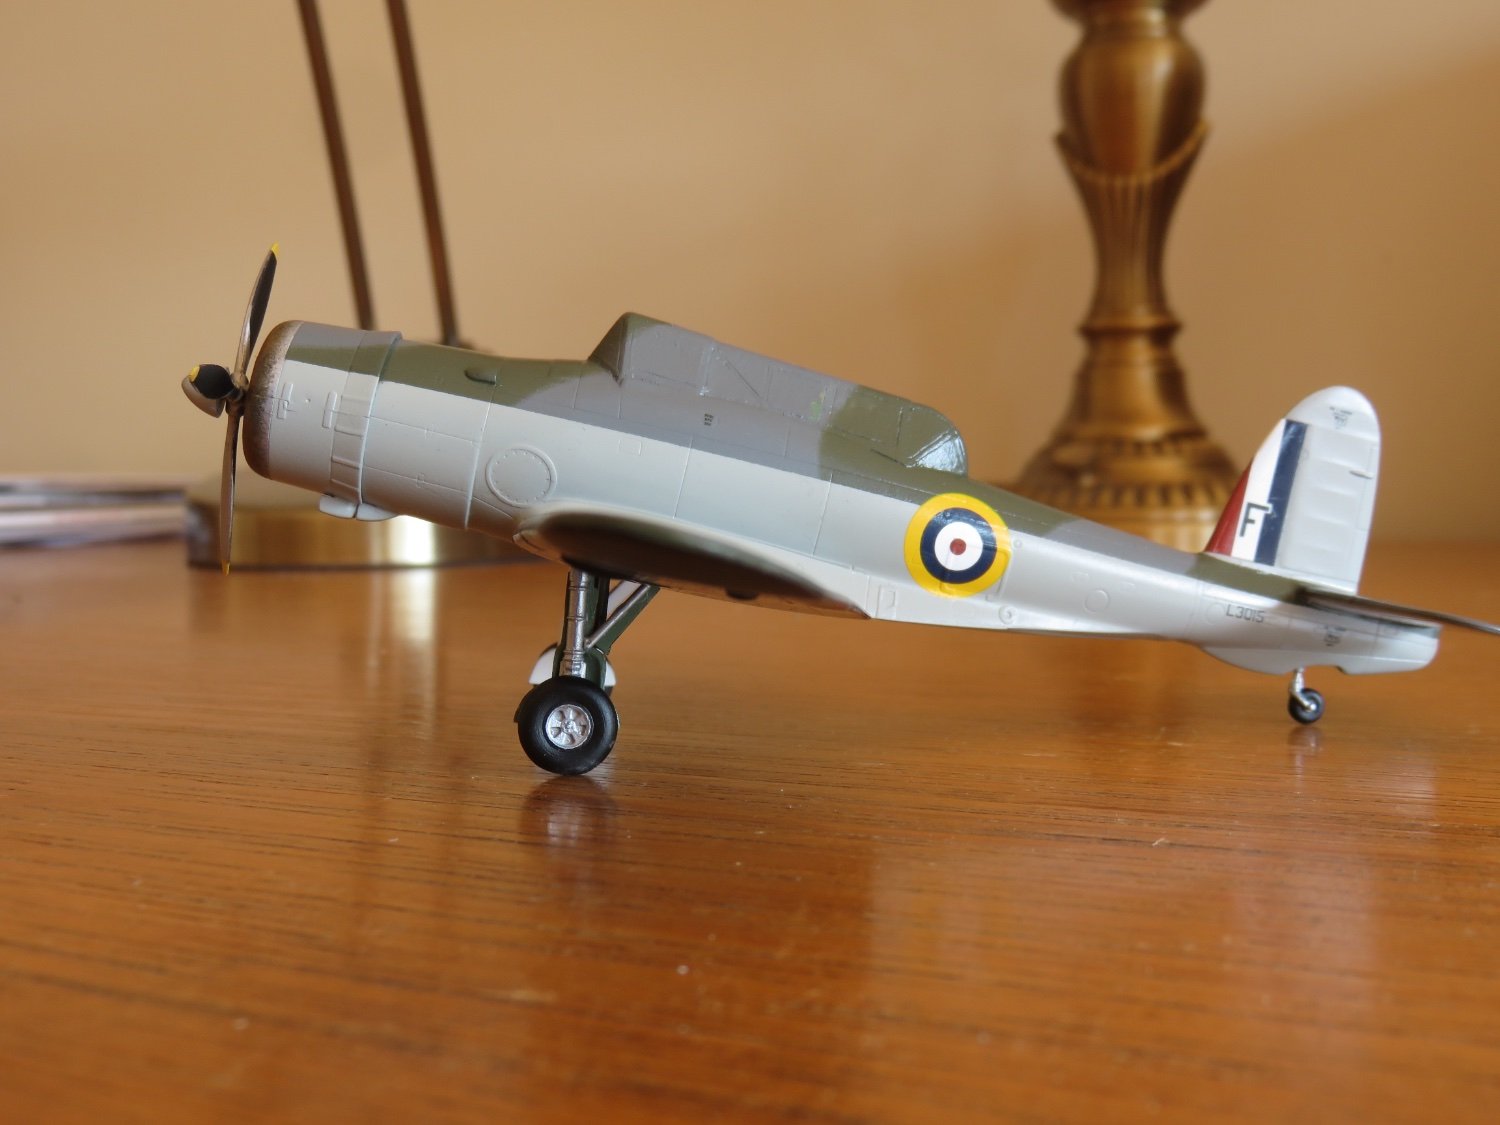
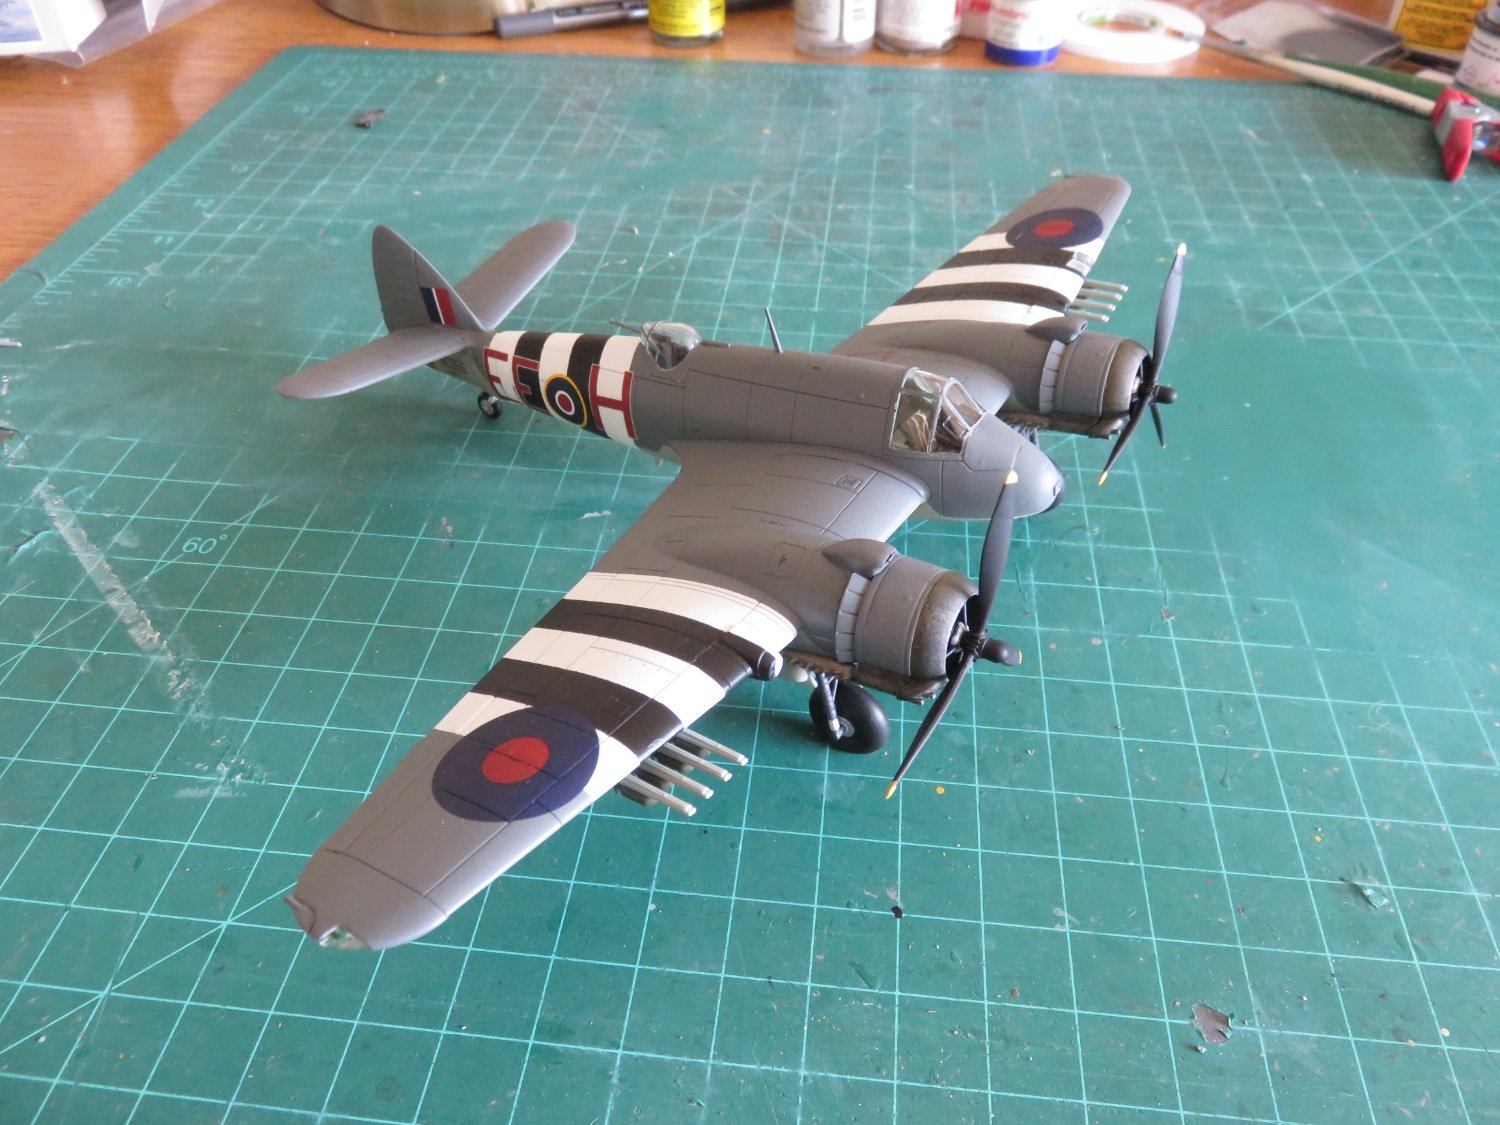
Well, I think I'm going to call this build provisionally finished. I'm planning on coming back to it and adding a bit of weathering, but for all intents and purposes I'm finished. Thanks to everyone who has been following along, and especially those who took the time to comment and/or "like".
A few final photos for everyone to enjoy:


Thanks again, everyone!
Andy
-
Amazing job you’re doing, especially all your little mods and tweaks. I wonder, though, that you tried to install the resin drops on the wrong side? Even though the side profile matches that of the draught. Just curious, you’ve made a decent job of your correction.
Andy


Chaconia by Javelin - 1/100 - RADIO - LPG Tanker
in - Build logs for subjects built 1901 - Present Day
Posted
I’m not sure of the precise wording of the rules, but if I recall correctly, every cabin door must be within ten meters (I think) of at least two exits. Where the distance to a second exit door exceeds 10m or is on a “dead end” passageway, alternate provisions for a second exit must be made (via a window, for example).
The emergency exit design in your ship has become outdated due to improved interior layouts, and the fact that clambering down on the face of an accommodation black is inherently dangerous!
Andy