Mirabell61
-
Posts
7,406 -
Joined
-
Last visited
Content Type
Profiles
Forums
Gallery
Events
Everything posted by Mirabell61
-
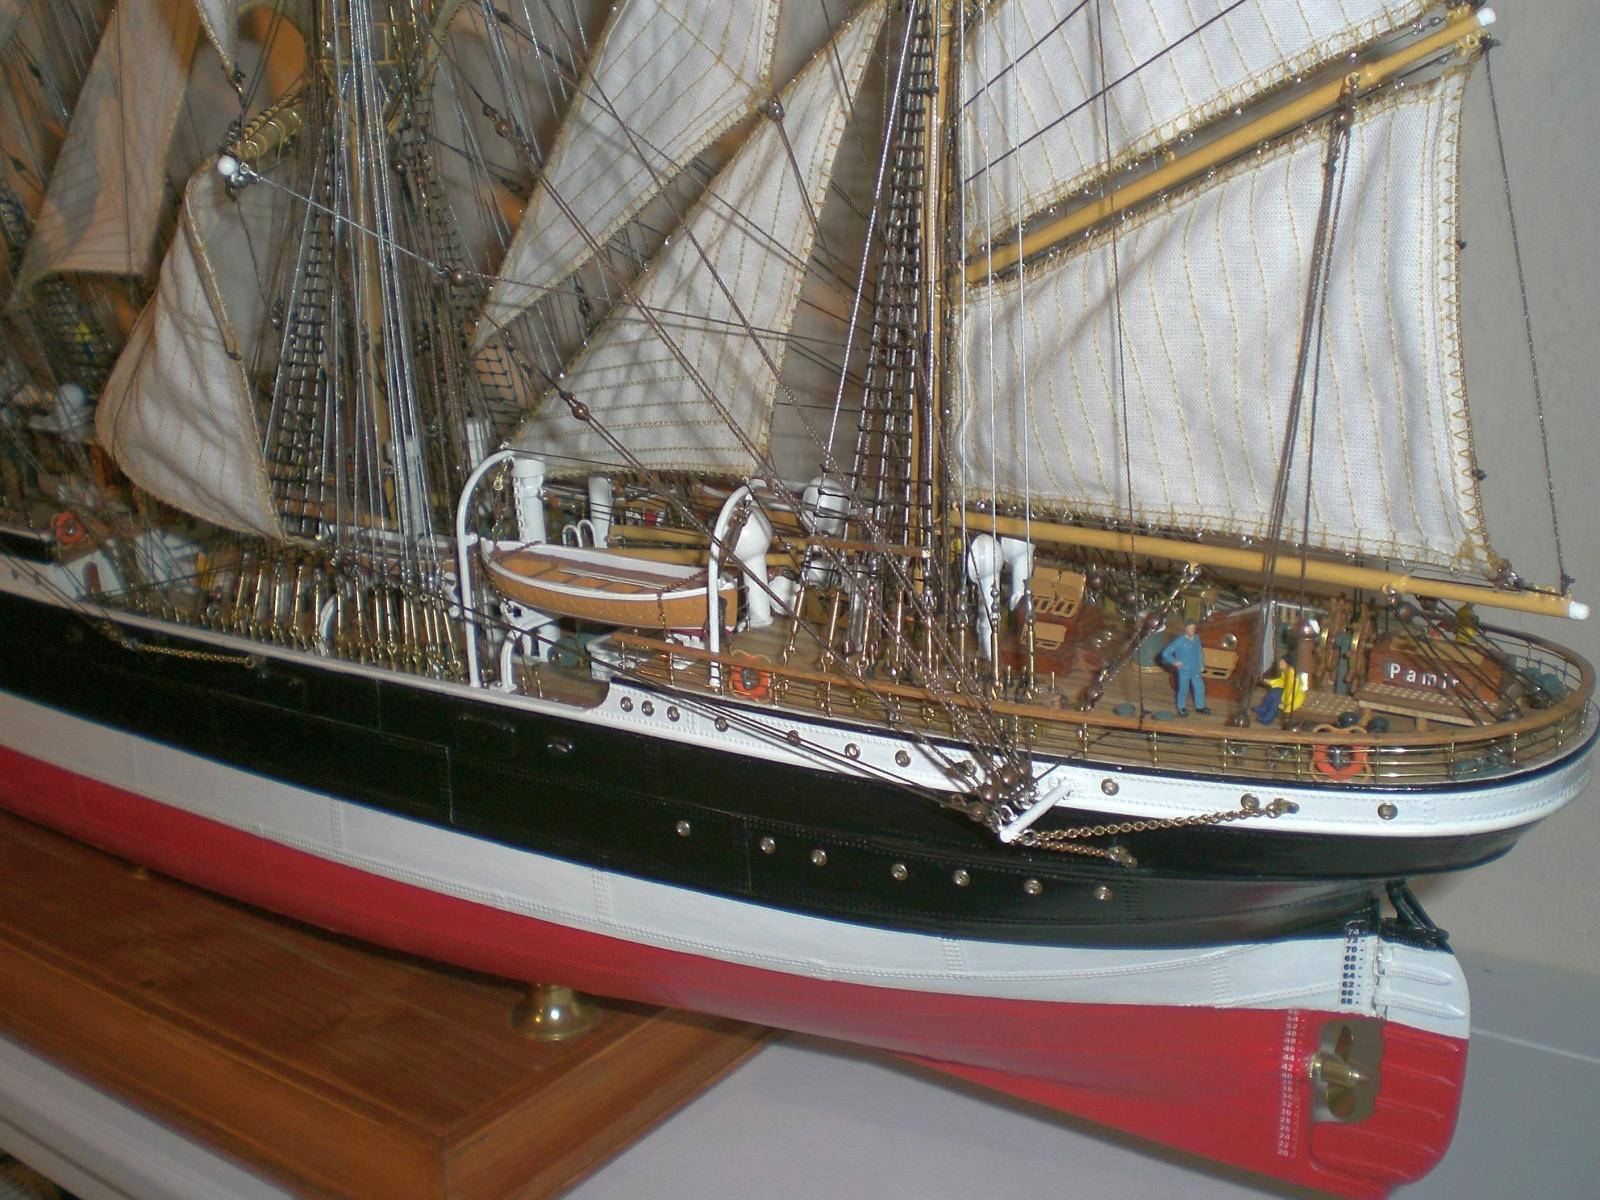
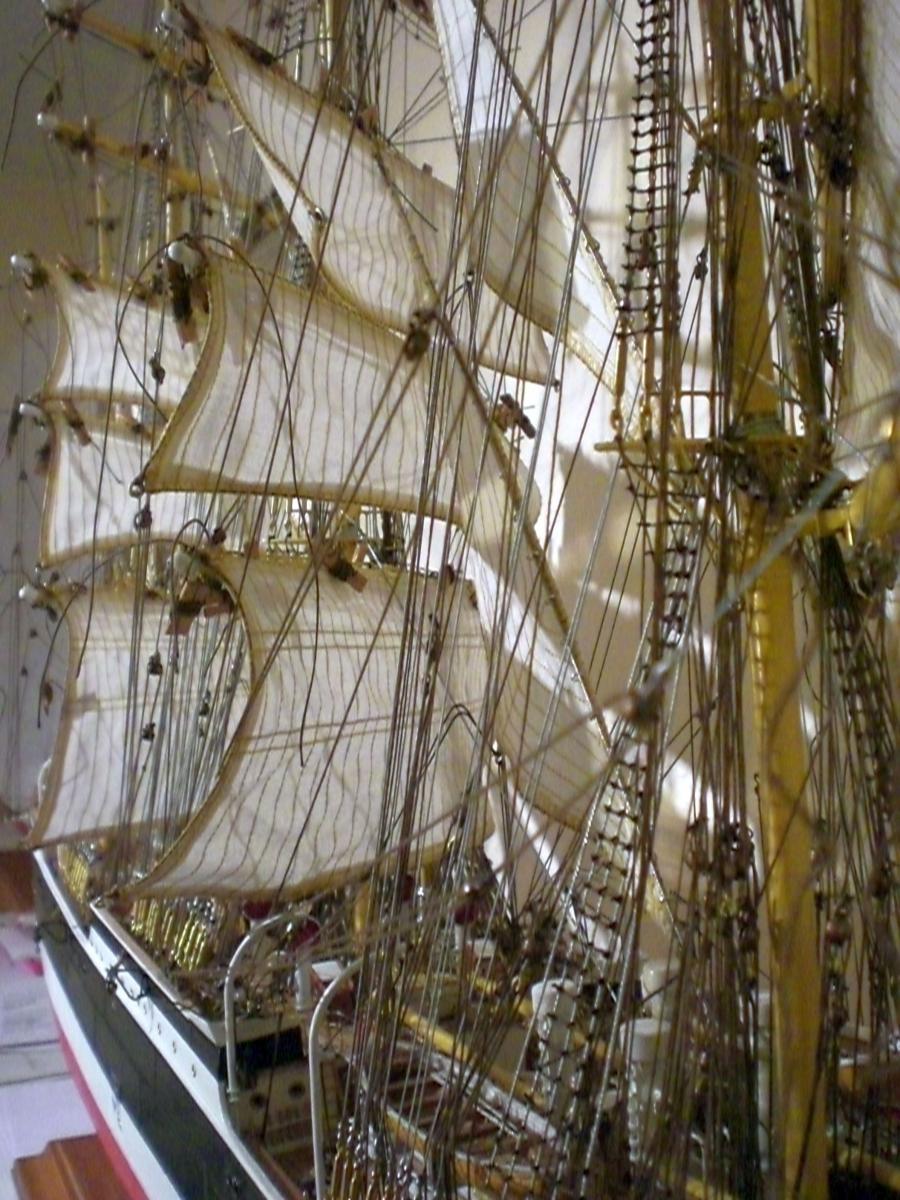
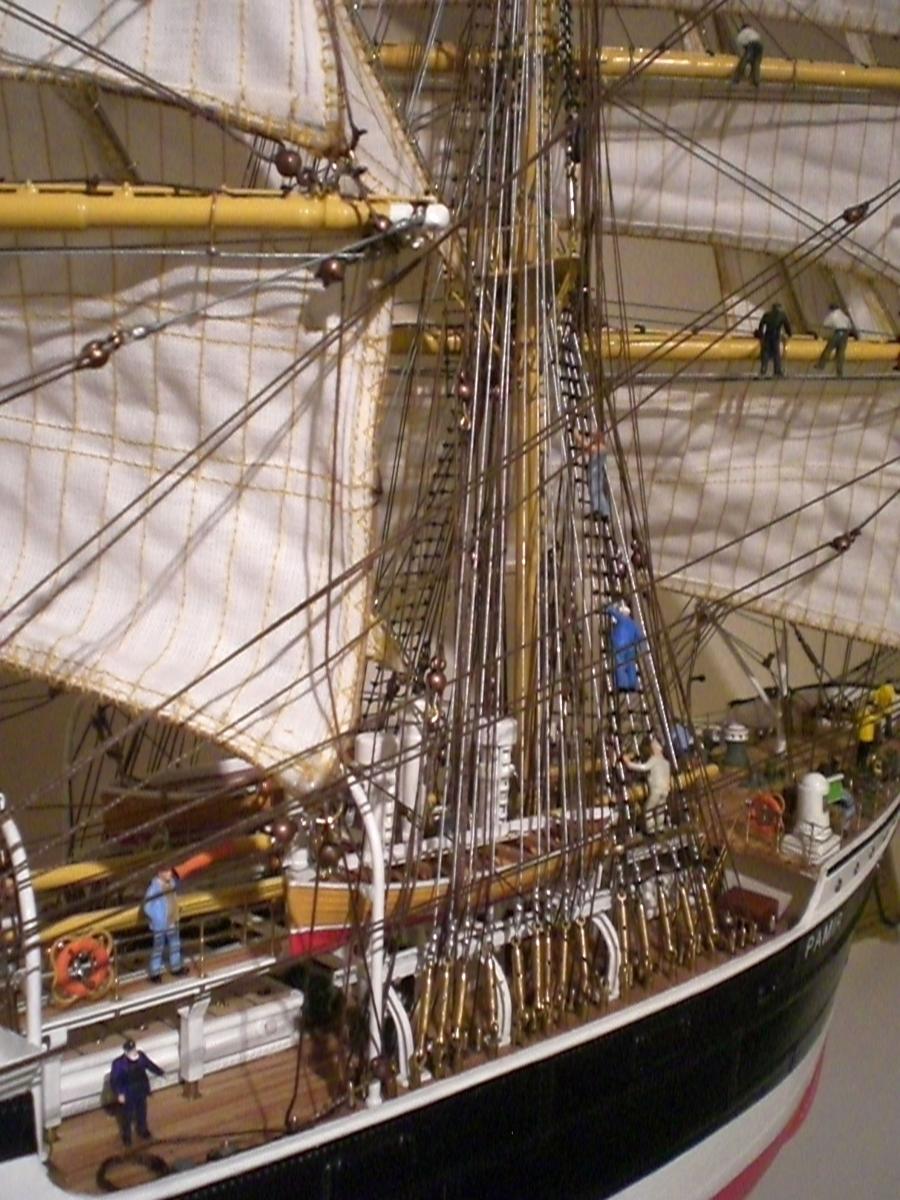
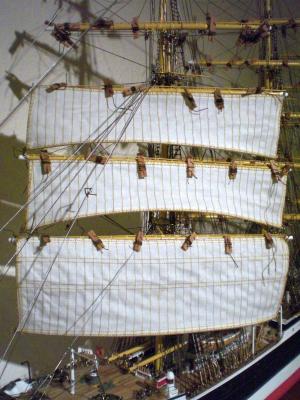
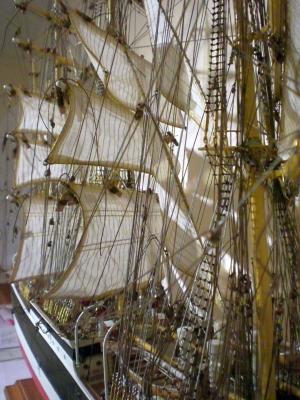
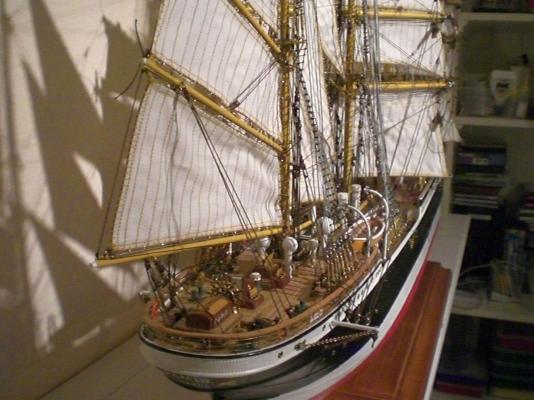
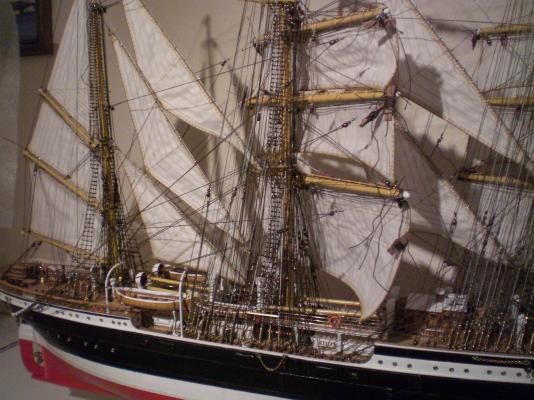
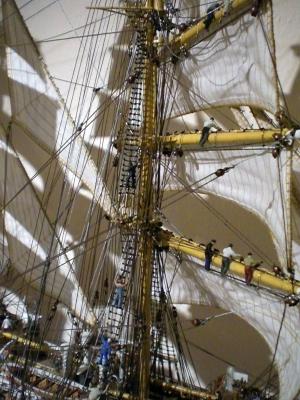
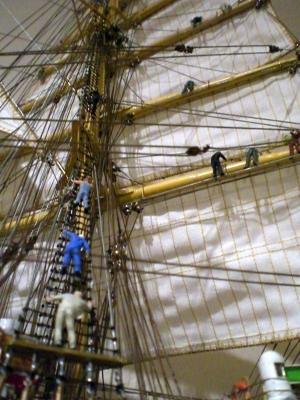
 build log part 45 rigging of the sails part 2 of 2 the Crew is wearing no safety harnesses the sails are attached one by one, (32 sails in total) all sails attached Build log part 46 to follow.... The next build log sets shall continue with some daylight illuminated Pictures of the (as final) completed ship Nils
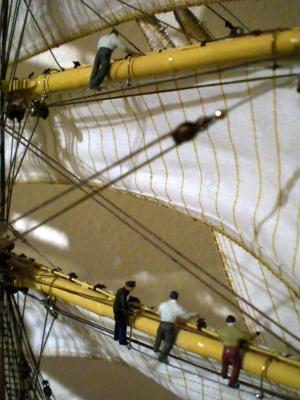


- 269 replies
-
- 15
-

-
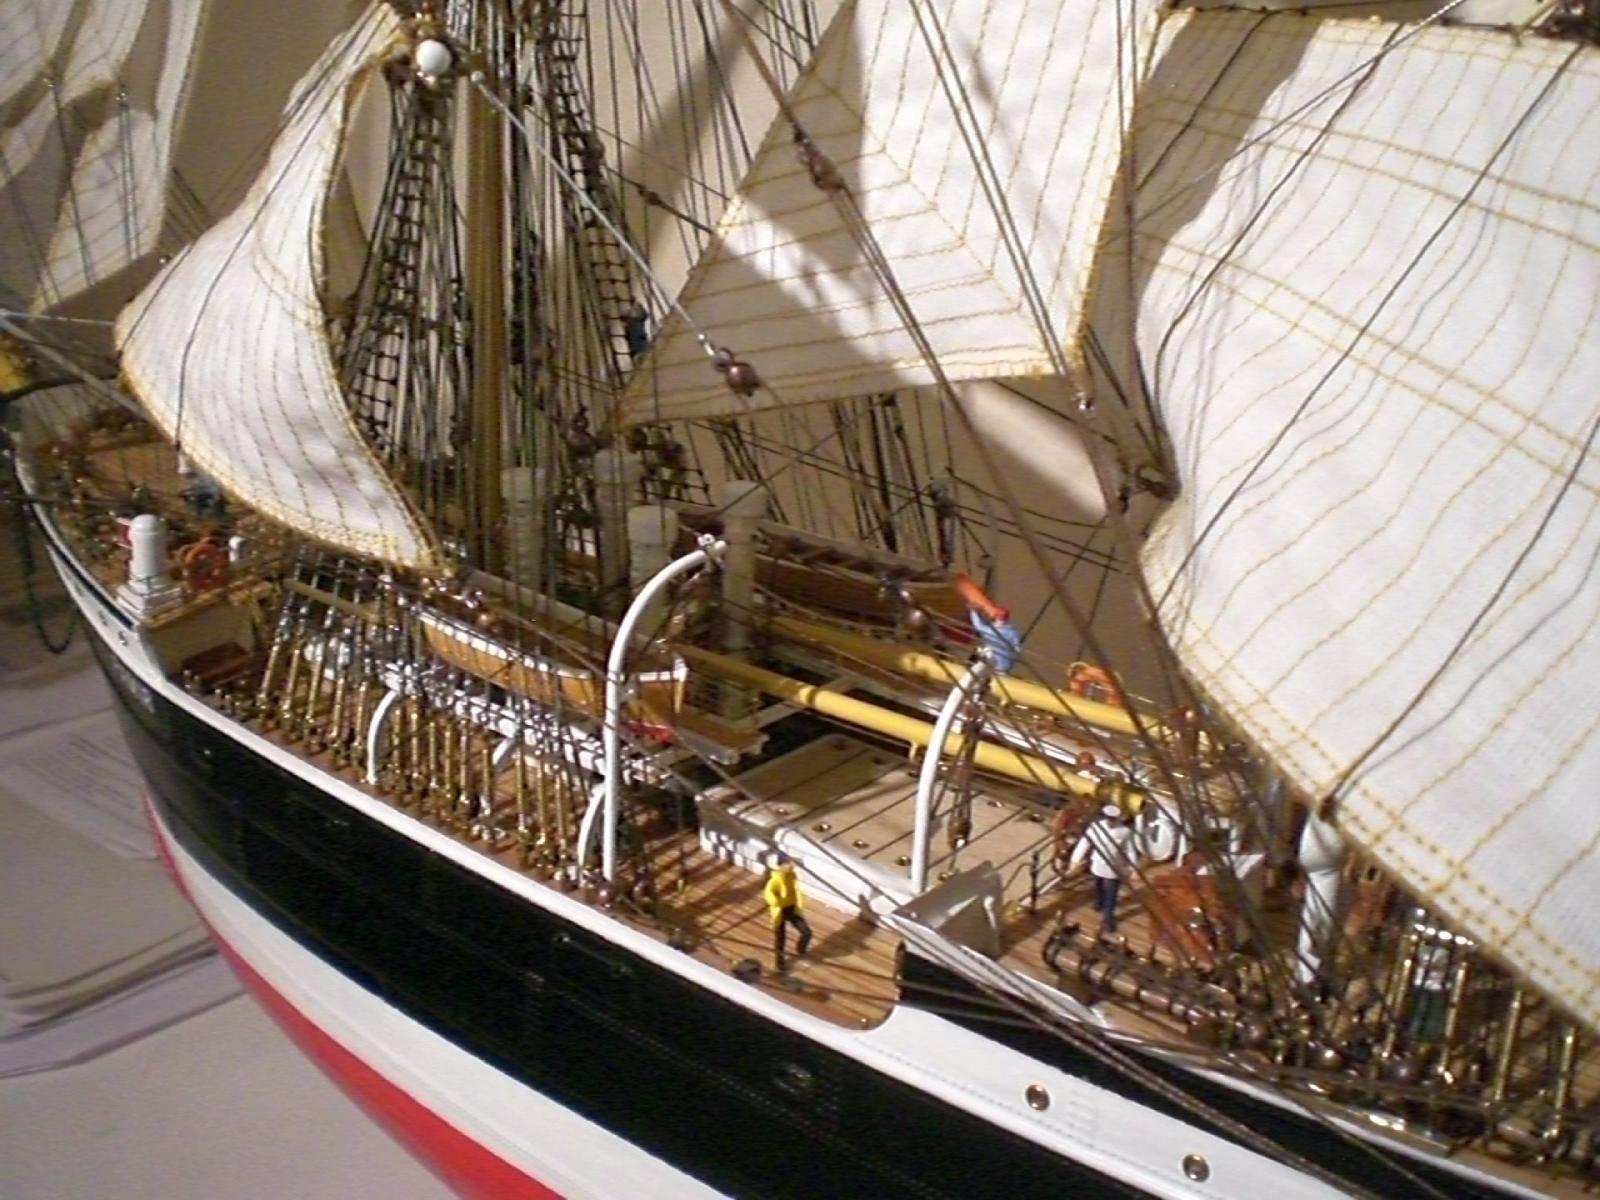
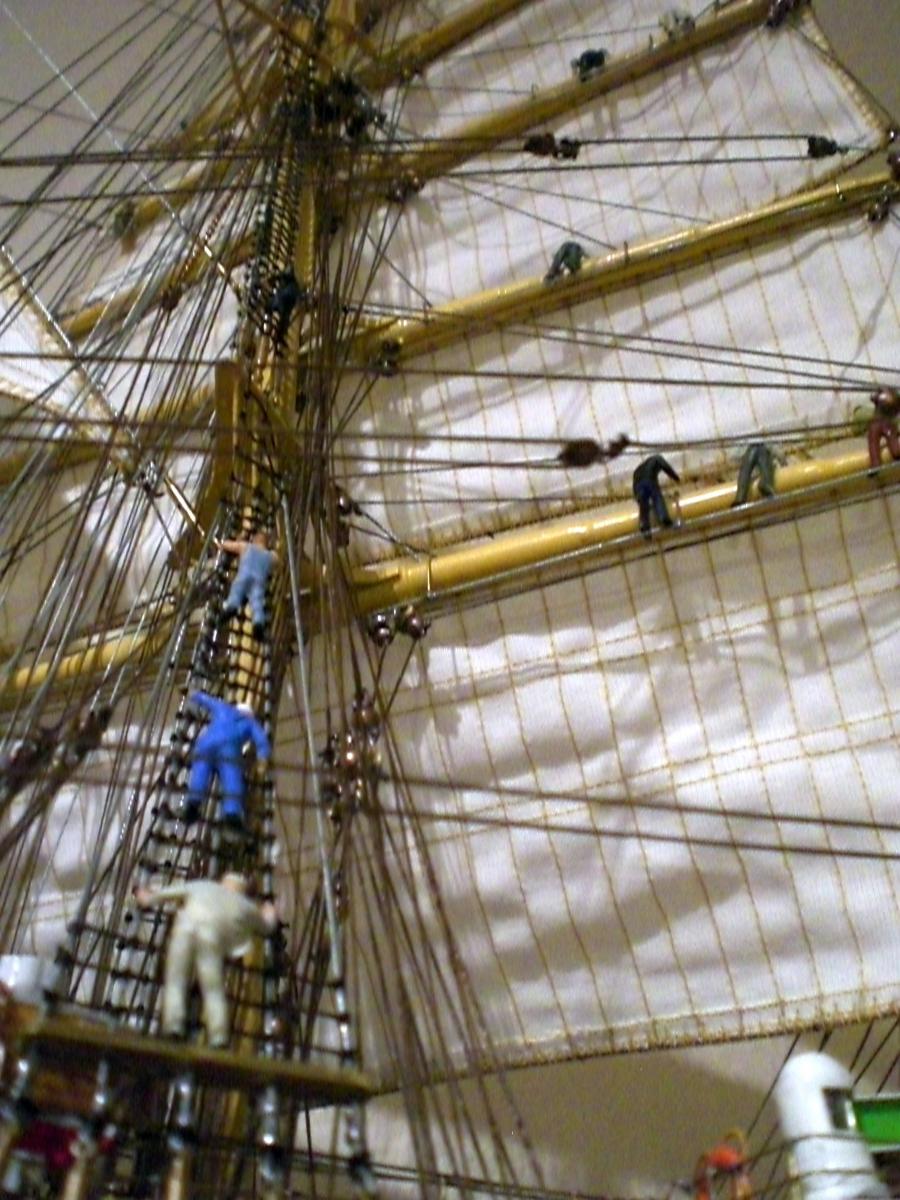
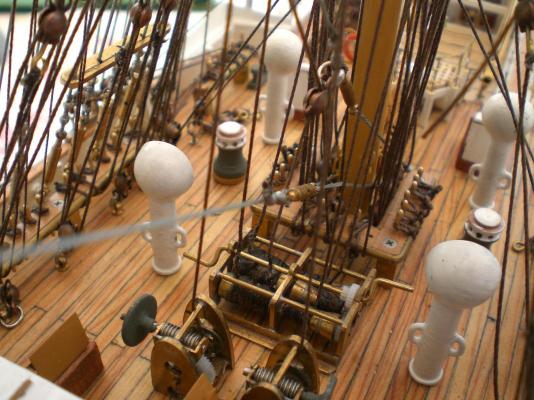
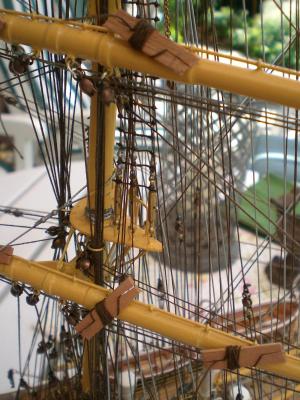
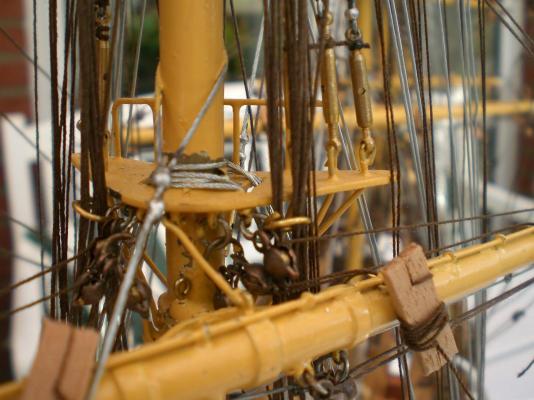
Build log part 44 rigging the sails part 1 of 2 the wire in the bottom boltrope gives some bulging Appeal to the sails the bulge in vertical direction is given by the brail ropes setting now the leech- clew and burlines have to be attached the gaffsails of the mizzenmast are attached to spanned wires parallel to the gaffyard beams and to the mizzen mast ratlines completed and triangle stay-sails mounted here again the effect of the wire reinforcement in the bottom boltropes Crew entering up the shrouds on to the Yards, to fasten the sails, when Standing on the horses Build log part 45 to follow Nils


- 269 replies
-
- 16
-
-
Beautiful work Rob ! I like all your work to date and the Fitting out of interior... Nils
-
Thank you John, but I`m sure you would not like to miss the challenge in doing your own sails....otherwise its like bramble berries without vanilla sauce cheers Nils
-
Bart, when using this self adhesive copper tape and the poncewheel method, of course the ponced, plate resembling strip lengths are each overlapping the edge of the last one below and the one horizontaly placed before. The strips are only ponced in two outer lines, the other two get their poncing from the next Strip wich covers (by overlapping ) in the appropriate positions. The overlapping is not so easy when you use machine prefabricated platings Hope this ia understandable Nils
-
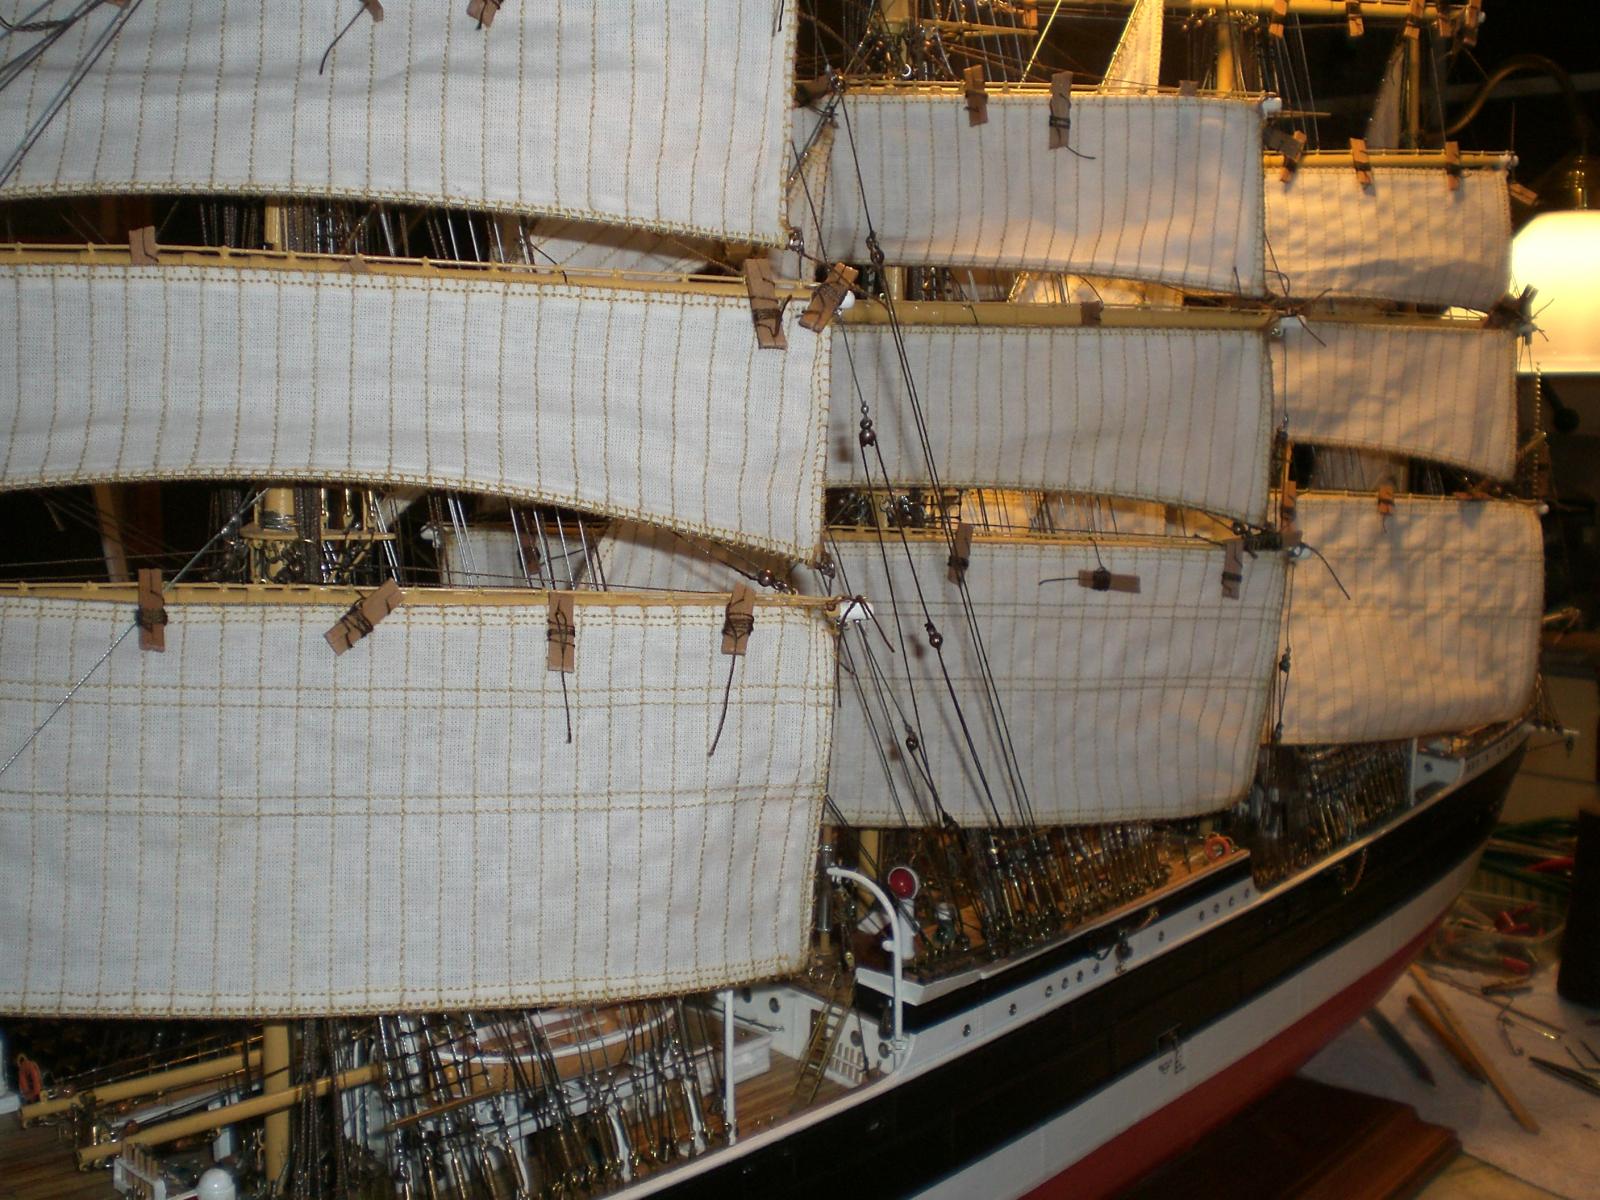
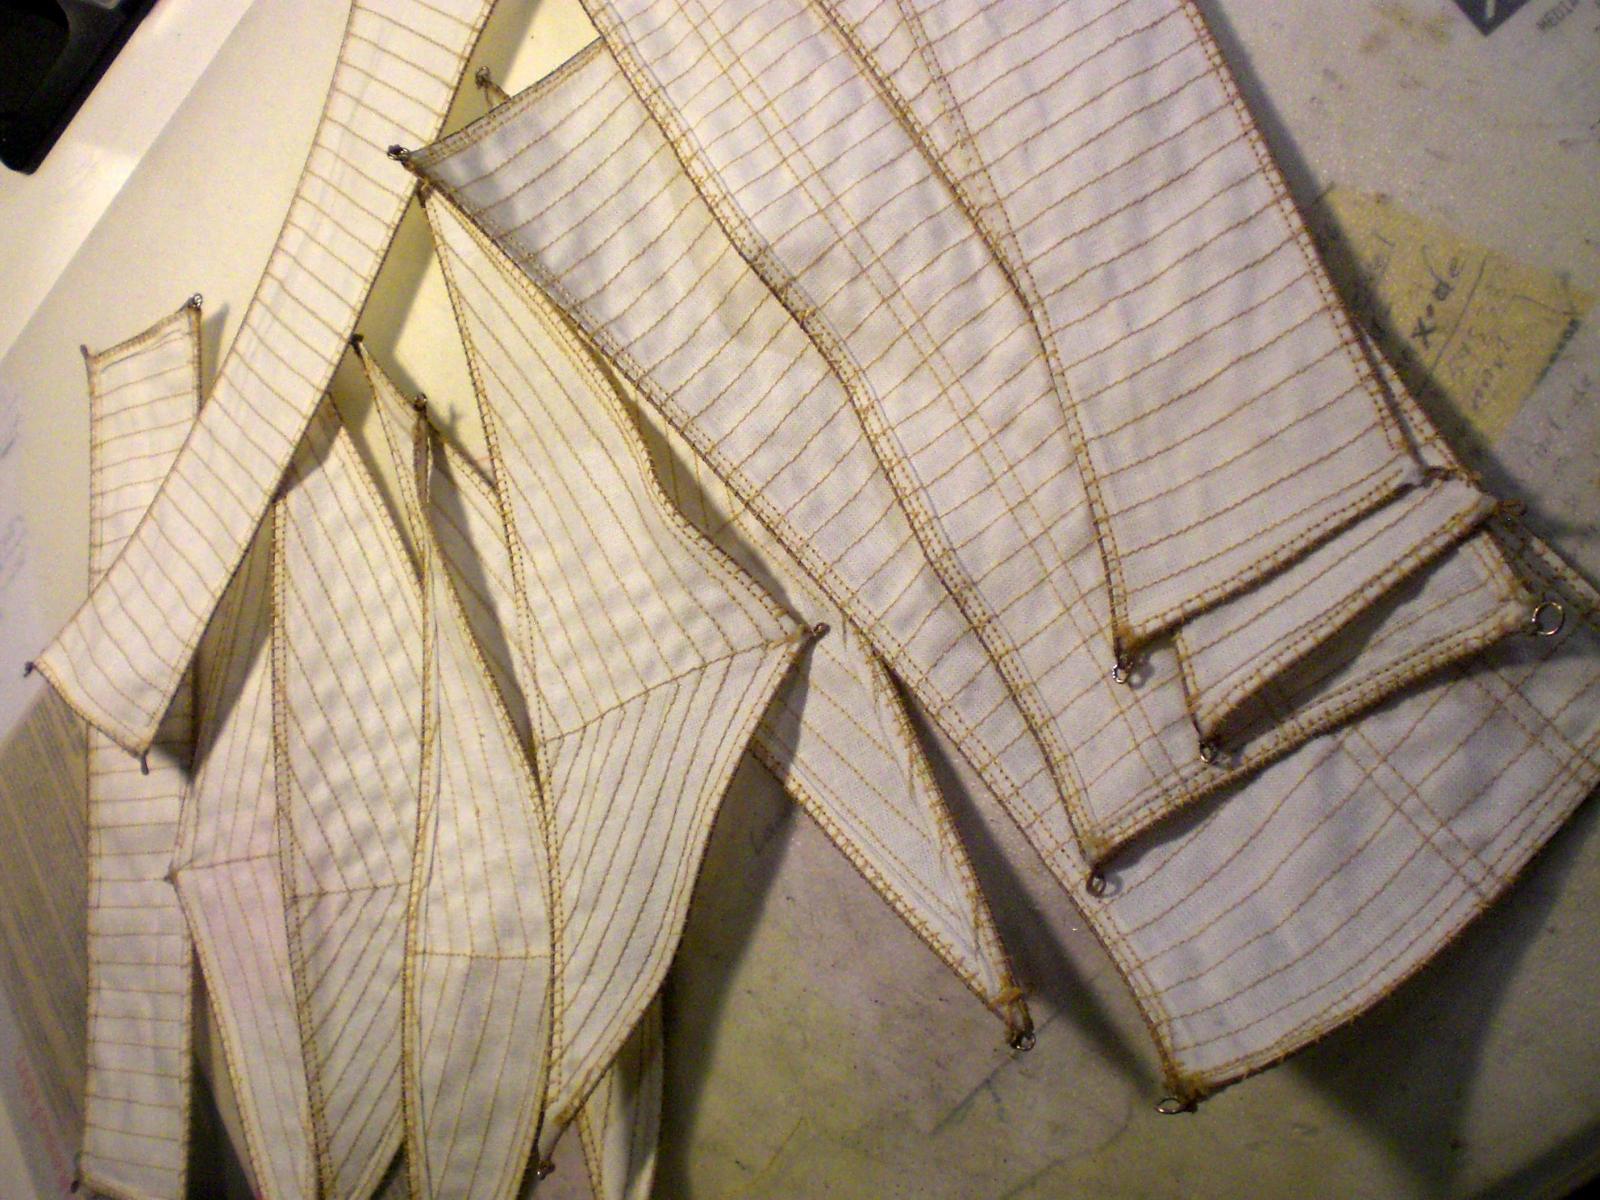
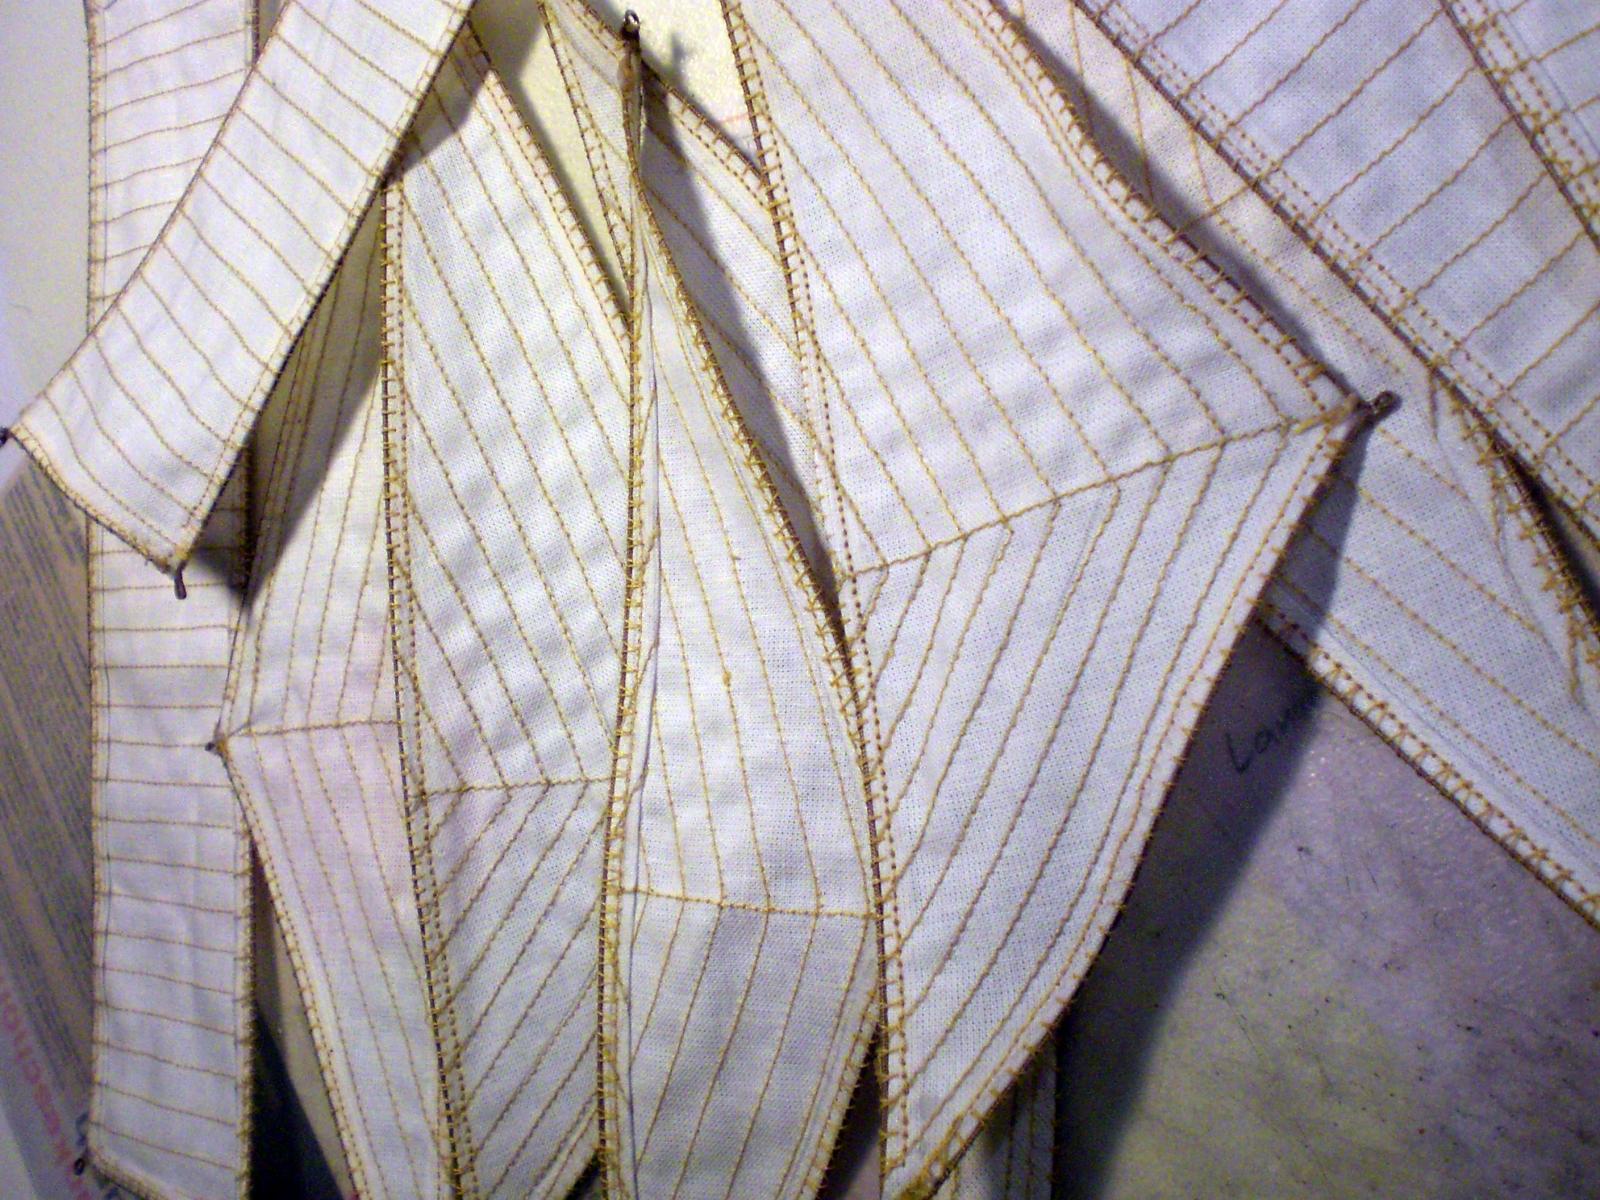
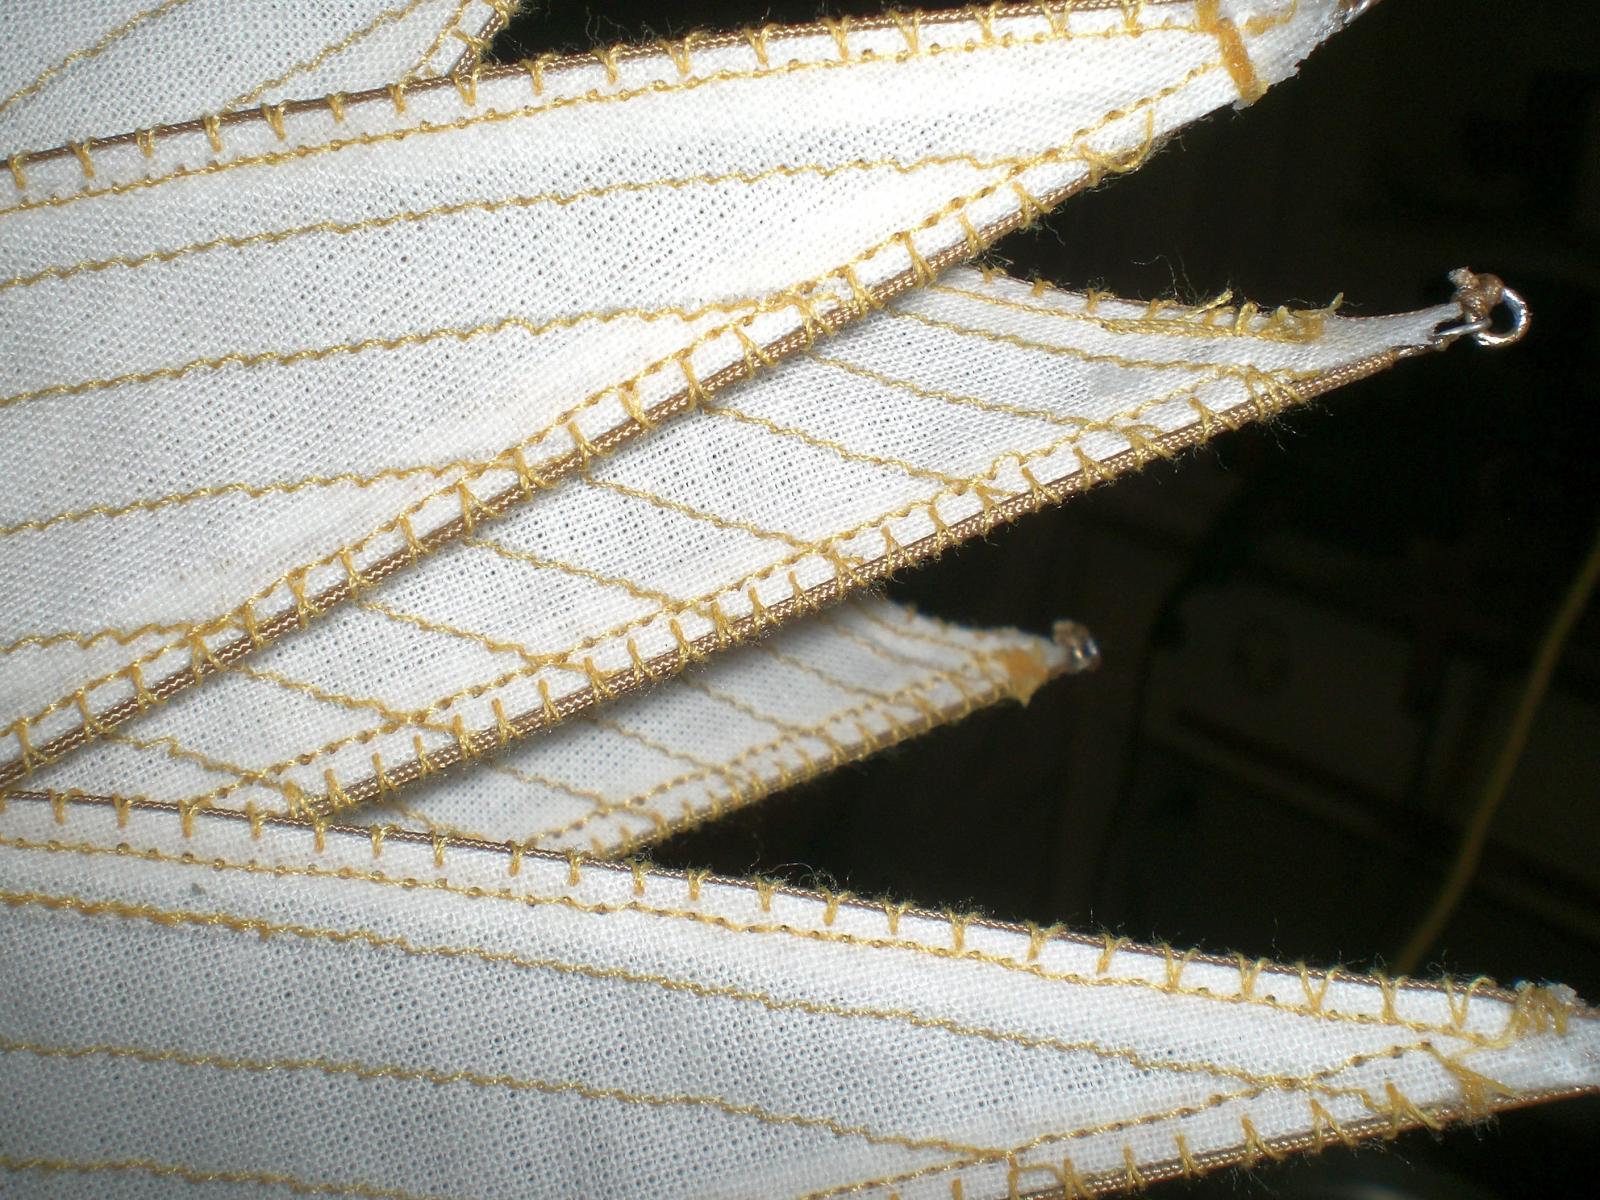
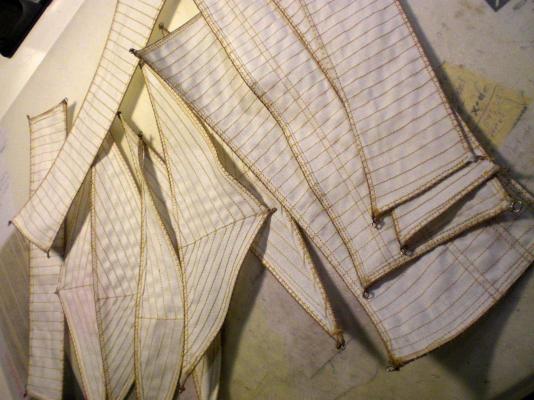
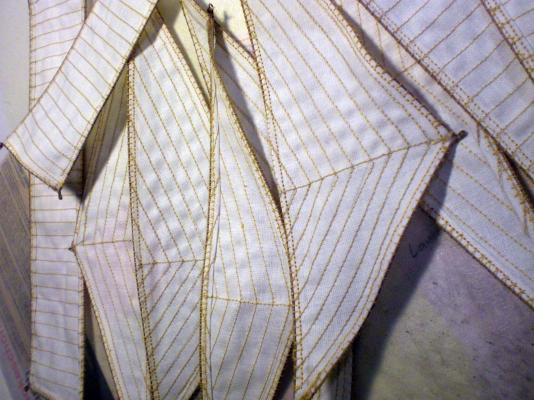
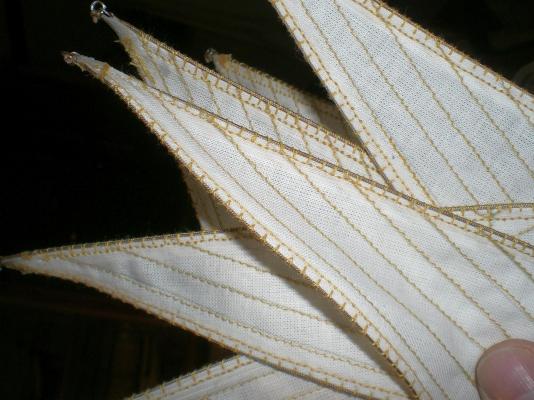
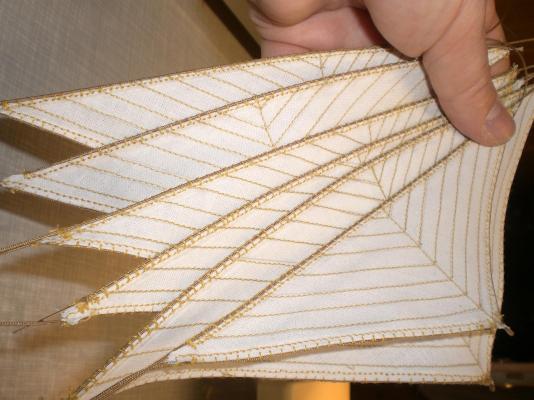
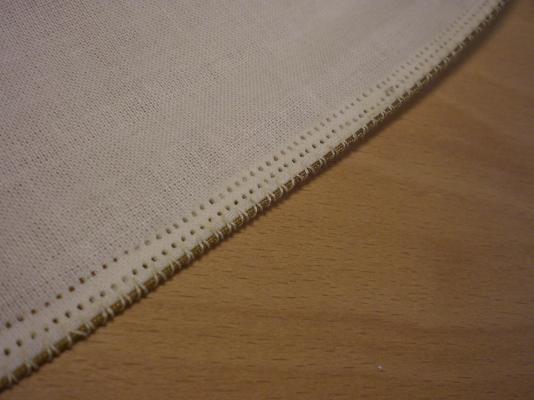
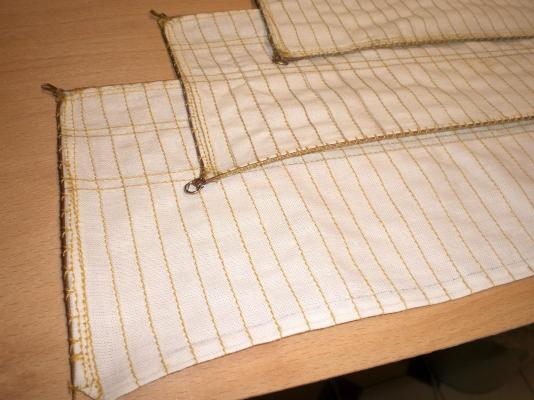
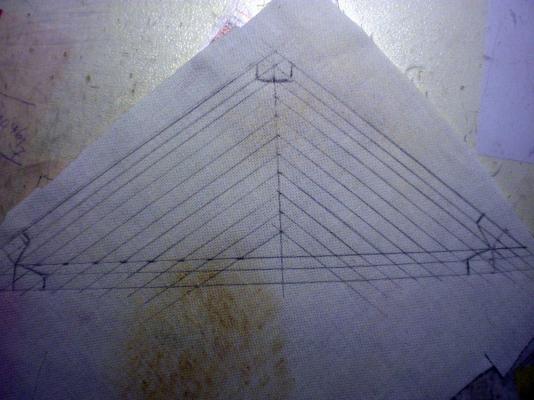
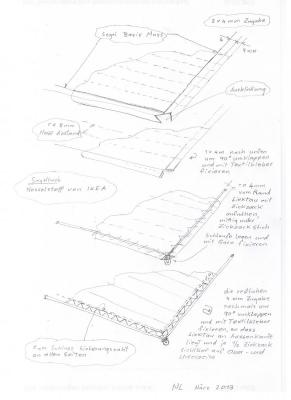
Build log part 43 SAIL MAKING PART 3 it took me some time to accept my wifes machine as my freind.... here doing the last seam parallel to the bolt rope. In case of the triangle sail the longer straight side gets the reinforced boltrope. (to take the pull stresses in rigged condition, without distorting the Cloth) this and the next pics...., impressions on the finished sails This is the end of my sail making chapter Build log 44 to follow..... Nils

- 269 replies
-
- 14
-
-
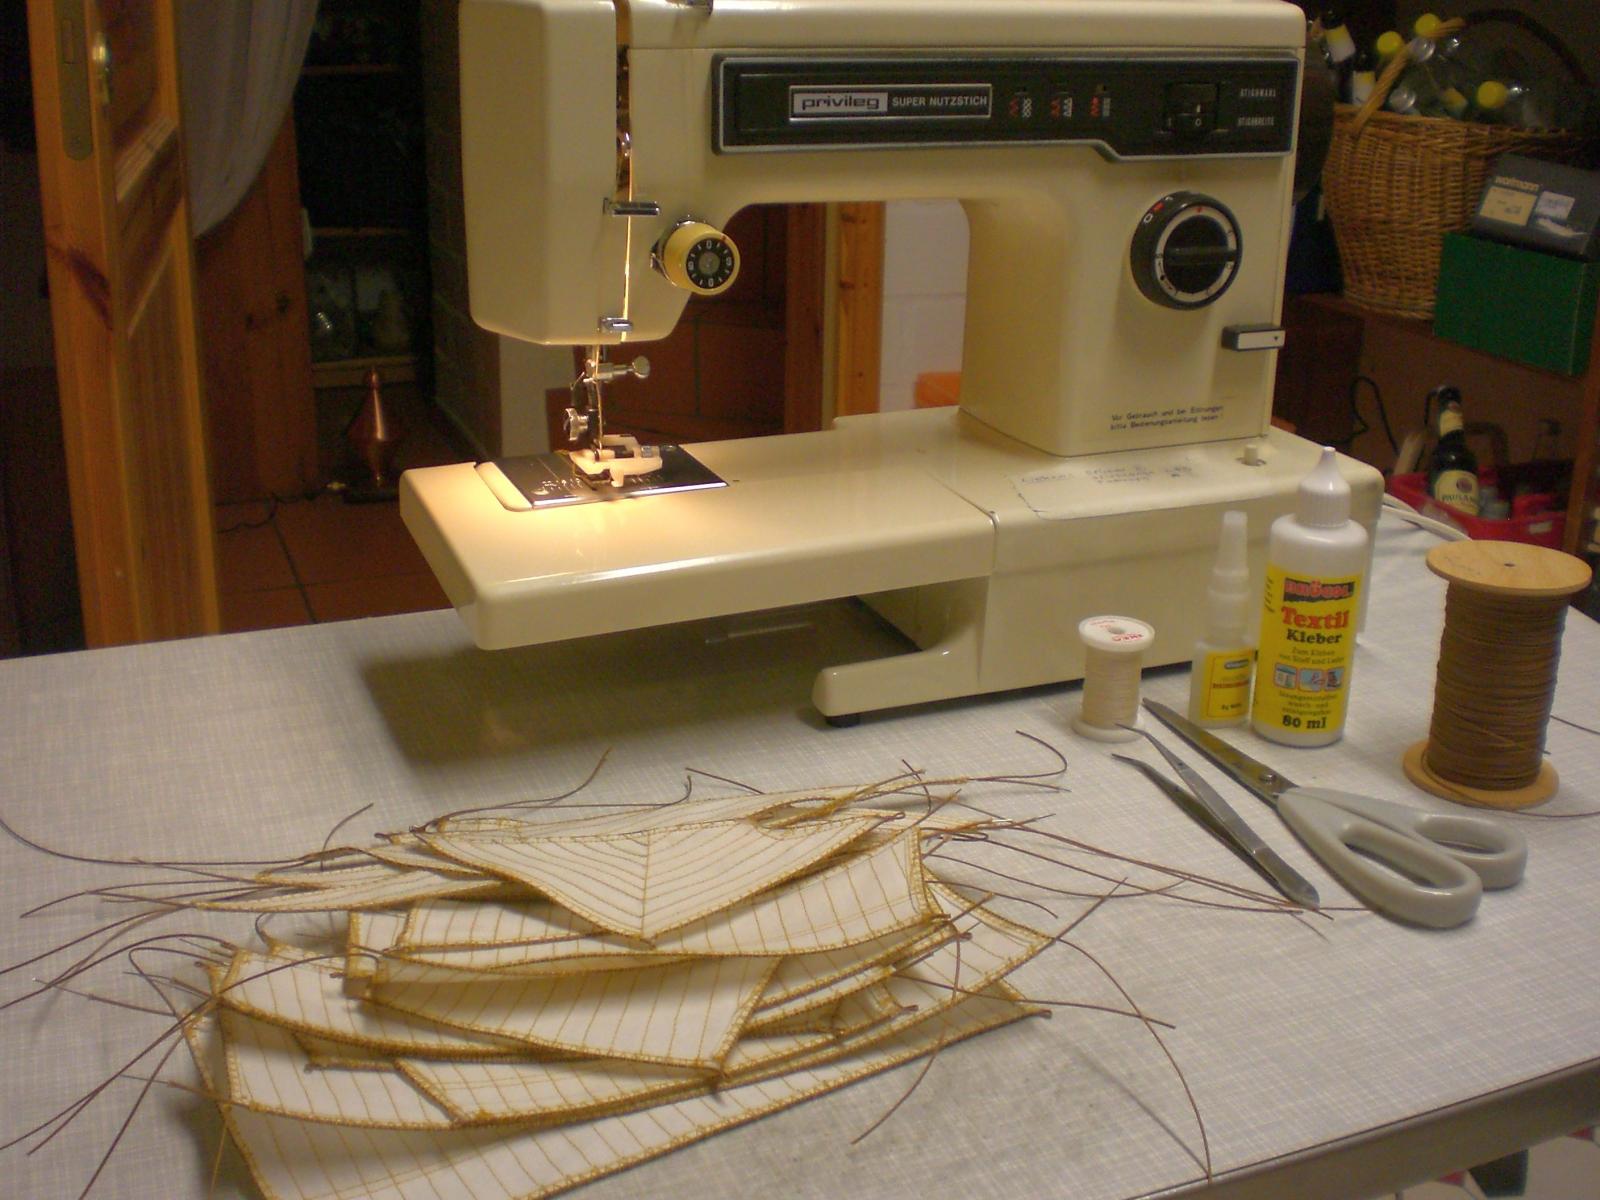
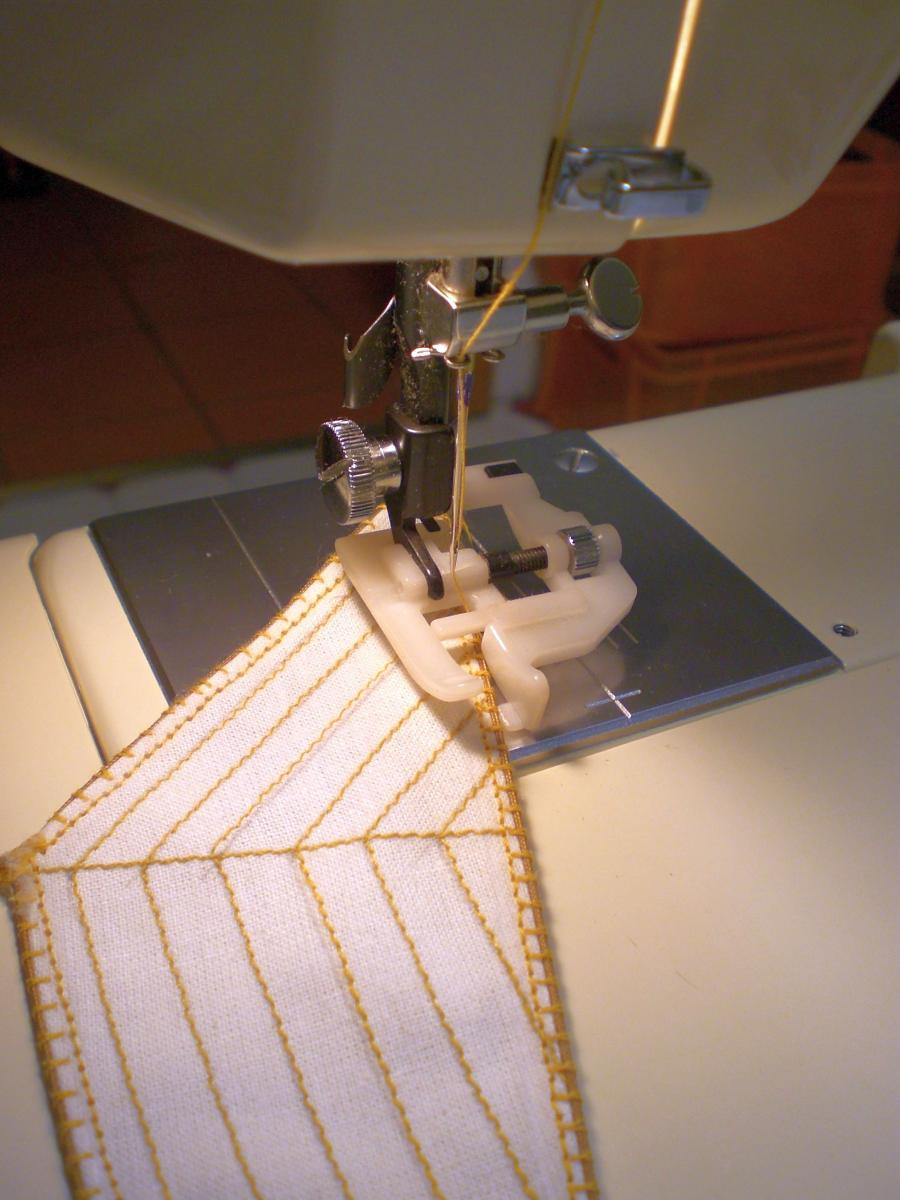
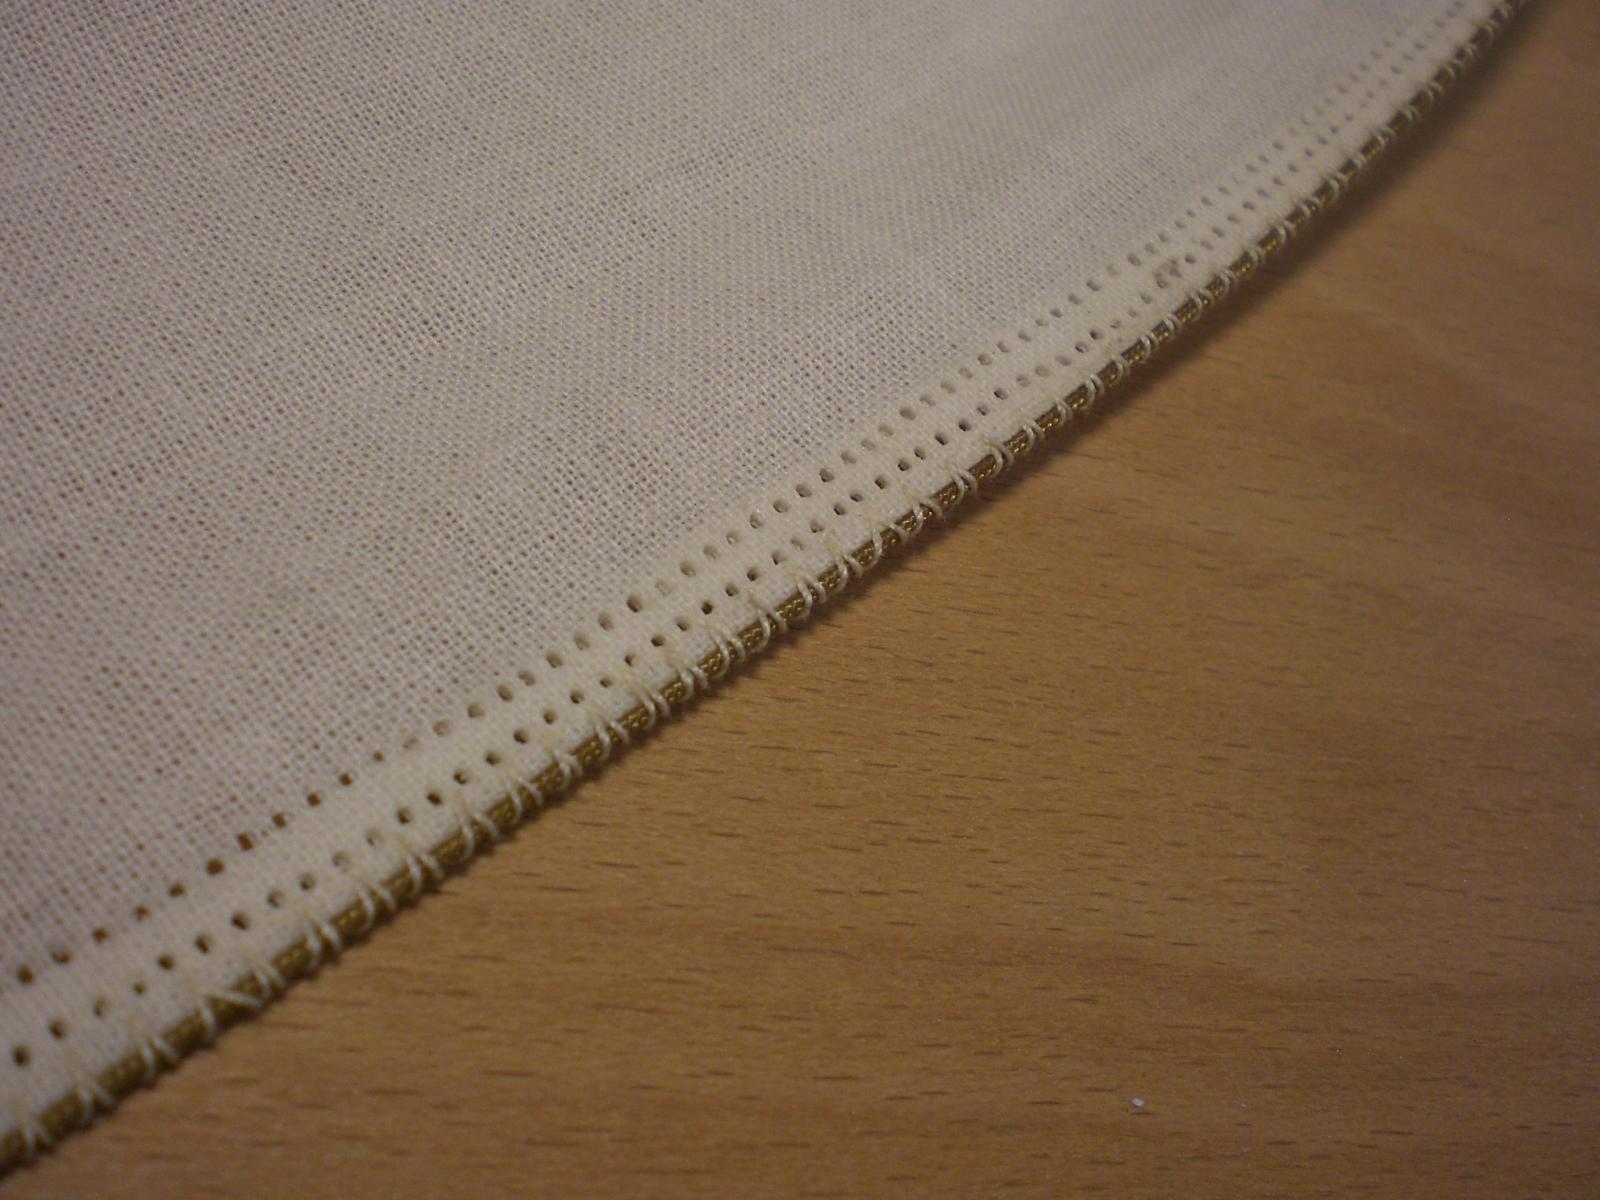
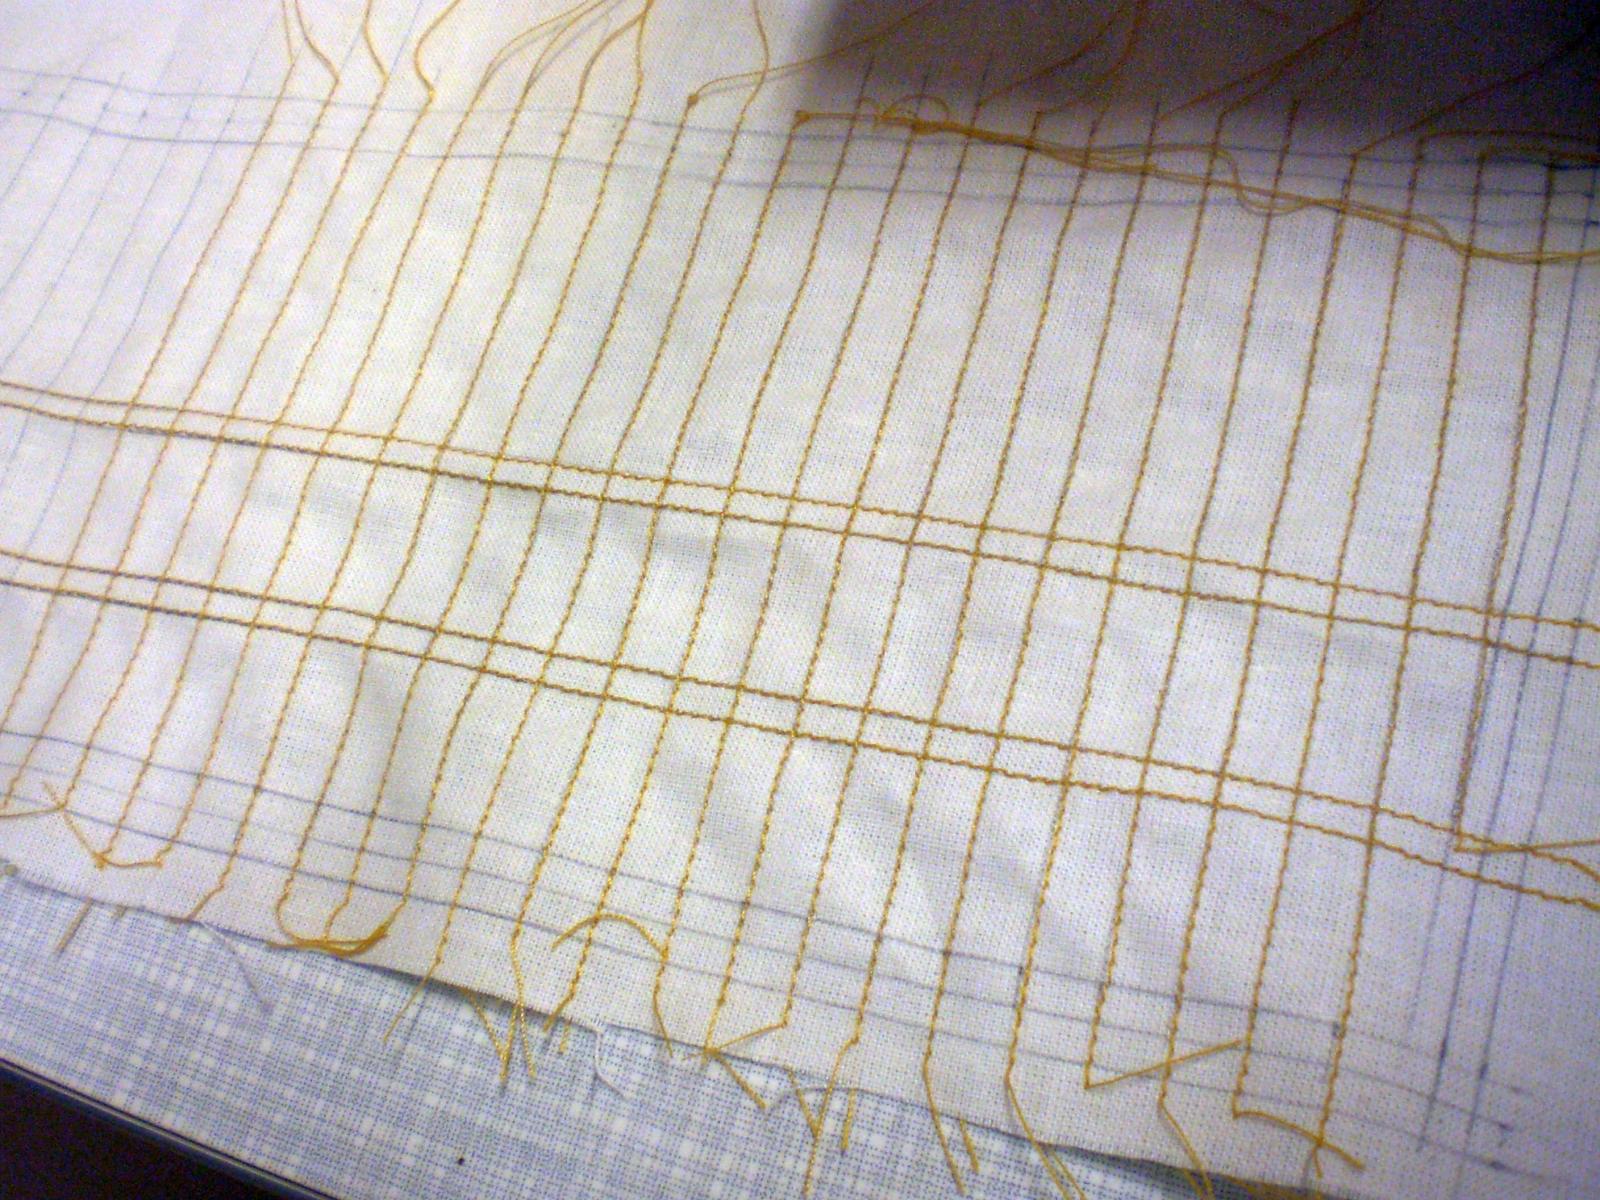
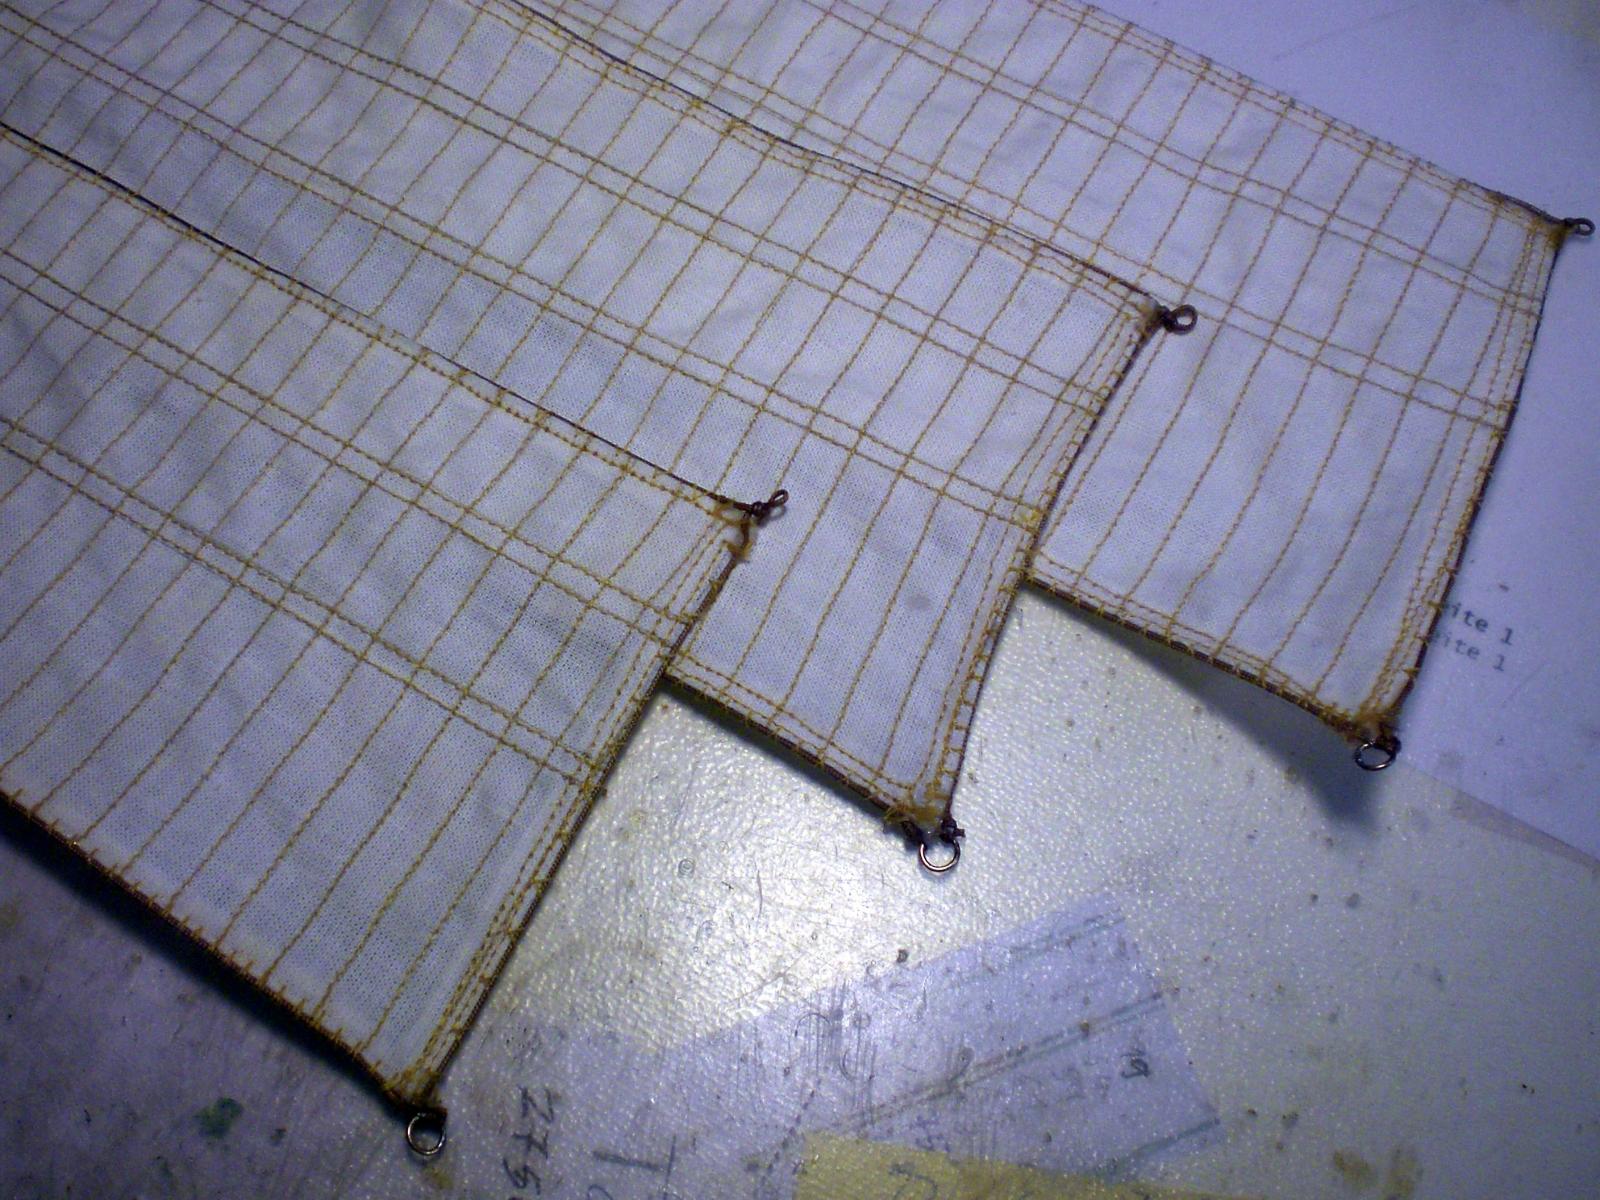
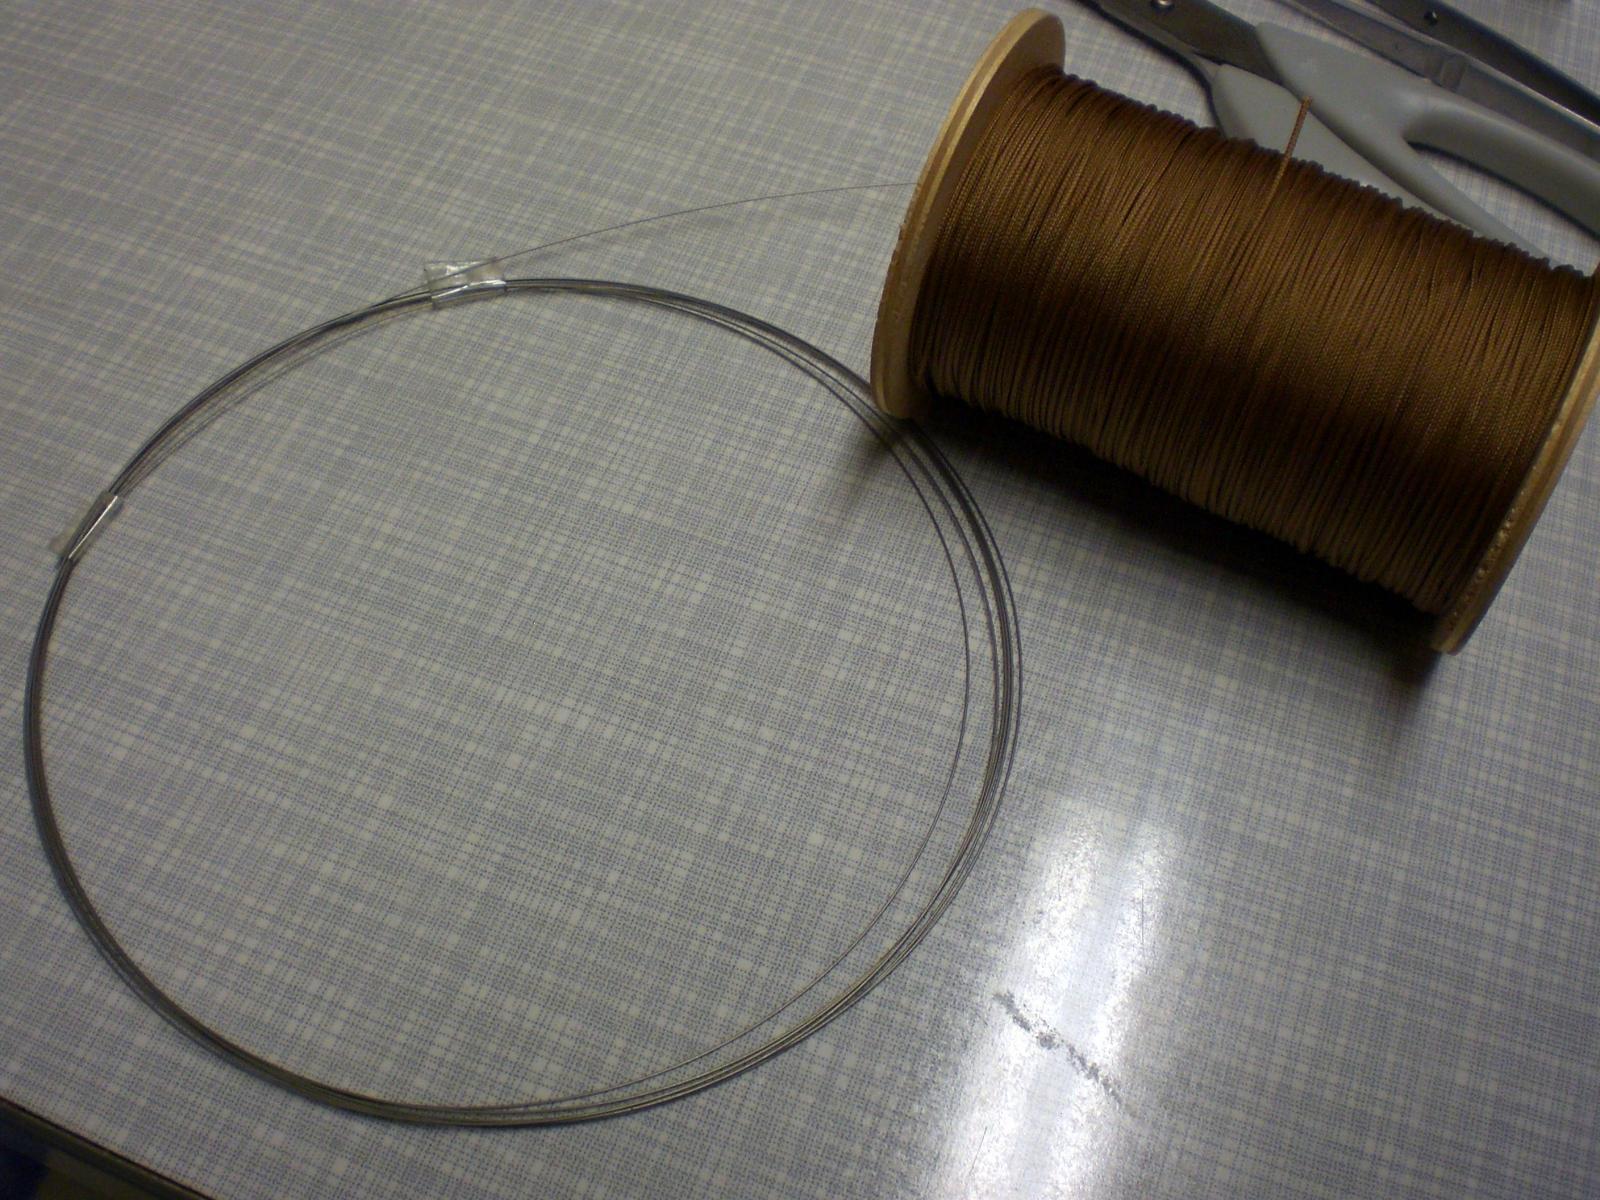
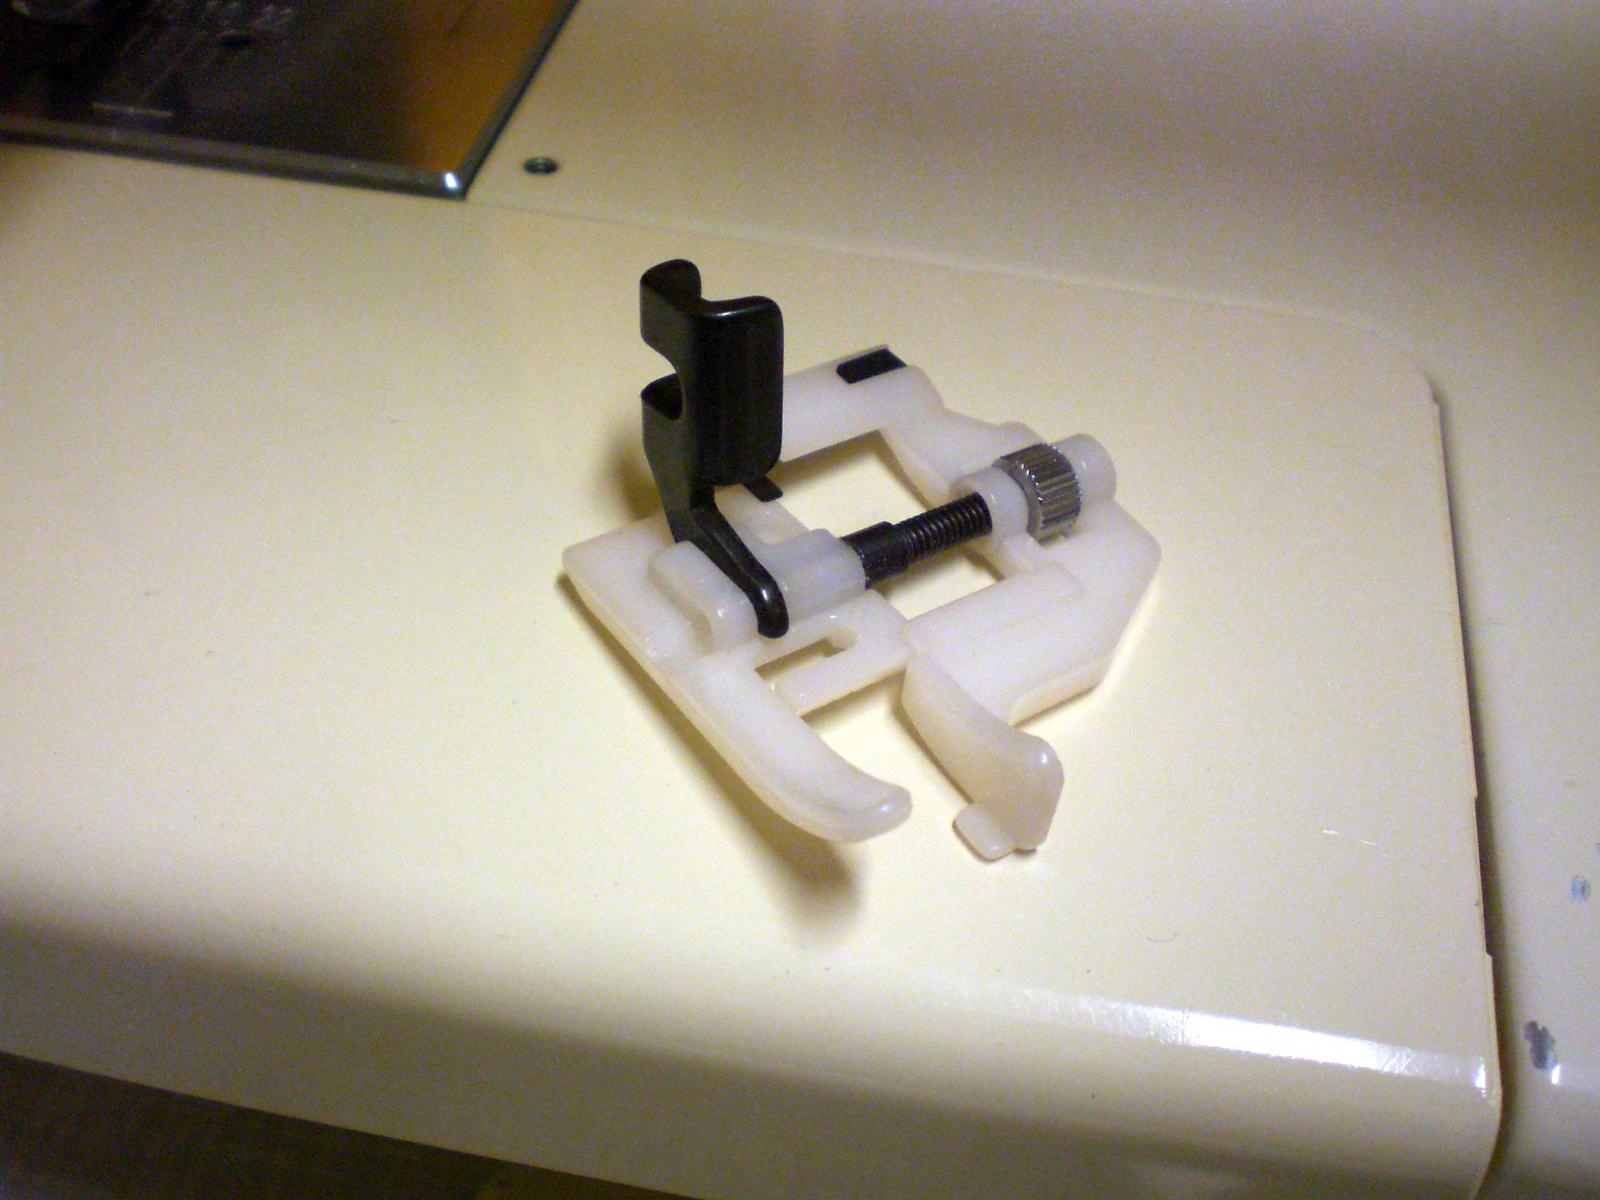
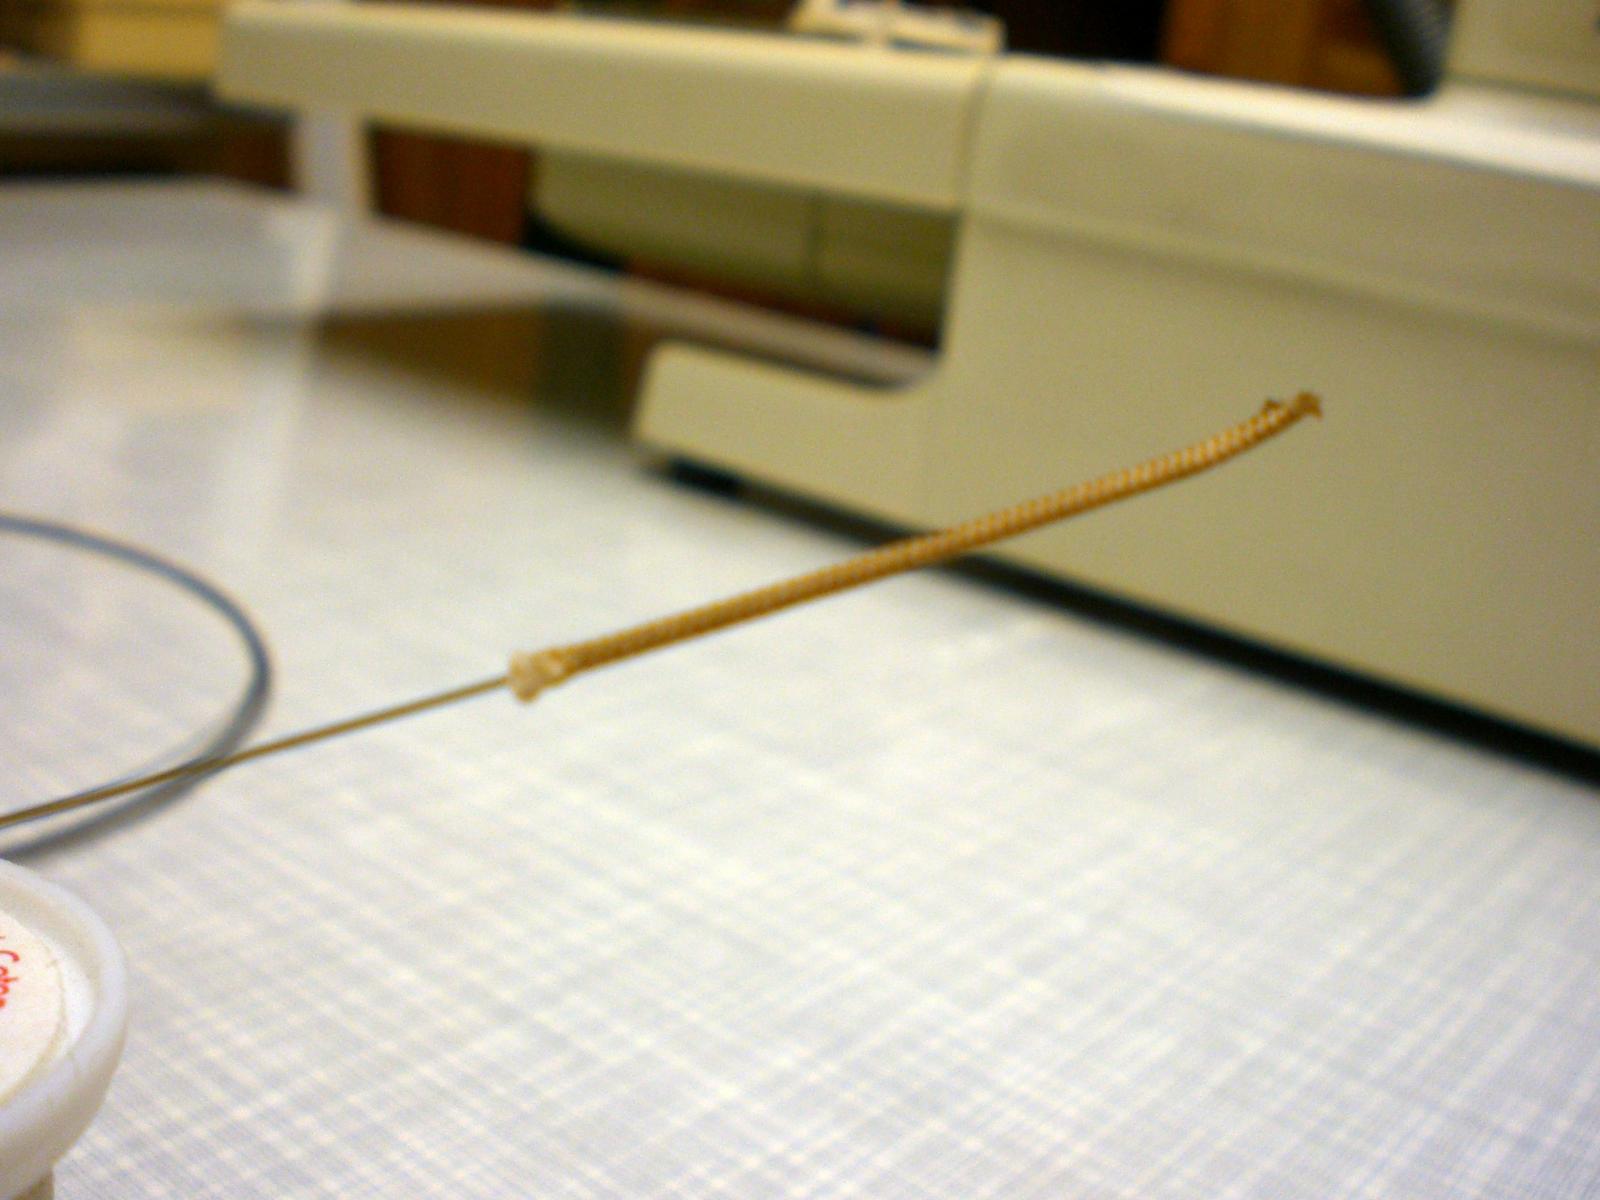
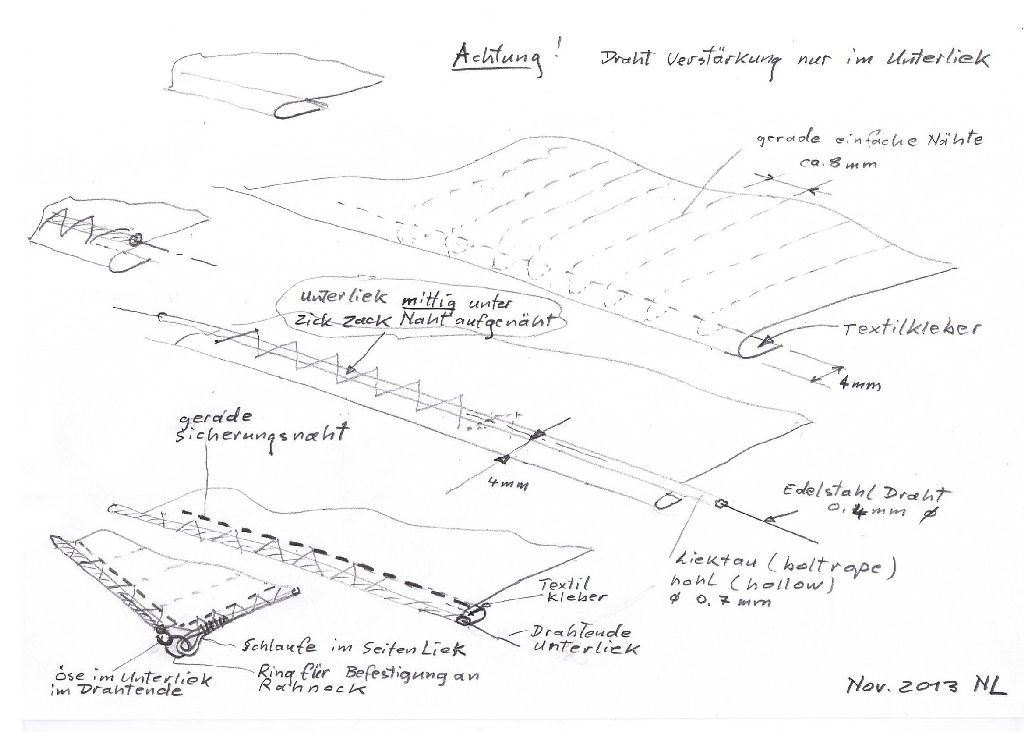
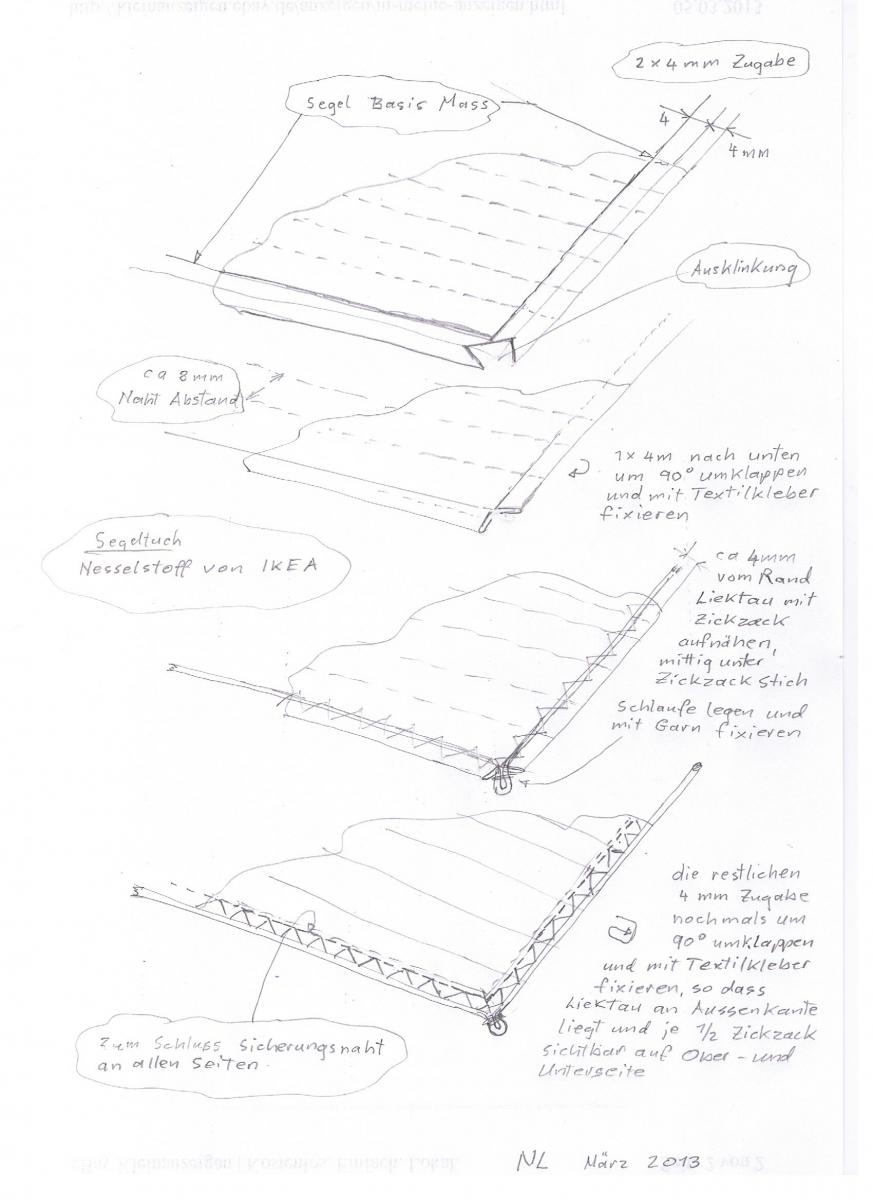
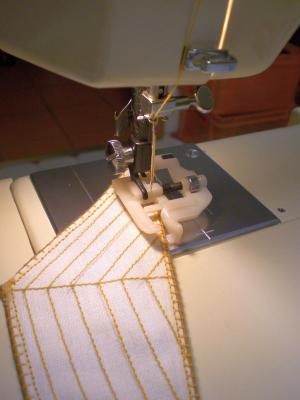
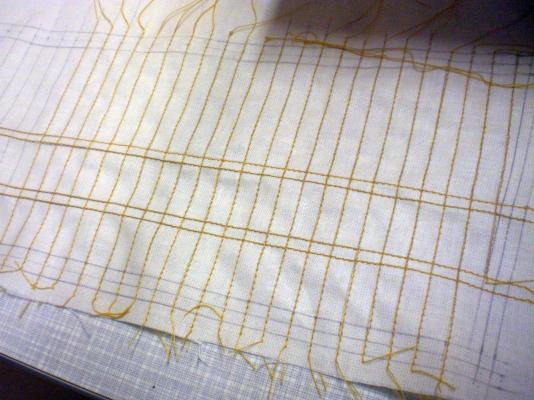
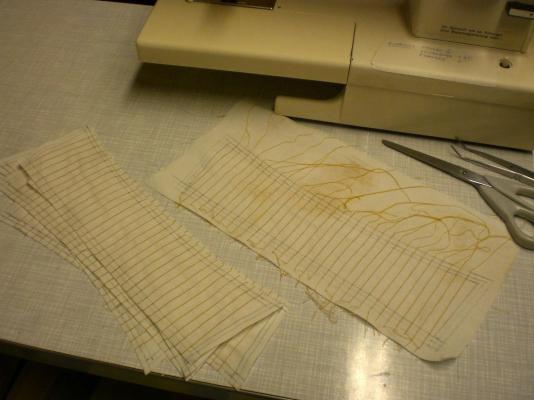
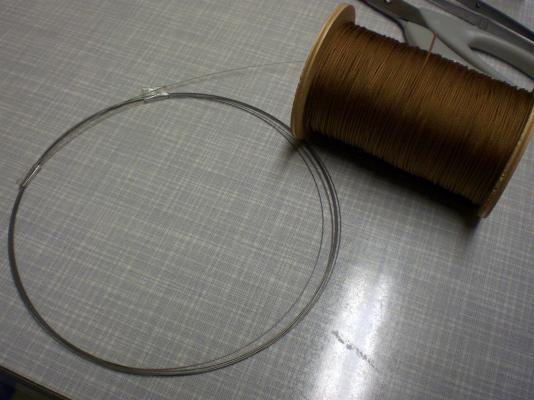
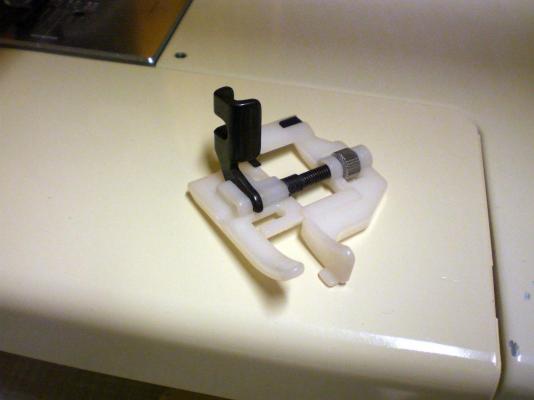
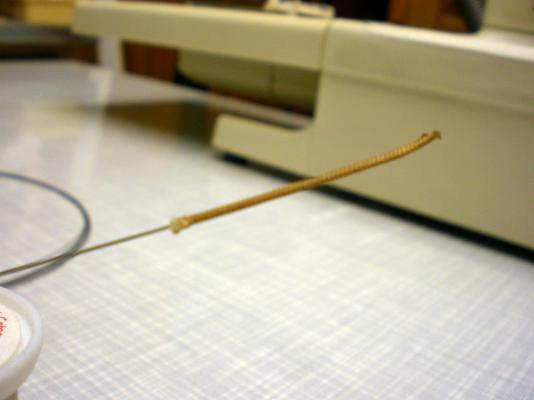
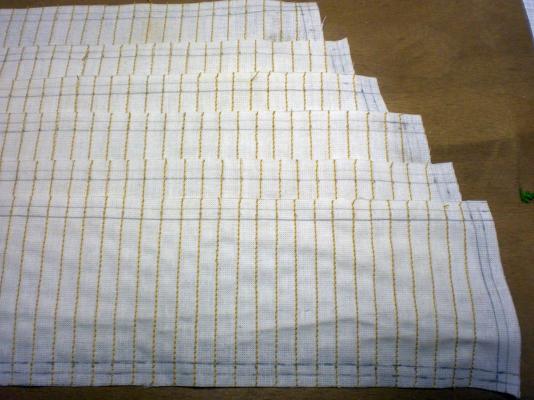
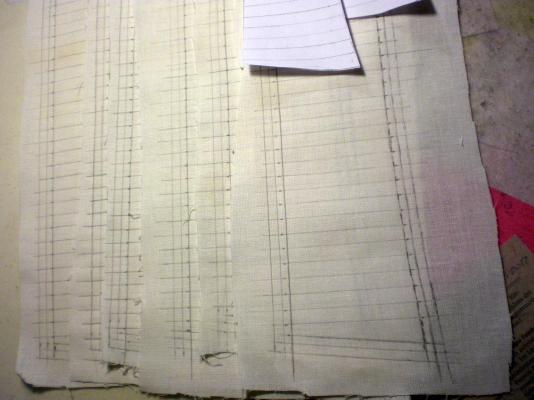
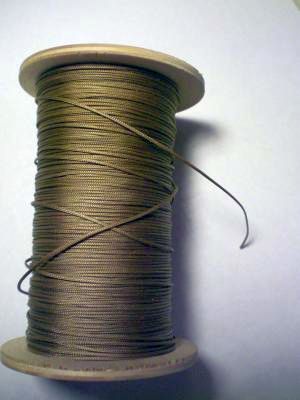
Build log part 42 SAIL MAKING PART 2 start with the straight seams, here distances 8mm sew on the horizontal reff lines sew a bit out over the pencil lines trim off the Surplus Cloth with fringed out Ends, but leave 2 x 4mm markings standing do some Trial machine sewing on the boltrope this 0,4mm spring hard stainless steel wire goes into the woven Polyester thread should be no Problem if the wire edge is deburred and rounded carefully before inserting your result should look like this attach rings to the bottom outside boltrope Ends (bend a small Loop on the reinforcement wire Ends to pick up the ring) this sewing foot for the machine is used for the last sewing seam parallel to the bolt rope and goes all around the sail Build log part 43 to follow.... Nils


- 269 replies
-
- 10
-
-
Nice Name for this Little gem Peter and also the nameboard nicely done I wish you the same success with the rigging and her sails Nils
-
on which Name is she paptized Peter ? a great model !! is it so that we shall not see her rigged with sails ? Nils
-
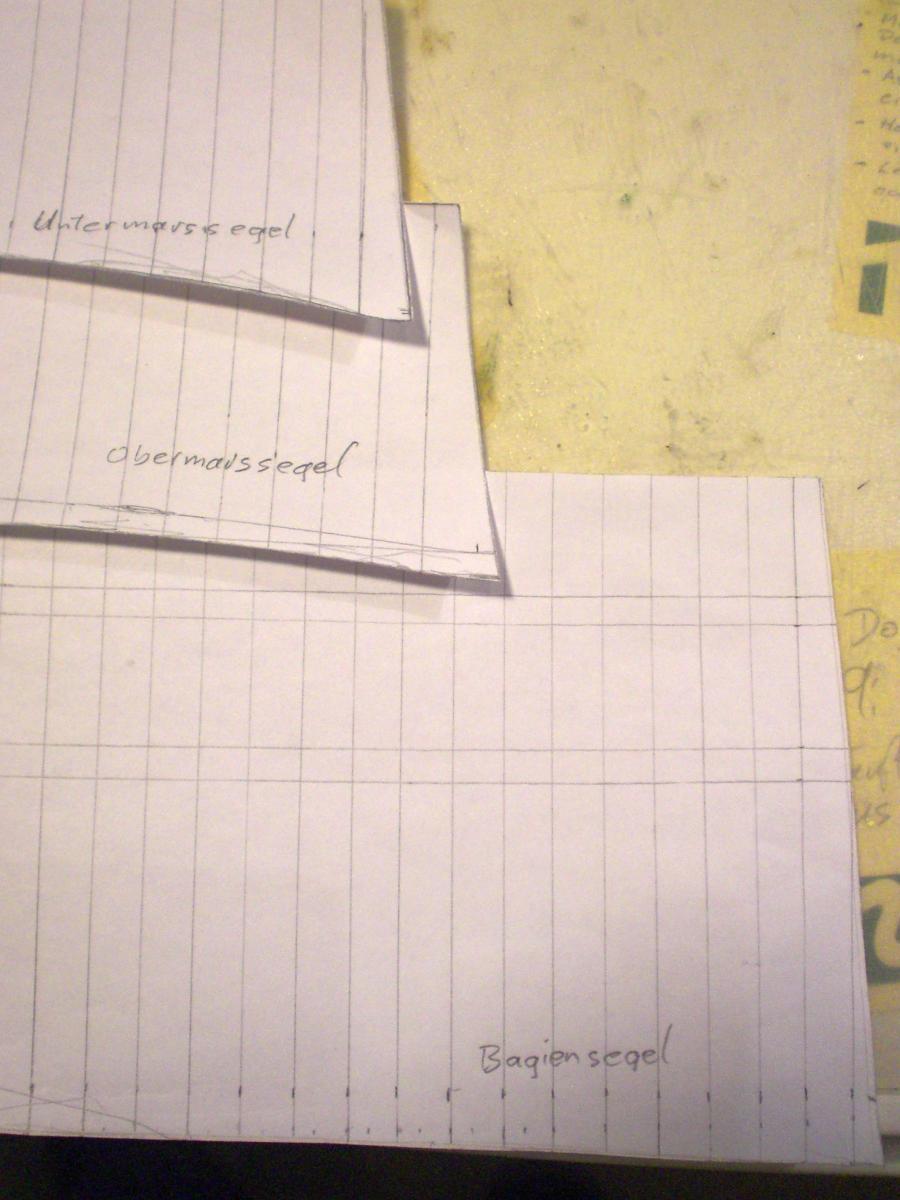
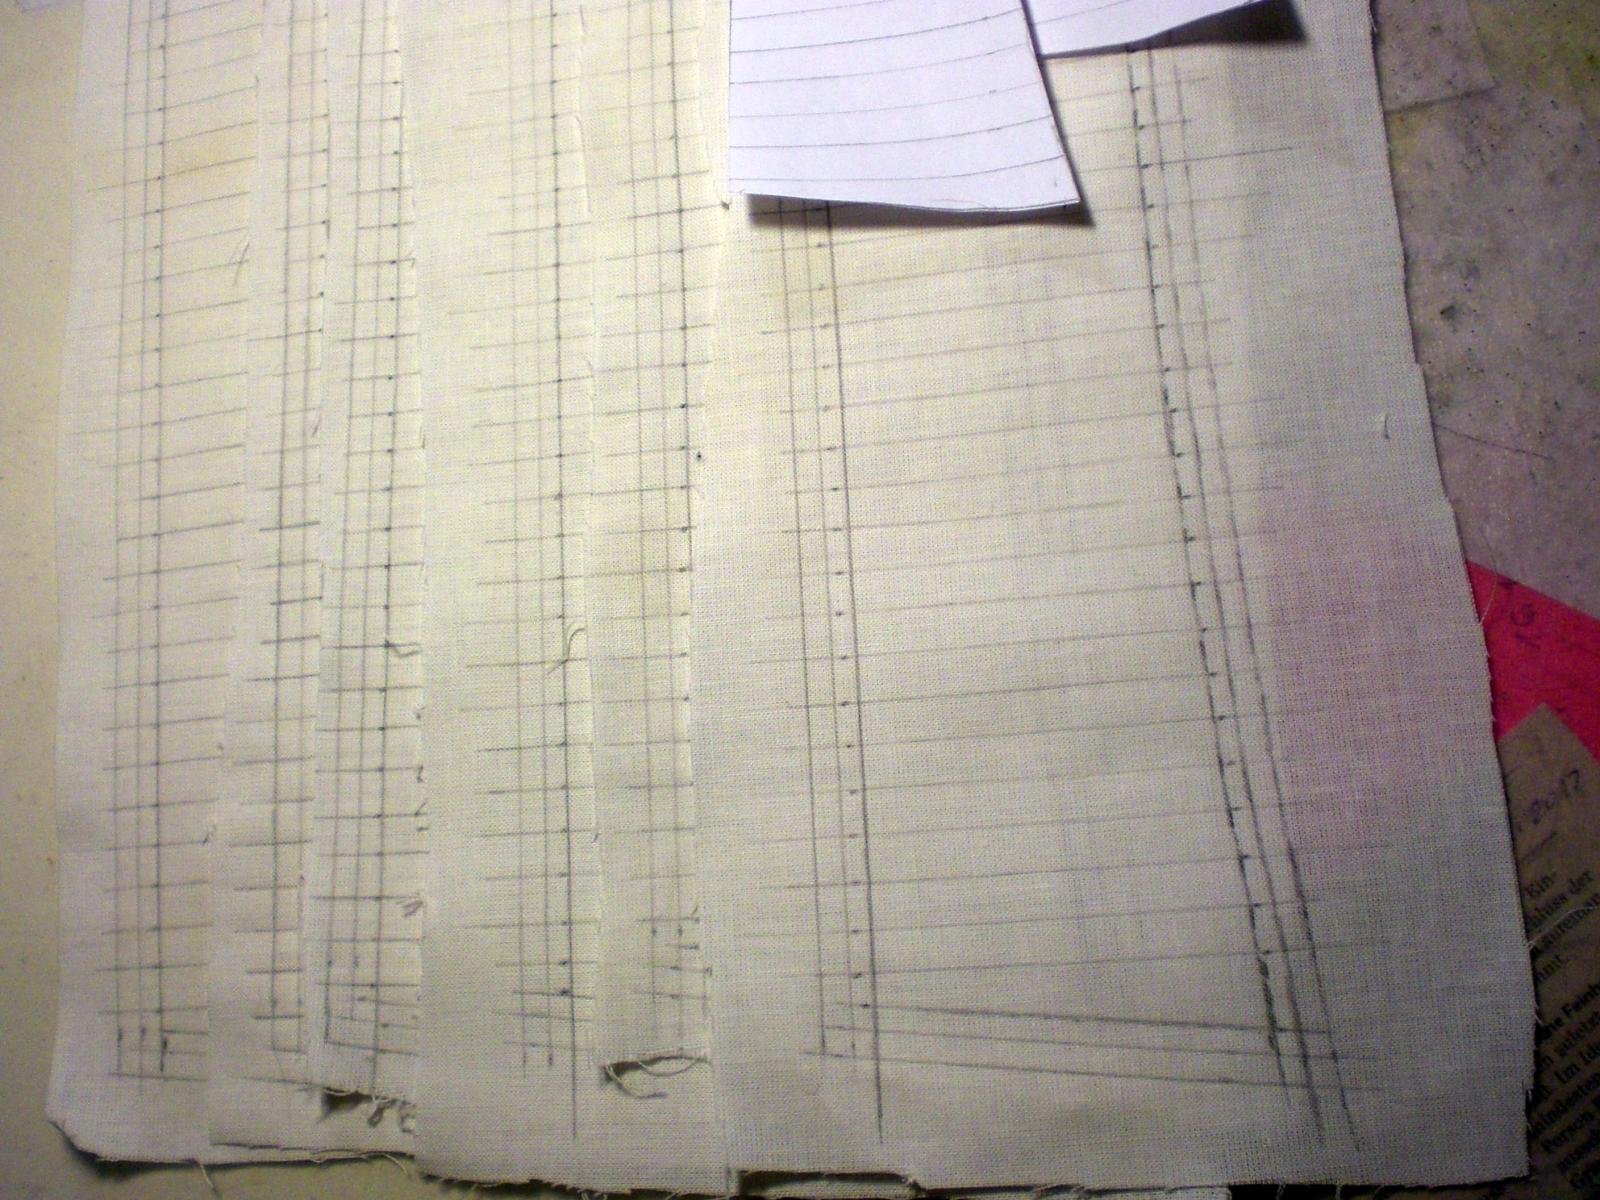
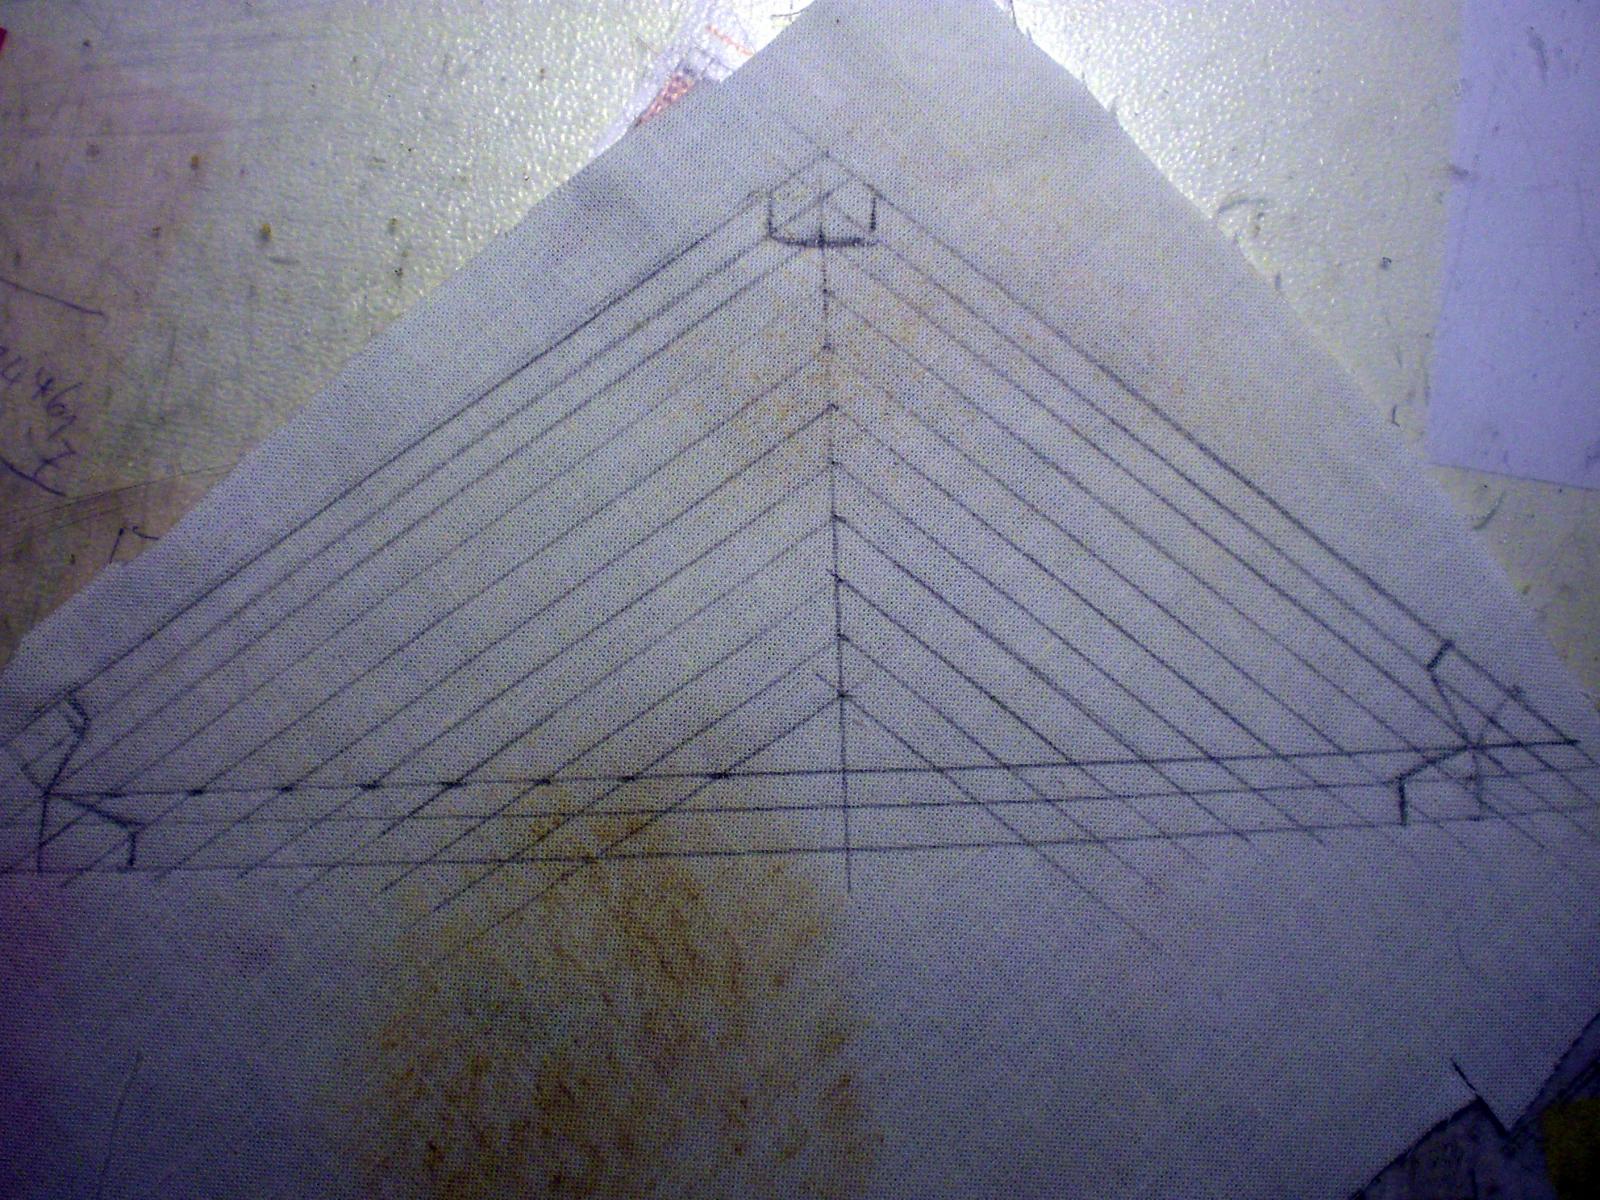
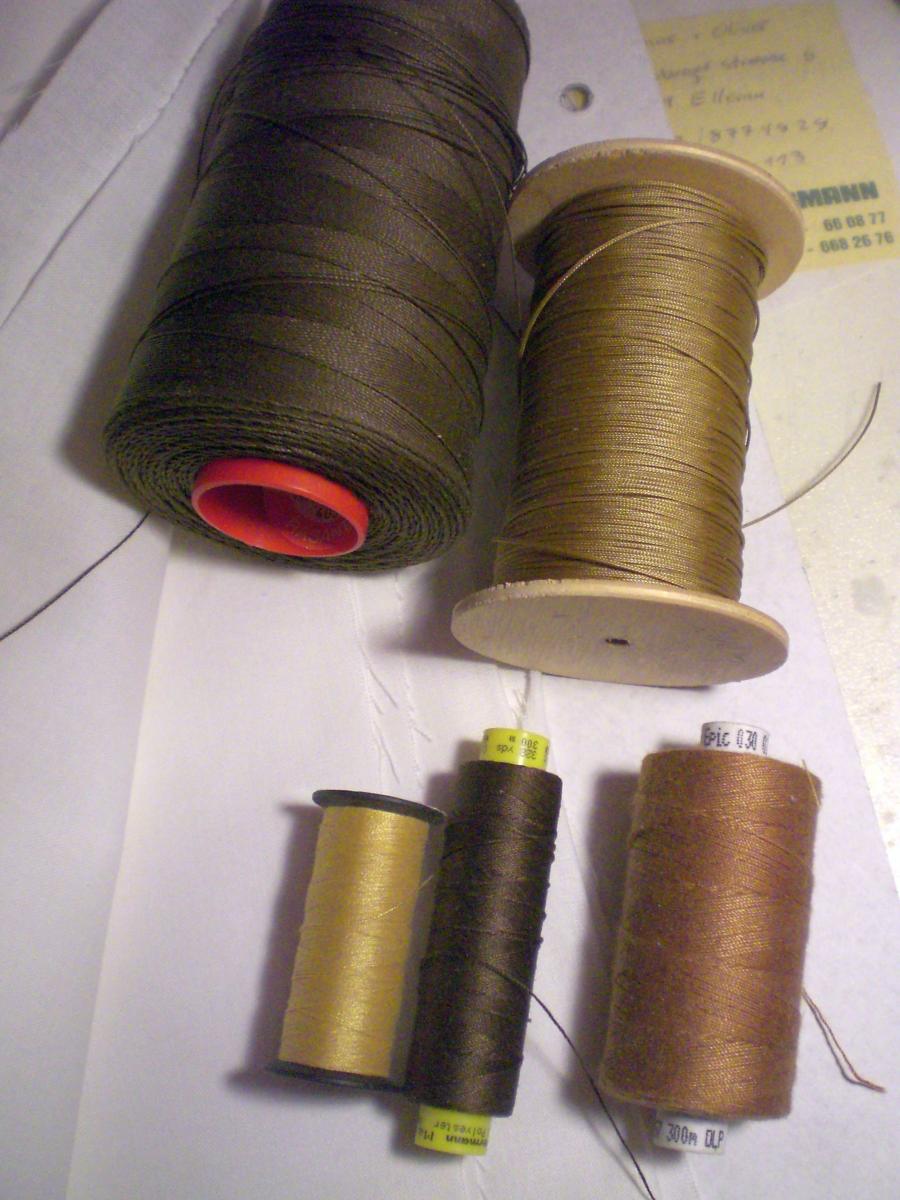
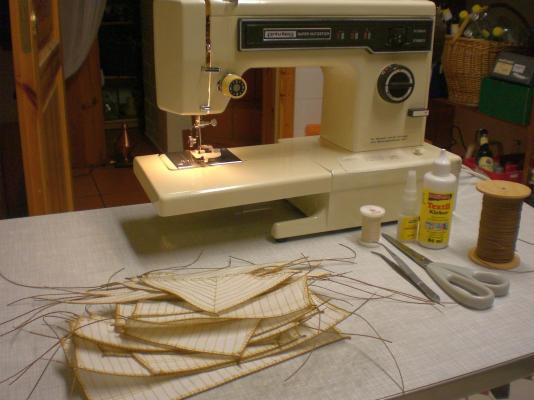
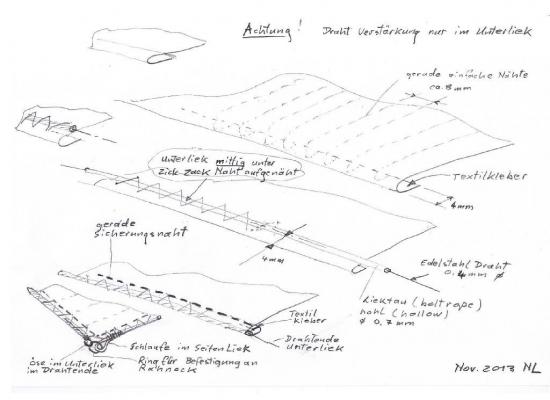
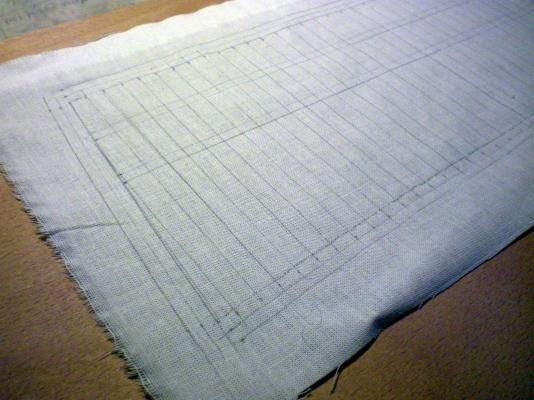
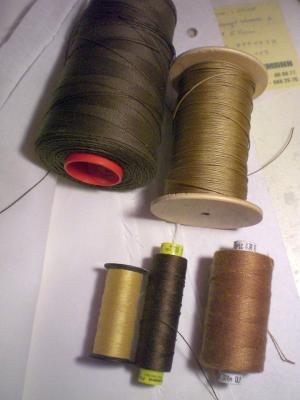
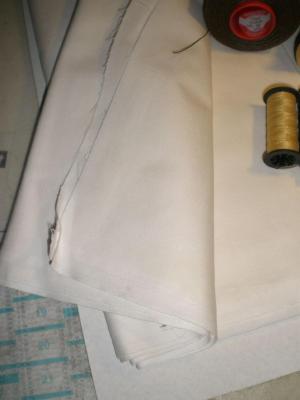
Build log part 41 SAIL MAKING this is the Basic sail Cloth, fine woven Cotton from warehouse IKEA the different threads, all 100% Polyester thread textile glue for prefixing the folded edges (instead of Fixing with needles) this is hollow woven Polyester-line (will be used for boltropes) first take the sails dimensions, horizontal width on top an bottom, vertical lengths and draw a paper pattern (template for transfering dimensions to Cloth) Cloth is then moisted (and spray-starched) and irond dry, then do transfered pencil markings on Cloth.My recomended procedure is to add all around twice additional parallel lines in 4mm distance fron another. Leave some additional Cloth all around ! That will give stability to the Cloth when sewing then mark the cutaways in the corners (cut later on) The vertical "seams" on the sail resemble the the individual Cloth breadths ( in scals here 7-8mm) the stain is what hapens if the iron is left on the Cloth too Long, well most of the stain will be cut away afterwards here handscetch how the edges are folded twice, how and when the glue for Fixing is applied, and how and where the boltrope is attached by laying a zick-zack stitch over the centered bolt rope. Need some experience the bottom boltrope, only This one !, (The hollow woven Polyester thread) is reinforced with a thin (0,4mm) springhard stainless steel wire. The wire is pushed into the threads Soul by rounding the wire edge thorrowly before. Leave Surplus wire Ends Standing out. You shall bend Loops to the Ends later on Will be continued..... I hope it has been understandable so far, be assured it works well Would love to receive some Feedback from whoever tried this procedure (preferably the "never give up" type) Build log part 42 to follow.... Nils


- 269 replies
-
- 12
-
-
Very nice work Len, this is a real eyecatcher !! Nils
-
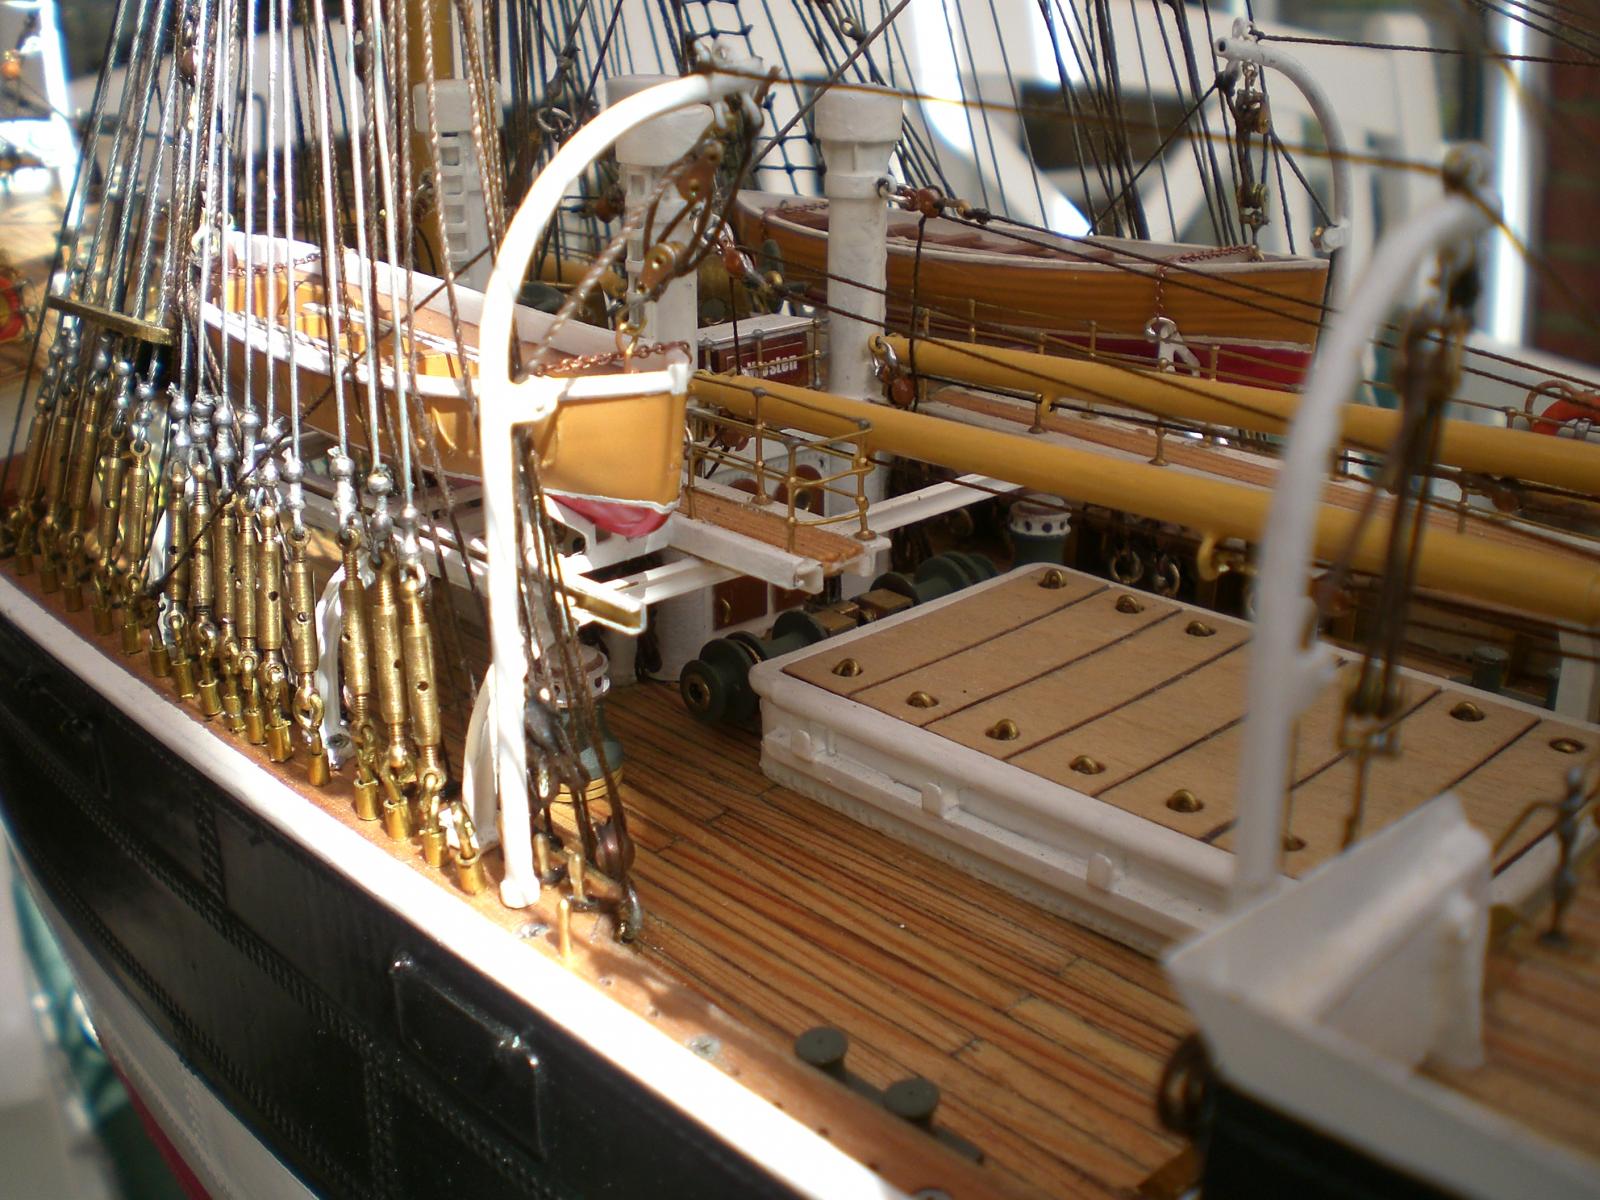
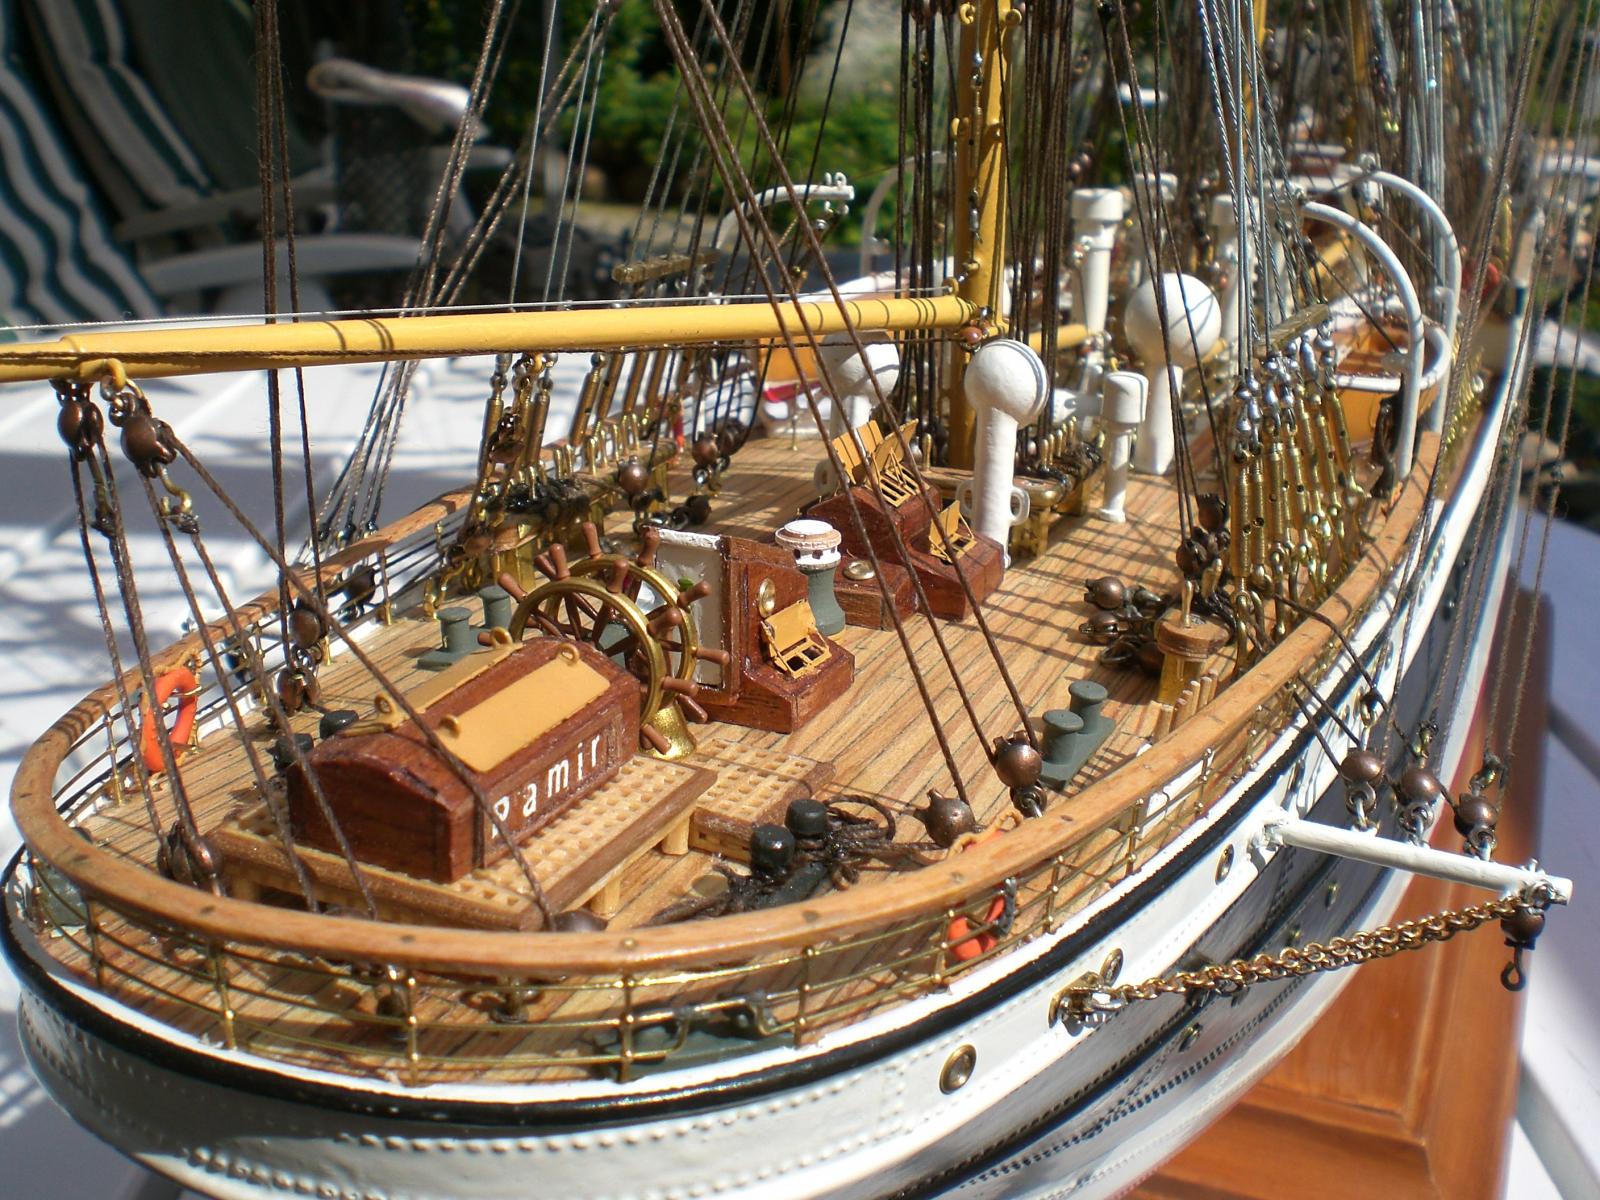
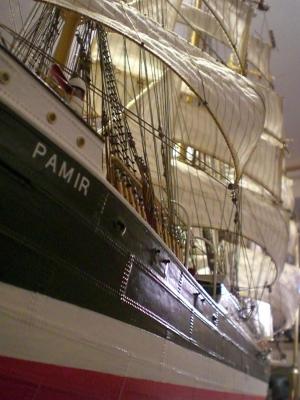
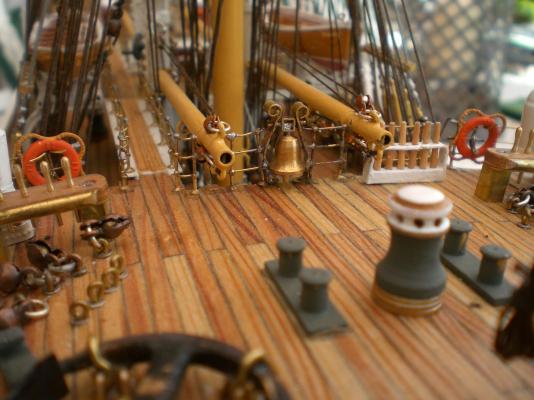
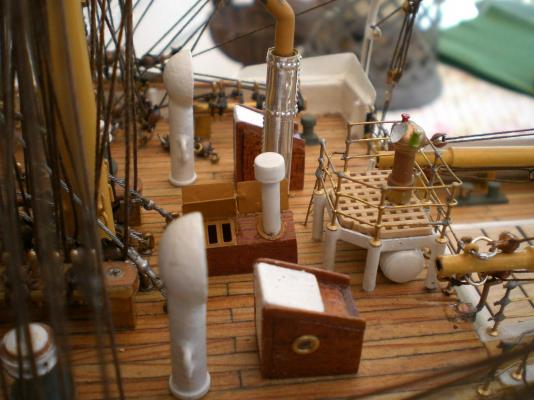
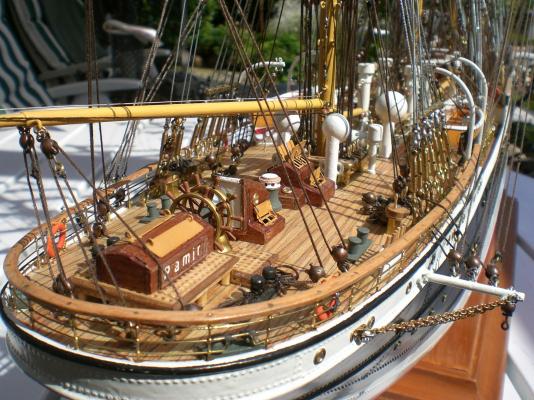
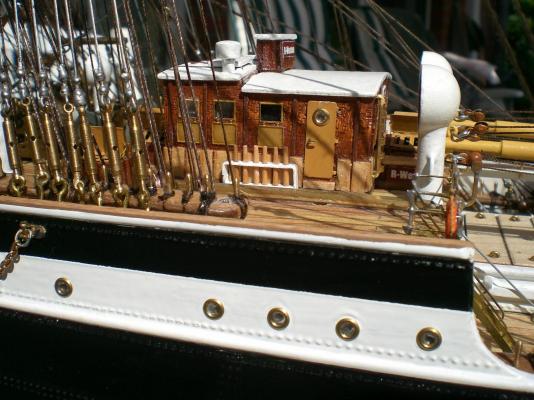
Build log part 40 forecastle deck, ships bell attached poopdeck view to completed highdeck Forward welldeck view on starbord side, ratlines under way on third mainmast not any suplus space... I tried to Keep it tidy though Build log part 41 to follow That one shall be comprising the sail making..... Nils


- 269 replies
-
- 17
-
-
Lovely model Denis ! this kit just must have been waiting for you to lay your skilled Hands on, and you sure are making a gem out of it, my respect, love to see it grow with every post you make... Nils
- 555 replies
-
- 2
-
-
- sovereign of the seas
- mantua
- (and 1 more)
-
Very impressive model George Well done !! I love the Details and the scale Chosen for this one... Nils
-
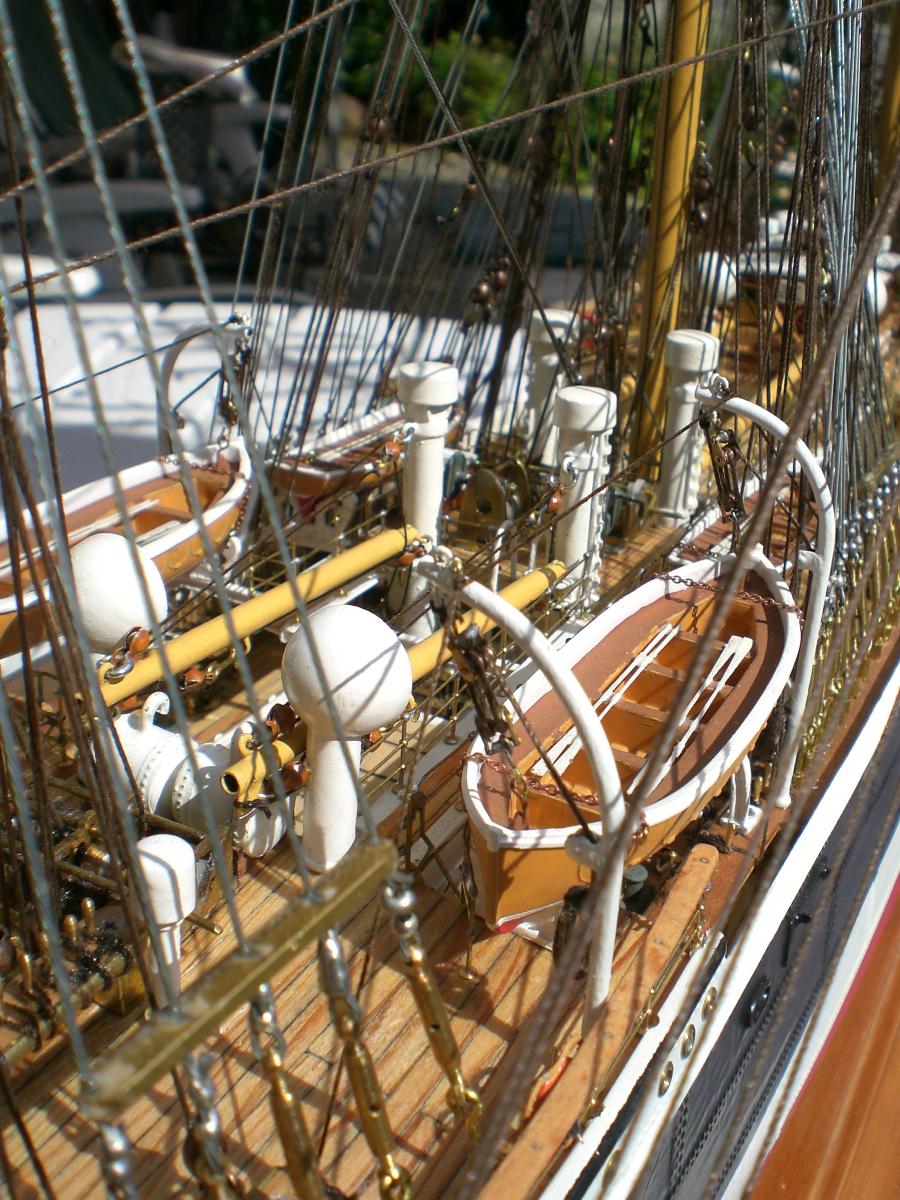
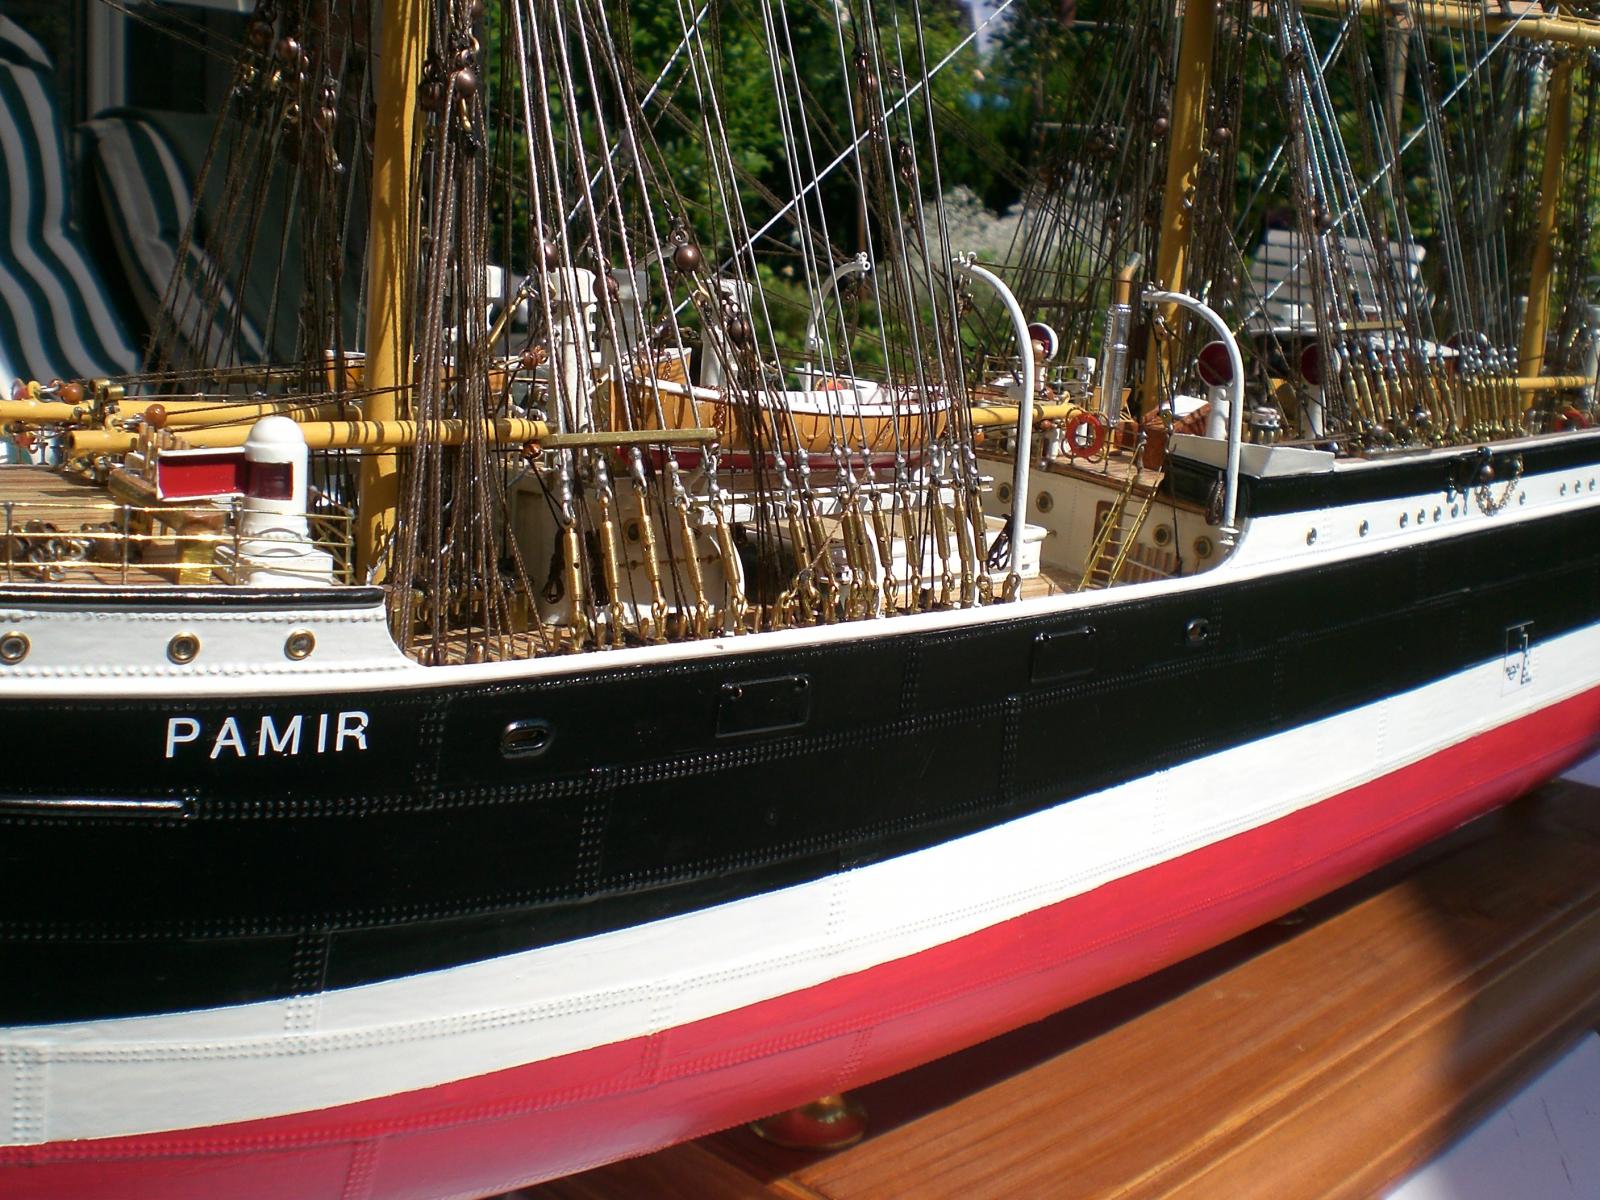
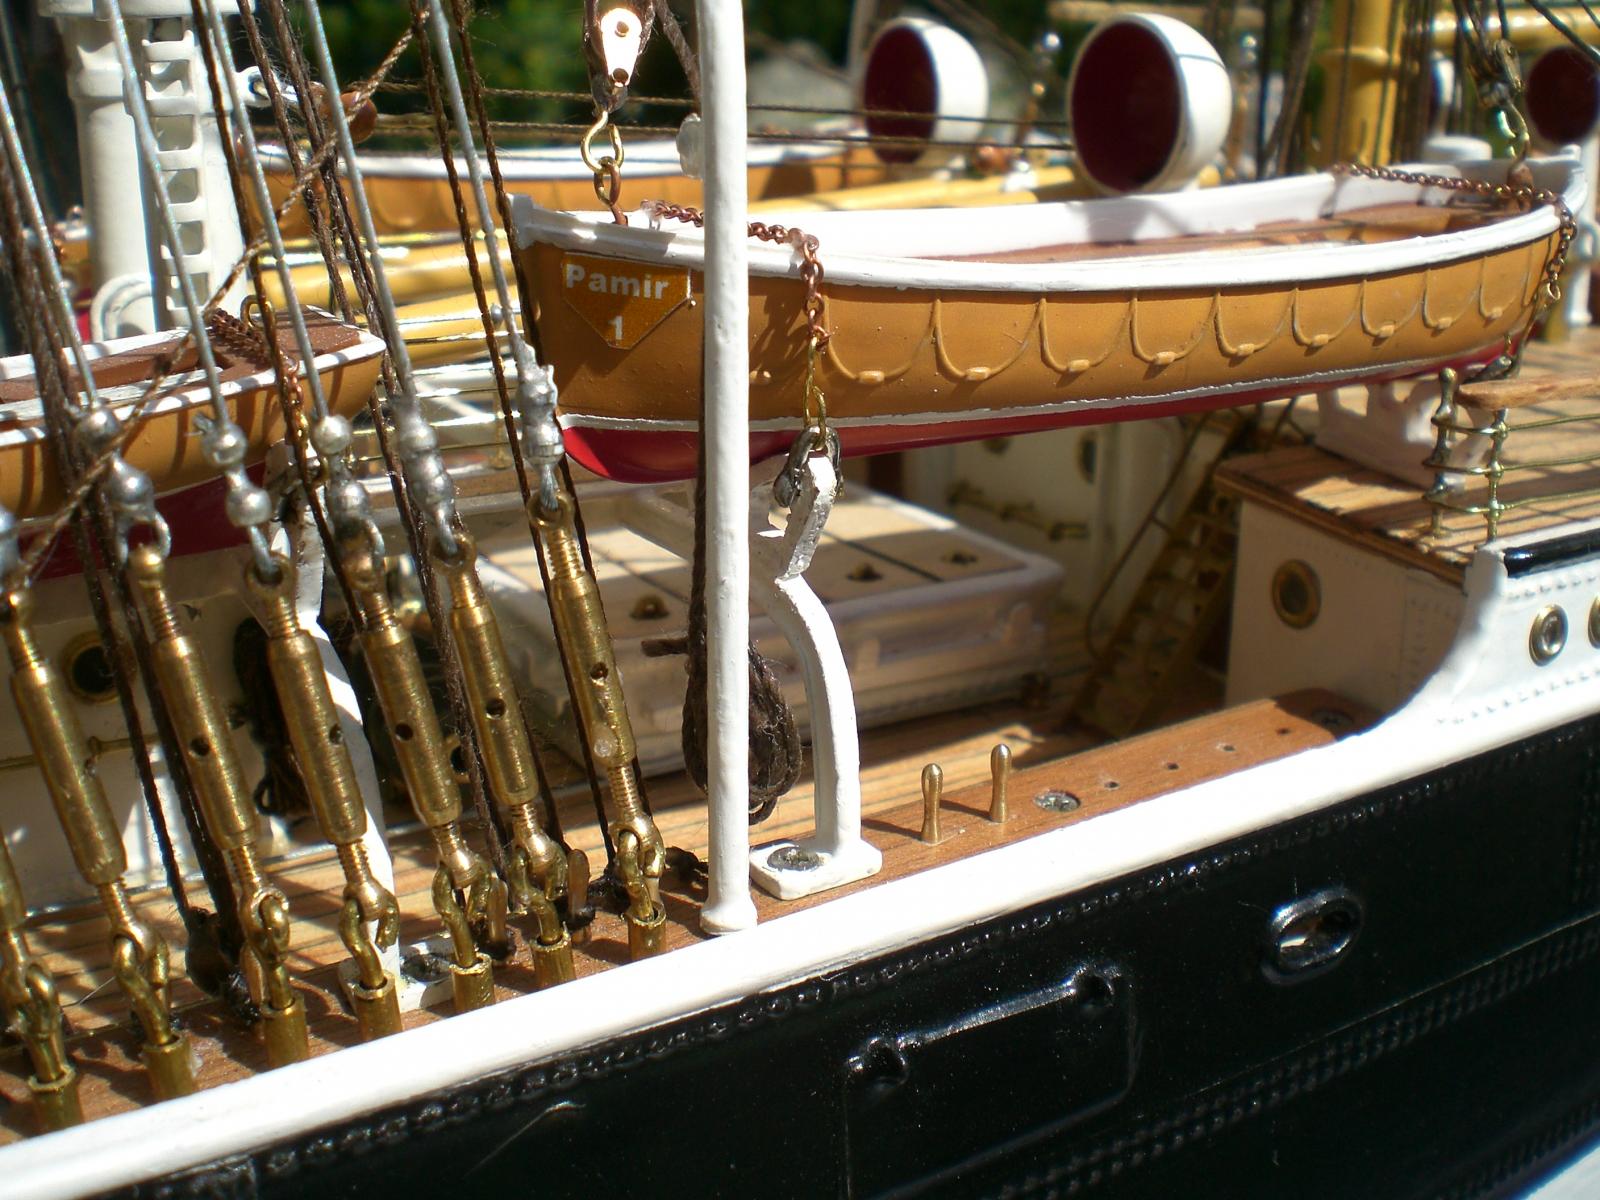
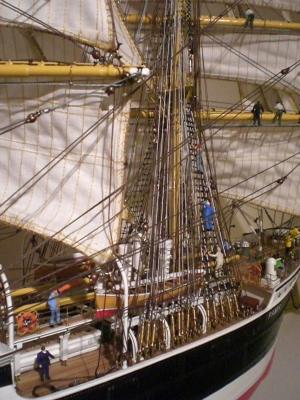
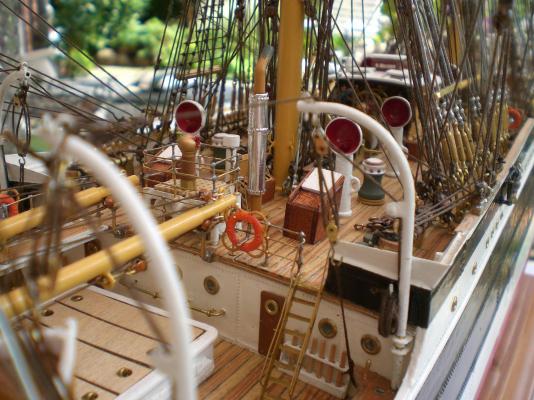
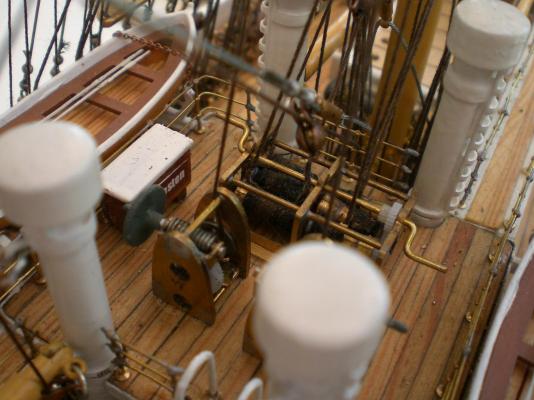
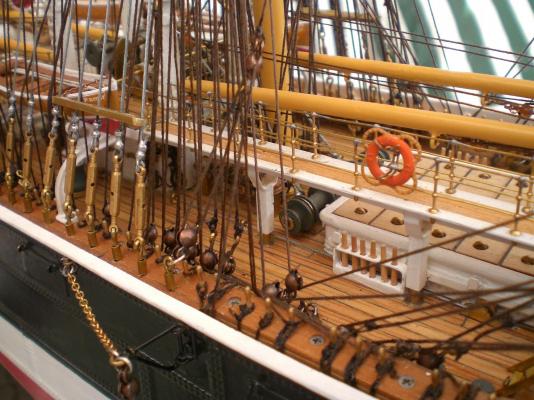
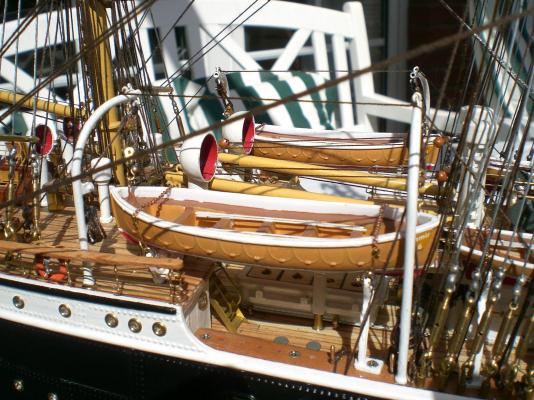
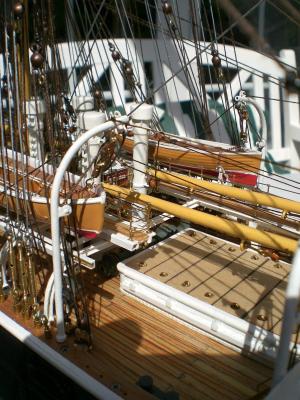
Build log part 39 view on aft deckhousing platform (boatstation and operating area Access to winches) down below, between the cargo derricks hatch #4 view looking Forward on highdeck catwalk stanchions fitted to brass angle bars, turned to the outside, thus leaving space for 3 Walking Planks in the middle small Access ladder to compas platform in front of the insulated Galley exhaust view over aft welldeck, shrouds mounted, but no ratlines yet. The lifesaver rings I found in correct scale at Billing Boats for those who were asking about the pig Kennels for live pork, here they are... running rigging ropes coiled preliminary on bits of Wood, for attaching to the sails later on view on port Forward welldeck and boat station quite a lot of ropes, stays and running rigging ropes and running rigging for six Yards and sails per mainmast Build log part 40 to follow.... Nils


- 269 replies
-
- 15
-
-
Crackers, B.E., Mark, Thank you all for those appreciative comments, I feel very honoured that my model is so much liked, there were times when I thought that the rigging would never end an I should have left away at least the sail relevant running rigging. Nils
-
Hi Rob, the plates are all self made...., there is a Brief Demonstration how I did it, If you would like to see at the end of Build log part 2 for my "steamship Heinrich Kayser" in Topic scratch built models in Progress. There I used exactly the same procedure as for Pamir Nils
-
Thank you Michael Nils
-
Congrats to your very well done model Panagiotis, the model hull design was a bit strange to me in the beginning, but therefore such highly interesting to follow. You seem to know exactly what you are doing. A great build !! Thanks for sharing this beautiful model log Nils
- 116 replies
-
- 1
-
-
- kilkis
- mississippi
- (and 2 more)
-
Thank you for your word John Nils
-
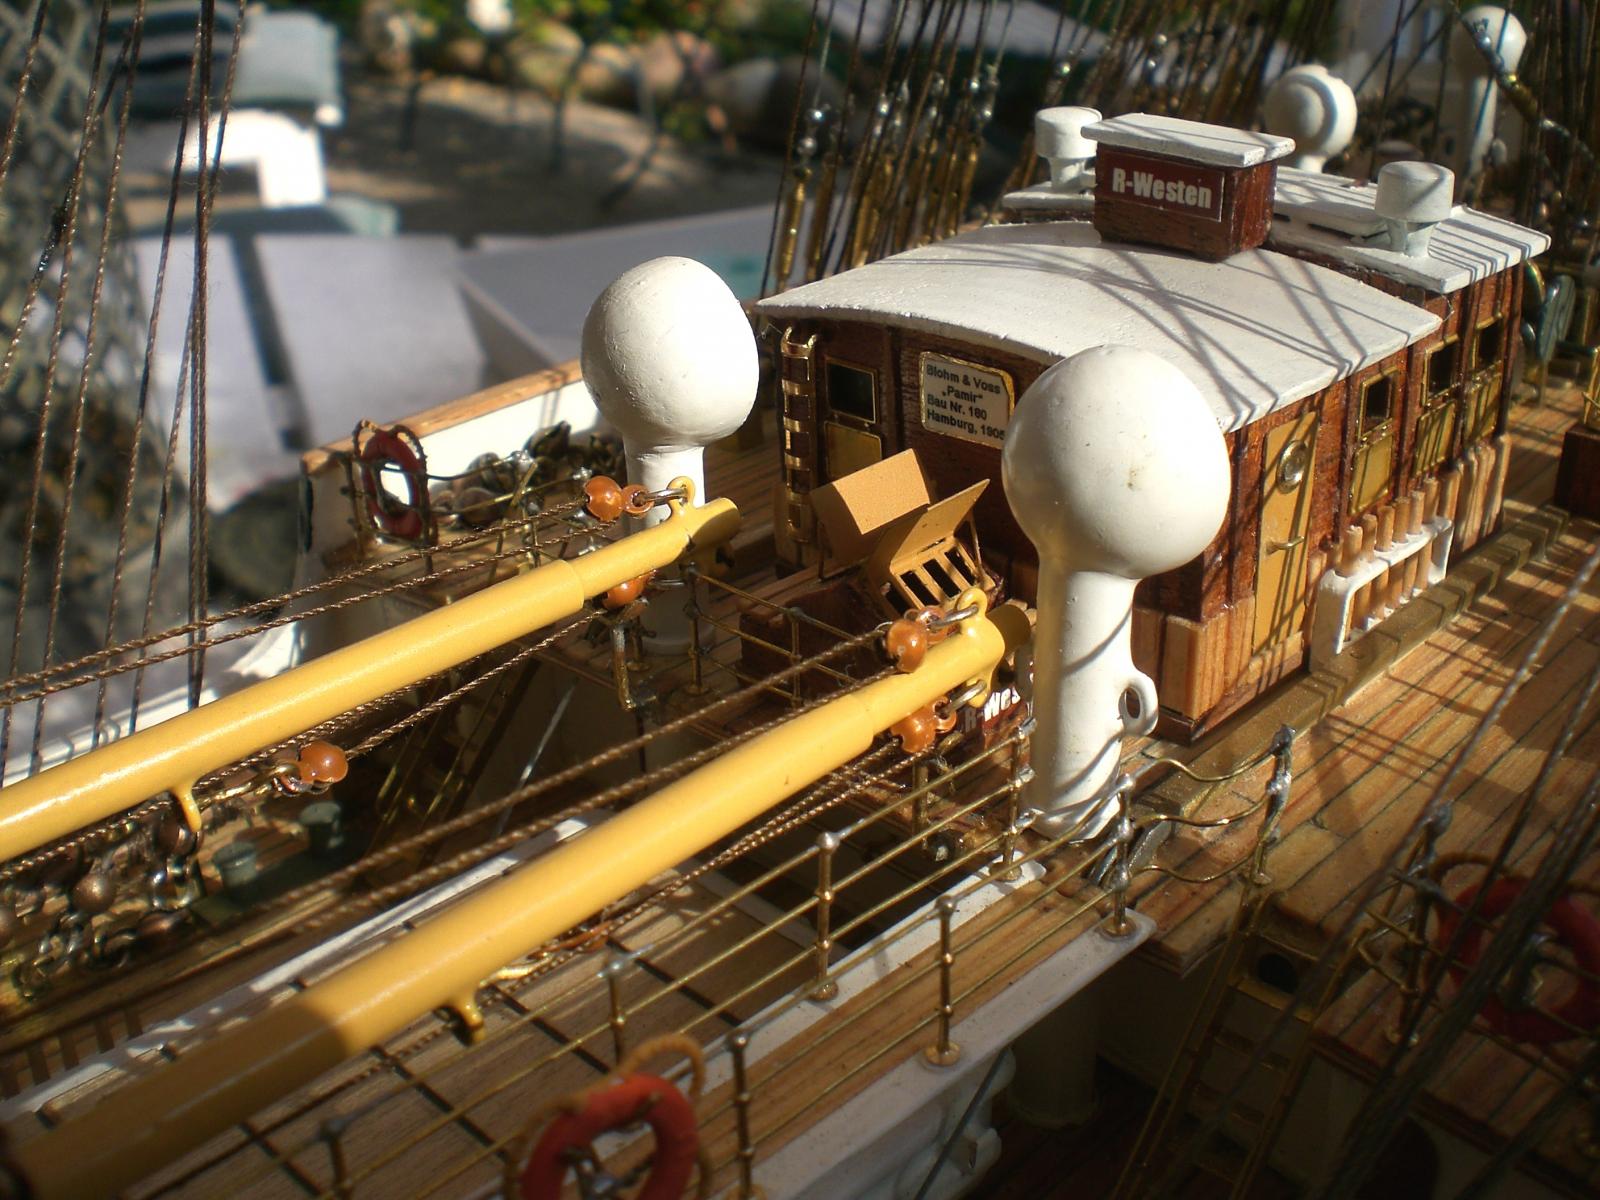
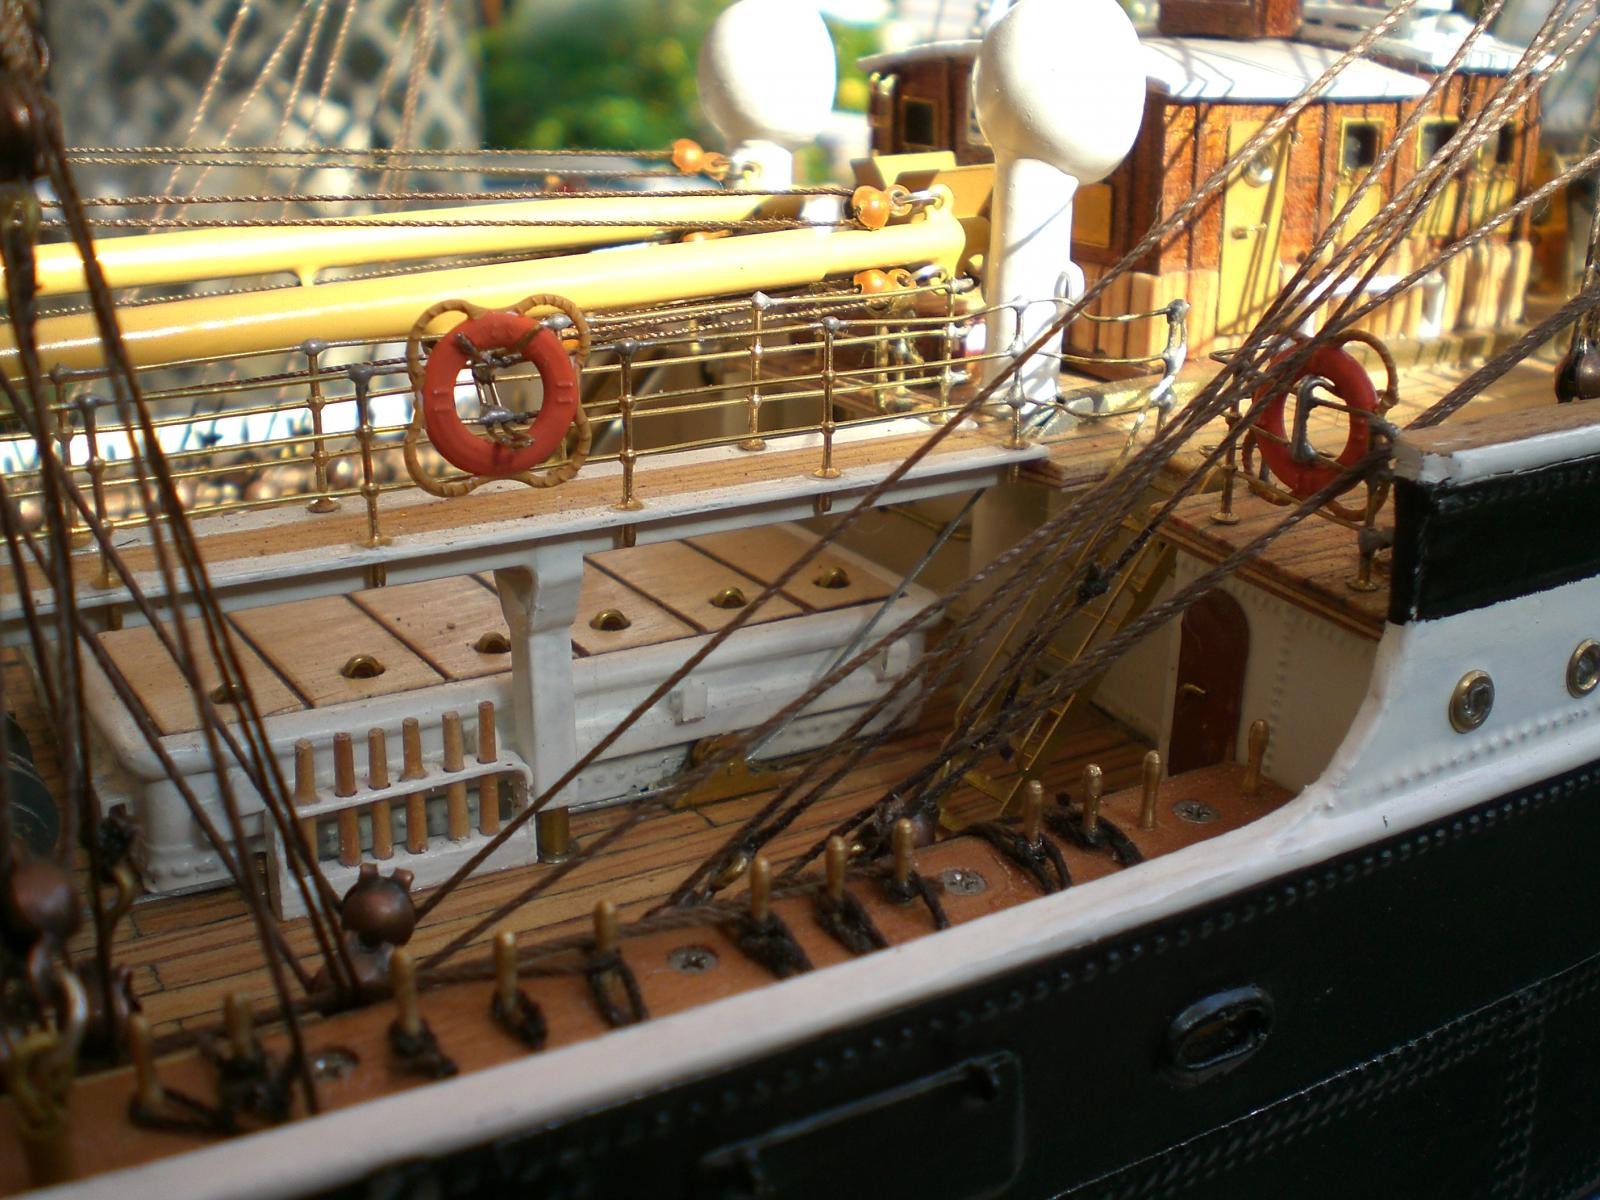
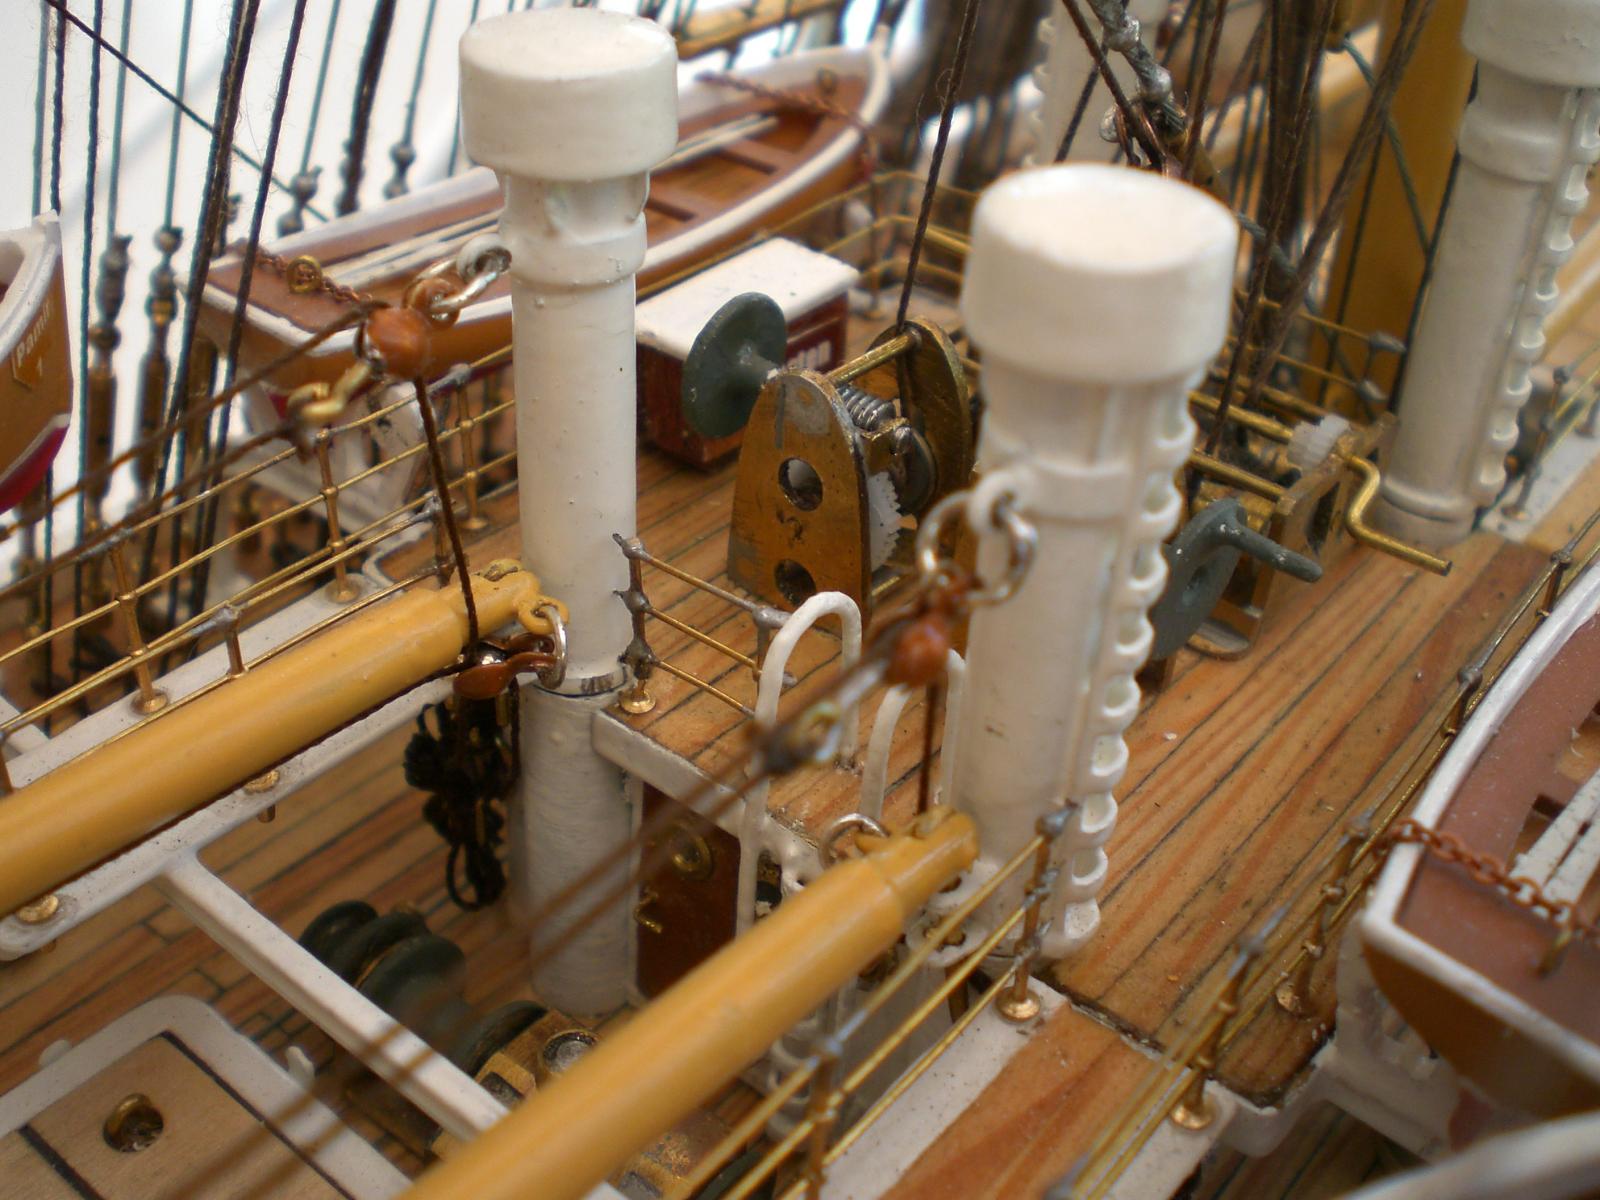
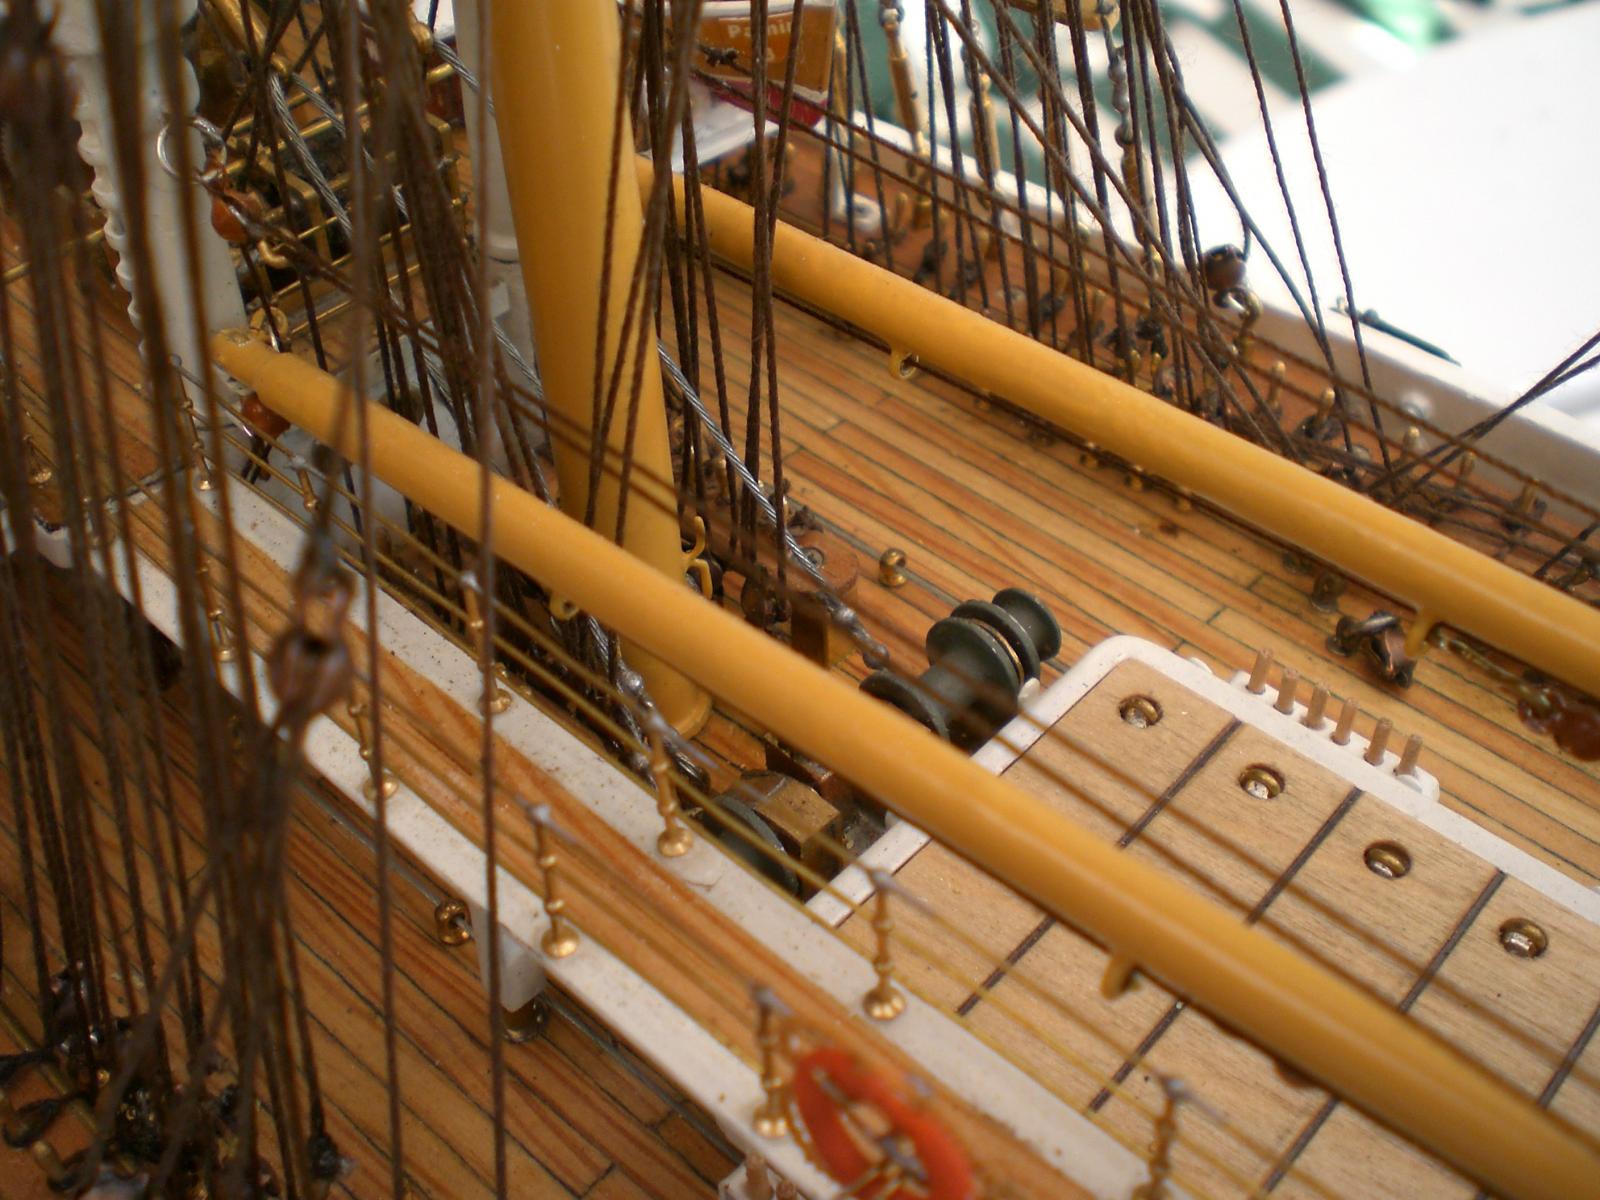
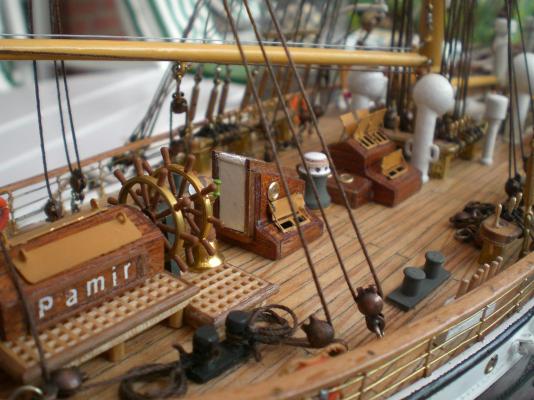
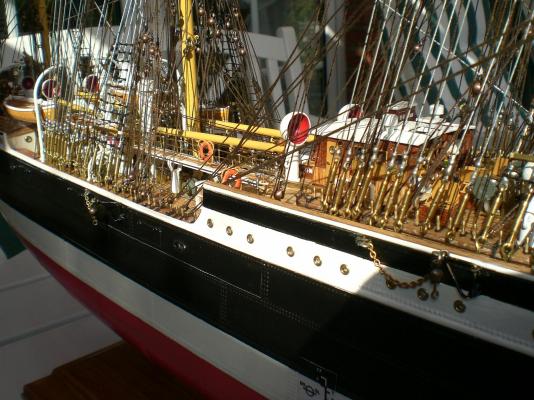
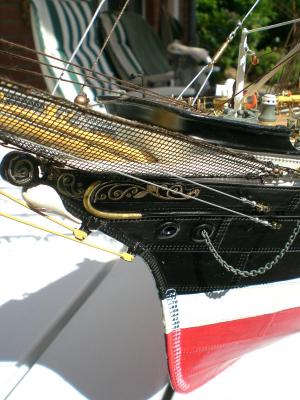
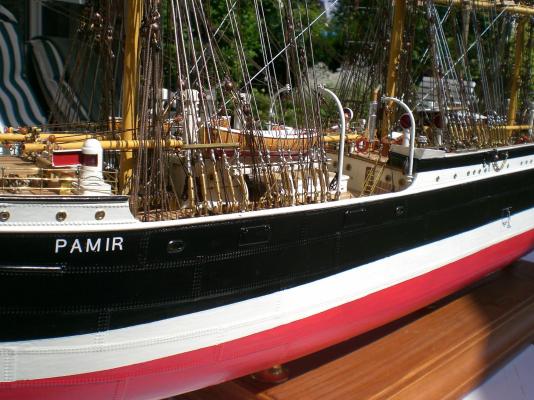
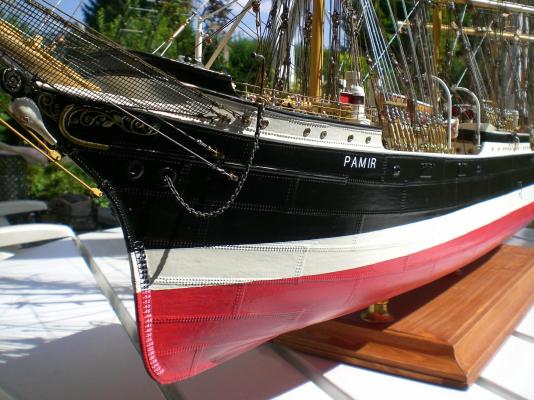
Build log part 38 Here come some Pictures I made whilst daylight ilumination, I find they are sharper and better in colour Quality than those made in the Hobby room Trust the sail making shall then start with log part 41 it has now nearly been 2 years since the Pamir was keellayed at Nils`s shipyard Deck has just been cleaned up for inspection the shrouds are fitted, but ratlines still missing tackled Davits at starboard aft boatstation, boats strapped down all bow stays set through tightly secured the day for relaunch after the 1951 changes is coming nearer day by day portside view to the ships comand- and control area on highdeck second hatch area on foreward welldeck portside aft boat on its cradles with functional strapp down device all paint touchups done view on the Jarvis winch for the third masts bracing tackle Build log part 39 to follow.... Nils


- 269 replies
-
- 10
-
-
Alexander, a "Masterpiece" is being created under your skilled Hands !! Well done Nils
-
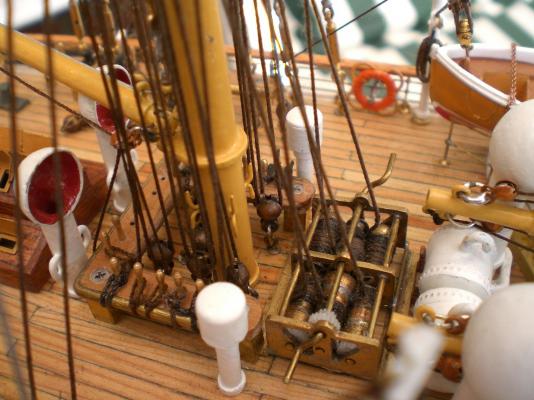
That is absolutely correct Bob, I have been told that the Young lads had to learn by heart the Location of every single belaying Point so that even in the dark nobody would by mistake loosten the wrong line, which could be fatal for safety and lives Nils
-
Stuart, a great build and a pleasure to watch your log, shall stay tuned Nils
-
correct Steve, so we both go for "learning by doing".... cheers Nils