BANYAN
-
Posts
5,966 -
Joined
-
Last visited
Content Type
Profiles
Forums
Gallery
Events
Everything posted by BANYAN
-
 That is a neat way to do the boat Mark. I especially like the base (top?) piece you have made with the securing points. Rather than carving out the interior, I thought this was a 'plug' and you would build the boat hull around it? In the next boat (or version if needed), you could draw and cut the slots where required on each slice and then connect by carving the rest of the slot for the frames? Sorry not trying to make extra work for you cheers Pat
 -
She is coming along very nicely Dave, nice work. Thin CA before painting should do the trick - medium/thick especially may not penetrate especially after painting which may seal the card? cheers Pat
-
She is looking mighty grand and very fine there Greg! The detail at scale is impressive and I understand the difficulties, as I am working on HMAS Vampire at the same scale (Frustrating at times eh?) cheers Pat
-
Thanks Popeye, Mike, Brian and Mark for looking in - appreciate the interest. Having fun with the rattlin Mike a tad tedious huh? cheers Pat
- 517 replies
-
- 3
-

-
- Endeavour
- Artesania Latina
- (and 1 more)
-
HI Wefalck, I had forgotten this build and only had a chance to revisit today - I started liking most posts then thought that may be irritating - sorry. All I can say is that I am very impressed with your machining abilities and capacity to think up alternate mechanisms. I look forward to the next instalment. cheers Pat
-
That's a 'bottler' Dan - or should I say a 'corker' (sorry mate couldn't help myself) cheers (and now back to my day job) Pat
-
Hi Byron, no problems taking questions mate, that is what these logs are all about My kit was the Artesena Latina (AL) but probably not that much different wrt their content. I stopped using all AL parts and accessories about 2/3s way through the hull build, so all my rigging and deck furniture etc is either scratch or after market. My rigging is a combo of Morope (tan) and home made (black). I had already purchased the Morope before acquiring my rope walk so I was compelled to use it or waste my money - easy choice Essentially, I used the rigging calculator (spreadsheet) developed by members JimLad and DanVad which is available on this site. I simply rounded up and down the calculated sizes and simplified the range to 4 tan and 5 black sizes, and applied the general rule of diminishing rope size the higher in the rigging. So while not absolutely scale correct, it should be close. As to references, I have not bothered with the AL instructions at all. I have basically used the AOTS book Capt. Cookes Endeavour by Karl Marquardt as my primary guide, but where there have been obvious or contentious issues I have also used the Replica, Ray Parkin and the feedback of some of our members to steer me. James Lees (The Masting and Rigging of English Warships) has also been very useful. In a nutshell, there will be difference to other builds; this is simply my interpretation. FYI - Ray Parkin and Karl Marquardt were members of our club and there were some interesting debates about the differences in ship construction/fittings and rigging Yes, there are differences between these authors interpretations, and with the NMM plans, the replica rigging etc - although the vast majority of the rigging is generally the agreed. Have a peek at MSW members Greg Lester Mike C and Shipaholic build logs to read of some of the issues that have arisen. cheers Pat
- 517 replies
-
- 4
-
-
- Endeavour
- Artesania Latina
- (and 1 more)
-
Hi folks, this sounds fairly promising although not confirmed yet. Henry V 'great ship' Holigost believed to be found in River Hamble in southern England http://www.abc.net.au/news/2015-10-13/one-of-henry-v-great-ships-holigost-likely-found-in-england/6848774 and http://www.independent.co.uk/news/science/archaeology/the-holy-ghost-historian-pinpoints-final-resting-place-of-one-of-medieval-englands-greatest-ships-a6689901.html cheers Pat
- 14 replies
-
- 11
-
-
Good luck Dan, as that add said Bugger! Just when things were going so well - one of Sod's laws isn't it. Look forward to your solution. Will you simply cut off neat just above the eye/loop and put a cap on? cheers Pat
-
Thanks Greg, appreciate you looking in; and the many others for their likes. cheers Pat
- 517 replies
-
- 1
-
-
- Endeavour
- Artesania Latina
- (and 1 more)
-
Cat Head dimensions
BANYAN replied to BANYAN's topic in Building, Framing, Planking and plating a ships hull and deck
Thanks Clare. -
Cat Head dimensions
BANYAN replied to BANYAN's topic in Building, Framing, Planking and plating a ships hull and deck
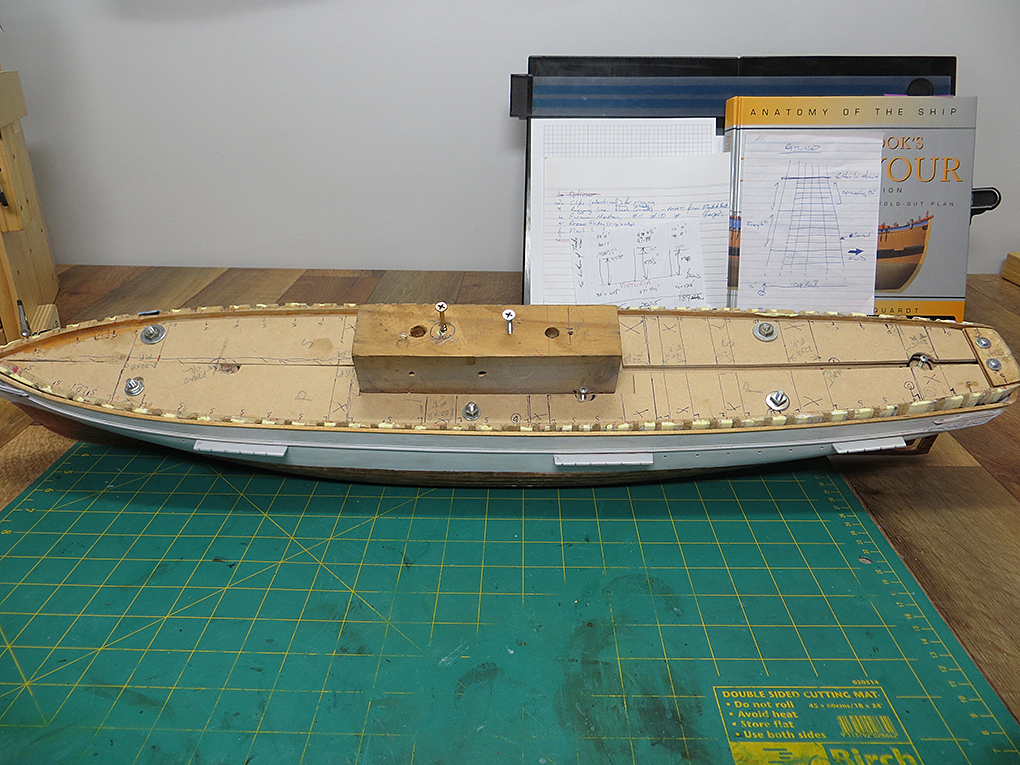
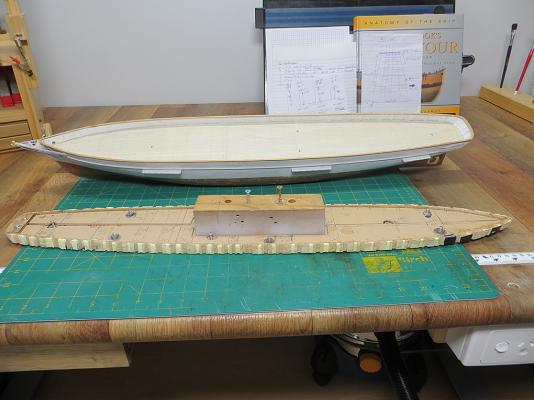
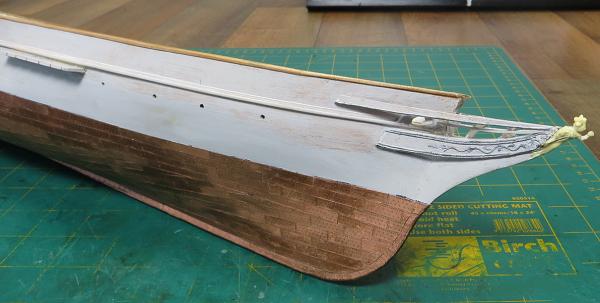
Hi folks, another update to the HMCSS Victoria - and yep - another question? We are progressing quite well as can be seen from the photos with the bulwarks now added and some decorations applied. We are using some experimental techniques with this build as it is a club project where we can all learn so what better subject. The photos show the deck (printed wood veneer), which turned out great. The bulwarks are fitted with all ports scribed (not opened) and these were son delicate we had to make a special jig to support them while they were fitted (and be reused if we open any of the ports). The jig has a base with two sliding outriggers which have the pattern (negative) of the roughtree timbers etc spaced as needed. The jig is screwed to the deck in places where the holes will later be covered and the outriggers extended to the edge of the hull to support the bulwarks etc. the photo shows the jig only partially inserted to provide a hinty of how it was fitted; I will post another when fully fitted when/if we do open any ports The yellow and black stuff is tape to stop the glue holding in these areas. Once the bulwark had been glued in place, the outriggers were slid inboard and the jig removed. At a scale of 1:72, the decorations were just too fine to carve. Our talented member hit on the idea of scribing the pattern into the wood, then applying appropriately sized thread that had been soaked in PVA, pushing it into the scribed pattern to form the decorative pattern. When the glue dried, it held the thread in place and stiffened it sufficiently to make it look presentable. With some cleaning up and some further hull furniture still to do, the whole lot will be painted black (Victoria did not have gilding or highlight colours according to the Contract and log book evidence). The Question: All the photos we have are of Victoria in harbour with the guns run out and poking through their ports. We are trying to determine whether the guns would have been run-in and the gun port lids closed when at sea? In support of having them run-in: 1. There was no threat of war or immediate action in this area/era 2. The ventilation skylight hatches were open (midships around the funnel) which only had iron gratings. Closing the ports would have reduced any shipped water. Against that though, a couple of watercolour lithographs based on etchings, show her with ports open. What do you think folks? cheers Pat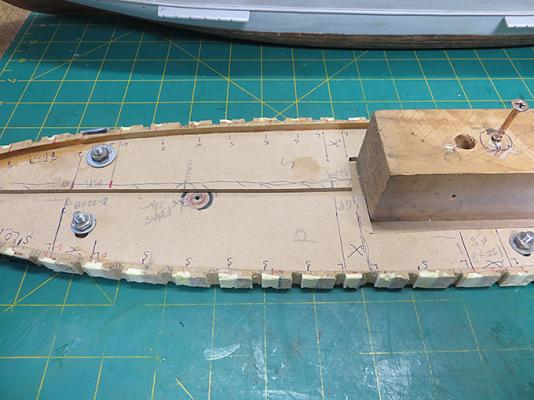


-
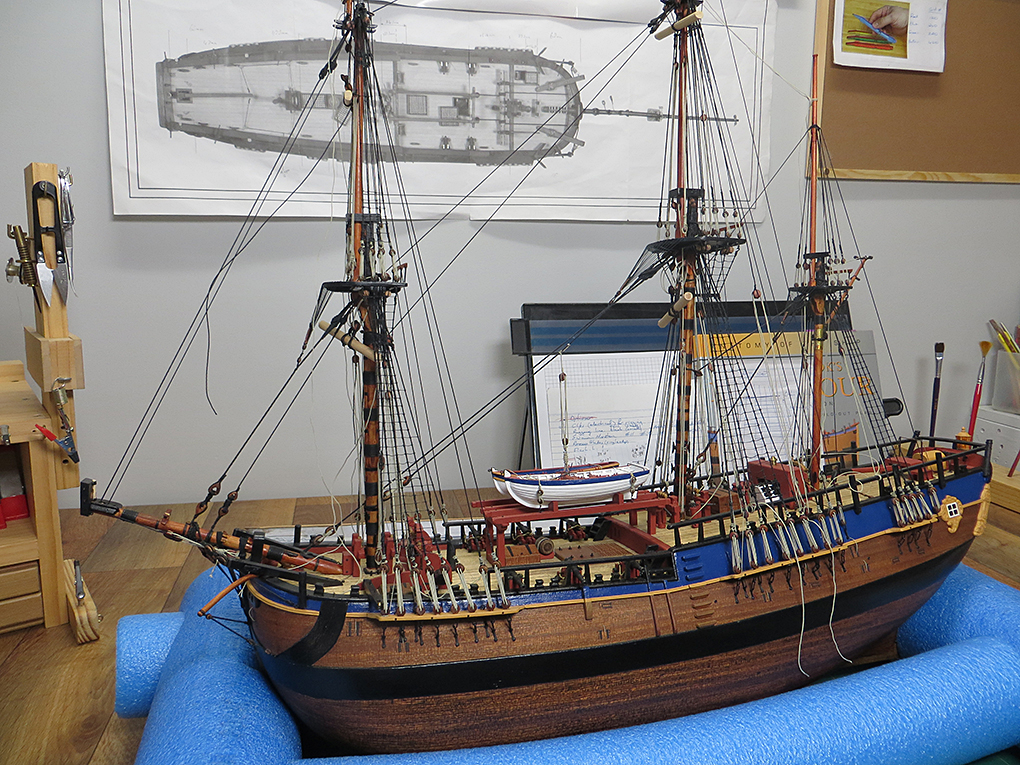
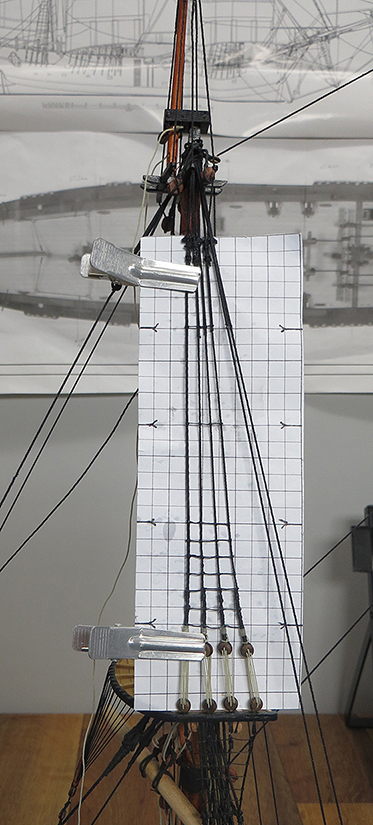
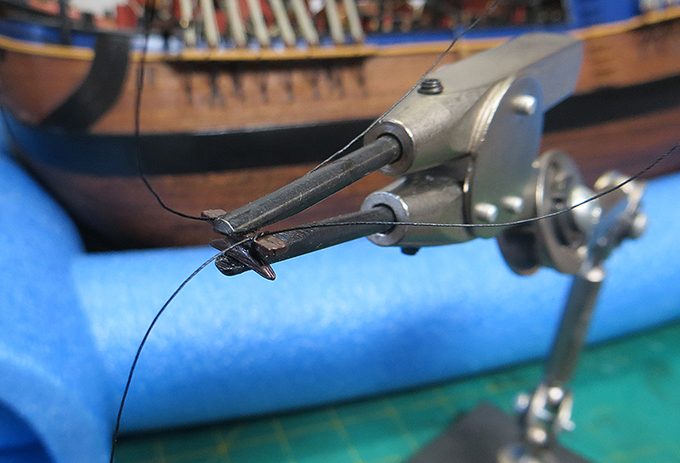
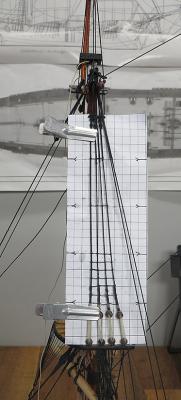
Hi all, a long overdue update. I have been busy with life (health issues), revamping my workshop and working on our club's build of HMCSS Victoria (see separate post) but have had time to progress. I have completed the 'rattlin' of the lower shrouds on the port side and working across the upper shrouds. I am using a template (see photo) which at scale provides 13" separation. Some of you may have noted my query re ratline sequence/pattern in a separate post/forum. In the end I followed James Lees description in his great reference " The Masting and Rigging of English Ships of War1625-1860" which is essentially what the replica has done with some minor adaptions which I have also applied. His reference is based on contemporary models in the NMM and while there are difference between ships in this era, it is anyone's guess what pattern was actually used I have also started rigging the shroud cleats - what a pain in the xxxx I have tried various techniques and having had advice from Dan Vad and Greg Lester (thanks guys), still had problems holding these 'slippery little suckers' in place while securing them to a shroud. even CA would not hold. In the end I finally had some success using a tiny dab of CA on a half hitch around the base of each leg of the cleat (see photo), then half-hitching these and applying a dab of PVA to the hitch to temporarily hold them in place while I finish the hitches. The PVA them leeches into the completed hitch and 'et voila' cheers Pat (and my 1000th post )

- 517 replies
-
- 12
-
-
- Endeavour
- Artesania Latina
- (and 1 more)
-
Hi Byron, in all honesty I think a bit of both. Chuck is very open as to their purpose and I don't thing he intended them for this use, more for gun tackles etc where there is no force. that said, I have redone them with the plastic hooks and they have held; even with the additional stresses applied during 'rattlin' (see following post). If you are careful they should hold unless you are applying a lot of 'load' (strain). Thanks for looking in. cheers Pat
- 517 replies
-
- 2
-
-
- Endeavour
- Artesania Latina
- (and 1 more)
-
Welcome to the Endeavour builders club Cabbie and c.a. Plenty of useful info in the many Endeavour logs. cheers Pat
-
I think I will join Mark - very nice work Dan. There are many models that don't have the same quality at much larger scales (mine included ) cheers Pat
-
Hi J..... (no name name supplied ??) I am building the AL version of Endeavour but very early on in the build I tossed the AL parts including that transom piece. I am sure you are aware of it, but you have it upside down in the photo (the rounded bits are to the top). This is ALs version/interpretation of the transom decorations; there are many versions including those selected by the Replica builders based on Sydney Parkinson's drawings. These drawings while accurate for dimension and general detail, do not provide much more than a hint of what the decoration detail was like, so who is to say if their interpretation is actually right or wrong. However, my opinion (not professional) is that looking at those drawings with a closer inspection I now believe my initial interpretation is not as close to the drawing as I first thought and AL's versions seems even more distant. According to the Parkinson drawings (and he was the official artist and present on the trip) there was some detail/decoration on the transom etc; I just wished his drawings showed a little extra detail If you choose to use that part, it needs to be slightly inset with the edges forming the raised scroll surrounds just proud of the 'flats'. Also, the cap rail sits over this. Your interpretation is what counts cheers Pat
-
Interesting method Mark; I am assuming you laser cut this then cleaned the char and did a bit of relief carving - did I get that right? cheers Pat
-
Looking really good - great work on this build Greg, you are really moving with this one. As a matter of interest, the top part of the circular skylights shown in the B&W photo of Varyag (Forecastle?) with the capstan in the background, appear very much the same as those in my HMCSS Victoria (built 1855). Do you have any photos of the skylights you will fit? I am interested in how they come up and if Eduard do them in 1:72 will save me a lot of work cheers Pat
-
Simply superb work Alex cheers Pat
-
Hi Greg, just caught up with your latest effort - Impressed! Some great detail and a lovely model. I too am just in the final throes of a 10year Endeavour build, and lining up a 1:350 build of HMAS Vampire so you log has provided some great ideas. cheers Pat
-
Thanks Druxey, your input is most welcomed and appreciated. I had poked around the photos shown in Navy Board Models by Franklin and the predominant pattern is as you have suggested; but, as you indicated, there are some instances where the alternate options have been used also. I will have a good look through the NMM models next. I have also looked at some photos of the replica, and apart from the bottom 6 ratlines, the remainder span the full width of the shrouds - basically, as Lees has suggested for ships between 1733 and 1773. I think your suggestion, or the Lees suggested pattern, may be the way to go. Thanks all for looking in - any further evidence to support one way or the other will be much appreciated.