

Gregory
-
Posts
3,079 -
Joined
-
Last visited
Content Type
Profiles
Forums
Gallery
Events
Posts posted by Gregory
-
-
5 hours ago, James Flynn said:
dose the HMS Triton plans have the mast's and rigging in the plans?
Keep in mind that construction plans such as the contemporary drawings from the NMM never have rigging plans.
Any rigging drawings are done after the fact based on knowledge of contemporary rigging practices.
Riggers didn't use "plans". They knew what they were doing.
Any three masted ship with similar sail plans from the time frame of Triton would have bee rigged the same.
Rigging Period Ship Models: by Lennarth Petersson covers the detailed rigging, line by line, of a contemporary model of HMS Melampus (1785).
Every rope on the model is covered in drawings like this.
The modeler should keep in mind that this is based on a model so there could be some minor differences from actual practice, but there would have been differences from actual ship to ship comparisons,. The basic principles would have been the same because the mechanics of controlling a square rig were well established and varied little over several hundred years. Of course there were changes in some details but these are well documented in references like The Masting and Rigging of English Ships of War, 1625-1860 by James Lees.
The dimensions of the masts and spars can be derived from various sources including Lees'.
- JacquesCousteau and mtaylor
-
 2
2
-
-
On 10/12/2024 at 3:02 PM, Jami Gibson said:
Hello Everyone!
I bought this kit for my 87 year old father at the end of last year. He is really enjoying it.
However, he now looking for some parts that he needs. Apparently, he does not have enough of the chain plates. I think he is about 10 shy I believe.
I have been scouring the internet and cannot find them for this ship. The ones I find come to a point rather than rounded.
Would anyone here have a clue where I could get me hands on this for him? It would be greatly appreciated!!!
Jami Gibson
As mentioned, Mamoli went out of business but Dusek has re-released most of their kits. Do you know if you bought the Dusek kit, or is it an old Mamoli version.

The new Dusek kit looks like this image.
-
Were the hand pumps a French thing, or a re-fit.
- Canute, thibaultron, Nirvana and 1 other
-
4
-
-
Can you show a marked up drawing indicating where you want a " D " shape?
- Paul Le Wol and Keith Black
-
2
-
-
I would vote for melamine. I personally would not buy the Woodcraft product if I could not hold it in my hand. Do you have a local Woodcraft or Rockler?
Sorry to belabor the point, but there is some of the ply mentioned above in 1/2" (12mm). I only see 12"x12" so that may not be a good working size.
Have you considered doubling up some of the 1/4' using Titebond or similar?
PS
I see this:
Baltic Birch Plywood 12 x 24 x 1/2 Inch
... As well as some other choices. Don't know how the price compares to Woodcraft.
I think bigger sizes is where you will encounter warping issues.
-
2 hours ago, davec said:
When I looked at plywood at my local hardware stores,
Hi Dave,
Just browsing and noticed your comments about plywood.
I have been using this stuff from Amazon, and it is the best plywood I have ever used, while costing a fraction of the "furniture grade" stuff available at places like Home Depot or Midwest.
Thick Basswood Sheets for Crafts Unfinished Plywood Sheets
It's available in a variety of dimensions and quantity.
It says 'Basswood' and I believe the very thin outer layers are basswood. For your purposes, a few coats of varnish may be in order.
-
43 minutes ago, Thukydides said:
Not sure what specifically you are referring to,
The main problem I see is that the piece that holds the gammoning slot probably would not have provided the kind of support/strength required for that function.
But as you alluded to, for modeling purposes, it wouldn't be visible with all the head gear in place.
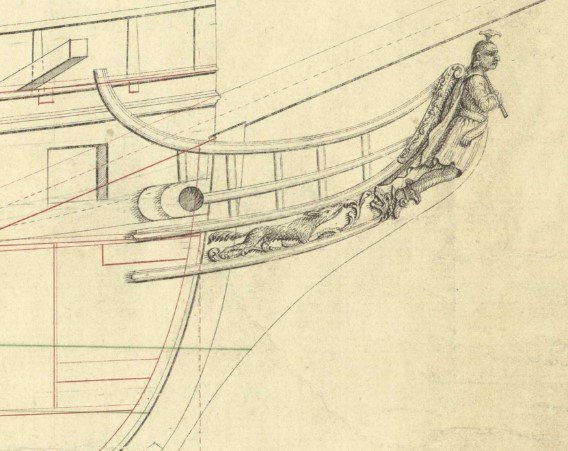
Here is the the actual NMM drawing.
Since this was not a construction drawing, any number of details could be missing.
- Thukydides, GrandpaPhil, mtaylor and 1 other
-
4
-
Good research. It may be one of those things that ship builders took for granted and just didn't document all that well..
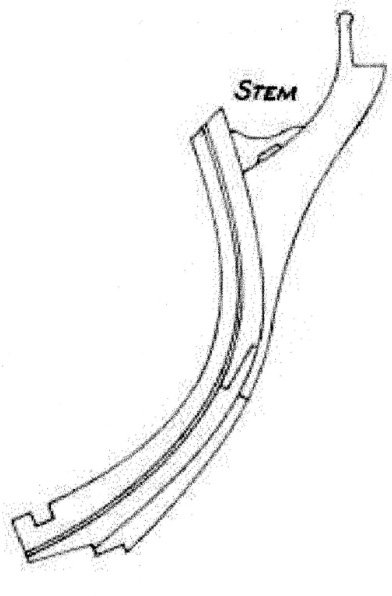
This is the way Hahn drew the stem on Rattlesnake , though it doesn't show this much detail on the NMM drawings.
I have seen it modeled a time or two in this manner, but there is something very wrong here. Any guesses?
- mtaylor, GrandpaPhil and Thukydides
-
3
-
3 hours ago, palmerit said:
I'll see if the buffing method works.
I have to back off on this.
I have had good results with the felt buffing on other wood. It has a polishing effect when used with Wipe -On poly..
However, I just tried it on some basswood strip, and it didn't have the effect I hoped for.. Rubbing briskly with some microfiber cloth did seem to have a good effect.
- Canute, mtaylor and thibaultron
-
3
-
-
-
Could be useful. I see similar products on Amazon as low as $38.
- GGibson, mtaylor and Keith Black
-
3
-
-
Now for a bit of my build process.
I'm cutting the skeleton out of this 6mm Plywood purchased from Amazon.
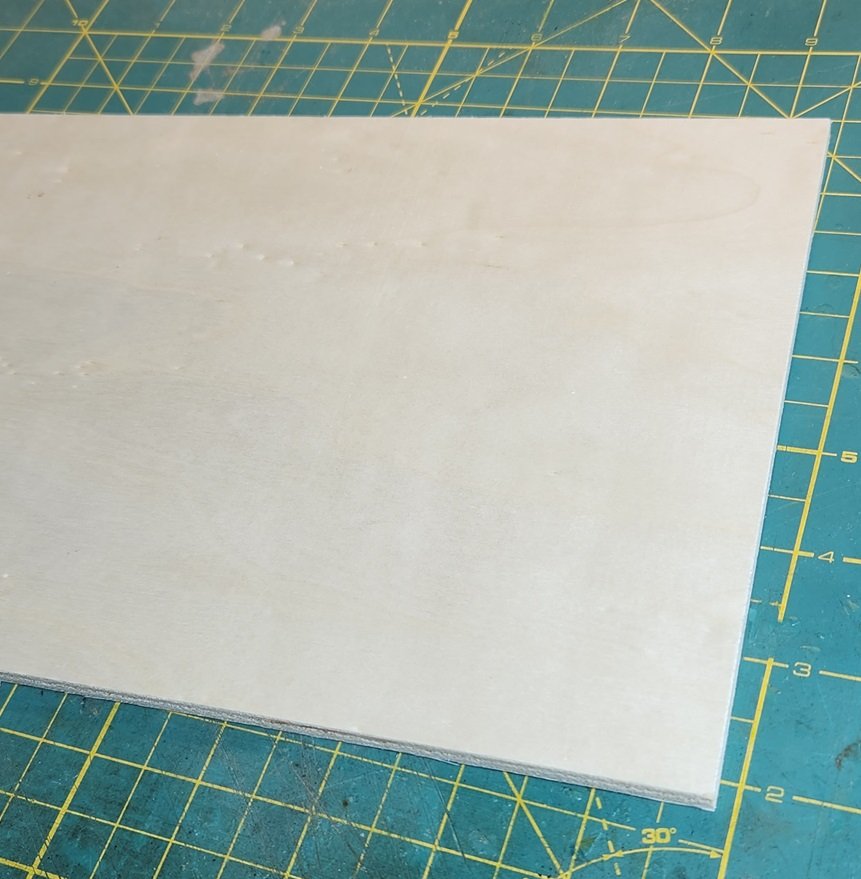
Its listed as 'basswood' plywood, and the outer layers look as good as any basswood I have seen. Those outer basswood layers are paper thin though, if that would make any difference for a project.
The product as a whole is as good or better than any plywood I have ever used.

It measures consistently a hair over 6mm and a hair under 1/4". I have not been able to get decent dimensioned plywood from sources like Home Depot for some time now. The last 1/4" plywood I bought from Home depot measured 5.2mm - closer to 3/16 than 1/4. The Amazon stuff is a fraction of the cost of sanded plywood at Home Depot.
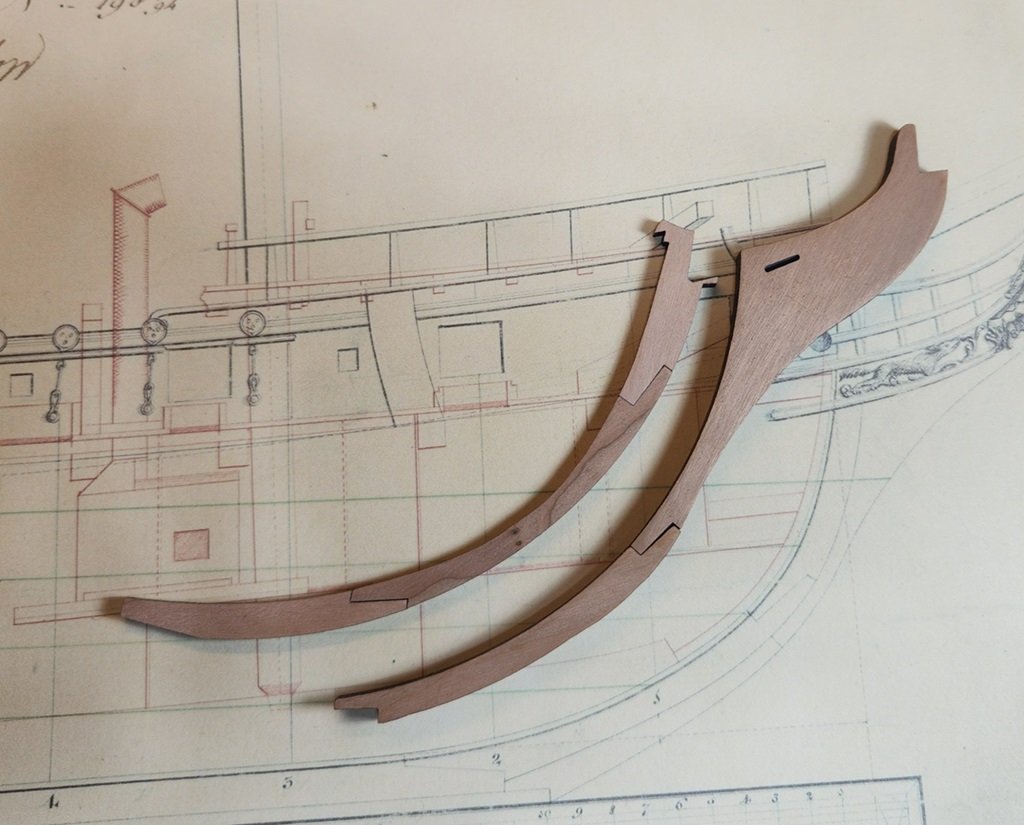
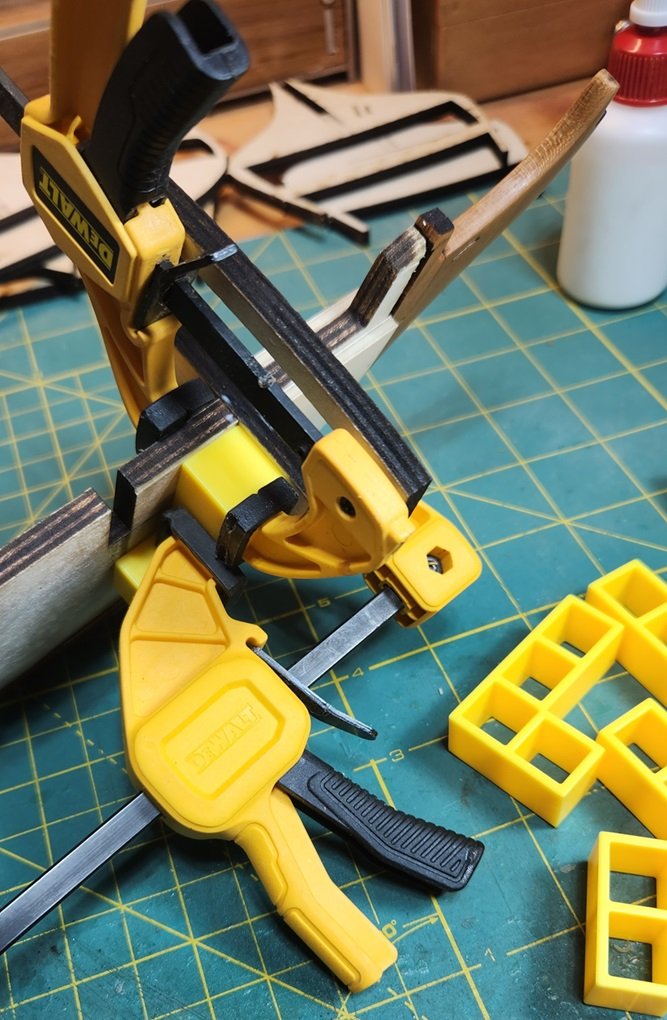
I cut the stem out of 1/4" Cherry that I thickness sanded to match the ~6mm ply. I built it up out of 5 pieces.
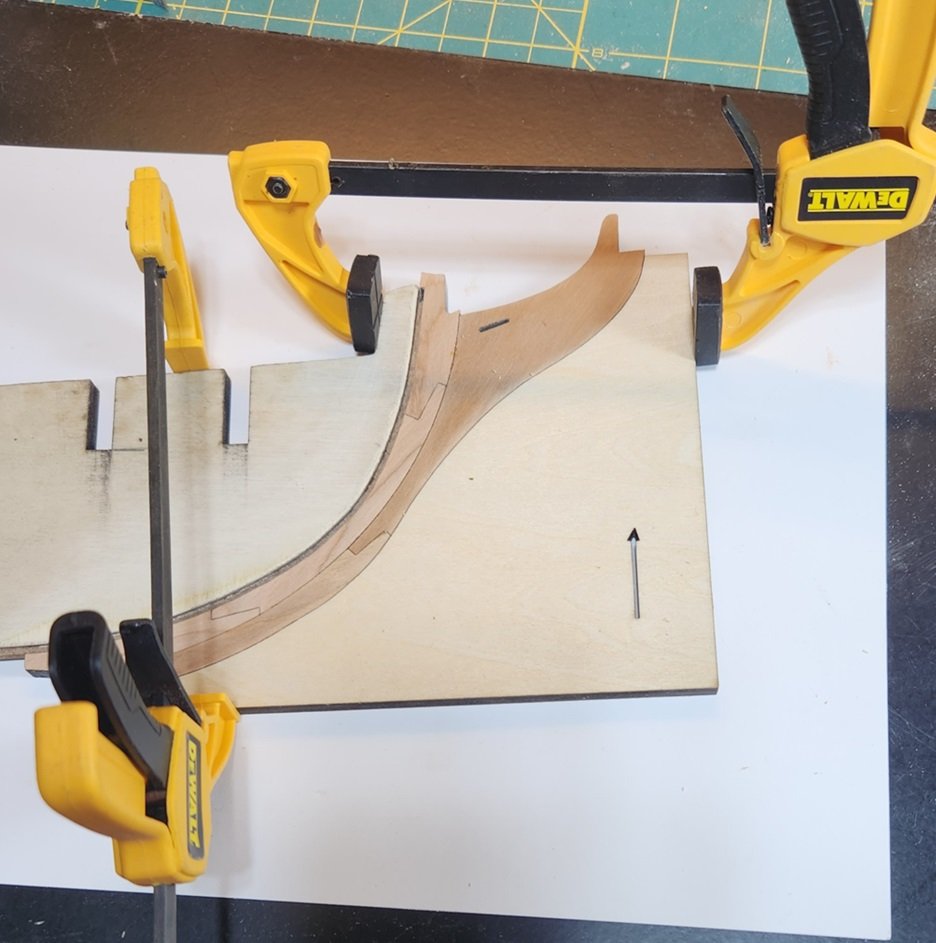
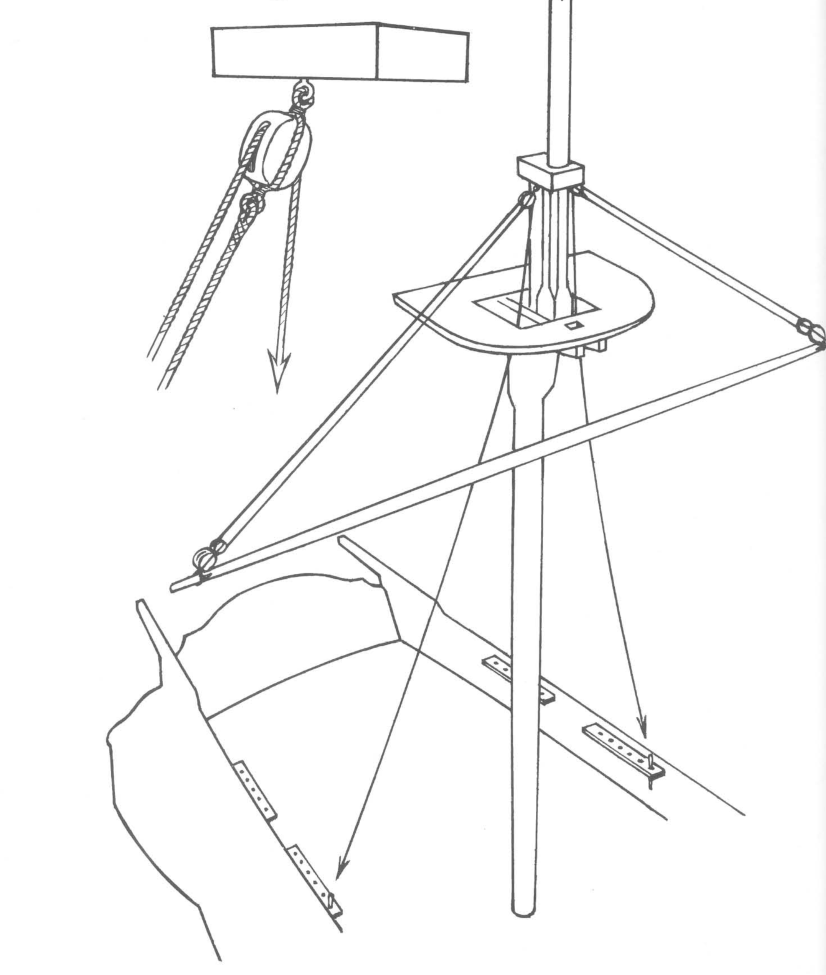
This shows a little form I used to glue and clamp up the Stem to the rabet strip on the backbone.
The backbone is made of three pieces, and this shows how it is easier to hold, sand and shape the stem before the three pieces are glued together.

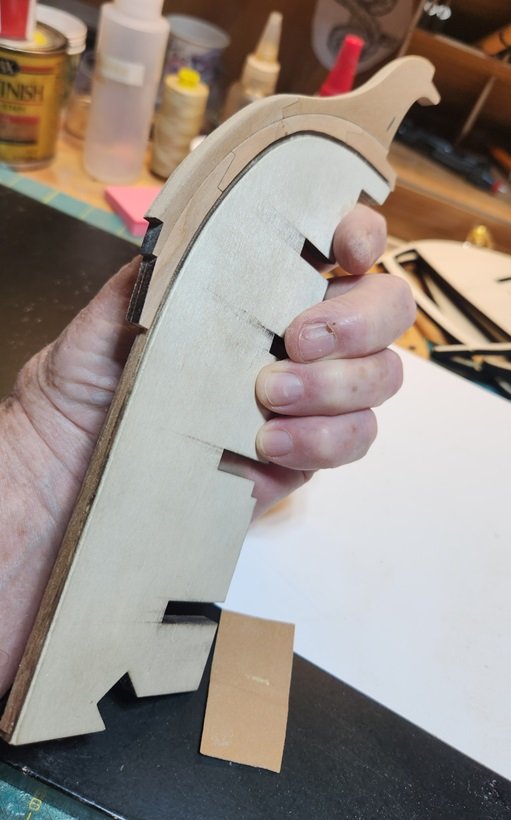
The stem, pretty much finished with a coat of WOP. I will be applying any number of coats as the build progresses. I use very thin WOP to get a lot of penetration to seal the wood.
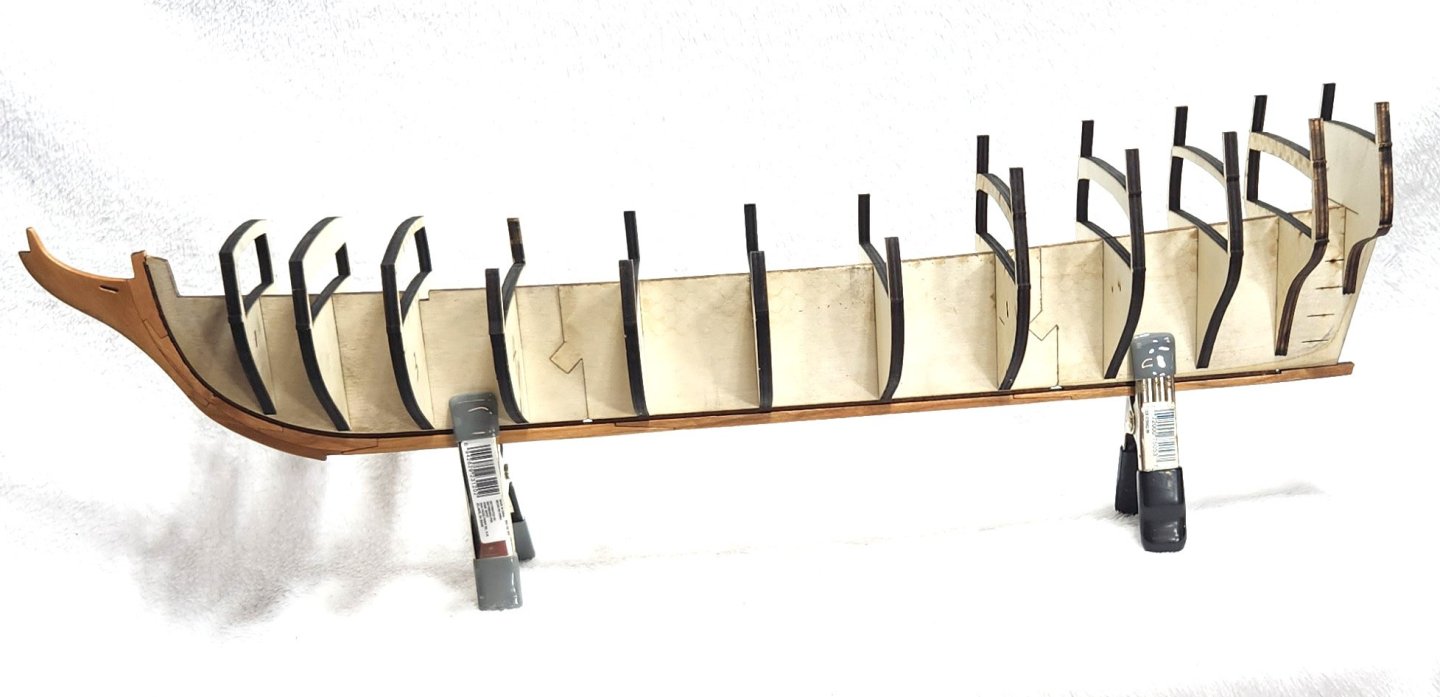
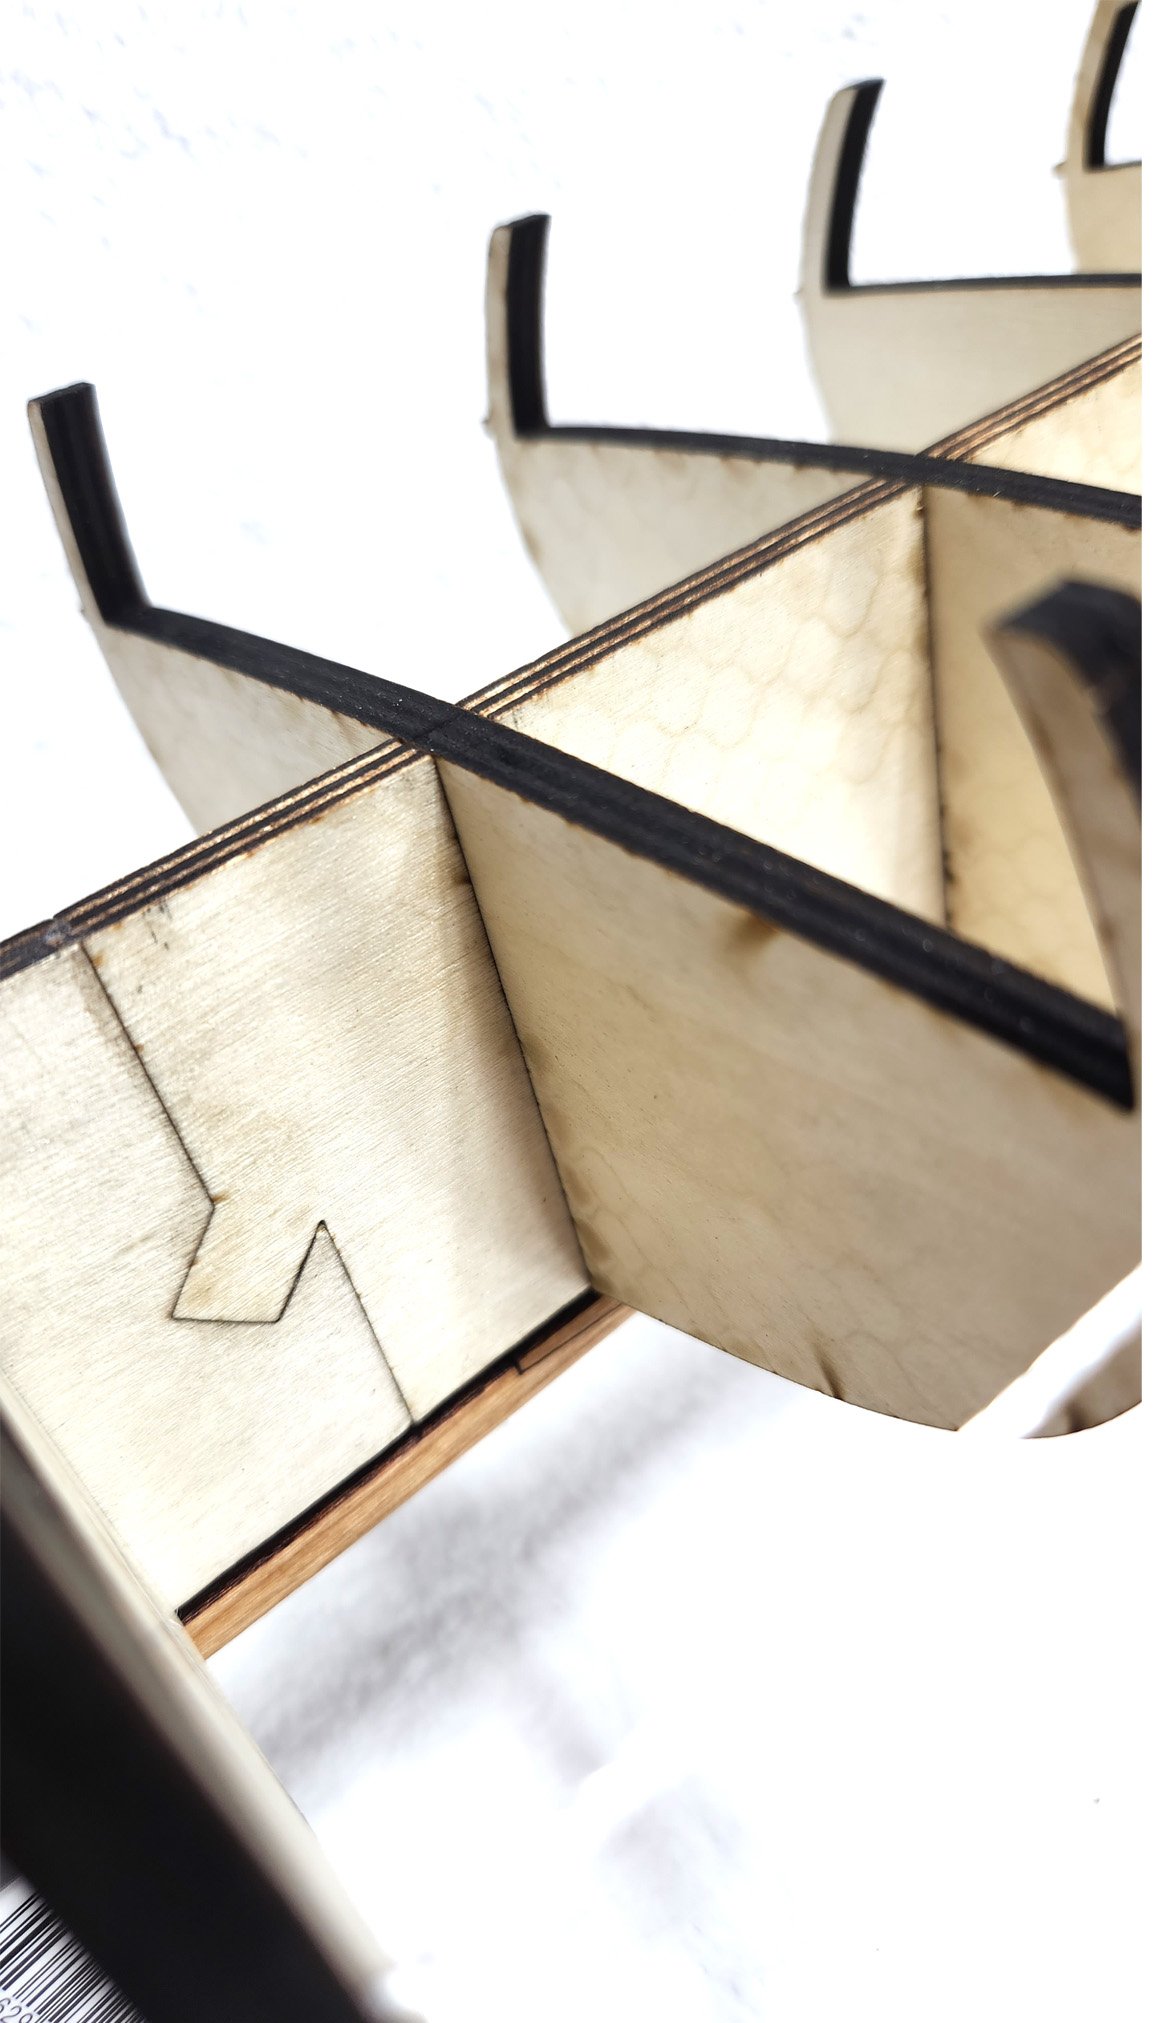
This is the first dry fit of the bulkheads and backbone. I managed a very tight fit with the slots. Inserting, then removing the bulkheads proved to be somewhat difficult, as I didn't have much more clearance than the thickness of the laser char.
Any squaring when gluing is almost unnecessary, but I will still be taking that important step. The center of the deck on the bulkheads is flush with the backbone except for the small difference in slope from front to back.

Close up of fit.
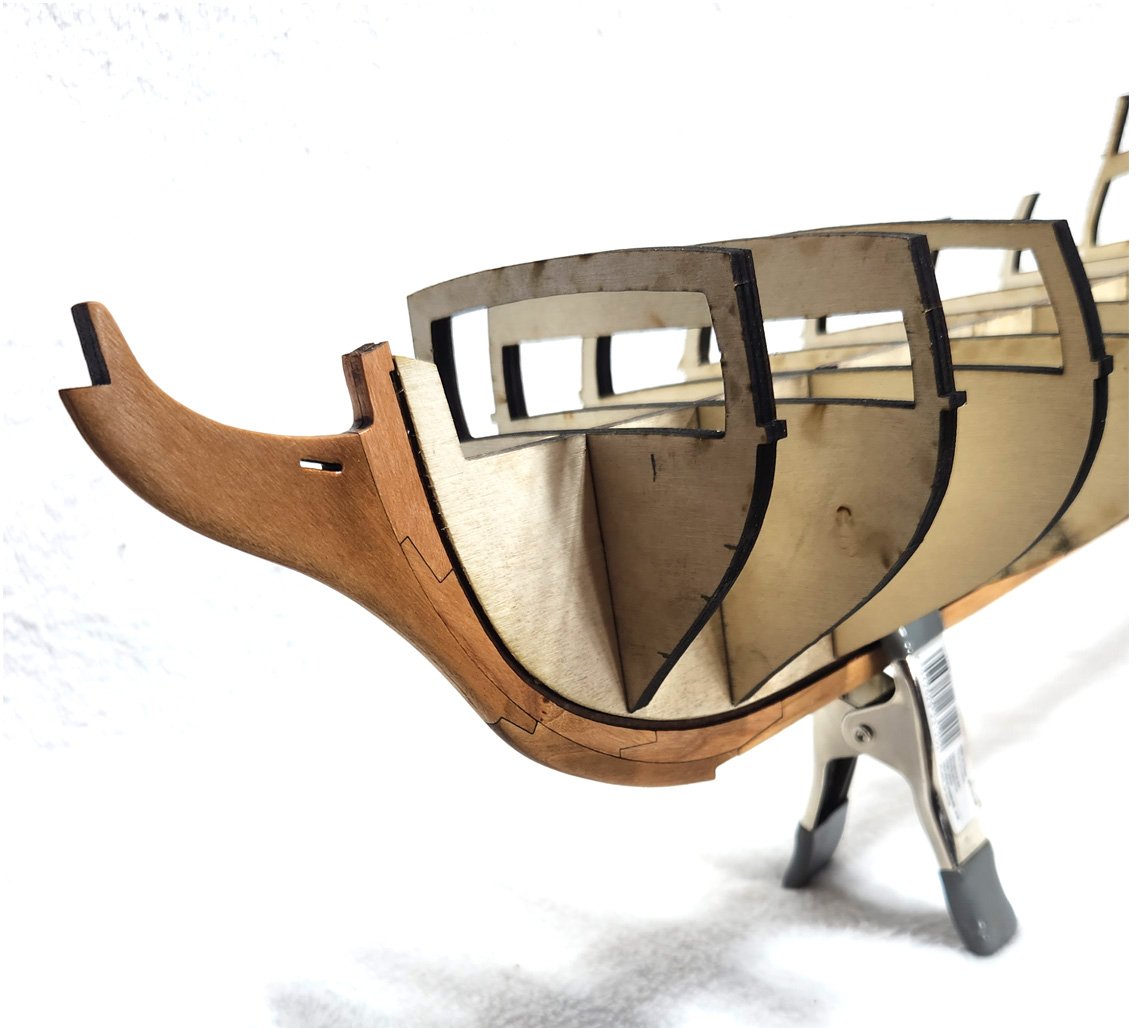
Could have used a little tighter fit to the rabet on the foremost frames, but that will shim up easily.
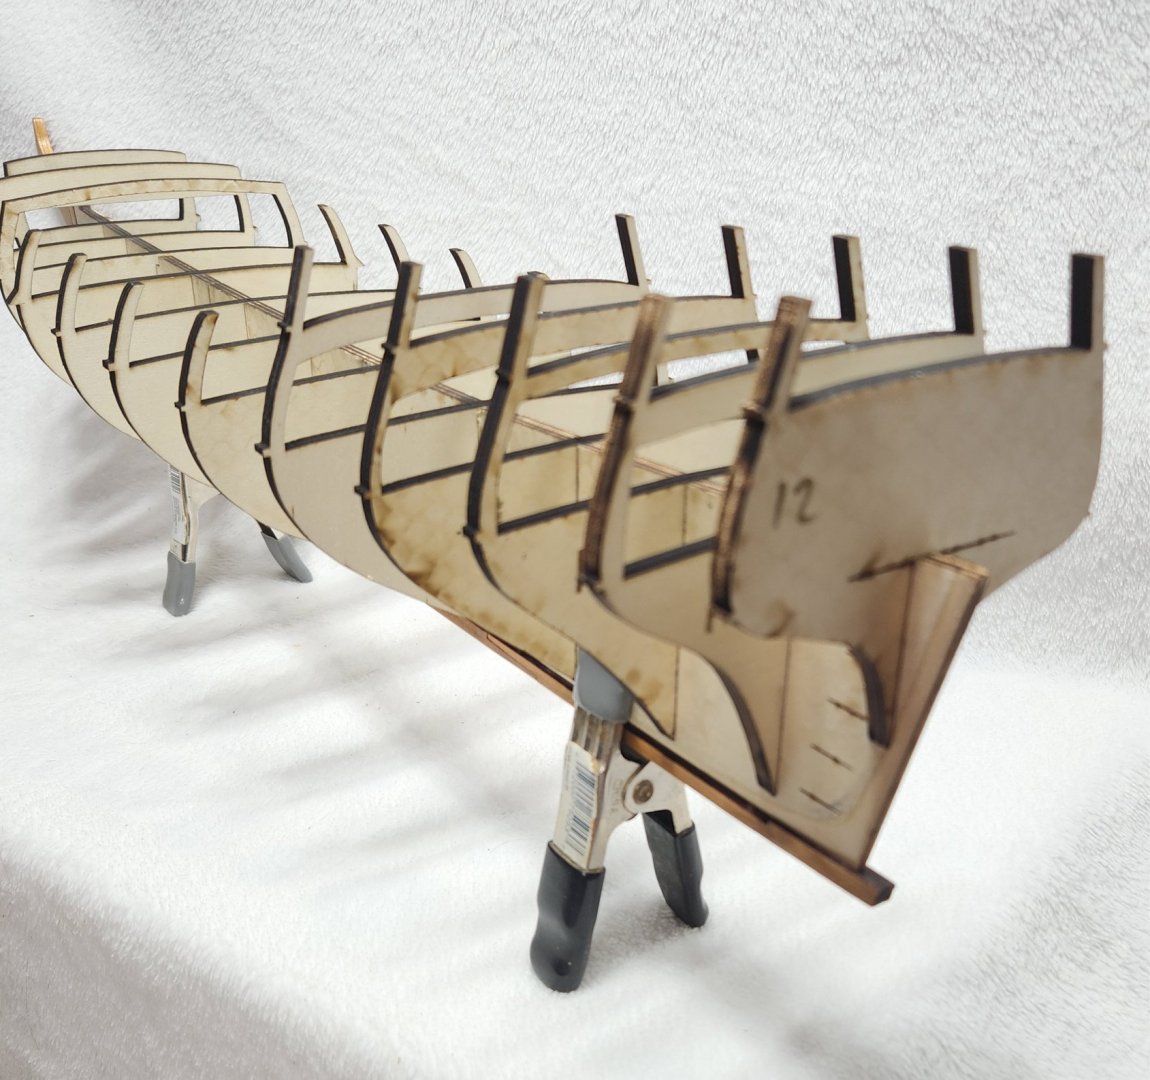
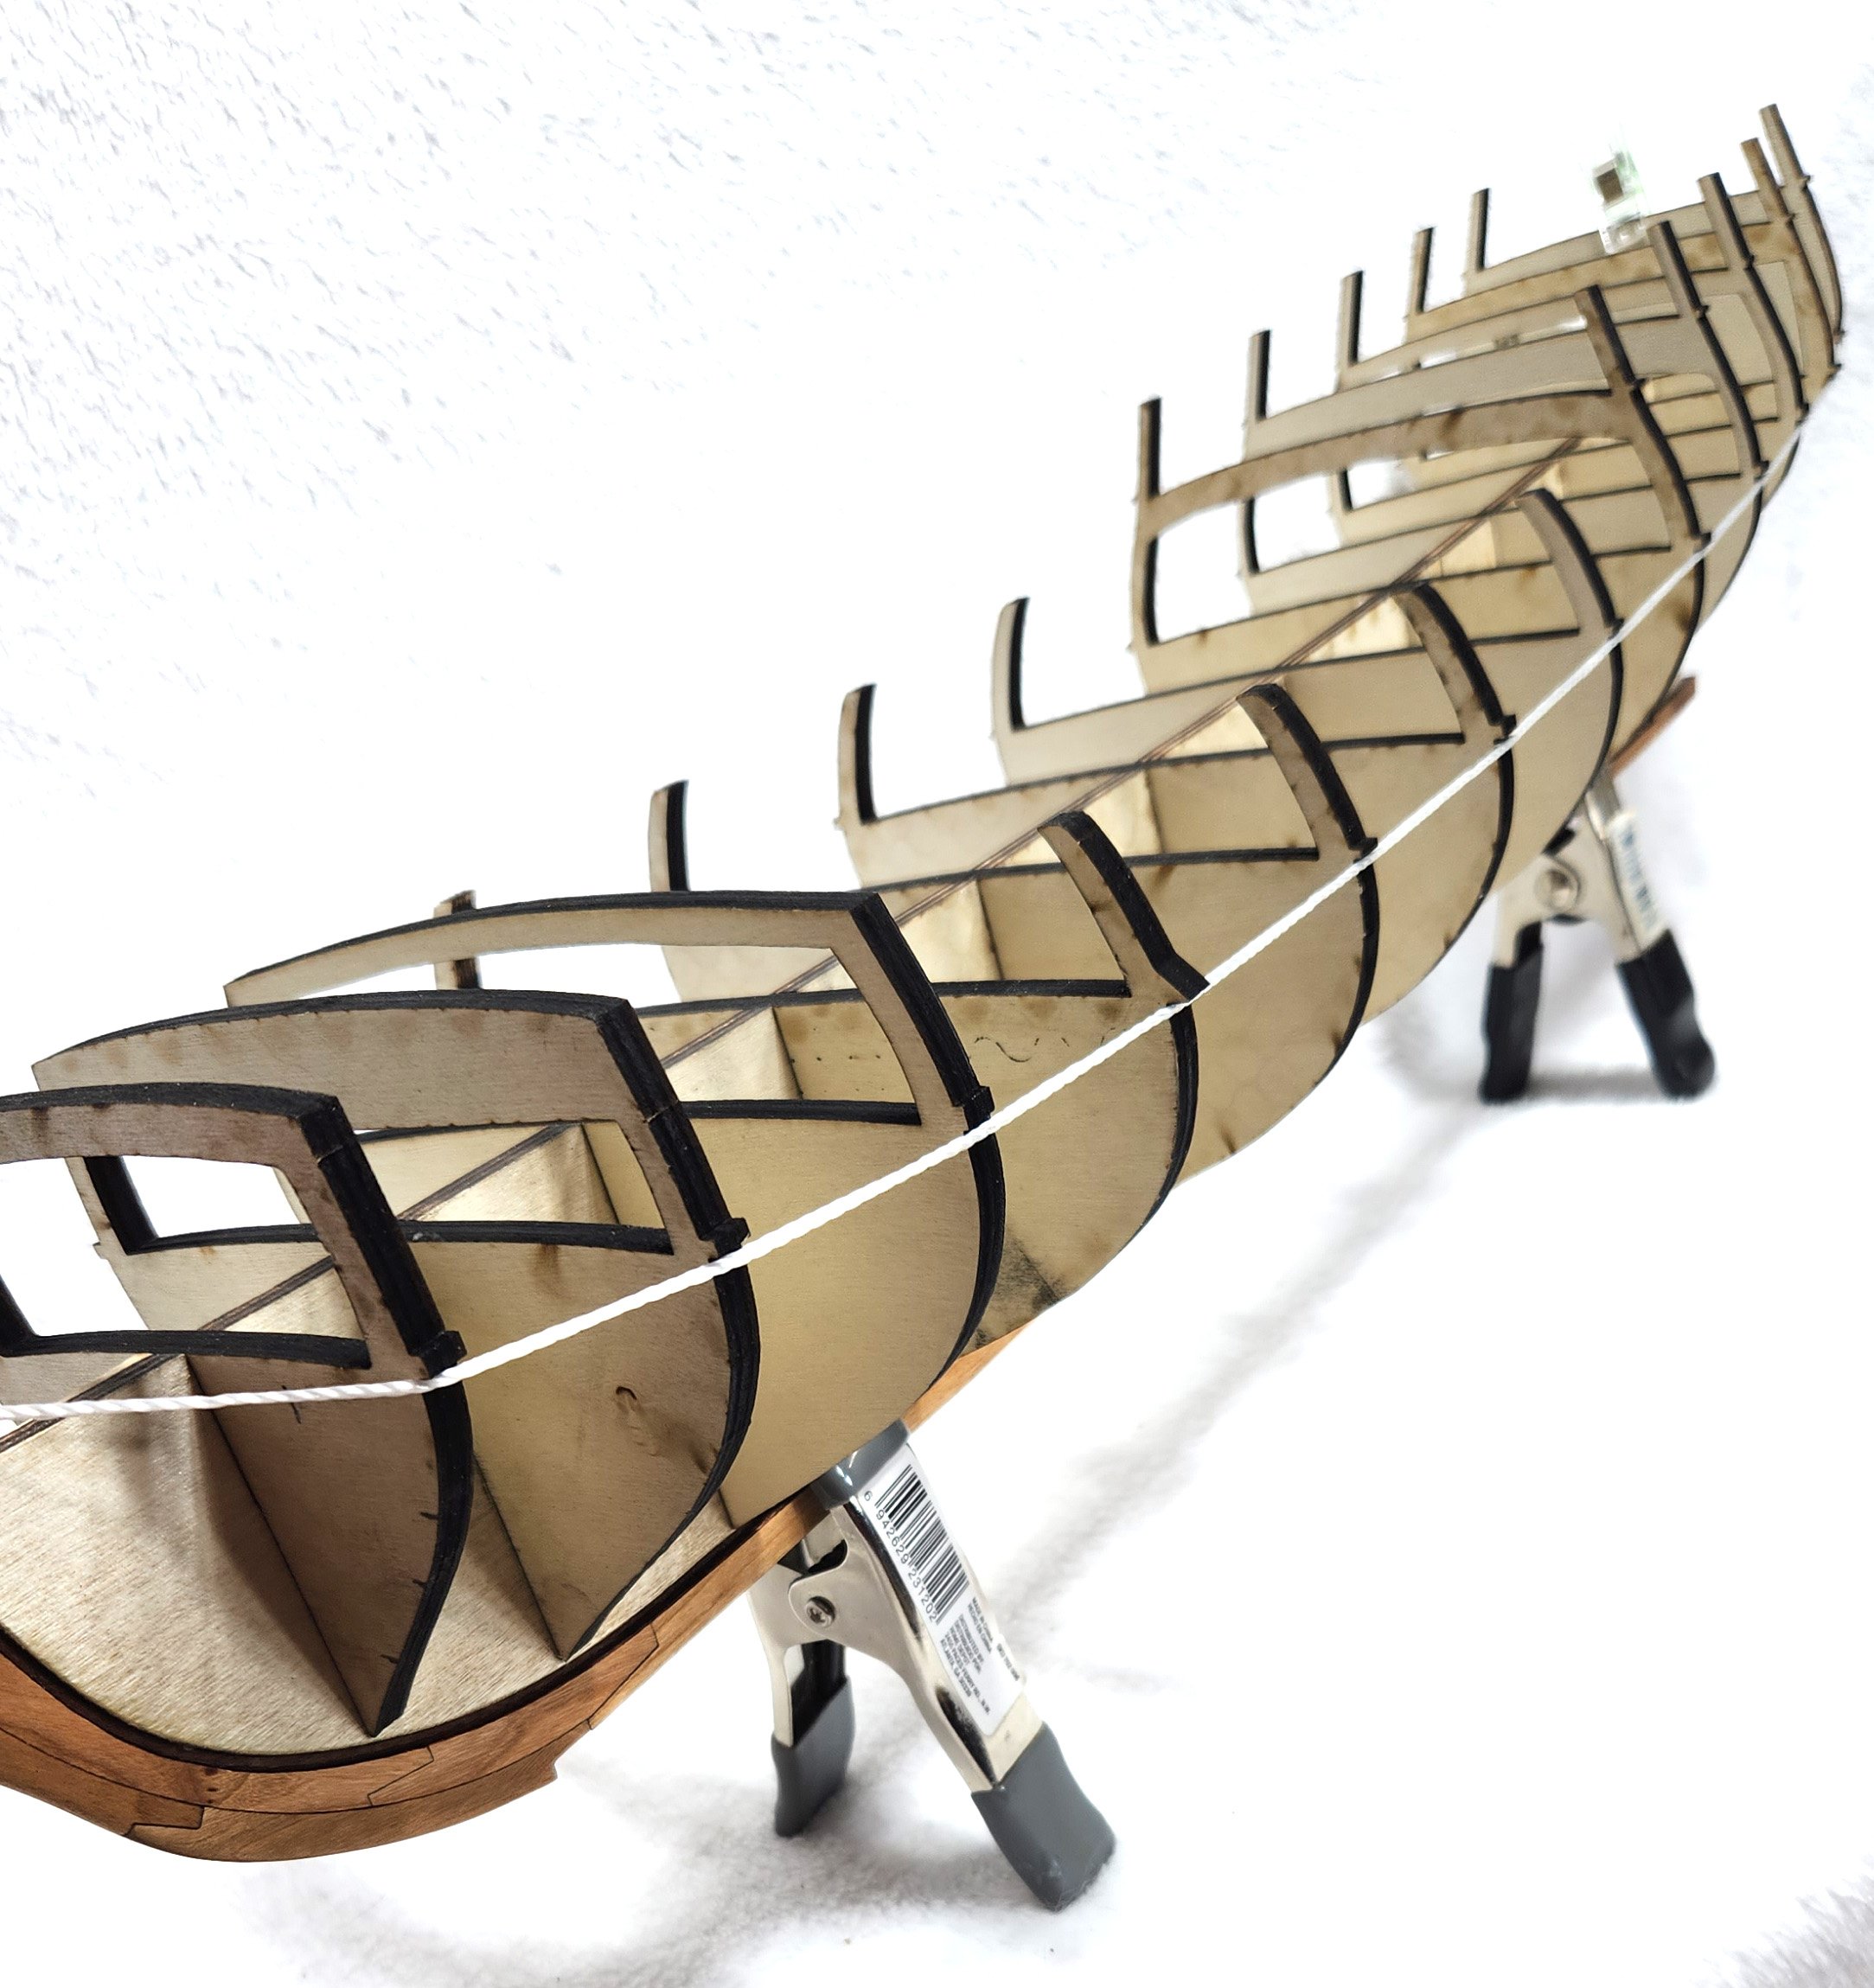
Looking forward from station 12.
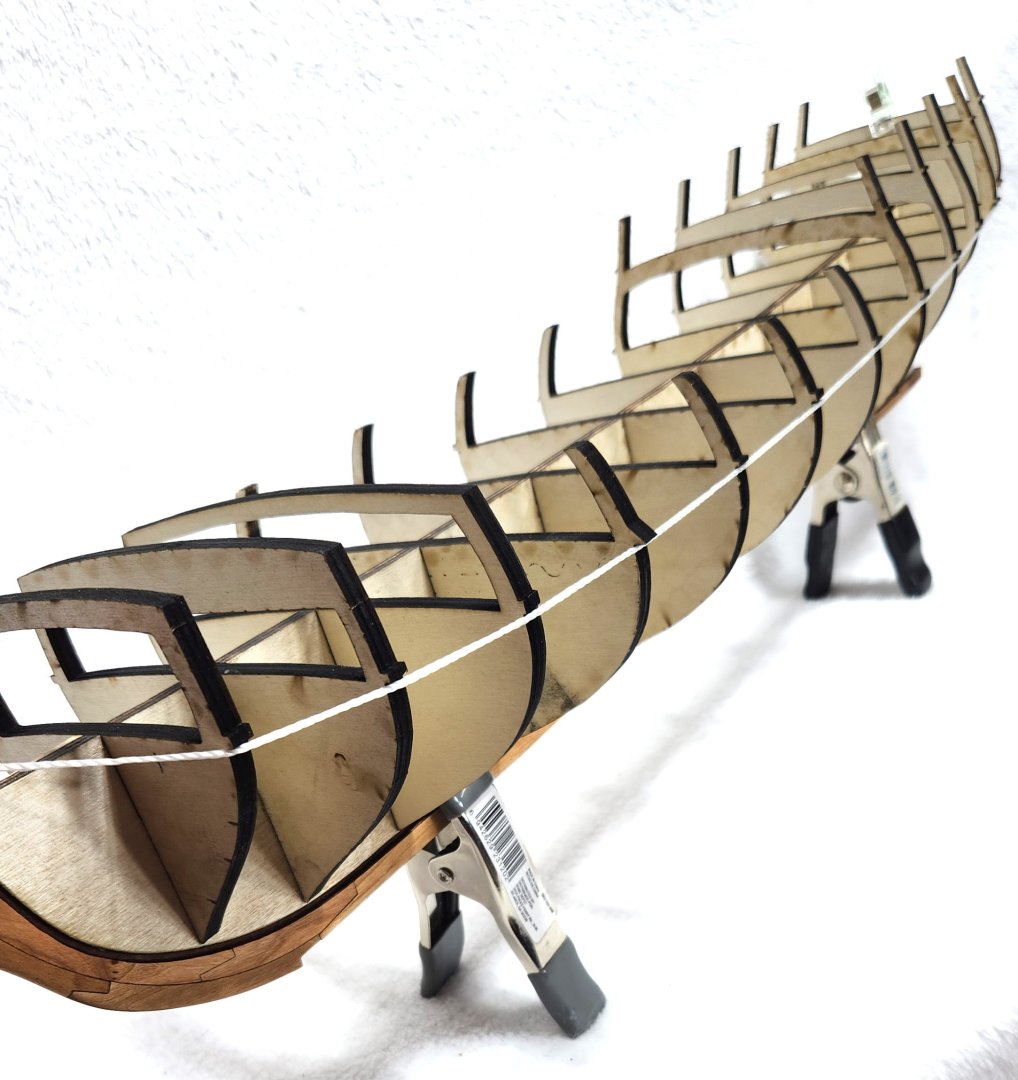
A piece of cord to show the run of the deck before any fairing has been done. There will be bow and stern fillers to get a good shape in those areas. This left me quite satisfied with my drafting efforts.
A little contribution to the " Tips & Tricks " department. I know that Legos are popular as squaring tools, but I recently discovered these little game/puzzle pieces. I feel they give you a little more to work with than Legos do.

Very inexpensive . 64 Pieces were $10.

Another view of bulkhead squaring.
Should be following up soon with filler placement and fairing.
-
The actual plotting for the garboard will best be done parallel to the keel.
- mtaylor and Chuck Seiler
-
2
-
It is not so much a theory as it is a matter of practice based on the measuring of the spaced to be covered with the planks in a uniform manner.
Look at Toni’s log beginning at post 22.
Consider how you would go about tiling a uniform rectangular space. All tiles the same size. Piece of cake.
Now think about how you would tile the surface of a sphere in a uniform way.
It’s a matter of filling the available space at stern and bow with the number of planks that were determined to be needed at midship. They will be wider at the stern and narrower at the bow/stem as well as having compound curves in some areas. Toni shows the use of a stealer at the stern; a common practice.
The 1/3 bigger formula was only applied at midship for the garboard and broad strake.
The extreme widths of all planks is determined by running fair lines from end to end . The 14” measurement was determined to be a good fit based on the fair run of the planks.
- mtaylor, tlevine and Chuck Seiler
-
3
-
-
-
Dr. PR, your Albatros is a continuing inspiration and source of information for me. As mentioned, I had a brief encounter with 3D modeling, with some of your work being an example to push me in that direction, but I am putting that on the back shelf for now.
Regards to Thunder . Your Corel Resolution is an inspiration for me, and I hope to get back to it someday. I'm stalled with the rigging after it got into a fight with the cat.
A little more about my 2D drafting workflow.
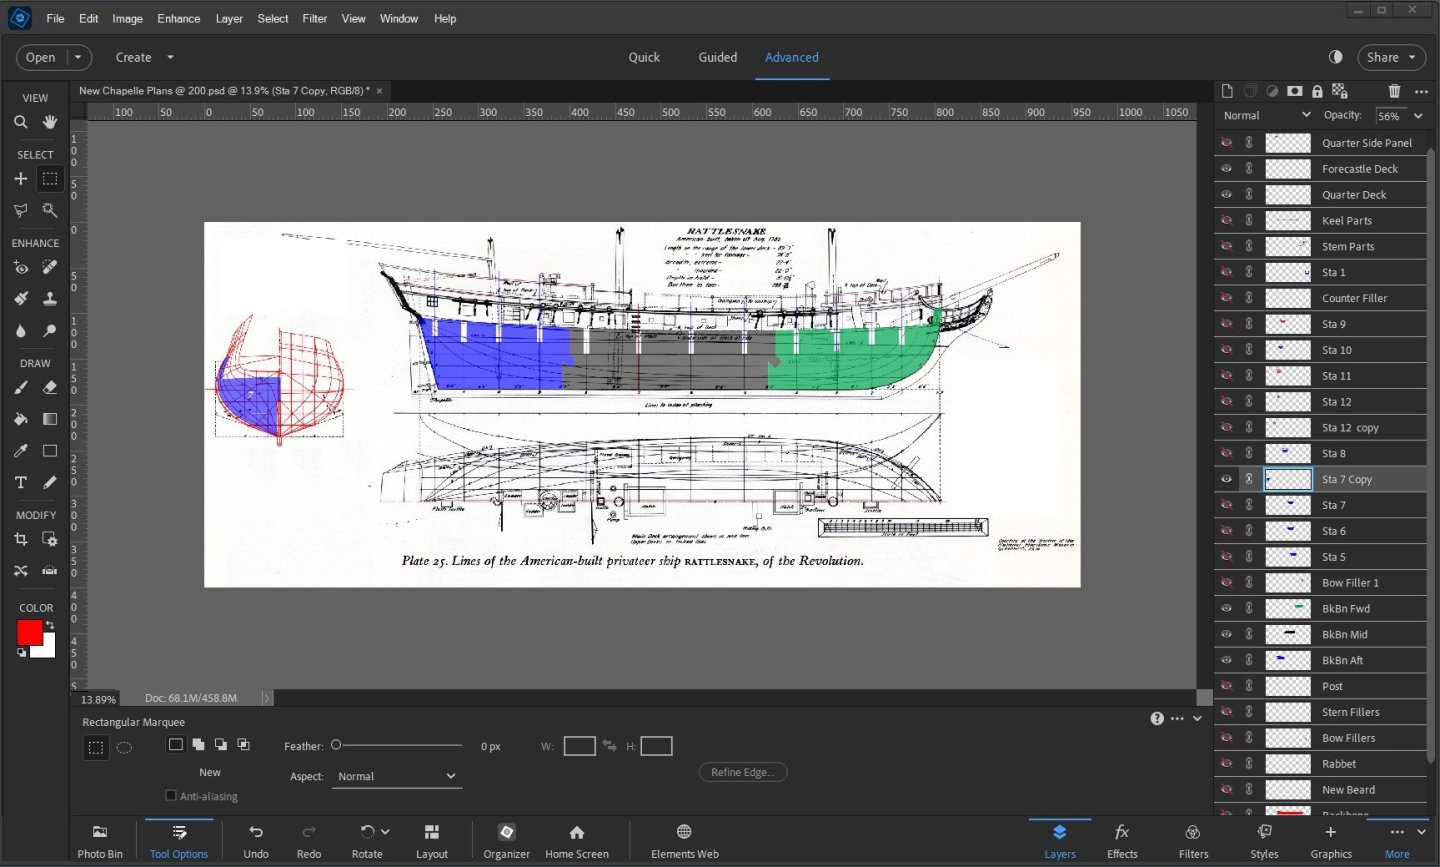
I am using Photoshop Elements 2024 for most of my drafting work . I find it to be very robust for what I'm doing, and at a reasonable price point. I have been using it for years and I am very comfortable with the interface and tools. It has a 2 decimal scaling accuracy and a lot of scaling options such as: size, PPI and percentage.
For instance, the Chapelle plans were on a 9 3/4 x 7 1/4 page of a book that I scaled up to full 1:48 scale, with a result of one division on the scale ruler being 6.35mm / .25 inch.
The scale on the page was about 1.6mm per division which I scaled up by around 390 something percent. I tweaked it until I got one division as close to 6.35mm as I could.
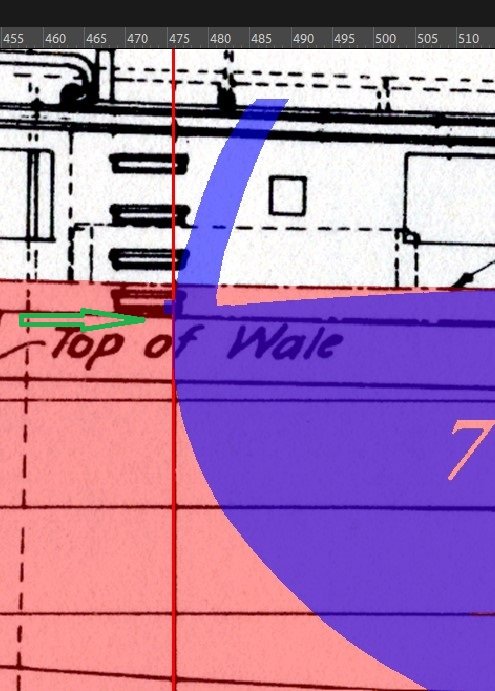
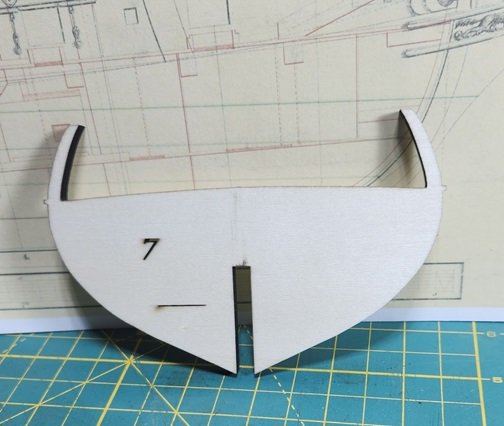
In the drawing, each component has it's own layer which can be turned off as needed to reduce clutter in the work space. Above, you see bulkhead 7 on the left, with the 3 parts of the backbone on the profile.
The transparency can be adjusted enable the underlying layers to be visible.
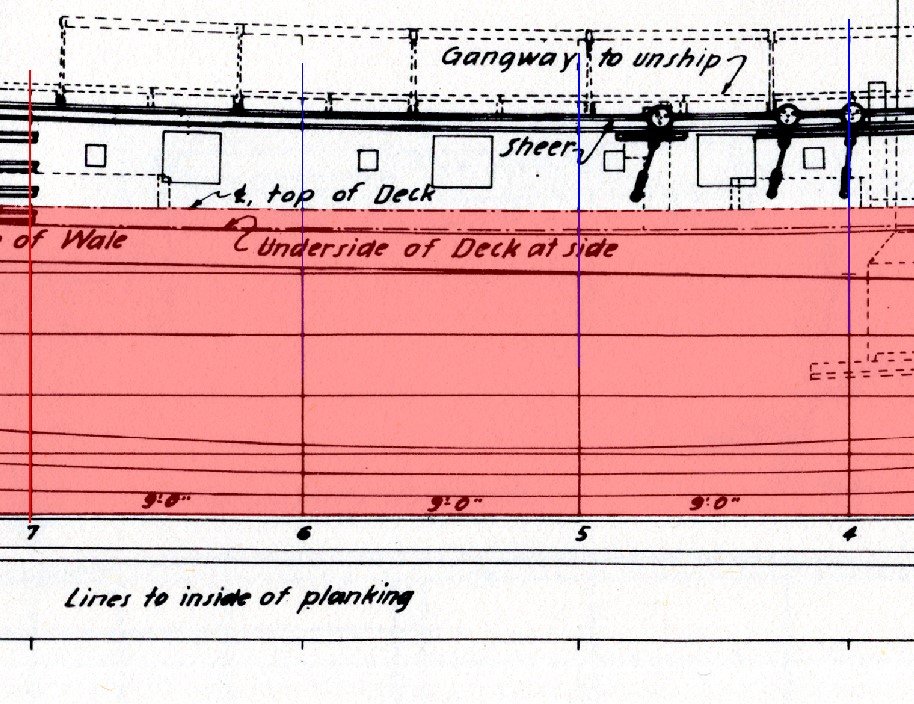
The initial tracing of the backbone was done by following the " top of the deck " and the rabet lines .
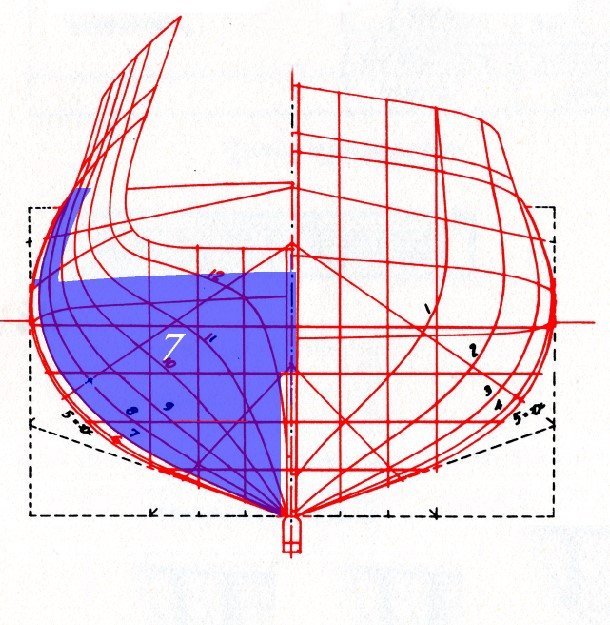
The bulkheads were developed by tracing the station lines and centerline. The shape of the deck and gunwales were established in a separate process which utilized the drawing lines of the top of the deck, the underside of the deck at the planking and the shear. Once I had the half shape, I mirrored it for the full bulkhead.
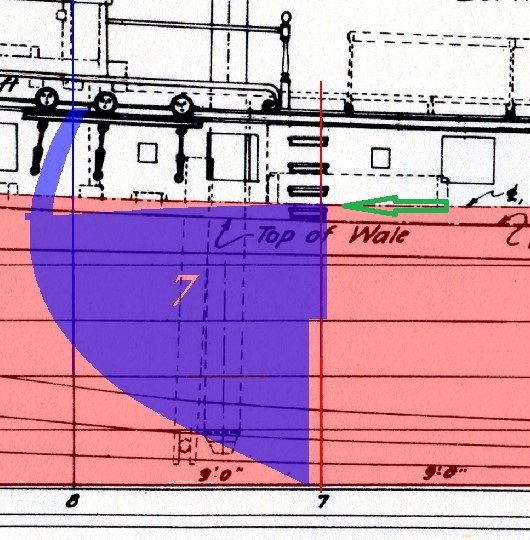
I established the center top of the deck for each bulkhead by aligning the center with the station line. The top of the deck can be marked with pixel precision, which at 200PPI is about .005"/.127mm.
Then I mark the side of the deck with a tab that will help me set the planks defining the level of the gun deck at the side. I will show later that this worked out very well.
The curve of the deck was drawn by connecting the center point with the side point using a curved line tool that I won't elaborate on here, but if anyone has any questions I will do my best to answer.
I overshot the shear with the gunwale a little bit because I want to refine that when I'm building.

Here is bulkhead 7 ready for the laser.
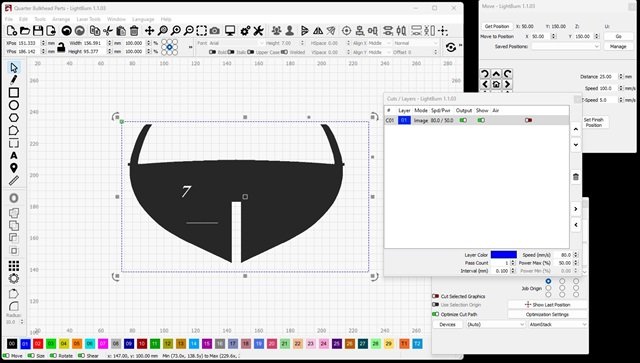
I want to talk just a little about the software I use to drive the Laser. It is called LightBurn, and has a modest price of $60. It is very versatile, and It would take a lot more than I want to go into here to talk about a fraction of it's features. Here I show where I have imported a solid Image drawing of a bulkhead. It imports it at the precise dimensions of the drawing without regard to the resolution.
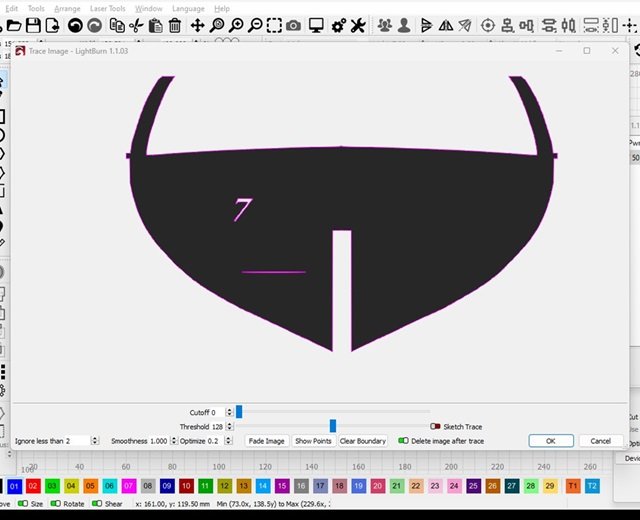
I invoke a " trace " feature which produces the outline ( pinkish ) seen here, which is essentially an .SVG drawing that can be exported for use elsewhere.
It is node editable, but it's use has a high learning curve that I haven't mastered yet. If I find a glitch I can't live with, I take it back to Photoshop.
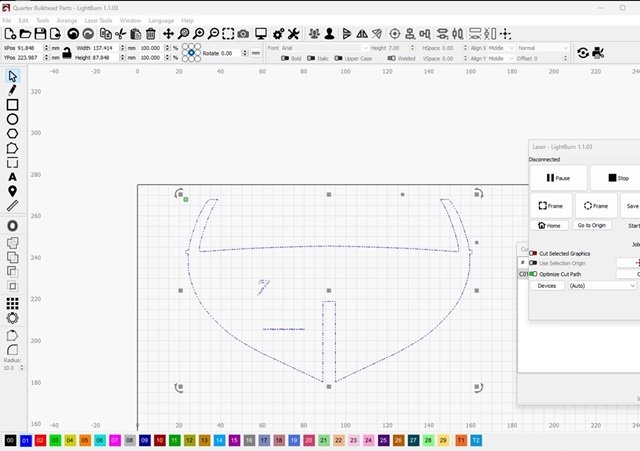
The .SVG is used to drive the Laser.
The piece is cut with pixel/node precision, limited by the accuracy of the laser.
This is all I have on my 2D drafting workflow for now. I will do my best to answer any questions, and I will certainly listen to any suggestions regarding a better or easier way to do something within the limits of my software.
I suspect something like " Corel Draw " might be a better tool in some regards, but I don't want to learn how to use it at this stage.
So, I'm not very open to suggestion that begin with " If you used " XXX " you could do " XXX " a lot easier. 😁
A little early construction to follow soon.
-
Hi! It's me again.
I stalled some months ago with my build using the plans from Model Shipways. I don't want to go into any details about why those plans did not work for me, but I hope to show how I have adapted the lines drawn by Howard Chapelle to start a new build.
First, a little history of why I chose this subject.
The Mamoli kit of Rattlesnake was my first wood ship kit over 30 years ago.
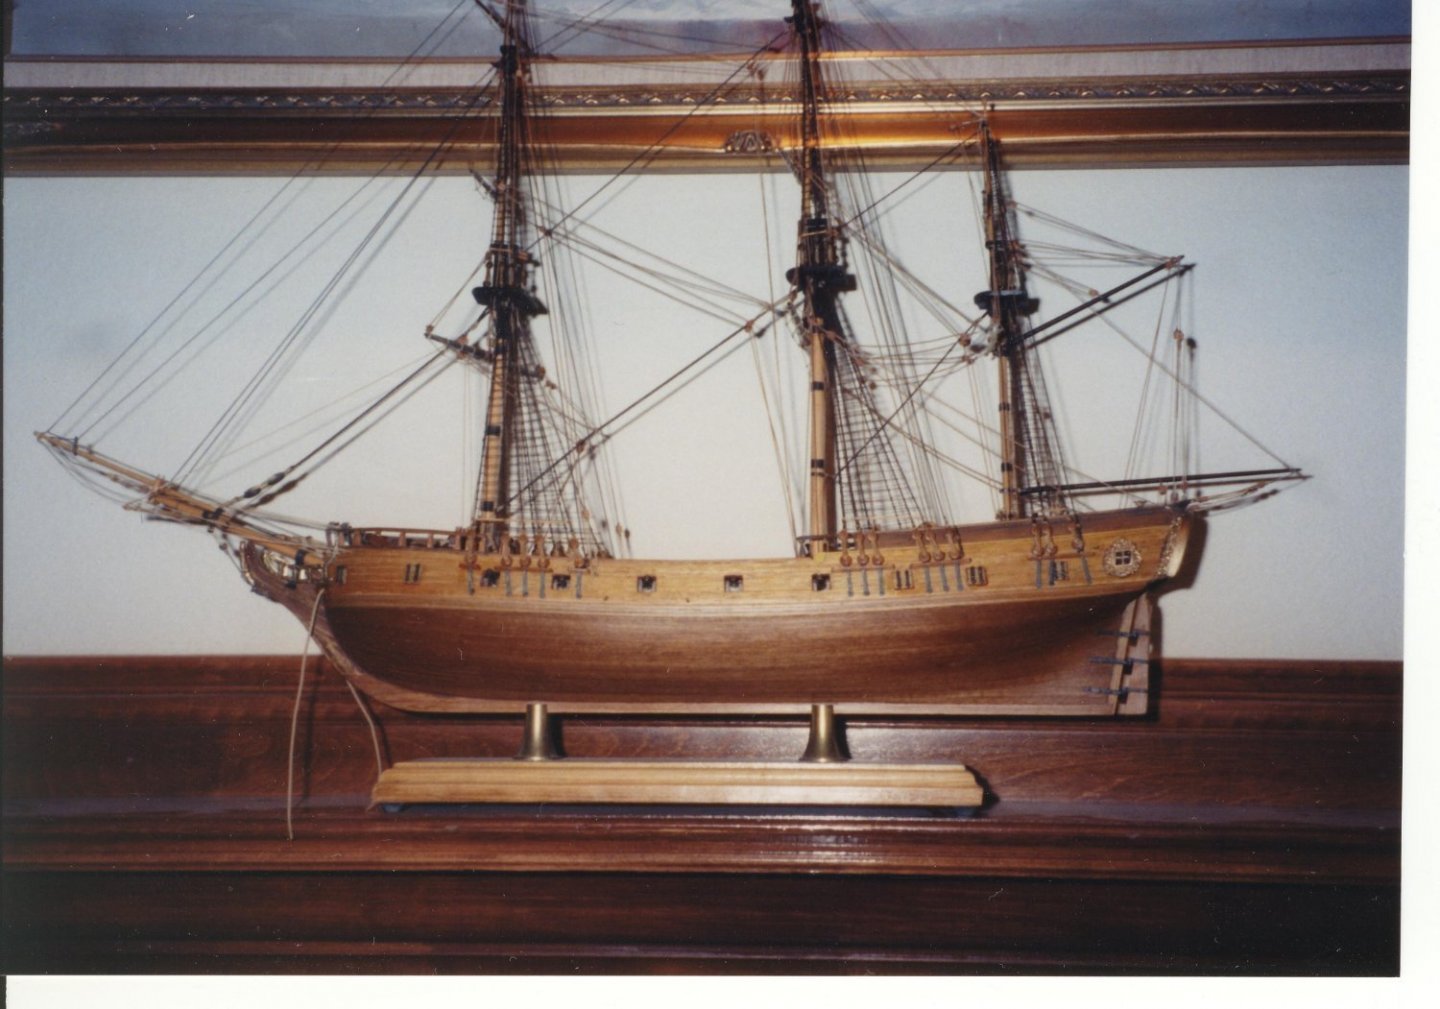
Here, it is not quite finished. I gifted it to a relative, and the story of how I caught up with it later will be left for another time.
I have always wanted to do the Rattlesnake again. Now with the idea of seeing what 30 years of experience, education, and inspiration, particularly from MSW might bring, I am launching this project.
All plans for models of Rattlesnake that I am aware of; Mamoli, Hahn and Model Shipways, are derived from the drawings from the NMM.
The NMM lines are available at WIKI Commons. I purchased the drawings from the NMM several years ago, and the ones at WIKI Commons are actually much better to work from than what I received from the NMM.
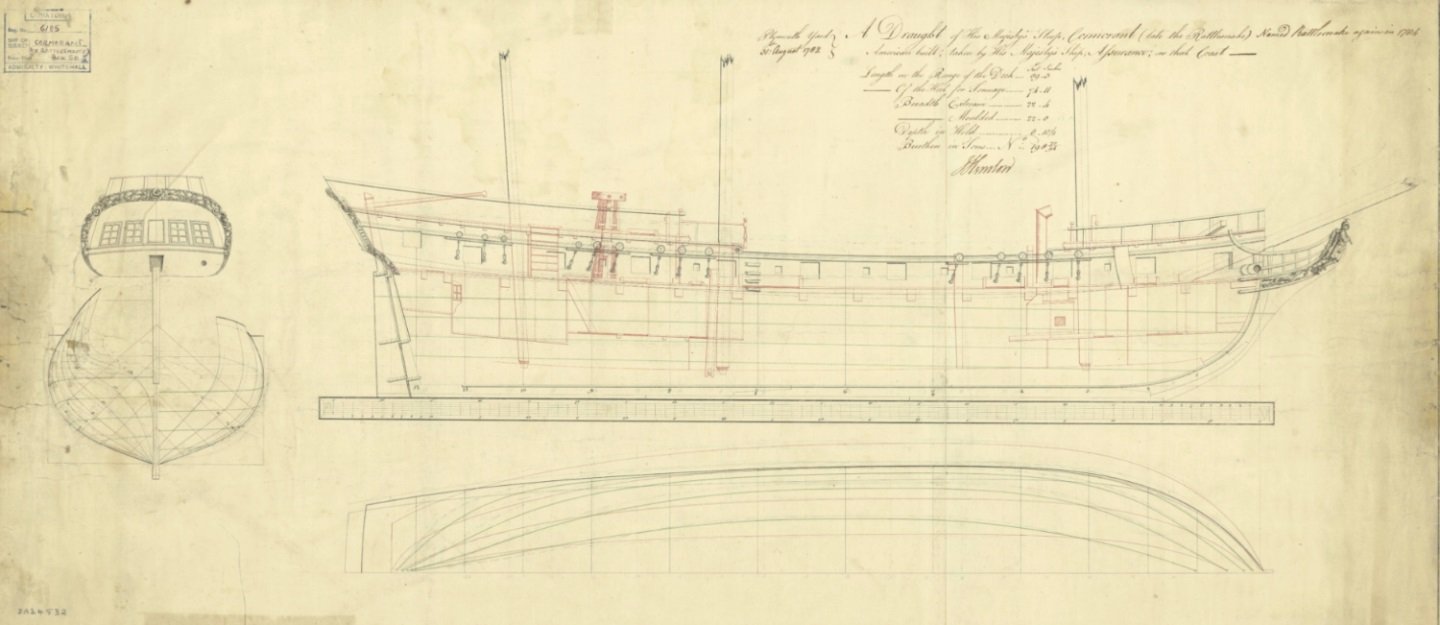
There are 2 additional drawings at the link above that show some deck details.
The MS plans were originally drawn by George F. Campbell for the solid hull version of the MS kit and further refined by Ben Lankford for the POB model .
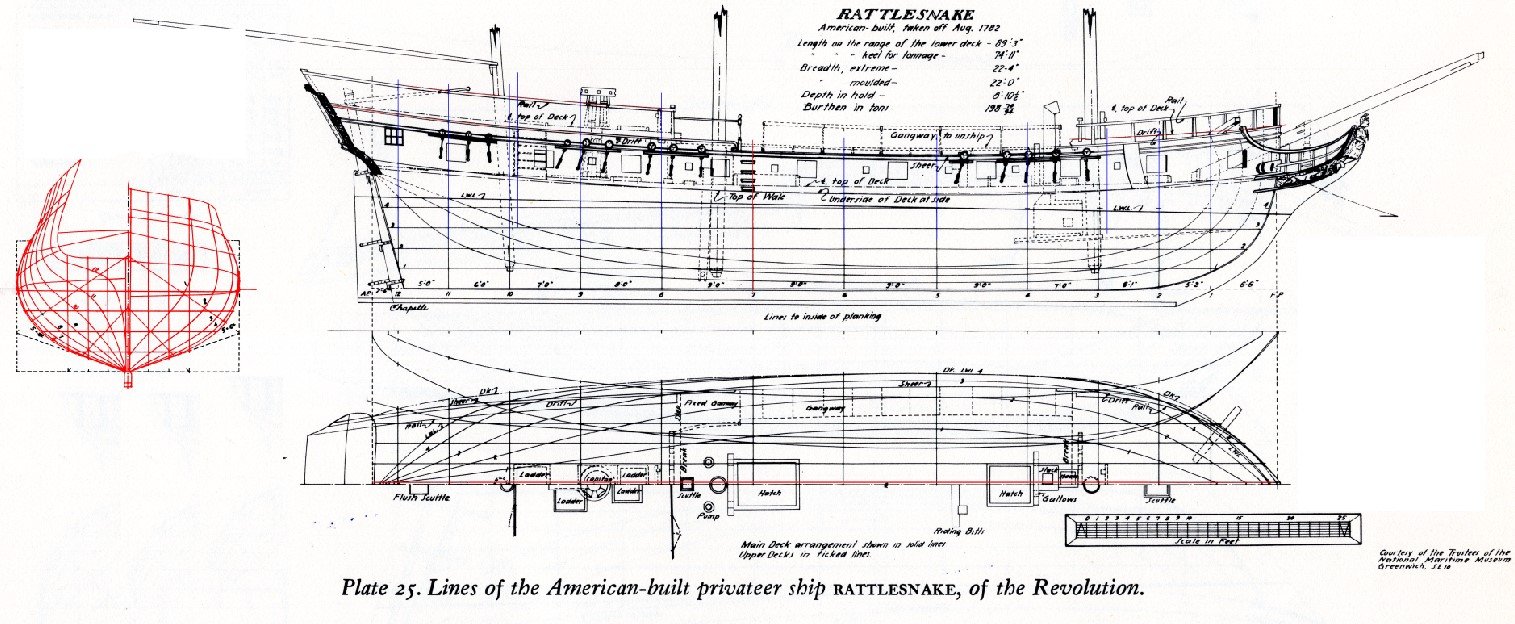
Chapelle's drawings originally appeared in 1935 in "The History of American Sailing Ships" and later in " The Search for Speed Under Sail " 1967.
They are also available from The Smithsonian, and include rigging plans that Chapelle would have inferred, based on his expertise. The NMM drawings do include mast and spar dimensions.
Of interest (to me, anyway) is an isometric drawing by George C. Wales included with the Chapelle drawings in "The History of American Sailing Ships".
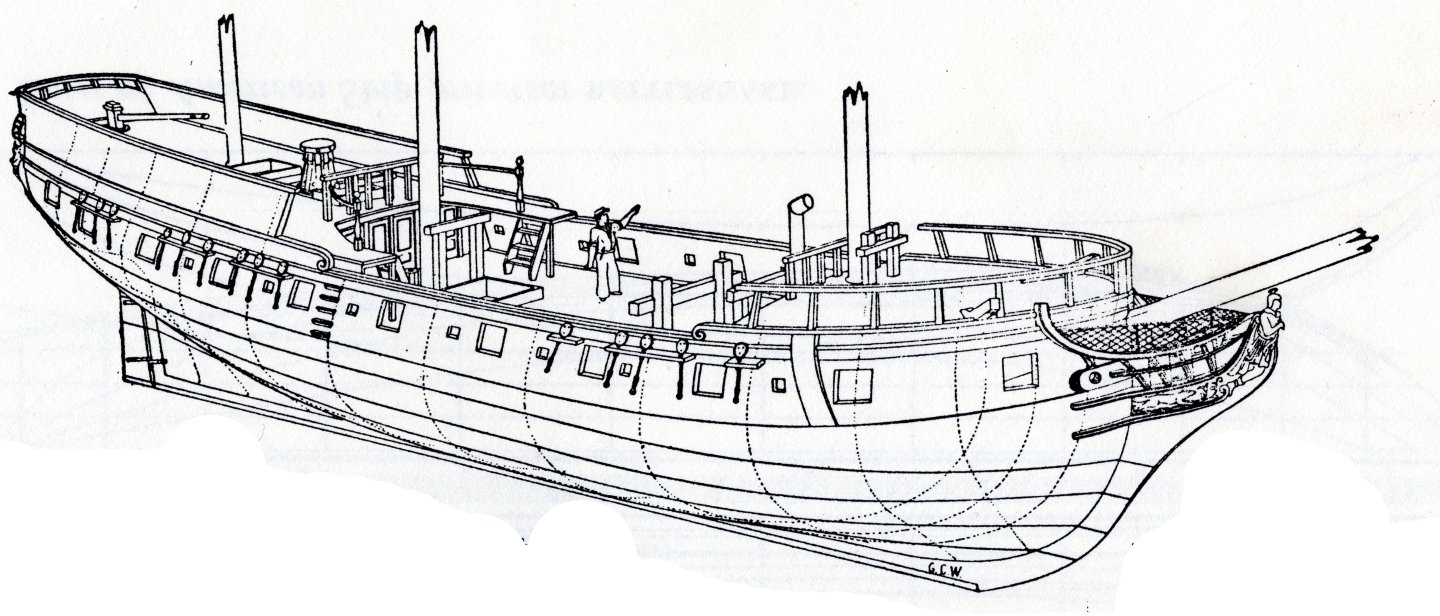
Amazing drafting skills in light of no computers and no CAD. I like the idea of the ladders going up to the gangway. I will consider modeling them if I ever get to that point.
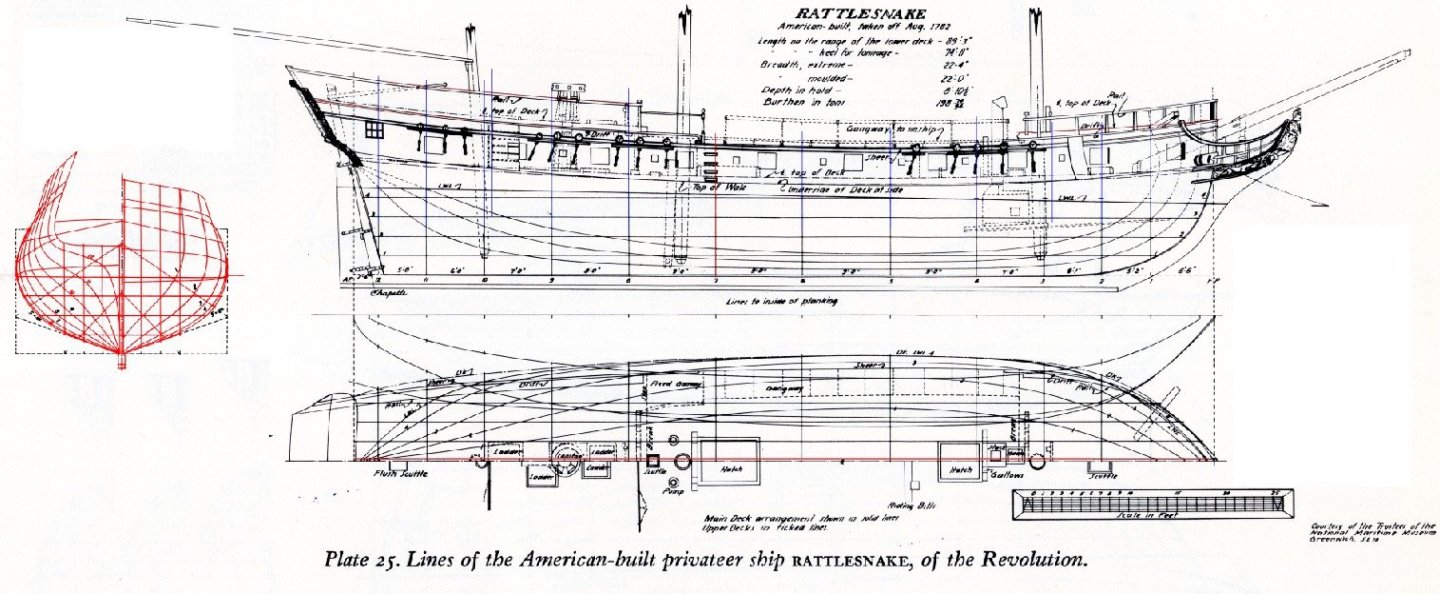
These are the lines by Chapelle from "The History of American Sailing Ships" on which I am now basing my work. ( coloring is mine )
We have to keep in mind that the NMM drawings were " taken off the ship " and were not construction drawings, so the NMM drawings lack other details that can only be left to speculation, so I think the modeler should feel free to satisfy their own vision based on what is available. Chapelle, Campbell and Hahn have provided additional details based on their expertise, and I think the modeler can feel comfortable drawing upon their ideas.
Of note, is the drawing of the quarterdeck bulkhead.
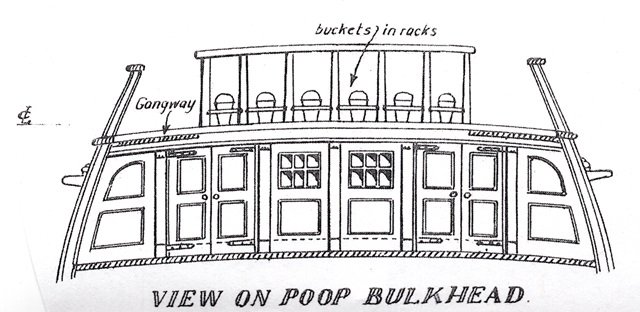
This drawing is by George Campbell and included in the MS plans.
Chapelle did not include it, although it is partly drawn in the Wales isometric. The Hahn plans and the Mamoli drawings show the bulkhead pretty much as Campbell drew it.
The two sets of doors are indicated on the NMM lines, but with no other detail.
The windows in the center panels, and not in the doors, do not seem logical to me. I plan to model the doors with windows.
I have copies of all of the mentioned plans, and for the most part, they match up fairly well .
The NMM, Chapelle and Campbell lines show 12 stations, but for whatever reason, the MS POB plans call for 13. In the long run, you would think 13 is better than 12 when building POB, but there is some slight deviation between some of the MS bulkhead shapes and the NMM profiles. I assume this comes from the use of 13 stations and the change in shape along the profile.
Before I document my actual building process, I want to share some of my work flow, the development of which, is what I have been doing for the past few months instead of building.
I ventured a bit into 3D modeling with Autodesk Fusion ( formerly known as Fusion360 ). It turned out to be more of a learning curve than I want to invest in at this time, so I reverted to my 2D efforts, which is what I will be sharing here.

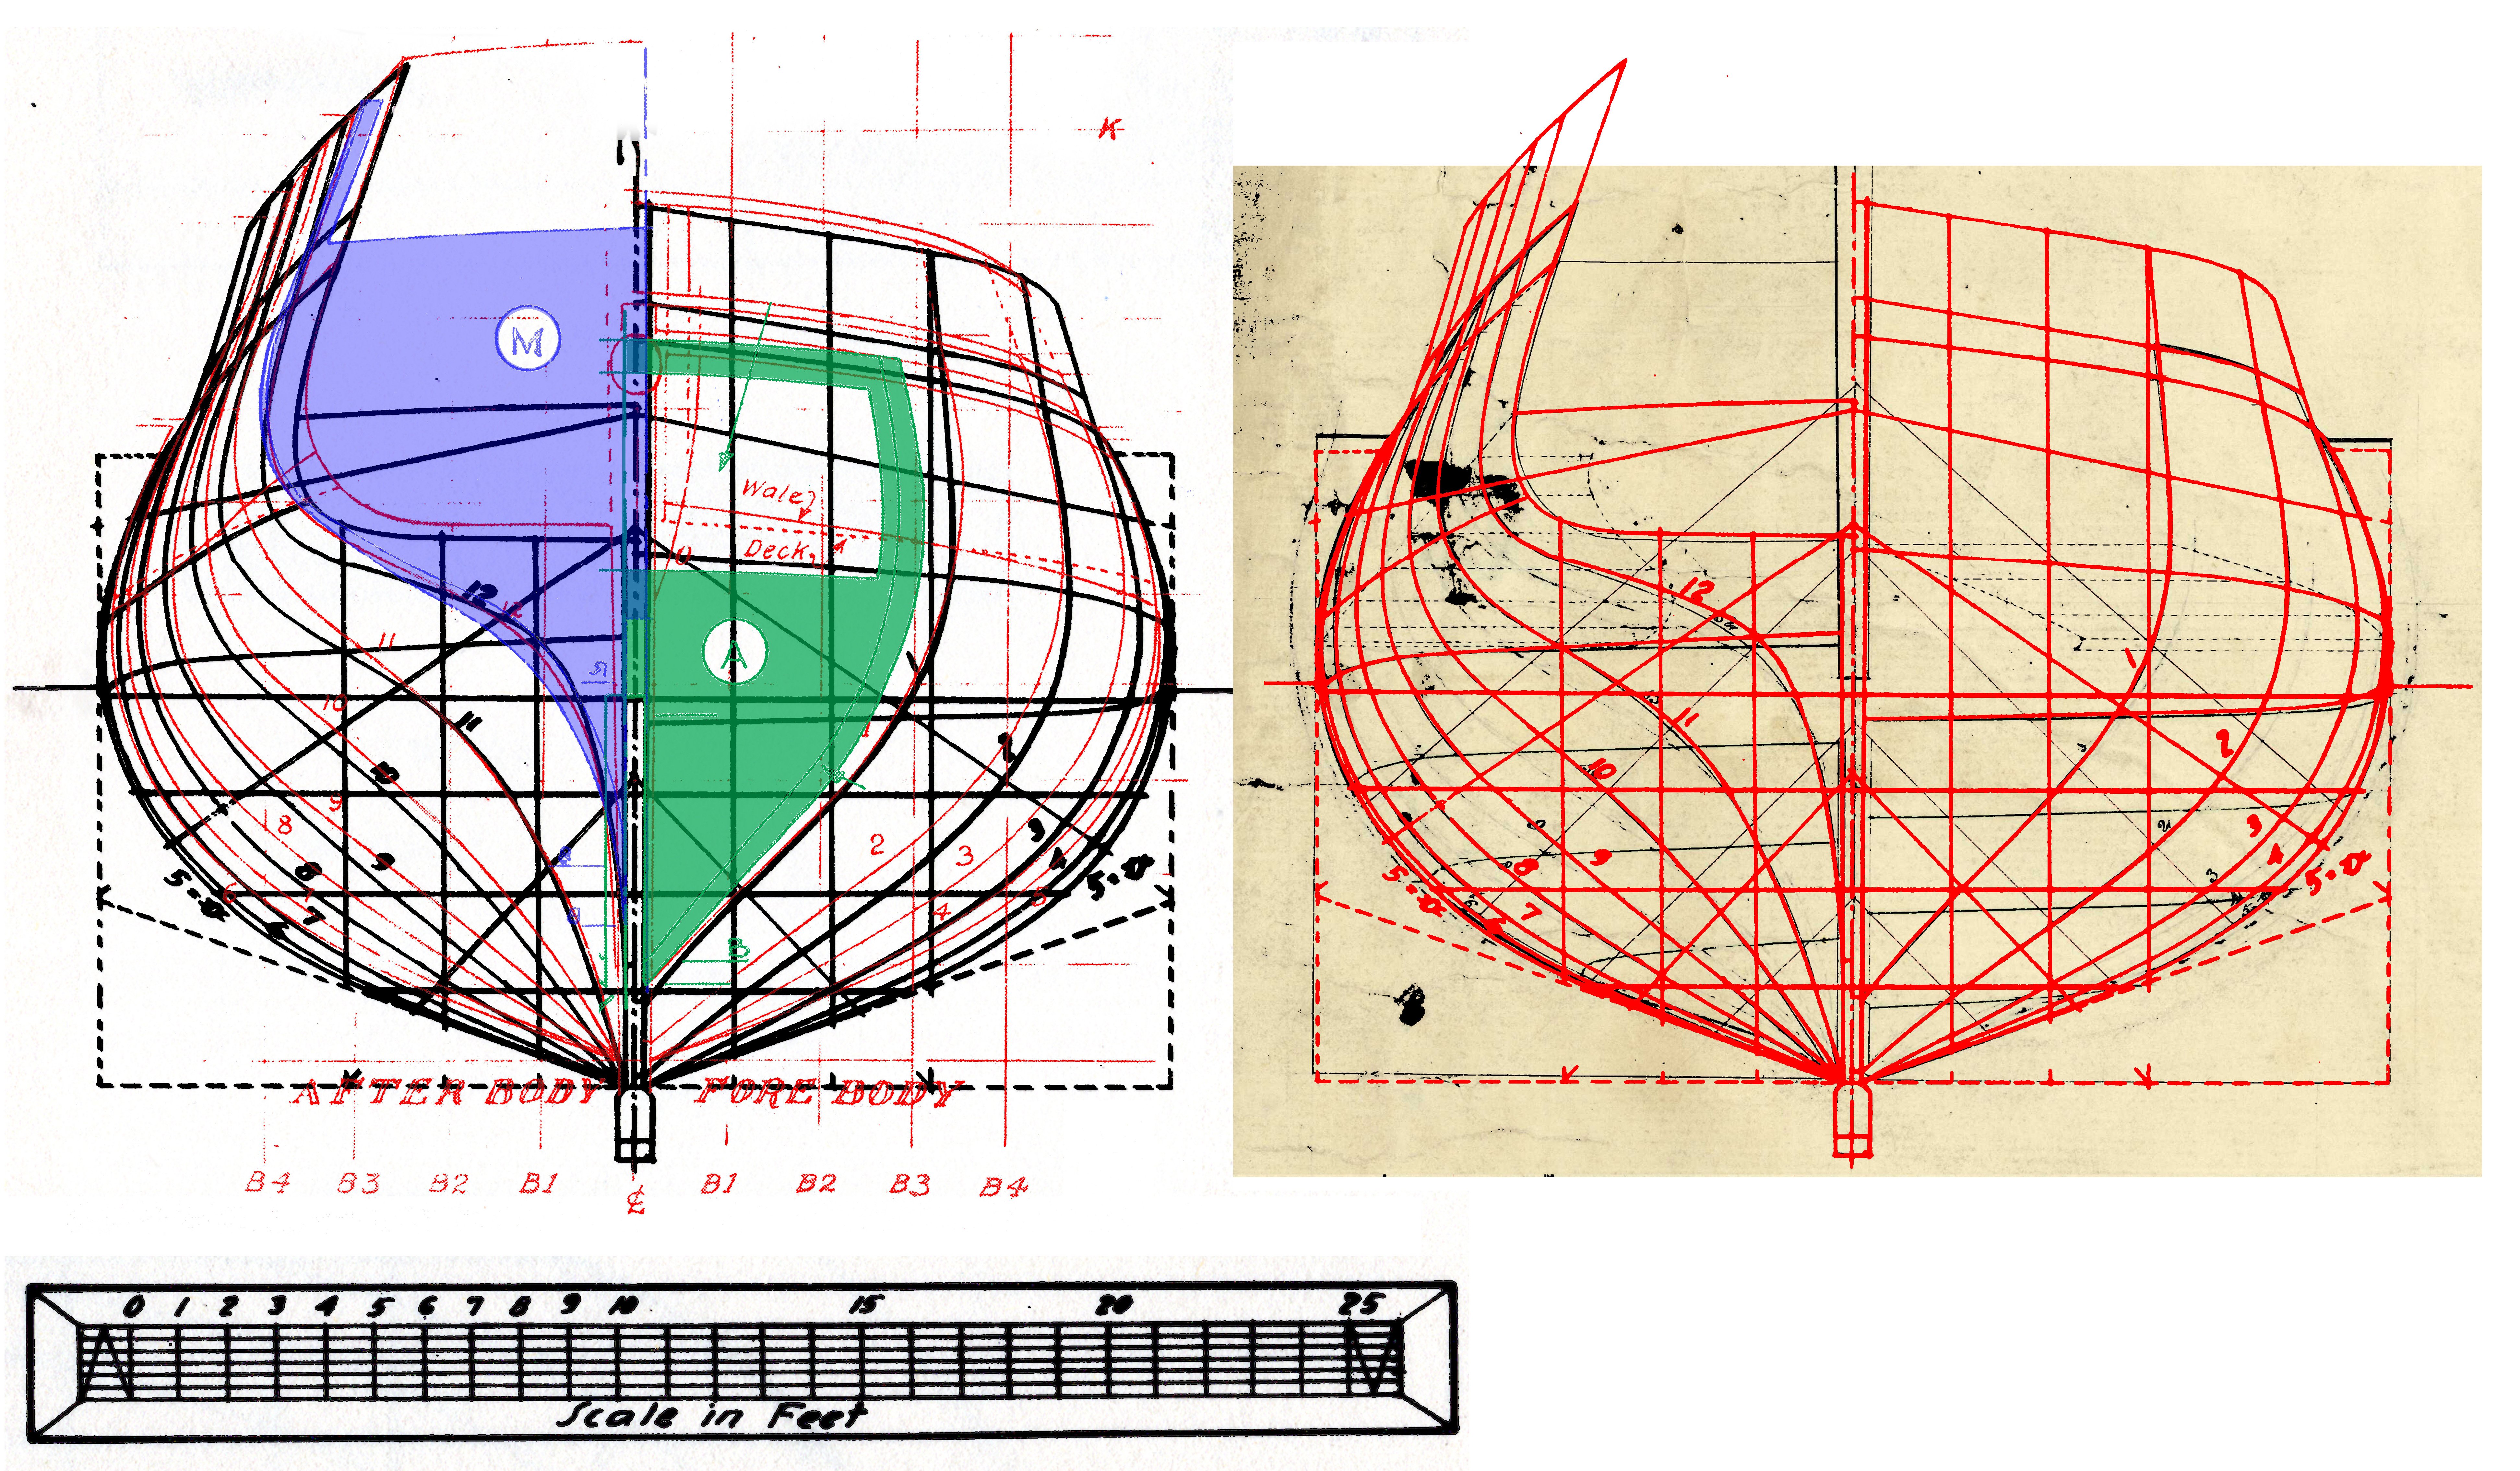
This shows the difference in station lines from the various drawings. On the left, the Chapelle lines are in black with Campbell ( from the MS plans ) in red. On the right are the Chapelle lines overlayed on the NMM lines.
The Chapelle lines are obviously very close, to the extent that much of the most of the NMM lines are obscured by the Chapelle lines. Station 12 is the most notable but slight difference except for the waterlines (?) which who knows why he chose to go off base there. Campbell followed Chapelle in that regard. The NMM lines do not include the railings.
Getting back to the overlay on the left. There are small but obvious differences between Chapelle and Campbell, but I think using either set would produce models with little apparent difference. I'm giving the nod to Chapelle since his lines are closer to the NMM lines.
The shaded in bulkheads are scanned and scaled copies of the MS drawings. Unless I overlooked it, the MS plans do not include any station lines that actually match the shape of the bulkheads as provided, but they are close enough to the Campbell drawings, and as I think the MS kit builders will attest, the bulkheads and backbone as provided, go together to provide a nice representation of the ship as drawn.
The MS backbone and bulkheads, which I copied and scaled up to 1:48, just didn't work for me in my scratch endeavors, and I should have made new parts based on one of the three sets of drawings, rather than copying the MS Parts, which is what I am pursuing now.
I have been pursuing this for a few weeks now and actually have some sawdust and smoke ( from the laser ) to show for it, but I have a little more story to tell. For now, I'm running up against the clock and will post some more tomorrow.
- Ronald-V, mtaylor, iMustBeCrazy and 4 others
-
7
-
I'm sure you have a good reason for wanting oak, but it may be hard to locate in those dimensions.
I would suggest you send an email to Joe at the Modelers Sawmill .. ( his email is right there on the home page. Modelers Sawmill is one of Model Ship World's sponsors.
Oak should be easy for Joe to source, and he may do a custom job for you.
- GGibson and Chuck Seiler
-
2


_RMG_J5106.png)
18th-Century Merchantman Half-Hull Planking Kit by palmerit - FINISHED - NRG - 1:48
in - Kit build logs for subjects built from 1751 - 1800
Posted · Edited by Gregory
I see the same issue on Toni's log.
She doesn't mention it. I think you should be able to just forge ahead without doing any trimming, without affecting the final outcome.
But of course that is up to you.
Looking ahead in her log, I still see a small deviation there at 4. So I think you will be good.