
HOLIDAY DONATION DRIVE - SUPPORT MSW - DO YOUR PART TO KEEP THIS GREAT FORUM GOING! (Only 36 donations so far out of 49,000 members - C'mon guys!)
×


AJohnson
-
Posts
2,028 -
Joined
-
Last visited
Content Type
Profiles
Forums
Gallery
Events
Everything posted by AJohnson
-
 Hi Edward, For a fuzzy edge, as I don’t have the requisite airbrush skills, I would still mask, but lift the paper mask off the surface by use of small blobs of blu-tac to allow some under spray. You’d have to experiment a little to find the height of mask you need for a given “fuzz”. Is this kit the the old Matchbox one, rebranded? nice work!
 -
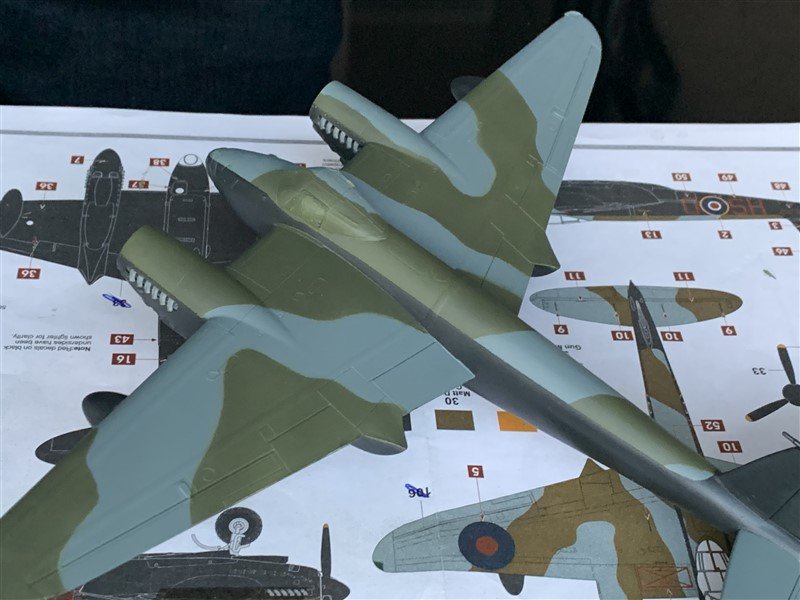
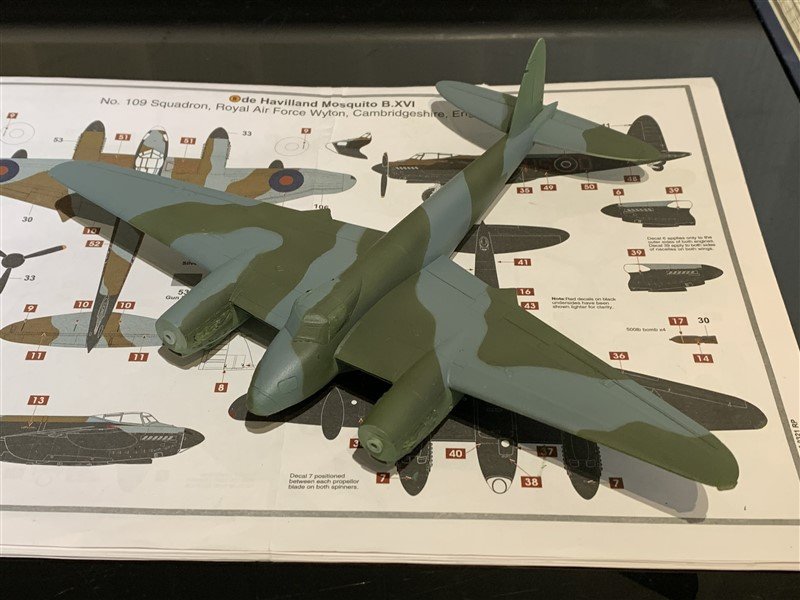
Yes agreed, the Green/Grey is very muted, almost "Coldwar" modern in look. Colourcoats do put a lot of research into their paints (many warship ones also.) So, fairly confident I'm in safe hands on that score; initially I thought the Grey looked too "blue", but it looks close to the few colour photos I have seen. Green/Brown is also my favourite, I'll post up some pictures of this one next to my "Phantom of the Rhur" Lanc. I did a couple of years ago when finished.
-
Now that is wonderful, lovely scene, very atmospheric. 👏
-
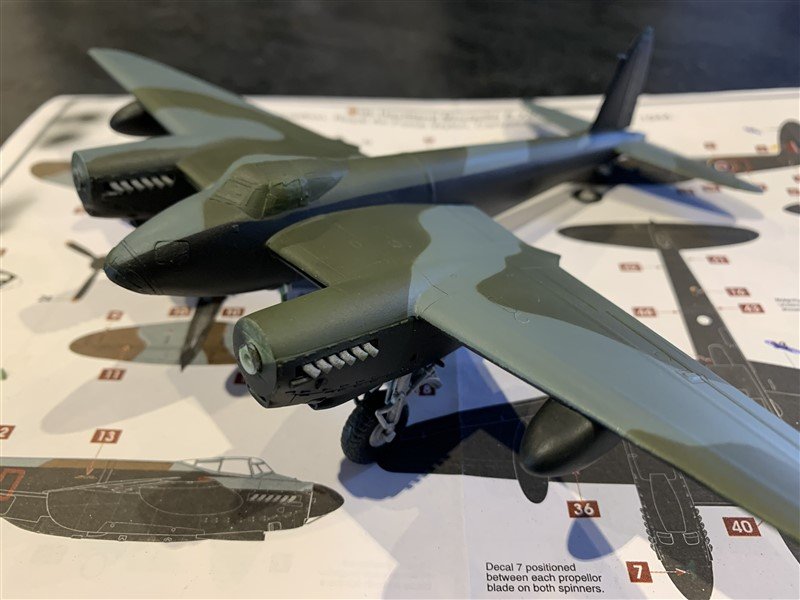
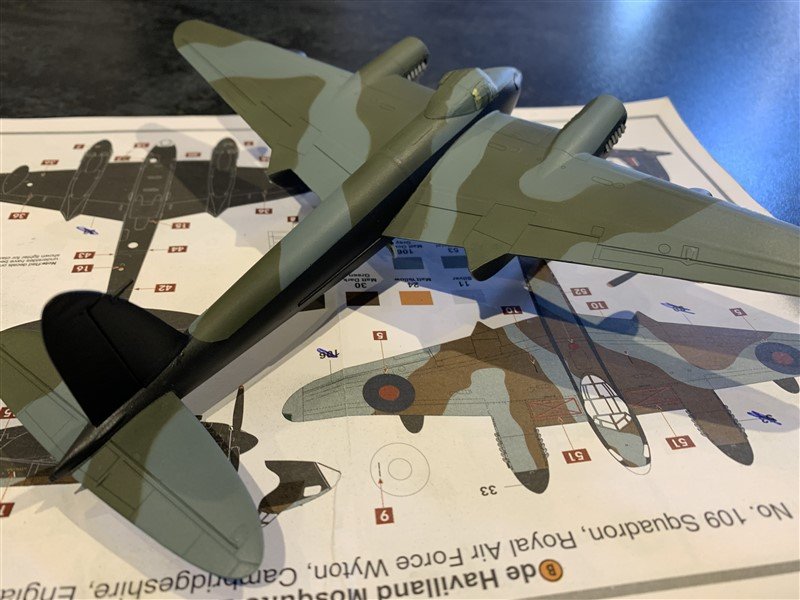
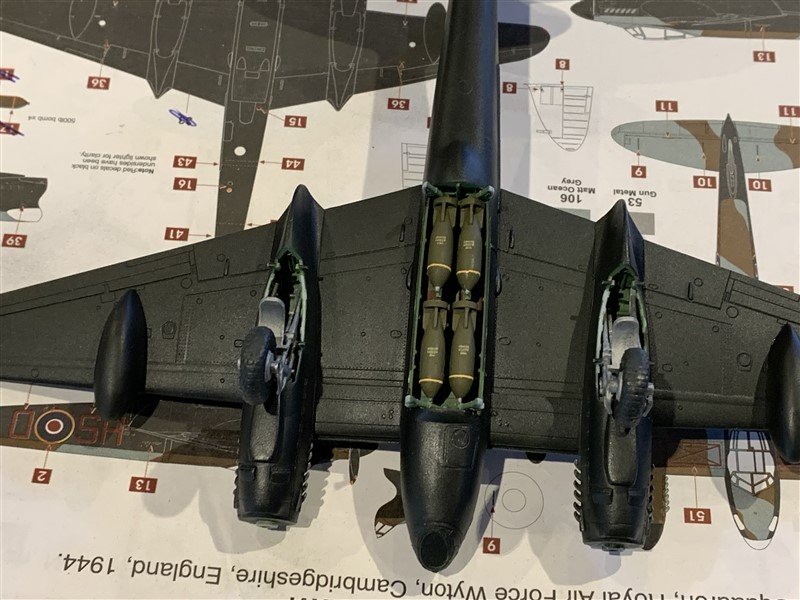
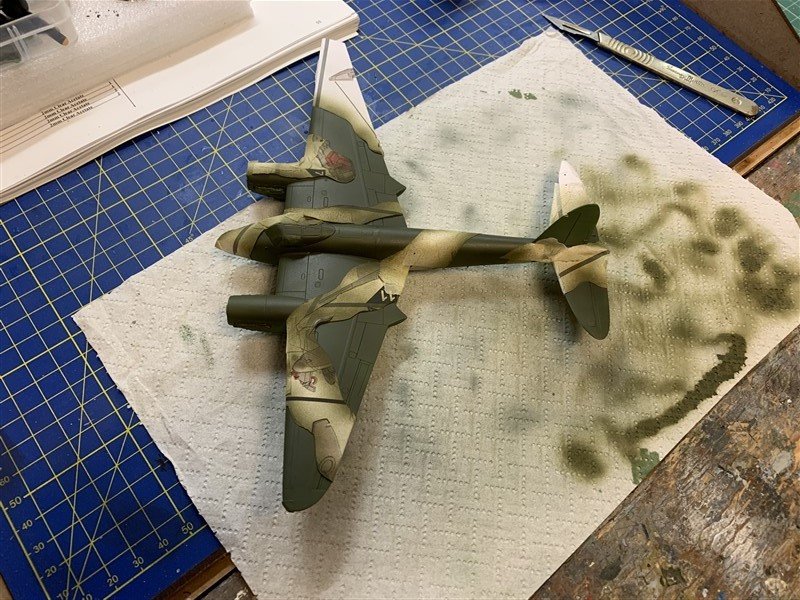
Last update I think before the big reveal. Enamel "Bomber black" from Colourcoats applied, it has a semi-satin type finish which is fine as the next job is a gloss coat for the decals. So after the gloss coat, all that is needed are the decals, adding the undercarriage and bomb bay doors and finally the props. I will do some weathering, mostly the "chalky" looking staining from the exhausts on the black, perhaps highlight a few panels lines around the engines, but not much more. Certainly no need to add "metal" chips to this one! 😁 (well perhaps the odd one on the metal engine cowls / radiator panels....) Then a final flat coat. Not sure, I think I prefer the "look" of a Mosquito in Daylight camouflage, the black disguises her lines a bit - shock! - do you think that was the purpose for black night bombers? 🤔 😂 Thanks all again for the interest, feedback and comments on this build, who knew - one of the best "aircraft" forums is on "Model SHIP World"! 👍
- 50 replies
-
- 14
-

-
Well Brian did say it was a Secret! 🤣
-
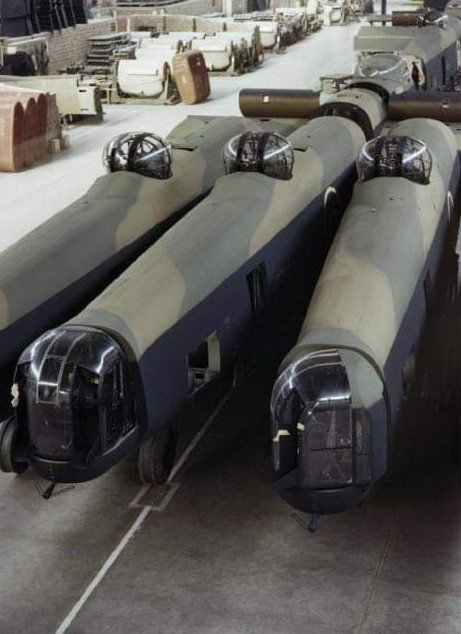
As an aside the factory picture of the Lancasters also shows they were “freehand” painted, each is slightly different than the other, so just shows research is your friend if you are after a particular aircraft to model. You can tell these are later mark Lancaster as there are no small oval fuselage windows. So maybe by the time these ones were being built the “mask to spray” or even “mask to chalk line” the airframe were not used at least in this factory. But given the average lifespan of a Lancaster was about 20 missions, it is a wonder they got a lick of paint at all!
-
Yep we are definitely on the same page, certainly no offence dear MSW friends - you should see some other forums get hot and bothered over fuzzy v hard camouflage lines! 🤣
-
Here is a picture of some clearly spray-painted Lancasters in the factory, you can just make out the "fuzz", but try that at 1/72 and it will be very hard to see as Javlin says. All down to research on a particular A/C. or personal preference, after all these are our models, me personally I don't like "fuzz" on my clothes or my models! 🙂
- 50 replies
-
- 11
-
-
Hi Javlin Thanks & @Egilman & @Canute for the kind words. Regarding the "fuzzy" v "hard" demarcation of the camouflage, I discussed this in my Beaufort build not long ago. Yes scale has a great deal to do with it, but also (with the caveat there was huge variation) the full-size aircraft were also sometimes painted in this manner with masks. So unless doing something 1/24 scale and bigger, or modelling something that actually was sprayed with a large "fuzzy" width in real life, some form of masking on model camo. is the only option really. Besides this is all academic really, as my "freehand" airbrushing is not up to doing anything without a mask"! 😆 The black underbelly will be done today, more updates soon! Thanks all.
- 50 replies
-
- 10
-
-
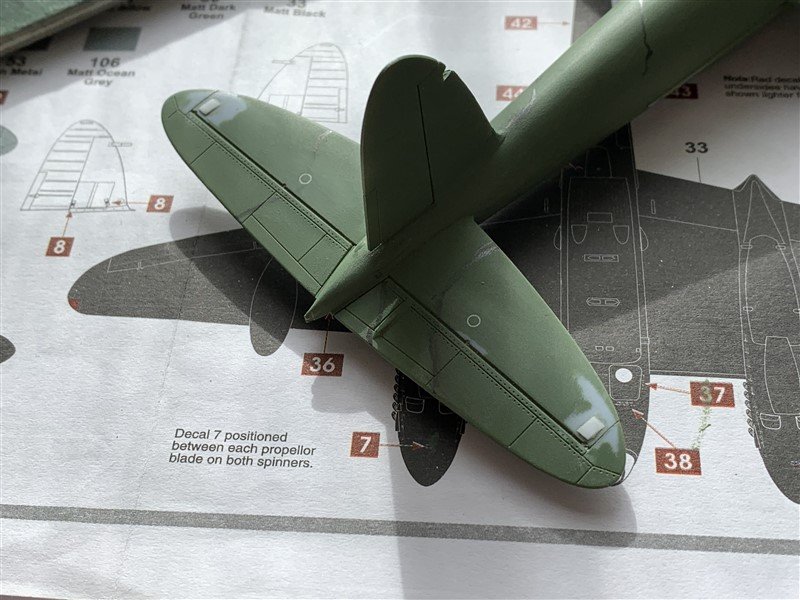
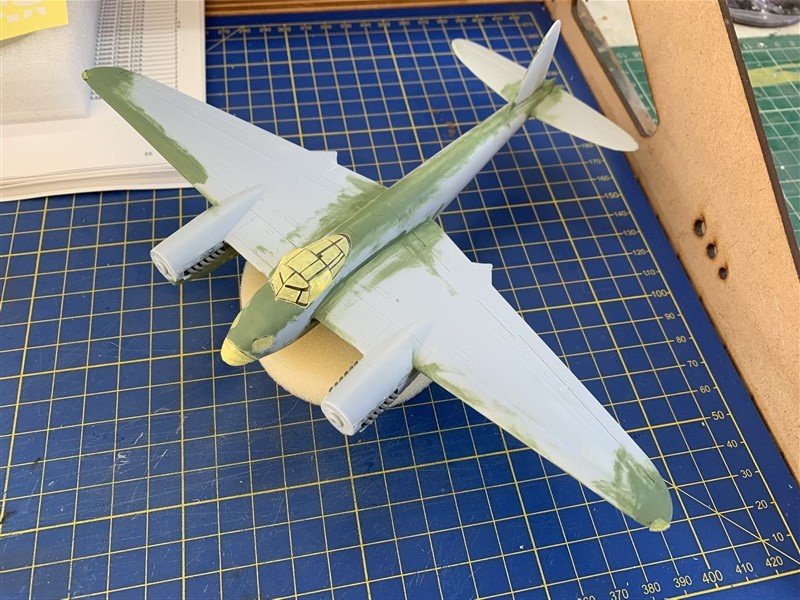
Painting update, but first a school-boy error to confess! 🤭 Whilst going over the kit and doing last minute polishing and filing around the canopy frame with thin putty I noticed I had glued the horizontal stabilisers on upside down! 🤣 Not too bad to fix, they are almost identical surfaces but for two circular access panels that should have been underneath and two rectangular raised ones that needed to be on top. So needed to fill one pair and made the other pair with thin plastic card, there nothing to see move along.... 😉 Painting was fairly straight forward, Colourcoats Enamels doing the trick again without drama. This all needs to harden off for a day, so I can mask it all for the bomber black coat. Until next time! 👋
- 50 replies
-
- 15
-
-
Hey Brian, good to hear you can still do something on the "Granado" as well as your "secret" vessel, I'm following both! 😁
-
Very nice OC and I hope the "Admiral" continues to recover.
-
Well we are about ready for painting, undercoat done, final inspection, fine rubbing down and the addition of tail aerial to do; I would be happier leaving that off until the end, but the way the part fixes to the tail fin means it might spoil the paint finish, so I will have to be careful! 😬 The hardest part of the build has actually been the canopy. It has alternate parts for the side window panels, so you can have the "blown/bulged" B.XVI versions or the "blister" alternative - similar to the ones on the Lancaster's canopy. (This indicates for those who might be interested, Airfix might be intending to do another version of the Mossie, probably a Photo recon. bird, which might interest US members as a few USAF units used the Mosquito in that role.) Anyways these little side panels have been an absolute B@&^%£! to fit satisfactorily. 🙄 Being safe I used canopy glue to avoid fogging, but this would just not pull together the main canopy to these small panels and keep their shape and twice the assembly sprung apart. (I think the main canopy is slightly bent upwards away from the seating on the fuselage.) So with a deep breath, plenty of magnification and lighting I fixed them with medium C-A used very carefully with an applicator tip. Blowing on the parts like an asthmatic 🌬️to keep the air moving to avoid the dreaded fogging. Upshot I think it is all still clear, though I will probably find later my masking hasn't worked and I now have a green canopy! 😂 Next update Cammo time! 😁 thanks for looking in and the likes. 👍

- 50 replies
-
- 11
-
-

-
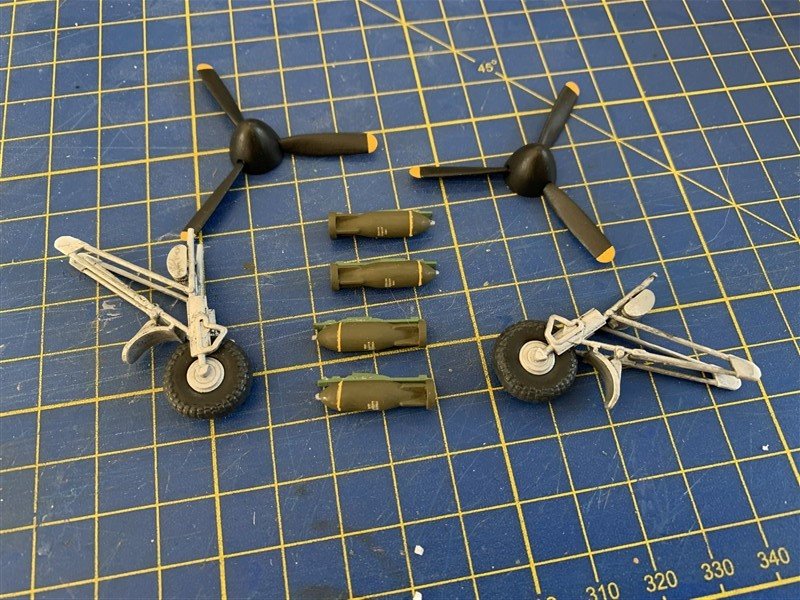
Hello everyone, I've been away from this little project for a bit, working getting in the way, shouldn't complain - it pays the bills! 🙂 So just a small update, have managed this week to finish off a few of the smaller parts, bombs, undercarriage and props ready for attachment at the end of the built. Also masked the clear parts ready for first undercoat.

- 50 replies
-
- 13
-
-

-
Well done Edward, a very nice first card model! 👏👏👏
-
A very neat looking hull!👍
-
F-86F-30 Sabre by Egilman - Kinetic - 1/32nd scale
AJohnson replied to Egilman's topic in Non-ship/categorised builds
Totally agreed, I had two in my stash. I still get the bug to do a Grey/white USN/Marines one! 😁 Years ago I did the Tamiya 1/32 E and a 1/72 Royal Navy version.

-
Don't do it! I said that months ago with my "Nisha" 🤐 Your Erycina is looking very smart, would be a shame for you to abandon her at just the same stage I did.... (I will be back to it next month I think)
-
Good luck with the further surgeries Jack! 🤞🤞
-
One of the (many) standout things about MSW is the very supportive camaraderie on here. There is only one person on here that constantly does this on build logs and fortunately MSW provides an “Ignore” facility 😄👏 Love your reply Chris 🤣
-
Another Masterclass Chris! 👏
-
I have toyed with the idea of doing a DWI Wellington conversion, "Aerocraft" do a 1/72 conversion set (£18.00), it would make interesting model and something different to look at on the shelf!
-
Looking good! 👍
-
Very good Edward, are you doing the rigging?
