


Dan Vadas
-
Posts
3,261 -
Joined
-
Last visited
Content Type
Profiles
Forums
Gallery
Events
Posts posted by Dan Vadas
-
-
-
2 hours ago, cog said:
Nice, looks very promising. Didn't have the second item (crane-ish things) in full PE?
My (very limited) PE set had at least the crane "Runners" in it
") .
.
Now that you're up to the same exact stage as me, I'll be following what you're fitting as far as smaller details is concerned. I feel a bit of "scratch-building" coming on
 .
.
 Danny
Danny
- Old Collingwood, mtaylor, cog and 1 other
-
 4
4
-
1 hour ago, EdT said:
Hi Steve,
I bought my mill quite a few years ago. It was equipped with zero adjustable handwheels. The zero adjustment is very important because it allows you to set the wheel at zero before turning to a specified setting. This avoids having to calcualte the increments from the current position - something I unfortunately still have to do on my old Unimat. Here is a link to the adjustable wheels.
Ed, have you ever considered buying a Digital Readout for it? I find mine indispensable for tasks like this. I start by making a Spreadsheet with all the relevant XYZ data points. I believe Sherline sells the DRO for a couple of hundred bucks, from memory mine was about $AU350.00 with freight to Oz.
Danny
-
8 hours ago, Captain Slog said:
Just an observation, but I think the barrels may need to slide further back into the breech block up to the collar.
Slog, the barrels are right to the end of the "scallops" in the middle of the breech block, which I assumed was correct. To get them in any further I'd have to take a bit off the end of the barrel. That's not a problem, but I'll check the dimensions which are almost non-existent
 .
.
EDIT - after taking another look at the barrels I found a tiny step which must have been the point at which I should have cut the end off. There's a large piece to take off anyway - this would have been the bit that was fixed into the lathe chuck, I just picked the wrong step. I won't be doing anything about the two guns I've already made, as removing the barrels would mean virtually destroying the whole lot. I can live with these two, I'll change the other 10.
Thanks for the comments guys, and also those who hit the "Like" button
") .
Danny
.
Danny
-
1 hour ago, BANYAN said:
Nice work especially at that scale Danny. You must have a 'surgeons' hands
cheers Pat
I wish I had a surgeons EYES
 . Thanks John, Pat and Fernando.
Danny
. Thanks John, Pat and Fernando.
Danny
-
Thanks again Popeye
.
There are two 20mm Guns on the aft funnel platform, so I thought I'd have a go at making them. These are the smallest guns on the ship, so if they came out OK the rest of them should (theoretically
) be easier. They are also the smallest guns I've ever made - the barrels are 9mm long, to give you some idea of the size. Here's the PE card of them all, there are 12 guns in total, and each has 34 parts :
.thumb.JPG.b4a29a2e1c2828684e61c1e7dd5e3657.JPG)
I started by rolling the support base into a cone and CA gluing it to the base :
.thumb.JPG.62e40a3900860cfd63ff632e9ccbb642.JPG)
Next is a rack to hold four spare magazines. Each magazine is made from 3 pieces, and there is a triangular divider between each of them :
.thumb.JPG.d52b1761786209e675030d59b0b10e55.JPG)
I didn't take any more pics of further sub-assemblies until I'd finished them. Some of the pieces were a bit tricky to get right, but they didn't turn out too bad. The Breech comes in 5 pieces to make up the thickness, the 3 middle ones have a scallop in them to accept the barrel. The barrel itself came with the set of CNC lathe-turned barrels. It's amazing how small and accurate they can make things like that these days
:
.thumb.JPG.55503d6763b32698ce9e11a2e1307035.JPG)
.thumb.JPG.e8d681d7e18c308ade73146cf236f3ca.JPG)
.thumb.JPG.a53241035ec7ee5b8ef660f4eba14e9e.JPG)
Here's a pic to give a sense of scale. The Australian 5c coin is 19mm in diameter :
.thumb.JPG.5624a8440b788e0eaa4a6d2a516fcf37.JPG)
There is a spent cartridge collector basket which is supposed to be fitted to the side opposite the magazine. I found out I'd actually fitted the stock and barrel back-to-front, so I can't fit the basket to these two guns. Something to watch out for on the rest of them
:
.thumb.JPG.ea16d7d2362e762b9657503906f6afee.JPG)
Here's one of the guns after painting - quite acceptable, and further ones should turn out even better as I've worked out a few tricks on how to work with the PE :
.thumb.JPG.02f181256f4109780a655053cdff64ae.JPG) Danny
Danny
-
11 hours ago, Old Collingwood said:
Hi Danny, will you be painting her when she is finished?
OC.
No. If I was going to paint him I'd be nearly finished by now
. That's why I'm doing all the touch-ups as I go, shouldn't need any extra painting (apart from the PE of course).
10 hours ago, cog said:Just one
 I broke three, but my hull was/is resin, does that give me any credits when I buy a new set!?!?
I guess resin would tend to "grab" the drill a lot more than paper does.
Danny
- popeye the sailor, mtaylor, Canute and 1 other
-
4
-
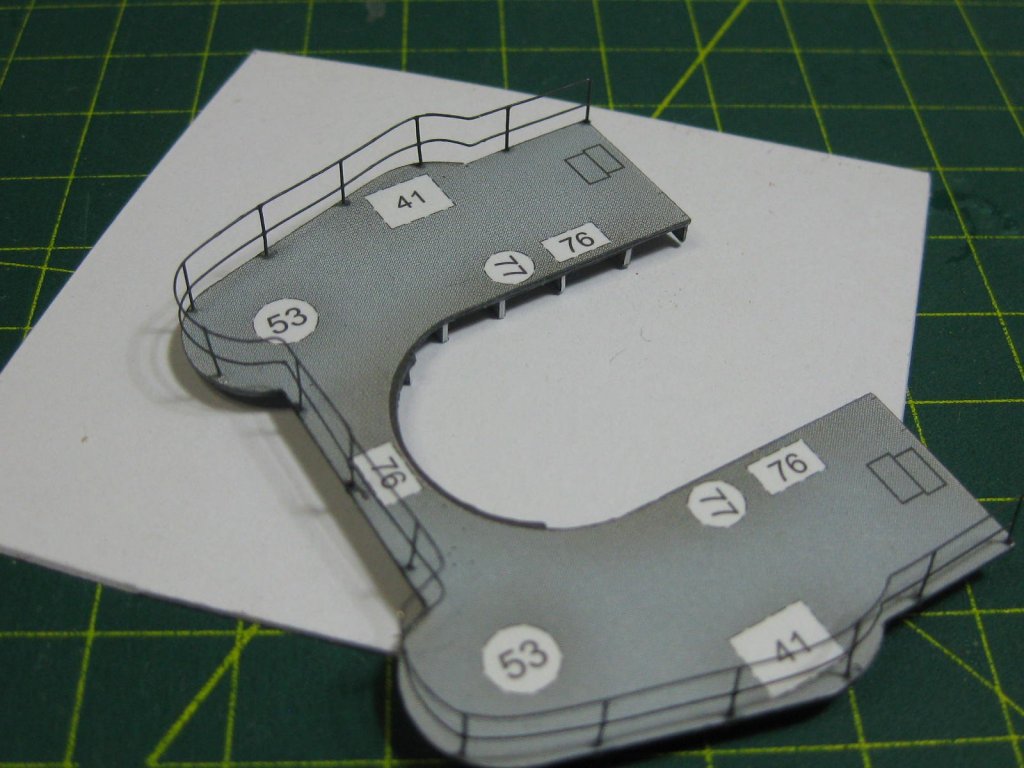
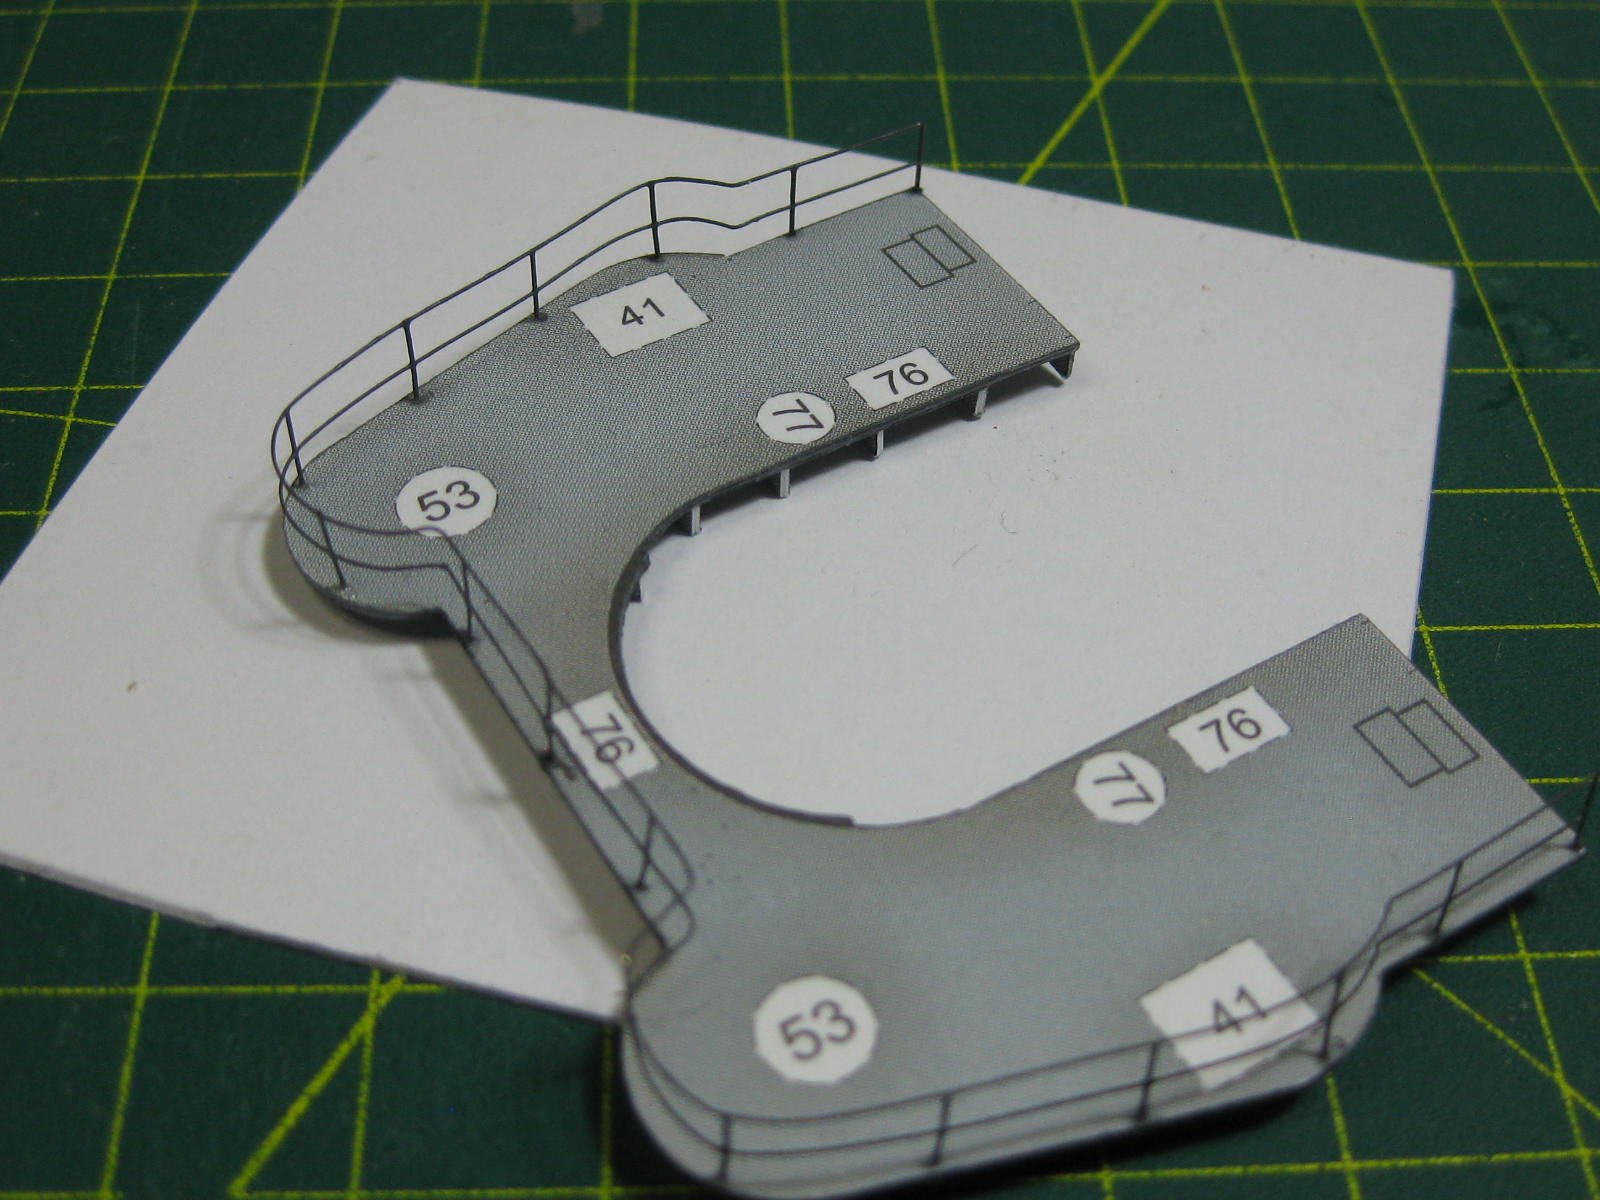
Surrounding the funnel are two Platforms. Straight-foward enough to make :
.thumb.JPG.6c54efc889e97b0556a22b9449f71aff.JPG)
There are a number of gussets beneath the platforms :
.thumb.JPG.7f7782100a32fd1c3b15ebbde86a7efe.JPG)
.thumb.JPG.bf7182bdca94eac71ae101ef85b7876e.JPG)
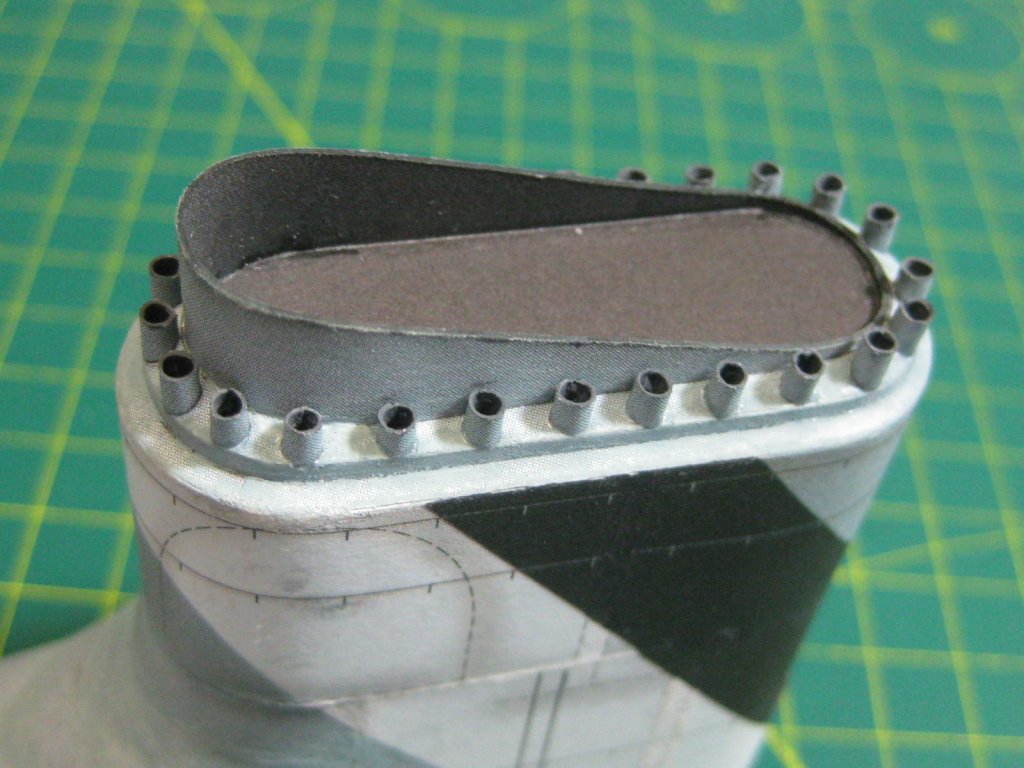
A railing is fitted to the edge of the platform. The PE railing I have doesn't have a "kickboard" which saved me having to cut it off. I drilled 0.3mm holes for each stanchion using a tungsten drill by simply turning the drill bit by hand, which gives me more accuracy than trying to use one of my powered drills. I was a bit "sus" about these drills until I actually started using them - they are excellent
. So far I've only managed to break ONE, and that was only due to not supporting the piece properly :
.thumb.JPG.cd67067fa4dc6ad4a206a87ce9fb29ce.JPG)
.thumb.JPG.be674c13c47da911e102647a7e6fe5ef.JPG)
Beneath the aft platform is another, which also has two Cranes for moving the ship's boats at the aft end of the funnel. I drilled out the holes in the gussets, the smallest is 0.4mm :
.thumb.JPG.ddb7009f0e91f1411ca555b9e8a83fd5.JPG)
.thumb.JPG.93510356ec08ec0539d52ae342335d2a.JPG)
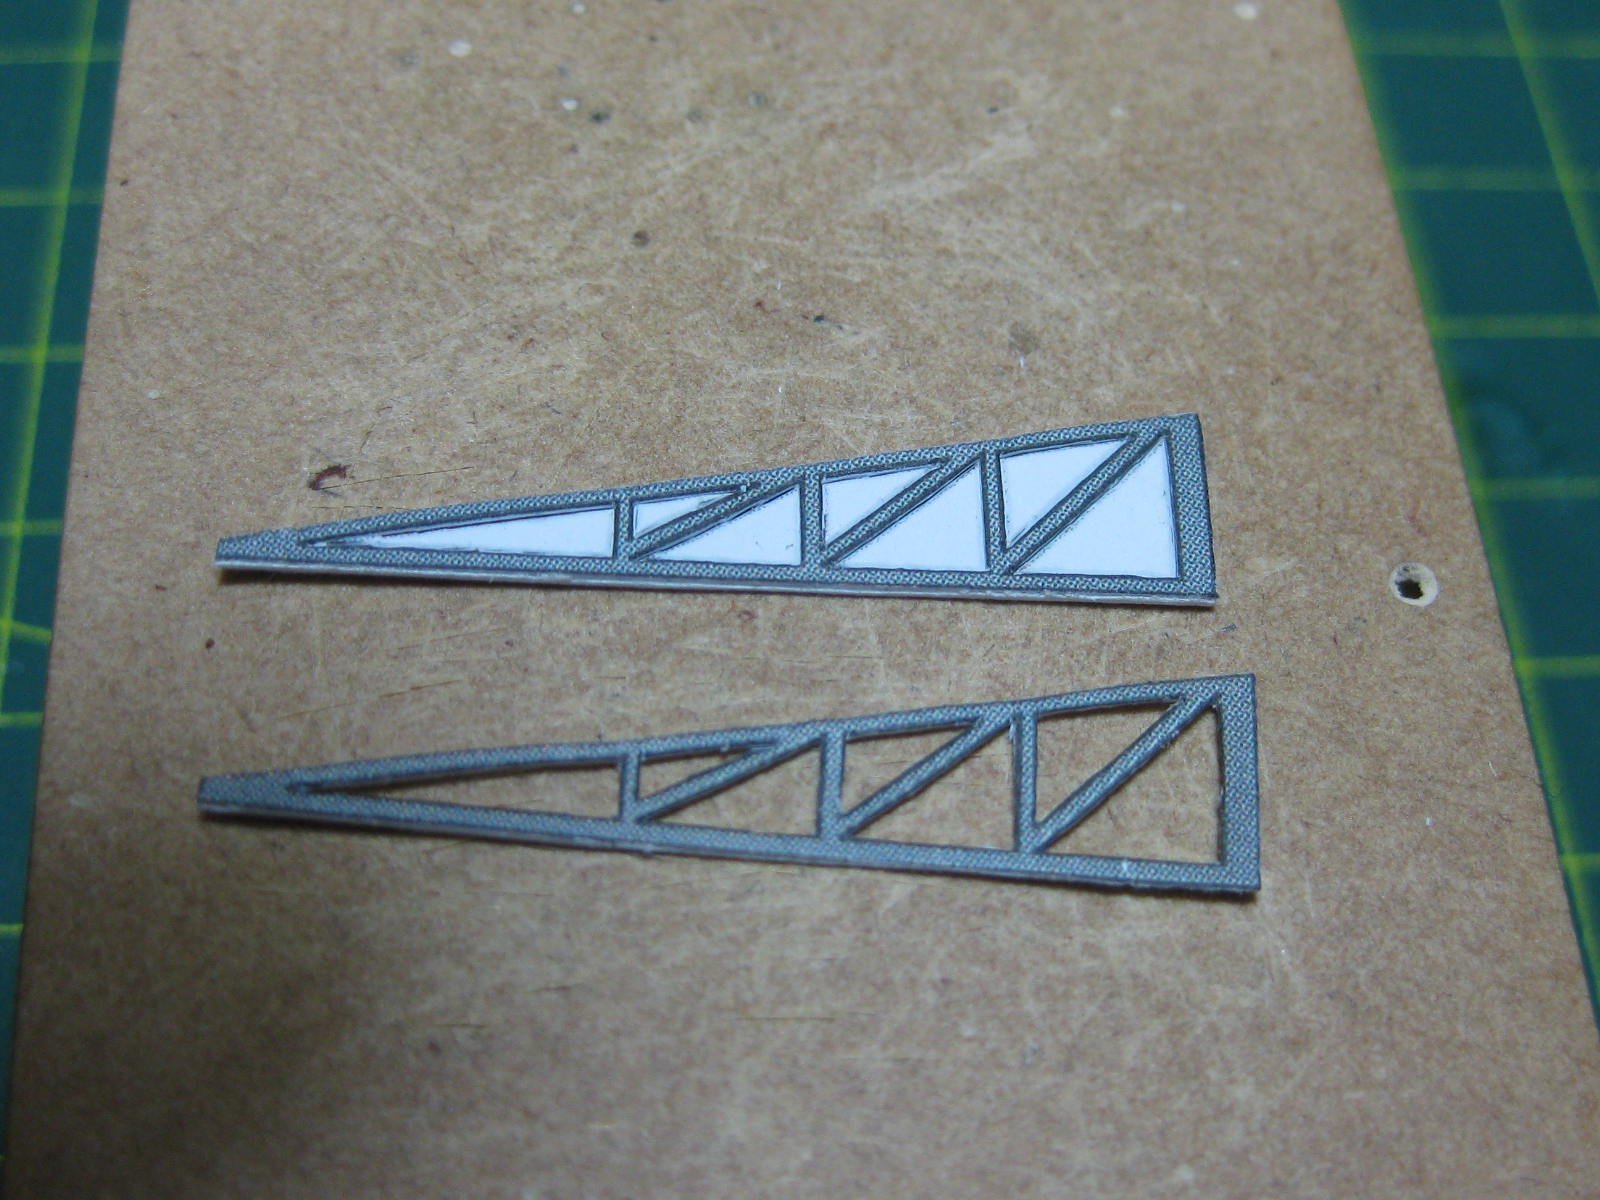
Finally, the two cranes. The "U" shaped section is PE, I really don't know why the two trusses weren't also supplied with the PE set - they were fairly difficult to cut from double-thickness paper :

.thumb.JPG.b351afcb55566e7fe8faeb646fea63ee.JPG) Danny
Danny
-
On 15/08/2017 at 8:44 PM, John Allen said:
canoes were as large as 60 feet if scaled down to 30 inches I was basing that on 1/2 inch to a foot?
QuoteIt is known as a Waka in New Zealand.
John, I fixed the scale in your Build Log title, and also the spelling of "Waka" in both the title and your signature.
Looking forward to seeing more of this build
.
Danny
-
Great job Fernando, allow me to be the first to congratulate you
.
You've even made those crappy blocks look good, and I know first-hand how bad they were before you started on them. So bad that mine went straight into the bin
. Definite room for improvement on the part of Modeller's Shipyard there.
Any thoughts on what's coming up next?
Danny
-
-
1 hour ago, amateur said:
I discarded the pva, as it tended to leave visible changes in the card due to rhe water, might switch back to PVA though
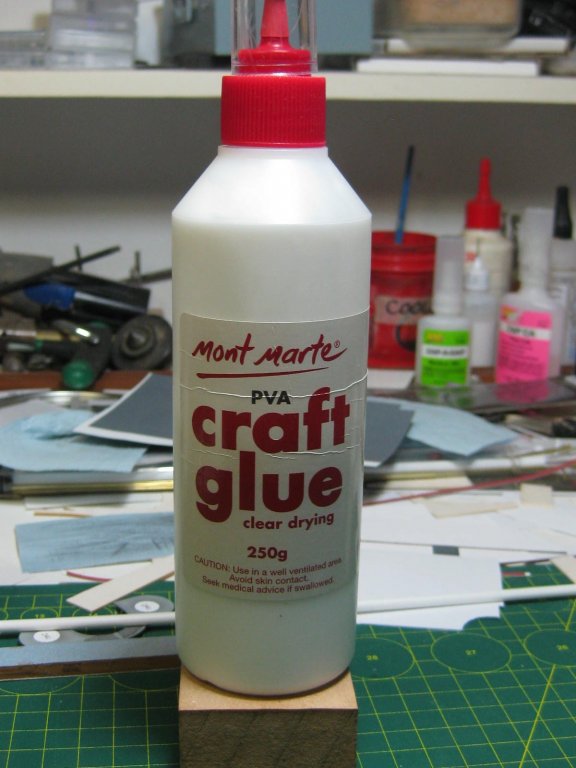
Jan, I've found there are huge differences in PVA glues. I started off with a common one that I used for wood (with good results) but it wasn't acid-free and it also affected the paper like yours does. The special Craft glue doesn't make the paper swell, as it's designed to be used for paper.
Here's the one I'm using, but there are many other brands that will probably do the job :
 Danny
Danny
-
11 minutes ago, amateur said:
again a learningpoint: find some acceptable glue.
this one tacks easily, but is rather thick, and is setting too quick, resulting in those nastly 'threads' of dry glue
What type of glue is it Jan? Sounds like a solvent-based one? I use an acid-free PVA Craft glue, which can be thinned with water if needed (usually not).
Danny
-
Hey Scott, it looks like we're both making the same things together - although mine look very little like yours
. I'd say yours are far more accurate , there are a LOT of short-comings in my kit.
For my next one I'll definitely be going with a Ponto's PE set
. AND a Halinski Card Kit as well.
Danny
- mtaylor, cog, popeye the sailor and 2 others
-
5
-
2 hours ago, ragove said:
Dan, what do you use for filler?
Testor's Plastic Filler, which is a very fine type of filler. It's not very easy to work with though, I'm open to suggestions for something else.
2 hours ago, popeye the sailor said:fantastic job Danny......are you going to add any P.E. to it? looks very well done
I will if I have any in the stuff that I bought - I haven't checked it out yet. There will be wire footrails and pipes, similar to those on Amatsukaze.
Danny
- robdurant, popeye the sailor, Canute and 1 other
-
4
-
Thanks guys
.
Finishing off the top of the funnel involved scratch-building some Baffles, which weren't even mentioned in the kit
 , and also the "Grating" at the top. The grating took some very careful cutting. I re-inforced it with a wipe of CA on it's under side after I'd cut it out :
.thumb.JPG.b6f7a99d669a7184bb6b22ab505af88a.JPG)
.thumb.JPG.28488aaa77e738feea48aaa65fd6b211.JPG)
.thumb.JPG.fb229b19f5cd2d966764bf54cc495886.JPG) Danny
Danny
- Canute, amateur, Old Collingwood and 12 others
-
15
-
Thank you Carl and John
.
This doesn't look like much of an update, but these tiny pipes took me a full day to cut, roll and fit :
.thumb.JPG.3d214a5d6fc4e8b066d8081299b84d2a.JPG)
 Danny
Danny
- popeye the sailor, hexnut, lmagna and 11 others
-
14
-
The Funnel was a fun bit of work
. All up it's taken me 3 days to get to this stage. The framework supplied in the kit needed a few extra pieces, but not many. I hadn't added any when I took the pic below :
.thumb.JPG.8f6cca0d67d4693585487a7d15e5a1ea.JPG)
.thumb.JPG.bd3733f57e13a9571d52e565d8c20c0d.JPG)
The funnel is in two sections. I forgot to take any pics during construction of the top section
 .
.
.thumb.JPG.f95d45e5a315c85695eb3e1e2da54025.JPG)
A little bit of filler was needed on the joins. Here are a couple of pics before painting :
.thumb.JPG.0fcbc7e5b3f7cc5cff34d78236fa00fd.JPG)
.thumb.JPG.61144ba15d4b00cad4c94c7aa8799c3a.JPG)
And after painting. The colour match was pretty good, no clear has been applied yet. The pics don't do it justice, as I couldn't stop the glare from the worklights making the "toe" look like it's too lightly coloured :
.thumb.JPG.9cfa8d8d34e897f3394a210cc91db752.JPG)
.thumb.JPG.0da76dc582cce9441049ca9711ecf5dc.JPG) Danny
Danny
-
5 hours ago, cog said:
Nice work, Dan, how did you cut out the ring itself, what I see the punch doesn't meet that circumference ...
The punch set was exactly the right size - just. Inside diameter of the larger ones is 2.4mm, outside is 4.5mm, the largest punch in the set. The smaller ones are 2mm x 3.8mm.
Danny
-
Thanks all
.
There are 25 Life Rings shown in the 3D Bismarck book. Only two are with the kit, so I printed up a heap more and glued them to 0.5mm card. There are two sizes, the smaller ones are fitted to some of the ship's boats. I used my punch set to make these, it only took about 15 minutes, and I'd hate to think how long it would have taken to cut them by hand
:
.thumb.JPG.2c5ba03dc073ae145e6fb5e5344d7b23.JPG)
.thumb.JPG.120012422c119b2c89291a52020d4074.JPG)
The forward section of the 3rd deck has an angled edging on the bulwark, similar to the one I made earlier. This one was a bit more complex, but it turned out a lot better than the first one - no filler at all needed, and the only paint touchup will be on the edges :
.thumb.JPG.d2f2d109505ba0c855c9ddf907b0cf30.JPG)
.thumb.JPG.8418305f3a45801ead34a48df1e1e72d.JPG)
.thumb.JPG.27fb4d23465cd5c5019b5942bde98200.JPG)
.thumb.JPG.486e6705f85e116954ac6e6fae78f251.JPG) Danny
Danny
- popeye the sailor, cog, Canute and 13 others
-
16
-
- semorebutts, Canute, John Allen and 3 others
-
6
-
-
Nicely done Fernando
. Ratlines were around 12" to 14" apart, so a spacing of 10mm @ 1:36 scale wouldn't be too far off the mark .
Danny
-
Thanks again Carl, Greg and John
.
There are two structures either side of the funnel, I have no idea what they are for. EDIT - Thanks to Slog for telling me they are the Hangars for Aircraft (must be broken down?)
.
I added lots of card to the poorly designed framing for them. One wall on each is not vertical, rather on an angle, and the roofs of both also aren't symmetrical :
.thumb.JPG.aa7d02c6a79b7e685e6c19748400359c.JPG)
.thumb.JPG.c2e9256880bdf6d0406cc249d8a2f27c.JPG)
On these structures are three Racks for some of the ship's boats. Cutting and gluing these pieces has taken me the best part of two days. Virtually every piece is a different shape, so keeping track of what went where was tricky :
.thumb.JPG.4eedba4e967f571f4b48ed4fd142911b.JPG)
.thumb.JPG.657b077d27417a3005a802ca261191ce.JPG)
.thumb.JPG.f470f5e9ecee4389e395c5782e7bcb8b.JPG)
Some of the brackets had rounded internal corners, so I once again used my punch set for them :
.thumb.JPG.22f4f1b8b54e43a255a787edaaaff2be.JPG)
The racks assembled and glued to the hangars. There is still some paint touch-up needed on the joins and folds :
.thumb.JPG.a73ee6a09bb719fbcc0b95250aa26782.JPG)
.thumb.JPG.7fd11c6f5cc68553dde2e1adc0692f7f.JPG)
.thumb.JPG.7423bf81a2394b335191b65dc684b148.JPG)
.thumb.JPG.967b1775713532a86925d8757005cad4.JPG) Danny
Danny
.JPG.18fe5d9926575cc8384c90b208a473d4.JPG)
.JPG.1f65a735ea926eb19546ac6c664f6853.JPG)
.JPG.2588b612e864457827a8e6e4aff9c401.JPG)
.JPG.c04098ee6ee6a73b555a2771fbe4c202.JPG)
.JPG.0c1ce6ae4d901cdccfbe99f478f9fb27.JPG)
.JPG.4ef159208befd17a328ffc1c00051071.JPG)
.JPG.89138c33f16132c3796b5f6fdd80321b.JPG)
.JPG.a0c23191b8a8ec566e942070208bb1c0.JPG)
.JPG.ffb8851f1cb12a995c0caf6bd7aa7803.JPG)
.JPG.0ad2f3258233cd689f0437f061707f03.JPG)
.JPG.a869982c2a031c6944ae6dd72a5592ba.JPG)
.JPG.8a5c2b882b1073603cabfdc12a766109.JPG)
.JPG.41b09d55becf5c33ff21b57ab60d5fde.JPG)
.JPG.0aa4b95e803b4b982c05a04adea7900d.JPG)
.JPG.898c870fbc41abe1ca6d25ca63e59420.JPG)
.JPG.13bcc5610c7340b59341a50854909a83.JPG)
.JPG.ba57b9a3daf3b4124a8067fe590c9f41.JPG)

.JPG.8e6e746e12841723149292293a32c45d.JPG)
.JPG.a2d1b1501e88a1fbc04ec7299a8278c4.JPG)
.JPG.c2dff459aadac36f4e41c3af1956c1bf.JPG)
.JPG.b0bdb1b79ddab12f4be3d4daedd103f0.JPG)

.JPG.b5297eb1b12d4ba8bfe457bbf7dd3715.JPG)
.JPG.ced39529d5b8733bf408f2a3d51920de.JPG)
.JPG.e957ea5324db74f3b919081895cfe8a4.JPG)
.JPG.3b68a0c16937d2b0e37a13096a25d876.JPG)
.JPG.2b820c020a1f8e2f188838e9cde782a8.JPG)
.JPG.fb85cd98879cb9763ca5681b7e2ea10d.JPG)
.JPG.66858a9d15e94205990ffe8d3e66cea3.JPG)
.JPG.ac404acf89f79f6569a440e86895701b.JPG)
.JPG.2f13e8387a8594fc288a9ce9dbe6d2b3.JPG)
.JPG.e9ef0efba0e4aa2e0a331ccab47b4a97.JPG)
.JPG.7c603ed34975beb3c80df27297099b3f.JPG)
.JPG.2c2a8604be0fcce8ef707c2b82fb3d73.JPG)
.JPG.b828cfe6b81eaceb56403fa4a53a6394.JPG)
.JPG.d79abac2b86b711c601a9a99e9638ab1.JPG)
.JPG.c7da1642b83cc7f1e1b2b5bccd461900.JPG)
.JPG.a9426eb024c95987a9b09f9e2df023f0.JPG)
.JPG.831edd68eb0ac63c9e32550bf8859f59.JPG)
.JPG.81ee486d4aff6b44ef68186e8c7adaef.JPG)
.JPG.831470d0f4f0ad01940e03150570a67d.JPG)
.JPG.e3b5f30b62861420ab2a294fb9647a62.JPG)
.JPG.cab01d5b621424e98b2234d95c647386.JPG)
.JPG.ed2ea36b9052ee948f1d7a1551e3416e.JPG)
.JPG.3a833a9c7c77124a867e1040220bbad2.JPG)
Bismarck by Dan Vadas - FINISHED - GPM - 1:200 - CARD and PE
in - Kit build logs for subjects built from 1901 - Present Day
Posted
Thanks for the info Slog, and the comments from the rest of the guys.
The Searchlights on the forward end of the funnel have a protective dome over them which is lowered beneath the platform when they are in use. Here's a pic of the parts for one of them rolled and ready to glue up :
These things take on a mind of their own when trying to glue them together, so I made a little jig to hold them steady and at the correct width :
One of the dome supports fitted to the port side :
I'm going to have one dome open and the other closed, so I only need to make one Searchlight. Here are the laser-cut parts for two of them :
The fit of the laser-cut parts is excellent. Working out the sequence and fit was a bit challenging, there is a plan for them but the line drawing is a bit vague in some places. I managed to get the first light looking something like it should") . The mesh grille over the lens is from the PE set :
. The mesh grille over the lens is from the PE set :
Here are the rest of the pieces glued up and ready to assemble into the finished article :
The finished light before painting. I sprayed it a dark gray after these pics were taken :
The light fitted in place :
I also glued on one of the cranes and fitted the PE railings around the funnel. I'll leave the other crane off for now, as it will be in the "working" position and will probably get damaged while I'm working on other things. I'll also give all the railings a straighten-up when the ship's completed, they are fairly easy to knock out of line a bit as you can see in the pic below :
Just when I thought I had finished the funnel assembly I realised I still had two more searchlights to make for the aft platform. At least I won't be spending a couple of hours working out the assembly sequence this time .
.