


Dan Vadas
-
Posts
3,261 -
Joined
-
Last visited
Content Type
Profiles
Forums
Gallery
Events
Posts posted by Dan Vadas
-
-
Thanks guys
") .
.
There are 6 large Row Boats and 3 small ones. These don't have any sort of framing, so I made my own after a bit of trial-and-error :
.thumb.JPG.8bd2ae1c7cc82a9290055b7cedb8e6e4.JPG)
There are extra thwarts which gives them a little more depth than plain printed decks. I glued these to the decks before cutting out :
.thumb.JPG.3af5a8adcec71ae7b55e1a07dbb18a45.JPG)
.thumb.JPG.8d6a586481ac9bdd22f6894552fc84f8.JPG)
Some of my framing was a little bit out - I'm talking fractions of a millimetre here. The slots in the hull sides were not worked out very well at all, resulting in some largish gaps. The ones nearest the stern were completely unnecessary and finished up the worst of them :
.thumb.JPG.1cd0f31ac5b7c2e274b5dcb0edc0ddb2.JPG)
.thumb.JPG.6b97b4bd17f642cbd4223bdf6bde10c5.JPG)
As a result of the bad fit I needed to use a bit of filler. I painted the whole hulls rather than attempting to touch them up. They turned out OK
:
.thumb.JPG.5c3e75e7186de2152e9fa1414a7dcf1a.JPG)
.thumb.JPG.6690f5a4f4d40d3afafe46fb1de3bc56.JPG)
 Danny
Danny
-
Dry fit, dry fit and dry fit again when you have the next section ready to fit before reaching for the glue, to make sure the sections will align properly.
Also, fit as much to each section as you can before gluing the assembly to the deck. It's usually a lot easier to fit guns etc while it's on the workbench and not attached to the main deck.
Danny
-
7 hours ago, amateur said:
Have to think whether a total repair does more harm than good, compared to the fix (version 2) Danny described above. (Quite a lot of tabs on the underside
)
Is the funnel already glued to the deck? That would make the job a bit more difficult
 . Not impossible though.
Danny
. Not impossible though.
Danny
- Canute, popeye the sailor and Piet
-
 3
3
-
1 hour ago, amateur said:
I guess they didn't pay attendtion enough in their prototype build
That would be my guess too, there seems to be quite a lot of this in your kit
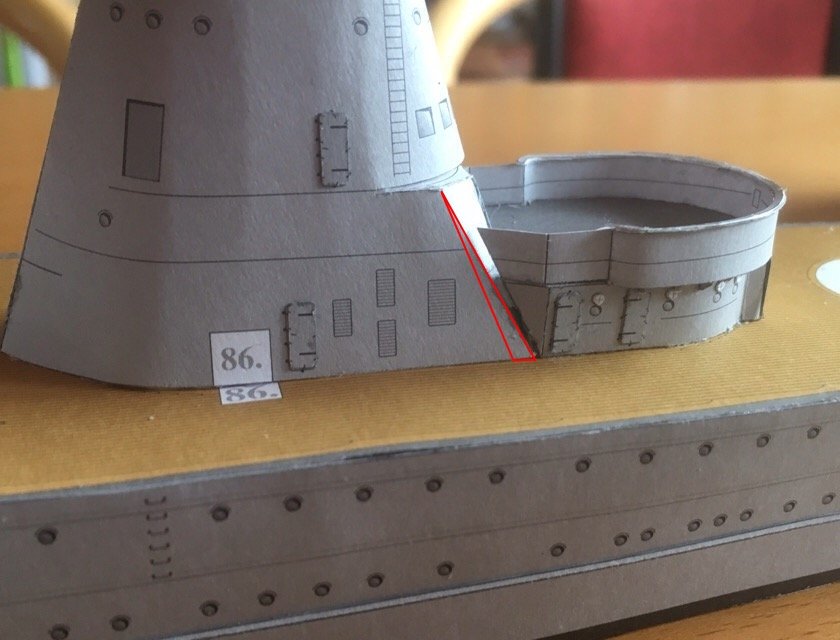
 . I'd say the problem was with the funnel base.
There are two ways you can fix it.
1. If there is any extra printed grey card supplied you could cut a couple of wedge-shaped pieces to fill the gap. It won't be perfect, but at least it will be better than having a large gap. If there's no extra printed stuff use some plain card and paint the area.
2. The better way would be to cut a wedge out of the funnel base (on each side) and glue back rogether. This would bring the white squares (part #86) back into alignment, as well as correcting the angle where the two assemblies meet. See pic below :
 Danny
Danny
- popeye the sailor, Canute and Piet
-
3
-
....... continued from last post.
Hull skinning begins by first using a rounded stick and a piece of high-density foam to shape the sides where they are rounded :
.thumb.JPG.6643e5c6dbc2a59e8a4b857d83d9fb34.JPG)
.thumb.JPG.92e19466749f3c2193e1efa1fa983099.JPG)
Then the top edge of one side is glued to the edge of the deck :
.thumb.JPG.015551855851debd82526ebfb24a55d4.JPG)
And the other side is also glued along the deck edge :
.thumb.JPG.97360301e9f673e3c27d601a0d0b89ca.JPG)
The Keel edge at the bow is next pushed against the hull and glued to it, followed by the aft section of skin :
.thumb.JPG.f37571e8f24cfbbe89178eb39204c801.JPG)
Finally the remaining sections are glued to the hull. If the hull has been shaped properly there should be no (or at least minimal) gaps :
.thumb.JPG.42665f74b18154a36de075704844a2a2.JPG)
.thumb.JPG.6837f1182e5b968e92f49581d4422945.JPG)
Now we start fitting the cabin, starting with both sides :
.thumb.JPG.13e7693b2f287002b06a63a73a85010c.JPG)
Then the front and back :
.thumb.JPG.86842bfb07e97ba55e17607ae47930b9.JPG)
And finally the roof, which in this case has a slight curvature. The white card needs to be painted to match the cabin - another poor piece of design by the manufacturer :
.thumb.JPG.90b916288aa44ae3efafe48754f2200b.JPG)
Railings and a screen are CA glued to the deck. A couple of tiny spots of PVA glue are used to position the pieces before the CA is applied :
.thumb.JPG.928f66c0f767a4e2ae6b039924c68c3e.JPG)
.thumb.JPG.265a3e11e30bbc9e67894c645cce7774.JPG)
Last things to fit are the rudder, prop shaft made from 0.4mm wire and a shaft support, and a PE prop :
.thumb.JPG.c4e016a4bf4b747e177018439476dec7.JPG)
.thumb.JPG.4a340b86962e7b6898b602da5af7cfbc.JPG) Danny
Danny
- hexnut, robdurant, Walter Biles and 14 others
-
17
-
Here we go with another "Mini Tutorial" on building Ship's Boats from Card.
To start off the kit supplies some laser-cut formers in the shape of the hull. There are only two of these per boat - one for the vertical axis and one horizontal at the waterline. These need extra fillers, so I used the 'bread and butter' method to build up the section under the horizontal former :
.thumb.JPG.4b2b22f3e76351b9a0edb91e899d768e.JPG)
The fore deck received some support along the edges :
.thumb.JPG.f6c481ae386acd467eb27cd4b8db2151.JPG)
Card can be carved with a scalpel to take off most of the excess :
.thumb.JPG.465edc2b79853dd6839c34fe0cda01bc.JPG)
.thumb.JPG.b6deedc51a1f575cf07fa958cb42819f.JPG)
Then a sanding stick is used to smooth the rest :
.thumb.JPG.209aa076dbe476d805d339cd6f2100b8.JPG)
The deck is laminated to a piece of 0.35mm card and glued to the hull :
.thumb.JPG.97ea921d82f122f504d0bda8cb9a0d7a.JPG)
Next to fit is the transom :
.thumb.JPG.3eda6c857f0b70d6b4bdfa67336ef9a0.JPG)
.thumb.JPG.0a05a9cc52d6e17fcb619138865ff09a.JPG)
The floor is glued in next, and some support is added to the sides under the deck to keep them in position :
.thumb.JPG.cc105e2f467ab4f22c56e1024f56620f.JPG)
Continued in next post ...........
.thumb.JPG.dbeafdd696ef0f51c34fc0679688d83d.JPG)
-
9 hours ago, cog said:
Thse double barrel guns look marvelous. Can't you get the railings from an Aussie shop? A pitty Greg (RGL) doesn't use your scale PE. He must have quite some railings left since he replaces them with stanchion posts ...
I think I might be OK with the railings, I found some leftovers from Amatsukaze that might be just enough to do the job
.
Danny
-
Thanks CDW, Pat and Scott. Yes, the PE is all aftermarket from the same manufacturer as the kit (GPM).
I just discovered that I'm at least one card of Railings short, so I'll have to order more which is a bummer as GPM aren't easy to get things from - the postage will cost me about 5 times the value of the actual order
 . EDIT - close, $AU14 for 2 cards of railings plus $AU40 postage. $AU54 all up.
I've been as frugal as possible when cutting railings to minimize waste. GPM haven't worked out the correct quantity needed (why am I not surprised
 ). Pav, if you read this and can still add some to your next order from them it would be greatly appreciated
 ") .
Danny
.
Danny
- semorebutts, PeteB, cog and 5 others
-
8
-
-
36 minutes ago, popeye the sailor said:
I didn't see that you repaired the rounded part, but apparently, I guess you did....so that was good
they look really nice .
As it turned out I had to cut that section off 8 of the quadrants anyway so that they would fit. So no harm done
 .
Danny
.
Danny
- PeteB, popeye the sailor, Canute and 2 others
-
5
-
6 hours ago, CDW said:
Those secondary guns look great, Dan.
Somewhere, I was reading a Polish gentleman's build log for a paper ship model, where he was saying contest rules for paper ship models required that paint not be used. I was shocked by that statement and cannot imagine how they assemble their models so that they needed no touch up paint. Those are some pretty tough contest rules.
I had to paint these guns, as they were raw grey card not printed
. I agree about the contest rules - those guys are crazy .
Danny
-
Thank you again Carl, Nils and Popeye.
I've made all the Breeches and Hoods, and assembled them :
.thumb.JPG.d44a18326e793a64407bc68d4ccaf273.JPG)
The breeches and conical support fitted. These supports are weird, they pivot the wrong way in my opinion and I don't really see a need for them at all. If anything they should swivel as there is no provision for that, and I'm not about to modify them to do so :
.thumb.JPG.978e7b8596181e05b7aab4b875da8b81.JPG)
.thumb.JPG.e42b9ddb3753f4adaae62d4746655d49.JPG)
.thumb.JPG.0fb20a472cc777d669d20f232309b211.JPG)
The four guns ready for the barrels and final bits and pieces :
.thumb.JPG.d136bfd6fd117bfbe79aca26f053d7e9.JPG)
Barrels fitted. Prior to fitting them I wicked some thin CA into all the seams and filed out any irregularities with a diamond file :
.thumb.JPG.db8de25d78db685cf90b0d3bdf874ddf.JPG)
.thumb.JPG.b153f642bd973d7d359fed9ba19f9b0a.JPG)
And with a coat of grey primer. I'll paint them Mid-grey before fitting to the deck :
.thumb.JPG.12f3cbc5999ca0a59fe53544f7f02d60.JPG) Danny
Danny
- CDW, GrantGoodale, hexnut and 15 others
-
18
-
1 hour ago, semorebutts said:
Yes they do Popeye. But mine are all broken because im a clutz.
Try fitting them into a Pinvise and see if you have more success. I find it gives me more stability than turning the drill by hand.
The part to be drilled should be firmly supported so it can't slip and snap the drill.
Danny
- mtaylor, popeye the sailor, cog and 3 others
-
6
-
Thank you John, Popeye and Pat.
I'm working on the four 105mm guns for the aft superstructure. These are as much of a pain to make as the fore ones were, especially as some of the laser cutting was awful
. Here are a couple of examples - note the big step in the middles of some of the edges, and also the missing bit on one of the semi-circular parts :
.thumb.JPG.db6a99fbf7bab6ee734ba56e0eaff14f.JPG)
.thumb.JPG.5f2c0705a00dd7415e843f71ab10658a.JPG)
The only way to fix the problem was by gluing some scrap into the missing bits, and then trimming them to size :
.thumb.JPG.ef71a8ada4c5feb66b5f421e63ea1ae1.JPG)
.thumb.JPG.d4fc97dc372651fd14d0a0436082f527.JPG)
Here's the body of the first one, and all four done to that stage :
.thumb.JPG.99b0972f9106741d32870f422a78b919.JPG)
.thumb.JPG.b1d8ce194a55c0a7332345def3bb3852.JPG)
.thumb.JPG.5525c49b8a77c743cb615e27b7d8a088.JPG) Danny
Danny
-
55 minutes ago, Mike Dowling said:
What's happened to your build Eddie ? Did you see the Sopwith ?
Eddie seems to have left us. His last post was the one above last April. I hope it's nothing serious.
Cheers, Danny
-
4 hours ago, semorebutts said:
This superstructure piece is alot more involved than I thought it would be.
Yeah, but that's what makes it fun
.
Danny
- semorebutts, Canute, mtaylor and 3 others
-
6
-
Thanks John.
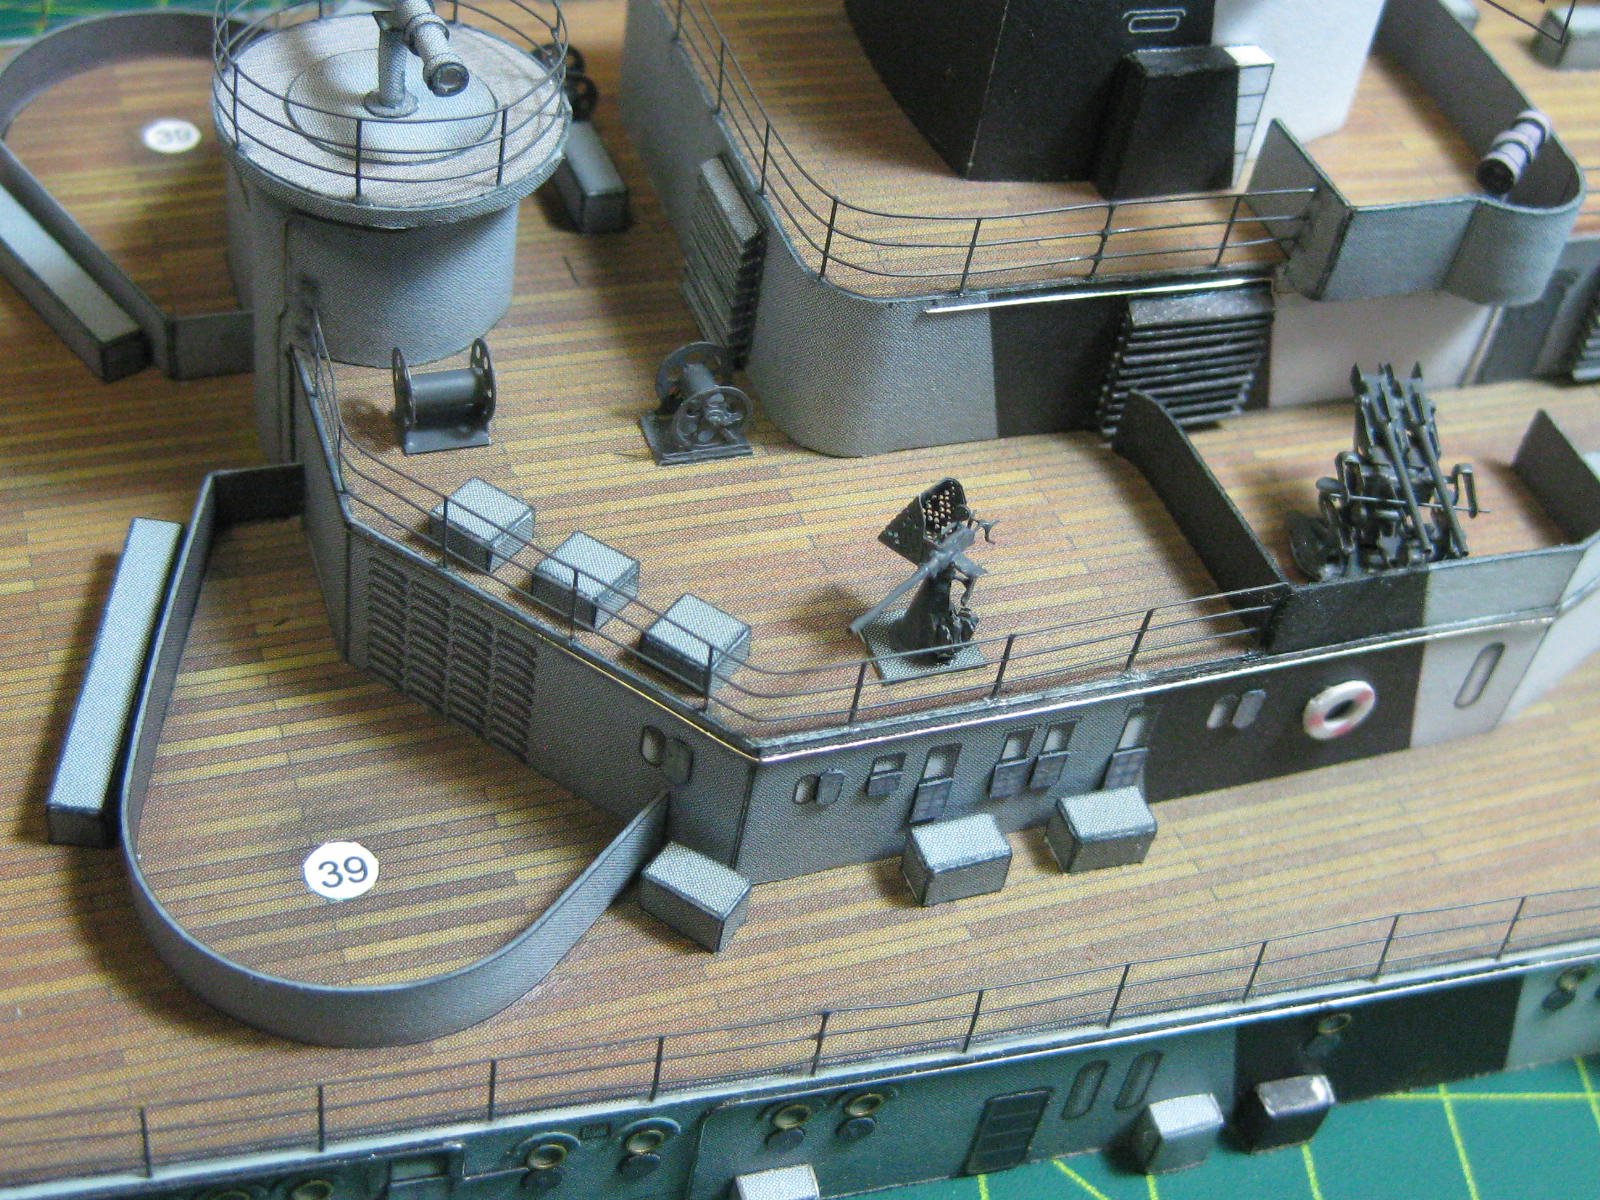
It's been a while since I've posted, but I've achieved a fair bit of mostly small fiddly stuff. My aim was to get the 2nd Aft deck finished and ready to install on the hull. Apart from two 37mm guns on the 1st deck I'm about there
.
There were seven small boxes to make. Here are a couple of pics of the process :
.thumb.JPG.7ce9389ad7cb74eebfaf8a43a189ad9e.JPG)
.thumb.JPG.954f2f21750815fb12db7dafdf8b9cdc.JPG)
.thumb.JPG.07ad25d5601669eed79c8485badc96f2.JPG)
I also had two 37mm guns and two 20mm guns as well as one more winch to make. Here's one side of the deck with all parts fitted :

Before fitting the whole assembly I thought it would be a lot easier later if I did as much of the rigging as I could. There are a couple more lines to fit, but that'll have to wait until tomorrow. First there are a few pics of fitting two eyebolts made from 0.2mm brass wire :
.thumb.JPG.9c03720314fc054e28d21ec11c34be56.JPG)
.thumb.JPG.5d05cc5fa56ad74b72797fde5db29ca1.JPG)
.thumb.JPG.5283a85f0d737abb35ca1d124c14b2d4.JPG)
.thumb.JPG.f03e3bc6da97f709a552dd4f4c7ee4f8.JPG)
.thumb.JPG.46226478337dbd2fa77920013936828f.JPG)
And here's the rigging I've done so far. The line is a fine elastic :
.thumb.JPG.3e48fc874edfbeb4e87a6f5d9260835b.JPG)
.thumb.JPG.a0150db130fa7640e588063cd056f0a5.JPG)
.thumb.JPG.01271b9833464ffc937bcf5ee217c184.JPG)
.thumb.JPG.87360a2a7915a18617375293b9624f83.JPG) Danny
Danny
-
On 16/01/2018 at 8:06 AM, marktiedens said:
Does anyone know how to create a link to my signature? There are no post numbers,so I don`t know where to star
Mark, I've done the link for you. While there are no actual Post Numbers any more you can provide a link to a specific post by RIGHT-clicking on the little icon that looks like three joined dots in the top-right corner of the post and selecting "Copy Link Location" from the drop-down menu. Then select the text you want to add the link to, click the Link icon at the top of the Edit Box (the 3-link chain), and Paste the link into the URL box.
Danny
-
I voted for Pegasus, but I wouldn't buy it because I've already scratch-built it (or one very close anyway - HMS Vulture's Cross-section
). I reckon you'd have a winner with this one.
A question (forgive me if you've already answered it) - will the Frames be in separate built-up pieces using Chocks, or one/two piece?
Danny
-
-
3 minutes ago, amateur said:
my printer did, unfortunatedly, not print the locator marks very clear. Is a bit of a problem when centering the parts
Jan, if you can see them at all use a pencil to make them more visible while you're fitting the parts together. Then just rub out the pencil mark when you're done.
Danny
-
Thanks again guys
.
On 12/01/2018 at 1:21 AM, popeye the sailor said:neat that you can flip it over and see the inner workings.......of course, it won't be seen when cemented in place {it will be totally shielded}
Popeye, they're partially visible on these four.
Continuing with the other three 105mm guns :
.thumb.JPG.cbbc714524171d4a888765688f4b8966.JPG)
.thumb.JPG.f53eca06b67a6d421bf07af0d880631d.JPG)
Aligning the axles for the gun barrels and gluing the shields together :
.thumb.JPG.198167374f1ff8fedd513c7b08d39ff6.JPG)
The four guns finished :
.thumb.JPG.6cbdca987f3ad8e3fb837904db4a183f.JPG)
.thumb.JPG.51629a531968fa76550f8ca91089c6a2.JPG)
You may remember that I'd lost one of the shields and had to cut a new one. Of course, now that I've done that I found it
. A bit the worse for wear so it went in the bin :
.thumb.JPG.f1fb0d42b440595b9a4f973ee927fcb5.JPG)
I've also made and fitted two winches from PE :
.thumb.JPG.6c63aec08c736b2a2c9f24d3466a8a6e.JPG)
.thumb.JPG.4cff43a911fdf2b89f9d11a072bb356c.JPG) Danny
Danny
- CaptainSteve, herask, PeteB and 14 others
-
17
-
G'day Andrew.
All you need to do is close up the ends of the black deadeye strap, leaving it wide enough to pass the brass strap through. Then make a hook in the brass strap, fit it through the black strap and close it up. It's not really authentic (reasonably close though), but fairly typical of the way that kits do it. After you've fitted the deadeyes to the channels put a drop of CA glue onto both straps to make sure they can't open again.
A better way would be to silver solder the black strap closed (without the deadeye in) and do the same as above. Check out THIS LINK to see how I made the ones for Vulture, it continues on the following page.
Danny
- Jobbie, lmagna and Ryland Craze
-
3
-
Thanks Pat and Jan. I estimate another month to the finish Pat
. Yep, LOTS of little thingys Jan .
There are eight 105mm Guns on Bismarck, slight differences between the ones on the forward superstructure and the aft one. This gun is one of the forward ones. Here are the parts - according to the instructions there are two pieces missing from the laser cut sheet, but nothing too serious. Another example of GPM's sloppiness
:
.thumb.JPG.3514b2b21adb229170ed004bb50132d2.JPG)
The two convoluted parts in the lower-right corner of the pic above are the hoods that go over the rear portion of the barrels, and were the hardest things to make. Naturally I lost one just as I was finishing it and had to cut a new one from some scrap. That was fun ..... NOT
). However it turned out OK - see if you can spot the one I had to cut in the pics below :
.thumb.JPG.d91b7777e97bb7813d5fb8c84df1eecb.JPG)
.thumb.JPG.da3a66ed2facc3791f68c621d4ce131b.JPG)
.thumb.JPG.c1f9d9cbde4c6018ac36dc179edd4f77.JPG)
Some thought had to go into working out which parts to fit first so everything was able to be attached :
.thumb.JPG.9de0ea2480a09a26eecf5cdff21e8c43.JPG) Danny
Danny
.JPG.33f3e50ce140c8f7bccb66e21c65a8f3.JPG)
.JPG.f2fd6170d63f019f65811e812d495ed4.JPG)
.JPG.87709d1fe037f71719f2b324cc3e3e48.JPG)
.JPG.fe62255200e557000f68c210a641fb6a.JPG)
.JPG.1df00c0785a20aaf0c7c21a2bf00366b.JPG)
.JPG.ccaa5192a9a34f83d2363c2c64768150.JPG)
.JPG.5919813cf89dd6d35eac5784c3145439.JPG)
.JPG.bfb30f3fe9684c9b78e9c6e79b2066a3.JPG)
.JPG.74821920d33d20ac794278c1de40478e.JPG)
.JPG.28d68942cca7b13bf324561738c6f947.JPG)
.JPG.08eec94df7eab32cc77ba3fb615c53a5.JPG)
.JPG.fdeb944e58ce1adab941c57be6b581dc.JPG)
.JPG.c3d4e914016eb1c8f7be7b40da3e1c37.JPG)
.JPG.2382aea1963719a5986ba7ea01fe9ea6.JPG)
.JPG.d95aea7ba56265e0c071840cae50ad7f.JPG)
.JPG.1bd37fed083113b99422205d1d2a5b18.JPG)
.JPG.8b09d00722d906022156a00ee461e293.JPG)
.JPG.f277580747f76b1b741096f34192d5e4.JPG)
.JPG.9fb67439343820e1d242e6d579be310f.JPG)
.JPG.92c9affe6ebf58126a1cc130470e358e.JPG)
.JPG.b0302bf79f162f865af4e772f8970a9f.JPG)
.JPG.8f76422542b8e11e61b691547aae1c95.JPG)
.JPG.80257de4ebeb9608e756761795fa0444.JPG)
.JPG.07aae54e4b0a585eb68eaf809e7a064b.JPG)
.JPG.8e95f407adb76a0ff54e87090ee8fb4d.JPG)
.JPG.5ffdc2f4a183d31e57789766527ebd73.JPG)
.JPG.f9c821751da3b9c8d2daffab7152ef17.JPG)
.JPG.f32377840f92268f256568ac5fd2b0a6.JPG)
.JPG.52149ec21a53c5754b8df80fe2f6d525.JPG)
.JPG.10c87bad55b708ae34080ba0bdf0375a.JPG)
.JPG.4ed1f5206888f197d348fc9f21c861ce.JPG)

.JPG.34d5e82084536d0f232f7d5237e02ef1.JPG)
.JPG.e7cd2c84af652321c43bd91c7b31514f.JPG)
.JPG.a59079b506190fb3e8095c32684c3b27.JPG)
.JPG.839523fca15f4a244872d8f42672490e.JPG)
.JPG.b8b215d4af98afda1864ad59ef9ac725.JPG)
.JPG.a2ecf828d9402a71c4c07168ac1a0d85.JPG)
.JPG.a541c89584ed70bfbe8cd059c00d2299.JPG)
.JPG.e0d7ee502175fba27f7ca7ca4ac8b8e8.JPG)
.JPG.f65e0632c6fc91385b70209294d3ce49.JPG)
.JPG.35dc5fb40f07428439bdfb2e881ad9df.JPG)
.JPG.7e8c0946a67abc3eebc02b0d19473e99.JPG)
.JPG.c52b89b60af4669f33bb2000ba55b7c3.JPG)
.JPG.cf67f40f6bf58d2dd30f614e291d72ae.JPG)
.JPG.a72703e0d4fd0c19486026fe182c230d.JPG)
.JPG.3a6909880cdf69023b42fa19df5d6565.JPG)
.JPG.329405af81dc3d07a318c1226f1600e7.JPG)
.JPG.07861ed72c6563078bccdd10ad0ac5cf.JPG)
.JPG.1b80dc3de42be9bf38054aa2f8f49320.JPG)
.JPG.bff4c56e880f6160259a69e6d35a8204.JPG)
.JPG.791feeb7180b94a97386cb47e00c222b.JPG)
.JPG.77fa3b05c4b889fe263b8c58bc8ffbd5.JPG)
.JPG.02a03597ea330c64b926da43ebc13686.JPG)
.JPG.167a8beff879311bc888049efafe4879.JPG)
.JPG.58fb0e64f6202bd9073d30dbf671067d.JPG)
.JPG.49390a0fb2b80c7895f1adeb449ef1cb.JPG)
.JPG.709d527340796fa6e0b7bf9e44efb5d2.JPG)
.JPG.db2d9ab374cf59f2ea6f5a719572ddeb.JPG)
.JPG.5bb7f92215ee3f688cb1b5304e63f8ab.JPG)
.JPG.78c054939e127dd5db23cc3d4b265bfa.JPG)
.JPG.6bbd1719ced5f1741ea9650f49535bd3.JPG)
.JPG.12a1ba67e14a083ce2480a10a90516fb.JPG)
.JPG.3c8ea64210a3728de155f64acff6051f.JPG)
.JPG.8521e858e84f74bdc03550d4d313a8be.JPG)
.JPG.d25dfbafc1f182084f38633a9e6006fa.JPG)
.JPG.7ba785644b16f082cafb42be7f50b50c.JPG)
.JPG.e7dd9bba3acb02b68119bc0005f85891.JPG)
.JPG.e7416215eeffd9c67e5735212e30e9f6.JPG)
.JPG.18a3f2552b7816b47c3da04a8d40671a.JPG)
.JPG.014302dea19acd25abcdd900981e4fec.JPG)
.JPG.e813334aa1bd11d6be00eace59947aaf.JPG)
Bismarck by Dan Vadas - FINISHED - GPM - 1:200 - CARD and PE
in - Kit build logs for subjects built from 1901 - Present Day
Posted
Time for another Progress pic or six. I've finished both superstructures to the stage where I can fit them to the main deck. I won't do this just yet in case there is a problem with any further sub-assemblies. Here's the aft superstructure :
And the fore :