HOLIDAY DONATION DRIVE - SUPPORT MSW - DO YOUR PART TO KEEP THIS GREAT FORUM GOING! (Only 13 donations so far - C'mon guys!)
×


Thunder
-
Posts
582 -
Joined
-
Last visited
Content Type
Profiles
Forums
Gallery
Events
Everything posted by Thunder
-
The ring that the breech rope passes through prevents the rear trucks from inadvertently running over the breech rope during recoil. if this happened it would overset. Having the rope though it in this manner would stop it dropping slack between the button and the ring but like others have said, full force would be applied to this ring as the breech was fetched up tight. To reduce the force on this ring the breech ring in the bulwarks would have to be fixed above the front trucks, this would allow more force to pass through too the button of the cannon. The carronade, as shown in the constitution, was mounted on a slide so did not have the issue of the breech getting trapped under the trucks and as such did not need the ring. The real problem here is that the tackle is both outside and lower than the breech rope. Great for traversing the piece but if just wanting to run it out most of the effort would be used against the other tackle and forcing the cannon trucks into the deck. It also looks that the bulwark fixings go into a belaying pin rack instead of through the planking and into one of the beams. Also, remember you are probably going to want to remove the tackles before firing as you will only need the breech rope when the tackle bolts fail or rope snaps if you leave it in place.
-
Hi Lou, yes it was ebay. I noticed you have Corel's Resolution. They listed this as a cutter but is obviously a sloop. I have built this and thoroughly enjoyed it. I noticed you are going to remodel. Recently I brought a book on naval sloops and there was drawings of HMS Ferret. This I noticed was very close to the Corel kit.
-
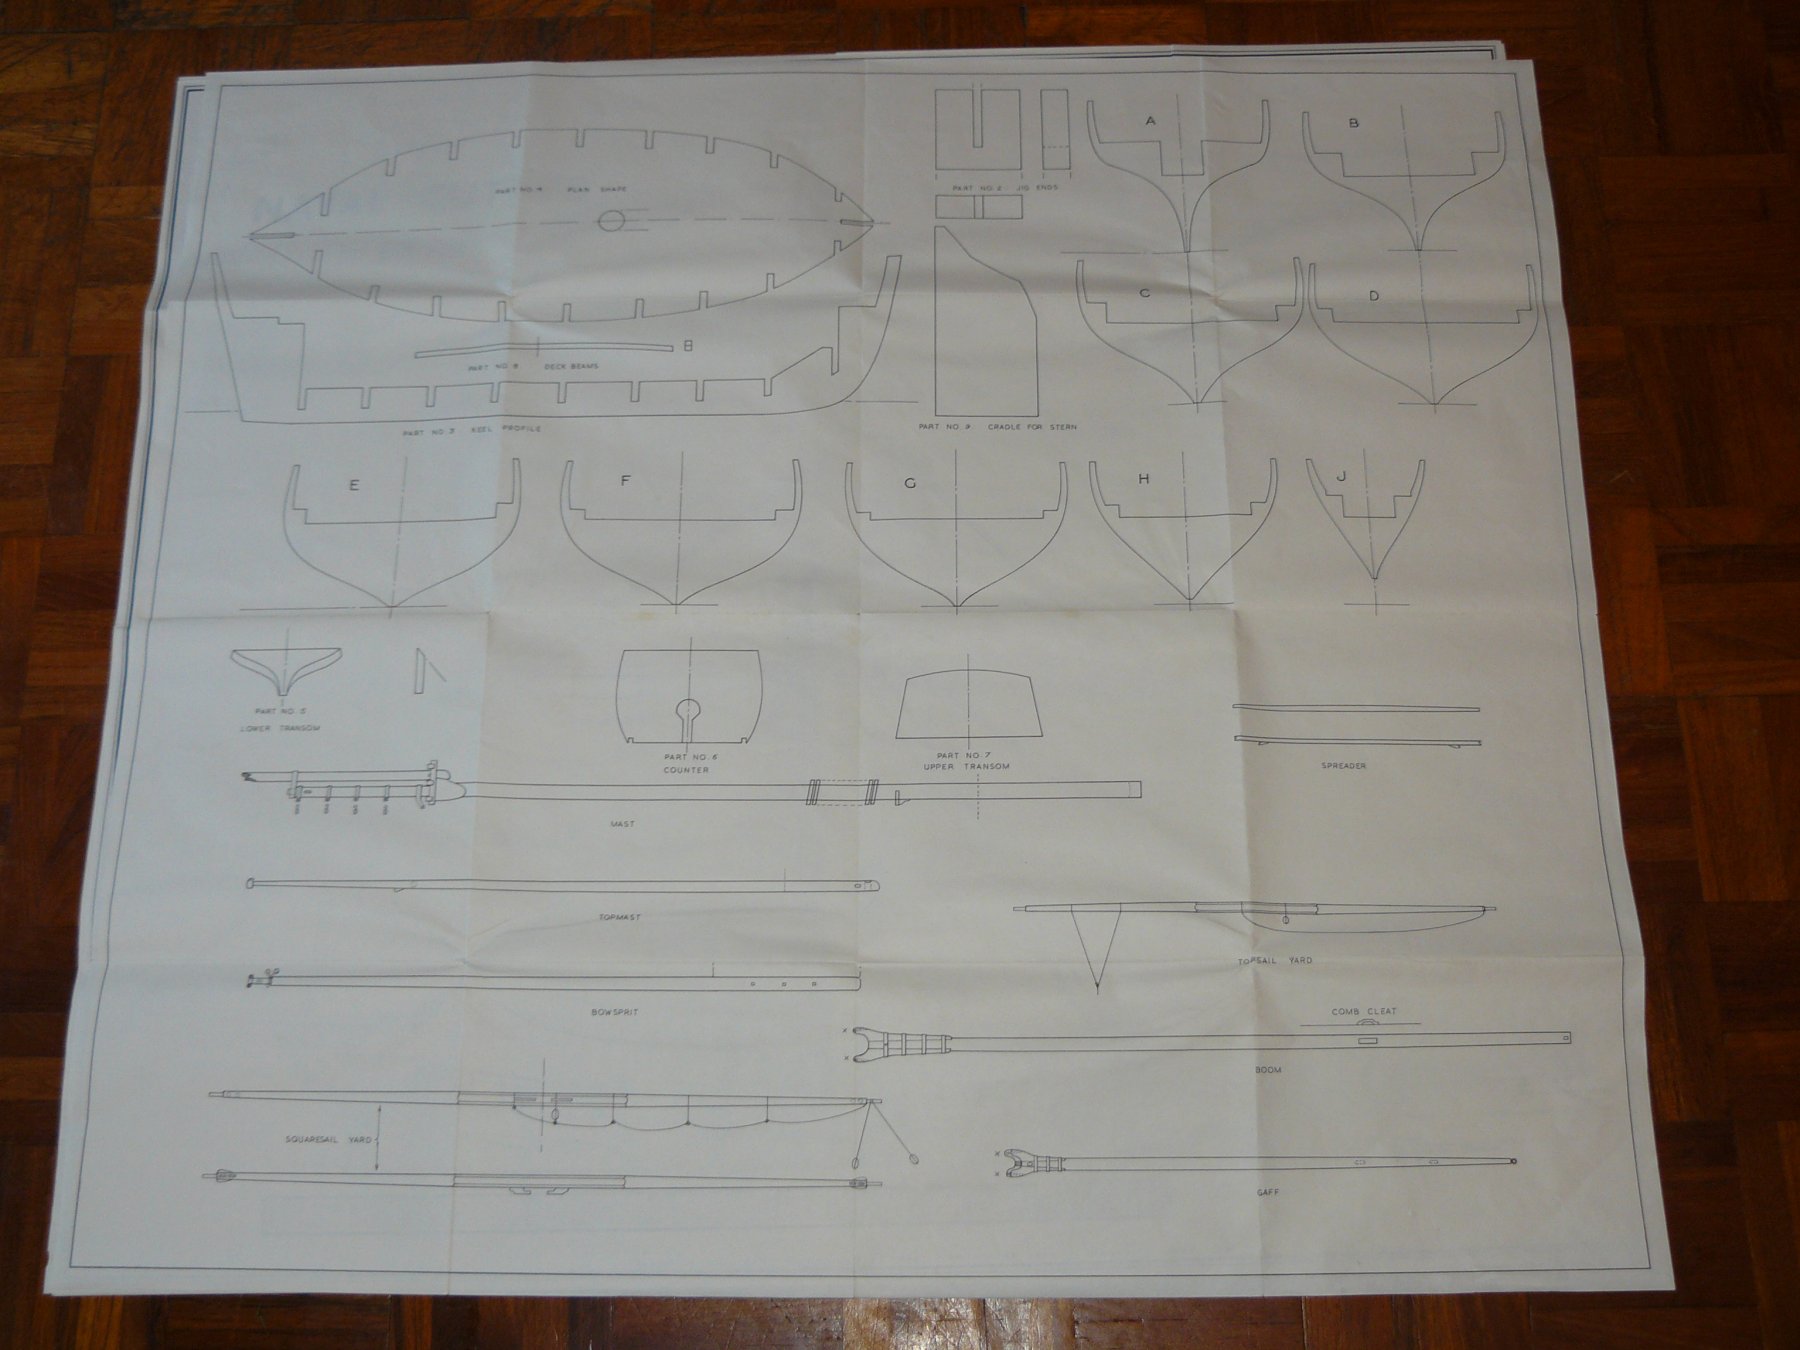
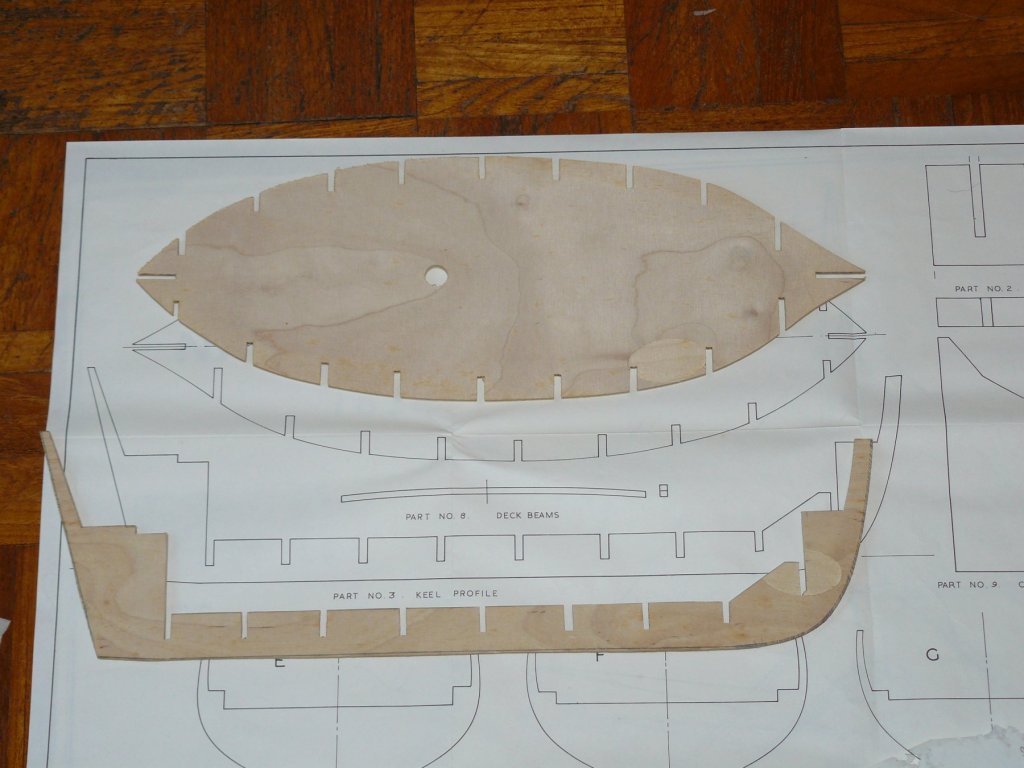
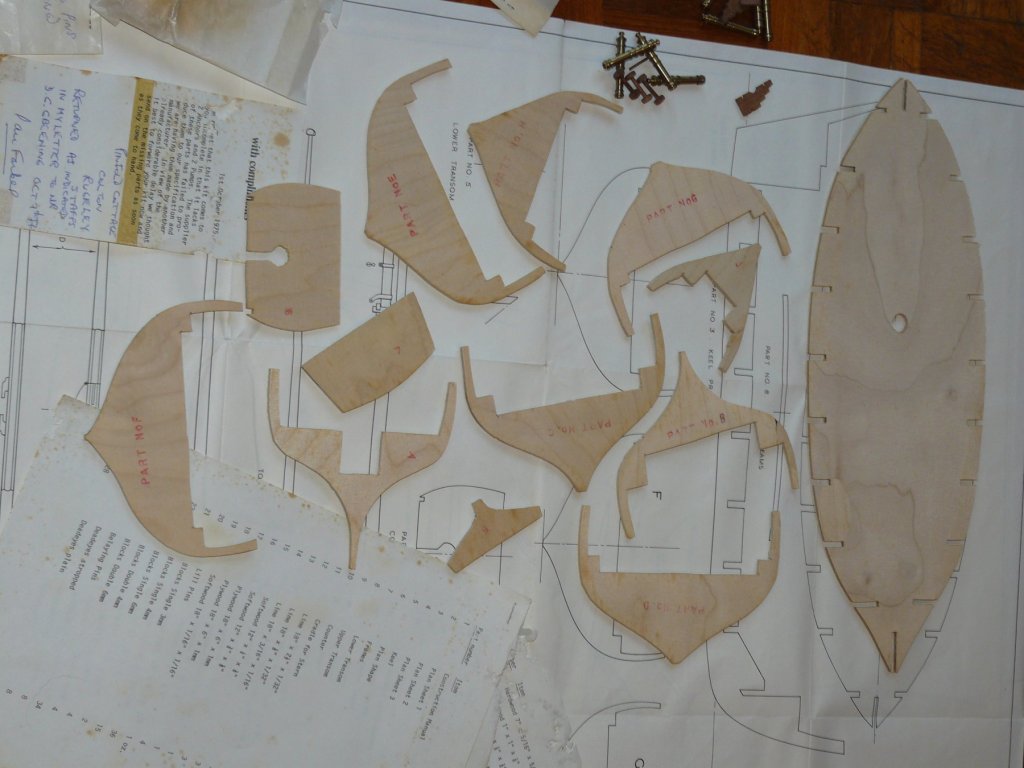
So, first stage of the build. First checked keel section and 'deck' section against the model plans and then to the ship plans. To clarify this, the the first plan shown above I will describe as ship plans as these replicate the plans at the NMM. The third set are like you would get in your average kit. Why he didn't just use the ship plans to make the bulkheads I will never know, unless it is to make it harder to check the accuracy. The 'deck' and keel only needed minor modification to match the model plans. More work was required to correct the slots for the bulkheads and to get correct alignment between the two. Thank fully most slots were too narrow and care in opening also corrected the alignments. Before any one spots it, the 'deck' plan is the wrong way round in the photograph. I say deck but it is a bulkhead stabiliser. Why he didn't put it in the position of the false deck I do not know, other than it is too thick to gain the deck curvature both larboard to starboard or fore and aft.
- 102 replies
-
- 4
-

-
- speedy
- model shipwright
- (and 1 more)
-
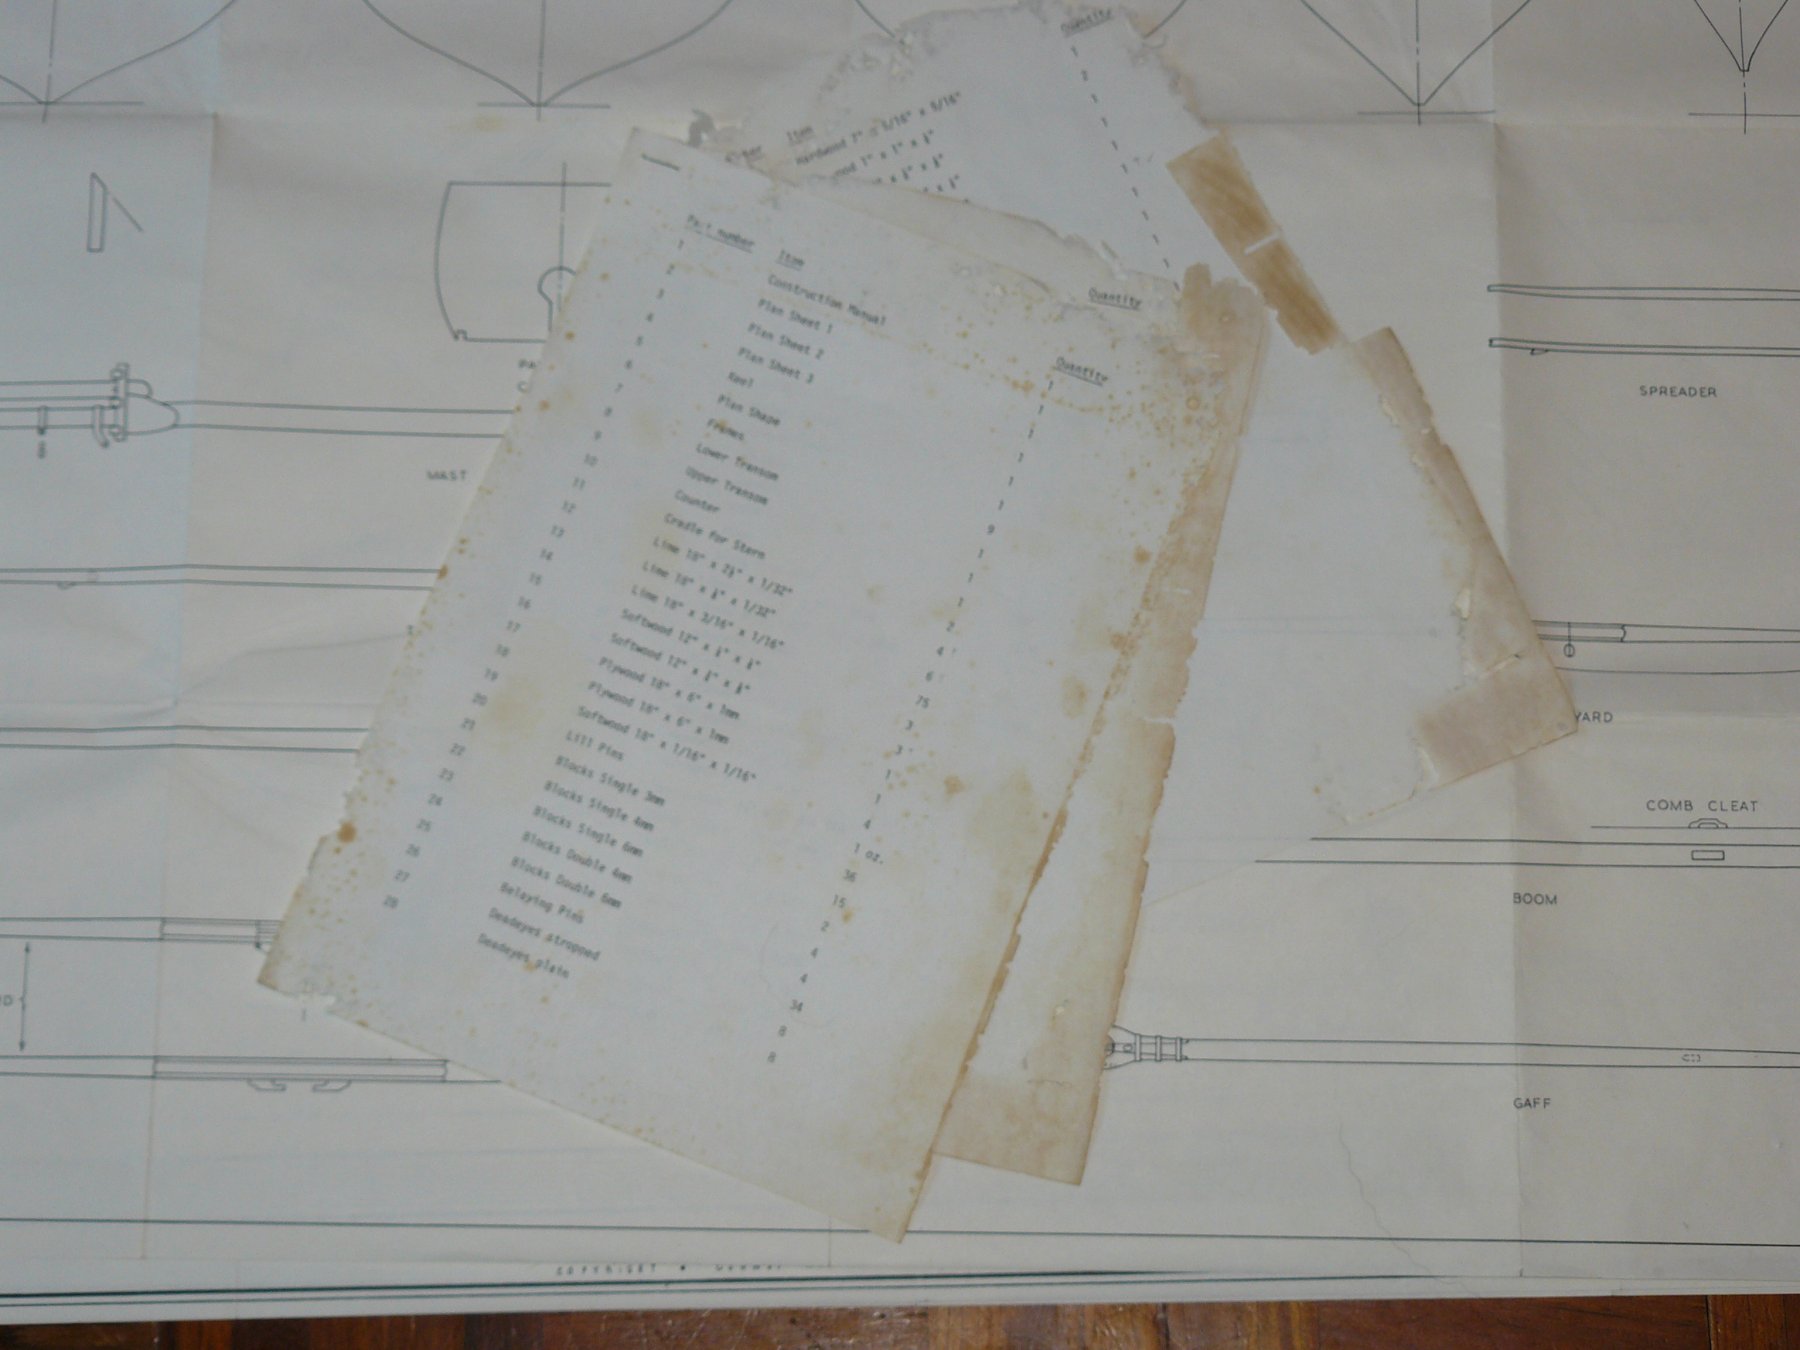
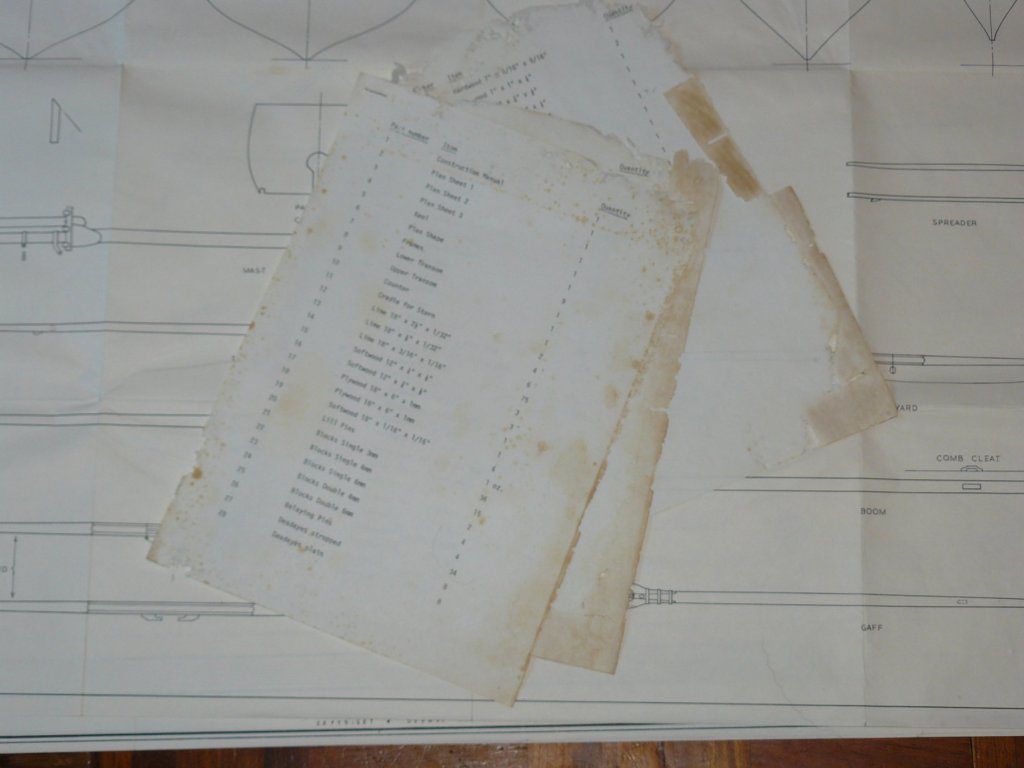
Above is the parts list, not sure what type of paper made off but something had been eating it away. Found this note inside. Obviously never came to hand as were not in the kit. Also ages the kit to 1975 when I was 5 years old! Would love to know why that first owner did not build it and if he returned the kit. Did not live far from me either.

- 102 replies
-
- 2
-
-
- speedy
- model shipwright
- (and 1 more)
-
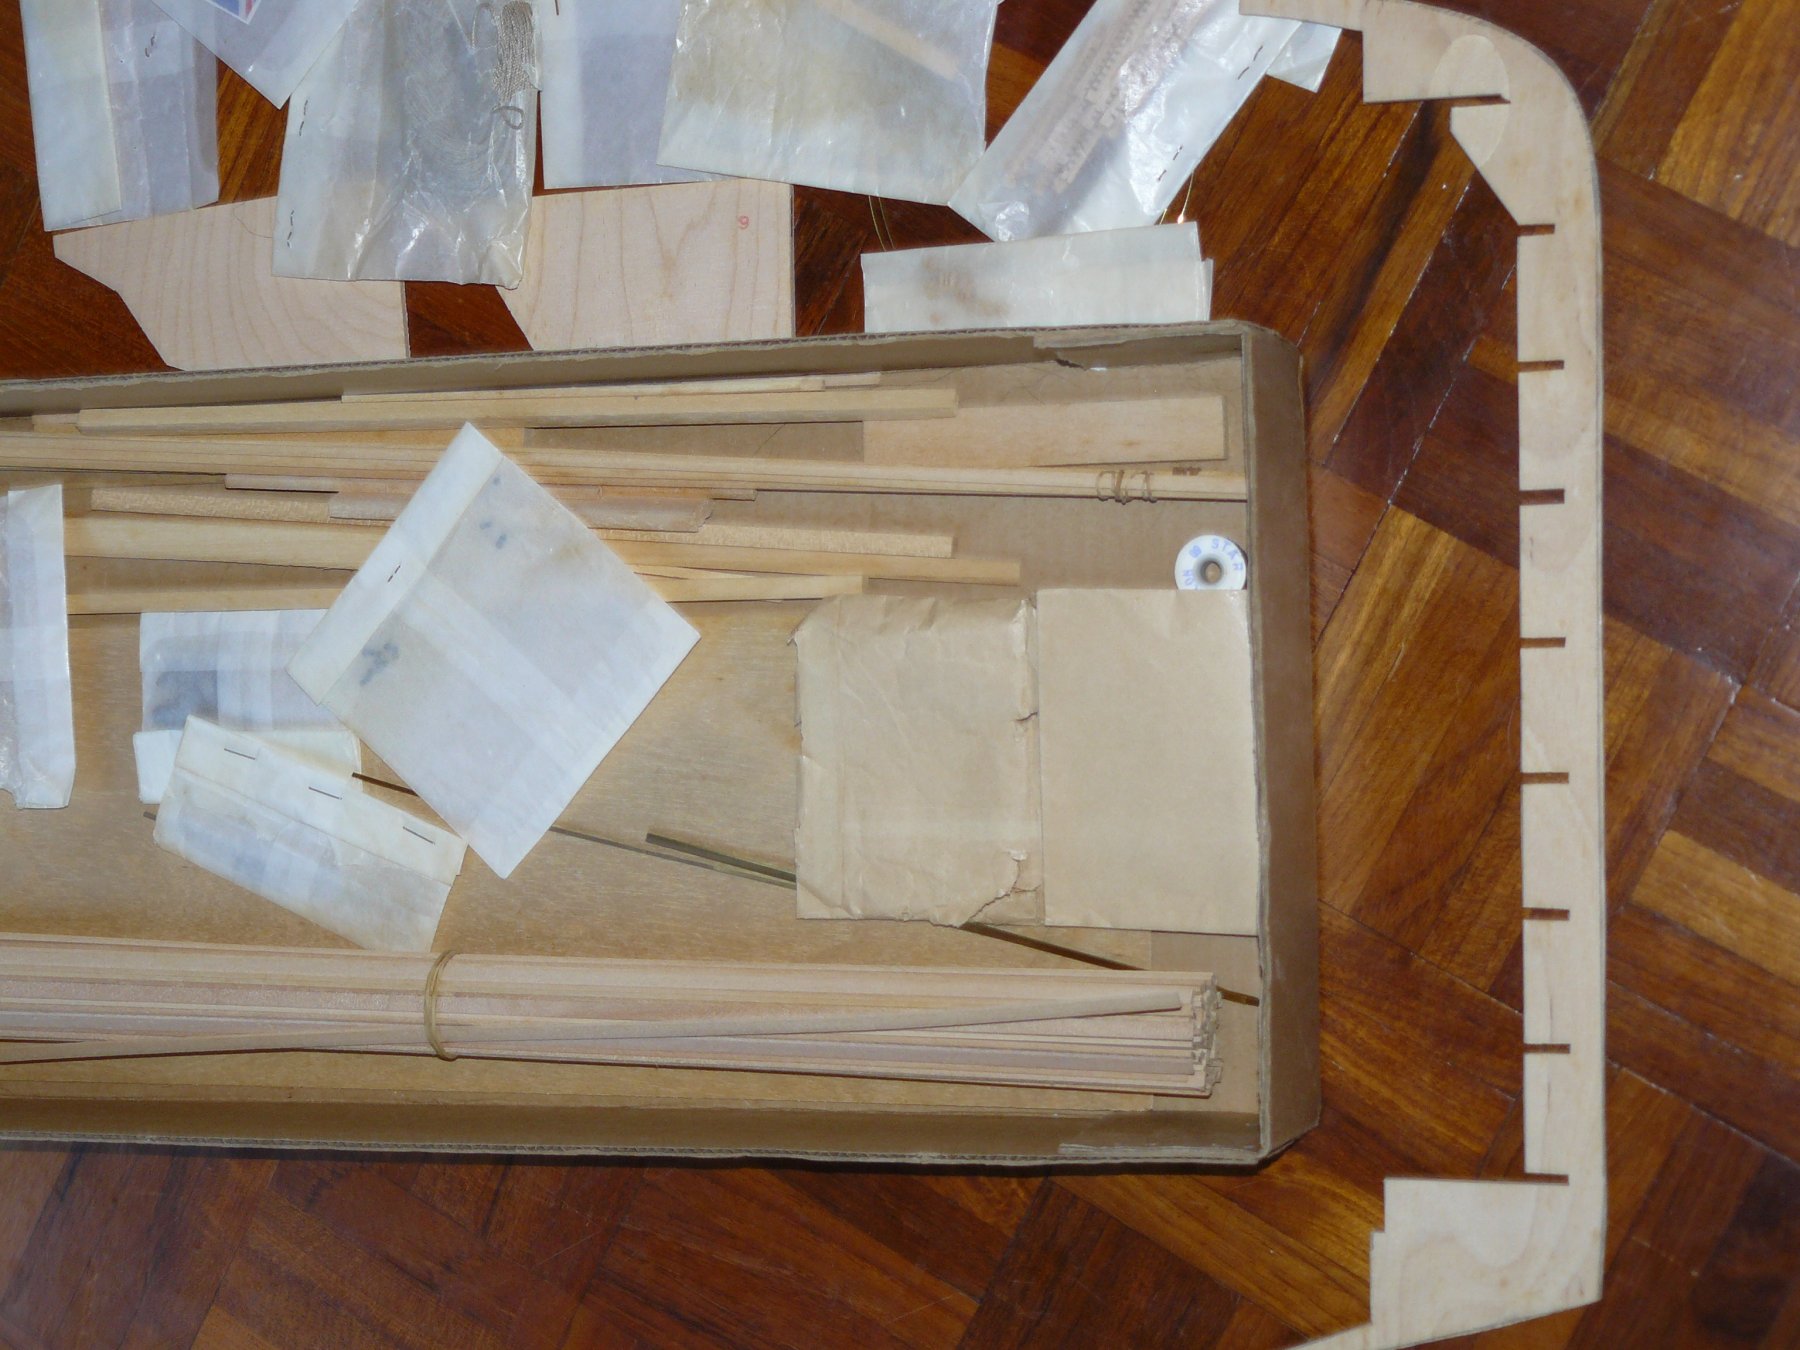
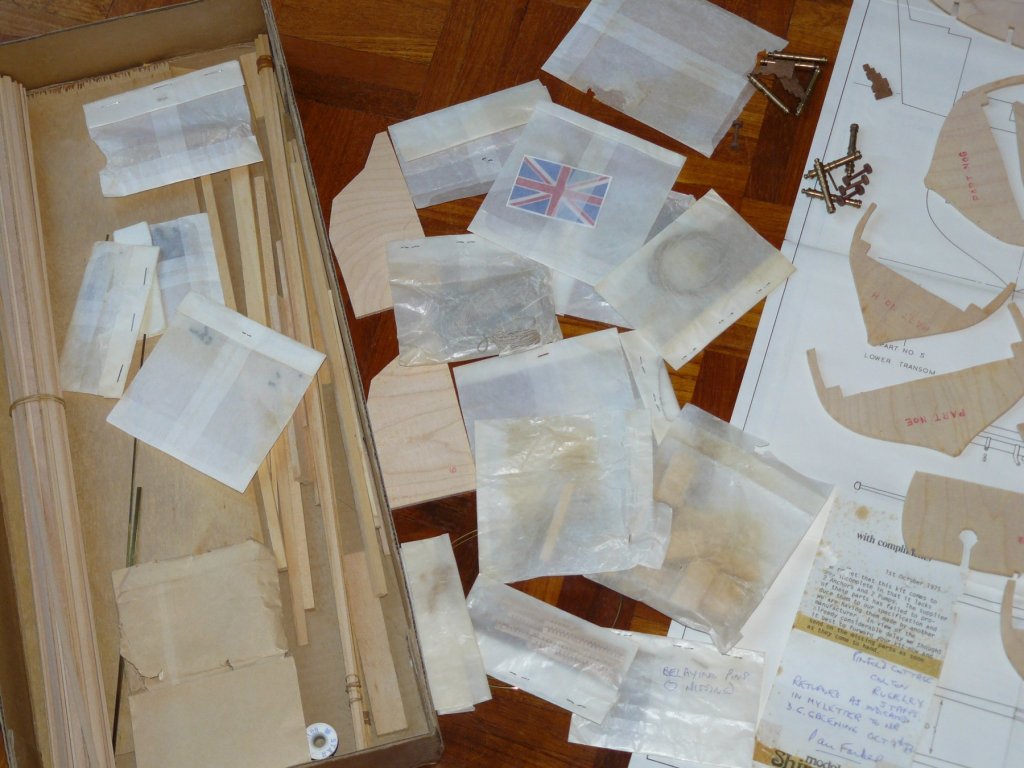
Now for some, poor photographs of parts as supplied: Some of those part bags just contain small pieces of different sized blocks of wood. So far I have not identified any use for them at all.

- 102 replies
-
- 3
-
-
- speedy
- model shipwright
- (and 1 more)
-
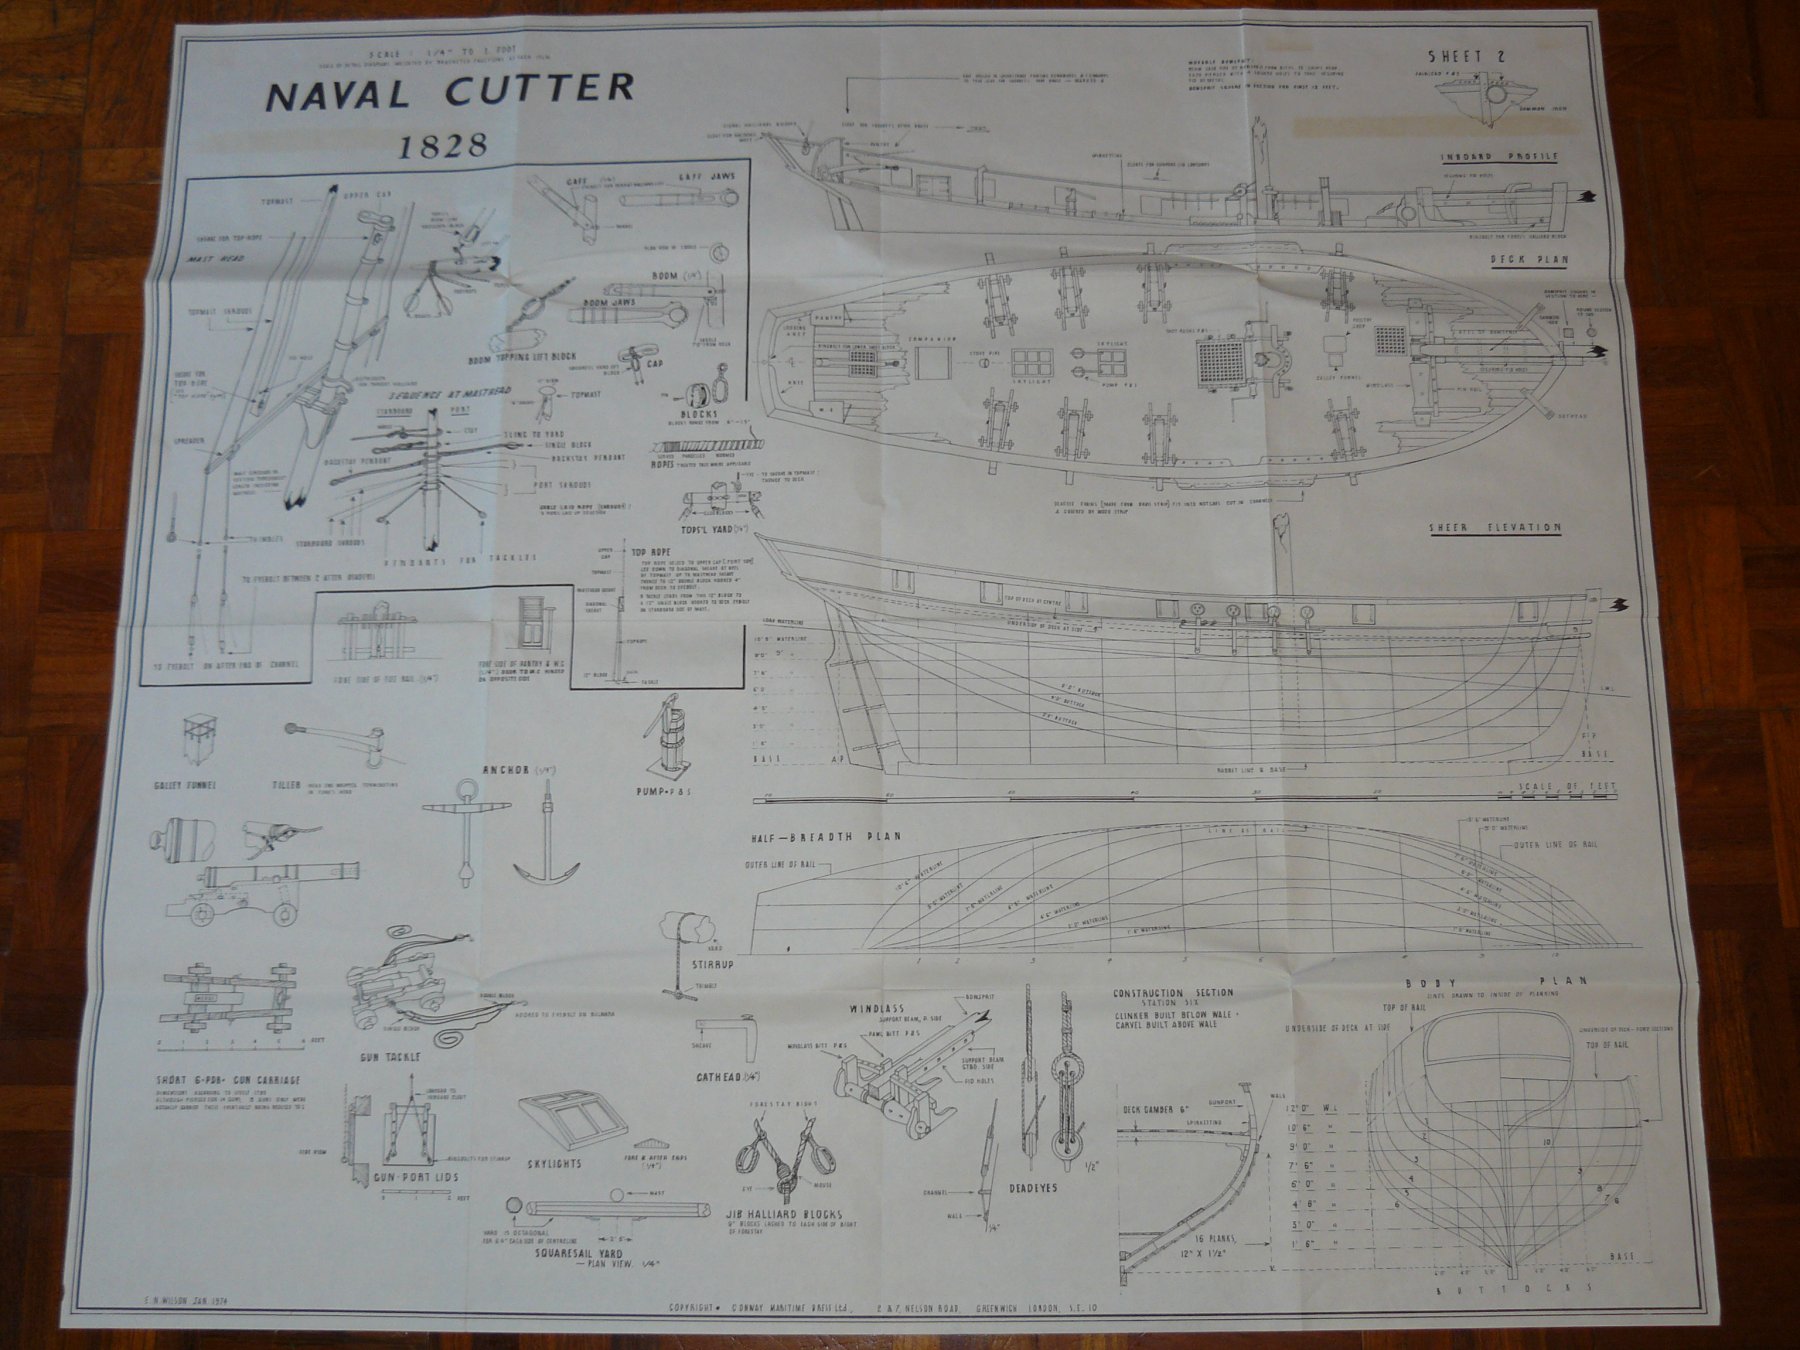
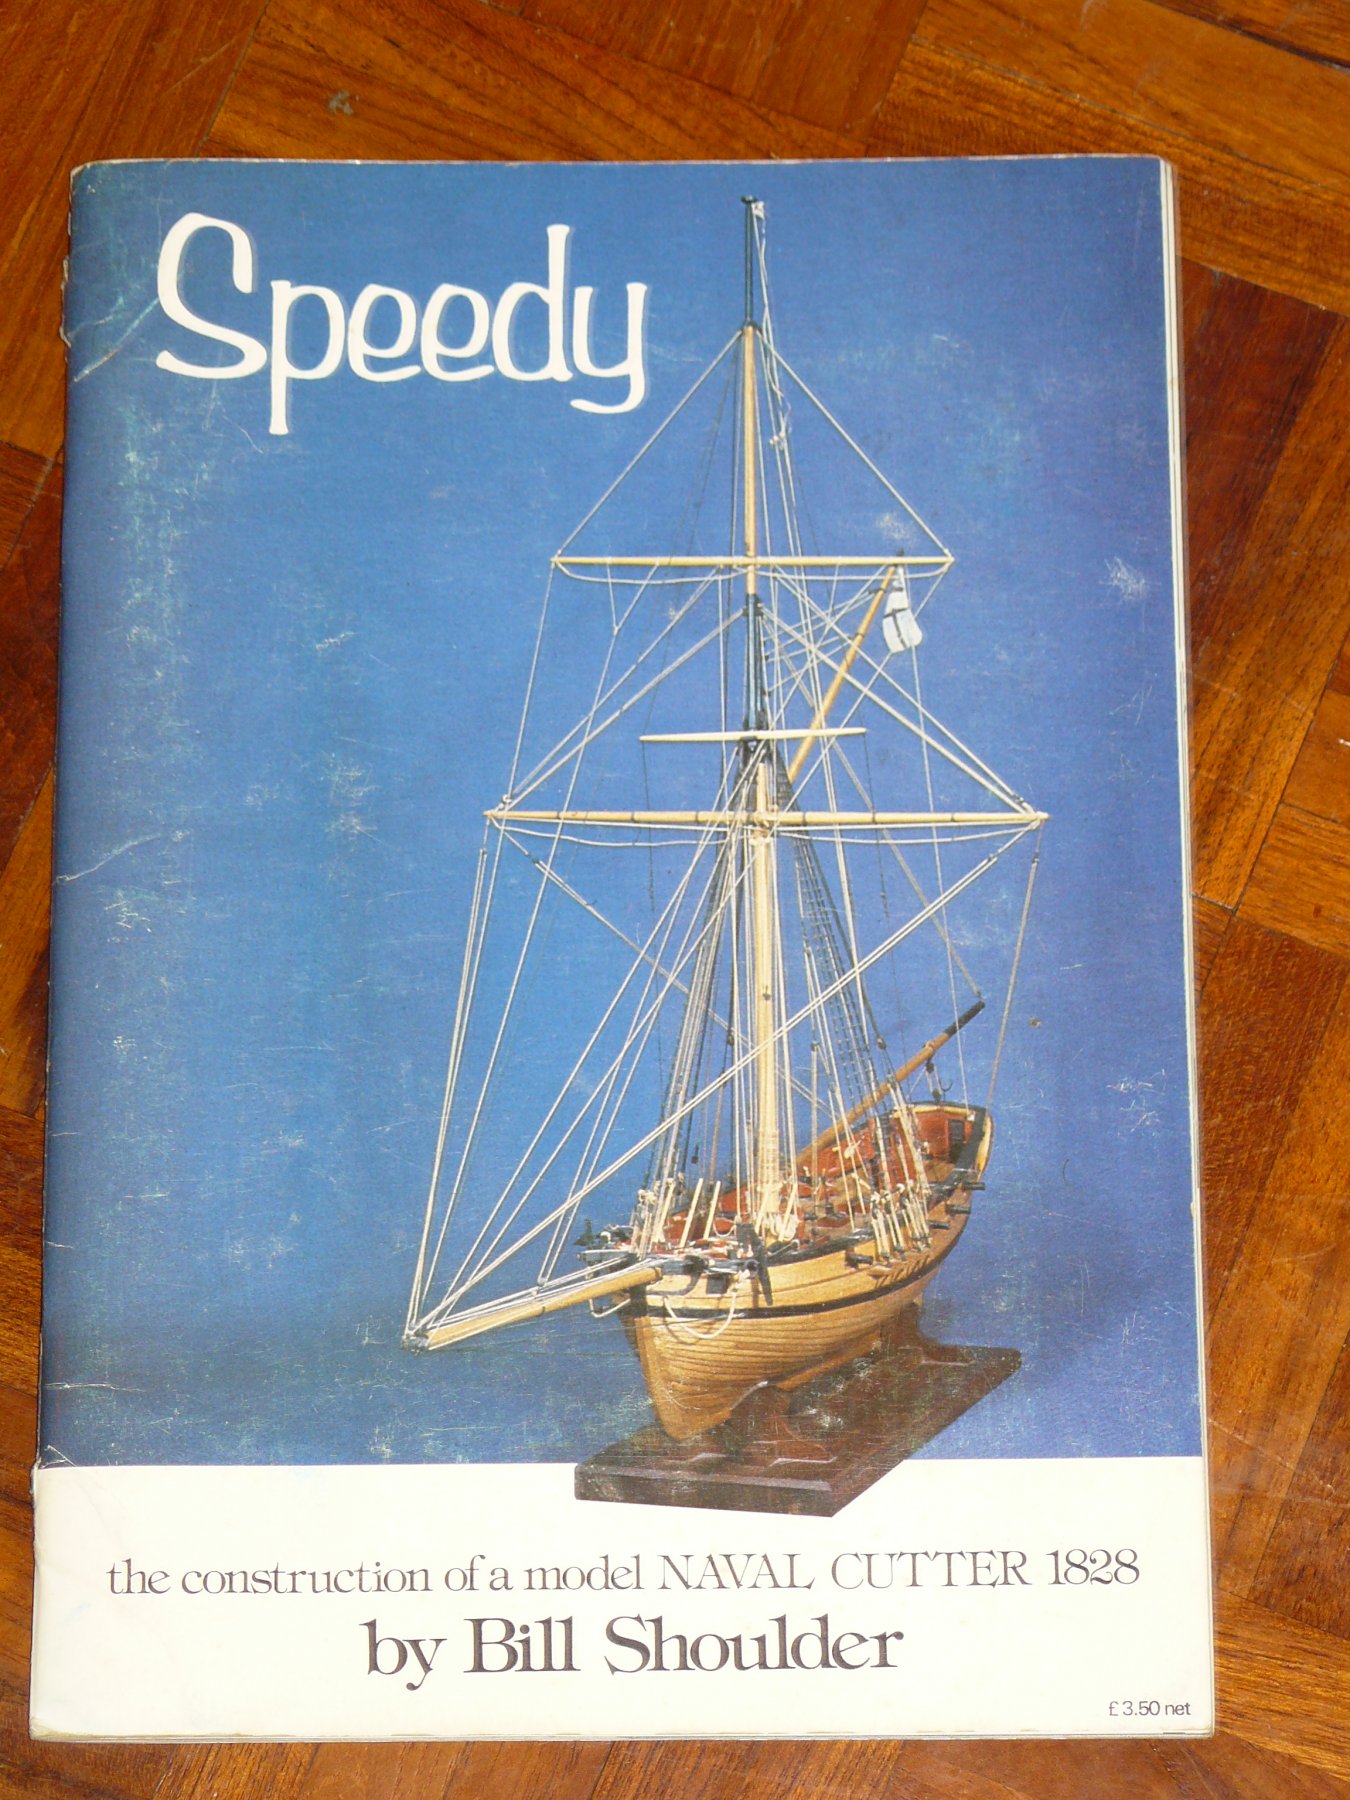
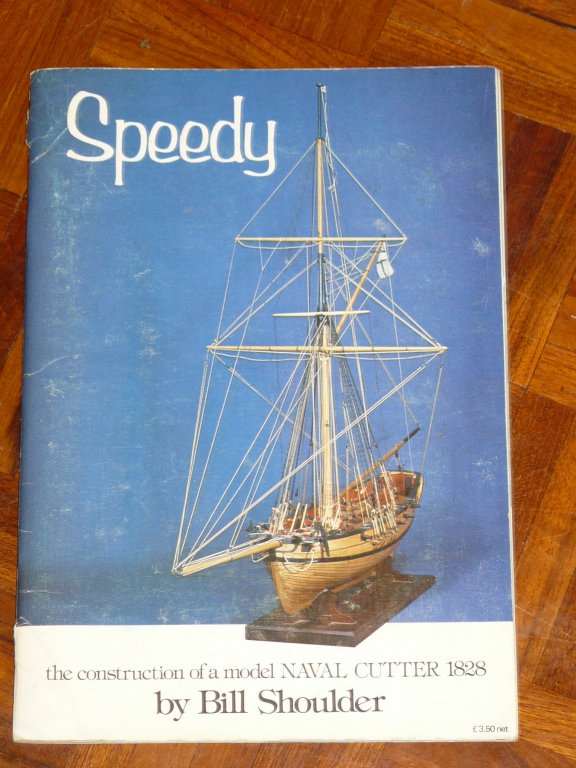
The kit came with most of the usual parts that you would usually expect but no dowelling for the masts. These were not missing, it actually states this on the box. Strange that it should have blocks and rigging thread. Kit photographs below: Above is the booklet by Bill Shoulder that, with plans, could be purchased separately. These show a Clinker built hull which I believe was 'out of favour' by this time.

- 102 replies
-
- 6
-
-
- speedy
- model shipwright
- (and 1 more)
-
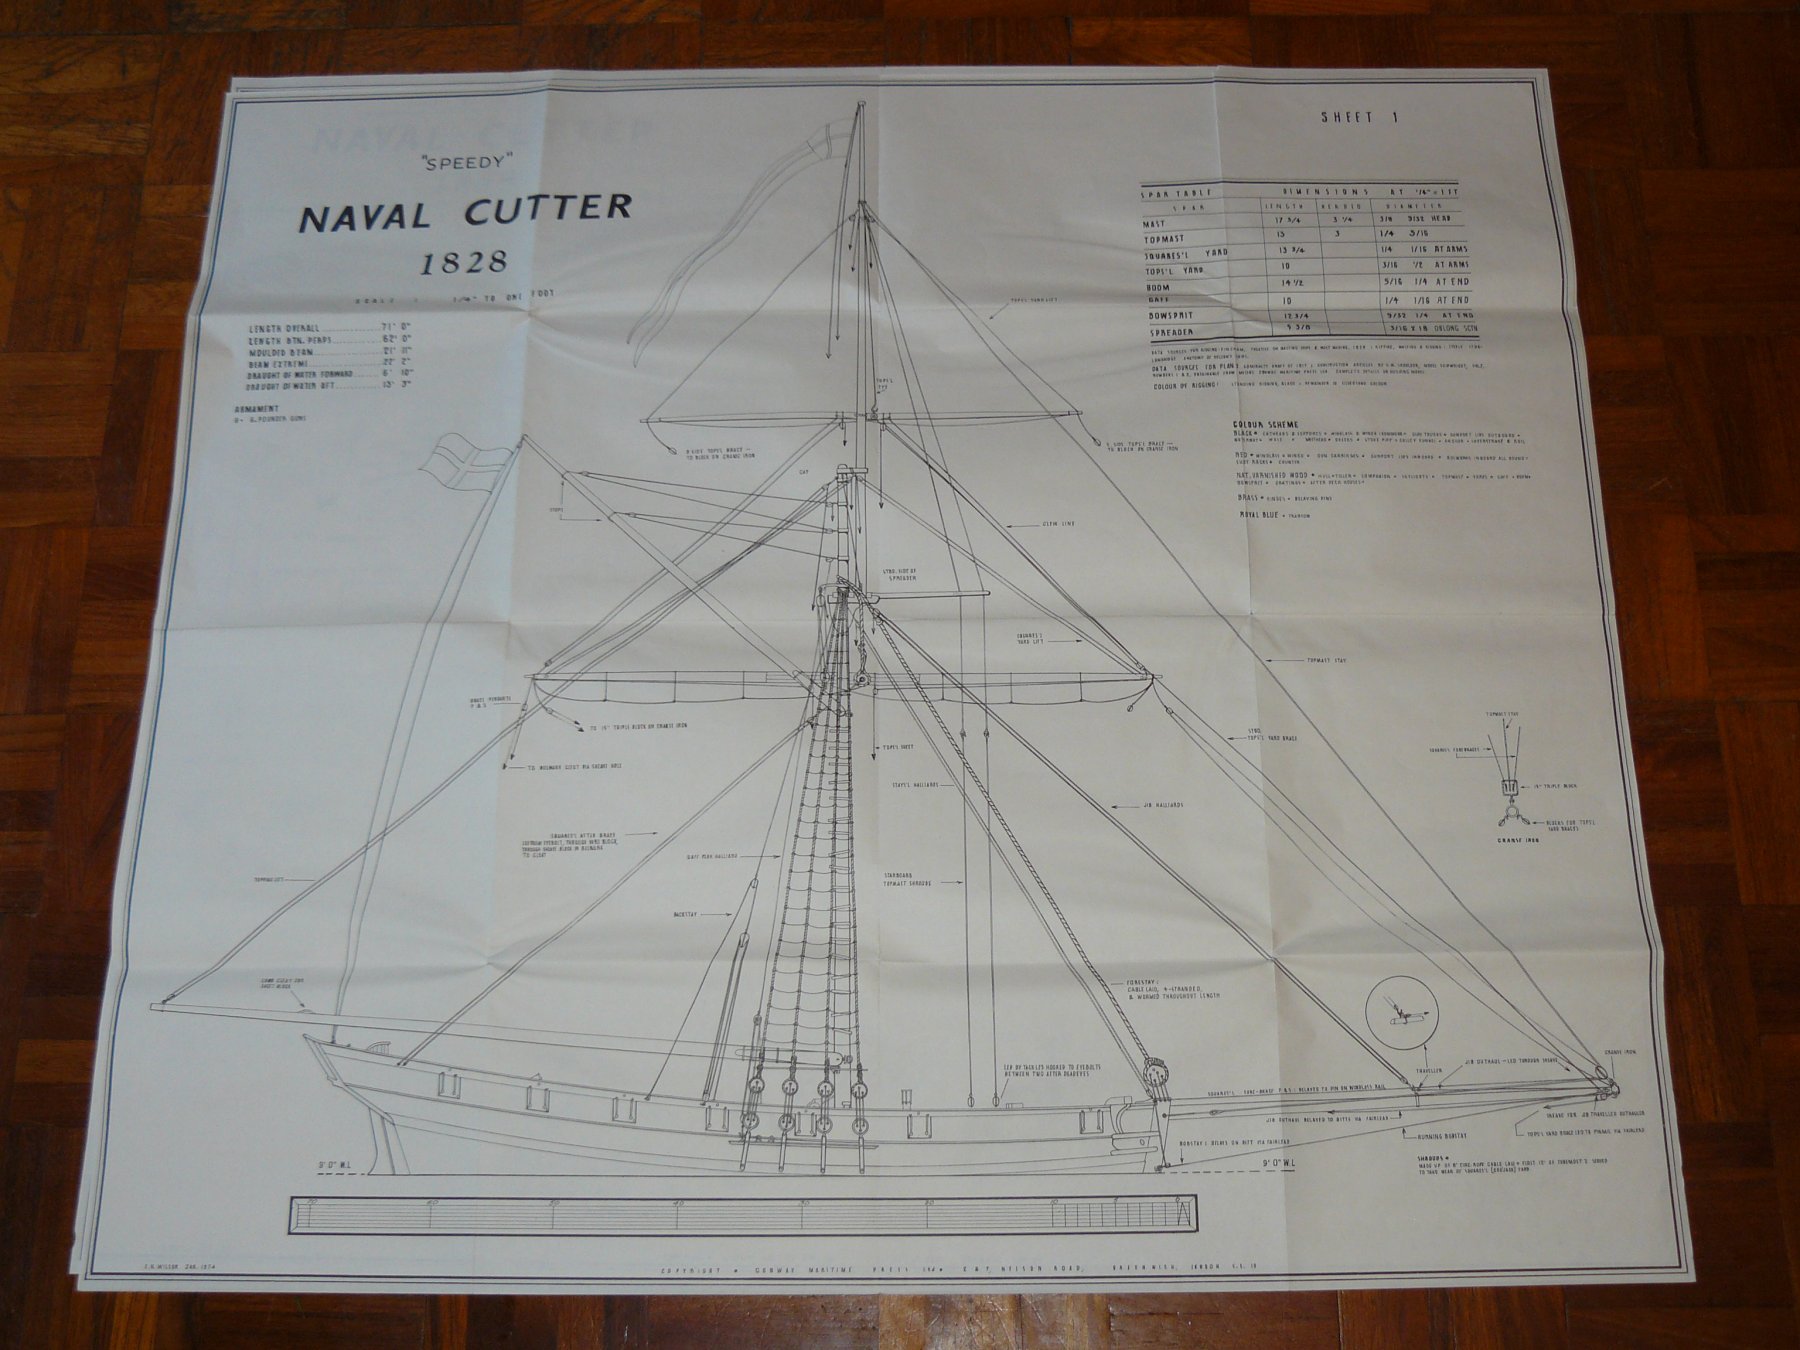
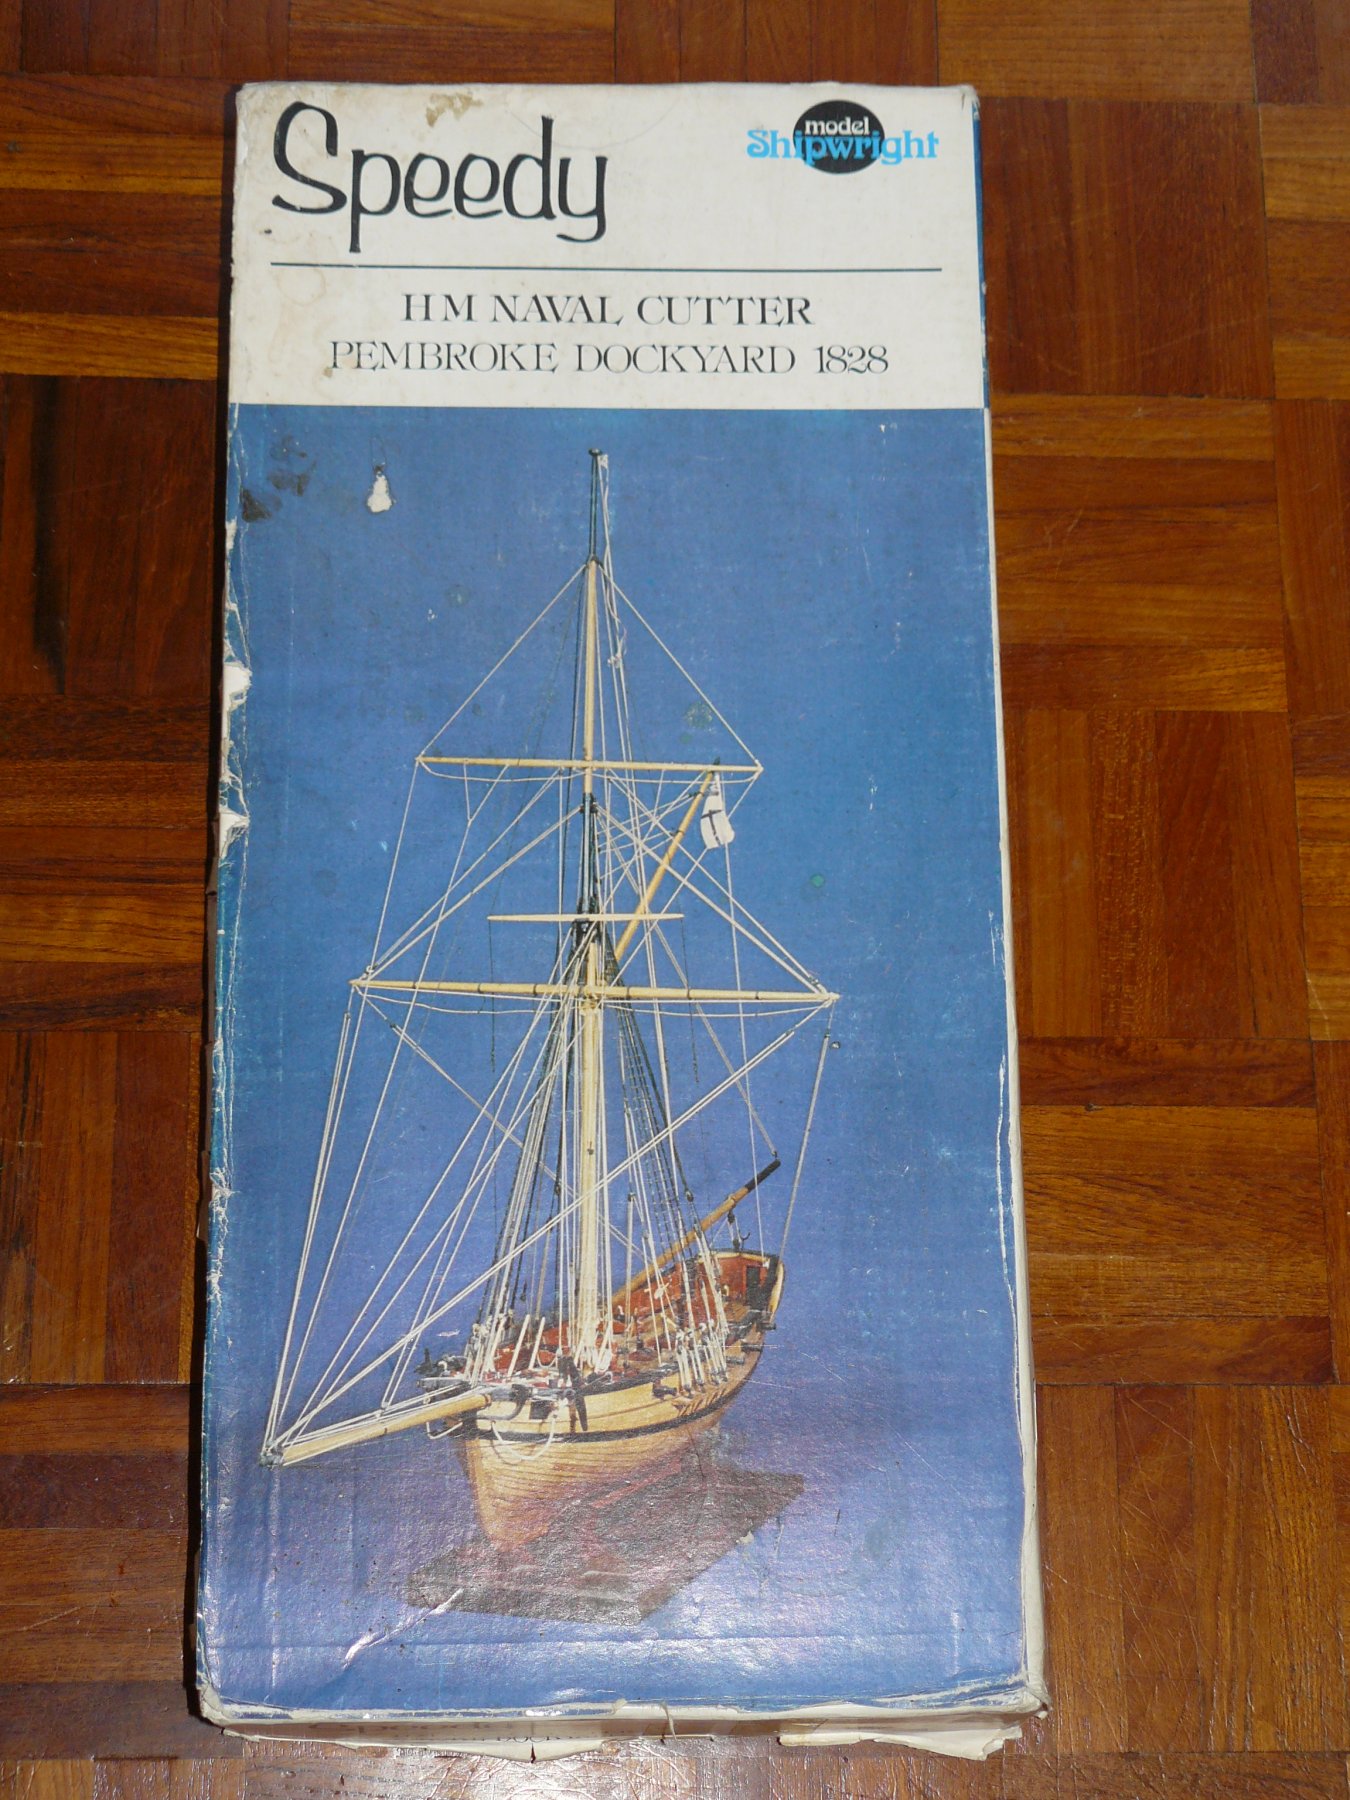
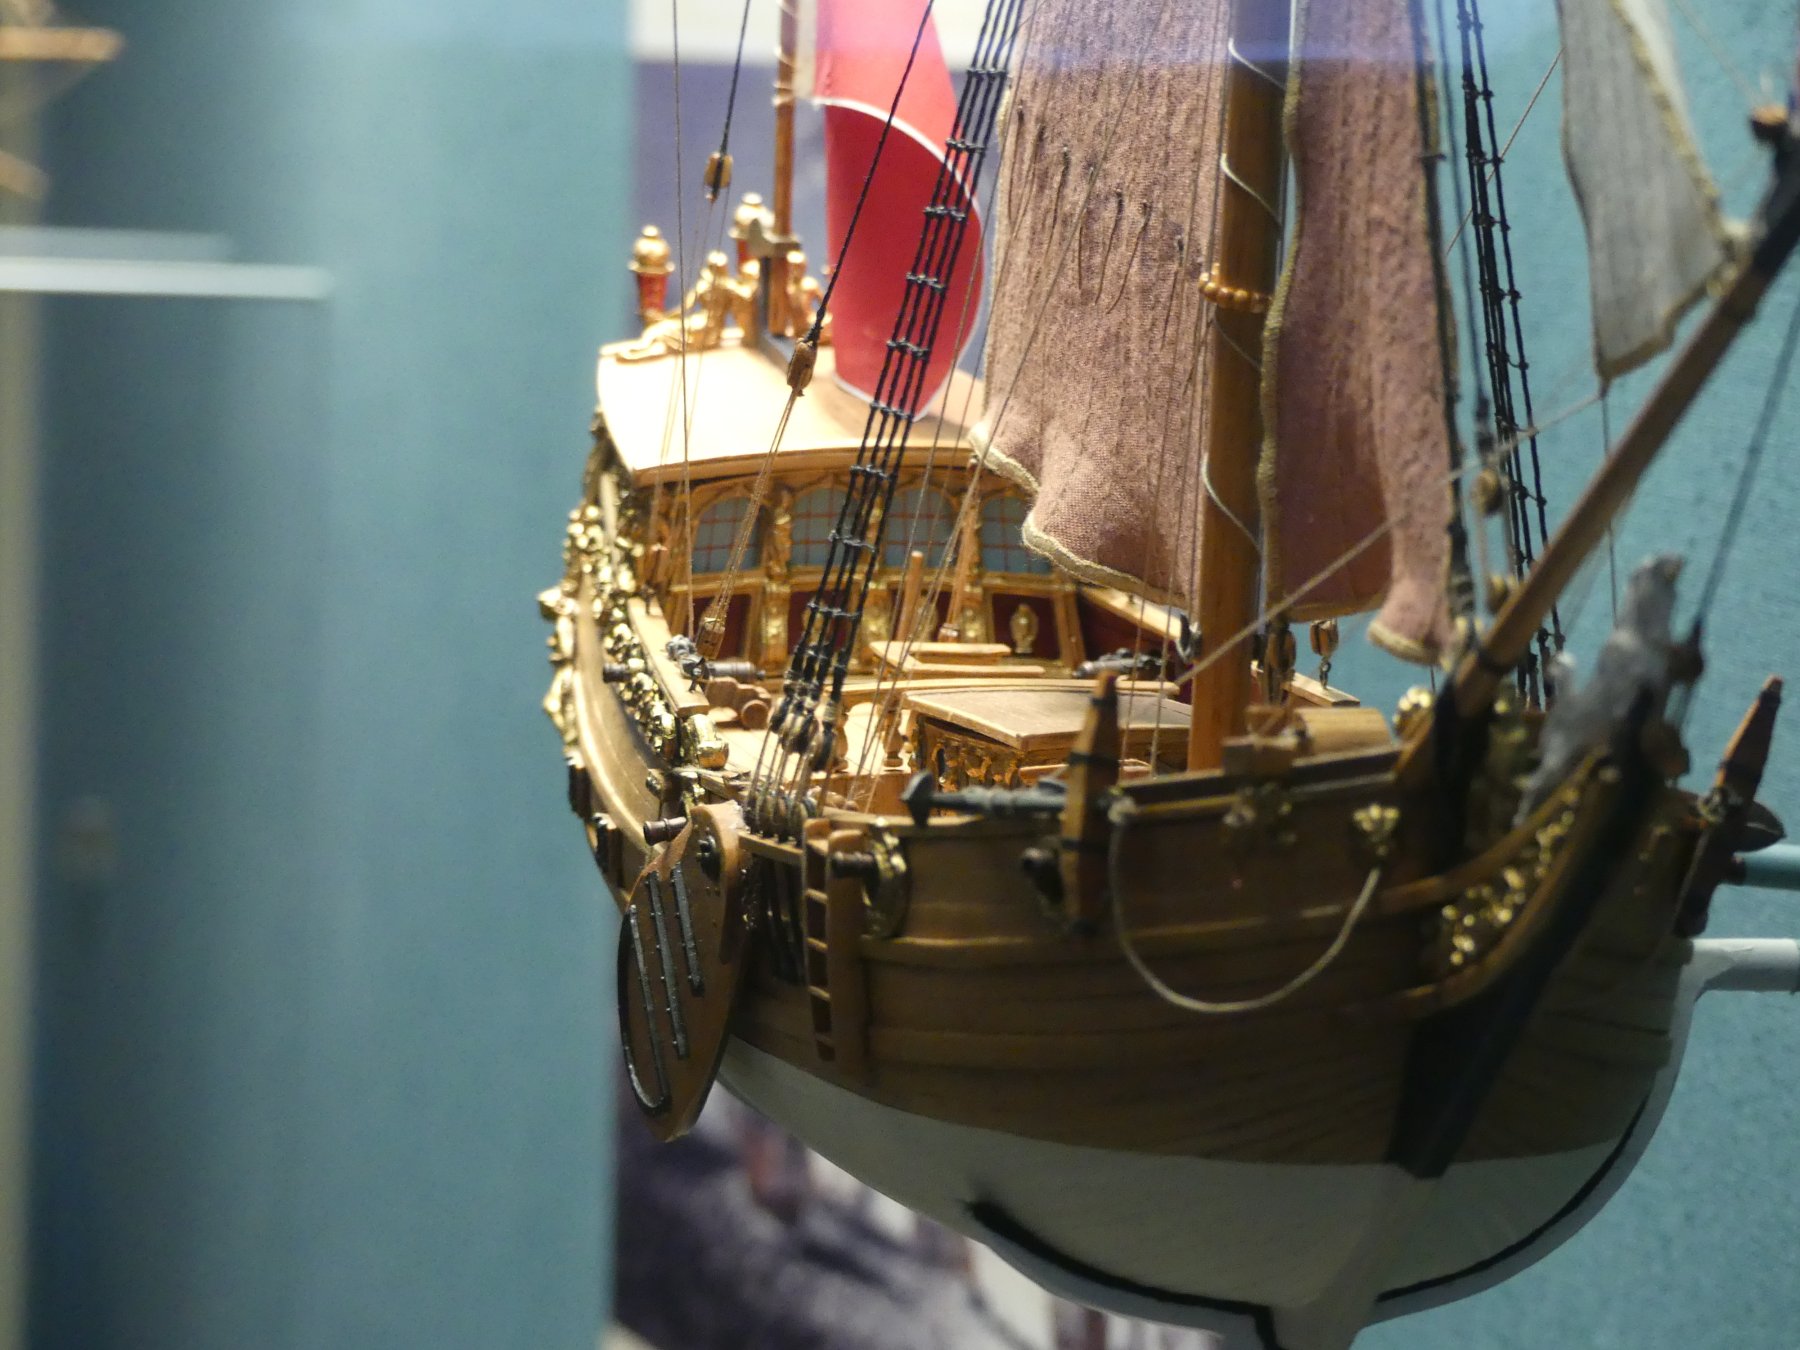
It is some time since I did a model log as I do not generally have the time or remember to take the required photographs as I complete the build - or should I say - do not have the self discipline. This build is no different but as it is an unusual kit I have decide to share it so far. This is not the usual kit you will find on the shelves in a store, although I have found reference to it on this site. I purchased this, as I have done many other, by impulse through a well known auction site. Little did I know what I was taking on. The kit comes with very good drawings and detailed instructions by Bill Shoulder and the main reason for buying it, apart from my love of Cutters, is the description that implies that the kit was produced to provide something of a higher standard than a normal kit and for a 'museum' standard. This coupled with the model shipwright name made me believe this to be a quality kit. Also, I have had it 'in stock' for some time and Chuck's kit was not produced at the time. I believed it to offer more than the Lady Nelson or Sherbourne kits.
- 102 replies
-
- 4
-
-
- speedy
- model shipwright
- (and 1 more)
-
If you look at pictures of HMS Victory's decks you will see that the trenails are lighter than the planks and hardly noticeable. Of course you would be better looking at her Orlop deck as the upper decks are not original and you would probably find that they are in fact plugs, inserted into counterbored holes and covering the fixing screws. With a plug used in the modern way for fitting boarding the grain would run the same way as the planking. A trenail would have its grain along its length. Consequently the end grain would be visible on its exposed end and result in a variation in colour. I am not sure if the same wood was used as the trenail would need to withstand being forced into place and so would have to have a close grain. I am not able, at present, to check any of my reference books to confirm this. If you can hardly see them at full scale then they would be even less noticeable at your model's scale.
- 6 replies
-
- 2
-
-
- deck planking
- caldercraft
- (and 1 more)
-
Hi, Probably one of the hardest ships to plank at the bow so wouldn't get so worked up as come good in the end. I wish I had a workshop like that.
- 108 replies
-
- 2
-
-
- endeavour
- caldercraft
- (and 1 more)
-
Snow, the Spanish were there as well. One book very worth looking out for is HMS Victory by Kenneth Fenwick. not just about the battle of Trafalgar but a history of all the ships called Victory. Trafalgar - eye witness accounts - Tom Pocock Trafalgar - Alan Schom Nelson - Christopher Hibbert the list could be endless.
-
Occre diana 1/ 85 scale
Thunder replied to Snow's topic in Painting, finishing and weathering products and techniques
In what stage of her life are you wanting to depict her? Paint schemes also varied for different periods. The picture looks more like an early period which is at odds with what looks like copper plating. If you want to have 'varnished' sides with a band of blue on the outer side of the bulwarks then the bottom of the hull (below the water line) would usually be white. If you want Nelson's period then the Yellow ochre band would be the width of the gun ports. Of course there was always variations and a lot is down to what you personally want. -
Byrnes Thickness Sander Advice
Thunder replied to janet bode's topic in Modeling tools and Workshop Equipment
Jim, Is it a capacitor start or does it also use it for capacitor run? If only for start is it possible that it did not switch out and hence cause the overheat of both capacitor and motor. It doesn't appear that Janet was particularly overloading the motor. -
Heller's Le GLorieux: Copper Sheathed Hull?
Thunder replied to Kriegmeister's topic in Plastic model kits
Blue Ensign, I have just looked at your version of this build and it is nothing less than brilliant! -
Heller's Le GLorieux: Copper Sheathed Hull?
Thunder replied to Kriegmeister's topic in Plastic model kits
Hi, there is only one sprue that is different between the two and that is the one with the name plate. Most Heller kits have at least one second kit that does this. The Phenix and Sirene are the same kit although very different when completed. Why not build it as in British service? -
Your planking does look to be coming along well. I think the Royal Navy didn't even start experimenting with the copper plating for about another 90 years so if you need to cover the bottom part of the hull it would of been 'white stuff'. I don't think any other country did it first and in northern waters it was not required as the Toredo worm cannot live there (yet). Hence the Wasa surviving. The model shown is in the historic dockyard museum at Portsmouth. One of the others I saw was in a museum at Anglesey but I cannot find any photographs. The only thing for me that lets it down is the gun port lids as they should be flush when closed.
-
I have this on the shelf to do and never realised it was such a pig to plank. I have seen it in three museums built and never noticed then. Unfortunately you cannot always tell till your into the build. It would be interesting to see if they changed the planks. It also features in the book 'ship modelling from stem to stern' but the build is not covered. I don't know about in Sutherland but I find it difficult to get decent replacement planking, what you get from the online model shops is exactly the same as in the kits. Trouble is, unless I find evidence that she was planked like the vessel in this thread, I will plank it in the usual style. Well the second planking layer at least. It looks like I will be getting some new planking so that it is narrower and be doing a lot of tapering with additional stealers at the bow. I will be watching this thread with interest but I must apologise if that is to learn from your difficulties and mistakes.


-
I know it is harping back to those photographs of the real build but I have never seen a hull planked like that and wondered if anyone new more about it. Was it a practice only in certain countries and then with only certain types or sizes of vessel? What was the frames like, those plank ends would have no fixing unless the frames were pretty much side by side. If it is only certain vessels it would make modelling them more accurate and it would be nice to know so that it wasn't used as the 'correct' method for all vessels. As for your sanding, I would take a look at how thin the planks would be after sanding to determine if you need the filler to provide strength. You wouldn't want to sand through one. It may be a good idea to get some inside the hull to strengthen them as well. Especially at the bows as if doesn't appear that there was a sold block for you to have landed the planks against.
-
I often use the thread but not many of the tools. There are some great fine scissors like the 'Dr Slick' scissors and micro clamps but the biggest problem I find when rigging is reaching in to grab threads and holding thread close enough to a belaying pin to tie it off. For the first the following are useful: https://www.ebay.co.uk/itm/Micro-Hartman-Alligator-Cup-Shape-Forceps-3-5-ENT-Surgical-Instruments-CE-/161329460991 For the second some blunt cuticle pushes / cutters. https://www.lightinthebox.com/cuticle-pusher-trimmer-remover-nail-manicure-tool_p233511.html?currency=GBP&litb_from=bing_shopping&utm_source=bingshopping&utm_medium=cpc&utm_campaign=bingshopping&msclkid=b0f8d03935de1bee23f08a4184fc6767 Also have some crocheting hooks at hand. https://www.lovecrochet.com/knit-pro-steel-gold-tip-crochet-hook These come in a range of sizes and are handy lengthened by fitting into a long piece of dowel. Make sure you get the silk thread rather than nylon. Some say it shrinks but I have not had that problem, in fact more likely to go loose over time. I have had black turn to dark brown but only after many times when washed dust off the finished ship by using the electric shower!
-
Hi, Airfix went with the colour scheme as suggested by the salvage team at the time. Blue was still shown as the colours of the ship in their museum guides till very recently so Airfix thought they had it right. I built this twice over the years and both times all the research and books illustrated her as being majority blue. The little sticky uppy things are the tops of the Kevels that Airfix moulded into the rails rather than putting inside the bulwark. These would have been used for the rigging so you may need them if doing full sail rig.
-
Well, I have done six builds and you have taught me a great tip on the first page of yours. I normally do the keel and bulkheads and then set about the blocks. Your simple trick of pre-shaping them before gluing in the bulkheads is an excellent, yet simple, idea. I can see I could learn a lot from your log. Thank you.
-
In British service she was re-named Cormorant (1781) but later returned to be called Rattlesnake (1783). She was then sold to the French in 1786 and re-named again as Le Tonnant (see Corel or Soclaine kits).
-
Hobbyzone building slip for wooden ship models
Thunder replied to aydingocer's topic in Modeling tools and Workshop Equipment
Hello Harley, just a word of caution. I had mine on a little table as you have shown yours, with the ends unsupported, and the ends have sagged. I have not been able to get it back the other way even after doing the reverse. -
Hi, I am building a kit that had an original invoice inside for 1970 and even though the parts list has eaten way almost like it was dissolvable, the wood is excellent and very nice to work with. On the other hand a Jotika kit of HMS Pickle that was only 3 years old required the walnut replacing. I have a large collection of kits, some from the 1980's and cannot really tell any difference in the wood.
-
Hi, Caldercraft / Jotika do the Pickle: http://www.cornwallmodelboats.co.uk/acatalog/caldercraft_schooner_pickle.html I think you can sample the instructions here: http://jotika-ltd.com/Pages/1024768/Heritage_4.htm