


allanyed
-
Posts
8,108 -
Joined
-
Last visited
Content Type
Profiles
Forums
Gallery
Events
Posts posted by allanyed
-
-
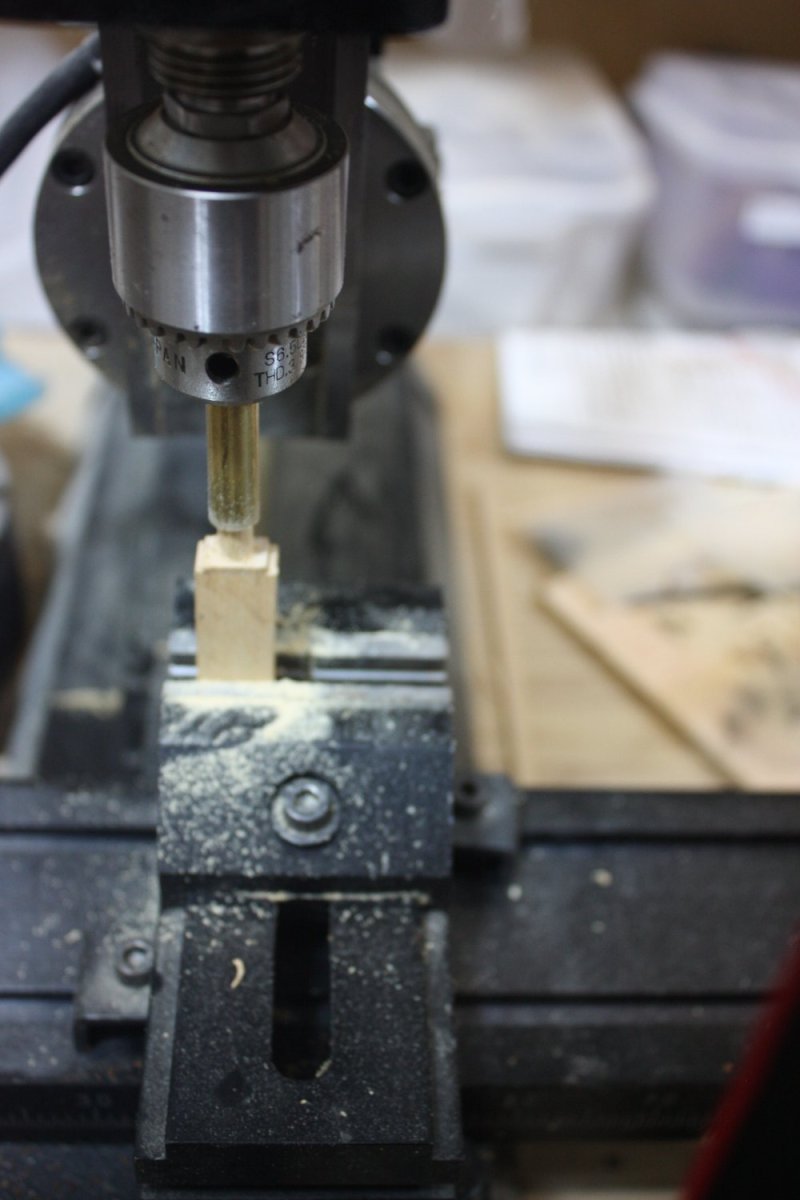
Rendering perfectly round ends on the axletrees is not difficult. There is no need to try to carve and file these, which is imprecise and takes a lot of time, especially if a project requires dozens of guns. In this case I used a piece of brass rod and a 0.25" drill bit to make an axle cutter. The hole is drilled in the rod with any type of drill and a hacksaw was used to cut small slots, creating teeth. It would be easier to cut the slots with a mill but as some folks do not have a mill or small press I wanted to show it is easily done with a hand tool.
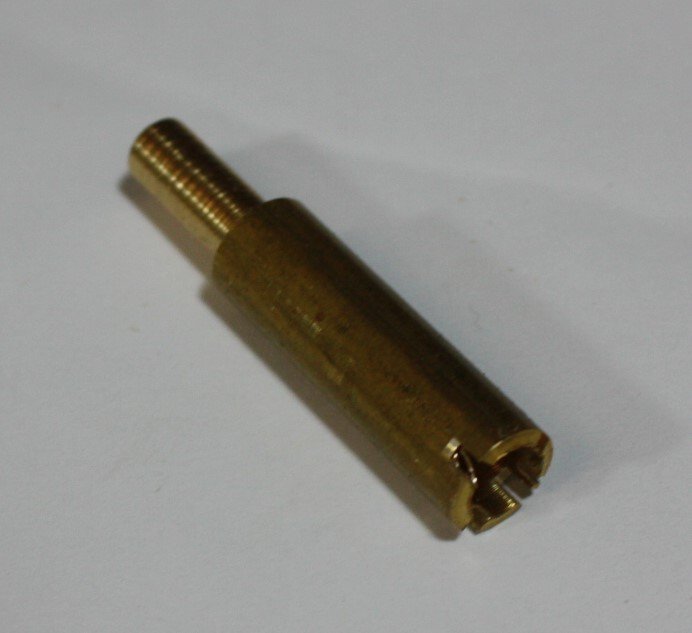
Cutting the axles themselves can be done using a hand drill, small press, or mill. First I rounded off the corners on the ends of the axles by hand to give a lead in for the cutter. The axletrees have shoulders which prevent the cutter from going too far. I made the portion to be rounded overly long for the time being.

- Siggi52, thibaultron, dunnock and 6 others
-
 9
9
-
Welcome to MSW!
Allan
- Keith Black and mtaylor
-
2
-
D
What ship, nation, year are you building? When I hear battleship I think steel ships, thus virtually no rigging compared to sailing ships of earlier times. Sailing ships had dozens of sizes of running rigging and standing rigging but later ships had very few lines by comparison and could be both manilla and steel lines. At your scale a few sizes would probably suffice.
Allan
-
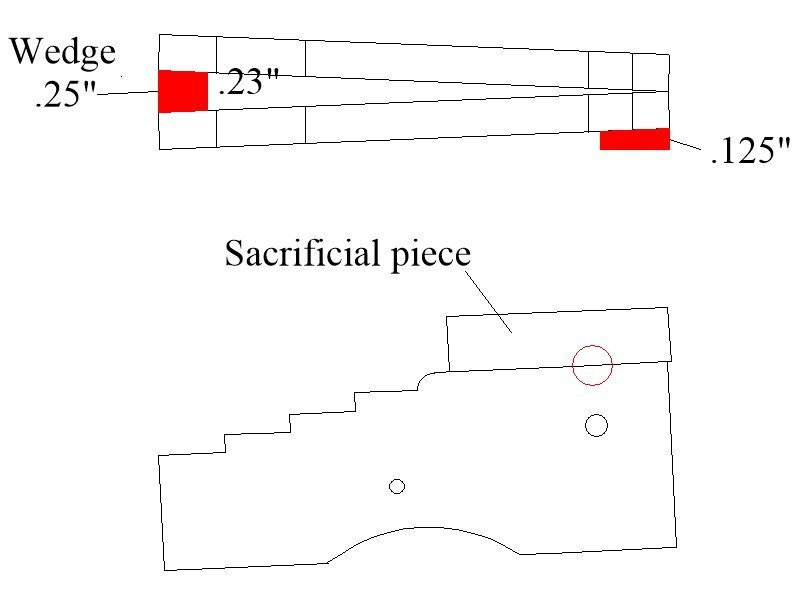
For the mortises for the axle trees, holes for the bed bolt and the cut out for the trunnions, wedges had to be made. The wedges were sized to have the brackets at the required 2 degree angle rather than lying flat. I first tried with temporary axletrees to get the brackets at the proper angle but this was not necessary. Using wedges as in the drawing below was easier and worked well. (Sorry forgot to take a photo) These openings are perpendicular to the bore of the cannon barrel so the brackets could not just rest flat when the mortises for the axletrees and drilling were done. The wedges were then temporarily glued in place with a tiny dot of PVA. This temporary assembly was then drilled and cut. Note that in order to get a properly placed partial hole for the trunnions sacrificial pieces were temporarily glued on top of the brackets and were large enough to drill a full hole, then the temporary pieces were removed.
Allan
- bruce d, thibaultron, Ryland Craze and 8 others
-
11
-
Hi D
If it is not the propellor that you need it would help if you would give a bit of detail on what you are looking for in addition to the dimensions. Are you looking for socket head, round head socket drive, slot, Phillips head, Torx rounded head, flanged, brass, steel, stainless, plastic?
https://www.mcmaster.com/products/screws/?s=metric+screws might have what you need.
Allan
-
Amalio
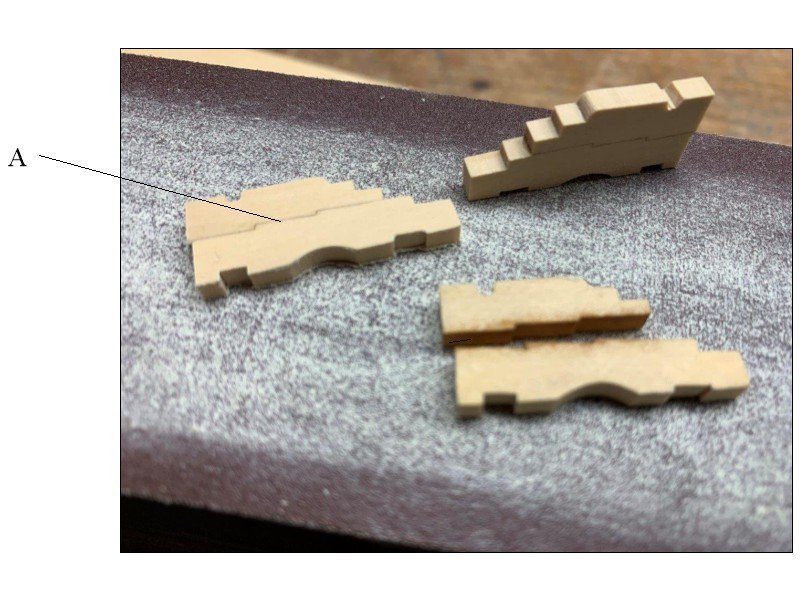
Your work is impeccable and you have shown some interesting alternatives on how to make things like the carriage trucks. Can you share your source or post the original drawings of the carriages that show the stepped joint line (Item A in the photo below), This step was new for me so interesting to see an alternative to the information I currently have on hand and I would like to add this to my current project files on these kinds of details.
Thanks
Allan
- bruce d, Keith Black, mtaylor and 4 others
-
7
-
I suggested to Daniel that he join MSW and post an introduction about himself and his project. I will send a note that he is getting comments so should really join up, if only to clarify more of what he is looking for. If this was 50 years ago I think that with the sinkings in the war years he would have had a lot of stories with which to work.
Allan
-
I received the following in an email and then "spoke" with Daniel about his project via email messages. I explained how we have over 43,000 member so MAYBE someone will see this and be able to provide some information for his project so we was very happy to have this posted. I realize we do not post email addresses so I've added the word dot in place of periods in his email address below
Allan
 Shipwreck Survivors Project
We've received the following letter from a PhD student at the University of Plymouth embarking on a timely and important new project - can you help? Do you know someone who can?
Dear Nautical Researchers,
I’m Dan Jamieson and I’m just starting a PhD at Plymouth University gathering oral histories of shipwreck survivors. The aim is to interview a diverse group of about twenty, from a range of different seafaring backgrounds – naval, merchant, cruise ships and liners, lifeboat, search and rescue, fishing, yachting, right down to cross-Atlantic rowers and migrants making crossings in small boats. The intention is to begin a collection of first-hand accounts that will grow over time, that will reveal the experience of shipwreck from a broad range of vividly personal perspectives.
The research will preserve survivors’ stories for the historical record and help raise awareness and understanding of their experiences. This seems important at a time when familiarity with life at sea is diminishing along with the number of people who work and travel there, also at a time when empathy for seafarers in distress is not uniformly engaged.
Yet as a maritime nation, seafaring remains a huge part of our history and shipping is a growing industry that brings us ever more of our worldly needs.
My task now is to find people with these experiences who are ready to tell their story.
If you have been on a vessel sinking at sea or if you know someone who has who might be prepared to talk, I’d be extremely grateful to hear from you. The interviews will be one-to-one, face-to-face if possible, otherwise by Zoom, semi-structured, and 60 - 90 minutes long.
When the time comes, I’ll approach prospective interviewees with a preliminary call or meeting to introduce myself and explain what I’m up to. I will also send an information sheet with a more detailed run-down of the project and ask them to sign a consent form.
The interviews will be sensitively and carefully conducted, subject to oral history best practice and according to a plan approved by Plymouth University’s ethics committee.
If you want to know more about the project or me, please feel welcome to get in touch atdaniel dot jamieson@plymouth dot ac dot uk.
Best wishes and hope to speak soon,
Dan Jamieson -
3 hours ago, tmj said:
I had no intention of going for true scale or becoming a 'rivet-counter'. I just wanted to build a model that looked good. That was 'then' and 'this' is now.
A desire to build an accurate model is not a bad thing as the term rivet counting connotes, so good for you. This is an individual decision and you should be commended for giving it a go.
Allan
-
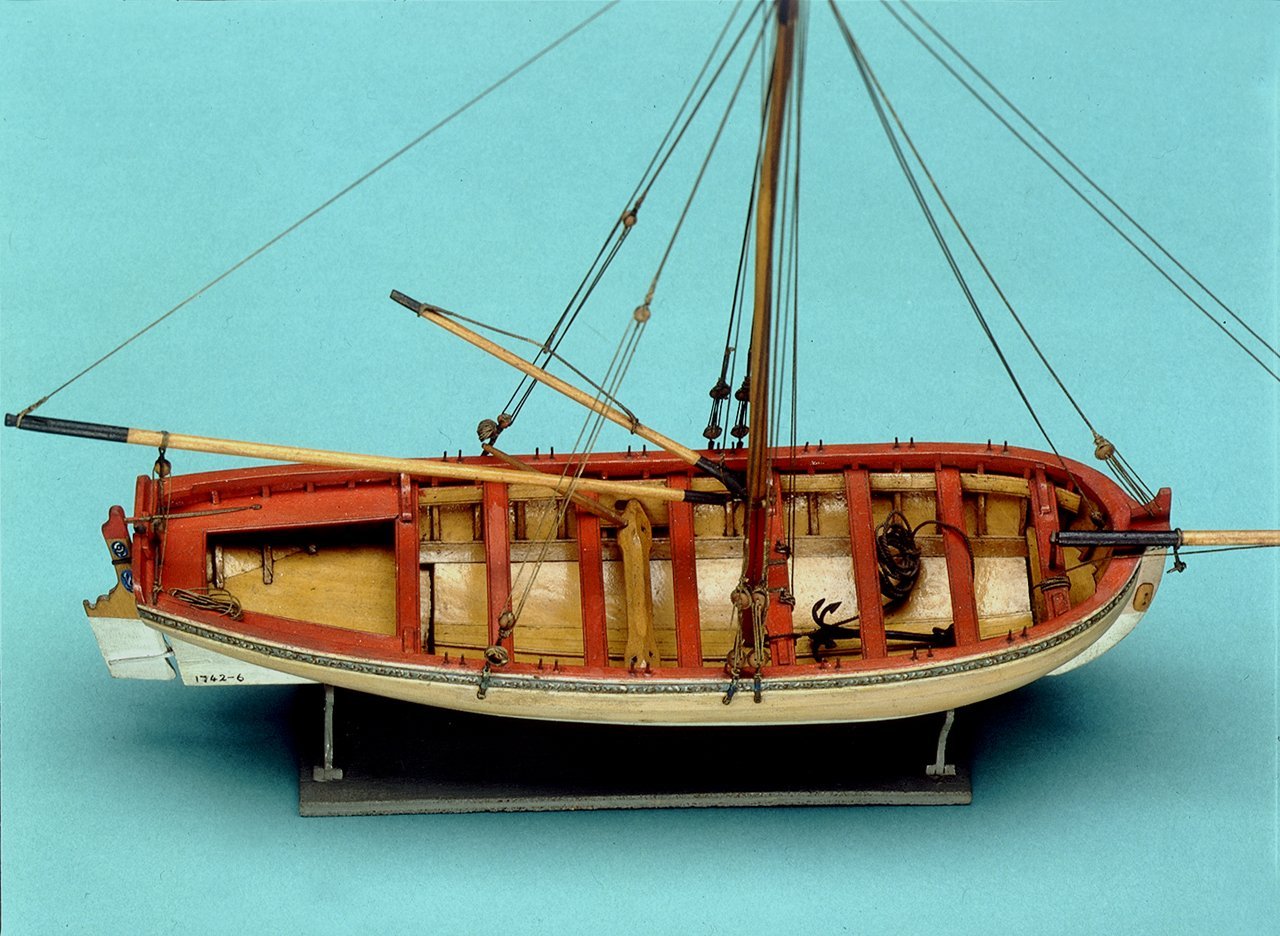
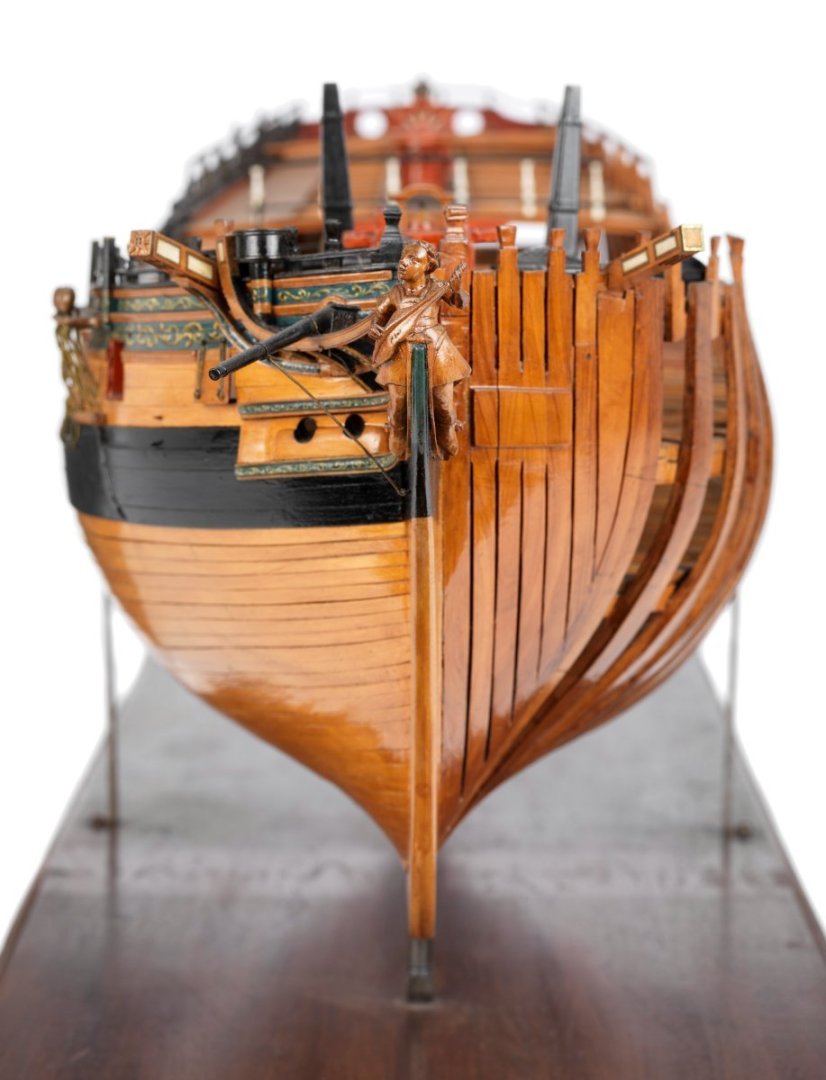
Very nice workmanship Roger! Do the plans call for the aft most thwart? Contemporary plans and models that I could find and photos of your kit box do not appear to have it so wondered if this sometimes was actually done. It would seem that a thwart there would interfere with the davit when it was in use. Below model is from RMG, SLR 0330 https://www.rmg.co.uk/collections/objects/rmgc-object-66291 I believe the side benches sat on the aft most thwart or in a mortise as shown at the circled area "A" on ZAZ5814 plan below.
Again, really well done model!!
Allan
-
-
7 hours ago, druxey said:
That looks much more like it! Good save, Allan.
Thanks to you Druxey. Even if you really were an old decayed piece of timber as your name implies you have been a heck of a savior many times over for a lot of us.
Cheers
Allan
- mtaylor, thibaultron, Canute and 2 others
-
5
-
On 8/14/2023 at 12:06 PM, hamilton said:
I do this for fun,
For more fun, if you have not already seen it, a fun few hours is watching the 1937 version of Captains Courageous. I watched it several days ago and while I thought I had seen it before, it was pretty much all new for me. Great scenes on board the Henrietta, a Grand Banks fishing schooner which was used in the filming of the movie. Following your build log and watching this movie has me wanting to build another fishing schooner model in the not too distant future😀
Allan
-
The drawing has been modified with the brackets at 2.5 degrees rather than 4.5 degrees. Always easier to fix the drawing than an assembled carriage😀
Allan

- druxey, scrubbyj427, Ryland Craze and 11 others
-
14
-
Below is the barrel superimposed on the carriage and it does look to be too much angle. The barrel taper is indeed 2 degrees and the brackets
are 4 1/2 degrees. Thanks for all your observations!!
Allan
- mtaylor, botra288, GrandpaPhil and 8 others
-
11
-
On 8/29/2023 at 10:54 PM, MajorChaos said:
I don’t like wordy posts, does any one read all this? Lol
Some of us do, and yours are concise anyway😀.
Did you bevel the edges of the planks where the station has a lot of curve? It is surprising to some how much of a gap there can be if they are not beveled.
Allan
-
On 7/11/2023 at 5:45 PM, Loracs said:
I'm not a fan of the printed decorations. Not sure now how to handle it later. Either paint myself or, most likely, use commercial inlays.
On contemporary models as well as modern models some, if not all, of the painting of the friezes and other fine work is done on paper which is then glued in place. I like to use silkspan rather than bond paper but both work well. There is an excellent description of this technique in The Fully Framed Model Volume II by David Antscherl on pages 27-30 as well as in some posts here at MSW especially those in Siggi's buildlog of Tiger. There are more, but one example: https://modelshipworld.com/topic/17716-hms-tiger-1747-by-siggi52-148-60-gun-ship-from-nmm-plans/page/17/ post #499
Allan
-
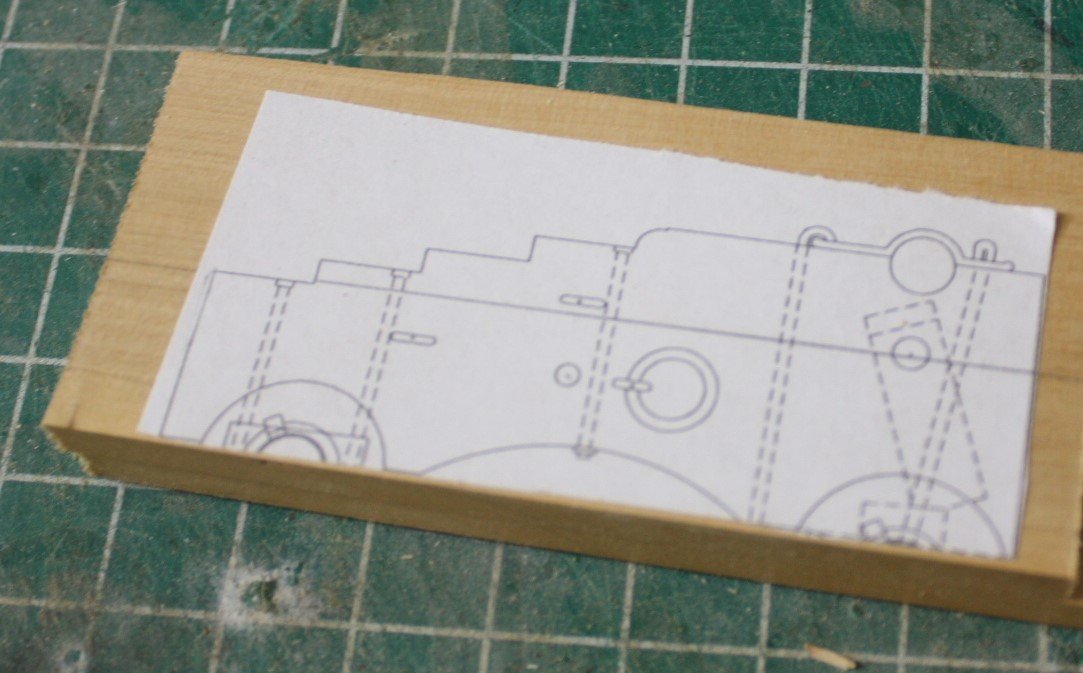
Lately I have taken a lot of interest in cannon from the Pitt pattern and Brown pattern era up to and including the Blomefield pattern era. For a change of pace I decided to do a little project building an Armstrong Frederick 24 pounder circa 1760-1790. First up was to make drawings of the cannon and the carriage. The carriage drawing was printed on label paper and a copy on regular bond as well. The PDF is much clearer than the jpg below so I have attached it as well. Carriage and cannon Parts ID.PDF
The brackets (or cheeks) were first up. Castello is used for the carriage, but any tight grained species would work. A slat of appropriate thickness was cut and thickness sanded, then cut in two to make a sandwich. A few dots of PVA just outside the periphery of the brackets was used to hold the two pieces together. The bracket drawing on the label paper was then cut and adhered to the wooden sandwich.
The brackets were cut out but not the mortises for the axles nor the half holes for the trunnions as the brackets will not be sitting parallel to each other.
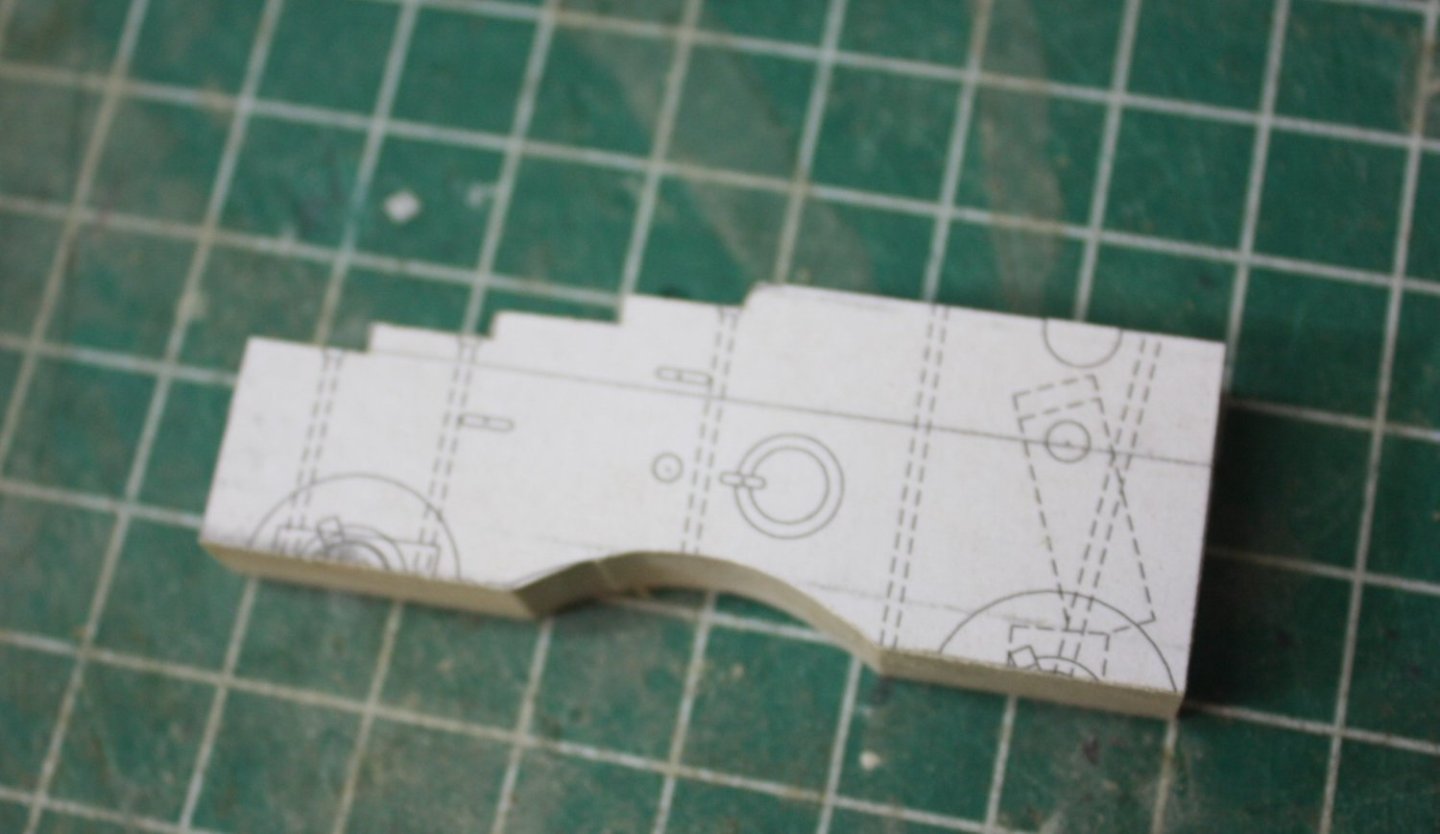
Allan
-
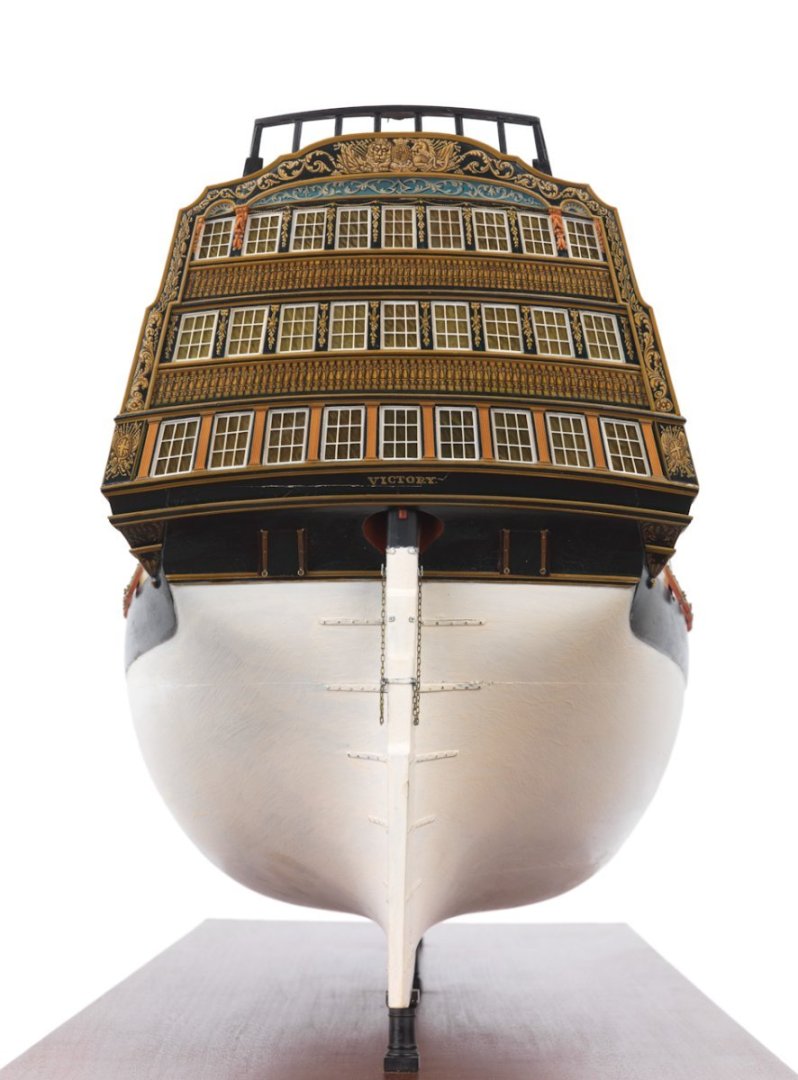
A picture of the stern of the model in post # 1
13 hours ago, Morgan said:but that is irrelevant to your query, the rigging points are applicable
I agree, but the plans bring up a question for me regarding number of guns. There are 15 gun ports on the lower gun deck, 15 on the middle gun deck, 15 on the upper deck, 8 on the QD and 3 on the forecastle. This yields a count of 112 guns, but, are carronades on the QD and FC counted in the number of guns? The plans for the Boyne and Union of 1811 show 15, 15, 15, 7, and 2 gun ports for a total 0f 108 gun ports.
Allan
- Keith Black and mtaylor
-
2
-
What kind of metal? My personal favorite for brass is no longer made so I have gone to Birchwood Casey brass black and better still is copper instead of brass and liver of sulfur. The latter can be applied with a small brush after the part is secured in place. Dilute the LoS, apply, then rinse with clean water, and it does not discolor surrounding wood.
No matter the metal, it needs to be thoroughly clean. An acid bath using Sparex or similar product followed by a good acetone and then water rinse works Handle with gloves, tweezers, or pliers to keep body oils off the parts before blackening.
Allan
-
On 8/10/2023 at 3:05 PM, BikerMart said:
Did you follow the kit instructions and place the middle gunport strip before the placing the lower gunport strip?
Hi Martin
Sorry if I am dense on this, but what is a lower gunport strip? It sounds like a strake under the gunports but the external planking did not follow the line of the gun ports as discussed earlier so I am at a loss. I am basing this on British contemporary planking expansion plans at RMG and now wonder if Spanish ships like Montanes might be different.
Thanks
Allan
-
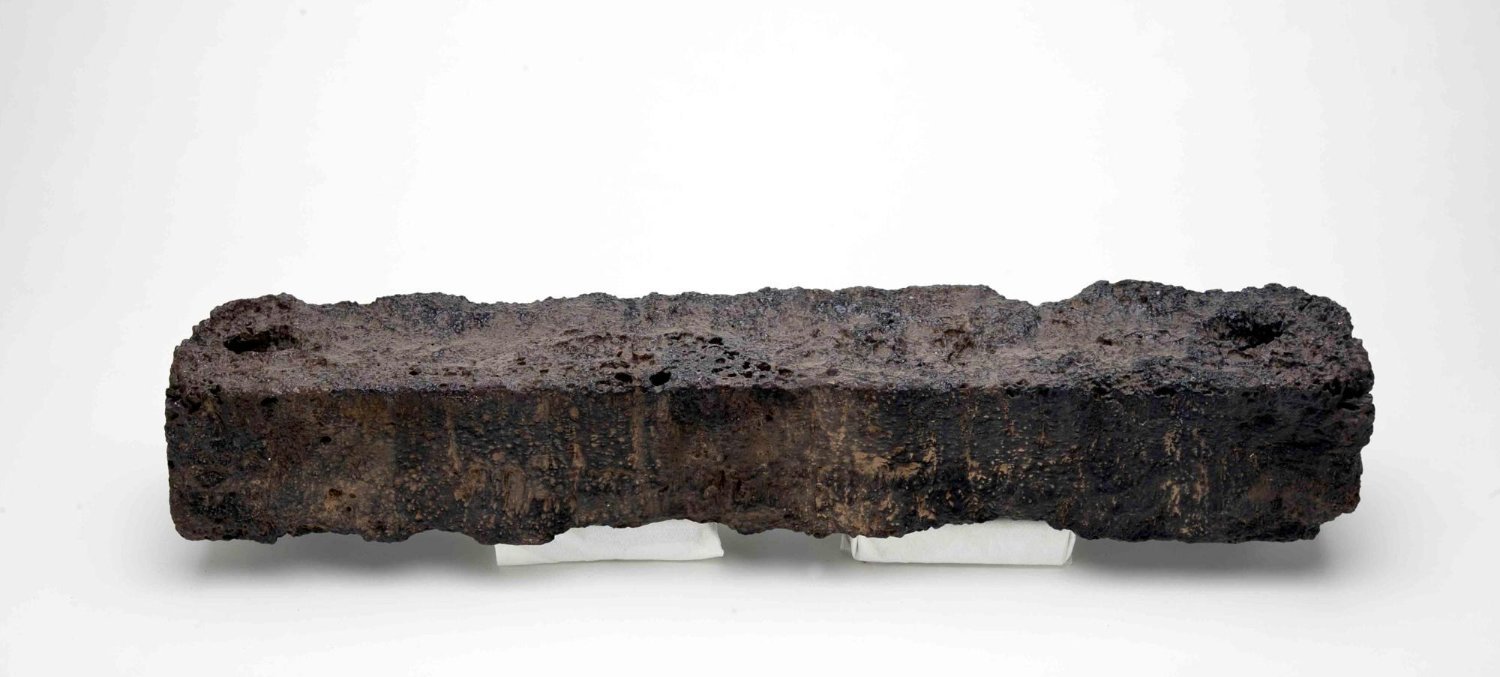
You can find a number of photos of pieces of iron ballast recovered from wrecks on the internet. Not to be confused with modern pieces which turn up in a search as well.
One example after a quick search is below from HM bark Endeavour when she dumped guns. stove and a lot of her ballast to refloat after running aground in 1770. The size of this block is 36" X 6" X 6.3" and weighs 300 pounds.
Allan

-
Hi Ian,
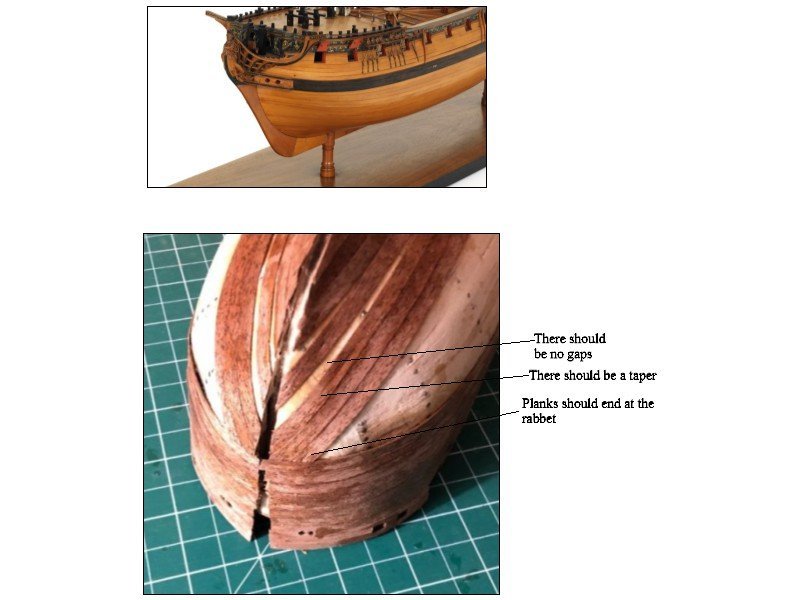
Wood is wood is wood (except oily stuff like Brazilian red wood for example) so yellow carpenter's PVA just like you would use on any planking is commonly used. Some prefer CA but in either case shape the planks by spiling or via the method many successfully use as shown on the videos by Chuck Passaro, https://www.youtube.com/watch?v=KCWooJ1o3cM PVA and a little finger pressure for 30 seconds works fine without clamps most of the time if the planks are pre-shaped properly. What ship are you building?
Picture below of correct planking that has been tapered and incorrect planking. Planks should all end at the rabbet, not come to a point short of the rabbet. There are drop strakes and such, but even these never come to a point.
AND - Welcome to MSW. Please post a little intro on the new members forum to let everyone know about yourself.
Cheers
Allan
-


HMS Royal William by KeithW - Euromodel - 1/72
in - Kit build logs for subjects built from 1501 - 1750
Posted
Hi Keith
Kudos to you for taking the time to replace those awful looking pieces with your own which are much better.
Allan