chris watton
-
Posts
2,339 -
Joined
-
Last visited
Content Type
Profiles
Forums
Gallery
Events
Everything posted by chris watton
-
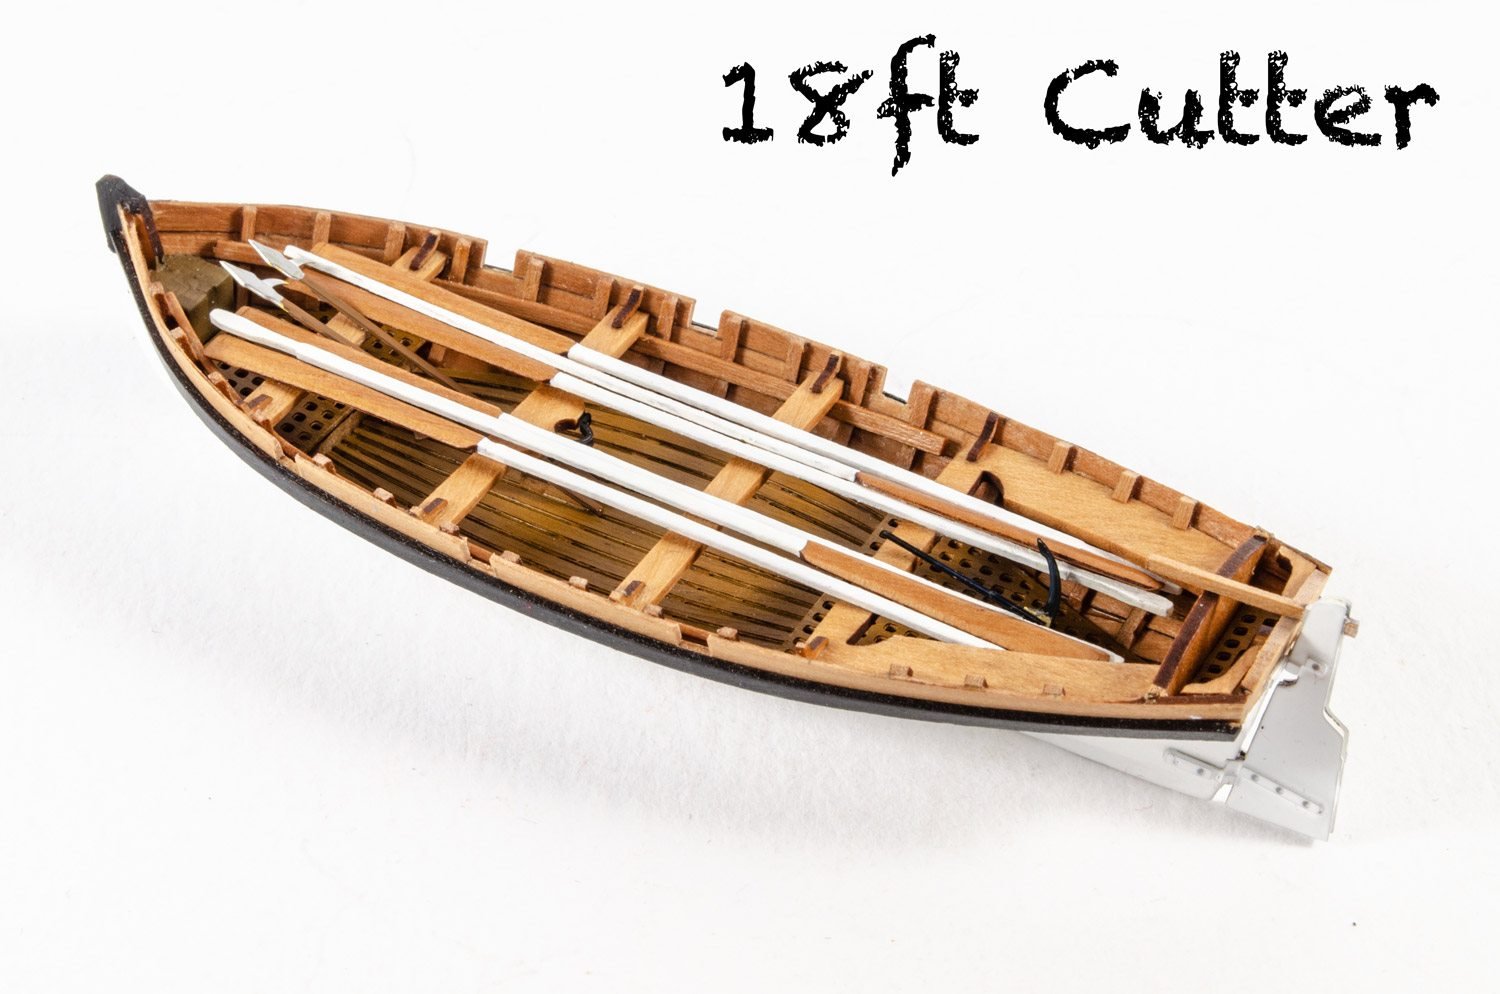
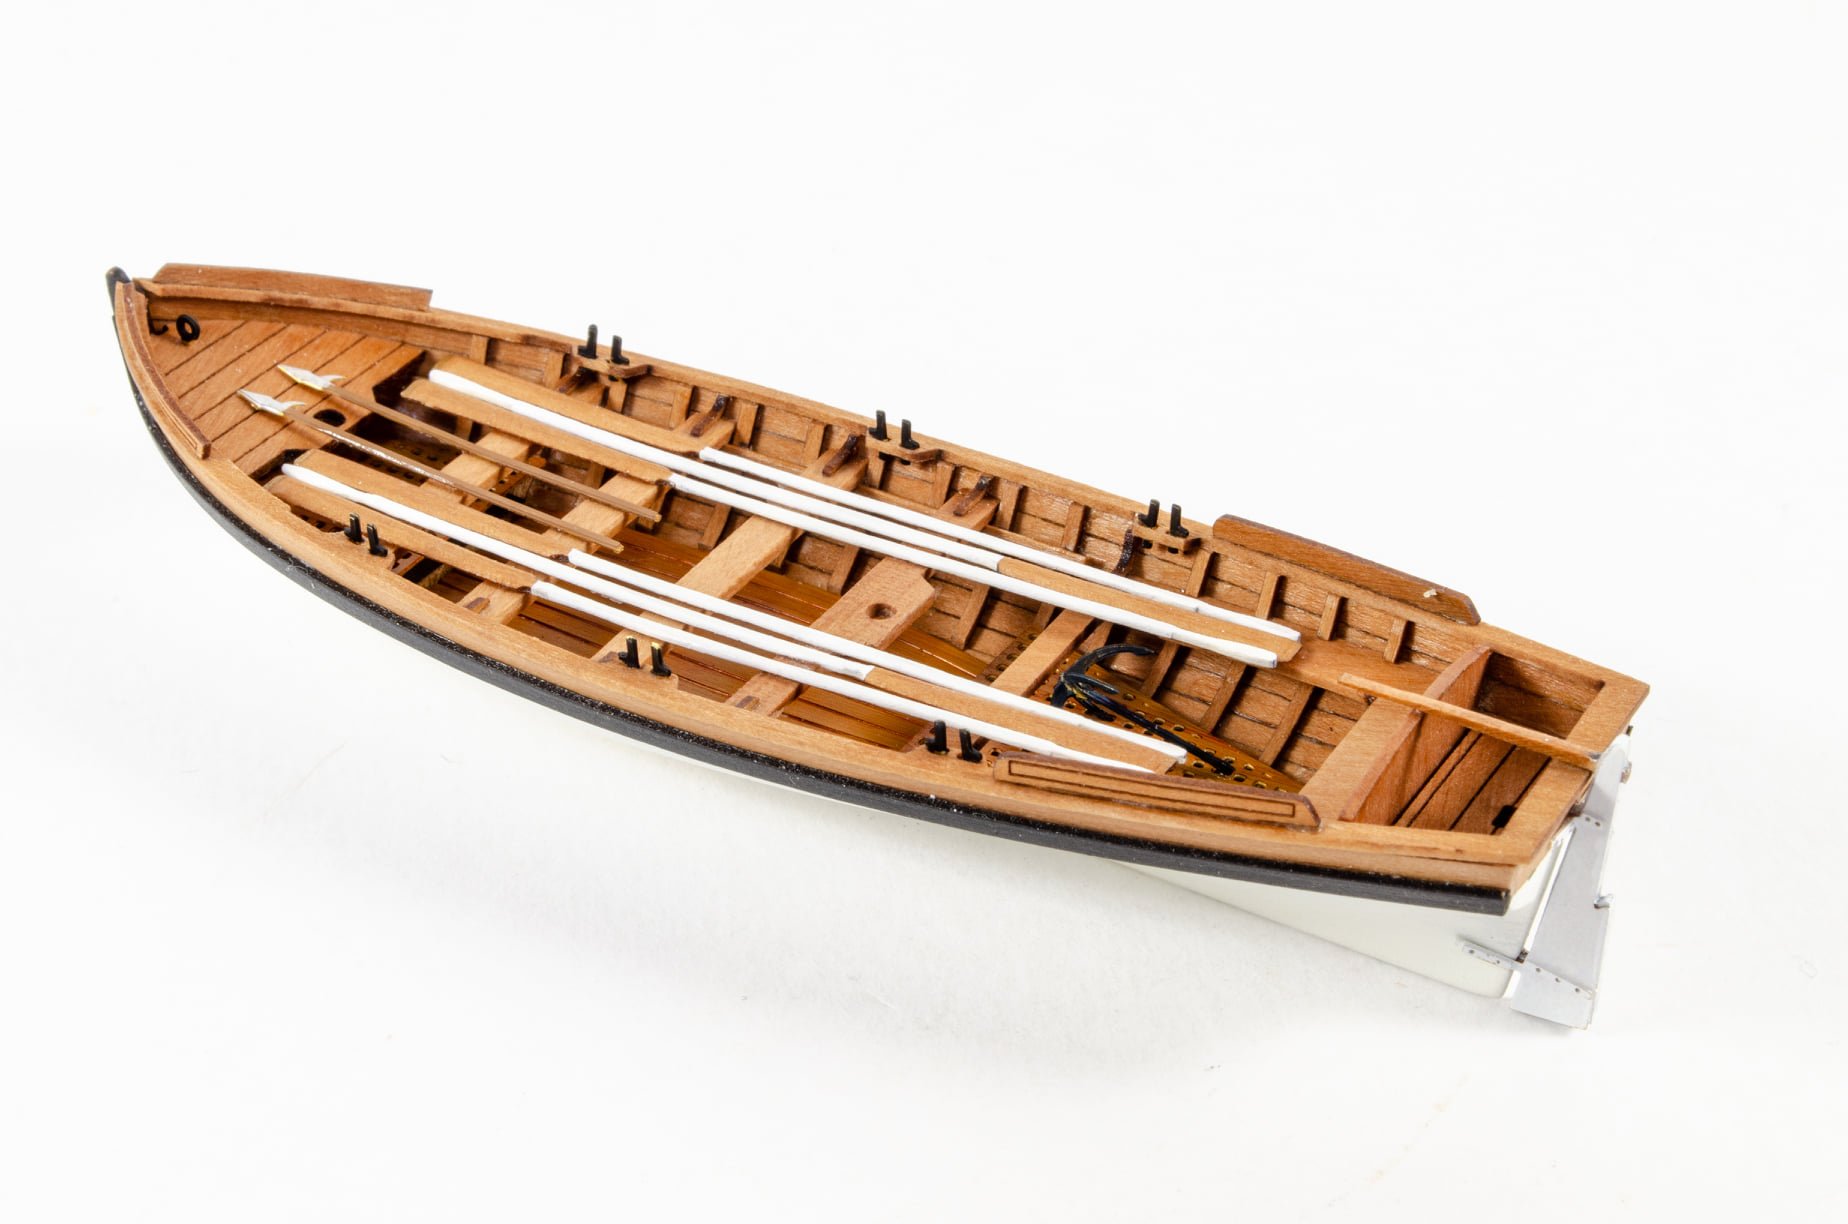
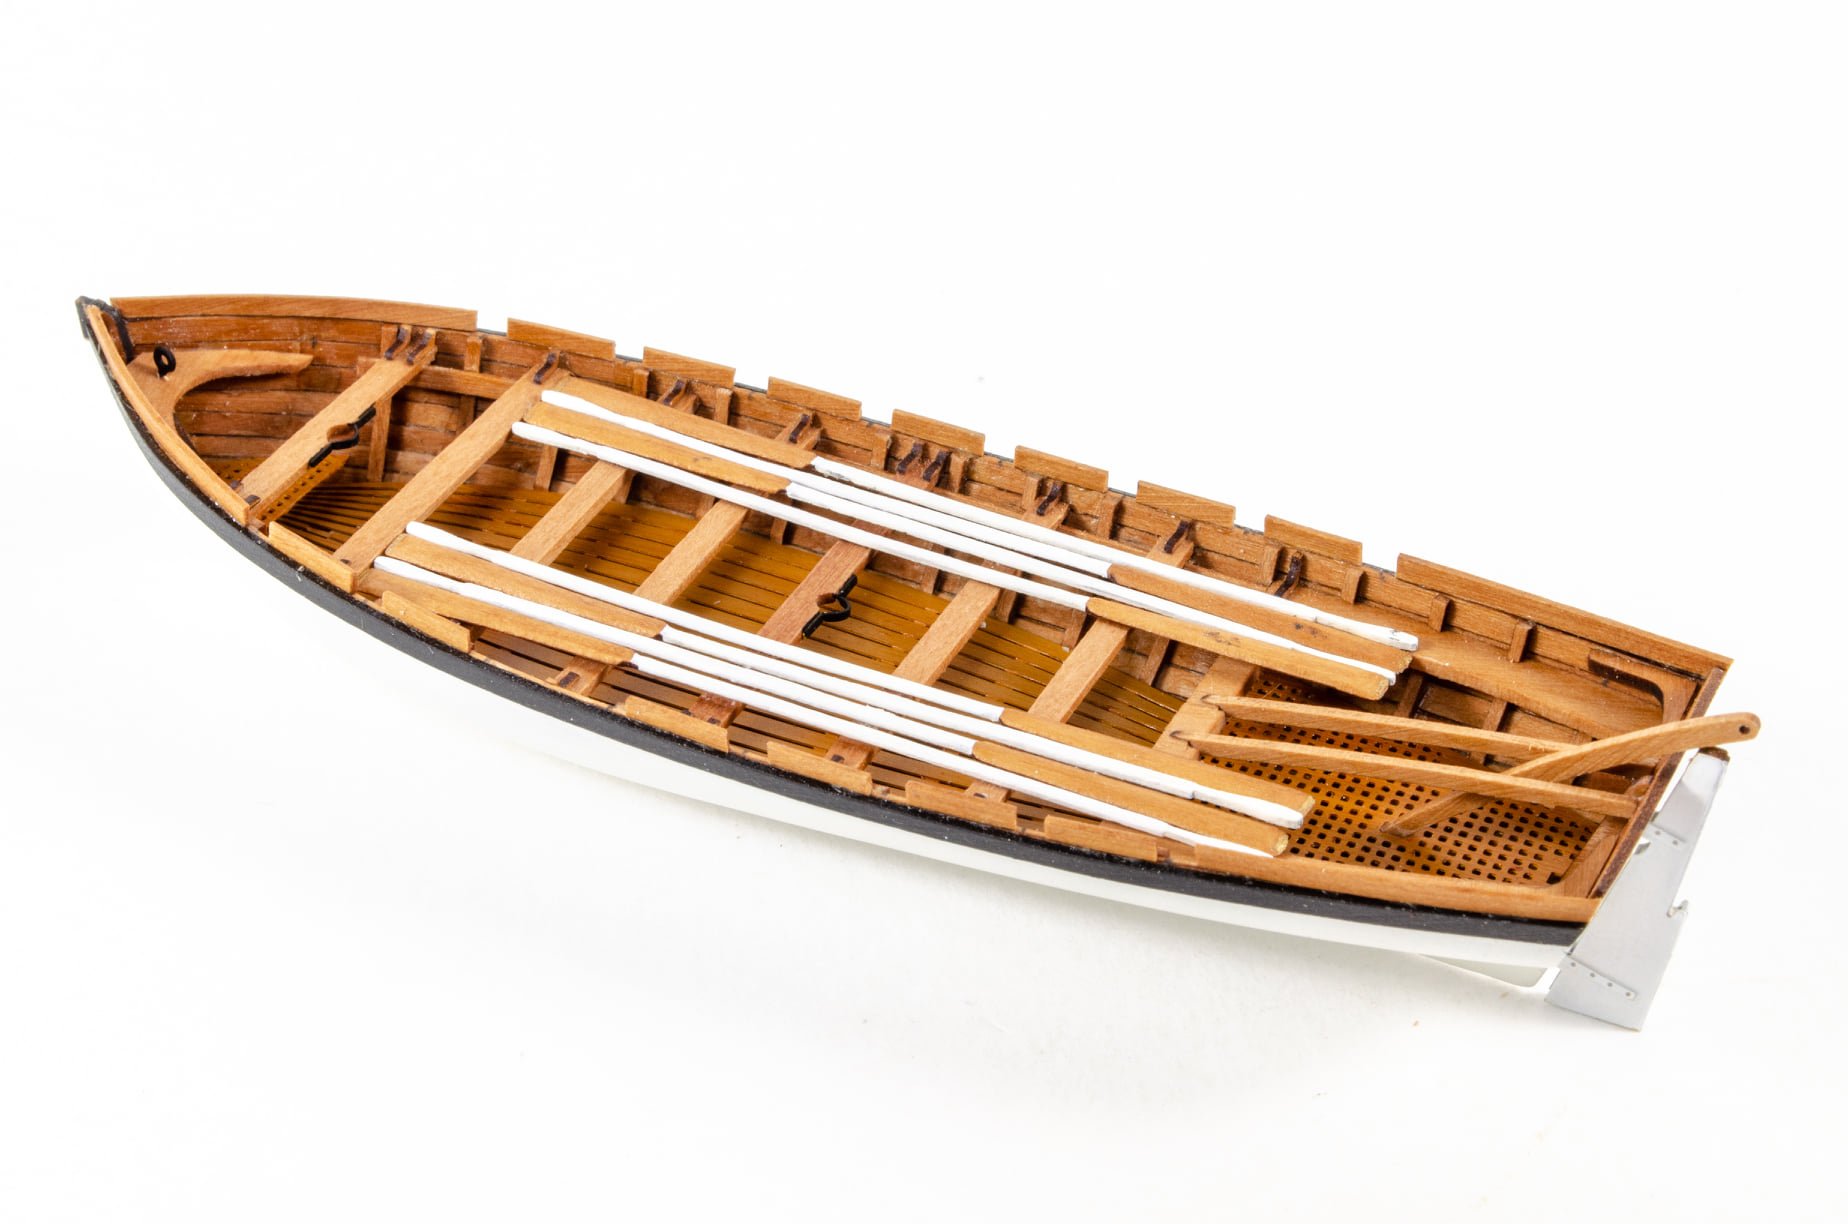
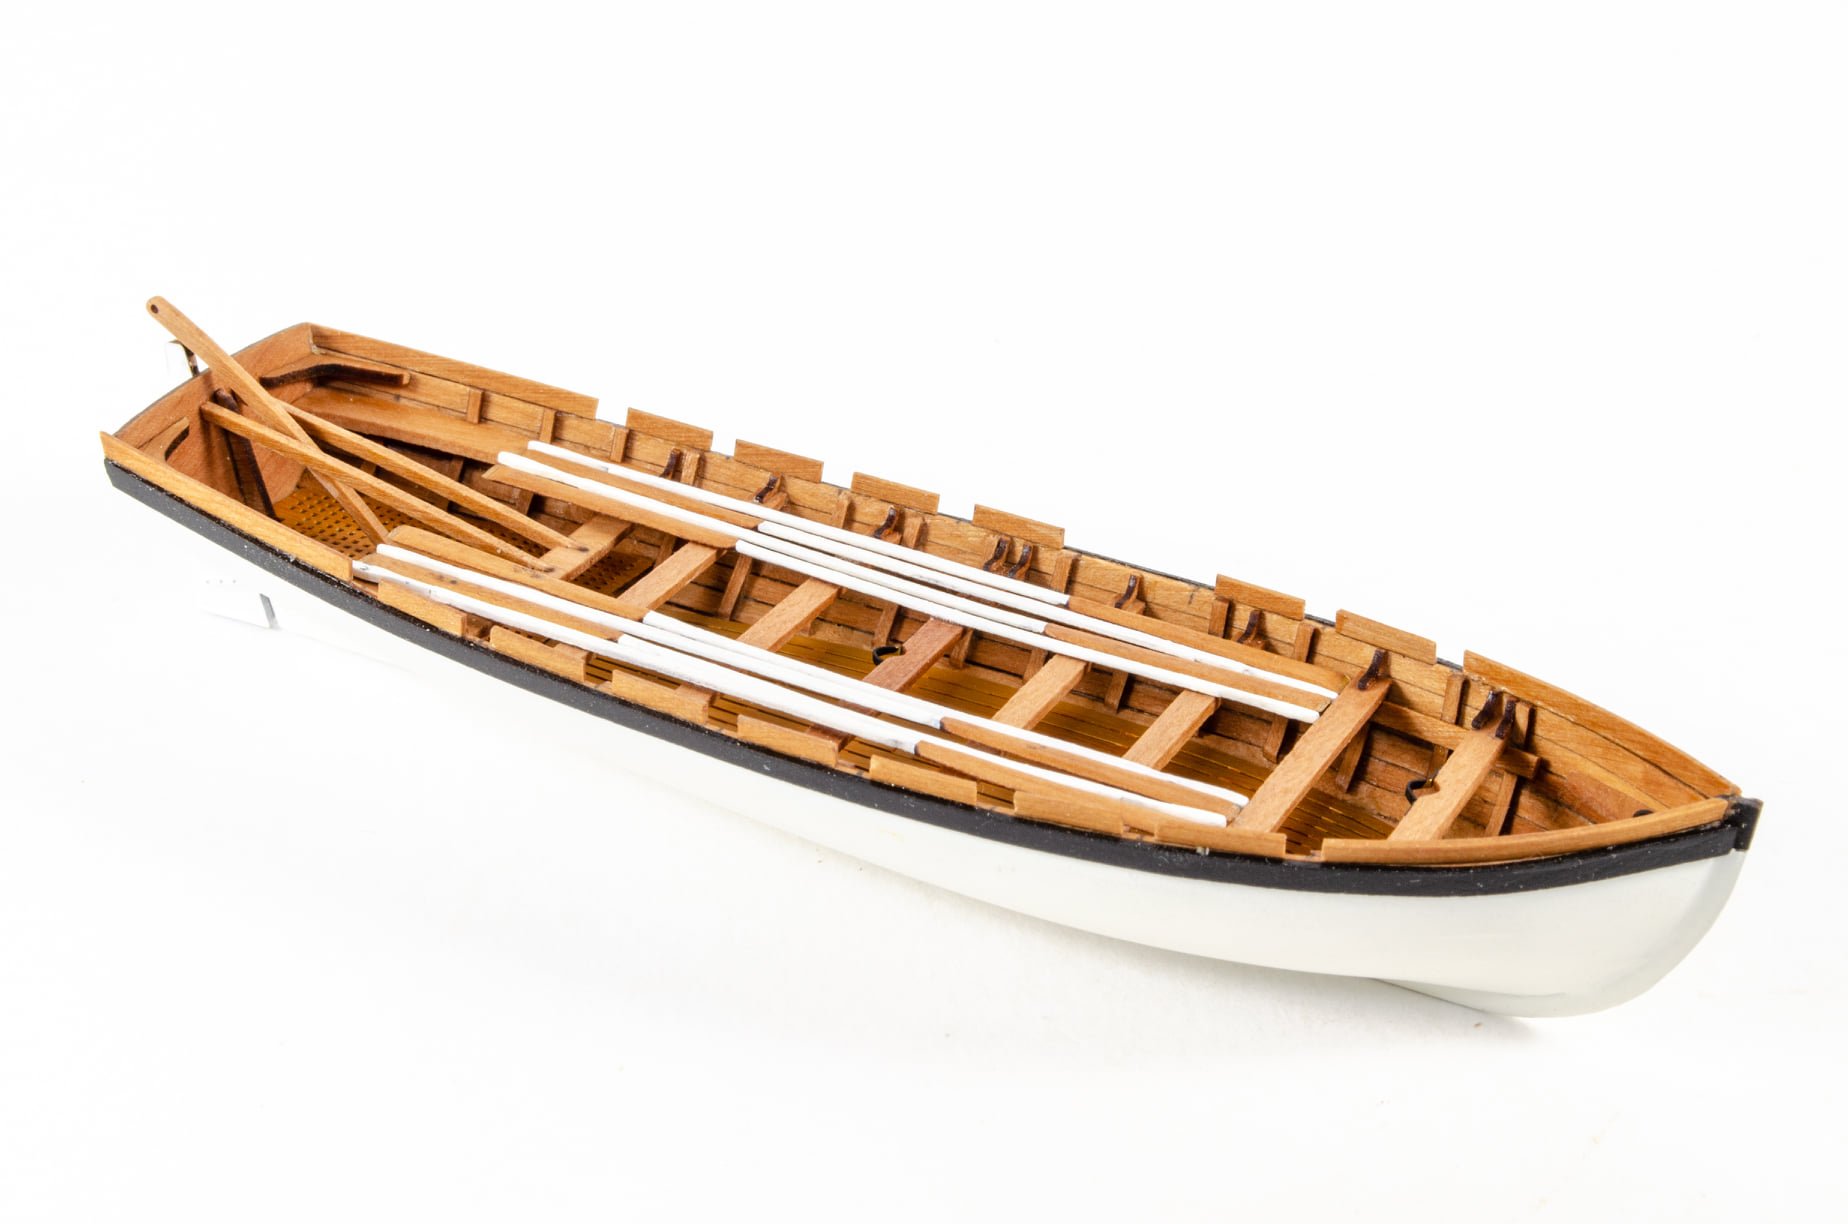
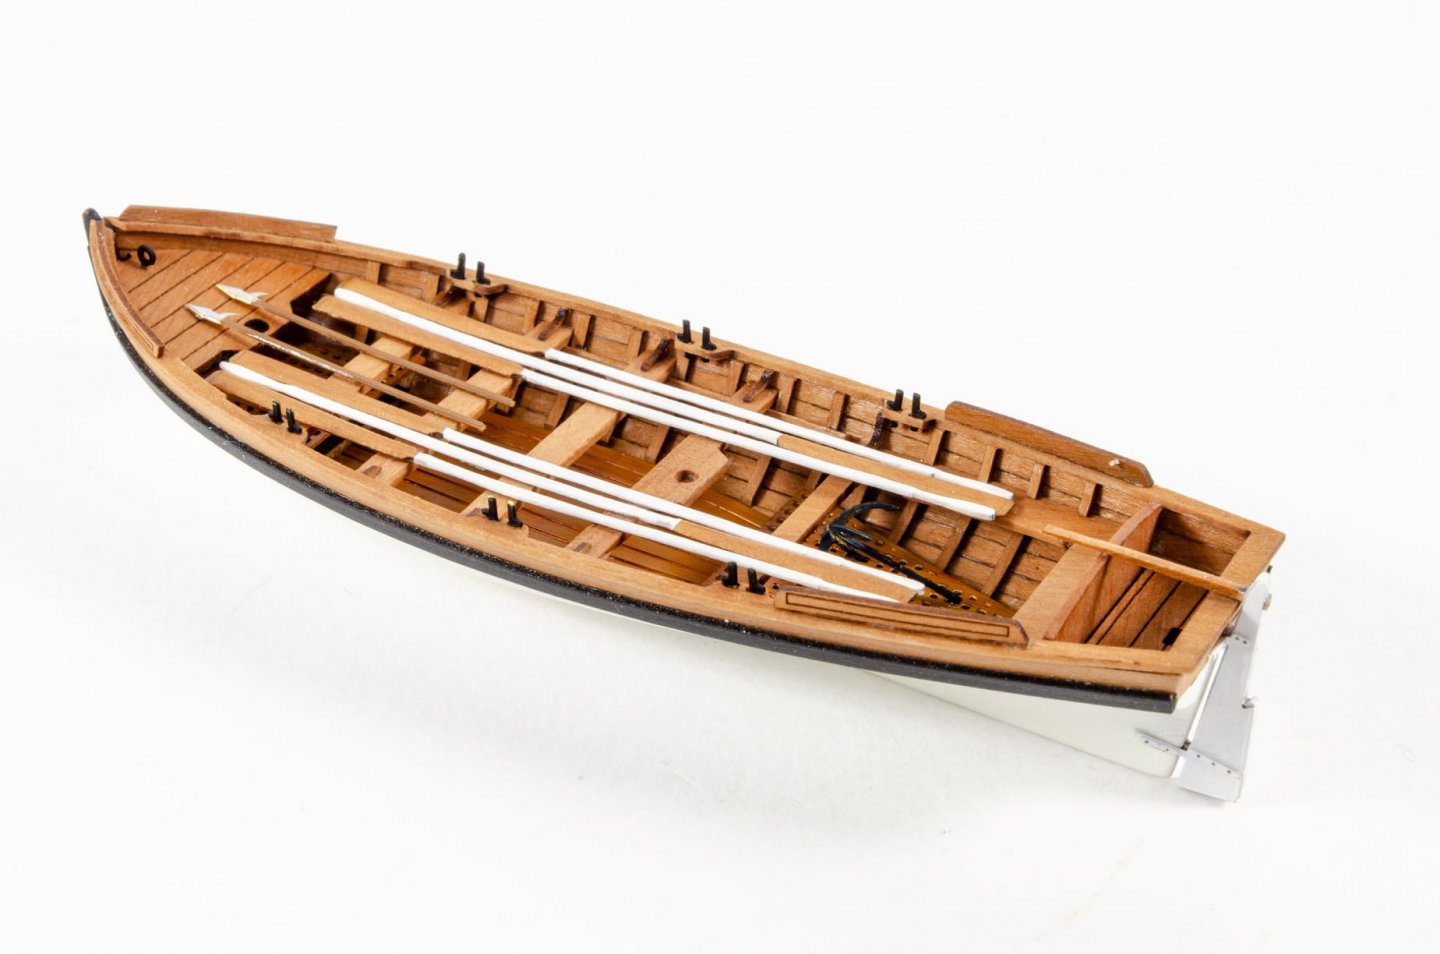
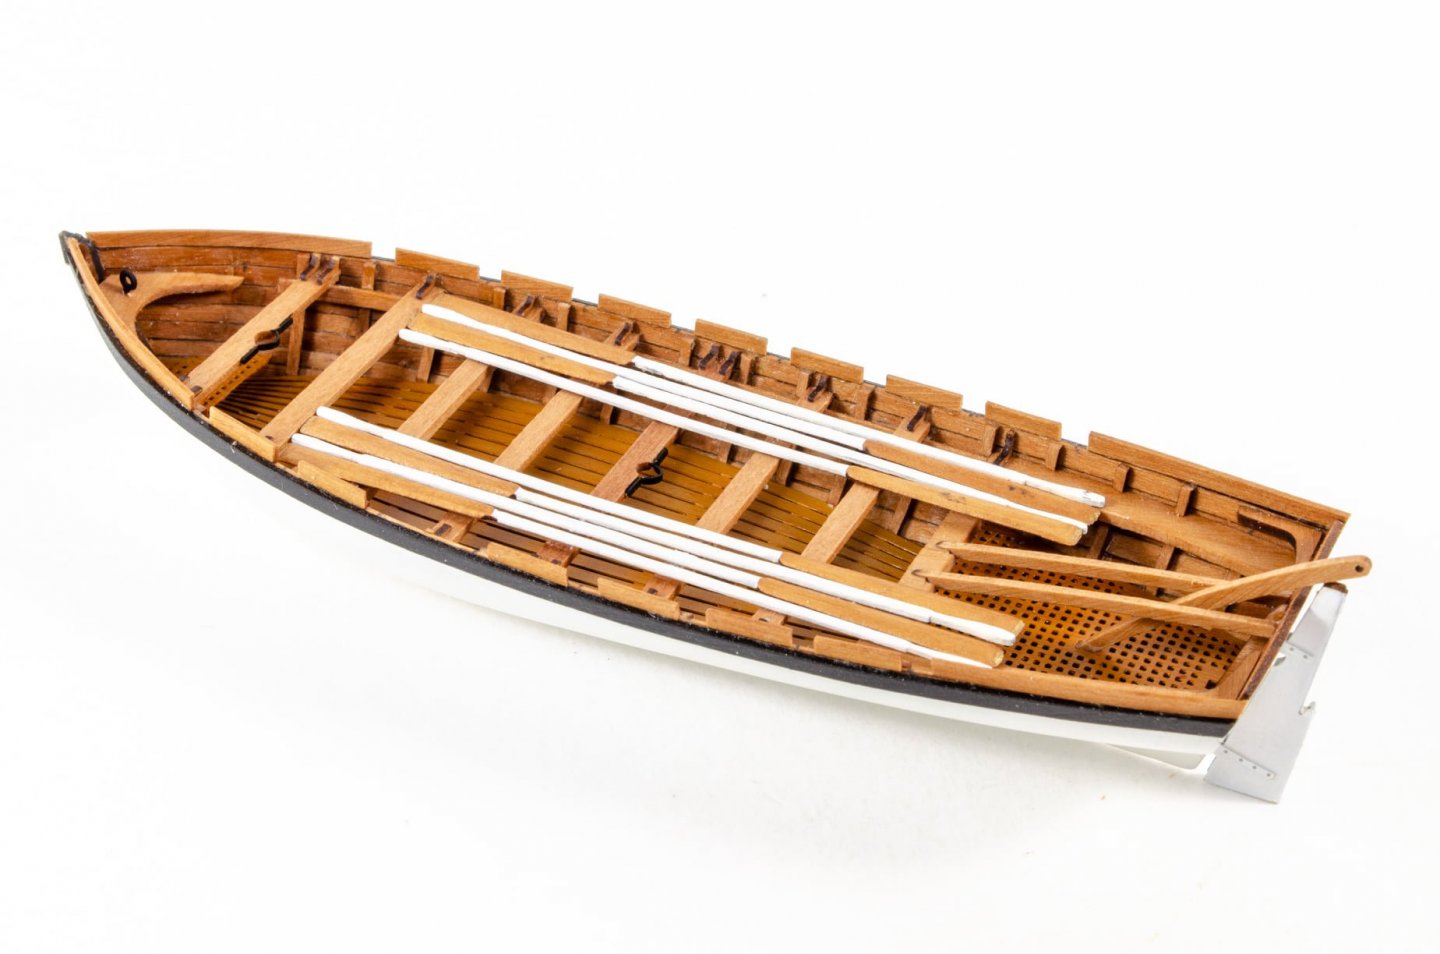
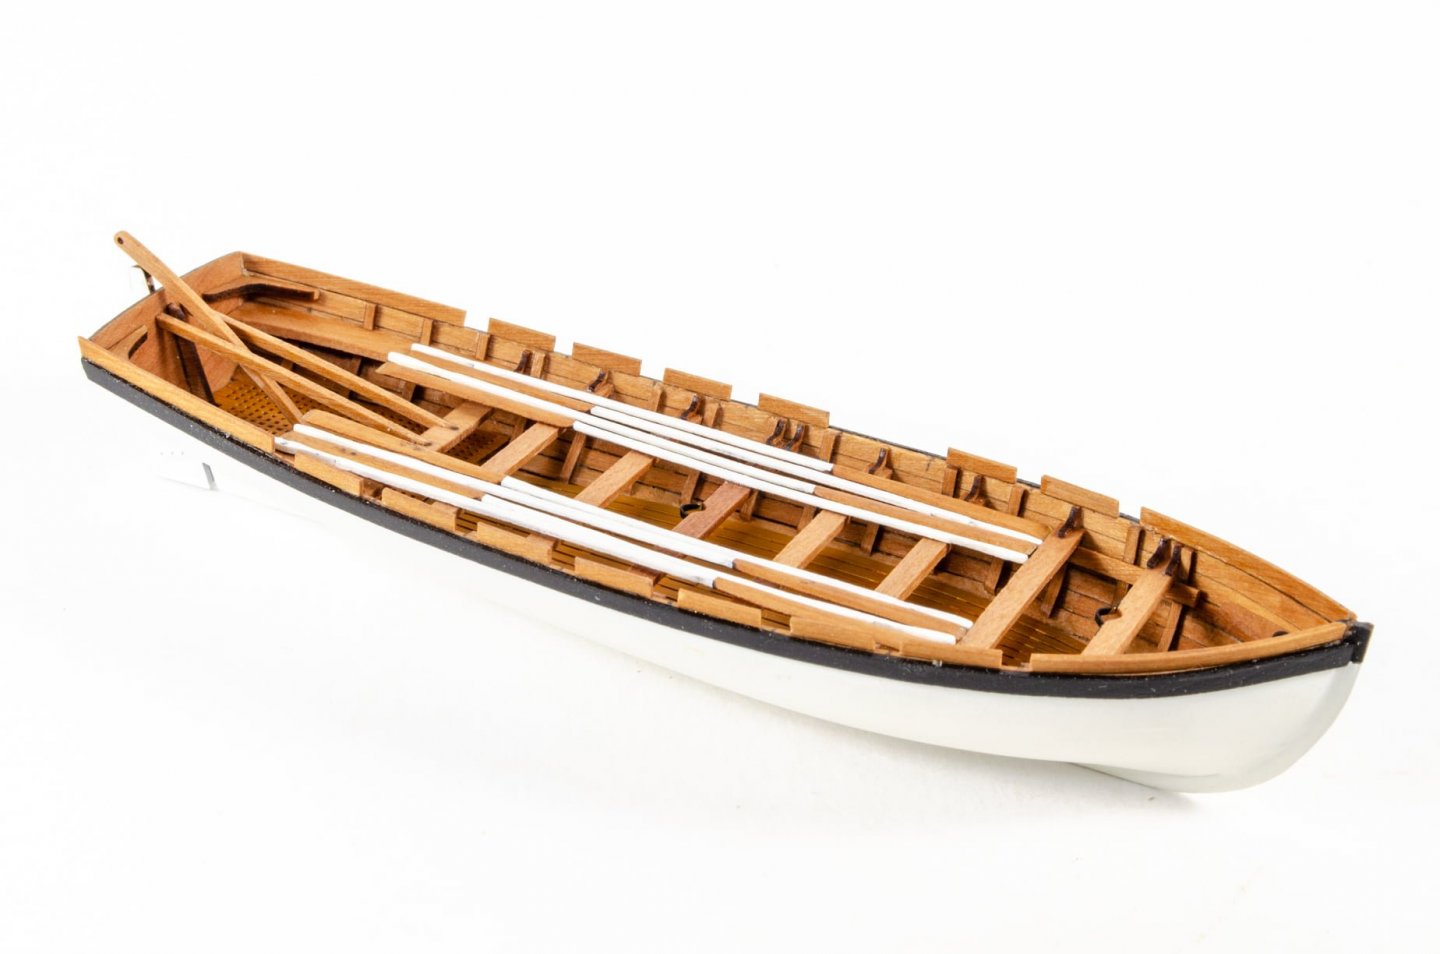
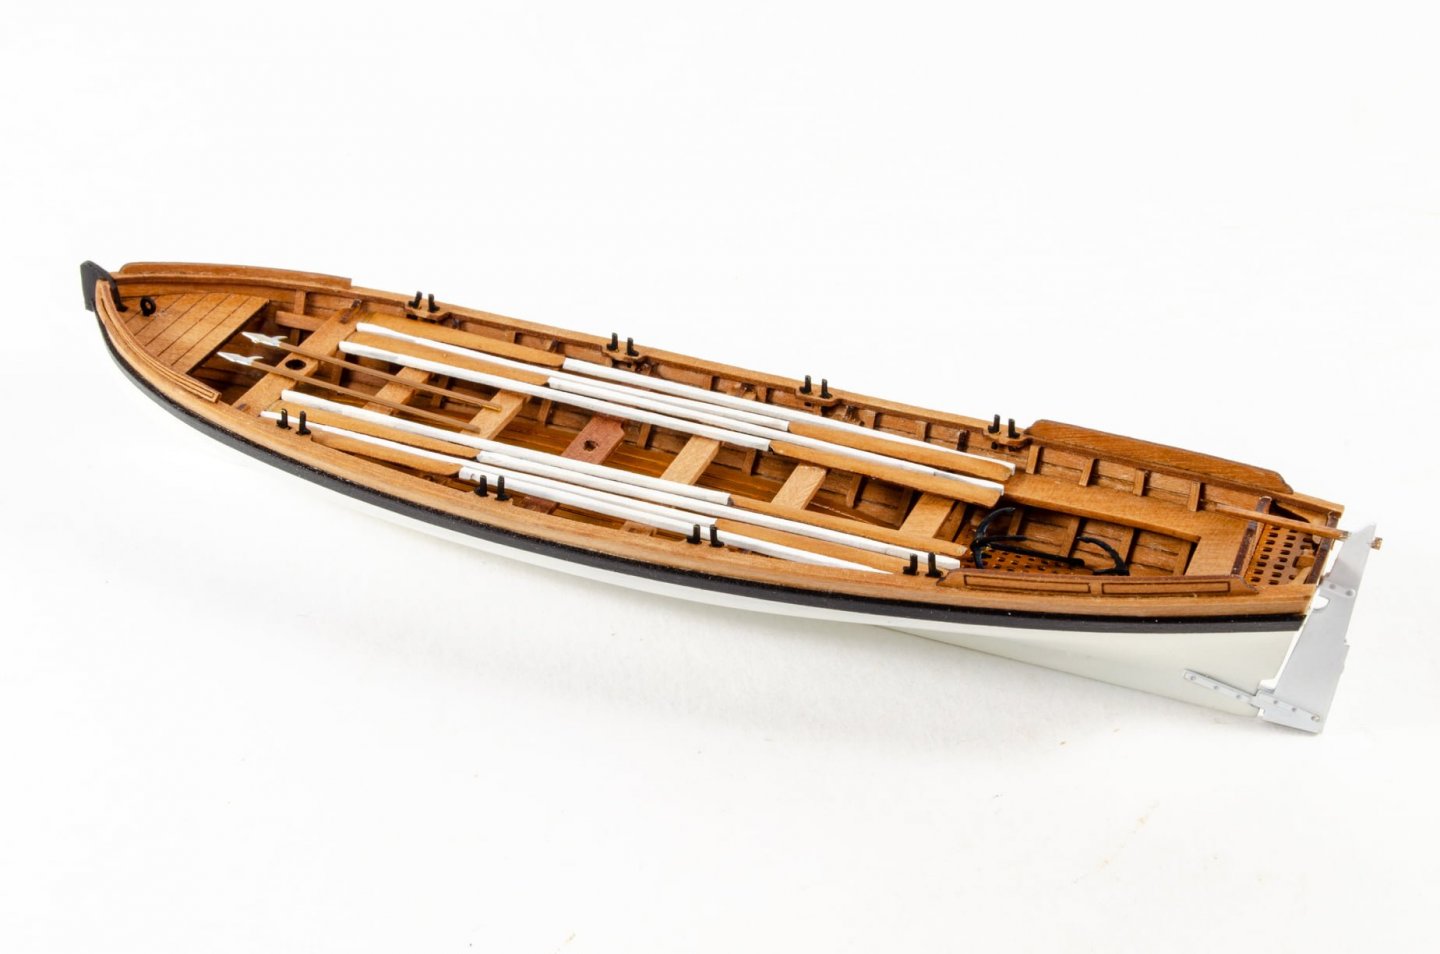
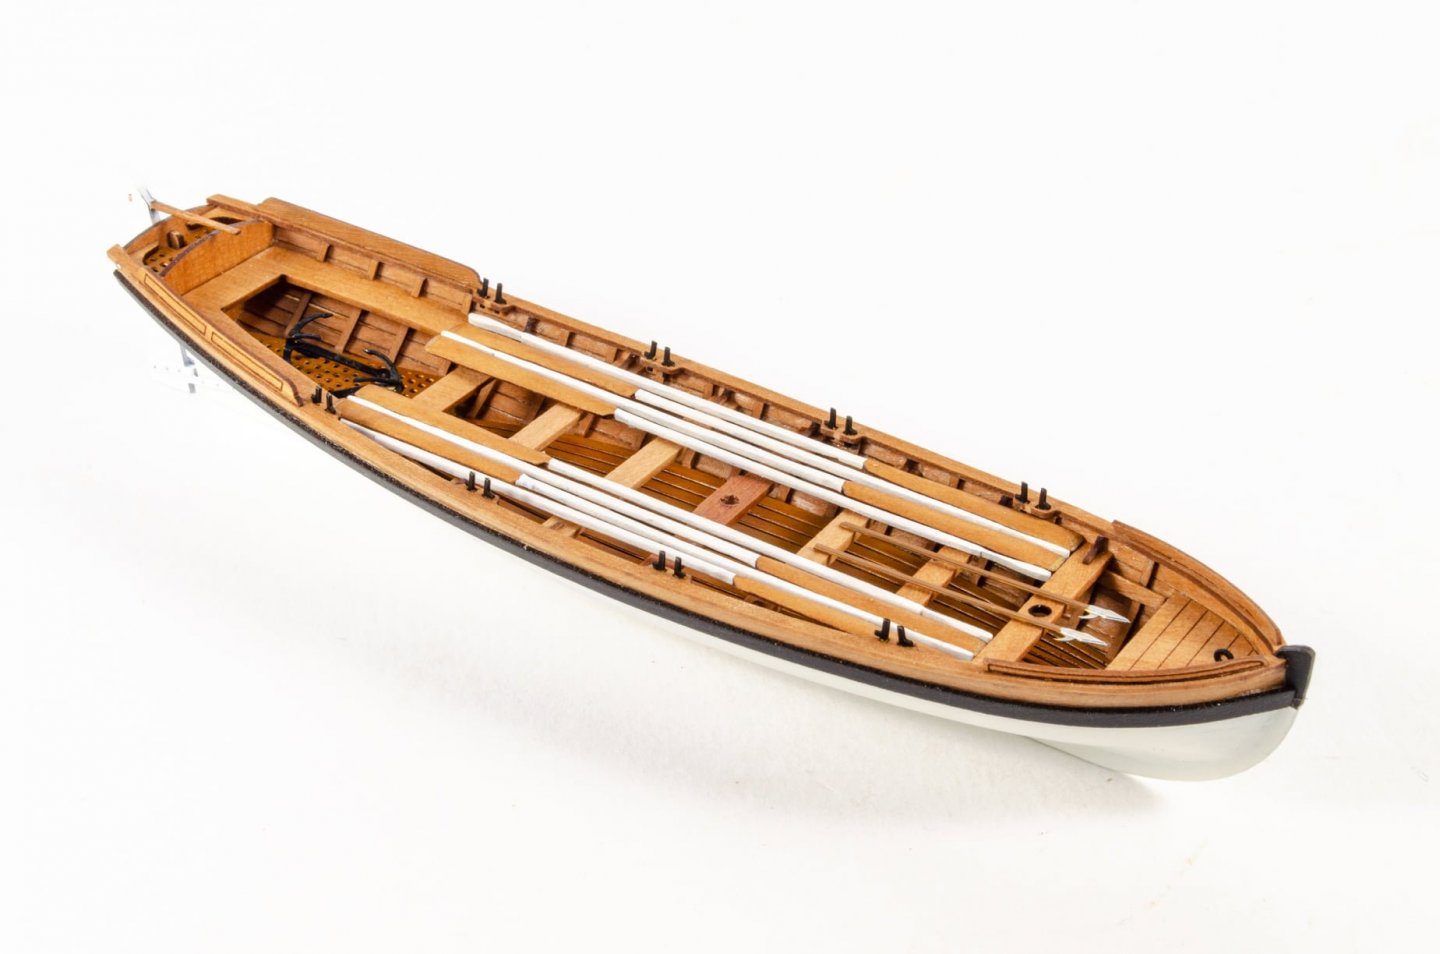
 I now have the slightly reworked 18' cutter online (again, thanks to Jim Hatch), This, in line with some of the other small boats, has a 1mm pearwood keel and laser cut pearwood oars and 0.6mm pearwood planking, so it looks more in scale, despite its diminutive size. Ship’s Boats (various types) – VANGUARD MODELS There will be another 4 boats ready in the next week or so, a 26 and 34 foot launch, 32 foot pinnace and 32 foot barge. There will be the 36 foot Admirals barge in the next couple of months, and will probably finish off the range with a couple of larger cutters that are to be found on the later 18th/early 19th Century vessels. I am still working on Sphinx, it's one of those frustrating and hated stages where I spend a hell of a lot of time doing seemingly very little, but I have to go through it. Even more for this development, due to the extra details and the headaches they cause trying to make sure the building of the model is as easy as I can make it.. I am once again furloughed from my day job for the next two weeks, so hopefully I can put this bonus time to good use..
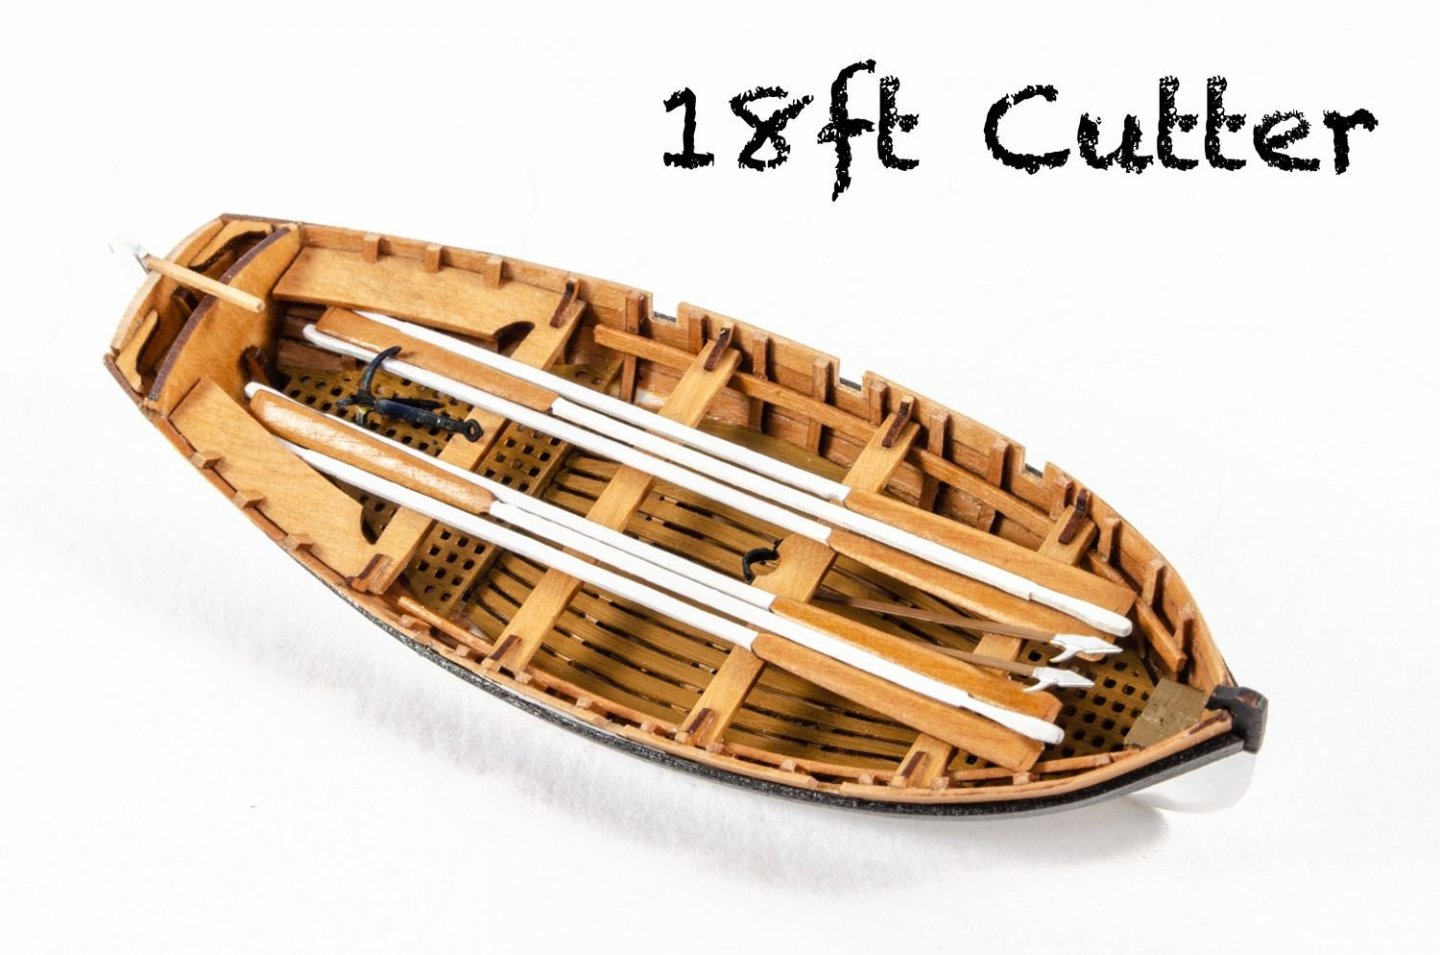

-
It is a shame. I bought one of my very first wooden kits from Nick back in 1992, Mantua's (then) brand new kit of Le Superb, and ordered from the Model Dockyard for years after. He will be missed.
-
Why do some manufacturers make single plank kits?
chris watton replied to Meriadoc Brandybuck's topic in Wood ship model kits
I guess ultimately, it comes down to what one is used to. For me, personally, my perception of single planked kits was one of cheapness, at least judging from my first wooden kits I bought and made in the early 1990's (Billings). What seemed to be the norm then (at least in the UK, and I assume Europe) was that cheap kits were single planked, with box contents that looked positively anaemic, with wood parts mainly of one type (lime/basswood/obechi), and the 'premium' kits were double planked. That, at least was my experience when first starting out. To do a really good job of a single planked kit, you do have to be very careful in preparation, planking and finishing. The wood is usually still basswood or lime (am talking mainstream kits). Thinking as a beginner/novice, if it were of a harder, closer grained type, because of the required thickness, the planks would be a nightmare to manipulate. Using double planking negates this somewhat, as the thickness can be as little as 1mm, even 0.6, which is much easier to manipulate, despite being closer grained than lime or similar mainstream materials. But this is just based on my experience. If you were brought up on a diet of single planked models, you would be more used to, and more comfortable with that, and naturally favour what you know best.- 24 replies
-
- 14
-

-
Well done, for a first model, that's not too shabby at all. Looks great so far, in fact.
-
cutter-manual.pdf (vanguardmodels.co.uk)
-
OK, again, thanks to Jim, I have three of the boats ready for sale (or sail...). Only limited stock, though, as I only ordered a few PE sheets for each, in case of any changes required, but there weren't any.. Ship’s Boats (various types) – VANGUARD MODELS
-
Looking great! regarding painting, I just used what seemed to be most likely for the period, so no real hard and fast rule.
-
No, Sphinx is a small 20 gun post ship, a miniature frigate in looks, and very mid 1770's. Surprise is two decades later, and in reality a French corvette, although larger than Sphinx, she was still considered too small for a frigate by that time, hence her very short active life after capture (in reality). Surprise would have had a launch and pinnace, but not a yawl, I do not think, as this was replaced by the cutter, around 24 foot in length.
-
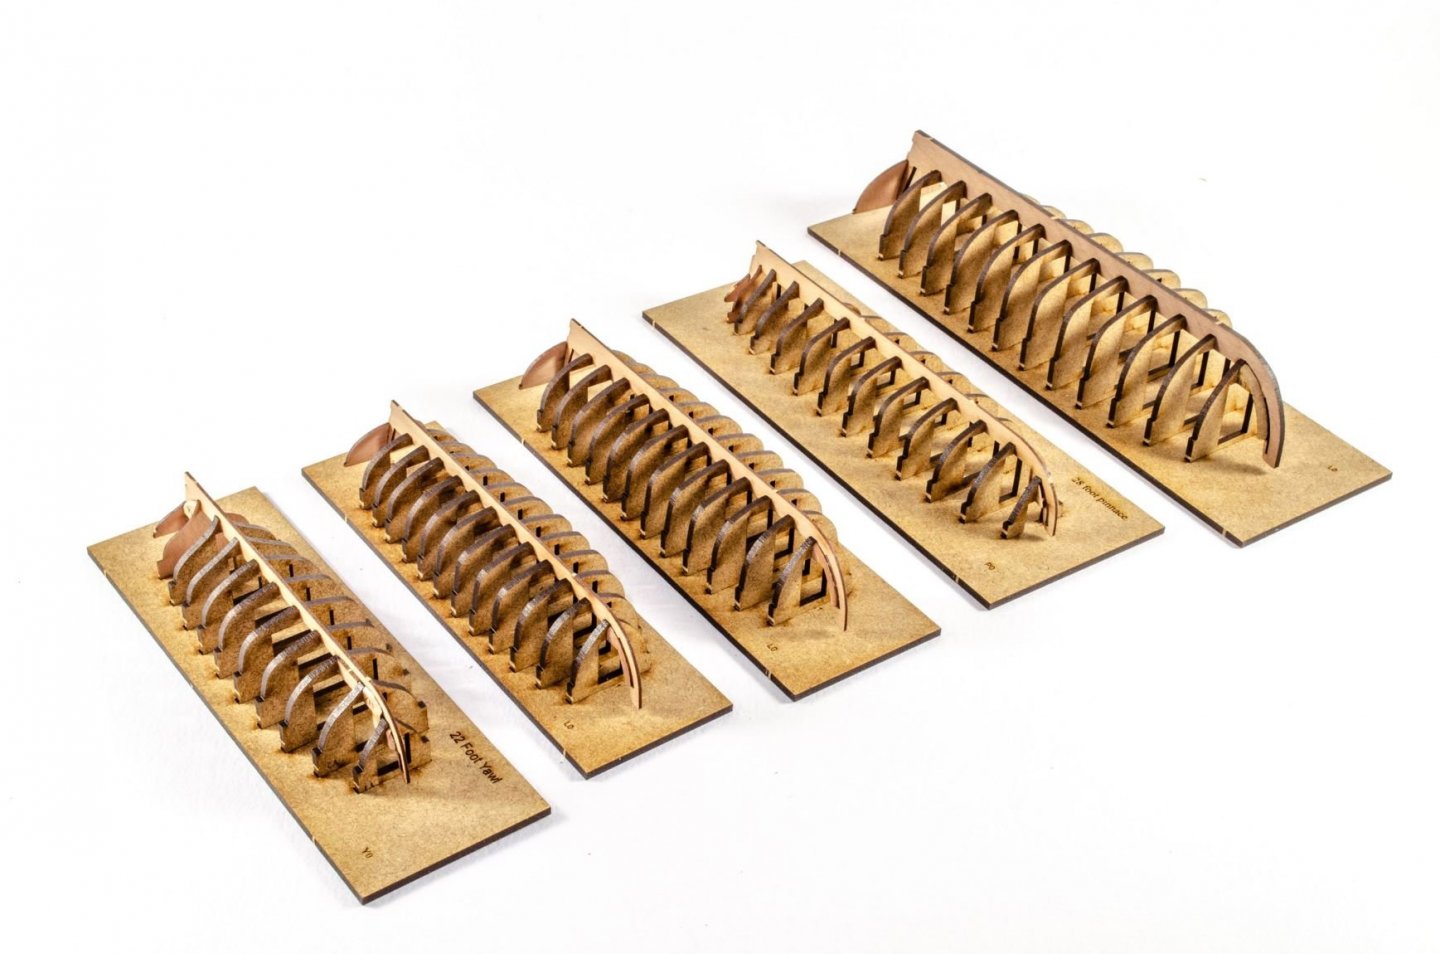
OK, Jim (Hatch) has put together the three mini coat kits that will be standard for the Sphinx kit, a 22' yawl (£24), 24' launch (£25.50) and 28' pinnace (£28.50). And he has done a marvellous job, I think. I am hoping to have a few of each in stock next week, to buy individually, as Jim is doing a little online (PDF) build manual for each. The 18'cutter is also getting a small revamp, in keeping with the new releases. The boat kits will have extensive laser cut parts, in pearwood (0.6 and 1mm), including laser cut pear oars, thwarts/stern sheets and gunwales if applicable, and MDF bulkheads and building base. The keel for all new boats is 1mm pear, to keep the scale look, plus a PE sheet for the finer detail (floor/gratings and 'iron work) A little later, I will have a 36 and 34' launch, 32' barge and 32' pinnace, and finally a 36' admirals barge, which will be suited for a larger model with the single boat on/in the waist


-
Looks fantastic Glenn! If the PE on that aftermost window decoration is just glued, I would suggest trying to remove it carefully using a knife blade, and swapping them over. there are locating holes for these, when matched up with a pin, should fit perfectly.
- 382 replies
-
- 2
-
-

-
- Vanguard Models
- Duchess of Kingston
- (and 1 more)
-
Trumpeter Scharnhorst Battlecruiser 1/200 is coming soon.
chris watton replied to yvesvidal's topic in Plastic model kits
I may have to get that. And then never find the time to build it... But feel I must have it! -
Amati Victory has 'Spirketting', but no etching detail. For Sphinx, I am working on a laser cut main wale with properly spiled etching, like the spirketting. Truth is, if this were sub contracted, there's no way I could afford the costs of the extra laser work, and it is only now, now that I know the capabilities of my laser machine intimately, that I feel confident in including this kind of detail in my future kits.
-
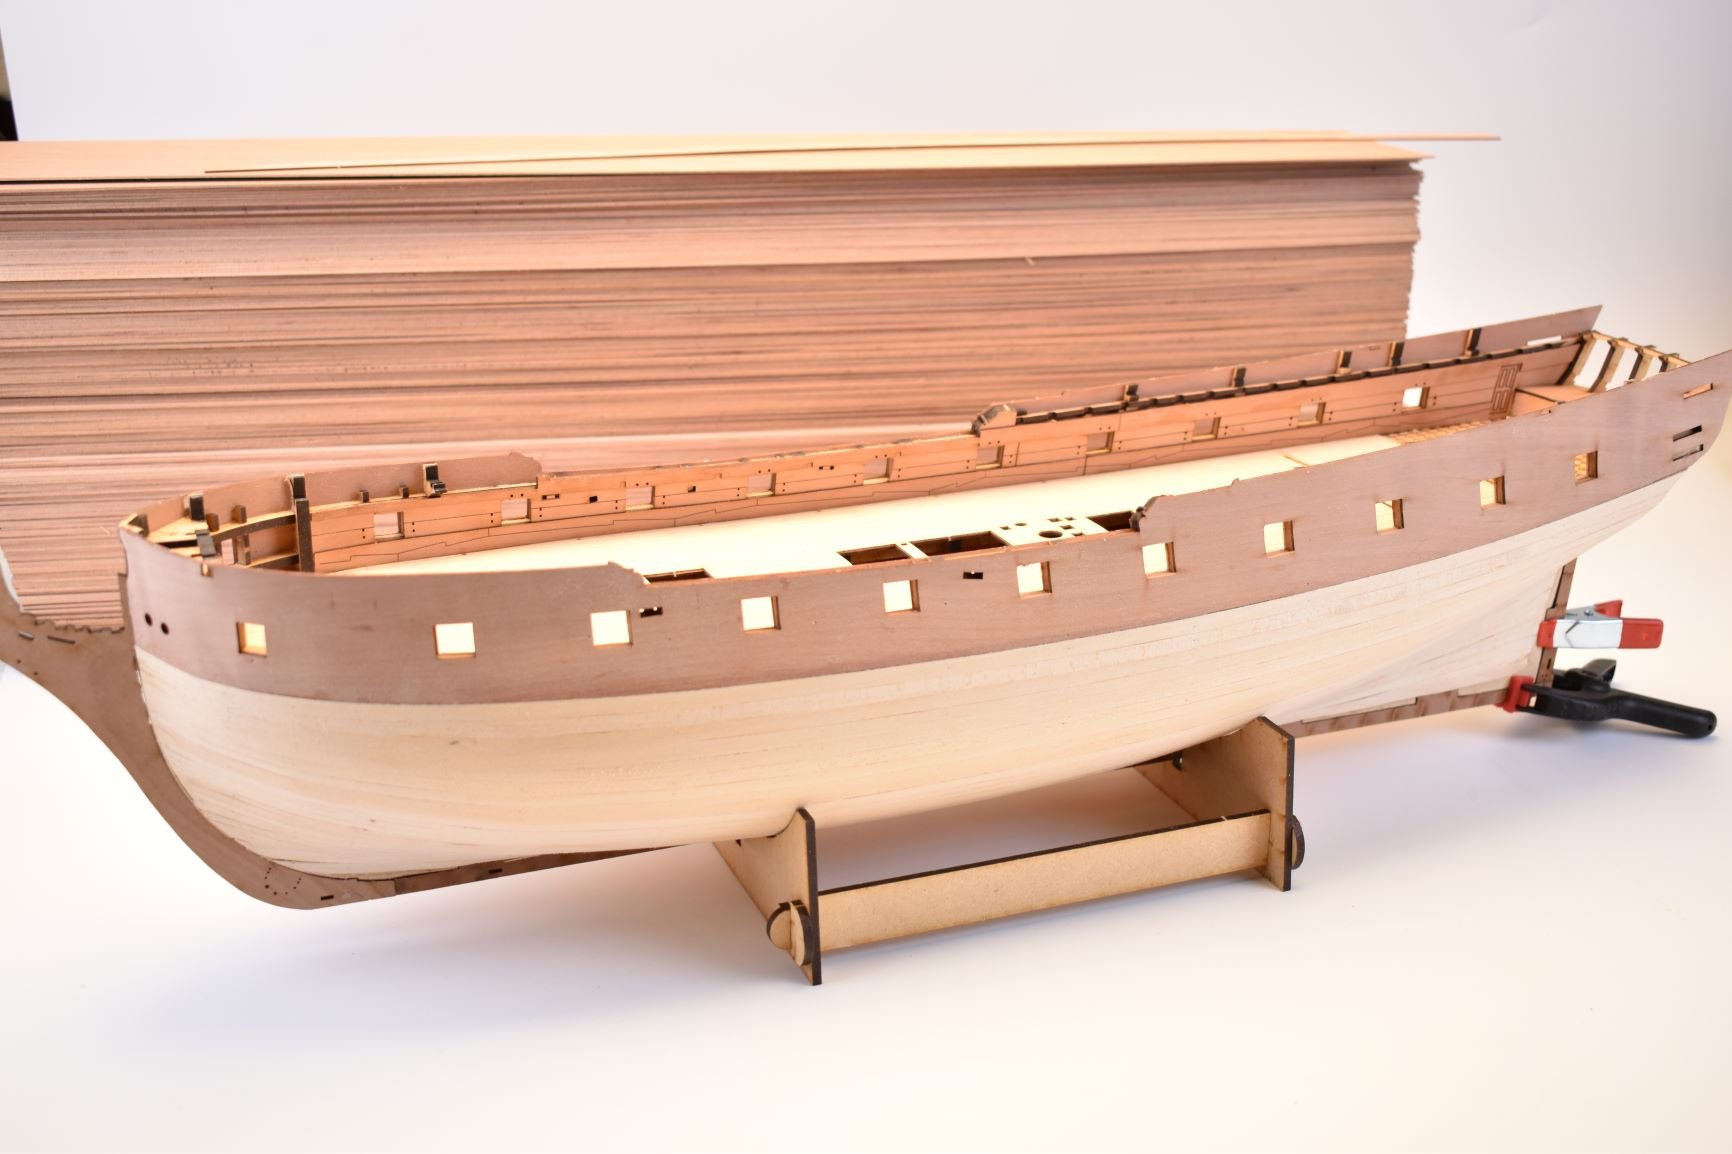
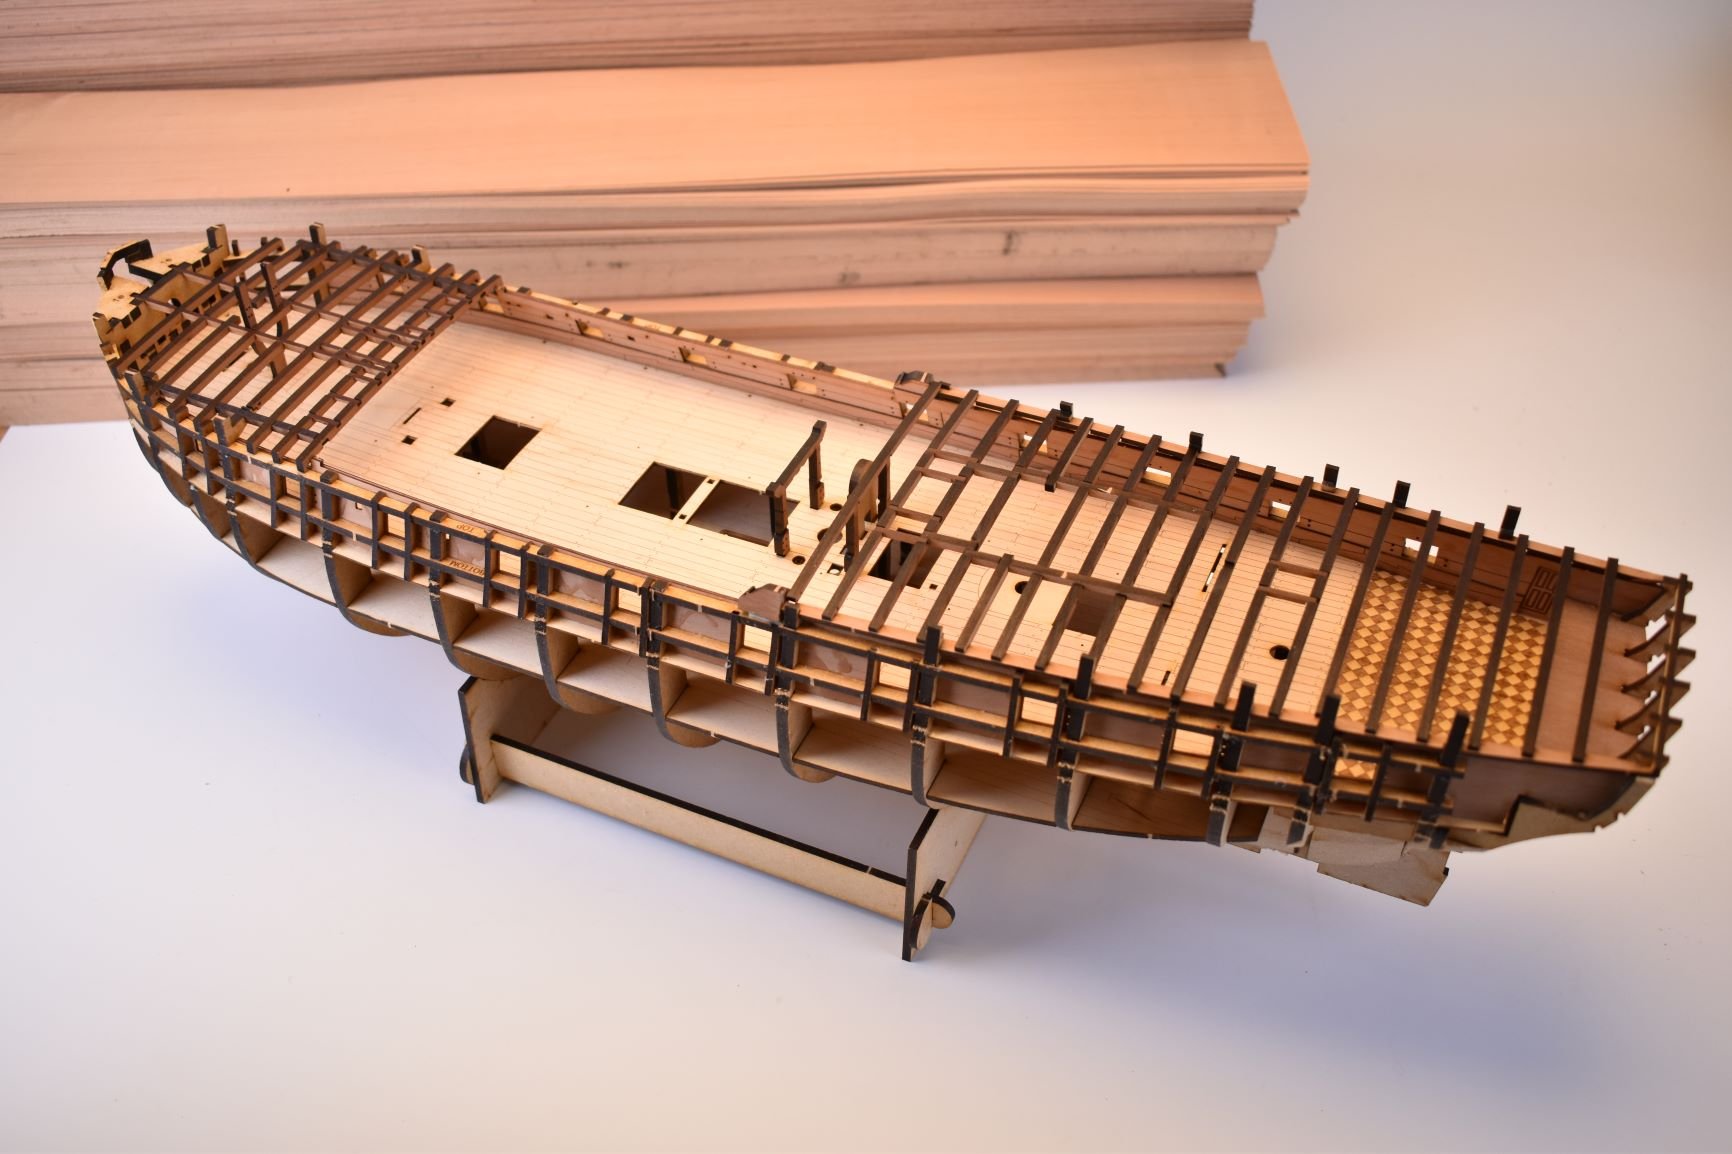
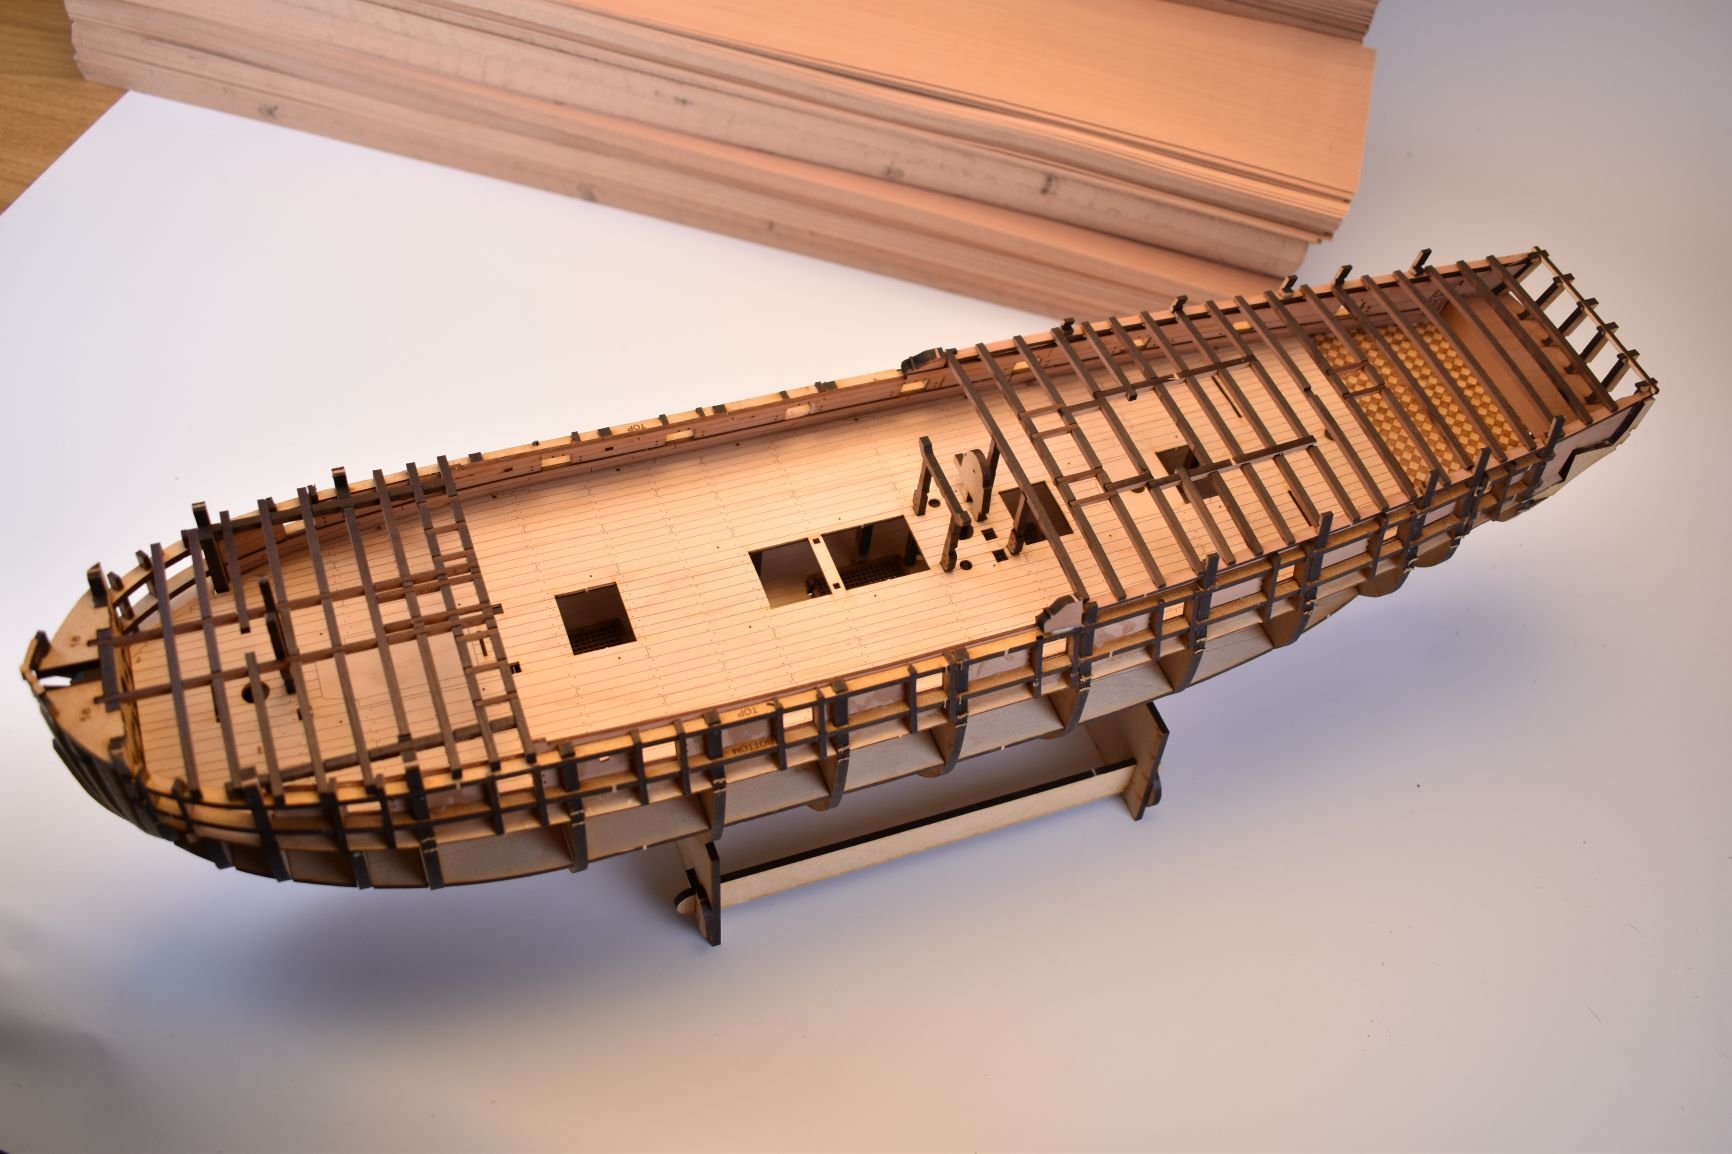
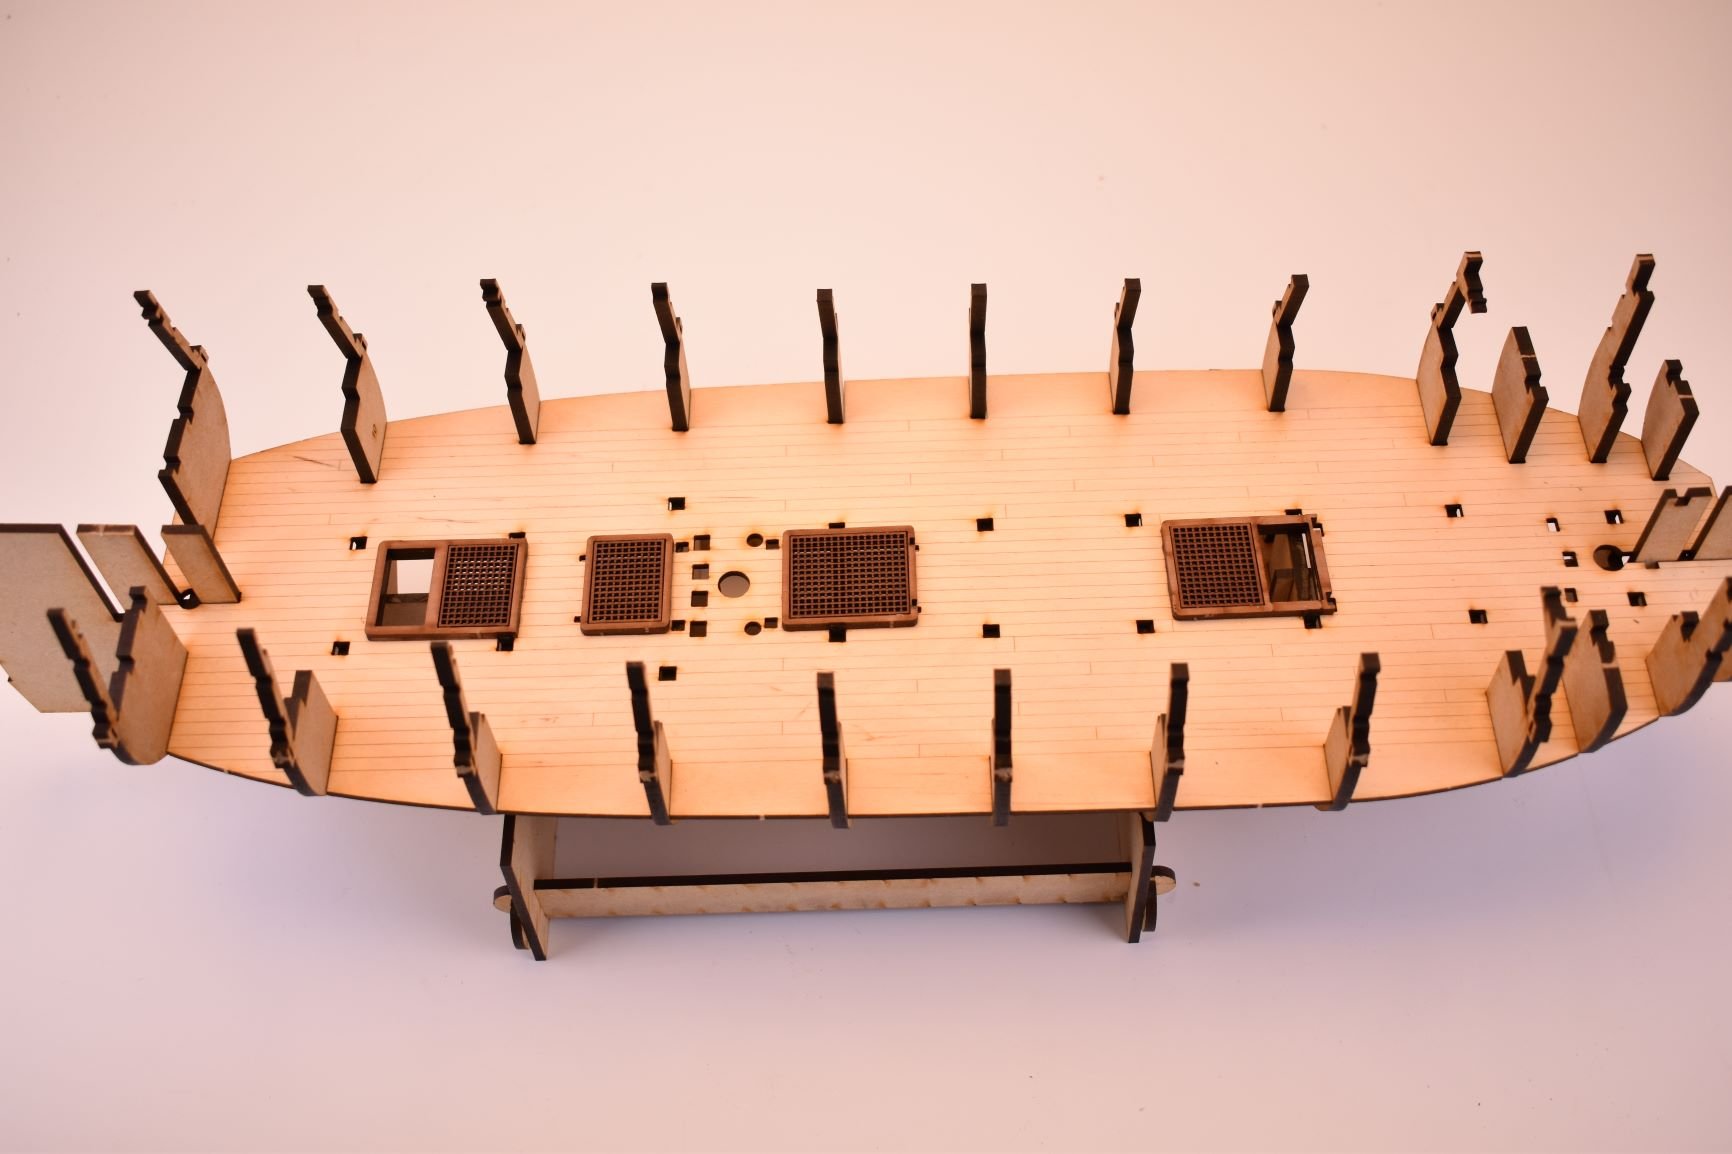
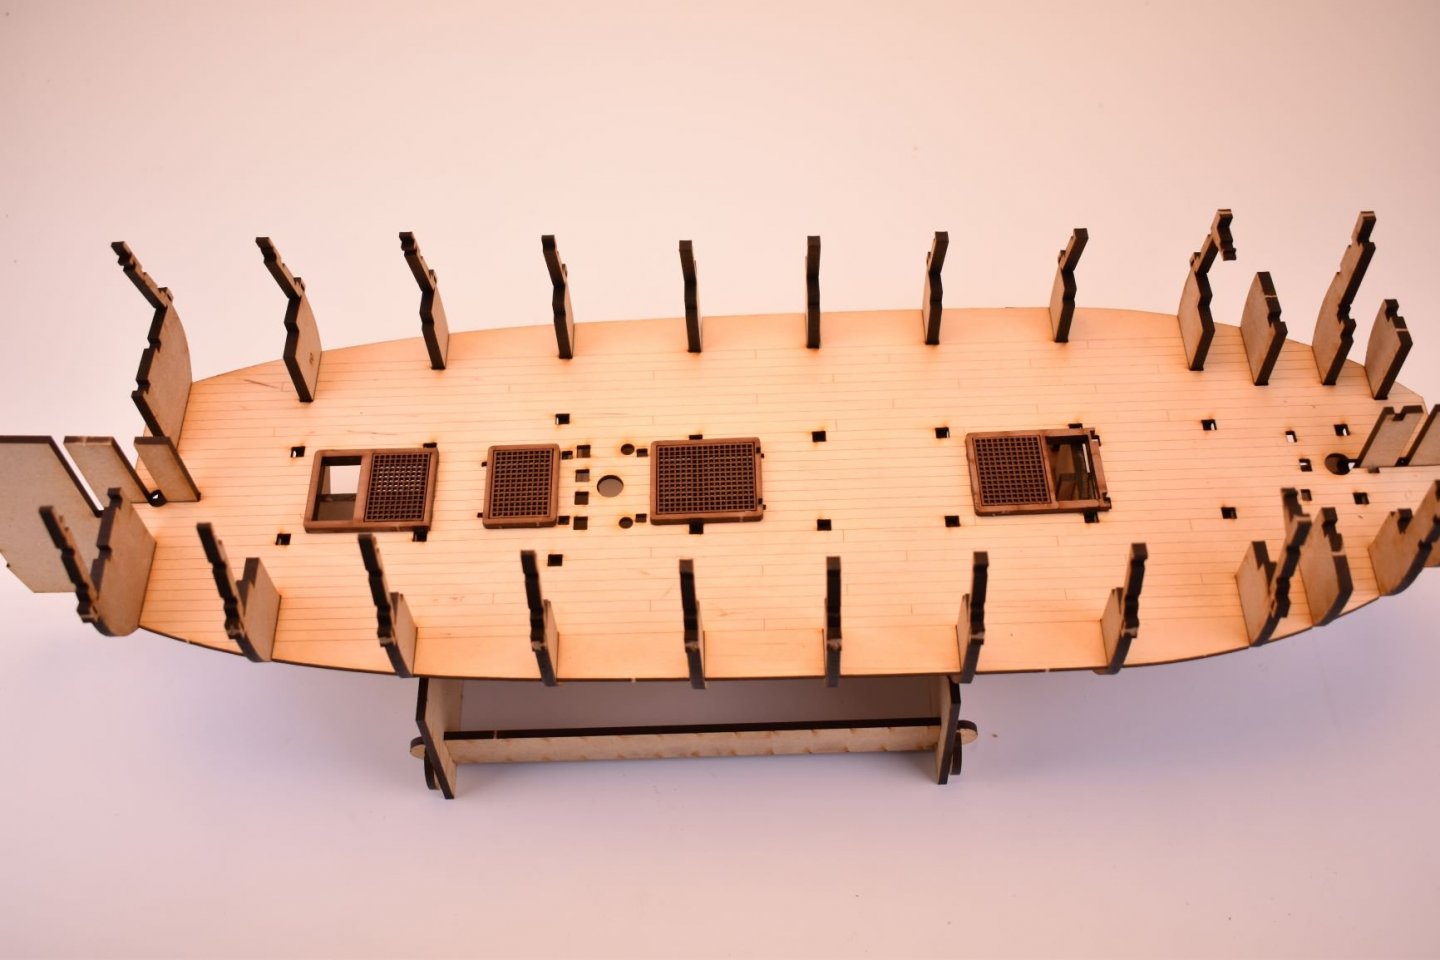
First planking complete and sanded smooth. This is 1mm thick x 5mm wide limewood, much easier to work with than 1.5mm thick lime (Took a day to plank and 20 minutes to sand). Hull lines are quite planking friendly, so not much overlap to sand. No changes needed for the bulkheads, as all planks sit just right on each, so this means I have no more work to do on main skeletal structure. No gun ports to mark out and cut out, too, they will just need a slight file so they are flush with the main frames.

-
Yes, what I designed is Amati's. If I wanted to develop another, it would have to be from scratch. But then again, I would not want to 'exhume' a 15 year old design...
-
Very nice progress, and a tough decision whether to leave the hull unpainted. I do think that the white complements the pear very nicely.
-
Not sure yet, have to be careful of laser cutting time. At this rate, I will only be able to produce one kit per day for laser cut parts..
-
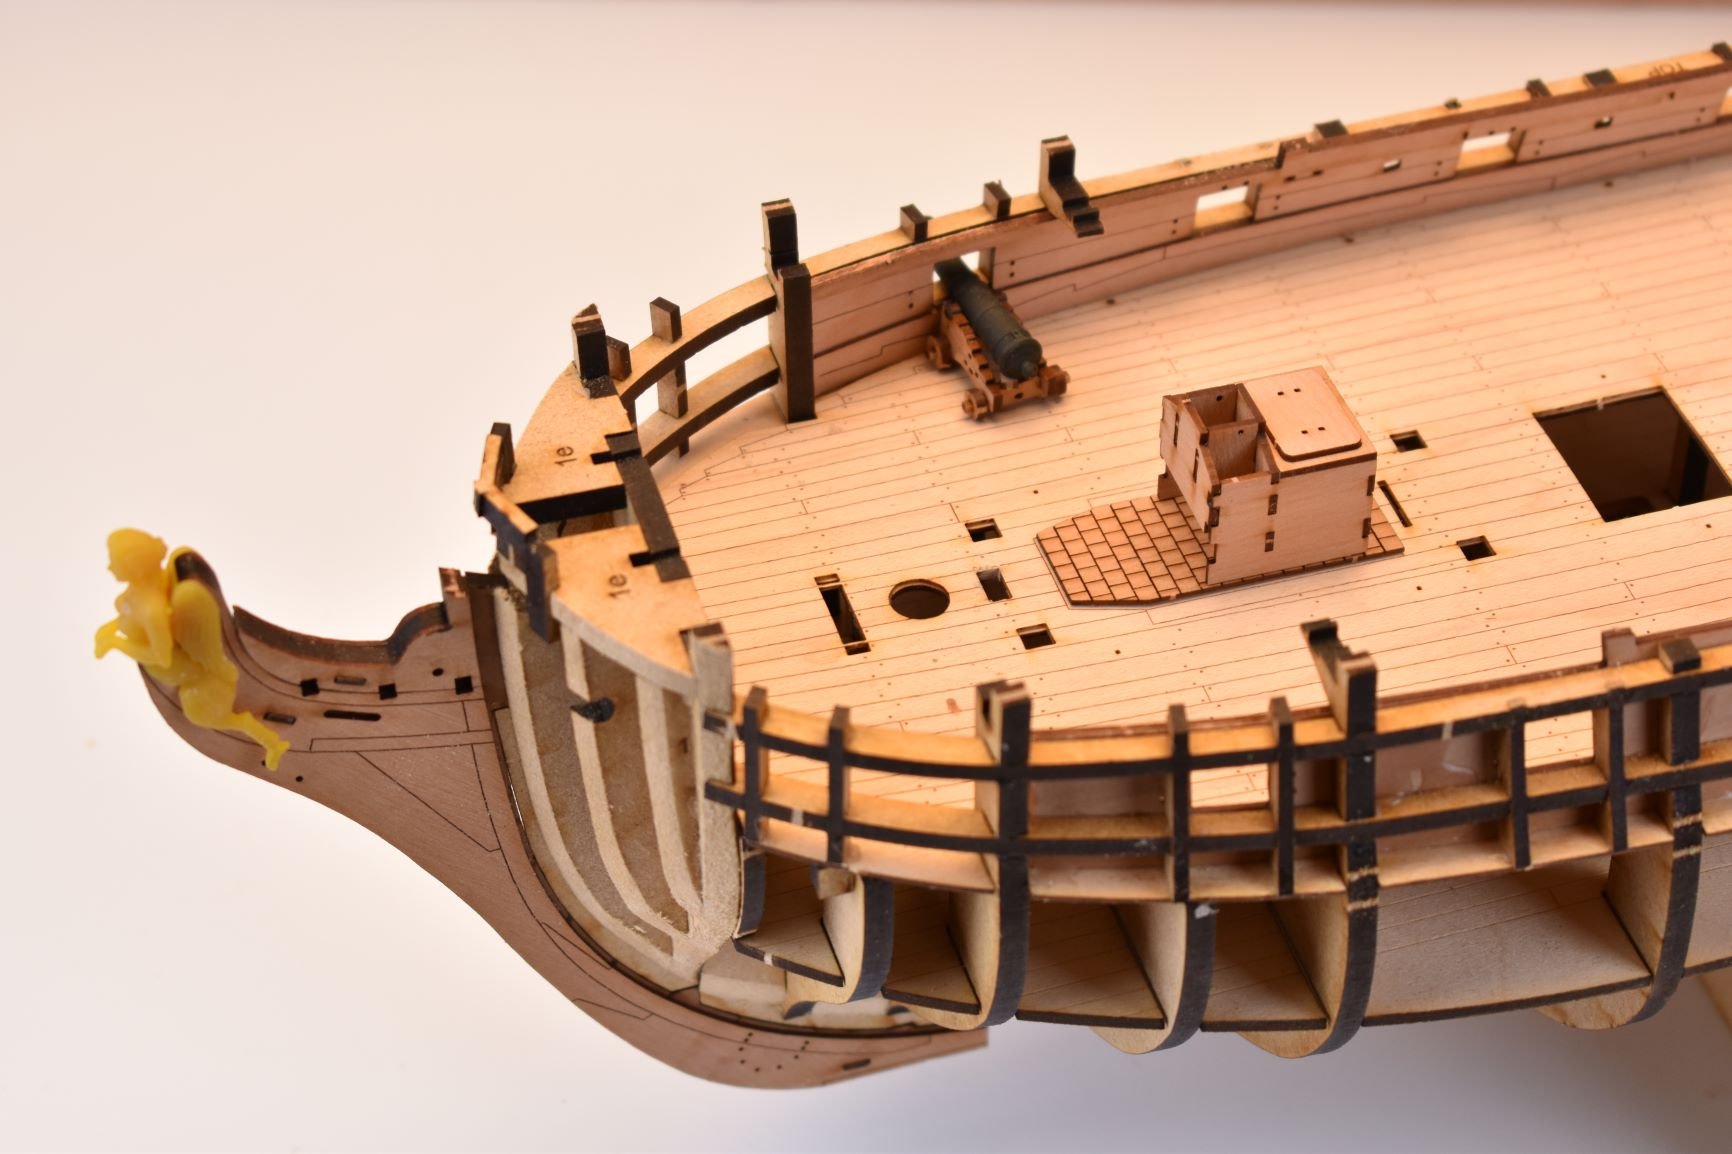
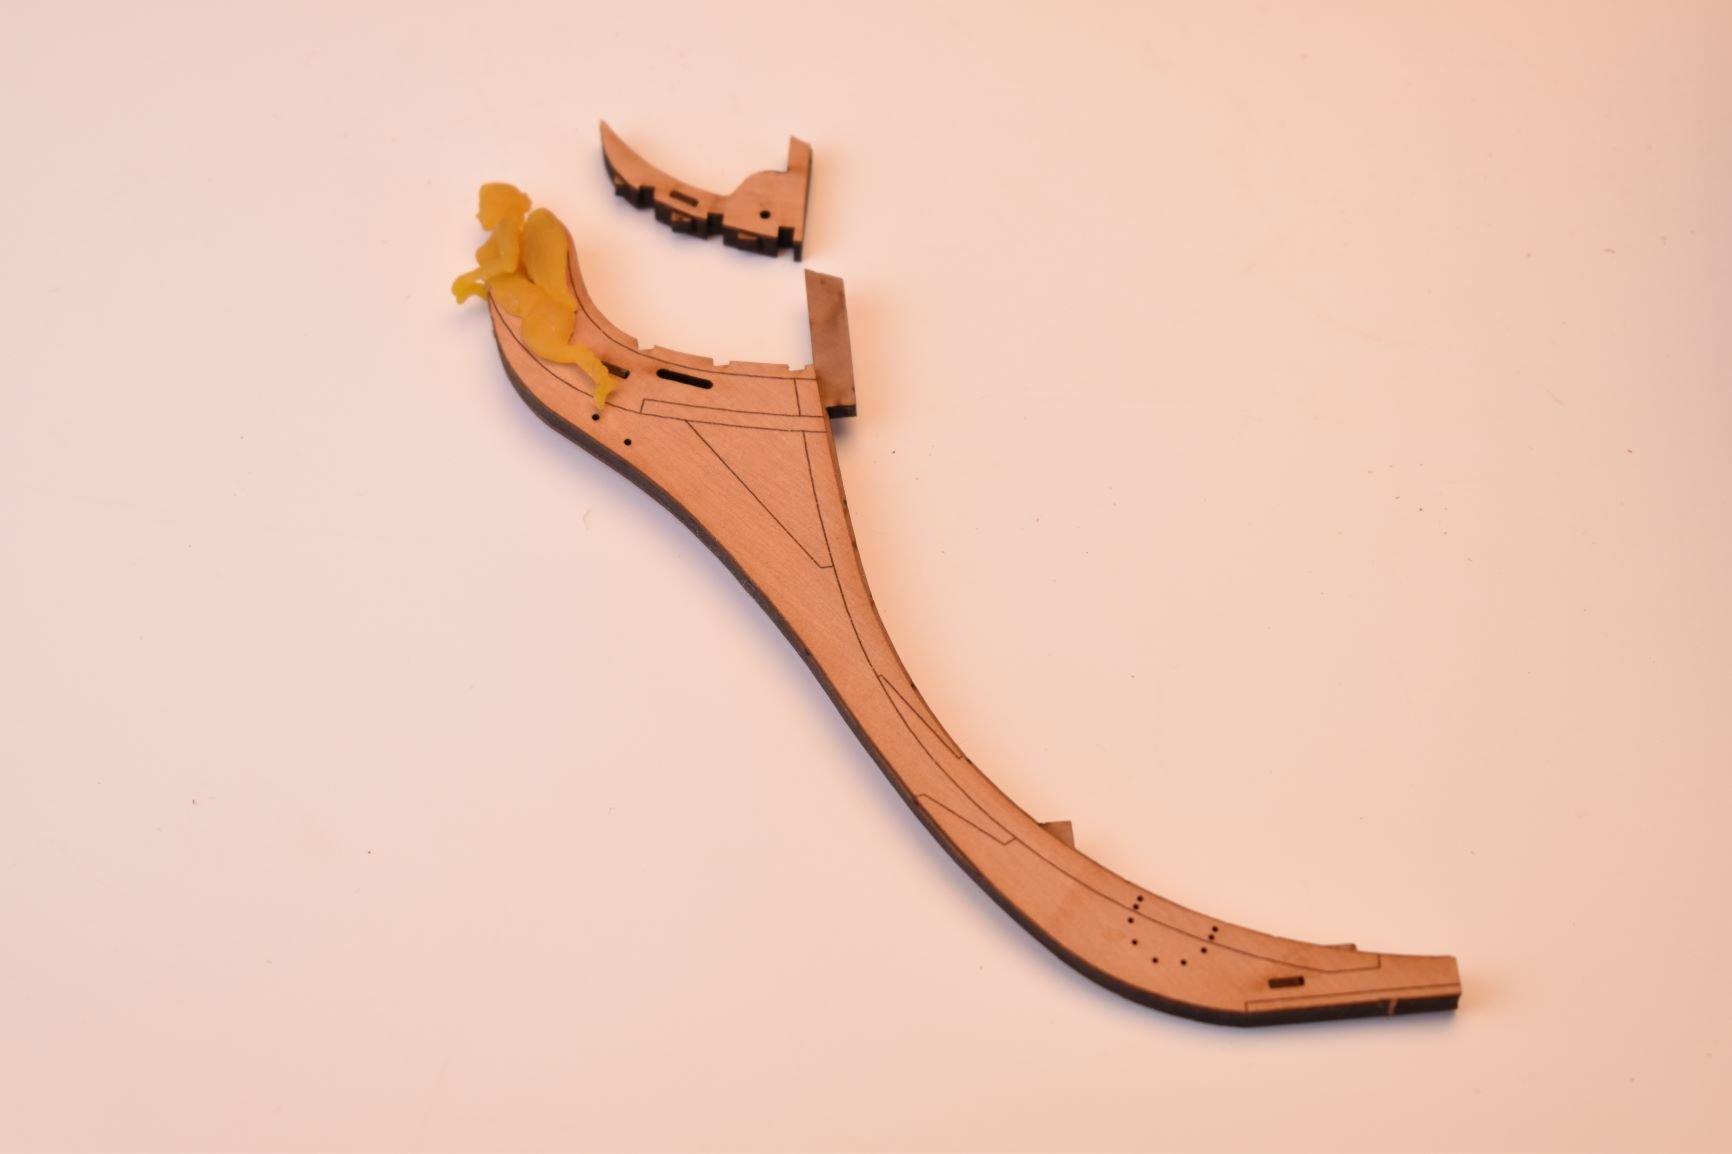
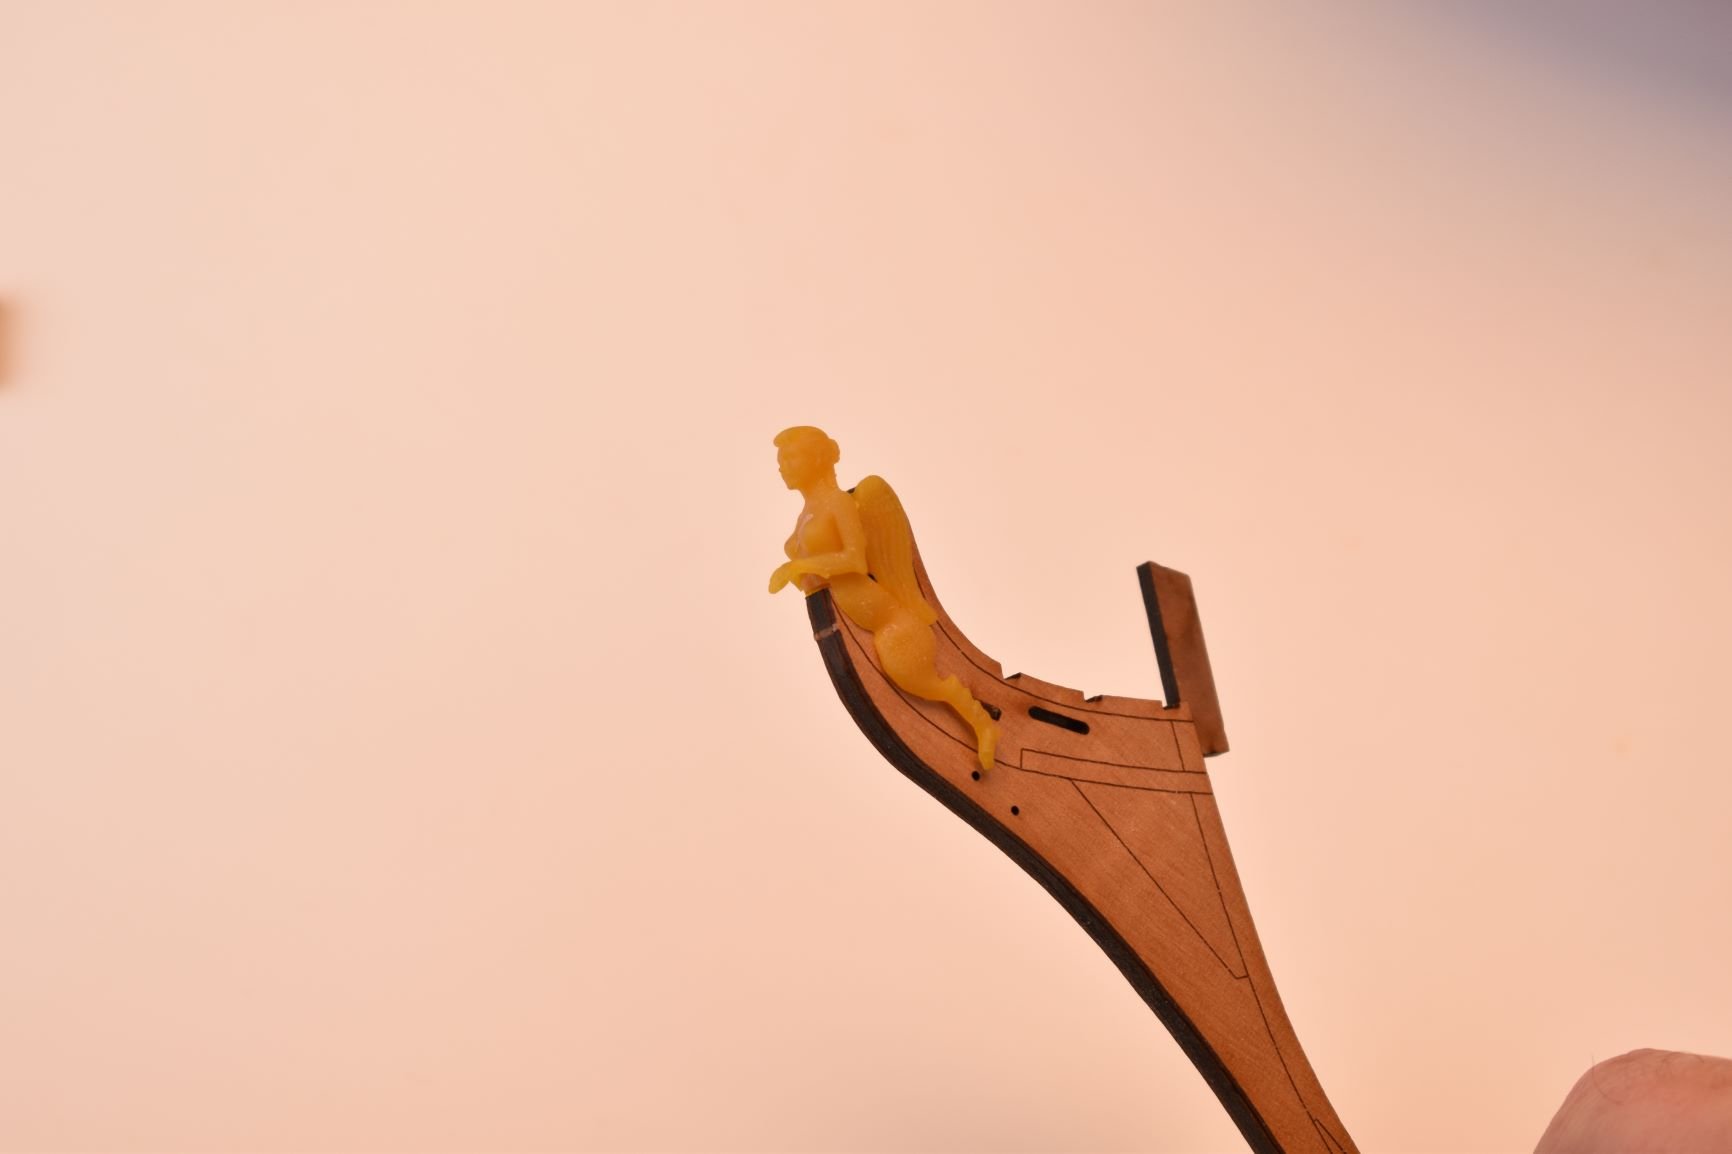
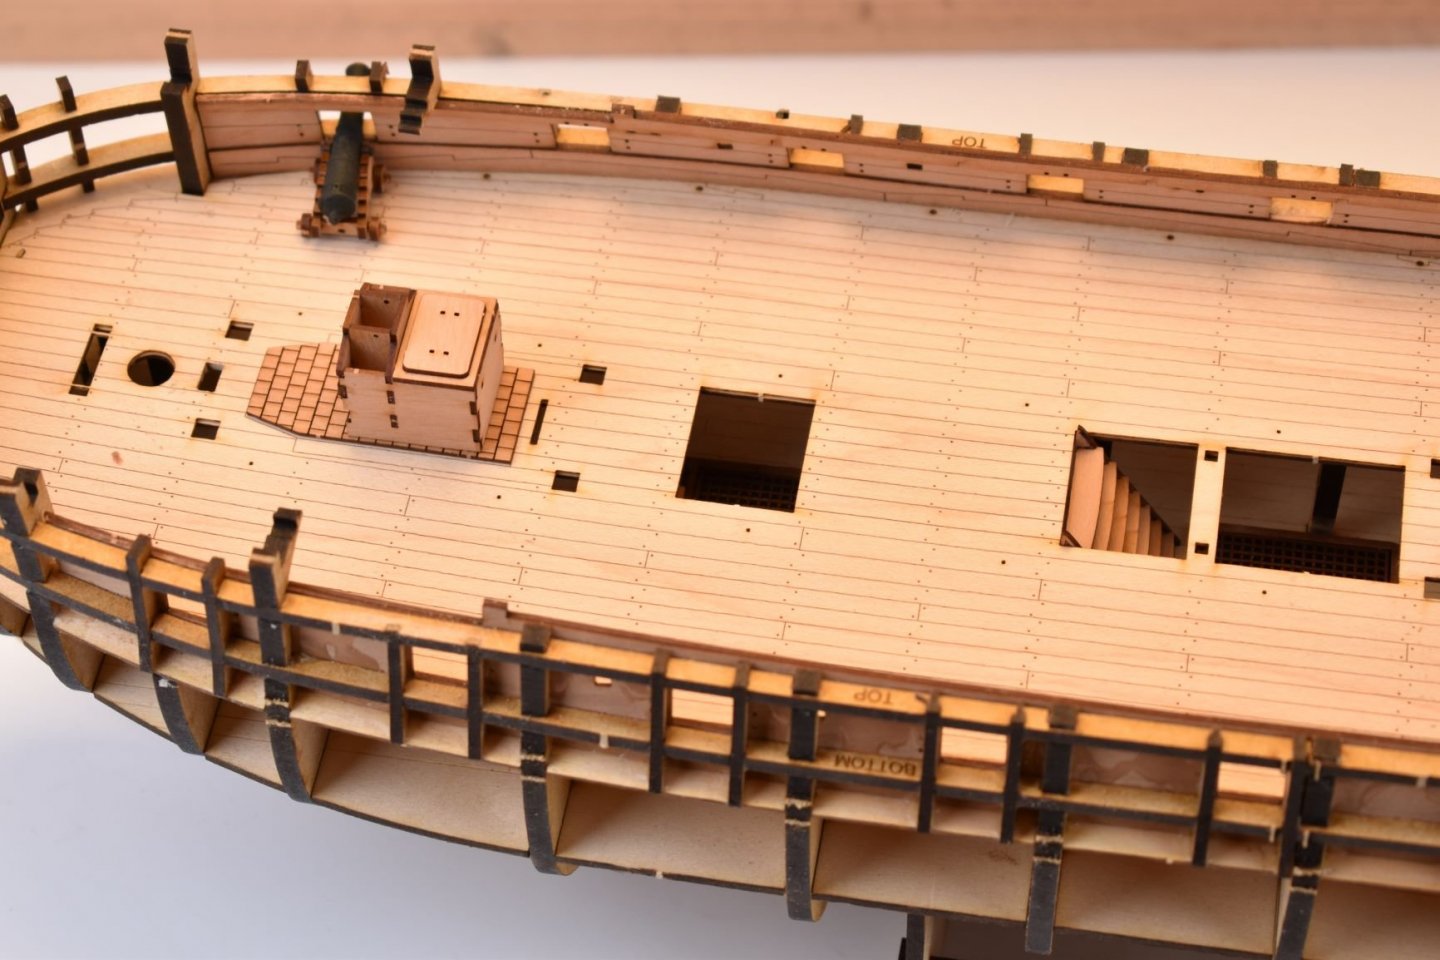
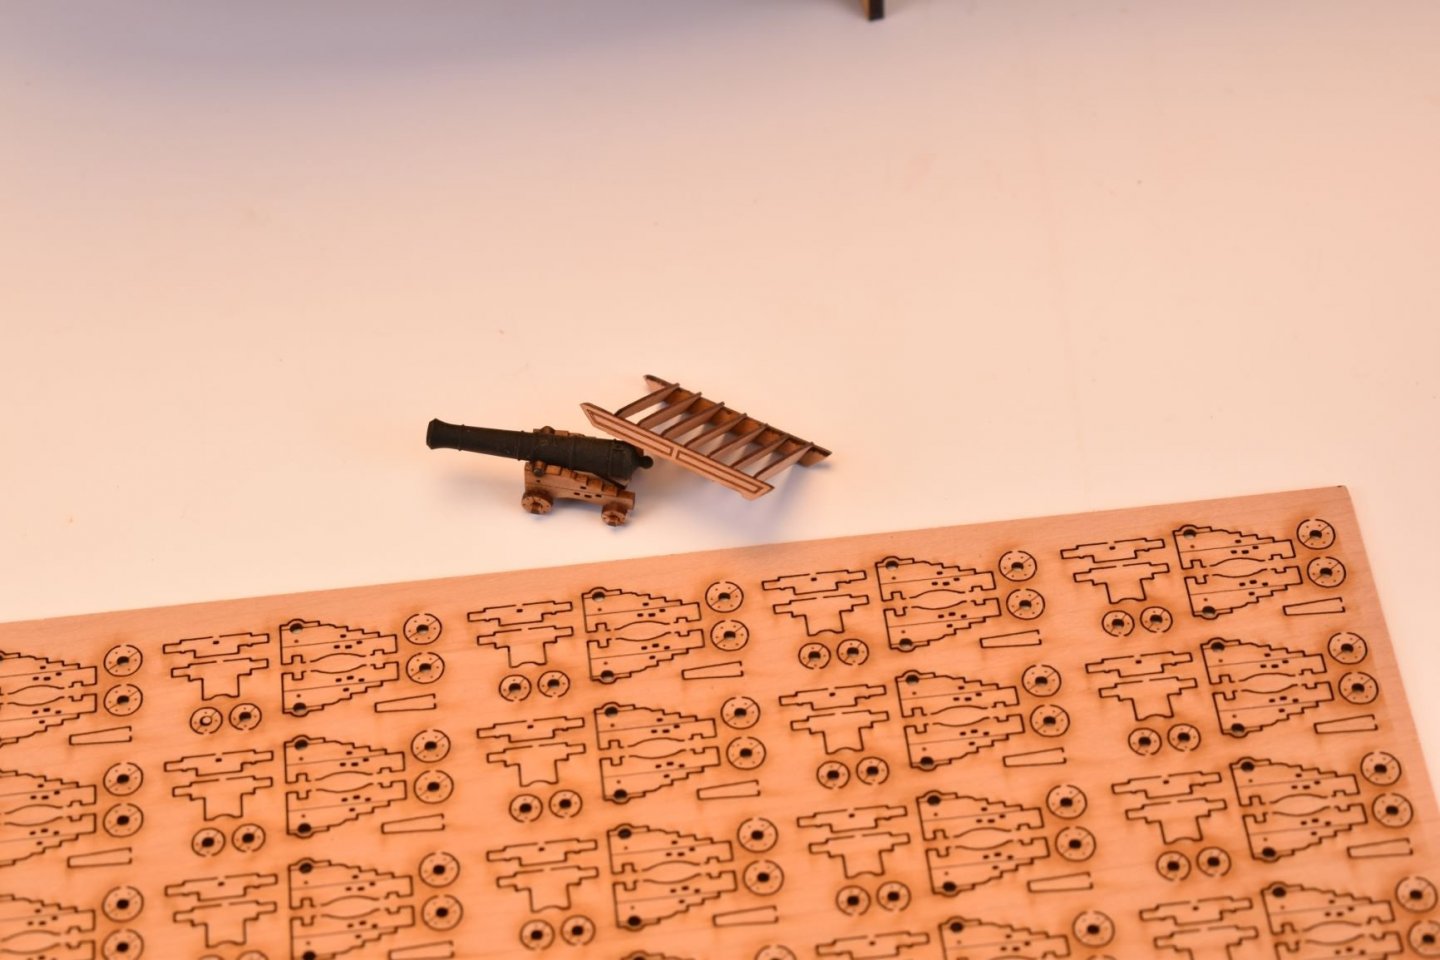
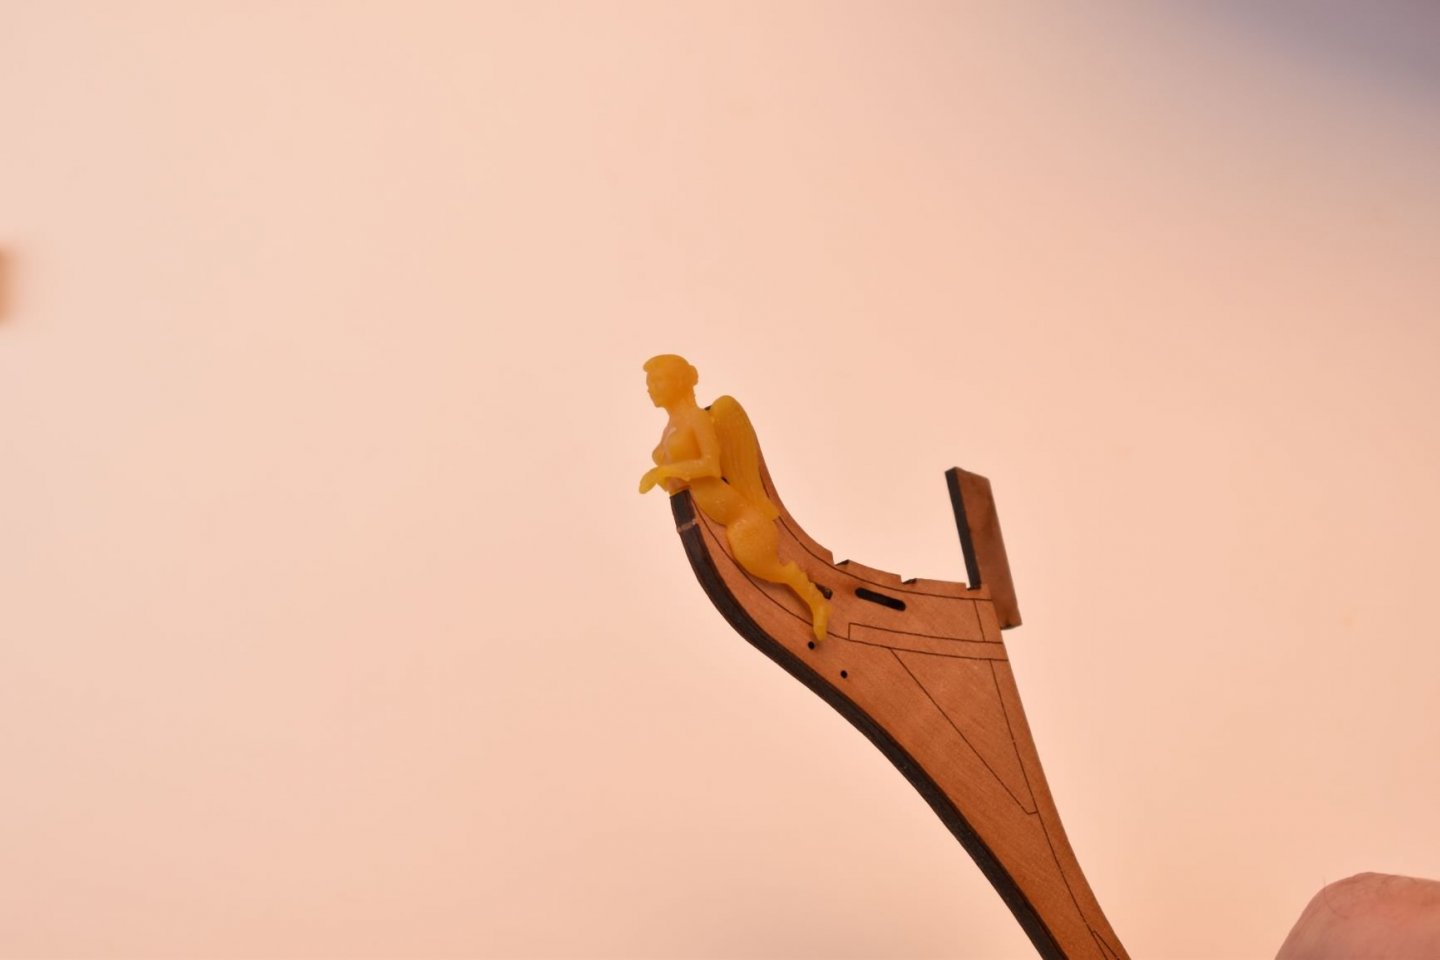
I have the more expensive Tamiya Yamato kit, and it is so much better than the standard older kit. As it's snowing heavily here today, I won't be going to the workshop to sand the prototype hull. Instead, I thought I'd dry fit another critical area, the bow. This is made up of 14 parts and, as with Duchess and fishing boats (and all new future kits), it has the rabbet worked into the prow and keel parts. Again, these are just for checking and are throwaway parts.. The figurehead is the kit version. Each kit will have a 3-d printed figurehead with zero trimming required. The 20 x 9 pounder short cannon barrels will also be 3-d printed in a matt black colour, an example of which is shown. I have given Jim two sets of carriages, a set with and a set without the cap squares pre-cut into the cheek. I think the pre-cut cap squares may win the day. Ladders this time will be laser cut and etched in 0.6mm pear, making them more to scale, thickness-wise (5 ladder sets altogether for Sphinx)


-
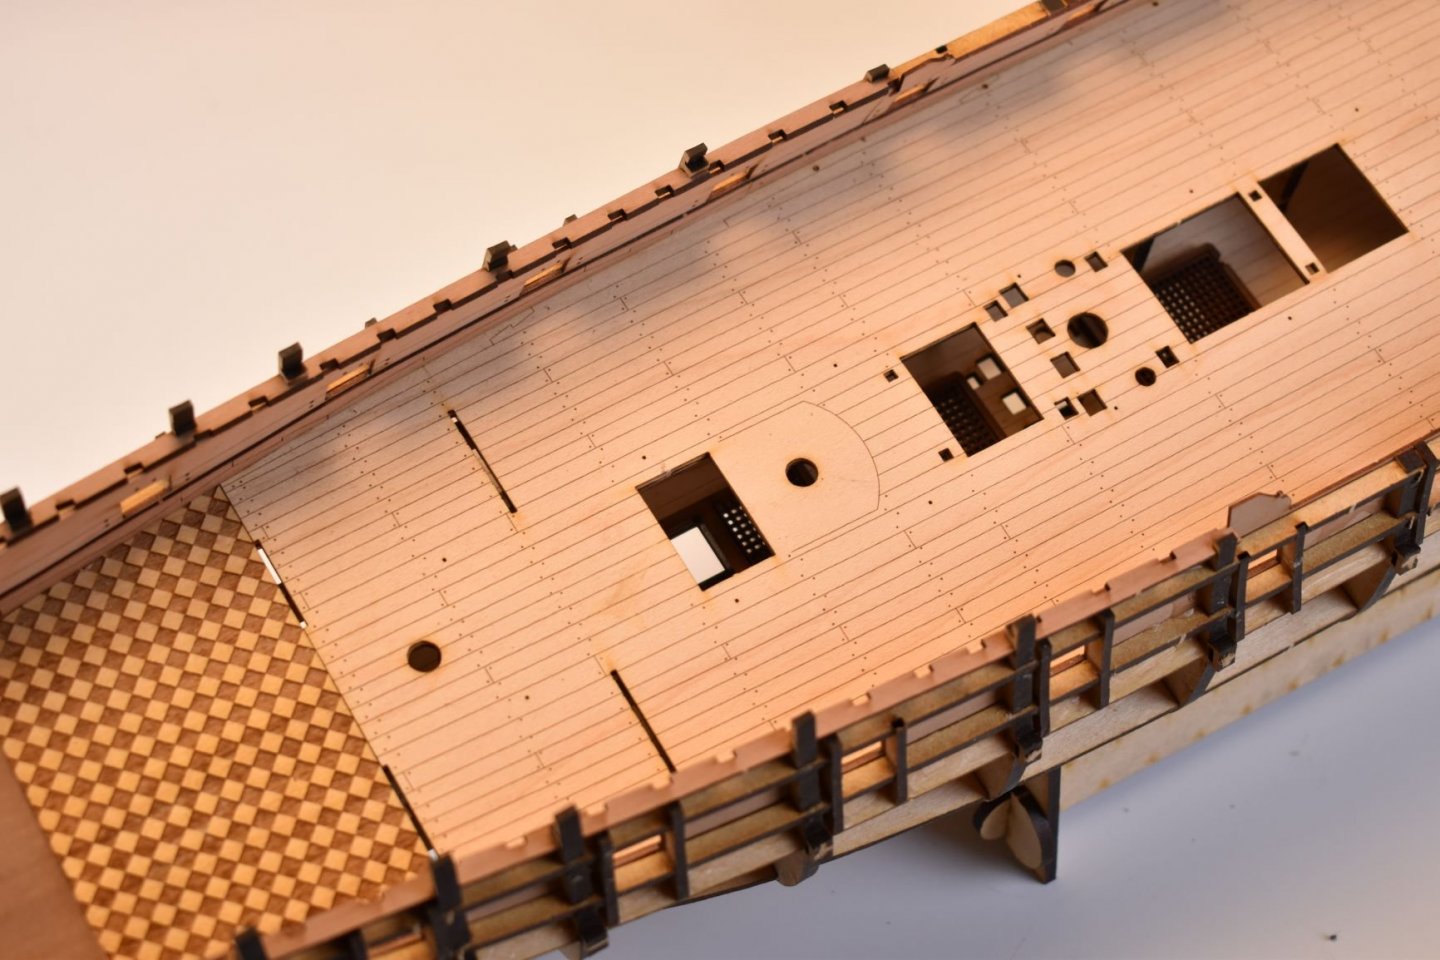
This is always my dilemma, price. If I was designing for a large manufacturer, this model would have been trimmed down to the absolute bare minimum, to keep the material and packing cost low. I do not consider this so much, but it still means it will cost more than an equivalent size 'mainstream kit' - although they are basically empty shells (As an example, even a small model like Duchess of Kingston has well over an hour's worth of laser cutting time per kit). Right now, considering the amount of materials required for this (many pre made parts means a lot more sheets of pear, maple veneer for decks and plywood), plus cutting times, it will not be below £500, but I hope that people will find pleasure in the build, rather than frustration. There will be a lot of parts both in wood and PE, but that doesn't mean complicated, it just means there's less parts the modeller will have to fashion themselves, plus more detail than conventional kits. It would be so much easier (and so much quicker, development-wise) to just include the bare minimum and a bunch of wood strip and drawings and then ask the customer to get on with it, with the end result being totally dependant on the skills of the customer. Price would be halved, but I suspect many kits would be abandoned out of sheer frustration - and my design philosophy has always been to design a model kit how I would like it, if it were my hard earned buying the kit. But this way, time and costs are quite large - but I also know there will be a lot less 'abandoned projects' with these kits. For Sphinx, like Duchess, this will be only one version, due to materials being tested for the prototypes. There will be a pearwood block and deadeye option, as usual, but that will be it. I am sure some will not use the laser etched decks and plank their own way, which is fine. Some of the results of this look stunning from what I have seen. But I prefer the customer to have the choice, they can use the pre made parts if they wish, or depending on their own preferences and skill level, can use the kit as a basis to really make it their own. (BE's Zulu kit and DELF's Speedy immediately springs to mind) Not sure about manger, as I have made 'concessions' with the extremities of the hull to ensure they are more than robust enough for sanding, so the front upper deck stops at bulkhead 1. Am sure there are seats of ease located on the bow gratings, but haven't thought of flag lockers yet, as I have spent all my time sorting the basics for the hull assembly. As mentioned before, for the larger models, I will dial back slightly, so hull and decks will be conventionally planked (as I can only buy certain materials up to a certain size), but will still include as much deck detail as I can get away with. But if Sphinx sells well enough, it may be worth transferring some of the same design cues to the much larger kits - but for the larger kits, I will also need to invest in another more powerful laser machine.
-
Hull from figurehead to stern is around 605mm long (Speedy hull length is 440mm). With bowsprit, it will come to a little under 800mm. Not too big, not too small.
-
I do not know yet, but am hoping for April/May release. If I get furloughed again, maybe sooner! Just dry fitted (not glued in place until outer hull planked) forecastle and quarterdeck beams, all seems fine.. ETA - All upper deck beams will be in pearwood


-
I always think that (even now)! when it comes to making them, but once I get started, I am always surprised that they are all completed in a couple of days. The new boats will have planking laser cut on a 0.6mm pear sheet, so not so thick (although you still have to taper them yourself, you need something to do..) ETA - I think Sphinx will work just fine without boats, as the quarterdeck will be designed to be only partially planked, showing the deck beams..
-
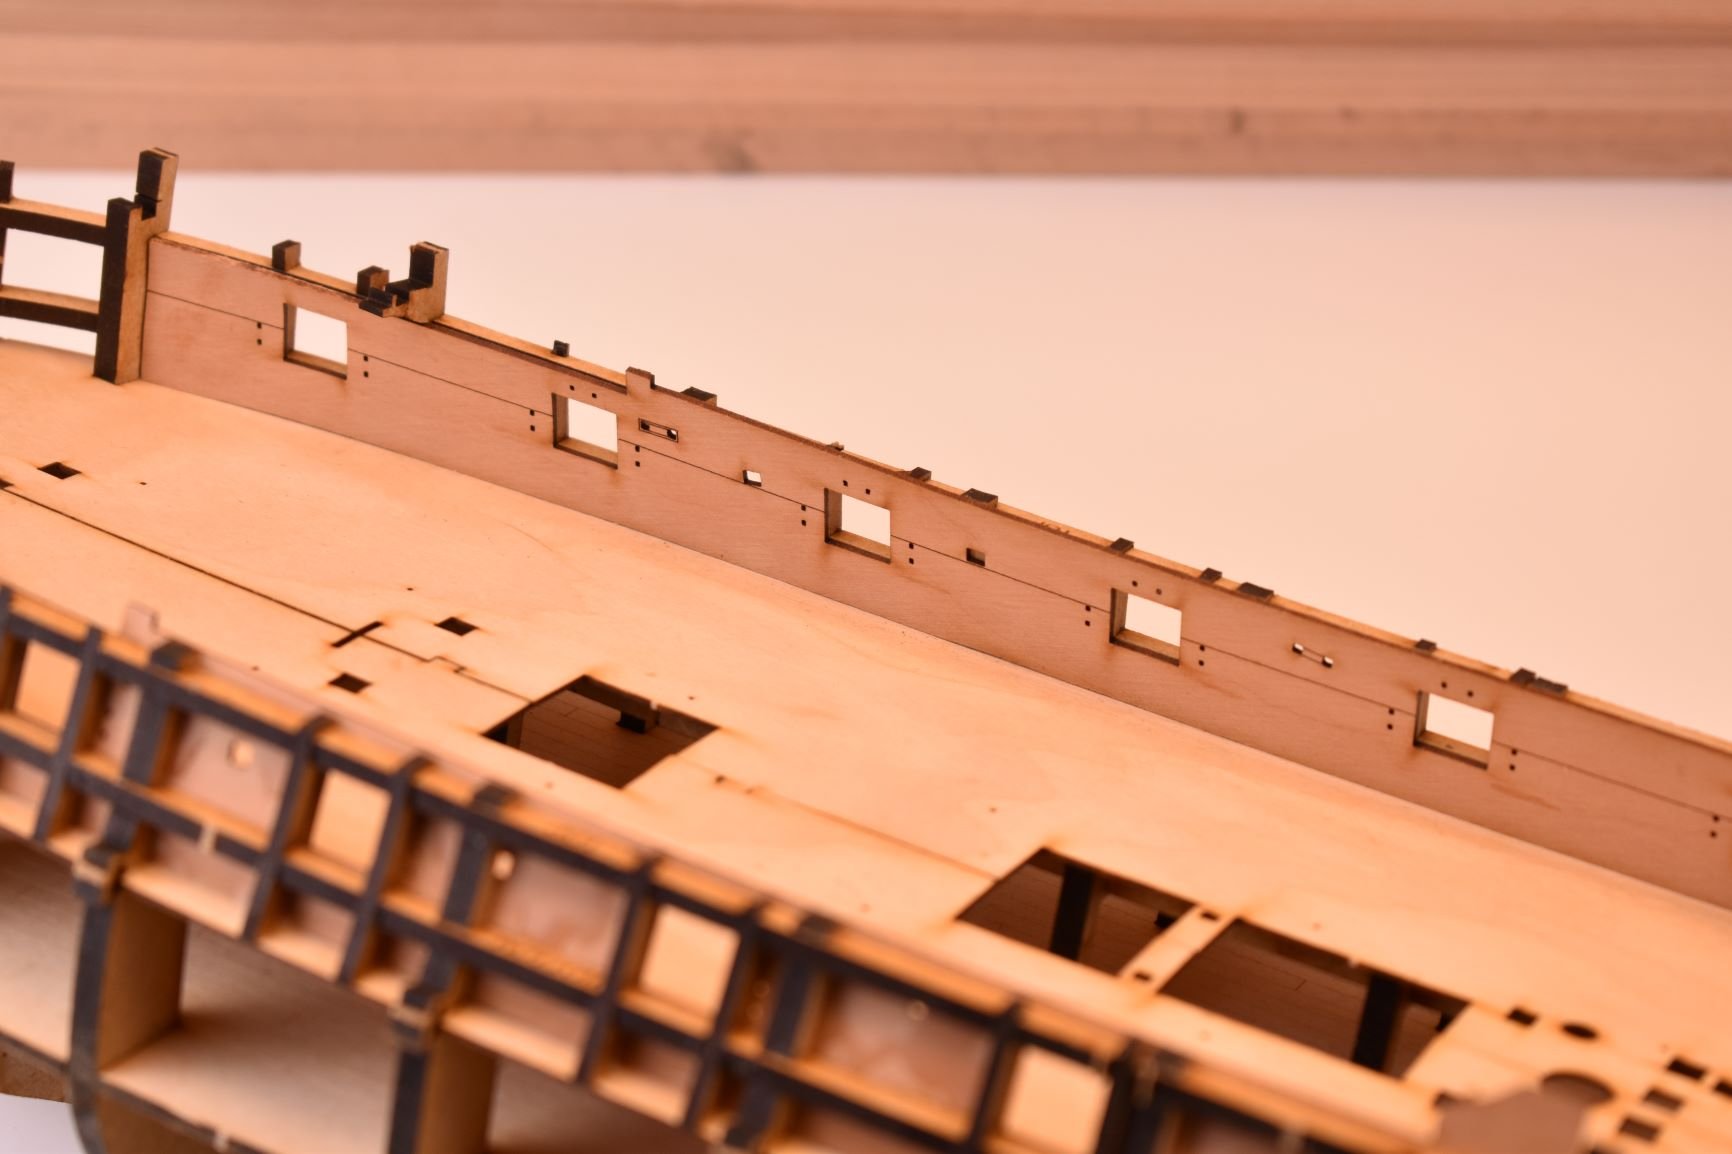
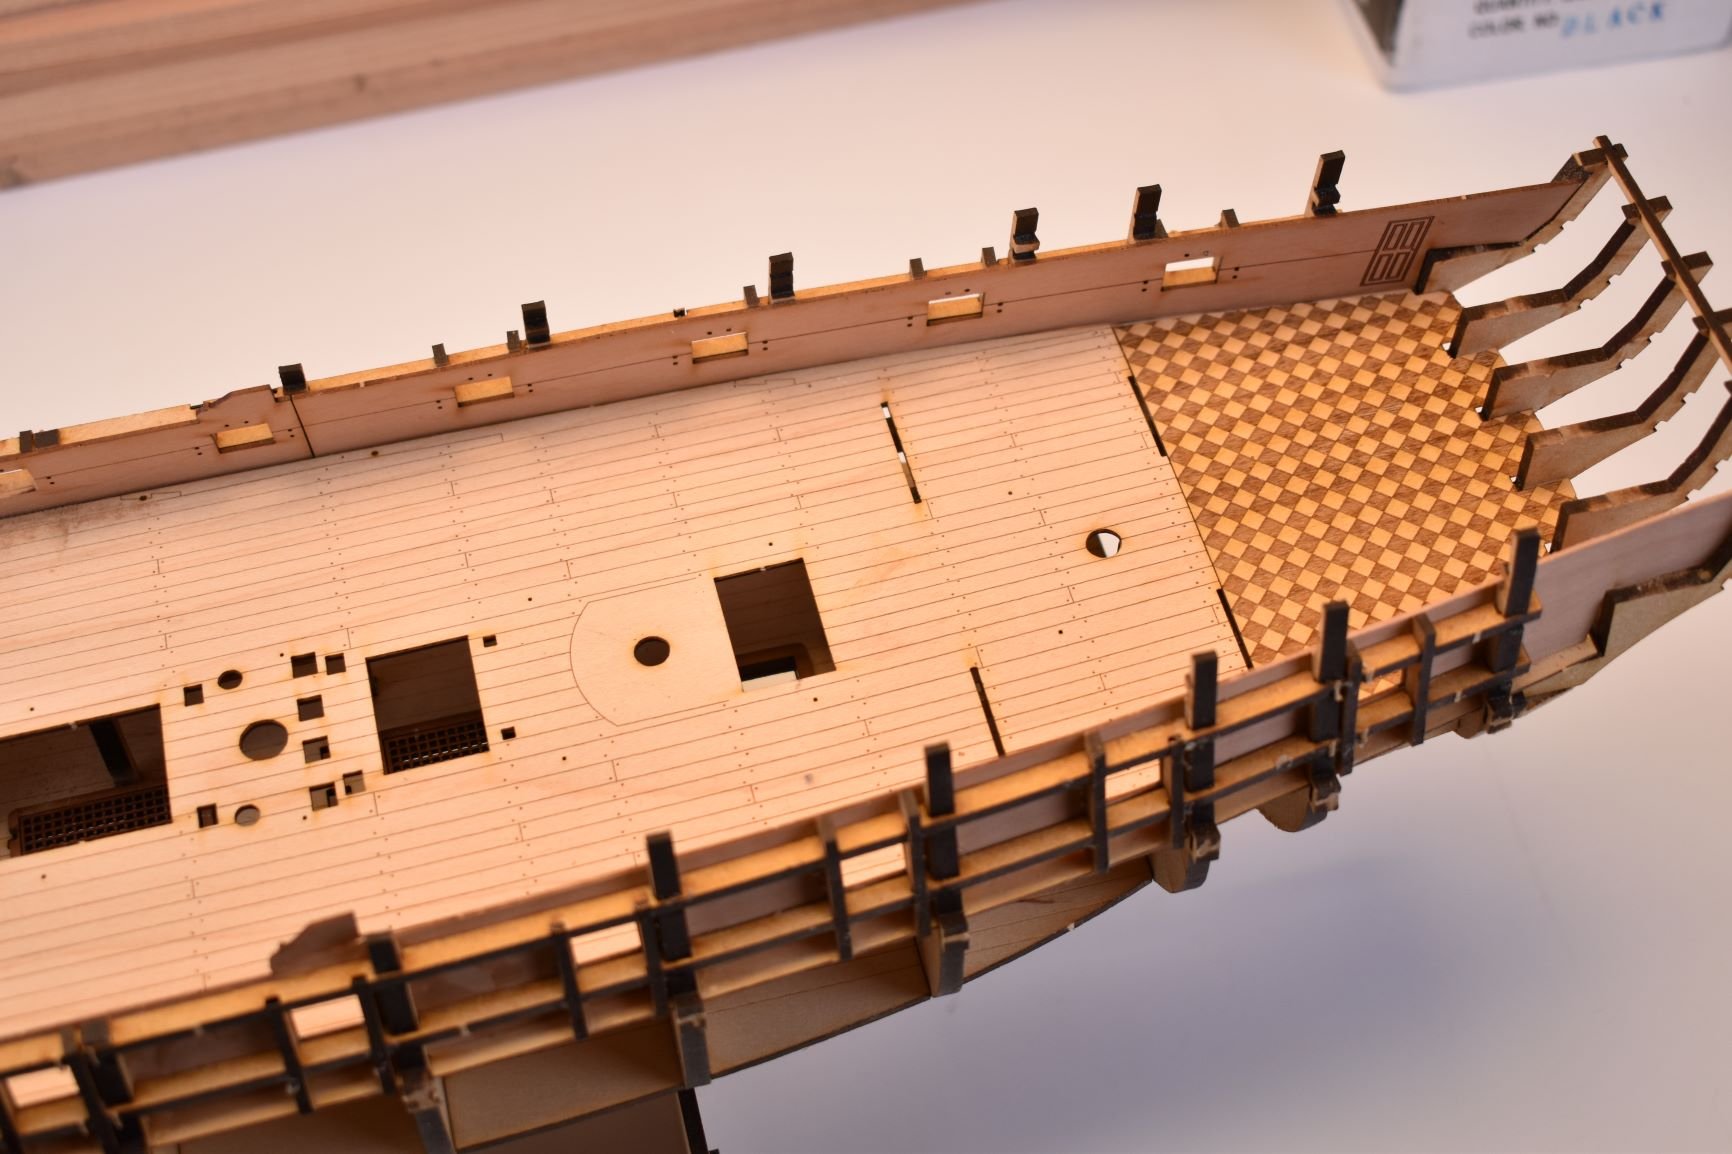
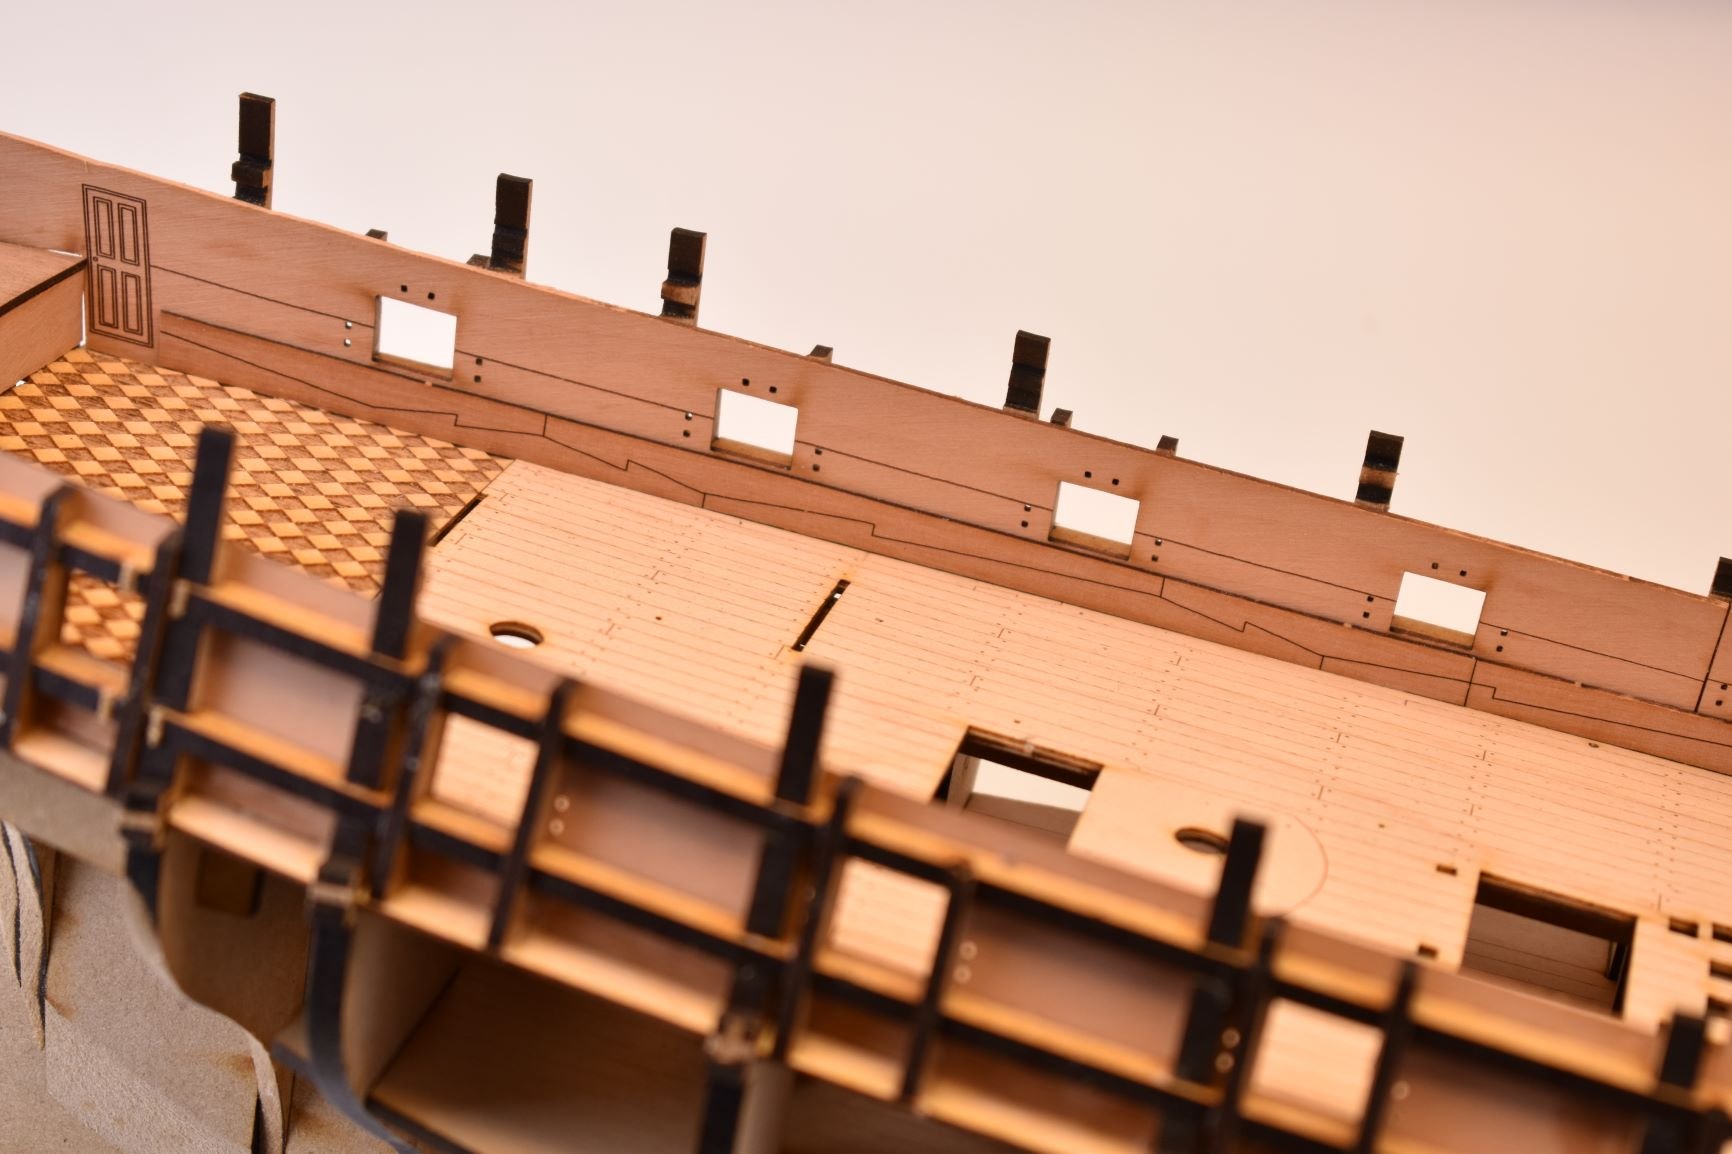
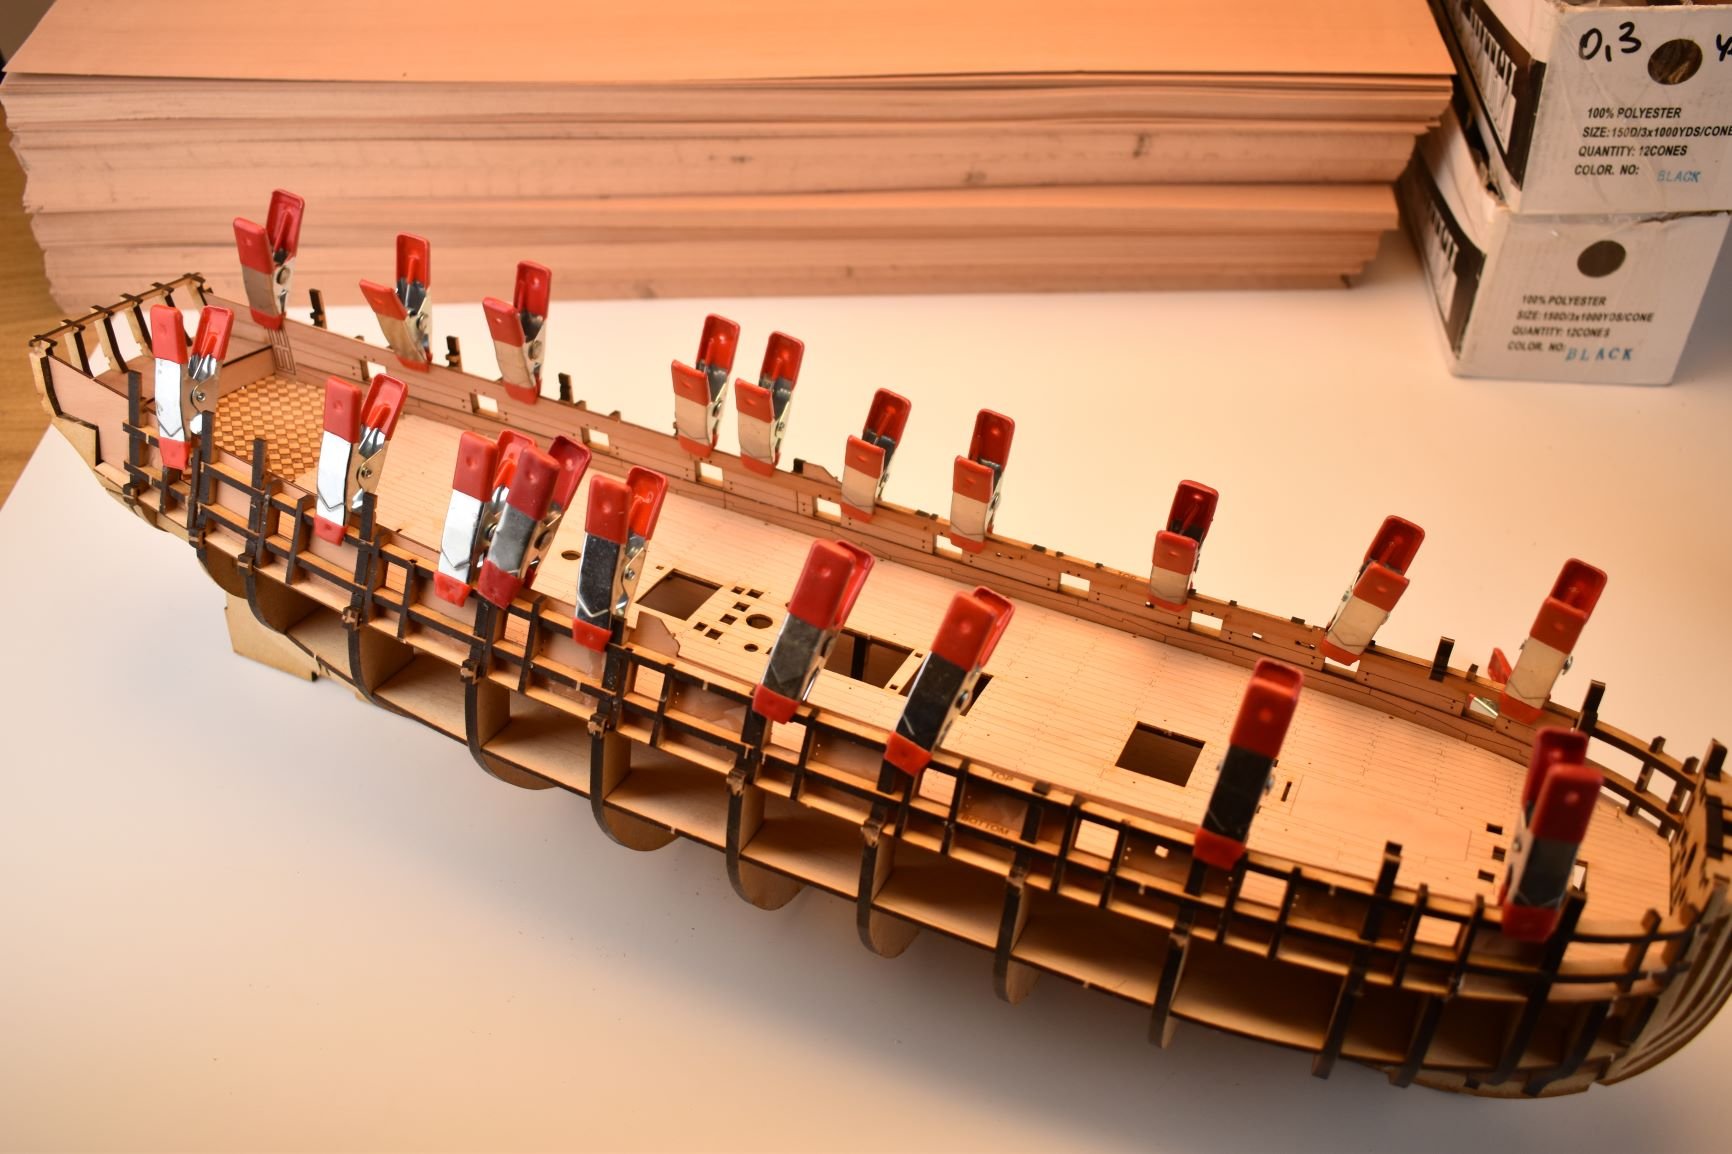
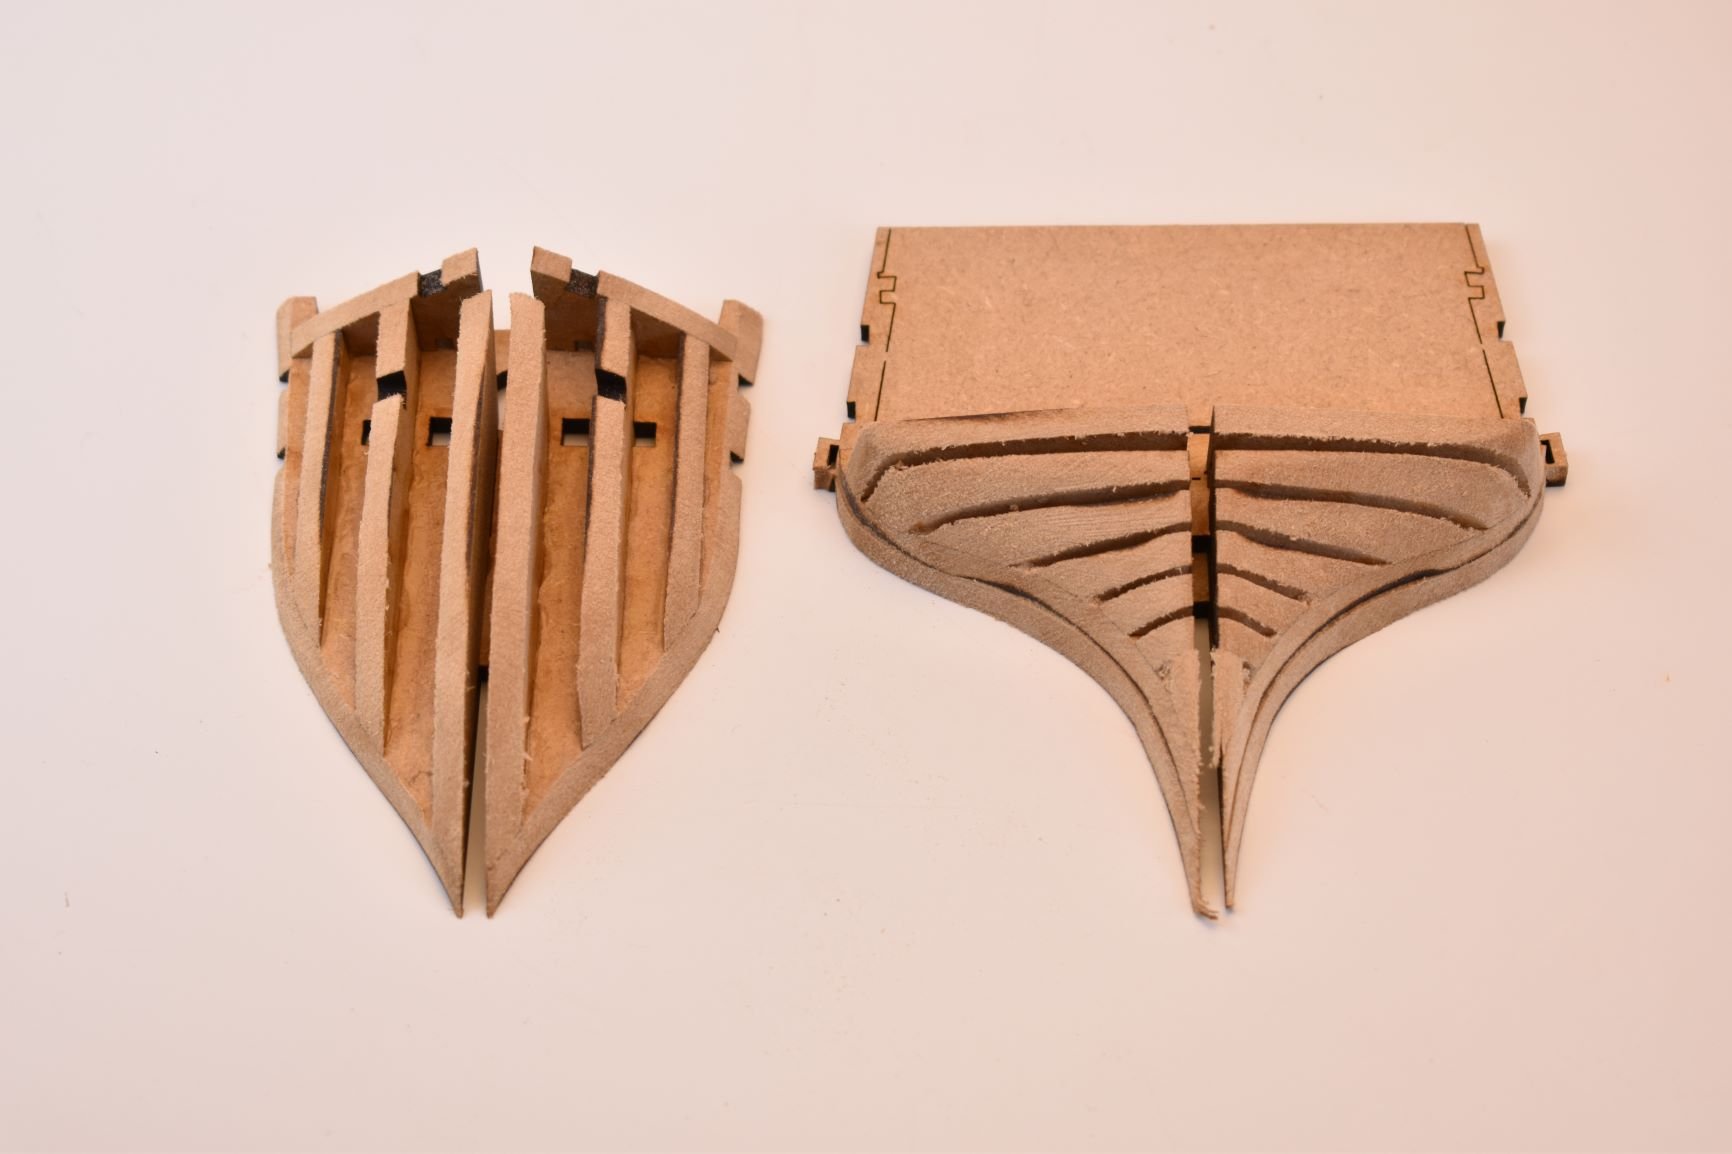
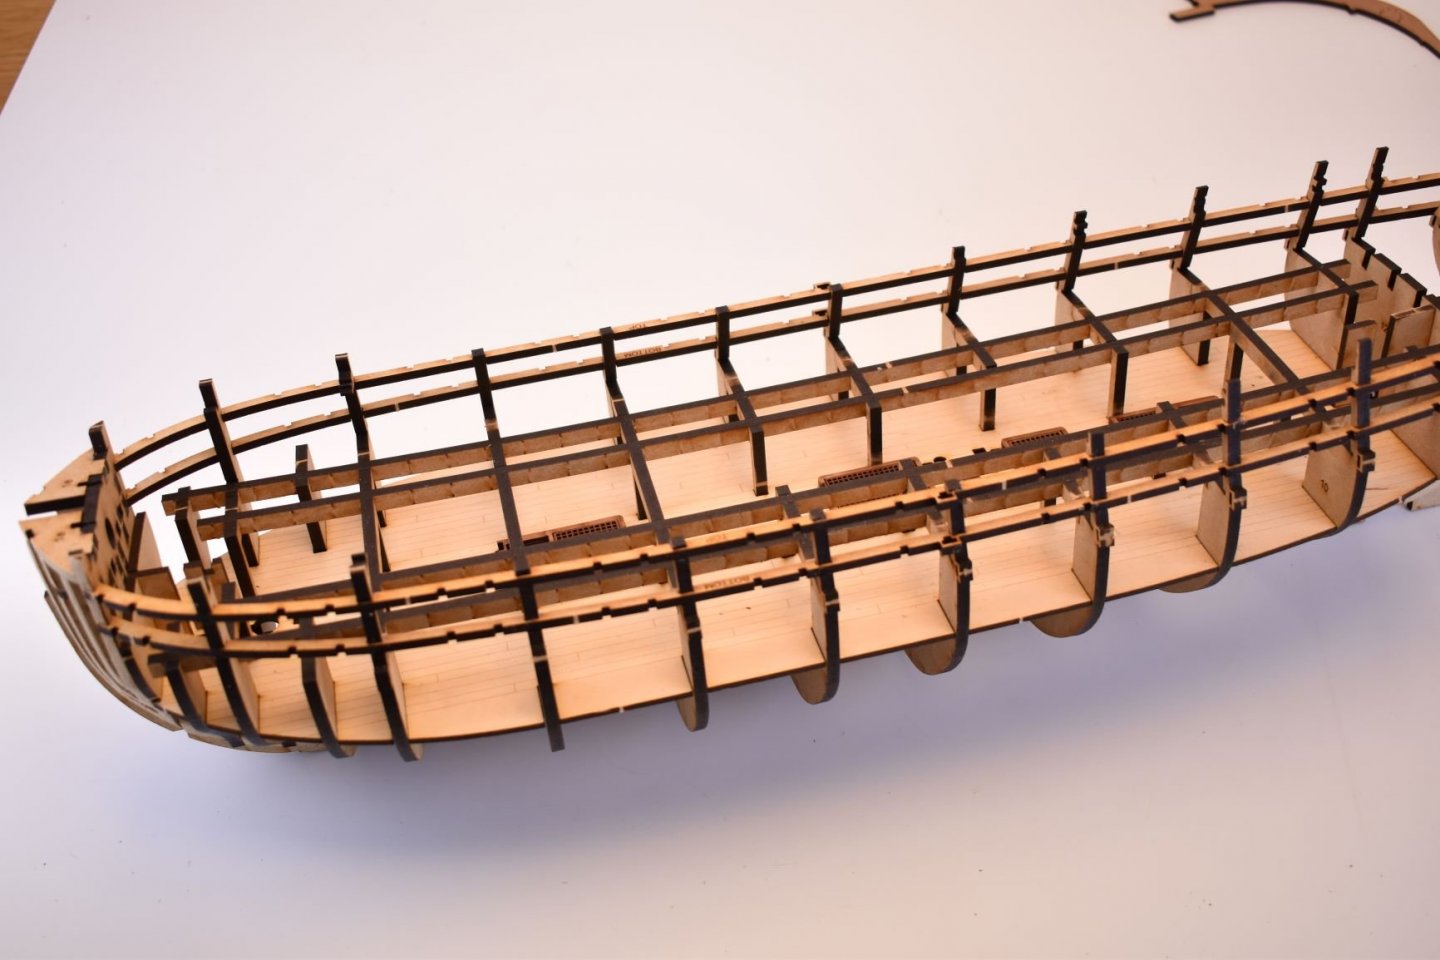
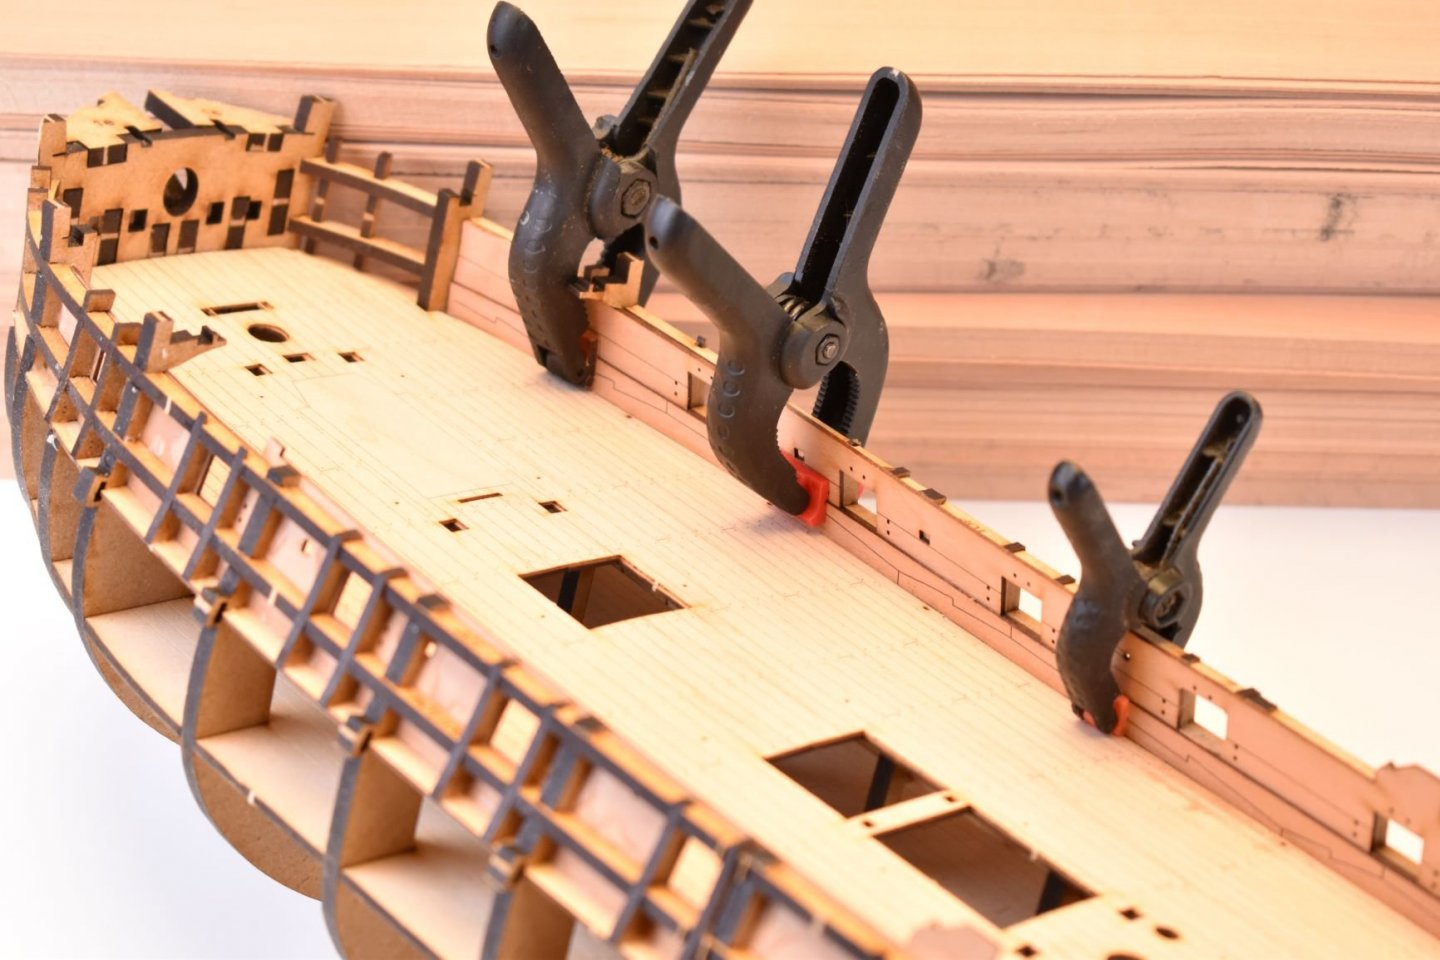
I have been ploughing on with designing the Sphinx model kit. here are a few (bad) pics of my prototype build (the third and hopefully final). I am just making this up for pictures for Jim, who will once again build the finalised model for the instructions and box art. This is a lot more complex than previous Vanguard Models designs, and as such, is taking far longer to develop. However, I am hoping the end result will mean that many will be able to make a very nice model from the kit, and enjoy the build without the need for special skills.. For now, this is as far as I will go, design-wise, and may pull back a little on larger models, due to material costs and cutting/engraving times. Knowing me though, I wont.... Regarding the pics, please bare in mind this is still in prototype stage (with a hope that this will be the final stage for all parts that have been fitted), and this model will probably been thrown away once I have what I need from it. Oh, and one last pic that Jim sent me, with progress on the ships boats, three of which will be included in the Sphinx kit.


-
Occasionally, both for the gunwales and main wales (the latter if they are single strips), I will just pin them in place with little to no glue. I then cut off the exposed parts of the pins and sand smooth and then touch up with paint.
- 382 replies
-
- 2
-
-
-
- Vanguard Models
- Duchess of Kingston
- (and 1 more)
-
I could get them in 48th, but it would take a few weeks. If you tell me the sizes I can let you know.
-
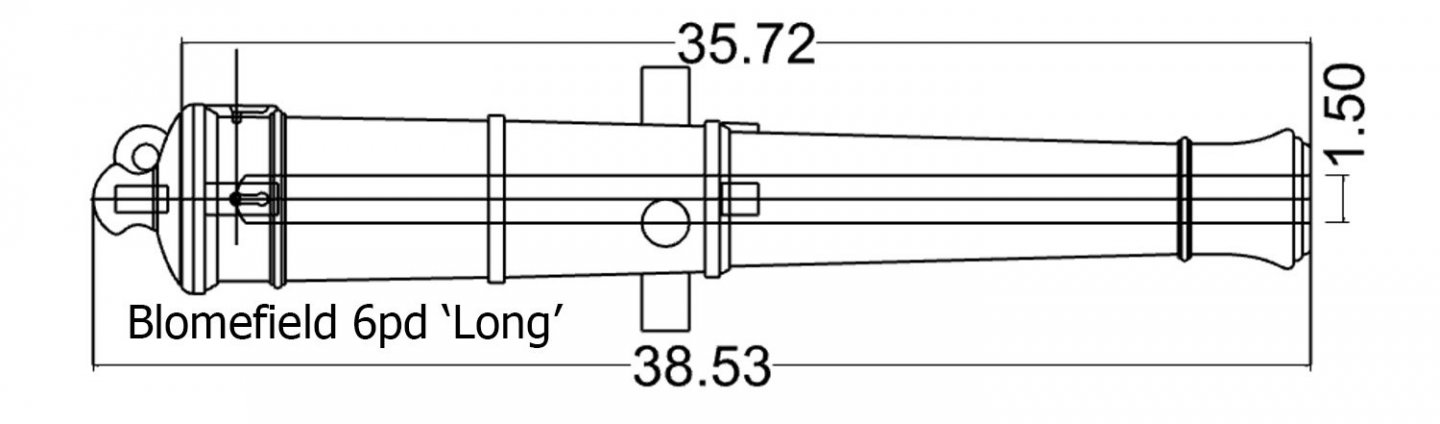
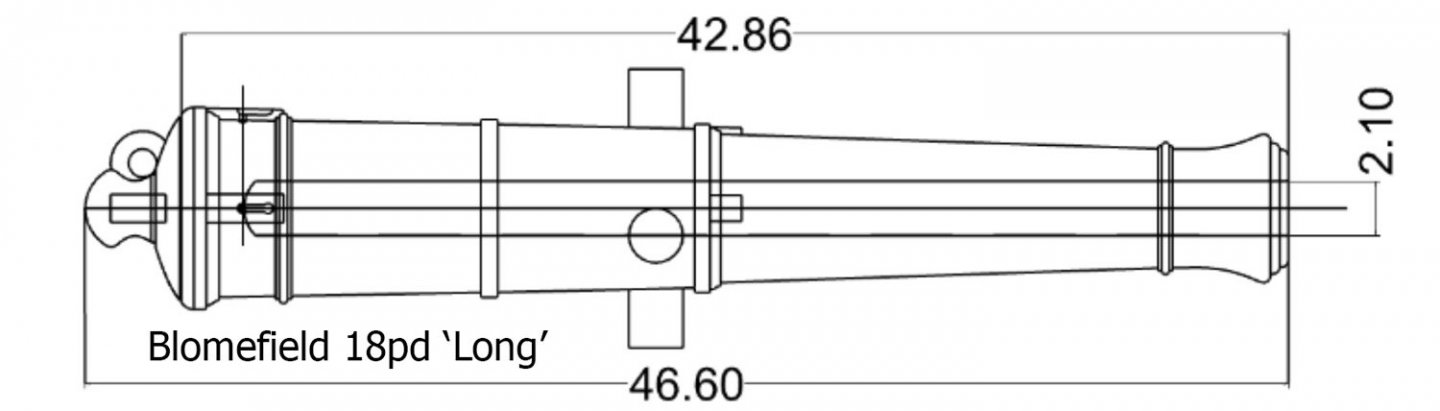
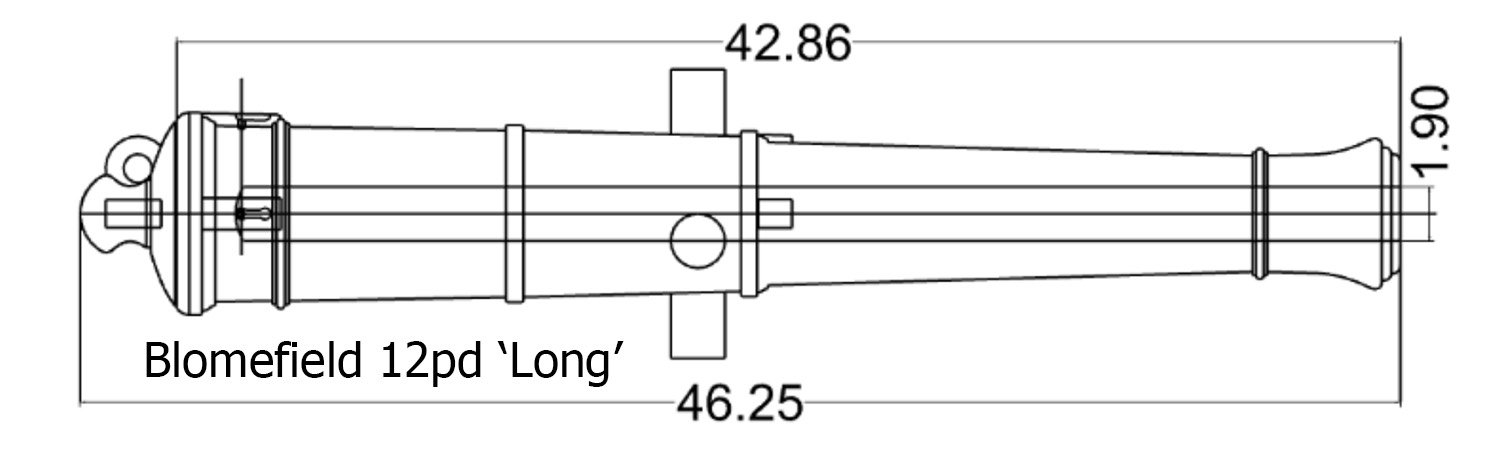
Yesterday I had a small amount of stock for a selected few Blomefield pattern cannon. I will be having more sizes made in the future, but what I have now is shown in the line drawings. These are 3-d printed and are of a dull black colour. I will be using the 9 pounder Armstrong shorts for Sphinx. These (Blomefield) were introduced in around 1795, so it is very probable that if the model you are making was launched around this time, it would have had the newer Blomefield pattern. However, I would assume that older ships that were still active after this date would have kept their original armament throughout their operational careers (Armstrong pattern). I will get some pics of the castings soon. Cannon Carriage and gun sets (Blomefield) – VANGUARD MODELS