captainbob
-
Posts
3,498 -
Joined
-
Last visited
Content Type
Profiles
Forums
Gallery
Events
Everything posted by captainbob
-
Nice sails. Love the grommets. Bob
-
Thanks John, When this is done I think I’ll give 1:96 back to you and return to my comfort zone of 1:48. Popeye, thanks for your comment on the color. Since two of us agree, I’m going to leave it as is. Guy, Thanks for pointing out the cap and pin on the post. I missed that. As for the scuttle hatches they were 18” and flush to the deck. At this scale It would be a 3/16” circle on the deck. Maybe, we’ll see. The bow mats and fenders will be added at the end. Bob
-
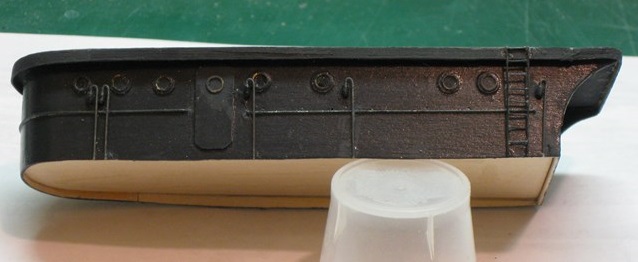
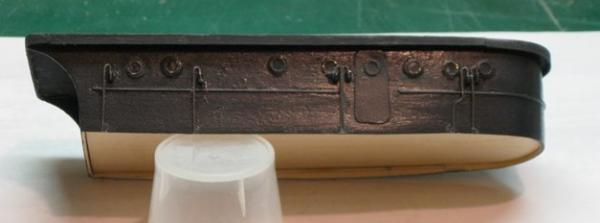
Finally a little more detail. The pipes are .025 darkened annealed steel wire. At the hardware store they refer to it as rebar tie wire. The ladder is .015 wire. I like this material. It’s easy to work and I frequently flatten it to represent black iron straps or mast bands. Now on to the upper deck. Bob

-
Looking great, but it’s obvious that you’re having way too much fun with this build. Bob
-
Fine creativity. Can’t wait to see the Kraken inside. Bob
-
Only 5000. That explains it. Bob
-
WOW ! They're made from 10,000 tiny blocks of wood. Oh that I had such patience. Bob
-
SS Vinal Haven by TBlack - FINISHED
captainbob replied to TBlack's topic in - Build logs for subjects built 1851 - 1900
I was thinking of river boats that had large doors, usualy open, where the boilers were located, but on a boat like this without those doors this heat shield could also be used as the intake for the boiler. Bob -
SS Vinal Haven by TBlack - FINISHED
captainbob replied to TBlack's topic in - Build logs for subjects built 1851 - 1900
Years ago I planned to build a large model of a western river steamboat with a working steam engine. Ah the dreams we have. Anyway. On river steamboats the stack goes through a large hole in the deck so the hot stack does not touch the wood. The large sheet metal ring with the sloping top keeps the rain and other water out of the large hole. The holes in the ring prevent heat buildup. Usually instead of vent holes there is a gap between the ring and the sloped top which extends a few inches past the ring as you can see at the far left of the picture. The intake to the boiler is near the firebox where the stoker works. Bob -
Bracera (Brazzera) by Albuk
captainbob replied to Albuk's topic in - Kit build logs for subjects built from 1851 - 1900
Just found your build. Nice planking job and I like the way you opened up the hold in the center. Bob -
Nice fix, Popeye. Why oh why can't we know all about a boat before we build. Bob
-
WOW! There's a croud already but make room for me, I want to watch too. Bob
-
SS Vinal Haven by TBlack - FINISHED
captainbob replied to TBlack's topic in - Build logs for subjects built 1851 - 1900
Tom, You say the cut you want is 1/2 mm or .019685”, so you are correct your .020” saw is too wide by .000315”. Bob -
Steve, you tell Angela her advice is of course spot on...that desire for perfectionism is one of my many flaws, but yet this hobby has indeed taught me that sometimes you just have to say it is good enough!! It takes 99% of your time to reach that last 1% of perfection. At some point we all say, “it is good enough”. Bob
- 773 replies
-
- 4
-

-
- san francisco ii
- artesania latina
- (and 1 more)
-
Happy Birthday ! ! !
-
SS Vinal Haven by TBlack - FINISHED
captainbob replied to TBlack's topic in - Build logs for subjects built 1851 - 1900
Tom, Isn’t it fun to look at the pictures and say, “Oh, blank, how do I do that”? Seem like I do it all the time. John's idea sounds good to me. Bob -
Ah, the joys of modeling. We think we are doing thing correctly only to look at some picture we’ve seen a hundred time and have one of those, “Oh, Sh** “, moments. Bob
-
SS Vinal Haven by TBlack - FINISHED
captainbob replied to TBlack's topic in - Build logs for subjects built 1851 - 1900
She's coming along nicely. You should be happy with her. Bob -
Thanks Popeye, Ah, that I could spend more time on her. Bob
-
Congratulations on a fine build and thanks for letting us all watch. Bob
-
The other day I was visiting a man who makes cabinets in his garage. He had a jar of vinegar in which he had put a few links of steel chain. It was the darkest rusty color I had ever seen. Using a rag he rubbed some onto a piece of walnut. The walnut instantly turned a beautiful black with warm over tones of brown like lovely ebony. Bob
-
You're doing fine. Steady on. Bob
-
Congratulations on a fine build. Bob