HOLIDAY DONATION DRIVE - SUPPORT MSW - DO YOUR PART TO KEEP THIS GREAT FORUM GOING! (Only 72 donations so far out of 49,000 members - Can we at least get 100? C'mon guys!)
×


keelhauled
-
Posts
788 -
Joined
-
Last visited
Content Type
Profiles
Forums
Gallery
Events
Everything posted by keelhauled
-
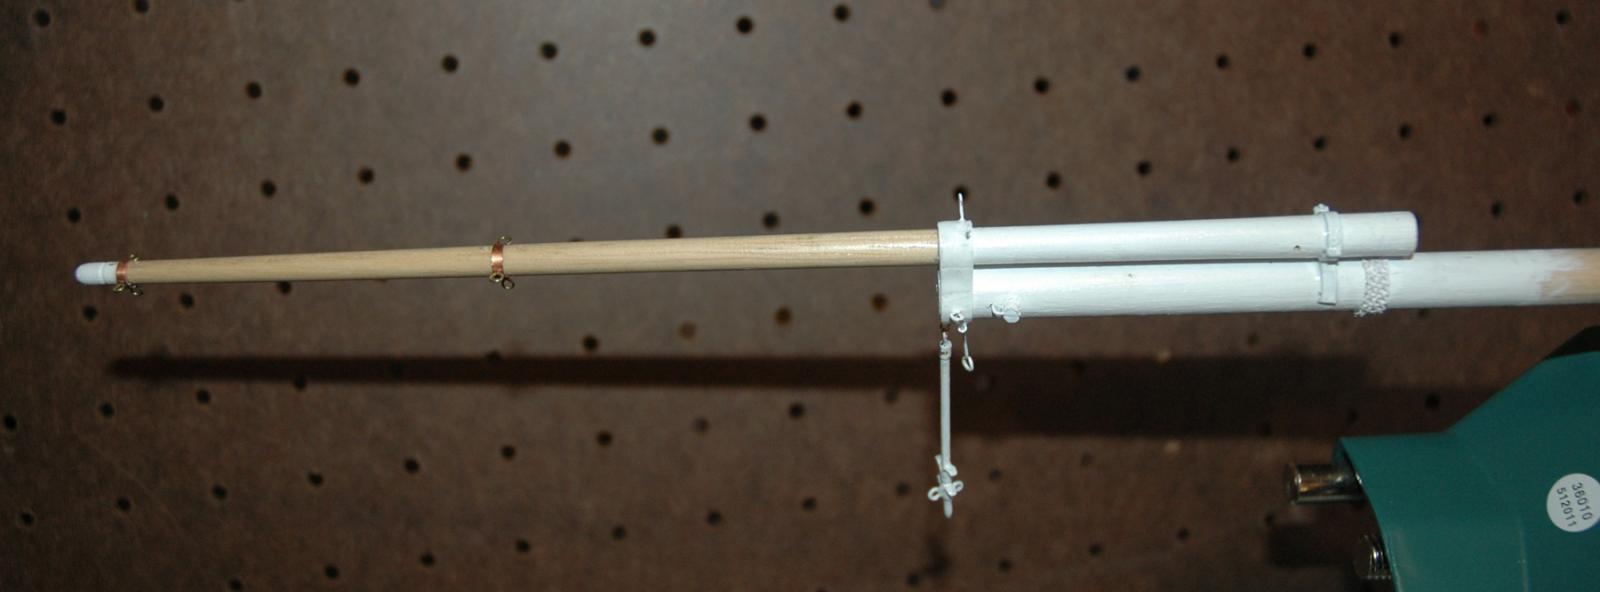
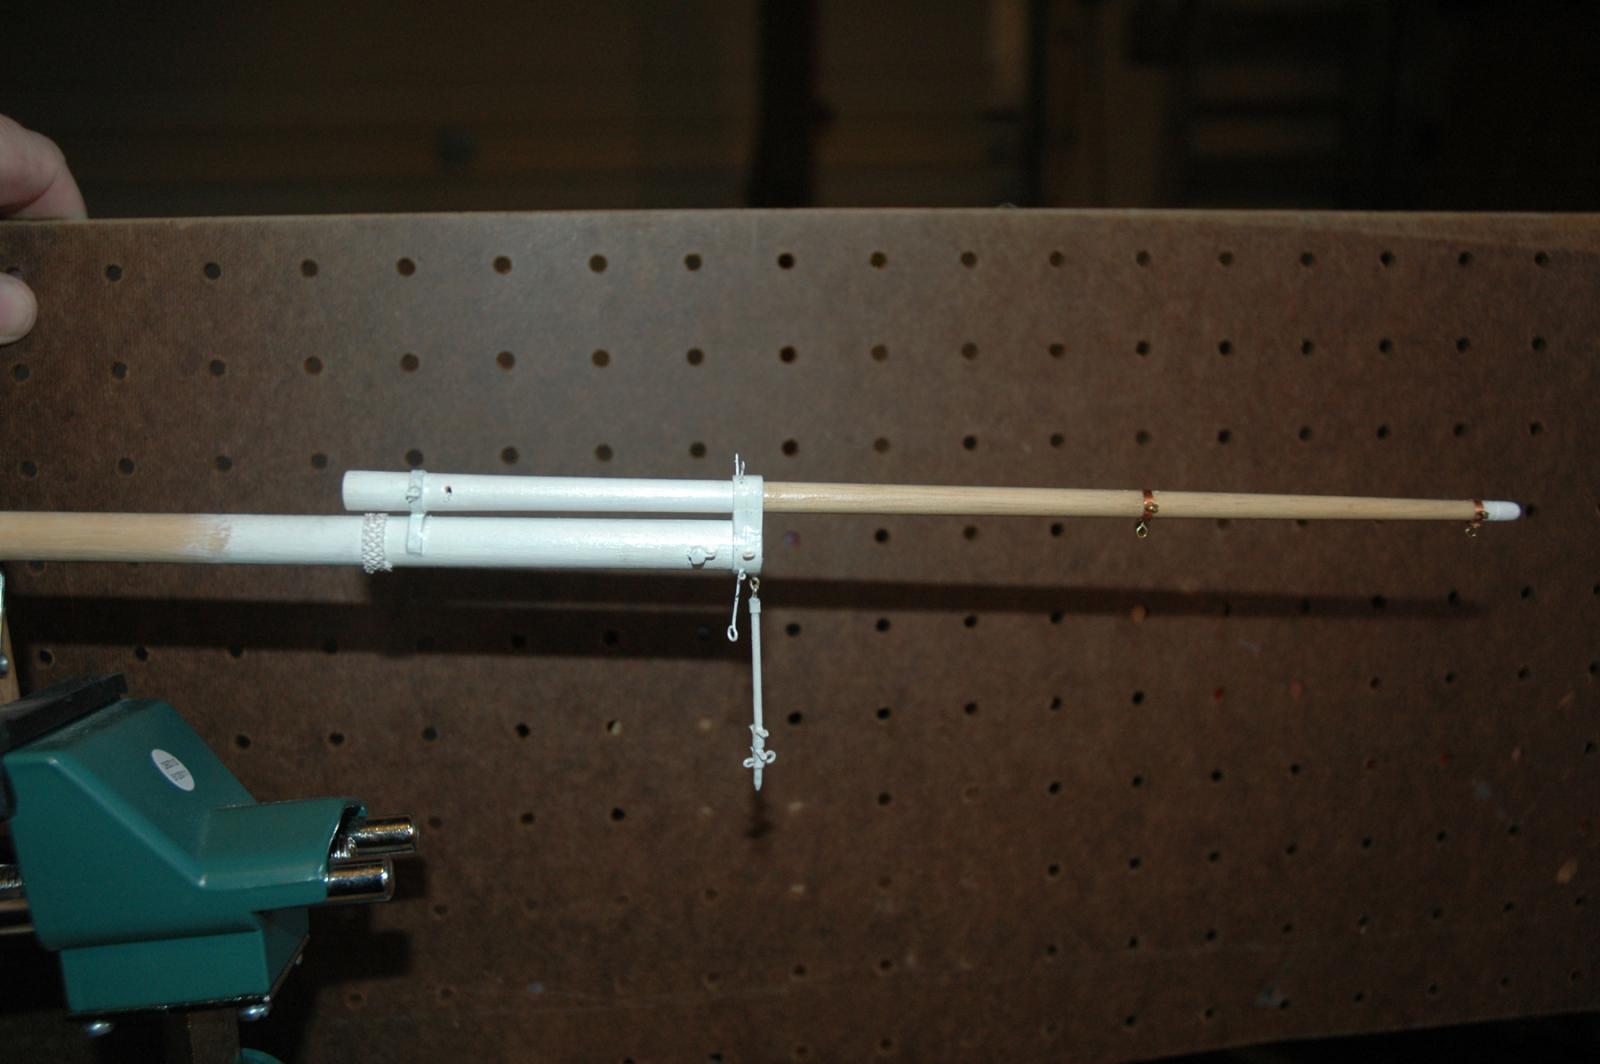
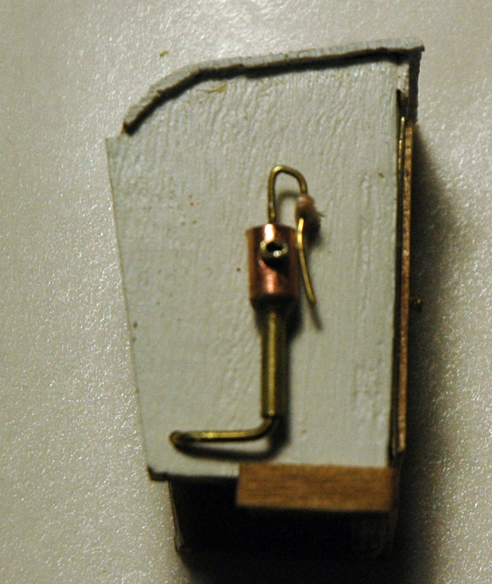
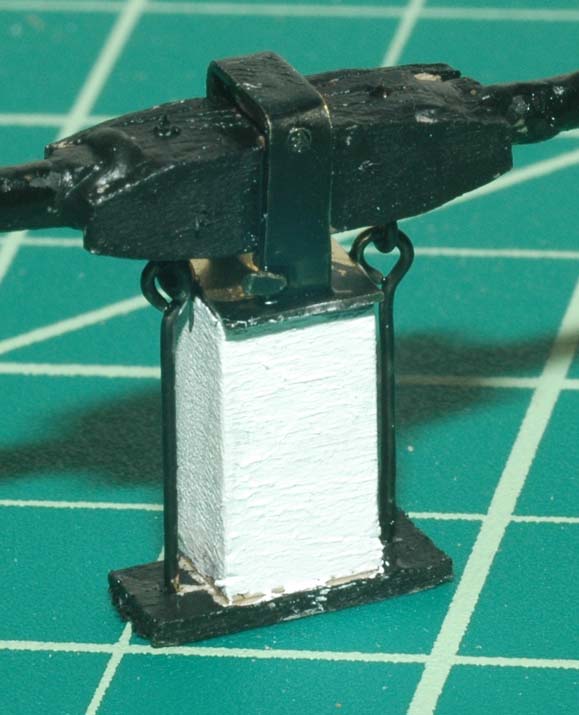
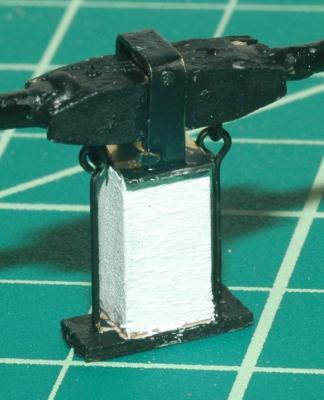
 I worked on the bowsprit. I went off of actual photos of the ship as well as Campbell's plans. Although the gammoning chains should wrap through the stem, the model didn't have this detail and by the time I realized it, it was too late. Further, the only portion of the gammoning that is visible when the model is finished will be the part going across the top of the bowsprit. So I just wrapped the chain around the bowsprit. The bands are brass. I simulated the hinge and clasp with brass rods and tubes. The dolphin striker is also made of brass.

- 525 replies
-
- 3
-

-
- cutty sark
- mantua
- (and 2 more)
-
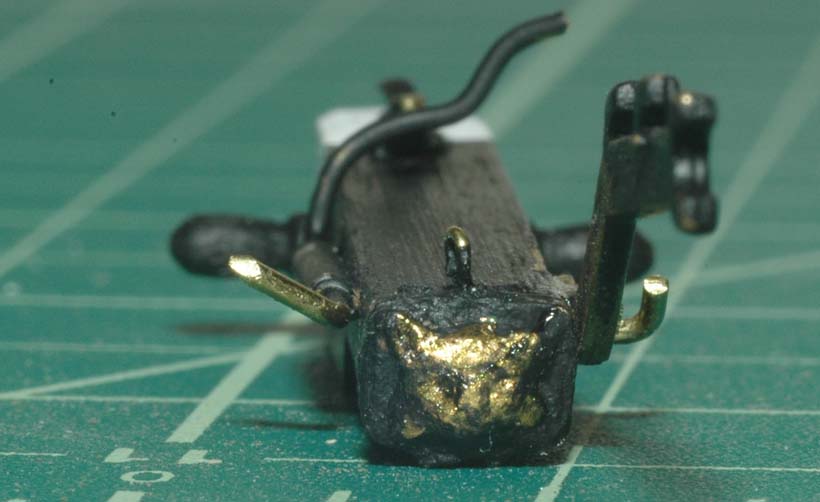
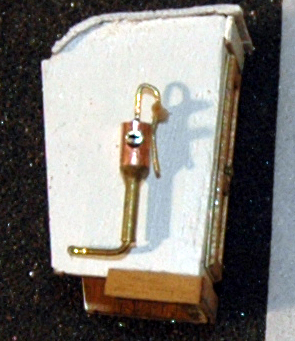
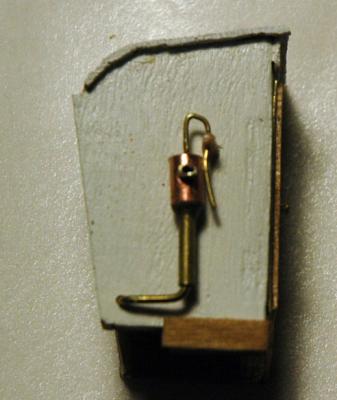
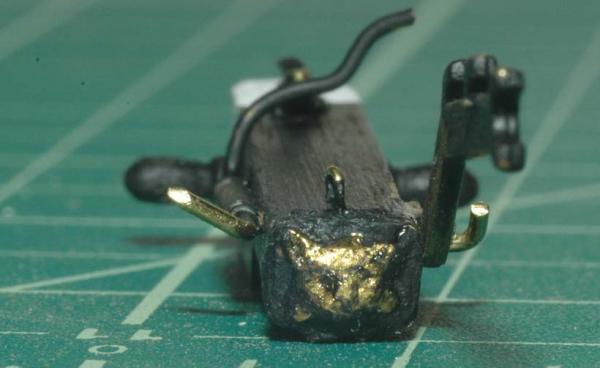
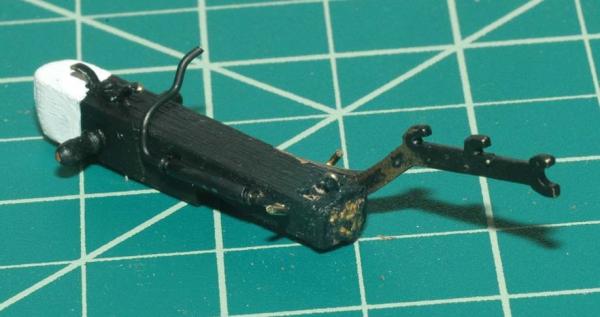
Sorry for the break in posts. I've been working on the ship on and off, but haven't managed to post the progress. I have been taking some photos so I'll work on posting them. I decided to tackle the ships pump. The pump that came with the kit didn't look anything like the real one. In fact, I can't figure out what the kit piece is supposed to represent. It kind of looks like a cam shaft for a car. Anyway, I made the pump out of brass. The pictures are of it before I painted it. But I think it probably shows up better before painting. Thanks Marc


- 525 replies
-
- 3
-
-
- cutty sark
- mantua
- (and 2 more)
-
Great build. The weathering finish is great and the interior details are very cool! Thanks for sharing Marc
-
David, Thank you for your thoughts. Marc
-
Bob, Really nice work on your Cutty. Something to be very proud of. The scale of your deck looks great! Just to jump in the conversation, as you said, the Cutty's hull was plated with Mutz Metal, not copper. It's slightly more yellow than copper. That being said, in 1990, I was lucky enough to be at the cutty when it's keel was being re-coppered for the first time since its launch. The crew was kind enough to give me part (about 3/4) of one of the muntz plates that they had removed. I have it mounted at home and it looks about the same color as the copper plates or tape that model expo sells after you let it air oxidize for a year. Really nice work! Marc
-
Popeye, Nenad, and Bob, Thanks for the condolences and wishes. We just interned my father-in-law today. I appreciate the thoughts. He is greatly missed. Hopefully, I'll be back in the garage this week. I was able to spend a couple of hours last week, but that has been it for the past month and a half. Take care, Marc
- 525 replies
-
- 1
-
-
- cutty sark
- mantua
- (and 2 more)
-
Thanks Grant, David, Bob and Nenad, You're right, you just have to accept that ships change during their lives and you can't always determine when those changes occurred. Sorry for the late replies. We had a family member who's health declined and required our help to take care of him. Unfortunately he passed and we've been tied up with family. So the Cutty has had to wait. I'm working on the spars today and will take photos and post. Thanks Marc
-
She's coming along very well! Nice job on planking - challenging bow. It's always a pleasure to read your build! Marc
-
nice work!!
-
Really a nice build! The diorama would be cool. Marc
-
Wow! Now I feel bad about my skills again! Now you're just showing off! Great work Grant! Keep it up Marc
-
Your ship is looking awesome. I feel for your bowsprit mishap. When I was building the Revell Constitution, I was almost done and my roommate cut the corner of our dinning room table a little too close and broke the bowsprit in the same fashion. If it is any consolation, the repaired plastic bowsprit has stayed true for 20 years now. So you should be good. I think that it's thanks to the rigging. keep up the great work and I'm glad that your healing! take plenty of breaks and protect that back! Marc
-
Hi Grant and Mobbsie, Thanks for feedback! I really appreciate it. Cheers Marc
-
Hi guys, Longridge's book on the cutty has a nice illustration. Unfortunately I don't have access to the book, but I've looked at that photo for hours trying to figure out how I was going to model it. This is the boomkin and not the stun sail boom. By the way, the cutty didn't use a boom for the lowest stunsail - it was triangular. This was common with some clippers, but not warships. The drawing in Longridge's book shows that the boomkin is square in cross section and hinged to fold forward with a stop to prevent it from going aft when deployed. The boomkin has a ring on the aft side which connects with a chain to the hull aft . From what I've read it is so that it can be folded when in port. Hope this helps. Marc
-
The Conny is looking great! Hated to see the issue with the rail getting pulled from the deck. I'm sure that the pin and epoxy will hold her down. I love watching your progress. Have a great trip! Marc
-
Hi Popeye! I never thought of having two building tables. I do have another model, a simple one - the sultana that I practice on before going back to the main build, but I never thought of having it so that I could easily go back and forth. May have to build another build table! My wife will be so happy! You are an inspiration!
-
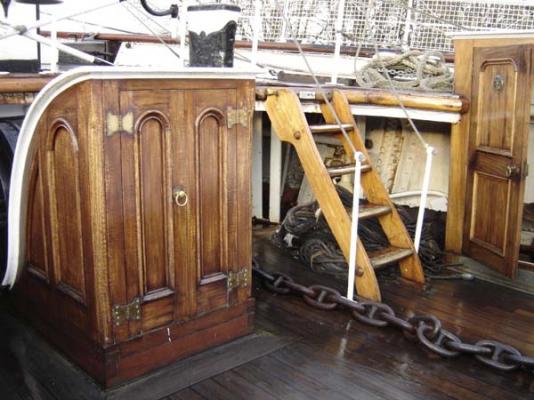
Thanks Popeye! When I was trying to figure out whether to varnish the cabins or paint them white, I looked at historic photos and paintings. One painting, commissioned by the Ship's owner and painted the year of the launch, had the cabins finished in teak. Then I read a scientific analysis of the paints taken during the restoration from areas on the cabin that were protected from stripping over the years . The report said the first layer had been white, then subsequent layers consisted of coasts of varnishes, and other coats of white. So were the cabins originally painted white and then the owner had them stripped back to teak and varnished as in the painting during her first year? Who knows?! I gave up and just painted the panels white. Same thing happened trying to figure out the hatches as well as the combings. Some photos had them white, some were dark (black or reddish/orange? - I read descriptions of both). Tons of time spend with magnifier glasses and old photos. I think that I spend too much time trying to figure out what the ship should look like instead of just building it. Sometimes I should just make a decision and move on. OR drink more!!! Marc
- 525 replies
-
- 1
-
-
- cutty sark
- mantua
- (and 2 more)
-
Hi Grant, I was just catching up. Sort of been out of it since my three operations. Now I find that you had some of your own! I'm glad that you've recovered well. Despite recovering, you've been very busy. I can't wait to try your contraption for sanding blocks. looks like fun and quite a time saver. Take care, Marc
-
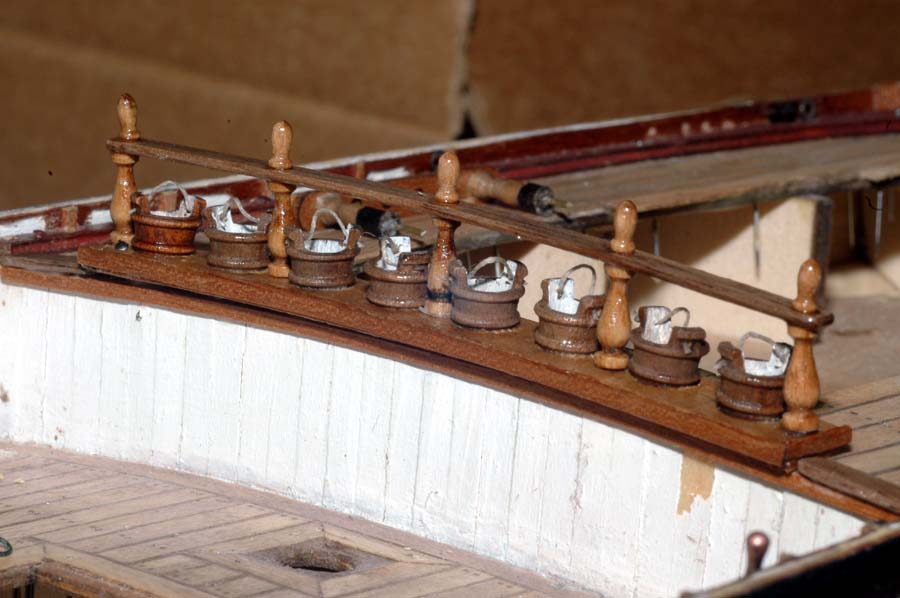
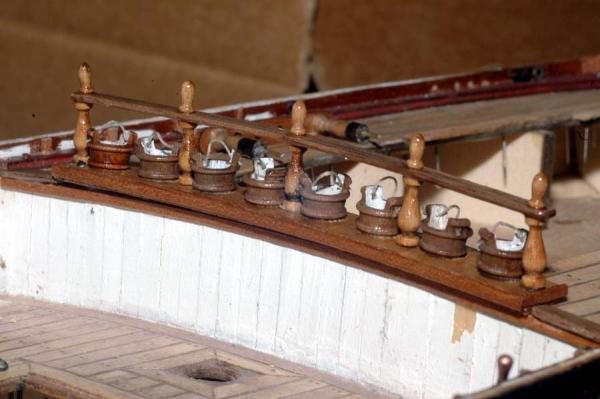
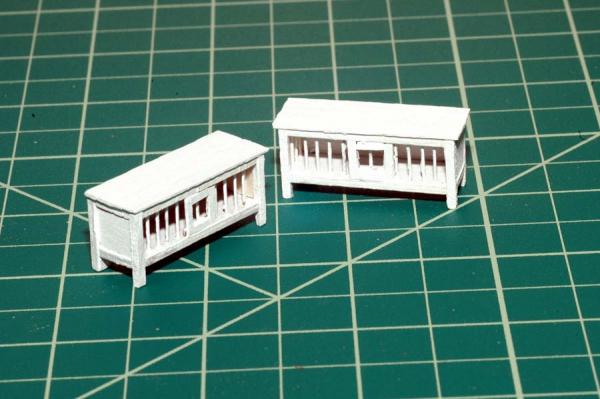
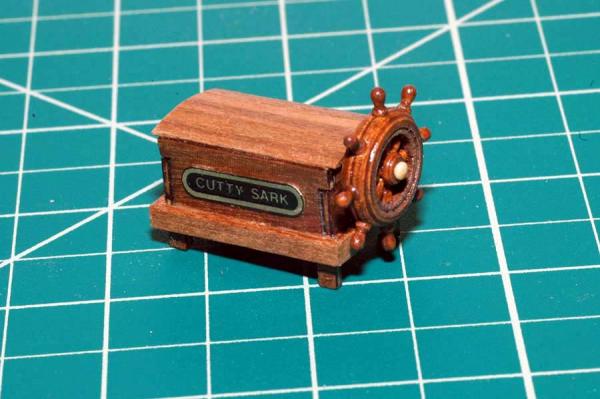
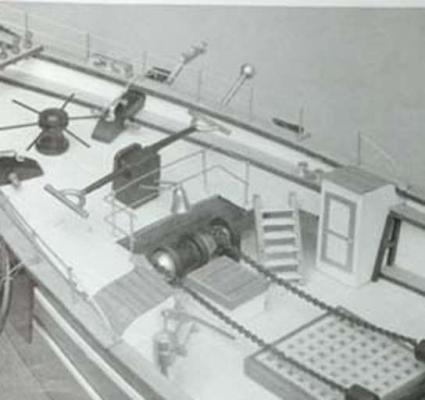
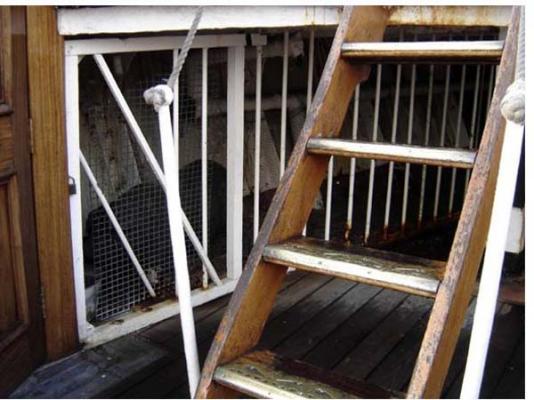
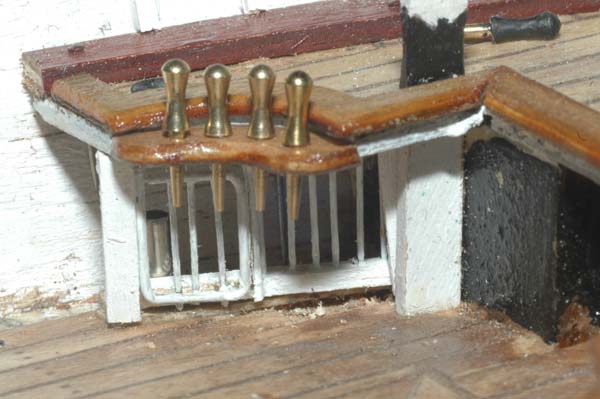
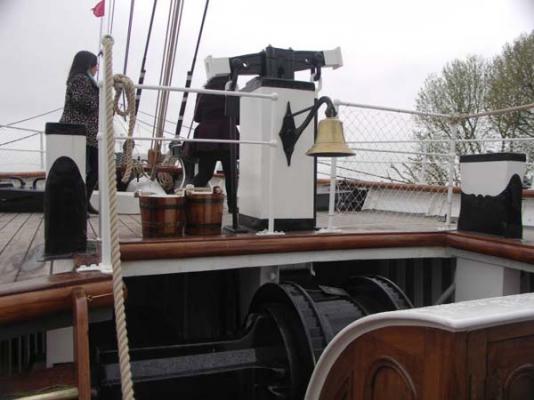
So I haven't been setting the world on fire. But I have gotten a couple of items assembled. It always amazes me how I can work for hours and not have much to show. It's the journey and not the destination! right?! So I've assembled the ships wheel It's not pictured, but I ended up painting the brass cap at the top of the handle. The wheel was very light, so I applied several coats of dark walnut stain. The kit didn't include the fire bucket rail, so I built one. I purchased the buckets. I made the rail as close as I could to the actual ship's rail. Different photos of the ship over the years show slightly different arrangements of the buckets as does the different plans. I went with what made the most sense based on the size of the buckets that I had. . I drilled holes through the uprights, through the rails and the tops. Then I put bronze pins through the assemblies in an attempt to give it some strength. When I was drilling the holes for the buckets I evenly spaced them. Dumb, I forgot to adjust the spacing for the spindles. I realized after it was all glued in place. It will be a mistake that I can live with. The photo is of the assembly almost finished. The tops weren't glued in place, so there is some misalignment in the photo I also built the hen coops. The coops are kit bashed to match the actual ones. The kit had brass pins going around the coop with no door. The actual coops have sides and doors in the front. Although they aren't pictured here, I also put the rings on the sides which tie down the coops to the deck. Thanks for the feedback!
- 525 replies
-
- 3
-
-
- cutty sark
- mantua
- (and 2 more)
-
Mobbsie, Popeye, David, and Grant, Thanks for the wishes!! I'm feeling better, but still in pain. Hasn't kept me from modeling. Just haven't been as active. I keep stealing away to the garage to work and the Admiral finds me and sends me back in. Now I'm back to work and just too tired in the evenings. so model work has to wait for the weekend.
-
Well, I'm finally back from medical leave. Thank God for modern science and medicine as well as my wife! She has been nursing me back to health. I had to take a month off to recover. Now I'm back making up for lost time. I haven't had time to post - too busy building , so here is a chance to catch up. I worked on the fore castle. I created walnut molding to cap the end of the deck. I also cut through the deck and added the posts for towing the ship (sorry the proper term has slipped my mind ). I built the paint locker for under the deck on the starboard side and the pig sty for under the deck on the port side. Here are some photos A photo of the kit for reference. where the paint locker on the ship should be. It was missing this time, but present the first time I was there. I have a photo, but not a scanner to digitize it. Also note the towing post running through the deck viewable above the hatch (black and white post) Paint locker and towing post on the left (forward) Pig sty on the ship Pig sty on the model created from soldering brass wire. I also added the belaying pins per Campbell. although the pins are the same size as those provided with the kit, I think that they are too large and will most likely replace them with smaller ones. I really didn't like the windless that came with the model, so I built one from scratch. I think that it turned out really good! The actual ship for reference. The towing posts are on the left and right. With the handles I ended up taking the handles off. Since I was going to have the ship under sail, it didn't make sense that the crew would have left the handles in longer than necessary to get the anchor up. So off they came. Here are the cats. I made them from scratch (except the whiskers). I made the anchor release our of brass, using the book by as a reference. The cat is actually in relief. I'm not sure how good the sculpt is but it was the best I could do. That's it for now. Take care and stay healthy!


- 525 replies
-
- 6
-
-
- cutty sark
- mantua
- (and 2 more)
-
Popeye, thanks for the wishes. Thanks for the feedback and encouragement DCIronFist! I should be able to start back with updates next week. Thanks Marc
-
"I was able to work out what was needed and make up a spreadsheet to convert all the sizes to my scale of 1:90. Adding these details at this scale presented something of a challenge, and so in some cases, there will be the "suggestion" of an item rather than the fact (for example the Snatch Blocks on the topsail yards). While I am sure that Remco would likely be able to produce a working facsimile at this scale, we mere mortals will have to settle for an approximation". Would you be willing to share your spreadsheet? Nice work on the yards/spars! Thanks Marc
-
Thanks Bob, Reading everyone's builds is what keeps me going!!
-
She's looking awesome! This was the model that changed my life and solidified this hobby for me when I was in college. You've really done a splended job. I also like your temp dust case. I'm going to build my next one the same way. It must be pretty light, but stable being out of PVC.