popeye the sailor
-
Posts
16,007 -
Joined
-
Last visited
Content Type
Profiles
Forums
Gallery
Events
Everything posted by popeye the sailor
-
 super job Jack...i've got at least four different tints of Olive Drab
 -
A small Crewe workhorse called Pet
popeye the sailor replied to michael mott's topic in Non-ship/categorised builds
the beauty of the hobby........it keeps us thinking.........it keeps us young I never knew that printers had those little motors........where's my sledge hammer -
for colors, you'd need to look at what the manufacturer's specs were at the time. in automotive, it's the same......I have charts on Ford and Chevy. it's also the same as the specs in general......research on the particular model will give you the info you need. I work for Wal Mart Logistic......I've worked on trucks a little, but my main job is maintenance on trailers. in the early days of my employment, I worked on quite a few different makes......trailermobile, wabash, Utility.......but now we have narrowed the makes down to Great Dane and Hyundai. I've been looking for a Freightliner w/sleeper tractor, to do a copy of a Wal Mart tractor, but all I've found so far are the day cabs {they are the older ones though}. Revell, AMT, and ERTL has done the firebird........but they were late with the trailer....they did one for the sequel don't recall the movie....not sure if it's accurate. sheriff Justice's car can also be found, if your going to go that far gonna prove to be a fun project
-
really nice....the houses look great!
-
WOW! either you move lightening fast, or I've been off line too long superb plane.........the canopy and ball turret came out great!........been there with the decals though yea....it stinks when that happens, but you managed very well......kudos! really great looking model Craig......really looks life like!
-
checking in Mark to see your progress....I see the hull frame is looking really good. hope to see planking very soon yea....weather's getting better...can't wait to get back to sanding in the garage. in the house I only do hand sanding, so a lot of the dust ends up on the table.
-
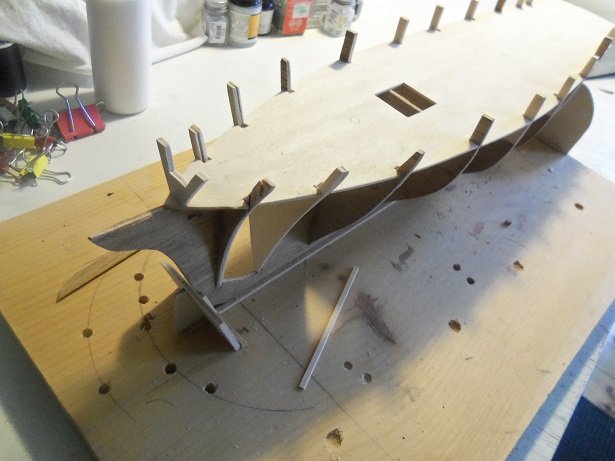
thanks Kevin......the hull is already look'in better, although I haven't been able to get back to sanding her down some more. when I do, I'm sure that the hull will be good enough to carry on with I'm sure it did J.......test fitting the planking also shows that a couple of them don't touch.......a visible gap to fill in. as long as I can get it close, I'll be OK with it. I'm not throwing it away. once I get a mile or two on the hull, I'll start a log for her. I though of additions..........did some checking and I think my idea will work. first I need to be sure I have a hull to work with
-
..oh John.........you know me........I'm no speedster! I'm lov'in it so much.........I'm building two no book ends! yes....the fun begins J! at the moment, it's waiting to be sanded some more......I repaired some of the imperfections with filler. I haven't used much....... it's going to be slow with the second hull frame........even with banding the frame when I put on the deck platform, I'm still finding them off. they don't fit the platform and a couple of the bulkheads aren't shaped correctly...I'm having to reshape them. the bow posts are splayed like a boudwa babe, so I'm embracing your idea with cutting them off, and replacing them. I'll likely focus on the first hull and devote some time to the second...I've already glued two sticks together, so I'd hate to give up on her now for her, I'd call her 'Jumbo II'.....I would never call her a 'Swan' thanks Lou.......it's not a large hull......but I did use narrower strip stock. dropping it down from 8 mm to 5 mm was a good move. I'm using the 8 mm stuff on the other hull frame, but the stuff is kinda stiff, so I don't know if I will do the whole frame in it. as I get down to the turn and the contour areas, I may cut it back. I completely used up the long bundle, which was about 17 strips. each one was cut in half to give me two strips...so it equated to 34 strips. I still have the other bundle of shorter strips, and I found another bundle in the spare room. I'll have enough to do the job well gents......I just got the word that the admiral wants to go, so I guess it is errand time here at the wharf. I hope to have some progress for ya later
-
hello Gary while I have been known to mix my own colors, I didn't for this model. I used Billings Robins Egg Blue, which is a gloss.......flat black and flat red. you could go totally with flat colors.......if you like to weather your models, it would be more realistic, as most fishing vessels sometimes don't get the maintenance that others do. I've seen some in different color schemes.......but if I were to do that, I'd also change the numbers to reflect that it is a different ship. I used an airbrush to paint the hull, but the Billing paints that I have are old and didn't perform well. there are rattle can colors that are really nice...and if you look for them, you can find them in flats {heck.......just use primers...can't go wrong with that}. scuppers allow water to drain off the deck....most fishing vessels have them. if a kit doesn't show them, then this would be a bit of detail that the kit manufacturer forgot. research would be your friend here.......and would help to give you a better understanding of the subject. they don't need to be large either and three would be the norm........one at the center of the deck curvature, and the other two offset the center to account for rolling and pitching. glad to hear your still working on your model......Billings kits are really good......I have built many. thanks also for looking in on my Word Press blog........it's a good feeling to know that they are getting used. if I can help further, just give me a shout
- 378 replies
-
- 2
-

-
- t78 norden
- billing boats
- (and 1 more)
-
it's all in experimentation and fabrication........sometimes the first try doesn't work. so you do it all again I've had mine as well. your leaving me in the dust just like you did with the half moon....still haven't masted her yet. your doing a fine job with this one, considering that the kit isn't very 'exact'. I'm finding out more as I work on the second hull frame.......I'm having to reshape two of the mid ship bulkheads. it's sad when one hull is cloned from the original parts......and that frame is assembled better than the one using the original parts! feel good that your hull came out as well as it did........I wonder if the fellow who built that other one ran into the same problems? with your speed..........when I finally finish mine, you'll be either fishing, or just getting back from your road trips
-
sweet looking model Jens..........superb job on sails and rigging!
-
very nice progress is that the Revell Cutty on the sill?
-
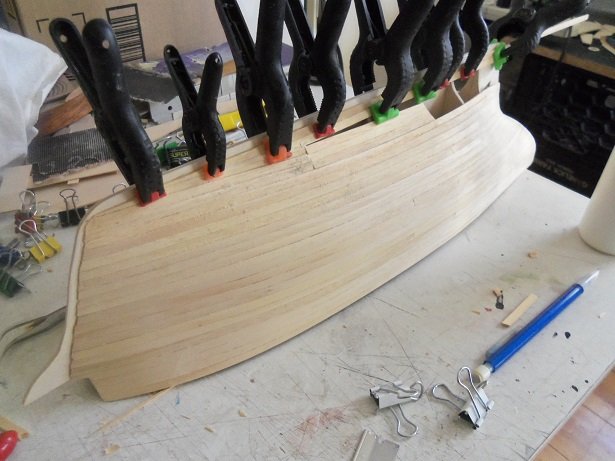
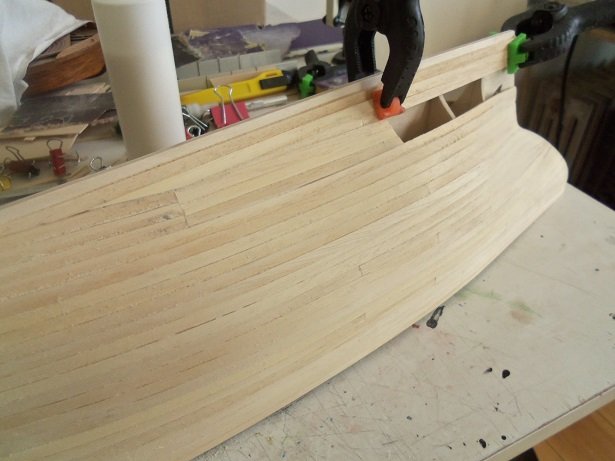
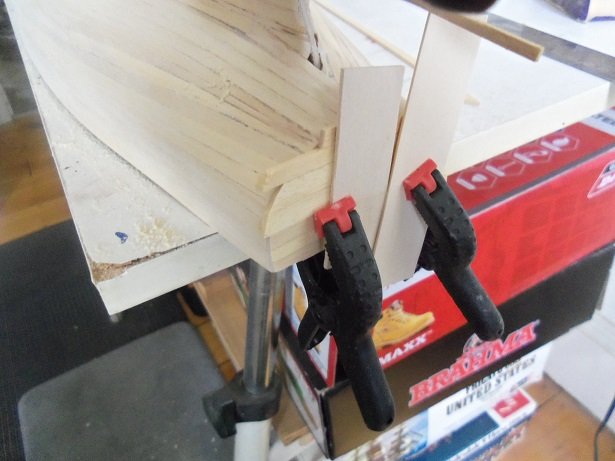
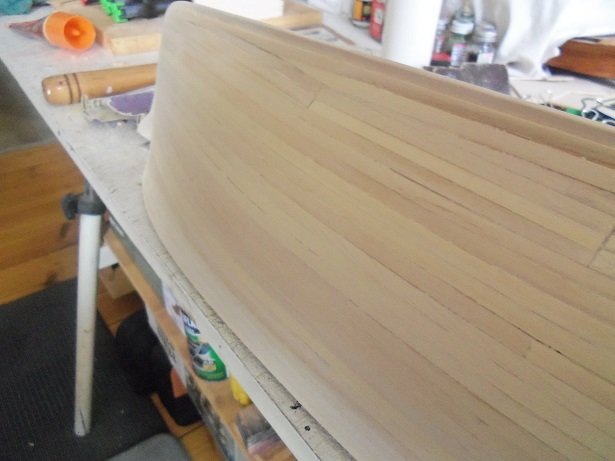
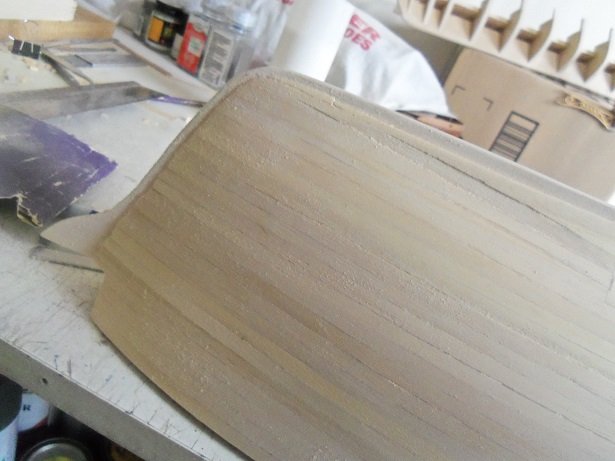
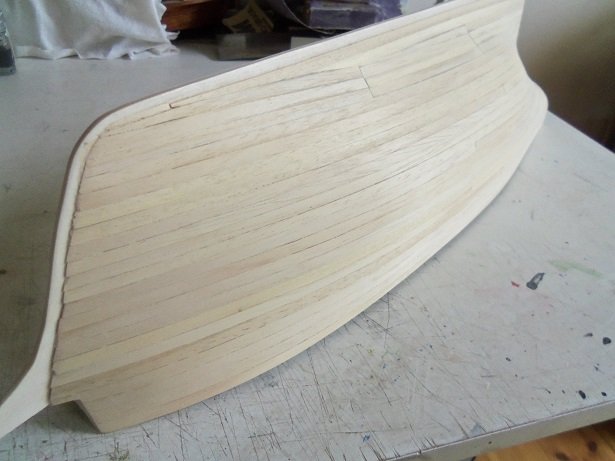
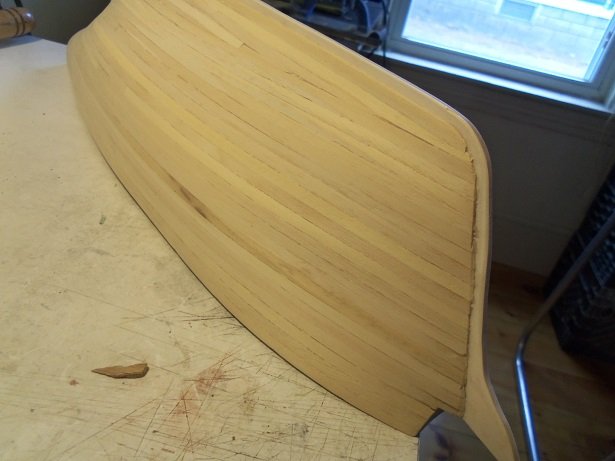
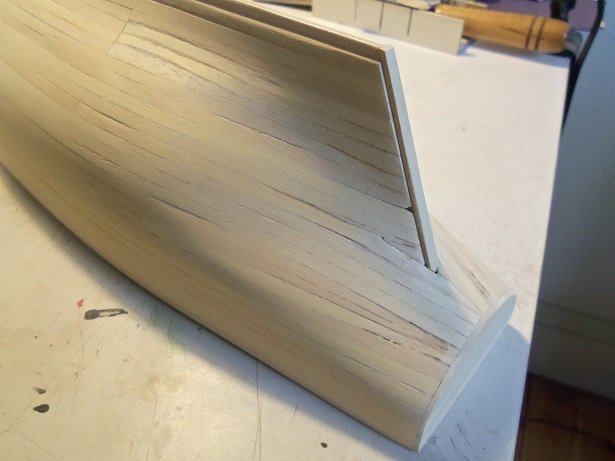
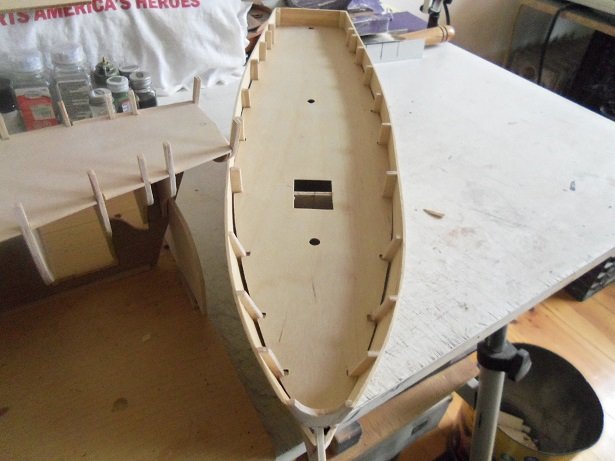
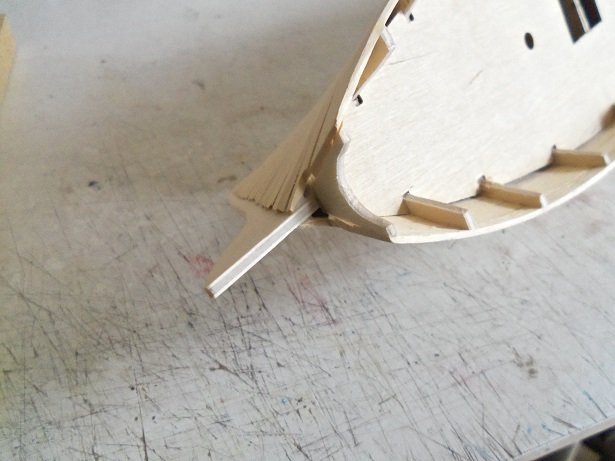
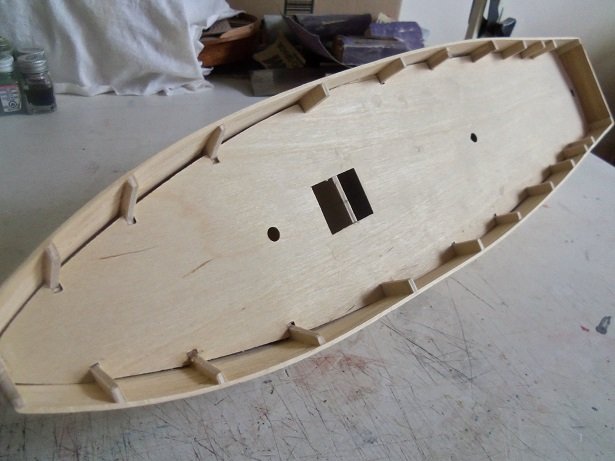
thanks for the kind comments and to those who are following along. the hull is officially planked!........hull wise, that is the other side gave me just about as much trouble.........the sanding was fairly tough....not sure how much I took off. I had done some of the sanding on the starboard side, but I went over it again to see if I couldn't get out more of the imperfections. still a bit more I need to do. I am happy to report that I've used little filler so far........I may need to use it on the harder areas though. thanks J.....your still further along than I am ......but that's OK! it'll give me a build log to follow welcome to the log Robert....I hope you enjoy following along. I believe the word is sweet OC.........I did enough of that sanding the hull .........changed my shirt once or twice thanks Ed....most of the log will be devoted to the first hull. I'd start a log on the second hull, but I don't have a definite name for her. so, for the time being, I'll post a few pictures of the second hull just to give you an idea if where I am with it. I've done some faring of the frame so far.......not very prolific.......but I did add the bow bulkhead on her today. I will need to trim the posts some for being too tall. it's almost ready for planking, and for her, I will use some of the supplied planking.....when I get to the tighter contours, I'll resort to the narrower planking. it worked out quite well. here is one picture of the bow bulkhead. it's still in the planning stage. as mentioned, the sanding was extensive........it was good to have used 1.8 mm planking......gives me more to sand. the shot of the starboard side.....with a little more sanding. not too much here......minimal the port side.......there's one area of the bow that still looks too thick. I didn't bevel the planks enough I guess. when looking at the stern, a few areas become visible.......the curvature of the stern and under both sides of the counter. I did add a stern strip, to tidy it up some and enable me to cut a better looking hole for the rudder. I shoulda got a picture of the outer surface of the transom......it's shaped and sanded as well. the deck area looks pretty good.....still got the gaps, but with planking they will be covered over. ...and of course, a view of the bow the next step will be to do more refinement of the hull, and to do a tracing of the bulwarks for the cap rails.


-
B-25 Mitchell "Meet Miss Runyon" by Javlin-HK-1/32
popeye the sailor replied to Javlin's topic in Non-ship/categorised builds
I see Murphy paid you a visit........ good that you got things sorted are there instructions to motorize the model? I know there are some out there that can be done. on some of the earlier kits, they supplied the instructions and some of the parts, but did not include the motor......kinda stupid if ya ask me. nice progress so far though........look'in very good -
I was always under the impression that Airfix kits were good. build a Lindberg kit and compare. I can see why your replacing the props........
-
I get that problem out in the garage. to combat it, I run a number of fans.........try to get'em before they get too close
-
there's a thought.........will we see a clone?
-
very impressive ...........you've done a spectacular job with this project. .......took you .......what, 20 years to bring 'er back out.....and look what a splendid model! kudos!
-
the pilots came out great Lou! you might want to bend the foot pedals up ....right side do them evenly, and the other to match the pilots feet {don't necessarily need to be touching}....it might add a tiny bit more detail.
-
outside of that one rocket rack, you wouldn't even know she hit the floor........ looking splendid! nicely detailed and all!
-
joining in on the fun Jack..........you've picked a really neat project off to a very good start!
-
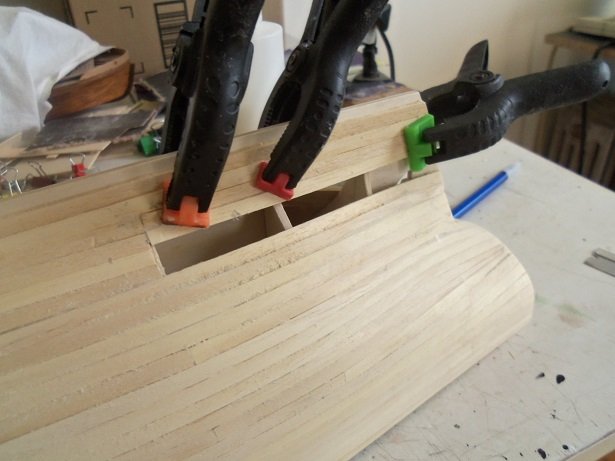
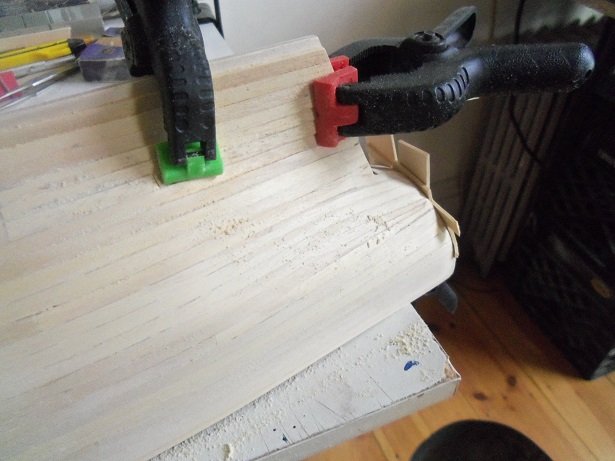
hey there all!...........planking has continued the port side is almost closed up. there will be a break in the action though, as we need to go to our oldest son's house for babysitting duties. * started to write this...this morning.......the babysitting job is done. had a great time with the two younger rug rats.....Ford has turned into a total chatterbox, and Ari......well he don't talk, but he's a pretty active monkey couple of things...I really shoulda tapered more......the bow could have benefited with a few....and I think I was too late with the stern.......but I do have a second stab at it I will guarantee that the second will not come out like the first...they never do, given the fact that I've done the two hull thing before. I have a project in the wings that would prove my theory, but another obscure project has caught my eye, and seeing that I have the perfect hull to do it to......it got bumped back. {now that I mention it.......it gave me an idea to try}. anyway......the planking was stubborn and wanted to lift off the bulkheads.....kept having to reset them. it makes me thing that the bulkheads might have been a bit off too. knowing that I'm going to close the hull by trimming planks, I added the garbard plank.......leaving the keel unplanked.....I don't want to add any more thickness to it. I need to trim the bow heel a little to get the proper curvature there........even the line a little too. I did a little tapering at the bow at this point.....filling in from bow to stern. it can be seen that I've been doing some sanding as I've gone along.......can't stand to see how ugly it looks. it's true..........to all those who are just starting out....these hull look butt ugly.........they don't start looking good, until they are sanded and get some form of paint on them. don't let it deter you...... the mid ship has been filled in and all that's left is the stern area. as it closes, the hourglass look appears at the stern stem. tapering and a stealer will fix that. while this was going on, the transom was being planked over. this will all be trimmed after and sanded. the port side got more sanding to get rid of most of the plank edges. it looks like clinkering........some folks need a tutorial for this method of planking..........I'm a natural at it I think with some paint on it, the hull will look alright. I did the trimming at the bow. the transom has been trimmed and sanded.......that's taken care of. the starboard side is the next step.........I've already turned it around and applied the first plank to end all planking