HOLIDAY DONATION DRIVE - SUPPORT MSW - DO YOUR PART TO KEEP THIS GREAT FORUM GOING! (Only 44 donations so far out of 49,000 members - C'mon guys!)
×


popeye the sailor
-
Posts
16,007 -
Joined
-
Last visited
Content Type
Profiles
Forums
Gallery
Events
Everything posted by popeye the sailor
-
 thanks John........it may not be the exact replica of the Clotilda that I was hoping for.........I think this isn't a good basis for the model. but, I'll try to get her as close as possible
 -
the start of the rigging........looks good I'll have to fix the anchors in my kit.........they are loose and the banding is beginning to peel. I don't have a rope walk.........I usually rely on different size thread
-
I'm not sure J........but that is what is under the fore deck.....no raised deck at the stern { I'll save that for the other one}. it may not be that far under either.....it's just a dry fit. if I were to guess, it's probably a ratchet/pawl set up operated by a lever of sorts. it might be too modern as well.....I may need to scratch build something to this effect. thanks Ed
-
Richthofen test flown the D VII himself and didn't like the way it handled, so it halted for modifications........he later flew the Dr 1 and loved it. little did he know that there was a flaw where it would lose a wing.......for those it happened to, they never lived to tell about it. I have a Guillows Dr 1 waiting for tissue at the moment........when I lived in Florida, I built Fokker D VIII....best flying model I ever built
-
you misread my post Thomas........I'm aware that they are all separate companies.....I've read about most of the info you listed. in the book, they mention the Stuka.........haven't seen the full name for the plane on any model boxes...I don't think it would fit very nice pictures of the pink lady {can't believe I spelt Focke wrong.......} nice to know someone else like the FW Ken........I built a lot of them in my youth. I also built a large scale Stuka.........sadly it was destroyed by my brothers and sister { only one sister was involved in nose diving it into a stump}. there are eight of us you'll have to enlighten me on the Do200........don't think Dornier built one.........I've never built one. not having done any research on her Mark...I'd have never picked up on any mistakes. the secret is safe with me .........still a beautiful model in my eyes.
-
looks like an interesting helo Jack......should prove to be a fun build! errrr, I'm not familiar with that number that's been float'in around ....what type of helo is it? {got that much out of the conversation}.
-
off to a great start Craig!
-
very nice........quite a bit of talent there
-
youse guys...........your baiting me aren't you! that looks to be a Revell kit........the deicing panel on the rudder fin is interesting I'll have to keep this one in mind {yea......you peaked my interest}. you did a superb job on her Mark ....super detail paint! my two favorite German planes of WWII are the Foke Wulf and the Stuka....WWI ......anything built by Fokker. you must have this book in your library Thomas? the Luftwaffe studied the B 17.......at one time, the KG 200 had around twenty of them. check out the Wulfe Hound log.......I have a soft spot for obscure subjects. I had fun build her hey Jack.........Gibbs is an American eskimo. he's kind of a half pint.......may have been the runt of the litter. that's his usual station when I'm at my desk...other than that, he goads me into the living room, and we sit together on the couch. sticks to me like glue
-
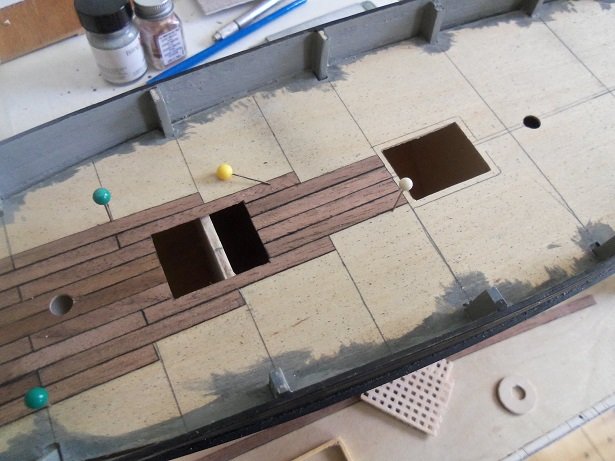
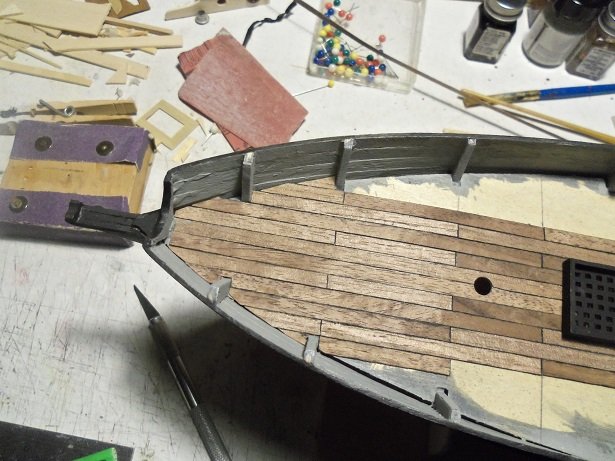
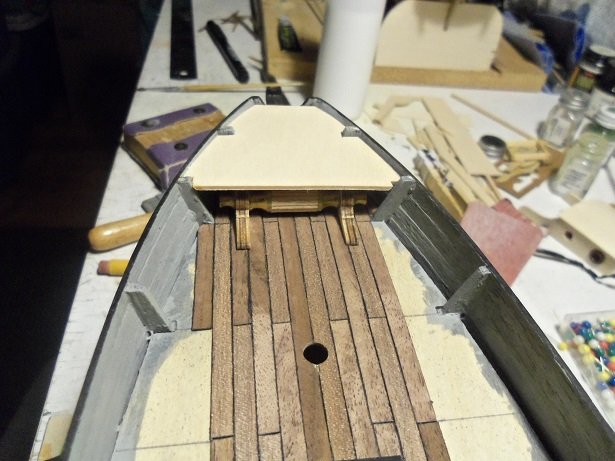
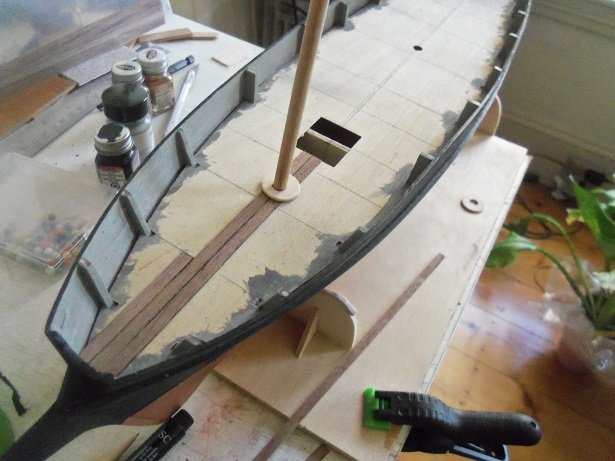
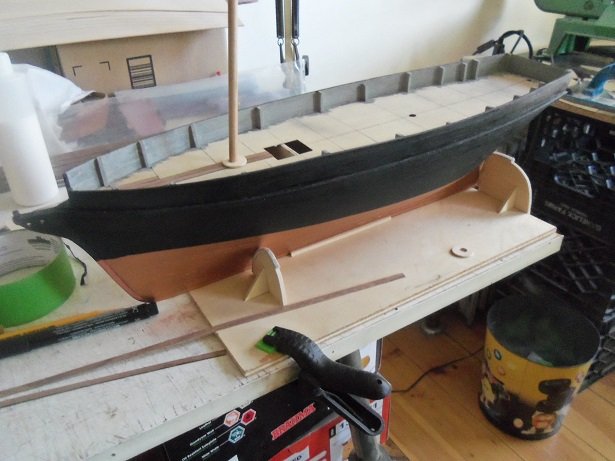
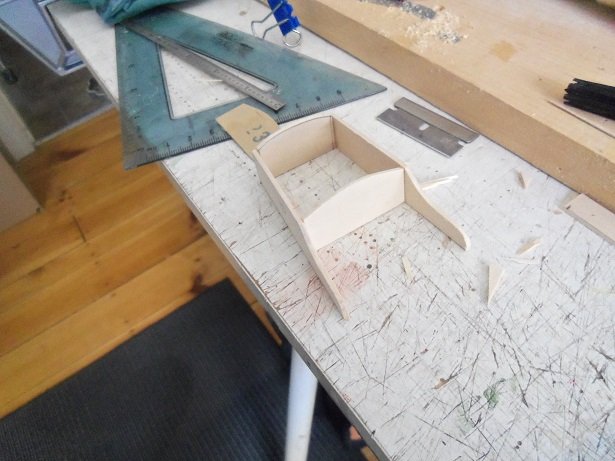
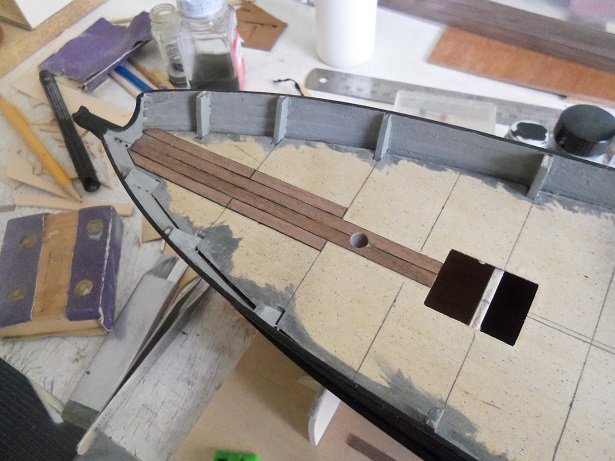
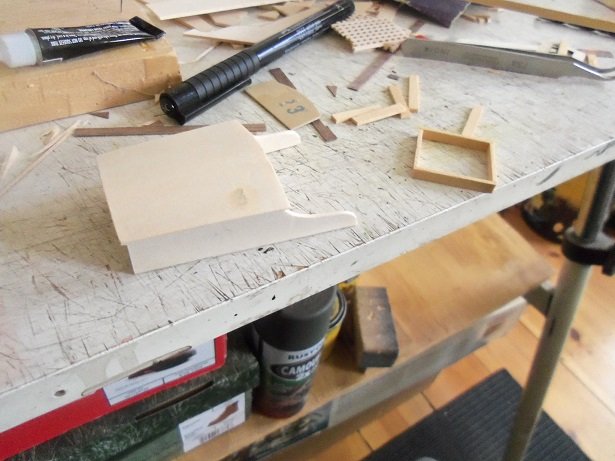
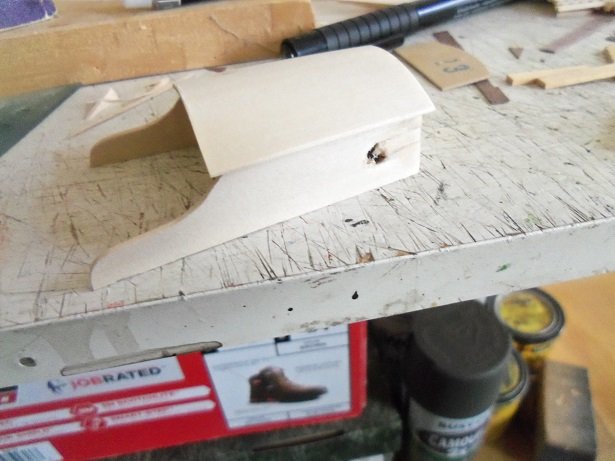
thanks J and Kevin........thanks also to all who looked in. I went further with the planking.......we still went out for the groceries....errands wait for no man {or virus}. I put together my portable jig........it's a jig and I set it up on the port side of the table it's quite simple really.....this hold looks much better. once the hold was dry, I used it to trace out the second hold. two things here.......1- it's supposed to be located aft of the main mast. putting it there would have made it cramped for the aft cabin and the wheel house {box}, so I bit it and moved it up. it does look logical. 2- I wanted to plank around these structures....I traced around the outside and inner dimensions of the hold, but I don't know why......I boxed in the forward hold. I later said the heck with it..... with the first hold done, the second one was made. the first hold got fitted with the grating. at this point, I went totally aloof and ran the planking all the way to the transom. I forgot to cut out for the main mast......I'll have to go prospecting later. the two grates.......now both have been fitted with the grating......they both got a coat of flat black here they are in place on the deck.. more planking has been added. the bow has been done up to a certain point.......now to whip up a fore deck. in the picture, the fore deck is tucked under the cap rails......no extra will be needed for the bulwarks. I'm surprised that there isn't a break water, or railing..........but...it is what it is the fore deck will cover the first two bulkheads. the height that it is to be, will be perfect for the windlass. I got it out on the bluenose kit.......gotta order fittings for that project anyway cutting the deck out, cutting out the posts...filing and beveling.......and we have the start of a fore deck. I will be planking it too. I may try and narrow the windlass down a bit.....might be too wide. more to come soon. the rest of the city may be home bound......but I have to work tomorrow. I should feel lucky......but I'm concerned.


-
looks like a Focke Wulf........interesting shot. if it was an attack, the belly turret is pointed the wrong way.
-
looks awesome you did a good job!
-
Jedi mind control would come in handy right now
-
this is one sweet looking plane! weathering and grime is done very well awesome!
-
thanks.....the color is a cromate on the green side.......perhaps I can add some green to it to attain the color. according to the instructions it can be either green or aluminum. these planes were painted during the early part of the war, but by the time that the G variant came into service, the direction of painting faded along with the paint....they started using them in bare aluminum. I do have several different shades of drab.......I will make do.
-
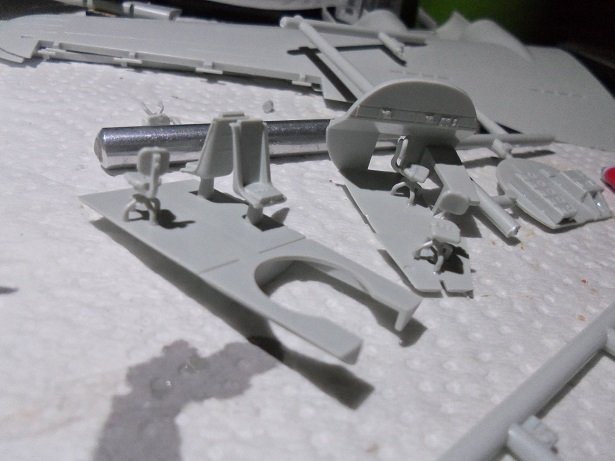
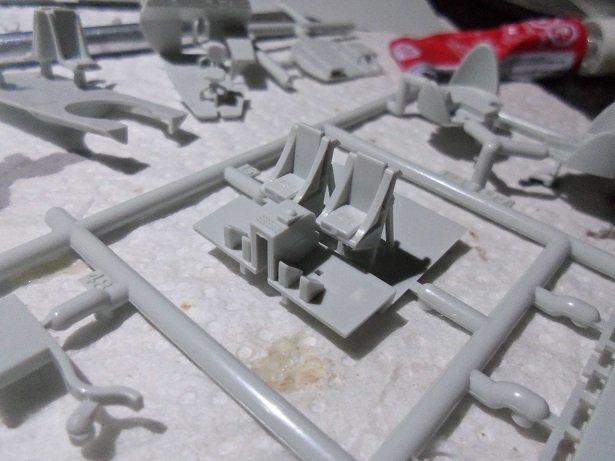
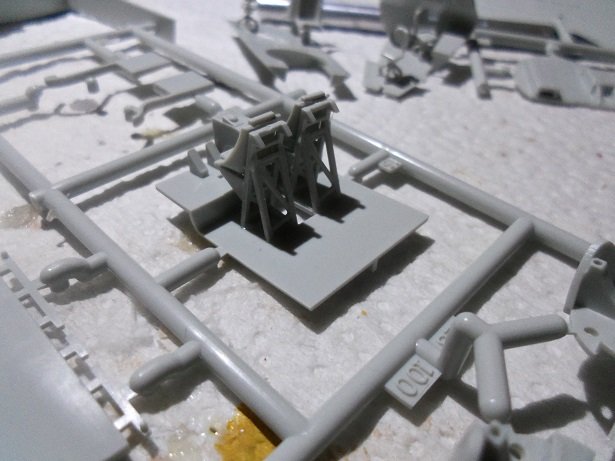
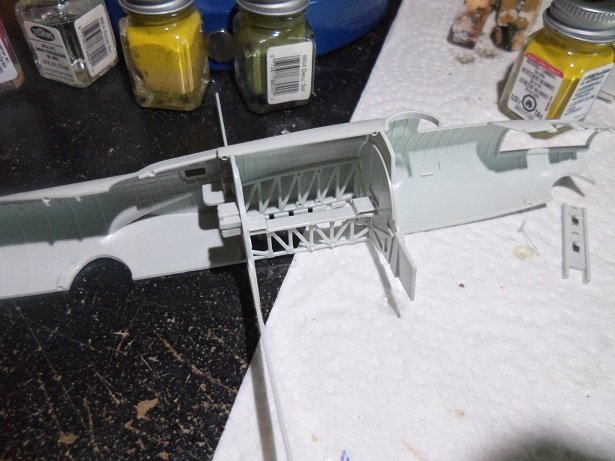
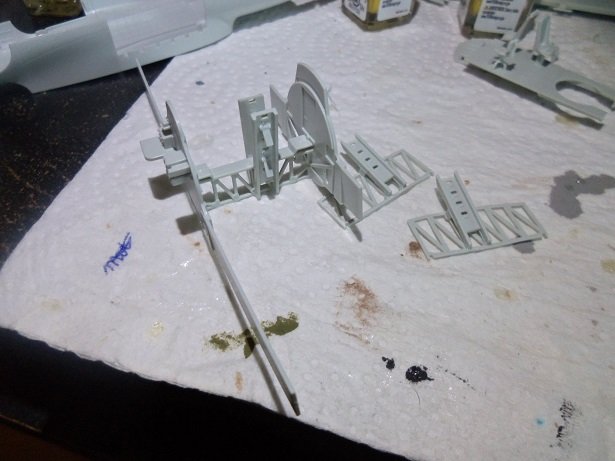
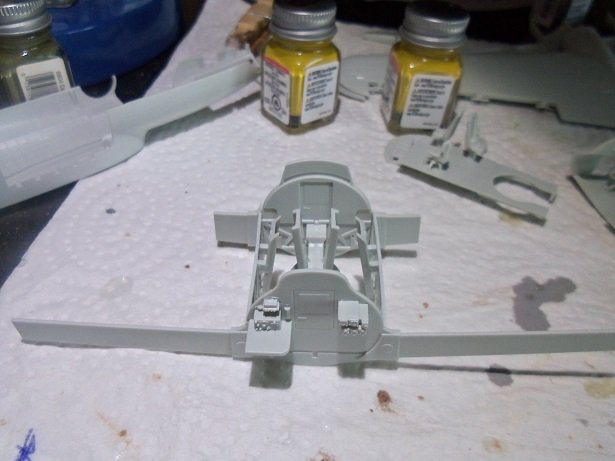
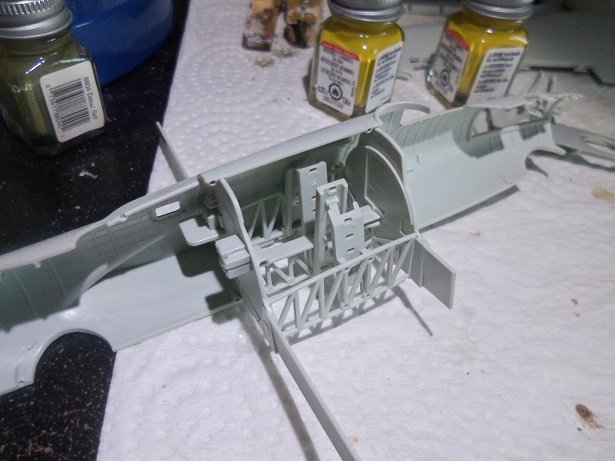
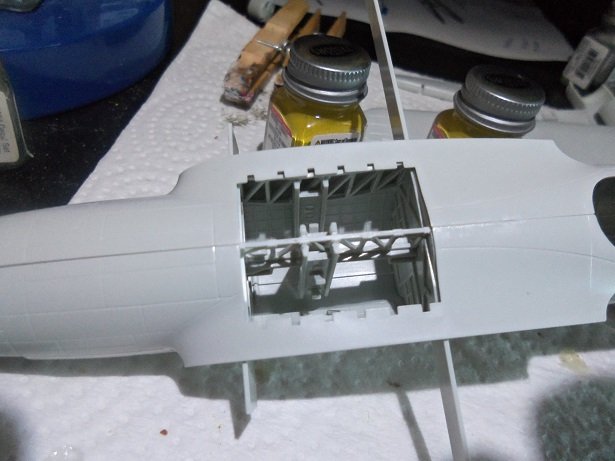
here's a couple pictures from last night....... this morning, I got more done. I decided to go back to the first page of the instructions.....to the bomb bay racks. I kinda had to feel my way through it, because I took the parts off the sprues. the outer rack girders are shaped in such a way, to fit in the wing roots. sliding one in place, the assembly was slid into place to check the fit. it fits perfectly. the racks need to be glued to the girders.......only one side { the inner side} has the bomb release holders........I got scared 'cuz I couldn't find the ones for the outer racks {silly rabbit}. the racks were glued to the outer girders, once I knew the direction of the shaping. the bomb bay doors need to be installed when the rack assembly is cemented in place.....I need to split them. I tried to put the in behind the outer girders, but I saw this was wrong, due to the 1/4 inch gap in the fuselage halves. looking at the instructions, they are to be set in the open or closed position. slid in place at the moment, the assembly went back in the fuselage half.......... I also glued the tail landing gear tub in place too........again impeccable fit! closed up, the fit is very good. looking down......I felt I was being watched........ I know that look.........you want to go out.......huh?!?! a bit blurry from all the action going on........yea bud, lets go out it's really nice outside.

-
I'm sure that I'm not the only guilty person that has bought a second kit of the same model. the security of having built the model before and a better sense of direction are two comforting facts.........every kit of the same subject is different in some way. they can keep going with the multi variant kit.......my spare parts bin will thank them for it it doesn't matter what plane it is........B 17.........B 24.......P 51......P 47....P 40.......they all have enough subject matter, to keep the mind busy. I knew a guy that only built Lancasters......he had quite a number of these planes.......all with various degrees of difference. as mentioned, there is no indication of which example pertains to which variant...I've always found this confusing. I have done kits that tell you which is which...guess it depends on the manufacturer of the kit. I note that the wheel wells depict the interior color. I went out and bought two bottles of Zinc Cromate......but to me, it looks more yellow than green. is this the correct color? you don't need to thank me Robert......it's the evolution of the medium........and our evolution as well. I still see the dangers of it...but it's all in how we use it ....... ....and learn from it
-
don't be like me though.......I'm stuck in B 17 mode ...........I obey.....therefore I build. I'm going to break the chains after this one, and hit the B 25 circuit
-
the article in the National Geographic depicts her as a schooner....I actually like both concepts.......schooner and Brigg. that's why I'm building the two........the other part is that I'm as crazy as a loon there wasn't much left of her.......if she was found right away, they would have only found what was below the waterline. she was sailed to a remote cove and burned. I also found another article that gives the same account. other than the N.G. article and picture, I have found no other pictures of her.......just a large mural that suggests her mispelt name and nothing more. I try not to go by drawings and paintings though....too much artistic licensing and embellishment. I could go with other known ships of the same cut, but the differences would be there. wow J.........you made back to the surface! thanks for posting the link to the log....I would have done it, but I figured that if anyone was curious enough, they'd look it up. that and it's another way to highlight the past projects that have been undertaken here. there are some really good logs that never see the light of day.........heck.....even I stop and look into one when I check to see what pages my other projects are on 2013.... has it been that long?!?!?!?! that's OK....soon.........that's all I can say on the time line for the moment. last year........considering the dating......maybe TWO years ago, I bought the Revell U.S.S. Constitution...believe it or not.....$15 dollars! while building the hull frame for the Agilis, I was thinking of her fit......and I thought of cannons {I really should start the second log now} I recalled assembling the bow chaser for the United States, so I found that one and got out the parts for the one in the Connie kit. while I was doing that, the hull halves for the Connie was laying on the long table {around me.......things should NOT be lying around.........they are apt to be played with}. I found myself removing flash and later, cementing the hull together. so now it sits on the long table.....she so massive {yes....I am salivating}. I though of something that was discussed some time ago, but I have not seen anyone undertake the concept.............let's just say that I'm doing some research I did get back to the Clotilda in the evening......fixed the porthole dilemma.... I think it would be better, that I assemble the cabins with strips rather than sheet. they need to peer over the bulwarks more, thus be a bit taller. I used these eyelets on my Gundalow project.......filled in with window maker, they made excellent portholes. I have them in different sizes....in brown, white, and shiny chrome...they can be painted to match any decor. I also did a little bit more on the deck planking. I'm not bothering to do margins, so it will be a lot of creative cutting. the hold I made yesterday......fails.........not totally square 'cuz I did it freehand, and my cuts were a little crooked because of it too. I still have a habit of doing things by hand.......silly because I bought one of those choppers and I should be using it. I'll have more later

-
it's almost impossible to do once the model shell is closed up. I'm sure someone has been able to overcome this, but I've not read anything to confirm this. the only thing to do is make sure they are clean when the hull is closed........my big peeve too you did well in not doing the windows.......the contrast is detail. the one thing I love about this medium, is that wood is a bare canvas. it is up to you to add in the little bits that add to the looks of your model........love the black strapping and the nail rivets....and the even spacing looks superb!
- 77 replies
-
- 4
-

-
- morel
- master korabel
- (and 1 more)
-
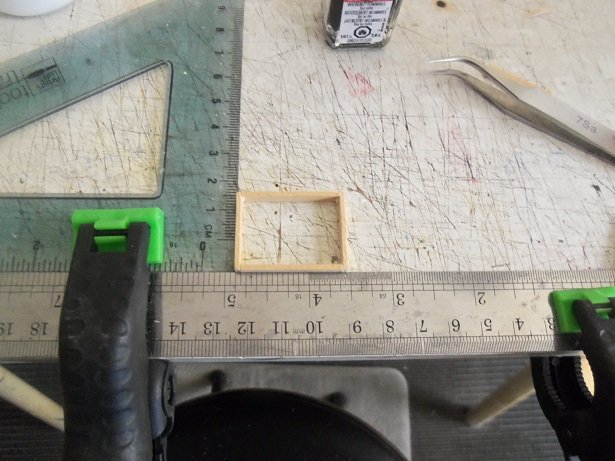
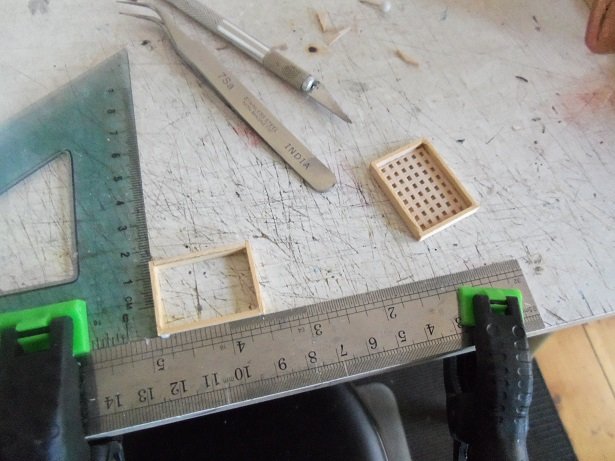
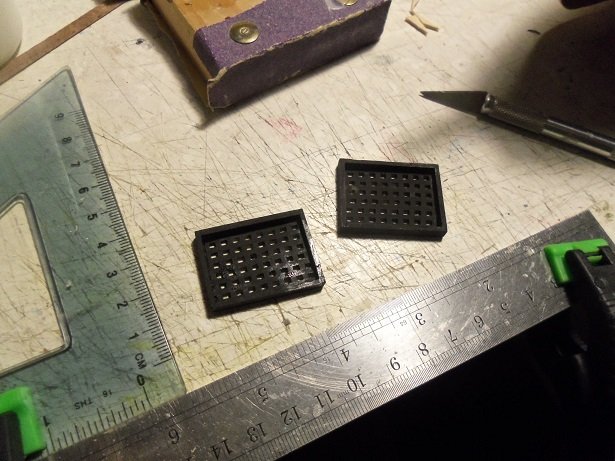
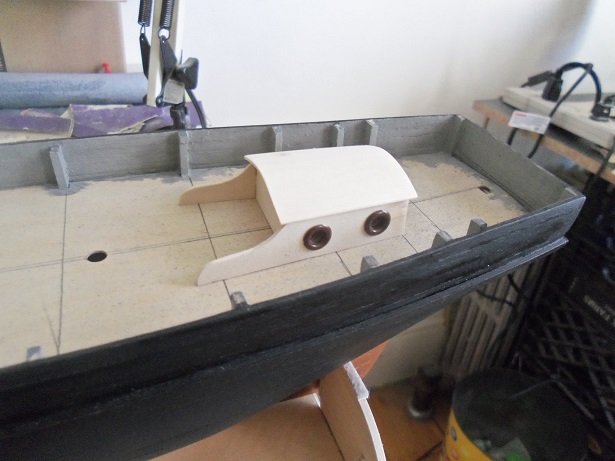
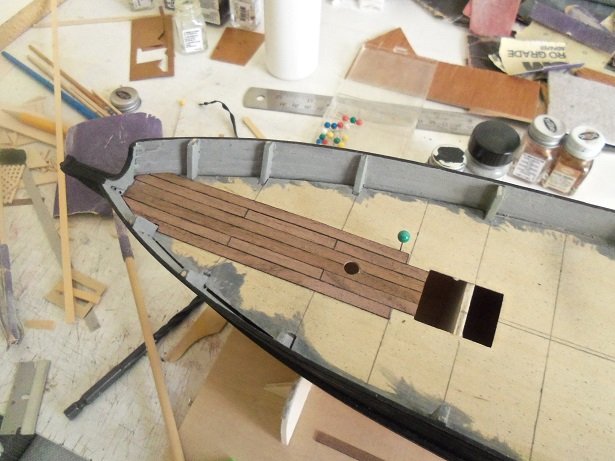
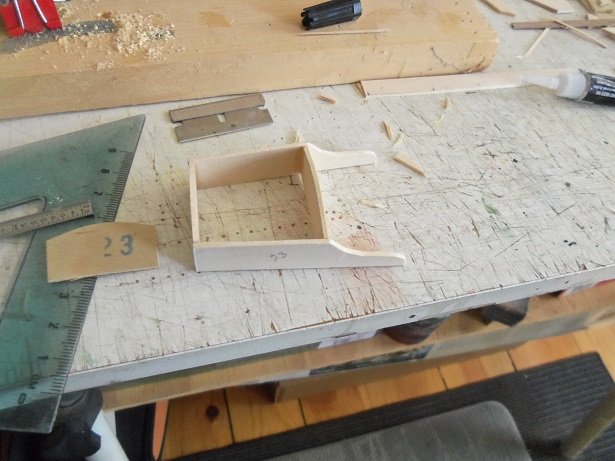
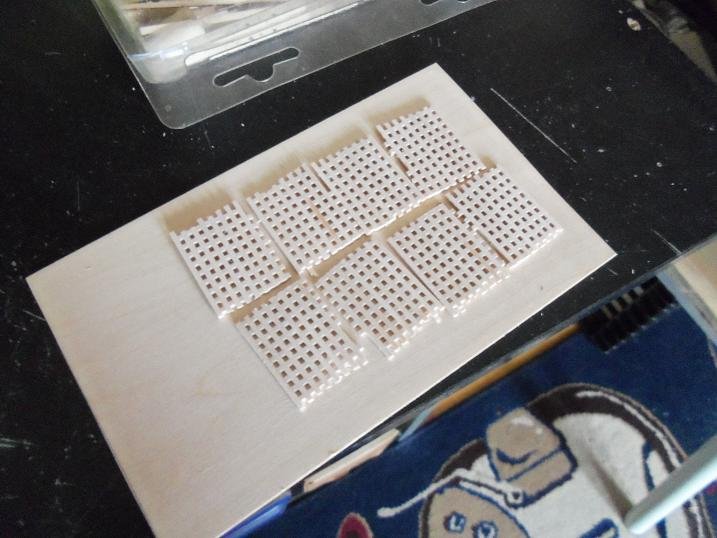
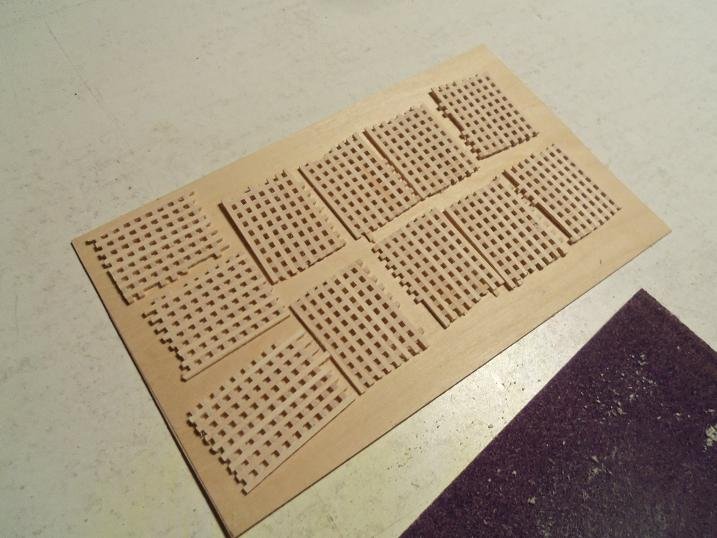
I made a bit more progress on the Clotilda..........yea, I may as well call her that. that is the ship I've decided to model her as. I haven't done anything on the Agilis, although I have begun to plank the frame. confusing I know, but as I get further down the road, the fog will clear. I did start to plank the deck....I will continue with the dark planking. the mast collars, as supplied in the kit...I made one for both masts. before I go any further, I need to cut out a second hold. I'll try and keep it between the bulkheads....the forward opening, I'll just paint the bulkhead black, rather than chance mess'in her up. I wish I had done something before I glued the platform down usually, I have the cabin structures done, so I can map out the deck.......I like to plank around the structures rather than glue them on top of it. it just makes for a neater appearance. so I began to make the aft structure, using the supplied parts. the back and sides of the cabin are 1 piece, but they are die scored...you just bend them to shape the cabin. wouldn't you know it........the die cuts are not straight....the darn thing is so warped! so I scratch built one........already had another all traced out. I made sure that the cuts I was going to make were square with the bottom line.........made another front piece, but a tad wider than the kit supplied part. a little sanding is needed to further square things up, and then I can make a roof. I also began to make the hold frames. they supplied a metal piece that looks like grating, but I don't like it....so I dug out some of the grating I made for the United States. you really don't want to know how I made these.........for the curious, it can be found in the Revell U.S.S. United States build. it's likely deep in the archives, so leave a trail of bread crumbs or sawdust, and we'll come and find you in a week or so...I made these February, 2013. these look perfect.......what is seen in the picture of the magazine. started to gt busy with the planking again....... but, I could not stop thinking about the cabin. cutting out a piece of 1/32 sheet, the roof was added to it. yea....that's my 'dinty' on the roof.........darn CA was leaking! that's the first of the two holds. curiosity was starting to get at me........I recall from the picture that ........1 - the cabin doesn't look like that. and 2 - there are two cabins on deck. the height of the fore deck is another question.......where I'm using a windlass, I need to know if I should raise the bow bulwarks at all. looking at the picture.........nope, wrong direction......so I won't be using it. can't say if I will use it for the Agilis either. shouldn't be a total loss........I'll see if my idea of portholes will work on the cabin. I have a huge assortment of eyelets.......for belts, shoes, and the like. I've been able to use them for portholes and hawse holes for past projects........thought I might put a few in on this project. I really need to toss out those CHEAP drill bits! the piece is glued back in place and sanded.......I need to refine the hole now. we'll see where tomorrow takes us
-
WOW!!! heads or tails I guess if you want the best of both worlds, this would be the one to model it is funny you mention that...this kit will also build the Shamrock Special, but it also has the nose turret and the cockpit glass for the G variant as well. there are three different configurations for the navigation glass, and I'm sure there are provisions to lose the extra glass around the nose. the one thing that Robert pointed out that I failed to mention, is that the instructions are a bit vague, as to the change over to the different variants. it numbers steps......like 46 and 46A....what is that?....doesn't tell you anything. so I'm having to compare the model to pictures of the Memphis Bell, to be sure I don't goof up anything. the instructions show you drawings of the sprues with some of the parts darkened...likely to denote that they are not to be used {as the Memphis Belle}. thanks for the picture.......even though it made me sad. ♻️
-
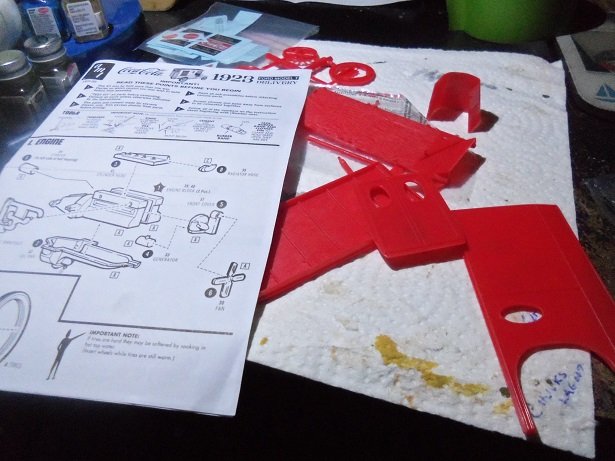
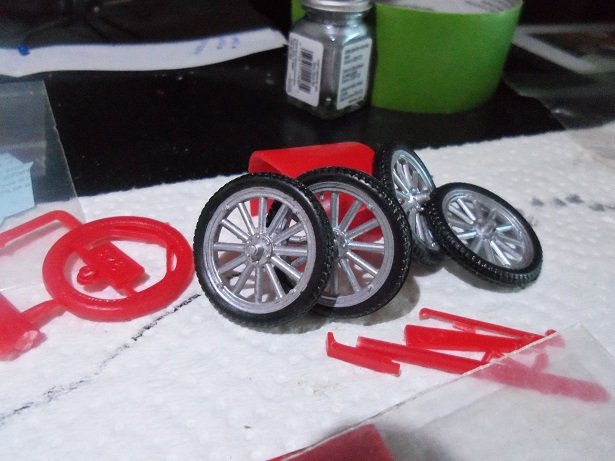
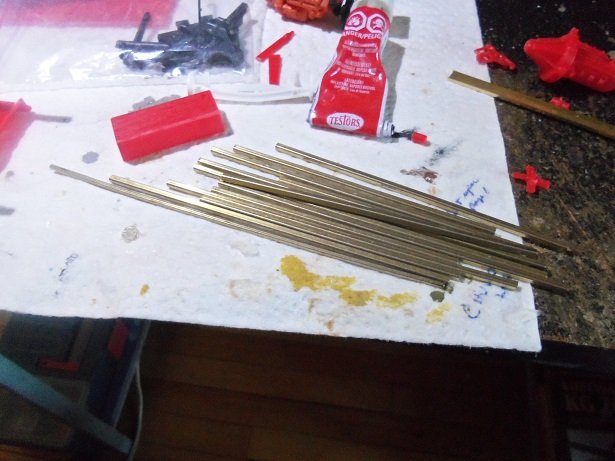
I'm sure your wondering why I reopened this log...there is a good reason. what am I gonna do with all these parts, that I didn't use? having built the body out of wood {about 80%}, I have all these parts in my spare parts bin. why this came about?..........well, that's like asking a masked man, who he is. *footnote: that quote came from the movie 'V for vendetta'* insanity has it's virtues anyway........since I still have the tires and rims.......I will use them. all of the main body parts are here, except for the fenders and running boards. these I will have to scratch build...likely from wood......or perhaps even brass. the body was assembled except for the roof...that will go on later. it shouldn't be too hard to construct a seat.......buckboard style. the engine you see is the stock engine from the '40 Ford sedan build 'China Girl'........I'm not gonna use it. I'll do something with the original engine that came in the kit. I have a front suspension....odds and ends from the Ford kit...but I need to make the suspension and rear differential. I have no parts for this. that should be neat also, I'll need to make a frame for the body to sit on. I'm toggling between brass and wood.......I bought one of those brass assortment bags from Micro Mark, and I picked out all the square hollow tubing. the length at the very front of the pile is small and will fit inside the square stock. it can be used to strengthen a joint by sliding a piece of it in one and leave enough sticking out to slide another section over it.....weld with solder........kind of like a mending fish plate...internally {best I can describe it, I'm afraid......I don't speak metal urgy}. this is where the mad hatter's dream ended..........for now anyways. never fear.......I'm certain that another fit will hit me, and I'll pull it back out.......I have it in a small box on the lower shelf of my desk.