HOLIDAY DONATION DRIVE - SUPPORT MSW - DO YOUR PART TO KEEP THIS GREAT FORUM GOING! (Only 13 donations so far - C'mon guys!)
×


popeye the sailor
-
Posts
16,007 -
Joined
-
Last visited
Content Type
Profiles
Forums
Gallery
Events
Everything posted by popeye the sailor
-
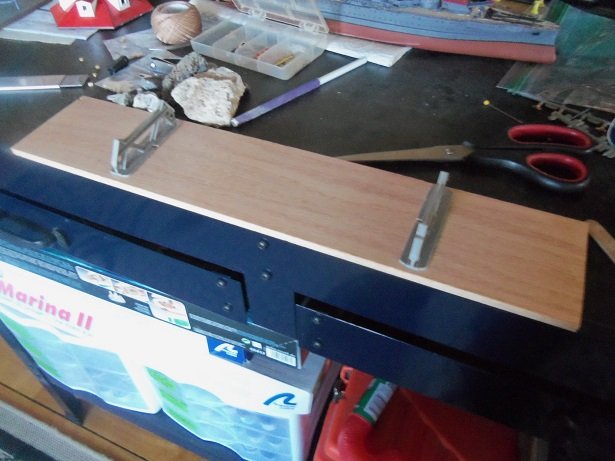
 hello Egilman, thanks for commenting on the project.......I came in this morning intending to look for this log. I have a little bit of progress that I've been meaning to add to it . if you read the log, you probably saw that someone else mentioned the turret. I painted it out of choice.......thought it would look better if they were all painted...nothing more. I have the picture, diagram, and others like it.......the one thing that stuck out as well, was the controversy about her paint color. yes........it even took them long enough to arrive at what is now deemed, the actual paint color. I wasn't aware that the kit was sold at the memorial.......it's a fitting tribute to the ship. the model is old.......can be a real pain to work with. the plastic is thick, hard and brittle, and unless scored before cutting, it tends to crack where you don't want it to. so care needs to be taken while cutting off the railings, if PE is used. I remembered this model.......long ago as a young lad.......saw it at the craft store and bought it. I was disappointed that in all this time, no one has come out with a wood deck for this kit......the scale must be an odd size....they have one for just about every other vessel. but hey.......thanks for pointing the turret out.....it's been already mentioned. personally, I'm not totally satisfied with how the railings came out, and I've been tempted to get another kit and redo the whole thing, but likely not. I've been made aware that there is one kit that's better to model the ship, and after market stuff is available. a few weeks ago I was tinkering with some PE for the forward mast. I don't add rigging to these models very often........hard time finding definitive information on how the rigging terminates for the most part. I do want to add it to this model. the first line I added is wrong....I've yet to reposition it. honestly, I had a hard time weening myself from the B 17 bug, I seen to have caught..........there's no over the counter medication for it, so I keep experimenting with various washes and glues, hoping to find a cure. wood has been helpful to calm the jitters. so.....from the Hood PE, I cut some parts from the plates that I might be able to use, that related to the masting and rigging of this particular area on the model. Craig sent me some PE that may be useful for the termination part of the rigging....{I'll have locate my notes}.......but I glued the PE parts to the outriggers on the forward tower. other parts of potentially useful PE is nearby........I've also been working on a stand for her. the original parts have been modified to fit on this wood base.......I think it came from the Billings America kit. I kept it thinking that one day it might be of some use. don't mind the table.........there are four unfinished projects on it at the moment. my aim is still to get this table cleaned off....the Arizona is one of those projects. more on her soon
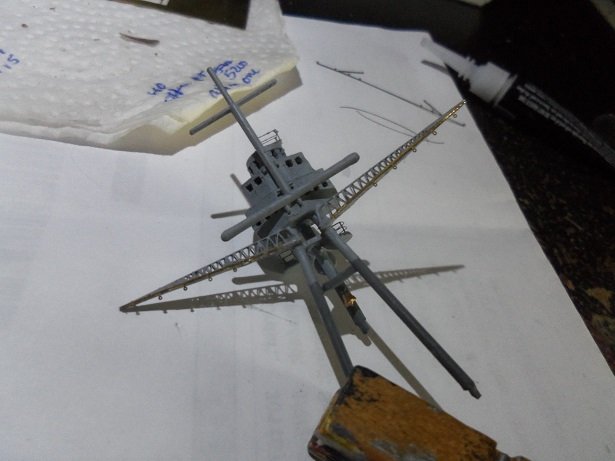
-
quite a gathering........they're not eating them raw are they? steamers is as close as I go
-
what is that flap of skin at the tail fin?.....are you feeding her enough? quite an impressive model look'in good
-
you welcome OC........and thanks for the good word. when I read the number of British planes they had, I thought of you. perhaps you can show us a Spitfire with German markings
-
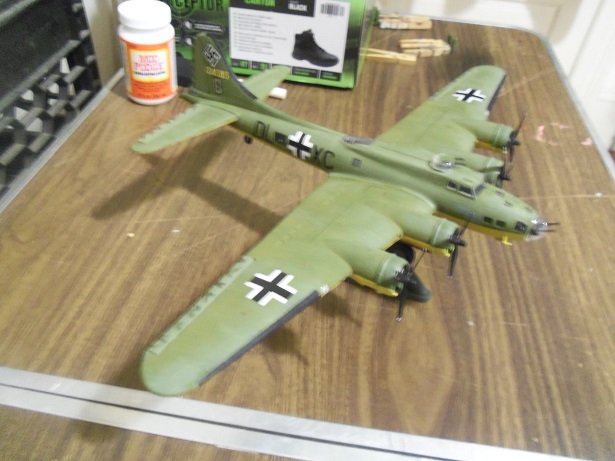
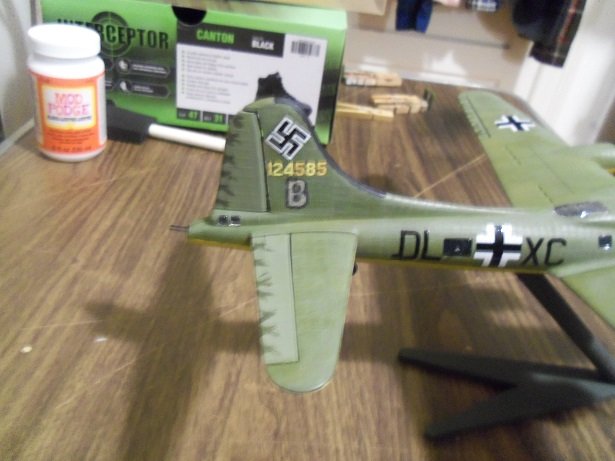
thanks Jack thanks to you as well Craig. I thought that was funny about the decal set........they can supply the numbers with the faded look, but they didn't do the 'B'. in pictures, it's quite visible. it's a bit more visible than it should be, but when I started to dab on the German gray, the decal began to come apart. I didn't push the issue.
-
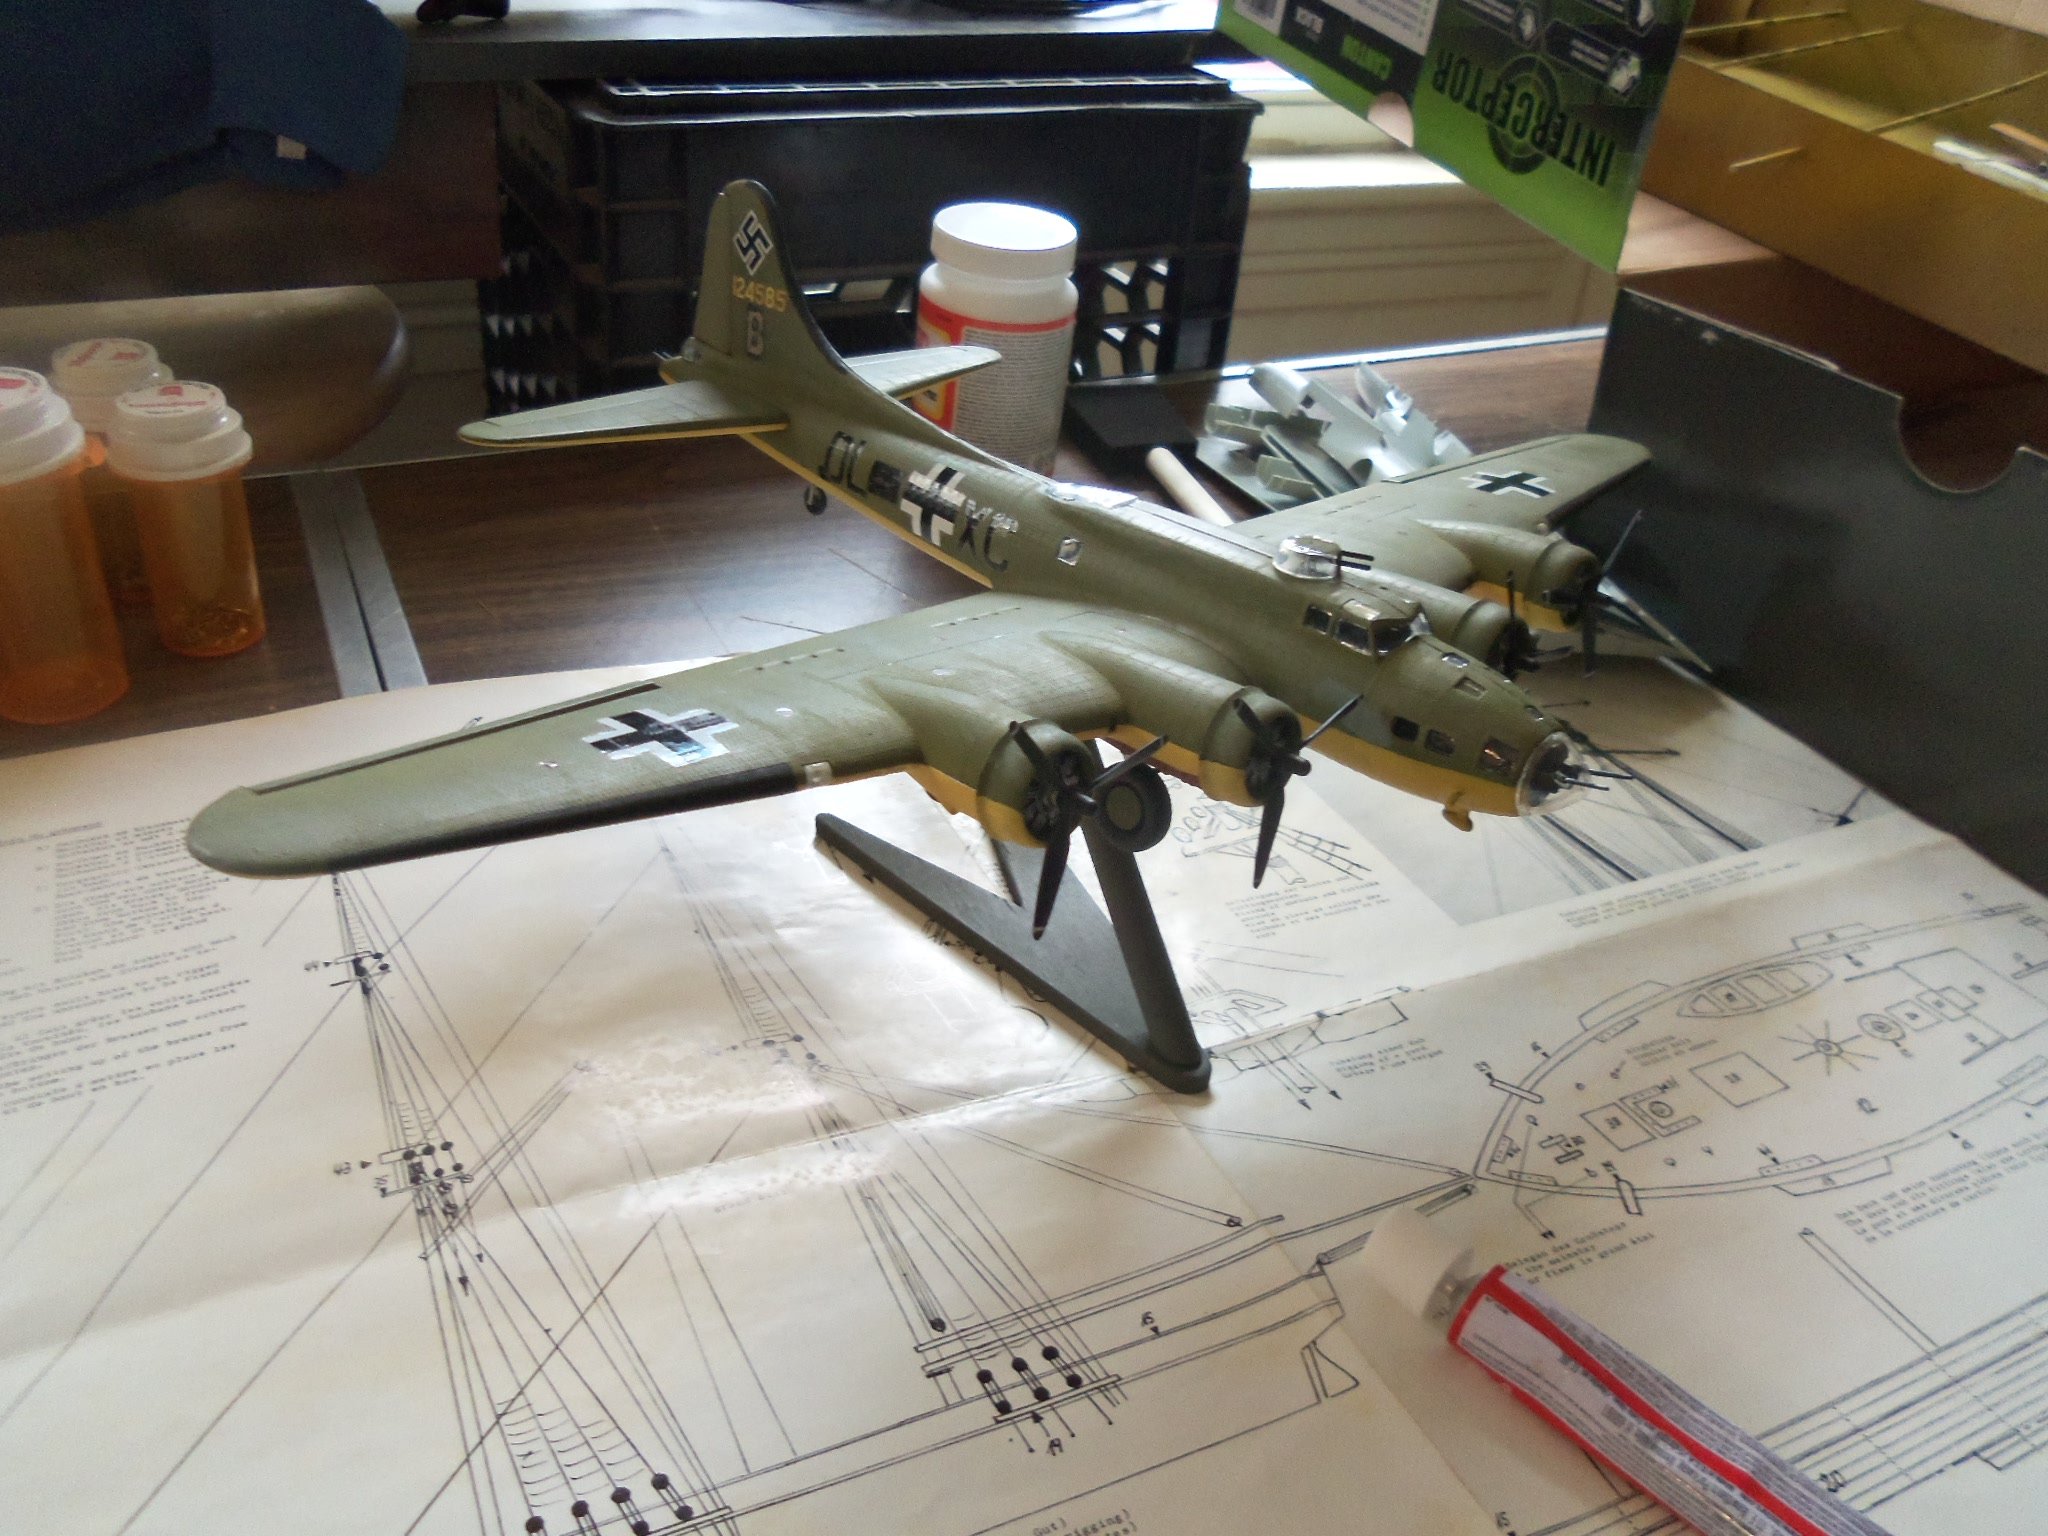
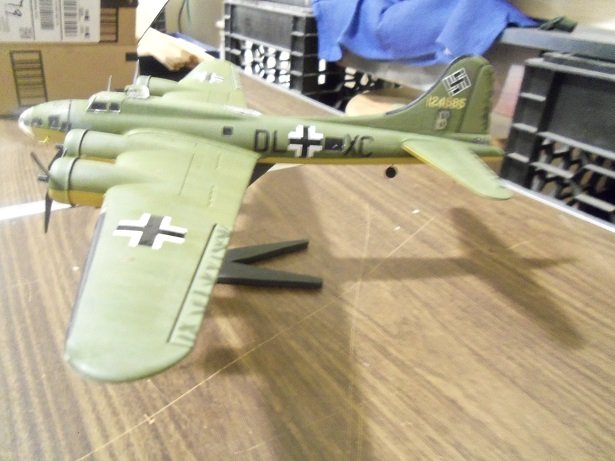
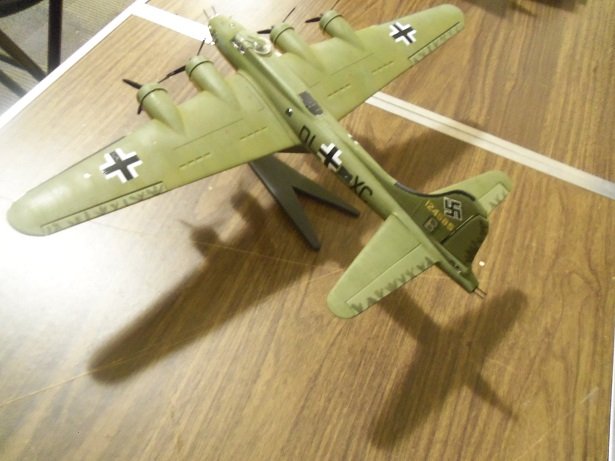
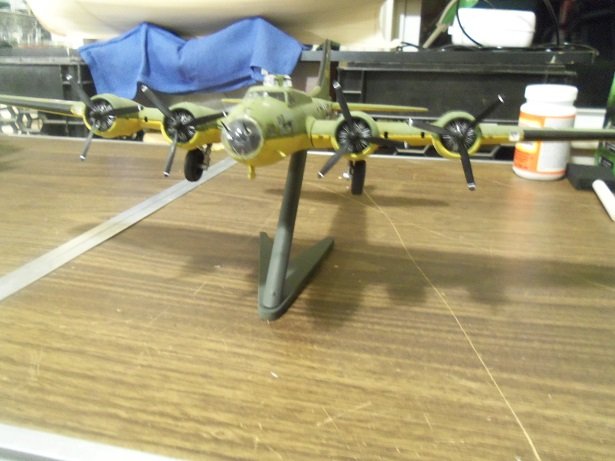
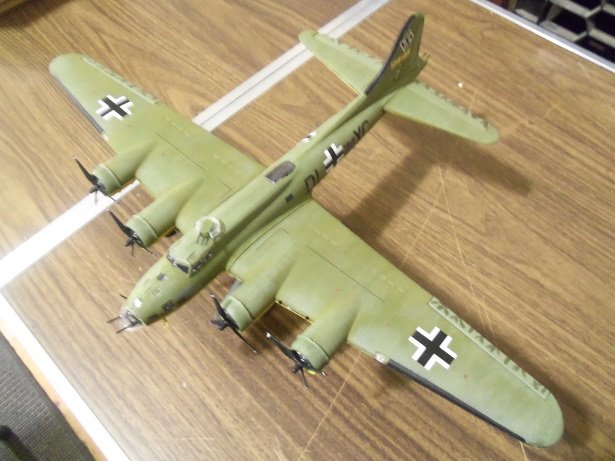
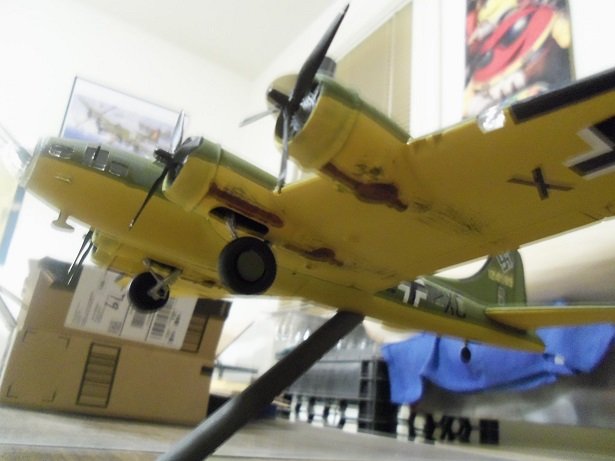
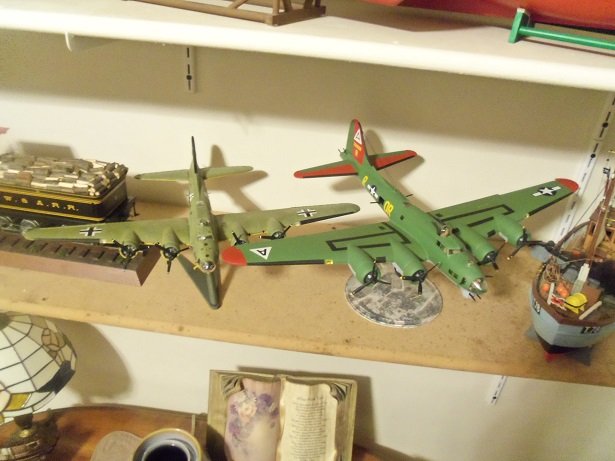
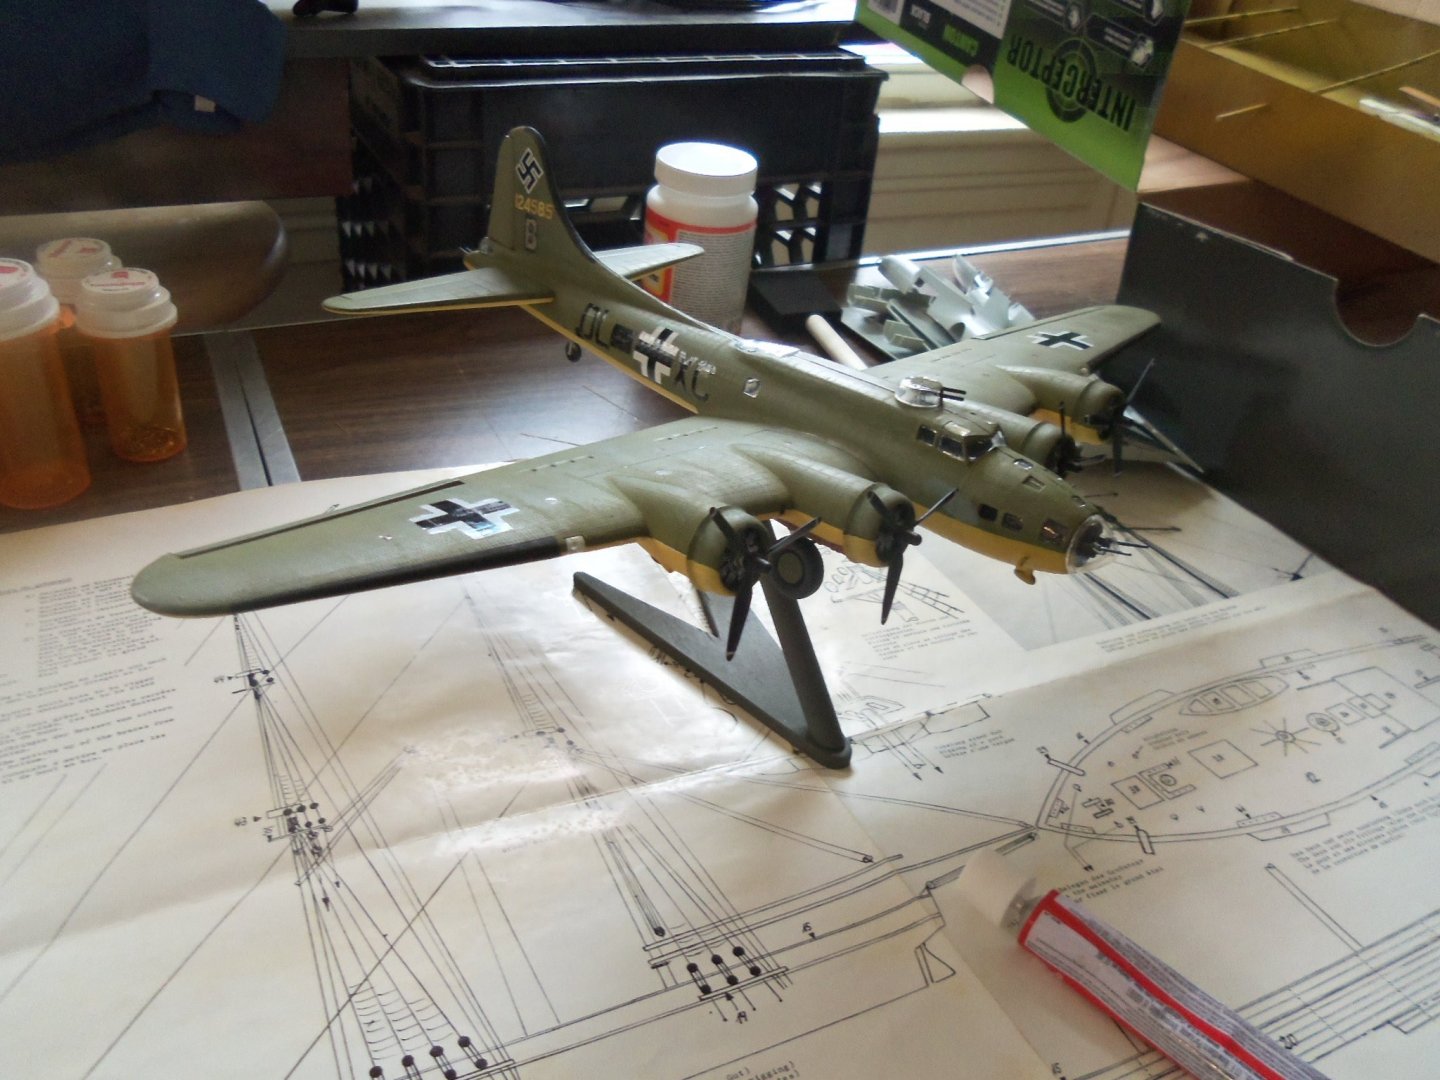
well...I'm going to call it finished. I added the unit markings and a little soot from the engines, and there ya go. the unit markings amount to splotches of paint on the ailerons and rudder.......from what I gathered, the 303rd marked their planes this way, but the Wulfe Hound was the only one I noticed with these markings. I'm not totally happy with the pictures.......if anyone feels gypped, let me know and I'll try to take better ones. I think the lighting had something to do with it. I got a scare when I sat down to do it...........almost knocked it off the desk! that would have very bad I mentioned this....probably at the beginning of the log that there are two accounts of her demise. one account stated that she became damaged and had to ditch in the Bay of Kalamata, but the other account is more believable. a B 17 was seen at Oranienburg airfield towards the end of the war.....the rest of the article is here: Wulfe Hound serial numbers on the parts don't lie. here is another article that might be of interest to you OC: Wulfe Hund - The B-17 Captured by Luftwaffe as I was bringing her to the place where she will be displayed...I also realized I forgot the antenna wires. I'll do them at a later time one of these models in 1:72 is still a decent size model.......even close to a 1:64 scale model. I'm going to need to juggle them around when the Memphis Belle gets here so thanks to all of you who came to visit, I really appreciated the suggestions and kind words....it made the model what it is.

- 134 replies
-
- 16
-

-
welcome Michael...........have I been gone that long???? I started to write my last post this morning........I have a feeling that the Alice in Wonderland concept is creeping in here . well anyway, it's still early so you haven't missed too much........just profane syllables at the scroll saw. glad to have ya follow'in along.......be sure to check out JCT's log on the same model....we're in on it together
-
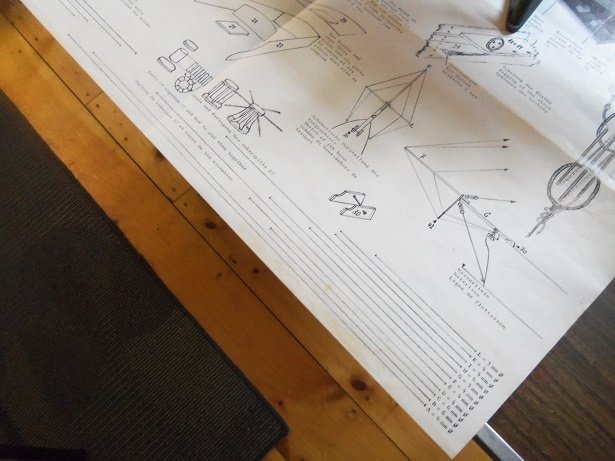
yup..... that's what I'm talking about....thanks! since the model is 1:60.......using the table.......it comes up blank {that's because 1:64 is exact scale being referenced to}. that's OK though....these are useful to give an idea of model length.....not to mention that I've installed mast pots in the hull. looking at the picture on the box, it appears that the lengths given on the diagrams, are the actual lengths used on the model. the assembled masts look really tall. I think the height is a bit overstated. I have a feeling that there is no conversion chart for what I'm looking for..........the length of the mast segments for this scale. I think I'm mistakenly referring the mast assembly as mast stepping........the term actually refers to the points that mast is set in the deck. or my idea of mast pots. there's been a pause here, although you'd never know it. I started to read underhill's book, but then I was distracted, looking for information on the Wulfe Hound's finishing touches. I've also begun assembling the second hull frame and adding more planking to the original hull. more on this later.
-
wow.....not just one spare tire....but TWO! the U.S. auto makers ought to take a lesson from that one.........I wonder. could you turn it into a U.S. import and put the steering wheel on the left side? whadya want?.......I'm a nutjob! looks superb Jack..........so, when will John Steed and Emma Peel gonna pick it Up? big fan of their show congratz my friend! so.........what's next on the menu?
-
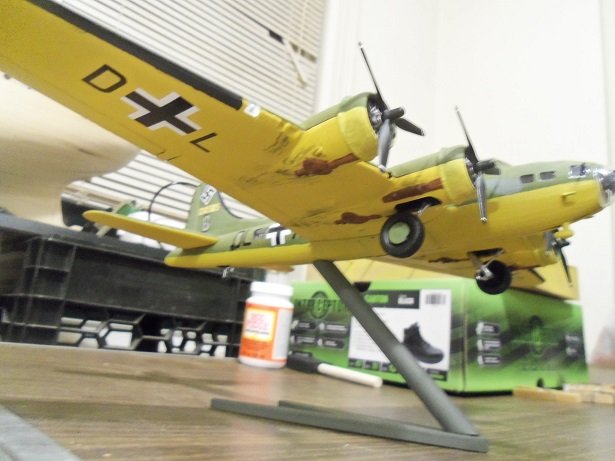
oh..........it's just me. I've always said that there are many subjects out there, that are just crying for some one to exploit them. it's likely why this subject jumped out at me.....it's not like the U.S. sold the Germans these planes, as we have with other countries. ships are perhaps the No 1 subject for little known participants in history.....planes I think are No 2. I was siked when I found that the Wulfe Hound was the first bomber captured by the Germans....it kinda made it special. the colors made her look interesting as well. I did make a small mistake...........likely there are others that I didn't notice....there are two white stripes on the prop blades.......not just one. on well......chalk it up to other details that even the author of the article didn't pick up on I try not to dwell on a subject for too long........I stumbled when I looked into the B 17............so many model worthy planes. I found it good that the possibilities to expand on the subject is quite large.......so many decal sets out there depicting different nose arts. I have one more to go into, and then I will close the book on the B 17......and I do believe I've set my sights on another obscure subject to model........on a very famous ship I'm glad you liked it OC.........I think that of all the wonderful folks I've met since I've been here. it's the basis of what this site means to us all
-
ICM 1/48 Spitfire MkIX Scrapped.
popeye the sailor replied to Old Collingwood's topic in Non-ship/categorised builds
a lot of nice detail molded.......and the access doors for the armament are a nice touch, if you want to show them I'e built a few ICM kits.......they are nice -
B-25 Mitchell "Meet Miss Runyon" by Javlin-HK-1/32
popeye the sailor replied to Javlin's topic in Non-ship/categorised builds
she's look'in sweet! with more painting on the menu, aren't you afraid that you could stand a chance of over spray on the decals? love your paint stand -
yea....it would be hard to cover those bubbles .......I'm sure the yellow masking doesn't have anything for it. when ever I mask.....I always go over it before I spray. I've been goofed too many time Damn you Murphy!
-
which part???
-
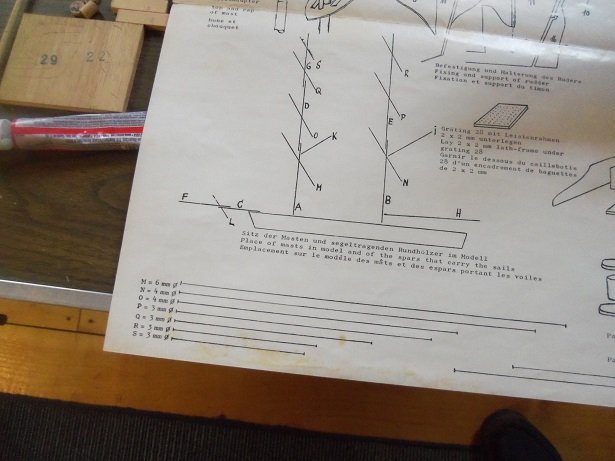
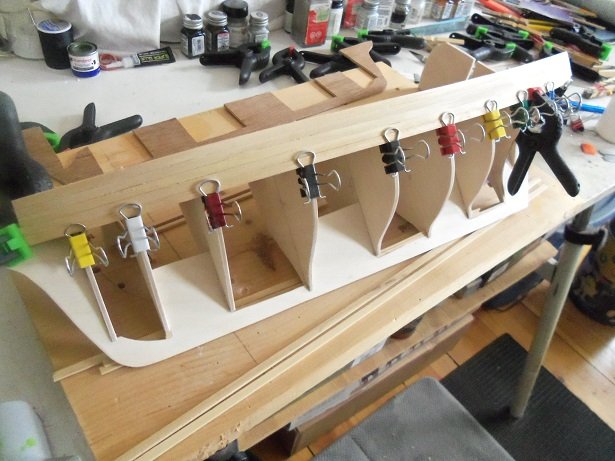
yea....ate most of my morning. I have underhill's book....looked through them both for measurements. I not too good at bring'in 'em down to scale...I may have to punt, but I'll see if there is a scale calculator on line {I just thought of this}. the Underhill book is from 1965........fairly good shape, hard cover, and has a fold out of the belaying diagram for a three masted clipper. I started to repair the old bulkheads.......I made another set of 10A & 1A parts to complete the bulwarks. I really hate to throw the parts away {my inner pack rat speaking}, so why not use them. I've already traced out another deck platform............ -> and it was at this point in the conversation, that Denis AKA Popeye, remembered something else<- .....I gotta make another pair of 9A's too........jeeze, almost forgot ...........anyway.........I do like the model that the kit represents, so I will try and build it that way too. misery loves company..........a bird in the hand, means you won't get any on the head.........the ungian thing sir......... ------------------>oops, got carried away again I have a bunch of ships of scale and model ship builder magazines that Harold gave me when he gave me the Nordkap. I thumbed through a few of them and found a article for a privateer 1812.......pretty close to the box image. I'll look through a few more and see what else I'll find.
-
called for supper and got pulled away........ but look at cho.......your ahead of me in other places the cabin and skylight looks great..........nice color choices. you've also made progress with planking...defining the edge for the bulwark posts. you may need to get rid of some of that keel though, if there's too much. the one thing I noticed with the frame, is that the pointy parts are little to none......after faring, it's even more. good to see you plank'in though.......it will stiffen the hull.
- 211 replies
-
- 2
-
-
- agilis
- steingraeber
- (and 1 more)
-
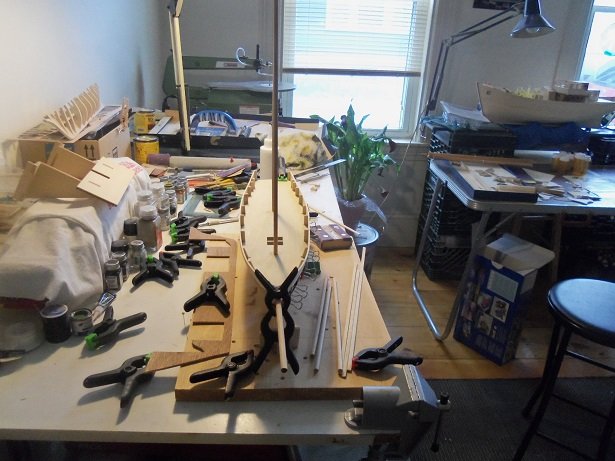
hello Dr. Per........thanks for the info I order two book.......I believe it was you that suggested them to J......I received Lennarth Petersson's book the other day and I just got Underhill's book today. the diagram sheet shows the length of the mast segment in lines along with this is the mast part arrangement. the first steps of the masts are both 6 mm..........the fore mast is 413 mm, and the main mast is 381 mm. I'm looking at them thinking that they are too long.....even knowing that they include the mast roots. where I plan on going the schooner route, these masts have only two segments each........I will have to find out the masts total height when fully assembled. I hope they can be narrowed down with the books, because they certainly aren't specified on the diagram sheet. the scale of the model is 1:60. I always plank from the bulwarks down J........that way I can hide my mistakes below the waterline........paint can hide a multiple of sin I haven't done much today.......took the admiral to the doctors.......out to breakfast, and then to the grocery store. broke my driver inside door handle, so now I gotta fix it luckily, it's a small job. now I'm scaring up the parts for the second hull......yea......the first one hasn't driven me batty enough, wanna times it by two and REALLY turn up the heat figure I'll get in there later and make some more sawdust.
-
I fancy the term necromancy.....especially if your using part from other kits to rip...........to cut......all physical changes are good! that would be Sid, OC............
-
nose cones and glass like that I try to cut around the edge, lightly scraping afterwards. sanding always leave the white ring where ya did it. what you did is good, but isn't that going to give a slight rise when painted? you want to be careful around the cockpit......the tape looks like it's lifting {happens to me too....I have to be vigilant}. I also have been known to use scotch tape...clear or the clouded stuff to hide mating lines.......it's a bit thinner than paper...fingers crossed it doesn't swell on you 🎨
-
any time is a good time Thomas. the book on KG 200 was very helpful with this subject. at any given time, the KG 200 had around twenty B 17's that were flyable...they also had an assortment of other planes, as well as British Spitfires and who knows what else B 24's and B 25's were also captured and studied. this is a subject that really hasn't attracted too many modelers........an obscure subject to be sure. but I stumbled onto it and it was so unique, that I had to try it. I think it worked out very well the idea was so interesting to do, that I made up my mind to do another project that is somewhat obscure......I read about it......I've even seen it, but I have the perfect model for it, and I decided to give it a go. sadly....it's not a plane. I may not go into this subject again.......but I have a habit of checking out ever link that's sent to me { I wouldn't be a modeler if I didn't}. thanks for the head's up hope to see you in one of my other projects....promise......... I'll give you a good laugh I was hoping you'd look in J...........yea....this plastic stuff grabbed me by the golden globes and won't let go. kind of refreshing to work with wood again....and with you {not gett'in mushy or anything like that} "brothers don't shake hands.........Brother's hug! leave it to me to pick the strangest projects.....aye! glad you like the model.....just a tad more I want to do, and then I'll have the finished photos. thank you my friend! hey......and thank you all for the likes! I appreciate the interest during my insane episode........I hope I can come up with another ............soon
-
sounds good.......glad there is some light at the end of the tunnel. for all the pain and aggravation that it's worth.........welcome to the rabbit hole you see the mad hatter, give 'em a hail he'll call you over and join you in an ale {no tea.....that's the kid's version }
-
such a beautiful ship Patrick........the mods you've done is right off the charts! the perfect example of what can be done with an old kit superb looking model
-
I was in the spare room most of the day today........Wulfie is sitting on the table that we do puzzles on {I've taken it over at the moment} still waiting for her finishing touches
- 134 replies
-
- 14
-
-
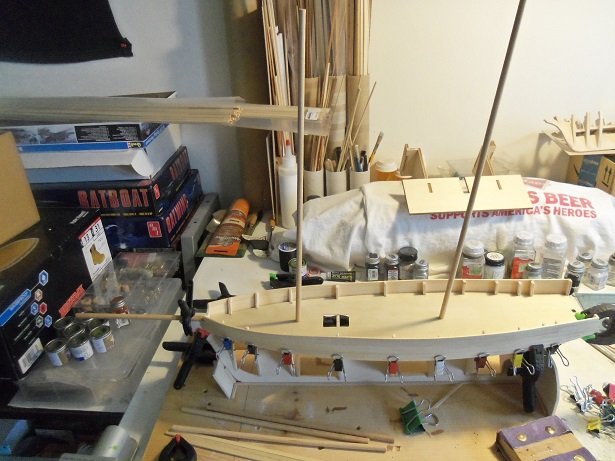
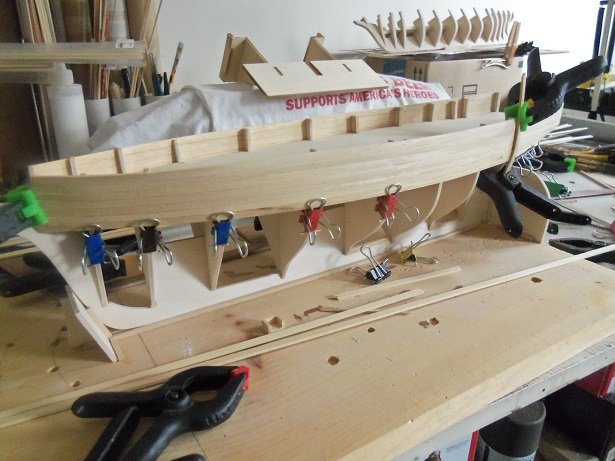
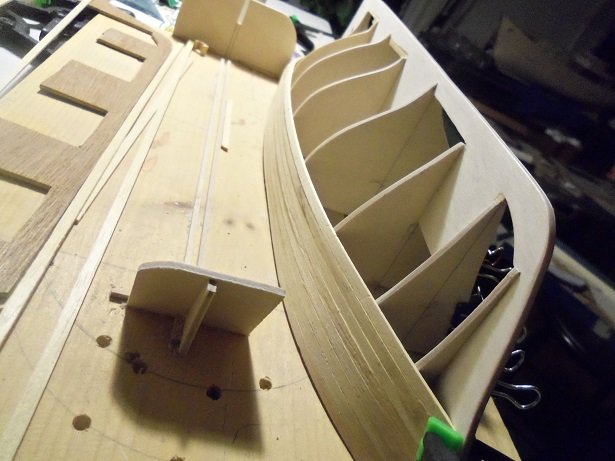
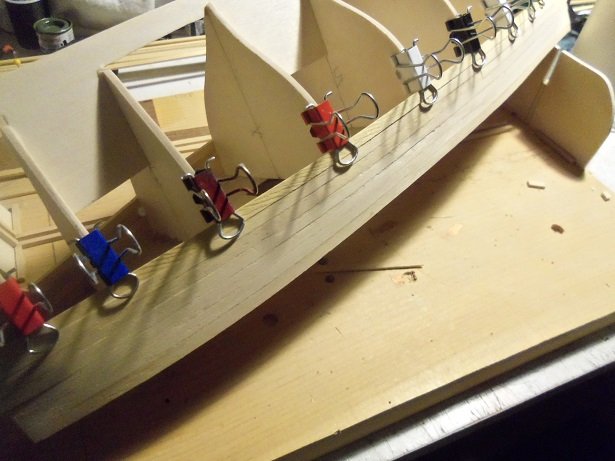
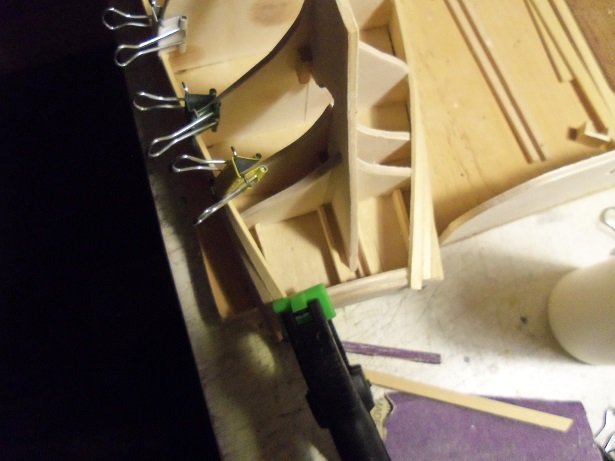
well..........it's confirmed.........planking is like watching paint dry I'm probably at the 1/3 point. do a strake......let it dry.......repeat. getting an idea of the angle of the bow stem, the bow end of the planks were cut to the angle, and then beveled so they would lay flat to the stem. the first plank laid after the bulwarks were closed up......... I got to thinking of the masts and the boxes I want to make. I want to be ready for that step, so when the masts are installed, they will have a firm root point. picking out the size dowels mentioned in the diagrams, the holes were made large enough to accept them, and then set in place. this looks to be the rake they are to be at....I have the spirit boom dry fitted too. I'm going to have to find out how long they are to be......I'm sure it's not this long. the boxes don't need to be pretty......just functional. after these are trimmed down and sanded to shape they will be installed........the main mast box already is. the fore mast box will need to be located further up the #3 bulkhead, or it will interfere with the planking. I did a few strakes on the starboard side too, but more was added to the port side . so now it's time to stop for the evening....this is where I am at the moment. the bow is OK so far........no drastic measures need to be taken yet. but the stern however....I think it's time to taper the planking. what you can see of the stern looks neat and trim........that's because I've already trimmed it........done some sanding too. .........just can't handle the idea that the planking is rough. this is Obechi.....a fairly soft wood, that likely wouldn't mill smooth in the first place. it does have it's limitations though....the twist will snap if you try to force it. usually when I plank, I will wet it down and plank the hull damp.....it is a bit more elastic. it can dry on the hull..........actually, I think it helps the glue seep into the wood's pores, giving it a better bond. but here, I'm using it dry without much trouble. tomorrow is another day....I had a great day off as always, thanks for look'in in and the likes

-
insanely nice job on the paint I was curious why you weren't painting it....I'd have a tough time doing that! she came out very nice........nice rigging too!
- 40 replies
-
- 3
-
-
- la tartane
- heller
- (and 1 more)