


popeye the sailor
-
Posts
16,007 -
Joined
-
Last visited
Content Type
Profiles
Forums
Gallery
Events
Everything posted by popeye the sailor
-
 I've never seen it.........but we wuz country folk.
 -
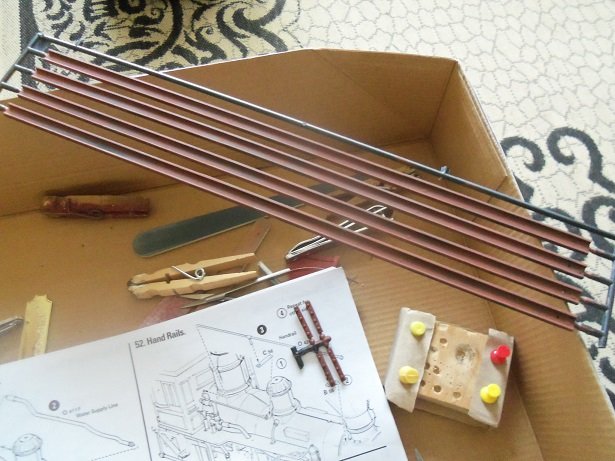
thanks for the good word! red ain't the word for it Bruce..........rode the bus from Florida to New Hampshire back in the 70's, and can never forget the terrain going though Georgia. displays of the model, I've seen a few variations....none of them were reddish though. I do plan to use a couple shades of gray, with a dusting of flat black......the rails are to have a flat steel on the wheel surface. an earlier idea I had was to paint the gravel part with diluted white glue and sprinkle play sand on it. the plates for the rails have the two spike detail, and I will dry brush them with the flat steel.......primer red....dry brush flat black, then the flat steel. for a reddish appearance to the gravel, instead of two shades of gray, I can just do one, and then go over it lightly with the primer red....then perhaps a very light pass of flat black. I'll see how it goes everything is just a base coat for the moment. was there any special detail to the drive wheels........were the wheel weights a different color?
-
four single throats........that would be early. don't think injection was common place.......late sixties and on. then you saw TBI , sequential, and other different combinations. I've done some of the extra detail stuff, but for me to do it, the model has to be coming out really good, or I don't see the use in it. I did wires for the Jukebox Ford........too bad the decals weren't that great. you'll likely find all you need on line. the Sox & Martin engine had the detail for the fuel delivery molded onto the intake..the module and lines {the return line would be on the module}. single barrel carbs was the way to go, until the four barrel came out. there was the dual throat, but I've never heard of them being used for racing.

-
now....that's the way I like my windows! back to the days when kits were cheap.......I miss those days >sigh< the decals look in tough shape though I did some quick checking and Slixx does do some, but they look different. here is a site that I found Drag Racing Decals - Mike's Decals
-
catching up on your build.......so glad to see your feeling better! I love the wood your using........stained or clear coated, the grain is gonna POP! great job on the rudder and the gun ports are awesome. it will be good to see her totally planked
-
your acquiring quite a fine fleet there! ...and I must say.......Genesis cleaned up nicely....she looks absolutely beautiful! it was such a treat catching up with your log.......and don't feel down about finishing. I know it's something one never loses, but you have another yacht in cue, and it should take the sting out of it I felt the same way when I finished my first wooden ship.......ya get kinda attached to the buggers. now a days, I don't get that way.....I have so many in the works I don't have time!!! congratz on a very fine model!
-
lost track of your wonderful project........your metal work is awesome great looking deck as well!
-
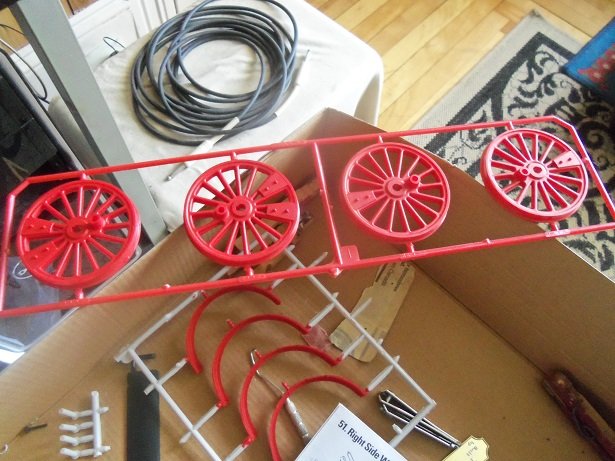
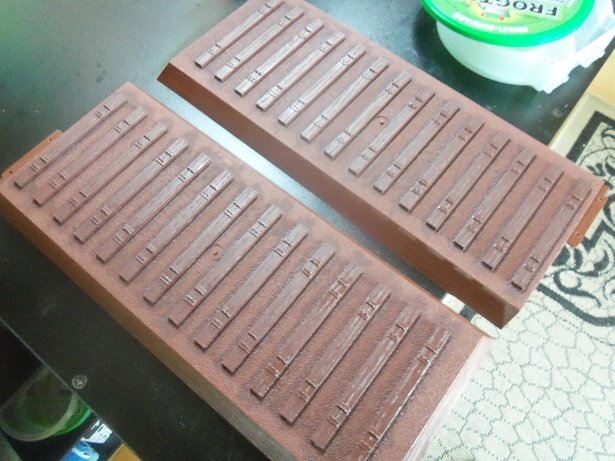
nothing spectacular going on at the moment.........one more day of work to go {I almost played hookie today}. Friday, although shot to bits with errands being run, I did manage to get some painting done. these parts will get multiple coats and colors........mainly just the base coats. the rails got a coat of primer red you might see some ghosting......it's alright, there's more to be done on them. then the drive wheels.... I still have the rail surface and the decorative ring........ then, the base. the ties are painted in a dark brown there is more to go here as well. can't wait to get this last day over with
-
awesome work Danny.......how you mastered all these small parts is fantastic!
-
really neat model! must not be visible flaws........looks great to me
-
the planking is coming along quite nicely Kevin I went to the wrong log though to find this.
-
very nice progress.......railings and life boats are looking great!
- 446 replies
-
- 1
-

-
- zebulon b vance
- deans marine
- (and 3 more)
-
no....I don't think of it as OCD. I have mentioned this in my projects as well. the use of chrome in older models was considered cutting edge back in the day. it gave the modeler the ability to add the shiny chrome where it was needed to give the model glitz. it also added to the customization of the model if the kit supplied different versions. touching up trimmed and nicked chrome has always been a peeve of mine........with the paint availability and choices of today, chrome has become rather pas-se. I tend to do quite a bit of de-chroming.
-
I might have a silver paint marker.......I know they do make a chrome silver now. your progress is look'in great...sweet little rod!
-
gave me a big head's up too........thanks gents!
- 446 replies
-
- 2
-
-
- zebulon b vance
- deans marine
- (and 3 more)
-
I wish you luck on finding one.......they are about as rare as the Kearsarge. I was under the impression that there were only seven kit in this series......I recently found out that there were others. I'm trying to get the budget director to let me get the Spanish Galleon. they did have one on oldmodelkits.com the price they are asking for it is almost $300.00. you truly have a wonderful project here.........now I wish I wasn't so stupid in my younger years.......I wasted that one
-
good to see your progress again Per......the finished fife rail looks awesome!