


popeye the sailor
-
Posts
16,007 -
Joined
-
Last visited
Content Type
Profiles
Forums
Gallery
Events
Everything posted by popeye the sailor
-
 Impressive job Greg......I think this one is more involved than the IJN Ise........between the paint work and etch ! so much added detail........yepper! you rank right up there with the best of 'em
 -
very happy to catch your build log! usually I don't find it till I smell sawdust looks like a really nice kit....don't think I've ever dealt with MDF.....gotta sand better that plywood and you won't have to worry about ply separation {I've had my share of that}. looking forward in seeing you progress
-
looks very good Doug.......you've done some amazing things with this old kit
-
hee....hee...hee.......I got the admiral scrambl'in 'round right now she got me this same kit for Christmas.......except mine is dated 2015. she noticed that your box isn't the same as my box......and set the stones to rolling another fellow just finished his.....he had a few issues that you might want to be aware of. I'm keeping his log in mind for the day I start mine: Look for Vossy's "riverboat" log too.......he's putting people on his and posted a link as to where he got them. they are not riverboat figures though....you may want to look into getting some that are more correct for the subject. I'll pull up a chair and look on.......perhaps you'll have some additional ideas {or maybe spark a few of my own }.
-
the upper paint color.......I plan on using olive drab for the bottom. I'll find a use for all that orange sooner or later I just finished a project that I could do a log on......but don't dare. it's just too outrageous and odd. the admiral seem to get a kick out of it, but wouldn't come near, 'cuz it's plastic
- 378 replies
-
- 5
-

-
- t78 norden
- billing boats
- (and 1 more)
-
Danny brought out his trained spiders! had to have been tedious very nicely done....so cool!
-
I gotta start mess'in with my logs in this forum.......then maybe I can get in here more often. it's always nice to see an update on this fine ship.......even snuck some deck work on there she's look'in my-t fine! tough dilemma.......there's been a few time where I said the heck with stuff, because it won't be seen. I guess it would depend on what you'll need to do when it's time to deck those areas over. sure.......don't go nutz with the cannons.......just where your certain they will be seen........but if your going to have the deck beams with the knees and all that, you may have to do the complete job, so everything will fit. I'm sure you'll do what's needed
-
the rabbits look good.......it was worth all you had to do to get there the extra keel blank is a good thing. as for which to do this week end.....if it's winter and your boat is as far as going to work, it might be nice to close yourself up in a nice warm shop and enjoy life always good to see more updates
-
wow Jim.......I can imagine that the other shrouds will be just as labor intensive. I don't blame you .......anyone who has attempted shrouds that large, don't either, I would say. wonderful job though......I hope mine come out as well, when I get to them. running rigging can be quite a balancing act.......that's why I came to a formula.......finding the true 'zero' tension and staying within this tolerance. it's not like the thread runs free in the blocks either. once tension is applied, the blocks tend to hold the tension, until you manually adjust them.......it can be frustrating. here is how I found 'zero': {you may have to do this with all different types of thread, so you'll know with that particular type} hold a piece of the thread in your fingers......pull outward as tight as will allow. release the tension slowly and watch the string as it relaxes. do this as many time as needed.....watch the string.....you will see the point where the string will begin to go slack. the point before it begins to go slack, is zero. the more you do this, you'll be better able to hone in on the exact point where zero is. this has helped me a lot with plastic kits......the yards bend very easy......but too much tension will also cause wood to bow as well. I know it sounds crazy........but give it a try. it may help in some cases BTW.......you've made quite a bit of progress. you might not think so, but I think your humm'in right along!
-
as Steve Martin says........those French have a word for everything! I have some plans in Italian and {I think} Dutch......getting translations can be tricky .....I completely sympathize. when it comes to sailing vessels, terminology isn't my strong point...but it's fun to guess. your progressing quite well in spite of all that, so it must not be hindering you too much. your reaching your goal.......that's all that counts
-
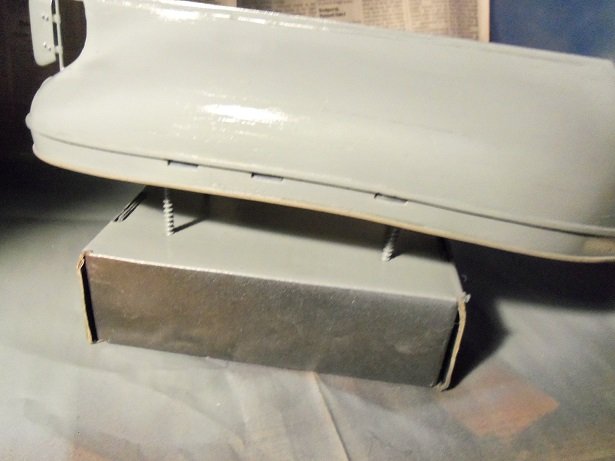
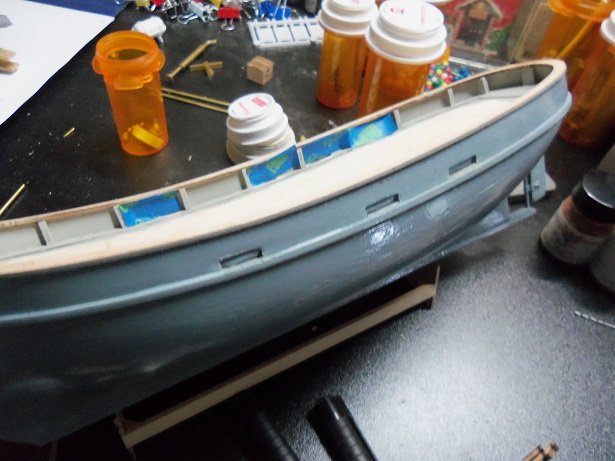
this is my main hobby now.........I need to get my butt practicing the bass again though. I still write my build logs on Word Press, Blogger, and Weebly, but I don't write as much as I used to.......haven't written a decent poem in a while either. I visit my friends here regularly I did get a little bit done yesterday.........the scuppers thought I had forgot about them.........huh!?!?!?!!? one side came out uneven with the rub rail......I fixed it as best I could. I might have one of them a teeny bit off from the others.......I may fix it........I may not......depends on what the fix curtails. after all...it is a work boat it took the morning to cut them out and sand to shape. I took one picture, fresh in the paint booth, after touching up the scuppers, rub rails, and rudder. I haven't touched up the other side yet, nor the margins inside. I figure I can do all that, once I get the hull paint on.......I'm leaving the scuppers masked over till I do. later, I brought the hull back to the table, after the other side had dried enough. this is the good side....here is the bad side {what I consider, anyway } I did some work to the structures while all this was going on. I drilled out the holes for the winch on the pilot house base, but for some obscene reason, the plywood plys that make up these parts began to split apart and break {my guess is weakened by the laser cutting}. I pieces them back together and will redrill the holes....but I really don't think it's a good idea to try and go for the 2 mm brass rod. I will look at some other way to accomplish the assembly.......I want to do something with it anyway.....I don't like the drum. sad........orange is out.......I keep mentioning it......and the admiral's face shrivels up like a prune! I hate prunes I mentioned Hunter Green.......I won't tell you what she said about that....this is a family show .......I guess Brunswick Green is out too she wants kind of a sea blue........I have some Duck Egg Blue, but it's a Billing paint......might not fair well with the air brush......I'll look into it more.

- 378 replies
-
- 9
-
-
- t78 norden
- billing boats
- (and 1 more)
-
these parts are small to begin with.........what you've done is amazing! superb job in every way! I hope your taking breaks to keep from getting eye strain.
-
totally understandable about the summer months........most folks do more of their modeling during the winter months. this is a hobby........chores and life thing need to be addressed first. me...I tend to model year round, but I have my to do lists too you will get to try your hand at scratch building......you can bet on it. but you'll get more satisfaction from it......and you'll enjoy it more. it's kinda like the Karate kid.......Miagi....."think tree" I see your looking in on probablynots {Brian} build log.....good ! there are a couple of other, I think. looking forward in seeing the start of your new log.........no shelving this time note to self.....commitment.......desire.......determination......and research.
- 378 replies
-
- 5
-
-
- t78 norden
- billing boats
- (and 1 more)
-
davits is usually a term used for life boat stanchions....I think boom would be better. on larger ships these would be considered studding sail booms......on a ship such as this, it probably would be considered a fore or main sail boom. the length can be found when you have the sail made and you can dry fit it on the yard, or get an idea of how far the yard reaches out past the sides of the ship. chances are, it will be 1/2 the length of the yard, measuring out from the center. love the pictures.......I see how much chain will be used......this is gonna look sweet when all is assembled the sail looks good too BTW
-
jee.........I was 9 at the time
-
even plastic models get things wrong........I always thought that too, until I started seeing sites like this, and some of the things folks do with their kits. with wood kit, I came to the conclusion that most kits are generic. unlike plastic, where one set of molds can produce kits of different variants, wood kits have only a few that can be build to portray different subjects. one sterling example with wood concerns the Mordant,.....although I forget the kit that it can be built from.....I think it is the Sovereign of the sea kit {I forget the manufacturer}. basically, just about any kit has a variant, they just need to be outfitted differently. the best example in plastic would be Revell's 1:96 scale kit series. I have both, the U.S.S. Constitution and the U.S.S. United States.....I have yet to do the comparison, but the United States was cloned from the Connie kit. the Thermopylae was cloned from the Cutty kit, and the C.S.S. Alabama was cloned from the U.S.S. Kearsarge kit. I hope you didn't get the wrong impression.....you did a fantastic job on your Norden......I would never say otherwise. all I meant is that building per the kit is good, but for those who have knowledge about the subject {the ship}, they want to add in all of the inaccuracies that the kit does not. that's where bashing and scratch building comes in. I recall my first wood build....I was as green as the pasture......not gluing between the planking was my biggest pho-par......I paid dearly for that come paint time. being an old, non laser cut kit, I learned scratch building early.......and my being a nut about functionality, bashed aspects of the kit early as well. I tried to look up the ship......all I got was pictures of the model. the ship must have gone under another name or something.....I never got to see an actual picture of her. your next project is blessed.......there are many knowledgeable folks here on the site that have built the Fly. you can be assured that seeing what and how they built their model, it will be correct and accurate of the subject. have you started the log on her yet? I'll keep an eye out for it
- 378 replies
-
- 4
-
-
- t78 norden
- billing boats
- (and 1 more)
-
thank for all you folks look'in in.....I've always enjoyed the comments and support you folks bring to the table. thanks for the likes as well you hit the nail on the head John.......it says that in the description on the older Billing kits. that's why the older kits sold the fitting kits separately. they assume you have some knowledge......jeeze, even their advanced beginner's kits can be daunting. the instructions are vague...no doubt about it, they take a bit of getting used to when I build a model, I look for pictures of real ships. I want to see functionality......how something really looks. most models you see in searches are done per the kit......it's easy to tell if the model pictured, is done by someone who added in the extra detail......an effort to build a replica. here on the site, is another good place to get ideas and insight..and to ask questions. it's hard when the ship you want to model has very few pictures to research. I had a fellow send me a folder with over 100 pictures of ships......I have even more that that on the Gothenborg. I still have the model.......hit the floor a couple of times and got damaged. one of these days, I'll haul 'er into drydock and start repairs......I wouldn't be surprised if I have to clone another hull though {another story}. thanks for the good word.......I wanted to get going on the deck, but I ended up giving my son's car the last rites. internal engine noises are NOT a good sign I've not heard that phrase before Pat .......another name for the funnel? thanks for the good word.....painted it will look better. I even thought about adding a shield around the muffler section, like I did with previous work boats. what do you think? thanks Piet.......I must be in a terrible fog lately......either didn't notice, or I forgot that there was a prop for this model. I thought the same thing.....if you read earlier, I was going to add one....but I didn't have one in my inventory small enough. the sails on this boat are not meant to propel the boat....like the lobster boat, they keep the boat steady as they deploy the net. I have a few ideas for her.....I do hope that if I go too far out on a limb, one of the fine folk here will steer me back on course.
- 378 replies
-
- 6
-
-
- t78 norden
- billing boats
- (and 1 more)
-
Kathryn's wheel came out superb....reminds me of a poem I wrote when I built the Susan A {AKA the Regina}. I had just hung her anchors, when it came to mind. I had to write it down: To all fine ladies who roam the seas a gift to the mortal man. So strong she behaves as she crashes the waves she gives him all she can. But the good cap’ knows, as the story goes that the lady loves a surprise. So, he brought her some steel and a shiny ship’s wheel an’ put a gleam to her eyes! the last line was about the 'ear rings', which were the anchors. I share it with you good sir
- 878 replies
-
- 10
-
-
Cutty Sark by NenadM
popeye the sailor replied to NenadM's topic in - Build logs for subjects built 1851 - 1900
glad to hear your finally going to have your eyes taken care of.....you mentioned your problem some time ago. take care of your family and Rhea........but most of all, take care of yourself. one cannot create, unless one is truly happy. you've done so much with this project......you've excelled and overcame every obstacle you've encountered. for her Majesty to look so good, you must have quite a desire to build her. your efforts show in every aspect of this model. I hope to see you in full production mode soon- 4,152 replies
-
- 5
-
-
- cutty sark
- tehnodidakta
- (and 1 more)
-
very nice to hear you've continued work on her again. I really like these large model ships, and your is no exception. when the finish goes on the hull, the grain is is going to be spectacular! look forward in seeing more
-
cameras are hateful creatures you know....... sometimes they show distorted views. they have a knack for zeroing in on the slightest imperfection. your gaining on that finish your look'in for......she looks super
-
wonderful progress! really like the decking......is it laser etch, or is it done with individual planks? superbly done