
HOLIDAY DONATION DRIVE - SUPPORT MSW - DO YOUR PART TO KEEP THIS GREAT FORUM GOING! (Only 13 donations so far - C'mon guys!)
×


popeye the sailor
-
Posts
16,007 -
Joined
-
Last visited
Content Type
Profiles
Forums
Gallery
Events
Everything posted by popeye the sailor
-
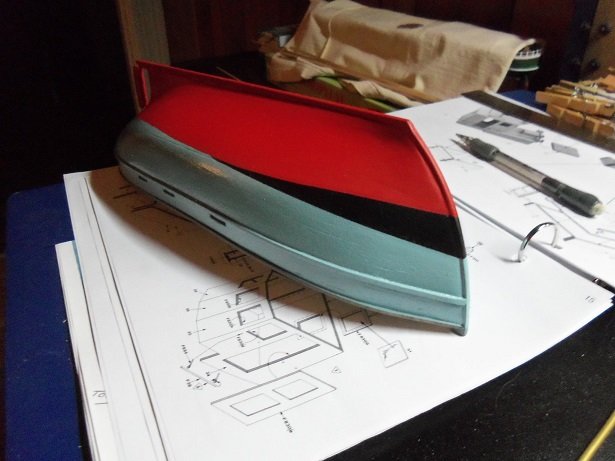
 this was odd.....I checked the editor earlier, and my post was still there. I noticed that it didn't post last night, so I did it again, and it posted. I came back in here tonight, and it was still here.......never happened before >shrug< something for the books, I guess thanks for all the kind comments folks....the colors were a last minute decision. the olive drab looked too greenish to me, so I went with the flat red......the sea blue is a Billing's color and I had another bout with the airbrush, in painting what I did of it. I was going to use flat white on the bow, but I had second thoughts.....I never really see any other color {aren't you glad it wasn't orange?!}. after the hull was painted, I noticed that the sea blue didn't go down far enough......gray still could be seen......so I finished it with a brush. I was relieved to see that no brush strokes showed up well, I'm glad you all liked it.....the scheme didn't shock you! thanks zappto, Nils, John, and OC......I appreciate the kind word thanks Patrick......I wish I was good with weathering......I'm doomed to be a "Mr. Clean" guy thanks SanJoseClay.....so, your responsible! when I first came here {if you look in the welcome forum}, a fellow chimed in to say hello, and posted it to me. I in turn copied it, and to this day, I keep it in my archives. I'm sort of a poet myself......very good writing I thank you very much and an honor to meet you....I do hope you'll follow along.....I'm not finished yet. much more to go... I hope you enjoy I do the laugh too
- 378 replies
-
- 5
-

-
- t78 norden
- billing boats
- (and 1 more)
-
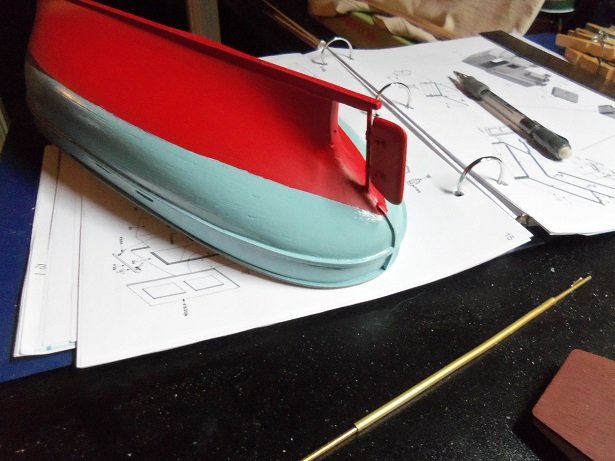
there is no such thing as a time dedicated build Kevin...any avid modeler knows that! see....it's right here in the modeler's handbook.....pg 14 "no modeler is to complete his project in a timely manner. perfection is not a rush job." there's more, but I have to power up the magnifying glass to read it. I think your doing fine, Rome wasn't built in a day......and the leaning tower of Pizza didn't get that way because someone sneezed. thanks for liking what I wrote...it's just me darn thing.........I hit submit last night! it didn't post.......just finished the paint work last night.....wanted to get it on here, so you all could see it this morning. oh well......no one spilt their coffee on their keyboard. "Jack, what are you doing?' "Daddy's making art honey......" the Joker
- 378 replies
-
- 7
-
-
- t78 norden
- billing boats
- (and 1 more)
-
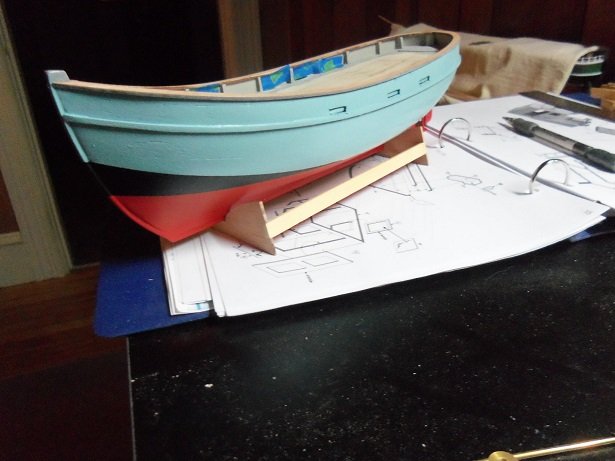
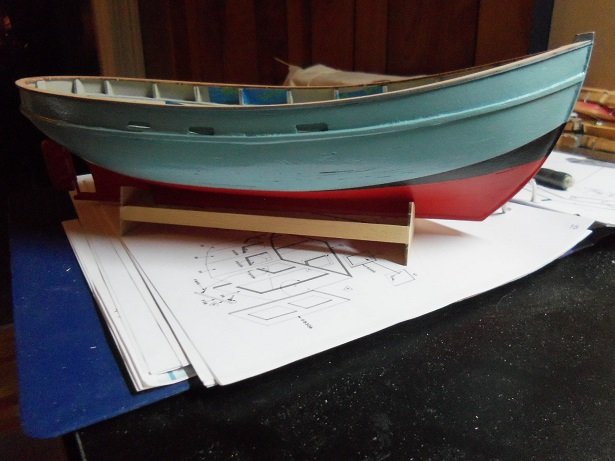
hello Lou.......I'll have to look that one up......I have Dumas bookmarked {god...what DON'T I have bookmarked!}. I believe a plastic version was built not long ago, by Kpnuts. I think I'd go for something bigger.....that way I'll use more paint. I appreciate the suggestion though.......I don't want to enrage the admiral either I just finished the paint work a short time ago.......I didn't use any of the colors I was going to use. I just winged it. I wanted to have the cap rail painted before I posted the progress, but I can do it tomorrow.

- 378 replies
-
- 10
-
-
- t78 norden
- billing boats
- (and 1 more)
-
this one......might be the one your referring to. yea.....I've dealt with older woods....have you tried soaking it? I had that problem with my recent build......it was in my closet for a year...might have accounted for the dry wood. sounds like the kit supplies Sapeli wood......a better wood , would be basswood...I use it a lot. I know some don't like it, because of the 'hair factor' it gets from sanding. but, if you go from medium to fine sandpaper, and then rub the hull down with a cotton cloth, the hull comes out really smooth.
-
there is another log going on as well, are you following it? he has the first strake running along the main deck all the way back to the stern. I was also looking at the kit......no parts panels to pop the parts from. first for me...never saw that. I would think the parts would be prone to warping...have you had any trouble?
-
there you go........hay burners! you might even find some tack to hang on the walls.
-
you'll be happy you did.....then you can better shape and taper the planks, as Mike suggests. look online as well on the subject....there are tutorials and photos you can find, while your waiting for the books. since the keel add on parts and the center spine is the same thickness, you will need to bevel the center spine enough to give yourself a good rabbit......I'm sure that will be in your books as well. for a closer idea, look in the scratch build forum at the beginnings of some of those projects. doesn't have to be the Fly, but something close. you'll see how folks did it on their keels and you can apply the method to yours......how deep the indent etc. I'm not too familiar, but there are folks here........you'll be fine.......I've babbled enough
-
nice job so far.......yea, that deck will sit fine, once you glue it down the A.L. kit has the spiral stair ways.......your will have port and starboard stairs off of the one shown? completed, it should look really nice. the absence of windows on the first level suggests housing for livestock, cargo and supplies..am I correct?
-
hard to find the right word ........just an outstanding first class job! busy throughout the model..the effort shows very well done. so....ahhhhh, ya gonna start another one.........errr, from the start, I mean
- 82 replies
-
- 3
-
-
- carl vinson
- trumpeter
- (and 2 more)
-
hi Kevin, problems.......which one.......the quest for knowledge, or the fact that I was in a fog awwww, we all have those moments. I've had ship builds, that I didn't have any problems, and then there were the ones that gave me nothing but grief. it's tough doing a scratch build.......I've fared just as well in that arena as well. I rarely ever go back to fix things. I tell this to anyone getting into the medium........build it.....don't look back, just go forward. after the second or third model, look at the first one......they can see their experience rise with each build. I know though where your coming from.....she's a big lady......you want her to be perfect, I understand. my admiral gets upset every time she sees me obsessing over things....."it looks good enough!" she says......"move on or you'll never get anything done." I think it depends on the subject......one subject you might click with more than another........you might have to put more thought into one, more than another. I'd like to build a Norske Love.......do I think I'd ever finish her? I have the Gothenborg sitting in the hallway......it's been there for some time now. she's hit the floor a couple of times......I might have to do a total redo. how about that.....we each have a closet monster we both know that one of these days, we'll have to pull those monsters out....and get 'em done without look'in back. pictures can add time to a build.....I've got over a hundred pictures of the Goth........but that's the problem.......how much detail do you want to add? the only remedy, is to set a goal and stick with it. for this model, I wanted to expand too much, I think. I'm beginning to think that I can't go as far as I would like. so, I'm going to settle for the ideas I have and go with it. we do the best we can with the projects we have on the table.....the next one will always be better that we have ever done. Don Quixote fights the windmill.......and Sancho shakes his head. I could freeze dry some minnows OC.......would that work?
- 378 replies
-
- 4
-
-
- t78 norden
- billing boats
- (and 1 more)
-
it doesn't matter what your modeling with........it's impressive what you've done so far. if you post a link to some expanded info on what your doing, I'm surly gonna look at it. your doing a great job thus far....keep up the good work what is chaff made up of? gotta be something if it knocks out radar.
-
is the bow, keel, and stern post thicker than the center spine? if so, you may not need to much more than a slight bevel on both sides, along the edge of the center spine. the rabbit is nothing more that an indention in the keel, so the planking will have a place to fit into, to give it a seamless appearance. it will help at the bow, giving the plank a slot to be inserted in. it will help the garboard plank along the keel......no gap. it will help in terminating the plank at the stern....you won't end up with a thick stern contour. I've haven't done it much.....most of the kits I've done supplied addition parts to be located at the bow and stern. they act as bumper stops for the planking, giving an additional surface to adhere it to. what I do for the garboard plank, is bevel the edge that is going to butt up to the keel, which works equally as well. for the first planking it won't matter as much. the main objective is to get the contour of the hull as good as you can. sanding and filling {if necessary} will refine it to receive the second planking. you can go full strip or what would be called scale planking. there is a formula for the scale which your model is based, but I'm not too good with it, so I cut my planks to fit two or three bulkheads. tapering is easier, since you'd be dealing with a much shorter length of planking...easier to fit. I've only second planked one ship.....most of the other models I've done were painted over anyway.....it would have been a waste of good planking. the preferred method for second planking is scale planking. someone with more knowledge of it can tell you more
-
sweet looking ship.......your carving skills are amazing too very well done!
-
with some kits, it's almost impossible to follow that first strake rule. I always start mine by following along the tops of the bulkheads, and proceed downward. for this one though, I would plot the first strake at the top, until you get to the higher bulkheads towards the stern. at that point, let the plank guide you where it wants to fall, and go down from there. the upper part can be done later. the half Moon and the Mayflower are other examples, where this method works well. does this model have the ply panels for the upper part? you could even start with those, and they will mark the line for you
-
that's a much better picture that the other link showed really neat!
-
thanks Nils! that is......if I don't fall asleep at the helm!
- 378 replies
-
- 5
-
-
- t78 norden
- billing boats
- (and 1 more)
-
sorry on the late reply folks......I was here the other night, but I should know better. I fell asleep at the computer and knocked out my browser when I do that, my hand is usually on the mouse.......subliminally clicking in lala land. I'm usually pretty tired when I get out of work. As said.......I should know better. I started to do the hull painting......should have something pretty soon thanks Pat......I should do a tanker.....or a ship like Andy's doing. then I can probably use most of it up it won't be orange anyway.....the admiral won. no Glenn, I'm an enamel man......I don't use acrylics {not that I don't like them, I have never used them}. one of these days, I do plan on doing an S.S. Olive Oyl, but I want to find figures first, so I can evaluate the scale OC.......I'll PM you with pictures so I don't scare the natives
- 378 replies
-
- 5
-
-
- t78 norden
- billing boats
- (and 1 more)
-
I would think that the doors are all the same......only doors that are different size might look a little different. the biggest thing to look out for, would be the way they open in different situations....you don't want to use a left hand door in a right hand situation nice progress with the added detail......odd looking launchers.
-
very nice job on the hammocks........looks really sweet!
- 1,306 replies
-
- 5
-
-
- syren
- model shipways
- (and 1 more)
-
that's a neat looking stand very nice paint work.......looking super!
-
most laser cut rails don't fit right anyway nicely done!
-
I get really thin wire like that from appliance cord....never though of using it for that Bob.......great idea well done on the rigging!
- 682 replies
-
- 2
-
-
- halifax
- lumberyard
- (and 1 more)
-
I wonder if there is some correlation between the misalignment of the dowel and the structure. your really giving me the itch to pull mine out of the box and do some research into it that's a dry fit on a large scale.......it's a good way to think ahead. I wonder how this model would look if you subbed the stairs with an elevator? apparently there's a problem with the incline of the stairs......plenty of time to figure a course of action.