
HOLIDAY DONATION DRIVE - SUPPORT MSW - DO YOUR PART TO KEEP THIS GREAT FORUM GOING! (Only 68 donations so far out of 49,000 members - Can we at least get 100? C'mon guys!)
×


popeye the sailor
-
Posts
16,007 -
Joined
-
Last visited
Content Type
Profiles
Forums
Gallery
Events
Everything posted by popeye the sailor
-
 dry fitting is part of the process.....very nice display saw your vid.....very nice.
 -
I got to see it just fine so cool to see....thanks for sharing
-
studding booms! very nice..........is that a brass plate?
- 188 replies
-
- 1
-

-
- cutty sark
- billing boats
- (and 1 more)
-
nawwwww....I'd just break out the sub rolls and have at it now if I go in the kitchen, she'll follow me we need to go to the store and get more Recotta.....I suggested getting two when we picked everything up.......drat! the great Ricotta caper........ got another length of planking on........it will give it time to dry zipper ready to close
- 378 replies
-
- 4
-
-
- t78 norden
- billing boats
- (and 1 more)
-
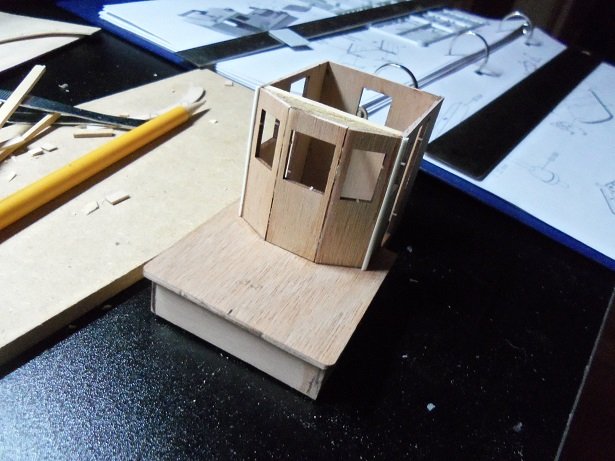
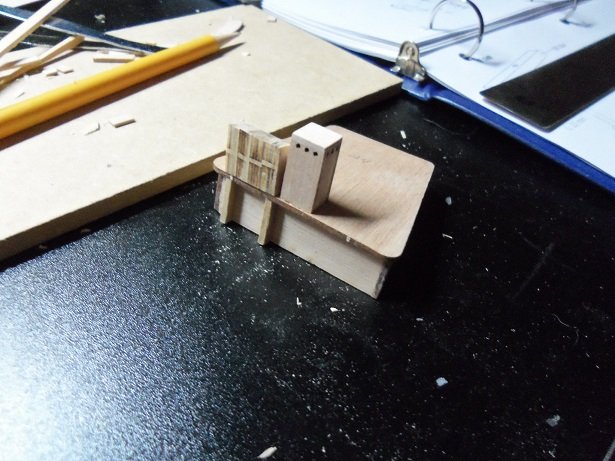
took me about two hours to clear the driveway......good thing it was light fluffy snow. the bad thing is when I blew it in the air, it created such a white out across the road, I had to be extra vigilant for oncoming cars. I did make a little progress yesterday on the Norden.......closed the starboard side up some more. while it dried, I did a few things to the structures. the two front corners of the pilot house, I cleaned it out and cemented in some 1/4 round Plastruct stock. the two inner ones will be sealed with filler. I have a mind to do mahogany siding, but I will need to install the windows first. I started to flesh out the companionway on the forward structure. I likely created a painting nightmare in the process.....but I'll work it out. I got a bit further on the hull........hopefully I can close it up today. the admiral was making her sauce for Lasagna during the day yesterday........I managed to get a taste in here and there sheer heaven! yes......it has sausage in it tried it again when I got in from snow blowing.........1 taste and I had to get away..........if I didn't, who knows what I 'd a been do'in
- 378 replies
-
- 12
-
-
- t78 norden
- billing boats
- (and 1 more)
-
thanks Keith.....I would think then that there might be some other type of drum mechanism working in conjunction with the winch on the pilot house base. the depiction of the winch itself seems a little bare....just the drum without the reel guides on either side of it. there would also need to be a pulley to change the direction of the line over the side of the boat.. now.....in one of the pictures I saw, I thought I saw some tell tail netting in the larger drum of the starboard side winch. I will check into this further to see if I'm correct. I'll try and draw something......I'm no good with the fancy stuff on the computer, that I see others do. if anything else comes to mind......please let me know. it might give me an idea......you never know thanks OC the internet has given us so much freedom.......wonderful if used correctly we have so many fine folk here......they deserve to be bragged about well I didn't get to finish......having too much fun watching Gibbs in the deep snow I got one drift that's well over my waist! clean up tomorrow!
- 378 replies
-
- 5
-
-
- t78 norden
- billing boats
- (and 1 more)
-
sorry if I made you second guess in any way. if you are done with that part of the structure, by all means, it should be cemented in place. that's a milestone in itself.......calls for a celebration it's nice to see a project grow. really like the direction your going with this project
-
well, it's nice to see that they supplied different size dead eyes for the upper steps of the masts. I've had kits that only supplied one size.....makes for a rather wonky model glad you weren't offended and read it the way I meant it. I'm by far no expert either, and I agree that there are others far better to learn from. glad to know that your enjoying the hobby. in my younger days, I'd see these kits in the store and shy away, thinking I could never do something that looked so demanding. now that I've completed a few models, I feel silly now, finding out what I really should have worried about, was the terminology of the parts keep up the good work.........your doing great!
-
that's the way I need to go with my Thermopylae, but at a smaller scale. very nice work!
- 188 replies
-
- 2
-
-
- cutty sark
- billing boats
- (and 1 more)
-
looks really nice OC.......are you gonna go black on the wales again?
- 455 replies
-
- 3
-
-
- slightly modified
- greyhound
- (and 1 more)
-
truly nice work Danny mistakes are human........how we fix 'em is our redeeming factor really like the joinery of the antenna.
-
that's a pretty ingenious way to paint them...........paint the one side, then flip the whole strip over and let them slide down the pins, to paint the other side. I will keep that in mind do you own a dog..............well.......you taught ME a new trick!
-
agreed on all counts! remarkable ingenuity Jesse.......rigged, it will look very good. most parts of the standing rigging is usually done with larger ropes anyways; it will fit in nicely super job my friend!
- 1,306 replies
-
- 6
-
-
- syren
- model shipways
- (and 1 more)
-
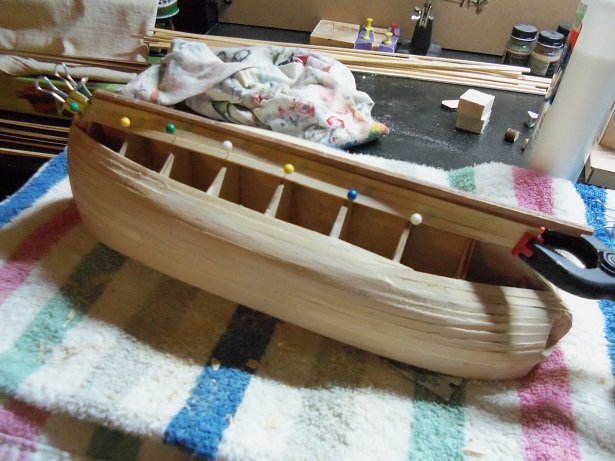
thanks for the kind comments folks I can count on one hand, the hulls where planking went well for me.....it's not my strong point. but by the time paint or stain goes on, they look good......and I'm happy with it I didn't get much done yesterday.....things to do around here. we visited a new gaming store that the admiral found {my other major hobby}. I talked to the owner for quite some time.......if I ever wanted a part time job, I'd be a good contender for a position I used to play a lot with my younger son, and we've owned just about every system out there. even though modeling wasn't our biggest draw, my sons and I are still very close thanks Zappo....I know I did a boo boo putting a picture of the Nordkap here......I'm not sure which one you mean. the Norden is a fairly up to date kit of a 1930's coaster. it's laser cut with the usual hieroglyphic Billings instructions. I've built so many Billing kits, that it's not a huge problem for me though, I get the jist of the instructions from the pictures the Nordkap is an old kit. the one pictured above had to come from a very early production period. it was not laser cut and featured printed basswood part sheets and planking. the one I got for Christmas is even older than the first one....I would be pretty safe to say it's very close to a first production kit. it isn't laser cut, but instead of basswood, it features printed mahogany part sheets and planking. I'll be using the printed parts sheets {of course}, but the planking I will save for a sailing ship, or a model that I won't feature paint on {I want that wood grain to shine}. on the Nordkap pictured above, I used about 90% of the original wood......something that I'm very proud of. I believe other pictures of her is in the gallery. thanks John and Pat........I'm absolutely froze up here! it's hardly ever been this cold so early in the season. today we have a major snowstorm going on....they are saying 8 - 10 for us........I feel bad for the folks down around the cape. they are bracing for almost 2 feet!.......coastal areas will be hardest hit {praying for you folks!}. I was toggling between Mass. news channels last night. now that the kitchen table is open again, I'll be able to spread the huge instruction sheets out for the Thermopylae without fear of wrath. there's still some deck work, but as John said, I need to get to the masts as mentioned.......the new table is long enough.........I'm sure there's enough elbow room I'm hoping that 2018 is a more productive year. thanks OC......funny you should mention ribs. yesterday I dropped the hull on the floor. where I had a pin in one of the stern ribs, it had cracked the rib in half lengthwise. since I'm so far along with the planking, this won't be an issue.......glue will fill in the void and will still be solid that's a good way to look at the site and what it means to us.......but I have one better. since I have been coming here {2009}, I have met and made so many friends. I've always wanted the ability to 'pen pal' folks in other countries, back in the days when I did it in letters. I recall a fellow in Belgium I used to write to....named Jean {I forget his last name}...a fellow modeler.....I recall some really long letters. a few months later, the letters dwindled and then they were gone. thanks to the internet, we can all meet in these 'hubs', and we can show, share, and compare what we do, and help each other to enjoy our hobby more.......and most of all, learn and expand our knowledge and abilities. it's an unstable world out there........and so is our beloved internet........when things go sour and the site goes down, it saddens me the most when I lose touch with my friends. this site is remarkable.......kudos to all of you that keep the gears moving here...this is by far, the best site I have ever been a member of I appreciate every day I can come in here, to show you all the crazy stuff i've done I'll finish the hull today.....I have a great incentive. the snow has picked up in intensity......it's REALLY coming down NOW! other than taking Gibbs out, I have no plans to go out there. I hope folks stay off the roads and stay safe.!
- 378 replies
-
- 9
-
-
- t78 norden
- billing boats
- (and 1 more)
-
it's pretty much in all of the pictures, so it doesn't look like it's removable. wonder if it was used to launch the paravanes?
-
the structure looks awesome.......boats and all! I'm just amazed how all this is coming together.
-
second that Michael! so good to see your back at the table. the mast redo looks awesome!
-
you'll be a lot happier with the way they will look the plastic dead eyes don't have the indentation around the outer edge.....bad thinking on Heller's part me thinks
-
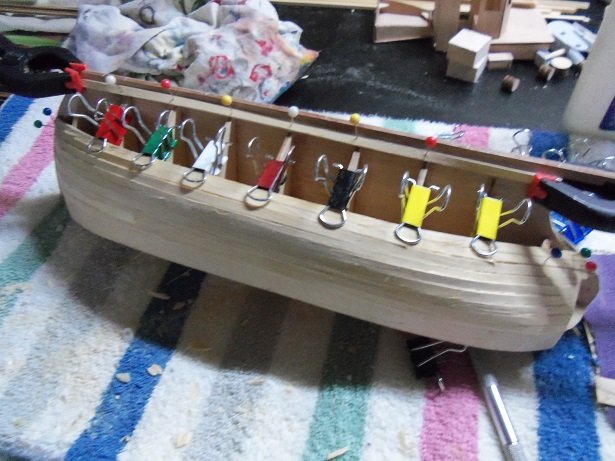
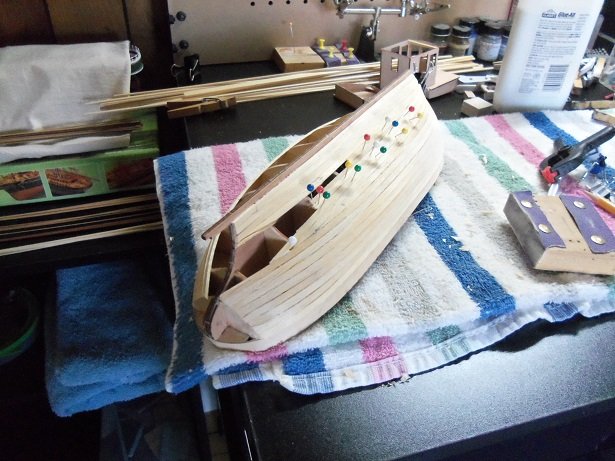
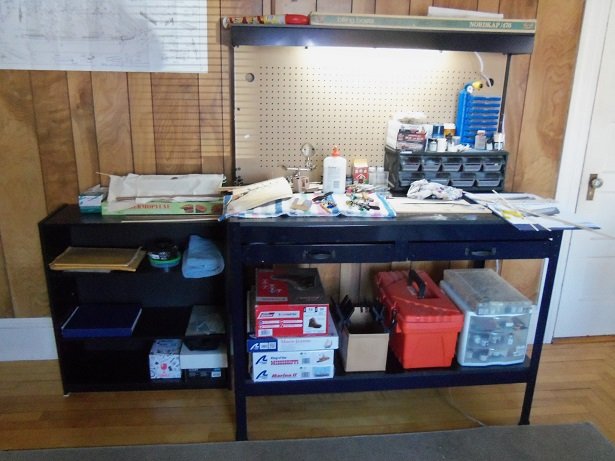
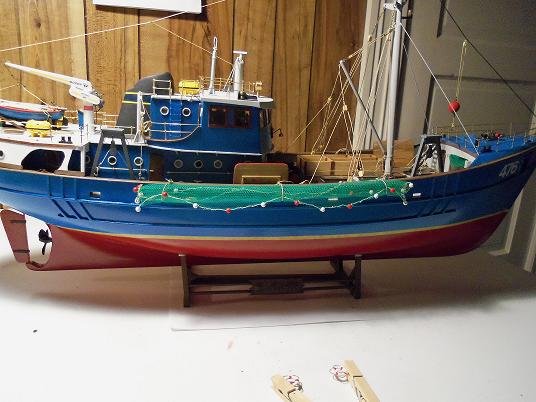
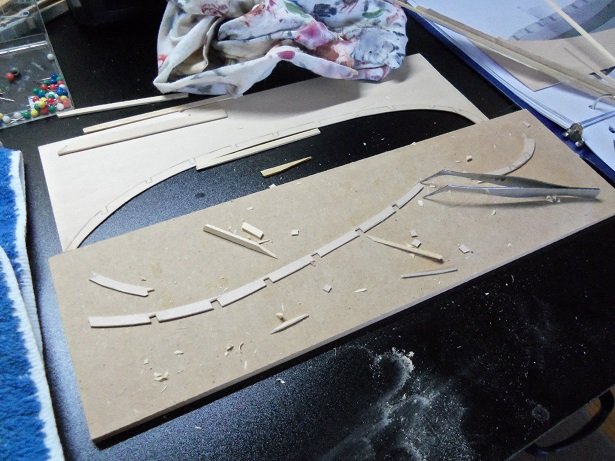
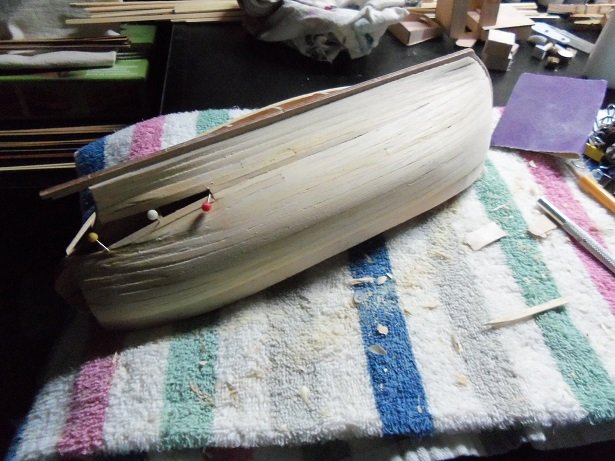
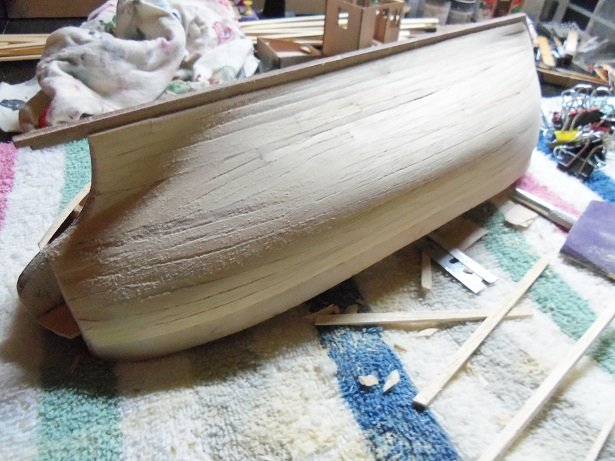
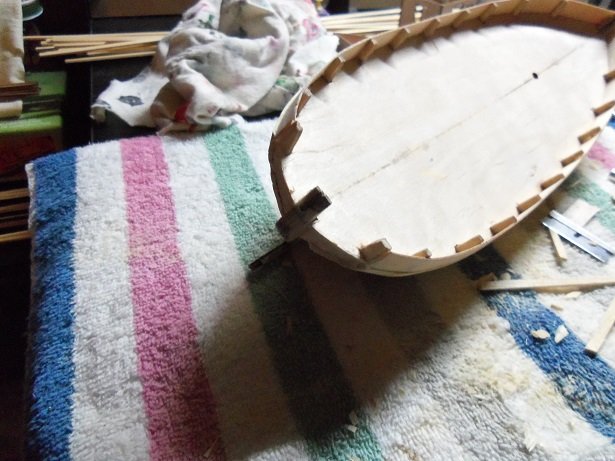
thanks Piet I was ready for the ball to drop......we ordered Chinese food.....I got some of my favorite spirits. our youngest son and his fiancee came over and we played cards. had a couple beers, but never touched the spirits ....don't drink like I used to. when I was younger........'party' at the drop of a hat......but not now. ended up watch'in a movie with Gibbs and never saw the ball drop. I hope you and Gwen had a great holiday season, and that 2018 is good to you folks as well. to one and all........a Happy new year as well.....I hope you are all equally as prosperous! I did get further with the Norden, although I'm making a sow's ear of it. as mentioned, paint will hide a lot of sin I didn't hold the line very well, and it got away from me really quick. not one to back track, I did the best with what I had done. I will add that this hull is a carbon copy of the Cux and the Mary Ann....if you put all three side by side, you'd see the similarity. the 'zipper started at the bow and worked it's way back to the stern. this model does the stern cap differently........Billing supplies two blocks of balsa, that fit into the cavities, to be carved and sanded to shape. the new table's maiden voyage is going along smoothly. it's nice to have the two drawers, allowing my 'most used' tools to be at the ready....just wish the pick ax would've fit in there off to the side, you can see that the admiral got her way.....although I went with a three shelf bookcase, rather that the bohemouth she wanted me to get. I forget what year it was.........I had seen the plans for a wall bookcase....I tore them out and kept them. I found them the other day, tucked in my old yearbook..........I'll save it till we get our own place again {although if I built it here, it would be an improvement}. here is how the Wharf now stands..... up top, you can see the crown jewel of Christmas......the Nordkap. I'm hard on the trail to find the fitting kit for her. contacted Billing/Danmark.....but no reply, so I sent an inquiry to Roger @ Age of Sail, to see if he can help. if that falls through, I'll either have to keep my eye on E-Bay or continue to do, what I started to compile already.......go piecemeal. I'd be pleased to post another log on this vessel.......she was so much fun to build Pictured here in 2011, waiting for her last two pieces. you can be sure that another hull will be cloned from her the only drawback to this configuration, is that I have to keep all my wood in the spare room. that will change though, once I unseat the Thermopylae from the top of the bookcase while I was in my muse state.....I continued to cut out the margins. as mentioned, it's proving not as easy, as I would have liked. due to the width, they are a bit fragile....I will have to do some piece fitting when it gets cemented in place on the deck. it will make deck planking easier though, not having to fit pieces in along the bulwarks. the planking went further back on one side of the Norden......almost to the point of closure. I'm determined to get at least one side done today. I did some sanding.........I do believe there's redemption for the hull after all finally done.........with more sanding to the stern........a little filler should smooth her out quite nicely. the stern bulwarks however, did not fair well, after the initial crunch from that clamp. more had crumbled by this time. I cut it out and removed it......A piece will be made to fill in the gap. I never did like these thin plywood bands........I think, on the Mary Ann, I simply planked from the top of the posts on down, and never used them. in this case, it might have been good not to use them......the band is only 0.5 mm, although the parts list says that it's 1 mm, and the planking looks to be about 1.5 mm......rather than the 1 mm strip the list says. there is a dramatic thickness deficit here, none the less. I'll take care of that later.....right now, I'm geared to get the other side planked and sanded.....take care of the stern, then I can deal with the bulwark band when I fix the stern. thanks for look'in in
- 378 replies
-
- 15
-
-
- t78 norden
- billing boats
- (and 1 more)
-
I tried that Carl.......that's what got me to where I am today not the bored part though....sometimes it's good to have something to work on while glue or paint dries {now that's the boring part } glad to hear your wanting to dive into a wood build. for so long, I used to look at them and feel daunted by them. they looked so good.....but I would still be hesitant. I had to have one land in my lap, to show me that I was just being silly is the funnel and aft structure cemented on the deck? looks darn good my friend! very nice work!
-
thanks OC......and those who hit the like button I bought a bag of each.......the smaller ones were easier to change over than the larger ones {I have to cut off the bent ends}. I'm not the best planker in the world.....my little hiatus left me a bit rusty. awwww, what the heck......a little filler, a lot of sanding.......no problemo! I've set up the other table in my son's old bedroom, so I can work on plastic projects in there, and the table here in the computer room can be for the wood builds. this new table is long enough.....it might not be so hard to work on another project, if an idea comes to mind. here's to 2018......may it be more productive
- 378 replies
-
- 6
-
-
- t78 norden
- billing boats
- (and 1 more)
-
in your instructions, do they give the size of the dead eyes? as a rule, larger dead eyes are for the shrouds, smaller ones can be used for back stays, and mast tops {the second step of the mast(s)} if you have a rigging diagram, it should tell you as well. you've made some really great progress if you stay with this size though make sure you have enough.....2 per shroud line.