DONATION DRIVE - SUPPORT MSW - DO YOUR PART TO KEEP THIS GREAT FORUM GOING!
×


popeye the sailor
-
Posts
16,007 -
Joined
-
Last visited
Content Type
Profiles
Forums
Gallery
Events
Everything posted by popeye the sailor
-
 gonna be a super cool looking set up when you get 'er together Nils. nice metal work!
- 2,625 replies
-
- 3
-

-
- kaiser wilhelm der grosse
- passenger steamer
- (and 1 more)
-
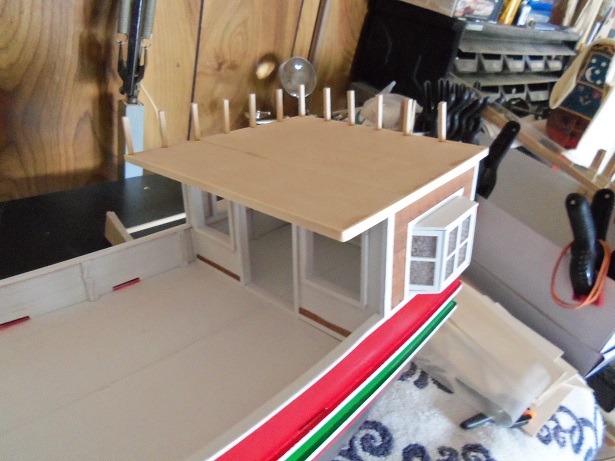
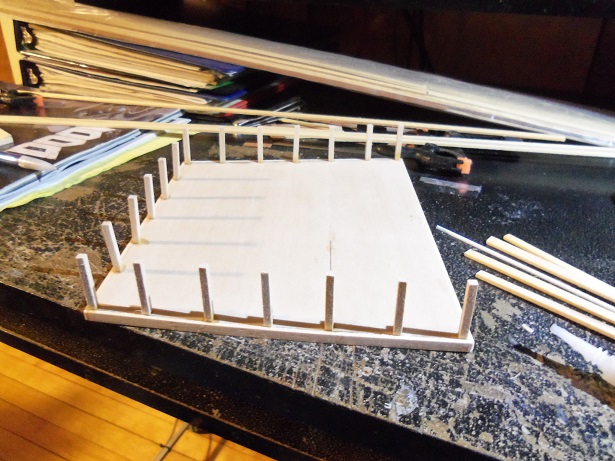
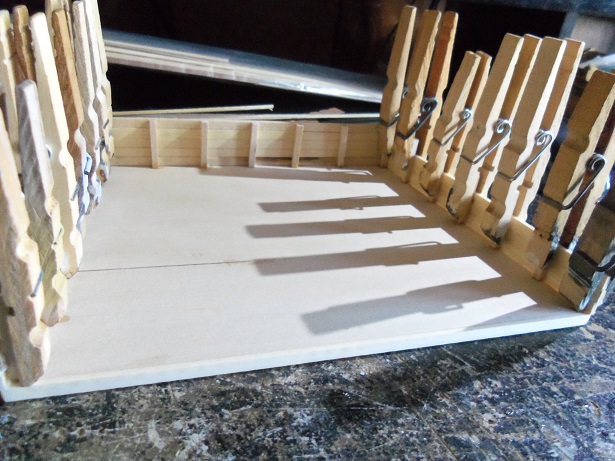
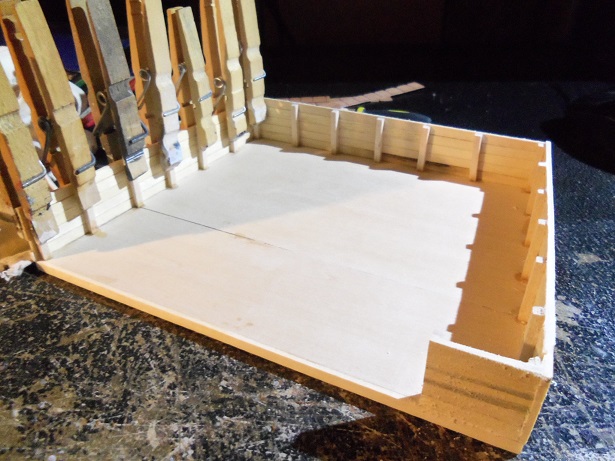
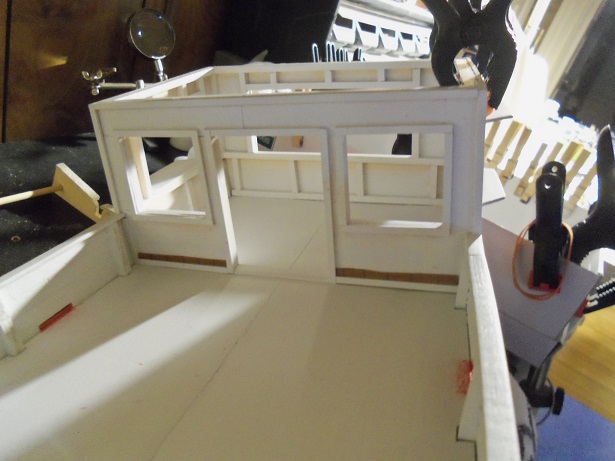
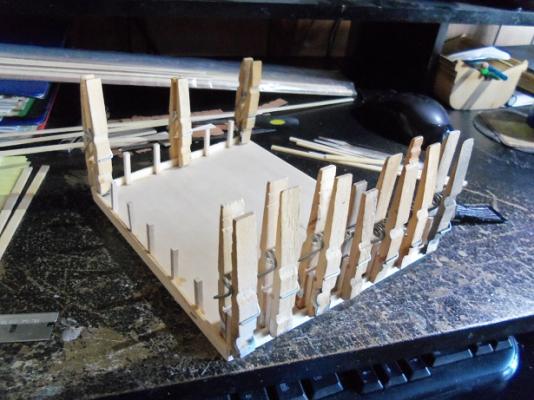
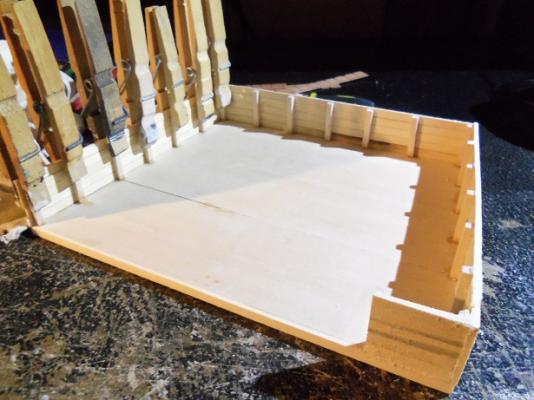
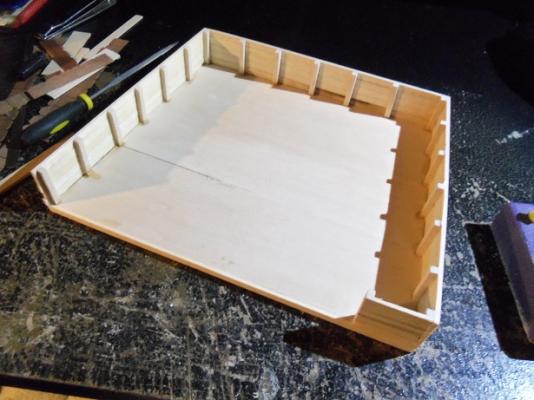
well........I got it to the point where it's about as finished as the roof. so.......what is to become of that platform? it all begins with some 1" posts........ ....later to be cemented around three sides.......for the time being. the next step, came the planking, to box it in. progression......... progression.......... progression........... until all three sides are done and sanded. that little on the port side was an idea that I ran across the admiral's inspection.........she likes my other idea better {it figures}.


-
thanks to all who commented and hit the like button. lots to think about........but I can't seem to do it with a straight face Mark.......bug........are we trying to guess what the purpose of this vessel is during the off season? hint.......the captain's name is Bubba you do understand Greg, that Santa's complexion is about as white, as the underbelly of a new born gosling.......poor soul would blend in with the beach sand! I better not say more........or I'll get coal next year thanks Gerty and John. glad your enjoying the log. I have been working on my idea.......if I do get pulled away this week......it will just be for short periods of time. It had better......my watch lists for both forums are beginning to get long again. hopefully, I can show you a comparison tomorrow. stay tuned
-
awesome Patrick........simply awesome! amazing to see your work in such a small scale!
-
looks really nice Mark.......if you hadn't mentioned the short comings, I would never had known. I tip my hat to anyone who can make decorations like that.....yours is just another stunning example! very nice work!
-
your off to a great start Bug.......very nice
- 2,191 replies
-
- 7
-
-
- confederacy
- Model Shipways
- (and 1 more)
-
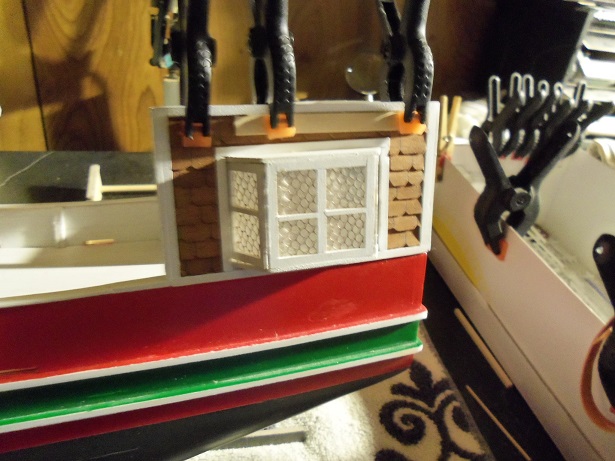
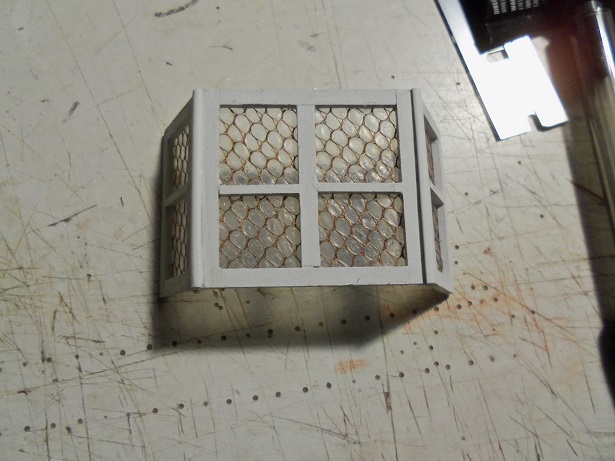
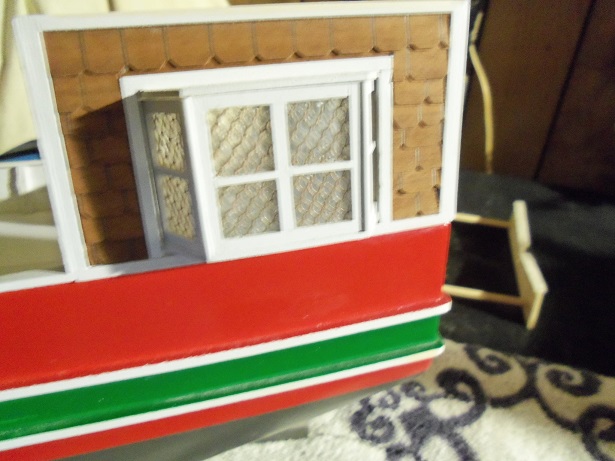
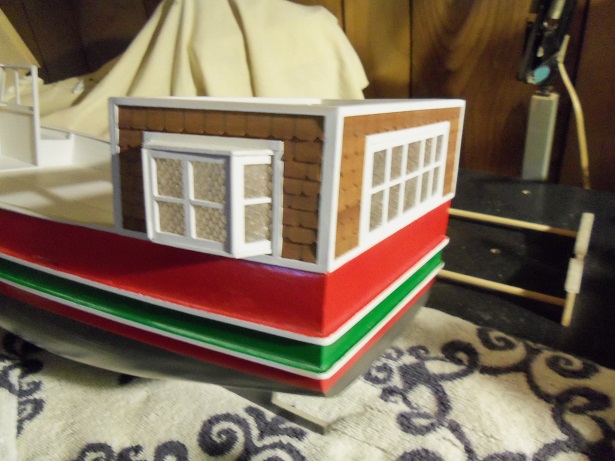
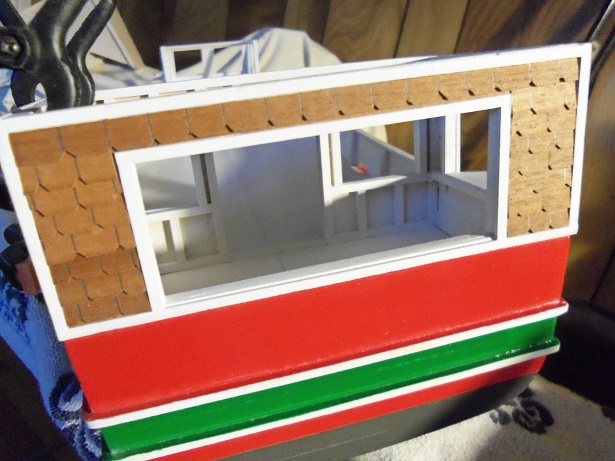
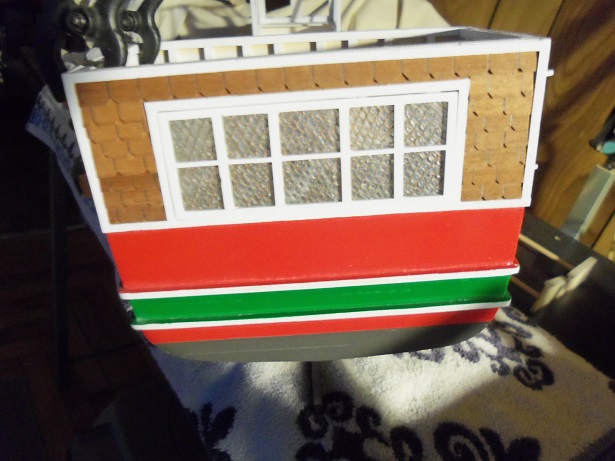
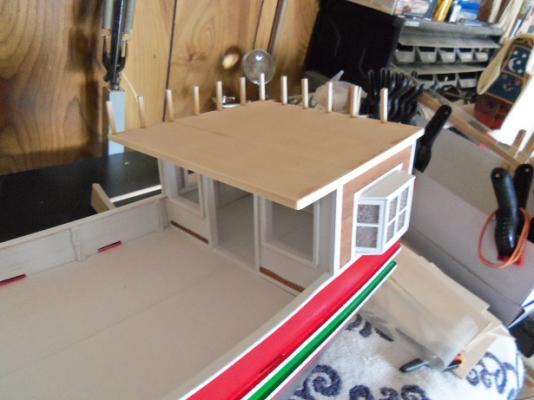
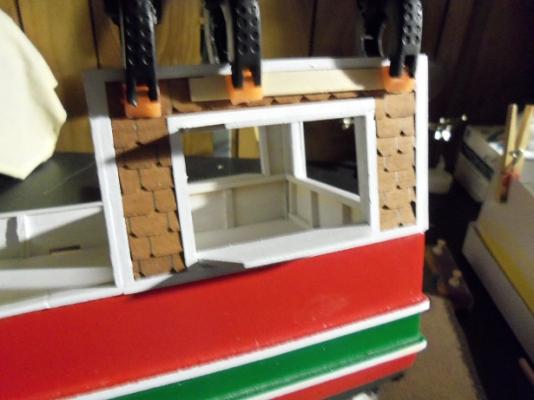
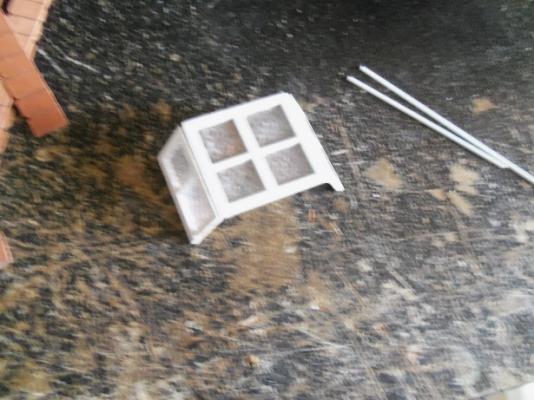
thanks Patrick........I appreciate your kind words. not to worry........there's still a lot of insanity left in these 'ole bones I fully intend to go stark raving mad with this build......even if it kills me {well, maybe a slight fever....anyways} :D I promised you folks an update.......trouble is, real life is playing with me. but I got a plan of action......I had to work Monday evening at the airport, after leaving Wally early to accommodate it. I had to work today.......and tomorrow for my boss over there.....he wanted the time off. {can't blame him}. so I'll work these two days, and Saturday at Wally......and then take Sunday and Monday off {at Wally}, to give me a nice long week end! I may have to work a few hours here and there, but I'll have plenty of play time in the meantime anyway.......the stern came out alright......and I was almost done with the port side. the bottom was laid down for the front wall.........this is going to be tough because of where it is...the deck side. while I was letting the last of the shingles dry on the port side, I thought I'd cement the windows together. they will need some touch ups when dry I have some plastruct 1/4 molding.......the joints in the windows were grooved with a triangular file. the molding will be cemented in these grooves to make the gaps disappear. when done, they look like this so, in place, now that the clamps are gone, the port side looks like this. I did get a start on the revised roof. again......please don't think that I troubled by anything that is said.......far from it. I see the key words........I'm not daunted by them........I use them. they gave me this wonderful idea......too good not to at least give it a try. it's going to add so much more to the build. it started by getting a tracing of the roof. I also have to take into account that the structure has a slight warp to it.......I got rid of it with the roof.......now I will do it with the new roof. it is lined with 5 mm planking strip........I goofed slightly with the width, so I slid it back about 5 mm and gave the stern window a roof edge. you'll see when it is in place. the edging will lap over the structure, and hide the warp. more as I get further along.


-
thanks Greg and everyone who hit the like button......I did complete the port side. I even cemented together the windows, but I didn't cement them in place......that will be later. should have the picture for you to see soon.
-
the hull mold is fabulous Kees! great job on the life rafts and racks super detail all around!
- 434 replies
-
- 4
-
-
- pelikaan
- beamtrawler
- (and 2 more)
-
as mentioned......the shingles are going to be a slow mover. I did complete the stern wall though, and made it half way up the port side wall. here is the stern wall. and with the window...haven't done anything with them yet. I hope to get the port side done tonight.......and maybe get a start on the front wall.


-
sweet looking capstans Nils
- 2,625 replies
-
- 2
-
-
- kaiser wilhelm der grosse
- passenger steamer
- (and 1 more)
-
nice job on the anchors Piet.........they really look spot on
-
looks good Patrick........once you get both of them in there......you'll see. they'll fill out the area and with paint, the added detail will make 'em pop! nice job my friend!
-
that's the second link I listed......I think the rigging plans for the booms are cool.
- 348 replies
-
- 3
-
-
- pequot
- cable ship
- (and 1 more)
-
love your sense of adventure Bob! oh, I intend to.........but I think a seriously high pitched roof like that, might be a bit over the top..{had to put the pun in there}. I won't dismantle it..........but I think it would be neat to compare the two. besides, I'm beginning to sound like Bob Villa that was my thought on the roof Carl. if I were to have the pitch the other way, it might act as a spoiler when the boat powers up. that might push the stern lower in the water....and pull the bow out of the water. I did that to the M&M boat......the aft lavatory roof slants backwards. the overall height of the vessel was kept at a minimum, and kept somewhat in the proportions with the width of the hull.
-
such a great build log.......and a superb looking ship Max! very nice detail and craftsmanship
- 153 replies
-
- 1
-
-
- royal caroline
- panart
- (and 1 more)
-
wow Max........sorry that I missed your build of this wonderful ship! you've done such a beautiful job.......must have been a real heartbreak to find out about the clew rigging. you'll fix it with no problem.....just gonna be a pain to get the clew blocks on the other side of the sails. a year is very quick for a model of this caliber....amazing that you did it in that little time. great looking ship my friend......I certainly hope I don't miss the Berlin.......I'll keep my eyes open for it start
-
thanks Greg.....no need to worry about being missing in action........the log is always here I fully understand. thinking about the roof.......the height in large part, doesn't look right to me. I haven't done anything yet...snow removal and a hectic work schedule got in the way. I hope to have an update very soon thanks for the good word and looking in.......always good to see you
-
I believe this might shed some light. I think that's the outcropping from the deck. I also found a couple sites......I wonder if you have them bookmarked. http://freeshipplans.com/free-model-ship-plans/passenger-ship-plans/uscg-pequot-general-samuel-mills-plans/ http://indicatorloops.com/usn_pequot_plans.htm this particular one has quite a bit of info. there is also a timeline in regards to her looks at different times. I hope this helps.
- 348 replies
-
- 2
-
-
- pequot
- cable ship
- (and 1 more)
-
the bulwark looks removable in that area as well..........and the single davit. makes you wonder where the other one is located........perhaps they raise a sort of scaffolding or platform along the side.
- 348 replies
-
- 3
-
-
- pequot
- cable ship
- (and 1 more)
-
Cutty Sark by NenadM
popeye the sailor replied to NenadM's topic in - Build logs for subjects built 1851 - 1900
or even better yet......how about fitting those holes with the same size dowel plugs........1/2 inch to 1 inch long should do it. cement them in place and then drill a center hole in all of them, about the size of your screws. then you'll have something for the screws to bite into when securing the stand. you gotta figure that all the glue and stuff you've put into the hull, has added some ballast.........how much more does that hull weigh?- 4,152 replies
-
- 6
-
-
- cutty sark
- tehnodidakta
- (and 1 more)
-
sorry to hear about Charlene.........I hope she does continue somewhere down the road. she 's a very talented modeler. the Bounty is coming along nicely Jerry
-
the wondering...........what does happen to a build, when a modeler leaves the table? does it get put in a box and end up in a closet or attic.....not wanting to part with it for sentimental reasons. circular file? given away, lost.........or forgotten? does it get put on display in remembrance, with the nagging reality that it will never finished? wonderful memories.....and a painful embrace........ "well, my friend Augie.........we're going to know what becomes of your build.....that wonderful ship." I don't think humility would be the word I'd use Bug...........honor, respect, courage...the willingness to give part of one's self to help another, are just some of the words I'd use. that right word is out there......perhaps we'll find it, maybe even lay tongue to it, and speak the word aloud. from what I've seen here in these past texts.....someone will hear it Diane asked me to help...I was all too happy to find a person with your skill......let alone how easy it was to do. everyone here recognizes what a tremendous task you've laid on your table.......so good to see how many offered to help. just goes to show how close the MSW community is. strength in unity....whoever said that was right. the confed is 'on' the best place it could ever be......I know you will do a great job in finishing her. have fun with her thanks again for your help with this.........which will be a stunning tribute to Augie when finished......and again, my condolences to Diane, who I'm sure will be looking in on your progress.. may your x-actor cut true.
- 2,191 replies
-
- 19
-
-
- confederacy
- Model Shipways
- (and 1 more)
-
amazing how you made those tops...very precise work. looks great!
- 188 replies
-
- 1
-
-
- cutty sark
- billing boats
- (and 1 more)