
HOLIDAY DONATION DRIVE - SUPPORT MSW - DO YOUR PART TO KEEP THIS GREAT FORUM GOING! (Only 72 donations so far out of 49,000 members - Can we at least get 100? C'mon guys!)
×


popeye the sailor
-
Posts
16,007 -
Joined
-
Last visited
Content Type
Profiles
Forums
Gallery
Events
Everything posted by popeye the sailor
-
 nice case.........great finish to a wonderful build!
 -
thanks Carl......yea, right now, the cellar is less than sufficient......had to bring her up to warmer temps. I got to my week-end {which is four days long}.......I hoped to get to something today, but clean up took longer than expected. after that I was too pooped humidity is not good for lacquer......turns it white the problem you had might have been too little thinner, or there was a suspension issue with the lacquer......which points to poor batch quality. I used it extensively when I worked in the cabinet shop. we had a batch one time that was so bad, it would catch fire five mins after being sprayed on a rag! it can create it own heat source if not made properly. in those days we got it in 55 gal drums........today I work with 1 oz bottles.........big difference hopefully, a better table day tomorrow........thanks for the good word!
- 956 replies
-
- 3
-

-
- andrea gail
- trawler
- (and 1 more)
-
Carl said it was palatable....so I tried it............don't do it
-
love the deck Frank........now THAT is a weathered deck, if ever I saw one! if there is a mistake......I can't find it......I'm too busy looking into the collage of colors super job!
-
Wow......I am so sorry that I didn't see this build sooner! what a ride it took you on! absolutely splendid workmanship...lots of good stuff here to be found. even with the problems you faced, you build this fine looking vessel.....my hat is off to you!
- 607 replies
-
- 1
-
-
- scottish maid
- artesania latina
- (and 1 more)
-
double planking is imitation of the original planking....mostly done with thin strip of decorative woods over lesser woods like basswood or Obechi. with earlier kits, Billing's used to supply mahogany for hull planking.......sounds kinda nuts to me, since it can be a harder wood to work with. I'm not an accomplished hull planker either, but I strive to be able to do a single hull planking, rather than the double planking to refine the finish. some kits even instruct you to do a double planking. to me it seems like a waste of good wood......if you can do a satisfactory job with the first planking.......why do a second? stains do a good job with wood color and texture. I may be wrong.......but I think Carvel is a type of ship, and not a style of planking. there's traditional planking, where planks are butted against one another in mated strakes, and clinker planking, which is overlapped strakes. I'm sure there are other types and methods, but I haven't run across them yet I was sorry to read that you had problems with your first build,......I am glad though that you haven't given up and are starting over this is such a cool subject, and I wish you better luck this time around
-
just catching up with your build Jerry......you've definitely made some very nice progress! looks really sweet!
-
just checking in John.......and man! what progress you've made! she's looking awesome....well done on the masting the cooker really stands out on the deck.....sweet!
- 2,250 replies
-
- 1
-
-
- model shipways
- Charles W Morgan
- (and 1 more)
-
kits are funny like that Ron.........but you seem to be doing quite well in getting the job done she's looking great!
-
stern framing looks excellent Augie! your skills are really shinning with this build
- 2,191 replies
-
- 2
-
-
- confederacy
- Model Shipways
- (and 1 more)
-
nice start on the rigging Dave.........I wonder if this same set up would pertain to the Half Moon as well ?.?. very well done!
-
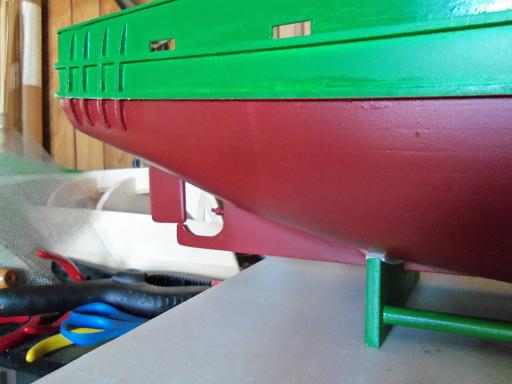
no worries Patrick......I'll not give up the ship got a bit of clean up to do outside with the snow and all, but I'll be at the table. I do have the one picture of the prop going on........didn't have to glue it or anything......the paint will do just fine {almost couldn't get it threaded on} I was looking at the stand, trying to figure out what made the scratches the first time around. this Billing's paint, when it dries, is a pretty hard finish.......I've not seen this before. the hull has been upside down for well over three days now........it should be fully cured.

- 956 replies
-
- 12
-
-
- andrea gail
- trawler
- (and 1 more)
-
thanks Mobbsie when I get back to work on her, I hope to do a dry fit. but actually, if I touch up all the over spray, I can pretty much fix many of the parts on permanently. but the first real order of business, is get the pilot house done and the roof on, so I can work more on the trawl rig. another major snow storm has fallen........need to clean up the mess before I can do anything else thanks for the good word!
- 956 replies
-
- 4
-
-
- andrea gail
- trawler
- (and 1 more)
-
interesting ideas from Bob's kitchen
-
very nicely done Piet! rigging , sails.......look super! congrats on such a beautiful vessel! I had to look back to see how you made your decals.....interesting
- 176 replies
-
- 2
-
-
- muscongus bay lobster smack
- Midwest Products
- (and 1 more)
-
one look at your fingers, and it gave me instant shivers! I use only white or carpenter's glue. I wonder why this kit calls for double planking. your doing such a nice job of it........is there a possibility that you might be able to get away with single planking? doesn't look like too much sanding may be involved, and you have the photo etch panels to go on afterwards......or is there just enough to do around the bulwarks? looks like a very nice kit.......love the brass goodies
-
thanks Lawrence.......perhaps I can get a dry fit together, and show what she looks like in color I put the prop on, so that step is finished. more soon....thanks for the good word!
- 956 replies
-
- 1
-
-
- andrea gail
- trawler
- (and 1 more)
-
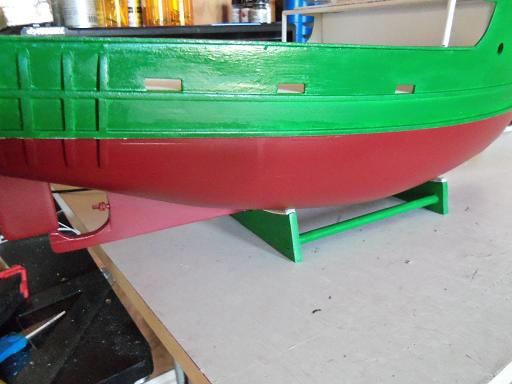
thanks Mark, Sjors, and Frank! this time is definitely a keeper! I will let the hull dry for the weekend.....the first time suffered a couple of chips from the stand {probably put it on there too early}. I'll examine it for sharp edges and make the adjustments. that's what I get for trying to rush things along. with all the hulls I've done in the past.......you'd think I'd know better thanks for the good words and the likes!
- 956 replies
-
- 1
-
-
- andrea gail
- trawler
- (and 1 more)
-
thanks John, Lawrence, and Dragzz.........a bit more touch up on the green {that I saw in the pictures}, and then the over spray, and then I can get back to fitting out the deck no Carl........you weren't wrong...I think you knew it was coming thanks my friend. you could come over Nenad......your becoming quite a color coordinator thanks! very true Marty.....not like I sell these boats though......they're just for my own pleasure besides......where I post build logs on the open web, I don't want the whole world to think I'm off my nut for letting something like this slide.........just here on the site I know that very well Piet.......but it still doesn't stop me from tripping up every once in a while you are right though......I didn't do the same thing the second time around ......and it came out fine thanks for the good word!
- 956 replies
-
- 4
-
-
- andrea gail
- trawler
- (and 1 more)
-
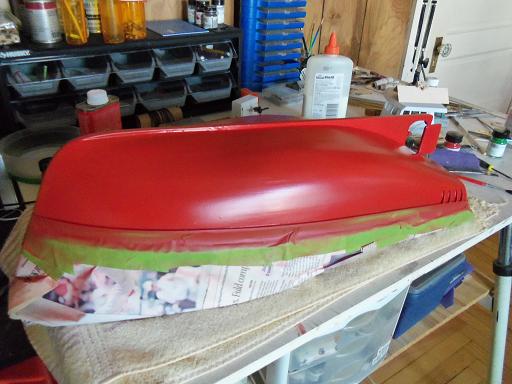
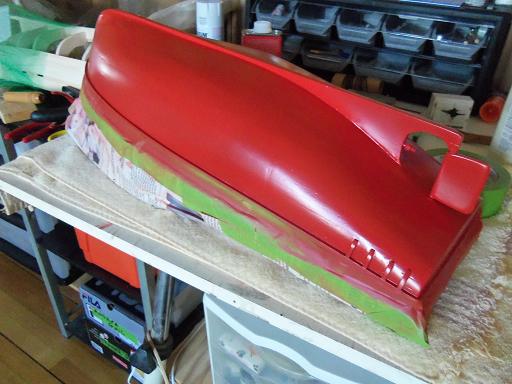
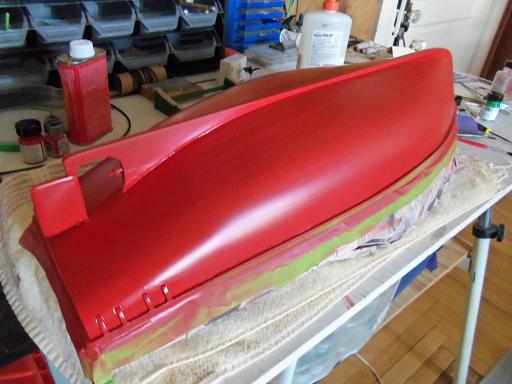
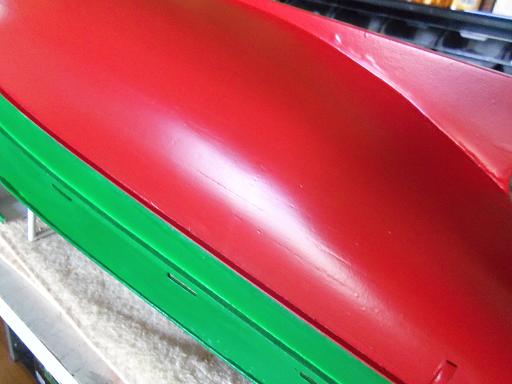
just looking at these two pictures convinced me.......that...and the rack / podium is on the port side...not a good side to show her. these were taken using natural light. after weighing out which hue to go with, I sanded the bad spot on the bottom.....along with a couple of others I noticed. I did get scared after I had sprayed it......one of the pictures showed it...like I didn't sand it enough. but, later pictures, after I had removed the masking, it could be hardly seen at all. here's the one that scared me the same area after the masking was removed it's not totally gone....the only way would have been to strip the hull. done it once already.......not a pleasant road to go down. but it's to the point where I can be happy with it


- 956 replies
-
- 15
-
-
- andrea gail
- trawler
- (and 1 more)
-
try the doll house section of your local craft store........they stock wall and floor coverings that might be of help.
-
very interesting Dave.........I might have to give that a spin! instructions sound pretty detailed........I don't see any of that with the ones I use
-
deed is done Patrick .....and don't try and talk me out of it either! it was like zero here this morning..........even with two water heaters and two furnaces in the cellar, the temp was less than desirable. I blew the whole 1/2 oz bottle of signal red on her! I'll most likely have to do something else for the day.......I had put her on the stand, and the keel got a couple of nicks out of it. I'll make sure the hull has time to fully cure. I'll be right back with an update
- 956 replies
-
- 2
-
-
- andrea gail
- trawler
- (and 1 more)