


popeye the sailor
-
Posts
16,007 -
Joined
-
Last visited
Content Type
Profiles
Forums
Gallery
Events
Everything posted by popeye the sailor
-
 fantastic work Augie........shows the labor of love your putting into her! good choice on the railings too...... top notch my friend.........top notch!
- 2,191 replies
-
- 2
-

-
- confederacy
- Model Shipways
- (and 1 more)
-
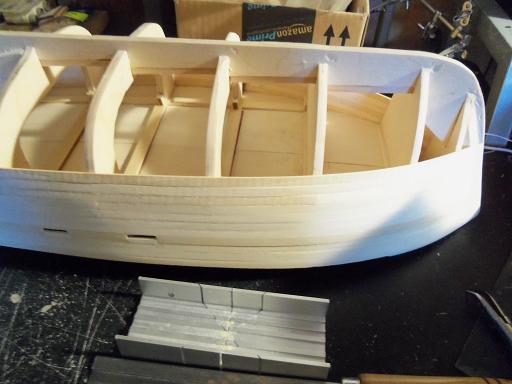
planking looks very good.........how are you handling tapering, if any? I know that there is no need to do any jogging.....or other fitting methods.......ship's boat had a complete flow to them. I could have sworn there was a tutorial here about clinker....haven't had the need to look for one though I have a sander similar to that one.........but yours is nice....it's got a handle very nice work!
-
looking good Larry........sorry to hear about your uncle.......thoughts are with you my friend! I wish you well, and fair winds in your travels.
-
awesome brass work....tubes are looking very nice Tim! but.......those full shots of your build..........now....THAT'S.....what I'm talking about! very nice work...very nice.......one lean, mean, floating machine!
-
thanks Patrick! if you find that there's something that your in question of Nenad....just let me know. I will do my best to explain things a bit further. thanks for the good word and for looking in gee Frank.......thanks a lot!! I count myself lucky to be able to decipher these Billing's plans, as well as I do I have both sets of plans......the smaller kit BB608....and the larger ABS hull version BB526. I've been following the 526 plans more. thanks for the good word! ...and again, thanks to those who are following and hitting the like button
- 956 replies
-
- 1
-
-
- andrea gail
- trawler
- (and 1 more)
-
as long as your using the same width of planking, as you did the gun deck......you should be fine it looks really good! do you have a dry fit photo with the deck in place? bet that looks neat!
-
good to see your back my friend! hopefully you will continue ........this is a very sweet looking piece...to be sure!
-
let's see.........you make the wood for yourself..........some one likes it and you make some for him......but you don't get paid....hmmmmm sounds like a sub-phylum from the original hobby ***********************************wait for it**************************that would make you a pl-anthropist!
-
thanks George and Michael........my main concern was hitting one of the bulkheads. but it all worked out! thanks for the good word and to those who hit the like button
- 956 replies
-
- 1
-
-
- andrea gail
- trawler
- (and 1 more)
-
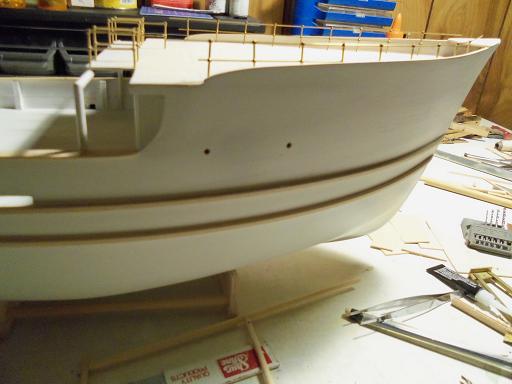
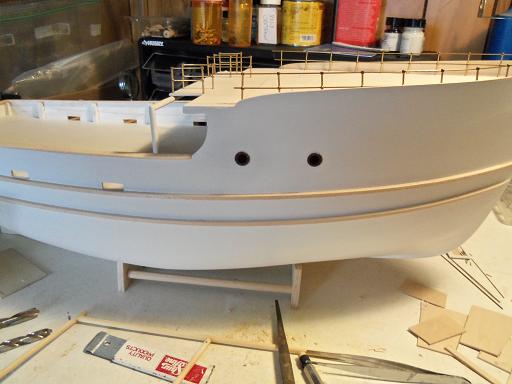
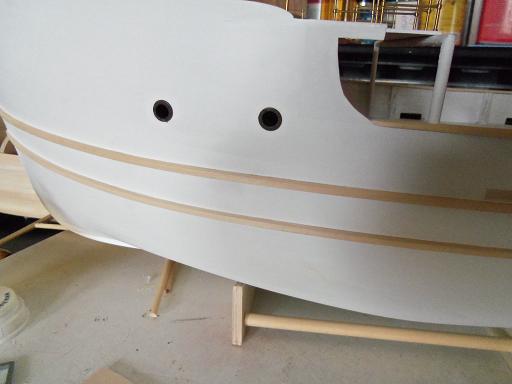
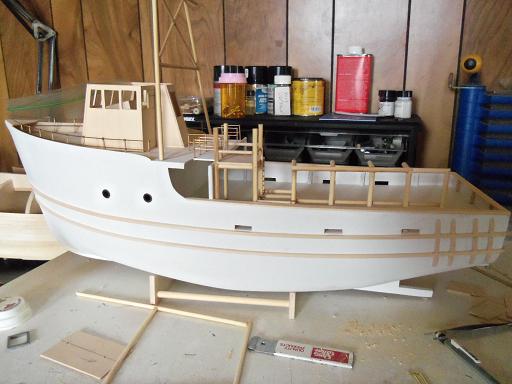
gee......who would you have had in mind.......David Hasselhoff? ohhhhh, right.......he was known for brawn....not brains!! soooooo.......anyway......tinkering still going on.....cleaned up the nasty rod ends on the reels and touched them up. added some strip stock to the top edge of the pilot house, to stiffen the side walls up. I took a look at the Tree Boat's hull frame to get an idea where the bulkheads are on the Andrea Gail. the area of interest is between the third and fourth bulkhead.......if I remember, it's roughly 51 mm. from this, the template was made. the fourth bulkhead is the fore deck bulkhead on the A.G...since the top rub rail follows along the main deck line, I used it as a reference. staying within the increment, I was able to drill the pilot holes.......then a size larger. the next size after that put the holes close to the size of the porthole inserts. 19/64ths......I used a rat tail file to enlarge them the rest of the way. it went well........only one very........very tiny chunk occurred! I figure paint will take care of it the fore deck railings were adjusted and cemented.......still need to be trimmed I drilled the holes for the aft section of the trawl rig.......but it made the rig unstable....bother! the Billing's kit doesn't have the portholes....figured I'd put 'em in. small issue with the exhaust fan..........working to get it resolved

- 956 replies
-
- 17
-
-
- andrea gail
- trawler
- (and 1 more)
-
there were quite a few nay - sayers, downing the movie. I think it gave a pretty good idea of what's it's like on a fishing vessel during inclimate weather....especially one that would never return
- 956 replies
-
- 1
-
-
- andrea gail
- trawler
- (and 1 more)
-
ahhhh.......the mother of bash! to look at an actual picture and realize that the kit makers lied! oh.....woe is me! there are time I hate looking at photos.......aspects that are left out........the ideas that spin. man, I'm talking about some of the most obvious stuff too! whether you add it in of not John........you'll still have a fine looking build there. ......I really like that broadside shot of her.....the chains give her a very nice look! very sweet!
- 2,250 replies
-
- 1
-
-
- model shipways
- Charles W Morgan
- (and 1 more)
-
they do have cutter for photo etch........but you could also try finger nail clippers. I get the large ones with the concave curving outward, but I also have a couple that have it curved inward as well. as long as your cutting brass, or light metal, they retain their sharpness for quite a while. of course......it kinda stinks when kits supply that brass plated metal stuff......it tends to dull them out quicker. nice work......BTW I'm not a big fan of the supplied copper wire either......little wonder why I have so much of it in my inventory
-
great looking hull Larry.......almost ready to start fitting out the deck hope your Uncle is doing better.
-
you should have all three shrouds done before you do your ratlines is the third one a back stay? three shrouds for the fore mast, and four shrouds for the main mast. back stays are interesting depending on the vessel your working on. some are tensioned with dead eyes, but for most vessels, they are usually done with a pulley assembly. the stern decorations look very nice.......your 1 up on me with the carving your putting some very nice character in this build. I also notice how you did the futtock shrouds..........in conjunction with the second step dead eyes? did you cement them into the tops? if you didn't, I would suggest that you do. when you rig your second step shrouds, they will in turn pull on the futtock ropes and contort the first step shrouds. I'm not sure if your diagram show this......this of course, depends on the detail that they show........where the futtocks lash to the first step shrouds, there is a stave there {it can be of wood or thin brass rod...of course painted black}. this holds the shrouds together at that point, and provides a lash point for the futtocks. joining these two stave points together, in there between the shrouds, are ropes called carthpins {I hope I spelt and said this right}. these control how much tension that the futtocks put on the shrouds and stop them from pulling the shrouds out of shape.......they will to a very minor degree, due to rope stretch I figured I'd give you this bit of information......if you cemented in the second step dead eyes, you won't need to add it, if you don't want to. sounds like your doing a bit of bash work on you own......and that's a good thing these smaller kits do omit some cool detail, and information that you acquire, will allow you to add them in. this is also the best way to learn terms and names of different parts. I'm not an expert either..........I remember the first ship I did.......{I don't want to talk about it} keep going.....your doing some nice work here
-
recover well...Sherry
-
think of it as a 'labor of love' ........it won't sting so bad your almost there Mark......laminating wood....hmmmm. sounds like a neat idea
-
Cutty Sark by NenadM
popeye the sailor replied to NenadM's topic in - Build logs for subjects built 1851 - 1900
looks good Nenad........nice spacing and the pins are just a bit forward! that's all you'd really need to do once all the ropes are tied and rigged.........it will never bee seen! great work my friend ....and BTW.........your no dummy!- 4,152 replies
-
- 1
-
-
- cutty sark
- tehnodidakta
- (and 1 more)
-
sorry if I join the party late Patrick.........I've not had my 'browse time' like I used to sweet looking hull shell......the way you made it was pretty interesting. card build frame? good to have gotten those bulkheads in there...... humidity and dryness can play nasty tricks. I look forward in seeing more progress
-
sure George.......I got 'em timed to fly over, once I get'em installed! I'm really not that much of a detailer......I try to do some, but later on, I think it looks messy, so I clean it up guess I'm the Felix Unger of boats {doesn't say much about my table though} sounds like you know a bit about them Augie........yes......"birds" is the nickname given to them. when deployed....it's kinda like a tightrope walker....except it on water. keeps the vessel steady, so she don't rock it's one of the reasons why I chose to do this one Nils.......the structure is so cool thanks Patrick, John, and Lawrence........hard to imagine that this is another vessel's hull. to think......just a bit of modification. at the moment, I'm putting that bit of detail, that the Billing's kit doesn't show. thanks to all of you and who hit the like button.......hope to have more soon
- 956 replies
-
- 2
-
-
- andrea gail
- trawler
- (and 1 more)
-
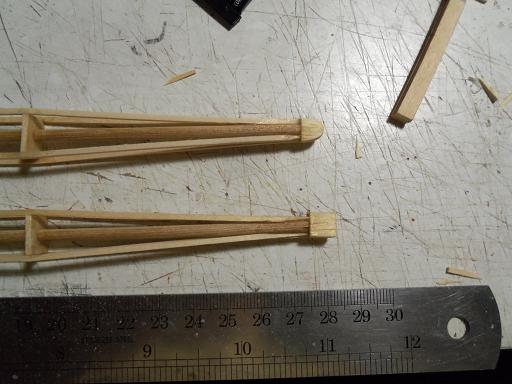
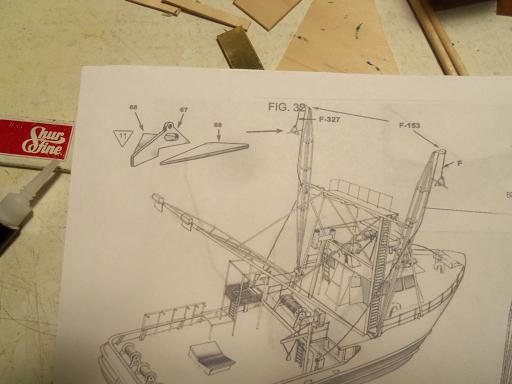
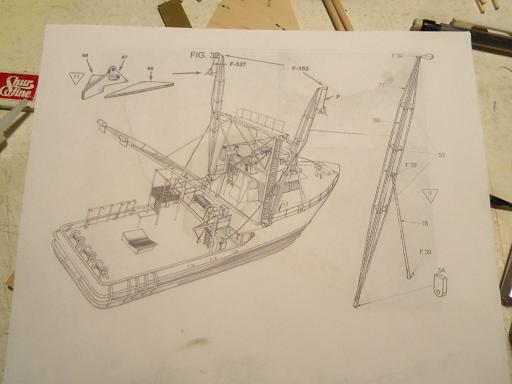
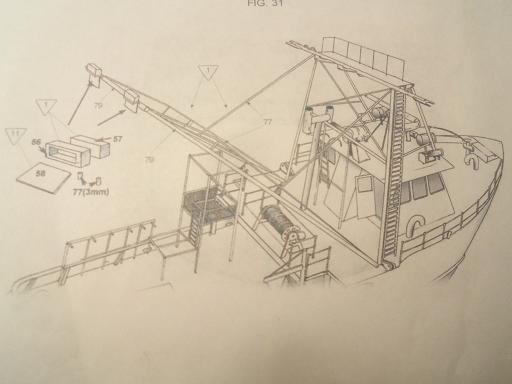
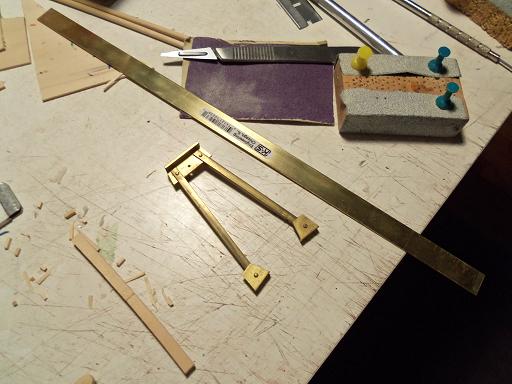
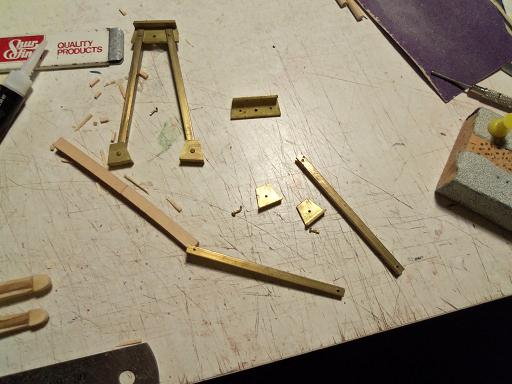
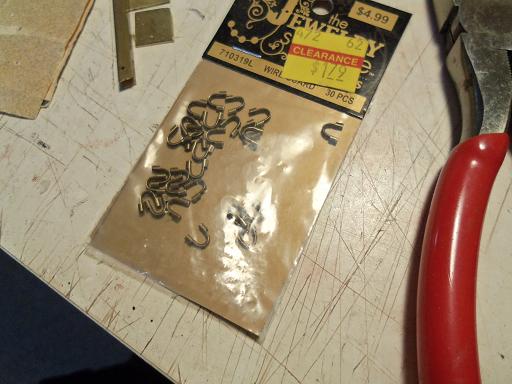
put more work into the stabilizers booms.....the ends are tapered. once I made heads or tails out of 'em, a block was cemented on the end that will fasten to the deck. this block will be rounded, and later a hole will be drilled I mentioned that I would show what the 'anchor' look like did most of the boom work on Tuesday..........did a bit more on Wednesday. there are two pairs of brackets that the stabilizers are attached to........I tried to make them using brass.......even bought some thicker stuff for the occasion. these are two diagrams that show the booms and the aft section of the rig. now .......for these 'anchors'.......I got an idea. let's see if someone else thinks of the same thing I did to make these brackets I speak of......I took apart one of the spare gallows I have hanging around. I will use one of the uprights as a template. I found that doing this in the house is going to be an impossible feat! first off....I have a son that works at night and sleeps during the day. I attached the vise to the main table......big mistake...the hammering sets everything to vibrating......and falling off of high places........not to mention the displeasure the admiral has expressed. in the kit, these parts are made of wood.......that's not going to happen here. I have a remedy......went to HobbyTown yesterday afternoon. I picked up a new pin vise and found something suitable.....show you next time I picked these up a while ago, thinking they might come in handy here.


- 956 replies
-
- 10
-
-
- andrea gail
- trawler
- (and 1 more)
-
it's because you love a challenge! the comparison looks great Dave.......they look so sweet together!
-
Cutty Sark by NenadM
popeye the sailor replied to NenadM's topic in - Build logs for subjects built 1851 - 1900
I was a bit rushed when I posted last. the Revell kit confuses some.........on the bulwark cap rails, there are tabs that suggest where the dead eye racks {that's what I'll call them} are to go.......but this is wrong. I was going to look at the instructions again {I keep all my past build instructions}......but if I remember, there are tab holes on the pin rails them selves. this is where they actually go. I mention this, because it is in line with your dilemma. it would be a small sacrifice......but you could make the pin rails a little wider, and locate the dead eyes close to the bulwark, and set the belaying pins toward the front of the dead eye arrangement. this would free up the pins and make rigging a bit easier. the toggle of 1 - 2 mm would make a big difference, and wouldn't upset the applecart. in the modeling medium, we all strive to build the perfect build. what we see is measured in inches and feet.........what we build is measured in fraction and mm.......sometimes the tolerance is so tight, that we must alter the structure a little to make it work. I hear so many lament that they are off a mm.........that silly mm.........it's time to make that silly mm work in your favor....and not in the favor of mistake. sorry if it sounds like a rant........it's not.......it's logic- 4,152 replies
-
- 2
-
-
- cutty sark
- tehnodidakta
- (and 1 more)
-
thanks Sjors.........I really need to get the update out of the camera.....again they are stuck I'll try to get them up appreciate the good word and the likes!
- 956 replies
-
- 1
-
-
- andrea gail
- trawler
- (and 1 more)