


popeye the sailor
-
Posts
16,007 -
Joined
-
Last visited
Content Type
Profiles
Forums
Gallery
Events
Everything posted by popeye the sailor
-
 super looking ratlines! cripes.......I'd have to look up doing those knots......never done them great camo......didn't even see that swivel gun there
 -
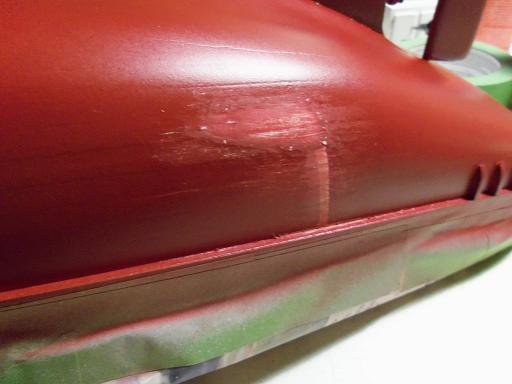
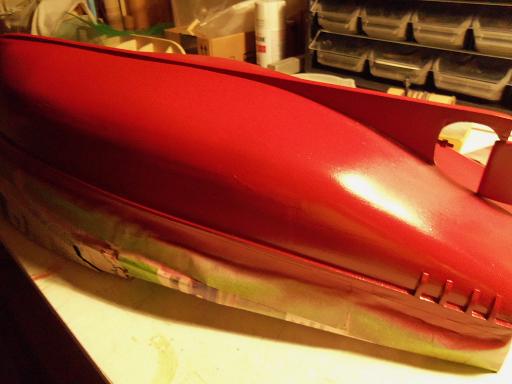
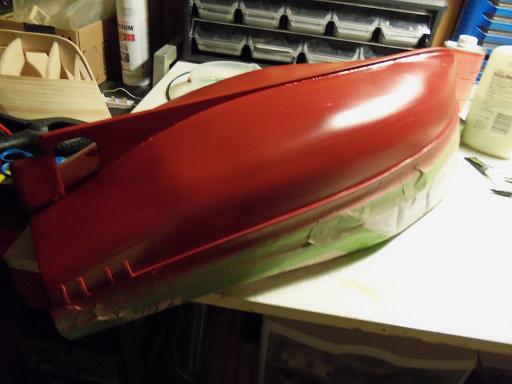
thanks for the good word gents........very sad......I've chosen to redo to a color a bit brighter. I've taken two other pictures using regular light, and they show the defect quite well. the bad part about it, is that the starboard side is the most prominent side to view the model, to leave the defect there would take away the looks. wish I didn't have to.........I liked the color
- 956 replies
-
- 6
-

-
- andrea gail
- trawler
- (and 1 more)
-
thanks Augie, Carl, and George. I took an inventory on paint.........I have 3 bottles of signal red 1 bottle of bright red 1 bottle of crimson tough choice, because these are already spoken for. gonna take a while to get this color paint, if choose to redo.
- 956 replies
-
- 2
-
-
- andrea gail
- trawler
- (and 1 more)
-
paint is funny George........if you look at one of the pictures, it looks like the 'skin' got pulled back around it. this is what paint actually is, a skin. pulled back like that......via sanding, it looks like an injury..there is swelling. looking at after pictures, you see the swelling slowly disappear.......now to see it, it has to be at an angle.
- 956 replies
-
- 1
-
-
- andrea gail
- trawler
- (and 1 more)
-
thanks for the good word Carl and George.......it's what I get for bringing her up too soon......especially with other stuff in my hands. if I had just left her down there a bit longer, but with the temp in the cellar being rather low, I didn't want to chance a slower drying time. I took a picture of her this morning........you can just make it out. yea......I could wait a couple of days, re-sand the area, and do another shoot......but I am out of this paint, just enough for touch ups. it's rendered insignificant now........but with close inspection, it can be seen. I dunno.........I'm still up in the air about it.........I may just leave it as is
- 956 replies
-
- 7
-
-
- andrea gail
- trawler
- (and 1 more)
-
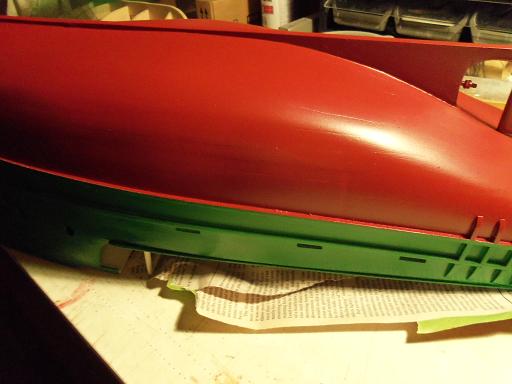
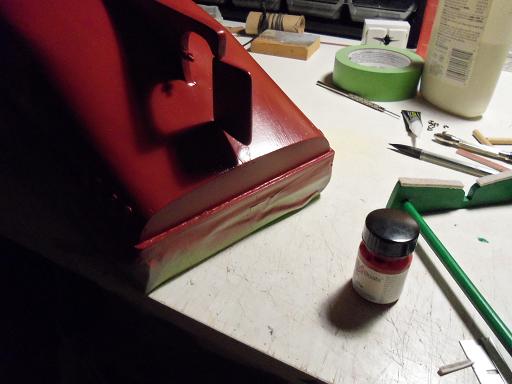
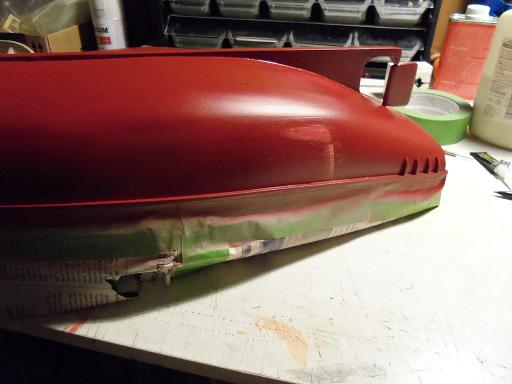
the best laid plans on mice and men........nothing to do, but repair it. letting it dry a while longer, I went over the smear with fine paper..........still a bit too soon..........so I waited a bit longer, and then hit it again with the paper. I fussed with it a bit longer.......then took her back down stairs to re shoot the area. the paint is still fresh, but it shows promise. as it cures, the color will deepen, and will hopefully hide the defect. when I was more sure about the repair, I removed the masking. this is probably a half hour later in the drying time. with more time added to it, I could put her on the stand for these two. I will flip her upside down again for the over night.
- 956 replies
-
- 9
-
-
- andrea gail
- trawler
- (and 1 more)
-
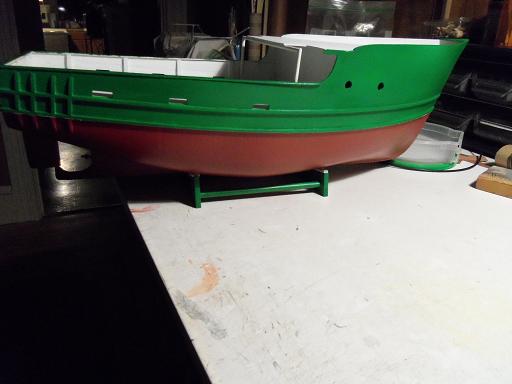
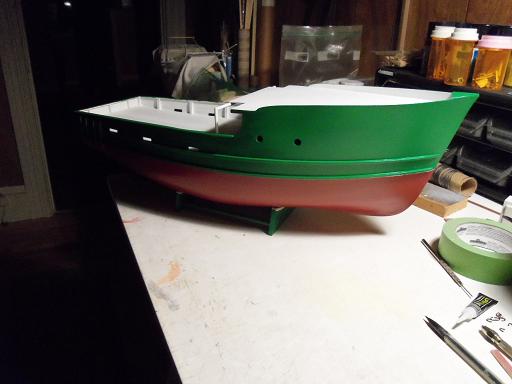
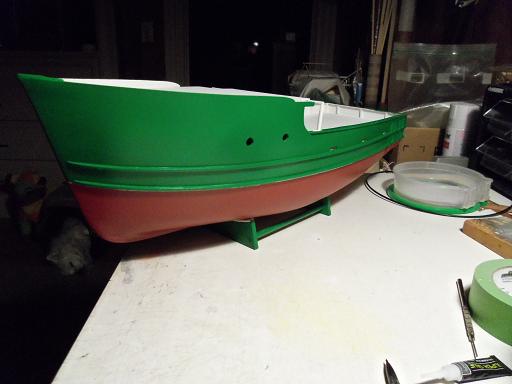
it started out as a good day........sun was out........storm was gone. the clean up wasn't too bad. in between it all, and going to the store, I did the painting I needed to do. ..........all around the lower rub rail...... adjusted the rails at the bow........I think it was the starboard side, but it was a bit off even painted the main part of the cap rails.......I'll do the rest of it when I touch up the over spray the stand was painted and put the felt on it the one last thing, was to set the rudder in place. the brass rod that secures it was cemented in, and a filler plug filled the hole. I did a bit more prep than the last time. I decided to give the other Testor's brush a go. I took the hose off of it, got two new caps and siphon tube, and pre - cleaned the caps, to make sure they were OK to use. I had two bottles of hull red........the first one I opened was dead....turned to gel, and useless. the second bottle was good......added three cap fulls of thinner and shook the heck out of it periodically, until I was sure it was mixed good. later in the afternoon, the hull was masked up again, after I was sure that the rub rails were good 'n dry. it was then brought to the cellar and given a light coat of primer, to cover any bare wood, and uniform the texture of the surface. it was a waiting game for a little while, to give the primer time to dry. the time came....and I went down.........set up was very quick. put the hose on the new airbrush........ connect the air supply.....pour some paint in a 1/4 oz bottle.......put on the spray cap......that's it. the new airbrush worked great! paint delivery was spot on........used almost the entire bottle on it. I figured that I'd bring everything upstairs to clean it.......sprayed some thinner through it it start the process. I'm not entirely sure how it happened. I brought it upstairs the same time I brought everything else up. I found a small scrape on the starboard side! I should have let it dry before I attempted any type of repair........but....oh...no! not me I got out a very small amount of paint on a brush....from the cap, and tried to brush over it.......but I didn't realize that there was some gelling on the cap....and smeared the area with it! scraping with a razor blade made it worse.....and adding thinner to the mix sealed the fate! I had totally botched the finish! the port side..... the bow...... the stern....... ....and the mess........


- 956 replies
-
- 8
-
-
- andrea gail
- trawler
- (and 1 more)
-
Cutty Sark by NenadM
popeye the sailor replied to NenadM's topic in - Build logs for subjects built 1851 - 1900
see.......I knew you'd do it! persistence always pays {makes other thing we're crazy } great work Nenad!- 4,152 replies
-
- 1
-
-
- cutty sark
- tehnodidakta
- (and 1 more)
-
thanks Carl for the good word I like to adorn my vessels with the latest bling gee Michael.......remember when they use to play that elevator music. 'pose to get ya in the mood! got a doozie of an update tomorrow..........enough to make a grown man cry
- 956 replies
-
- 3
-
-
- andrea gail
- trawler
- (and 1 more)
-
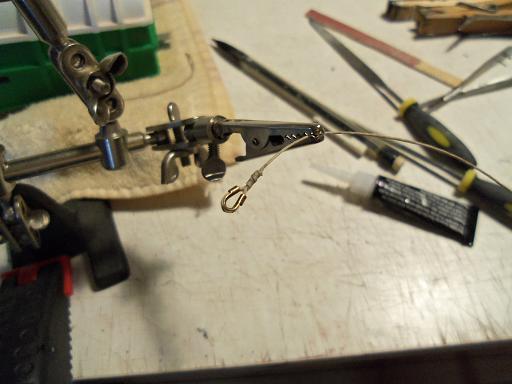
they can be found in the bead / necklace dept at the local craft store.......in my case, it's Hobby Lobby. you saw how I used them on the trawl rig frame......eye bolt / shackle {correct terminology?}. as I thought further, think of one of these babies lashed as a truss cable {?} down to the {I'd probably do another one at the stern bulwark} deck, or something like it. there is another pair that support the first section to the aft section. I've seen other models, and it looks as though they ran the line through holes, or they tied them on. even with simple eye bolts, it might not look right. I think by using these, it will have more of a detailed look to the assembly. as mentioned, every time I go to the craft store, I try to find stuff that can be used. I'm finding the jewelry aisles to be quite a gold mine.
- 956 replies
-
- 7
-
-
- andrea gail
- trawler
- (and 1 more)
-
I'm sure that in some obscure sea somewhere......you'd probably see a 'graveyard' very neat! set 'em up and do a test picture....love to see it! errr.......the Keith Richards........is that before or after he snorted his father's ashes? {I just had to add this.......first thing I thought of when I read the name}
-
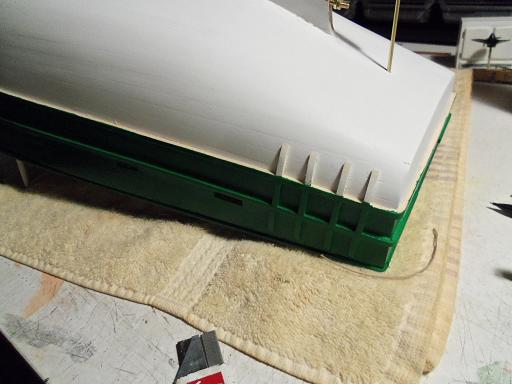
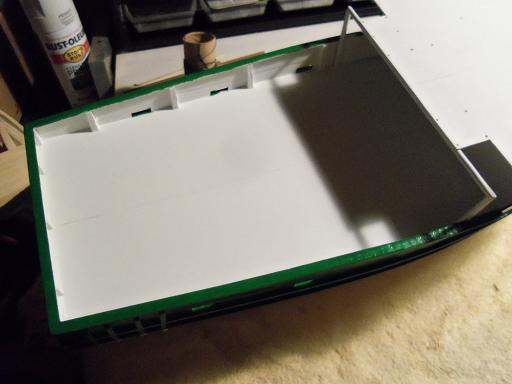
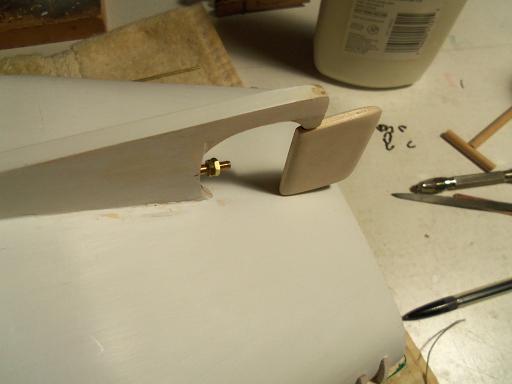
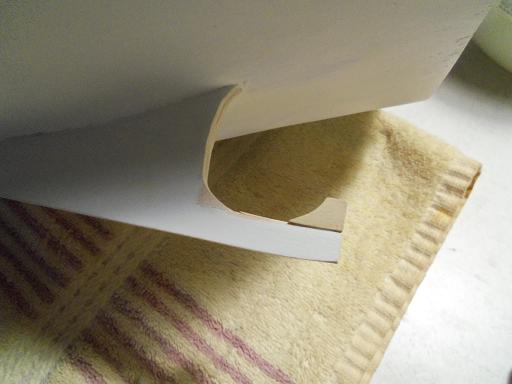
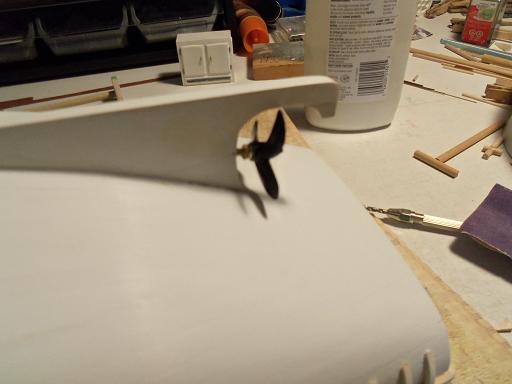
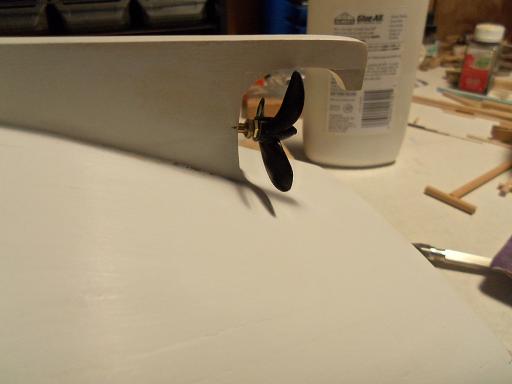
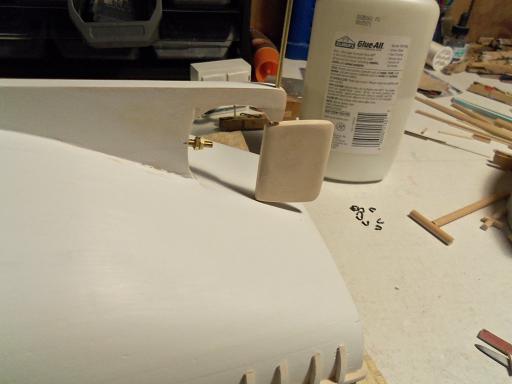
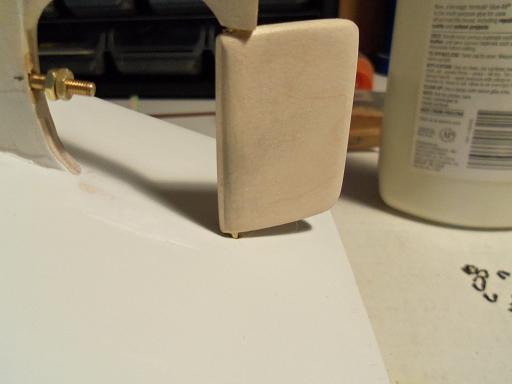
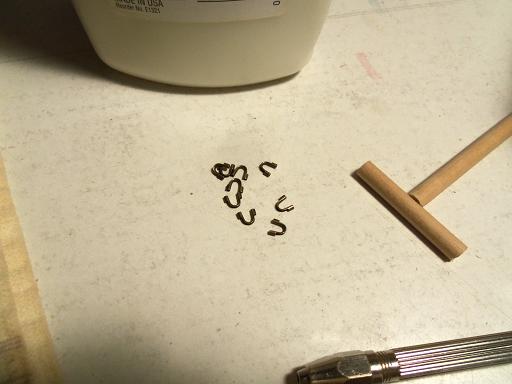
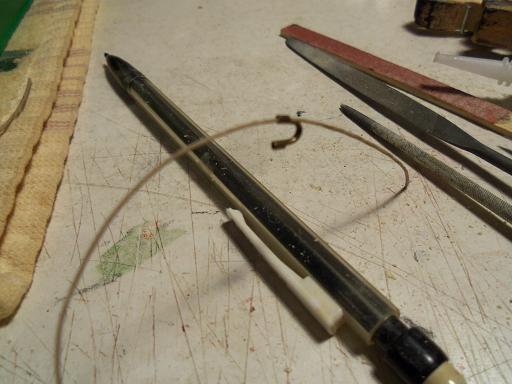
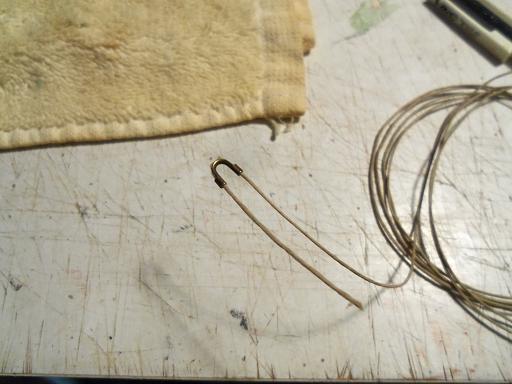
before I go out there and brave what elements there are left after the storm, I thought I'd show you what I did yesterday.........and something I did this morning. the biggest Achilles's heel about this hull has been the stern. putting on the cap rails cured the tapered look of the stern.......to look at her on the table now......you wouldn't see it, unless you were looking for it. another difference with this hull is the shoe position........it's a little further back, so I needed to make the rudder a bit larger. not that it matters....but even though the overall view of the model is a sight to see, the topside always get the bigger review. the way the hull parts were cut out, left the shoe area square-ish in nature........probably something I should have done earlier, but now that I'm out for blood {hull red in this case}, I need to flesh it out in order to do it. a triangular piece of the same thickness was cemented in the inner nitch and sanded to shape. another piece was cemented in place to create the outer horn. the prop was nicked from the Boulogne Etaples kit {I have to order three others anyway}......the shaft was cut and cemented in place. the prop was then removed.....the flash and weird stuff was sanded off...and then painted flat black. a hole was then drilled through the horn, and the rudder was fitted. not too sure about it........I may make another one and run the shaft hole further in. I could try it to this one.....but I don't think I'd get a good outcome. the hole for the hull end was drilled for the shaft to fall into. now.......here is what I did this morning. I have been looking for pictures of the rigging......can't seem to get good ones.......but I have seen one thing.....there is cabling involved. I envisioned painting like-size thread with silver {I've seen it in black}....I've seen it used to further the support of the trawl rig apparatus, as well as to limit how far the stabilizer booms can be deployed. I thought of how to do this........that's when I thought of these little guys. at each end, there is a channel that thread can be run through. I have that black beading thread, but I want to get more of the larger size {I know I have some somewhere} for now though......I'll use the medium hemp thread.......I have plenty of that, and it's of a decent size for the task. it was threaded through one side of the 'shackle'. ....and then through the other side... the two ends are crimped together, wrapped and cemented. now it can be painted......or even left as is
- 956 replies
-
- 12
-
-
- andrea gail
- trawler
- (and 1 more)
-
ahhhh.......the thing we modelers think about..........and the foot tapping admirals that wish we were putting just as much thought, in the things that are more 'down to earth'! got the prop fitted.....beginning to access what I'll need to do about the rudder. I've done the shoe adjustment, and I'm quite happy with how it came out. then perhaps I can work on getting the bottom paint done update soon.....errrrr, of course after doing one of the thing the admiral's tapping her foot about..........snow clean up! we got it.........but good! over two feet in my neck of the woods!
- 956 replies
-
- 4
-
-
- andrea gail
- trawler
- (and 1 more)
-
Cutty Sark by NenadM
popeye the sailor replied to NenadM's topic in - Build logs for subjects built 1851 - 1900
yea.... you may have to 'layer ' colors.....I'm not aware of any one that puts out a 'true teak' . never done it myself neither....raise my hand to be counted as one who settled for something close to it. should be a treat to see what you come up with.........you know you want to.........I can see it in your work- 4,152 replies
-
- 2
-
-
- cutty sark
- tehnodidakta
- (and 1 more)
-
agreed to how well you run the planking....looks very good! well done with the ebony!
-
I have a couple bottles of the Testors paint Piet........looks to be the same color, but I'll have to test. as mentioned, I have one more bottle of the Billing's.......I've been shaking the crap out it periodically, ever since I found out about the problems with it. I should also be doing it to the hull red I will be using.......I'll be checking thanks Lawrence.......I think I've gotten over the 'hump' ....progress should pick up now I'll be happy to get all the sub assemblies cemented in place.....this will also be a giant leap forward! thanks for the good word my friend.......I hope to do another dry fit soon
- 956 replies
-
- 2
-
-
- andrea gail
- trawler
- (and 1 more)
-
sorry to hear that Bob.........see what happens when 'floodgates' are opened?!?! hope you make a smooth transition and get back to posting soon
-
I can't believe it's been six years...........wow! this is such a great log on this vessel Gil.........anyone who chooses to build her would do well in referring to this log, for any answers they might be looking for! you've put so much into her....some really great detail! a call???? I'd be more than Honored! .........but you don't EVEN want to come 'round here right now........we're in the beginnings of one nasty looking blizzard ! keep 'er moored! I've already tipped one or two in your Honor!
- 755 replies
-
- 1
-
-
- finished
- caldercraft
- (and 1 more)
-
very nice progress.......gonna look great with a copper bottom
-
awesome update Augie.........very nice work indeed! pumps came out looking super as well!
- 2,191 replies
-
- 2
-
-
- confederacy
- Model Shipways
- (and 1 more)
-
masts are looking awesome John.......the added detail is very nice!
- 2,250 replies
-
- 1
-
-
- model shipways
- Charles W Morgan
- (and 1 more)
-
personally, I'd leave them in place. it's all hypothetical........but it depends what you wish to show in your model. the decking would look more 'complete'....and look better in the process.
- 525 replies
-
- 1
-
-
- cutty sark
- mantua
- (and 2 more)
-
planking job looks splendid! impressive looking build as well
-
Cutty Sark by NenadM
popeye the sailor replied to NenadM's topic in - Build logs for subjects built 1851 - 1900
so.......all the years of bringing up daughter, is finally paying off .........of course, not like you would have expected take care of yourself.......we're not getting any younger! nothing wrong with too much ambition.......that's what makes skill and imagination grow- 4,152 replies
-
- 2
-
-
- cutty sark
- tehnodidakta
- (and 1 more)