popeye the sailor
-
Posts
16,007 -
Joined
-
Last visited
Content Type
Profiles
Forums
Gallery
Events
Everything posted by popeye the sailor
-
 Sjors.....the Corel Half Moon uses the narrow cap rails......look to be about 5 mm wide. they have separate pin rails that cement along the posts........they only show the rib posts. now I believe she mentioned that she removed the posts.......she could very easily do what I have done here. I have seen these cap rails on pretty much all the models I have seen. I have also seen the thick ones that my kit 'had'.
 -
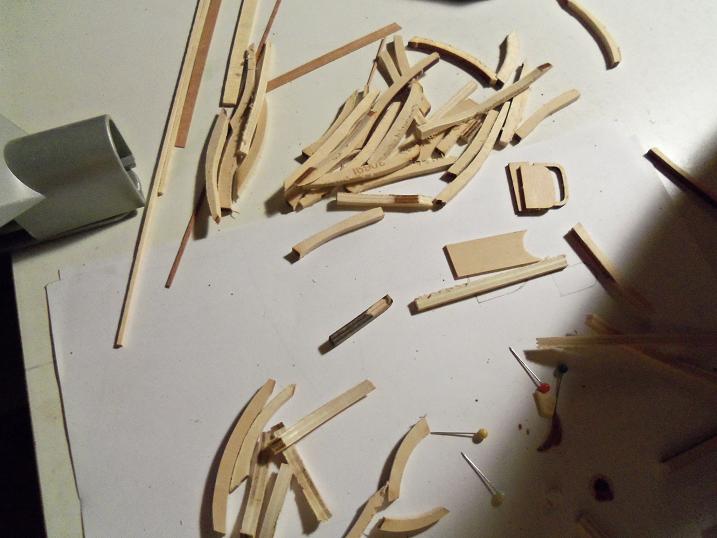
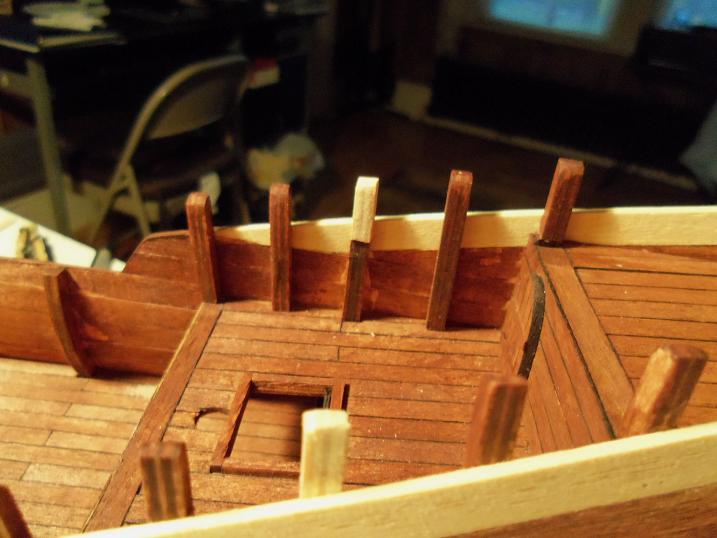
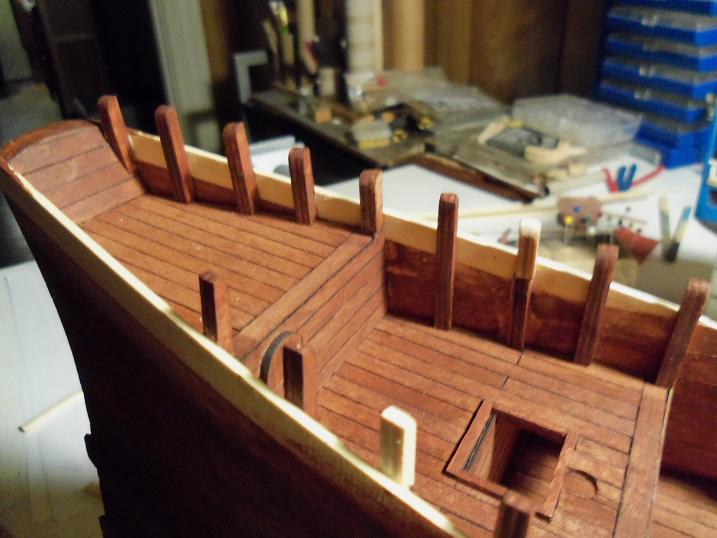
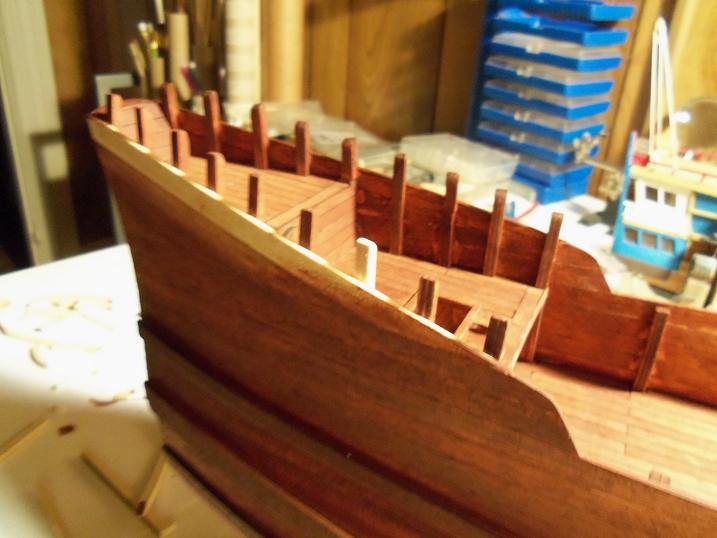
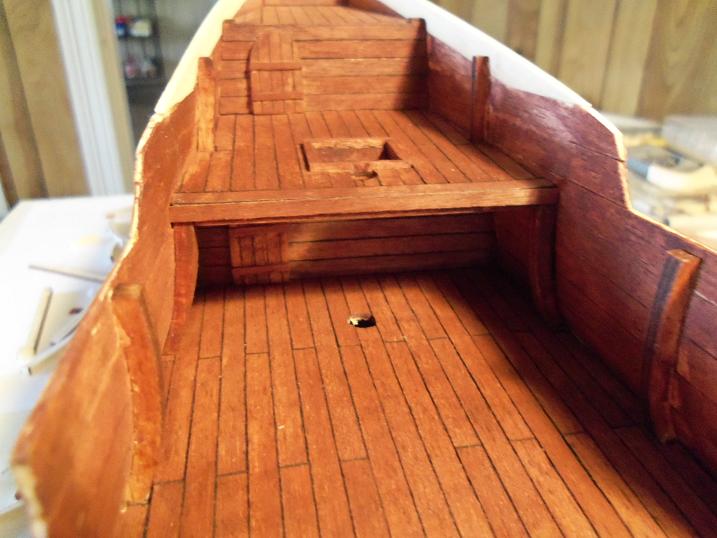
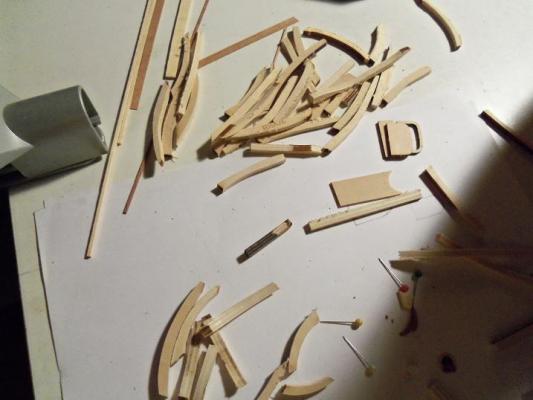
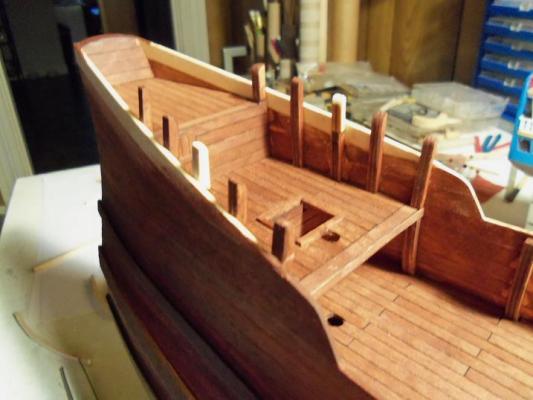
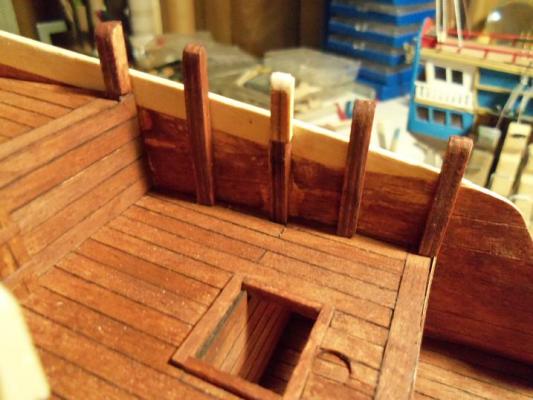
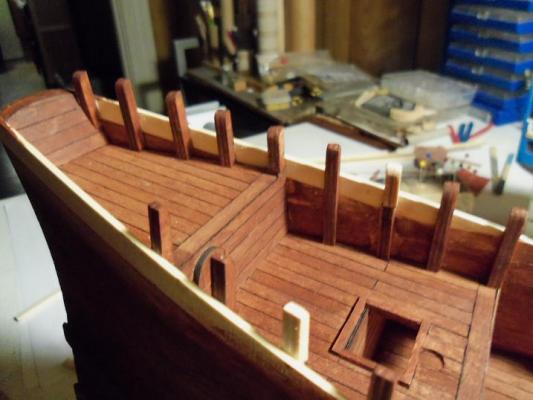
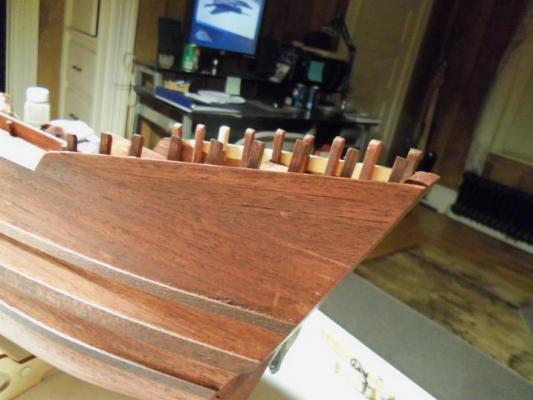
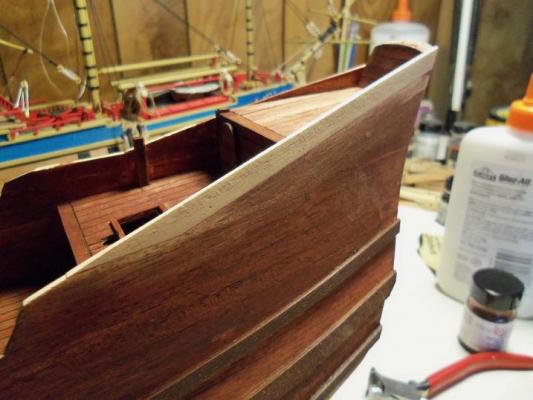
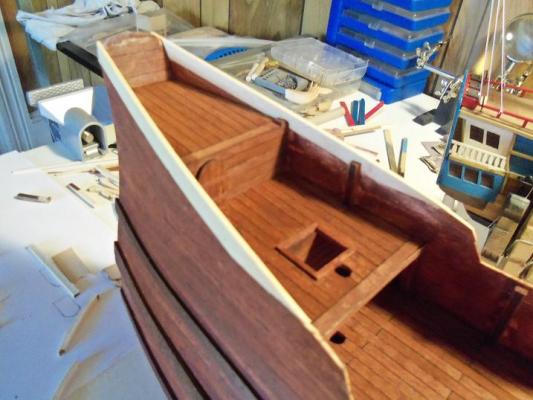
that didn't take me too long to assemble the pictures for this update now that I have the stern bulwarks back to square one, I can start over. OK..........so, as I mentioned earlier, I took one of the parts panels that the ribs came from {I cried doing this......just wanted you to know}, and I cut it up........some straight, and some with a curve to match the bulwarks. seeing that I had put posts under the aft deck overhang, I continued it up the rest of the bulwark, sticking up about a half inch above the head board. I took a measurement of the space between the ribs, but overall, I placed them by eye........each one is a step up to match the inclination of the bulwark. I do see one that is a wee bit too tall......I'll sand it down later. these are all shaped and contoured to the bulwark. those that land on a rib post, is an extension of that post. the port side is done with this step of the assembly......I waited a while for it to dry. when it was dry, I got the starboard side finished and I stained the port side......I'll do the other side in the morning.


-
thanks Dragzz and pygothian.........that's why I didn't mind removing the headboard. I'm not in the habit of ripping things apart, only if it can be done without damage. thanks for the good words. thanks Adrieke........your so busy now.......nice to see you back to your former self surely Sjors.......you can spare a few miniutes to help your ladyship .....you big strong sailing ship builder, you. I had a glance at the plans she posted, but what she has to do slips my mind. I'll have an update soon.....it's late, but perhaps I'll post it tonight, I don't have to work tomorrow {it's 1:20 AM here....it's today}. thanks Adam......so far, so good. I think it's going to work! It's ALIVE!!!!!!! :D
-
no......I used CA, but I had also cemented a strip under it.......it most likely would have been messy looking. it was nothing to replace them, so I just ripped them off and replaced them. nothing major to do, and it looks like nothing had happened. I have been doing the bash work.......I should have an update soon. thanks for the good word and looking in
-
thank you Mobbsie and John...........I hope the next step goes just as well
-
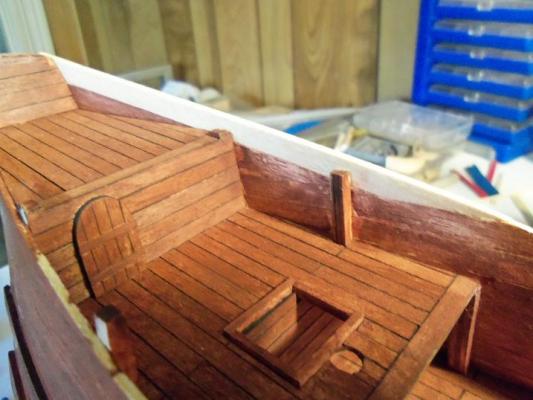
with this new revelation......a whole new direction is taking shape. just to see how strong a bond there was to the cap rails, I gave them a tug........I heard snapping sounds and the cracking of wood. then, I pulled on the back corner........more evil sounds. it soon came off, but not without taking part of the head board with it. the other side was pretty much the same deal. I felt like Chevy Chase in the movie 'Christmas Vacation' Bzzzzzzzzzzzzz! "Honey.......fixed the newel post!" I can see there is going to be a slightly larger scale demo in the remodel. with both cap rails and the head boards removed, the areas were made ready for the new headboards. they were fitted and replaced one side at a time. what I want to do with the overhang to the aft deck, is going to coinside nicely with what I have in mind for the rails. the posts, cross beam and cap board is installed. I also will be doing the same thing for the fore deck overhang. the other head board is installed with stain, I'll be back to square one.......not a big job at all I know I should get back to the Gothenborg.....but I feel the need to feed my Frankenstein, and put this into motion. I should know very soon.

-
hello Erik stumbled onto your build...........the progress blows me away! fantastic job with the lighting and false cannons. I'll take a seat quietly and watch your progress
-
gee........thanks for the head's up on some of the B.S. with this kit...........it will help emensely when I get to it. sounds like you have a system all worked out for yourself....this is good. do you have any pictures of your current progress?
- 118 replies
-
- 1
-

-
- jolly roger
- lindberg
- (and 2 more)
-
just seeing her as she sits now Robbyn, looks great. I try never to be angry at my work.......all it does is put a negative spin on progress. If I can make it better......I try........but if not, I leave it........and learn from it. the next build will be all the better for it. your perseverance with this build is very much applauded......it has definitely shown what a modeler and some wood can do. I enjoy your work, and hope to see more
- 773 replies
-
- 5
-
-
- san francisco ii
- artesania latina
- (and 1 more)
-
looking great Adrieke........sorry to hear that the magnets aren't working out as well as you planned, perhaps location pins would have been a better direction to have gone. you'll get it together, I'm sure..........your almost done
-
it might be the dead parrot........kipp'in on his back, after a prolonged squawk :D ............ lovely pumage! sweet detail Daniel
-
nice progress.......the paddle wheel looks good!......windows too
-
I haven't seen too many builds that include those stanchions....very nice work!
-
sweet looking framework Augie.......can't wait to see what the sawmill produces
- 2,191 replies
-
- 1
-
-
- confederacy
- Model Shipways
- (and 1 more)
-
your doing a great job Robert......I'm watching both builds. looking forward in seeing more.
-
thank you Rowan........your just in time then........finding out that she really doesn't have the normal cap rails, like other ships, is a bit of an eye opener. it's a good thing I didn't get them all on and find this out. I have an idea......I'll have an update soon. thanks for the good word, and welcome! that's not the way to be Adam........never get angry at your build. use the force and think of a solution. you'll see soon. thanks for your good words.....I'm going to have fun
-
she's a beauty Sjors.......but I see the danger with parking her in front of the door like that two ships that size.........that's a lot of work!
-
nice bit of progress PopJack...the deck looks great!
-
looks to be a neat project for you.....it sure didn't take you long I'd be pleased to see this one take shape.
-
thank you Borge.........I hope your doing well.
-
oh.......wait till you see what I'm going to do John..........I ripped those rails right off!!! ....a bit messy, but a very easy fix thanks for the vote of confidence, and the good word I wasn't trying to bend it, mark......I already did it. I used hot water.....hot as I could stand it...and set up in my jig. the breakage was happening with my staining the strips. thanks for the good word hey there Chris........so glad you joined up with us again! I'll give you a call sometime this week.......so good to see your back
-
she looks great Augie.......yup......planking soon, and all that sweet stuff!
- 2,191 replies
-
- 1
-
-
- confederacy
- Model Shipways
- (and 1 more)
-
Cutty Sark by NenadM
popeye the sailor replied to NenadM's topic in - Build logs for subjects built 1851 - 1900
so, the game plan starts with replanking the deck? -
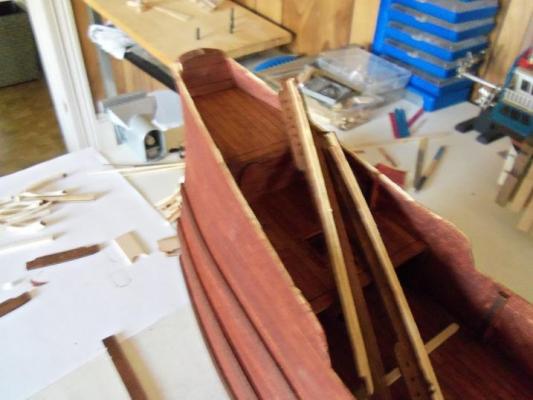
I couldn't agreee more Bob and Clare I have a picture......I'll post it later.......scary, but it's a stark reality of what I'm going to have to do. heck, I may even be able to add in that extra step that's missing. after I posted last, I took one of the parts panels and cut it up into posts.....the rest, I'll leave up to the next update.
-
kits...........ya gotta love'em! .....no wonder why I like to bash the hell out of them I look at models of this ship, and they all show cap rails.........not as wide as these are, but they have rails, none the less. the fact of the matter is..............the ship doesn't have any! I've seen these pictures........but I wasn't working on that particular aspect........so, I guess I overlooked it .........and yet another pho-par takes hold! not the end of the world by any stretch yes, Andy......I think your going to get your wish........to the Goth!!!!!! let's huddle............moe, you up the center, and try to intercept. Larry, go around the side and try to flank. Curley,...........you go long! I'm going to rip them up! don't know what I'm going to do about the stern cap just yet........but there will be NO rails. point well taken gentlemen......don't know how I could have missed this bit of detail. it ain't going to be pretty.........but I'll be sure to show the gory details......gotta take the dog out before the admiral has a COW!